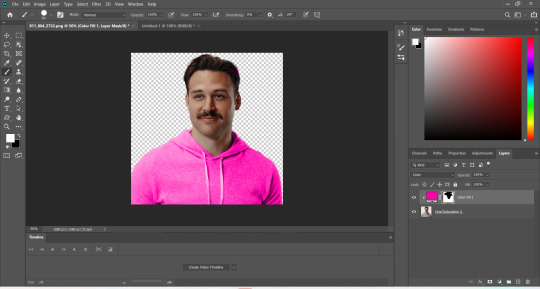
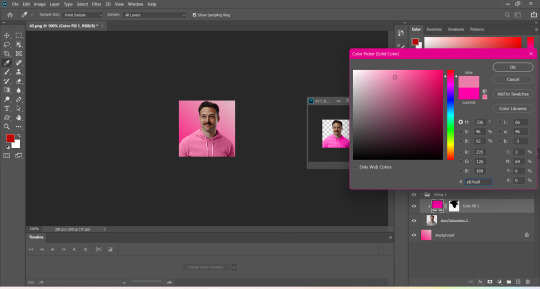
#trying to use gimp for the first time
Explore tagged Tumblr posts
Visit Tumblr Blog
Explore Tumblr blogs with no restrictions, modern design and the best experience.
Last Seen Tumblr Blogs


Fun Fact
Hackers stole 65M passwords from Tumblr in 2013.
Text
you can't catch me in cyberspace!
#trying to use gimp for the first time#yes i had ungodly amounts of trouble figuring it out#no i cant install my tablet's drivers on linux#but fuck it we ball. stream digital nightmare#rhythm doctor#bug.png#Spotify
3 notes
·
View notes
Text


the complete eri guidebook (2023) full version under the cut ♡ pdf ver. happy birthday @xiaojuun !! <3

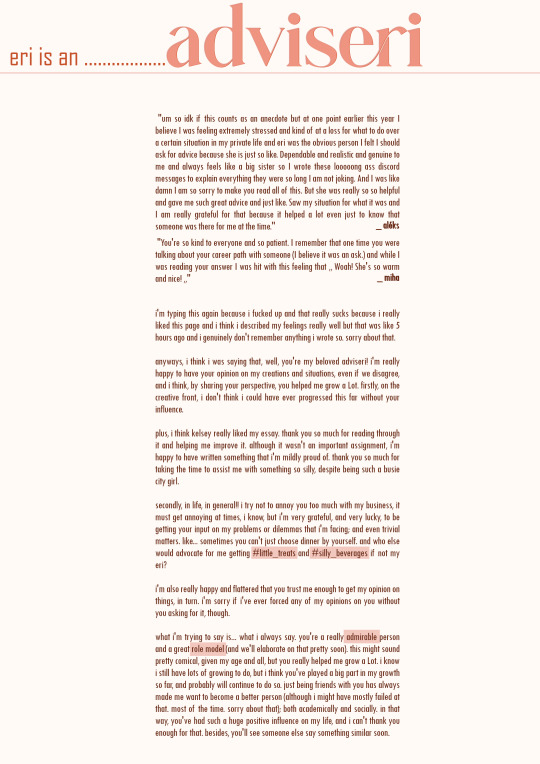
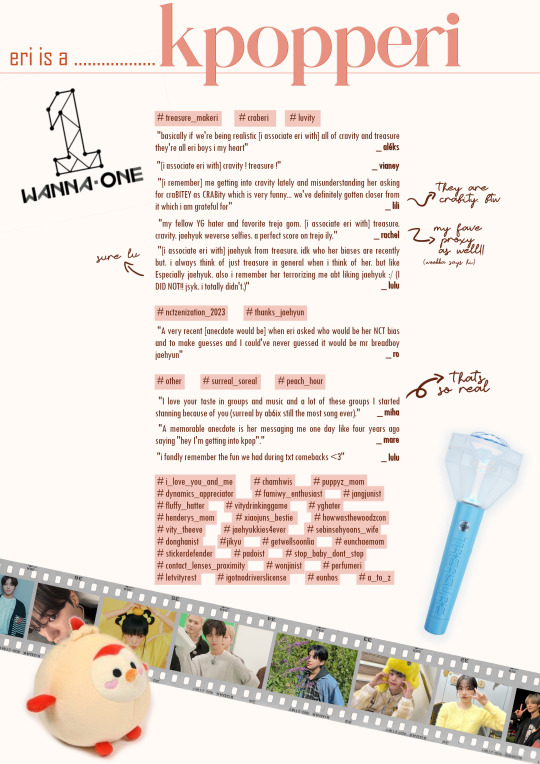
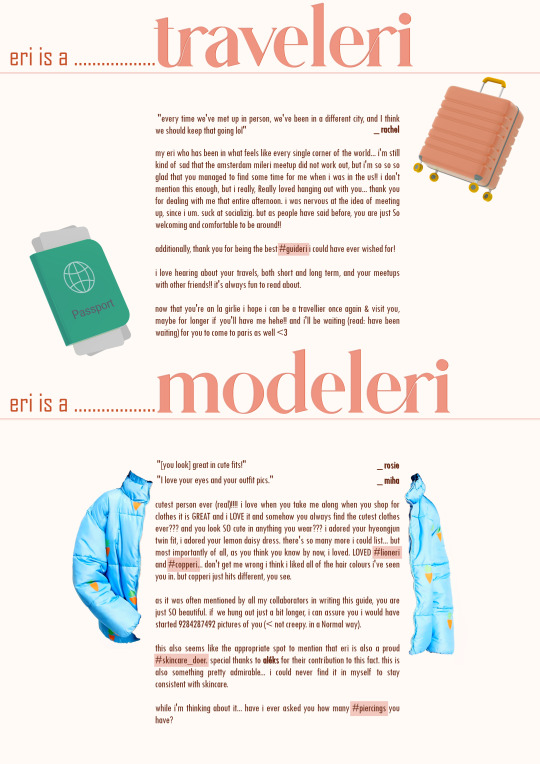


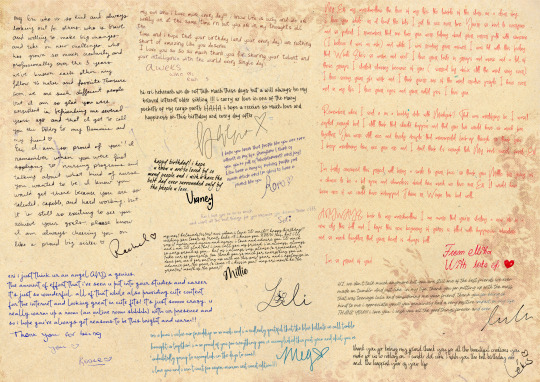
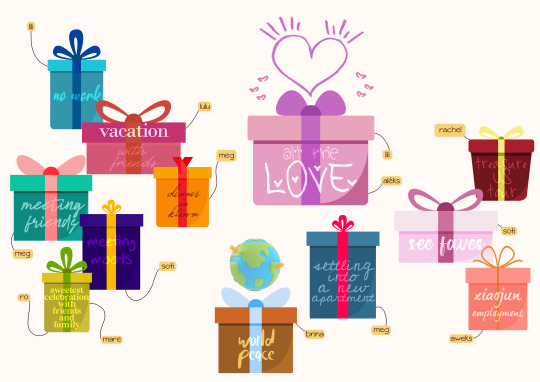

credits. with the help of: meg (@hozierbyrne) // brina (@aquablues) // aléks (@possession1981) // vianey (@souladies) // lili (@ninqz) // aweks (@awek-s) // miha (@jaebeomtual) // rachel (@gnanii) // mare (@dongkwan) // ro (@sunghanbin) // rosie (@kimjiwoong) // lulu (@fushigojos) // sofi (@yukuz) graphics: gift boxes // broccoli // orange fruit watercolor // lip print textures // notion-style scribbles // healthcare vector icons // human anatomy icons // film cutouts pack // 3d travel icons // drinks vector icon set // coffee outline illustration pack // baby vector icon pack
#*mine#oorieri#genuinely thank you SO MUCH for participating @ everyone who did . and if i didn't contact u ... im so sorry i probably didnt fully realize#that u were friends with eri um . sowwie#thank you for finding the time to think about this and . for those who did . for sending in your answers i lob u this is only possible beca#because so many people agreed to help...#a note to meg!! specifically!! because you did so much (from being my first interviewee and my lab rat to responding to the few questions i#had . to suggesting people to include and offering your help with contacting some people (although it did not work out in the end as i said#i really appreciated the thought!!)#note for meg (2): i ended up not being able to use indesign at all... it was too big for my poor little tablet skjsk i got rlly excited abt#n downloaded it strategically for the free trial to expire today or tomorrow but. had to uninstall right away... sighs)#special thanks to lili for being so sweet . i think we became a bit closer through the messages we exchanged in between this project <3#special thanks to rachel and mare who i know are both really good friends with eri but who aren't exactly familiar with me... i was really#nervous messaging you both so thank you for being so sweet and for participating despite life not exactly helping!!#note for rachel: im sorry i ended up casually calling you rachie in my head the past month or so .. forgive me#special thanks to lulu for being willing to participate#a big thank you to everyone for opening up#and thank you to gabi and sarah who did try their best to find the means to participate#big thank you to gimp for crashing so many times while i was making this & to myself for overriding one of the most important files acciden#accidentally. good job#and finally. the BIGGEST thank you to OUR BELOVED ERI who. clearly. is just the biggest sweetest sunshine & the bestest friend to all of us#thank you for everything always ... i hope you're sleeping well by now#and of course: HAPPY BIRTHDAY!! i truly wish you all the best today. and this month. and the next year and the next one and the next one an#i love you. <3 i really do#and so does everyone! clearly!!
34 notes
·
View notes
Text
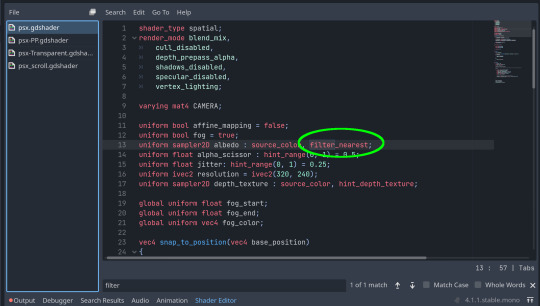
Yet Another Package Editor

Download the latest version here
YaPe is a modern package editor for DBPF (.package) files
Features:
Edit any package - FAST
List and edit resources in a package
Filter resources by type
Easy editors for several resource types
Supports opening ANY DBPF-coded .package, .dat, or .sc4 file
Easily reduce texture size, add/remove/recreate mipmaps, change texture format
Import textures by dragging, export DDS
Native on Windows and Linux
Why make yet another package editor?
Simply said, because SimPe can be kind of cumbersome especially on Linux, and package editors other than SimPe (s3pe, s4pe, iLive's Reader etc.) do not support Sims 2 resources.
To illustrate, I timed someone shrinking a texture (convert RawARGB32 -> DXT1, shrink 2x) in both SimPe and YaPe:
SimPe + GIMP: 1m 30s
YaPe: 10s
Originally this started as just a way to easily test if my DBPF library was doing the correct thing, but over time it has grown to become a half-decent editor suitable for more general use.
Tutorial / usage tips
Here I will explain how to shrink and convert textures in YaPe because that's what I imagine most people will use this program for right now, but of course you can use it for other things as well.
Let's get started by getting the program to look the way you want to: use the options in the top left to change the scale of the interface and switch between dark and light mode.
Now drag a package file into the program (don't worry about closing the sims except when you save the package), a list of resources in the package will be visible. You can find out what the abbreviations mean by hovering your mouse over them; in general I try to add tooltips like this to buttons or options that are unclear.
Don't be afraid to mess around and make changes! The changes you make are never saved unless you press the save button, so if you simply drag your package file into YaPe again without saving you will get your original package back (there is currently no undo function, but it is a planned feature).

All these resources are great, but we're only interested in the textures for this tutorial so let's set a filter. Right click on a texture (TXTR) and select "Filter on type".

Great! Now you can only see the textures we're interested in. You can disable this filter by unticking the "filter" option at the top.

Now click on the "TXTR" to open the texture, it will open a new tab in the lower half of the window by default. If your window is not very big (like mine is for this tutorial) you might have trouble seeing the texture and all the options. You can drag the tab around and put it somewhere else in the program, I'm going to put it on the right and make it a little bigger so we can see what's going on.

Okay, now we can see all the options, and well... there's a bunch of them. We'll go over some of the options that you'll likely want to use but feel free to experiment of course.

First, let's have a look at the texture viewer at the bottom: you can zoom in on the texture by holding control and scrolling, and you can change which mipmap is displayed by clicking the radio buttons above the texture.

But wait, this texture does not have enough mipmaps to show up in game! (post by @pforestsims) Let's fix that right this instant by clicking the "Add missing mipmaps" button in the middle.

Okay, now the mipmaps will show up in game, which is good... except that this mipmap is really blurry. (post by me) Luckily we can fix this really easily, just click the "Recalculate all mipmaps" button.

Much better!... except that we've created a new hidden problem: the leaves will disappear when zooming out in game (blog by lisyarus) but even this problem can be fixed. We can actually preview what the texture will look like when zoomed out by switching the format to DXT1 since DXT1 has binary transparency, just like alpha tested textures like leaves and grass.

Right, so the leaves have a bunch of holes that don't look right when zooming out, let's change that. Above the "Add missing mipmaps" button there is the "Preserve transparency" slider: try changing it to something like 120-170 and click "Recalculate all mipmaps", you can see that the transparency changes, if it's still too thin/transparent set the value higher and recalculate again and so on.

Have a look at all the mipmaps (zoom levels) and once you're satisfied with the transparency change the format back to DXT5.

This texture will now look great in game! But it is also quite large, so we can reduce the size 2x smaller without sacrificing very much in terms of looks (sorry to all the cc authors who love their large textures). Click the "Remove largest texture" button, which will make it so that the first mipmap becomes the largest texture effectively reducing the size by 2x. Like mentioned it does use the first mipmap so make sure to fix any blurry mipmaps first.
You can repeat the same process for the other textures in the package, and then we're done. Save the package by clicking the save button in the top bar, and have a look in game at your beautiful textures.
Another option is to drag images/textures you've made somewhere else into the program (with special support for dds files), for a full lists of supported image formats you can look here. (image-rs documentation) The image/texture will currently go into the firsts open texture resource tab because of UI framework limitations.
Here's a look at some of the other editor currently implemented:


Enjoy :)
195 notes
·
View notes
Text
How to take screenshots and edit (when it's just not your thing)

Alright-y!
So, I have over the years learned how to use reshade and to edit my pictures. I am really not a natural on these things, so this is very much to help others who are as aesthetically challenged as I am. I have to have certain "rules" to follow, because I can rarely just see if a picture will turn out well or not.
We all need to realize where I started. We're talking using FRAPS to take screenshots and then running holy colours batman! to get some sort of effect.
Now, I'm not one to buy fancy stuff and to pirate certain programs isn't really my thing either. So we mend and make do!
Also, I am by far very good at taking screenshots and edit, but I have learned things and hope that it might be useful for someone!
A word on light
One thing I've learned is to work with is light. Where the light is is where the focus will go. This doesn't mean that a person has to be in the spotlight, but if they aren't - try to make that a more conscious choice. I am no pro at this, but I have to say that some of my favorite screenshots are where the light is just good. It focuses the eye or it just give a vibe.


(and yes, for some reason all of my faves are of Agnes, which is a bit annoying since Amanda is my fav-character, lol)
This is also where reLight comes in handy. Yes, it's behind a paywall but there are ways that you will have to figure out yourself.
Great tutorial here on reLight by @pictureamoebae! (if you want to really understand reshade, do check out their tumblr. So many helpful tips and tricks!)


Posing
Posing is fun! I don't fully story-tell with my sims, most of it is gameplay. But I do like to pose for family pictures or to enhance something that is going on.
What you need is Andrew's Pose Player and Teleport Any Sim or Wicked Whims.
Now, I haven't figured out how to use WW for children and younger to pose, so I use both. And I like @ts4-poses to find poses. Eventually, you'll find your favorite creators and can follow them directly.


Angles and vibes
Here's a trick. Work with angles. I am a master of pictures with zero vibe, just a face. Those can be ok, and sometimes that's what you have - but try to angle your shot a little.
Or add clutter, focus on that and let something out of focus happen in the background.
Or just go higher, take the screenshot from above.
Or don't focus on your sim at all, focus on something else that adds to the story/post.


Take the screenshot
The light is good, the angle great, the poses are in place and now, we need to take the actual screenshots.
I am a huge fan of reshade, I use version 4.9.1 because that works for me and the presets I use. No need to update reshade unless it becomes too old.
It can be really difficult to to find a preset that you like. I mostly use birdie by @monasims, tawhay by @windslar and paperbacks by @literalite. But I have tried many.
I like this youtube-tutorial on how to make your own preset, which also helps if you wish to modify one that you've downloaded. I do always recommend learning how to use ADOF and CinematicDOF to help focus the image on what you want to capture. I also strongly recommend @pictureamoebae's Foundation.
To take pictures, use the tab-key to leave the UI behind and use Q and E to go down/up in your game and then the mouse to angle. I use print-screen to take my screenshot, but that's something you set up when installing reshade so that's different for everyone.
And now you have your screenshot and it's time to open an editing program. Cheap as I am, I open GIMP.
Let's edit!
I don't use many steps. Since I can't use fancy photoshop actions I have to make all the steps by myself and well - I am human and therefor lazy.
Resize and start to think of a post
First things first. I cut my pictures to work for the tumblr ratio. I actually don't resize them smaller anymore - because when I change layout on my tumblr I just feel as if it messes it up. Now, I don't have a huge screen and my screenshots aren't massive, so it's not necessary either.
My images will be 1017x1017, 1525 x 1017 or 678 x 1017.
Once this is done, I also try to look at how they will go together. If I want a post of just squares I need to have an even number of images. Sometimes I want a landscape image as a sort of heading, or one in the middle with squares around it. It depends on what I want to convey.
This is by no means something that comes natural to me - I am aesthetically challenged after all. Sometimes, I just have 5 images and have to make do.

Resized
Topaz Clean
Yup, it's awesome. No, it doesn't come with GIMP. Yes, there are ways to work around this. You will have to find those ways on your own.
But I have to say, it does makes wonder for the images. I have completely stolen @sojutrait 's settings because I really like her style and therefor - I copy. I have added a bit more sharpening, but otherwise it's completely hers.

Topaz Clean:ed
Curves
Curves my beloved! I use curves for two things! Take out the yellow (aka increase the blue) and to brighten/darken the image!
I do sometimes matte the image too and here's a good tutorial for GIMP users on how to use curves in GIMP (for a matte look)

Less yellow/more blue

Brighten the brights (but I did not brighten the darker parts)
Layers, curves and increase the light where needed
Now, remember that we need light? Sometimes, a screenshot just doesn't have the right light. So I duplicate the layer, use the free marking tool around what I wish was brighter and put that on a new layer.
Then I use curves to lighten the layer with what I want to brighten and to make darker the layer with what I want to put less focus on (here's an ok youtube video on the subject).
Below, you can see the effect on my images.


Sharpen
Pretty basic. I subtly sharpen the image again. Even if I use the sharpening in topaz clean I do like to add an extra touch before it's time to save and move on.

So sharp!
PSD and UI
I do like to use psd's now and then. I mainly use @windslar's psd-collections and @deathbypufferfish's Build-a-Sim Icon Pack.
It's mostly to help give some info about the post or when my sims age up and I want to show their traits.
I do use the UI-info sometimes. If I do, I go into Game Options in the game > Accessibility > UI-scale and just drag that up a bit. Then I copy/paste that part onto the image I'm using.


Done!
That's pretty much it. Thing is, to post good edits you have to actually take good screenshots. As annoying as it is, it's like cooking: it all comes down to the ingredients. I hate cooking Yes, editing does help but I think my main journey has been to learn to take better screenshots from the start.
The picture below is from resized to done.
Hope this might help someone! I will probably learn more and more as I continue to post, but this is where I am so far in my journey!
151 notes
·
View notes
Text
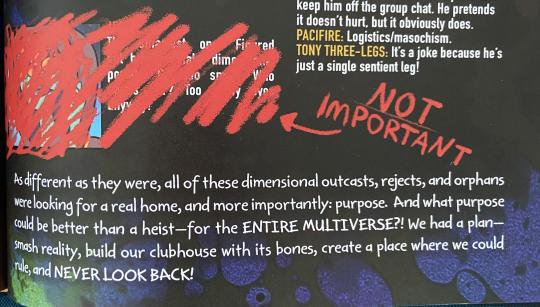
Trying to figure out what's under the Jhesselbraum crossed out text in the Book of Bill
EDIT: Somebody figured it out! Thank you @kitcatia (and @angst-estefany for helping them out)!!! This makes a lot of what's in the post outdated or wrong here but I'll keep it for archival purposes. :D
Dunno if anybody's done this before but I figured I'd give it a shot. This is the original image.
I first went and found the font used for this. I think it's DIN Condensed Bold. This font unfortunately costs money to get onto your computer, but it is included with Adobe Suite software so if you have Photoshop or are silly like me and used Illustrator, you can access it (I know Illustrator isn't great for this stuff but I generally use GIMP and didn't feel like installing Photoshop for this one thing).
And this is the image with the letters I can figure out.

If I got this right, there are a couple of things in here that are huge.
Bill thinks (or at least thought) very highly of Jhess. He describes her as the smartest Henchmaniac. Depending on how you interpret that comment about the eyes, he either let her into the group despite not liking how many eyes she has or has sour grapes about her leaving.
Jhess did a ton of the heavy lifting for the portal project. Bill is often presumed to simply have the multiversal know-how for a lot of the physics and stuff behind the portal, but this implies that Jhess was actually the first one to figure much of this stuff out and Bill went off of what she told him.
I also want to draw your attention to a tiny detail I noticed in the name Bill gives her. It's so small that it might just be me just seeing a pattern where none exists, but I thought it worth mentioning anyway.
My first thought was, obviously, that the name given was "JESS." The first two letters are clearly J and E and the character is called Jheselbraum so that would track. But then I noticed this tiny squarish region that does not line up with how the red pen's stroke normally tapers off and is slightly whiter than the pen. It is exactly where another letter would be... and it does not line up with DIN's capital S! The capital letters in DIN that it lines up with are B, D, E, F, H, I, L, M, N, P, R, and T. The name looks like it cannot exceed 5 characters given the position of the pen stroke.

In terms of plausible names in there, these are the options:
Jeb
Jed/Jedi
Jet/Jett/Jete
Jeff
Jerry
Jerk (lol)
Jelly
Jem
Jen/Jenn
The majority of the plausible names, as you can tell, are either masculine or ungendered. Which makes me wonder-- is Jheselbraum the Unswerving trans??
Because that implies a lot. For one, I have to question why Bill is deadnaming her in that case. Is it to be hurtful or did he just legitimately never figure it out? She went on the run from him so it's likely she never updated him on her live-name. (And I mean, let's face it, "Jheselbraum" is not that far off from some of the live-names trans people choose for themselves. You guys are reviving antiquated names one transition at a time. \pos)
He also speaks rather admiringly of her, which would be odd if he was trying to insult her with her deadname, so I think it's really highlighting how little Bill actually knows-- and might underlie the real reason he crossed it out. He literally just found out she transitioned and he doesn't even know her live-name. Really undermines the whole "unlimited being with knowledge and answers" thing he claims about himself.
It would also explain what drew her to Bill in the first place. Bill already believes in 14 million genders, and he was offering to smash all the norms and rules. What have norms and rules ever done for the trans community? Seldom anything good is my impression.
Hell, maybe she wound up doing her own sex change surgery, because nobody else would do it for her, and that's why she has the skills to install a metal plate in Ford's head. (Pure speculation of course)
Or maybe I'm just overthinking a print error or false pattern or something! Who knows?
Anyway, I thought this was interesting enough to share. Not important my tailbone lol.
#gravity falls#book of bill#bill cipher#jheselbraum the unswerving#deciphering text#henchmaniacs#lore#speculation#I did this instead of sleeping lol#update
96 notes
·
View notes
Note
I do love how Astarion, lovingly, tells DU Drow to stfu about his breeding kink lol
Astarion, for the first time in two hundred years can have sex the way he likes. Do you have any headcanons about him and DU Drow discovering what he actually likes?
(I'm pretty positive this was in reference to this, (un)fortunately my inbox is a little hard to keep up with so I must have missed this one at the time)
Kind of! I try not to overthink his internal processing of sex following everything that has happened, as I feel like that runs the risk of setting too clear a line between good and bad recovery and experimentation - y'know, that concept I have delved into a few times by now about how I assume he continues to do things that make him uncomfortable/that he doesn't necessarily wants to do, not to self-harm but simply because he doesn't want to be held back by by his experiences and (mostly) has the ability to deal with the emotional consequences of it, as long as it was a choice he made of his own free will.
Which is to say that I think Astarion was willing to try a lot of things with his partner. Especially after "vanilla" sex became normalized between them past the end of the campaign (as they weren't really fucking during it at all) and things like putting small fantasies of his own the table started to feel like a strange, but tempting excursion. This is a trigger for the both of them to be much more blatant about their desires with each other, especially once DU drow gets over his perception of Astarion as some kind of wounded bird who needs to be handled with kid gloves.
While Astarion doesn't strike me as someone who'd ever get into wizard sex inflation or whatever gimp parties the Loviatar people are throwing, I do think he likes it when sex is injected with a degree of weirdness, even awkwardness. Keeps him from the temptation of defaulting back to a script like he used to do - even if whatever they got up to wasn't particularly titillating, at least he was present all throughout it, which would be a priority. I think it will take decades for Astarion to figure out what he's actually into into.
In the meantime, he is very fond of his partner's body, his general behavior in bed and of taking his time, also a bit of an oral fixation. Unless purposefully leaving his comfort zone, Astarion prioritizes his own fun and enjoyment because he knows DU drow gets off on being the source of it. This is a very body-worshippy couple overall, but Astarion is the main perpetrator since it is an invigorating experience to not be in the role of the Desired after having his identity revolve around that very concept for so long. Naturally, DU drow lets him do whatever the hell he wants to him and doesn't even demand that he finishes, or that it escalates to actual sex at all. It works out well for them.
315 notes
·
View notes
Note
Ozz! I'm trying to get into drawing, but I'm absolutely horrid at it and have no idea where to begin. Do you have any tips for beginners? Also, what program do you use? I've heard Krita is good, have you heard of it?
Also, also, remember to hydrate properly and get a good amount of sleep and do lots of self-care! <33 we love you and your content; you make the world a brighter place ^^
~ 🐇
If you want to start from the very bottom, there's a website where the first lesson is drawing a line, quite literally. It builds your confidence with basic shapes, then moves on to more complex topics like textures, shapes in space, construction of real life objects and so on.
I've had it in my bookmarks for...gosh, years now. I should definitely pick it up again, haha.
I also follow Alphonso Dunn on YouTube, he has hundreds of art tutorials and exercises.
As for software, I briefly used Krita years ago and it was nice! It had a very easy interface and the brushes worked well if you wanted to reproduce traditional art. The only reason I didn't stick to it was because I already had PaintTool SAI and Photoshop at the time. When I got my first graphic tablet, I started with Paint.NET, though it was very simplistic.
The general consensus online seems to be Krita for painting or MediBang if you're into drawing anime. In terms of paid software, I think Clip Studio Paint is very popular and has a lot of resources, from brushes to 3D models. Photoshop is classic, but it can be overwhelming if you're new to digital art.
I personally use Procreate because it came with my iPad and it has a very simple menu. Some professional illustrators say it lacks the advanced options you'd find in other programs, and I do agree it may not be enough if you want to go beyond merely drawing. To add text and make small edits, I'll put the doodle through Photoshop, for example.
Free software: Krita, MediBang, Gimp, KRESKA.art (no installation required)
Paid software: PaintTool SAI, Adobe Photoshop, Procreate, Clip Studio Paint
If anyone has more suggestions or tips, feel free to drop them in the comments!
88 notes
·
View notes
Text
Gaming GIF Tutorial (2025)
Here is my current GIF making process from video game captures!

PART 1: Capturing Video
The best tip I can give you when it comes to capturing video from your games, is to invest in an injectable photomode tools - I personally use Otis_Inf's cameras because they are easy to use and run smoothly. With these tools, you can not only toggle the UI, but also pause cutscenes and manually change the camera. They are great for both screenshots and video recording!
As for the recording part, I personally prefer NVIDIA's built-in recording tools, but OBS also works well in my experience when NVIDIA is being fussy.
PART 2: Image Conversion
Do yourself a huge favour and download PotPlayer. It is superior to VLC in more ways than one in my opinion, but is especially helpful for its Consecutive Image Capturer tool.
Open the video recording in PotPlayer, and use CTRL + G to open the tool. If this is your first time, be sure to set up a folder for your image captures before anything else! Here are the settings I use, albeit the "Every # frame" I change from time to time:
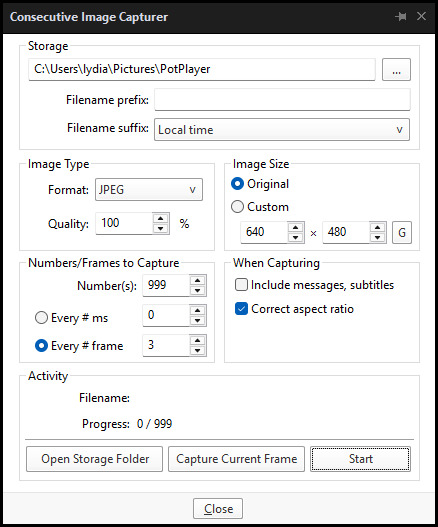
When you're ready, hit the "Start" button, then play the part of the video you want to turn into a GIF. When you're done, pause the video, and hit the "Stop" button. You can then check the images captured in your specified storage folder.
(TIP: Start the video a few seconds a head and stop a few seconds after the part you want to make into a GIF, then manually delete the extra images if necessary. This will reduce the chance of any unwanted cut-offs if there is any lagging.)
PART 3: Image Setup
Now, this part I personally always do in GIMP, because I find its "Open as Layers" and image resizing options 100% better and easier to use than Photoshop. But you don't have to use GIMP, you can do this part in Photoshop as well if you prefer.
Open the images each as an individual layer. Then, crop and/or scale to no more than 540px wide if you're uploading to Tumblr.
(TIP: This might just be a picky thing on my end, but I like to also make sure the height is a multiple of 10. I get clean results this way, so I stick to it.)
If you use GIMP for this part, export the file as .psd when done.
PART 4: Sharpening
If you use GIMP first, now it's time to open the file in Photoshop.
The very first thing I always do is sharpen the image using the "Smart Sharpen" filter. Because we downsized the image, the Smart Sharpen will help it look more crisp and naturally sized. These are the settings I mostly use, though sometimes I change the Amount to 200 if it's a little too crunchy:

Here's a comparison between before and after sharpening:


Repeat the Smart Sharpen filter for ALL the layers!
PART 5: Timeline
First, if your timeline isn't visible, turn it on by click on Windows > Timeline. Then, change the mode from video to frame:

Click "Create Frame Animation" with the very bottom layer selected. Then, click on the menu icon on the far-right of the Timeline, and click "Make Frames from Layers" to add the rest of the frames.
Make sure the delay should be 0 seconds between frames for the smoothest animation, and make sure that the looping is set to forever so that the GIF doesn't stop.
Part 5: Editing
Now that the GIF is set up, this is the part where you can add make edits to the colours, brightness/contrast, add text, etc. as overlays that will affect all the layers below it.
Click on the very top layer so that it is the one highlighted. (Not in the timeline, in the layers box; keep Frame 1 highlighted in the timeline!)
For this example, I'm just going to adjust the levels a bit, but you can experiment with all kinds of fun effects with time and patience. Try a gradient mask, for example!
To test your GIF with the applied effects, hit the Play button in the Timeline. Just remember to always stop at Frame 1 again before you make changes, because otherwise you may run into trouble where the changes are only applied to certain frames. This is also why it's important to always place your adjustment layers at the very top!
Part 6: Exporting
When exporting your GIF with plans to post to Tumblr, I strongly recommend doing all you can to keep the image size below 5mb. Otherwise, it will be compressed to hell and back. If it's over 5mb, try deleting some frames, increasing the black parts, or you can reduce to number of colours in the settings we're about to cover below. Or, you can use EZGIF's optimization tools afterwards to reduce it while keeping better quality than what Tumblr will do to it.
Click on File > Export > Save for Web (Legacy). Here are the settings I always use:

This GIF example is under 5mb, yay! So we don't need to fiddle with anything, we can just save it as is.
I hope this tutorial has offered you some insight and encouragement into making your own GIFs! If you found it helpful, please reblog!
135 notes
·
View notes
Text
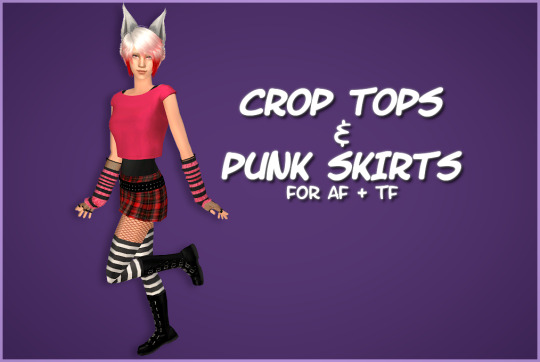

HAPPY BIRTHIVERSARY part 2 - Crop Tops & Punk Skirts
FUN FACT: The Sims 2 (2004) was released 3 days before the date upon which I was released from my mother's womb, therefore making me younger than The Sims 2 by 3 days as of September 14th 2024, but objectively older by 6 years as of September 17th 2024. As of this post, it is now my birthday. I can feel the hands of time slowly pulling me into the earth. Let's celebrate!
Today's Very Special Birthiversary post includes a set of stylish, vaguely Scene-inspired clothes for ladies: 24 recolors of the Urban Primitive skirt, separated from the Maxis outfit by Skell, and 5 Goth themed patterned recolors and 5 bright solid recolors of the 4t2 Bow Crop Top by MDPthatsme, with black tank top undershirts attached using textures by DeeDee. The clothes are for AF and TF, with Standalone and Repositoried options for TF, and they come with all morphs.
All meshes are included and special characters that would make the game load slower (specifically hyphens) have been removed from the filenames. Since the skirt is from the ever popular Maxis Match Repository Project, you probably have the mesh for the skirt lying around in your Downloads somewhere, so make sure you don't have duplicates.
For the skirts, there are two versions with tights - one of which is a mashup of fishnets by Io (colored red and black) and the Maxis black and white stockings, and the other is the Maxis shorts+fishnets texture because I liked it - and one version with bare legs, which can be used with @themeasureofasim's stockings accessory boxes. (actually only a handful work, see under the cut)
The crop tops and the skirts are 'meant' to be paired together but, being separates, you can mix and match with any other top or bottom you want.
CROP TOPS SWATCH | PUNK SKIRTS SWATCH
See under the cut for more (not very important) information.
DOWNLOAD (sfs)
Mesh credits: @mdpthatsme, Yuichen, @deedee-sims, Skell Texture and alpha credits: DeeDee, Ghanima Atreides, Creesims, Io, and Maxis Pattern credits: andrea_lauren, nerd-and-vine, ophelia_payne (@ Spoonflower), Blue Moth Fabrics, and VictoriaBat.
I have done my best to credit everyone who's resources I used. If I have misattributed or missed anybody, or if I have broken a rule in someone's TOU somewhere, please let me know.
Secondly, this is my first time 'retexturing' clothing instead of just recoloring it, as well as the first time I've done anything clothes-related in a very long time, so please be gentle to me with your criticisms and let me know if anything needs fixing <3
I wanted to recreate this outfit using only textures, because I know nothing about meshing and Milkshape scares me. As you can probably tell, I got a little carried away from the original goal.
I mashed a bunch of patterns, textures, and colors together on top of the crop top and skirt in an effort to learn 'advanced' recoloring of clothes in GIMP, as the most I've ever done before was just recoloring using pre-made PSDs. it was a bit of a disorganized disaster and there was quite a bit of blood, sweat, and tears. But the end results look... mostly nice, I think.
The arm warmers and fishnet gloves shown in the preview are a pair of accessories created by katsurinssims that I used to try to 'complete' the look, and are not included in this download.
Edit: im very sorry, I only tested a handful of the accessory stockings on the bare legs skirts, because I was very tired and there are A Lot of them, and assumed they would all work. But after a bit more testing, some of them have small gaps or poke through the boots, and the ones that are supposed to go over the crotch area end up looking like over the knee socks. Other than that, most of the knee high socks and tights work, but only on AF. I don't consider this a huge problem though, because a good amount of the tights work and the ones with gaps are barely noticeable.
There's a shoe swap that makes all of the boxes work with these skirts and I'll make another versIon of them with that mesh later.
#ts2#the sims 2#ts2cc#s2cc#sims 2 cc#sims 2 download#sims 2#happybirthiversary2024#the sims 2 anniversary#ssd cc#dl clothes#dl afclothes#dl tfclothes#i worked so fucking hard on this you don't even know
181 notes
·
View notes
Text
Going overboard, 9: Karma


This one is again, on the shorter side, and there's no Josh, so sorry about that. Hope you're keeping up so far (only two parts left!). The power went out today so I actually thought I wouldn't be able to update today, but after a couple of hours it passed so we're fine. Thank you for all the requests I've gotten, I'll start working on them at once (but please also be patient with me).
We walk deeper into the tunnels, Sam leading the way. Everyone is silent, except when Sam occasionally asks if everyone is keeping up. I can see that Chris is struggling, but Ashley is taking care of him, sometimes holding him up, so he doesn’t have to lean too much on his hurt foot.
The tunnel is scary, and everytime we arrive at a corner, I feel like something’s going to pop out, ripping us to shreds. The walls are dark and dusty, I didn’t even know dust could collect on walls, considering they’re vertical. The tubes above us make an occasional sound, echoing through the rooms.
“Come on guys! We’ve got to find Mike!” Sam urges, looking back at us. I stop, the anxiety getting to my head. I’m even more stressed now than when I was taking the college entrance exam. Emily has not said a word. Ashley and Chris have said a few words to each other, but nothing has come out of her mouth. I feel bad. Of course one’ll feel defeated if your ex held a gun to your head.
“Come on!” she continues, starting to walk again.
“Hey guys, I’m kind of gimping out here” Chris exclaims, breathy and exhausted.
“I think maybe you should go on without me”
“No, Chris, we’re not leaving you” Ashley reassures, hand on his shoulder.
“We’re sticking together, that seems like the safest option anyway” I add, waiting for him.
“Mike will just have to wait”
I see Sam’s face fall. She doesn’t want to wait. Waiting might kill him, but we cannot continue the path separated. We continue forward, sometimes hearing loud screams.
“Shit! What is that?” Ashley asks.
“Their screams, the wendigo. I think the sound travels through the pipes” I point to the ones in the ceiling, then the ones on the wall. She takes my answer, nodding approvingly, as if to assure herself that what I’m saying is true. Honestly, I’m trying to convince myself as well.
We finally arrive at a large metal door. Sam tries opening it with no luck. She hints for me to grab the other handle, and we try forcing it open together. It doesn’t work.
“He must’ve locked it on the other side” I state, trying to look into the gap.
“Crap, there’s gotta be another way in” Sam exclaims, and I can sense her frustration. I’ve never seen her like this before, a mix of panic and frustration, covered with false braveness. I want to comfort her, but that’s not what she needs. She needs to find Mike, and that’s the only thing I can help her with right now.
“Wait, hey. How about this?” Ashley chimes in. We all turn to look at her, standing over a manhole cover.
“Oh, um” Sam starts. I know she doesn’t want to, but the urge to find Mike overtakes her.
“Should we try it?” Ashley adds, looking over at her for approval.
“I mean, do we have any other choice?” I ask, waving my head and hands.
Sam wastes no time, walking over and trying to get it open. She’s struggling, and I can’t help but pity her. The others don't notice how scared and desperate she is. A metal rod is laying on the ground not too far away.
“Hey, use that” I tell them, pointing in the direction. Ashley grabs it, wiggling up the cover. They all help move it, before shining all their lights in there. It’s dark and gross, an eerie air coming through.
“Okay, maybe this is the last place I want to be right now” Ashley says, taking a few steps back.
“We need to find Mike” Sam retorts, fixated on her decision. “So, who’s going first?”
Everyone is silent, standing around the hole as if waiting for the first climber to be dragged down and murdered. I sigh, walking past them and climbing down the ladder. The others follow close by, so I keep going. When I’m down, I stand guard, looking around and helping Emily and Chris on the last part of the latter. Everyone gets down, and Sam starts immediately walking again.
“Hey Sam!” I yell, confident she’ll not hear me if I ask in a lower tone.
“What?”
“Should we, like, close this thing? In case something’s following us?”
“Yes, fine, close it, but can you catch up, please?” she continues, stressed and impatient.
“Yeah that’s fine” I yell, seeing them go off in the distance. The cover is heavy, and it takes a couple of tries to get it in place again. When I get down, it seems silent. Too silent. I start walking, but it quickly turns into a jog when the feeling of loneliness comes over me. I don’t know how much further they’ve gone, but I keep following the main path.
“Help!”
I look around, confused by what I heard. Who was that? The sounds don't stop, crying and yelling continuing to emerge. It sounds so familiar.
“Help me!”
“Hello?” I try saying back.
“Hey” the voice sounds again. It kinda sounds like… Jess?
“Jess, is that you?”
“Please, help me” she continues, the sound of crying filling the air once again. I walk to the voice, who continues its rampage. If this really is Jessica, then how did she survive her encounter? The voice grows stronger as I get closer, a bad feeling squeezing my chest. Mike said she was dead, and she died in the mines. Why is she suddenly here? I keep walking, though my steps grow more hesitant by the second.
I arrive in a room with a big trap door, banging continuously. This doesn’t seem like Jess, wouldn’t she talk more, ask more, tell me that she’s okay? I lean down, hand on the lock, considering my options. What did Ashley say again? These wendigo things are able to mimic their prey? And if she, at some point, was the prey, the wendigo would know what she sounds like. I let go of the lock, hoisting myself up. This cannot be Jess, at least I hope not. I continue further in, seeing a jump down. I carefully make my way, and meet the others.
“Oh my god, I’m so glad to see you!” I exclaim.
“Glad you’re safe” Sam says, both hands on my arms. I give her a nod and a half-hearted smile. What if she didn’t die, and I’m the reason she’ll be dead? What if she’d been there for hours, waiting for someone to hear her?
We arrive in a large room once again.
“Look!” Ashley says, pointing upward.
“Wow, great”
“The ladder’s toast, we’re never gonna make it up there”
“No, no, no. I think I can do it, it’s like a rock wall” Sam says, looking over at me. “You’re coming with me right? Getting Mike and Josh?”
My heart flutters by the mention of his name, and I give her a determined look. She’d taken me climbing before, not too many times, but only so I know the basics. She still needs to help me. She turns to the others.
“We’re gonna keep going, you guys should head back to the lodge” she tells them, looking for a way up the rock wall.
“Good luck!” I hear, before their footsteps faint into the nothingness.
Sam points to a grip. “I’ll give you a push, and you go for that, the pattern upwards seems fairly easy” she says, and I nod. This’ll be fine. She holds out her hands, letting me put my foot on them, and hailing me up. I take a firm grip, and manage to climb up. The pattern is easy, the grips coming fairly quickly and painless while moving upwards. I get up, getting one foot over and rolling my body over. I wait for her, stretching out my arm for her to grab on the last passage. She takes it, and I use all my strength to drag her up.
“Ugh, we beat you” she tells the wall, and I give a snicker. It feels good to laugh a little.
“So, are we like, officially in the mines now?” I ask, unsure about our surroundings.
“I think so”
We make our way further in, walking up some beat up stairs. They lead to a wooden railing fastened to the stone wall. As we get to the top of the stairs, it starts rumbling.
“Fuck, Sam?” I ask, unsure what we should do. I turn back, but she grabs my hand as several big, heavy stones fall in front of me, destroying the stairs.
“Okay, let’s be careful” she whispers, letting my hand go. We continue on, and I notice a couple of unsteady planks before us.
“Sam?” I ask, but it’s too late. She walks over them, which breaks beneath her. She falls, and I’m quick to grab her hand, using my other to hold the railing so we both don’t fall.
“Don’t let go, please!” She screams.
“I would never!” I yell as I try taking a step back. I sit down, both feet pressed to the railing for support so I don’t fall.
“Okay, I’m gonna pull, try to grip the railing when you get up” I tell her. She doesn’t answer, small whines coming out of her mouth. I pull, and she grips a plank. It instantly breaks, causing me to grip her harder.
“Shit shit shit” I exclaim. “Try again”
I pull, and she’s able to reach the railing, pulling her up further. I get her all the way up, and we both sit down and take a breather.
“Fuck” she whispers. “Thank you”
“No problem”
We jump over the broken parts and walk into a bigger room. The silence is interrupted by a horrid scream, a scream we’ve heard too many times tonight. I look around, finding a metal rod against the stone and picking it up. She looks up at me, finger to her lips, signalling for me to be quiet. I nod in response.
We walk further in, noticing a large door.
“That must b-” Sam starts, but is interrupted by a choir of yells. The door slams open, and Mike is on the ground, a glowing hot wendigo over him.
“Shit” Sam yells, unsure of how to help. I swing the pipe, hitting it in the face. It comes up over me, and I hit it once again, its head falling off and body collapsing. Mike is quick to get on his feet, closing the door and sealing it with a shotgun.
“Are you alright?” I ask him, all of us breathing heavily.
“Define ‘alright’, I’m alive, for a start”
“Well, alive is good” Sam comments.
“What the hell are you guys doing here anyway?”
“Came to warn you about the wendigos.”
“I think I got it”
“Yeah”
“Let’s find a way to where this fucker lives” he says, walking past us and into the mines.
“Okay…”
#until dawn#joshua washington#josh washington#chris hartley#chris until dawn#christopher hartley#until dawn chris#josh until dawn#until dawn josh#josh x reader#josh washington smut#josh washington imagines#josh washington x reader#josh washington x reader smut#joshua washington x reader smut#joshua washington smut#joshua washington x reader#michael munroe#samantha giddings#ashley brown#ashley until dawn#until dawn ashley#ashley and chris#emily davis#emily until dawn#until dawn emily#until dawn mike#until dawn sam#sam giddings#until dawn fanfics
58 notes
·
View notes
Note
Hi! I saw a post where you had a game made in godot with old school rendering, do you maybe have any tips on how to make godot render a game like that instead of its normal rendering method?
I'd be right happy to!
I'll try to make this concise lol, I always end up overexplaining and then getting lost in the weeds. Buckle up, it's a loooooot of little little things that all add up.
First off, you should decide which look you're going for. N64 and PS1, the two consoles I'm emulating, both had drastically different specs. (plus, there's plenty of other early 3D systems I've not even touched!)
The N64 had texture filtering (textures were interpolated aka "blurry"), it had floating point vertex precision (points moved correctly), it had perspective correction on its textures (no warping)
The PS1 had no texture filtering, no floating point vertex precision (vertices snap and pop around), affine texture mapping (textures warp weird). I also think the color space they operate in is different? Don't quote me
So you can go hard one way or another or pick and choose what you think looks good! We don't have anywhere near the hardware restrictions they did in the 90s so go nuts.
RESOLUTION
To get a low resolution window, I set the window size of the game and the window override size to different amounts

In green is actually how big the window is on my screen (4k monitor) and in red is the retro resolution I want. If you set the stretch mode correctly (an option a little further down the Window tab) then it'll make the pixels big

COLORS
Now the PS1 had the capability of showing you over 16 million different colors, but it could only display 50,000-150,000 at a time, so in order to get more fidelity out of it, the engineers implemented a dithering effect to better blend the otherwise sharp edges between colors.
I used this shader to achieve the dithering effect. If you don't understand shader languages, that's fine. There are a few different pre-built ones for looking like the PlayStation 1 out there.
TEXTURES
Textures for the PS1 could be as big as 256x256, but they were typically 128x128. And they would squish everything a model needed into there usually, at least with like player models and objects and such.
As mentioned, if you're not good with shader language don't worry. There are countless resources out there that people will either let you use or teach you how it works. But I'm gonna touch on it a little bit here.
PS1 textures had no pixel filtering, so you could see individual pixels.
This is what determines that in the shader code. If you want it to look like the N64 (blurry lol), the proper hint is "filter_linear". Note that it won't be 1:1 with N64, cuz they used bilinear filtering (which kinda sucks and causes weird quirks) whereas now you'll only find linear or trilinear filtering. It's a negligible difference imo.
PS1 textures also were only saved using 15 bit color. I'm told that Photoshop's "Posterize" filter set to 32 can achieve this, but don't use photoshop if you can help it. I use GIMP, and while a newer version might have a posterize filter, or there may be a plugin out there, my version doesn't so I cluge it a little.
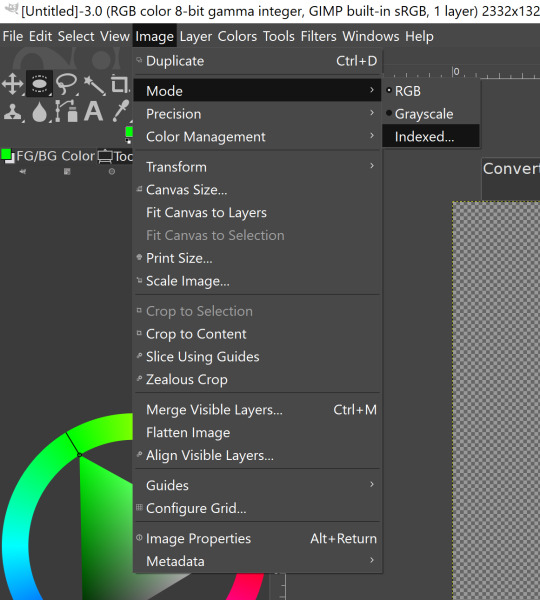

Change your color mode to "indexed", set color dithering to how you like it, and the number of colors in the palette to a number to get a good result. Usually I'll do 16, 8, 32, but occasionally I'll cheat and do a non-multiple-of-8 teehee >:3c
You can change it back to RGB after to make further editing easier.
LIGHTING
N64 and PS1 both implemented vertex lighting, as opposed to the more modern and (now) ubiquitous per-pixel lighting. Godot as it is right now (4.2 i think?) claims it has vertex lighting that you can set as a shader property but they're lying and it doesn't work yet.
The old consoles could only handle like, 2 lights though so it doesn't matter much.
The real star of the show, and in my opinion the one thing that makes a game most look like the 90s is the inclusion of vertex colors.
By multiplying the color of your texture by its stored vertex color, you can do all the shading yourself!
Plus you can reuse textures like crazy just by coloring them differently. The N64 also made heavy use of vertex colors by forgoing a texture on models entirely and just painting them using verticies. The only textures on SM64 Mario are his eyes, stache, hat emblem, buttons, and sideburns. Everything else is done with vertex colors.


Here you can see this level from my Crock Land with no vertex coloring, with some of the vertex colors only, and then with the two combined.
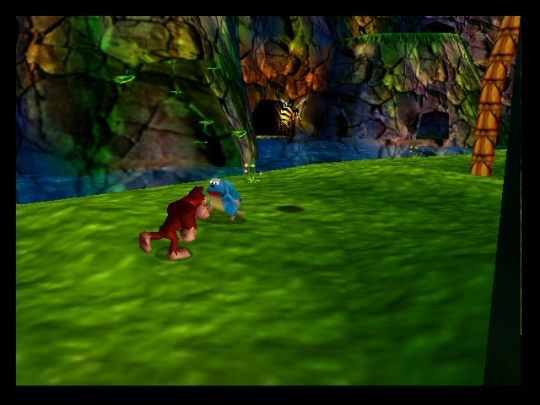
Rare loved this. Look at how colorful that cliffside is in Jungle Japes. It makes it so much more interesting than just a brown cliff face. Plus you can see the vertex coloration instead of textures at work on DK and the Gnawty.

My go-to example for PS1 is always Spyro, what a gorgeous game. All of those colors there are not made by a light or an environment. They're hand painted babey! Also! With spyro! The skyboxes are actually just huge domes made up of vertices that are colored in different ways! That's how they can look so colorful and "hi-res".
There's plenty more you can do, like adding a CRT filter or a little bit of chromatic aberration which I haven't gotten into yet.
The way I've learned all this is just by being curious as to how the old consoles did their thing, and slowly accruing the knowledge over time. There's still infinite stuff I don't know too.
I hope that helped! And wasn't too longwinded or confusing! Like I said, it's all about piling up tons and tons of little things, small details, weird graphical quirks that really bring out the retro 3D feel for me.
And I didn't even get into the modeling side of things! That's an entirely different "color-of-the-sky"-sized post though.
I'd be happy to re-explain or explain more about any of this!
214 notes
·
View notes
Note
Hi!
I know you use Xara 3D Maker to make your posts, but do you know if there are any similar tools a complete beginner could use? Do you know of any apps or websites? Any tips for anyone starting out?
This site is what I use to make glitter text gifs. The only other animation software I can think of is Blender, which I tried but it is actually very hard to learn. There is also cooltext.com where you can make simple animated text, like flaming letters. And there is Make Word Art where you can make still images of text in different fonts and styles.
Honestly, Xara 3D Maker 7 seems intimidating to learn, but it's relatively easy once you know the buttons. There are some tutorials out there, and I will at some point make one for a simple animation and show the basics. I have no experience with animation outside of Xara 3D Maker, it's simple enough that you don't need to know how to work Blender or GIMP or anything super complicated.
As for tips for starting out with Xara 3D Maker, read and watch the tutorials. Those were my lifelines when I first started out. And if you like a particular animation/color combination or you have some text you want to use as a template, click File -> Save As... and save it. Then when you want to go back to it, click File -> Open... and select your saved text.
A major thing that would have saved me so much time spent manually cropping animations is to export the animation with the size selected as 'current window size,' the 'crop' box checked, and the 'transparent' box checked. I spent literal years manually cropping text with ezgif.com and GIMP before I decided to mess with the export options and it changed my life, lol.
Again, I'll make my own tutorial sometime. Xara 3D Maker 7 is honestly a lot of fun, and I don't regret paying for it. It was well worth the money to make these animations and some stuff for myself. You could watch the tutorials first and see if it's something you feel comfortable spending money on to try for yourself.
23 notes
·
View notes
Note
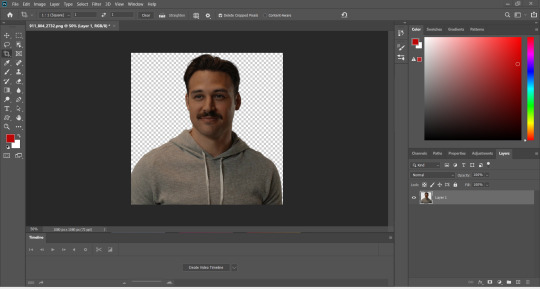
Hiii your icons are so pretty, would you have a tutorial on them or tips on how to do it?
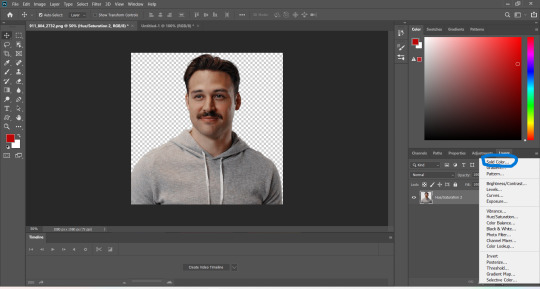
hello lovely and thank you so much!! i have been making icons for a long time, but have also just started with this style of icon, so i don't know how much of a help i can be but i'll try my best! i make all my icons in photoshop, but when i first started i used gimp, it works similar and i'd recommend it if you dont want to commit to ps just yet. this ended up getting kinda long because i went step by step on how i make my icons like the ones from this post, with a bunch of tips and tutorials linked, so i put it under a read more. i specifically go deeper into how to change the colours of his hoodie depending on your background/preferences. i hope i could help even a little bit!

1. the base
one of the first steps is deciding what you want the base to look like. you can do just a solid colour, gradients, patterns, etc. you can use the solid colours and gradients that are already a feature in photoshop, but there are also a lot of amazing resources and bases by other talented people either on here or on deviantart. just look up icon textures on deviantart, you'll be able to find a bunch of textures and pre-set gradients you can use as your base. this is a really great pack you can find on deviantart that offers a bunch of bases. if you'd like to make gradients yourself, here's a really good tutorial! i am not really an expert on explaining how to use textures because i've only really just started with headers.
2. the picture/png
onto the star of the show - the person you want to have in your icon. i usually get those from screencaps from whatever show/movie i am making icons of. you can get screencaps of most shows and movies from screencaped.net. i then isolate the person i want to be in my icon so that the background is removed and transparent. you can do that yourself, here is a very good tutorial on how to do that in photoshop, or you can use other platforms like canva or adobe express, that have features to remove the background for you. you usually cannot adjust those, so if they dont cut out things the correct way you have to adjust in photoshop afterwards. when chosing a screencap you should make sure that the person and silhupette are clear and delinated from the background, without any obstruction in the foreground, so that you can cut out the entire figure easily without parts of their body missing. i usually also look for screencaps where the head and the sites aren't cut off, so that i can freely adjust the sizing and move the figure around. i also try my best to get a scene where the lighting is alright so that i don't have to fight for my life colouring it, but sometimes it can't be helped.
this is one of the screencaps i used for my recent eddie icons and it's a good example: his upper body is clearly seperated from the background, nothing is cut off, etc.
this screenshot is an example that i personally wouldnt use because there is a jug in the foreground in front of eddie that would be in the icon as well.
buck looks very cute in his lil hat but the shot is cut off on the right and on top, so i didn't end up using it either. you just kinda go through the screencaps you have (or take your own) and figure out which frames fit for the type of icon you'd like to make.
if you'd like to make screencaps yourself, here is an easy tutorial to follow!
3. basic colouring
when i make icons like these, i usually dont go too crazy with the editing, i mostly just adjust the lighting and colouring the create a well-lit base. here you can see the unedited png (first picture) and then once ive used a basic colouring (second picture).


this is a very good tutorial on basic colouring using curves, hues, etc, as i've done as well. it is for gif-making but those same editing steps can be applied to still pictures as well.
4. colour isolation
the icons i am currently making are in a style that you can see a lot around tumblr - where parts of the person in the icon, usually their clothes and other accessories, are edited to be a certain colour that matches the background, and that colour can be changed to match different bases. you can see that the hoodie eddie is wearing has a different colour to match the different colours of the background.
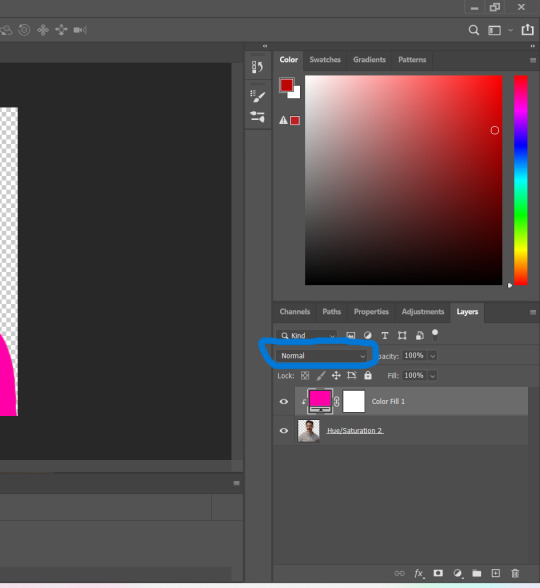
i desperately tried to find the tutorial that i used to learn how to do this but i can't, so i'll try my best to explain it myself (brace yourself). i have seen people do this by drawing onto the png, but i use a different method. for this you'll need to have some basic knowledge on layer masks.
we're gonna start with our png image that already has the colouring applied to it (1).

now, click on the layer and add a solid color layer (2). you do that by clicking the symbol i've marked on the bottom and then selecting "solid color...".
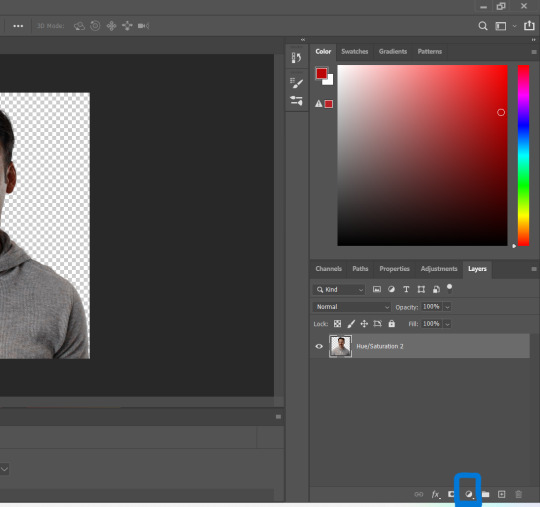
in the screen that pops up now you can select the colour you would like the accents to have (3). choose the colour you want and then click "OK".

your entire image should be in the colour you chose. now right-click on the solid colour layer in the layers panel on the right and select "create clipping mask" (4). this will apply the solid colour layer only to the cut out of your lil guy. it should looks like this now (5).


now we're going to adjust the blend mode. right now it should be set to "normal" (6). click onto the drop down arrow and select the blend mode "colour"(7).

now we can see eddies features again! now we want to edit it so that the pink is only on the parts that we want to be colourful. for this left-click on the white box in your solid color layer (8) so that it's selected. after that select the brush tool (9) and make sure it's set to black. we use black to take colour away and white to add colour back in.
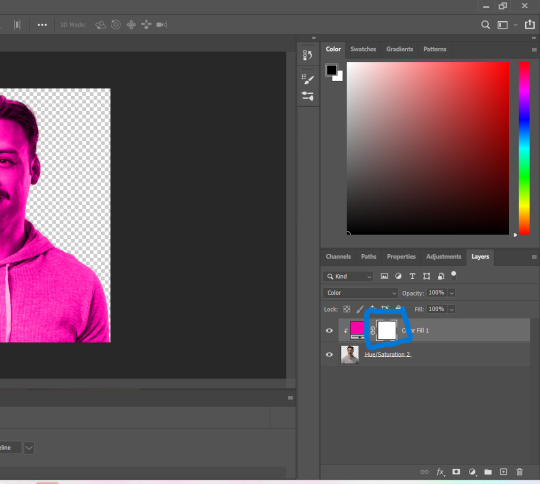
now go over all the parts that you don't want to be colourful. if you accidently take too much away don't worry, just switch the brush colour to white and go over what you want to add in again. it looks like this (10) for me afterwards.
you can change your colour if you double click on the little pink box of your colour layer and adjust it however you want.
5. adjustments
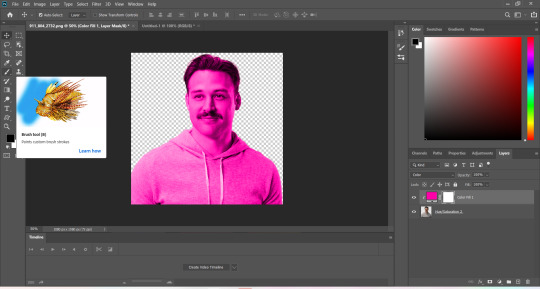
after i've done everything listed above i usually group the two layers (your cutout and the solid colour layer) together so i can move them as one (11). after that i pull the group over onto my base and adjust it so that fits properly (12).

now that the cutout is on the base layer i usually go in to properly adjust the colours and make sure the colours on the cutout match well with the background. you can do that by changing the colour manually or using the eyedropper tool. and voilá! i know it sounds like a lot right now reading this, but once you've gotten the hang of it, it really isnt that hard.
i hope this was at least somewhat understandable and that i could help a bit! there are a ton of amazing tutorials out there for all parts of editing and photoshop in general that go deep into details in case there is a specific part you want to learn more about. for now i hope this gives you at least a small overview.
38 notes
·
View notes
Text


[sources: x / x / x / x / x / x / x / x ]
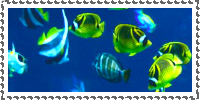
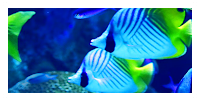
"Frutiger Aero - Fish/Aquarium" (Stamps)
8 digital stamps (200x100) plus variations made in GIMP with self-made templates/borders and free stock images from pexels and unsplash. The theme I was going for was Frutiger Aero + Fishes/Aquarium.
Further thoughts beneath the cut:
I saw some stamps pop up on my dashboard and immediately wanted to try and make some myself. I went for Frutiger Aero + Fish/Aquarium as a theme and I quite like how the stamps turned out.
And yes, the templates/borders are my own - for a first attempt, I quite like them, though I am aware they could be improved upon. All in due time though.
These could be used on tumblr blogs, personal blogs or neocities websites (or anywhere else really, though those pages are the most common to use these for).
#neocities#neocities stamps#stamps#GIMP#fish#frutiger aero#sealife#fishes#aquarium#artwork#art#old web#old web aesthetic#personal web#old internet#blog resource#web graphics#deviantart stamps
40 notes
·
View notes
Note
Do you have any tips/useful information for people who want to start making audio rps?
(Also love ur content sm!!! Mitch is the most lovable little guy)
Aw thank you so much! Love him too!
This is a great question, had to think about it for a bit;
If you want to dabble with making audios, feel free to start off with public scripts! I think there's subreddits like ASMR script haven (IIRC?) that has public scripts that can be filled by anyone. Just be sure to read the author's conditions carefully i.e. credit, terms of use, what can be changed etc. Right at the start I recorded a public script to try and get started, it's a great way to just jump right into making something to learn the ropes of it without also first having to write an entire script for it too. Filling public scripts is a fantastic way to start off, however I reckon writing your own stories is a major part of the fun!
You don't need an expensive mic, but audio quality is a very important factor. Do some test recordings and listen back to them (with headphones!) and see how it sounds. This is especially important for whispered scenes (DO NOT get too close to the mic or breathe on it!) or loud scenes (DO NOT peak the mic!). If your mic has a gain / input dial, play with that before recording! Just start with mono to begin with, play with stereo if your mic supports it after you become familiar with it. Aim for your recording to be no louder than -6db at the highest, if you can keep your voice roughly between like -20 and -6 that tends to sound reasonably natural.
Do your best to eliminate external sounds! If you have AC or anything like that on, turn it off. I have to shut down my main PC and record with only my editing Mac on because the PC fans are much louder and my mic is very sensitive! There'll pretty much always be background fuzz, some mics will just have some, but try to make your room as quiet as you can. Your software may have some background noise removal tools, I use filters for that (expensive so I can't recommend them), but DO NOT use the noise removal tool in Audacity! It's terrible!
Speaking of, Audacity is decent to get started with. It's good basic recording software, plus multiplatform. For a while I preferred recording on Windows with Audiodope, also very simple, plus I liked that it asks me whether I wanted to record in mono or stereo first in case I forget to switch, I currently record on Mac with ocenaudio which does the same, while Audacity won't ask, you have to go into settings. Anyway Audacity is okay to start with for editing, it's free, but from what I understand it's a "destructive" editing software in that after you make a change like adding a filter, you can't then go back in and change it other than just undoing, which I really don't like, plus changing the timing of things looks fiddly. I don't know what to recommend to move up from, I've heard good stuff about Reaper but it looks very complicated. Avoid Adobe unless you have a free subscription from somewhere else. I edit entirely in Final Cut Pro so I can't recommend that unless you're on Mac, plus it's my old work software and expensive! If you need sound effects, I use freesound.org, there are other great free resources as well, but make sure you check each individual sound effect's license before use.
Once you've edited the audio and want to turn it into a video, I've heard good stuff about Da Vinci Resolve and Kden Live, both are free! Make a video canvas of 1920 x 1080, FPS doesn't especially matter if you only have a still thumbnail, 25 or 30 is fine, and render it out as a h264 mp4 if you're not sure what to select! Good compression for internet video, good for streaming. Try to record and export your audio as wav if you have enough space, wav is uncompressed audio so it maintains full quality but they can get large.
I also make my thumbnails in-edit but you may want to use external software like Gimp to make them. Avoid getting random stuff of google especially anime boys / girls, and definitely don't ever use an artist's stuff without asking for permission + giving proper credit. Using pre-built generators like Picrew is totally fine, just be sure to credit where you got it from, but 100% avoid AI generators, obviously. Be careful with Adobe stock images, apparently there's AI slop in there too. You don't need art for audios though, they're a nice to have bonus, but many of my most viewed videos have no art at all. If you need background images, I like unsplash.com because it has a free license! Read over it yourself but basically you're able to use pretty much any image they have in your videos!
Just jump in and try making something small, never start with your magnum opus! I started with the introverted incubus character because I'm a very shy person myself, it was an easier role to get started with! If you want to start writing your own scripts too there's a lot we could talk about there as well, just try to picture the scene from the perspective of the listener, what they may be thinking or feeling at any given moment, not just the perspective of the character you're going to be playing!
This was a lot and I don't think I covered much, I hope some of it helps though!!
49 notes
·
View notes
Note
How do you do your Final Fantasy edits?
The hard way, my friend. No AI is used here, I do it all by hand. 🥰 I assume you mean the screenshot manipulations I create? I'll try and give a simple summary... First, I boot up Remake on PC and use a "free camera" mod(you can find the links to the mods I use on my archive pages for manipulations, which is on my pinned post) to take a couple screenshots that I think will work well together. Sometimes I change my mind and choose a different one. It can be hard to match the camera angles and lighting, so sometimes I have to mess with that later, as well. But it's easier if they fit together from the beginning. We'll take my current WIP as an example. I started with these two screenshots:


I open them in the free program GIMP (GNU Image Manipulation Program), which anyone can download at gimp.org. Then the first thing I do is choose the base image. In this case, they're both facing the same way, so I choose to flip Sephiroth(you can't really do that with Cloud easily because of his earring, and his hair is less symmetrical). Since the camera was closer up on Cloud, and he's the smaller one, I usually choose Sephiroth's to be the base image. With that decided, I roughly cut Cloud from his background and paste him onto Sephiroth's image as a new layer. Then I position him, resize him, rotate him, whatever I need to do until he seems to be in the desired place, which ends up looking like this: (I ended up adding snow for this preview, so it would look more complete than it is when I showed it to my server, haha)

If you look at Cloud, you can still see a thick outline of his old background around his head. Once he's positioned properly, it's time to remove the rest of his background(I use a size 10 eraser with 100% hardness and zoom in about 5 times). Then I need to think about where they're connected, and how to make them look like they're touching, as well as layering to make them seem intertwined, as if they're truly occupying the same space together.

I cut away some of Cloud's shirt, and the rest of that effect will come with shading later. If I wanted Cloud even closer, I would make a duplicate of Sephiroth and erase his background, so that his lock of hair would appear to go over Cloud's face. I could also make it semi-transparent, so you could see the outline of Cloud's face through his hair. You can see I have some small game defects to fix, such as Cloud's hair clipping through his ear. I leave those tiny details for later, typically. Sometimes, because of their height differences, I have to "rebuild" missing parts of them from scratch, such as I did for this other manipulation:


It's a delicate process that's mostly the clone tool(to keep the textures) and some freehand drawing, but I don't have an art tablet, so I use my mouse for everything, which can be quite challenging. I've had a lot of practice from translating doujinshi, where I'd erase the words, rebuild the missing part of the image, and then place the translated words over that spot.
In any case, I decided I wanted more out of this manipulation than just leaning against each other. I wanted Cloud to be reaching up towards Sephiroth, and perhaps for Sephiroth to be pulling him closer. To do that, I needed pictures of their hands/arms like so:


I've taken hundreds of shots, so I looked through what I had first, but it wasn't the right angle, or was the wrong outfit for Cloud, so...then you open up those images and cut out the parts you want. After that, you work on positioning and things like that again. I haven't finished with that part yet, so it looks a little awkward. (And when you're doing these kinds of things, color matching is very important, but that's a bit advanced.)

I'm not fully satisfied yet, so I'll probably remove the rest of the background from the arms and then mess with the placement. As for Sephiroth's hand, I intend to thread it in Cloud's hair, so Cloud will need to be duplicated in order to create that layering effect, as mentioned previously. Which should end up looking similar to this one:

(I had to draw in most of Cloud's hand because I didn't have the camera mod back then, and the Sephiroth shot was provided to me by Coeurlwhiskers.) After that, it's a matter of shadows and highlights, remaining details, and finishing up the colors, etc. It's a long and difficult process, and can take many hours to complete, depending on how ambitious I get with it. Most of that stuff would be a much longer tutorial, and I did used to do some actual artwork a long time ago, so I...kind of know what I'm doing?? I probably do a lot of stuff the hard way(like not using layer masks) because I just don't have the time to teach myself more than the basics. 😅I know it may seem daunting, but it's really fun! I hope I managed to answer your question properly. Feel free to ask follow ups~
20 notes
·
View notes