#tutorial course
Explore tagged Tumblr posts
Visit Tumblr Blog
Explore Tumblr blogs with no restrictions, modern design and the best experience.
Last Seen Tumblr Blogs


Fun Fact
If you dial 1-866-584-6757, you can leave an audio post for your followers.
Text
Archery: expectations vs reality vs reality again! REJECT THE BORING VERSION OF REALITY AND SUBSTITUTE THE FUN ONE!
You can find the College of Arrows here join us and be an Archery Bard! Or something
#please do ridiculous things responsibly. there's a reason one of the courses on my site is entirely on safety.#archer#archery#nerd#fantasy#history#trick shot#tutorial
5K notes
·
View notes
Text

☀️The Waiting List is OPEN again!!!☀️
My BEGINNER Course on Cartoon Character Illustration is coming available again for registrations soon!!
Topics of the course:
Warm ups, poses, style study, Procreate basics
Stylized Anatomy for cartoon characters
How to draw any Hairstyles & Clothes
Lineart tips and brushes for beginners
Color theory and Palette creation for characters
Final details, Brush packs, Speedpaints, Books rec.
People who join the waiting list will get HUGE DISCOUNT, so get your early bird discount before registrations open!
You only need to insert your email and you are NOT bound to purchase it once it's available!
#art course#kyri45#my art#art tips#art tutorial#cartoon characters#drawing tutorial#drawing course#asexual artist#drawing tips
561 notes
·
View notes
Text

A little art tip. Use grayscale!!!!
612 notes
·
View notes
Text
My GIF Making process: Screen capturing using MPV player, Organizing files, 3 Sharpening settings, Basic Coloring PSD + Actions set

This is a very long post so heads up.
I’ll try to be as thorough and true as much as possible to the way I make my gifs (I already use Photoshop Actions which I’ve long since set up but now for this tutorial I’m reviewing them to show you the exact steps I’ve learned to create my gifs 😃) and present them to you in a semi-coherent way. Also, please bear with me since English is my second language.
First things first. Below are the things and tools we need to do this:
Downloaded 4K or 1080p quality videos (let’s all assume we know where to get these—especially for high definition movies and tv series—so this post doesn’t get removed, okay? 😛)
Adobe Photoshop CC or the CS versions can work as well, but full disclosure I haven’t created gifs using the CS versions since 2020. I’m currently using Adobe Photoshop 2024.
mpv player. Use mpv player to get those frames/screenshots or any other video player that has a screen grabber feature. I’ve used adapter for the longest time but I’ve switched to mpv because the press to screenshot feature while the video is playing has been a game changer not to mention ultimate time saver for me. For adapter you need to play it in another video player (like VLC player), to get the start and end timestamps of the scene you want to gif which takes me ages before I can even open Photoshop.
Anyway! Please stop reading this post for a moment and head over to this amazing tutorial by kylos. She perfectly tells you how to install and use mpv player, both for Mac and Windows users.
One thing I have to share though, I had a tough time when I updated my MacOS to Sonoma since MPV is suddenly either duplicating frames or when I delete the duplicates the player seems to be skipping frames :/ I searched and found a solution here, though it didn’t work for me lol. My workaround for this in the meantime is decreasing the speed down to 0.70 then start screenshotting—it’s not the same pre Sonoma update but it works so I’ll have to accept it rather than have jumpy looking gifs.
Now, after this part of kylos’ tutorial:

you can continue reading the following sections of my gif tutorial below.
I want to share this little tip (sorry, this will only cater to Mac users) that I hope will be helpful for organizing the screenshots that MPV saved to the folder you have selected. Because believe me you don’t want to go through 1k+ of screenshots to select just 42-50 frames for your gif.
The Control + Command + N shortcut
This shortcut allows you to create a new folder from files you have pre-selected. As you can see below I have already created a couple of folders, and inside each folder I have selected screenshots that I want to include in one single gif. It's up to you how you want to divide yours, assuming you intend to create and post a Tumblr gifset rather than just one gif.

Another tip is making use of tags. Most of, if not all the time, I make supercorp gifs so I tag blue for Kara and red (or green) for Lena—just being ridiculously on brand and all that.
Before we finally open Photoshop, there's one more thing I want to say—I know, please bear with me for the third? fourth? time 😅
It's helpful to organize everything into their respective folders so you know the total number of items/frames you have. This way, you can add or delete excess or unnecessary shots before uploading them in Photoshop.
For example below there are 80 screenshots of Kara inside this folder and for a 1:1 (540 x 540 px) Tumblr gif, Photoshop can just work around with 42-50 max number of frames with color adjustments applied before it exceeds the 10 MB file size limit of Tumblr.

Sometimes I skip this step because it can be exhausting (haha) and include everything so I can decide visually which frames to keep later on. You'll understand what I mean later on. But it's important to keep the Tumblr 10 MB file size limit in mind. Fewer frames, or just the right amount of frames, is better.
So, with the screenshot organization out of the way, let's finally head over to Photoshop.
Giffing in Photoshop, yay!
Let’s begin by navigating to File > Scripts > Load Files into Stack…

The Load Layers window will appear. Click the Browse button next.
Find your chosen screenshots folder, press Command + A to select all files from that folder then click Open. Then click OK.
After importing and stacking your files, Photoshop should display the following view:

By the way, I'll be providing the clip I've used in this tutorial so if want to use them to follow along be my guest :)
If you haven't already opened your Timeline panel, navigate to Windows > Timeline.
Now, let's focus on the Timeline panel for the next couple of steps.
Click Create Video Timeline, then you’ll have this:

Now click the menu icon on the top right corner then go to Convert Frames > Make Frames from Clips

Still working on the Timeline panel, click the bottom left icon this time—the icon with the three tiny boxes—to Convert to Frame Animation
Select Make Frames From Layers from the top right corner menu button.
So now you have this:

Go and click the top right menu icon again to Select All Frames
Then click the small dropdown icon to set another value for Frame Delay. Select Other…

The best for me and for most is 0.05 but you can always play around and see what you think works for you.
Click the top right menu icon again to Reverse Frames.
I think Photoshop has long since fixed this issue but usually the first animation frame is empty so I just delete it but now going through all these steps there seems to be none of that but anyways, the delete icon is the last one among the line of feature buttons at the bottom part of the Timeline panel.
Yay, now we can have our first proper GIF preview of a thirsty Lena 😜

Press spacebar to watch your gif play for the very first time! After an hour and half of selecting and cutting off screenshots! 😛 Play it some more. No really, I’m serious. I do this so even as early (lol) as this part in the gif making process, I can see which frames I can/should delete to be within the 10 MB file size limit. You can also do it at the end of course 🙂
Now, let’s go to the next important steps of this tutorial post which I’ve numbered below.
Crop and resize to meet Tumblr's required dimensions. The width value should be either 540px, 268px, or 177px.
Convert the gif to a Smart Object for sharpening.
Apply lighting and basic color adjustments before the heavy coloring. I will be sharing the base adjustments layers I use for my gifs 😃.
1. Crop and Resize
Click on the Crop tool (shortcut: the C key)

I like my GIFs big so I always set this to 1:1 ratio if the scene allows it. Press the Enter key after selecting the area of the frame that you want to keep.
Side note: If you find that after cropping, you want to adjust the image to the left or another direction, simply unselect the Delete Cropped Pixels option. This way, you will still have the whole frame area available to crop again as needed and as you prefer.
Now we need to resize our gif and the shortcut for that is Command + Opt + I. Type in 540 as the width measurement, then the height will automatically change to follow the ratio you’ve set while cropping.
540 x 540 px for 1:1
540 x 405 px for 4:3
540 x 304 px for 16:9
For the Resample value I prefer Bilinear—but you can always select the other options to see what you like best.
Click OK. Then Command + 0 and Command + - to properly view the those 540 pixels.

Now we get to the exciting part :) the sharpen settings!
2. Sharpen
First we need to have all these layers “compressed” intro a single smart object from which we can apply filters to.
Select this little button on the the bottom left corner of the Timeline panel.


Select > All Layers
Then go to Filter > Convert for Smart Filters
Just click OK when a pop-up shows up.
Now you should have this view on the Layers panel:

Now I have 3 sharpen settings to share but I’ll have download links to the Action packs at the end of this long ass tutorial so if you want to skip ahead, feel free to do so.
Sharpen v1
Go to Filter > Sharpen > Smart Sharpen…
Below are my settings. I don’t adjust anything under Shadows/Highlights.
Amount: 500
Radius: 0.4
Click OK then do another Smart Sharpen but this time with the below adjustments.
Amount: 12
Radius: 10.0

As you can see Lena’s beautiful eyes are “popping out” now with these filters applied. Click OK.
Now we need to Convert to Frame Animation. Follow the steps below.
Click on the menu icon at the top right corner of the Timeline panel, then click Convert Frames > Flatten Frames into Clips
Then Convert Frames > Convert to Frame Animation
One more click to Make Frames From Layers
Delete the first frame then Select All then Set Frame Delay to 0.05

and there you have it! Play your GIF and make sure it’s just around 42-50 frames. This is the time to select and delete.
To preview and save your GIF go to File > Export > Save for Web (Legacy)…
Below are my Export settings. Make sure to have the file size around 9.2 MB to 9.4 MB max and not exactly 10 MB.

This time I got away with 55 frames but this is because I haven’t applied lighting and color adjustments yet and not to mention the smart sharpen settings aren't to heavy so let’s take that into consideration.
Sharpen v1 preview:

Sharpen v2
Go back to this part of the tutorial and apply the v2 settings.
Smart Sharpen 1:
Amount: 500
Radius: 0.3
Smart Sharpen 2:
Amount: 20
Radius: 0.5
We’re adding a new type of Filter which is Reduce Noise (Filter > Noise > Reduce Noise...) with the below settings.

Then one last Smart Sharpen:
Amount: 500
Radius: 0.3
Your Layers panel should look like this:

Then do the Convert to Frames Animation section again and see below preview.
Sharpen v2 preview:

Sharpen v3:
Smart Sharpen 1:
Amount: 500
Radius: 0.4
Smart Sharpen 2:
Amount: 12
Radius: 10.0
Reduce Noise:
Strength: 5
Preserve Details: 50%
Reduce Color Noise: 0%
Sharpen Details: 50%
Sharpen v3 preview:

And here they are next to each other with coloring applied:
v1

v2

v3

Congratulations, you've made it to the end of the post 😂
As promised, here is the download link to all the files I used in this tutorial which include:
supercorp 2.05 Crossfire clip
3 PSD files with sharpen settings and basic coloring PSD
Actions set
As always, if you're feeling generous here's my Ko-fi link :) Thank you guys and I hope this tutorial will help you and make you love gif making.
P.S. In the next post I'll be sharing more references I found helpful especially with coloring. I just have to search and gather them all.
-Jill
#tutorial#gif tutorial#photoshop tutorial#gif making#sharpening#sharpening tutorial#photoshop#photoshop resources#psd#psd coloring#gif coloring#supercorp#supercorpedit#lena luthor#supergirl#my tutorial#this has been a long time coming#guys. i'm BEGGING you. use the actions set - it was a pain doing all this manually again ngl LMAO#i've been so used to just playing the actions#so this has been a wild refresher course for me too 😆
771 notes
·
View notes
Text

hello!
#i tried#its been two years forgive me#twas fun#i guess if u call trying ri download n run softwares and finding tutorials for the past six hours only to rely on my old gif intuition fun#do i hate rhe colourinf? of COURSE#the quality? yes#but its fineee#its only upwards from here#btsgif#annietrack#usersky#dailybts#userdimple#userkelli#raplineuser#pjmdaily#what WERE THE TRACKING TAGS#userines#esmetracks
273 notes
·
View notes
Text

i would like to share this VERY handy tutorial on drawing cars by the ever-immaculate EtheringtonBrothers (twitter, instagram)
#tutorial#cars#etheringtonbrothers#knight rider#transformers#resources#tagging the two fandoms i can think of who might need this the most lmfao#thank you EB i would never be able to draw kitt without you o7 coupled with my gmod references of a kitt car model too of course#please check out their accounts they have so so so many good tutorials. absolutely phenomenal tutorials. on like Everything ever#i know cars are THE biggest pain in the ass to draw ever so here's where i learned it 👉👉#you still gotta do a bit of thinking but its amazing how much even just this one trick can do for you. it carries HARD
868 notes
·
View notes
Text
RESOURCES FOR ANIMATION
Book Disney Animation: The Illusion of Life by Frank Thomas & Ollie Johnston

Book The Animator's Survival Kit by Richard Williams

Book Drawing Lessons from the Great Masters by Robert Beverly Hale

Book Character Animation Crash Course! by Eric Goldberg

TUTORIAL VIDEOS:
youtube
youtube
youtube
youtube
#reference#tutorial#art reference#art#poses#artist#art resources#resources#web#pages#help#guide#action#line#figure#animation#2d animation#3d animation#courses#12 principles of animation#youtube#video#pdf#book
255 notes
·
View notes
Text
Elizabeth, arriving at Netherfield looking bright eyed, flushed, and disheveled: hi. I care about none of you — except you, Bingley, nice to see you — where’s my sister?
Darcy’s big brain: it’s nice that she’s so devoted to her sister, who is obviously the only respectable member of her family. I like that in a woman.
Darcy’s little brain: I bet that’s what she’d look like after being tumbled in a haystack. I really like that in a woman.
Darcy’s big brain: shut up little brain. Now I’m worried about whether I should like obvious devotion in a woman in case it leads her to be so overcome by emotion as to be not respectable or endanger herself.
Caroline, loudly: oh my goooooood. She looked so blowsy —
Darcy’s little brain: hot
Caroline: and flushed —
Darcy’s little brain: hot
Caroline: and like she was practically rolling in mud!
Darcy’s little brain: HOT!
Caroline: I bet you wouldn’t appreciate your baby sister whose virginity you just saved not that I know about that tramping all over creation looking like that, would you Mr Darcy?
Darcy’s big brain: what the fuck?
Darcy’s little brain: yeah, gross! Now I’m sad
Darcy’s big brain: I can’t even appreciate that you’re behaving again. Jesus Christ.
#I can’t believe I have to spell this out#of fucking course Darcy appreciates dishevelment what do you all think those ‘just got out of bed’ hair and eyeliner tutorials implied?#pride and prejudice
101 notes
·
View notes
Text

A child of war, a fallen leader of the nation and a mysterious check-taker. What they gonna do?
(Click for better quality!)
Also version without text cus i still liked it

#dream smp#dsmp#dreamwastaken#tommyinnit#wilbur soot#of course all c! not cc!#artists on tumblr#digital art#wonderful scary lighting#:) hehe#will waited 12 years to came back i waited 3 years to draw this#also please#this is just art of my favorite charasters#lets not bring drama here#pretty please#also! if you see that it have troubles with quality no u not#i just figuring out how to make it look good give me time(and tutorials)
189 notes
·
View notes
Note
Hi, hello, hi. Art question! How do you do gore so well cause I’ve been try to figure it out, and it’s so damn hard, lol.
Could you give an explanation or something plzplzplzplzzzzz? Ty :3
Hope you’re doing well -anon
Here's a nondescript gut, and all the layers of it separated:
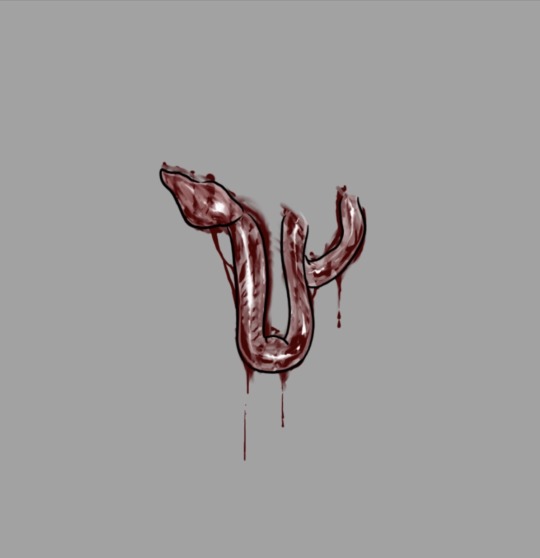
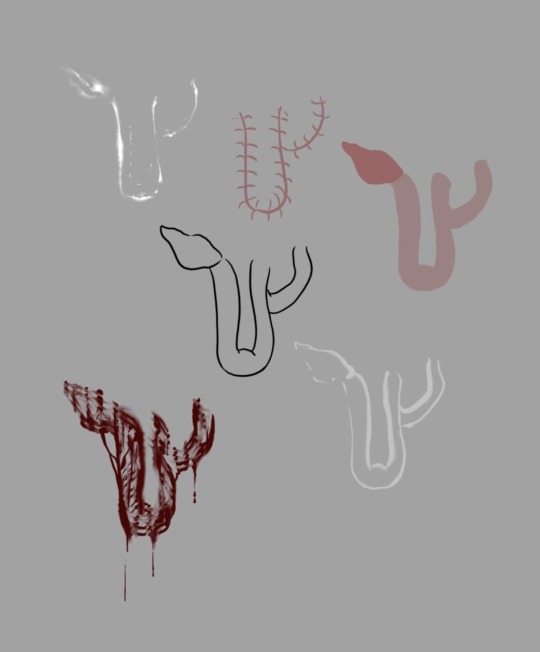
First off- guts are shiny, the more wetness effect you can achieve the better! ✨ Secondly, organs aren't just red and pink! The more colours you can add into the organs, the more realistic they'll look: Blueish, grey, dark red, browns, purpleish, a faded or muted pink, etc.
Now- of course, if you're going for something more "fun" or a cartoonier style, this doesn't technically have to apply! 💚
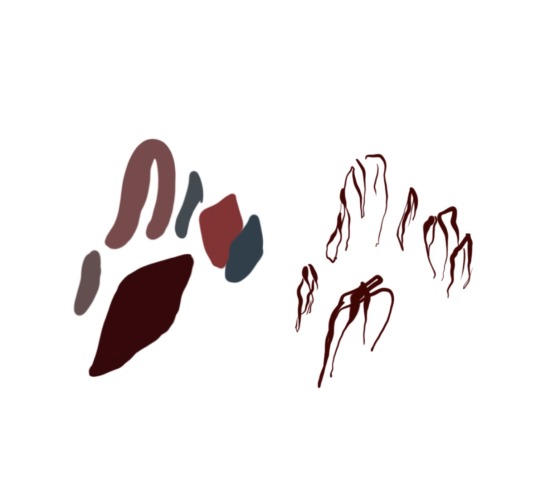
Here's some gut colours, and what a little blood and shine can do to them!
Smudge tools and highlights are your BEST FRIENDS with gore, and honesty the lazier your smudging, the better, guts are messy, so make a mess!
I grew up in a hunting family, so I did always have good reference material on hand! <:]
If you can stomach it, great references are: 🩸
Medical injury forums/images
Tutorial videos on how to clean/dress an animal you’ve caught hunting (gutting and skinning tutorials)
Gory movies!
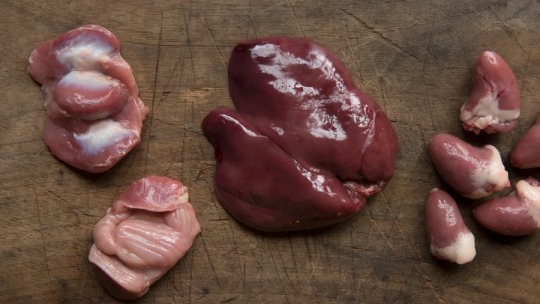
That sound a lil too out of your personal comfort zone? More good references are: 🥩
Raw meat! Raw meat is a great reference for how muscles work, and how they are supposed to look colour-wise and otherwise!
*There’s quite a few organ meats (offal) that people consume! So honestly, just search images of “organ meats”! You’ll get a variety of gut colours, beautifully plated, and possibly garnished ✨🍽️🌿
Other people’s art styles! Look at a bunch of internet images for Goretober or just study an artist’s gore style you love! Compare the way multiple people draw viscera, cuz there’s no right way! :D
Gory video games / look up some horror game death scenes!
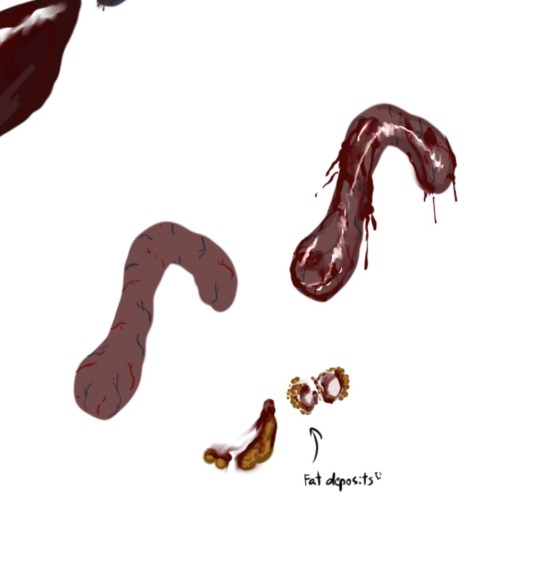
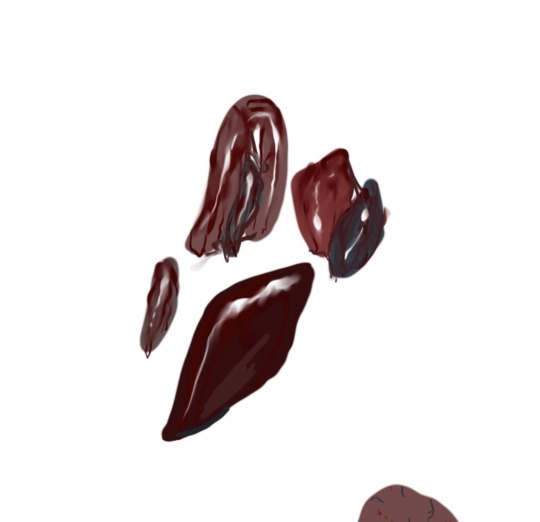
More fun touches, if you’re going the realistic route, are veins and fat deposits! :] ^
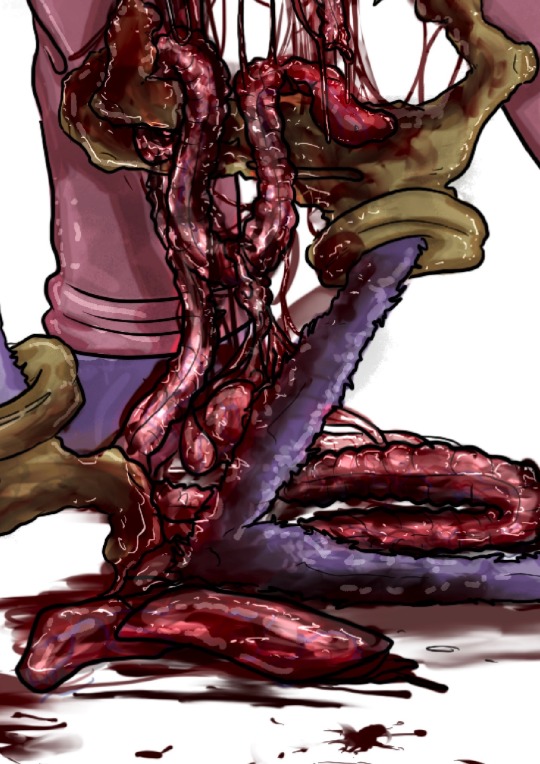
See the use of different gore colours and the veins, in this piece?
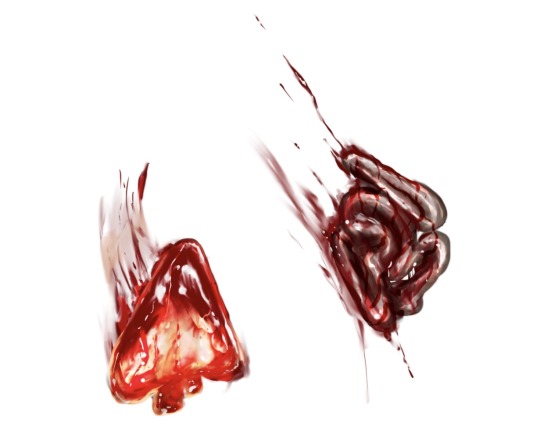
I can also do a mini tutorial on blood splatter, if you guys want. But there’s also tons of even more in-depth ones out there! Just search up blood splatter tutorials! 🩸 I like to make my blood and goop, stringy, when it comes to guts -v-
I’ll say once more, there is no right way to draw viscera! This is just how I do it, and what I can provide from what I’ve learned! Have fun!!

Now go forth and disturb people! 🩸✨ /j
#OF COURSE!! 💚💚💚#hopefully this was helpful!!#my stuff#tree talks#tree’s tutorials#cw gore#cw blood#gore tutorial#drawing tutorial#colouring tutorial#horror art#ask#tree makes an appearance#long post#drawing tutorials: gore
123 notes
·
View notes
Text
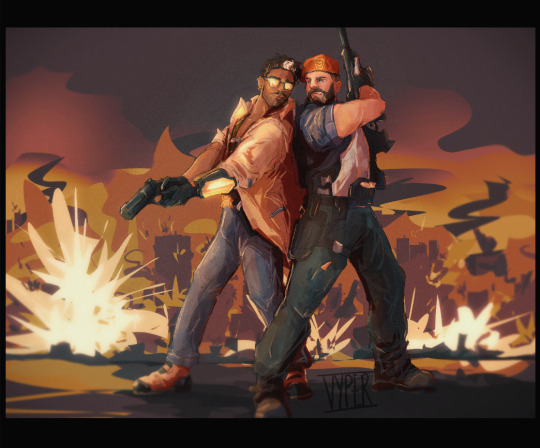
"just like old times, eh, cucho?"

#my scribbles#vypersketches#valorant#valorant fan art#brimstone#valorant brimstone#tejo#valorant tejo#digital art#i worked so hard on this and (like usual) not very satisfied with the end result but i am trying to be more proud of my work#and be braver ion doing more big pieces with backgrounds and then posting then#sketches my comfort zone...#i used to be able to paint and then i stopped for so long and digitial painting is so hard to me#every time i watch a tutorial im like yeah duh of course and then i start and i just start taking tick damage#it takes so looonngggggggggggg#and then i always dont like the end result#i know to improve i need to practise but boyyyyyyy#i want to be able to paint so bad!!!!! i love paintings!!!!! i used to love the process!!!!#but now to me it is eternally in the ugly stage and i cannot get the balance between line work (my fave and often called my strong point)#and nice shapes and juciy colours#colours are a whole different thing#traditonally i use whacky colours and i love it#and as soon as i go digital its like i get petrified of using anything other than the original colours with no lighting and no adjustments#oh god this ended up as a vent#anyway enjoy i have tejbrim on the brain
92 notes
·
View notes
Text

DM ME or email me at [email protected] to join!
- Discord Required
- Completely Free
#arcanesouls#fantasy#art#dnd#abril de lucia#free#course#learn#workshop#class#tutorial#tip#art discord#tumblr fyp
36 notes
·
View notes
Text

✨My FREE online workshop on INTRO TO STYLIZED ANATOMY is BACK!✨
If you missed it the first time then this is your chance!
What we’ll do:
realistic human anatomy vs cartoon anatomy
proportions for cartoon characters
breaking downp characters anatomy
What you’ll need:
a drawing tablet + PC or a tablet +stylus (you can also print the PDF and follow with paper and pencils!)
1 hour of your time
a drawing program (Procreate, Photoshop, Ibis Pain, Clip Studio Paint,etc…)
pdf files you’ll receive a couple of days before the workshop
The lesson will be RECORDED! So as long as you are registered, you can watch it later during the week in case you miss it :)
#art tutorials#art course#art tips#art advice#artist support#asexual artist#drawing course#drawing workshop#drawing tips#drawing advice#kyri45#my art#art workshop
664 notes
·
View notes
Text
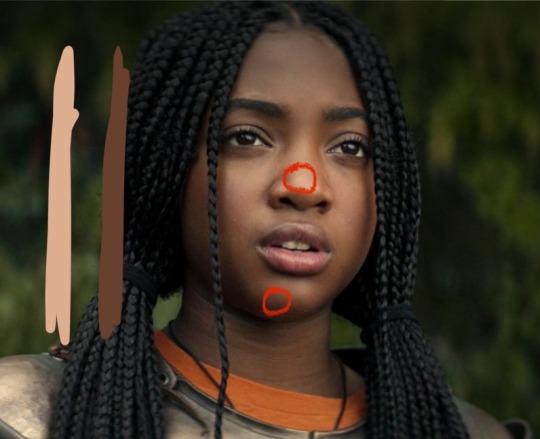
I haven't seen any posts about this yet but l've seen some fan art that makes me feel this needs to be said:
Don't forget Leah Sava Jeffries has darker skin when making Annabeth Chase fan art!
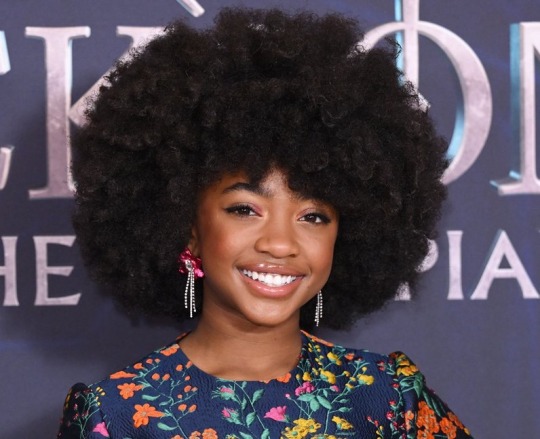
She is much closer to Lupita Nyong'o than Zoe Kravitz when it comes to shading, reflection, and complementary color usage :).
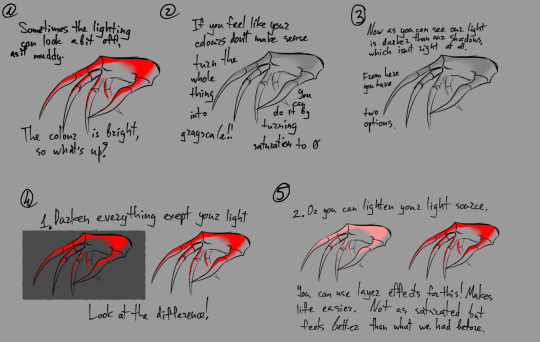
Lighting for dark skin is different on light skin. Light skin gets changed by lighting, and dark skin reflects the lighting. Below is a lovely shot of Nyong'o's character from Wakanda Forever in mourning. The filmmakers emphasize the umber qualities of her skin in contrast to the funereal white and (arguably harsh) light across her shoulder below.
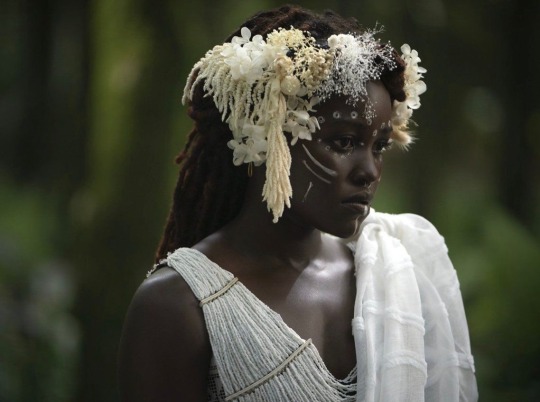
Try to pick spots that aren't directly in or near the light, and try mixing 3 or more! You can put it into a color mixer online, or even color pick, lower the opacity, and lay the shades over each other until you find one that fits. And of course, the more 'realistic' you want to go with shading and lighting, the more shades you're going to want to be able to explore vivaciously :D.
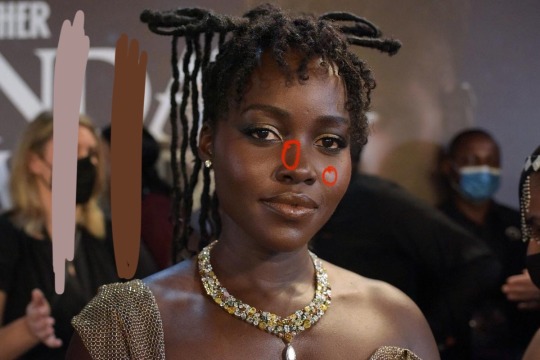
Let's take a look at the same 3 beautiful actresses I mentioned at the beginning, with a bad color picked area and a better-ish color picked area. (Please keep in mind, these are not perfect comparisons, as I was not able to find pictures of all 3 actresses under the same kind of lighting.)
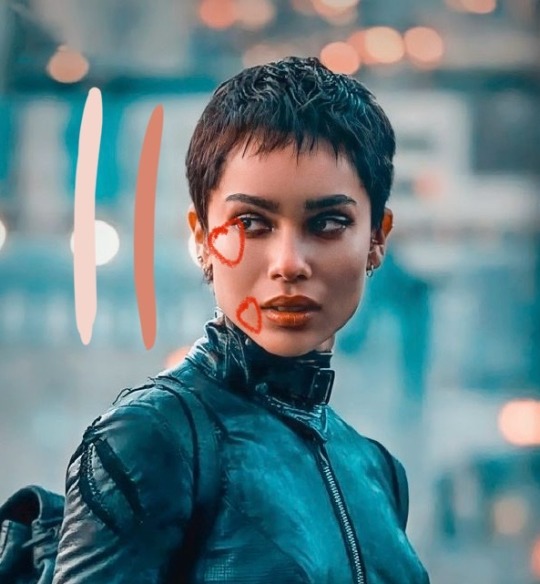
Kravitz's has a clear difference between the two, but they aren't too far apart, in comparison to Nyong’o’s and Jeffries’s. Note the dullness in the poorly picked shades as opposed to the better ones. Also keep in mind that while Kravitz has a rosy undertone (at least in that picture - it’s from The Batman, which has stylized coloring) Nyong’o has a slight cool undertone (I can’t pin down quite what, but the picture is definitely not stylized like Kravitz’s).
Jeffries runs more ochre or russet, but neither of those are pink. They are more red than terracotta or umber, but to call Jeffries’s face rosy would be wrong. Err more towards the golden when drawing her.
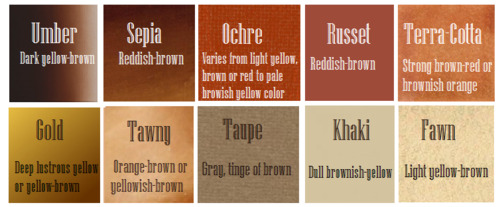
^^saved an image from a writing tutorial long ago, but can’t seem to find it. If someone recognizes it, I’ll link it. EDIT: it’s from this post. Thanks @autumnrowancollector ! <3
And also, the darker skin gets, the less likely warm undertones are going to appear. Don't be afraid to use blue or purple or even green on occasion!
Additionally, cool lighting on dark skin is always a win imo.
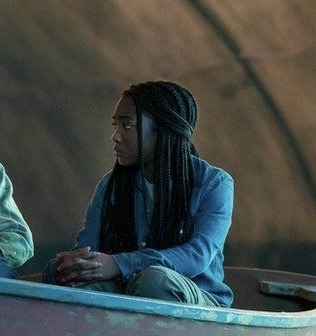
(I was going to use that picture of Jeffries as Annabeth by the lightning bolt, but then I realized the lighting on her face doesn’t quite match up with where it should hit from that angle, and I realized they kind of just turned everything bluer, so screenshot time!)
(Also if you want another really great live action example, check out anything Aldis Hodge is in, like Leverage and Black Adam)(and of course there’s Spiderverse <3 but I want to post pictures of Hodge)

Now, to here’s a list of more experienced people’s advice:
Black facial features & hair
Shading digitally for a (somewhat) monotone Black character
Stylistic choices and places to start looking for inspiration (besides a search engine).
Coloring Black people’s lips
A better coloration tutorial
Also a nice tutorial for Indigenous skin tones, just in case yall want to draw Piper or use this information for other dark skinned characters :).
EDIT: Some actresses who are closer in skintone to use for Annabeth, provided by the lovely @blackfemmecharacterdependency ! If you can’t find a reference for Jeffries in a specific lighting, maybe check out these ladies’ pictures! It’s a reblog, so scroll down.
TLDR: Don’t make Annabeth pink and pale, make her dark and golden.
#Annabeth chase#Percy Jackson#percabeth#leah sava jeffries#pjo#leah jeffries#art tutorial#percy jackon and the olympians#I love superheroes and so of course all of the actors I thought of were from superhero movies lmao#also for the record my advice is mostly from reading others’ tutorials and observation#and I don’t really use it a lot because I stick to lineart a lot lol#like down to mentioning Hodge (love himmmm) as a reference for good lighting on dark skin#there’s another post floating around here that specifically mentions him and Leverage for that#I’m tagging this as an art tutorial but really i want it to be more of a master post#master post so yall can see the tutorials I usually use#but then I ended up writing about Jeffries specifically because I’m dumb#I wanted to go to sleep four hours ago I’m dumb#I really want to draw her and ginger Percy but#irl it’s starting to get busy at school again :/
380 notes
·
View notes
Text
what if i had another try to learn how to make games phase, will i get past basic movement
#i've had so many of these phases#there's just so much to game making that i try to learn something different each time#i remember none of it of course#it just makes me faster at tutorials each time
69 notes
·
View notes
Text
nny and edgar in the dance club be like
OKAY LOL this is SUPER DUMB but
it all started when @zarla-s sent this video to a gc i'm in saying " edgar goes with nny to the club to go dancing and he sees nny do this and just stands there paralyzed " " DANCE EDGAR nny shouts at him, edgar sways awkwardly back and forth " i was like haha that's so funny when i do have the time i'm gonna animate that i think guess what i did have the time . right now
#sunny's art#vargas#edgar vargas#vargas zarla#zarla s#shitpost#jthm#johnny c#jthm nny#okay i just banged this whole thing in like FIVE HOURS .#THE WHOLE THING . the guidelines the animation EVERYTHING#this is actually the first csp animation i've made#or like . my first animation EVER#the interface is actually not that hard to understand#it's just that i was forced to watch a tutorial for more than 8 minutes to understand the basics#( i can't finish tutorials to save my life#god i'm still surprised i wanted to finish this before going to sleep and I DID#me : takes a week to make a 9 frame animatic#also me : takes 5 hours to make a 70 FRAME ANIMATION#( well of course this is not colored and stuff#i think this is the most iconic thing i've made for this fandom . proud of myself .
148 notes
·
View notes