#tutorial string formatting
Explore tagged Tumblr posts
Visit Tumblr Blog
Explore Tumblr blogs with no restrictions, modern design and the best experience.
Last Seen Tumblr Blogs


Fun Fact
Tumblr was the first site to host the blog for President Barack Obama in 2011.
Text
WOWOW on Demand Sign Up Tutorial
Hello, I am back (?)
Quick tutorial in case anyone wants to sign up (and later cancel) for a WOWOW on Demand account in order to watch Justice in the Dark when it airs at midnight JST on the 7th of March (aka Thursday night going into Friday morning).
Under the cut to reduce spam!
Before you start, please know that whilst you will sign up on the website, you will only be able to watch the shows using the phone app itself, because the website blocks VPNs.
You will need:
The ability to install the WOWOW on demand apk on your android phone (for iPhone users, it's available on the Jp app store, but I can't help beyond that)
A VPN (I used surfshark)
Access to a JP phone number (I used the number given on my forwarding service)
A credit card
2530 JPY per month (JITD is expected to end sometime in June 2025)
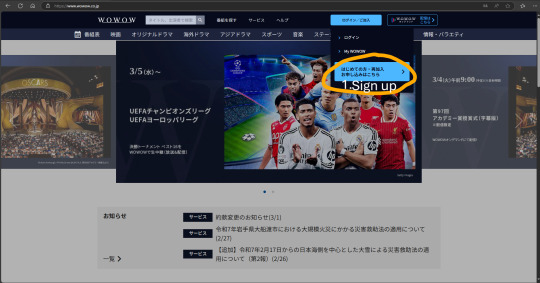
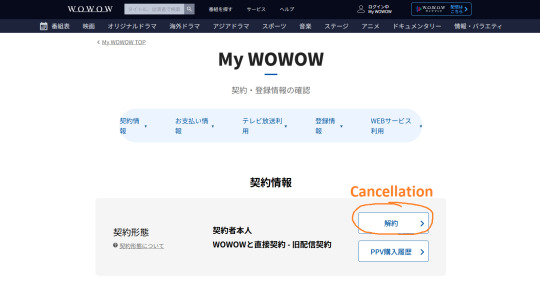
STEP 1: Set your VPN to Japan, go to the WOWOW website as shown, and click on the blue tab circled in orange

STEP 2: This just informs you that the service costs 2530 JPY/mth. Click the blue tab again.
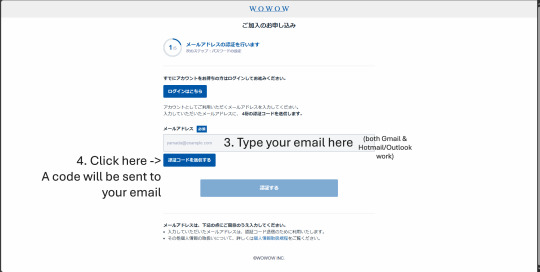
STEP 3: Key in your email and click the button to receive a 4-digit OTP (it will be the first and only string of 4 digits you see in the mail). Major email domains should work.
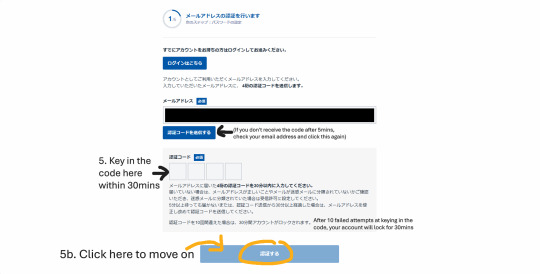
STEP 4: You should receive the OTP within 3-5mins. If you don't receive the email, check your junk folder etc I lost patience after 2 mins and clicked the button 😅
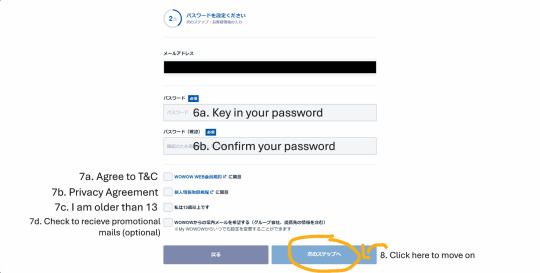
STEP 5: This is all pretty self-explanatory. Don't ask me to translate the T&C/privacy agreement because I didn't read it either 😬
Congratulations! You have successfully created a WOWOW Online account (this is the normal account which lets you watch free videos/livestreams for eg, Spirealm Ep 1 is free to watch for now).
Next, you want to create a WOWOW on Demand account, which is the service that will give you access to JITD, the rest of Spirealm episodes, and if you are in Japan with a BS Cable subscription, the ability to watch and record WOWOW shows on your TV.
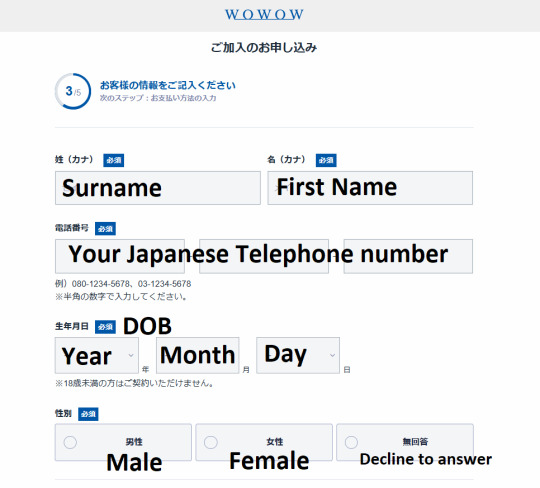
STEP 6: FINALLY we get to the most important bit, so of course I forgot to screencap it. For your Surname and First name, you will need to type it in Japanese text, so go ahead and google translate your name. For the phone number, I used the number from my Jp forwarding service (tenso), but I did try again by changing a few numbers, and it actually went through to step 4 so... if you don't have a forwarding service, you could try random numbers following the 03-1234-5678 format? Don't quote me on that.
Click the blue button at the bottom (which I accidentally cropped out) to move on.
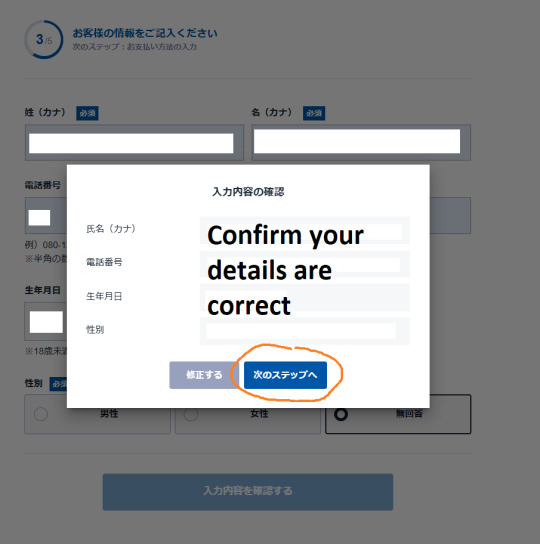
STEP 7: A confirmation window will pop up, keep clicking the blue button...
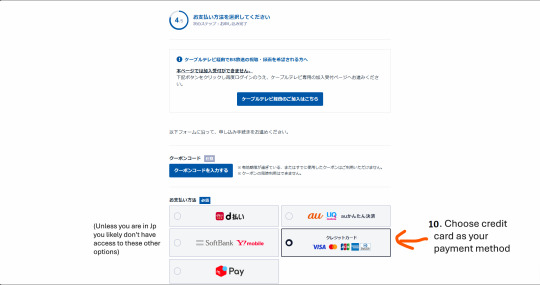
STEP 8: Almost there. Ignore all the blue buttons and choose the credit card payment option.
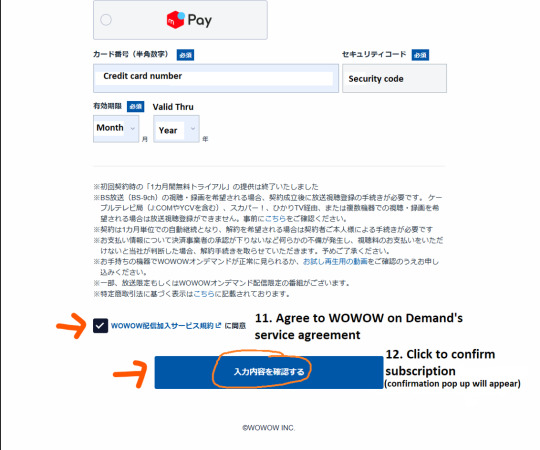
STEP 9: Scroll down and key in your credit card details (doesn't have to be Japanese), agree to the service agreement and then hit the blue button again. You will not be charged yet.
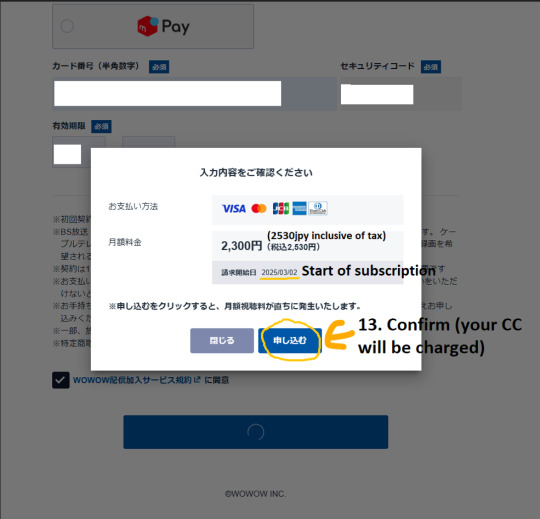
STEP 10: Confirm you really do want to spend 2530 JPY x per mth (which for JITD would be 3 months = 7590 JPY = USD$50) and click the blue button again. Your CC will be charged here.
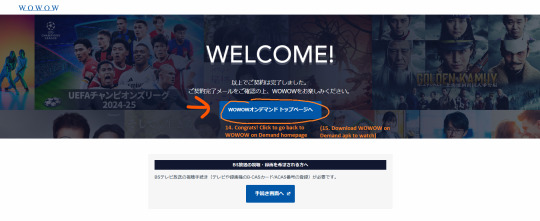
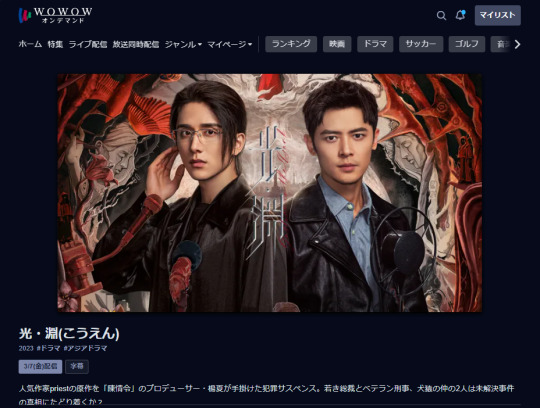
Congrats! You're done (and broke)! Now, using your log in details, log on to the app and search 光淵 or こうえん (you will need to use your VPN on your phone too)
HOW TO CANCEL WOWOW
You will be able to watch shows for one month from that date your subscription was charged. Ie, if charged on the 3rd of July, and you cancelled on the 31st of July, you would be able to access WOWOW on demand till the 2nd of August (1 month from the 3rd of July). Hence, please remember to cancel a few days before your subscription is charged, just in case the application takes a few days to be processed.

STEP 1: Log in and go to My WOWOW
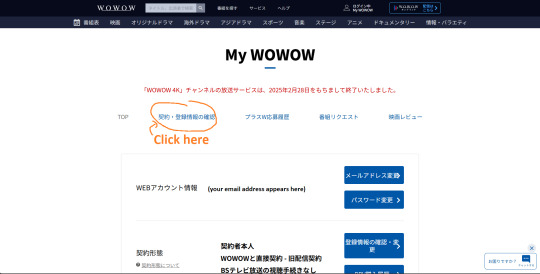
STEP 2: You'll be brought to your profile page, choose the 2nd option from the left (right next to the word TOP)
STEP 3: Look for the 解約 button
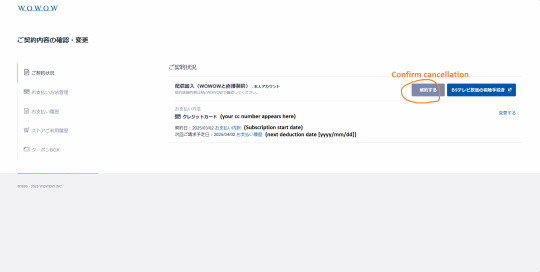
STEP 4: Look for the same word, and confirm cancellation
That's it! (When july comes, if there are extra steps required, I'll post a follow up 😅
Happy watching everyone!
#how to#jitd#wowow on demand#justice in the dark#mo du#silent reading#i'm sorry I disappeared#life got in the way as usual#thank you to everyone who sent me messages#i have not opened tumblr since MPW ended#i'm sorry if I worried anyone!!
59 notes
·
View notes
Text


Pride Wall Lights
There are 3 files with lights.
Pride String Lights
3 swatches of rainbow flip-flop string lights.
Polygon Count: 668 (this is the same count as the EA lights)
REQUIRES: Free Holiday Celebration Pack* (to download via origin, see this post: https://answers.ea.com/t5/Technical-Issues-PC/The-Sims-4-Holiday-Celebration-pack-won-t-let-me-purchase/m-p/8872842 In the EA app, it may not show up as an add on. If not, go to search bar and put in "the sims 4 holiday" and the free add-on should appear for you to download and add to your game.)
Pride Neon Wall Lights
26 swatches of Neon Pride-themed Wall Lights. These lights are compatible with retail signs.
Polygon Count: 6
Pride Heart Neon Wall Lights
18 swatches of Neon Pride-themed Heart Wall Lights. These lights are compatible with retail signs.
Polygon Count: 6
DOWNLOAD for FREE: SFS
OR at Patreon*
*You must be over 18 to access my Patreon page.
The Pride String Light was produced as a selective clone using Sims 4 Studio.
The neon wall lights are new 3d meshes created using Blender and Sims 4 Studio.
CC created by SexyIrish7
All CC have:
*Ability to search catalog using search terms: sexyirish7 and si7
*Customized thumbnail
*******
CREDITS:
Software credits:
Sims 4 Studio v. 3.2.4.3 (Star): https://sims4studio.com
Blender 4.0: https://www.blender.org/download/
GIMP v. 2.10.34: https://www.gimp.org/
Inkscape v. 1.2: https://inkscape.org/
Thank you to the creators and moderators producing tutorials and answering questions!
*******
Model and Image credits:
Mesh created by me.
Simlish font credit to Franzilla: https://modthesims.info/
Pride String Lights Image Credits: IMGBIN https://imgbin.com/png/i64QLdZ0/flip-flops-shoe-rainbow-sandals-sock-png
Pride Neon Wall Lights Image credits:
Swatches 1, 5, 8, 11-12: Design by katemangostar via Freepik https://www.freepik.com/search?author=1757139&format=author&last_filter=selection&last_value=1&selection=1
Swatch 2: Design by Freepik https://www.freepik.com/free-vector/pride-day-neon-signs-design_7932599.htm
Swatch 3: Design by Freepik https://www.freepik.com/free-vector/pride-day-neon-signs-concept_7747200.htm
Swatch 4: Design by Freepik https://www.freepik.com/free-vector/pride-day-neon-signs_7751478.htm
Swatch 6: Design by Freepik https://www.freepik.com/free-vector/neon-sings-style-pride-day_7665447.htm
Swatch 7: Design by pikisuperstar via Freepik https://www.freepik.com/free-vector/pride-day-neon-sign-collection_4661795.htm
Swatch 9: Design by Freepik https://www.freepik.com/free-vector/pride-day-neon-signs-set_7713711.htm
Swatch 10: Design by Freepik https://www.freepik.com/free-vector/pride-day-neon-signs_7769778.htm
Swatch 13: Design by Freepik https://www.freepik.com/free-vector/pride-day-celebration-neon-signs_7665436.htm
Swatch 14: Design by Freepik https://www.freepik.com/free-vector/pride-day-neon-signs_7776877.htm
Swatches 15-16: Design by Freepik https://www.freepik.com/free-vector/pride-day-neon-signs-style_7799514.htm
Swatches 17-20: Design by Freepik https://www.freepik.com/free-vector/neon-signs-with-pride-day_7656518.htm
Swatches 21-22: Design by Freepik https://www.freepik.com/free-vector/pride-day-neon-signs_7751483.htm
Swatches 23-24: Design by Freepik https://www.freepik.com/free-vector/pride-day-neon-sign-collection-theme_7747184.htm
Swatches 25-26: Design by Ekaterina Pravednova via Vecteezy https://www.vecteezy.com/vector-art/24813738-pride-lgbt-symbols-lettering-not-a-phase-with-shapes-in-rainbow-colors-supporting-love-freedom-flat-vector-illustration
Pride Neon Heart Lights Image credits:
Swatches 1: Designed by Freepik https://www.freepik.com/free-vector/pride-day-neon-light-signs-set_7713780.htm
Swatch 2: Design by Freepik https://www.freepik.com/free-vector/pride-day-neon-signs-concept_7747200.htm
Swatches 3, 11-12 : Design by Freepik https://www.freepik.com/free-vector/pride-day-celebration-neon-signs-style_7665465.htm
Swatches 4 and 7: Designed by katemangostar via Freepik https://www.freepik.com/search?author=1757139&format=author&last_filter=selection&last_value=1&selection=1
Swatch 6: Design by Freepik https://www.freepik.com/free-vector/pride-day-neon-signs_7751478.htm
Swatches 8-10: Design by rawpixel.com via Freepik https://www.freepik.com/free-vector/rainbow-heart-lgbt-pride-month-icon-set-vector_18710813.htm
Swatch 13-14: Design by Freepik https://www.freepik.com/free-vector/pride-day-neon-sign-collection-theme_7747184.htm
Swatches 15-18: Design by Freepik https://www.freepik.com/free-vector/colorful-pride-day-neon-signs_7733145.htm
*******
TOU:
Do not re-upload and claim as your own
Do not re-upload and hide behind a paywall
#pride#pride month#sims 4 pride#lgbt pride#gay pride#the sims 4#the sims 4 cc#ts4cc#sexyirish7#sims 4 cc#wall lights#neon lights#string lights#lights#wall decor#featured
20 notes
·
View notes
Text
Since I was recently tagged on making CC in milkshape, I figured I'd copy and paste what I know from my other blog, rather than just forwarding the page here for ease of viewing. It’s the FAQ page for creating CC under the read more.
What do you use to make mods?
S3PE is used to export snippets of the code to edit to make tuning mods. If you wanna make some yourself, HERE is the tutorial to learn how.
What do you use to make objects/clothing/hair?
This one has a few answers depending on what you mean specifically.
TSRW mainly for cloning and editing objects. It also lets me export the files in simpack and package formats.
If you want the version of TSRW BEFORE the sims 4 versions, you can get that HERE. This is important to note because some other programs used for CC creation aren’t fully compatible with the newer version of the TSRW’s WSO files.
If it’s an object that needs a fourth channel added, but it isn’t supported, Texture tweaker by Ignes Jones is what gives the object that channel to work with.
For meshing I use milkshape, and I’m currently working on learning how to use blender instead, since it’s freeware and has a lot more that can be done with it. However, it seems like the plugins from TSRW no longer work with blender, but there are plugins to have blender import geoms HERE that are best used with blender version 2.8-2.9.
There are some additional plugins for Milkshape that makes working in it much easier. There is an align normals plugin set by Demon 432 HERE, and the Unimesh plugins by Wes Howe found HERE. Lastly, to make UV editing easier in Milkshape there’s the CatofEvilGenius UV plugin HERE. They also have a UV flipper too.
For editing textures I personally use Photoshop and here’s how to add DDS usage to it with a link already there in it to download the necessary files. If you use Gimp instead, you can get the DDS files for it HERE. Installation should be similar to PS’s, just look for the file formats.
HERE is a link to the faces and scalps for when I need to model hair or jewelry, since doing it right on the head is much easier. Teens and elders aren’t in here because they aren’t that much different from the adult head.
Is that everything you use?
No there’s also:
Delphy’s Dashboard – Used to make sure my package files aren’t corrupt and won’t make sims implode. It’s also good for checking if anything you already have may be corrupted (a lot of it out there sadly is through no fault of the creator. It just happens during creation sometimes)
S3OC – Another program that lets you clone files, save unlike TSRW it can clone interaction objects, like toothbrushes, game controllers, bowls, plates, and other things that only appear for certain situations. The downside is everything mostly appears in strings with few images, but most of the names make sense for the items. Just sort by name and get to scrollin.
Compressorizer – This compresses simpack and package files in order to help keep the game running smooth. Due to some of its functions, remember to back up your CC and games before using the program.
MeshToolKit – This one is indispensable for creating custom content if you’re adjusting meshes just a bit, or using it to give completely new weight assignments (what makes it move and work like a sim body part) and morphs (the thin to thick range, pregnancies included). Thornowl also made an updated version that can be downloaded HERE.
Normal/Bump map plugins – They’re necessary for any CC you make, as most art programs don’t natively have the ability to make them. Now there are a couple different sets you can download and use depending on your art program of choice.
You can get the ones for GIMP HERE, with the link to the downloads on that page.
The ones for Photoshop can be gotten HERE, and this is a mediafire link because I personally had difficulty using NVIDIA’s newer exporter
And I THINK that’s everything, if I think of or get asked anything else I’ll edit this as needed.
#thesims 3#sims 3#the sims 3#s3cc#ts3 cc#least I think that's everything#If there's anything anyone thinks should be added let me know
34 notes
·
View notes
Text
Glucosify's Quick Start Guide to Twine's Sugarcube for Interactive Fiction
Or GQSGTSIF for short.
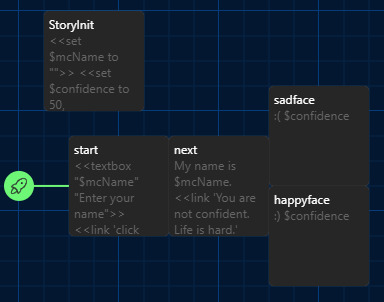
Very simplified guide to making interactive fiction on Twine, using Sugarcube. This won't cover how to change the UI or anything like that, it's really the bare bones on how to make passages, variables, choices etc. There are multiple ways and syntaxes to do these things, I'm covering the ones I use but it's really not the only way to write code and to do these things ^^ This is not a replacement to the documentation, I'll link relevant parts of the documentations throughout the guide but it's really going to be your best source of information Let me know if there's anything else you think I should add in there ~ 1. Passages & StoryInit 2. Variables 3. If statements 4. StoryMenu (bonus)
First of all, assuming you've already downloaded Twine and opened a new project, make sure that your default story format is Sugarcube (in the top left of the window, go to Twine -> Story Formats and click on Sugarcube then at the top left 'use as default format')

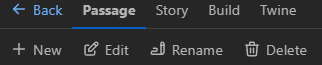
Now, go back to your project. In the top left, click on Passage -> New : this is how you'll create new passages.
Passages are what makes the game essentially, it's where you write your story. Whenever you play an if and you click on a choice and it progresses to a new passage of text, that's how it's done. Make sure to name your passages in a way that makes sense to you, two passages can't have the same name. It's probably best the names aren't super long either considering the names are what you'll type in your code to make the player go to this or that passage.
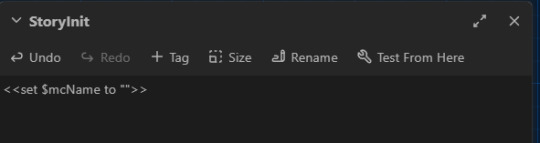
Special passages :
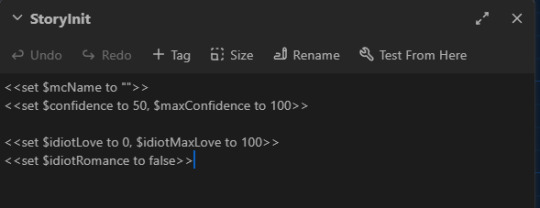
there are some passages that have special functions. Create a passage and name it StoryInit : this passage is used to store variables. Whenever a new game is started, it will load up the variables states as they are in the StoryInit passage. This is essentially a default state where no progress has been made in the story so for example : all stats would be at 0, all relationships points would be at 0, the MC wouldn't have a name yet etc. We'll store our variables there. Variables are attached to values, these values change as the player goes through the story. A variable's value can be many things, it could be a string which is anything that you'd write inside double quotes "" and would be printed as is in the string. For example :
<<set $mcName to "">>
$mcName is a variable. Its value changes to whatever the player chooses for the MC name. As you write your code, you just have to type $mcName and it will be changed to whatever name the player has set it to. A variable's value can also be a number, in this case, you wouldn't write it in double quotes.
<<set $confidence to 50, $maxConfidence to 100>>
It can also be a true or false statement.
<<set $IrisRomance to false>>
Figure out what needs to be a variable in your story and add them accordingly in your StoryInit passage, you'll add more variables as you go. Remember to give them a value, even if the value is 0 or "". Common variables would be for the MC's name and different physical traits, personality stats, pronouns, character's relationships stats etc. For this tutorial, write in your StoryInit :
<<set $mcName to "">>
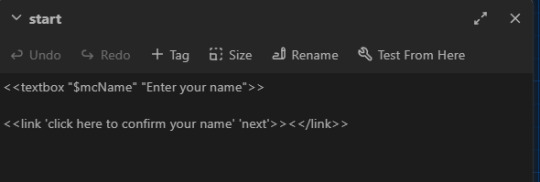
Now, let's test our variable. Create another passage, call it start. In the top left bar, select Start Story Here : you should now see a little green rocket attached to your start passage. This is the passage the players will first see when they launch your game.

Inside the "start" passage, let's make a way to enter your own name with a simple text box.
<<textbox "$mcName" "Enter your name">>
Under it but still inside the "start" passage, let's write a simple link that will let us go to the next passage when we click on it.
<<link 'click here to confirm your name' 'next'>><</link>>
((the first string in the single quote is what will be displayed on the screen as the link, the second word in quotes, in this case 'next' is the name of the passage this link should direct you to))
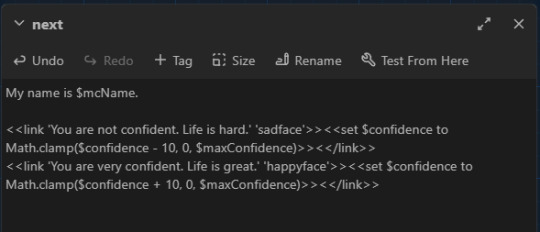
Now make a second passage and call it next. Inside that passage, write this :
My name is $mcName.
Let's see if it works : in the top left, go to build -> play.
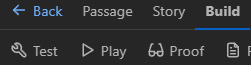
It will open an html file in your default browser. Considering we haven't touched the UI, it will have the default Sugarcube UI. You should have a textbox on the screen and a link under it in blue. If your link is red or if you have an error, go back to your code and check for misspellings or make sure you have the right amount of quotes etc.
Type whatever name you want inside that text box then click on the 'click here to confirm your name' link. It should now have changed the $mcName we wrote in the next passage into the name you input in the box. Congrats, you've learned how to set, change and display a variable :^) Now, let's say you want personality (or relationship) stats that change when you select a choice. Back in your StoryInit :
<<set $confidence to 50, $maxConfidence to 100>>
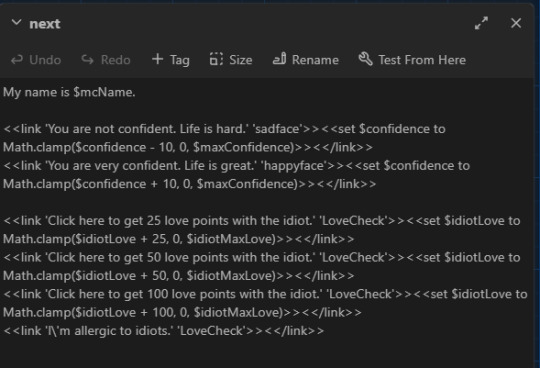
If you want to have a visual elements like actual bars and meters, I would suggest making it easy on you and just getting Chapel's meter macro. You just copy the minified code inside your Javascript file (top left -> story -> Javascript) and then write in your StoryInit and in your relationships / stats / profile page as explained on his demo. Go back to your "next" passage. Under the first sentence, let's write two choices link, one that will lead to an increase in confidence and one that lowers it.
<<link 'You are not confident. Life is hard.' 'sadface'>><<set $confidence to Math.clamp($confidence - 10, 0, $maxConfidence)>><</link>> <<link 'You are very confident. Life is great.' 'happyface'>><<set $confidence to Math.clamp($confidence + 10, 0, $maxConfidence)>><</link>>
((Math.clamp might look intimidating but don't worry too much, it's just to make sure your variable's value doesn't go over the min and max allowed so you can't go below 0 or above 100 in this case. You write the variable you want to change then a + or a - followed by how many points you want to remove / add - in this case, 10. Then the 0 is the minimum and the $maxConfidence is the maximum value.))
Now create two new passages, one called sadface and one called happyface. To make sure your variable changed, type $confidence in both of the new passages and play your game.
On one of the statement, it should now say 40 instead of 50 and 60 in the other one. Congrats you've learned how to change a stat. :^)
But what if you want two choices to lead to the same passage but to display different informations depending on how high / low a stat is? Welcome to the world of if statements. Back in StoryInit, you know the drill :
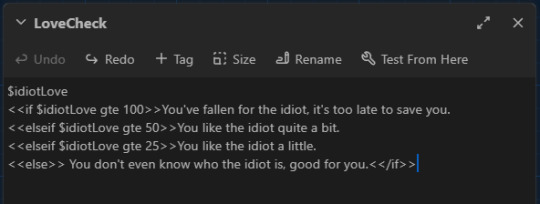
<<set $idiotLove to 0, $idiotMaxLove to 100>> <<set $idiotRomance to false>>
New passage, call it LoveCheck. Go back to your "next" passage :
<<link 'Click here to get 25 love points with the idiot.' 'LoveCheck'>><<set $idiotLove to Math.clamp($idiotLove + 25, 0, $idiotMaxLove)>><</link>> <<link 'Click here to get 50 love points with the idiot.' 'LoveCheck'>><<set $idiotLove to Math.clamp($idiotLove + 50, 0, $idiotMaxLove)>><</link>> <<link 'Click here to get 100 love points with the idiot.' 'LoveCheck'>><<set $idiotLove to Math.clamp($idiotLove + 100, 0, $idiotMaxLove)>><</link>> <<link 'I\'m allergic to idiots.' 'LoveCheck'>><</link>>
((you need to add a \ before your apostrophe when it's supposed to be part of the string, otherwise, the program will just think that's a closing single quote and not an apostrophe))
Alright, so now go to your newly created LoveCheck passage and let's write your first if statement. An if statement is basically a condition that you set, if the statement is 'valid' so like if it's a match then the program will ignore every other 'if' possibility. This is important because it means the order of your if statements matters. An if statement can be as simple as :
You are a person. <<if $idiotRomance is false>>You are not in love with an idiot.<</if>>
((this means that if the variable is false, then the second sentence will be displayed but if the variable is true, then the second sentence wouldn't be displayed to the player.)) An if statement can have an else :
You are a person. <<if $idiotRomance is false>>You are not in love with an idiot. <<else>> You love an idiot, I'm sorry. <</if>>
Note that this is the same as this, using elseif :
You are a person. <<if $idiotRomance is false>>You are not in love with an idiot. <<elseif $idiotRomance is true>> You love an idiot, I'm sorry. <</if>>
What this does is, if the variable is true, it will show the third sentence and not the second one and vice versa if the variable is false - because an if statement will only display the first statement that matches, if the variable is true then it will ignore any statement that require the variable to be false. As I said earlier, the order of your statement matter especially with variables tied to numerical values. You'll understand better once you try it - let's do it in the wrong order first (still in your LoveCheck passage), we'll print the $idiotLove variable to see its value :
$idiotLove <<if $idiotLove gte 25>> You like the idiot a little. <<elseif $idiotLove gte 50>>You like the idiot quite a bit. <<elseif $idiotLove gte 100>>You've fallen for the idiot, it's too late to save you. <<else>> You don't even know who the idiot is, good for you.<</if>>
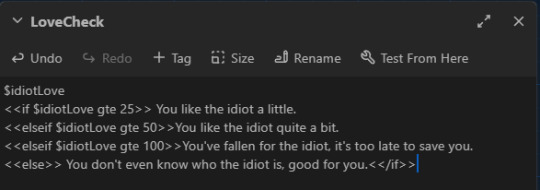
Click play and let's look at the problem. If you click on all the links, the number will be different but the sentence will still say that you like the idiot a little, even if you have 100 points. That's because gte stands for greater than or equal to, 100 is greater than 25 so the first statement is always valid so long as you have at least 25 points. The program sees the first statement matches and is valid so it has no need to read the rest of the if statements. To remedy this, we just change the order :
$idiotLove <<if $idiotLove gte 100>>You've fallen for the idiot, it's too late to save you. <<elseif $idiotLove gte 50>>You like the idiot quite a bit. <<elseif $idiotLove gte 25>>You like the idiot a little. <<else>> You don't even know who the idiot is, good for you.<</if>>
Now it works. If statements will be your most used tool I imagine, especially if there's a lot of variations in your story. You can use if statements for pronouns, for stat checks, romance checks etc.
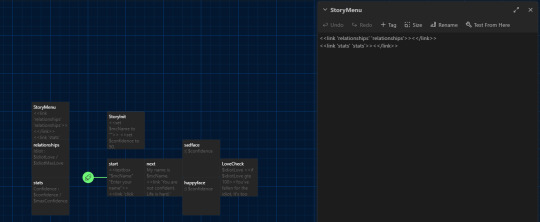
I can always make another guide for the UI but for now, I'll just show you how to add another link in the sidebar of the default UI, using StoryMenu.
Make a new passage, call it StoryMenu :
<<link 'relationships' 'relationships'>><</link>> <<link 'stats' 'stats'>><</link>>
Make two new passages called relationships and stats. Write whatever you want in them, if you're using Chapel's meters, you could use the <<showmeter>> macro here to display your stat bars.
#did this in a couple of hours so it's nothing fancy#twine#coding in twine#twine sugarcube#interactive fiction#hope it helps the person who messaged me about needing help with sugarcube
102 notes
·
View notes
Text

Frequently Asked Questions
Update: 8/29/2024
I would like to remind everyone that I am just another fan, and this is a fan project. I have no control over character dialogue.
Remember to be kind in my ask box and notes. I cannot explain why some character lines were chosen to be cut from the game, nor is this the place to start character discourse. I am also not a machine - I am a person with feelings and other hobbies. I love to take dialogue requests, but asks that demand certain quests or are rude will be swiftly deleted. Repeat offenders, or especially rude anons, will be blocked.
Please be courteous! This is something I enjoy doing, and I ask that you keep the experience enjoyable for myself and your fellow fans.
What is this project?
DAI Transcripts is my endeavor to document and format all of the dialogue (companion comments, location banter, various remarks, and more!) in Dragon Age: Inquisition. I started this project in 2019 as a spiritual successor to the discontinued @dragonagetranscripts. ㅤㅤ ㅤ ㅤ
Why are you doing this?
Because god has punished me for my hubris and my work is never done.
jk it’s actually because I was sick of watching bad let’s plays while trying to work on my longfic so I took matters into my own hands. ㅤㅤ ㅤ ㅤ
How do you know you're using accurate dialogue? Where are you finding the deleted lines?
I type the transcripts by hand side-by-side with the game files, a plot flag editor, numerous youtube playthroughs, and my own game open. I also keep a number of handwritten notes on plot flag strings. I have played DA:I over 30 times, and crowd-source from the communities I'm in.
I do occasionally miss things or can't figure out exactly how a piece of dialogue fits, but I always note this within the transcripts. ㅤㅤ ㅤ
Where did you learn to read the files?
I used to create my own mods for DA:I - There are a tutorials online that cover dialogue file editing you can find on the nexus. ㅤㅤ ㅤ
Can you share the audio files?
Unfortunately, this isn't something I'm willing to take on right now. Each line must be extracted one at a time and renamed as you go, or every line within a dialogue file will try to export with the same name (some files have hundreds of lines). They are not logically named and it is a lot of trial and error. ㅤㅤ ㅤ
Why do you use "PC" instead of "Inquisitor" or "Herald"?
The game files use "Hero," and to save myself the trouble of trying to differentiate between conversations that can happen before or after reaching Skyhold I decided to use the neutral "Player Character," or "PC". ㅤㅤ ㅤ
You typo'd/did a thing wrong/you’re missing race/class specific dialogue!
Please let me know in an ask—I hope to have a very accurate account of all the dialogue, so don’t be afraid to let me know if I’m missing something or have any egregious typos.
Please note: since this project has been ongoing for nearly 5 years, I bridged over the change in text editors. Additionally, I only started referring to the text files around the end of 2022.
Posts made before August 2023 (around the middle of Wicked Eyes and Wicked Hearts) may have formatting errors due to the change from old to new text editor and missing dialogue. ㅤㅤ ㅤ
Will you do -insert quest-?
Short answer: Hopefully, yes!
Long Answer: I intend on working through the game from start to finish, first main quests, then secondary/companion quests, and then romances. DLC, location, and side-quest dialogue are on the list as well.
If you want to see something specific, just drop me an ask! I don't mind it at all, and sometimes it's a refreshing little break. ㅤㅤ ㅤ
Who are you anyway?
I'm @plisuu in disguise :) I am a high school teacher, artist, and writer. You can find me on all social media under the same name, though I'm only really active on tumblr these days. ㅤㅤ ㅤ
Please take my money! How can I support you?
I have a Ko-fi, but honestly, the kind messages and tags I get on my posts are more than enough! The best way to support me is by sharing this resource :)
Feel free to share your fics with me as well, I love seeing how different folks use the dialogue given to us and spin such unique and varied stories.
Remember, my ask box is always open!
36 notes
·
View notes
Text
Fully awake and recharged, so I wanted to do a quick battle map tutorial. This is just what worked for me, no professional opinions here.
I realize I'm extremely late but that's because I love procrastination. My friend helped me compile this.
Instructions under cut
Before anything...
Please remember to set your movement speed to fast. It's much less tedious when walking across the map after skipping tiles.

Team Formation
I might be stupid because I only found this out on level 7 of the Crowley tile event... But please, PLEASE use BUDDY POINTS. The game becomes so much easier that way. Instead of forming teams around who has the highest HP/ATK, try stringing together characters who all have matching HP buddy points.
Essentially, HP buddy points are like shields. when your team is attacked, the damage will take away from the bonus health points first for anyone who has HP buddy points active. The bonus health points won't slowly decrease either, it regenerates for every battle you participate in.
For new, newcomers: buddy points are leveled up through alchemy lessons or giving your characters tea (which can be gained most efficiently from alchemy lesson drops). You can also check it from the card menu when composing teams by scrolling below the spell section.
TL:DR picture explanation:

Form a team that synergizes with the buddy points. In this case, all 5 of the characters I chose give each other buddy point buffs, but I'm only using Silver as an explanation here.
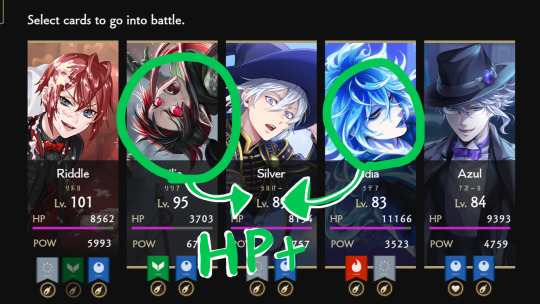


A quick way to check all the buddy points that are currently active in your team is by clicking "buddy details." The number just tells you how many buddy points are active in total (in this case, 9). I always like to double-check instead of just looking at the number, since it includes power boost points too...
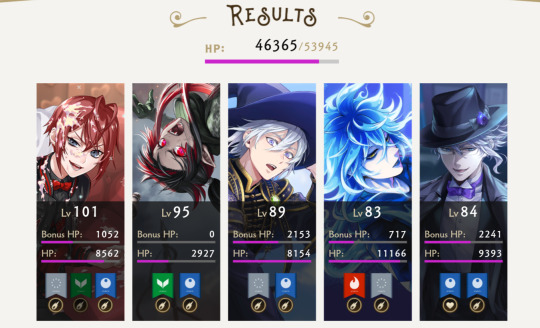
As you can see, they have "Bonus HP" listed above their regular HP bars. That HP bar will contain the same amount of health at the start of every battle, acting as a shield. The only way your real HP will be depleted (Riddle, Lilia, and Idia are damaged from previous battles here) is if the Bonus HP drops to zero. If your regular HP bar never takes damage, you'll never need to heal.
No Buddy Points?

If you haven't build buddy points/you don't have good cards for buddy point synergy... Bring debuffers. You can make the enemy deal 0 damage if you have good debuff characters. The ONLY case I see healers as more useful is when:
You plan to defeat the enemy on round 3, where it's still possible to fully heal your health bar to ~100%
Your healer is a much better DPS than your debuffers, I.E. Halloween Silver
Healers are at their best performance when you plan to bring heavy DPS, doubly so when you have buddy points activated.
Other buffs like evasion/any form of defense up for your characters is alright, but not as efficient. Evasion being heavily reliant on RNG makes it not very optimal, either.
Tile Priorities
My first priority is always, always buff nodes. I tend to take paths that will avoid 4 star battle tiles if possible. This method really depends on if you want to clear all tiles for the achievement, only collect the loot boxes, or only get to the boss as quickly as possible.
My pattern for clearing all tiles:
Buffs
2★ and 3★ fights
Mini bosses
All other nodes
Crewel
I did NOT include healing tiles because the order for those are extremely volatile.
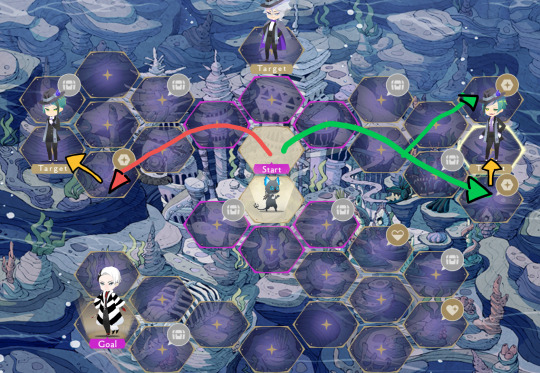
For example, this is how I would play the first few tiles. Usually, I'll look at what buff is located in the buff tiles/mini boss fights to decide where I should go first. After collecting everything on the red and green arrow paths, I follow the yellow arrows. Afterwards, I would likely fight Azul. He was the last mini boss I fought since Jade/Floyd were ranked 3★, while Azul was ranked 4★.
Healing/Revive Tiles
Generally, you want to clear the levels surrounding the healing/revive tiles and save them for later. Try to reuse the same rotations of characters until they're all at ~50% health, then use your healing tiles.
As for revive tiles, it's pretty self-explanatory if your team has some dead members and you want to revive them, but if you've completed most of the tiles but have just... A few cards you really want to use, and they're on low health? I save revive tiles so I can purposely kill off my DPS, then revive them. Sometimes I'll do this before the final boss fight by taking them off of buddy points. If most of my good cards are near-death, I'll get them all killed in the final boss fight, then revive.
This is a good way to avoid the RNG on the healing tiles from completely screwing you over. I wouldn't recommend purposely killing off characters once you already have three of them, though.
Final Boss/Losing...
If you lose a battle, you can still continue from where you left off. That goes for any tile, not just the final boss.
I.E. you fight Crewel until he's at 1000 out of 4000 health—all 5 of the cards you used in that battle will die, but you can spend another move point to continue the fight. This time, instead of 4000 health on round 1, he'll start at 1000 health on round 1.
With this logic, I recommend trying to deal the highest damage you can if you're inevitably going to die. Don't try healing if you think your chances are slim.
The only time I would NOT recommend that is if you don't have any more cards. At all. And have no retry tickets (which revive a few characters of your choice).
Otherwise, I don't have much more to add besides the obvious.
Make sure your cards have high spell levels, the minimum being level 5 if you really have no one else
Use cards with DUO magic. The good thing about them, their duo magic partner is also always one of their buddy point chatacters too
Don't be afraid to use SR cards if your SSRs lack good synergy. Some SRs can be pretty cracked, especially event cards that let you increase their spell level with event items (don't have to waste books).
This was made on a whim, I will probably reblog for every tile event so it is not completely irrelevant. Good luck storming the castle.
#Guide4You#otherwise known as how to beat the SHIT out of Crewel#twisted wonderland#twst#guide#twst guide#twisted wonderland guide#gameplay#battle tiles#game guide#tutorial#twst event#new tag yaa#hallo! hallo! hallo!
2 notes
·
View notes
Note
Yo. How do you code? (I only know the basics to HTML and CSS :/)
Idk which specific question you’re asking, like like how do I code as in what tools do I use, or what do I do and what is my process, or how did I learn to code, or can you teach me to code
And because I don’t know I’ll answer all of them :3
1. What tools do I use?
I use a few things to code, VS Code for actually writing the code, GitHub for storing projects and collaboration, Google and StackOverflow and depending on the project various other apps
2. How do I do it and my workflow process
Uh I have like no idea, I kinda just learn how certain things work via Google and then I slot them together, But the workflow process, I know exactly how to do that, ok so get a white board or a notepad or something, write what you want your program to do, and then break it down into steps and then break it down again and again, so for example,
For my current project, (The Incorrect Quote Generator), I need to take inputs, from a list of quotes choose one that fits the parameters, replace names in the quote with the inputted ones and then print the whole thing
Breaking down the first bit I need the inputs, what inputs do I need? I need the amount of characters and the names of the characters, ok done, second bit, take the quotes, sort them based off of character amount, using the amount of characters from the previous step, pick a set of quotes that match, replace the names, last bit, take the quote with it replaced and done
Breaking down again, first bit, done already, second bit, do we want something like autocapitalisation to make it nicer , yeah sure, what about capitalising the entire name if it fits the circumstance, makes it smoother, done, last bit done
Ok what about formatting, do we want all of this on one line or do we want separate lines for each person speaking, yeah we want separate lines, ok use an “&” symbol to represent a space and when the piece of code that assembles the end string encounters it, print the string and reset continuing from where we are to make a new line
That’s the design process for that
But first you make a prototype of it, to see if it works, like I didn’t have the autocaps or anything at first, I only added that when one of the submissions needed it
Anyways-
3. How did I learn to code
Through a number of ways, first I had gone to this computer club thing when I was like 8 or something and I found Scratch and learned about that, then when I was about 10 I was curious about html and websites, so I ended up making websites for classmates, then lockdown hit and I had nothing to do, I wanted to make a game, so what did I do? I jumped headfirst into Unity and struggled to get absolutely anything done (DON’T DO THIS), at some point I ended up joining this thing called Coderdojo which is like a coding class which worked really well (I actually still go there every Saturday although I’m at more advanced stuff now) and I learned about python and then kept learning more, then I made my own projects and learned more on my own from that
If you are looking to learn on your own, I’d recommend W3Schools, they have tons of courses, are entirely free and very in depth
But first I’d recommend you check out Scratch, it’s great for learning how to think in computer terms
4. Can I teach you to code
I know this probably wasn’t what you were asking but I’ll answer it anyway
Sure, I’d love to, coding one of the things I enjoy a lot because it combines logic and making things, and I love helping and teaching people things so teaching someone else to code sounds good to me :3
Stuff mentioned here
5 notes
·
View notes
Text

Here comes the Bride Widow🕷️🕸️
A little something made over the weekend. Read bellow for process!
Material used:
Fake spider
Papercraft
Fishing string
Metal wire
Crazy glue & Hot glue
Exacto Knife
Pincers
Acrylic & Spray paint
Frame from thrift store
Looking through my creepy crawlies from Halloween, I found the perfect body for a Black Widow. However she needed a little bit of love.


First of all, I removed the legs and cut four slits using my knife on the abdomen to squeeze the metal wire. The crazy glue was good enough but I added some hot glue to seal the part better and not make them fall when positioning the legs with the pincers. Afterwards I sprayed the body and painted the signature red hourglass of the spider.


For the web, I forgot to take more pictures. However this tutorial from Kristine Crochet (and many more creators) helped me understand better how to make it. Attach your string in a pie formation and make sure to tie a knot each time you intersect with another string before securing at the back of the papercraft. Since the material is more rigid than yarn, I had to knot at each section for it to keep its place. It took me longer and it's not perfect but from afar it looks almost like the real thing!
Place within your frame and voil��! Another grim decoration!
#gothic decor#diy#my crafts#dark aesthetic#spider#black widow#tw arachnophobia#tw arachnids#tw spiders#gothic aesthetic#spooky decor
5 notes
·
View notes
Text
PRE-ARTFIGHT PREP - SAVING REFS FOR FUTURE ATTACKS! :)
Hey y'all!! I'm so excited for Artfight 2023, especially to be on team goggie :> (You can find my profile here!)
I know I'm responsible for getting a few more folks into AF this year, and I've seen a lovely few tutorials on many aspects; but one thing I haven't seen is a general 'how to' on saving refs pre-fight.
For those who are new to AF, the site... Typically doesn't work the first week or so. Downtimes are getting increasingly better, but since this site is run on donations and volunteers, it's understandable that it's experiencing some hiccups with SO MANY people joining every year! AF is usually extended into the first week of august to make up for this.
HOWEVER, this does mean that all those lovely characters you've bookmarked to attack? You won't be able to access their refs if the site is down! :((
This is why it's EXTREMELY RECOMMENDED that you save them beforehand, as is often repeated!
This is not a universal method for most folks, but if you're like me just hearing 'just do x!' doesn't always help me picture *how* to do something, so I wanted to share my method :) My example will use discord, but you can very well use a google doc or word doc; anywhere that images can be saved.
Now, Let's begin!
For starters, I have my own discord server that I use for various things. I'm the only member in it, and it's great for organizing things I need.
Next, I use a text channel where I'm going to store all of the information I need
Now, while the site is up, i head over to my bookmarked characters:
Find a character you'd like to save the refs of from your list, and click onto their character profile! :)
Now, for the important question: What should you save, at the very least? (Hi @saturno-sol I'm using Chantilly as an example :> Go attack fae here!!)
Above a character's main image, you should see this:
The first thing that may not be obvious to save is that string of numbers, which can be copied by pressing the clipboard. Artfight does not use character names, but character IDs for submitting attacks, and these cannot be found anywhere but on-site.
Second, you'll want to save the username of the person who the character belongs to. I usually format these in my notes like:
Chantilly - 2231643 By Saturno-Sol
The other things you will want to save text-wise will be that person's permissions, found under the images and character descriptions here:
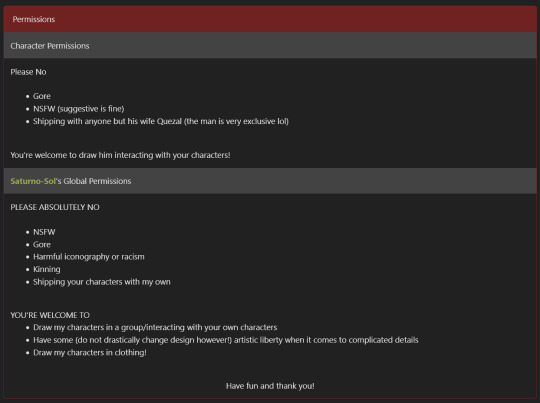
( Please be sure to take note of each person's character and personal permissions! Getting free art is lovely, but so is respecting boundaries <3 )
And the character profile itself, situated above the permissions and below the image gallery

If a character description is longer, I personally tend to pick out important bits from it and paste them together in more bullet-pointed form. But those who won't break the character limit of a normal discord post, I'll simply copy paste both perms and character description :)
Finally, you'll want your images of course! These can be copy pasted into wherever you're saving them, though I highly recommend a format where you can have the above text information and the images together for sake of clarity. Especially if you're going to have a lot of saved characters, like myself :>
In the end, my posts usually end up looking like:
**Name - ID** By [Username] **Character permissions** [character permissions] **[username's] global permissions** [global perms]
**Character profile** [Character information here]
And lastly, images at the bottom, given how discord formats things :) All in one place, off-site, so I may still browse various characters while the site broken. And as soon as it's ready, I don't have to worry about loading multiple tabs on-site to submit the attack, I've got all the information I need right there!
I hope this helps some new and maybe even some old artfight veterans. I'd recommend saving over the amount of attacks you think you'll do, just in case you're an indecisive queen like I am and want some variety to choose from.
Hope to see you all in the fight when it starts! Excited for my fourth year in the brawl >:)
13 notes
·
View notes
Text
How to edit captions with your video track
Why: I like making edits of my favorite series, but I hate redo captioning. But I also know quality captions are vital to some viewers (I also use them). To me adding captions is the bare minimum for release, but also hearing all the words and timing them or even re-timing existing captions is very hard with my disabilities and this has been a barrier to me releasing edits. But no more!
DaVinci Resolve lets you add a SubRip (SRT) subtitle track to any video and then edit it at the same time as the video. It also counts as an edit for the Go To Previous/Next Edit button. Con: You can't use the button to jump to big cuts in the video. Pro: You can now easily jump to the an existing timing for someone starting to talk.
DaVinci Resolve:
DaVinci Resolve is a professional video editor with widespread industry use that also has a no-strings-attached perpetual free version. It's got a ton of features in the free version that will more than cover basic editing. It's relatively easy to use (basic tutorials help). If you need more advanced tools you can upgrade to a full license. They don't pester you about it in the free version unless you try to use the advanced tools. I would already recommend using this program to anyone looking to get into video editing.
SRT Subtitles
The SRT subtitle standard is a type of text file that includes subtitles with timings and no formatting. They can be stored separately from a video file or embedded into certain files like MP4s. This is what you'll get if you download captions from YouTube (some YouTube downloaders embed them in the video, some don't). DVD rippers usually have several options. You want an SRT file. And there are websites that host fan-made or fan ripped subtitles for less officially obtained material. You can also make your own SRT file with timings within DaVinci Resolve or with an SRT editor. You can also use this to improve on official captions while making your edit.
A pro feature of DaVinci is it can do machine captioning and then you clean it up. You can also do this for free using YouTube by privately uploading the video, letting it auto-caption, and then editing the captions. You MUST edit machine captions. They are not accurate enough on their own to be accessible. But they can be a step in helping you get it done.
Extracting Embedded SRTs
DaVinci needs an SRT file to import captions. It doesn't seem to extract embedded SRT files from MP4s. Fortunately, it's very easy to extract them.
Subtitle Edit is an open source subtitle editor. It's a great tool if you're making your subtitles from scratch or editing existing ones.
For our purposes, simply open the video with the embedded subtitle track. Click save. Save the SRT file with a useful name somewhere convenient. I recommend using the same name as video it goes with in the same folder.
Adding a Subtitle Track to DaVinci
Rev Tutorial with text and video
Open your project in DaVinci Resolve. Add your SRT file to the bin.
Under "File" select "Import" then "Subtitle."
Or click the Import Media button and add it as normal.
From the bin, select your video and subtitles. Right-click them and select "Create New Timeline Using Selected Clips".
You should now have a timeline where the video and captions are reunited and can be edited together.
Editing the Subtitles
You can now move around the subtitles like any text overlay, including making them longer or shorter. If you click a subtitle you can edit the text and exact timing using numbers. Or edit the timing visually using the timeline. The Go To Previous/Next Edit button can now help you skip to a timing someone else made for you which is usually good enough for a fan cut, making your job easier. From the Edit view you can see the audio track visualizer along with the captions for a perfect cut.
Putting Your Tracks Together
If you're making a compilations, where's where things start to suck. The subtitles are not brought along when you next your clips. They will play over the video, but they won't export to an SRT video or be embedded. You're going to have to manually copy them. But at least now they're the correct length and you have them synced up. I would highly recommend you start your subtitles right at the beginning of the clip or put a fake one in to delete later.
Add your Timelines to a new timeline as usual.
Go to the timeline of the first clip.
With the clip at the beginning, right click the seeker bar and click the select to right button on the circular menu.
Use CTRL + left click to deselect the video/audio tracks. Copy the subtitle track.
Go to the combined timeline. Go to the start of your clip.
Paste the subtitles. You may have to add a subtitle track.
Copy the subtitles from the next clip.
Go to the combined timeline and move to the start of the that clip. Paste the new set in.
Rename your subtitle tracks with the language they're in or type.
Export
Go to the deliver tab. Choose the file name and location. If you're posting to YouTube, render as a single clip, and export to MP4. Under the Subtitle Settings, select "Export Subtitle", Format "As a separate file", and Export As "SRT Without Formatting". Select the subtitle tracks you want to export with the video.
Add to Render Queue. Then render the clips over on the right.
Uploading to YouTube
Upload the video as normal. At the Video Elements step, add subtitles. Select upload file, then with timings. Your subtitles should show up on the timeline and you can check they're correct and fix anything last minute. Do this for each language you add. Continue uploading as normal.
Conclusion
That's my process for adding existing subtitles to my videos. I've wanted something like this for ages so I was super pleased to learn Davinci Resolve has it. I hope this encourages other clip makers with some access to pre-made captions to use them for their videos. It's easy, free, and can even help speed up the editing process. It makes your videos much more accessible and creates a transcript that's searchable and timestamped for easy navigation and quote copying. I really recommend working this into your process so more fans who need captions can share in your work.
4 notes
·
View notes
Note
I just wanted to say that the section of your Alenoah fic where the pacing is framed by Twitter posts and headlines is seriously the most impressive thing I've ever seen a fanfiction do. It's so awesome and innovative and I've never seen it before!
Omg, this is such high praise, thank you!!! 😭😭 I've always loved books that string various media sources together to form a story, so I really wanted to try.
Also, I can't take all the credit because I knew I had seen Twitter posts on ao3 in the past (I forget where), BUT I was able to find a tutorial where someone already had all the code laid out. (shoutout ao3 user aerynevenstar)
And even with that tutorial, lemme tell you, all brain cells were firing trying to figure out how to make it work. I've never spent so long on formatting for a fanfic, but I think it was totally worth it! I was originally worried it might be too difficult to read, so I'm glad it worked out 😮💨
4 notes
·
View notes
Text
Front end web developer skills you need to know
To become a successful front-end web developer, you’ll need a solid foundation in key skills. Mastering HTML & CSS is essential for creating the structure and style of websites.
JavaScript and ES6 add interactivity and modern functionality, while CSS & JS frameworks like Bootstrap and React streamline development.
Understanding GIT & GITHUB for version control and implementing responsive design ensures your projects work seamlessly across all devices.
In this article, we will review some of the key skills required for expert front web development.

Download Infographic
HTML & CSS
HTML (HyperText Markup Language) and CSS (Cascading Style Sheets) are the backbone of front-end web development. HTML structures the content of a web page, using elements like headings, paragraphs, links, and images.
CSS styles that content, controlling layout, colours, fonts, spacing, and responsiveness. Together, they allow developers to create visually engaging and well-structured websites.
Mastering HTML & CSS is crucial before moving on to more advanced topics like JavaScript or frameworks. You’ll need to understand concepts such as semantic HTML, CSS selectors, the box model, and media queries.
There are plenty of free and paid resources to help you learn. Great starting points include MDN Web Docs, W3Schools, and freeCodeCamp’s Responsive Web Design certification.
Platforms like Codecademy and Coursera also offer beginner-friendly courses. Practising by building small projects is one of the most effective ways to reinforce your learning.
JavaScript
JavaScript is a core technology of front-end web development, used alongside HTML and CSS to create dynamic, interactive websites. While HTML provides the structure and CSS handles styling, JavaScript enables user interaction by manipulating elements on the page in real-time.
It’s responsible for features such as form validation, image sliders, dropdown menus, modal windows, and dynamic content updates without reloading the page (using AJAX). JavaScript interacts with the Document Object Model (DOM), allowing developers to modify HTML and CSS based on user actions like clicks, scrolls, or keystrokes.
Modern front-end development often uses JavaScript libraries and frameworks such as React, Vue.js, or jQuery to streamline development and enhance functionality. Understanding JavaScript fundamentals is essential before diving into these tools.
There are excellent resources to learn JavaScript, whether you’re a beginner or looking to advance your skills. Top recommendations include JavaScript.info, MDN Web Docs, and freeCodeCamp. You can also find interactive tutorials on Codecademy, as well as comprehensive courses on platforms like Udemy and Coursera.
For in-depth understanding, the book Eloquent JavaScript is highly regarded in the developer community. Practising through small projects and coding challenges will solidify your knowledge.
ES6
ES6 (ECMAScript 2015) is a major update to the JavaScript language, introducing powerful new features that make coding more efficient and maintainable. It brought significant improvements to JavaScript syntax and functionality, including let and const for block-scoped variable declarations, arrow functions for cleaner, more concise function expressions, template literals for easier string formatting, and destructuring for simplifying data extraction from arrays and objects.
ES6 also introduced promises for better handling of asynchronous operations, modules for organising code into reusable components, and classes for a more structured, object-oriented approach to JavaScript development.
ES6 has become a standard in front-end web development, forming the backbone of modern frameworks like React, Vue.js, and Angular, where these features are heavily utilised to create fast, scalable, and maintainable web applications. It also improves code readability and reduces common bugs, making it an essential skill for front-end developers.
To learn ES6, great resources include MDN Web Docs, JavaScript.info, freeCodeCamp’s JavaScript course, and Codecademy’s interactive tutorials. The book Eloquent JavaScript also covers ES6 in depth, while platforms like Udemy and Coursera offer structured courses for more in-depth learning. Practising with real-world projects is the best way to master ES6.
CSS & JS Frameworks
CSS and JavaScript frameworks play a vital role in front-end web development by streamlining the coding process and reducing development time.
CSS frameworks like Bootstrap, Tailwind CSS, and Foundation provide pre-written CSS classes and components for creating responsive layouts, navigation menus, buttons, and more. They help ensure consistent design and save developers from writing repetitive code.
JavaScript frameworks such as React, Vue.js, and Angular offer structured approaches to building interactive user interfaces and managing complex application states. These frameworks simplify DOM manipulation, improve performance, and enable the creation of reusable components.
By using these frameworks, developers can build modern, responsive, and scalable web applications more efficiently.
To learn CSS frameworks, explore the official documentation for Bootstrap or Tailwind CSS, as well as tutorials on freeCodeCamp and W3Schools. For JS frameworks, the React and Vue.js official docs, MDN Web Docs, Codecademy, and Scrimba offer excellent learning paths.
GIT & GITHUB
GIT and GitHub are essential tools for front-end web developers, enabling efficient version control and collaboration. GIT is a distributed version control system that tracks code changes, allowing developers to manage project history, revert to earlier versions, and work on multiple features simultaneously using branches.
GitHub is a cloud-based platform that hosts GIT repositories, making it easy for developers to collaborate, share code, and contribute to open-source projects. It also offers features like pull requests, code reviews, and issue tracking to streamline development workflows.
In front-end web development, GIT and GitHub are used to manage code for websites and applications, ensuring version control and seamless collaboration. They also make it easy to showcase projects in a professional portfolio.
To learn GIT and GitHub, consider GitHub Learning Lab, freeCodeCamp, Codecademy, and MDN Web Docs. Platforms like GitHub Docs and GitKraken also provide excellent guides and tutorials for beginners.
Responsive Design
Responsive design is a crucial aspect of front-end web development, ensuring that websites look and function well across a wide range of devices, from mobile phones to large desktop screens.
It focuses on creating flexible layouts, images, and components that automatically adjust to different screen sizes and orientations. This approach enhances user experience, boosts SEO, and reduces bounce rates by delivering a consistent browsing experience, regardless of the device.
Responsive design relies on key techniques like media queries, flexbox, and CSS grid to control the layout and structure of a website. Fluid grids and responsive images ensure content scales appropriately, while mobile-first design prioritises smaller screens before scaling up to larger devices.
Many front-end frameworks, like Bootstrap and Tailwind CSS, include built-in responsive design features, making it easier to create flexible layouts.
In modern front-end development, responsive design is essential, as mobile traffic continues to grow. It’s a core requirement for building professional websites and web applications.
To learn responsive design, consider resources like MDN Web Docs, W3Schools, and freeCodeCamp’s Responsive Web Design certification.
Books like Responsive Web Design with HTML5 and CSS by Ben Frain and platforms like Codecademy also offer comprehensive tutorials.
Building small projects and experimenting with media queries is a practical way to master this vital skill, ensuring your web pages deliver a seamless experience across all devices.
Conclusion
Mastering front-end web development skills like HTML & CSS, JavaScript, ES6, CSS & JS frameworks, GIT & GitHub, and responsive design is essential for building modern, high-performing websites.
These skills form the foundation of interactive, responsive, and visually appealing web pages. By leveraging powerful frameworks and adopting best practices, you can streamline your workflow and create exceptional user experiences.
With countless online resources available, from MDN Web Docs to freeCodeCamp, there’s never been a better time to start your front-end development journey. Keep practising, stay curious, and continue expanding your skill set to become a proficient developer.
Article first published: https://dcpweb.co.uk/blog/front-end-web-developer-skills-you-need-to-know
0 notes
Text
Arturia — V Collection X Windows Download

System Requirements:
Operating System: Windows 10, 11 (64-bit only)
Download: Instant digital access
Activation: Lifetime license
Updates: Free future updates
Formats: VST2, VST3, AAX
Download Link 👉Arturia — V Collection X
Why Choose Arturia V Collection X
Arturia V Collection X is the ultimate music production suite, featuring 39 premium software instruments, three exclusive expansion packs, and over ten thousand world-class presets. Whether you are a producer, composer, or live performer, this collection delivers the most authentic vintage emulations, cutting-edge synth engines, and meticulously modeled pianos and keyboards for your next masterpiece.
Key Features
Authentic analog and digital synthesizers that recreate legendary hardware instruments
More than ten thousand presets crafted by industry-leading sound designers
Intuitive interface with in-app tutorials for easy navigation and customization
Exclusive hybrid sound engines combining classic and modern synthesis techniques
High-performance audio processing for professional-quality sound production
More than twenty years of engineering innovation and expertise from Arturia
Included Plugins
Arturia Synths Collection Acid V, ARP 2600 V3, Buchla Easel V, CS-80 V4, DX7 V, Jun-6 V, Jup-8 V4, Mini V4, MiniFreak V, Prophet-5 V, Synthi V, Vocoder V, and more
Keyboards and Pianos Collection B-3 V2, Clavinet V, CP-70 V, Farfisa V, Mellotron V, Piano V3, Stage-73 V2, Wurli V3, and more
Augmented Series Augmented Brass, Augmented Grand Piano, Augmented Strings, Augmented Voices, Augmented Woodwinds
Analog Lab V Pro — Centralized access to all instruments and presets
Elevate Your Sound Today
Instant download, lifetime activation, and free future updates.
Buy now and start creating professional-quality music.
Download Link 👉Arturia — V Collection X
1 note
·
View note
Text
New commits :3
Tui is complicated. It strongly echoes html and other web-dev stuff, but it's a rust crate, not an html file dropped into a browser, so there's external handling that both makes it more versatile and complex. The example programs they have on the crates.io page for tui work very well as a tutorial for the crate though, especially for someone new to Rust.
Tui, along with a cross-platform terminal interface called "crossterm" consider the terminal as a frame, with width and height and nothing else assumed, like a pared down version of how windows are handled in Vulkan.
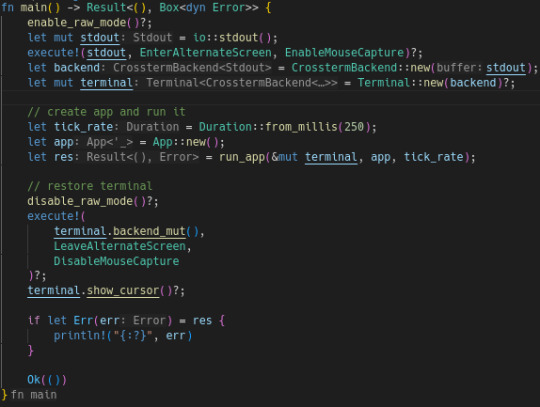
'terminal' here is crossterm's concept of an agnostic terminal object. It is constructed by acquiring the stdout through rust, then acquiring a "backend" then building that out into a full "terminal". 'terminal' is then passed into 'run_app' to be used in the process of rendering.
Crossterm handles creating and managing a terminal and exposes that information to tui. Tui, once provided with this information packaged as a 'terminal' can then render widgets in the provided space and along the provided output stream.
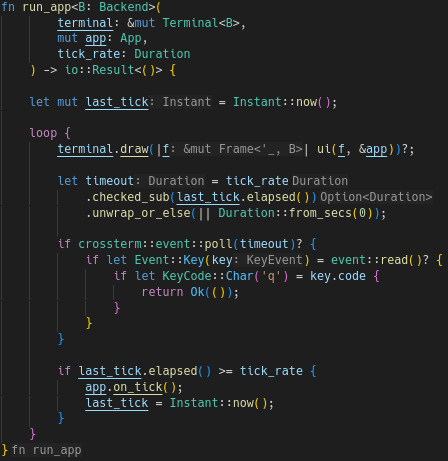
terminal.draw(|f| ui(f, &app))?; takes in the frame provided by the terminal.draw function (as far as I understand) as well as the app's data struct in the form of &app and renders the widgets, passing just a string (presumably a really long one) back out to terminal.draw.
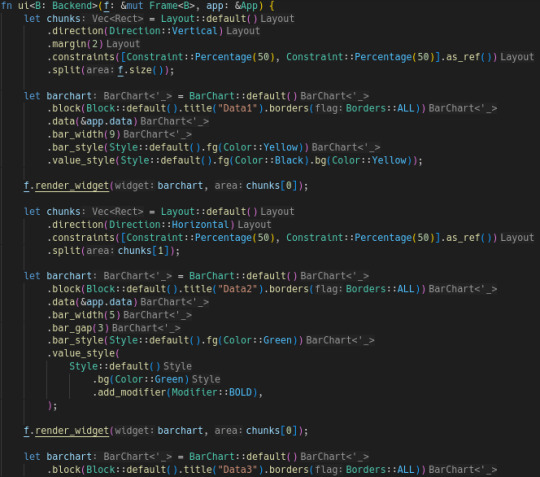

This ui function contains all the formatting of the widgets to be rendered. There are three bar charts rendered to the top half of the frame, the bottom left quarter, and the bottom right quarter. This sectioning is done via "Layout" objects.

As you can see, the styling of widgets is... verbose. Every aspect of the style of a widget must be specified explicitly, and with both a function name and arguments often taking the form of enums, this can make a single widget take up about 100 characters or more of typing time.
I don't think this is an issue as I doubt I will have a huge number of layouts, so I will likely specify up to 10 different layout functions over the course of this project. Compared to the amount of writing that should go into the control code, not to mention the simulation code, this should be small, if tedious.
I'm so happy back looking at this code editor :3333. It's not exactly my passion, but there's a peaceful satisfaction to this process that I think we all share.
1 note
·
View note
Text
Price: [price_with_discount] (as of [price_update_date] - Details) [ad_1] (2nd Edition: Covers Object Oriented Programming) Learn Python Fast and Learn It Well. Master Python Programming with a unique Hands-On Project. Have you always wanted to learn computer programming but are afraid it'll be too difficult for you? Or perhaps you know other programming languages but are interested in learning the Python language fast? This book is for you. You no longer have to waste your time and money learning Python from lengthy books, expensive online courses or complicated Python tutorials. What this book offers... Python for Beginners Complex concepts are broken down into simple steps to ensure that you can easily master the Python language even if you have never coded before. Carefully Chosen Python Examples Examples are carefully chosen to illustrate all concepts. In addition, the output for all examples are provided immediately so you do not have to wait till you have access to your computer to test the examples. Careful selection of topics Topics are carefully selected to give you a broad exposure to Python, while not overwhelming you with information overload. These topics include object-oriented programming concepts, error handling techniques, file handling techniques and more. Learn The Python Programming Language Fast Concepts are presented in a "to-the-point" style to cater to the busy individual. With this book, you can learn Python in just one day and start coding immediately. How is this book different... The best way to learn Python is by doing. This book includes a complete project at the end of the book that requires the application of all the concepts taught previously. Working through the project will not only give you an immense sense of achievement, it"ll also help you retain the knowledge and master the language. Are you ready to dip your toes into the exciting world of Python coding? This book is for you. With the first edition of this book being a #1 best-selling programming ebook on Amazon for more than a year, you can rest assured that this new and improved edition is the perfect book for you to learn the Python programming language fast. Click the BUY button and download it now. What you'll learn: - What is Python? - What software you need to code and run Python programs? - What are variables? - What are the common data types in Python? - What are Lists and Tuples? - How to format strings - How to accept user inputs and display outputs - How to control the flow of program with loops - How to handle errors and exceptions - What are functions and modules? - How to define your own functions and modules - How to work with external files - What are objects and classes - How to write your own class - What is inheritance - What are properties - What is name mangling .. and more... Finally, you'll be guided through a hands-on project that requires the application of all the topics covered. Click the BUY button and download the book now to start learning Python. Learn it fast and learn it well. ASIN : B071Z2Q6TQ Publisher : Learn Coding Fast; 2nd edition (10 May 2017) Language : English File size : 475 KB Text-to-Speech : Enabled Screen Reader
: Supported Enhanced typesetting : Enabled X-Ray : Enabled Word Wise : Not Enabled Print length : 175 pages [ad_2]
0 notes