#whole time -- an embroidery hoop!
Text
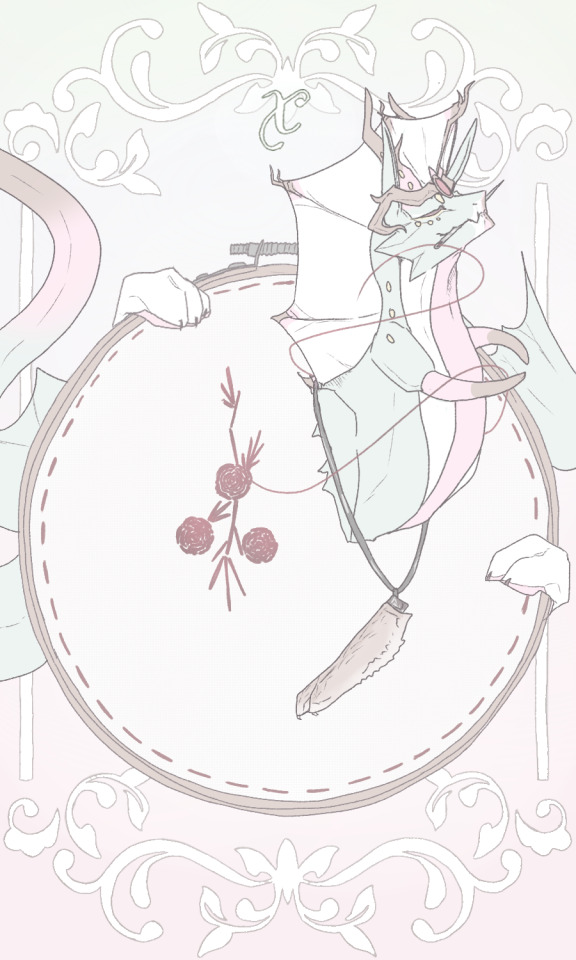
10 - The Wheel of Fortune
#i thought this'd be one of the last ones id do bc i couldnt think of anything for a wheel! but it was staring at me from my sewing kit the#whole time -- an embroidery hoop!#would it be really be a tarot of ME if there wasnt an embroidery reference in the deck? anyways it looks fun to embroider with the red#string of fate!#drawing#artists on tumblr#drawings#manga#anime#artist#mangaka#rkgk#original character#original character art#kvroii#tarot card#tarot art#tarot#tarot deck#dragonsona#scalesona#dragon art#fursona#sona#the wheel of fortune#tarot cards
5 notes
·
View notes
Note
Omg ok Jade my love can I request a princess soulmate au with Steve? Where reader is Prince Steve’s soulmate but maybe she’s not royal herself and is struggling a bit with being the future princess?
Almost like similar vibes to some of the loser gf with rockstar Sirius things you’ve done
thank you sm for your request! (sci-fi fairytale au) prince!steve
cw talk of losing weight to fit into a dress
Prince Steven sits across from you with a bowl of grapes and a pair of embroidery scissors. He's going to stab me, you think morosely. I'm wretched and boring and he's going to stab me and then the stars will give him another soulmate and he'll forget this whole misfortune.
He seems lost for words as you are, or uninterested. You think he's going to talk and he eats another grape instead, hair fluttering in the breeze that filters in from the balcony, his eyes trained on the holoscreen. He's pretty —soft face, softer hair, almond shaped eyes that seem perpetually amused— but more alarmingly, he's fit. Physically fit from years of sports. Royals do all manner of olympiad competition, evident in his toned shoulders and his sun-kissed skin.
"How's your embroidery?" he asks suddenly.
You startle, pretending you'd been attending to that rather than staring at him uselessly. "It's going well, Prince Steven," you lie. You've never embroidered before —you have practical sewing skills for darning scuffed trousers and patching elbows, but embroidery is a labour of time. Time is a luxury you haven't had.
"Steve," he corrects.
"Do I… Is it really okay for me to call you that? Won't people think I'm presumptuous?"
"Ten dollar word." He slides the bowl toward you, a beautifully glazed ceramic piece that likely cost more than your month's rent. "Well, they usually let me have whatever I want, and I want you to call me Steve. And to relax. And eat more."
"I can't. They said I need to fit into my wedding dress."
"The wedding dress needs to fit you," Steve says, the simple cut of his button down pulled snug to his chest as he leans back in his chair. "Not the other way around. Is that why you didn't eat much at breakfast? Or was it just gross?"
"It wasn't gross," you say softly.
"You don't have to do any of that stuff, either, if it's boring."
You run your finger down the creamy linen stretched between your bamboo hoops. "I don't know if it's boring. I can barely do it."
"You're too mean to yourself," he says.
Steve stands and puts his arm behind his head, pushing his elbow until something clicks. Embarrassed by his dismissal, you stare at your hands and fume at yourself when they begin to tremble.
It's too much. All of it. The cruel Palace attendants who know you're not good enough. Steve and his good nature. The wedding dress, the fine China, your wonky stitches.
Steve steps to your side. He holds out his hand, and you pass him your embroidery without meeting his eyes. Your mood worsens at the sharp slink of snipping, sure that Steve will cut your pattern from the sketch and tell you to start again.
"Sorry, your white knot at the back was bothering me. Pass me a slimmer needle? I'll tuck it behind your stitches."
Astonished, you pass Steve a smaller needle from the pin cushion. His brows creases gently as he works, rewiring the white thread with patience and efficiency.
"There. It looks really nice, honey. You're a fast learner." He passes you the hoop. You take it a beat too slow and he either doesn't notice or doesn't make a fuss, chucking you under the chin softly. "Don't worry so much. I'll talk to Cordelia about your wedding dress, the idea that you need to fit into it like it's one size fits all is dumb. It's made for you. Like, what are they expecting?"
"They're probably hoping this is all a big mistake."
"Did someone say that to you?"
"Nobody had to say it to me, I can tell from the way they look at…" Steve takes your face into his hand, effectively killing anything you'd been trying to say.
He seems royal, then. Used to getting his way, maybe, the disapproving lining of his otherwise sweet eyes. You get a flash of a memory, the morning you'd been presented, Steve in his finery with his platinum crown like a beacon in brown hair, you in your best dress, embarrassingly drab in comparison, your hand offered. He'd been meeting with eligible women all week.
You were there as a formality. Never for a second did you think your soul mark would react to his, lines of light around your opposite wrists.
To think you'd worried about touching him. You could never imagine how beautifully careful he is, how tender. You didn't know men were like this until Steve showed you, his niceness apparently bone deep and in everything he does.
"If people are being jerks, you have to tell me." You never imagined how casual and vulgar he'd be either. "What's the point in being a princess if people don't respect you?"
"I'm not a princess," you say. Your heart is a hummingbird as he turns his hand and strokes your cheeks with the backs of his fingers.
"You will be. Nothing can change that. You're going to be a princess, and you can do as much or as little as you want, because those dorks left me in charge and I say so. I can decree it, if that makes you feel better," he says, dropping his hand, the phantom of it lingering like static shock.
"What if I'm not meant for this?" you ask quietly, shy but terrified enough to ask.
"I was meant for you," he says, tone matching yours in timidity. His sleeves rolled up as they are, you can see the soft light of his soul mark taking a pink hue. "Right?"
Your soul mark glows a gentle pink to match his. Because you and Steve don't know one another well, not yet, but the feeling is there, thrumming under the skin like a pulse. Not love, not not love, a glowing desire. A want to know him.
There have been moments where you wished he wasn't a Prince, but then there's no guarantee you ever would have met.
"Right," you mouth, offering him a small smile.
"We were meant to be together…" Steve bends at the waist, meeting your eyes. He's yet to kiss you in the week since you met, but his touches come braver everyday, the unfamiliarity between you melding into butterflies. His smirk shakes them awake. "So let's be together the way we want to. Think of princess-ing as optional."
"And you as mandatory?"
"I'm also optional," he says with a warm laugh. "But dinner is not. I need to know what you like, if we're going to get married."
You practically gulp. Right. You're going to be his soulmate, his princess, and his wife.
"Don't be scared. I'm not cooking it, chef Joyce is." Steve brushes hair from his eyes like a model from the giant holo screens, unaware of his own attractiveness. "I'm a shitty cook. My talents lie in other things," he drawls grandly, "like lacrosse, and neck massages."
He winks. You laugh genuinely for the first time since you met him, and his face splits with glee.
—
if you want to request anything for this AU please do! steampunk princess soulmate and her smitten prince is my new fave thing
#prince!steve au#steve harrington x reader#steve harrington x you#steve harrington x y/n#steve harrington#steve harrington fic#steve harrington blurb#steve harrington drabble#stranger things x reader#stranger things fic#steve harrington imagine#steve harrington fanfic#steve harrington fanfiction#stranger things#stranger things 4
1K notes
·
View notes
Note
Spencer who learned like a whole sss language or something niche like knitting, so he can teach it to reader cause he heard her talking about how hard it is to find a good teacher???
acts of service [ s.r ]

Summary:
Hobbies are supposed to be relaxing. So when Spencer sees you dwindle into frustration at your newfound hobby of embroidery, he takes it upon himself to teach you better than any low quality youtube tutorial would.
WARNINGS: unserious threat of self-induced harm, lots of mentions of needles and piercing things, horrible description of how to do a chain stitch 😭
pairing: spencer reid x gn!reader
genre: fluff
wc: 2.0k
masterlist!!
a/n: i genuinely spent about 15 minutes trying to figure out how to do a goddamn chain stitch because lo and behold, the internet sucks when it comes to tutorials 😭

Spencer watches from across his desk as you re-attempt a stitch in your embroidery hoop for the sixth time before giving up and throwing the hoop down on your desk with a huff and leaving to get a cup of coffee, muttering something under your breath about “Stupid stitches,”
He’d been watching you try in vain to learn to embroider for almost three weeks, and it was getting to the point where he was frustrated for you.
You’d picked it up as a way to relieve your stress whilst working, and instead you’ve manged to frustrate yourself to the point where you’re literally having to remove yourself from your desk to calm yourself down.
“Are you alright?” Spencer raises his eyebrow at you as you return to your desk with a cup of coffee cupped in your hands, and you sigh as you take a seat.
“I’m two minutes away from sticking my embroidery needle in my eye so I don’t have to look at this monstrosity anymore-” You place your mug down on your desk, holding the embroidery hoop to your face to judge your own creation.
“Please don’t,” Spencer’s tone carries genuine care for your well being, but its also followed by a laugh on the back end which indicates he knows you’re not serious.
“Why do I do this to myself?” You ask the question to no one in particular as you lean your head over the back of your chair, swivelling it back and forth with your foot as a pivot and leaving your hand to fall into your lap.
“Studies have shown that having hobbies, particularly creative ones, can decrease the amount of cortisol produced in our bodies over time, leading to an overall more relaxed state of being,” Spencer mirrors the way you turn in your chair as he watches you, answering your rhetorical question as if it were completely serious.
“I can tell you right now that I am the exact opposite of relaxed,” You exhale through your nose, joined by a shake of your head as you straighten your posture once more. “I think its time I cut my losses and give up,”
“No you should keep up with it, it’ll be much easier once you’ve got the hang of things,” He tilted his head slightly at you as he voiced his encouragement.
“Easy for you to say Mr. ‘I have an 187 IQ and an eidetic memory’,” You roll your eyes at him, although your expression betrays the fact that you’re not truly antagonistic towards his intelligence. “Half of the tutorials i’m watching don’t even actually show how to do anything,”
Spencer chuckles as your eyes examine the three straight lines of red stitching in the fabric like you were trying to incinerate them with your mind before discarding the hoop to the corner of your desk to actually get some work done.
_ _ _ _ _ _ _ _ _ _ _ _ _ _ _ _ _ _ _ _ _ _ _ _ _
It’s two weeks before the topic of embroidery comes up again, you sat cross-legged and hunched over in your jet seat on the way back from a case in Montana, eyes boring into the fabric as you tried to create a shape vaguely resembling a circle.
“You shouldn’t hunch over like that you know,” Spencer sat down in the seat next to you with a yawn, leaning back against the padding of the leather chair with his head tilted in your direction. “It’ll tighten the muscles in your neck and give you a tension headache,”
You huff at his chastising of your posture considering his own but straighten your back nonetheless, holding your embroidery hoop at eye-level as you carefully puncture the fabric.
He’s glad to see that you haven’t given up on embroidery yet. Partly because it’s good for you to have a hobby that had zero relation to your job and partly because it meant that his 18 hours of research over the last ten days hadn’t been in vain.
“If you’re going in a circle it’s better to use a chain stitch,”
Your eyes flicker upwards at Spencer’s suggestion, wonky thread oval forgotten about as you narrow your eyes at him slightly in an accusatory fashion. “How do you know that?”
“I uh-” Spencer blinked a few times, eyes flickering across the jet’s cabin as he tried to find a reasonable explanation for his sudden knowledge in embroidery that wasn’t because he wanted to be able to teach it to you. “I know a lot of things,”
His intelligence was usually a valid excuse for whatever niche bit of information would come out of his mouth, but you knew for a fact that he had no prior knowledge on how to embroider something. He might have known the history of it at a stretch, but how to physically embroider something? Absolutely not.
If he had he would have told you weeks ago. So this was definitely something new.
“Mhmm, apparently so,” You nod with clear suspicion riddling your expression, but you weren’t about the turn away his help just because you were suspicious of the origins of his newfound expertise in embroidery. “Alright genius, show me then,”
You hold out the hoop in his direction and he takes it from you with an awkwardly endearing smile, un-stitching your botched attempt at a circle and turning the hoop at an angle so that you could see what he was doing.
It was only six stitches, but the way he passed the needle through the fabric was effortless, and it left a perfectly symmetrical blue circle in it’s wake.
“Chain stitching is much easier to curve than straight stitching due to the nature of how the needle passes through the fabric,”
If you weren’t so beholden to his ability to be good at absolutely everything he does you’re sure you’d be a little jealous. Or maybe it was the way his eyes glistened as he looked at you. No. It definitely wasn’t that. You were just grateful he was willing to help you, that’s all.
“Show me how to do it then if it’s so easy,” You shift yourself towards the leather arm that’s separating the two of you, leaning your elbows on it to watch him more closely as your eyes locked on the way the pads of his fingers held the needle.
“Here,” He held it out towards you, blunt side up, as an indication for you to take it. “I’ll walk you through it,”
You take the needle from him with a raised eyebrow, one that only continued to rise as he passed you back your embroidery hoop as well and leaned towards to to angle the fabric at a 45 degree angle towards himself so that he could see what you were doing.
“Alright, so first you want to pierce the needle through the back of the fabric towards you and pull all of the thread through,” You follow his instructions as he speaks, nodding once you’ve garnered yourself a big loop of thread that’s connected under the fabric at one end and your needle at the other.
“Alright?”
“Alright, now go back through that same hole from the top, and bring the needle back up through the fabric about a centimetre downwards, only half pulling the needle through,” You furrow your eyebrow slightly but try to follow him, although he stops you as you attempt to pull the needle all the way through with his hand on top of yours.
“Don’t pull it all the way back through,” He adjusts his body to face a similar direction to yours. “Here, let me help,”
His hands brush the tops of yours as one comes to assist you in holding up the hoop of fabric and the other guides your fingers in holding the needle. His skin is frigidly cold against your own, although whether that’s just because you run hotter than him or the fact that he’s so close to you you feel like you’re internally harbouring volcano you’re unsure.
With his hand guiding your own, you reinsert your needle back through the original hole you’d made from the top down and pierce it upwards through the fabric a little further across, leaving both the tip and the end of the needle above the fabric with the middle underneath.
“Good yeah, now this is the complicated bit, you need to get the rest of your thread,” He loops his ring finger around the excess thread, and makes an effort to move his fingers as slowly as possible so that you can see exactly what he’s doing. “and wrap the start of it underneath the tip of your needle,”
He demonstrates his words as he speaks, pulling the beginning of the loop of thread tight underneath the tip of the needle before slowly pushing the needle all the way through the fabric until it’s free once more, and there’s a small looped stitch in the fabric.
“And then to create your next stitch you do the same steps, but start inside of the first loop,” He again demonstrates his words as he uses your hands to make a second stitch that, like the name suggests’ creates a two-stitch chain from where the stitches are connected.
“See, really simple, just a little convoluted in terms of instructions,” His eyes turn away from the fabric and back towards yours once he’s finished his explanation, although yours remain on your needle. “Think you can do it on your own?”
It takes you a second to come back to your senses, and you blink up at him blankly for a moment before nodding, a soft “yeah I think so…” echoing from your throat.
You didn’t have the heart to tell him that you were to distracted by the way his hands moved against yours to listen to a single thing he said.
“Let me know if you need any more help okay?” He gave you that awkwardly endearing smile that reached his eyes and made you want to scream into your hands at the prospect of being so perfect.
You return it with a half-stunted nod as you desperately turn your eyes downwards to your fabric again, unable to look at him any longer without flushing red light a traffic light. “Yeah thanks-”
“I’ll teach you how to do a running whipped stitch next, it uses two different colours of thread,”
Whipped is right-
Spencer’s tone held all the enthusiasm of a child who’d just learned that you could mix multiple colours to create a new one, and it easily rubs off on you as you resign yourself to actually listening to what he’s trying to teach you instead of just fawning over how it feels when he touches you.
“Can you- show me how to do a chain stitch one more time?”
“Of course!”
The minute his hands touch yours again you know you’re done for.
#spencer reid#criminal minds#spencer reid x reader#criminal minds x reader#mgg#spencer reid fluff#criminal minds fluff#asks 🫶
370 notes
·
View notes
Text
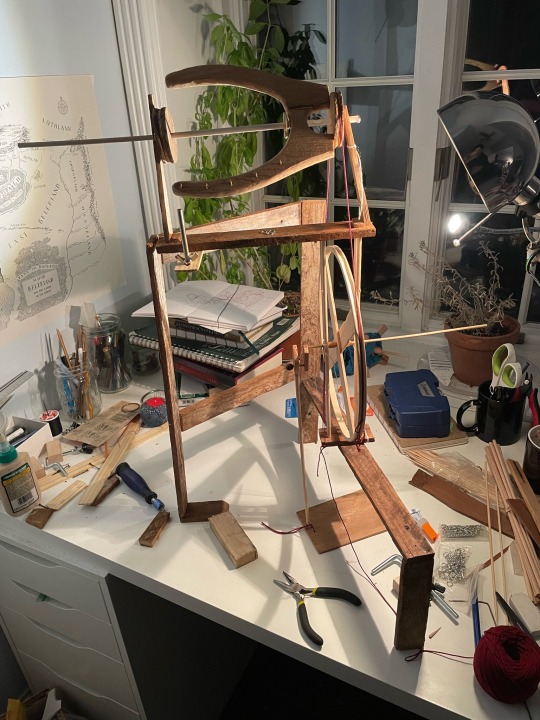
everyone clap and cheer for my beautiful daughter who has every disease 🥰 her name is þerindë because her wheel is made out of an embroidery hoop; she is entirely handmade and boy howdy does it show
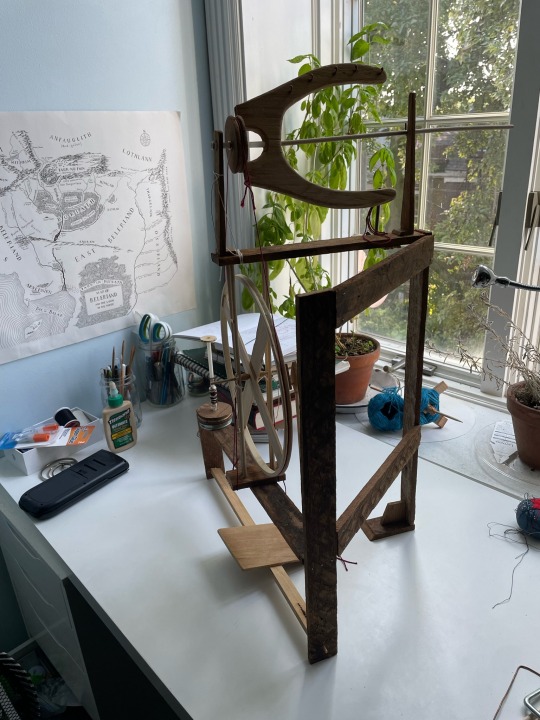
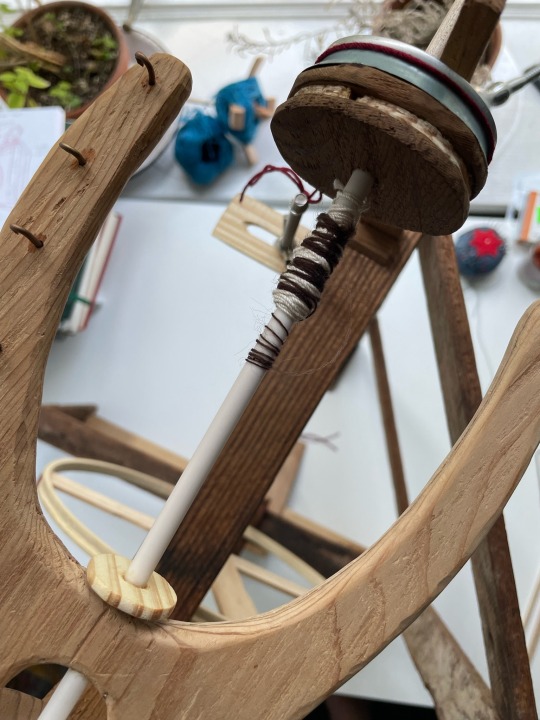
a whole bunch of things have stopped working since i took that video last night and i'm not sure how much more wherewithal i have to keep messing with her, but i did manage to spin about two feet of something before then! so i'm showing her off a bit now, and if i can figure out what-all i fucked up maybe you'll see more of her in the future. some process and progress photos under the cut (not a tutorial. do not do this. i cannot sufficiently stress how bad of an idea this was and is*)
(*if you are going to do this and have questions not answered here i am always happy to answer them, inbox and dms are open etc, but like. i would strongly advise against it)
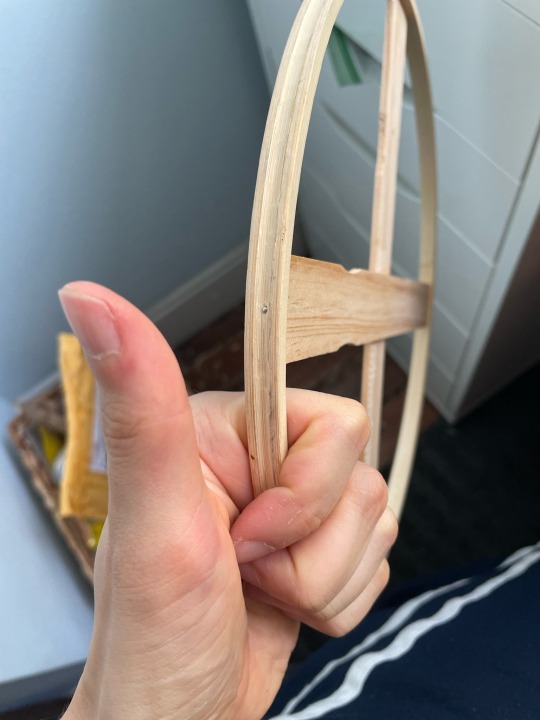
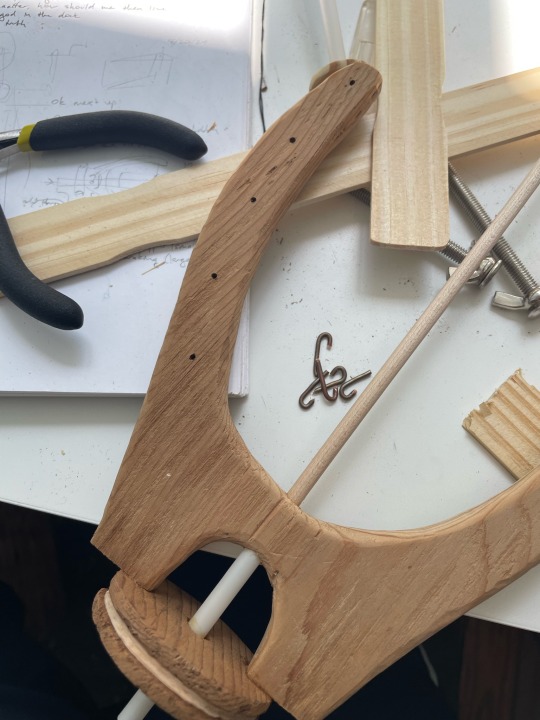
here's the hoop! it's about a foot across, with a groove carved out with a speedball. this ended up being way too shallow (who'd'a'thunk) so the final version is a lot deeper than what you're seeing here. the paint stirrers are held in with straight pins because i was worried regular nails would just crack the hoop lmao. my girl is so deeply and profoundly scuffed <3
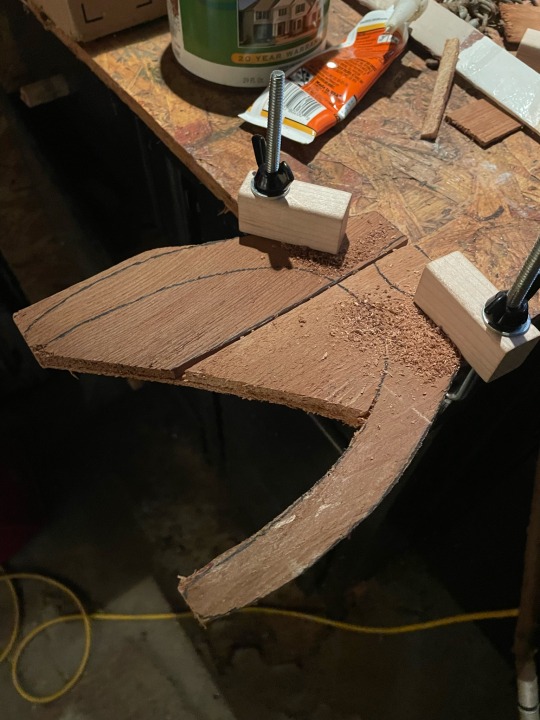
the flyer is made from three cedar shingles glued together because i didn't have a solid piece of wood large enough. astonishingly nothing broke while i was sawing out the rough shape and it whittled down pretty nicely! the hooks are scrap 2mm copper wire, the orfice is a couple inches of plastic drinking straw, and the pulley wheel is also hand-carved, which is why it looks like a fucked-up oreo and has the weird hitch at the top of the spin that you probably saw in the video 🙃 frankly i am astonished it works as well as it does

the wheel frame is. man. the axle supports haven't broken yet but frankly it's a miracle they're still in place with how much strain they're under every time. the original base was that weird little bit of paint stirrer, which (shocker) did not work out in the long run; it's been replaced by an offcut from the frame and is significantly more sturdy now. it's surprisingly level, though, and turns pretty smoothly all things considered!
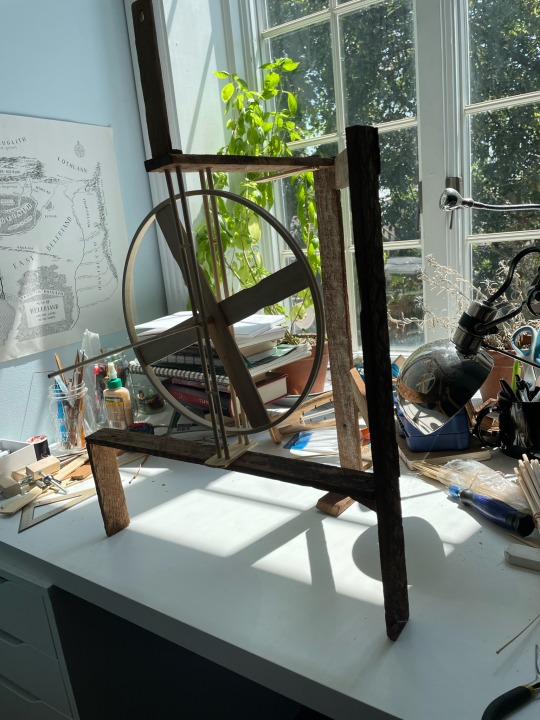
the frame was a nightmare start to finish; i've never done any serious woodworking before in my life and the whole thing was just kind of slapped together without a plan or any sort of concrete measurement. it wobbles so fucking bad and every few hours i have to push a couple of the parts back together where the nails are sort of drifting out of the wood. you may observe a weird post sticking out the left side of the mother-of-all; that is supposed to be for scotch tensioning. does it actually do that? sort of! the belt is a length of cotton crochet thread that is, after much fiddling, just the right size to not slip out more than once every three minutes.
treadling was another pain to figure out and i think i probably made it way more complicated than it needed to be. it still doesn't work very well and i can't tell if that's something i can fix hardware-wise or if i just have to suck it up and practice a lot more. turns out feet are not as coordinated as hands! i would say "now i know for next time!" but frankly i am never doing this again. you couldn't pay me. speaking of which, i did the math and at my current pre-tax hourly salary i could've bought two brand-new ashford travelers with the number of hours i spent building my awful rickety daughter. at the end of the day, do i love her? immensely. is she "good"? by no stretch of the imagination.
anyway. this was a terrible use of my time <3 but i do finally feel confident enough in all the parts of a spinning wheel and what they're for that i can brave the dangers of facebook marketplace's "spinning wheel" category without getting too badly scammed! which is pretty valuable in its own right, i guess.
#hand spinning#spinning wheel#my darling girl. i love her so much. she is so bad at her job#aggressive linguistic prescriptivism#subcreation
88 notes
·
View notes
Text
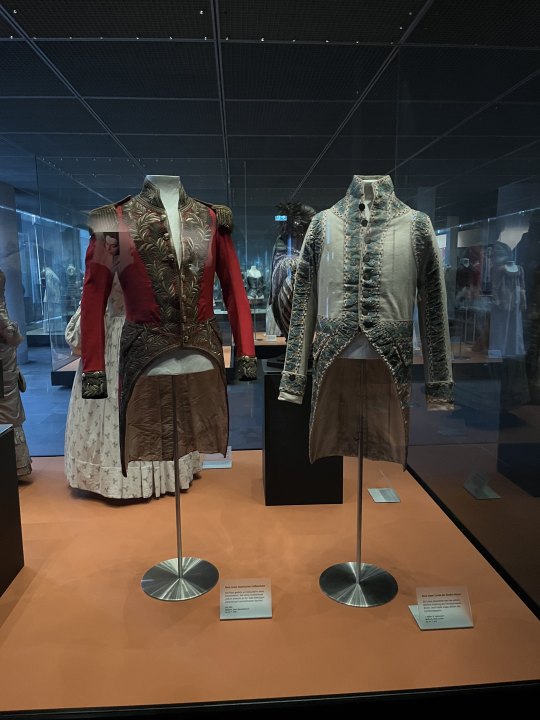
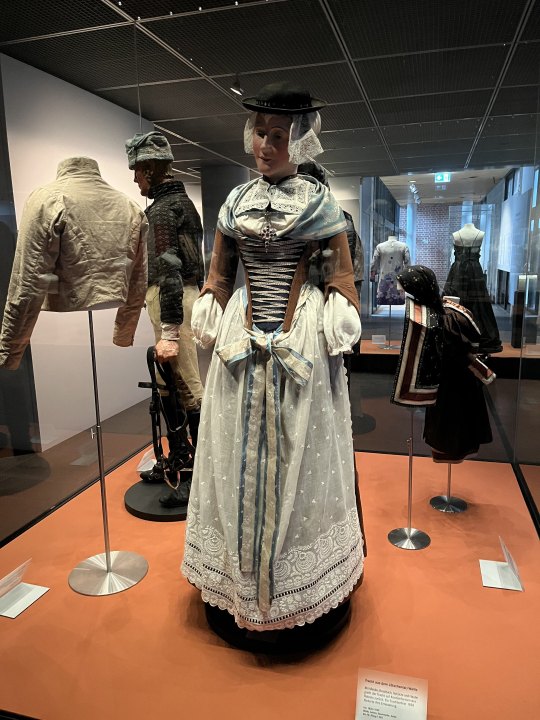

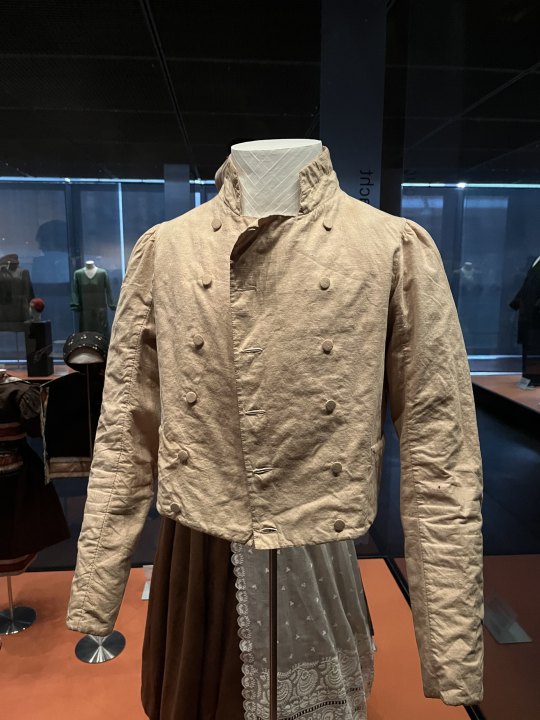
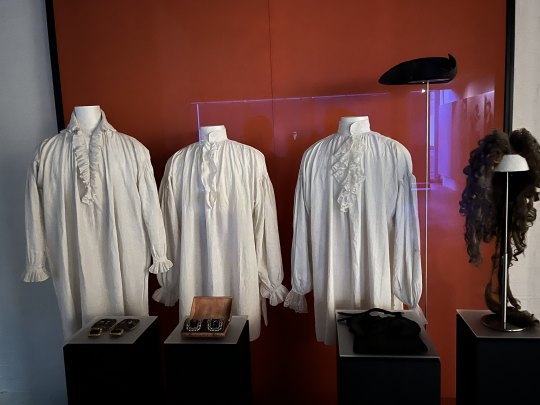


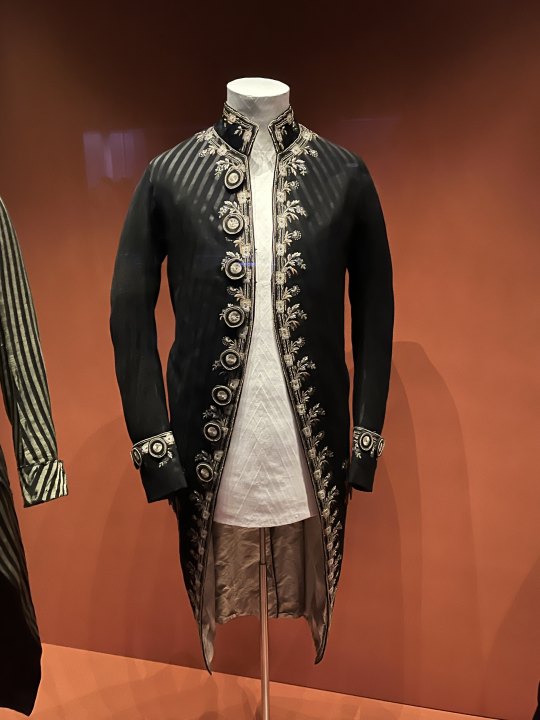
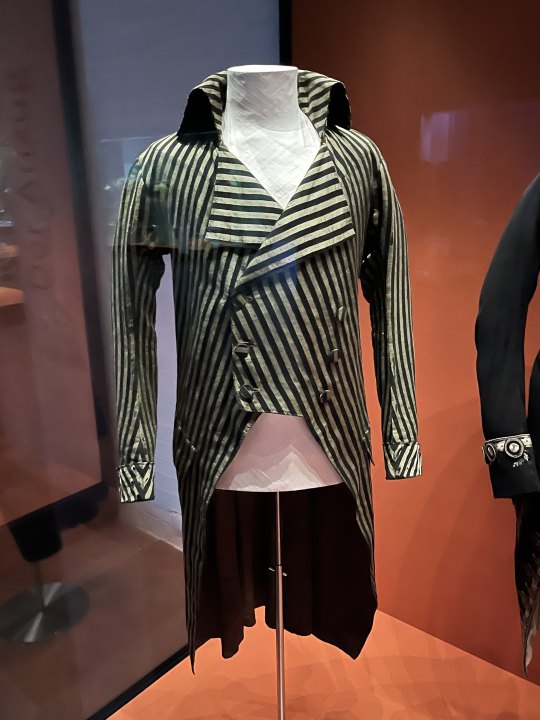
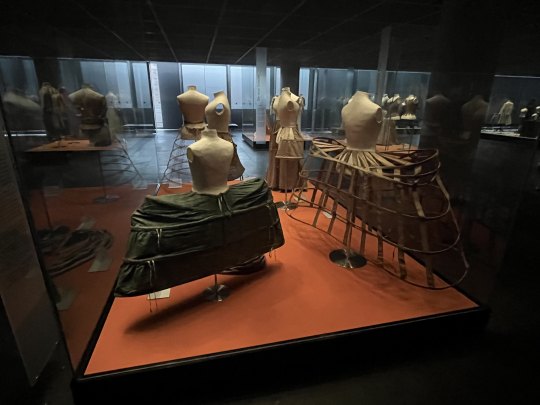
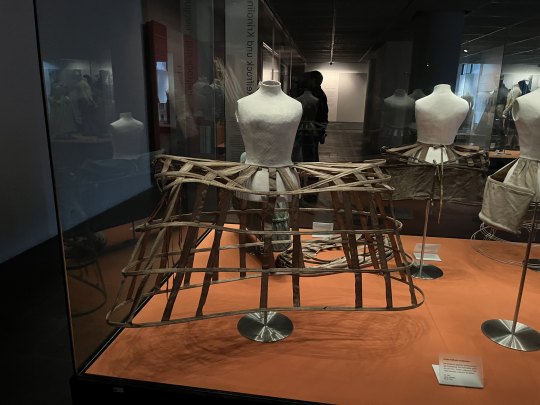

And here, as promised to the dear @vinceaddams come a lot of extant Garments from my recent Visit at the German National Museum in Nuremberg. I am trying to give as much Information about each Picture as I can though unfortunately not all of the Pictures were taken by me and I could take Pictures as extensively (including Info Signs) as I would have wanted, lest I be abandoned in the Clothing Section. Also the whole Section was awfully dim, which made it rather difficult to read some of the Signs. The last three Pictures were taken in a different Section, thus the more pleasant Lighting.
Servant Livery, bavarian Court, mid 19th Century (left); Servant of the Count of Cannotreadhisname, first half 19th Century (right)
Woman's Folkdress, Lötschental/Wallis (Switzerland), Museum dates it 1830/1905 which is an awfully broad Range, but maybe it was altered later; shows wonderfully how late 18th Century Styles were preserved in european Folkdress that came to be in the 19th Century proper
Various Men's Garments throughout the 18th Century, as there are Closeups of each, the respective Detailinformation will be provided further down.
Men's Spencer, c. 1810s-1820s, Linen and Cotton, the Sign didn't say it explicitely but due to it's Placement in the Exhibition and comparable other Pieces I have seen, I think this is more of a common Man's Piece of Clothing.
Three Men's Shirts, various Shoebuckles, a cocked Hat, a Periwig and what I assume to be a Hair Bag. This Display Case had a rather badly illuminated Sign, so sadly I have no further Details about the Pieces.
Justeaucorps, c. 1695, Wool, Silk, Metal Trim.
Waistcoat, c. 1695, Silk, according to the Museum it was worn together with the Justeaucorps, which seems to be a nice Colour-Combination.
Breeches, 1790-1800, Silk. Very pretty Pair, but the bad Lighting doesn't really let it show.
Habit à la francaise, c. 1790, Wool, Silk, Embroidery (What a Material Specification...). I really like the Combination of those subtle dark on dark Stripes and the Embroidery.
Tailcoat, c. 1790/1795, Cotton, Silk, Linen, really peak 1790s Look honestly.
Very wide Court Panniers, with Pocket Hoops and Crinoline in the Background. Alas no Detail Information for this and the next two Pictures.
Frontal View of the Pannier. I suppose I have to get one of those at some Point, if only for how extra they are.
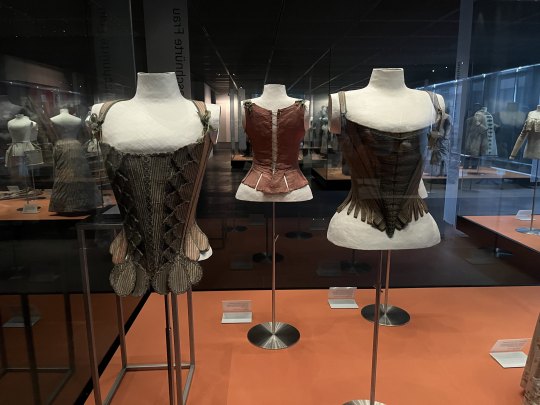
Three Pairs of Stays, two from the Front, one from the Back. Sadly I don't feel confident enough to Date those and I have no Pictures showing the Info Signs well enough.
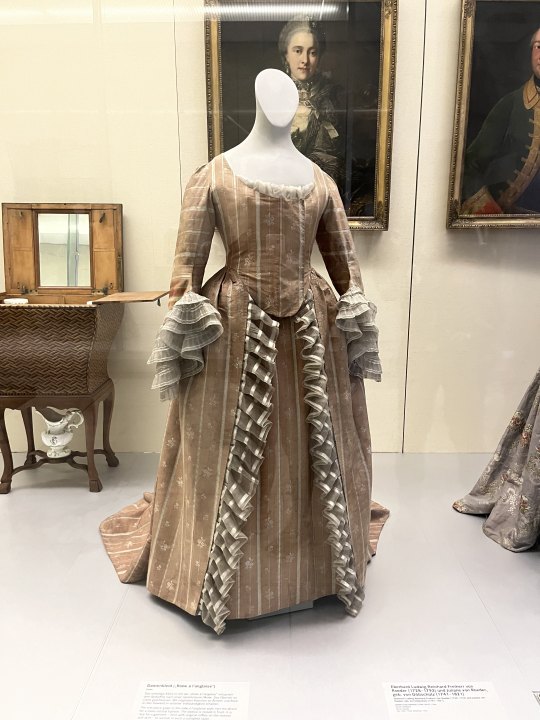
Lots of pretty Dresses that were exhibited in another Section of the Museum. The right one is a Robe à l'Anglaise, but that's all I can tell.
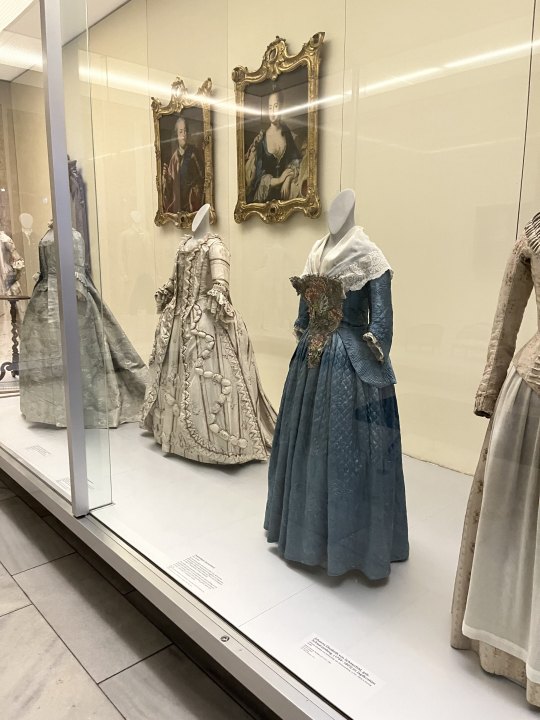
Another beautiful Anglaise, notable for being preserved in its Entirety with original Ruffles.
More pretty Dresses. Unfortunately due to Time Reasons I have no Pictures of the Suits displayed across the Dresses in the U-shaped Display, though I have to say one of them had a very much not authentic Lacebib hanging from the Neck...
That's all the cool Clothing Pics I have, at some Point I will return and take loooots more Pictures from all the Angles too. Also at some Point I might write to the Museum about the Lighting, there surely is a better Solution when having your Objects barely visible with unreadable Signs while still protecting them from UV-Rays.
Bonus-Pic 1:

Me, in historical Dress, c. 1750 (minus the Shoes), standing in a historical Kitchen.
Bonus-Pic 2, for the Boat-Crowd:
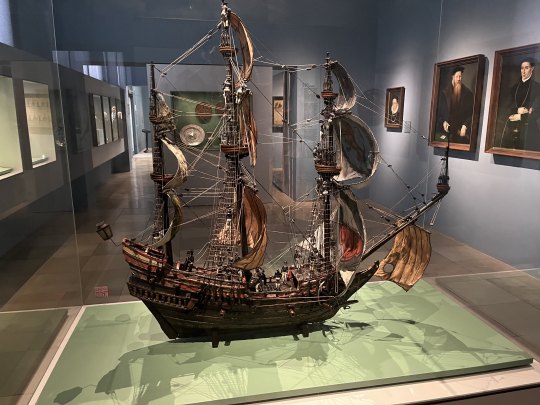
Beautifully detailed Modell Sailing Ship, early to mid 17th Century if I remember correctly. Interestingly enough all the little Sailor Figurines on it were very much early 19th Century in Style, so I assume the previous owner had those added at some Point, before the Museum acquired the Model in the late 19th Century. (The Incongruence sadly wasn't addressed on the Info Sign, so I might contact them about this too.)
#Aus dem Leben einer Taugenichts#Extant Garments#Historical Fashion#Germanisches National Museum#18th Century#19th Century#Museum
160 notes
·
View notes
Text
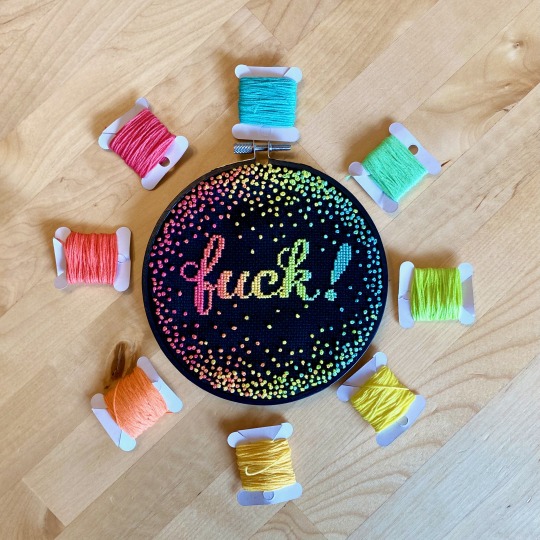
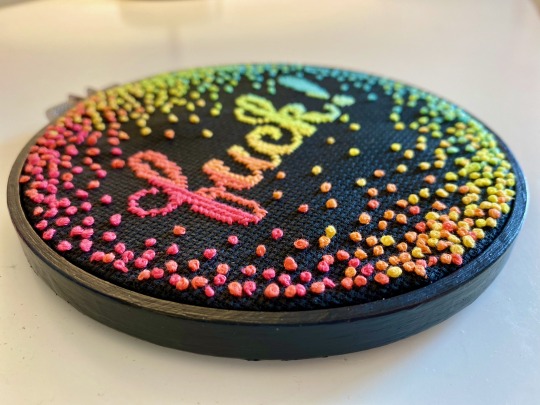
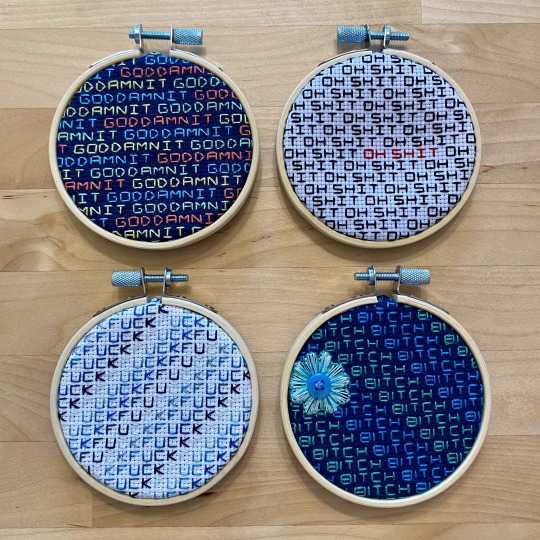
To cope with… well, you know... ::makes vague gesture:: EVERYTHING for the last 3 years, I’ve been puttering away at a series of cross stitch projects to cheer myself up through the effective combination of (1) swearing and (2) stabbing.
10/10 highly recommend. Here’s what I’ve made so far:
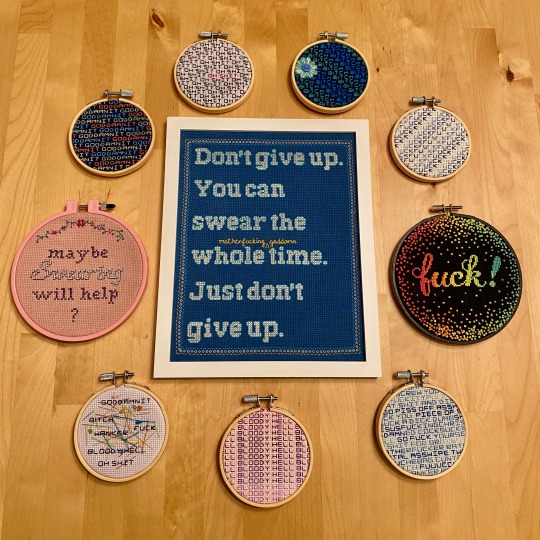

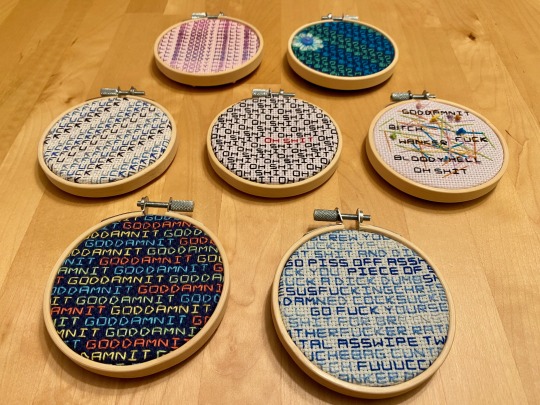
[ID: Photo 1: Overhead photo of a group of 9 cross stitch hoops and a rectangular framed cross stitch. They contain various swear words and motivational messages related to swearing.
Photo 2: Overhead photo of a cross stitch hoop with black fabric and the word "fuck!" stitched in rainbow gradient lowercase cursive letters, circled by rainbow French knots. The hoop is surrounded by bobbins of thread in rainbow colors.
Photo 3: Close up photo of a cross stitch hoop with the word "fuck!" is stitched in rainbow cursive letters, surrounded by French knots.
Photo 4: Overhead photo of 4 cross stitch hoops in navy blue or white fabric. In small text they each have repetitive swear words stitched: (1) goddamnit, (2) oh shit, (3) fuck, and (4) bitch.
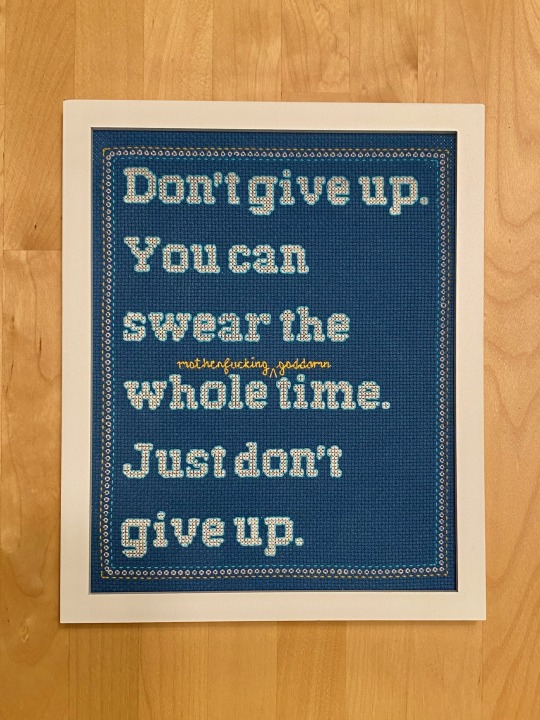
Photo 5: Overhead photo of a framed cross stitch with blue fabric. The white large-font stitched text reads: "Don't give up. You can swear the whole time. Just don't give up." There is small yellow cursive text stitched inserted with a caret in between "whole" and "time" that reads "motherfucking goddamn".
Photo 6: Close up photo of a cross stitch hoop with pink fabric. The purple and silver stitched text reads: "Maybe swearing will help?"
Photo 7: Close up photo of a group of 7 cross stitch hoops with fabric that is either white, navy blue, pink, or light blue. They each have repetitive swear words stitched in a small font: (1) bloody hell, (2) bitch, (3) fuck, (4) oh shit, (5) assorted swear words with tangled thread, (6) goddamnit, (7) assorted swear words and insults. /.End ID]
Crafty details and more info under the cut.
Many of these (especially the mini hoops) were done in between working on larger projects, to take a little break from full coverage pieces, or to use up leftover fabric or leftover thread. I’d never finished the back of an embroidery hoop using felt before, and did several of the hoops so I would have a chance to practice my blanket stitch and whip stitch. I also wanted to experiment with dyeing fabric, and getting more practice with French knots.
Fabric and size details:
Each of the small hoops are 3-inch with 14-count aida.
The rainbow fuck! is a 5-inch hoop with 16-count black aida.
The pink Maybe swearing will help is a 5-inch hoop with 14-count aida (dyed in grape koolaid, lol!), and uses DMC Satin Floss #S762. (Never again!)
And the Don’t give up piece is 8" by 10" on 14-count Nordic Blue aida.
Pattern credits:
Lettering for the rainbow fuck! hoop was modified from Oh Wow Stitch on Etsy.
Font for the Don’t give up piece was from adapted from SuncatcherStudio.
And I've seen the quote "maybe swearing will help" stitched a bunch, but wanted to make my own pattern for it. I had a lot of fun hiding some grawlixes among the flowery vine. :)
Totally okay to reblog but please do not repost to other sites. Thanks!
#cross stitch#my cross stitch#ok to reblog#back stitch#subversive cross stitch#crossstitch#x stitch#xstitch#embroidery#handmade#textiles#swear words#crafts#handcrafted#diy#french knots
464 notes
·
View notes
Text
Currently thinking about: Astarion and embroidery.
Astarion stealing away bits of thread from people - "oh, you have a loose thread here :)", anything left on his clothes afterwards. It's not like Cazador will provide him with it. Practicing his sleigh of hand by pulling out threads, unraveling, stealing away bits of scrap. It's not like they'll miss it.
The threads are all mismatched colours, but who cares? When he's left alone in the dark, everything is black and white anyway with darkvision, and he doesn't dare to check his work in the light of lanterns and candles, where Cazador might see it. It's something hidden, for him, tucked away on hems and inside collars and the cuffs of sleeves. Being able to touch, to run his fingertips over the embroidery, is more important than seeing it.
He has one tiny needle, tucked into a seam. There's no point using it as a weapon, as something to fight back - it's more valuable to him as something he can use to create instead of destroy.
Cazador provides him with fine clothes, can't go out hunting when you look unpolished. It becomes a minor act of rebellion to pull threads loose, always where they won't be noticed, to stash them away for his own use later. Something secret, just for himself. Cazador's never explicitly ordered him not to do that, not to have this, and Astarion will not be the one to let him know about this one, tiny, secret delight.
After, being able to pick out colours, to buy whole skeins of thread, better needles, thimbles, embroidery hoops. Being able to embroider the outsides of his clothes as well as the hidden places. Flowers, the sun, white clouds against blue skies. Things he lost before and will lose again, but at least this time he can take some of that colour with him.
Just. Astarion and embroidery!
222 notes
·
View notes
Text
Time for another lace style...
We will eventually get around to learning all of these, which one do you want to learn first?
Also we have many more styles planned, these are just the styles we have good tutorial resources for so far.
These styles all require some specialty tools/supplies, which I've listed below the cut in case that's a deciding factor for people. Pretty much everything can be DIY'd or repurposed from some other common objects, and this information will be shared as part of the lace-along :)
Bobbin lace:
Thread (e.g. sewing thread, embroidery floss) (edit by mod Rex: crochet cotton or perle cotton preferable for beginners)
Bobbins (24 for the sampler we will do)
Bobbin lace pillow
Pattern printed or drawn out
Pins with small heads (a whole lot of em)
(edit by Mod comfy: I dipped my toes in this already, you can use clothespins as bobbins (basically everything that holds some thread and can be moved around comfortably), and some sturdy cardboard as a pillow. Your "pillow" just needs to be sturdy enough to keep the pins in place for the time you work on the lace, so if you have a couch pillow that could work, go for it)
Drawn thread lace:
Plain-woven linen or cotton fabric, with large enough threads you can comfortably see individual threads at a comfortable working distance
Sewing thread in the same colour as your fabric
Fine blunt-tipped needle
Fine tipped scissors or seam ripper and a steady hand
Lacis/ filet lace
Sturdy thread/ twine/ crochet cotton
Netting shuttle/ netting needle
Netting gauge/ mesh stick (e.g. dowel, knitting needle, smooth popsicle stick or similar)
Blunt tapestry needle
Some method of tensioning the net for embroidery: mesh frame/ embroidery hoop/ stiff paper to tack net down to
Needle lace:
Paper pattern printed or drawn out
Backing fabric (e.g. sturdy medium weight calico) (will not be part of finished piece)
Sticky backed plastic/ clear packing tape
Lace thread (e.g. crochet cotton, perlee, stranded cotton, silk thread)
Regular sewing thread in a contrasting colour for tacking down pattern (will not be part of the finished piece)
Sharp needle to tack down pattern
Blunt needle to make lace
Tweezers
Fine tipped scissors
Thimble (optional)
Sprang:
Sprang frame (e.g. empty backless picture frame, DIY frame made of sticks, two dowels tied to sturdy objects an appropriate distance apart)
Sturdy cord or crochet cotton
Smooth dowels/rods, 4-6 of them?
#lace race 2024#lace along#lacemaking#lace making#bobbin lace#drawn thread lace#lacis#filet lace#needle lace#sprang#poll
80 notes
·
View notes
Text
First things first, basic materials for basically any cosplay.
No need for sewing machines or even embroidery hoops, they’re pretty new in the grand scheme of things and people made insane stuff without them for millenia after all.
(I actually recommend learning hand sewing FIRST, it lets you learn how to fix your stuff in a pinch and is way easier to get into. It’s slower, sure, but it also lets you make finer, more consistent seams and if you have sensory issues tied to sound it’s FAR less likely to set you off. Plus, it’s calming and frankly impresses the hell out of people at competitions and the like and some groups (like re-enactments) do not count machine made things at all in their competitions and standards.)
All you need to sew clothing is a needle, thread, scissors, a measuring tape, a pencil and sharpener or chalk to mark things in a washable way, fabric and time.
If you aren’t totally confident in being able to track seams or keep them even, straight pins or clips helps hold stuff together. You also want these if you don’t want to transfer a pattern from paper to the fabric with drawn lines, but that’s also not exactly needed since I go off the base shapes and measurements. If you aren’t confident with holding material extremely taught while you work on embroidery or bead work and the like, a good embroidery hoop can be found second hand for pretty cheap and you can usually find a really good one for under $10 usd at a craft store with an embroidery section (with $10 being a MASSIVE one, I recommend getting a 6 inch or less unless your doing something at a standing one, which is overkill most of the time).
I’ll explain how to use the materials later, but everyone has trouble with fabric and I’ve had people balk at the cost before, so here’s where to start (or if your on a tight budget)
- broadcloth: cheap cotton, comes in a whole array of solid colors and a staple of cosplay. Be sure to make certain you don’t make something too tight with this, it isn’t the best at holding up to extreme strain. Typically about $5 usd a yard… full price.
- quilting cotton: slightly more enxpensive and usually patterned in some way broadcloth. If you go to a fabric store they will have TONS of this. Averages about $6-8 usd a yard full price, depending on the brand and store.
- old linens: a cosplay classic. Go to goodwill or Facebook marketplace or a garage sale or something and buy up a bunch of old bed sheets and stuff or some curtains and be ready to get dirty with dye, bleach, and a lot of prayers. Best to aim for solid white, makes it easier, unless you want that specific color/pattern. Upside is that these make bigger pieces easier to make. Think cloaks, super big skirts, “Aladdin” pants, things that have a high depth AND width to the piece you need. Lowers the seam count, at least.
- Muslin: I will have an unhinged rant about historical vs modern muslin later on, but this is a fabric you can get for as little as ¢50 a yard in some cases used for a pattern making method called “draping” that will also be explained at a later date. It’s thick, completely undyed/unbleached, and sturdy enough to take some abuse and doesn’t gray too bad. It’s shit compared to historical muslin, but it does its job as a cheap canvas in a pinch. Be warned: these come on VERY short bolts and often aren’t “double wide” like other fabrics, which can be an issue and lead to TONS of seams.
Again, muslin is used to make patterns usually. Will explain “draping” later but it’s pretty self explanatory based on the name.
#cosplay help#cosplay tutorial#cosplaying#ac3s tutorials#cosplay materials#fabric#beginner cosplay tips#sewing#hand sewing
41 notes
·
View notes
Note
what do you think stan and kyle’s interests would be like as they get older?
IM SORRY I’M SO LATE TO THIS!!!! But here are some of my thoughts (and my friends’ thoughts, since I consulted them very heavily):
Stan:
I think he stays interested in sports!! That being said, I don’t think he goes pro or anything, so how often he’s able to participate naturally dwindles once he graduates college and stops playing for the team. He definitely keeps up with the Broncos, though, and catches all of the football games he can. I imagine that he’d also coach for his kids’ sports teams as an adult!
He keeps loving animals, ofc. He wants a big dog as an adult, but Kyle turns him down. Were Kyle to actually agree to a dog, it would be a small really annoying one that Kyle puts in little outfits and carries around in a stroller. He spends some time volunteering at shelters during college to get his dog fix in, and maybe ends up getting the big dog of his dreams when Kyle figures that between a husband and two kids, someone’s bound to take care of it other than him.
Stan also likes woodworking! He chops and carves it, and even though he likes intact nature, he also likes making things out of it. He makes little wooden statues of things that he likes (animals, typically) but he always ends up going back to carving Kyle’s face. He gets very, very good at it. It’s very sweet until Kyle has like fifteen statues of his face that stare at him whenever he steps into his room, and he starts feeling less flattered and more creeped out.
Stan is super outdoorsy. He loves camping, fishing, and anything along those lines. He’s not much of a hunter though, mainly because it would make him sad to kill any animals. Kyle likes to keep his time outdoors very limited, so he isn’t super keen on it, but he does it for Stan anyway. He bitches the whole time, but secretly doesn’t mind it so much when Stan’s there.
Stan is also a Bowling Dad. He loves doing typical white dad things. He’s also very good at it because he’s still fairly athletic, while Kyle sucks at it and gets worse when he gets into the bowling alley drinks. They always go bowling for Stan’s birthday and Stan sweeps, followed by his daughter in 2nd place, his son in 3rd, and Kyle in last.
Kyle:
He likes reading! That being said, he likes it less than his room would lead you to believe; his real hobby is buying books that he doesn’t actually read because he likes feeling like an intellectual. He also encourages his kids to get into reading, but he’s terrible at practicing what he preaches. He tells them to get off their phones and read, then immediately goes and posts on Instagram.
I can’t take credit for this one because my perpetually correct friend suggested it, but Kyle would cross stitch. And it would be so cute. He would mostly do cute things like his kids’ names and little images that represent them (which they are naturally embarrassed by), as well as some pretty floral imagery. At times he rage stitches swears and combines them with those ‘basic’ wife imagery embroidery hoops, and hangs things up like ‘BLESS THIS FUCKING MESS’.
Kyle would birdwatch! He likes pretty much anything that he can track, and he keeps a whole journal of birds and marks down the ones that he sees. It’s one of the only outdoorsy things that he’s actually interested in, so Stan is very very supportive. Kyle looks like a total dork with his binoculars and his notebook, but Stan thinks it’s cute.
Kyle also just generally collects things, even beyond books. He collects pretty teapot sets and candles that he never actually lights, and so on and so forth. Stan asks if they can actually use those tea sets for something, and Kyle gets pissed at him for even considering endangering his beloveds. He also cries a little when one of his kids unknowingly lights one of his prized candles. It smells really good, though.
Both:
They’re both into gardening! Stan is more into growing food (so he can try and maintain his vegetarianism, which he never actually sticks to) and Kyle is a flower guy who ends up getting very invested in the language of flowers. They spend a lot of time out in the garden together and it’s very peaceful for both of them.
THANK YOU SO MUCH FOR THE ASK!! <3
86 notes
·
View notes
Text
*slides a list of notes on Amnesiac Darkrai’s character across the table*
First of all, when you bonk all thoughts of world domination out of his head you're just left with PolitelySittingPlankton.jpg

That and also someone who is deeply and irrevocably disturbed by the thought of being abandoned or left alone. He has no idea why that's such a sore spot for him, but it is engraven into his being as inherently as his connection with nightmares is. It's pretty similar in nature to Twig's issues with being a burden that remain despite her own amnesia, actually. Wonder why that is?
(*Shakes paragraph vaguely hinting at Darkrai's evil origin story like it's a bag of cat treats* psspsspsspss—)
So yeah Clingkrai is a whole thing! Who'd've thunk. You can't even go to the market for fifteen minutes without the guy tagging along. If someone leaves the room he gets up and follows them. He doesn't even want to talk to or do something with them, he just Cannot Stand existing without another person around.
He's extremely formal and polite, and honestly a bit archaic when it comes to his fixation on manners. It's like he hasn't had a full conversation with anyone since the PMD equivalent of the regency era.
(*Shakes paragraph harder*)
While he can be knocked out in a fight, he can't naturally fall asleep. This is a trait he shares with Cresselia. While he can't get any energy from sleep, he is capable of sustaining himself entirely on physical food and the ambient energy of nightmares.
He can't completely stop the area of effect he radiates that inflicts nightmares, but he can put a temporary lid on it if he's got enough energy stored up and is able to dedicate a lot of effort and focus to the task. This is very draining however, and it's pretty much equivalent to someone holding their breath— it can't go on forever.
Twig eventually realizes that getting Darkrai a hobby or two would probably help in her quest to get him to stop looming over her shoulder at all times, but is stumped on what could possibly hold his attention when he doesn't show much interest in anything in particular. One day she assigns him the chore of mending these awful ripped-up curtains she had found in a garbage pile and hung up in her home as a desperate bid to get some time away from his company. She collapses in a disgruntled lump in her room, and finds a lot more than just the curtains mended when she finally exits. She takes a chance and gets some embroidery hoops and different types of thread, and both she and Darkrai are surprised to learn that he's an embroidery master. Go figure.
(Twig has to laugh, just a little, at the thought of the Darkrai she fought in Dark Crater holding a tambour and stitching the same landscapes that this one is so fond of creating. It's something she can't imagine, but the familiarity with a needle and the skill with which he holds it had to come from somewhere.)
Upon him being introduced to the future trio, Celebi spends a while staring at Darkrai while looking like she's seeing double. It reminds Twig of how she reacted when she met her for the first time— or at least the first time since Twig was turned into a charmander— but she doesn't know if it means anything or not. Either way, Celebi is eventually done staring and becomes the greatest advocate for Darkrai of them all. The bar for that was so low it's 20 feet underground, sure, but Celebi is in the stratosphere regardless. She absolutely adores him. No one can figure out why, especially when she was an outspoken member of the "If you somehow find Darkrai in the wild, it's kill on sight" club before now.
Grovyle is firmly in the camp of hating Darkrai's guts, but reluctantly defers to Twig and Celebi despite his distaste for him. He won't talk to the guy beyond monosyllabic responses to his attempts at polite conversation, but he'll begrudgingly maintain the peace treaty that was put into place and keep quiet about what Darkrai did before his memories were lost.
Dusknoir just avoids him. If there is any excuse to leave the room when he's around, Dusknoir is gone, and there is always an excuse— he keeps up a civil front in the moments they do interact, but he is not happy with this turn of events or how Twig is handling it, although he can admire the "bread and circuses" strategy she's employed in a grim, disappointed sort of way.
Darkrai has heard a lot about someone named Kip, but Twig always shifts the conversation in another direction when his name is mentioned. He's not fool enough to ignore the revelation that Kip used to be a member of an exploration team with Twig, though, nor the implication that Kip knew him as well before he forgot everything but his own name. He once broached the topic of meeting this partner of Twig's, and she had denied the thought with such abrupt, resolute anger that he barely recognized the fidgety, nervous character who took him in. Lesson learned: Do not talk about Kip with Twig. Objective Get: Learn everything there is to the falling out these two definitely had and how it relates to his past.
(There was no falling out and they're still the best of friends, but Twig hasn't admitted to Kip who exactly her new roommate is, and she wants it to stay that way.)
Uhhhh what else can I say
Darkrai doesn't emote that intensely, or even very often. He pretty much always has the same wide-eyed, neutral look on his face unless he makes a conscious effort to express something. Flat affect-ers unite
What else, what else…
Y'know that one proverb?
The one that goes "The child who is not embraced by the village will burn it down to feel its warmth"?
It's pretty significant here.
#sofie says stuff#The Present is a Gift AU#pmd eos#pmd explorers#pmd2#pmd sky#pokémon mystery dungeon#pmd#pmd darkrai
31 notes
·
View notes
Text
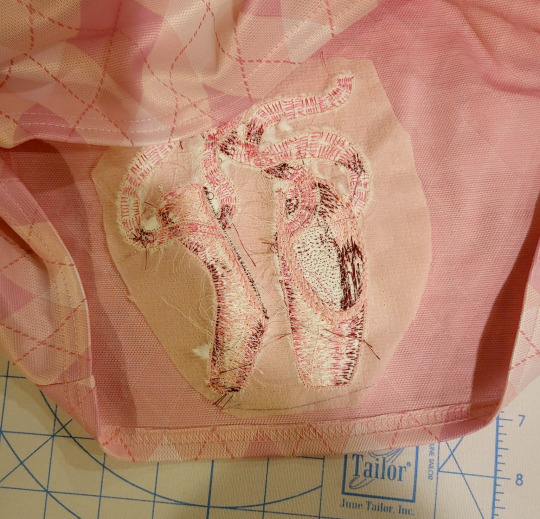
Machine embroidery tutorial: Shaded pointe shoes.
I know from working in a sewing machine store that a lot of people are intimidated by machine embroidery. So, I made this pattern the other day, and let's go into how I stitched it out.
Embroidery does not need to be this hard. If you've never used the embroidery part of your sewing machine before, stick some cheap stabilizer in the hoop with some fabric, grab a random pattern from inside your machine, and run all or part of it. Once you do this, you will be much less afraid of it. Some brands of machines will include some stabilizer and fabric for you to run an initial test on.
So, let's get into something more complicated. There's a few things that we're going to do to make this more complicated. The first is the surface that we're embroidering on. I'm using a dress from Five Below, which is made of a knit fabric without a whole lot of stretch. The surface that you embroider on does impact how you want to set up the design. I also want to do the embroidery very close to the bottom edge of the dress, so it's won't fit in the whole hoop. The third difficult thing about this design is that there's a machine applique in the very start. This applique will let you embroider this on a fabric that isn't pink, and the shoes will stay pink.
Regarding the applique, I've been told that it's small enough that you could cut up an actual pointe shoe and use the satin from that, if you want to. I don't have a shoe on me, since I don't dance (I just do the costumes). But, if you're making a gift for someone who dances on a level where they're throwing away dead pointe shoes instead of keeping them in a memory box, it could be a fun addition. Here is a template to show you how big the pieces need to be. Important: do not cut out the appliques using this template. The machine will cut them out for you later. You can use this template to know if the pieces of fabric you are using for your applique will be big enough. You want your pieces to be larger than this template, but they don't need to be significantly larger.

The first problem that we're going to deal with is the fact that the dress has a small amount of stretch in it. We don't want the section of the dress that has our embroidery to stretch at all. At best, it'll look bad, and at worst, it'll destroy the whole embroidery. To stop the area with the embroidery from stretching, we're fusing a fusible non-showing mesh stabilizer onto the area to be embroidered. I'm doing this design in 6x6 hoop, so I got a piece that was about 8x8 and fused it on the area.
When you're using fusible stabilizer, you want to iron it on from the fabric side. Some nylon meshes will melt if you iron them, but most importantly you want the face of the fabric to be perfectly smooth.
When the design is done, this stabilizer will remain in the design forever. This stops the design from stretching, even when the garment is worn or washed. The mesh is light and flexible enough that it doesn't drastically change the way the fabric moves.

The next thing we need to do is add stabilizer to the hoop. Embroidery machines put a lot of stress on the fabric, and so it's not usually possible to embroider without stabilizer. In this case, we're also using the stabilizer to hold the fabric, since we can't get it in our hoop.
This is two layers of soluble tear-away stabilizer. If I'm using tear-away, I always use lightweight tear-away. Using multiple layers of tear-away will put less stress on the stitching when you rip it away, because you rip one layer at a time. This requires less force than ripping a thicker layer away all at once. We're using tear-away because we don't want to keep all this stabilizer in the design. The specific one I'm using is a tear-and-wash stabilizer, where the extra bits of tear-away can be washed out of the finished design.
The other thing that I did while the iron was still hot was to press the pink satin that I'm going to use for my applique. Applique is much easier if the fabric you're using isn't wrinkled.

We're going to pop the hoop into the machine. Now is a good time to go into your machine's manual and find out where the basting line setting is. Bernina, Viking, and Pfaff all make this super easy, and Baby Lock and Brother do not. For Brother and Baby Lock, it's often in the "embroidery edit" mode. If it really gives you trouble, tell me what hoop you need it for, and I'll make you a version of this file with a predone basting line.
Some people like to spray-baste into the hoop. I do not like this, because it makes your hoop and your machine all ugly and coated in spray shit. If you are one of those people who likes spray, 100% take the hoop outside to spray! It's not good for your body and you'll get overspray glue all over your shit. If you're not a person who spray-bastes, do not become one.
Some people like to use tacky or sticky tear-away for this. That's a completely fine and valid option, but that shit is expensive. Basting line is cheap. A general stabilizer rule is that you can cheap out on tear-away and cut-away, go mid-price on fusible, and buy a good brand of tacky or wash-away. This is because it's pretty hard to fuck up cut-away stabilizer, but also pretty hard to make a good stabilizer that's also tacky and n'gones when you need it to. Since I have 200 things I'd rather do with $86 than buy a roll of stabilizer, I just use the basting program for 99% of my embroideries.
Before you run the design, flip through your color blocks. Make sure that your design starts with five blocks of the same color. If your machine decides to "help" you and merge the color blocks together, this won't work properly.
Now, put your fabric in the hoop, wherever you want the final design to go. I lined the hem up with the bottom of my hoop. Run your basting line, holding your fabric flat on the hooped stabilizer. You might need to pause and unpause the machine several times to move your hand and keep the fabric flat. Remember that as long as your hand is flat on the fabric, and you have a presser foot on your machine, you can't hit your fingers with the needle. Despite what this image shows, I often hold the fabric down with my whole hand in the center of the hoop.
Floating the fabric like this, instead of hooping, also allows you to line the fabric up very precisely. It's hard to hoop something 100% straight, but it's pretty easy to float it 100% straight.
Another advantage of floating with a basting line is that the line will show you exactly where the design is going to go. If you don't like where it's going to go, you only have about 50 stitches to rip out so that you can change the location. You'll know that your embroidery unit will have enough space to move. All hail the basting line.

The machine is going to sew an outline, and then stop. This is showing you where to place your applique fabric.
A good general rule is that any time a pattern sews an outline and then stops, you're supposed to put fabric down there. If your pattern does this, and you're not sure why, see if there's any instructions that tell you what applique fabric to use where.
If your machine sewed this outline and then kept going, make sure you have color block merge turned off, and that you're not in monochrome mode.
Just like when you were basting your garment onto the hoop, you're going to hold the applique fabric over the outlined area, and keep it there while your machine runs the next color.

Once the machine has sewn the applique fabric down, you'll want to trim away the excess. I use some very small curved scissors for this, since the curve lets me get very close to the stitching line. Generally, you want to be as close as possible to that line.
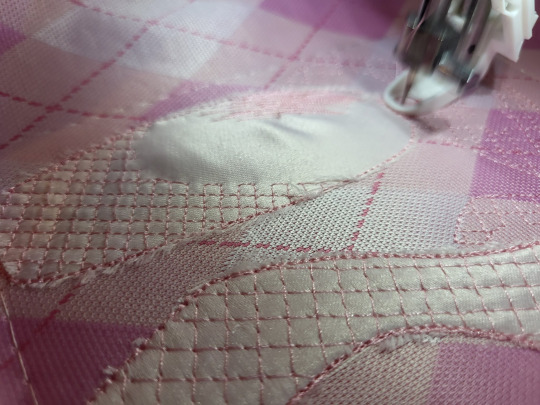
Once you have your applique fabric sewn in, you can more or less just watch the machine and change the colors when it asks you to. You'll see that I have a bulge in my applique fabric on the lefthand shoe. This isn't ideal, but since this design has so much stitching, it all got flattened down in the end.
You'll see that there's a lot of crosshatching on the surface before the colors go on. This is to stabilize the fabric and keep it in place when the big feathered stitches start. These stitches also sew the stabilizer to the back of the fabric, which means that if your fusible mesh starts to lose fusion, it'll still be completely sewn down.
If your machine has manual tension, you'll want to lower it after the crosshatching layers are done. You can change it after color block 5.

The reason that you're lowering your tension is that these stitches are particularly lorge and lomg, and that means the machine can pull just a bit harder than normal when it moved form place to place.
If your machine doesn't cut jump stitches (the long stitch the machine leaves when it jumps from one section of embroidery to another), you will want to trim them between color blocks, instead of waiting until the end.
If you're watching this stitch out and going, "Wait, I was told my machine embroidered at 1200 stitches per minute! This isn't going at 1200 stitches per minute! What gives?" well, I'll tell you. Your machine's stitch speed was rated by the absolute fastest that the machine head can go. It doesn't actually take into account how fast the embroidery unit can move. Since these are longer stitches, the embroidery unit can't move fast enough to keep up with the machine going 1200 stitches a minute, so the machine has to slow down to deal with the e-unit's speed.
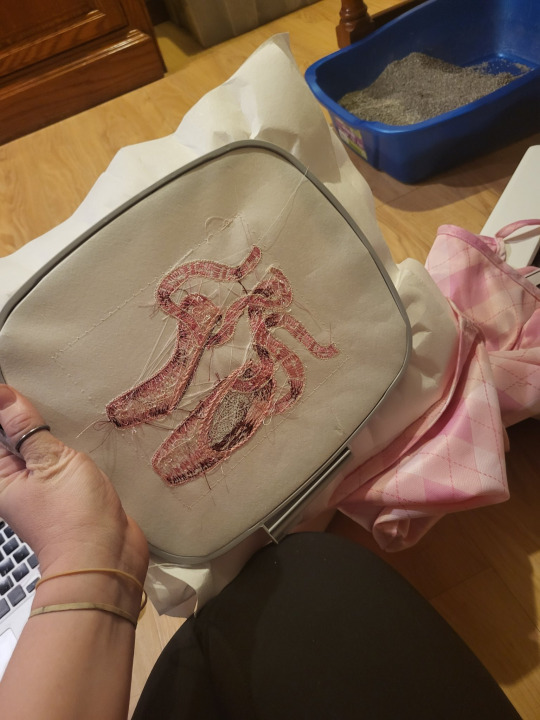
If you did this correctly, the back of your embroidery will not be sewn to the front of your embroidery, and you'll have something that looks like this.

You'll need to cut your bobbin thread about every 10 stitches in your basting line. This is pretty easy, because the stitches are so big. I do this from the back side because the stabilizer protects the fabric from my scissors.
Then, flip it over and rip out your tear-away, one layer at a time. You'll notice that my back side is really ugly. This is because Viking and Pfaff don't cut the bobbin thread between jump stitches. In the old days, this meant that they jammed and locked up significantly less than other brands, but now there's things like wiper feet and tail-clearing programs that work a lot better. No, there's no way to activate bobbin jump cuts. If there was, I'd have done it by now.
Now, using your iron if you need to, peel back the extra fusible mesh and trim around your design. You can get closer to it than I did here. I'm just lazy.
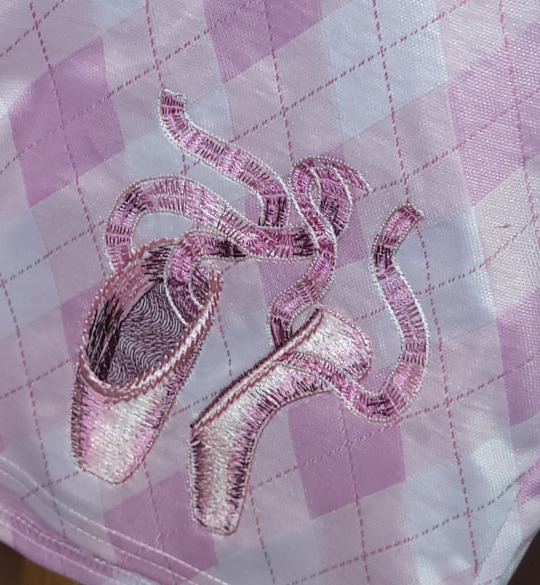
If you're using polyester embroidery thread, you get some pretty good results by sticking a press cloth over the design and ironing it. This will make sure the threads line up and stay extra shiny.

And that's important because polyester thread already doesn't have the same luster as rayon thread. It's more sparkly than lustrous. However, some brands of thread are just easier to work with. When we're testing machine problems in my store, we test with isacord, since it's the least likely to have problems, so we can rule out thread problems. But man, I just think it's so ugly. I used polyester for this design, because it's long stitches on a garment, and I need that strength, but I'm not happy about it.
Anyway, there you go, that's the basics of a somewhat complex machine embroidery pattern.
I'm considering making a separate blog for embroidery stuff. I'm really tired of the embroidery industry charging for tutorials like this or instructions on the embroidery software (looking at you, Floriani Total Control University DVD for $218), but this blog isn't really for my vendetta against the embroidery industry.
#machine embroidery#tutorial#not lolita#applique#pointe shoes#ballet shoes#you know that moment in welcome to the black parade where they modulate and it's just such a good moment
40 notes
·
View notes
Text
It’s been a hot minute since I posted any progress made on Ingrid’s Greywarden outfit so here’s a rundown of what I’ve done:
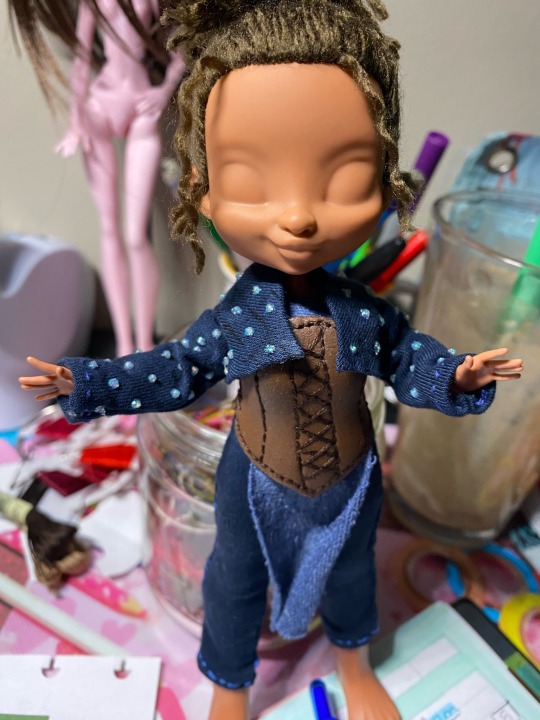
After finishing the chest piece I moved onto making the cropped jacket thing. Above is the first pass. I used 3D fabric paint to mimic the studs typically seen on this particular garment. As you can see it’s a tad too big.
Because I’m lazy and didn’t want to hand stitch the fabric edges I used fabric glue and folded them down. This messed with the shape of the edges, making them curved rather than strait. And of course stiff. Because you know. Glue.
I also didn’t make the hump thing while making the sleeve pattern so once the sleeves were attached the whole garment didn’t lay on the body well.
So I did some tweaking to the pattern and tried again.
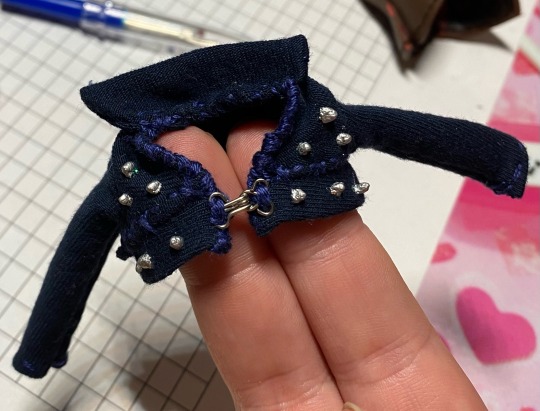

The jacket fits much more snug to the point where her hands need to be removed to put it on but that’s fiiiine. I hand stitched all the fabric edges this time around and it looks so much better. Also sewed on a collar and front clasp
As for the studs I decided not to have them run down the sleeves so I can add bracers without there being too much going on on the arms. This is a smaller scale doll after all so less is more in this case. Once the fabric paint was dry I covered each stud with silver paint using a toothpick.
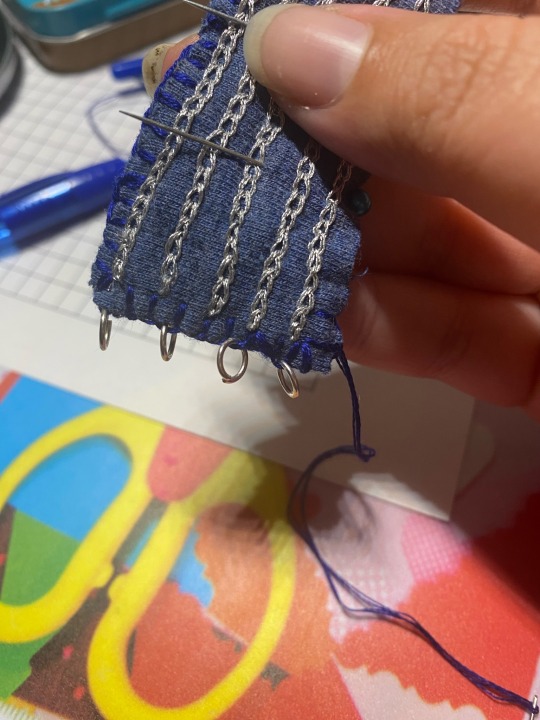
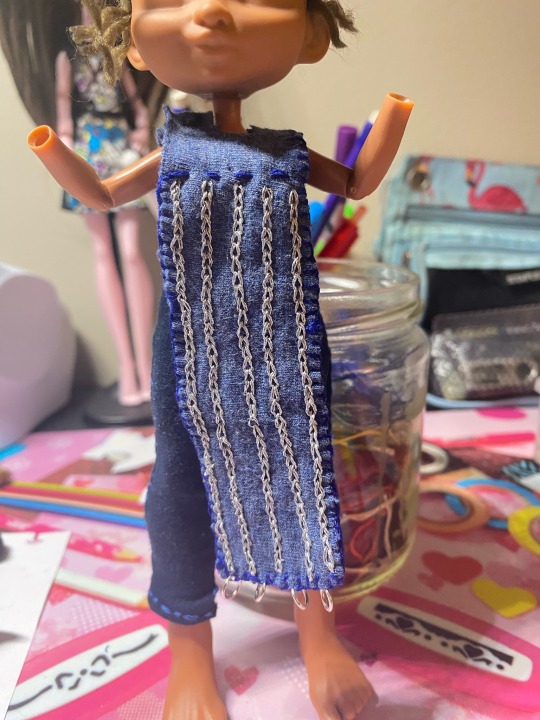
With the jacket done I can pay more attention to the tunic/poncho thing that will be worn under the armour. To give the illusion of scaled plating striping the front and back I made chain stitches using metallic embroidery floss. It was a bitch to use and in hindsight I should have made guidelines on the fabric to keep the stitches straight. Ah well
To prevent the fabric from curling in on itself and to cover up the backing of the chain stitches (or is it chain knots? I can’t remember), I pinned some extra fabric to the back and used a blanket stitch all the way around. The image above is during that blanket stitching process.
You will also notice that I added jewelry hoops every couple stitches to the bottom hem. I did this on both sides and just wanted a fun little detail. Would they be practical for a rogue? Maybe not a lot, but I like how it looks and it’s not as if dragon age armour is realistically practical all the time anyway.
Here is what it looks like thus far:
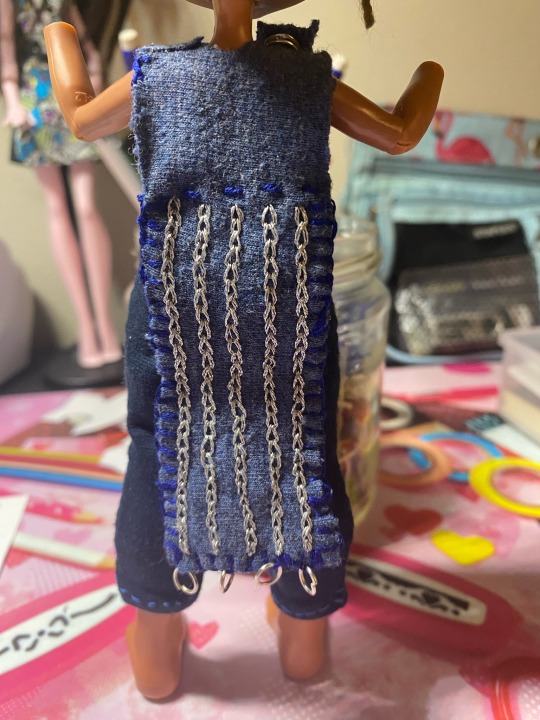
Where I left off was blanket stitching the upper portion around the shoulders to clean up the fabric edges. I’ll likely do some sort of stitch around the neckline as well.
Then I’ll move onto either bracers or boots next. I’m not sure yet. Because she’s a Fereldan warden I had the thought of using the extra brushed out yarn I have to possibly use as fur lining. Stay tuned!
#artists on tumblr#custom dolls#ooak doll#handmade#diy#dragon age origins#warden brosca#ingrid brosca
13 notes
·
View notes
Text
Embroidery 101: Basic Tutorial, Part 3
Welcome to the third and final installment of Embroidery 101. Wait, wait, I know what you’re thinking - “But, Mx Gradientdescent, we already FINISHED our embroidery last time! What could possibly be left?” Well, my wonderful students: just as we had a whole entire Part 1 to set up the embroidery before ever picking up a needle, we must not neglect the steps at the end to finish our work cleanly. But don’t worry: we’re still keeping this simple, with one of the very easiest finishing techniques.
Step 1: Clean Up The Work


After all the stitching is laid down, you’ll still see little bits of our original water-soluble pen marks underneath. These are very easily removed: simply run a bit of warm water over the work. You can keep things simple and just leave it in the hoop while you do this. Gently pat it dry with a clean towel and set it aside to fully dry.
Step 2: Trim The Fabric

We’re going to finish the embroidery by using the hoop as a frame. To do this, first trim away most of the excess fabric, leaving approximately 1” of fabric remaining.
Step 3: Running Stitch

We’ll now prepare to semi-permanently attach the work to the hoop using a simple gathering technique. Thread up a needle with a thick, heavy thread. Here I’m using a variety of embroidery thread called pearl cotton, but you could also use a length of embroidery thread with all six strands.
Now, using long stitches, sew a running stitch all the way around the excess fabric. Don’t knot it off yet!
Step 4: Pull the Gathers


Now gently but firmly pull on the long tail of your thread. Your long stitches should easily gather up, puckering the fabric and pulling it taut around the embroidery hoop. Now you can knot off the thread and cut it.
Step 5: Admire Your Work

With that, your first project is complete! Take a moment to sit back and gaze in admiration at your handiwork. Take in its beauty! Reflect upon the joy of creation! Today you have made a beautiful thing with your own two hands, and you should be proud.
4 notes
·
View notes
Text
I JUST REALIZED I'VE BEEN PUTTING THE EMBROIDERY HOOP TOGETER BACKWARDS THIS WHOLE TIME
2 notes
·
View notes
Note
Hi, I like your mdzs meta (and am interested in the hopefully forthcoming yzy meta) but even that of fandoms I’m not in (your final fantasy meta about the differences in canonical vs fanonical sartorial choices due to coding was enlightening, and I didn’t even know it was dark.) For the ask game: 🦷🐇 🦴 P.S. if you haven’t found it the eldest sibling cinematic universe is all tagged naruto?
thank you! :DDD i do meta posts primarily because i Have Thought that wants to be heard, but it's delightful for it to actually be wanted lmao.
i have filtered my blog for 'naruto' through three different methods without finding the ask where i was asked to crosscast mdzs and naruto. it is a Hidden Value for some reason. if someone finds it, please send me the link through dm or something.
haha only white things! three white items! tooth-bunny-bone.
🦷 ⇢ share some personal wisdom or a life hack you swear on
So when you own a lot of stuff it is so so important to store it in the most organized way you can manage, because the [task burden] of finding the desired item needs to be low enough to keep you from giving up on finding your own things when you want them, because that makes them useless to you.
This is especially important for things like craft supplies and hardware. Put the same kinds of things together, in a closed, clearly labeled container, with some kind of internal partitioning by sub-category, as much as you possibly can.
Take as much of the burden of locating your possessions off Future You as you can; I know it feels like a tiresome outlay of effort in the present keeping you from dedicating the time to actual [activity], but once you make a habit of it it's very much a stitch-in-time-saves-nine that will make [activity] more accessible to you.
This doesn't mean you need to Buy Product, although some of the stuff that's sold for organizing can be very useful. I keep all my embroidery floss in a small wooden chest I bought at a tag sale, sorted by color family into little plastic baggies. So it's fairly trivial now to go in and see 'what reds do I have?' choose one.
Then I transfer the hanks I'm using for my current project into the transparent plastic box with a snap-on lid I got for one dollar from Michaels Crafts, where the embroidery needles live fulltime, and bundle just that into a basket or bag with the hoop and fabric, while the rest of the chest can go back in the closet until it's time to put the remainder away again. Maneuvering the box physically in and out of the closet becomes the hardest part of accessing the materials.
The ability to pick up and move a whole project at once is also very valuable for anyone without like, a whole designated Crafting Area in their space. And for people who do have that, but are always being impeded by their own clutter.
If you have a basket or tray or something you can stack all of a given project onto and whisk away to clear your worksurface at need, you'll be much more likely to actually commit to working on that project when you want to, without feeling burdened by the future opportunity cost of having to completely finish and/or abort progress on it if something else comes up.
Probably not everyone gets stuck on that, especially people who only work on one thing at a time, but I think there are enough people like me that giving yourself permission to use the 'sewing basket hack' is valuable. There are big downsides to burying yourself in stuff in the effort to keep it all near to hand and accessible, but there are also definite, meaningful costs to having to put everything away in its Own Place every time you're interrupted, especially if you have trouble with any part of executive function.
🐇 ⇢ do you prefer writing original characters, reader inserts, or a mix of both?
Egad I have never attempted a reader-insert in the contemporary style. Honestly, I can't stand them.
Writing in the second person is all well and good for textural reasons, but as a way to 1) compensate for the evidently dreadful imagination skills of the audience and 2) shield the writer from responsibility for their own writing choices, I consider the 'reader insert' to be an overall cowardly and limiting construct.
I would much rather see a fic that instructs me to understand myself as a four-foot-tall electric blue parrot than one that attempts to narrate a 'me' generic enough to be plausible to any potential reader; when the 'you' is a giant parrot with discernible preferences and goals it is, of course, an original character.
In fact, so is every reader insert, they're just usually terrible ones. Attempting to write an OC with no traits is so sad.
Anyway I'm fully capable of projecting myself onto a parrot if I want. Otoh I'm not shameless enough to publish old-fashioned self-insert fic, which is a different less craven stylistic approach to the same goal, which is only partly because I was trained on anti-OC backlash and mostly because my standards are such that the few attempts are either 1) plotless exercises in self-gratification which aren't worth finishing once the fun part of drafting the entertaining scene is done or 2) agonizingly honest. I don't feel like being quite that honest with the internet, ty.
I love character creation though so OCs good yes.
🦴 ⇢ is there a piece of media that inspires your writing?
Like. Besides the obvious, given this is a fanfic ask game afaik? Uhm. Diana Wynne Jones' body of work; the way she structured the narratives of her children's novels so the inherent unreliability of any narrator was maximized and played a vital role in mediating between the story and the reader.
I am not naturally good at playing keep-away with information, but I recognize it as a vital writing skill because context is so vital to the experience of media, so I pay close attention to how this sort of sleight of hand is accomplished. I also really appreciated Jones' relative lack of talking down to her child audience.
#ask#hoc est meum#glitterypenguintyphoon#ask game#organization#oc versus reader insert#dwj#people say nice things
2 notes
·
View notes
Last Seen Blogs