#wig tutorial
Explore tagged Tumblr posts
Visit Tumblr Blog
Explore Tumblr blogs with no restrictions, modern design and the best experience.
Last Seen Tumblr Blogs


Fun Fact
Tumblr is available in 18 languages.
Text
hi I’m a very long time cosplayer (20+ years experience) who has chronic headache and migraine problems and this is a post about how to prevent your cosplay wigs from giving you painful headaches! Nobody likes wandering around the con in blinding pain and so hopefully this post will help you reduce the chances of this happening.
1. If your wig is way too tight, don’t use it. Get something with a bigger cap. tbh I often wear slightly too big wigs to reduce the pressure! Find out what brands and sellers sell wigs that are comfy on your head and prioritize buying wigs from them! I made a big master list of cosplay wig sellers a while back so here’s a few you might not have known about. Arda (and its Canadian and European sites) sells by far the biggest wigs, but I personally find Classe the most comfortable for my specific head. It’s all very YMMV and it’s totally possible for a wig to not actually be too small but fit your head in an uncomfortable way (Blue Beard on taobao does this to me every time), so just don’t buy from suppliers that do that. Also consider resizing wigs to be larger! For wig clients with extra large heads I like to nip the edge of the wig right behind the ear where your ear and hair from above will cover it and add in a little godet of elastic.
2. Reduce weight! A heavy wig will make head pain much more likely, so here’s a few tips on wig weight reduction!
A) if your wig doesn’t need a ton of volume and is already very dense, rip out some wefts in the bottom half. Anything on the part of your head from the ridge where your head starts going in towards your neck won’t really show unless your wig is very short and it’ll obviously reduce weight instantly! You can replace any missing volume with light crimping or light heat and tease, or leave the wig as is for a natural and silky look without the unnatural volume of a cosplay wig.
B) if you need more volume in your wig, instead of going straight to adding wefts for more volume, see first if combining crimping with heat and tease at the roots will give you the extra volume you need! Crimping or heat and tease adds volume and if you straight up destroy the fiber in the first two inches from the scalp by doing both repeatedly, it’ll add huge volume without you needing to add extra hair! When I do this I like to heat the fiber near the roots, tease it, let it cool, crimp the teased part, let THAT cool, and then brush it out. You can flat out double the perceived volume in the back of the wig this way!
C) if your character has a high ponytail or high pigtails, consider using clip on ponytails that you can easily remove if you need the weight off your head right the fuck now. here’s two tutorials I swear by for making a short wig + clip on combination look more natural! They’re in Japanese but easily comprehensible if you use machine translation thanks to the clear photography. They also help with spreading out the weight on the wig itself, and if your hair is long enough, using a clip on with a fishnet wig cap and clipping through the wig and into your real hair will also he lp make it more secure and distribute weight more evenly.
if your character has high pigtails
if your character has a high ponytail
D) when you need extra wefts, opt for sewing in wefts rather than gluing whenever possible. Glue doesn’t seem heavy but enough of it can make a wig get real heavy REAL fast.
E) redirecting the weight to your entire head and not just the front hairline will feel lighter and give you less forehead tension, which is one of the biggest causes of wig headache. Toupee clips sewn evenly around the edges and a Wig Fix https://therenatural.com (the name brand one, the knockoffs genuinely don’t work half as well) can help with doing this. A Wig Fix will also let you use fewer pins to keep your wig on, which is another cause of wig headache. Can’t suggest trying those enough. There are also some velvet wig grips out there but I find those don’t work quite as well, but they’re by far better than nothing.
3) make sure your wig is easy to remove. A lot of characters have horns or veils or other head things on top of the wig so make sure those can easily come off if you need a wig break! I’m a big proponent of using wig glue or double stick tape to glue strands (face framing layers etc) to your face for a more natural and more flattering look, but if you get headaches from wigs, keep that glue or tape in your bag so if you have to de-wig for a bit, you can get it back on!
4) take the ibuprofen or whatever BEFORE you put the wig on, and not when your wig is already making your head miserable! It’s like taking the ibuprofen before you wear the horrible shoes for a special event; it’s more effective in advance.
5) what are your normal headache triggers? Make sure you’re doing the work to EXTRA avoid them before wearing a cosplay wig. Stay hydrated. Keep up with your electrolytes. If you have any food triggers, make sure you’re managing them properly.
6) try multiple types of wig cap before deciding which ones to use! I’m a big fan of the fishnet kind because I’m in agony every time I try to use the stocking kind. Some people find relief in doing pin curls under their cap, and @/battleangelgif on twitter suggested doing this with damp hair the night before you wear the wig. There are tons of methods! Stretching out fishnet caps can be done more effectively when they’re slightly damp and that’ll make them pinch less. Experiment with what you like best to keep your irl hair in place and once you find a method you like, go for it! Make that your go-to!
7) always remember: wearing a short wig is less miserable than wearing a wig to your ankles. consider very carefully whether or not you can actually handle that wig that’s as long as you are tall. sometimes you just can’t and that’s okay! reduce the length of any super long haired character to hip length and it’ll be FINE. I swear. It’ll still read as super long and it won’t be as terrible.
8) always remember you can just. take the entire wig and cosplay off if you’re in agony. it’s not worth it. don’t do that to yourself. If the migraine hits anyway, just take it off.

Hope some of this might help you out! Focusing on reducing and redistributing weight is what helps me out the most 😌 feel free to reply or reblog or message with questions and I’ll try and get back to you ASAP!
#cosplay#cosplay tutorial#wigs#wig tutorial#cosplay tips#reducing wig weight#I just want to save everyone from blinding cosplay wig induced migraine#nobody likes head pain at the con#hope I was clear enough hhhhhh#yes this is an expansion of a twitter thread I wrote#y’all get the better version
633 notes
·
View notes
Text
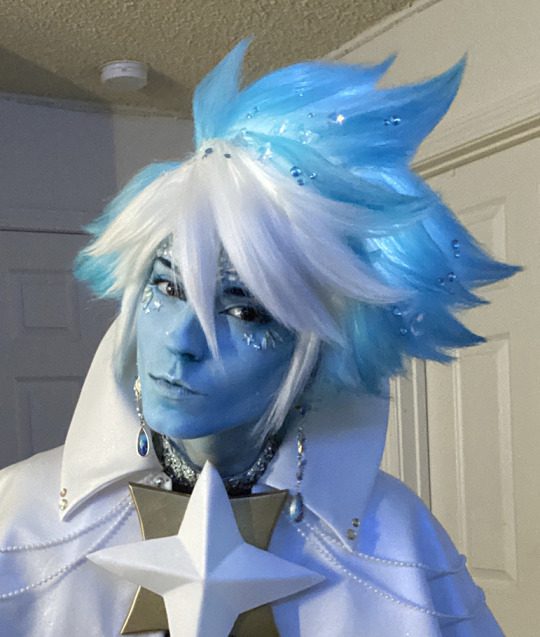
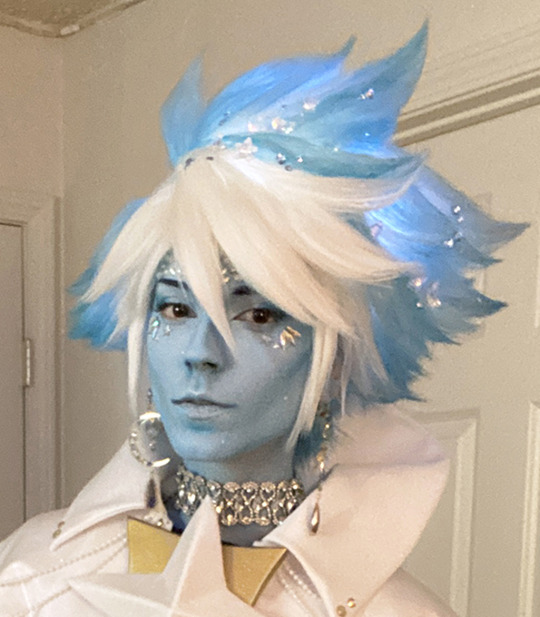
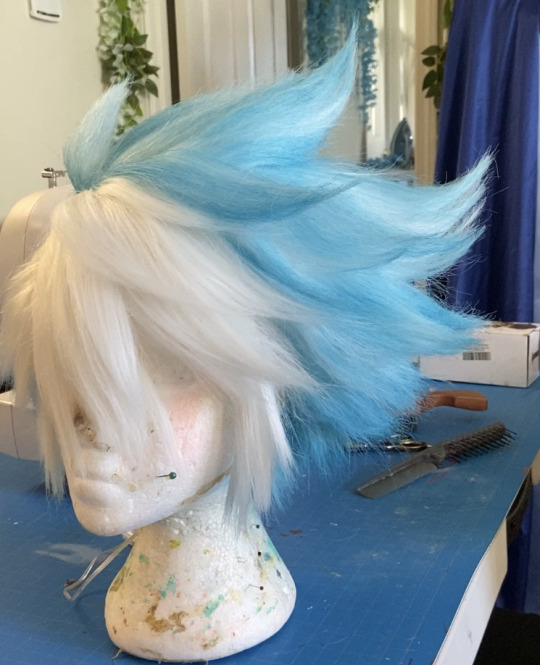
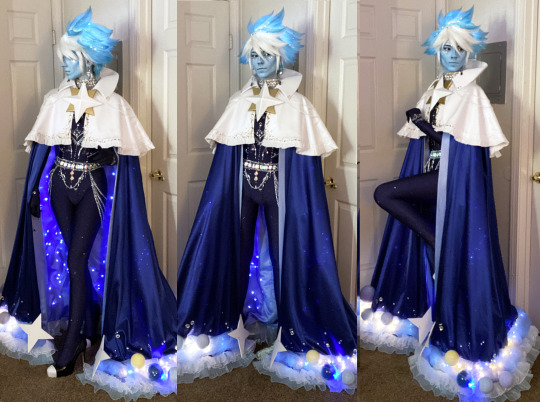
How I made my glowing stardust cookie wig with translucent spray paint and button battery LEDs
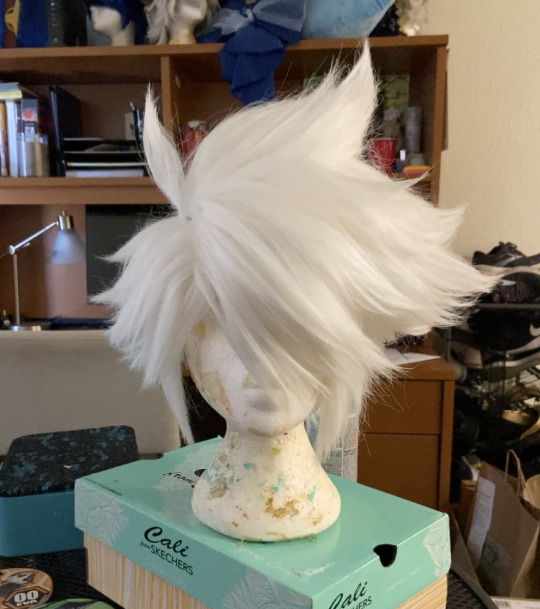
I started with a pure white arda wigs jaguar that was already fully styled since you will need all the shapes to be set before adding color. To style it, I did the classic "heat the fibers upside down, tease via backcombing, brush them out, heat and tease again, brush out...again" method that is formally outlined in my karna tutorial. You dont have to have your shapes perfectly locked in before adding in color since you will be brushing it out once more, but you will need all of your teasing and heat training to be done before adding color.
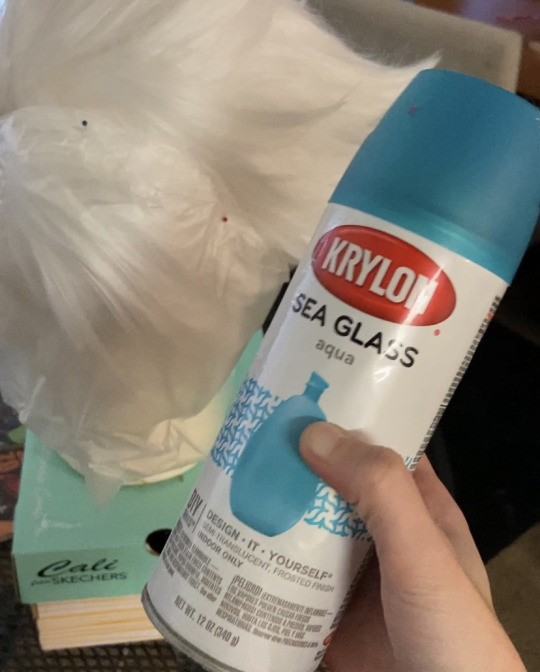
Stardust Cookie's wig involves leaving the bangs pure white and the back sections blue. There are a million ways to do this (start with a blue wig and add a white bang front, airbrush color, dye wefts and sew them together, etc) but the method that was the most economical for me involved using krylon translucent spray paint. I know using spray paint on a wig sounds scary and i would not use an enamel or fully opaque spray paint on a wig, but the krylon translucent spray paint is shockingly soft, flexible, and goes on in light coats.
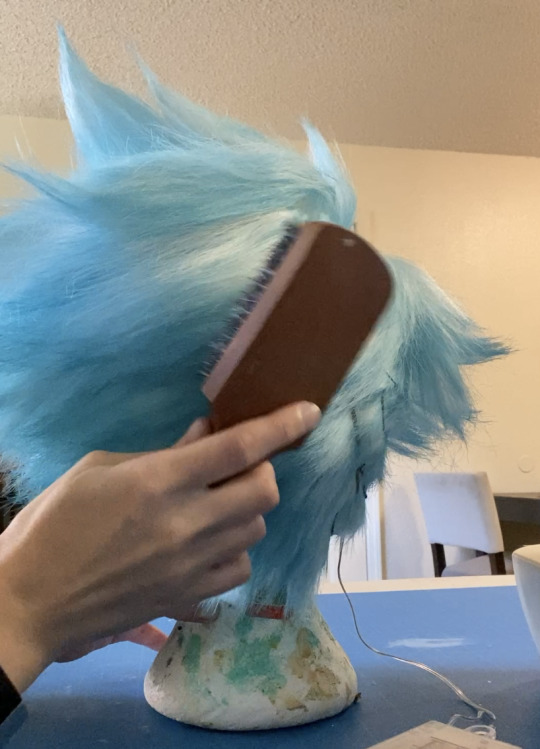
To keep the bangs white, I pinned down some cling wrap all around the bangs and made sure the line was snug. at this point I very gingerly began applying spray paint to the back sections of the wig. I did this in very light coats at a distance of about 18 inches from the wig. Honestly right after spraying, the fibers were still soft and the coverage was as good as i was expecting to get, but i did take a hog bristle brush and thoroughly combed out the fibers after this stage. This helps break up any strings and more evenly distributed the color.
This method works well if you want a soft color that does not need to be perfectly uniform. And I knew since I was adding lights below, that the color coverage itself didn't matter a whole lot, so long as it was translucent, didn't have any major streaks or clumps, and light could get out smoothly.
To add lights to the wig, there are 4 button-battery 30-LED fairy light packs glued into the underside netting of the wig. Always be sure to check if your LED wires can withstand hot glue heat before application (but most standard LED packs can withstand a low heat setting.) I did not have any problems with the heat of the wig + my body heat causing problems with the LEDs after being worn for several hours. These lights provide a diffuse, background glow throughout the wig and can be seen through the blue color. the below image of the wig only has lights underneath the netting (only one pack on for that image).
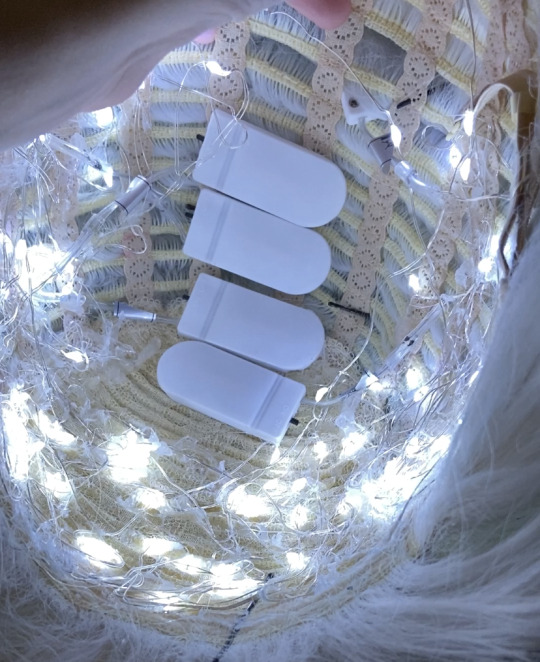
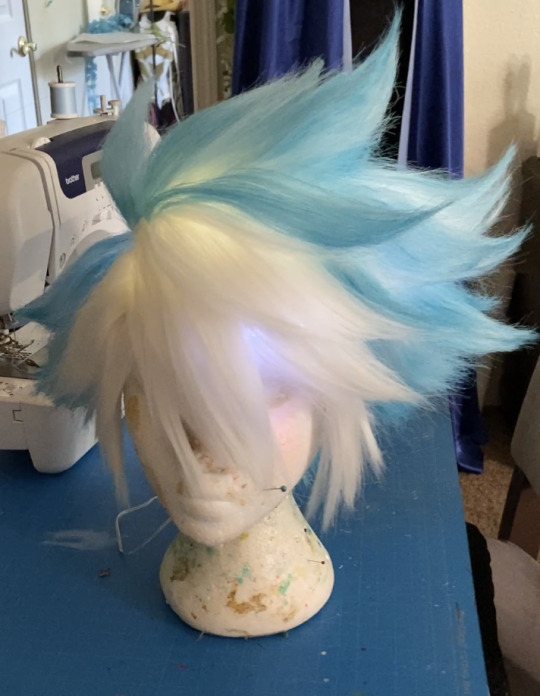
To light up the upper parts of the wig, there is one pack of LEDs threaded through the teased, textured bases of the spikes. Because these lights are on top of the netting and going through the textured sections, they scatter off of the teased hair and provide illumination to the higher parts of the wig. below is an image of the wig with only the single "top" lights lit.

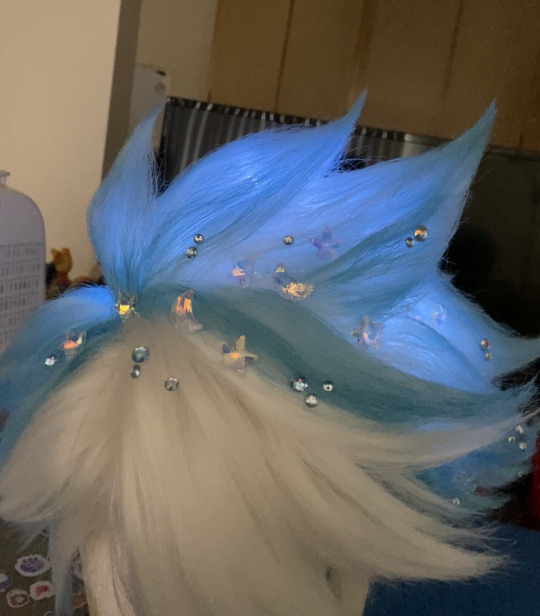
and that's how I made this wig! Other than that the rhinestones and other accessories were just glued on w/ hot glue. This wig looks nice in person and on camera and is stable. Granted its a little uncomfortable since you can feel the wires and the battery packs ngl but i've certainly worn worse. You can use hairspray on top of the translucent spray paint in small amounts, but in general i would proceed with caution since if nothing else, it may make the fibers look particularly stringy (which is why i highly recommend heat-set styles for this application over hairspray-set ones)
Believe me you can go pretty far with a "let me just slap some LEDs in there with a bit of glue" attitude when it comes to adding lights to stuff.
294 notes
·
View notes
Text
🖤🖤🖤 @baeway954
#black tumblr#black girls are beautiful#black girls rock#black women#black girl beauty#black beauty#black girl aesthetic#black is beautiful#black woman appreciation#black femininity#beauty#beauty tips#synthetic wigs#wig tutorial#wig styling#wigtips#tutorial#hair tutorial
44 notes
·
View notes
Text
instagram
5 notes
·
View notes
Text
Rick Sanchez Wig Tutorial | Monobrow Included!
youtube
Sharing in case I accidentally close this tab I've had open for months (like I almost just did 😅), and because I REALLY need to finally decide on & buy a damn wig this week.
I'm not 100% on the wig actually used in the video - instead of spraypainting to tone the color like they say to at the end, I'd rather just... find one closer to the right color to begin with.
#rick and morty#rick and morty cosplay#rick sanchez#rick sanchez cosplay#omg i really need to start actually working on this#the con is just over a month away#and i have 500 things to do#wig tutorial#epic cosplay wigs#i kinda think they made too many spikes in his hair?#so i'll probably opt for doing a few less and making some of them bigger#but I do think this tutorial looks good & will be helpful overall#especially for making the bald spot#Youtube
2 notes
·
View notes
Video
youtube
HOW TO INSTALL YOUR WIG LIKE A PRO FOR BEGINNERS
1 note
·
View note
Text


One of my absolute favourite techniques for getting synthetic wigs with depth and realism is to go at them with alcohol markers (copics if you can afford them, but store brand also work!)
Light-coloured wigs give the most possibilities for dramatic alterations, but you can add depth to medium-darker shades as well! By adding roots and lowlights, you can get really beautiful blended shades, or you can even change the colour completely. You can also tint wigs warmer or cooler depending on your goals - a blonde wig for example could read more platinum if you blend in a cool grey, blue, or purple tone.
For most of the work featured here, I literally just drew on the wig strands with markers, and heat-set with a hairdryer after! You could also do alcohol inks mixed with isopropyl alcohol in a spray bottle if you need more coverage.
Basically, I always encourage folks to look at wigs (and any materials tbh) with an eye for not an exact match, but what they COULD become with a little work behind the scenes! Happy wigging!
(Oh and to add!! The one thing you have to be careful of is hairspray! Wigs that are lightly markered are usually okay, but the more ink you add, the more likely it will be reactivated by the alcohol in hairspray cans, so keep that in mind for your projects!)
365 notes
·
View notes
Text

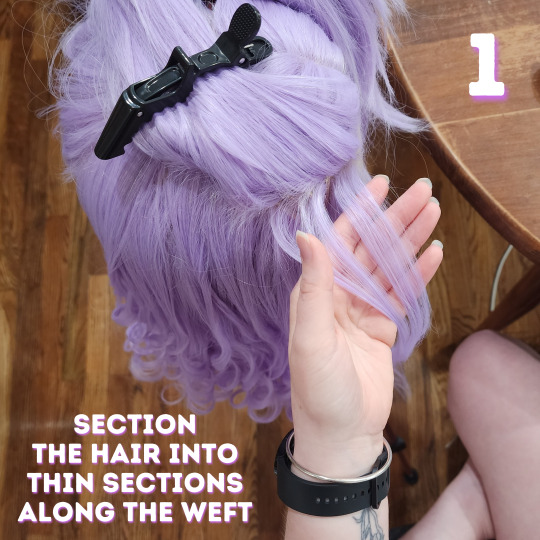


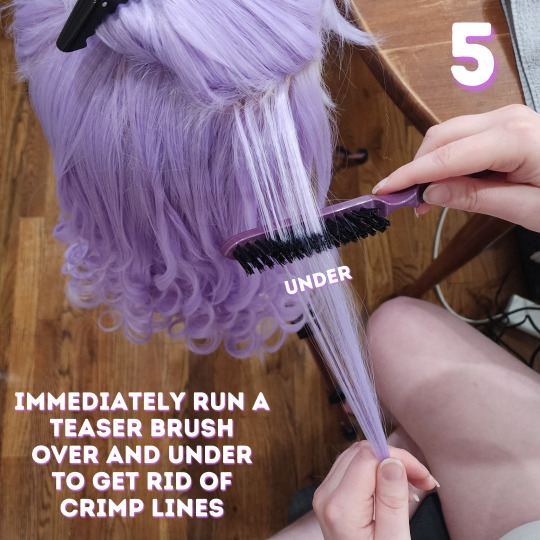


Here is our complete guide to curling a heat safe wig!
We specifically figured out this method worked best when styling this wig for my level 3 Imogen Temult cosplay. She's from campaign 3 of Critical Role. There are many other methods to curl wigs, but this is the one that got the best hold and our desired look on this particular wig! Of course, then I decided to cosplay Imogen at level 13 first and her hair is totally different so this wig is going in storage but at least we got to make a useful tutorial first.
We already have a video version of this tutorial up on our Tiktok and Youtube that we will move over to Tumblr, but honestly I struggle The Most with learning from video tutorials. I prefer things written out so we wanted to make this sort of tutorial as well for accessibility!
Additional tips & all of the products we use are under the cut. Feel free to shoot us a message if you have any questions or want more tutorials on wigs!
What We Use:
Wig: Pastel Purple Wavy Lace Front Synthetic Wig LF5110 from Wig Is Fashion. It technically comes with a curl but we straightened and recurled it differently. Whatever wig you get, just make sure you check that it's heat safe before attempting this!
Silicone Spray: Mane 'n Tail Detangler. Yes, this is technically for horses, but listen, it works SO WELL on synthetic wigs. It keeps it from getting all static-y and tangled. We've only ever used this brand but it works really well so we're def sticking with it.
Setting Spray: Schwarzkopf Got2b Glued Blasting Freeze Spray. This makes sure the curls you spent hours making actually hold!
Crimper: SixRiver Ceramic Waver Hair Tool with 4-in-1 Flat Crimping Iron Plates. This comes with four ceramic crimping plates and Nic uses the one with the "most wiggles" on the lowest setting (320). You can probably use any crimper that goes low enough. Crimp it fast, you aren't holding it like with curls.
Curling Iron: Conair 1 Inch Curling Iron. We use this on "19", whatever that means because it doesn't actually have temperatures. Any curling iron with low enough heat settings will do, you might need to play with settings to make sure you don't melt the hair. Test it on the bottom of the lowest layer of hair where you could cut it off if you melt it. As with curls on human hair, different barrel widths will give you wildly different curl looks.
Teaser Brush & Large Tooth Comb: Honestly these probably came with one of our first hair cutting or wig styling kits so ¯\_(ツ)_/¯ Apparently the teaser brush is Revlon branded.
We aren't sponsored by anyone, this is just what we use! Feel free to substitute in anything that you have / know works well with wigs. We hope this helps! Please let us know what other cosplay or crafting tutorials you'd like to see <3
#wigs#wig styling#cosplay#cosplay wigs#critical role#imogen temult#imogen temult cosplay#bells hells#cr3#imogen temult cosplay level 3#nic crafts#work in progress#crafting#craftblr#cosplay wip#buy list#crafting guide#tutorial#how to#cosplay guide#cosplayer#wig#polycraftory
76 notes
·
View notes
Text
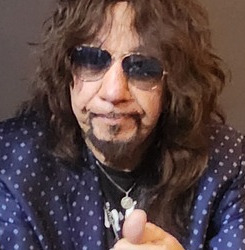


Just got my 'hair' did
#kiss#mykissposts#ace frehley#space ace#spaceman#old man ace#imagine if he had a hair tutorial for styling and it's just him putting on the wig lol
15 notes
·
View notes
Text
cosplayers, may I present to you…..
✨ shaded braid ✨
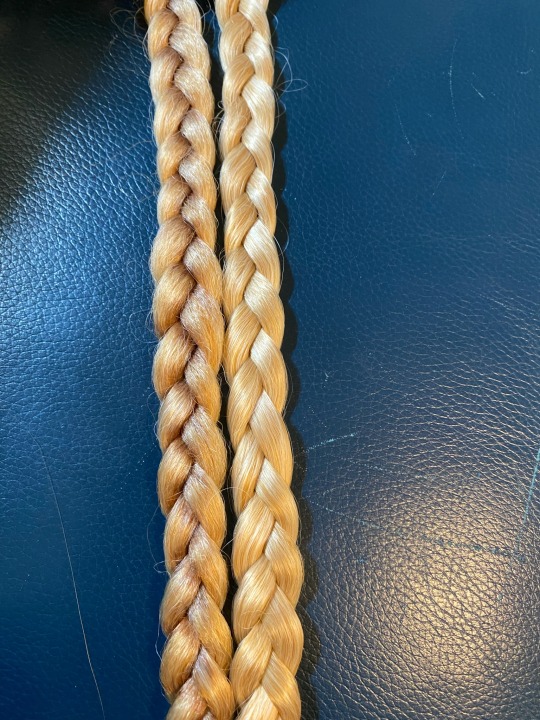
These two braids are otherwise identical but on the left, I used inexpensive alcohol markers to add some extra shadows into braided wig fiber so that it’d photograph with more dimension, much in the way you’d black wash a miniature or prop! It took such little time for such a dramatic result. It’s also hard to overdo this because if you put too much on, a little bit of rubbing alcohol on a swab will erase it!
[ID in alt text]
#cosplay#cosplayers on tumblr#cosplay wig#cosplay tutorial#cosplay tip#wig tutorial#wig tip#this was for a Jolyne wig lmao
139 notes
·
View notes
Text


Hello guys, i need some advice about how to style a new wig for my first cosplay as chili pepper cookie.
But I don't know how to style this wig to make it have those shapes on the sides and front of her hair. So, if you have any tips for this cosplay, it would be very helpful. 🥳🌶
(Even tips for making props)
#beginner cosplayer#cosplay wigs#red hair#wig styling#cookie run kingdom#chili pepper cookie#cosplay#costume#prop making#crk#beginner artwork#tutorial
3 notes
·
View notes
Text
#black tumblr#black girls are beautiful#black girls rock#black women#black girl beauty#black beauty#black girl aesthetic#black is beautiful#black woman appreciation#black femininity#wig hairstyles#synthetic wigs#wig tutorial#wig styling#wigtips#cosplay#tutorial#unboxing
48 notes
·
View notes
Text
instagram
2 notes
·
View notes
Text


I'm... starting to not hate it. But fighting with this wig has easily been my least favorite part of working on this cosplay. I want to be done with it so badly. 😭 I still have a LOT more work to do on it, but I needed a break (and to come complain).
#rick and morty#rick sanchez#rick and morty cosplay#rick sanchez cosplay#cosplay wip#why won't this damn wig do what I need it to?#nothing is working like in the tutorial
8 notes
·
View notes
Text


girl power ‧₊˚🌸✩彡👊🏻‧₊
#i watched a bunch of tiktok tutorials on wigs and i'm pretty proud of how it turned out!#sakura haruno#sakura haruno cosplay#aljosch
13 notes
·
View notes
Text
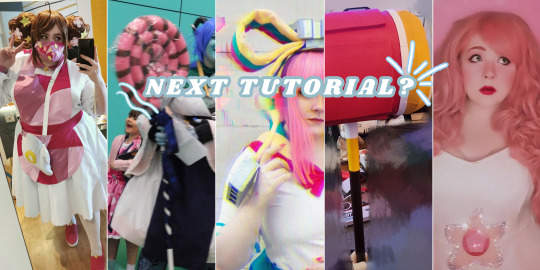
Hey! Do you want to learn how to make Giffany's Bow? Or Rose's shield? or maybe Jester's Lollipop?
Well I'm trying to work out what tutorial to work on next, head over to my Ko.fi to vote! Click Here or on the picture above!
#Cosplayer#cosplay#cosplay tutorial#tutorial#kofi#cosmaker#wig styler#wig styling#sewing#crafting#prop building#jester#critical role#lavorre#bee#and#puppycat#wig#robot#cyborg#donut ep#cartoon#giffany#yandere#disney#costume#makeup#robotics#foamsmith#foamwork
5 notes
·
View notes