#(erased everything in the save folder)
Text

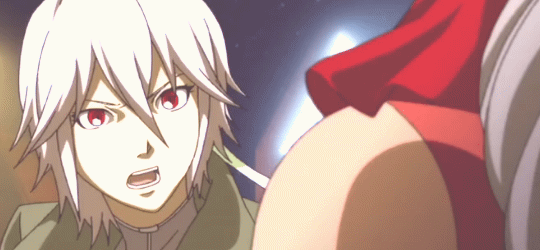
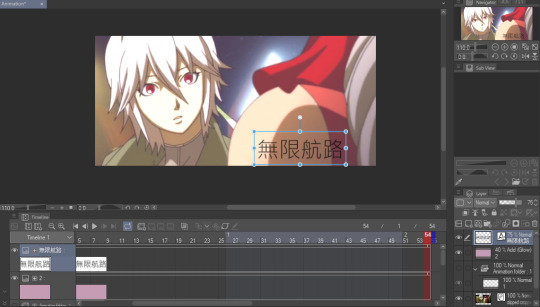
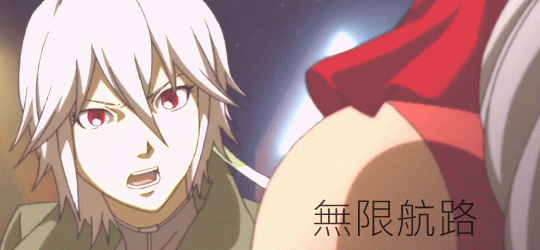
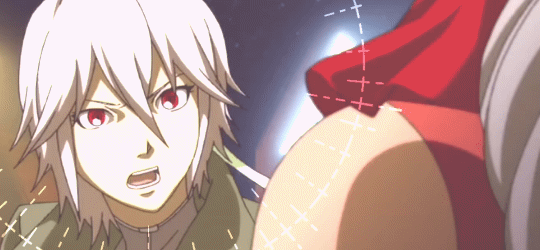
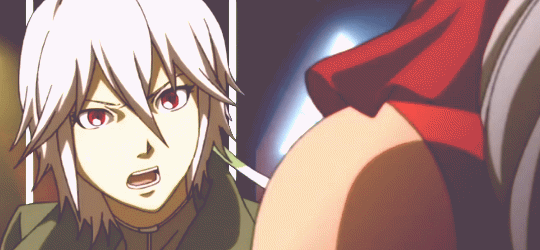
random note about king on that animation, i got really lucky with how simple his animation was and how clean my sketches were to begin with that i was able to do very minimal cleanup on what i had sketched (and add back. his horn. it's supposed to take place just after echoes of the past, Oops) and call it done that way instead of having to redraw the entire thing like i had to on his dad
first sketch > line cleanup > nearly final animation (i'd added slight eye movements last-second but otherwise that's the final)
#toh#the owl house#animation#gif#king clawthorne#the lineart slightly flickers on his one paw where i had to erase the tag and i thought it would bother me a lot more#but most people seem to use the internet on their phones - coupled with the darker palette and color of his fur#it basically completely hides it#based on feedback i don't think a lot of people realize i made that and it's not a gif from the show lmfao#BUT ITS STILL REALLY NICE THAT PEOPLE THINK IT IS!!!! I AM NOT AN ANIMATOR I AM JUST A HOBBYIST...#i animate like once a year... shits hard man.... but apparently when i do animate. its extremely good :) proud of that#even if i have an extremely unhinged way of animating#i don't have an animation program i draw everything individually frame by frame in photoshop#each character had their own psd file with the same background and every frame was its own group. twice. one for sketch one for colors#i do test takes with gifcam (there are literally 55 WIP gifs in my documents folder rn) by switching between layers and taking a 'frame'#and i compile in blender's video editor and to move things separately i save each character's frame in its own .png 'cel'#so luz was her own 'cel'. king was his own 'cel.' etc. and then i have to manually slide the lengths of the frames around#to match the right framerate. traditionally animation is animated at 24 FPS on 2's - so 12 frames a second. i go on 3s. 4 to slow down#anime-ass framerate. i'm insane apparently but its what i like to do#i dont understand real animation programs they have too many pieces but i DO understand photoshop and my funny brushes#imagine having Digital Programs and Still basically doing ye olde traditional animation method just in the computer#if im Just making a gif then i only use gifcam and switch between layers. like digital stop motion. somethings wrong with me
326 notes
·
View notes
Text

this WIP... i am... how u say... riding the strugglebus
#you do NOT want to see what the layers folder on this psd looks like....#i draw everything on the same layer but each time i want to create a /save state/ before altering something i duplicate the layer#save scumming but in an artist way#so much left to do before i can even start coloring also no lineart we erase the stray shit on our sketch layer like men#kazumaji#WIP#yakuza
143 notes
·
View notes
Text
i honestly think it's really neat how when it comes to MMD models there's a sliding scale of "uses raw untextured materials colored via diffusion/ambient/relfective values and relies solely on external shaders for definition" ala the original animasa models to "has highly specific specialized shading baked directly into the textures and may use a single toon At Most™ for flavor" and how most models tend to fall somewhere in the middle
#there are also models that are very intricately textured but Will Actively Perish™ if not rendered with an external shader#and models that have a really nice balance between baked and toon/spa shading that opens up the option to swap in new shaders as needed#i am thinking about these things because i am once again working in vroid and thinking about how much i don't want to use blender#and thus am making this As Baked As Possible™#because like yes#in theory i know how to repaint normals and clean up edges and incorporate a little knife tool action as needed#but working in blender makes me feel like i'm performing surgery in a operating room laced with rube goldberg machines designed to blow up#like i put in the effort to learn grease pencil and I'm Good With That Now™#but i do not have the terminology nor vocabulary to look up what i need in general blender tutorials#and thus every moment is another chance for Disaster™#(like the time i went to save my model and somehow hit a key that just)#(erased everything in the save folder)#(with no way to get it back)#(put the fear of 3D modeling in me)
16 notes
·
View notes
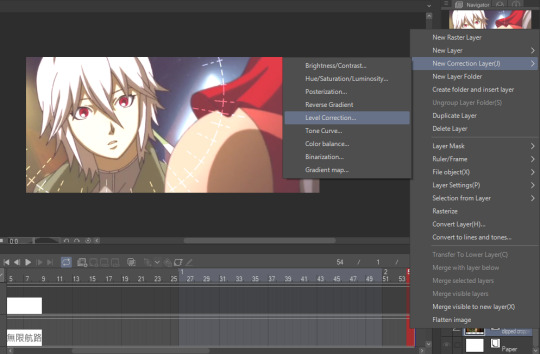
Note
Hii you're so talented!! i wonder if you could explain how you did this gif effect with the squares? and do you have any tips on colouring because yours is always top notch <3333
heyy thank you so much 🥹 and of course! i've never really done a tutorial before but i'll try my best to explain it in a way that makes sense 😅

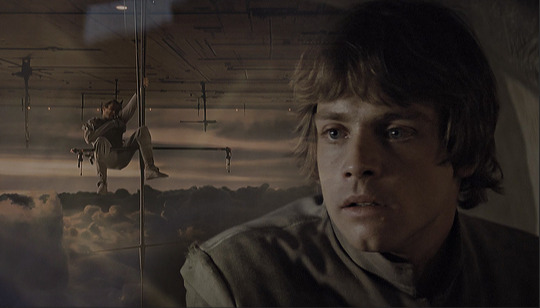
so i start off with making my two gifs seperatly and colouring them as i normally would, once i've done that i load both gifs into the same project and once i've done all that i started on the grid part:
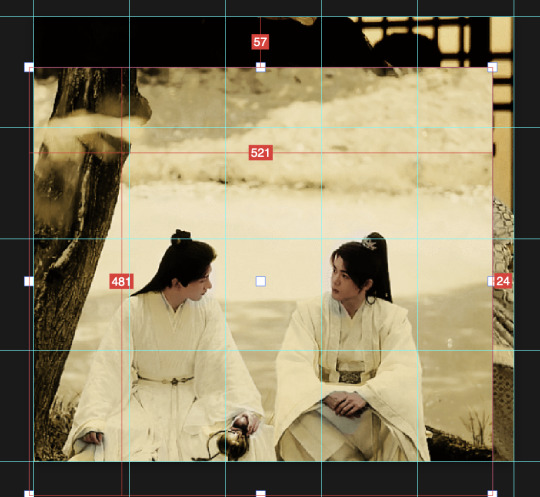
now go to view -> add guides and this window should pop up:
(it's was so daunting at first when i saw this i was like ????? and started putting in random numbers and was like oh that's how this works 🤣)
here's the settings i used for my gif which is 540px x 500px in size with 5 squares x 4 squares: (if you want more or less you just have to play around with it)
once you've done that it should look something like this:
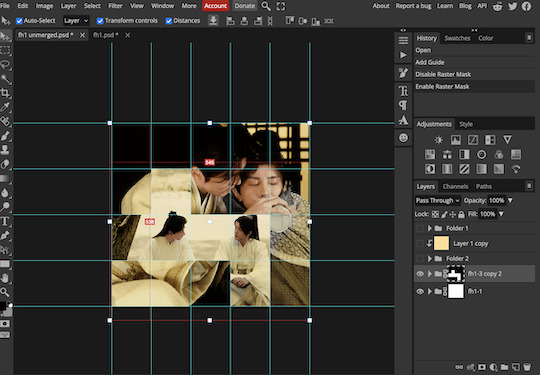
now the next part is really up to preference again: add a vector mask onto the gif that's above the other one like this: (ignore the name of my folder that is irrelevant 🤣)

and then i used the rectangle select tool (this is because the rectangle select should lock onto the grid squares making it easier to erase certain sections) + a black brush tool to erase the squares to show the other gif that's underneath (you can reposition both gifs to your liking which is what i did)
before & after:

so my vector mask looks like this afterwards

(you don't have to do the squares so close together like i did it was just how i liked it & because of the scenes i had chosen that mine turned out this way)
now onto the grid lines: i used the line tool with these settings

just like with the rectangle select tool the line tool should lock onto the grid line you want to redraw, do this for every line that you want/have for your grid & once you're done go to view -> clear guides and it should look something like this: (added a version with just a black background so it can be seen a little easier)

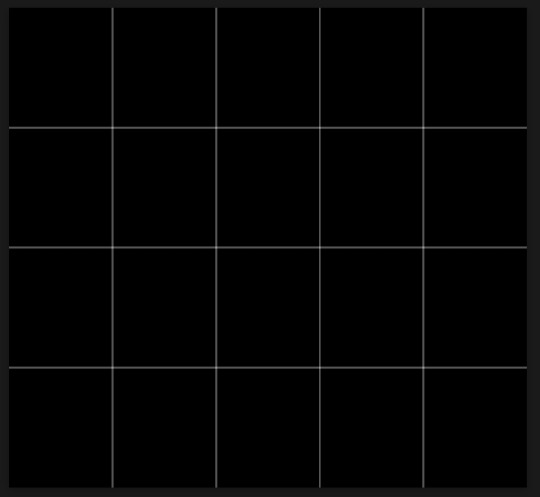
(i'm ngl idk why my lines ended up kinda faded and not white 🤣 i think it might be because i used a white fill instead of white stroke but it doesn't really matter to me because i got my ideal outcome anyway 🤣)
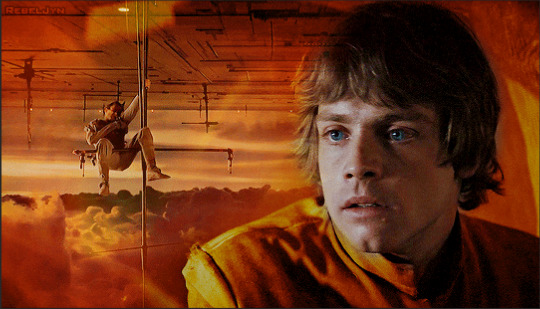
bonus step: you can stop here if you'd like but i wanted my lines to match my colouring & my intended typography so i put all my line layers into a folder and set the mode to difference & added a yellow fill layer with a clipping mask, like this:
and it should look like this:
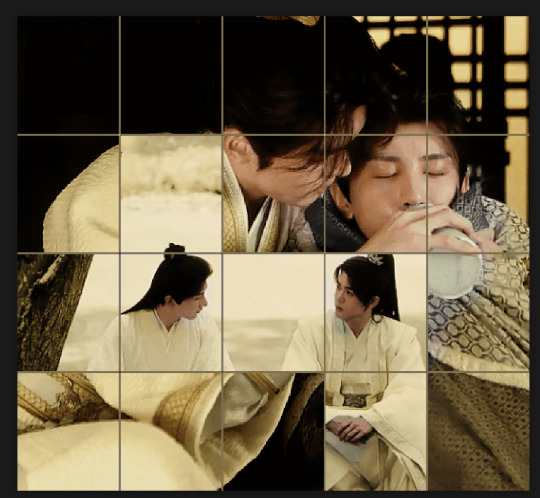
you can also play around with the opacity of the lines too which is what i tried out but i prefered for my set the lines being at 100% opacity but it's really up to you with what you want to play around with
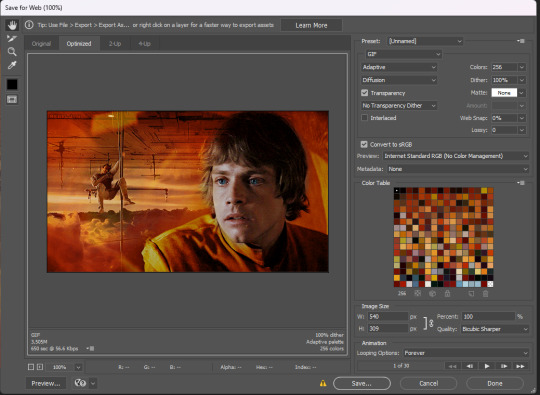
now once you're happy with everything merge those layers together (make sure they have the same amount of frames first before merging them) and either save as it is or add some typography like i did and you should end up with this:
for tips when it comes to colouring it really depends on what you're colouring, if you want to manipulate the colours as much as i do i recommend choosing a colour within the scene so you're not having to change too much, or finding scenes that have colours that can be manipulated more easy (any colour that aren't skin tones, unless you're working with red or yellow like i did here, i chose yellow because one of the outfits in the gif was yellow toned and it looked better with the gifset being yellow than my original colour which was blue), also looking for scenes were the people in it don't move as much also is a big help!
i hope this helps :) feel free to ask more questions if you didn't understand or want some more tips i honestly don't mind!
#replies#mrmalcolmslist#photopeablr#tutorials#photopea tutorials#completeresources#usergif#mine | tutorials#gif tutorial#photopea#resources#gif resources#gifmakerresource#i hope i didn't forget anything aksjdskds#photopea tutorial#tutorial#gif tutorials
138 notes
·
View notes
Text


made a blender file that lets you construct a toon from the game rigs without hassle. it's (ideally) usable even if you don't know much about blender. additional (important) information about it under the Read More
there are no accessories (glasses, backpacks, etc.)
the panel on the right will ask you for the name of the TEXTURE of the clothing, not the in-game name of the clothing item. if you do not know the texture name of the item, you can use the spreadsheet that is put in the google drive folder to figure it out. the different types of clothing (shirts, shoes, bottoms) have their own sheets which you can ctrl+f through, or you can make a personal copy of the spreadsheet to use the "user input" sheet, where you can type in the in-game name and the spreadsheet will automatically find the texture filename for you. (worth mentioning that when you put in the texture name - don't add a ".png" onto it, the script will do that for you anyhow)
when you hit "Build Toon", the file will erase everything inside the "COMPLETED_TOON" collection and build the toon from the ground up again. if you wish to keep two different toons, you should move them into other files by appending the "COMPLETED_TOON" collection into them. this also means that you will lose the pose of the toon or anything other edits you made before you hit the "Build Toon" button again. please be wary of this!
you can change the emotion of the snout without deleting the toon by hitting the "Update Emotion" button.
always remember to save frequently, especially as this tool has a tendency to crash sometimes when i hit ctrl z too much??
if there's anything i made unclear, or you have any difficulty using this, or you find an error, please message or shoot me an ask! if i'm made aware of any bugs or issues, i'll likely edit this post and make a list of ones i am already aware of/working on.
117 notes
·
View notes
Text
Sci-Fi Horror AU
idk kinda word vomited this tonight after trying a new strain. I will be continuing it into a full story but not sure when
Entry Log 2043
-DateStamp: 14th July 5399
-Location: DeepSpace Sector G8677-65HG-76789_I
-Personnel File: Maj. J.C. Egan (Zoot Suit)
Recording_
“This is Major John Egan, callsign ZootSuit, aboard the vessel M’lle ZigZag. Today is the dawn of my final day of exploration, putting an end to a sixteen-month foray into DeepSpace. Initial findings reveal little of note. A few developing stars and planets; an asteroid belt; and a total of six planets, two of which I will be recommending for a second more thorough exploration of due to planets possibly location being within the ‘Goldilocks Zone.’ I look forward to whiskey, solid food and to breathe air that isn’t recycled from a fucking can. I can’t wait to fuck my husband-”
John pauses.
“Ah, computer erase the last seven words. Reasoning: Irrelevant to mission. I will be entering Hyperspace within the hour, once I hit proper trajectory to slingshot around the primary sun.”
He taps the record button to end the log, carefully labeling the file and placing it in a folder with the few thousand other logs he’d recorded over the last year and a half. A verified library of data, observations and the occasional love-letter. A year and a half of research; one of the longest expeditions ever undertaken by any pilot. Considered bold by some and risky by far more. Deep space played with people's minds, the long stretches of isolation broken up only by Hypersleep creating the perfect recipe for a light case of mental instability.John had trained for this, ran through thousands of psychological tests and millions of scenarios. There was not a person in the universe more capable of this task.
John rubs his jaw, feeling the scratchy beard and spins out of his pilot's chair, leaving the computer to guide the craft.
Moving about the cramped space of the craft, built to maximize storage space; and to minimize comfort in his opinion, he begins securing anything not already safely battened down. He shaves in the cubicle sized bathroom, splashes water across his face and ignores the swirling flickers of color and light around the edges of his sight. Jaw smooth save for the now carefully trimmed mustache - just how Gale liked- he makes his way to the tail of the spacecraft to run an inventory check on his samples. Moon rocks and space dust and asteroid dirt. Anything the computer pinged or John spotted in his long hours gazing out into the empty void of space.
He checks a few straps, making sure they’re tension tight before hitting the override on the artificial gravity. He holds the intentionally placed handle as he slowly lifts from the metal walkway. Giving himself several seconds to adjust he uses the similarly placed handles along the wall to pull himself back over to the pilot's chair. A second check on the navigation systems; the mathematical calculations for his trip around the sun and through hyperspace. Much of the process was left up to the computer these days, but John hadn’t survived twenty one missions - one of the highest in the force save for a handful - by not being thorough.
Finding nothing out of the ordinary he switches all the lights off until his world is lit only by the approaching Red Giant, bathing everything a warm red. System lights blink soothingly as he takes a moment to take in the vast wonder in front of him. Years now it had been, and it still never failed to leave him breathless.
“Computer, begin countdown to Hyperspace entry, one minute. Beginning LCHS procedure, eta one minute.”
John pulls himself to the economically sized bunk, slotting into the space that barely left room for him to stretch and roll over, strapping himself down.
“32…31…Thirty Second To HyperJump’’ the computer announces.
Bucky presses two fingers to his lips and then to the photograph taped above his bed. Folded so many times the crease lines were white and soft to the touch, Gale’s face gazed back at him. Caught unawares he was smiling soft and curving, glancing somewhere behind the camera. Laughing at something John had said, trying to pretend that he wasn’t. His cheek was rested in one elegant hand, gold ring glinting in the sunlight; a carbon match to the one on John’s own finger.
“Be seeing you soon Buck.” John adjusts himself against the organic synthetic fibers of the mattress below him.
Fifteen seconds the computer chirps warningly. John always thought she got a little testy in those last few moments, as if scolding an unruly child.
John reaches for the pouch beside his temple, withdrawing the last pill from the sheathe. Soft baby blue and the size of a quarter, he’d been issued exactly sixty-five of them upon the start of his expedition. Enough to get him all the way to the furthest reaches of the known galaxy in the shortest amount of time. Seven more consecutive jumps than had been previously attempted. Anything more than thirty and Federal Law was a minimum six months rest and recuperation before attempting further jumps. Risks for brain bleeds, heart attacks and Z-Sum sleep went up with every extra jump. John had stopped only once, stretching to forty five jumps before stopping at the nearest C-Class Planet Simulator outpost to rest. It had been his last chance to speak to Gale before he exited the reach of all communications. Eight months since he had seen that smile in any medium other than this photo.
A quiet, tense conversation. Buck hadn’t wanted him to go; knew better than to stop him.
“You’ll be careful out there John?” Buck was the only one to never call him Bucky. To the public he was Egan, Major if they were being formal. In private it was John, always John. His husband was strange like that.
“More careful than a cat in a rainstorm.”
Buck hums and squints his eyes at him. Stress sat in heavy lines at the corners of his lips, between his brows and around his temples. It had been eight months since John had kissed that mouth, tasted Gale’s sweet noises on his tongue.
“You have enough LCHS’s to get through? None of them are compromised?”
“Buck.” John sighs, “Come on.”
Gale runs a hand through his hair, sucks his bottom lip between his teeth “I know you know what you’re doing...” His deep voice rumbled through the comms, staticky and pale in comparison to the in person thing.
“It’s just your job.” John finishes, grinning at Bucks self-amused shrug. “I checked them all twice. No leakage, no discoloration.”
“I love you.”
It never failed to make John’s spine tingle, hearing those words spoken so easily and effortlessly. The Gale he had gone to flight school with was a reserved quiet thing; John was better off trying to space-walk without a suit than pull an ounce of vulnerability from the other man. The years had softened him - John had softened him.
“I love you too sweetheart. I’ll see you in eight months.”
Ten seconds.
John startles, the pill slipping from his fingers and drifting in the gloom. He curses and reaches for it, straining against the straps holding him down. His steady beating heart kicks into panic mode.
For centuries mankind had struggled to break out of the tiny confines of their miniscule corner of the universe. Confined by things like time-space and the limits of the human life span versus the distance needed to travel to discover anything new. They’d languished away certain of it was their destiny to never walk amongst the stars. Until HyperSpace had been discovered. The miniscule pocket between the folded pages of space-time. A way to jump through matter from one corner of the galaxy to another - and further. It blew the doors wide open on space exploration. They could go anywhere, journey past the point of creation they could find it.
The only thing holding them back was the side effects of HyperSpace. It didn’t seem to pair so well with the cranial contents of human beings. The tendency to turn ones brain to pure soup was a drawback that left researchers, scientists and theorists all stumped. SMall jumps were manageable, with migraines and dizziness a much more risk-acceptable outcome. But in order for them to make any real progress they would need to find a solution,
LCHS. Lysergic Cerebral Hibernation Synthesizer.
The miracle drug and the solution to their dilemma. Developed initially from LSD the drug soothed the more vulnerable edges of one's brain and put the subject in such a deep sleep it took a reversal injection to bring one back to the waking world. It was used recreationally now as well; a way of opening one's mind to the world beyond the physical dimensions. Where light and color and feeling weren’t senses but physical states of being. It kept their pilots down for the jump; kept them asleep to the journey home.
Without it. Well. Nobody had made a waking Hyperjump in as long as John could remember, at least had done it and lived.
Five seconds.
John hisses through clenched teeth, straining for that little blue pill, technology his husband had dedicated his life to. Logically they both knew it was unlikely Gale had made the exact LCHS’s that sustained John, but he knew the other man pretended he did either way. The level of care put into each new batch as if it was made for his beloved specially.
Three seconds.
John risks freeing one of his shoulders from the straps so he can get better reach. “Come on” he hisses. Closes his fingers around the dosage.
Two seconds.
John lays back, shoves his shoulder back into the strap so quickly the velcro scrapes his skin raw. He lifts the pill to his mouth, pressing past his lips.
One second.
_
_
_
Entering Hyperspace.
Gale. John thinks.
His brain turns to mush.
51 notes
·
View notes
Note
I think you've gotten a few questions about your process ( apologies! ) But I saw you use CSP to make these gifs - do you cut up the frames from your recordings to do that? Is there a particular way you go about that? I'm interested in making gifs and was a bit curious 🤧♥️ but if you cannot share such secrets I understand!
All right, this finally convinced me to make a guide and I hope this was helpful!! Feel free to send in any questions.
First off, PRO has a frame limit of 24 so your gifs will run very short. EX has no frame limit and right now there's a free trial for users until the 24th.
Make a new canvas that's an Animation. For my gifs, I use a 540 width and adjust the height later. Go to Window and turn on the Timeline so you can see all the cells.
I trim my game recordings into short clips of what I want to gif. Then I insert them like this as MP4 files:

The red line is the current frame you're looking at. The blue lines mark the gif duration at whatever starting and ending frames you choose.
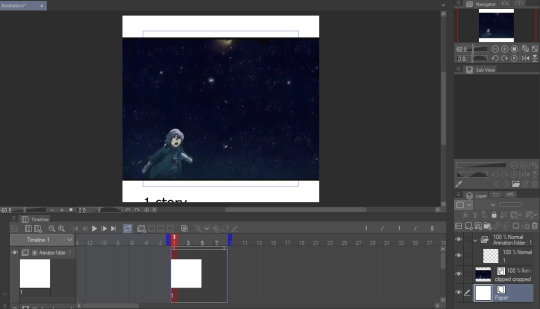
Whatever is inside the blue box will appear as the gif. Personally, I don't like using this and end up fixing the canvas size later. But let's get to actually making our gif first.
I like to make my gifs 30 FPS or less and I'll be changing it to 25 FPS from here:
Click on your clip on the Timeline. For this example, I didn't trim my clip exactly where I want it to start so I'll drag it to left where the frame number turns negative and I end up going 4 frames back (or you can just move the first blue line 4 frames ahead):
Then I drag the second blue line to where I want my gif to end. Since I want to make the height shorter, I go to Change Canvas Size and fix the dimensions (you can still resize and adjust your clip around too):
The blue box is gone and we can just use the canvas itself to fit the gif. I ended up adjusting it again and now we just need to save it!
I'm already fine with everything so I won't change the numbers. Make sure the Loop Count is set to Unlimited:

Choose where to save it and wait for it to export. Let's take a look at our finished gif:

Notice how pixelated some of the areas are? That's because we didn't export it with Dithering on so let's redo it:

Look at how much better it looks! Make sure to turn this on or it can make your gifs look way worse.

And that's the basics! If you want to put a color filter, make a new layer and put it above your clip. I use the bucket tool with the color i want and change the opacity and layer type:

And here it is! If your color filter only showed up partway on the gif, that means your layer wasn't present on all your frames so go to the Timeline and drag it to cover the entire length.
If you want to add a watermark or words, start making a text above your color filter and you can also change the opacity:
You can also add images on the gif with your brushes. Make a new layer above the color filter and apply them:
If you want to fix the colors more, right click your clip layer and it'll make a new layer above with the adjusted colors:

You can also do the 3D white bar effect. I make a new folder above all my layers with a bunch of colored lines. You'll need to erase whatever shows in front of the object and I decrease the opacity to make it easier, then change the color to white. You can adjust which frames each bar will appear by dragging the ends of the Timeline length (arrows will appear). As shown below, I was able to use the same line in frames 1-33 before making a new one at frame 24.
With 2 bars:
And that's all I wanted to cover! There's many editing guides that you can also apply to CSP so don't hesitate to try them out. As I mentioned earlier, you should only use CSP to make gifs if you already have it and don't have better programs to use. I hope this guide helped you out :)
44 notes
·
View notes
Text

i didn't have a tutorial yet... so i made one lol. its longer than i wanted it to be, but i wanted to make sure it's easy to follow for people who've never made cc or have no experience with photo editing software, and fully explain my process. it's by no means hard at all though lol, i guarantee you making skin details is the easiest thing aside from recolors and if you want to learn this is a good place to start :-)
for people who are more experienced than that, and want to know specific things-- i've sectioned everything so it should be easy to skim through until you find what you need!
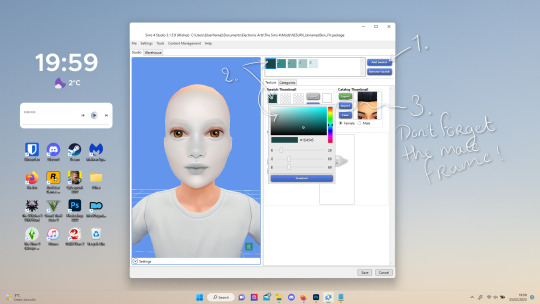
requirements.
this tutorial will only require sims 4 studio (free) and photoshop (not free) or gimp (free). i pirated photoshop 2022 myself. any version will do but i think 2022 just has nice new features for making content! if you don't want to buy or pirate, gimp is a similar alternative.

1.1 how to find skins to use as a base.
in case you don't have (a) skin(s) in mind to use for your skinblend, my tip is to download as much random ones as you can find. this way you have a lot to choose from and it's easier to get an idea of what you want.
go-to creators for maxis match skins: heihu, madmono, pyxiidis, faaeish, miikocc, emmibouquet and stretchskeleton.
creators for maxis mix/alpha skins: sims3melancholic, obscurus, ddarkstonee and pralinesims.
creators for maxis mix/alpha skins that only allow editing for private use: northernsiberiawinds, remussirrion and thisisthem.
go into cas and try them all out. if you like a part of a skin, write down which skin it is and what part(s) you want to use of it from which swatch if it has multiple.
for example, i almost always use one or two skins for just the nose shape, one for the eyebags, one to three for the lips and one for the basic shading of the face. don't be afraid to use the opposite style skins of what you're going for, you can always add or erase details.
1.2 exporting the skins.
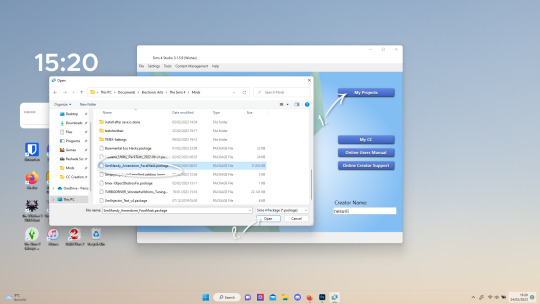
now we're gonna export the skins with sims 4 studio. click on "my projects" (1) and navigate to whereever you have the skins you want to use, and select one and click "open" (2).
the colored little boxes in the top right are the swatches. click whichever swatch you wanted to use something from (1), then click the "export" button (2). you'll get a window to save the exported skin now.
tip: i highly recommend making an organized folder for your skinblend, to have all your files together and easy to find. if you haven't made it already you can easily do so within this window.
i put mine in a folder called "resources" in a folder named "unnamed skin" for example.
name the exported skin file (3) and make sure the "save as type" is set to .png (4).
after saving the file, you can just click "cancel" on the bottom right to go back to sims4studio's starting screen. if you have multiple skins you want to use, repeat the above process for all the other skins to export them too.

2.1 opening the exported files in photoshop/gimp.
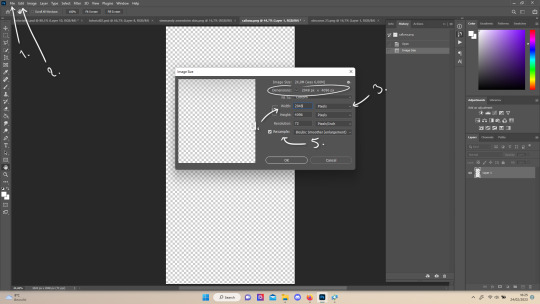
open your program of choice and click on "file" from the top bar (1) and then "open..." and navigate to the skin files. you can left click and hold down your CTRL key to select multiple at once to open.
we have to layer them all in one file, but before we do that we have to check if they're all the same size.
note: some skindetails might be 2048x4096, others may be 1024x2048. unless you want your skin to be compatible with the HQ mod, you should just opt for 1024x2048, as without the mod both resolutions look identical. the bigger one will just make your fize unnecessarily large.
click "image" at the top bar (2), then "image size". it'll say the size at dimensions. if it's at the size you want it to be at, just exit the window.
if you need to edit it, select "pixels" from the dropdown menu (3), and put in 1024 for width and 2048 for height OR 2048 for width and 4096 for height. if you're sizing up select "bicubic smoother (enlargement)" under resample (5).
repeat this for every skin you opened.
2.2 layering the skins together.

copy and paste all the skins individually onto one by selecting them with CTRL + A and CTRL + C on your keyboard, and pasting them into one of the other opened skins with CTRL + SHIFT + V. you can then close all the other tabs.
the file now has multiple layers. you can rename them by double clicking the layer name. this makes it easier to keep track of whats what. you can reorder them as well by dragging them with your mouse. put the skin you want to use as base (for the general facial shading, highlighting) at the bottom.
tip: i recommend making all white and all black background layers to see the skins better. you can do so by pressing D, then CTRL + SHIFT + N. for the white layer then press CTRL + BACKSPACE and for the black layer repeat the first two steps and then press ALT + BACKSPACE. now there should be two new layers in black and white. drag them to the bottom of the list. i prefer using white so i put black last.
2.3 changing the opacity in parts of the base skin layer.
to make ea's preset details (cheek/nose bridge sharpness, dimples) come through your skinblend, you need to change the opacity of the base skin sometimes. alpha skins tend to be fully opaque but maxis match skins are usually already transparant enough.
hide all the layers aside from this base layer by clicking the eye icon next to the layer names. you can see the transparancy with the visibility of the grey-white blocks or if you find it easier you can also unhide the black background to see it instead.
to change the opacity, you can either edit the entire layer's opacity (1) or use the eraser tool (E key) to add transparancy at specific parts.
if you have photoshop 2022, turn on vertical symmetry (+). if you don't have it, you can choose to edit only one side of the skin and mirror it later or do both sides and embrace some asymmetry.
i selected the eraser (2) and set the brush size to about 200px and 0% hardness. the opacity of the brush i set to about 10% (3). i used the eraser on the lower cheeks, the nose bridge and tip and the bottom of the chin. i also erase the upper eyelid 100%, cause i prefer to have eyelid freedom :p. it then looks like the above! this will very subtly let through details, if you want more you should make it more transparant.
2.4 optionally: editing out freckles, pores and/or eyelashes.
your base may have pores, freckles or moles you want to get rid of. to smoothen everything at once, click "filter" at the top bar (1), "noise" and then "reduce noise". i only edit the strength and sharpen details setting (2), this setting erased the pores and most of the freckles for me while keeping the details looking sharp, but you likely have to adjust it a little cause it depends on how large/fine the details are.
the remaining freckles, pores and eyelashes i remove by using the smudge tool, with 0% brush hardness and at 25% strength. (3) brush size depends on the size of the details. i just go over it in circular motions until the freckle or whatever it is has been blended away without pixelation.

for this part i'm going to only show how i do the nose as an example, however it works the same for editing in eyebags, lips, jaw lines or whatever you want to add in too.

unhide the layer of the skin you want to use a part of, and hide the base layer.
if you are going to use multiple parts of that skin (for example, you want both the nose and the lips of that skin), duplicate the layer by right clicking the layer name and choosing "duplicate layer...". then hide the duplicated layer. it's easier to edit one part at a time.
use the selection tool (M) to select the part. press CTRL + SHIFT + I and then DELETE. press CTRL + D to unselect. should look something like the above.
use the eraser tool (E) at a moderately small size like 30px~ with about 30% hardness and 100% opacity to erase around "hard lines", like the nostrils in this case and the bottom of the nose. the nose bridge has "soft lines", so if you were to use a hard brush for that, the shading of the nose bridge would look far too harsh and unblended.
for the soft lines, set the eraser tool at a bigger size like 100px~ with 0% hardness and a lowered opacity between 15-45%. erase soft lines "gradually", so the shadows blend in with the layers underneath it. should look something like the picture above.
always look at the newly added part with both a black and white background to see if there's anything you need to erase more. then look if it blends in properly with the layers underneath. if it's too dark or light, you can click on "image" on the top bar, then "adjustments" and "brightness/contrast", and lower or raise the brightness until it blends in better.
i'm using two separate skins to make the nose, so i've repeated the process above for the second nose skin, then used the method of step 2.3 to erase certain parts and make other parts more transparant / blended in. as you can see above, it's now the perfect offspring between the two noses i used.
note: for a maxis match nose, you'll want to avoid a completely opaque nose, mainly at the nose bridge it should be more transparant. i always make sure the lips and eyebags are fully opaque though, unless you're going for a vanilla type of skin it doesn't look good transparant.

at this point, i like to save the file with the white background layer on and see what it looks like in sims 4 studio. this gives you a better idea of what it looks like on sims and what you may want to change or add. press CTRL + SHIFT + S and name your file, and set the file type to .png.
open any skin or skin detail cc file just like in step 1.2, and instead of exporting anything, click "import". now navigate to the file you just saved, and open it. the sim model now displays what your skin looks like. should look something like the above! you can click cancel after you've looked enough, so you don't have to worry about ruining the original cc file.

maybe you're happy with the skins current state... but in case you want to add or change some things, here's a step by step how i do it.
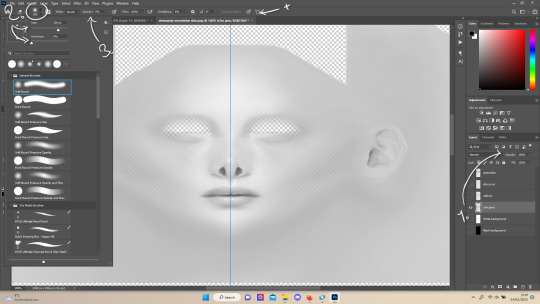
5.1 drawing shadows & highlights.
as you probably have noticed, everything needs to be done in greyscale, so select black (for shadows) or white (for highlights) in the top right colored box. make a new layer (CTRL + SHIFT + N). select the brush tool (B) and set the brush at about 0px with 100% opacity. draw the shape of the shadow or highlight where you want it. make sure to make a new layer for every shadow and highlight!
now you can either use the smudge tool to blend it out, but i prefer using "filter" from the top bar, "blur" > "gaussian blur". i just play around with the radius until it's blended out but still has some shape to it. it depends on how small or wide and blended you want it to be.
then i use the eraser to shape the shadow/highlight further. for example, i want the shadow in this case more blended out towards the eye, but harder towards the forehead and nose, so i use the eraser on that side. lastly i change the layer opacity to make the shadow/highlight less dark/light. my preference lays with subtle details, but of course you can make it as contrasted as you like!
5.2 drawing small details.
to draw your own details, use the brush in 1-3px brush size, 100% opacity in black. i can't help you here cause it's just drawing where you want and then blending it out with the smudging or blurring tool where needed, and using the eraser at lower opacity to blend it in.
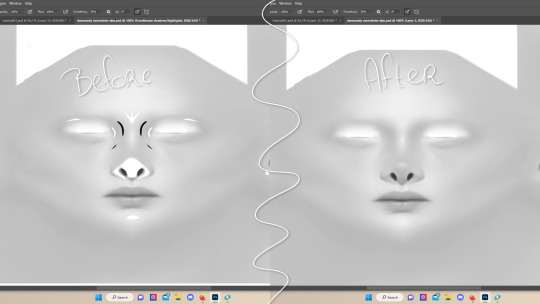
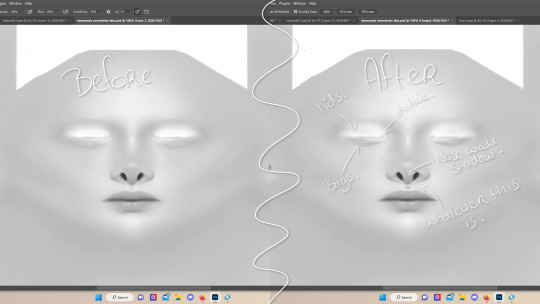
to give you some ideas, i usually draw some details on the nose like sharper nostrils or a nose wall, some texture on the lips and the eyebags. i like using reference pictures of real peoples skins to see where and how to draw things. before and after pictured above! (i'm so proud of these eyebags yall T-T)
5.3 adding other creators cc skin details.
if you don't like drawing things yourself or know just the right cc skin detail your skin needs, you can also use other creators' skin details on yours.
maxis match + mix details: pyxidis about face, miikocc face kits, okruee face details, sammi-xox face details, lamingtonsims face details.
maxis mix + alpha details: detail overlays by obscurus-sims, ddarkstonee & sims3melancholic
like in step 1.2, just open the file in s4s and export whatever swatches you want to use. remember to make sure the resolution of the file is the same as your skin's before copy and pasting it on your skinblend! and remember you can lower the opacity layer for these too.
5.4 mirroring your skin.
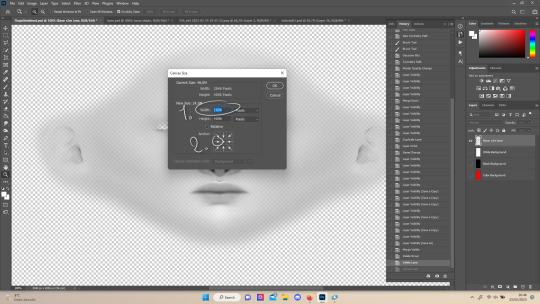
if your skin isn't mirrored/symmetrical yet, save your file as a .psd and then right click the layers, click "merge visible", press CTRL + ALT + C, and set the canvas width to half what it is now (either 1024 or 512). (1) click the arrow in the left middle if you want to mirror the left side, or the arrow on the right middle for the right side. (2) press "ok".
press CTRL + A, then CTRL + X, then CTRL + SHIFT + V. delete the layer beneath the active one (it's empty). then press CTRL + ALT + C again, and put the canvas width back to the original (2048 or 1024). select the same arrow you selected before, and click "ok".
press CTRL + A again, then CTRL + C. now click "image" from the top bar, "image rotation" and then "flip canvas horizontal". now press CTRL + SHIFT + V .... and voila, your skin should now be mirrored.
note: ik there's a ridiculous amount of steps for such a simple thing so i feel like there's probably a much faster way to do this, but i hate following tutorials and guides (the irony) so this is just the way i taught myself lmao
5.5 last test & optional last touches.
at this point, i'm done with the skin. i erase everything aside from the face if the skin still has a full body texture cause i prefer face-only skinoverlays. i always save as .psd and .png, .psd is to edit it later on if need be. once again import your skin into s4s like in step 4, and see if you're happy with the skin. if not, just keep editing whatever you need!
i also like to add alternate versions of the skin lastly here. some examples: a soft nose or hard nose bridge (justice for flat soft noses, simblr loves to erase them lol), different eyebags, lighter or darker lip option, version with eyelid overlay or without.

6.1 creating the package file.

to make the package file for your skinblend, open s4s and select "create cas standalone" and then click "cas". (2) now select "skin detail forehead" from part type (3), click the most left forehead wrinkle and click "next" (4). name the skin file whatever you want, you can always change it later!
click "import" and open your skin file. and voila! you're pretty much done!
6.2 editing the age, gender & occult flags and category.
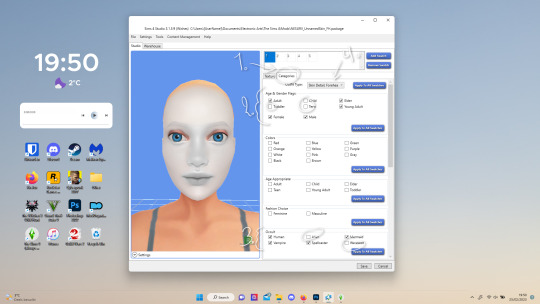
right now your skinblend is only available for young adult to elder sims, and not for aliens and werewolves, so you probably want to change this. go to "categories" (1) and check the boxes you want under "age & gender flags" and "occult" (2). you don't need to change any of the other things.
if you wish to change the skin detail slot it's in, you can change it at "outfit type". most people use either forehead or mouth crease, but you can use any of the ones that start with 'skindetail'.
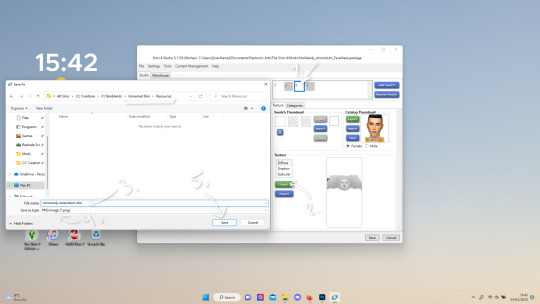
6.3 adding swatch colors, thumbnails or additional swatches.
if you want, you can add multiple swatches (1). you can also edit the color of the swatches (2) and upload a custom thumbail with 104x148px resolution (3), make sure to upload for both male and female frames.
6.4 editing the sorting layer.
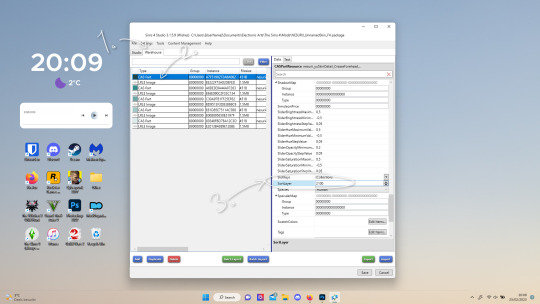
it's not the end of the world if you don't do this, but you may run into some skin details or freckles/moles that won't display on top of your skinblend if you don't edit it :).
click on the "warehouse" tab (1), select the first "cas part" (2). scroll down on the right to find "sort layer" (3) and put in 2100. you're gonna want to change this for each cas part individually.
now just save your file... and try it out in game!
if you need any help or have any questions please comment below <3 feel free to tag me in the end result if you want too.
(my end result)
249 notes
·
View notes
Note
Hello! I am a beginner artist and I love ur art!! Super pretty and the colors are very tasty. Do you have some tips? I'd love to see your art process!
HELLO ANON!! first of all i am very honoured that u would ask me this because 90% of the time i feel like i have no idea what i am doing and like im still a beginner artist myself DSDSJDF. i would love to share some stuff i learnt and some stuff about my process (regardless of how messy it is sdfhsj)
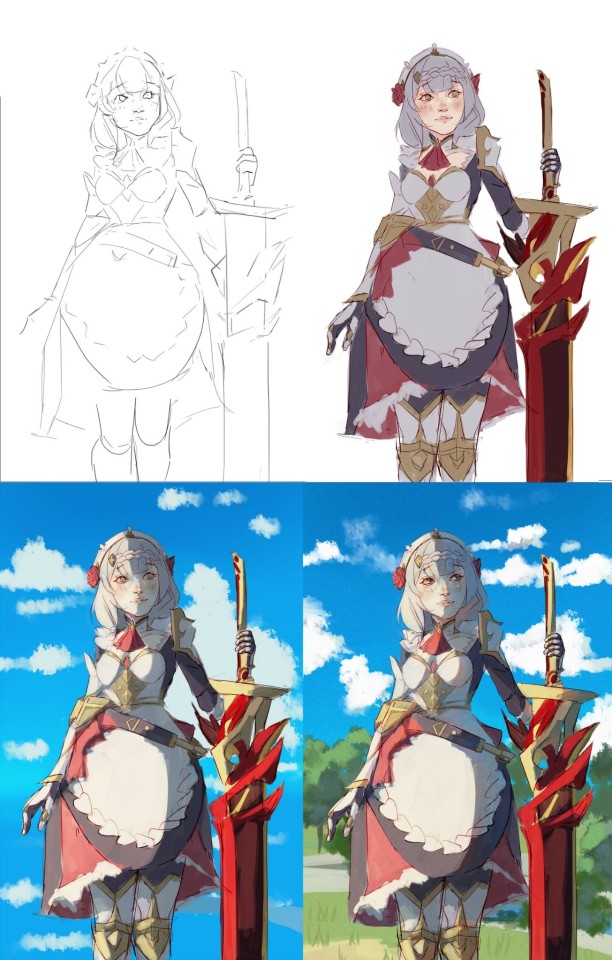
(final piece)
here's an old example of my process i found! while the steps sometimes look different for other pieces, i feel like this is a good demonstration of how the basic structure looks.
1. the sketch - this is where i'm mainly figuring out how i want the piece to look. i was redrawing a screenshot for this piece so it looks a LOT neater than what a lot of my other sketches look like, for example, here's the process of me figuring out my recent drawing of haise:


(final piece)
in the first two steps, i was mainly working with showing myself what the piece was going to be. the last one was where i used references/technical knowledge to try and show whoever will be looking at it what the piece was
2. cleaning up the sketch + base colours. these two usually occur simultaneously because i will get bored cleaning up the sketch midway through and want to start adding colour LMAO. on a more practical note, sometimes putting down the base colours and having a better idea of what the finished product will look like might make it easier to refine things.
a note: cleaning up for me doesn't mean doing lineart. it mostly means erasing any overly messy lines on the sketch and redrawing small parts to make it look tidier where needed. i often leave it 'messy' at this stage, too. like here:

(final piece)
3. light/shadow. this is my FAVOURITE part because it's where the piece starts pulling together. the method i used in the current piece was putting a multiply layer over the colours folder and filling in where light would be obstructed. after that, i used a luminosity layer to put in some bright sunlight. marc brunet has a great way of explaining it by advising to pretend that the light is the camera and you're behind the lens. this is such a good way to block in average light/shadow values! sometimes this looks a bit crazy because everything is still so messy but that is why we have...
4. rendering. this is where i fit all the remaining pieces of the puzzle together. i'll refine the colours a bit more -- e.g. colouring in the eyes, -- and fiddle a bit with the shadows to add some more variation to the hues/value. this is where i think a lot about light and shadow theory and try and make it look more realistic. marco bucci saved my LIFE with his videos about ambient occlusion and ambient light (part 1 / part 2) -- essentially, what i keep in mind the most is that if a plane in shadow is facing the sky (or is open to any other form of light that isn't the direct light source) it will contain ambient light. it is SUCH a game changer when you add it to your pieces, trust me, even if youre lazy about it. if needed i'll pull up some references to make everything look good!
5. rendering... part 2? honestly this step kind of blends with the last one as i tend to do it simultaneously. i basically clean up all the messy lines from before by painting over them! with the majority of the colours i need put down, i can just eyedrop them and paint over anything that's needed. this also comes in with the light/shadow, where, if i need a more subtle hue for either/or, i will eyedrop it and brush it in.
some further notes:
i very rarely use references during the first stages of my sketch. i think it tends to look quite stiff and unnatural if i rely too hard on the. and i personally prefer the creative room when the idea is still being conceived. references come in when i can look at what i have down on the canvas and have a fairly decent idea of what i want, including pose, composition, etc. it's essentially a first draft to guide me to where i want to go with the piece. it's when i'm done with this that i bring out references, and even then, they don't necessarily have to be the exact pose -- i'll usually get a couple of pics which show what i need to double check and keep them up as a guide. by the end of the 'sketch', i usually have a basic construction of what i need to continue, even if it's messy.
i use very soft brushes when putting down colour because it allows for more hue variation. like i said, i enjoy eyedropping and brushing in colours afterwards, so this really helps!
layer modes are ur friend! i try not to rely on them too hard during rendering because i like the freedom of painting over but they're very useful when you're blocking in your initial colours
sometimes, when i feel like i want to try something new with my art, i'll keep pieces that inspire me up in front of me. i have two of sui ishida's art books and sometimes i'll just flick to a page that oils the Art Gears in my brain and keep it open while i draw. i don't necessarily reference it, but i like having it there so i can glance over every once in a while. i don't usually make a conscious choice where i'm like "ok i want to render skin the way he does" but it's more like. my brain knows what it likes in his art and it'll try and push that part of my art in a similar direction.
honestly the best advice i have is that art is very much based on vibes. everytime i've tried to think too much about it, to do things 'correctly', to rigidly stick to art theory, my art has not come out nicely. i think the technical parts of art are important to know and understand but i also think it's important to let your knowledge come through naturally when it is needed instead of pressuring yourself to do things 'right'. tbh you probably already know that but it's something i forget a lot so maybe it serves as a helpful reminder?? sedsfhsl
ANYWAY SORRY THIS WAS SO LONG! i hope i covered what you needed and if you need anything else/want me to expand on anything feel free to drop me another ask ! <3
make sure to look after yourself and trust yourself and ENJOY!!! art is about having fun!
81 notes
·
View notes
Note
Every time I see your sprite work, it just makes me want to make a sprite edit of Akane with the design I made for her in my "She Was Saved" AU (An AU based on the idea of Akane surviving the events of DRA), but I've never done any sprite work so, do you have any tips?
Ok ok so, first things first, i wanna make it clear that none of my sprites are made from scratch, they're sprite edits, hence why i always tag them as such. Every single one of them used some canon character as a base for the base sprite (that one fitst sprite where the character is just standing there with a simple expression) and a handful even have canon sprites uses as bases for poses. Just figured i should make that clear so there's no confusion here.
While I'm not sure if I'm the best at giving tips n stuff, here's what i could think off;
I think the most important tip i can give anyone who wants to get into sprite editing is MAKE A BUNCH OF LAYERS‼️Save things separately just to be sure rather than merging them because that almost always leads to more time spent later down the line. While the amount of separate things certainly varies from artists to artists here's the one i use for my edits.

The app i use (Ibis paintX) allows me to make folders with a bunch of layers to them so i use them to keep stuff more organized.
On the first pic well have a folder with the base sprite, one for the different poses and in Beni's case two for the different eyes she has (one for the normal eyes and one for the ones that are part of the glasses, normally i only have one layer with all the eye variants)
On the second image I've opened the folder that holds the base sprite, or should i say just sprite since it's in this folder that i organize everything that belongs to one specific sprite when I'm making them as to not get myself confused. Anyways, you can't see in the screenshots but the first layer has her glasses, second has her eyebrows and mouth and the third has the eyes.
Fourth has the main body lineart and fifth has the main body colors, please keep those separated as by doing so you make it easier to add those lil effects onto the character's faces on certain expressions + having the lineart of the main body always helps when sketching and connecting the different arms to the main body.
Lastly you got the arms, but ideally you should make the arms/poses in a way they can be placed over the body layers since that just makes things easier to put together, i just have this habit of placing the no pose arms under everything else.
When editing i make the different arms and eyes in advance so that when i start making the different sprites i can just duplicate the canva with the first one a thousand times and everything will carry along with those. Saves time in the long-run + you don't need to separate all layers on them (lineart, colors, shading) since they're just parts there's no problem in just merging them together.
A very important thing to note tho i that if the character has glasses or any accessories that you plan on removing or moving around in some pose/sprite this accessory should be made in a different layer from the main body, this makes editing easier than if you had to just erase and refill the part where the accessory was in the sprite you don't want it to be in.
A similar rule should be applied to the character's hair, if they have short or mid length hair you can just add the whole thing to the main body sprite, but if the character's hair is long you should make this bluk/back part of the hair in a separate layer placed under the main body layers. This also apllies to any back accessories.
Here's Akira as an example; she has one layer for her glasses, one for the back/bulk of her hair and one for the guitar case she carries.
These are essentially the basics of if, so let's go over to some actual tips.
Make the sprites on a small canvas.
Since the Danganronpa another games are made on game maker the size of the character sprites is surprisingly small, while I don't think you should just do it on the same canvas size as the actual sprite, it's good to have a smaller canvas so that the lower amount of pixels gives it a look similar to the in-game sprites + as you can see by mine, they don't actually look low quality at all.
(if curious, the go-to canvas size i use for most of my edits is 773x1020)
Use other sprites as references/bases
Especially if you're just starting on making sprites, use the canon ones for bases, references or even just straight up trace them. This will make the sprite look closer to canon and will start making you undertand the elements that make up the style of the sprite, do it enough times and soon enough you'll be able to make poses on your own without needing a sprite from the game as a base.
Remember! What's wrong about tracing is not the act of tracing itself, as the act of doing so is a great exercise to help you learn, the problem is when you do it and claim you made it 100% on your own. Since these are sprite edits, there's not a problem in doing so.
Observe and learn what makes up the style you're trying to replicate
This is hard to talk about since it really is something that comes with practice, I've been making sprite edits for like 5 years now so this stuff is like written on the walls of my brain by now. Just try to look and analyse the sprites and slowly you'll start seeing patterns and small onto them that you didn't noitce before, like how Linuj's sprites have a bit if line weight to them but are still on the thinner side, how he tends to make the hands a bit on the smaller side, how when he color the character's skins he makes the area near the top of the head a lighter shade than the rest of the skintone, the way he usually makes the character's mouths, and even some more complex things like how the male characters will have very little to no eyelashes while the female characters tend to have a whole lot of them, etc.
At the same time, there's no shame in deliberately ignoring some of these things. Personality the small hands REALLY bother me in a few cases and i tend to just make mouth shapes on a whim instead of trying to stay 100% close to the style. It's just a question of messing around and figuring stuff out, it won't look perfect on the first go, but overtime you'll start to get the hang of it.
#i hope this small sprite editing tutorial helps! if you have more questions feel free to send them#these are sorta all i could think of for now#you did mention that these are for an Au Akane so you could also try editing these out of her sprites themselves#instead of making a whole base and multiple parts just pick the sprites and edit the new design over#it could possibly be easier for a beginner? i do feel like making them in this form leads to better results tho#anyways. fun fact! i used the eyelash thing as a subtle form or trans coding on Akira's sprites :]#i love you small details that people won't notice unless pointed out ❤️#hyena ramblings#sprite edit#edit#sprite editing tutorial
17 notes
·
View notes
Note
The blending in your Lucas gifset was absolutely gorgeous! Do you have or know a tutorial on how to do it?
Blending Tutorial!
Firstly, thank you for the compliment anon! Now, I'm going to go through the process considering that you already know how to make regular gifs and know how to use adjustment layers, so I'll be focusing specifically on blending but if you need those tutorials I can make them, just ask!
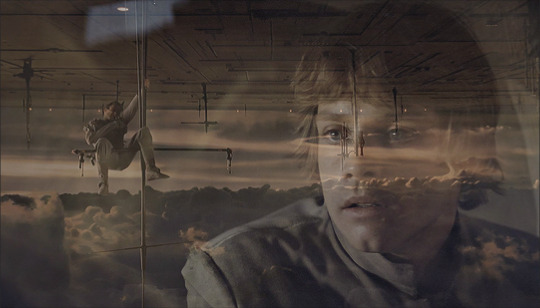
This is gonna be our end result after the whole process:

This specific gif from this gifset(with the typography removed) is focused on a color palette with only two adjacent colors so it's a bit easier to make the blending look good but this process works for any kind of gif! So let's start the tutorial!
1. Get your desired gifs into the same canvas

These are the two gifs I'll be blending for this gifset. Make your gifs and resize them to the size of your final gif. Remember to turn the layers of each gif into Smart Objects so that you can move them around properly when blending.
I usually make the gifs and just copy and paste one of them onto the canvas where I made the other one. You can also make your gifs and save them separately from each other first and then put them into the same canvas, but I prefer to make all adjustments except for resizing in one canvas so I can tweak the positioning of each gif as well as the coloring so everything looks the way I want it to.
2. Put each gif into a folder

This will make it easier for when you start using adjustment layers on each gif so that the adjustments don't interfere with other layers.
3. Set layer mode to screen
Set both folders to Screen, this will help blend them together better than if you were relying only on the opacity of the layers. I also usually create a new layer and use the paint bucket tool to color it black. Your gif should look something like this:
And your layers like this:
The black background makes sure there aren't any transparent spots in your gif when you use the layer masks to blend them as you can see here:


4. Create layer masks

Select each group one at a time and go into Layer > Layer Mask > Reveal All. Your layers should now look like this:

5. Start erasing each gif on the layer mask
Use a soft airbrush to erase each gif to your liking. With layer masks you can use the eraser tool or the brush tool. Layer masks work based on color value(how light or dark the color is). The darker the color you paint with your brush the less opaque it will be. Painting in black will erase the area completely and painting it white will make it completely visible. The eraser defaults to the same effect as if painting with a brush in black.
This is the final result of the blending:
This is how each of the gifs look after I erased them with the layer masks:


This is what my layers look like:

As you can see I've erased one of the gifs way more than the other, that's because I only erased parts of the gif that would interfere heavily with the gif I wanted to be more visible. Make sure to move around the timeline of your gif to see if you need to erase more or less of each gif since the person or thing you're trying to keep visible can move around and get covered.
6. Make your color adjustments
If you've already made your adjustments before pasting both gifs into the canvas you can skip this step. Since this gifset was focused on orange and yellow I adjust my colors to match that. I keep my adjusment layers in groups inside the respective gif's folder so I can turn them all on or off easier and so they occupy less space in my Layers tab.

And this is what the colors look like in the end:
7. Export your gif
This is what my export settings look like:
This doesn't interfere with the blending and a lot of these settings are personal preference but I thought it was worth sharing.
And finally we've arrived at our final result as shown previously:
Other blending tutorials:
Now the links to some other blending tutorials that might have different methods(sometimes because of different desired outcomes). I'll be tagging the creators for if anyone wants to look at their content!
Tutorial using gradients and lighten mode by @linda-darnell
Tutorial using erasing with layer masks by @eddiediaaz
Tutorial adding color on top by @miriammaisel
Tutorial using screen and color layer modes by @disaster-lineage
That's it! Hope this was helpful!
114 notes
·
View notes
Note
hey so feel free to delete this if this isnt the right place to be asking about this but im having trouble getting blackout hospital to save properly, if i save the game and then close it then open it again it erases everything i just did and i have to start over from the beginning, im not sure if im doing something wrong or not
I remember a few players encountering this when Blackout Hospital first released! When I asked on some RPGMaker forums about it I was told that it could be an issue with Windows, and specifically Windows 11. These were the responses I got:
From user ATT_Turan: "That sounds to me like an issue with permissions. If your players put the game in a directory where they don't have write permissions, the save files wouldn't be created.
Windows 11 does some screwy things with permissions, I've found. The Program Files folder, which is the default for a lot of programs, has write permissions disabled by default and it can be difficult to change (I found it impossible with a moderate amount of effort).
You can ask them to right-click on their saves folder and see if the read-only box is filled in. They can try unchecking it and seeing if the change saves, otherwise they might need to try putting the game in a different directory.
It could also be an issue with an overly aggressive anti-virus/malware software."
From user Andar "As a third option, it could be a browser setting - especially if they are using chrome.
RMMV games are HTML-games running in a browser, and the default exe is a chromium-based browser.
If their computers have especially restrictive security settings, that might prevent the browser from saving anything - or rather everything saved gets deleted on closing the browser."
I hope these answers may help you somehow!! I would look into your permissions and security/antivirus programs & softwares!
22 notes
·
View notes
Note
Do you keep all the pics you’ve posted saved on your computer? If so how big is your pics folder?
I DONT ACTUALLY HAVE ALL THESE SAVED TO MY PC I BOUGHT AN ENTIRE EXTERNAL HARDDRIVE TO MAKE SURE I SAVED EVERYTHING (This Isnt every post Ive made since I had a shit ton of data get lost about four years into running this blog)

Consider this folder is thirty three gigs of PNG's and JPG's so yeaaaah over twenty three thousand images and two thousand folders(erased my C: name for security reasons)

I also obsessively compulsively categorize my folders by artist this is as MANY folders as windows explorer can fit on a fullscreen at 1440x2560 resolution.
22 notes
·
View notes
Text
I think the gods of luck like to laugh at me.
I bought and installed Baldur's Gate 3 yesterday and played for a couple of hours with no problem. Today, I tried mods; found a couple I liked, downloaded the BG3 Mod Manager and got to it. I had everything I needed but the Mod Folder just wouldn't appear, the one that should be created in AppData -not even a Larian Studios folder, there's no BG3 folder in my pc, only inside the steamapps folder there's proof that I have the game installed.
So, I can't mod the game, but for some reason the Mod Manager recognizes the mods I keep in a separate folder and lets me install them.
I enter the game. The game crashes. I quit and erase the mods. The game keeps crashing. I erase the mod manager even. The game keeps crashing. I delete the saves and uninstall and reinstall the game. After the first cinematic, the game crashes again.
I am at a loss here, I don't know what's happening anymore.
24 notes
·
View notes
Note
It's been on my mid for a while, but i gotta ask, what kind of sandwic are you? ham,grilled cheese. veggie, bacon? Tis an important question.
Now that we've got the important stuff out the way, how long does your average digital art piece take? Usually, for, me even a simple portrait will take atleast 4-6 hours. Do you have any tips towork digitally more efficiently while saving time? I use ibis paint x btw so yeh
Definitely a cheese sandwich, with maybe ham in it, but i really like croque monsieur too.
my average piece takes at least 8 hours, though usually i spend upwards of 27. On simple sketches i will take at least two hours.
I think it's really important to know your keyboard shortcuts to work efficiently, and create or configure them as you please too. The more comfortable you are with shortcuts, the easier processes like selecting, changing tools, undoing/redoing, changing values/saturation/brightness, etc, will be. Roaming the menus to see what the program can do and where it is, is also a really good idea.
Also, i would recommend downloading PureRef, it's a fantastic tool to have your references always visible, and it's really easy to use. Identify the processes that take more time and create a reliable workflow. That way, you know exactly where on the process you are, what's next, and how you can save time.
For example, when doing lineart, i have an automatic action (a feature of clip studio paint) that creates a folder for lineart or a folder for color, the folder for lineart has two layers, named and marked: "lineart" and "sketch", the folder for "color" has several layers and folders, the first one is "base color", then a folder named "color parts", inside which there are five layers "hair", "eyes", "skin", "clothes", "etc", and then another folder named "multiply" that is set to multiply so all the layers inside are automatically in the setting to multiply too.
Organization is KEY to working fast and efficiently. a regular piece has four main folders, "character lineart", "character color", "background lineart" and "background color". This is indispensable because you don't have to be fighting for your life trying to find where that one dot is that you can't erase, and you always know where everything is:

(those top layers outside the folders are for color correction, ambient effects like dust particles and that kinda thing)
And here is how my folders look inside:

I don't know if IbisPaint has automatic actions, but you can make a file where you have the template that you can open to copy the folders or layers for easier access maybe?.
otherwise, my process, regardless of what i'm drawing is always the same: i import 3d models and pose/arrange them how i need them, then i sketch features of the background and then characters. For characters, first the face, then the hair, then clothes, then shoes, then details. Then, i do lineart, from top to down. Then i carefully select the outer edges, mirror the selection, and color inside in the layer "baseColor", then i color the different parts starting from hair, then skin, then eyes, and then color. Then i decide the lighsource, and do the shadows in the multiply folder. Then, on top of the multiply folder and outside, i apply the light and color effects corresponding to that part of the drawing (either characters or background).
This process of course can change, you can add or subtract layers as you need, or adapt them to your process. sometimes i have "glasses" layers, sometimes i have separate layers for pets, secondary characters, or folders for the foreground.
Anyway!!! i hope this makes sense, and that it is useful!!! you don't have to follow my process step to step, it's just an example!! i hope you can find a flow that works for you, and if you have questions, tell me, and i'll do my best to answer!!!
3 notes
·
View notes
Text
Hey guys welcome back to another episode of Ay ruining your day because HAAAA.
Felt like we needed some depressing shit here that isn't depressing in the "What did you do you to him? Wh-Why? I'm gonna go vomit now what the fuck did I just read—" way so have angst. :bbg_emoji:
Also if you feel like you've seen this before, that's because you probably have. I yoinked this from my Wattpad because I'm (not) cool.
××××××××××××××××××××××××××××××××××××××××××××××××××××
Blue Or Brown, Can't Remember
It's been a few months since Deimos had passed. Almost more than half a year. Specific period. But that's because that event kept haunting you, replaying in your head. Hah, replay. Even thinking of that word reminds you of his stupid song that he'd bug you with. Funny how you'd describe it as him annoying you back then when now you'd do anything for him to just come back and pester you with his stupidity just once more.
You really couldn't get your mind off of him. Everything would remind you of him and the stuff you'd do together as friends. As friends. Nothing but friends. That's what it was, what it was and what it always will be due to you taking him for granted. You thought he'd always be there. That one day, you'll eventually get the courage to confess to him. Or hell, maybe he'd confess to you! I mean, he did seem to take an interest in you. But that'll remain unknown for the rest of eternity, or at least the rest of your life, because he's gone. Gone forever.
You didn't even get to say goodbye. You weren't even there when it happened. Every day you keep thinking about it. All the 'what if's and 'if only's filling your brain. Just like how it's filling it right now, as you sit here and ponder your now meaningless life.
"What if I was there?"
"What if I took the bullet instead of him?"
"If only I saved him."
"If only it could've been me."
These thoughts kept harassing you. You couldn't take it anymore. It was all you could think of. You could barely experience any form of happiness without you being pulled back into this state of constant, unhealthy grief.
"If only, if only, IF ONLY!!" You screamed out, tears in your eyes. You didn't even care if Hank or Sanford heard you from their rooms. You just couldn't take this anymore. It was literal hell on earth.
Hell on earth...
Huh.
Makes you wonder where your beloved little chain-smoker is right now. The thought had just popped into your head. Now instead of regret, you felt fear. Fear, worry, and concern. You hoped that he was somewhere safe, his soul resting in peace from this hell you all called Nevada.
You shook your head, trying to get these thoughts away. But you couldn't. God, how much you missed him. His dumb jokes, his stupid personality, his voice, his scent of tobacco, his eyes... His...eyes... Huh. Now that you think of it, you can't even remember his facial features, or any of his features for that matter. You had a hint in your head that his eyes might have been either blue or brown, but you can't seem to remember.
That thought made you get up from your bed to go and look for a photo of him, or anything similar to that. You looked and looked until it hit you that you haven't kept any sort of archive of him. That thought made you freeze in your place. Tears started stinging your eyes, the sour feeling setting in. The fact that you don't even have anything to remember Deimos with broke you.
You immediately and frantically opened your phone. You scrolled and scrolled on every app that you had, back and forth and went through every single piece of data there. And... Nothing. No chat logs, no conversations, no images, nothing. It can't be possible... Can it?? Oh, wait...
It can.
And that's because in a fit of pure anguish, you decided to erase what little you had of Deimos left on your device so you can forget about him. So you can heal faster. It all moved to your "Recently deleted" folder, but you had forgotten to move the files back where they belonged. As for the chat logs... They never had any hope of being restored easily after you deleted them. Only someone with complicated tech knowledge could do that job so easily.
Someone like him.
And there you go... Remembering him again... Gosh, you really were dependent on him, huh? You started to think about life before him. It was... Bad. To say the least. It might just be because of the fact you lived in this pathetic excuse of a state, but who knows? You certainly don't since your view of the past, yourself, everyone and the whole fucking world has been contorted after this little incident
It's all just so absolutely meaningless now. So worthless and nugatory. It all felt so dull without him. He was the spark of joy in your life that you didn't know you needed. That you didn't appreciate enough. That you took for granted.
You sighed, laying on your bed again, staring at the ceiling. You felt the tears dry but then you just burst out, again. You took a shaky breath, trying to regain composure. You felt so hopeless. It just hurt so much to cry over and over again. You couldn't take it anymore. To make it all even somehow worse, your nose had started burning thanks to all the tissues. You tried to take deep breaths to calm yourself by at least a bit, but you simply kept breaking down mid-breath.
Choking on your own breath and panting heavily, you sighed, tears falling down your face. You were so damn exhausted from crying. It felt like shit, but you couldn't stop. Your heart was pounding like crazy, and your lungs felt like they were beating. It started to physically hurt you. Is this how Deimos felt?
...
Why?
Why?
Just why?
Why did you have to remember him again? And why did it have to be that memory out of everything?
Why couldn't he leave your mind? Why couldn't he let you be? Why can't you just let this thought disappear? Why can't you repress it like all the horrible things you've repressed?
Was he haunting you? I mean, in your current state, you'd probably be delusional enough to believe that he does still live on as some sort of undead entity. Thankfully, that thought didn't cross your mind. Yet.
Trying to clear your mind out of all these thoughts just made you feel worse. Again. All you did was remember how you could have treated Deimos better. All the insults you'd throw at him, all the hits, punches, kicks, all the mean comments. You meant it in a joking, friendly, light-hearted manner. But it still made you feel like shit.
What if he didn't catch the hint?
What if he took it as genuine?
What if he hated you all the time?
What if you hurt his feelings?
You just broke down again at these thoughts. Something that made it all worse is that you actively denied these comments and actions to be jokes. Deimos seemed to take it well, but would seem hurt from time to time. You couldn't tell if he was being sad as a sort of joke of his, or if he was genuine. It still hurt to know that.
Fuck. What if he did actually have feelings for you and never confessed because of these comments? What if he felt the same way? You couldn't tell which thought hurt more. The one about him hating you in silence, or loving you in silence.
It hurt. It hurt so much. You just wanted your consciousness to be taken away. You couldn't even dream about any more happy moments with Deimos.
What if you were nicer to him?
What if you actually confessed?
What if you were there for him?
What if you didn't let him split and leave you?
What if you took his place?
What if?
What if?
What if?
What if.
What if.
What if.
What if.
What if.
WHAT IF?!
...
But it doest matter.
Because he's gone.
Gone forever.
××××××××××××××××××××××××××××××××××××××××××××××××××××
lmao loser.
Still nervous about posting shit onto this hellhole woo.
#madness combat x reader#deimos x reader#madcom x reader#madcom deimos x reader#mc deimos x reader#madness combat deimos x reader#Angst#Ok I have no other fucking tags#also Target is a corrupt organiza—#cross posted on wattpad#Criminayl Writez.#Yes that's gonna be the writing tag stfu.#Edit: ok I hate this piece of writing now.
26 notes
·
View notes
Last Seen Blogs

tiklart
TK BLOG for art

grandsandwichpenguin
Untitled

ossansafari
op after work

aliciafangirls4ever-blog
Fangirl

plantasvszombiez
lanzaguisantes sombrio