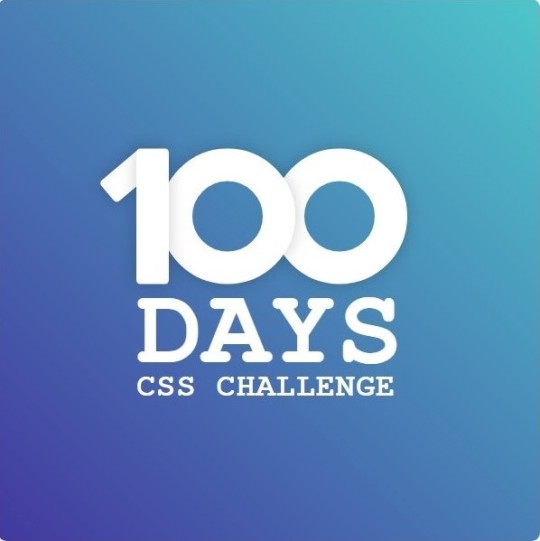
#100 days css challenge
Explore tagged Tumblr posts
Visit Tumblr Blog
Explore Tumblr blogs with no restrictions, modern design and the best experience.
Last Seen Tumblr Blogs


Fun Fact
12.7% of mobile users access Tumblr.
Text
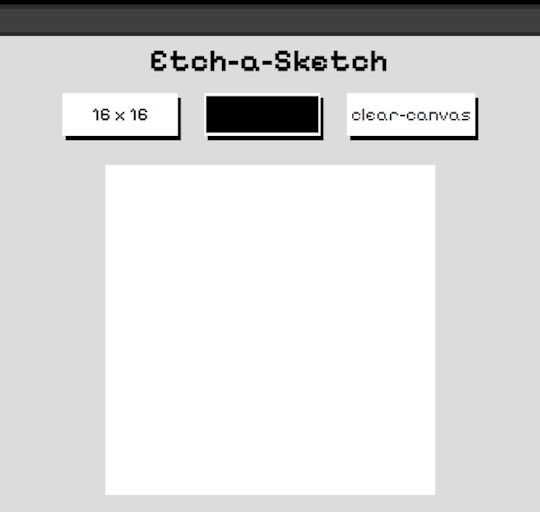
100 days of code - day 16
31.10.23 again ?
Hello! 😊
Today I did a project with HTML, JS and CSS. It is like a pixel art canvas, you can pick a color and draw some pixels.
I'm impressed with the reduction of time that I made the project, if compared with yesterday project I was I little faster today :)
I struggled a little when trying to make the dynamic size for the canvas and the click + holding event to draw the line, but after a lot of googling I managed to do it.
This project was so fun to make. I always got excited when saw it slowly taking form.
I also added some cool buttons style:

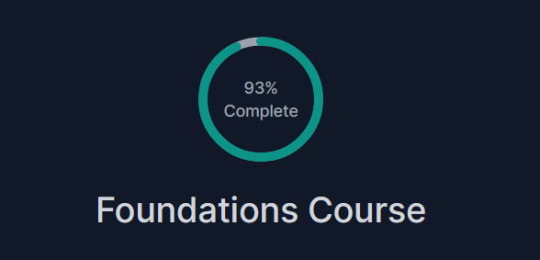
Now I have only one project left to finish the foundation path!
That's it, I also made some rust exercises on rustlings, but not too much.
Now I'm going to 🛌😴😴😪

#day 16#100 days of code#100daysofcode#codeblr#programming#progblr#studyblr#computer science#Rust#1000 hours#code#100 days of productivity#100 days of studying#software development#100 days challenge#tech#javascript#html css#coding
144 notes
·
View notes
Text

Day 2 - 100 Days CSS Challenge
Welcome to day 2 of 100 days of css challenge, where we will be together getting a given image result into reality by code.
We already know the drill since we did the first challenge, now let's get right into the different steps:
First step : Screenshot the image and get its color palette

No crazy color palette here, we only have two colors
White
This shade of green: #3FAF82
To make things more organized and get used to coding in an organized way, even if not doing it here wouldn't make any difference because we only have two colors, in more complex projects we would have a lot, we will define our colors at the beginning of our CSS code (well, only the green in this case):
:root { --main-green: #3FAF82; }
And this is how we'll use it whenever we want:
color: var(--main-green);
Second step : Identify the image elements
What elements do I have?
Three lines: line1, line 2, and line 3. I'll add them to my HTML starter template, again I'll leave the frame and center there:
<div class="frame"> <div class="center"> <div class="line-1 line"></div> <div class="line-2 line"></div> <div class="line-3 line"></div> </div> </div>
Third step : Bring them to life with CSS
Applying the background color
Only one line should be changed in the CSS code already added to .frame class:
background: var(--main-green);
So this is what we have going on for now :

Creating the lines
Now let's create our lines; if you noticed I gave each one two classes line-number and then line. I'll use the line class to give them all the common properties they have such as the color, height, width, position, border-radius, and shadow. And then I'll use the line-number to move them wherever I want using the left, top, right, bottom properties of an absolutely positioned element in CSS.
Let's start by creating all of them:
.line { left: -45px; position: absolute; height: 9px; width: 100px; background: white; border-radius: 10px; box-shadow: 2px 2px 5px rgba(0, 0, 0, 0.2); }
And just like this you'll see this in the browser:

You only see one line because the three are overlapping each other, and that's why we'll move each one of them exactly where we want using this:
.line-3 { top: 22px; } .line-1 { top: -22px; }
Now our static menu is ready:

Creating and analyzing the animations
As of observing, we can see that:
Line one goes down to line 2
Line three goes up to line 2
THEN line 2 disappears
THEN lines 1 and rotate to create the X
line-one-goes-down animation
This is my line-one code in the static version:
.line-1 { top: -22px; }
What I'm trying to do here is simply a movement translated by changing top from -22px to it becoming 0px:
@keyframes line-one-goes-down { 0% { top: -22px; } 100% { top: 0px; } }
line-three-goes-up animation
Again, I'm trying to go from top being 22px to it being 0px:
@keyframes line-three-goes-up { 0% { top: 22px; } 100% { top: 0px; } }
line-two-disappear animation
Making disappear simply means turning its opacity and width to 0:
@keyframes line-two-disappear { 0% { opacity: 1; width: 100px; } 100% { opacity: 0; width: 0px; } }
I'm gonna apply these animations and see what happens , before I create the rotation animations
.center.active .line-1 { animation: line-one-goes-down 0.5s forwards; } .center.active .line-2 { animation: line-two-disappear 0.5s forwards; } .center.active .line-3 { animation: line-three-goes-up 0.5s forwards; }
forwards means that the element will stay in the final state after the animation and not return to its original state.
This is what applying those three animations looks like:
Last but not least : let's Create the X
We only have to animations left for this: rotate-line-1 and rotate-line-2. Let's create them:
@keyframes rotate-line-1 { 0% { transform: rotate(0deg); } 100% { transform: rotate(45deg); } } @keyframes rotate-line-2 { 0% { transform: rotate(0deg); } 100% { transform: rotate(-45deg); } }
And that is my friends how we finished this challenge!
Happy coding, and see you tomorrow for Day 3!
#100dayscssChallenge#codeblr#code#css#html#javascript#java development company#python#studyblr#progblr#programming#comp sci#web design#web developers#web development#website design#webdev#website#tech#html css#learn to code
18 notes
·
View notes
Text
So, just heard of this “100 Days” Challenge
Since I won’t be able to get an accurate metric anyway I just decided I’ll start the counter now
I wanted to start this challenge so that I guess I’ll have somethin’ to put on the ‘Blr and to keep track of progress I think that’d be cool
Currently the only resource I am using is Codecademy with the Plus subscription
As of current:

I have finished the basic Javascript course, and after learning basic HTML and CSS, move onto intermediate Javascript.

This much through HTML, learned about the <form> and <input> elements, and the various types, well, inputs. And also about ‘Client-Side Validation’, basically letting you know that the input data is input correctly.
And to officiate it,
DAY 1/100 OF CODING
19 notes
·
View notes
Text

Introduction
Hi! I decided to join 100 days of code challenge, codeblr accounts gave me a huge inspiration. I am already graduated from university but a feel like I am not good enough about coding. So i want to share my process.
I am working at a retail company as a frontend developer and i use angular14 rigth now. I want to start very basic, i will work css html and js/ts from the start. So if you know something useful send me pls >w<
Actually me
After graduation and finding a job, I feel like my life is not progressing. I don't even know i like coding but my major was computer science. I am just trying to be love it. Actually I do not know is there a job that I can be like to do. I am very confused.
I want to learn gave development(but this is too hard), I want to learn how to draw, illustiration maybe ux/ui. there are many thing to learn that I curios about. If I keep posting regularly and improve coding I want to start for drawing, ux / ui design and also game development
Interest
I love animes, mangas , kpop (a little), meditation, drawing, graffic design, Also horror movies and games.
I want to go Japan and i want to live there.
I want to make friends
I want to read more
I like goth aestetic, y2k, harajuku
Yes, this is me! probably I will use here as a journal
12 notes
·
View notes
Text
How to Stay Motivated While Learning to Code
Learning to code is one of the most powerful decisions you can make in today’s digital-first world. But let’s face it—coding isn’t always easy. There are days when bugs don’t go away, logic doesn’t work, and the motivation to keep going fades. That’s completely normal.
At Trendnologies, with branches in Chennai, Coimbatore, and Bangalore, we guide hundreds of students from different backgrounds—many with zero experience—into successful IT careers. Our students don’t just learn coding; they learn how to stay committed and motivated through practical support, real-world projects, and a 100% Job Placement Guarantee.

Let’s explore how you can stay motivated while learning to code, especially if you’re just getting started.
1. Set Small, Clear Goals
Don’t start by saying, “I want to be a full stack developer in six months.” Break that down:
Week 1: Learn HTML/CSS basics
Week 2: Build a simple webpage
Week 3: Start JavaScript
Celebrating small wins builds confidence and momentum.
At Trendnologies, our course structure is designed in micro-modules, so every achievement feels meaningful. From Day 1, you’ll feel the progress.
2. Build Real Projects (Not Just Tutorials)
Tutorial fatigue is real. Watching videos is helpful, but doing is learning. When you build a small calculator, a blog, or a portfolio site on your own, you start to see results—which is deeply motivating.
Our programs offer hands-on real-world projects from early stages to help you gain practical experience—not just theoretical knowledge.
3. Surround Yourself with a Coding Community
Learning alone can be lonely. Join communities—whether it’s on Slack, GitHub, or in person. At Trendnologies, we offer peer learning environments, coding labs, and group activities that make the learning journey interactive and social.
Ask questions, share doubts, and collaborate—it keeps the excitement alive.
4. Remember Why You Started
Whether you want a high-paying IT job, to shift from a non-IT background, or to build your own app, remind yourself of your “why.” Write it down. Stick it on your desk.
Your long-term goal should always be your biggest motivator.
Many of our students in Chennai, Bangalore, and Coimbatore start with no IT background—but with focus and consistent support, they transition into developer roles within 6 months.
5. Mix Learning with Practice
A good rule? 80% doing, 20% reading. Try to code as you learn, even if it’s just replicating examples. The sooner you apply what you learn, the stronger your skills get.
At Trendnologies, we follow a code-first approach. Every theory lesson is immediately followed by lab sessions where you implement what you’ve just learned.
6. Accept That Failure Is Part of Growth
Getting stuck is part of coding. Don’t see bugs as failure—see them as part of the process.
Our trainers provide individual mentorship, so you never feel stuck for too long. We help you understand mistakes and debug with confidence.
7. Track Your Progress
Use tools like GitHub to track your code, or maintain a simple coding journal. Watching your skills evolve over weeks and months gives a huge motivational boost.
In our courses, we maintain student dashboards to track performance, progress, and project completion milestones.
🔥 Stay Motivated with Trendnologies
At Trendnologies, we make the journey easier and more rewarding:
Real-time project training
Mock interviews + resume building
100% Job Placement Guarantee
Career support for freshers & career switchers
Flexible weekend & weekday batches
From Chennai to Coimbatore and Bangalore, our alumni are now placed in top MNCs, thanks to the guidance, structure, and community support they received during their learning phase.
🌟 Final Thoughts
The journey to becoming a developer may be challenging, but with the right mindset and environment, you can thrive. Stay consistent, stay curious—and don’t be afraid to ask for help.
Want to learn coding the right way and stay motivated throughout?
👉 Join Trendnologies today – where motivation meets results.
📞 Visit www.trendnologies.com or call us to book your free counselling session.
0 notes
Text
Why I Am Doing the 100 Days of Code RTFM Challenge
Coding isn’t about chasing trends. It’s about mastery. That’s why I’m doing the #100DaysOfRTFM challenge: 100 days of digging deeper, not wider. Follow the journey! #Python #Rust #WebDev #WordPress #WPDev #Coding #Coder #HTML #CSS #PHP #UpSkill
Coding is a craft—a mix of logic, creativity, and grit. But like any craft, it’s easy to get complacent, to hit a plateau where you feel you “know enough” to get by. That’s exactly where I found myself. And that’s why I’m diving headfirst into the 100 Days of Code RTFM challenge. RTFM isn’t just an acronym. It’s a mindset. It stands for “read the f’ing manual” (with a sharper edge), and it’s…
1 note
·
View note
Text
Dislate DevLog 1: When Comparing Size Matters
Daily Blogs 277 - Aug 8th, 12.024
Something which I noticed today while programming the project-dislate's database interface, is how much the files that I write got bigger. When I was starting programming, most files didn't pass the 100 lines most of the time. I still remember doing my first "real" project, a simple To-Do list application called ToToday (which I actually used when I was starting to organize my life), which I made 2 years ago and felt really proud on how I made the code "scalable" to add more features and just use the LocalStorage API for everything. The Tasks' Component I specially felt proud about, and even showed to friends them, showing the amount of lines and how much it was scalable and organized.
However, seeing now, even though the files have around 300 lines of code, the actual logic of the code is just around 120 lines, the rest is just HTML and CSS. Not only that, but last year, as an experiment, I created another To-Do list application in just one HTML file, which ended having 350 lines of code for the entire application (this kinda also shows how much JavaScript, and its ecosystem has the tendency of over-engineering a log of things).
And today, I actually wrote just a database interface, and it ended up with 300 lines of code before I was even having time of completing it today. All these lines are code, pretty much. And I asked me "why?", and pretty much already had the answer in mind: I'm doing more complex things now.
I hardly look backwards to compare myself, which I know is a problem and I probably should do it more since it really shows me how much I improved as a programmer/Software Engineer. I even call myself now a "Software Engineer" instead of "Programmer", because that what I am, I solve problems now, I make actual software that solves problems instead of just gluing things together and calling it a day. Even though number of lines doesn't really represent quality or even improvement, the idea that nowadays this amount of code every day is normal and the bare minimum for a small part of the projects that I do, I would say that it shows that I'm improving and actually creating things. Projects and codebases aren't big when the only thing you're doing is gluing libraries and frameworks together, I would say. If you are solving problems, if you're making business logic, you will need to write it and write more code.
That's why I always recommend making and write projects that you will use, that you actually care, instead of just following tutorials and making To-Do apps. Actual software is hard and big most of the time, but writing them can be fulfilling. I acknowledge that my first To-Do app was a start and a good step in actually trying to complete something, but I fell a lot happier seeing myself now actually persuading bigger challenges. And I hope that you go pursue bigger challenges.
Today's artists & creative things Music: Road To Hide - by ZeRO
© 2024 Gustavo "Guz" L. de Mello. Licensed under CC BY-SA 4.0
#scope/code#day/2024-08-08#type/devlog#project/dislate#language/go#subject/personal-improvement#codeblr#golang#software engineering#personal growth#personal improvement#progblr#programming
1 note
·
View note
Text
Top 10 Website Designers in Hyderabad: Leaders of 2024, featuring EasyQuickWeb
Find Your Perfect Match: Leading Outfits on The Top List in Hyderabad Web Design.
Dominate Hyderabad’s online world! These days it is not you who have a site, the site have you! Sure multiplicity of choices provide us with opportunity to exploit them, but the task of choosing one from many is another challenge entirely.We’ve narrowed it down! Here are addres of Website Designers in Hyderabad ,Hyderabad’s top 10 web design leaders for 2024, which includes EasyQuickWeb, an affordable and workable solution for web design whom you can always rely on.
EasyQuickWeb:
Your web site is created by one of our experienced specialists and has a price that will match your budget.
Leads Website Designers in Hyderabad on the criteria of service provision, resolution options, and client satisfaction. Engages in SEO-friendly, volunteer-minded websites. Set a benchmark of outstandingness.
Why Choose EasyQuickWeb?
Affordable Excellence:
We provide custom-built web design at economical prices and in this way our service is available for all businesses.
Tailored Solutions:
We design unique websites that show off the colors and principles of your business and attract visitors that are interested in your offerings.
Unwavering Quality:
The cost of our websites are super low, but don’t be deceived by price tag because our company delivers quality web design services.
PixelCraft Studios: Eye-Catching & Ultra-Level-of-Detail
Similiar to one of the milkshake recipes, they’re also known for detail and creative flair.Crafts visually stunning websites. All about the UI/UX and consider every aspect of the same to make sure it is 100% pertinent and appealing to users.Exceeds expectations.
InnovaTech Designs:
Investments in user-related research, information design, and intuitive interfaces will play a vital role in the current healthcare landscape.
Providing website developments with specialization on user-friendly design and uptime that are also accessibility oriented are the domains of expertise. Designs HTML/CSS from scratch and devises fresh and friendly user interfaces to ensure less time browsing.
TechSavvy Solutions:
The bounty of talent that mastery entails is inextricably interlinked with one’s clear vision and understanding of duty.
Builds stunning web presentations that no matter what device they are exhibited on, they show outstanding performance. Be uniquely human through the combination of elegant glamour with the incredible details. Dedicated to the design trends for the most modern solutions. From US/Asia to life abroad You were a grown up person last week, and next week, you need to go on vacation to another country. It can be a little scary, to be honest. As you go through the security clearance, look at these people with their papers and passports. You, too, must have all of your documents ready.
WebCraft Innovations: Both craftsmanship & results.
Devises specific websites which correspond with all brand features. expand expand YourselfPlease wait for few seconds Provide a package which includes corporate websites, e-commerce platforms, and results oriented websites. Create an article (do not exceed 400 words) introducing an advanced technology relevant to the chosen field. In your introduction, explain the technology and how it has evolved over time, highlighting key milestones and challenges faced during its development.
DesignForge Studios: Working together for solution
Every project is tailor-made to the requirements of the client, therefore building a strong relationship with our customers is a priority. Artistic Specials weave visions into vivid realities using imagination and attention to detail.
CreativeCanvas Creations:
Using Virtual Reality and Augmented Reality in the quest of creating interactive and immersive web experiences which have the unparalleled power to engage and educate is vital.
Thrives on it being interactive, with the help of multimedia and user-engagement tools to create real-life experiences people can appreciate.
Elevate Designs: Creativity and Proficiency.
Elevates brands through design. Fuses the invention with practices that replicate websites that truly deliver.
TechTrend Studios:
Toward the future thinking Website Designers in Hyderabad Appent see new technologies and design trends. design sites that are up to the minute keeping in touch with current trends in easyQuickWeb.
ArtisticEdge Studios:
Witnessing the rise of the internet and how it has transformed marketing and driven businesses’ online presence, we have made our goal to create stand-out websites that help brands achieve their marketing objectives and stand out amongst fierce competition.
Transforms projects into something special and unique with touch of artistry and craftsmanship. Write-up: With increased combined efforts, technological advancements, and renewed focus on preservation and restoration, it is our collective responsibility to safeguard our ecosystems for future generations. We must strive to shift towards a more sustainable planet that is conducive to life for all its inhabitants, animals included wildlife. Offers visually engaging websites integrating individual illustration and advanced effects.
The stakes couldn’t be higher when it comes to the success of an e-commerce store. There is no single factor determining an online enterprise’s win or loss.
Consider these factors when picking a Hyderabad web design company:
Assume you have specific everyday necessities and the brand you wish to develop with EasyQuickWeb Team . The explications of your ideas through the samples added to that can make people understand your vision better.
Client testimonials and reviews
Clear communication and collaboration
Work in collaboration with the industry leader in Hyderabad Web Design, EasyQuickWeb.com, to create a website that specifically represents your business, engages your audience, and eventually, steers your Internet presence in the right direction. As to be your convenient, reliable, and cost effective, we provide tailor-made and premium-made solutions meeting all your needs. Let us help you now! More information is available upon contact.
#web designers#webdesign#webdevelopment#website#websites#web developers#web development#web design#seo#seo expert
0 notes
Text
(R6D018) - 100 Days of Code - Notes, notes, notes... and a little code.
Ok, I’m GOING TO COMPLETE THIS CHALLENGE! No excuses, let’s go! 09:39 – The challenge tasks me with the following: Look at the web page All links to CSS and JavaScript are removed; fix them Create a favicon and Apple touch icons and link them correctly Hints for completion Style sheet order: foundation.css, app.css Link JavaScript in the body of the document JavaScript order: jquery.js,…

View On WordPress
0 notes
Text
Experience Software Development If you’re new to software development and want to experience how to code for yourself, then try our free 5 Day Coding Challenge. Within five days, you’ll have built your first web page and you will learn the basics of HTML, CSS and JavaScript (not to be confused with Java). Register now through the form below.
0 notes
Text
The Flagship Profile (for now)
The big question I had to answer is... what topic do I discuss first? Why not the profile I've designated (at least until I get inspired to do something else) my "Flagship Profile"? That is, this is the profile where I pour way too much energy into making something interesting out of it. Maybe I want to test out animations. Maybe it's interactive in some way. So here it is, the profile I created for the Arknights character, Dorothy Franks. Most of this was inspired by an animated video on Yostar's official YouTube channel providing some exposition about a faction in the game world. After watching this video, I enjoyed the animation and design that well, wanted to see if I could mimic it with CSS animations. It's not 100% to the tee, and some things were too complex for me to even try. Though this wasn't my first rodeo in animating with CSS like this. Earlier I made a profile for the Dimension W character Mira Yurizaki. There was a scene in the anime (episode 2 I believe) where Mira "boots up" and provides an animation of that process. While I can't find a clip for it, that was the first animation I created. And it looked pretty darned convincing. There are certain caveats with what I'd call my Flagship Profiles: they're not really intended to be practical when it comes to delivering the actual meat and potatoes of a profile. They're more of a challenge to me, to see how much I can work my HTML + CSS magic. Any other day, I'd slap together something with a few snippets I've created, adjust a few things here and there, and call it a day.
If anything, what I hope this profile and other Flagship Profiles I create is to inspire others to push themselves. They may not need a 20-30 second introduction that has nothing to do with their character (or maybe their world), but maybe some parts of it could be used to add some flavor to a part of their own profile.
Later posts will go into some details about the profile in a sort of break down of what's going on.
0 notes
Text
100 days of code - day 20
Hi! 😵💫😊
Today I continued working on the calculator from the last time. I've added some style and completed the logic for the calculations.
It isn't "done" yet, I can add support to float numbers, power, and handle keyboard input. But since these features are more of the same, I don't know if I'm really going to add them 😅😴.


GIF 1 just a simple usage of the calc, GIF 2 I'm manually going to 2^31 -1, max int in C ☠️. It would be easier if I had added the power operator 😭😵💫.
With this project, I've completed the foundation course, and I'm going to take the node.js path. This is just the beginning !!

That's it, nothing really new for today, just practicing the concepts I learned the past week.

#day 20#100 days of code#100daysofcode#codeblr#programming#progblr#studyblr#computer science#1000 hours#code#100 days of productivity#100 days of studying#software development#100 days challenge#tech#javascript#html css#coding
63 notes
·
View notes
Text

Day 1 - 100 Days CSS Challenge
Welcome to day 1 of the 100 Days CSS Challenge! In this challenge, we'll bring a design to life using only CSS. Our goal is to recreate the image we're provided with on the challenge page using HTML and CSS.
On the challenge page, we see:

A small preview of the design we need to replicate.
A starter HTML template.
A submission form to showcase our work alongside others who have taken on the same challenge.
Let's dive into the process step by step.
Step 1: Screenshot the Image
The first thing I always do is take a screenshot of the target design. Even if the design includes animation, having a static reference helps me focus on the basic structure and colors. Here’s the screenshot of the design we’re aiming for:
Step 2: Extract the Color Palette
Next, I identify the color palette that we'll need. This helps ensure that we maintain consistency with the original design. Here’s the color palette I’ve created:

Step 3: Identify and Create the Image Elements in HTML
Now that we know the colors, I break down the elements in the image:
Background: This is a linear gradient.
The 100 number: This is the main challenge, and it will require some work.
Text: “days css challenge,” which we’ll place to the left of the number.
Here’s the HTML structure for these elements:
<div class="frame"> <div class="center"> <div class="number"> <div class="one-one"></div> <div class="one-two"></div> <div class="zero-one"></div> <div class="zero-two"></div> </div> <p class="sentence1">days</p> <p class="sentence2">css challenge</p> </div> </div>
Now that the elements are in place, CSS will bring them to life.
Step 4: Bringing the Elements to Life with CSS
Linear Gradient
To create the background, we’ll use a linear gradient. Here’s a basic syntax:
background: linear-gradient(to <direction>, <color-stop1>, <color-stop2>, ...);
Parameter 1: Direction/Angle
This defines the starting point of the gradient. You can either specify a direction (e.g., to top, to bottom) or an angle (e.g., 90deg, 180deg).
Direction options:
to top
to bottom
to left
to right
If you want more precision, you can specify angles:
0deg: Gradient starts from the top.
90deg: From the right.
180deg: From the bottom.
270deg: From the left.
You can also combine two directions, specifying both horizontal and vertical movements, like to left top or to right bottom. This means:
The first keyword (left or right) controls the horizontal movement.
The second keyword (top or bottom) controls the vertical movement.
For example:
background: linear-gradient(to left top, red, blue);
This gradient starts at the bottom-right corner and transitions toward the top-left.
Parameter 2: Color Stops
Color stops define how the gradient transitions between colors. Each color stop specifies a point where a color starts or ends. Here's an example:
background: linear-gradient(to right, red 10%, blue 90%);
This means:
The element starts at 0% fully red.
By 10%, the transition from red begins.
Between 10% and 90%, there is a smooth blend from red to blue.
At 90%, the transition to blue is complete, and the remaining part is fully blue.

Once we understand the concept, we can apply the background we need. In our case, the gradient flows from the bottom left to the top right, so the code will look like this:
background: linear-gradient(to right top, #443DA1, #4EC3C9);
Bonus: Stacking Multiple Linear Gradients
You can also apply multiple gradients on top of each other:
background: linear-gradient(180deg, #f00, #0f0), linear-gradient(90deg, #ff0, #f0f);
Step 5: Making the "100" Number
Creating the Zeros
We start with the zeros. These are simply circles created using CSS. To make a full circle, we use border-radius set to 50%.
The white border gives it the appearance of the number zero.
.zero-one, .zero-two { position: absolute; height: 100px; width: 100px; border-radius: 50%; border: 24px solid #fff; box-shadow: 0 0 13px 0 rgba(0,0,0,0.2); }
This gives us a nice circular zero. We adjust their positions using properties like left and top, and manage the z-index to make sure the zeros stack correctly.
.zero-one { z-index: 8; left: 17px; } .zero-two { z-index: 6; left: 100px; }

Now both zeros are positioned, and they overlap in the way we want.
Creating the "1" Number
The number "1" is made of two div elements:
One-One: This part represents the slanted part of the "1".
One-Two: This is the straight vertical part of the "1".
What make the one-one element slightly slanted is
transform: rotate(50deg);)
the one-two is created simply with a little height and width nothing too particular then it is placed directly on top of the slanted part, giving us the full "1". Its z-index tho has to have a higher value than the slanted part of our 1 to ensure it stays above the slanted one.
Step 6: Adding the Text
For the two sentences “days” and “css challenge,” the styling is basic CSS. You can achieve the look with just a few font changes, some padding, and adjustments to font size. It’s as simple as:
.sentence1,.sentence2{ text-transform: uppercase; margin:0; padding:0; } .sentence1{ font-size:82px; font-weight:700; } .sentence2{ font-size:25px; font-weight:700; margin-top:-20px; }
And just like that, we’ve completed day 1 of the 100 Days CSS Challenge! Each part of the design is carefully crafted using CSS, giving us the final result.
Happy coding, and see you tomorrow for Day 2!
#100dayscssChallenge#codeblr#code#css#html#javascript#java development company#python#studyblr#progblr#programming#comp sci#web design#web developers#web development#website design#webdev#website#tech#html css#learn to code
16 notes
·
View notes
Text
How many days does it take to learn UI UX?
The amount of time it takes to learn UI and UX design course in Chandigarh varies depending on the depth of knowledge you want to acquire and the time you dedicate to learning each day. Learning UI/UX design is an ongoing process, and proficiency is developed through practice and experience. Here's a rough breakdown of the timeline you might expect at different stages of learning:
With the rise of mobile apps, websites, and digital platforms, the need for intuitive and visually appealing design has never been higher. That’s where UI/UX designers come in. But if you're new to this field, one of the first questions you might ask is:
“How many days does it take to learn UI/UX design?”
The answer depends on your background, goals, and commitment. Generally, you can learn the basics of UI/UX in about 30 to 90 days, but becoming proficient enough for a job can take 6 to 9 months of consistent learning and practice.
This article explores:
The difference between UI and UX design
A breakdown of the skills you need
How long it takes to learn each area
A realistic timeline for beginners
Tips to speed up your learning
What Is UI/UX Design?
UI (User Interface) Design
UI design focuses on the look and feel of a digital product. It includes:
Layouts
Buttons
Typography
Colors
Icons
Interaction elements
UI designers ensure that a product looks visually appealing and aligns with brand identity.
UX (User Experience) Design
UX design is about the user's journey. It involves:
User research
Wireframing
Prototyping
Usability testing
Information architecture
UX designers ensure a product is easy to use, efficient, and enjoyable.
Together, UI and UX form the bridge between the product and the user.
Core Skills Needed for UI/UX Design
UI Design Skills:
Typography & Color Theory
Layout & Grid Systems
Figma/Adobe XD (Design Tools)
Responsive Design
Visual Hierarchy
UX Design Skills:
User Research
Wireframing & Prototyping
Journey Mapping
Testing & Feedback
Interaction Design
Most UI/UX design jobs today expect you to know both disciplines at a basic level—even if you specialize in one.
Learning Timeline Breakdown
Let’s break it down based on days and learning intensity.
First 30 Days: UI/UX Basics
Learn design principles
Understand difference between UI & UX
Get hands-on with Figma or Adobe XD
Start analyzing real apps/websites
Create basic wireframes and mockups
Time commitment: 1–2 hours/day or 10–12 hours/week
Outcome: You’ll understand how digital design works and create your first mockups.
Day 31–60: Tool Mastery & Mini Projects
Master Figma features
Build 2–3 small UI screens (login page, dashboard, mobile app layout)
Study UX patterns and personas
Create a sample user journey or sitemap
Test your designs with friends or users
Outcome: You’ll begin combining visual and user-centered design into working interfaces.
Day 61–90: Real-World Design Practice
Work on 1–2 complete design projects
Start creating a portfolio
Get feedback via communities (Reddit, Dribbble, Behance)
Join design challenges (DailyUI, 100 Days of Design)
Learn how to present your work
Outcome: You’ll have real case studies and a basic portfolio.
Do You Need a Degree?
No. In 2025, most UI/UX designers are self-taught or come from bootcamps or online courses. Employers care more about your portfolio and practical skills than a degree.
Popular online learning platforms:
Google UX Design Certificate (Coursera) – ~6 months
Interaction Design Foundation – Self-paced
CareerFoundry / Springboard – 6–9 months career tracks
YouTube – Free, beginner-friendly tutorials
Can You Learn UI/UX Faster?
Yes, if you already have:
A background in graphic or web design
Knowledge of tools like Photoshop, Illustrator, or Figma
Basic HTML/CSS understanding
Experience working on digital products
In that case, you can accelerate your learning and create a portfolio within 60–90 days.
When Can You Start Freelancing or Apply for Jobs?
After 3–6 months of focused practice (especially if you're building real projects and a solid portfolio), you can start:
Freelancing on platforms like Upwork or Fiverr
Applying for internships or junior roles
Collaborating with developers or startups
By month 6–9, many learners are ready for full-time entry-level UI/UX design roles.
Tips to Learn UI/UX Design Quickly
Learn by Doing: Watch tutorials, but always apply what you learn in real projects.
Use Design Challenges: Commit to 30 or 100 days of design prompts.
Follow Experts: Join communities and learn from practicing designers on LinkedIn, Twitter, and Dribbble.
Ask for Feedback: Post your work early and often to improve rapidly.
Work on Real Problems: Redesign an existing app, help a nonprofit, or create a case study from scratch.
Job Roles You Can Apply For
Once you’ve grasped the fundamentals and built a portfolio, you can apply for roles like:
Junior UI/UX Designer
Product Designer (Junior Level)
Web Designer
UX Research Assistant
UI Design Intern
Final Thoughts: How Many Days to Learn UI/UX?
While you can grasp the basics of UI/UX design in 30–90 days, becoming truly job-ready takes 6–9 months of consistent effort.
The timeline is flexible—what matters is how much time you commit, how well you practice, and how strong your portfolio becomes.
If you dedicate even 1–2 hours a day for 3–6 months, you can launch a promising career in UI/UX design—without a degree or expensive training.
0 notes
Text
Day 6 / 14 | #TwoWeekStudyChallenge
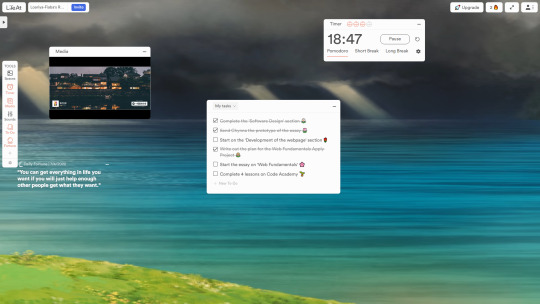
Week One Prompt Day 6: What popular self-care ritual does nothing for you? 🌼
I would have to say meditating? I am either doing it wrong all the time, or it has no effect on me at all. I see my boyfriend do it all the time and say it clears his chakras, making him feel x10 better. But it does nothing for me which is a shame because I like the idea of meditating… -(>︿<)/
What did I study today? 🌼
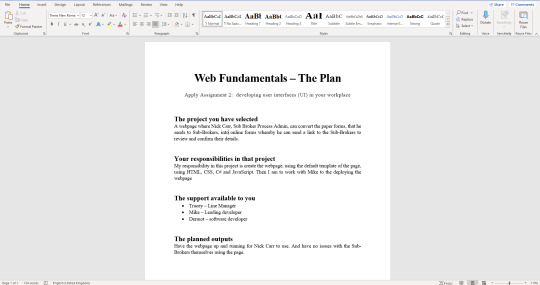
I am still doing my essay but now I have two to do simultaneously! My brain is semi-fried but if I keep on schedule, I can do it. I sent my 4th draft of my unfinished essay over so I am just waiting for feedback, so as I wait I started my new essay which covers a project using HTML, CSS and JavaScript. I hope this project is super easier than the last. I have to write up a plan beforehand so that is what I complete just now and will be sending that over.
I also have like 3 tumblr draft posts because people have asked my question but thought it’s best I just make a post about it! I am behind so much but it is what it is! Can’t stop and cry about it, cause things won't get done that way! I’m not giving up because technically my deadline for everything is just before I go on holiday on 31st July, thus I still have time!
That's all and have a happy day programming! ♡
#TwoWeekStudyChallenge#studyblr#study challenge#studying#coding#coding study#programming#comp sci#software developer#projetcs#student#javascript#JavaScript#100 days of code#python#html#css#html5 css3#html website
15 notes
·
View notes