#Ac Capacitor
Explore tagged Tumblr posts
Visit Tumblr Blog
Explore Tumblr blogs with no restrictions, modern design and the best experience.
Last Seen Tumblr Blogs


Fun Fact
Tumblr Inc. has $15.1M in annual revenue.
Text
0 notes
Text
youtube
AC Capacitor Replacement
#ac repair#indoor cooling#air quality#ductless inverter#ductwork#water drainage#ac capacitor#pioneers heating and air#Youtube
0 notes
Text
Discover the Top Reasons Why Your AC Capacitor Keeps Failing
Do you find yourself constantly replacing the capacitor in your air conditioning unit? If so, you're not alone. Many homeowners experience the frustration of a failing AC capacitor, which leads to decreased cooling performance and adds up costs for repairs and replacements. In order to address this recurring issue, it's crucial to understand the common reasons why an AC capacitor fails and take preventive measures to ensure its longevity.

Image Source: https://www.bobvila.com/
Overloading
Overloading is the culprit! When a capacitor takes on more electrical load than it can handle, trouble brews. The excess stress leads to overheating and, ultimately, failure. Don't sweat it! Prevent overloading by making sure your AC unit is the perfect fit for your space. An oversized unit is a no-no, as it constantly cycles on and off, burdening the poor capacitor.
Voltage Issues
Don't zap your AC! Fluctuations in electrical voltage can shock your capacitor, leading to a shortened lifespan. Let a qualified AC expert zap-proof your electrical system and keep your AC running smoothly.
Age and Wear
Like any other component, capacitors have a limited lifespan. Over time, the internal components can wear out, leading to failure. The average lifespan of a capacitor is usually around 10 to 20 years. Regular maintenance and inspections can help identify when a capacitor is nearing the end of its lifespan, allowing for proactive replacement before failure occurs.
Dirt and Debris
The capacitor inside your AC unit is exposed to the elements, making it susceptible to dirt and debris. When these contaminants accumulate on the capacitor, they can interfere with its proper functioning and cause failure. Regularly cleaning and maintaining your AC unit, including the capacitor, can help prevent this issue.
Poor Installation
Improper installation of the capacitor can also lead to failure. If the connections are loose or not secure, it can result in electrical arcing, overheating, and, ultimately, capacitor failure. Hiring a professional HVAC technician to install or replace the capacitor is crucial to ensure it is done correctly.
Poor Quality Capacitors
The capacitor's quality plays a vital role in its durability and performance. Cheap or low-quality capacitors may have manufacturing defects or lower tolerances, making them more susceptible to failure. Always opt for high-quality capacitors from reputable manufacturers, even if they are slightly more expensive, as they will likely last longer and provide better reliability.
How to Prevent Frequent Capacitor Failures
Want to avoid capacitor failures? Follow these smart strategies! First, choose the right-sized capacitors that can handle the electrical load. Consider voltage, current, and temperature ratings. Second, stay on top of maintenance and inspections to catch wear and tear early. Keep the environment spotless, free from dust, moisture, and icky contaminants that can ruin performance.
And remember, surge protection devices! They'll shield your capacitors from nasty voltage spikes and surges that can cause serious damage. Lastly, invest in top-notch capacitors from trusted manufacturers. They'll be your superhero against failures. By taking these preventive measures, you'll say goodbye to capacitor mishaps and enjoy smooth-as-silk electrical systems. Bam!
Conclusion
Discover the secret to a chill and carefree summer! Uncover the hidden truths behind your AC capacitor failure and unlock the keys to a smoothly running cooling system. Say goodbye to costly repairs and replacements and say hello to a consistently cool and comfortable indoor oasis. It's time to take control of your cooling destiny with regular maintenance, proper sizing, voltage regulation, and professional installation. Don't settle for less than the ultimate in cooling perfection.
1 note
·
View note
Text

#Shree Trading Syndicate is The House Of Capacitors#Supplier#Dealer And Authorised Distributors Of Jaivic Power Capacitor#Jaivic AC Capacitors#HT App Shunt Capacitor#Mumbai#India.
0 notes
Text
Enhancing Motor Longevity with the Right Start and Run Capacitors
0 notes
Text
AC Capacitors Manufacturers and Suppliers in India

Power up your air conditioning units with our reliable AC capacitors.
0 notes
Text

Learn why your AC compressor stopped working. Uncover the common issues and solutions for a malfunctioning AC compressor.
Explore now: https://ramservicesandsales.com/2023/10/24/why-did-my-ac-compressor-stop-working/
#AC compressor belt problems#AC compressor capacitor failure#AC compressor clutch engagement issues#AC compressor failure causes#AC compressor not turning on#AC compressor tripping breaker#AC compressor won't start#air cooler repair services#Air Cooler Service Center Nagpur#Air Cooler service in Nagpur#Air Cooler Services in Nagpur#Air Coolers Sales and Services in Nagpur#Burned-out AC compressor#Common reasons for AC compressor failure#Compressor clutch failure AC#Electrical problems AC compressor#Failed AC compressor motor#Low refrigerant AC compressor#Overheating AC compressor#Refrigerant leak AC compressor#Signs of AC compressor issues#Troubleshooting AC compressor problems#Why Did My AC Compressor Stop Working
1 note
·
View note
Note
Not the original asker, but how would you make NPC equivalents of PC mechs? Some stuff feels fairly intuitive, but there are some others that I'm less sure of/not sure how to do.
IPS-N
IPS-N mechs are probably the easiest, since there are many mechs that are close to being 1-to-1 NPC approximations of IPS-N mechs.
Blackbeard - One of the easiest, since the Berserker NPC is basically just a Blackbeard. It has the Chain Axe, it has the reckless speed and it has the inability to properly determine between friend and foe. It doesn't have the Blackbeard's enhanced Grapple shenanigans but those aren't really appropriate on an NPC mech anyway.
Caliban - Give an Assassin the Devil's Cough Shotgun and Explosive Knives.
Drake - Take the Bastion, increase its HP just a little, remove the Rotary Grenade Launcher and give it the Scourer's Thermal Lance, except make the Thermal Lance do Kinetic damage instead of Energy.
Lancaster - Another easy one. The Support NPC is just a slightly slower Lancaster. It has a Latch Drone, it has Restock Drones, it has Whitewash, it's got all the fun stuff.
Nelson - Yet another easy one. The Cataphract does pretty much exactly what the Nelson does, just with added trample.
Raleigh - This is much more difficult - so much so that for In Golden Flame, I created an entirely new NPC class, the Slinger, just to simulate it. If you don't have IGF, start with an Assault. Remove the Assault Rifle, Combat Knife and Hunker Down. Take the Drum Shotgun from the Goliath and call it a Hand Cannon. Give it the Archer's Impending Threat optional.
Tortuga - This one's fairly simple. Take a Sentinel, upscale it to Size 2, give it Punisher Ammunition and the Bombard's Siege Armor.
Vlad - Take a Berserker, give it the Nail Gun optional, and then give it the Bastion's Near-Threat Denial System.
Zheng - Take a Berserker, give it Juggernaut and Retribution, remove Aggression, remove the Chain Axe and replace it with the Demolisher's Demolition Hammer.
SSC
SSC mechs also have a lot of parallels, so it's pretty easy to model them.
Black Witch - Probably the hardest mech to model with existing NPCs. I created another whole new class, the Lodestone, just to simulate these guys.
Death's Head - Take a Sniper, cut the damage on its Anti-Material Rifle to 6/8/10, strip the Loading trait and permanently give it the effect of Deadmetal Rounds (shots become Line 20 instead of Range 25).
Dusk Wing - Literally just a Hornet.
Metalmark - Take an Assault and give it the Operator's Fade Generator.
Monarch - Depending on the exact flavour of Monarch you want, you can do two things. Either take a Rainmaker, scale it up to Size 2 and give it Atlas Missiles the Ace's Missile Swarm, or take an Ace, scale it up to Size 2 and give it Missile Swarm.
Mourning Cloak - Literally just a Specter.
Swallowtail - Literally just a Scout.
HORUS
HORUS mechs are where we need to get a little bit more inventive. This shit ain't natural boys.
Balor - Take a Hive, give it Electro-Nanite Cloud and the Berserker's Harpoon Cannon, then give it the Exotic template and choose Regenerator. Or, if you have No Room For A Wallflower, just use the Lurker NPC.
Goblin - It's a Witch.
Gorgon - Take a Sentinel, scale it up to Size 2 and give it the Archer's Impending Threat and Suppress reactions.
Hydra - There's not really an NPC that simulates a mech deploying 800 drones and honestly that's probably for the best.
Manticore - Give a Berserker the Superhot optional, the Cataphract's Capacitor Discharge, the Sentinel's Combat Shotgun and the Operator's Self-Erasure.
Pegasus - Do not attempt to simulate me, ha ha.
Harrison Armory
Home stretch here.
Barbarossa - Take a Goliath, give it the Ultra's Short-Cycle Lance or the Bombard's Bombard Cannon.
Genghis - Literally just a Pyro.
Iskander - This is just a Seeder.
Napoleon - Why does this mech exist
Saladin - Scale up an Aegis to Size 2.
Sherman - Take a Scourer and give it Emergency Vent.
Tokugawa - Take a Berserker and give it Superhot. Make its Chain Axe do Energy instead of Kinetic, and instead of Shredding on crit, make it do a couple of Burn damage.
295 notes
·
View notes
Text
i know enough electromagnetics to mostly understand clever electrical stuff but little enough that it still has the magic charm
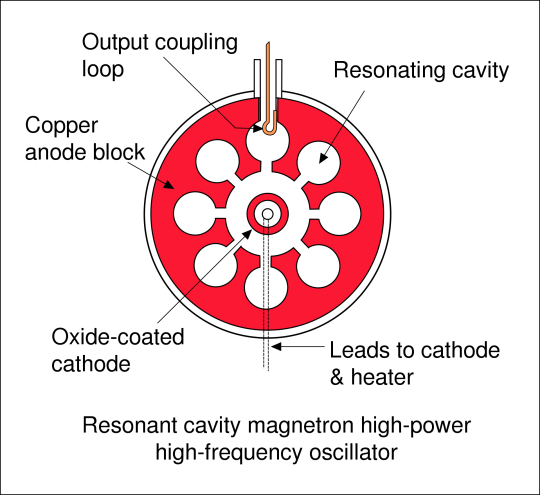
Mechanically, the cavity magnetron consists of a large, solid cylinder of metal with a hole drilled through the centre of the circular face. A wire acting as the cathode is run down the center of this hole, and the metal block itself forms the anode. Around this hole, known as the "interaction space", are a number of similar holes ("resonators") drilled parallel to the interaction space, connected to the interaction space by a short channel. The resulting block looks something like the cylinder on a revolver, with a somewhat larger central hole. Early models were cut using Colt pistol jigs.[11] Remembering that in an AC circuit the electrons travel along the surface, not the core, of the conductor, the parallel sides of the slot act as a capacitor while the round holes form an inductor: an LC circuit made of solid copper, with the resonant frequency defined entirely by its dimensions.
The magnetic field is set to a value well below the critical, so the electrons follow curved paths towards the anode. When they strike the anode, they cause it to become negatively charged in that region. As this process is random, some areas will become more or less charged than the areas around them. The anode is constructed of a highly conductive material, almost always copper, so these differences in voltage cause currents to appear to even them out. Since the current has to flow around the outside of the cavity, this process takes time. During that time additional electrons will avoid the hot spots and be deposited further along the anode, as the additional current flowing around it arrives too. This causes an oscillating current to form as the current tries to equalize one spot, then another.[12]
The oscillating currents flowing around the cavities, and their effect on the electron flow within the tube, cause large amounts of microwave radiofrequency energy to be generated in the cavities. The cavities are open on one end, so the entire mechanism forms a single, larger, microwave oscillator. A "tap", normally a wire formed into a loop, extracts microwave energy from one of the cavities. In some systems the tap wire is replaced by an open hole, which allows the microwaves to flow into a waveguide.

Cause of skin effect. A main current I flowing through a conductor induces a magnetic field H. If the current increases, as in this figure, the resulting increase in H induces separate, circulating eddy currents IW which partially cancel the current flow in the center and reinforce it near the skin.

Twin lead (in the specific sense of ribbon cable) is a form of parallel wire balanced transmission line. The separation between the two wires in twin-lead is small compared to the wavelength of the radio frequency (RF) signal carried on the wire.[2](p 24⸗1) The RFcurrent in one wire is equal in magnitude and opposite in direction to the RF current in the other wire. Therefore, in the far field region far from the transmission line, the radio waves radiated by one wire are equal in magnitude but opposite in phase (180° out of phase) to the waves radiated by the other wire, so the overlapping opposite waves cancel each other out.[2](pp 24⸗16–24⸗17) The result is that almost no net radio energy is radiated by the line.
twin leads especially are sort of obvious but also sort of magical. like. where does the energy go. i mean, back into the wire i guess. but what pushes the energy back...
16 notes
·
View notes
Text

3D printing method could improve micro energy storage
One key to making portable devices more compact and energy efficient lies in the precise nanoscale form of energy-storing capacitors. Researchers in Sweden report they've cracked the challenge with a unique 3D printing method. Researchers at KTH Royal Institute of Technology demonstrated a 3D printing method for fabricating glass micro-supercapacitors (MSCs) that reduces the complexity and time required to form the intricate nanoscale features MSCs need. The advance could potentially lead to more compact and energy-efficient portable devices, including self-sustaining sensors, wearable devices and other Internet of Things applications, says Frank Niklaus, professor of micro- and nanosystems at KTH. Their study was published in ACS Nano.
Read more.
13 notes
·
View notes
Note
tell me everything about AC to DC filters Right Now
:0
Dear god.
OK I have to make some assumptions or else this is going to get really long. I am going to assume that you already know what AC and DC are. I am going to assume that you took (and passed) geometry, so a sine wave and it's variations are familiar to you. I am also going to assume that you also know the difference between voltage, current, and resistance.
So, what are AC to DC, why do we care about that? Well, the electricity coming out of the wall is AC, but in order to, lets say, charge your laptop battery, you need DC. In fact, if you look at a laptop charger, you'll see The Brick. The thick rectangle that gets hot when charging the laptop.
THAT'S THE AC TO DC CONVERTER
I just called it converter instead of filter. Why? Because filters technically only remove a 'ripple' from DC current, so a current that's almost DC but not quite. If you are making the entire jump from AC to DC, then that's called a converter.
Now here's where things get fucked.

These are all of the parts after the plug. The load is your laptop, the regulator is your filter.
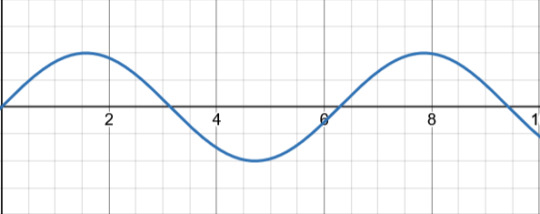
Let's say that this is your AC signal (this graph showing the voltage over time). Now, the first thing this passes through is the transformer, which only adjusts the voltage to the correct level. Some devices need it higher, some lower. Let's say that this transformer is a step up transformer, because it made the signal bigger.

The next step is the rectifier. Now, traditionally this part is taught in stages in order to show it's affect on the signal. I'm going to speed run that. I will assume that you're familiar with what a diode is. If you aren't, just know that it only allows current to flow in one direction. So, anything going backwards will be removed. Picture a one way valve.
So, if we were to send this signal through one diode, then that would leave us with
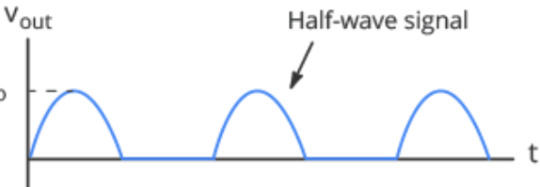
just the positive half! That's why this setup is called a Half-wave rectifier.
But what if we were to use two diodes. As in, fill in the blank spot that the negative half left with another positive bump. That would give us

This lovely thing! Which is great, but it requires another AC signal that is 180 degrees off from the original one in order to exist. Which, transformers exist which can provide that, but it's not cost effective. So, that leaves us with the most common setup, the Bridge Rectifier.
I've been skipping the circuit diagram so far, but now it's important.
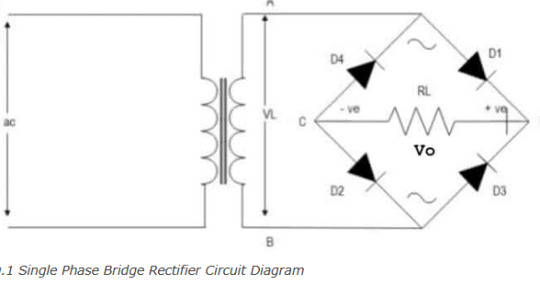
THIS thing is a bridge rectifier connected to the transformer (yes that's what transformers look like according to circuit diagram shorthand). Now, I am American, and for some reason American electricians use that up and down sharp thing in the middle of the diamond to indicate a resistor. Europe uses a rectangle. Again, I am going to assume that you know what a resistor does.
Those four black triangles with lines? Those are diodes. The line across the tip of the triangle indicates what direction they are allowing current to flow into. Now picture you were a positive signal flowing in through point A into the bridge. There's a split in the circuit, but one way (diode D4) is blocked, so you have to go across diode D1. Now you're at the edge of the diamond, once again two ways you can go. You head towards diode D2, because diode D3 won't let you through. What that looks like is this
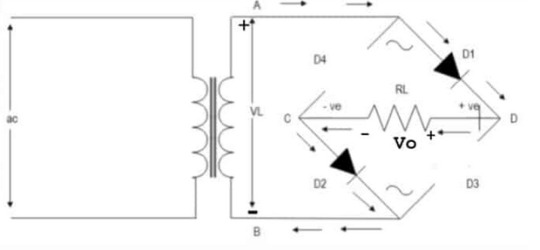
What about the other direction? Well that looks like
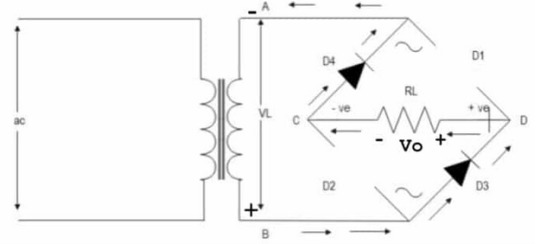
Notice that the edges of the diamond are called out? Points C and D. That's the money makers. You see, if you plug into point D as your positive and C as your negative, you get a full wave signal! (so sorry for not going fully in depth on why that works just trust me it's a bit of a mess and should really be taught with the actual circuit in front of you, not across the internet like this)
A full wave signal is completely positive, but it's not exactly DC yet. That's where smoothing comes in. This is done with a capacitor!

The capacitor is charged up and then slowly releases it's charge. But before it can completely discharge, it gets recharged by the next wave. Quick review, a capacitor is like a battery where it can be charged up, but unlike a battery which holds charge with chemistry, capacitors hold charge with physics. They can still wear out, but not nearly as quickly as a battery.
What does that red line look like? Well, almost like a straight line, except it has RIPPLES! That's right, we're finally back to the filter! Or the regulator as the diagram calls it. Means the same thing.
Sometimes, this step is skipped. If the device getting signal isn't too sensitive or it's just cheep, then the electricity stays bouncy. Some devices really care about any fluxuation in the signal, in which case they get a big expensive filter.
Unfortunately, the inner bits of a filter are many, so I won't be going into all of that. But you want me to go into that, so I will show a circuit diagram.
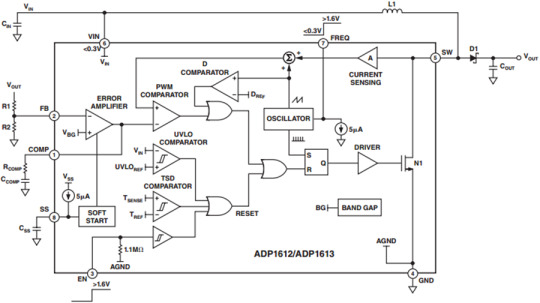
This is a diagram of the ADP1612
This website has a downloadable version of the spec sheet!
But that's a level of detail that you usually only get into if you are planning on building a circuit. The day that you're flipping through spec sheets in order to check compatibility is when you've really become an engineer.
So that's how you go from AC into DC. Yes, I just spent an hour typing this all out. I like electricity a lot.
Here's a GREAT video that goes over all of this but the guy actually has a circuit and an ossiliscope in front of him to show the signal.
#electricity#electronic#electrical engineers#physics#AC to DC rectifier#electrical engineering#mmm electricity for power#ask#literally several college classes worth of info that I am skipping in this#ough my circuit bits#I chose the perfect degree I am built for this shit
11 notes
·
View notes
Note
got back from work, got to cooking
stuck all of this in an Atlas, might do something for the king crab in a similar vein

Yeah its all clantech, you cant really beat it. using that cER PPC + capacitor combo you told me about to replace the ac/20. some medium pluses for fun, clan spec missiles with ammo jammed where possible. Micro pulse laser in the head for scaring off infantry

After last nights centurion, you might spot a certain returning stupid idea in this mech too. It doesnt quite match the excess of the Great Turtle, but its got more guns so it works out. Better hope that armour does hold though, that IS Composite structure wont like getting damaged
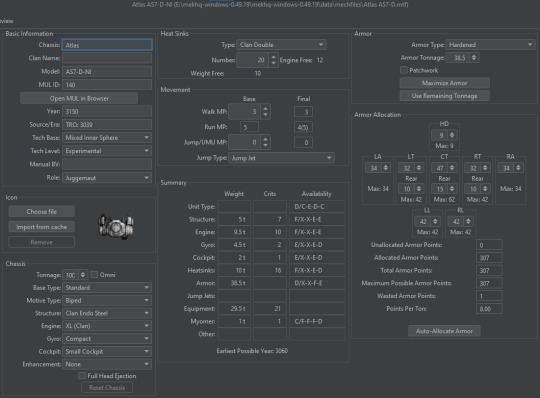
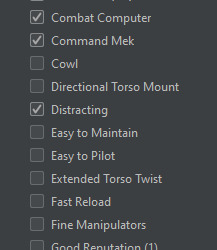
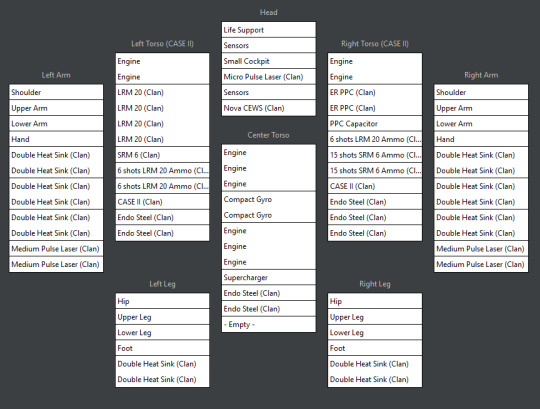
So a few suggestions, illustrated by my own build of your design: One: I might move the torso heat sinks (the one from the left and at least one from the right) into the arms. That way you can put the LRM ammo into the torsos with CASE II (I would move the CT CASE II to the right torso so the PPC Cap is cushioned against explosion). Two: I added a Small Cockpit, which lets you move the ECM into the head (prevents destruction if the cap/ammo go boom). Three: you have enough crits left to add cEndo in place of the Composite. Do that so it's not as vulnerable. Four: I don't think the active probe is needed, so I would ditch it and get that last extra .5 tons of armor. If you then swap the ECM suite for a Nova CEWS, you get all the benefits of the ECM, a Light Active Probe, *and* C3! Five: You've now freed up weight and space for an extra cDHS. You could also ditch that extra heat sink and add a supercharger instead to get some speed back (making it 3/5 movement again with the 'charger active). Six: add the Improved Sensors quirk to increase the effectiveness of the Nova's AP component and the Combat Computer quirk to add 4 free heat sunk per turn (leaving you, with a full alpha, at +7 with the supercharger, or +5 with the extra cDHS). I also added Multi-Trac because funny, and Improved Comms because Satellite Uplink rules are absolutely hilariously cool.
10 notes
·
View notes
Text

Amarok
The Amarok is a unique assault 'Mech among the Clan Wolf touman, intended as a close combat 'Mech. It was built and conceived under Ramiel Bekker's idea of combating the Death From Above (or DFA for short) tactics being employed by Clan Jade Falcon. However, lacking time, he had to seek assistance from Clan Sea Fox, as he did with the Stormwolf. It was during his time with Clan Sea Fox that he started to investigate the Hammerhead, a new Sea Fox 'Mech, and from that 'Mech he borrowed design choices that would later be a part of the Amarok — for example, the use of Hardened Armor for better protection and modified hand actuators for use in close combat.
With the Amarok being focused on combating DFA tactics, a program was initially installed which was intended to assist with dealing with such an attack. The main idea was taken from both data collection on Solaris VII and the layout of the Hammerhead, in order to make a program that would force the 'Mech to lock its arms above the cockpit. This ultimately failed, and pilots of the 'Mech would soon disable this program, it eventually being omitted in further production runs.
The primary model carries all of its weapons in the torso, while the other variants have their weapons in the head and arms. It is equipped with twenty and a half tons of Hardened Armor for better protection and a Supercharger to increase the speed of the 'Mech. The main long-range weapon is an ER PPC with a PPC Capacitor in the right torso for fighting off incoming 'Mechs intending to carry out a DFA attack, backed up by a rotary AC/5 in the left torso and a large pulse laser in the center torso. Finally, the 'Mech carries two Streak SRM-6s in the right torso for engaging targets at close range.
8 notes
·
View notes
Text
LT Power Factor Capacitors, Distributor, Dealer, Supplier, Mumbai, India
Shree Trading Syndicate is The House Of Capacitors, Supplier, Dealer And Authorised Distributors Of LT Power Factor Capacitor, LT Power Factor Capacitors, AC Motor Start Capacitor, Aluminium Electrolytic Motor Start Capacitors, MPP Capacitor, Priya Capacitors, Mumbai, India.
#Shree Trading Syndicate is The House Of Capacitors#Supplier#Dealer And Authorised Distributors Of LT Power Factor Capacitor#LT Power Factor Capacitors#AC Motor Start Capacitor#Aluminium Electrolytic Motor Start Capacitors#MPP Capacitor#Priya Capacitors#Mumbai#India.
0 notes
Text
Troubleshooting & repair of an old camcorder as a distraction from some life stuff: installment 1
So a close friend gifted me some broken old camcorder that doesn't work anymore because their mom was like "do you know anyone who would want this garbage" and they rightfully said "yes" and shipped it to me.

Don't yell at me about testing electronics on carpet, the actual electronic things are on a rubber mat, and also nothing is plugged in right now, I am grounded when I work on it, and also yeah ok I have terrible habits too bad.
Camcorder in question: Canon ES8400V 8mm VIDEO CAMCORDER
Symptoms: doesn't turn on at all. However, this could just be because the AC adapter that's supposed to charge it is dead. I'm hoping that's the case because that's a way easier fix than the camcorder itself.
Steps to troubleshoot:
Well in an ideal world I would have a different AC adapter to try and hook it up to. The manufacturer one has an output of 8.4V 1.5A and I don't seem to have anything remotely close to that lying around. Like the connector looks proprietary but I could pretty easily just solder the connector to a different one just to prove that it works, but I didn't have anything like that.
Next up was of course to open it up because I like opening things up. I wanted to look for any obvious signs of like blown capacitors or broken solder joints or whatever. Really obvious physical issues.
Nothing like that showed up, it looks very normal on the inside and there weren't any obvious symptoms of which parts may have failed over the years. That very obviously does not mean it still works but sometimes you can open something and immediately spot the problem, not the case here though.
But here's a picture just because it's always fun to see what the insides of things look like.

So I finally bought a multimeter which is something that I probably should have done a million years ago. I bought the cheapest crappiest one from home depot. Any electrician on Reddit would probably go off for five paragraphs about how terrible this multimeter is. For my janky DIY purposes, I can't really be fucked to spend more when this one probably works fine for what I'm doing.
Anyway I plugged the adapter back in and hooked up my multimeter and it read... 5V.
Decidedly not 8.4V or remotely close. My hunch is that this is the problem, it's literally impossible to charge this thing on the adapter I was given so for all we know the camcorder itself works fine.
The #safe and recommended thing to do at this point would be to buy another AC adapter at the given rating, but that's boring and I want to learn more about circuit boards so I want to see if I can at least learn to figure out what failed components may be the problem here. Which means my next step is actually going to be a lot of research and learning.
Some very quick duckduckgo searching brought me to the following resource, so I'm going to dive into this and see if it helps: https://www.repairfaq.org/sam/aapsfaq.htm
Will update again after I've either learned something, found something, or given up.
(If it turns out that the camcorder works fine and all I have to fix here is the AC adapter don't worry I still get to try and fix a camcorder later because I have a different old camcorder that has an audio issue I'd like to troubleshoot. But that's for another day)
#electronics repair but like the shitty version#some of us open up obsolete electronics to cope#I don't even know if I have any sort of tag for this kind of thing#electronics repair#there I guess I do now
11 notes
·
View notes
Text

Moter Run Capacitor Manufacturer in India
MPP capacitors for motor run are meticulously designed for motors. With our premium quality capacitors you’ll get smoother running motors for a longer period of time. Some of the main features are – low watt loss, high efficiency level, well built structure and design.
0 notes