#Button Design Tool
Explore tagged Tumblr posts
Visit Tumblr Blog
Explore Tumblr blogs with no restrictions, modern design and the best experience.
Last Seen Tumblr Blogs


Fun Fact
Mobile US users spent an average of 115.8 minutes on Tumblr app monthly.
Text
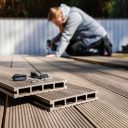
BTN AK Pro Advanced Button Design Tool (New Update) V3.01 ❤⚡👇
BTN AK Pro أداة تصميم الأزرار المتقدمة (التحديث الجديد) V3.01
#blog#BTN AK Pro#Advanced Button Design#blogging#searchengineoptimization#digitalmarketing#seo#أداة تصميم الأزرار المتقدمة#ai#ai generated#ai art#artificial intelligence#chatgpt#technology#Button Design Tool
1 note
·
View note
Text
Kinger with a shotgun coming soon <3
#Kinger#tadc kinger#tadc#tadc fanart#etsy#the amazing digital circus#my art#Hi jI didn't forget about Etsy#I just got a lil preoccupied with my new job and then got sick for a few straight days#5/6 button designs ready! I will prep some freebie stickers too if all goes swell!#Got most if not all my required tools for basic shipping!
677 notes
·
View notes
Text
i really really love procreate dreams and what its capable of but i gotta say that so far i have some major gripes with the UI </3
#shush slinky#i want to love this app so bad!!!!!! but there are no pen pressure settings#that i can find because there... is no settings button#the flipbook is huge and you cannot scale it#pen resolution scales to match the zoom on the window?? which is. bizzare.#you cannot move around brushes at all. im fine with not being able to make or edit them i guess bc you can easy import from the other app#even tho so many of the default ones have unbearable streamline on and you cant change it#there are no undo and redo buttons even though there is... clearly space for some#theres even no action button like the other app#the timeline view makes the actual image super small on my device model because its older and clearly smaller than was designed for#and you cant scale that either it takes up half the screen whether u like it or not#theres NO LASSO TOOL... the fill tolerance is extreme and you cannot change it to my knowledge...#the verdict so far is that it is a very good editing tool at the expense of frame-by-frame; which procreate itself is better for#and its pretty unintuitive to me which i was suprised by because of how used to procreate i am
16 notes
·
View notes
Text
people be like “14 jobs are so brain dead!” while having a plogin that reduces the number of buttons on a job
#wahh rdm is so brain dead they say as they have made the job easier#we need more buttons says the guy who reduced the buttons#ask a 14 raider to raid without their 3rd party tools and watch them also complain about job design in the same breath#owen plays ffxiv#the cognition dissonance is amazing#edit: there are criticism to be made about job design in the game#and I’m glad there are tools out there for accessibility reasons#mt friend uses a tool because she has hand issues#but it’s just wild hearing people complain about something they have altered themselves
12 notes
·
View notes
Text
//Damn, that new Fantastic Four trailer looks pretty great.
Shame about the promotional poster though. Damn thing's a mess of bad photoshopping and generative AI fill.
#ooc#to be clear i don't think the poster is 100% ai generated#i am absolutely convinced the designer used generative fill tools as a shortcut#here's the thing though#photoshop has had generative fill tools for over a decade#long before AI became a hot button issue#so i'm not sure how to feel about it here
0 notes
Text
I recently designed a new warrior cat Rp character and I just had to draw him in the realistic spraypaint Roblox game so here is the lil guy named Buckwheatpaw! He’s an ex kittypet, his mother is a purebred lykoi cat, so he’s half lykoi half random rogue.


#warrior cat oc#digital art#art#character design#warriors oc#roblox#yes Roblox has a realistic spray paint game and yes it has an undo button but no fill tool#seriously it’s a lot of fun and I’m addicted.
1 note
·
View note
Text
1 note
·
View note
Text

i got the ios app version so i dont have to keep sending files from my ipad to my laptop and its honestly shockingly easy to use
#re: the projectTM#like i spend so goddamn long trying to figure out how to layer videos in lightworks#i got it in under 10 seconds of pressing random buttons in capcut#admittedly part of the reason might be that when i send transparent gifs from my ipad to my computer they stop being transparent#but still. thats a W for capcut for having an ios app#like for the first mobile video editor ive ever used its incredibly user friendly the ui design is impeccable#and it has basically all the tools id need /as an ios app/#incredible
1 note
·
View note
Text
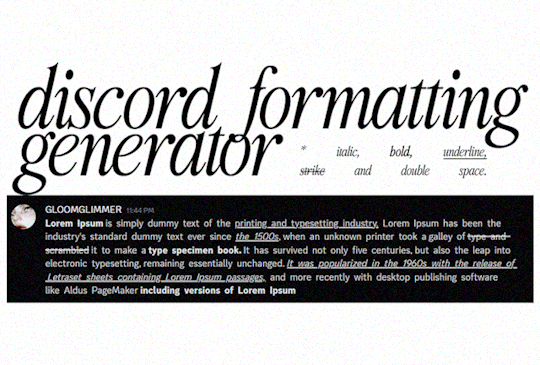
𝐂𝐇𝐈𝐀𝐑𝐎𝐒𝐂𝐔𝐑𝐎 is a text generator designed specifically for roleplayers using discord. It helps you format your text with ease, ready to be used in Discord, making your roleplay posts stand out. This is my first attempt at a generator. If it has any bugs feel free to dm or inbox me. Please, like or reblog if it helps with your interactions.
› 𝐅𝐄𝐀𝐓𝐔𝐑𝐄𝐒 :
Bold, Italic, Strikethrough, and Underline › Want to make something bold or italic? You can click the B, I, S, or U buttons to quickly format your text while typing in the editor.
Double-Spaced Text › Enable the Double Space checkbox, and it will automatically add extra spaces between words.
Markdown-Ready Text › Once you're done typing and formatting your text, click the Generate Discord Format button. Your text will be converted into Discord's markdown syntax, ready to copy and paste into your chat!
Copy to Clipboard › After generating your formatted text, you can quickly copy it to your clipboard with a single click.
This tool uses some simple coding magic behind the scenes. Built using Quill.js, a text editor library, and some custom JavaScript, it allows you to format text in real time. When you apply styles (like bold or italic), it changes the text instantly, and when you hit Generate, it converts it into the markdown format used in Discord.
667 notes
·
View notes
Text
This Night: Paperback Edition!
Hello BRITISH FOLLOWERS and YES this is DISCRIMINATING
It is my ecstatic joy to announce that I have been given the highest honour an author could ever hope for — my book about how to sort your shit out (take control of your mental health) You Will Get Through This Night, is being rereleased in paperback on May 9th in the UK! It will never be lighter, cheaper or more flexible.

Look out for it in the hands of weary travellers standing listlessly in an airport WHSmith, about to lose their last glimmer of hope before this book instantly magically changes their life. This new edition of This Night features a new disturbingly optimistic and snazzy inverted cover design. It has new topics and chapters, new practical exercises you can do to make yourself feel better when you may need it - and a painfully sincere epilogue reflecting on the impact this book has had, and my gratitude for everyone that has read it. If you already read the hardback - this is a great update featuring even more tips and helpful breakdowns of why you have unhelpful breakdowns. If you are yet to read this book at all ...like... it's actually very useful. You might not think you have 'problems' but we all do, it's human nature. If you learn literally one interesting thing or tool to manage your own emotions from this book, is it worth buying to change your life forever? Just get it thank you okay that's it.
You can get this book anywhere BUT if you feel like supporting the nerd that wrote it, you can get en exclusive SIGNED copy only on the Daniel Howell Shop!
http://shop.danielhowell.com
Also to be nice, the publishers over at Harper Collins are doing a contest to win a FREE beautiful enamel pin just for submitting proof of purchase.

pin competition button →
Thank you to everyone, and I'll be yapping about this closer to release date with some exciting events and all the contractually obligated marketing and press you could dream of.
— Dan
1K notes
·
View notes
Text
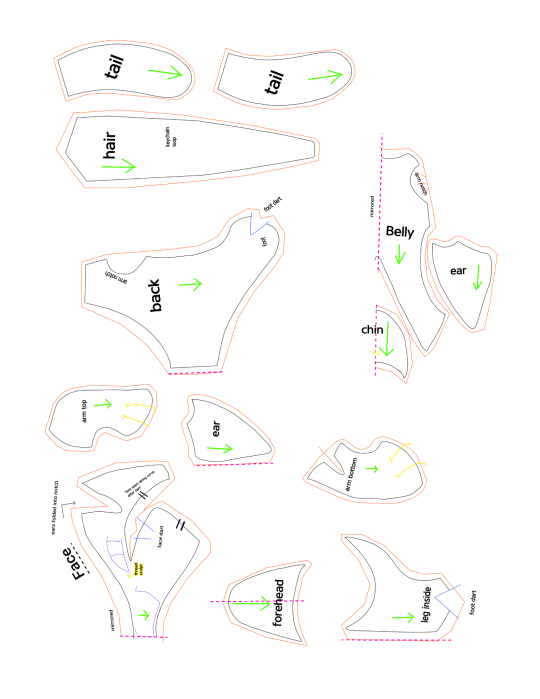
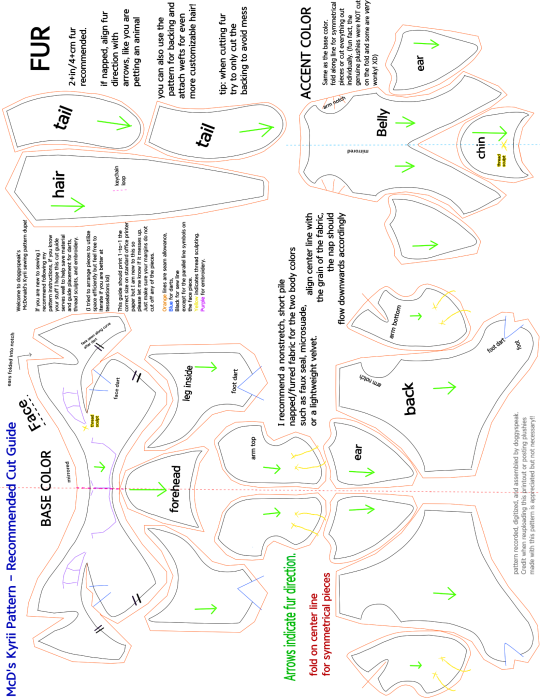
✩ Make your own Kyrii Plushie ✩
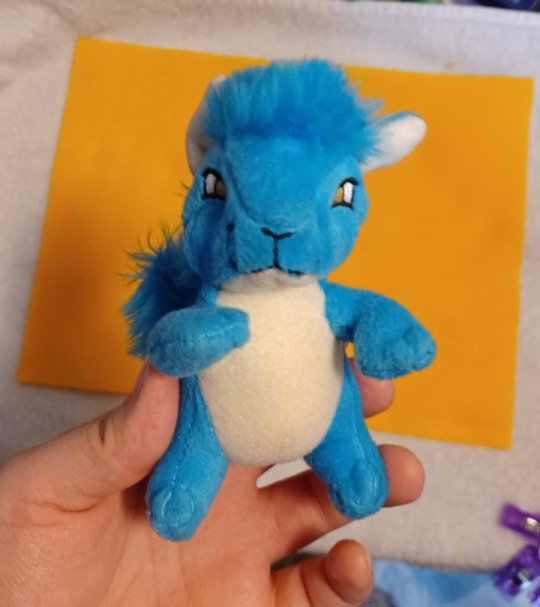
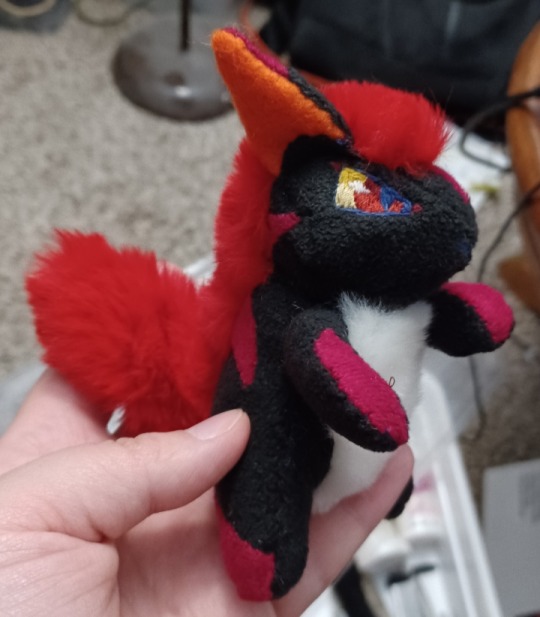
Thank you @free-sewing-patterns and @jestersneopia for asking so kindly for me to release my pattern dupe! :3 These guys are very intricate little plushies so I did my best to make something comprehensive. I also made detailed instructions which I will include after the readmore, so long post ahead!
McD's Plush Kyrii
What you will need:
•The two included images printed on 8.5"x11" (A4/Letter) paper.
•Enough of your desired Fabrics (reference the pattern size on your paper, you don't really need much at all)
✩ I recommend a short pile faux fur or other nonstretch fabric for the two body colors, and a long pile (1-4cm) faux fur for the mane and tail.
✩ You can also make the mane and tail using yarn or doll hair wefts by attaching them (sewn or glued) to a backing fabric like cotton or felt.
•Scissors or precision knife to cut fabric.
•Sewing implements (needle, pins, thimble, thread scissors, etc.)
•Thread matching one or both of your body color fabrics.
•black thread or embroidery floss for the mouth embroidery.
✩embroidery floss or thread in your desired eye colors (recommended a white for sclera, an iris color, and a black for outlines)✩OR✩buttons or safety eyes in your desired size and color.
•Stuffing (two or three handfuls of polyfill will do the job)
✩ribbon or cord to use as arm tension band and/or a loop to clip hardware like keychains and backpack hangers.
((✩ optional ))
General note: default suggested stitch length is 3mm apart unless stated otherwise.
Step 1
Print out the pattern, making sure to format your printer to use the full page with no margins. Check print preview to be sure nothing is cut off. (I made the piece inventory sheet to sort of offset any default margin weirdness but I'm new to this so let me know if it messes up.)
Step 2
Conceptualize your design and gather your materials. Are you cloning one of the plushies already out there, or making your own design? It is always good to keep reference on hand during any art project!
What special design elements are you translating to plush form? Keep in mind this pattern is small and intricate and it might be easier to omit or simplify certain design elements if you are working from something more detailed.
The cutting guide assumes 1 base color, 1 accent color, and 1 fur color with no significant shape, size, or design difference to the original McD's plushie. (Only a few fixes for symmetry and fur direction.)
Step 3
Prepare your base material for cutting. If you are doing embroidery or applique designs this may be easier while the fabric is flat and whole. Same with fur wefting, do anything like that while you have one big piece of fabric to work with. Trace the pattern pieces using chalk, heat erase pen, or some other washable marking tool using the cut guide provided. (I recommend cutting out any shape you need to add details to from the pieces inventory page, then trace those pieces on your fabric in roughly the same positions as the cut guide page.) Then do any embroidery or details you need to do while the pattern is flat.
Embroidery tips:
• Use a stiff backing piece like interfacing or felt behind your fabric to make the embroidery more durable and stiff.
•Use a back stitch or chain for lines, line in color for crisp color-changes.
•Parallel vertical lines close together catch the light and read as blocks of color best.
•Don't use stitches that are too long or loose, build stitches up diagonally like a brick pattern instead, the key is to attempt to stay parallel.
•If you are using sewing thread instead of embroidery thread, use two or three strands at once to save time.
•When you are done, cut away your backing fabric/interfacing a little outside where your embroidery stops so as not to interfere with future seams.
Step 4
Cut out your materials. If you didn't need to trace from the pieces inventory for pre-cut details, then you can just pin the cut guide paper to your fabric and cut it directly. Otherwise simply follow your trace and cut out your pieces. Be sure to keep track of which pieces go on the left and right of your plushie.
Step 5
Begin assembly by sewing all your darts first, those will be on each side of your face, inner leg, arm bottom, belly, and back pieces. Follow the blue lines that appear anywhere that says "dart" and any sew lines that create a V-like dip in the perimeter of the piece (like the arm bottom and belly pieces). Fold the seam allowance inside your seam so that the right sides of the fabric end up with a clean, unnoticeable seam. I recommend a tight, short straight-stitch about 2mm apart on darts.
Step 6
Make the loose body parts.
Sew together ears, arms, and tail by placing right sides together and sewing around based on the solid black lines in the pattern.
•Each ear will have a base color piece and an accent color piece. Make sure their shape lines up so that right sides of the fabric are together. The ear pieces are fairly flat and their sew lines should line up perfectly. Use any stitch you are comfortable with, straight stitch about 3mm apart works just fine.
•Sew one top arm piece and one bottom arm piece together for each arm. The discrepancy in their shapes creates a slight twist that gives the arm part a tube-like shape. I recommend pinning the pieces at the ends and wrist first to get the tension/gathering correct on the arm part. Any stitch works but a straight stitch will probably be easier to keep track of tension with or to rip if you make a mistake and need to retry. Keep it tight, about 2mm apart.
•For the tail, sandwich your pieces right sides together so that all the fur is tucked inside and you can sew the edges with a secure stitch like a whip or back stitch.(about 3-4mm apart) You might need to pick or brush out the fibers if they get caught in the seam.
Once you finish each piece, flip it inside out, wrong sides should remain inside while the right sides of the fabric show and all seam allowance remains inside. If any edges are having trouble flipping inside out, use a thin tool like a crochet hook or chopstick to prod them from the inside.
Stuff the 2 arms until they hold a 3D shape, firm fill recommended. Leave the other pieces in this step unstuffed.
You should have two ears, two arms, and one fluffy tail.
Step 7
Shape the face.
With the dart now sewn into the cheek, the two seams with the || registration marks should be much closer in length. Line the seam up according to the marks and fudge the rest of the length using tension. I recommend using a ladder stitch on the right sides while keeping in mind the general size of the seam allowance.
Repeat on the other side.
When you are done, your face piece should have curvy cheeks.
Step 8
Build up the head.
Connect the forehead piece to the face piece, the curve's center goes right above the nose.
Sew in the chin piece along lower jaw.
There is a bit of leeway into how long the ears will be and which angle they stick out. For best results, give it a test right side out and pin where you like the ears to stay.
The ears go into the notches on the top of the face piece, about half of the ear should fit into that notch. Sew it into that notch, any remaining ear folds around that top seam towards the forehead and is stitched down to give the ear a slight curve that helps it remain upright.
When you're finished you should have the (bald) head.
Step 9
Construct the body.
Sew the two inner leg pieces onto the sides of the belly piece.
Sew the back pieces onto the belly and inner leg piece, leaving the arm notches alone to make the arm holes. Sew all the way around the inner leg and to the center line on the belly where the dart seam sits. There may be some overlap/extra on the back piece.
Sandwich the tail between the two back pieces and sew them together. You can adjust the angle of the tail before you sew it in, the original plushie has its tail sticking up behind the back. (Tip: if you fully close the tail seam you can use a loose couple of stitches to attach it to the body to make a hanging tail that wags when you pick up and shake the plushie.)
Your current parts should be a head, a body, two arms, and the hair piece.
Step 10
Attaching the hair piece to the head.
(OPTIONAL): First, if you want to add a keychain loop like the original plushies, snip two tiny holes into the backing of your hair piece about 6mm apart and feed a small length of cord or ribbon inside to create a loop on the outside.
Leave plenty of slack on the ends of the loop for a more sturdy hold.
Secure the loop and holes with a lot of sewing and/or glue to keep the fur fabric from fraying. Stitch down the ends of the cord/ribbon to the backing of your hair piece.
Start sewing the hair piece to the head beginning with the hairline along the forehead to get it nice and clean. Next sew across the ears and down the face piece on both sides.
Your head should now have hair, with the rest of the mane hanging down behind.
Step 11
Sew head to body.
Make sure the chin piece lines up to the belly piece, the bottom of the head should line up with the rest of the back piece on either side.
Next, sew down one side of the hair piece to the back piece, connecting the bottom edge to the seam near the tail and stopping.
Leave the other side seam of the hair piece open for arm adjustment and stuffing.
Step 12
Attach the arms.
Tension Band Explanation:
The original plushies have an arm tension band inside to keep the plushie's shape and seams intact when pulling on the arms. Generally I think this can be skipped without much issue, but could be a good idea if you plan to use this as a bag hanger or keychain plush, as the arms are the extremities most susceptible to getting caught on things, and when they are secured more comprehensibly they are less likely to rip the plush apart when yanked. Not a big deal if you just plan to keep them around the house.
(OPTIONAL): If you want to install your own arm tension band, start with the plushie right-sides-out. Sew the band to one arm and pull it taught through the chest to the other arm, securing the tension band before sewing the arms into the body piece.
To sew the arms, be sure to pose them and pin them in place right-side out first. (originals usually have one arm down and the other up on their chins/waving, though they vary a lot and there are plenty of ways to position them for different expressions.)
Then, either turn insideout again or ladder stitch the arms into place.
Almost there! You should have all your pattern pieces together at this point.
Step 13
Stuffing the plushie.
Make sure your plushie is right side out, with no incorrect seams or holes other than one of the seams between the hair piece and back piece. If you need to, gently prod a crochet hook or chopstick along the backs of seams to turn them out.
OPTIONAL: To make a weighted plush, add a small mesh bag of plastic pellets or weight of your choice to the bottom of the plushie before stuffing.
Add in your polyfill, pillow fluff, yarn fibers, scraps, or whatever you decide to stuff the plushie with, paying attention to the density of the stuffing.
I recommend keeping the head and feet more densely stuffed to keep their shape while leaving the body a bit more loose for a squishable belly.
Step 14
Close up the last seam.
Using a ladder stitch, close up your last seam, pulling tight and tying off your thread at the end for a clean, invisible seam.
Now that all the seams are in, you can now brush or pick any long fibers from the hair and tail out of the seams.
The plushie is whole! You can keep it like it is, or do some thread sculpting for a more finished look!
Step 15
Thread Sculpting.
(OPTIONAL):
Using thread in the color of your body fabrics, you can pull tension at various points to create a more sculpted shape. The original had two through the face (vertically through the chin up behind the forehead, and horizontally between the corners of the eyes), and two over top of each hand and foot to look like the separation of the toes. See the original pattern pieces for precise placement.
And that's it! You should have a finished plush kyrii!
If you have any questions or concerns please contact doggyspeak. Feel free to use this pattern, share it, or edit it with or without credit.
PLEASE DO NOT SELL THIS PATTERN OR INSTRUCTIONS! IT IS BOTH NOT ORIGINALLY DESIGNED BY ME AND ALSO SOMETHING I'VE WORKED VERY HARD ON!
If you would like to see more pattern reconstructions from me, show me your finished plushies and provide feedback and suggestions to me. I would love to see what you have made and hear what you'd like to see next! ^o^
#neopets#Next time I make a new kyrii plush I will snap pictures of each step to add to the instructions!#doggyspeakart#plushie#plushie pattern#sewing patterns#bootleg#thanks for your patience I got over an illness 2 weeks ago and have spent most of my free days since then doing dentist or house stuff!!
226 notes
·
View notes
Text
I've been in love with how physical all of the items in Star Trek are. The large boards of colorful looking buttons and levers

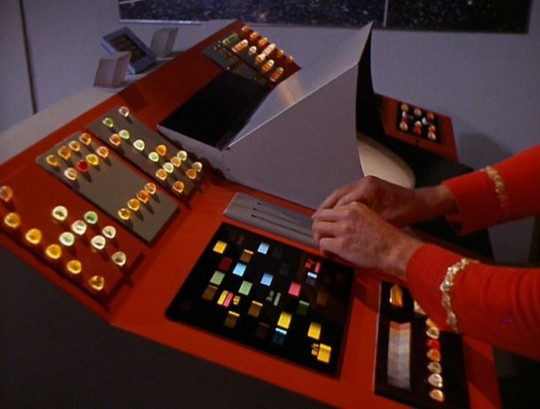
The cartridges everyone has for ids and holding information in voice memos
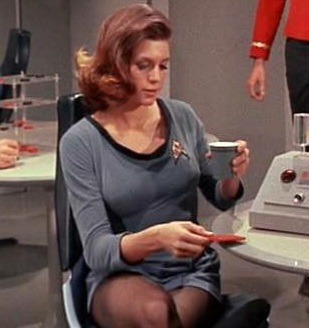
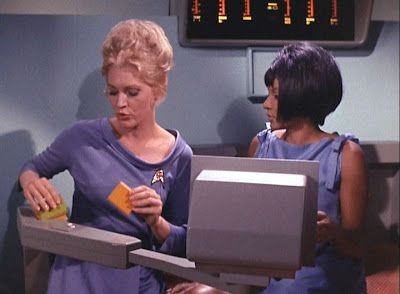
The movable screens and the small viewfinders the navigagors use it all is so practical, real to me.
Even simple tools we see only once having such a physical design makes me smile

I dont really know where I'm going with all this but I guess with so much of life turning digital, everything touch based on a flat screen, nothing to grab nothing to turn, no tactile sensations. It's wonderful seeing people decades ago see the future full of what we lack now and what seems a lot of use yearn to see, to be brought back.
1K notes
·
View notes
Text
Project Zomboid is very effective at curbing the "Badass Lone Hero with a Cool Gun" kind of fantasy. Guns are a hinderance. They're loud and completely kill the stealth that is the base of the game, dozens of zombies swarm to you the moment you fire one. If you're an untrained person, reloading them is a hassle, even aiming is terrible (yes, I've played the 42 beta). They're heavy to carry (maybe too heavy) so they prevent you from carrying more vital stuff. Finding ammo is a pain, and this is set in the gun crazy US, I can't imagine how it must be in other countries. Even without all that, they're just very poor weapons, not every hit lands, they jam easily, you can't really use them with other weapons, you're ten times better using your bare hands.
The only way guns work in Project Zomboid is if you have an organized team behind you, covering while you reload, using tactics, etc. Otherwise, they're just a hassle. When I'm searching for loot and I find a cabinet full of guns, in any other game it would be cause for celebration, but in Zomboid I just groan, I'd much rather have found a screwdriver or a hammer, not even as weapons, as tools. (and if you really think about it, finding cabinets full of guns outside a police station or a military base is such an Usamerican thing)
The design choices that led to this are very interesting to me because it's a subversion of something that is prevalent not only in zombie media but in videogames in general: one Guy with a Gun can just mow down entire armies no problem. This is because most games featuring guns, despite all the customization options that border on fetishism (but that's something to be said about Usamerican gun culture that sees guns as fashion items), don't really show how guns are used, besides a token "press R to reload" button, all the difficulties are stripped away so the player can get to mow down as many enemies as possible. Understandable, for the sake of gameplay, perhaps, but I think that a game that shows just how difficult using guns in a stressful or post-apocalyptic situation, and in general, is an interesting subversion.
#cosas mias#project zomboid#does it simulate it way to the other side to the point guns are nearly useless? perhaps but I find it refreshing
300 notes
·
View notes
Text
Updated Resource List: UI Edition (Updated 11/10/24)
This is all the mods in my downloads folder that changes the game UI and makes it look better on modern display, removes annoyances etc. My old resource list only listed 3 which have since been replaced.
I play on a 2k monitor with the game set to 1080p with the default UI because I like the nostalgic look.
If you use cleanUI by @greatcheesecakepersona, then many of the widescreen fixes are already included! Many of these also have an alternative version made for cleanUI.
Loading screen replacement:
UC loading screen by @eddysims replace the Fun With Pets logo and removes idle M&G sims on select menu (I use an older version to match the Super Collection for mac, but have combined with this to remove the idle sims).
UC startup strings by @simsllama replace the M&G text strings while loading to fit Ultimate Collection.
M&G to UC program name replacement (MTS) changes the program name to say Ultimate Collection on taskbar, when closing the game and in credits. I use the old original Sims 2 icon in start menu.
More UI mods below my loading screen.
Removed or disabled buttons:
No delete button in Sim Bin by Chris Hatch avoid accidentially deleting a family in the neighborhood.
No delete button in Buy/Build mode by Chris Hatch. I prefer to delete cc in the downloads folder instead.
Edited No useless town buttons by ePSYlord. Removes the AL, FT and Pets buttons from upper select menu in hood view. It also disables Custom Content Browser button to the old sims2 webpage, the camera and video buttons which I never use but always accidentially click.
Removed Auto Login button by ePSYlord. Removes the redundant option in settings.
No delete button in CAS, edited More Columns in CAS by ePSYlord. This is an edit of Chris Hatch's ui mod (cas300Extra) that adds the columns while also removing delete button from all categories. I had difficulty getting it to work for me, but managed after changing load order and removing specific cc hairs.
Remove hood popup dialog box reoploaded on MATY. No more nagging to add subhoods when entering a neighborhood.
Visual annoyances begone:
No CC icon in CAS (MTS) hides the star on custom content.
No pause frame by @simnopke removes the red frame from live, buy and build mode.
Add store icon to CAS by @jawusa. Restore the TS2 Store Edition icon on store content which can all be found here.
Widescreen fixes:
Wider change appearance by Chris Hatch.
Wider buy/plan outfits by Chris Hatch.
Wider family tree by SixAM!
Wider design tool by @lamare-sims.
Wider collections by Chris Hatch.
Menu fixes or addons:
Subhood selection by Mootilda changes menu from big button to list of selections instead. Useful if playing with multiple subhoods.
Select your cemetery (MTS) adds dialog box to move tombstones if all sims on a lot die.
Baby Last Name Chooser by @midgethetree adds dialog box to choose a baby's last name when born.
Marriage Last Name Chooser (MTS) adds dialog box to choose last name after sims gets married.
Misc. UI changes:
Clearer need bars by simnopke. It just looks nicer.
Season icons in color (MTS). Replace the blue with colorful icons.
LTW icons fixed by Lamare. Resizes the Life Time Wants icons to be consistent.
I think that was everything concerning the user interface in my game. A lot more than anticipated and most added in the last year or so. My game looks so nice now!
If you have other UI mods or dialog box addons that isn't on the list, then please leave a suggestion for me 🥰
313 notes
·
View notes
Text

Life's Sweet Bells
A COD Farm Sim AU with omegaverse splashed in!
Not a long fic (I hope) but just a series of little stories surrounding Paloma, a soft and sweet omega who's recently earned a farm from a long lost inheritance. Paloma begins cultivating her new life, embracing the rewards and challenges of her new town and it's eccentric strangers.
Poly 141 x F!OC
Link for all the "Villagers"
Introductions
Paloma nearly ignored the old ratty letter she'd received in the post. A hand written thing, outlining her inheritance from a long lost relative.
An inheritance she stands before now.
Alejandro, the mayor, a tall alpha with a bright smile, had been incredibly apologetic about the state of the old farm. Rudy, his partner, had explained that the old place had been vacant for some time, and it had only been recently that they discovered the old man’s nearest next of kin.
Paloma, however, was hearing none of it, gazing at the lonely plot of land with stars in her eyes.
The place was beautiful, a humble little cottage nestled in the middle of a quiet rolling forest. Its overgrown, vines crawling up the cobbled stone chimney, weeds taking over the empty field, but she can hear a brook nearby, and the little plot had not only a barn, but a greenhouse to boot. It was all worn, in disarray from by the elements, but it's hers. ‘Paloma Hadley’ now legally scrawled on the deed in swirling black ink.
Alejandro and Rudy had been kind enough to assist her with the small chest of her belongings, and with a promise to check in tomorrow to finalize the last of the paperwork they had left her to her own devices.
The next day passes quickly, with Paloma up to her elbows in dust and grime, scrubbing years of dirt off of the fine hardwood floors. She’d nearly slipped twice, trucking around her little cottage with bright red wellies to spare her socks. Had gone to war with what appeared to be a small village of spiders living in her bathroom, dutifully capturing and tossing them outside in a cup, and nearly fell down her front steps trying to drag the old heavy rugs outside to wash and beat on an old drying line. But compared to how it was before? She would catch spiders every day. Happily.
She didn't have much to her name when she left, just a small bedroom’s worth of items that she’d kept while she’d lived with her parents. She’d had no problem with leaving, and it wasn’t like her old job was paying her enough to have a place of her own anyway. Despite the increasing list of fix-ups and chores, Paloma had already started to cultivate a sense of pride over her new little home.
A home, with lovely rugs and quaint wood furniture.
She’s still cleaning, bopping around her kitchen while a pop song blares on her meager little radio when she just barely catches the knock on her door. She fumbles with the volume, dusting off her hands on her already dingey apron and scuttles toward the door, swinging it open to find perhaps the most handsome man she has ever seen in all her years of life.
He’s almost too pretty, dark curls cropped neatly, with a roguish little scar across his cheek. He’s dressed in a simple button up, short sleeves rolled a few times to highlight the toned curves of his arms, well worn belt with an assortment of tools slung heavily around his hips.
“Evenin’ miss” he greets with a nod of his head, pearly white fangs on full display as he smiles down at her, warm and bright. Pretty and an alpha. He must have been working hard today, having sweated through his blockers if the way his scent rolls through her is any indication. It’s warm and floral, tonka and citrus, with a hint of spice that would have her tail wagging if she had one. It wasn’t every day that she got a whiff of alpha, really anyone for that matter. Most designations kept their scent muted or gone entirely, especially in the city where she’d grown up. It was considered polite work culture to keep one’s scent from intervening from day to day activities, which was more a way for designations to avoid bias in the hiring pool. Only bonded pairs stopped blocking their scent.
Her eyes flick to his neck for a quick confirmation, only to see it covered conveniently (and charmingly) with a soft blue bandana. A new mystery to solve.
Paloma realizes she must have been staring a little too long when he clears his throat softly, making her flinch. Way to be cool Paloma. She has a hard time getting her words out, smiling dumbly as the alpha on her porch chuckles awkwardly. Extending a hand.
“Kyle Garrick, y’can call me Gaz.”
She reaches out without thinking, her fingers brushing against his wrist in her haste to wrap her soft hand around his. If Gaz notices the small social faux pa he doesn’t say anything, simply gives her soft a squeeze before letting go politely.
“Sorry! Wasn’t expecting anyone else today.” she attempts, tucking the loose strands of her hair behind her ears nervously, introducing herself in return as an afterthought.
“‘Course not, didn't mean to intrude. It’s not often we see a new face around here, let alone one moving in. Wanted to bring by a little house warming gift, figured you’d have your hands full with all this.” he gestures.
Gaz presents her with actual tools, a decent sized shovel, hoe, and axe, he even tosses in a small toolbox, and a handful of varying seed packets.
He rubs the back of his neck, “Not sure if you wanted to actually keep up with the old farm, but if you did, these'll give you a start.”
She looks it all over with absolute glee.
“No! This is perfect. Thank you Gaz, really. I don't know what this place used to look like, but I want to pick up where it was left off.” she says proudly, hands on her hips.
She'd already hoarded up all sorts of books and manuals on farming and caretaking. Determined to be as self sufficient as she could.
It was a pipe dream maybe, thinking she could make a living selling produce and cute jams, and she tells him so, shoulders falling ever so slightly.
“It's really not. Been missing someone like you around here since the old man died. The general store and village market's been suffering for it. I think you're just the person we needed around here Paloma.”
His words are so genuine it nearly makes her misty.
“I've got my work cut out for me, but I intend to do my very best” she promises, meeting his eyes with a bold resolve.
“I've got no doubt you will.” he chuckles. “Just so you know, I run the carpentry shop just up the road. If you need a hand, come see me, yeah?”
“Will do!” she waves, watching her first kind stranger take his leave.
–
Paloma takes it easier the following days.
Well
A little easier.
Rudy had explained the old shipping bin on her property, and with her cottage finally, less spidery and grim she had resolved to at least do a little foraging in the bountiful area Alejandro had been sure to remind her of. The move in general had taken what little savings she'd had. And if selling off a few things would garner her some pocket change then she had to do all she could.
It was at least a start.
She was pretty pleased with her bounty around the mid afternoon, having already filled her basket full of varying mushrooms and wild vegetables. At least the ones she thought were edible. She hopes Rudy at least looks it over before taking it.
She's plopped on her rear, fingers stained blue as she works over a healthy looking berry bush (popping a few of the prettiest ones in her mouth in between) when a new voice startles her.
“New to town and already riflin’’ through other folk's gardens I see!”
The loud scottish lilt has her nearly jumping out of her skin. She whirls, eyes falling to yet another handsome stranger.
He's another big boy, white tank top smudged with dirt and loose sprigs of hay, his hair is cropped into a short mohawk, a rabbit's foot charm dangling from a loose chain around his neck. A farriers apron hugs his thick thighs, a fine layer of sweat glistening against his sun kissed skin.
Good heavens, they build them different in the country.
She sputters, trying to haul herself up “I didn't mean to- I didn't know?? I'm-”
“Easy lass, just yankin’ your chain” he laughs, extending a hand to help her up, his grip is firm, and he must overestimate how much strength he needs to pull her soft body up out of the dirt because he hauls her right into his chest.
Her brain reels, getting a nose full of sweet alpha musk, a fun mix of buttery shortbread and soft rose that seems odd clinging to such a macho looking alpha.
His freehand catches her, warm broad palm against the small of her back as she flails again, trying to get distance between them, nearly tripping over her own boots when he settles her again, a warm palm on her shoulder to hold her in place.
She's grateful she grabbed a healthy supply of her own blockers before leaving, at least she wouldn't be perfuming all over the place like a fool. She was embarrassed enough that her encounter with Gaz the day before had her snuffling at his scent on her hand all evening like a lonely puppy.
“Easy there” he says good naturedly, giving her a pat not unlike a horse before pulling his hand away. “Was wonderin’ when you'd come by and see me.” he beamed, pretty blue eyes bright with mischief.
She rights herself, dusting the dirt from her knees. “Is this your property? I didn't mean to intrude, I didn't realize someone was so close…”
She admittedly hadn’t strayed too far from home just yet, she wanted to get at least a little settled before meandering into town. She feels a little bad for not even bothering to see her new neighbor.
He introduces himself as John Mactavish, Soap for short. Explains that he minds the livestock just up the way, ducks and chickens and cows and horses, and that she was indeed on his property.
“Not that I mind of course. Alejandro told me we had someone new, didn't know you'd be such a bonnie thing, s'good to finally have a new face ‘round here.” he teases as they walk together. Soap had insisted he walk her home, had even snagged her basket of berries, holding them hostage, claiming she had too much to carry already with her backpack already sagging heavily against her shoulders.
Soap was a talker, rambling animatedly, introducing her to new names of fellow townsfolk she’d yet to meet, too many names lost on her as they made they’re way down the worn dirt path to her home. Talking with him was as easy as breathing, and while Gaz had been friendly she didn’t feel quite the same nervousness with Mactavish, and soon enough her own chattery energy came out to match his own. It wasn’t long before the pair were laughing and giggling their way under the afternoon sun, swapping stories of past awkward moments and old jobs.
Just from the way he talked, she could tell Soap was well liked, referring to most everyone in town as his friend. It was incredibly sweet how he only had good things to say. And if what Soap was saying was true, Paloma would have no issue getting to know everyone in town, well, mostly, everyone.
“Ach, Ghost, you’ll like him, he’s a tough nut to crack, but he’s good people, my best pal.” he says warmly, setting her basket down beside her front door. He starts to continue before he pauses, taken aback. She guesses in their chattering Soap hadn’t noticed their arrival until she’d let him right to her door.
“My days” he sighs, baby blues surveying her little farm, he doesn’t say anything as he steps off her porch, beelining it for her old barn, making her half run just to keep with his longer strides. He takes it upon himself to survey the building, making a couple rounds around the foundation before wrenching the old doors open with a grunt of effort. She follows him inside, mimicking him by putting her own hands on her hips as they both look around. Paloma isn’t quite sure what she’s looking for, but Soap does, and if anything she’s here for support.
“Ya know, I’ve never been out here before, the old man kept to himself, ya got yourself a good little setup here, hen. Little bit of patching here and hammering there and this’ll do just fine!”
“You think so? I would love to have a few animals, nothing too serious, but the company would be nice.”
“I know so, and tell you what.” he turns to her, a mischief Paloma suspects is permanent in his eyes, “ you come ‘round my place, help me tend to mine, and I’ll teach you a few things, even throw in a few coins for your trouble. That way we both have some company, aye?”
“You’d really do that?”
“‘Course! Just a little while, once you get this place all neat and tidy you’ll have your hands plenty full, and then you’ll be askin’ ole Soap for help.” he teases, clapping her on the shoulder once more, broad palm dangerously close to the tender gland at the juncture of her shoulder.
Paloma nods her head at the charismatic alpha, cheeks burning at the innocent contact. She wasn’t going to turn a prime opportunity down, and hands on contact would be much better experience than fumbling around with a book. It’s not like she was imposing, he offered after all, like good neighbors do, and she’d admittedly grown fond of the playful scot after their little walk together.
“Excellent, I’ll get out of your hair for now bonnie girl, but do me a favor would ye?” he asks seriously, looking her dead in the eye. “Stay out of trouble, your lucky I was alright with you pilferin’ my berries like that but-”
A loud snort tears from her at his teasing, one she attempts to cover half heartedly as more snorts follow, making Soap laugh too, she punches him in the side playfully, trying to catch her breath as Soap’s giggles make her laugh even more.
“And now you’re assaulting me! I’ll have you know I wont tolerate nefarious behavior like this, I’ll let it slide this time girlie, but it won’t happen again.” he proclaims, waggling his finger at her, only making her laugh harder. They part ways in giggles, Soap waving pleasantly as he trots back off into the distance, his sweet rose scent wafting around her in a pleasant cloud.
Paloma’s cheeks hurt from smiling, and for once the heavy weight of carrying on feels like nothing at all.
#they may accidently sound southern#but i do think the english and southern accents follow a similar pattern#sorry in advance#johnny soap mactavish#kyle gaz garrick#call of duty#farm sim au#wildcraft writing#Life's Sweet Bells#oc: paloma hadley#poly 141
176 notes
·
View notes
Text
COUCH POUCH!! Free Pattern & Tutorial
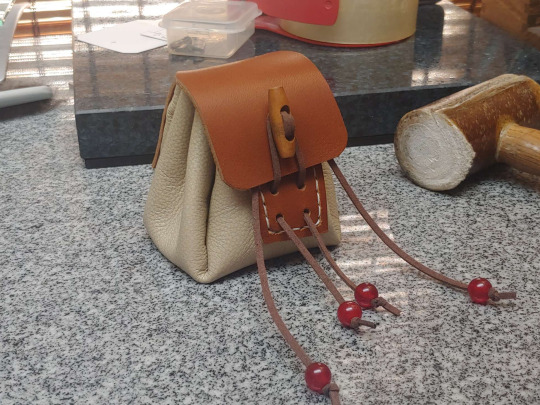
...called thus because they use upholstery-weight leather for the bag body, that in my case was in fact skinned off a couch. 🤣 Turns out they are relatively quick and easy to make, so I tidied up the pattern for printing and took pictures to document the process when I made another five of them.

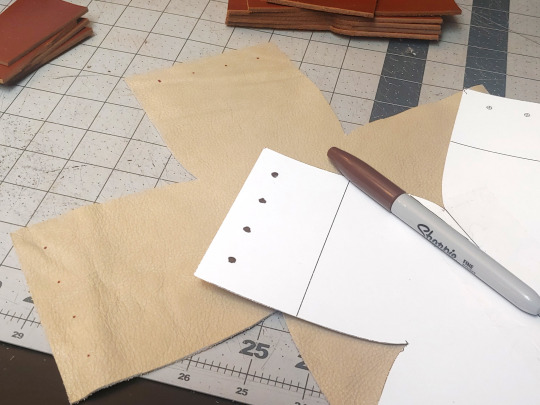
First off, print your pattern, 100% scale:
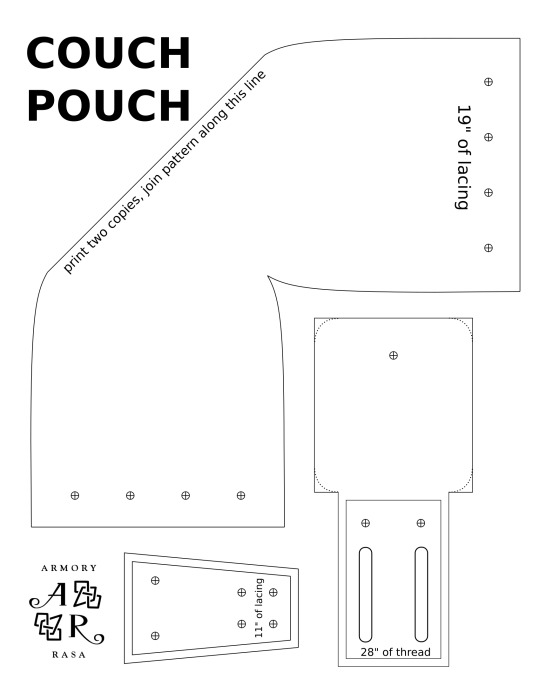
The bag shape was a modified version of the pattern I used for the Morpheus sandbag, but sized to fit in the roughly 11" squares that my couch skin came in. It makes a bag that sits very well on a tabletop, thanks to the flat base.
Though it turned out to not be the most efficient use of material, because that plus-shaped pattern tessellates well, if you're cutting them out of a full hide, but makes a lot of waste when you're cutting them out of squares of material. A more efficient design would have a half-rounded front and back, and a gusset between them, like so:
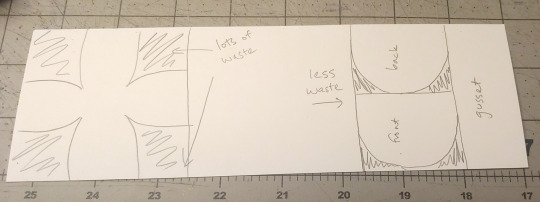
Ah well. It's not like I have any shortage of couch skin, though for the next round I'm going to experiment with a more efficient pattern.
First step, trace and cut out the bag body from your chrome-tan leather:
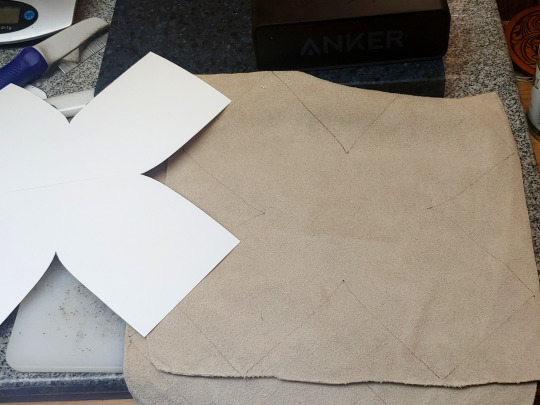
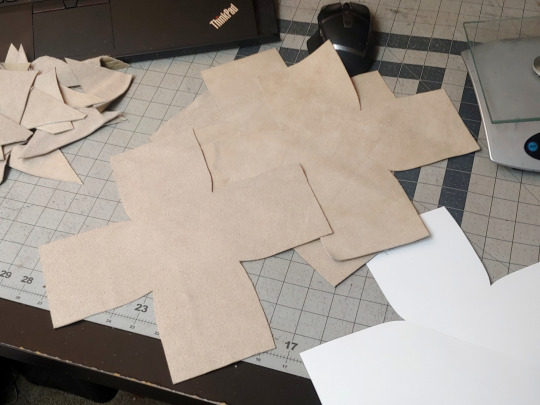
Like I said, this was upholstery leather, but anything that's flexible and ~1.5 mm thick will do.
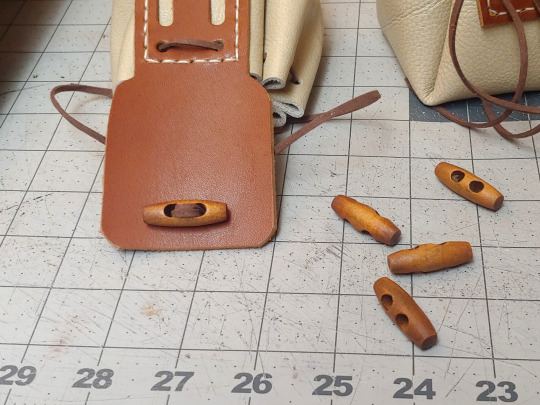
The flap and front need to be a stiffer leather though -- I used 7 oz latigo, but veg-tan would work equally well. (And then you could ✨tool it!✨)
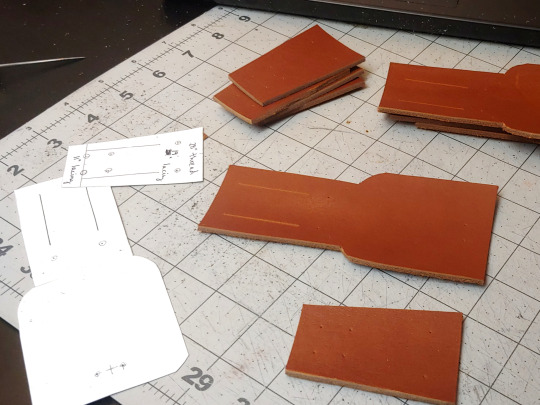
Cut them out, and then use the pattern to mark where your holes are going to be. Mark the holes on your bag body too:
The latigo pieces get hand-stitched to the bag body, so I used a stitching groover to carve out little channels for the thread -- it's not strictly necessary, but it makes your stitches lay a lot more neatly:
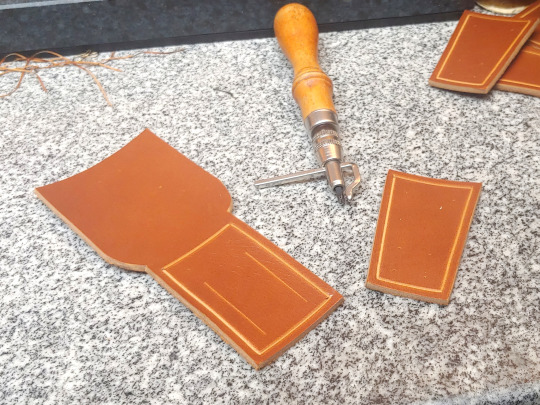
Punch the holes shown below:
I used a ~5 mm hole punch for those, and a 1.5" slot punch for the belt loops. Some of the holes on the front piece you're not punching yet, because they need to go through both layers.
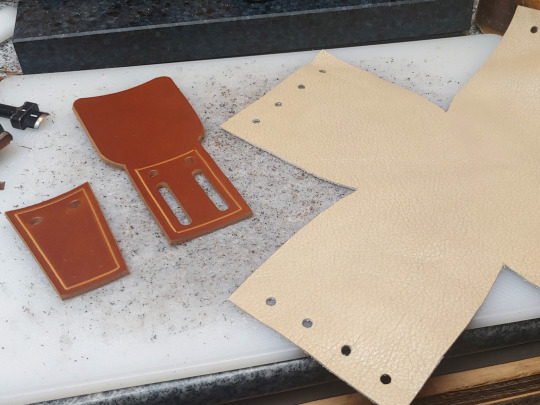
I put a dab of contact cement on the pieces (circled in white) to help hold them in place when I go to punch the stitching holes:
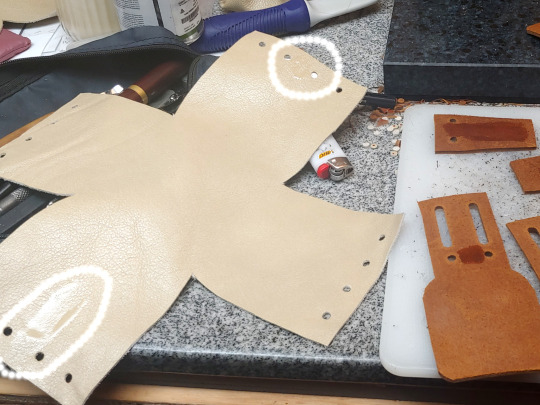
(Make sure you're not putting glue between the belt loops)
Wait fifteen minutes for the contact cement to dry until tacky, and then line up the holes and the edges and press the pieces together:
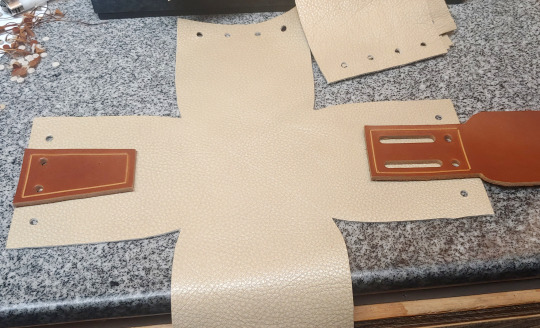
Punch stitching holes:
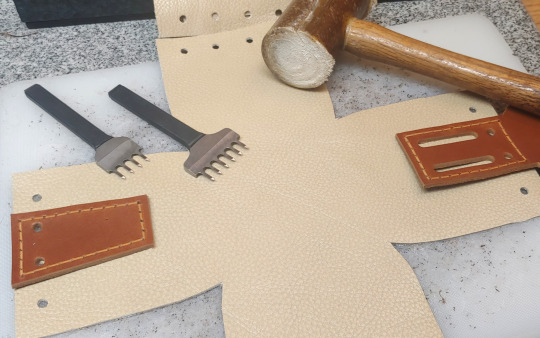
Saddle-stitch both pieces in place (takes 28" of thread per):
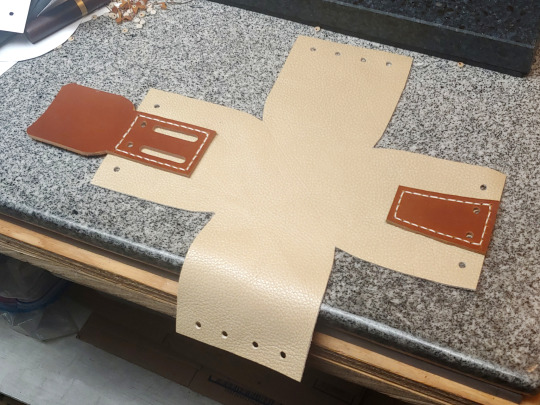
Now you can punch these holes:
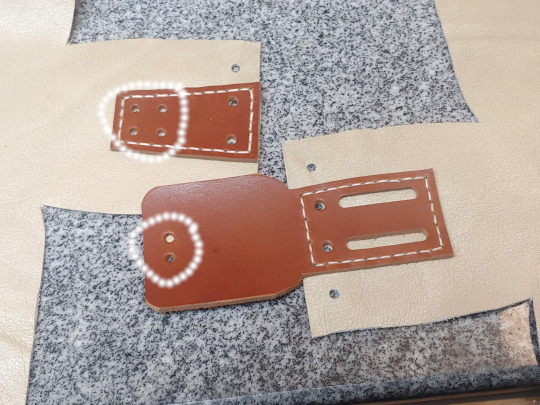
(I used a slightly smaller hole punch than for the others, but it doesn't really matter.)
Now press the right sides of the leather together and sew up the seams from the inside:
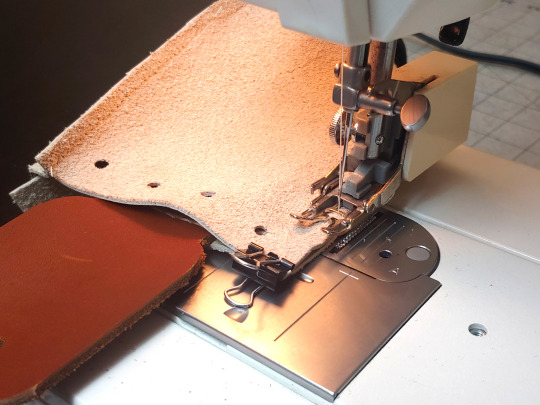
A regular sewing machine should be able to handle this, though you will need thicker thread, a heavy-duty leather-sewing needle, and a walking foot attachment. (If you don't have a walking foot attachment, it is SO WORTH getting one, even if you don't expect to sew much leather. Seriously, I use it for everything -- once you go walking foot, you don't go back. 💀) Because you can't pin leather without leaving permanent holes in it, tiny binder clips can be helpful for keeping your material lined up.
What they look like when you're finished sewing:
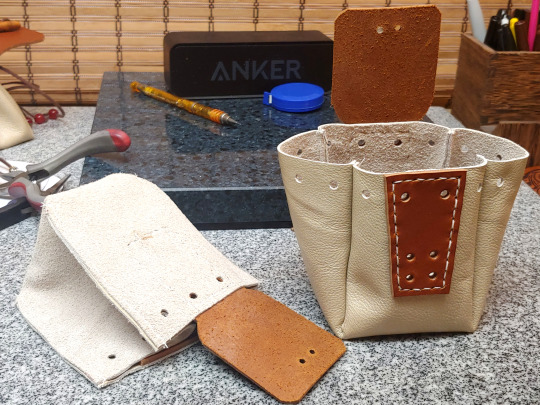
Cut 19" of lacing for the drawstring, and 11" of lacing for the toggle:
I use the 1/8" EcoSoft lace from Tandy, I think it's stronger than real leather would be at that thickness. The only important factor here is that you need something with a bit of texture and friction -- a silk cord isn't going to stay closed, it's going to slip open.
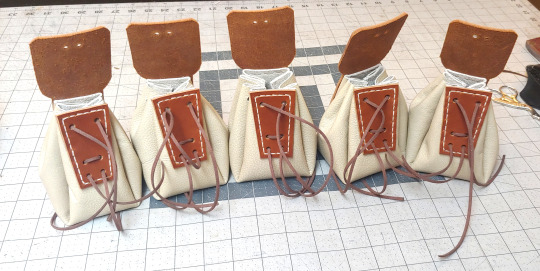
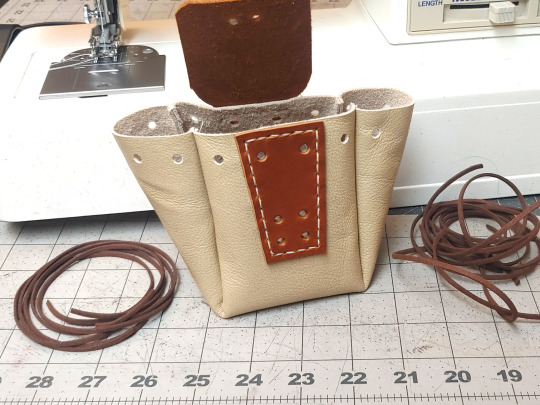
MANY BAGS.
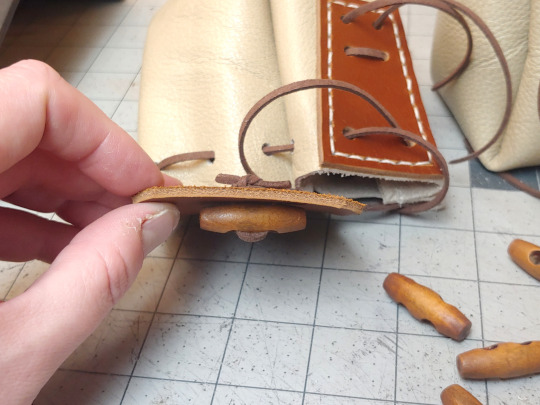
For these I used a wooden toggle -- cut another 8" of lacing, looped it through the toggle twice, and then made a tight square knot on the back:
But another option is putting a concho or a large button on the flap. The bag I copied this design from, in fact, uses a concho toggle:

Thread some beads on the laces to keep the ends from getting lost, and you are DONE! 😁
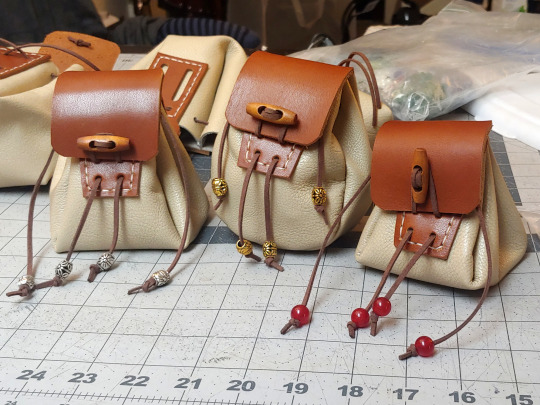
Happy Bagging!
713 notes
·
View notes