#CSS Links Free Tutorial.
Explore tagged Tumblr posts
Visit Tumblr Blog
Explore Tumblr blogs with no restrictions, modern design and the best experience.
Last Seen Tumblr Blogs


Fun Fact
The Tumblr app for Google Glass was released on May 16, 2013.
Text
In the wake of the TikTok ban and revival as a mouthpiece for fascist propaganda, as well as the downfall of Twitter and Facebook/Facebook-owned platforms to the same evils, I think now is a better time than ever to say LEARN HTML!!! FREE YOURSELVES FROM THE SHACKLES OF MAJOR SOCIAL MEDIA PLATFORMS AND EMBRACE THE INDIE WEB!!!
You can host a website on Neocities for free as long as it's under 1GB (which is a LOT more than it sounds like let me tell you) but if that's not enough you can get 50GB of space (and a variety of other perks) for only $5 a month.
And if you can't/don't want to pay for the extra space, sites like File Garden and Catbox let you host files for free that you can easily link into NeoCities pages (I do this to host videos on mine!) (It also lets you share files NeoCities wouldn't let you upload for free anyways, this is how I upload the .zip files for my 3DS themes on my site.)
Don't know how to write HTML/CSS? No problem. W3schools is an invaluable resource with free lessons on HTML, CSS, JavaScript, PHP, and a whole slew of other programming languages, both for web development and otherwise.
Want a more traditional social media experience? SpaceHey is a platform that mimics the experience of 2000s MySpace
Struggling to find independent web pages that cater to your interests via major search engines? I've got you covered. Marginalia and Wiby are search engines that specifically prioritize non-commercial content. Marginalia also has filters that let you search for more specific categories of website, like wikis, blogs, academia, forums, and vintage sites.
Maybe you wanna log off the modern internet landscape altogether and step back into the pre-social media web altogether, well, Protoweb lets you do just that. It's a proxy service for older browsers (or really just any browser that supports HTTP, but that's mostly old browsers now anyways) that lets you visit restored snapshots of vintage websites.
Protoweb has a lot of Geocities content archived, but if you're interested in that you can find even more old Geocities sites over on the Geocities Gallery
And really this is just general tip-of-the-iceberg stuff. If you dig a little deeper you can find loads more interesting stuff out there. The internet doesn't have to be a miserable place full of nothing but doomposting and targeted ads. The first step to making it less miserable is for YOU, yes YOU, to quit spending all your time on it looking at the handful of miserable websites big tech wants you to spend all your time on.
#this is a side point so it's going here but I really think tech literacy should be a requirement in schools like math grammar history etc.#we live in a world so dominated by the stuff and yet a majority of the population does not understand it at even the most fundamental level#tiktok#tiktok ban#indie web#neocities#web development#current events#twitter#facebook#meta#amazon
10K notes
·
View notes
Text
Unlocking the Potential of CSS: A Deep Dive into Outlines, Text Effects, Fonts, Icons, and Links

Cascading Style Sheets (CSS) is a fundamental component of modern web development, empowering designers and developers to create stunning and engaging user interfaces. In this blog post, we will explore some key CSS features and techniques that play a crucial role in enhancing the visual appeal and functionality of web pages. Specifically, we'll delve into CSS Outlines, CSS Text, CSS Fonts, CSS Icons, and CSS Links, providing practical examples along the way. Let's dive in!
CSS Outlines:
CSS Outlines allow you to add visual emphasis to elements by creating an outline around them. Outlines are distinct from borders, as they do not take up any space and are typically used to highlight active or focused elements.
Example:
/* CSS */
button:focus {
outline: 2px solid blue;
}
In this example, when a button is in focus, a 2-pixel solid blue outline will be displayed around it, indicating its active state.
CSS Text:
CSS Text properties offer granular control over the appearance and layout of text within HTML elements. From adjusting font size and color to controlling letter spacing and alignment, CSS Textprovides a wide range of options for customizing the text on your web pages.
Example: /* CSS */
h1 {
font-size: 24px;
color: #333;
letter-spacing: 2px;
text-align: center;
}
Here, the h1 element will have a font size of 24 pixels, a color of #333 (a dark gray shade), a letter spacing of 2 pixels, and will be centered within its parent container.
CSS Fonts:
CSS Fonts allow you to define the typeface, size, style, and other properties of text elements on your web pages. With CSS Fonts, you can create visually appealing and consistent typography across different browsers and devices.
Example:
/* CSS */
body {
font-family: Arial, sans-serif;
font-size: 16px;
font-weight: bold;
}
In this example, the body element will use the Arial font (or a sans-serif fallback), have a font size of 16 pixels, and be displayed in bold.
CSS Icons:
CSS Icons offer a lightweight and scalable way to incorporate visual symbols and icons into your web pages. By leveraging CSS properties like content, font-family, and ::before or ::after pseudo-elements, you can easily include icons without relying on external image files.
Example:
/* CSS */
.button::before {
content: "\f138";
font-family: "Font Awesome";
margin-right: 5px;
}
In this example, we use the Font Awesome icon font to add an icon before the content of an element with the class .button. The Unicode value \f138 represents the specific icon to be displayed.
CSS Links:
CSS Links allow you to customize the appearance of hyperlinks on your web pages, making them visually distinctive and engaging. CSS properties like color, text-decoration, and hover pseudo-classes enable you to control link styles based on different states.
Example:
/* CSS */
a {
color: blue;
text-decoration: none;
}
a:hover {
color: red;
text-decoration: underline;
}
In this example, all links (<a> elements) will be displayed in blue without underlines. However, when a user hovers over a link, it will turn red and have an underline, indicating the interactive state.
Conclusion:
CSS Outlines, CSS Text, CSS Fonts, CSS Icons, and CSS Links are powerful tools that allow you to enhance the visual presentation and functionality of your web pages. By understanding and utilizing these CSS features effectively, you can create engaging and visually appealing user interfaces. Experiment with these examples, customize them to suit your needs, and explore further possibilities to elevate your web design skills. Happy coding with WebTutor.dev!
Don’t Miss to Read
Learn Free Online CSS Tutorial
Learn Free Online CSS Outline Tutorial
Learn Free Online CSS Text Tutorial
Learn Free Online CSS Icons
Learn Free Online CSS Links
#Free CSS Tutorial#Online CSS Tutorial#Online CSS Outlines#CSS Outlines#Free CSS Outlines Learn#CSS Text#Learn CSS Text#Online CSS Text#Free learn CSS Text#CSS Text Property#CSS Fonts#Learn CSS Fonts#Online CSS Fonts#CSS Fonts tutorial#CSS Icons#Learn CSS Icons#Online CSS Icons#CSS Icons Tutorial#CSS Links#Learn about CSS Links#Online CSS Links#CSS Links Free Tutorial.
1 note
·
View note
Text
========================================================
[tutorial: build your own neocities/nekoweb page]
========================================================
a beginner's guide for making your very own home on the indie web—retro, personal, weird, and 100% yours.
this ain’t an average wix, squarespace, or tiktok aesthetic.
we’re talking full html/css with soul and attitude.
[ prerequisites ]
------------------
> an idea
> basic text editor (vscode, notepad++, or even notepad)
> account on https://neocities.org or https://nekoweb.org
> some gifs or tiles you love (dig deep or make your own)
> optional: image host or gif repo (or self-host everything)
[ feeling overwhelmed? read this. ]
-----------------------------------
you do *not* need to know everything.
html is not a mountain. it's a garden.
you plant one tag. then another. then a style. then a button.
you can build your site piece by piece.
and every piece is a portal to somewhere personal.
you are allowed to make broken pages.
you are allowed to use templates.
you are allowed to start over as many times as you want.
this is *your* world. you control the weird.
[ step 1: create an account ]
-----------------------------
> neocities: https://neocities.org
> nekoweb: https://nekoweb.org
register a name, log in, and enter your file manager.
this is where you upload your files and see your site live.
[ step 2: your first file - index.html ]
----------------------------------------
make a new file: `index.html`
basic starter:
<html>
<head>
<title>my weird little corner</title>
<link rel="stylesheet" href="style.css">
</head>
<body>
<h1>welcome to the void</h1>
<p>this is my page. it’s strange. like me.</p>
<img src="mygif.gif">
</body>
</html>
> upload to the dashboard
> boom. you’re live at
https://yoursite.neocities.org
or https://nekoweb.org/u/yoursite
[ step 3: add a style sheet - style.css ]
-----------------------------------------
create a file called `style.css` and upload it.
here’s some nostalgic magic:
body {
background: url('tile.gif');
color: lime;
font-family: "Courier New", monospace;
text-shadow: 1px 1px 0 black;
}
img {
image-rendering: pixelated;
}
marquee {
font-size: 20px;
color: magenta;
}
link it in your html and the vibes activate.
[ step 4: decorate it like a haunted usb ]
------------------------------------------
> use <marquee> for chaos scrolls
> embed gifs from https://gifcities.org/
> steal buttons from https://cyber.dabamos.de/88x31/
> set up a guestbook at https://www.smartgb.com/
> loop audio with <audio autoplay loop>
> add fake errors, 90s web lore, random link lists
[ step 5: resources, themes, and comfort ]
------------------------------------------
> templates & layouts: https://numbpilled-themes.tumblr.com
> glitchy gifs & buttons: https://glitchcat.neocities.org/resources
> layout builder: https://sadgrl.online/projects/layout-builder/
> free tiled backgrounds: https://backgrounds.neocities.org/
> beginner html intro: https://www.w3schools.com/html/
> pixel fonts & cyber assets: https://fontstruct.com/
remember:
you don't need to know js. you don't need to be a coder.
you just need a mood, a direction, a dream.
the html will follow.
[ bonus concept: shrine pages ]
-------------------------------
> a page just for one character you love
> a room to house digital fragments of your identity
> embed quotes, music, images like altars
> call it shrine.html and link it from your homepage
[ closing mantra ]
------------------
you are not here to be optimized.
you are not a brand.
you are a ghost inside the machine,
carving your initials into the silicon void.
welcome to Your website.
========================================================
#webcore#old web graphics#neocities#web graphics#carrd graphics#carrd resources#rentry decor#rentry graphics#carrd moodboard#carrd inspo#neopets#indie#indie web#early web#webdevelopment#web development#web resources#web design#old internet#old web#oldweb#nekoweb#transparent gif#tiny pixels#pixel gif#moodboard#tutorial#html page#html theme#htmlcoding
291 notes
·
View notes
Text
Twine/SugarCube ressources
Some/most of you must know that Arcadie: Second-Born was coded in ChoiceScript before I converted it to Twine for self-publishing (for various reasons).
I have switched to Ren'Py for Cold Lands, but I thought I would share the resources that helped me when I was working with Twine. This is basically an organized dump of nearly all the bookmarks I collected. Hope this is helpful!
Guides
Creating Interactive Fiction: A Guide to Using Twine by Aidan Doyle
A Total Beginner’s Guide to Twine
Introduction to Twine By Conor Walsh (covers Harlowe and not SugarCube)
Twine Grimoire I
Twine Grimoire II
Twine and CSS
Documentation
SugarCube v2 Documentation
Custom Macros
Chapel's Custom Macro Collection, particularly Fairmath function to emulate CS operations if converting your CS game to Twine
Cycy's custom macros
Clickable Images with HTML Maps
Character pages
Character Profile Card Tutorial
Twine 2 / SugarCube 2 Sample Code by HiEv
Templates
Some may be outdated following Twine/SugarCube updates
Twine/Sugarcube 2 Template
Twine SugarCube template
Twine Template II
Twine Template by Vahnya
Sample Code and more resources
A post from 2 years ago where I share sample code
TwineLab
nyehilism Twine masterpost
How to have greyed out choices
idrellegames's tutorials
Interactive Fiction Design, Coding in Twine & Other IF Resources by idrellegames (idrellegames has shared many tutorials and tips for Twine, browse their #twine tag)
How to print variables inside links
How do I create a passage link via clicking on a picture
App Builder
Convert your Twine game into a Windows and macOS executable (free)
Convert your Twine game into a mobile app for Android and iPhone (90$ one-time fee if memory serves me right) // Warning: the Android app it creates is outdated for Google Play, you'll need to update the source code yourself
245 notes
·
View notes
Text
YOU MUST MAKE A WEBSITE
Oh wow, look at that! YET ANOTHER post urging you to make a webbed site! What a completely new thing that people haven't made a thousand masterposts for already!!
• Making a website might look scary. It is Not.
At first, I too thought making a website was too much work. It really isn't! It turns out that all you need is
an HTML file,
a web hosting service and
w3schools tutorials,
and that's about it!
This post will point you towards these resources, and others I found useful while figuring out how to make a website.
• VERY QUICK EXPLANATIONS:
What's HTML and CSS?
HTML is the content of your webpage, the skeleton of it. What shows up in a webpage is what's written in the HTML file!
CSS is the way the HTML is styled; the colour of the background and the letters, the size of elements, the font, all that!
Do I absolutely NEED JavaScript for a website?
Not at all! You don't need to worry about learning it before getting started.
• What do I make a website for? What do I put in there?
ANYTHING AND ALMOST EVERYTHING. Here's some ideas for pages from a post of mine were I was very normal about websites:
You can make a page that's only pictures of your pets.
You can make an interactive adventure.
You can make your own academic blog full of your own essays or articles.
You can just post a ton of art or make a full music page.
You can make a blog and infodump eternally, give book reccs and reviews. You can host a thousand virtual pets and nothing else.
Upload entire books in a single html file. Make a wikipedia for your ocs. Make a fake site for a random fictional place (restaurant, hotel, whatever). You can make a thousand fanpages/shrines about your favorite media. You can upload your own webcomic and make it all like a fancy website and shit.
I could keep going but, for the sake of "brevity", I won't.
• WEBSITE EXAMPLES!
If I started listing the websites I know, this post would be bottomless. Here's only seven:
https://publictransit.neocities.org/ - A webbed site, for sure
https://ribo.zone/ - A personal site
https://leusyth.neocities.org/ - An art archive
https://solaria.neocities.org/ - Personal website with A Lot of stuff (it'll come up in a bit, because it offers web making resources)
https://hog.neocities.org/ - The Hogsite
https://thegardenofmadeline.neocities.org/ - Another personal site! It also has a web resources page and has made another masterpost like this one (but better)
https://spiders.neocities.org/ - My own website, which must be weird to see in mobile . sorry
• You've convinced me. I want a webbed site. Where do I start?
https://neocities.org/
FIRST OF ALL: Neocities. It is a free web hosting service, and it's the one I and the sites I linked use!
When I first started, my website was a black page with red letters and a drawing, and nothing else! It was like that for a month, till i started picking up on how to do things.
Here's what helped me get an idea of how to make things work:
https://sadgrl.online/learn/articles/beginners-guide-neocities
An absolute beginners guide to neocities -- while when you make an account there you get a tutorial page from the site, this one's extra support for that.
https://www.w3schools.com/
Learn HTML, CSS, JavaScript and MANY other coding things for free. All the tutorial/reference pages have live testing windows for you to mess with!! helped me a LOT while figuring this stuff out!
https://htmlcheatsheet.com/
https://htmlcheatsheet.com/css/
Cheatsheets for HTML and CSS, respectively. It includes a JavaScript one too!
https://sadgrl.online/webmastery/
Sadgrl's webmastery resources! Also includes the next resource listed here:
https://sadgrl.online/projects/layout-builder/
Sadgrl's layout builder; not a lot of customization at a first glance, but I've seen wildly different websites all using it as a base, plus it works using CSS Flexbox, so it generates a responsive layout!
(basically, a responsive layout is one that translates well in different sized screens)
https://www.tumblr.com/fysa/728086939730919424/wikitable-code?source=share
Tumblr user fysa made this layout imitating a wiki page!
https://brackets.io/
At some point, you might want to do things outside the Neocities code editor and get one outside the site. I recommend Brackets, because my old as fuck computer can run that and absolutely nothing else apparently, and it works wonderfully! Though I recommend either turning off the code autocomplete or using it after a good while of already using the Neocities code editor, so you get used to coding on your own.
http://www.unit-conversion.info/texttools/text-to-html/
Turn your text into HTML code! i use this kind of pages for my lengthy blog entries that I don't feel like formatting myself.
https://imagecompressor.com/
COMPRESS YOUR IMAGES.
The heavier an image is, the more your site weighs and the more time your page will spend loading. You don't want that, specially if your site is heavy on graphics. This might help!
https://solaria.neocities.org/guides
Some CSS, JavaScript and Accessibility guides! Worth checking out!
https://eloquentjavascript.net/
This is a free, interactive book for learning JavaScript! NOTE: It is very intuitive, but JavaScript is HARD!! I still haven't learned much of it, and my website does fine without so don't worry if you end up not doing much with it. It's still useful + the exercises are fun.
And now, accessories!
• Silly stuff for your page :]
https://gifypet.neocities.org/
Make a virtual pet, copy the code and paste it in your HTML file! You'll get a little guy in your webbed site :]
https://www.wikplayer.com/
Music player for your website!
http://www.mf2fm.com/rv/
JavaScript silly effects for your site :]
https://blinkies.neocities.org/geoblinkies
Blinkie search engine!
https://www.cbox.ws/
Add a chatbox to your site!!
https://momg.neocities.org/
Infinite gallery of gifs. i've spent hours in there looking at moving pictures and out of them all, the ONLY gif i actually ended up using on my site was a rotating tomato slice. it is still there. trapped.
https://wrender.neocities.org/tarotinstructions
A widget that gives you a random tarot card!
https://www.websudoku.com/widget.php
Sudoku widget!
That's about it for now! I don't know how to end this!!! Remember to have fun and google everything you don't know :]
569 notes
·
View notes
Text
Edgaring time!
Tutorial on how to make your own responsive Edgar :D I will try to explain it in really basic terms, like you’ve never touched a puter (which if you’re making this… I’m sure you’ve touched plenty of computers amirite??? EL APLAUSO SEÑOOOREEES).
If you have some experience I tried to highlight the most important things so you won’t have to read everything, this is literally building a website but easier.
I will only show how to make him move like this:
Disclaimer: I’m a yapper.
Choosing an engine First of all you’ll need something that will allow you to display a responsive background, I used LivelyWallpaper since it’s free and open-source (we love open-source).
Choosing an IDE Next is having any IDE to make some silly code! (Unless you can rawdog code… Which would be honestly impressive and you need to slide in my DMs and we will make out) I use Visual Studio!!!
So now that we have those two things we just need to set up the structure we will use.
Project structure
We will now create our project, which I will call “Edgar”, we will include some things inside as follows:
Edgar
img (folder that will contain images) - thumbnail.png (I literally just have a png of his face :]) - [some svgs…]
face.js (script that will make him interactive)
index.html (script that structures his face!)
LivelyInfo,json (script that LivelyWallpaper uses to display your new wallpaper)
style.css (script we will use to paint him!)
All of those scripts are just literally like a “.txt” file but instead of “.txt” we use “.js”, “.html”, etc… You know? We just write stuff and tell the puter it’s in “.{language}”, nothing fancy.
index.html
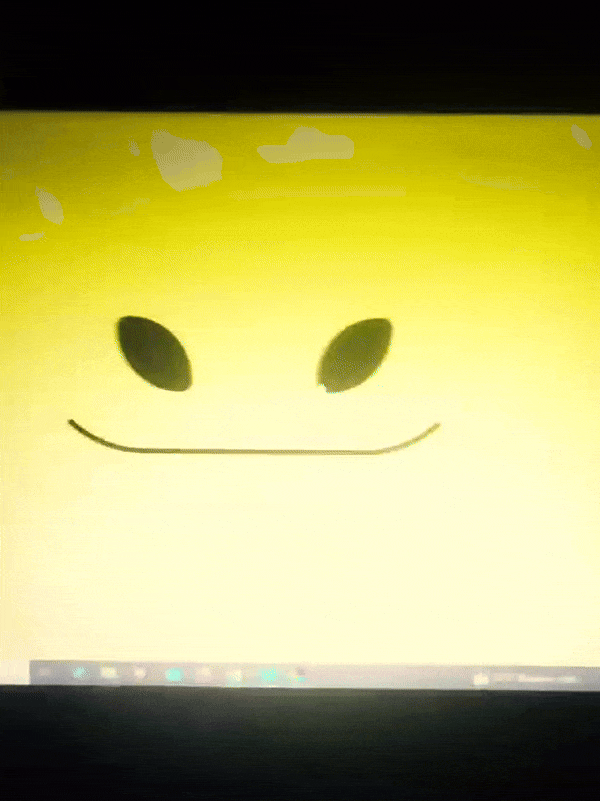
Basically the way you build his silly little face! Here’s the code:
<!doctype html> <html> <head> <meta charset="utf-8"> <title>Face!</title> <link rel = "stylesheet" type = "text/css" href = "style.css"> </head> <body> <div class="area"> <div class="face"> <div class="eyes"> <div class="eyeR"></div> <div class="eyeL"></div> </div> <div class="mouth"></div> </div> </div> <script src="face.js"></script> </body> </html>
Ok so now some of you will be thinking “Why would you use eyeR and eyeL? Just use eye!“ and you’d be right but I’m a dummy who couldn’t handle making two different instances of the same object and altering it… It’s scary but if you can do it, please please please teach me ;0;!!!
Area comes in handy to the caress function we will implement in the next module (script)! It encapsulates face.
Face just contains the elements inside, trust me it made sense but i can’t remember why…
Eyes contains each different eye, probably here because I wanted to reuse code and it did not work out and when I kept going I was too scared to restructure it.
EyeR/EyeL are the eyes! We will paint them in the “.css”.
Mouth, like the eyeR/eyeL, will be used in the “.css”.
face.js
Here I will only show how to make it so he feels you mouse on top of him! Too ashamed of how I coded the kisses… Believe me, it’s not pretty at all and so sooo repetitive…
// ######################### // ## CONSTANTS ## // ######################### const area = document.querySelector('.area'); const face = document.querySelector('.face'); const mouth = document.querySelector('.mouth'); const eyeL = document.querySelector('.eyeL'); const eyeR = document.querySelector('.eyeR'); // ######################### // ## CARESS HIM ## // ######################### // When the mouse enters the area the face will follow the mouse area.addEventListener('mousemove', (event) => { const rect = area.getBoundingClientRect(); const x = event.clientX - rect.left; const y = event.clientY - rect.top; face.style.left = `${x}px`; face.style.top = `${y}px`; }); // When the mouse leaves the area the face will return to the original position area.addEventListener('mouseout', () => { face.style.left = '50%'; face.style.top = '50%'; });
God bless my past self for explaining it so well, but tbf it’s really simple,,
style.css
body { padding: 0; margin: 0; background: #c9c368; overflow: hidden; } .area { width: 55vh; height: 55vh; position: absolute; top: 50%; left: 50%; transform: translate(-50%,-50%); background: transparent; display: flex; } .face { width: 55vh; height: 55vh; position: absolute; top: 50%; left: 50%; transform: translate(-50%,-50%); background: transparent; display: flex; justify-content: center; align-items: center; transition: 0.5s ease-out; } .mouth { width: 75vh; height: 70vh; position: absolute; bottom: 5vh; background: transparent; border-radius: 100%; border: 1vh solid #000; border-color: transparent transparent black transparent; pointer-events: none; animation: mouth-sad 3s 420s forwards step-end; } .face:hover .mouth { animation: mouth-happy 0.5s forwards; } .eyes { position: relative; bottom: 27%; display: flex; } .eyes .eyeR { position: relative; width: 13vh; height: 13vh; display: block; background: black; margin-right: 11vh; border-radius: 50%; transition: 1s ease } .face:hover .eyeR { transform: translateY(10vh); border-radius: 20px 100% 20px 100%; } .eyes .eyeL { position: relative; width: 13vh; height: 13vh; display: block; background: black; margin-left: 11vh; border-radius: 50%; transition: 1s ease; } .face:hover .eyeL { transform: translateY(10vh); border-radius: 100% 20px 100% 20px; } @keyframes mouth-happy { 0% { background-color: transparent; height: 70vh; width: 75vh; } 100% { border-radius: 0 0 25% 25%; transform: translateY(-10vh); } } @keyframes mouth-sad { 12.5%{ height: 35vh; width: 67vh; } 25% { height: 10vh; width: 60vh; } 37.5% { width: 53vh; border-radius: 0%; border-bottom-color: black; } 50% { width: 60vh; height: 10vh; transform: translateY(11vh); border-radius: 100%; border-color: black transparent transparent transparent; } 62.5% { width: 64vh; height: 20vh; transform: translateY(21vh); } 75% { width: 69vh; height: 40vh; transform: translateY(41vh); } 87.5% { width: 75vh; height: 70vh; transform: translateY(71vh); } 100% { width: 77vh; height: 90vh; border-color: black transparent transparent transparent; transform: translateY(91vh); } }
I didn’t show it but this also makes it so if you don’t pay attention to him he will get sad (mouth-sad, tried to make it as accurate to the movie as possible, that’s why it’s choppy!)
The .hover is what makes him go like a creature when you hover over him, if you want to change it just… Change it! If you’d rather him always have the same expression, delete it!
Anyway, lots of easy stuff, lots of code that I didn’t reuse and I probably should’ve (the eyes!!! Can someone please tell me a way I can just… Mirror the other or something…? There must be a way!!!) So now this is when we do a thinking exercise in which you think about me as like someone who is kind of dumb and take some pity on me.
LivelyInfo.json
{ "AppVersion": "1.0.0.0", "Title": "Edgar", "Thumbnail": "img/thumbnail.png", "Preview": "thumbnail.png", "Desc": "It's me!.", "Author": "Champagne?", "License": "", "Type": 1, "FileName": "index.html" }
Easy stuff!!!
Conclusion
This could've been a project on git but i'm not ready and we're already finished. I'm curious about how this will be seen on mobile and PC,,, i'm not one to post here.
Sorry if I rambled too much or if i didn't explain something good enough! If you have any doubts please don't hesitate to ask.
And if you add any functionality to my code or see improvements please please please tell me, or make your own post!
98 notes
·
View notes
Text
If Tumblr ever actually goes tits up you can always find me at my personal portfolio website, www.featherwurmgraphics.com, where I link my other active social media accounts or wherever else I can be found.
And hey, while I'm here, setting up your own site on the web is always a great idea to have a home base that isn't beholden to advertisers, app stores, or having a successfully funded social-media server. I pay for my site through OneWebHosting but Neocities is free, if more bare-bones in what you can make. Basic HTML and CSS are very simple to use, and there's tons of tutorials out there.
Twenty years ago artists used to consider having their own website portfolio a critical part of their online presence, and while that's given way to a lot of social media posting without a 'home base', with the way advertising and legislation have gone - having your own space online seems still pretty important to me!
46 notes
·
View notes
Text

EMPIRE - MULTIMUSE MUSE PAGE !!!
This page is completely free. Please support me and my work by liking or reblogging this post.
[ INFORMATION ]
THIS CODE IS 100% JAVASCRIPT FREE!!!
This code comes with tabs which allows you to give each muse a separate page. Therefore, you can add as many muses as you want.
The theme is very responsive and doesn’t need much editing!
All colors and effects are easy editable. Not many colors are needed.
The gradient effect over the picture can be removed, it can be turned into one picture, it can be turned into a gray filter or any filter can be entirely removed
The pictures are 250 x 280 in size but they resize automatically if your chosen picture is too small or too big.
The size of the muse picture is also editable and changeable.
The picture can also be removed completely without any editing in the CSS part.
The code offers 2 main links (Home and Ask) but also three free individual links. As well as space for hidden information of your choice.
The main box with detailed information can be edited and designed to your liking. Possible options and variations can be found in the code.
[ GUIDELINES ]
Do not claim as your own.
Do not remove the credit!
Do not use as a base code or take parts of this code for your theme.
Feel free to edit as much as you want!
Editing help and tutorials on how to edit the tabs can be found in the code. A tutorial page is linked there.
Click the SOURCE LINK to be redirected to the preview and the code!
#indie theme#free theme#multimuse page theme#muse page#muse page theme#rph#indie rp#rpc#indie rph#rp theme#page theme
584 notes
·
View notes
Text
learning to code!
When I was 9 years old, I learned enough html to code neopets pages, my own geocities websites, and I even made forums on my own sites so my friends could all roleplay together or rant together lol. And then? I forgot so much. I no longer no how to make a forum, or even a 'next page' button - so even the dream of just making a simple blog or webnovel site feels like a huge hurdle now. (9 year old me could probably figure it out in 2 hours).
So I'm relearning! I figured this would be a fun post to place resources I find for coding, since there's coding languages, and I figure maybe if you like running you're blog then you also might be interested in tools for making blogs!
First, for those of you who miss the old geocities and angelfire type of sites to make your own free site on: neocities.org
You can make free sites you can code yourself, the way 9 year old me did. A lot of people have made SUCH amazing sites, it's baffling my mind trying to figure out how they did, I definitely wish I could make an art portfolio site even a fourth as cool as some of the sites people have made on here.
And for those pressed for time, who aren't about to learn coding right now: wix.com is the place I recommend for building a site, it requires no coding skill and is fairly straightforward about adding pages or features by clicking buttons. I used it to make my art portfolio site, I am testing out using it for my webnovel - the alternative is Wordpress, but wix.com is letting me basically make a wordpress blog Inside my own site. It's very beginner friendly in terms of "how the fuck do I set up a 'sign up for updates' message and have my site actually email these people my novel updates?" and "I need a 4x20 grid of my art down the page, that lets people click the art to see it's information and make it bigger."
I did neocities.org's little html tutorial today, it's the part of html I DID remember (links, paragraphs, headers).
My next step is to go through htmldog.com's tutorials. They go from beginner, to intermediate, to CSS. Unlike many a coding tutorial I've seen, they explain what program on your computer you need to WRITE the code in and then how to save it and how to open it. (You'd think this isn't a big deal but I've been looking into how to learn Python for months and I can't find a tutorial explaining what fucking program to write my python in... notepad? do I need something else? I don't fucking know!! My dad finally gave me a printed textbook which supposedly tells you what to download to start... I learned C++ in college and for that you needed Visual Basic to code C++, so I figured I needed Something to Write the fucking python IN.)
#coding#rant#wooh my new CODING TAG#learning to code#i feel very. odd if im honest?#i genuinely knew how to build full fucking forum websites as a child including user sign ups#and i studied Computer Science Engineering in college so i did everything with C++ we were asked to and got As#and then i promptly BLOCKED IT OUT because i#HATED studying c++ SO fucking much. i hated my whole major. i did not like Engineering. i hated it. i was so mentally destroyed#by my college major that when i graduated i got a DIFFERENT job#and do NOTHING related to my major#i want to get into a more tech focused career eventually...since that is what my fucking degree is in#but i've been looking into something with less coding OR trying to teach myself#to like coding as long as its not fucking c++ again... i cant do it. too many bad memories#i think cybersecurity sounds like a fun job.#but u know me. im a person who likes knowing the BASICS#so i feel like i need to Relearn to code and learn python decently#before i try to study cybersecurity specific shit
36 notes
·
View notes
Text
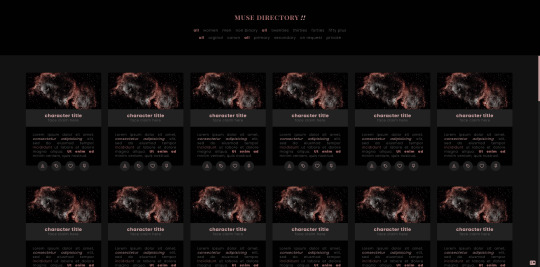
KITTEN !!
page forty six by sugar !!
JAVASCRIPT FREE - this is a muse directory page css filters, and a straightforward format, each muse panel features an image, title & subtitle, description and four customizable links.
special thanks to @eggdesign for their tutorial for css filtering !!
for help with troubleshooting, please contact me directly on my main blog.
PREVIEW CODE
get the code - ( free ; or pay what you want ) !!
join my discord ( members get a discount on premium themes ) !!
194 notes
·
View notes
Text

A free template for a spinning wheel that randomly picks a character. Use this to send a wheel to your followers to randomly select a character to interact with!
With basic HTML/CSS/Javascript knowledge, this template is fully customisable. Even if you don't know any code, the examples should guide you enough to add characters, change the text, and change the colours on the wheel. With more knowledge, you can change the background, add fancy fonts, create more complex results, etc.

Basic Version (returns a character name)
Complex Version (returns a character name, links to an about page, gives brief information about the character, and randomly picks a verse for them)
This generator uses Perchance. To use it, make an account, then go to the generator and click edit -> save. This will save a version to your account. You will now be able to customise the generator.
There are no limits to how many characters you can add, but the wheel does become cluttered and hard to read eventually. One potential solution would be to spin for the fandom instead of the character, and then have the wheel return a random character based on the fandom instead. You would do this using the same method as the verse selection in the complex version of the template.
Help resources:
Basic Perchance tutorial
Perchance wiki
Wheel plugin tutorial
Link plugin tutorial
HTML tutorials
#rph#rpc#rp help#rpc help#rp meme#roleplay meme#rp prompts#roleplay prompts#rp memes#roleplay memes#templates;
35 notes
·
View notes
Note
Hi! just wanted to ask on how you personally use Twine I've been a fan of OM, and wondered how u made the remake in that system lmao. I was wondering if you had any tips / tutorials u used, I've spent some time testing and have got the hang of variables and linking but i was really confused on how you designed it / removed the borders around the side bar and everything, along with how you made the intimacy system, Especially the notify / achievement bar system! No tutorials were helping me lol
Sure! I'll do my best to explain below; feel free to ask me to expand on anything if it's confusing.
Changing sidebar:
The way you do this is basically through CSS ("Story Stylesheet"). When your game is open in the browser, you can inspect elements to figure out what they're called, then change their styles. For example, I removed the border of the menu buttons by putting the following in the stylesheet:
(for the overall borders)
menu ul {
border: none;
}
(for the borders between each link)
menu li a {
border: none;
}
w3schools.com is a great website if you'd like to learn CSS - it's what will help you completely restyle your story. There are also plenty of Twine design templates for something easier to use without having to learn code.
Intimacy system:
This one is a little more complicated. I'm actually completely rehauling the intimacy system for version 1.1. Right now, it uses a lot of if statements to check the amount of intimacy the player has collected with a character - and this intimacy is in a variable initialized in the special StoryInit passage. However, that's bandaid code which is messy and easily runs into bugs, as has happened ever since release lol. To fix it, I've essentially created a proper levelling system using custom macros and JavaScript. That requires a good grasp on behind-the-scenes programming, though. If your game isn't a huge project, keeping intimacy in variables should work just fine. Just make sure to keep a spreadsheet or notes somewhere that list how much intimacy is possible to gain and in which passages. It will make your life easier in the long run.
Notifications:
This one I actually got from one of Chapel's custom macros! They're super easy to use and do a lot of cool things. I highly recommend checking these out because they can make your life easier: link
Achievements:
I'm going to assume you're talking about achievements that persist over different saves - for this, you'll need to utilize Twine's special StoryInit passage again. In case you are not sure of what that is, it's essentially all the variables that will be initialized when the game is first loaded into the browser. Your achievements and important story-spanning variables (like personality traits, intimacy counters, etc) will go here. To create an achievement, you'd put something like this in your StoryInit:
<<set $achievement1 to recall('achievement1')>>
If the player hasn't obtained the achievement, $achievement1 will automatically be set to false. To have them actually get the achievement, put
<<run memorize($achievement1, true)>>
<<set $achievement1 to true>>
in the passage where the achievement is gained. Also, be sure to have your players know that keeping saves and achievements like these relies on browser cache - if that's cleared, their progress will be lost.
Hope that helps! I wasn't sure how familiar you are with Twine beyond variables and linking as it's a pretty big engine with many things, so I just covered things without going into deeper mechanics like Twine's special passages, scripts/stylesheets, macros, etc. I'm happy to explain those too if you're having trouble. Also, everything I explained is specifically in the Sugarcube language - it won't work in Harlowe, Snowman, etc.
Helpful links:
Twine cookbook
Chapel's custom macros
Cycy's custom macros
Albie's Twine Tutorial with tons more resources
13 notes
·
View notes
Text

my olrox webshrine is finished!
was the whole reason for making this that i wanted to apply to yume-ring (a webring for self-shippers) and it requires that you have a shrine to a character you love... yes BUT i had so much fun with this. i always sketch out my page layouts before trying to make them, and i was worried about if it would be possible as i still consider myself a newbie compared to others at html and css coding (i coded a little html on old tumblr themes, but have only consistently been coding in html and css to build my website for about 7 months). the only thing that got me stumped for a little was how to get the boxes to appear over the frames, because if they were underneath the scroll bars wouldn't work, but i figured it out (with the help of w3schools) and it looks exactly how i wanted it to!
it's just a simple page, but it's what i had envisioned for it. i hope it suits olrox. and while i don't expect anyone to care about my rambles describing olrox or why i like him, maybe it can be resourceful for anyone trying to find reference of him to draw as one of the boxes contains all his official art (character sheets, concept art, posters and a lot of screenshots). also some silly stamps and other graphics i made, feel free to use them to decorate your own sites and pages, crediting me for making them isn't necessary but it is appreciated.
you can take a look at the webshrine here.
... i spent too long erasing the background from that heart frame in the middle.
[18+, minors dni. areas of my website do have 18+ art so my website is 18+ only.] [my website is hand-coded using html and css code (and the occasional javascript). i proudly consider myself part of the web 1.0 revival movement which aims to get people making unique websites again to express themselves, encourages web literacy, media preservation, and is against things like constant advertisements, pop-ups, pay-walls that stop you being able to read articles, and more. if you're interesting in making your own website without limitations, coding can seem scary, but i have a page on my website called 'explore the web' that links to many resources. i learnt from neocities own tutorial, looking at other's codes, just trying to code and see what happens, and when in doubt checking web3schools. for more information on web 1.0 revival you can check out 32bit.cafe, they have lots of helpful information and resources about how to make a website, how to get ideas, how to stay safe online and more.]
#are people interesting in me posting updates about my website on here? i work really hard on it#we could call the tagg uhhh#the vampire codes#olrox#castlevania nocturne#castlevania#mdni#olrox castlevania#castlevania olrox#indie web#web revival#neocities
18 notes
·
View notes
Note
do you happen to know any site building tutorials to follow and learn from? been having a hard time finding a place to start with my own neocity but the free reign and customization of them interests me a lot :0c
ABSOLUTELY! I do want to stress one thing if HTML/CSS is something you're not familiar with: It's okay if your website doesn't look like the most creative, eye-popping thing in the world! I've seen sooooooo many people get so discouraged because their beginner websites don't look like the flashier websites you see on Neocities' front page (by people who've been coding for a Long Time, mind you!) and like!!! That's fine!!! The code of my own site was quite possibly the worst thing you've ever seen thrown together into one big CSS soup before I Literally Just Rewrote It Today, After A Year Of Having A Neocities. And so, with that being said:
As anyone on the internet might do, w3schools is the absolute first place I'd recommend to beginners! There are videos, it's mostly a text-based learning site with lots of exercises to test your knowledge. If you'd prefer videos:
My personal favorite guy on Youtube to learn coding things from is Giraffe Academy: Here's his full course on HTML! The video itself is about two hours—I skimmed through it and everything seems to be perfectly oriented towards beginners (I haven't watched it in its entirety, but I have seen his videos on C# and Python [programming languages, don't worry about it] and they did a lot to help explain certain things to me that I didn't know previously!).
BroCode's HTML in 1 hour and CSS in 1 hour are pretty good! His videos do include a little bit on how to implement some JavaScript here and there, but nothing major or terrifying.
Here's a playlist of HTML/CSS tutorials in bite-sized videos, too! Think about 10-25 minutes per video.
I will say that searching for YouTube videos on HTML/CSS will always sort of gear more towards what people in the professional sphere are looking for rather than what you'd see on Neocities.
As for Neocities-specific things (which may be the actual point of your ask! Might've misinterpreted the hell out of it oops):
sadgrl.online is perhaps the most known website on Neocities, largely because the website itself not only has a layout maker you're free to use if you want to make a website now but the thought of writing HTML/CSS from scratch terrifies you, but also HTML/CSS guides themselves! There's also a bunch of links you can use to help fluff up your site a bit, generate HTML code for you, or just fluff up your site in general.
The Melonland Project is also dedicated to providing website development tools and tutorials for beginners: here is its guide to making a website on Neocities! It also provides a link to learnlayout.com, which I'll link here as well—a website for helping you learn CSS layouts!
And, once you've got the hang of how CSS works but are still feeling unable to code it yourself (no ideas? just not feeling up to it? FUCK MAN DO I UNDERSTAND THAT) Eggramen has free CSS pages you can use, and all you have to do is write the HTML for it!
But I would always focus more on learning HTML first before any CSS—and then learning how to integrate CSS into HTML via inline styling (which those video tutorials do!) before worrying about any external stylesheets or whatever. HTML is the actual building block—CSS just makes it look pretty.
#'site-building' tutorials will almost always lead you to like. coding bootcamps and stuff for companies#the nc-specific links should be more help in just building a site on nc!#anyway. hope to god i didn't misinterpret this question HAHA#asks
12 notes
·
View notes
Note
Ur website so cool!! ❤️❤️ Do you have by any chances coding tips? Been trying to make my own website for a while but adhd won't let me concentrate a second when it comes to learning coding
Thank you! And 100% It is deceptively approachable but also time consuming, I'm familiar enough with html from a highschool class where we did need to write code out by hand, and then soft practice with coding toyhou.se profiles and futzing around with free code snippets. Largely though I don't think you need to know everything or to write everything by hand, you just need to frankenstein code pieces together (As long as they're free ofc).
I used this first, it's fucking insanely handy and lets you make a simple layout with sidebars, navigation, header, footer and a body base ect, and then just generate and copy the code. The html itself also has greyed out little notes about what parts do what!
I'll be real the rest of it after that is just me googling what I want to do or googling html snippets bc I forgot them. So like html image link with size attributes ect ect, how to make a html image gallery. I don't use one site exclusively but w3schools.com has a bunch of common ones and also has a little live code editor in its tutorials.
Like I still get greatly stumped for hours bc code's kinda sensitive and one or two characters out of place will break sections of it especially when ur just frankensteining. Trying out little segments in live code editors is really helpful because you can kinda break it apart and diagnose the issue before putting it into your site html.
Also if it helps this is kind of how I break it down in my brain as another ADHD-er. so fuckign sorry for how this looks im doing it in snipping tool. But code bits love to live in cages even if it all looks the same, iit would also help if you clean your code up mine is pretty horrid but you just want to familiarize yourself with the little "Sections" ig that's where doing things by hand would help because you would 100% know what each chunk is for but yk yk.
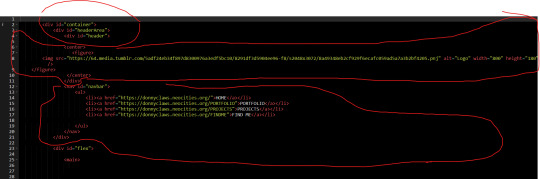
CSS is a different beast I barely understand. The parts of code where it starts stacking on top instead of being horizontal is css and it's basically how you do fancier things to your code, it's linked to stuff you already have down. So like changing the background in the body text box or something, you can only do so much in there. Css targetting the body text box is where you can level it up. Again the sadgrl layout builder has notes so you're not completely blind in there. There's also 100% so many resources to explain what all these words mean, my mmethod is incredibly avoidant I don't know what flex is I haven't needed to fight her yet ect ect.

Sorry if this is confusing this is just my hack and slash understanding atm. Be humbled by code I've spent too long trying to fix up hysterical margin issues just because I had a random apostrophe somewhere or because I tried to spell it colour and not color ect.
33 notes
·
View notes
Note
Hello, I love your website nd just wanted to ask - because I can't find it anywhere - how did you get the images on top of the corners of the boxes? (for example the bowser cry and the eevee on your pokemon page)
Even if its just a link to a tut - thanks ^_^
sure! it's just absolute positioning in css. i have the images set to "position:absolute" and the parent div i'm referencing as "position:relative", then i just use the left:/right: and bottom:/top: values to move it relative to the parent. i used to do this with just margin-right and margin-left on the image without making the parent relative but i think this method is more consistent.
if you're ever confused about something you can just right click and inspect on firefox to see how the page is set up wrt html and css rules
here's some info on the position css value on w3schools. the fourth example is basically what im talking about:
9 notes
·
View notes