#Free CSS Tutorial
Explore tagged Tumblr posts
Visit Tumblr Blog
Explore Tumblr blogs with no restrictions, modern design and the best experience.
Last Seen Tumblr Blogs


Fun Fact
Post activity is at the highest at 4:00 pm EDT; notes peak at 10:00 pm EDT.
Text
Unlocking the Potential of CSS: A Deep Dive into Outlines, Text Effects, Fonts, Icons, and Links

Cascading Style Sheets (CSS) is a fundamental component of modern web development, empowering designers and developers to create stunning and engaging user interfaces. In this blog post, we will explore some key CSS features and techniques that play a crucial role in enhancing the visual appeal and functionality of web pages. Specifically, we'll delve into CSS Outlines, CSS Text, CSS Fonts, CSS Icons, and CSS Links, providing practical examples along the way. Let's dive in!
CSS Outlines:
CSS Outlines allow you to add visual emphasis to elements by creating an outline around them. Outlines are distinct from borders, as they do not take up any space and are typically used to highlight active or focused elements.
Example:
/* CSS */
button:focus {
outline: 2px solid blue;
}
In this example, when a button is in focus, a 2-pixel solid blue outline will be displayed around it, indicating its active state.
CSS Text:
CSS Text properties offer granular control over the appearance and layout of text within HTML elements. From adjusting font size and color to controlling letter spacing and alignment, CSS Textprovides a wide range of options for customizing the text on your web pages.
Example: /* CSS */
h1 {
font-size: 24px;
color: #333;
letter-spacing: 2px;
text-align: center;
}
Here, the h1 element will have a font size of 24 pixels, a color of #333 (a dark gray shade), a letter spacing of 2 pixels, and will be centered within its parent container.
CSS Fonts:
CSS Fonts allow you to define the typeface, size, style, and other properties of text elements on your web pages. With CSS Fonts, you can create visually appealing and consistent typography across different browsers and devices.
Example:
/* CSS */
body {
font-family: Arial, sans-serif;
font-size: 16px;
font-weight: bold;
}
In this example, the body element will use the Arial font (or a sans-serif fallback), have a font size of 16 pixels, and be displayed in bold.
CSS Icons:
CSS Icons offer a lightweight and scalable way to incorporate visual symbols and icons into your web pages. By leveraging CSS properties like content, font-family, and ::before or ::after pseudo-elements, you can easily include icons without relying on external image files.
Example:
/* CSS */
.button::before {
content: "\f138";
font-family: "Font Awesome";
margin-right: 5px;
}
In this example, we use the Font Awesome icon font to add an icon before the content of an element with the class .button. The Unicode value \f138 represents the specific icon to be displayed.
CSS Links:
CSS Links allow you to customize the appearance of hyperlinks on your web pages, making them visually distinctive and engaging. CSS properties like color, text-decoration, and hover pseudo-classes enable you to control link styles based on different states.
Example:
/* CSS */
a {
color: blue;
text-decoration: none;
}
a:hover {
color: red;
text-decoration: underline;
}
In this example, all links (<a> elements) will be displayed in blue without underlines. However, when a user hovers over a link, it will turn red and have an underline, indicating the interactive state.
Conclusion:
CSS Outlines, CSS Text, CSS Fonts, CSS Icons, and CSS Links are powerful tools that allow you to enhance the visual presentation and functionality of your web pages. By understanding and utilizing these CSS features effectively, you can create engaging and visually appealing user interfaces. Experiment with these examples, customize them to suit your needs, and explore further possibilities to elevate your web design skills. Happy coding with WebTutor.dev!
Don’t Miss to Read
Learn Free Online CSS Tutorial
Learn Free Online CSS Outline Tutorial
Learn Free Online CSS Text Tutorial
Learn Free Online CSS Icons
Learn Free Online CSS Links
#Free CSS Tutorial#Online CSS Tutorial#Online CSS Outlines#CSS Outlines#Free CSS Outlines Learn#CSS Text#Learn CSS Text#Online CSS Text#Free learn CSS Text#CSS Text Property#CSS Fonts#Learn CSS Fonts#Online CSS Fonts#CSS Fonts tutorial#CSS Icons#Learn CSS Icons#Online CSS Icons#CSS Icons Tutorial#CSS Links#Learn about CSS Links#Online CSS Links#CSS Links Free Tutorial.
1 note
·
View note
Text

So you have a Tumblr account for a long time (or not), but probably you may have a theme that is not supported anymore by its developer, or they just vanished from the face of this earth.
That means that you might be having problems with the new Neue Post Format (NPF) and how is handling new post types.
For more on what went into creating the Neue Post Format, check out Tumblr's Engineering blog post.
I know some-what about coding and even made some themes for Tumblr, though those were for a client so I can share them here.
The goal of this blog is to help:
Fix an old theme that's not behaving well with the new format.
Update some JavaScript knowledge that's breaking your theme.
Update outdated code to better display your theme.
And whatever, if I can help, I will.
AND if you'd like to give me a tip for helping out, that'd be awesome but not require for me to help you. [Ko-Fi not ready yet!]
Please check the READ.ME
⬇️ Versão Português 🇧🇷🇵🇹

Então você tem uma conta no Tumblr há muito tempo (ou não), mas provavelmente você tem um tema que não é mais suportado pelo seu desenvolvedor, ou o dito cujo simplesmente desapareceu da face da Terra.
Isso significa que você pode estar tendo problemas com o novo Neue Post Format (NPF) e como ele lida com novos tipos de postagem.
Para saber mais sobre o que foi necessário para criar o Neue Post Format, confira a postagem do blog de engenharia do Tumblr (em inglês).
O objetivo deste blog é ajudar:
Corrigir um tema antigo que não está se comportando bem com o novo formato.
Atualizar algum conhecimento de JavaScript que esteja quebrando seu tema.
Atualizar o código desatualizado para exibir melhor seu tema.
E tanto faz, se eu puder ajudar, é nóis.
E se você quiser me dar uma gorjeta para ajudar, isso seria ótimo, mas não é necessário para que eu o ajude. [Ko-Fi ainda não tá pronto!]
Por favor, verifique o READ.MEediting
#tumblr theme#tumblr themes#blog theme#blog themes#tumblr glitch#tumblr layouts#theme resources#theme makeover#theme makeovers#tumblr codes#editor#theme#themes#help#pls help#free content#theme change#brblr#html css#theme commissions#tutorial#tumblr issues#editing#layout
7 notes
·
View notes
Text
i need to learn 3d modelling so that more than anything my power to mod persona 4 golden can grow
#rambles#modding#the thing is i'm SO BAD at following tutorials#i've always learned better by doing my own thing. messing around with whatever tool it is until it works#but that isn't really something i can do with 3d modelling.#or at least it's not something i can do at a total beginner level. i imagine it'll be kinda like how i learned coding#(did a couple free online classes and once i learned the very basics/got bored i just did my own thing)#but i started THAT when i was like 14. i wanna be as good at blender as i am with html/css NOW!!!!!!#<- is not even that good w html#<- because of the aforementioned ''hates taking classes on this kind of thing'' thing
3 notes
·
View notes
Text
#Technology Magazine#Free Online Tool#Interactive Tools and Collection#Internet Tools#SEO Tools#Learn Search Engine Optimization#Computer Tips#Freelancer#Android#Android Studio#BlogSpot and Blogging#Learn WordPress#Learn Joomla#Learn Drupal#Learn HTML#CSS Code#Free JavaScript Code#Photo and Image Editing Training#Make Money Online#Online Learning#Product Review#Web Development Tutorial#Windows OS Tips#Digital Marketing#Online Converter#Encoder and Decoder#Code Beautifier#Code Generator#Code Library#Software
0 notes
Text
Búscame en Facebook y sigueme en mis redes sociales
Donde subo todo tipo de contenido relacionado a html, css, ccs pic, proteus, arduino, PLC, ladder language, python programming, web design, photography, 3d design, kung fu training, guitar tricks, mechatronic tools, hacking y mucho más.
Mi Facebook personal 👇
https://www.facebook.com/jesuscarlos.riverareyes
0 notes
Text
In the wake of the TikTok ban and revival as a mouthpiece for fascist propaganda, as well as the downfall of Twitter and Facebook/Facebook-owned platforms to the same evils, I think now is a better time than ever to say LEARN HTML!!! FREE YOURSELVES FROM THE SHACKLES OF MAJOR SOCIAL MEDIA PLATFORMS AND EMBRACE THE INDIE WEB!!!
You can host a website on Neocities for free as long as it's under 1GB (which is a LOT more than it sounds like let me tell you) but if that's not enough you can get 50GB of space (and a variety of other perks) for only $5 a month.
And if you can't/don't want to pay for the extra space, sites like File Garden and Catbox let you host files for free that you can easily link into NeoCities pages (I do this to host videos on mine!) (It also lets you share files NeoCities wouldn't let you upload for free anyways, this is how I upload the .zip files for my 3DS themes on my site.)
Don't know how to write HTML/CSS? No problem. W3schools is an invaluable resource with free lessons on HTML, CSS, JavaScript, PHP, and a whole slew of other programming languages, both for web development and otherwise.
Want a more traditional social media experience? SpaceHey is a platform that mimics the experience of 2000s MySpace
Struggling to find independent web pages that cater to your interests via major search engines? I've got you covered. Marginalia and Wiby are search engines that specifically prioritize non-commercial content. Marginalia also has filters that let you search for more specific categories of website, like wikis, blogs, academia, forums, and vintage sites.
Maybe you wanna log off the modern internet landscape altogether and step back into the pre-social media web altogether, well, Protoweb lets you do just that. It's a proxy service for older browsers (or really just any browser that supports HTTP, but that's mostly old browsers now anyways) that lets you visit restored snapshots of vintage websites.
Protoweb has a lot of Geocities content archived, but if you're interested in that you can find even more old Geocities sites over on the Geocities Gallery
And really this is just general tip-of-the-iceberg stuff. If you dig a little deeper you can find loads more interesting stuff out there. The internet doesn't have to be a miserable place full of nothing but doomposting and targeted ads. The first step to making it less miserable is for YOU, yes YOU, to quit spending all your time on it looking at the handful of miserable websites big tech wants you to spend all your time on.
#this is a side point so it's going here but I really think tech literacy should be a requirement in schools like math grammar history etc.#we live in a world so dominated by the stuff and yet a majority of the population does not understand it at even the most fundamental level#tiktok#tiktok ban#indie web#neocities#web development#current events#twitter#facebook#meta#amazon
10K notes
·
View notes
Text

neocities guide - why you should build your own html website
do you miss the charm of the 90s/00s web where sites had actual personality instead of the same minimalistic theme? are you feeling drained by social media and the constant corporate monopoly of your data and time? do you want to be excited about the internet again? try neocities!!
what is neocities?
neocities is a free hosting website that lets you build your own html website from scratch, with total creative control. in their own words: "we are tired of living in an online world where people are isolated from each other on boring, generic social networks that don't let us truly express ourselves. it's time we took back our personalities from these sterilized, lifeless, monetized, data mined, monitored addiction machines and let our creativity flourish again."
why should I make my own website?
web3 has been overtaken by capitalism & conformity. websites that once were meant to be fun online social spaces now exist solely to steal your data and sell you things. it sucks!! building a personal site is a great way to express yourself and take control of your online experience.
what would I even put on a website?
the best part about making your own site is that you can do literally whatever the hell you want! focus on a specific subject or make it a wild collection of all your interests. share your art! make a shrine for one of your interests! post a picture of every bird you see when you step outside! make a collection of your favorite blinkies! the world is your oyster !! here are some cool example sites to inspire you: recently updated neocities sites | it can be fun to just look through these and browse people's content! space bar | local interstellar dive bar creature feature | halloween & monsters big gulp supreme peanutbuttaz | personal site dragodiluna linwood | personal site patho grove | personal site
getting started: neocities/html guide
sound interesting? here are some guides to help you get started, especially if you aren't familiar with html/css sadgrl.online webmastery | a fantastic resource for getting started with html & web revival. also has a layout builder that you can use to start with in case starting from scratch is too intimidating web design in 4 minutes | good for learning coding basics w3schools | html tutorials templaterr | demo & html for basic web elements eggramen test pages | css page templates to get started with sadgrl background tiles | bg tiles rivendell background tiles | more free bg tiles
fun stuff to add to your site
want your site to be cool? here's some fun stuff that i've found blinkies-cafe | fantastic blinkie maker! (run by @transbro & @graphics-cafe) gificities | internet archive of 90s/00s web gifs internet bumper stickers | web bumper stickers momg | gif gallery 99 gif shop | 3d gifs 123 guestbook | add a guestbook for people to leave messages cbox | add a live chat box moon phases | track the phases of the moon gifypet | a little clickable page pet adopt a shroom | mushroom page pet tamaNOTchi | virtual pet crossword puzzle | daily crossword imood | track your mood neko | cute cat that chases your mouse pollcode | custom poll maker website hit counter | track how many visitors you have
web revival manifestos & communities
also, there's actually a pretty cool community of people out there who want to bring joy back to the web! melonland project | web project/community celebrating individual & joyful online experiences. Also has an online forum melonland intro to web revival | what is web revival? melonking manifesto | status cafe | share your current status nightfall city | online community onio.cafe | leave a message and enjoy the ambiance sadgrl internet manifesto | yesterweb internet manifesto | sadly defunct, still a great resource reclaiming online social spaces | great manifesto on cultivating your online experience
in conclusion
i want everyone to make a neocities site because it's fun af and i love seeing everyone's weird personal sites that they made outside of the control of capitalism :) say hi to me on neocities
EDIT: part 2!!
#neocities#old web#webcore#old internet#web revival#indie web#html#website#recource#guide#can you tell that i've gotten REALLY into neocities this month!!!!!#but its so FUN i love seeing everyones weird af websites#its amazing#i love celebrating the old web#ANYWAYS MAKE A NEOCITIES HERES A GUIDE#i haven't touched html in like a decade#and i've been having a great time relearning#:)#share your sites with me!!!!!!#oh and share resources if you have them!
88K notes
·
View notes
Text
========================================================
[tutorial: build your own neocities/nekoweb page]
========================================================
a beginner's guide for making your very own home on the indie web—retro, personal, weird, and 100% yours.
this ain’t an average wix, squarespace, or tiktok aesthetic.
we’re talking full html/css with soul and attitude.
[ prerequisites ]
------------------
> an idea
> basic text editor (vscode, notepad++, or even notepad)
> account on https://neocities.org or https://nekoweb.org
> some gifs or tiles you love (dig deep or make your own)
> optional: image host or gif repo (or self-host everything)
[ feeling overwhelmed? read this. ]
-----------------------------------
you do *not* need to know everything.
html is not a mountain. it's a garden.
you plant one tag. then another. then a style. then a button.
you can build your site piece by piece.
and every piece is a portal to somewhere personal.
you are allowed to make broken pages.
you are allowed to use templates.
you are allowed to start over as many times as you want.
this is *your* world. you control the weird.
[ step 1: create an account ]
-----------------------------
> neocities: https://neocities.org
> nekoweb: https://nekoweb.org
register a name, log in, and enter your file manager.
this is where you upload your files and see your site live.
[ step 2: your first file - index.html ]
----------------------------------------
make a new file: `index.html`
basic starter:
<html>
<head>
<title>my weird little corner</title>
<link rel="stylesheet" href="style.css">
</head>
<body>
<h1>welcome to the void</h1>
<p>this is my page. it’s strange. like me.</p>
<img src="mygif.gif">
</body>
</html>
> upload to the dashboard
> boom. you’re live at
https://yoursite.neocities.org
or https://nekoweb.org/u/yoursite
[ step 3: add a style sheet - style.css ]
-----------------------------------------
create a file called `style.css` and upload it.
here’s some nostalgic magic:
body {
background: url('tile.gif');
color: lime;
font-family: "Courier New", monospace;
text-shadow: 1px 1px 0 black;
}
img {
image-rendering: pixelated;
}
marquee {
font-size: 20px;
color: magenta;
}
link it in your html and the vibes activate.
[ step 4: decorate it like a haunted usb ]
------------------------------------------
> use <marquee> for chaos scrolls
> embed gifs from https://gifcities.org/
> steal buttons from https://cyber.dabamos.de/88x31/
> set up a guestbook at https://www.smartgb.com/
> loop audio with <audio autoplay loop>
> add fake errors, 90s web lore, random link lists
[ step 5: resources, themes, and comfort ]
------------------------------------------
> templates & layouts: https://numbpilled-themes.tumblr.com
> glitchy gifs & buttons: https://glitchcat.neocities.org/resources
> layout builder: https://sadgrl.online/projects/layout-builder/
> free tiled backgrounds: https://backgrounds.neocities.org/
> beginner html intro: https://www.w3schools.com/html/
> pixel fonts & cyber assets: https://fontstruct.com/
remember:
you don't need to know js. you don't need to be a coder.
you just need a mood, a direction, a dream.
the html will follow.
[ bonus concept: shrine pages ]
-------------------------------
> a page just for one character you love
> a room to house digital fragments of your identity
> embed quotes, music, images like altars
> call it shrine.html and link it from your homepage
[ closing mantra ]
------------------
you are not here to be optimized.
you are not a brand.
you are a ghost inside the machine,
carving your initials into the silicon void.
welcome to Your website.
========================================================
#webcore#old web graphics#neocities#web graphics#carrd graphics#carrd resources#rentry decor#rentry graphics#carrd moodboard#carrd inspo#neopets#indie#indie web#early web#webdevelopment#web development#web resources#web design#old internet#old web#oldweb#nekoweb#transparent gif#tiny pixels#pixel gif#moodboard#tutorial#html page#html theme#htmlcoding
293 notes
·
View notes
Text
index (I hope to follow this tag system lol)
#blinkies #stamps #gifs #favicons
edit: thx for the love on this post. im going to try and continually update this!
⇩ ⠀websites that are FULL of other web graphics below ⇩ ⇩ (+ some html tools!) ⇩
Graphics: blinkie maker : make your own blinkies! DOLLZ REVIVAL : a revival of pixel dolls where you can create and share your own. very cute! GlowTxt : create glowing transparent text gifs that say whatever u want HOARDER'S PILE : contains blinkies, buttons, stamps, and teddies plasticdino.neocities.org : blinkies Glitter Graphics : contains gifs, blinkies, dividers, and just sooo many web graphics Cute Kawaii Resources : contains gifs, blinkies, stamps, favicons, dividers, buttons, fonts, literally everything you need. its an insane resource Adrian's blinkie collection : collection of blinkies, stamps, and buttons ☆ (supplies.ju.mp) : blinkies, stamps, buttons, & favicons twigbranch.carrd.co : blinkies lallys.carrd.co : blinkies, stamps, dividers, and other resources Bugleeblinkie.carrd.co : blinkies, and 3 very special gifs at the end ;) unshinesblinkies.carrd.co : blinkies The 88x31 GIF Collection : buttons. there are 5 parts! huge collection! Bonnibel's Graphic Collection : blinkies WELCOME TO GIFCITY : blinkies, dividers, favicons, stamps cass-tastrophe.carrd.co : blinkies, stamps kotatsuOS : blinkies Cute web graphics : blinkies, stamps, dividers, and a LOT of other graphics, all very cute
HTMLS/neocities Stuff: MDN (mozilla.org) : if you're just starting out like me this is super helpful HTML Tutorial (w3schools.com): same here! (offers other programming languages as well!) Accessibility Checker(Free Scan) : a site you can use to check accessibility/ADA compliance when making your website! it will point out what needs to be changed. it is free, but they also offer paid services if you need more help imagecolorpicker.com : hex code picker. i use this one because you can upload an image, paste clipboard, OR type in the website and it'll grab a screenshot for you! something simple that was made really well. cssgradient.io : helps you make css gradients for backgrounds or whatever else you need them for smartgb.com : a free guestbook service FC2 Counter! : free "site visits" and "online now" counters. fully customizable Unclosed Tag Checker by Alicia Ramirez : does as it says, checks for unclosed tags (although I recommend using a program that does this as you write anyways. I use Visual Studio Code. Status Cafe : an updateable and embeddable status that you can stick anywhere on your site! it is mostly customizable with CSS but I have noticed a few small quirks with it
e10's web (neocities.org) <- shameless site plug. show it some love :P
#blinkies#stamps#favicons#gifs#old web graphics#old web aesthetic#old web stamps#old internet#old web#old webcore#2000s web#90s web#html#html css#html5#css#htmlcoding#web design#web resources#early web#early internet#neocities graphics#neocities#geocities#gifcities#web graphics#webcore
480 notes
·
View notes
Text
Learn Online CSS Design Fundamentals: Backgrounds, Borders, Margins, Padding, Height, Width & Box Model
In this blog post, we will delve into the essential aspects of CSS backgrounds, borders, margins, padding, height, width, and the box model. Whether you're a beginner or an experienced web developer, understanding and utilizing these CSS properties effectively can greatly enhance the visual appeal and layout of your webpages. Follow along as we explore each topic with concise explanations and practical examples.
CSS Backgrounds:
CSS backgrounds allow you to style the background of an element. Here's an overview of commonly used background properties:
a. background-color:
The "background-color" property sets the background color of an element. For example, to set a blue background color, use:
.element {
background-color: blue;
}
b. background-image:
With "background-image," you can specify an image as the background of an element. Let's say you have an image called "bg-image.jpg" in the same directory as your CSS file. To set it as the background image, use:
.element {
background-image: url("bg-image.jpg");
}
CSS Borders:
CSS borders enable you to add borders around elements. Here's an overview of relevant properties:
a. border-style:
The "border-style" property determines the style of the border. For example, to create a solid border, use:
.element {
border-style: solid;
} b. border-color:
To set the color of the border, you can use the "border-color" property. For instance:
.element {
border-color: red;
}
CSS Margins:
CSS Margins allow you to control the space around elements. Here are the key properties to consider:
a. margin-top, margin-right, margin-bottom, margin-left:
You can set individual margin values for each side of an element. For example:
.element {
margin-top: 10px;
margin-right: 20px;
margin-bottom: 10px;
margin-left: 20px;
}
CSS Padding:
CSS Padding is the space between the content of an element and its borders. Consider the following property:
a. padding:
The "padding" property sets the padding for all four sides of an element. For instance:
.element {
padding: 15px;
}
CSS Height and Width:
Controlling the height and width of elements is crucial for achieving desired layouts. Here's what you need to know:
a. height:
To set the height of an element, use the "height" property. For example:
.element {
height: 200px;
}
b. width:
Similarly, the "width" property sets the width of an element. For instance:
.element {
width: 300px;
}
CSS Box Model:
Understanding the CSS box model is fundamental to layout design. It describes how elements are rendered on the page. Here's a brief overview:
The box model consists of four components: content, padding, border, and margin. When you set the width and height of an element, it applies to the content area. The padding adds space around the content, followed by the border, which surrounds both the content and padding. Finally, the margin creates space outside the border, separating it from other elements.
Consider the following example:
.element {
width: 200px;
height: 150px;
padding: 20px;
border: 2px solid black;
margin: 10px; }
Conclusion:
In this blog post, we covered the fundamental aspects of CSS backgrounds, borders, margins, padding, height, and width. By mastering these properties, you can take your web design skills to the next level. Experiment with different combinations, explore advanced techniques, and create visually stunning webpages. Stay tuned for more informative content at webtutor.dev!
Don’t Miss to Read
Learn Online CSS Background
Learn Online CSS Margins
Learn Online CSS Padding
Learn Online CSS Box Model
#Free CSS Tutorial#Online CSS Tutorial#Online CSS Design Fundamentals#Learn Online CSS#CSS Backgrounds#background-color#background-image#CSS Borders#online CSS Borders#Learn CSS Borders#border-style#CSS Margins#Learn online CSS Margins#online CSS Margins#CSS Padding#Learn CSS Padding#Online CSS Padding#Free tutorial#CSS Padding free learn#CSS Height and Width#CSS Box Model#Learn CSS Box Model
0 notes
Text
Twine/SugarCube ressources
Some/most of you must know that Arcadie: Second-Born was coded in ChoiceScript before I converted it to Twine for self-publishing (for various reasons).
I have switched to Ren'Py for Cold Lands, but I thought I would share the resources that helped me when I was working with Twine. This is basically an organized dump of nearly all the bookmarks I collected. Hope this is helpful!
Guides
Creating Interactive Fiction: A Guide to Using Twine by Aidan Doyle
A Total Beginner’s Guide to Twine
Introduction to Twine By Conor Walsh (covers Harlowe and not SugarCube)
Twine Grimoire I
Twine Grimoire II
Twine and CSS
Documentation
SugarCube v2 Documentation
Custom Macros
Chapel's Custom Macro Collection, particularly Fairmath function to emulate CS operations if converting your CS game to Twine
Cycy's custom macros
Clickable Images with HTML Maps
Character pages
Character Profile Card Tutorial
Twine 2 / SugarCube 2 Sample Code by HiEv
Templates
Some may be outdated following Twine/SugarCube updates
Twine/Sugarcube 2 Template
Twine SugarCube template
Twine Template II
Twine Template by Vahnya
Sample Code and more resources
A post from 2 years ago where I share sample code
TwineLab
nyehilism Twine masterpost
How to have greyed out choices
idrellegames's tutorials
Interactive Fiction Design, Coding in Twine & Other IF Resources by idrellegames (idrellegames has shared many tutorials and tips for Twine, browse their #twine tag)
How to print variables inside links
How do I create a passage link via clicking on a picture
App Builder
Convert your Twine game into a Windows and macOS executable (free)
Convert your Twine game into a mobile app for Android and iPhone (90$ one-time fee if memory serves me right) // Warning: the Android app it creates is outdated for Google Play, you'll need to update the source code yourself
244 notes
·
View notes
Text
YOU MUST MAKE A WEBSITE
Oh wow, look at that! YET ANOTHER post urging you to make a webbed site! What a completely new thing that people haven't made a thousand masterposts for already!!
• Making a website might look scary. It is Not.
At first, I too thought making a website was too much work. It really isn't! It turns out that all you need is
an HTML file,
a web hosting service and
w3schools tutorials,
and that's about it!
This post will point you towards these resources, and others I found useful while figuring out how to make a website.
• VERY QUICK EXPLANATIONS:
What's HTML and CSS?
HTML is the content of your webpage, the skeleton of it. What shows up in a webpage is what's written in the HTML file!
CSS is the way the HTML is styled; the colour of the background and the letters, the size of elements, the font, all that!
Do I absolutely NEED JavaScript for a website?
Not at all! You don't need to worry about learning it before getting started.
• What do I make a website for? What do I put in there?
ANYTHING AND ALMOST EVERYTHING. Here's some ideas for pages from a post of mine were I was very normal about websites:
You can make a page that's only pictures of your pets.
You can make an interactive adventure.
You can make your own academic blog full of your own essays or articles.
You can just post a ton of art or make a full music page.
You can make a blog and infodump eternally, give book reccs and reviews. You can host a thousand virtual pets and nothing else.
Upload entire books in a single html file. Make a wikipedia for your ocs. Make a fake site for a random fictional place (restaurant, hotel, whatever). You can make a thousand fanpages/shrines about your favorite media. You can upload your own webcomic and make it all like a fancy website and shit.
I could keep going but, for the sake of "brevity", I won't.
• WEBSITE EXAMPLES!
If I started listing the websites I know, this post would be bottomless. Here's only seven:
https://publictransit.neocities.org/ - A webbed site, for sure
https://ribo.zone/ - A personal site
https://leusyth.neocities.org/ - An art archive
https://solaria.neocities.org/ - Personal website with A Lot of stuff (it'll come up in a bit, because it offers web making resources)
https://hog.neocities.org/ - The Hogsite
https://thegardenofmadeline.neocities.org/ - Another personal site! It also has a web resources page and has made another masterpost like this one (but better)
https://spiders.neocities.org/ - My own website, which must be weird to see in mobile . sorry
• You've convinced me. I want a webbed site. Where do I start?
https://neocities.org/
FIRST OF ALL: Neocities. It is a free web hosting service, and it's the one I and the sites I linked use!
When I first started, my website was a black page with red letters and a drawing, and nothing else! It was like that for a month, till i started picking up on how to do things.
Here's what helped me get an idea of how to make things work:
https://sadgrl.online/learn/articles/beginners-guide-neocities
An absolute beginners guide to neocities -- while when you make an account there you get a tutorial page from the site, this one's extra support for that.
https://www.w3schools.com/
Learn HTML, CSS, JavaScript and MANY other coding things for free. All the tutorial/reference pages have live testing windows for you to mess with!! helped me a LOT while figuring this stuff out!
https://htmlcheatsheet.com/
https://htmlcheatsheet.com/css/
Cheatsheets for HTML and CSS, respectively. It includes a JavaScript one too!
https://sadgrl.online/webmastery/
Sadgrl's webmastery resources! Also includes the next resource listed here:
https://sadgrl.online/projects/layout-builder/
Sadgrl's layout builder; not a lot of customization at a first glance, but I've seen wildly different websites all using it as a base, plus it works using CSS Flexbox, so it generates a responsive layout!
(basically, a responsive layout is one that translates well in different sized screens)
https://www.tumblr.com/fysa/728086939730919424/wikitable-code?source=share
Tumblr user fysa made this layout imitating a wiki page!
https://brackets.io/
At some point, you might want to do things outside the Neocities code editor and get one outside the site. I recommend Brackets, because my old as fuck computer can run that and absolutely nothing else apparently, and it works wonderfully! Though I recommend either turning off the code autocomplete or using it after a good while of already using the Neocities code editor, so you get used to coding on your own.
http://www.unit-conversion.info/texttools/text-to-html/
Turn your text into HTML code! i use this kind of pages for my lengthy blog entries that I don't feel like formatting myself.
https://imagecompressor.com/
COMPRESS YOUR IMAGES.
The heavier an image is, the more your site weighs and the more time your page will spend loading. You don't want that, specially if your site is heavy on graphics. This might help!
https://solaria.neocities.org/guides
Some CSS, JavaScript and Accessibility guides! Worth checking out!
https://eloquentjavascript.net/
This is a free, interactive book for learning JavaScript! NOTE: It is very intuitive, but JavaScript is HARD!! I still haven't learned much of it, and my website does fine without so don't worry if you end up not doing much with it. It's still useful + the exercises are fun.
And now, accessories!
• Silly stuff for your page :]
https://gifypet.neocities.org/
Make a virtual pet, copy the code and paste it in your HTML file! You'll get a little guy in your webbed site :]
https://www.wikplayer.com/
Music player for your website!
http://www.mf2fm.com/rv/
JavaScript silly effects for your site :]
https://blinkies.neocities.org/geoblinkies
Blinkie search engine!
https://www.cbox.ws/
Add a chatbox to your site!!
https://momg.neocities.org/
Infinite gallery of gifs. i've spent hours in there looking at moving pictures and out of them all, the ONLY gif i actually ended up using on my site was a rotating tomato slice. it is still there. trapped.
https://wrender.neocities.org/tarotinstructions
A widget that gives you a random tarot card!
https://www.websudoku.com/widget.php
Sudoku widget!
That's about it for now! I don't know how to end this!!! Remember to have fun and google everything you don't know :]
570 notes
·
View notes
Note
your oc website is SO SO SO SO INCREDIBLY COOL how the hell do you even start learning how to do this ?? if you learned how to do this by yourself online, are there any tutorials or resources you can share with us? was making this website free??
omg THANK YOU SO SOOOOOO MUCH!!! It makes me so happy to hear that folks like my little site. I code my site with Phoenix Code (for the live viewer and number dials) and I host my site on Neocities - it is all free. Phoenix can be used in browser or on desktop, but I like having it on desktop more for big projects in case my files get deleted. I use the browser version when I just want to test something quickly.
The 2 videos I use and can not recommend enough to anyone who asks me are this HTML tutorial and this CSS tutorial. They are simple and easy to understand, but I recommend watching it the first go, and then following along the next few watches until you get the flow of basic parts to a website, how they're organized, and what order they go in. At this point, I've memorized exactly where everything goes, and it is all thanks to these 2 videos.
If I am being honest, I learned how to code by myself, not quite even with online tutorials but just from being stupid and messing around myself (1, because I was a kid, and 2, because I didn't understand English very well to know what tutorials are saying.) I used to do html coding for Neopet pages when I was a kid with too much online time, first by just editing the default petpages and adding info and images, and then just doing trial and error with the html. I'll just try something and then if it doesn't turn out the way I want it, I try to find out why it didn't work and also get inspiration from other similar sites to figure out where things go or how they coded (with this nifty thing called right click > inspect page or right click > view page source). And BOOM, working webpage.
It was rudimentary, white blank background without any boxes or anything, you just scrolled down the page and sections were separated by a horizontal bar. OH and every text was centered! I had no idea how to make scrolling boxes or fancy assets, but damn I still had so much fun working on it every weekend. When you find authentic selfmade sites from the 90s and 2000s, most of them aren't super fancy either unlike what modern nostalgia makes you think. So I hope you don't feel discouraged if you begin making a website and feel it isn't "fancy", you're already doing a first big step which is making a webpage and learned your first set of html code!
It was over a decade later before I coded webpages with html again. I've gotten lazy and started relying on site builders, but nothing was quite as versatile as html. I wanted to try coding my own OC site again, so that was when I started working on OutKrop (the site I posted). Until I started coding again, I had literally no idea what CSS even is (and let me tell you, it's a game changer!)
Personally, I work best when I can do things hands on. I don't read through tutorials, I code first then go back and read through coding help sites like w3schools when I find myself stuck and unable to figure something out. Sometimes I grab existing codes and play around with them to see what changes and what I can do with it, cuz having visual context is what helps me a lot.
I can also share my process:
Once I gather up some ideas, I make a sketch, including what boxes (divs in css) should approximately go. It is very rough, but shows me exactly what I need to know.
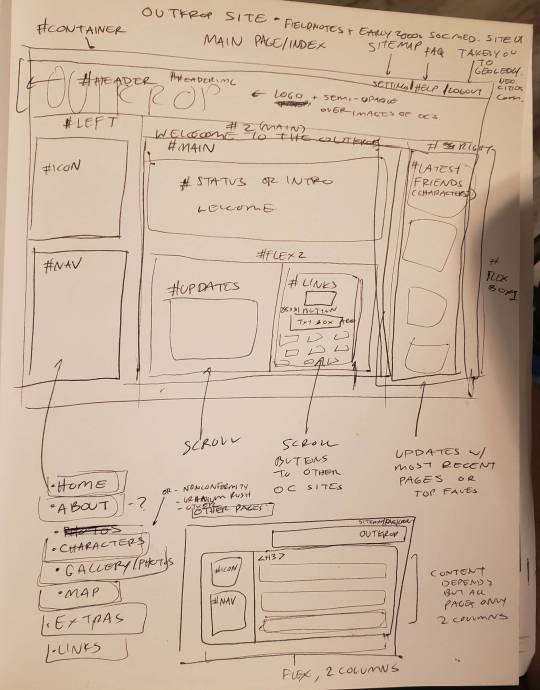
Next I load up my coding app (Phoenix Code in my case) and "sketch" the layout. Nothing fancy going on here, just putting things where they need to be, and fixing size of boxes and margins if needed. I give my boxes all a background color so I can easily see how big they are and where they are located.

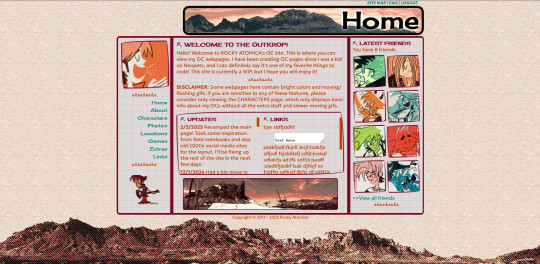
After some adjustments like moving stuff around and adding assets like backgrounds and images, and changing colors of the boxes, rounding off corners, etc., we get this!
so recap + additional useful sites I use:
Coding app: Phoenix Code
Site hosted on: Neocities
Video tutorials: HTML and CSS
Sites for learning code: w3schools, also lissa explains is a great site that is written for kids to learn html so it's easy to understand. Finally, sadgrl has a lot of great resources for coding as well!
I recommend looking through these sites AFTER you tried taking a spin at coding - it doesn't have to be anything fancy just follow the HTML video tutorial I linked!
Thanks for the ask, and I hope this helps you and many others out there who are interested in building a site with html/css! Don't be afraid to get things "wrong" or have an "un-fancy" site. This is how you learn to code, and it'll become so easy once you get the hang of it.
Anyone is always more than welcome to reach out for coding help and advice :-]
55 notes
·
View notes
Text
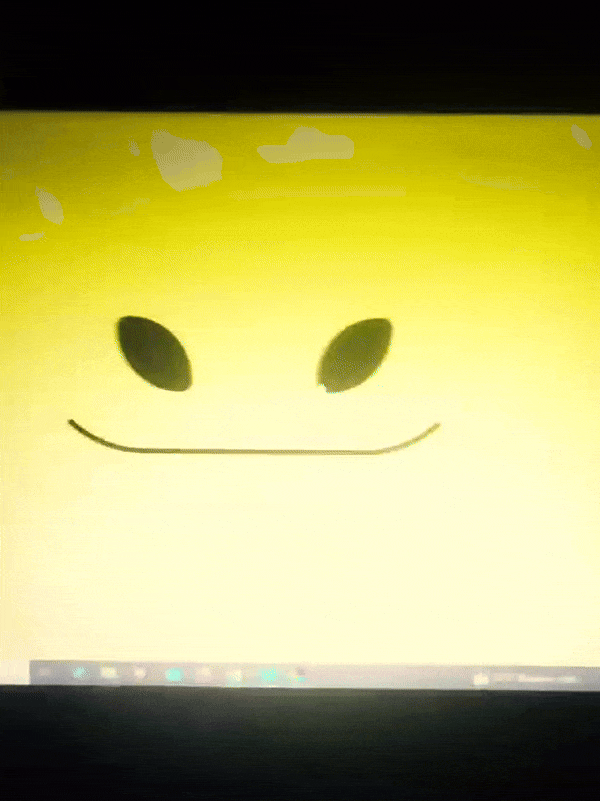
Edgaring time!
Tutorial on how to make your own responsive Edgar :D I will try to explain it in really basic terms, like you’ve never touched a puter (which if you’re making this… I’m sure you’ve touched plenty of computers amirite??? EL APLAUSO SEÑOOOREEES).
If you have some experience I tried to highlight the most important things so you won’t have to read everything, this is literally building a website but easier.
I will only show how to make him move like this:
Disclaimer: I’m a yapper.
Choosing an engine First of all you’ll need something that will allow you to display a responsive background, I used LivelyWallpaper since it’s free and open-source (we love open-source).
Choosing an IDE Next is having any IDE to make some silly code! (Unless you can rawdog code… Which would be honestly impressive and you need to slide in my DMs and we will make out) I use Visual Studio!!!
So now that we have those two things we just need to set up the structure we will use.
Project structure
We will now create our project, which I will call “Edgar”, we will include some things inside as follows:
Edgar
img (folder that will contain images) - thumbnail.png (I literally just have a png of his face :]) - [some svgs…]
face.js (script that will make him interactive)
index.html (script that structures his face!)
LivelyInfo,json (script that LivelyWallpaper uses to display your new wallpaper)
style.css (script we will use to paint him!)
All of those scripts are just literally like a “.txt” file but instead of “.txt” we use “.js”, “.html”, etc… You know? We just write stuff and tell the puter it’s in “.{language}”, nothing fancy.
index.html
Basically the way you build his silly little face! Here’s the code:
<!doctype html> <html> <head> <meta charset="utf-8"> <title>Face!</title> <link rel = "stylesheet" type = "text/css" href = "style.css"> </head> <body> <div class="area"> <div class="face"> <div class="eyes"> <div class="eyeR"></div> <div class="eyeL"></div> </div> <div class="mouth"></div> </div> </div> <script src="face.js"></script> </body> </html>
Ok so now some of you will be thinking “Why would you use eyeR and eyeL? Just use eye!“ and you’d be right but I’m a dummy who couldn’t handle making two different instances of the same object and altering it… It’s scary but if you can do it, please please please teach me ;0;!!!
Area comes in handy to the caress function we will implement in the next module (script)! It encapsulates face.
Face just contains the elements inside, trust me it made sense but i can’t remember why…
Eyes contains each different eye, probably here because I wanted to reuse code and it did not work out and when I kept going I was too scared to restructure it.
EyeR/EyeL are the eyes! We will paint them in the “.css”.
Mouth, like the eyeR/eyeL, will be used in the “.css”.
face.js
Here I will only show how to make it so he feels you mouse on top of him! Too ashamed of how I coded the kisses… Believe me, it’s not pretty at all and so sooo repetitive…
// ######################### // ## CONSTANTS ## // ######################### const area = document.querySelector('.area'); const face = document.querySelector('.face'); const mouth = document.querySelector('.mouth'); const eyeL = document.querySelector('.eyeL'); const eyeR = document.querySelector('.eyeR'); // ######################### // ## CARESS HIM ## // ######################### // When the mouse enters the area the face will follow the mouse area.addEventListener('mousemove', (event) => { const rect = area.getBoundingClientRect(); const x = event.clientX - rect.left; const y = event.clientY - rect.top; face.style.left = `${x}px`; face.style.top = `${y}px`; }); // When the mouse leaves the area the face will return to the original position area.addEventListener('mouseout', () => { face.style.left = '50%'; face.style.top = '50%'; });
God bless my past self for explaining it so well, but tbf it’s really simple,,
style.css
body { padding: 0; margin: 0; background: #c9c368; overflow: hidden; } .area { width: 55vh; height: 55vh; position: absolute; top: 50%; left: 50%; transform: translate(-50%,-50%); background: transparent; display: flex; } .face { width: 55vh; height: 55vh; position: absolute; top: 50%; left: 50%; transform: translate(-50%,-50%); background: transparent; display: flex; justify-content: center; align-items: center; transition: 0.5s ease-out; } .mouth { width: 75vh; height: 70vh; position: absolute; bottom: 5vh; background: transparent; border-radius: 100%; border: 1vh solid #000; border-color: transparent transparent black transparent; pointer-events: none; animation: mouth-sad 3s 420s forwards step-end; } .face:hover .mouth { animation: mouth-happy 0.5s forwards; } .eyes { position: relative; bottom: 27%; display: flex; } .eyes .eyeR { position: relative; width: 13vh; height: 13vh; display: block; background: black; margin-right: 11vh; border-radius: 50%; transition: 1s ease } .face:hover .eyeR { transform: translateY(10vh); border-radius: 20px 100% 20px 100%; } .eyes .eyeL { position: relative; width: 13vh; height: 13vh; display: block; background: black; margin-left: 11vh; border-radius: 50%; transition: 1s ease; } .face:hover .eyeL { transform: translateY(10vh); border-radius: 100% 20px 100% 20px; } @keyframes mouth-happy { 0% { background-color: transparent; height: 70vh; width: 75vh; } 100% { border-radius: 0 0 25% 25%; transform: translateY(-10vh); } } @keyframes mouth-sad { 12.5%{ height: 35vh; width: 67vh; } 25% { height: 10vh; width: 60vh; } 37.5% { width: 53vh; border-radius: 0%; border-bottom-color: black; } 50% { width: 60vh; height: 10vh; transform: translateY(11vh); border-radius: 100%; border-color: black transparent transparent transparent; } 62.5% { width: 64vh; height: 20vh; transform: translateY(21vh); } 75% { width: 69vh; height: 40vh; transform: translateY(41vh); } 87.5% { width: 75vh; height: 70vh; transform: translateY(71vh); } 100% { width: 77vh; height: 90vh; border-color: black transparent transparent transparent; transform: translateY(91vh); } }
I didn’t show it but this also makes it so if you don’t pay attention to him he will get sad (mouth-sad, tried to make it as accurate to the movie as possible, that’s why it’s choppy!)
The .hover is what makes him go like a creature when you hover over him, if you want to change it just… Change it! If you’d rather him always have the same expression, delete it!
Anyway, lots of easy stuff, lots of code that I didn’t reuse and I probably should’ve (the eyes!!! Can someone please tell me a way I can just… Mirror the other or something…? There must be a way!!!) So now this is when we do a thinking exercise in which you think about me as like someone who is kind of dumb and take some pity on me.
LivelyInfo.json
{ "AppVersion": "1.0.0.0", "Title": "Edgar", "Thumbnail": "img/thumbnail.png", "Preview": "thumbnail.png", "Desc": "It's me!.", "Author": "Champagne?", "License": "", "Type": 1, "FileName": "index.html" }
Easy stuff!!!
Conclusion
This could've been a project on git but i'm not ready and we're already finished. I'm curious about how this will be seen on mobile and PC,,, i'm not one to post here.
Sorry if I rambled too much or if i didn't explain something good enough! If you have any doubts please don't hesitate to ask.
And if you add any functionality to my code or see improvements please please please tell me, or make your own post!
98 notes
·
View notes
Note
I'm actually curious what the CSS rule is to disallow copy and paste if you can share?
It’s this:
user-select: none;
49 notes
·
View notes