#Convert Files From One Format To Another
Explore tagged Tumblr posts
Visit Tumblr Blog
Explore Tumblr blogs with no restrictions, modern design and the best experience.
Last Seen Tumblr Blogs


Fun Fact
Users from the US are the majority of Tumblr visitors.
Text
there's a file called whatever_YYYYMMDD.csv with data generated every day
every day, we process the day's data and also reprocess a few days back
the way this is done involves copying over the various whatever_YYYYMMDD.csv files for the last few days from one folder to another
the way this is implemented is via a script that takes the earliest date and latest date we're processing today, converts them to a number in YYYYMMDD format, and loops between them
not a date. a number.
if one of those numbers is 20240612 and the other is 20240615, this is fine. it just hits every number in between them, which matches up to every existing whatever_YYYYMMDD.csv file in between those dates
if one of those numbers is 20240630 and the other is 20240703, this is slightly less fine. It's going to check a bunch of numbers that do not correspond to any dates, like 20240646. so it runs dozens more times than necessary, trying to move files that don't exist. fortunately computers are pretty fast and this adds very little time.
if one of those numbers is 20241230 and the other is 20250102, then instead of checking for seventy or so nonexistent files it checks for some nine thousand or so. each one of those is pretty fast. less than a second. but not, like, much less than a second.
several hours worth of delay in a process that should take seconds, which has been happening longer than i've been working here, every year, for a few days around new year's. which it seems nobody noticed for a number of reasons mostly adding up to 'several hours worth of delay are invisible unless you're specifically looking for it and nobody had a reason to look for it until now'
2K notes
·
View notes
Text
how to build a digital music collection and stuff
spotify sucks aaaass. so start downloading shit!!
file format glossary
.wav is highest quality and biggest
.mp3 is very small, but uses lossy compression which means it's lower quality
.flac is smaller than .wav, but uses lossless compression so it's high quality
.m4a is an audio file format that apple uses. that's all i really know
downloading the music
doubledouble.top is a life saver. you can download from a variety of services including but not limited to apple music, spotify, soundcloud, tidal, deezer, etc.
i'd recommend ripping your music from tidal or apple music since they're the best quality (i think apple music gives you lossless audio anyway. .m4a can be both lossy and lossless, but from the text on doubledouble i assume they're ripping HQ files off apple music)
i also love love love cobalt.tools for ripping audio/video from youtube (they support a lot of other platforms too!)
of course, many artists have their music on bandcamp — purchase or download directly from them if you can. bandcamp offers a variety of file formats for download
file conversion
if you're downloading from apple music with doubledouble, it spits out an .m4a file.
.m4a is ok for some people but if you prefer .flac, you may wanna convert it. ffmpeg is a CLI (terminal) tool to help with media conversion
if you're on linux or macOS, you can use parameter expansion to batch convert all files in a folder. put the files in one place first, then with your terminal, cd into the directory and run:
for i in *.m4a; do ffmpeg -i "$i" "${i%.*}.flac"; done
this converts from .m4a to .flac — change the file extensions if needed.
soulseek
another way to get music is through soulseek. soulseek is a peer-to-peer file sharing network which is mainly used for music. nicotine+ is a pretty intuitive (and open-source) client if you don't like the official one.
you can probably find a better tutorial on soulseek somewhere else. just wanted to make this option known
it's bad etiquette to download from people without sharing files of your own, so make sure you've got something shared. also try to avoid queuing up more than 1-2 albums from one person in a row
tagging & organizing your music
tagging: adding metadata to a music file (eg. song name, artist name, album) that music players can recognize and display
if you've ripped music from a streaming platform, chances are it's already tagged. i've gotten files with slightly incorrect tags from doubledouble though, so if you care about that then you might wanna look into it
i use musicbrainz picard for my tagging. they've got pretty extensive documentation, which will probably be more useful than me
basically, you can look up album data from an online database into the program, and then match each track with its file. the program will tag each file correctly for you (there's also options for renaming the file according to a certain structure if you're into that!)
there's also beets, which is a CLI tool for... a lot of music collection management stuff. i haven't really used it myself, but if you feel up to it then they've got extensive documentation too. for most people, though, it's not really a necessity
how you wanna organize your music is completely up to you. my preferred filestructure is:
artist > album > track # track

using a music player
the options for this are pretty expansive. commonly used players i see include VLC, foobar2000, clementine (or a fork of it called strawberry), and cmus (for the terminal)
you can also totally use iTunes or something. i don't know what audio players other systems come with
i personally use dopamine. it's a little bit slow, but it's got a nice UI and is themeable plus has last.fm support (!!!)
don't let the github page fool you, you don't have to build from source. you can find the releases here
click the "assets" dropdown on the most recent release, and download whichever one is compatible with your OS
syncing
if you're fine with your files just being on one device (perhaps your computer, but perhaps also an USB drive or an mp3 player), you don't have to do this
you can sync with something like google drive, but i hate google more than i hate spotify
you can get a free nextcloud account from one of their providers with 2GB of free storage. you can use webDAV to access your files from an app on your phone or other device (documents by readdle has webDAV support, which is what i use)
disroot and blahaj.land are a couple providers i know that offer other services as well as nextcloud (so you get more with your account), but accounts are manually approved. do give them a look though!!
if you're tech-savvy and have an unused machine lying around, look into self-hosting your own nextcloud, or better yet, your own media server. i've heard that navidrome is a pretty good audio server. i unfortunately don't have experience with self-hosting at the moment so i have like zero advice to give here. yunohost seems to be a really easy way to manage a server
afterword
i don't know if any of this is helpful, but i just wanted to consolidate my personal advice in one place. fuck big tech. own your media, they could take it away from you at any moment
2K notes
·
View notes
Text

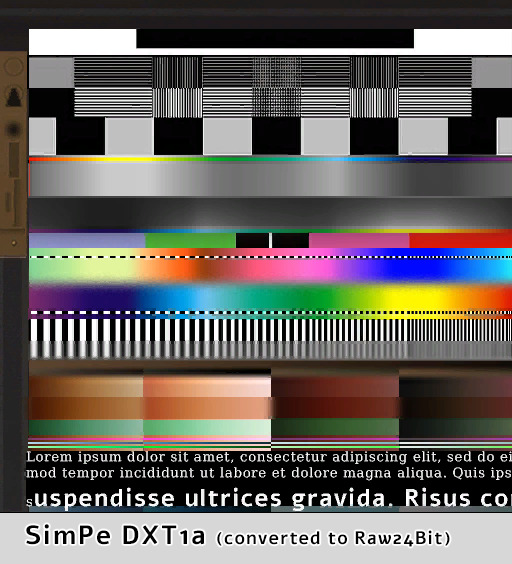
If you create CC for TS2 you probably avoid using DXT1 format, because it often looks really bad, right? Well, I've got news for you😐
‣ SimPe texture viewer can't correctly decode DXT1 textures. It often displays artifacts not visible in the game.
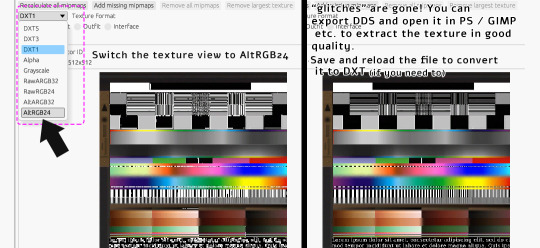
Up until now it was not possible to extract such texture from a package without 'glitches'. @chieltbest recently shared their revolutionary YaPe package editor. It's an experimental version, for now - it's still being developed - but I've already edited 180+ CC textures with no issues. YaPe is very easy to use. It allows you to reconvert textures inside a package to different format, remove or add mipmaps with one click, replace textures with drag and drop method - supports JPEG, TIFF, DDS and more! You can get it here.
YaPe editor is also the only app I know, that allows you to extract DXT1 texture from the package file without glitches. Below the cut you'll find a little tutorial on that. I also included a detailed comparison of DXT textures built with various plugins:
Note: YaPe is a huge time saver, however I still recommend SimPe for textures with smooth gradients, where quality is very important - such as skintones, and especially dark ones (also for removing mipmaps from such content, current version of YaPe rebuilds textures in the process fixed).
-------------------------------------------------------------------------
*DXT1 format has gained a bad reputation amongst TS2 creators, mostly because of borked SimPe DXT1 texture preview/export.
But the fact is - DDS plugins (aside from SimPe DDS Builder) create DXT1 that looks quite similar or identical to flat DXT3 / DXT5.
Important thing about DXT1 format: file size is around half smaller than DXT3/5.
‣ What's wrong with SimPe DXT1 textures?
Nothing, really. SimPe /Nvidia tools DDS builder is using special settings for DXT1. It saves textures as DXT1a format.
Unlike ordinary DXT1 (DXT1c) that doesn't support transparency at all, DXT1a format has basic 1-bit transparency switch. DDS builder 'hides' black pixels from compression by enabling transparency - this trick is actually meant to reduce artifacts in some areas /thanks @chieltbest for explaining this/.
Transparent parts of DXT1a texture are displayed as black in the game, as long as TXMT doesn't have transparency enabled.
Below: DXT1a previewed in YaPe. Left pic features transparent pixels (hard to notice if you enable dark UI mode). Please note that, unlike SimPe, it displays colors and grays correctly.
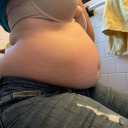
‣ Extracting DXT1 texture without 'glitches' in YaPe:
Open package in YaPe editor. Preview TXTR resource, pick AltRGB24 (Raw24Bit) from dropdown menu.
AltRGB24 preview displays flattened version of the texture (texture background is exposed)
'Export DDS' button creates .dds file out of the previewed texture
/optional: If you save the changes, then you can reload the package and convert from Raw to DXT format/
exported DDS texture can be opened in apps with DDS plugin - GIMP, Paint.NET etc.
if you don't have apps with DDS plugin, you can use SimPe (click on texture in SimPe, pick 'import DDS..', choose dds exported in YaPe, then export as PNG.
Pic above: Yet Another Package Editor v0.4.0, light UI mode. My sample DXT1a texture in Alpha preview - transparent pixels are clearly visible.
⚠️ Editing original SimPe DXT1a texture with YaPe (removing or adding mipmaps - for example) and saving as DXT1 again, will most likely increase the number of 'false artifacts'
..however, the texture will still look decent in game. I edit CC with DXT1a for my own use that way - because reconverting to other formats doesn't improve texture quality, might even make it a little worse in some cases.
BUT if you're going to share such content, it might be best to reconvert it. Because if it looks very glitchy in SimPe, it also looks glitchy in Sims2Pack Clean Installer. And people might just delete it.
Alternatively, if you use DXT1 for your CC, you could inform people that "glitches" in SimPe / Clean Installer preview are not visible in the game.
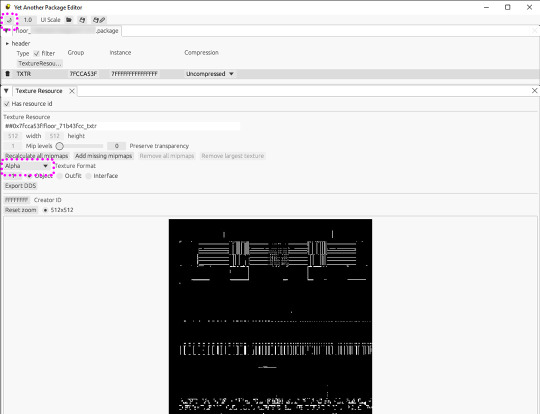
DXT1 vs flat DXT 3/ 5:

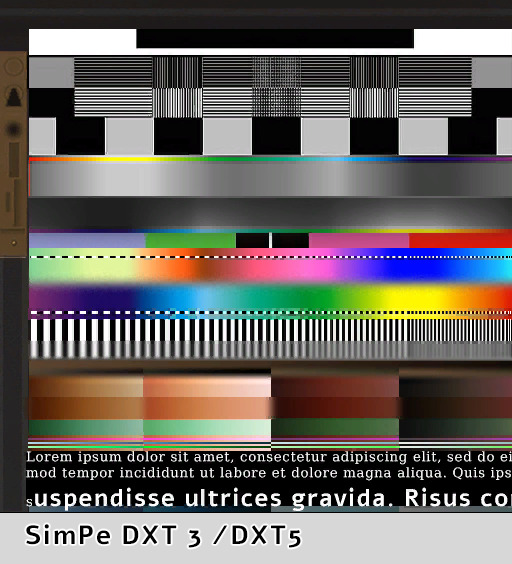


(YaPe allowed me to extract SimPe DXT1a texture without glitches)
*Yes, flat DXT1 and DXT3 / DXT5 created in GIMP really looked exactly the same.
GIMP had 'perceptual error metric' option on, it slightly improves some details.
so, who won?
You be the judge. Overall, I think YaPe (v0.4.0) did really good in this particular case.
SimPe DTX3 shows more artifacts in the blue/ turquoise /black dots area but dark gradients are smoother than others. GIMP DXT had issues with black dots over the pink - red tones seep into black.
SimPe DXT1 is not bad, but has some issues - a few artifacts appeared over thin black & white stripes. Also, blurred colors in the middle became a bit crunchy. /Dark brown gradients are better than GIMP DXT tho/.
‣ DXT5 Alpha-channel quality
The difference between DXT3 and DXT5 lies only in the way transparency is handled. DXT5 can store more alpha-channel grayscale information and offers much smoother transparency.

Pic above: alpha-channels extracted from DXT5 (white = opaque parts, pure black = 100% transparent). These looked basically the same so I did another test using more demanding texture - darker alpha gradients plus thin lines:

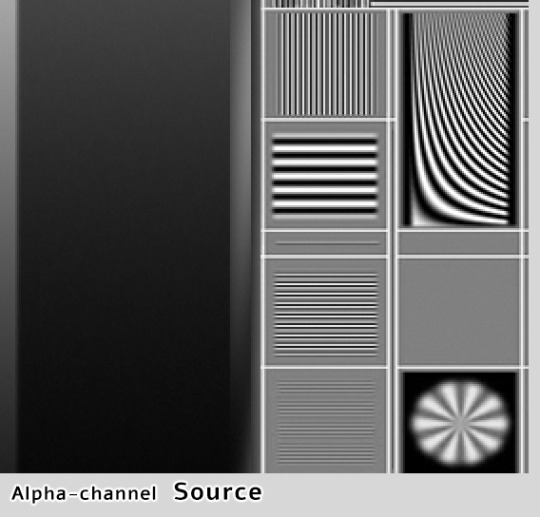
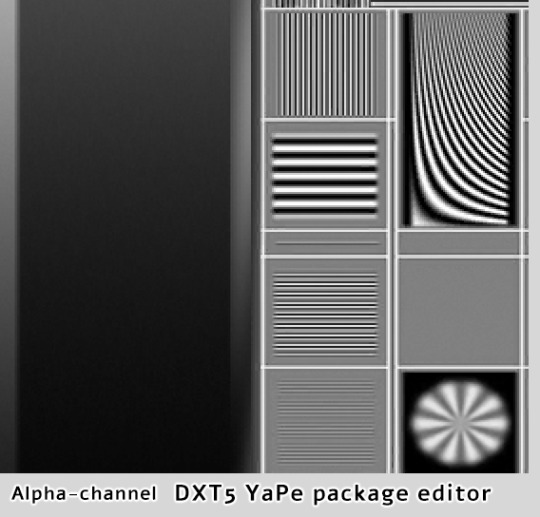
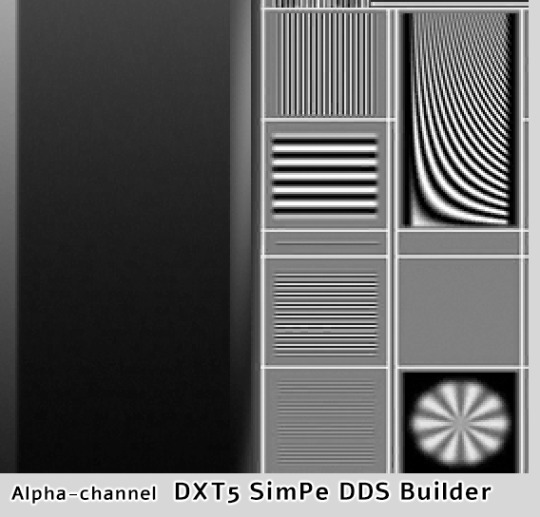
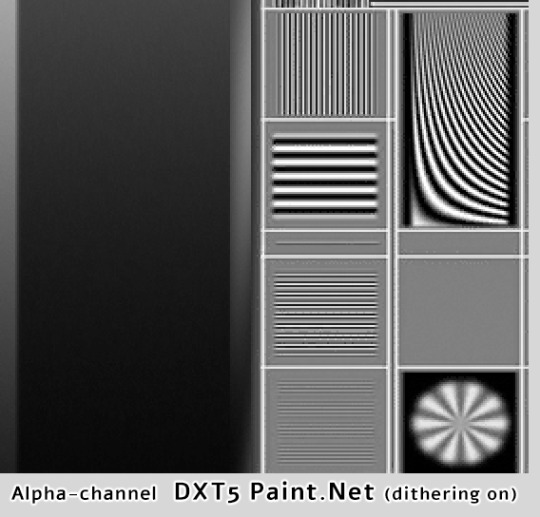
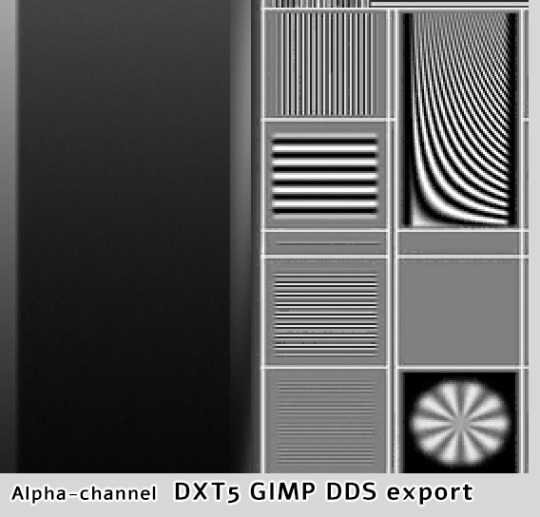
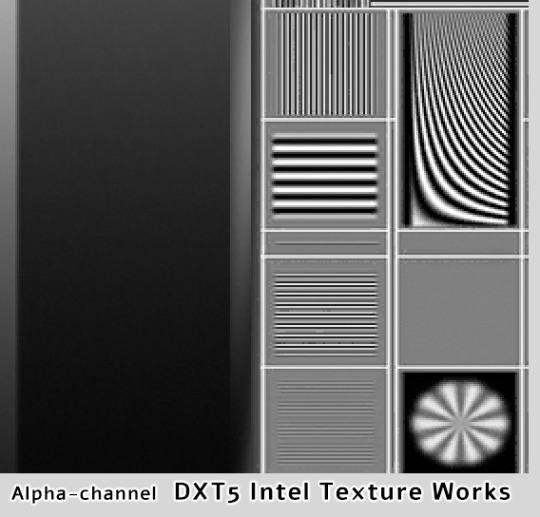
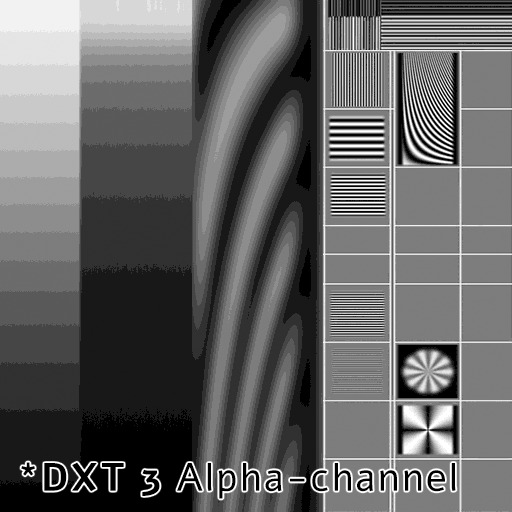
YaPe has produced very nice alpha channel without much artifacts, the gradient looks almost as the source. SimPe DXT5 - also clean details, but surprisingly, darkest parts of the gradient are a little bit choppy. GIMP DXT5 and the other two show tiny pixel artifacts around light lines.
Last pic above is DXT3 alpha-channel for comparison - crisp details are clean, but gradients are very choppy. I've compared various plugins, all produced identical DXT3 alpha. DXT3 format is OK for stuff that's using alpha-test transparency (not smooth, not see-through) - leafy plants etc.
*Please note that's exactly why transparent clothing looks so bad when created with Bodyshop - it doesn't use DXT5, only DXT3.
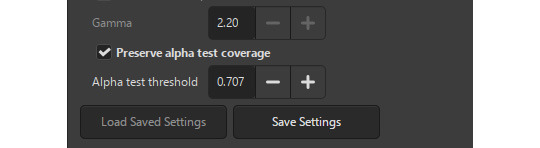
GIMP DDS exporter allows you to improve transparent mipmaps for plant textures etc, you need to select 'Preserve alpha test coverage' and increase the threshold if required - it will make very thin details a bit more thick on zoom-out and reduce details disappearing.
YaPe editor also has an option to tune transparent mipmaps (increase the value with "preserve transparency" slider). YaPe lets you preview each mipmap, which is very convenient. Here's a detailed tutorial by Chieltbest.
‣ Color gradient: DXT3 /DXT5
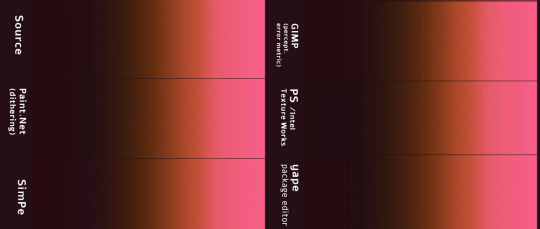
Paint.NET (DDSFileTypePlus 1.12.13.0) did best in this case, thanks to agressive error-diffusion dithering. SimPe DDS Builder DXT 3/5 did really good and you probably won't find better DDS plugin for building clothing or skintone DXT textures, especially dark skins.
Next goes YaPe editor - gradient is quite smooth, aside from the darkest tones - quite choppy. GIMP DXT and Intel Texture Works are so-so.
*I already posted one DXT formats test here, it features darker gradients. I still need to compare how textures look as actual SimSkin or overlays in game. The TS2 game is not great at displaying grey / dark color gradations, especially on Sims...
Above, uncompressed png texture for reference.
99 notes
·
View notes
Text
tips for 4t3 converters/CAS clothing creators
3 main things:
non-recolorable presets
DDS. settings
Adult to Teen conversions
disclaimer: i'm not a CC expert, but these are things i've noticed and learned these last couple months converting cc. special thanks to thornowl and the other converters in the TS3 Creators Cave discord.
Non-recolorable presets:
we obviously know that ts4 lacks a CASt tool, so ts4 creators rely on recolors. In my conversions, I do include a couple of the item's recolors. these usually are patterns that CASt does not have.
one thing I've noticed more and more converters doing is putting such item recolors in the 'Overlay' tab in TSRW.
let me show you what that looks like for a non-recolorable preset:
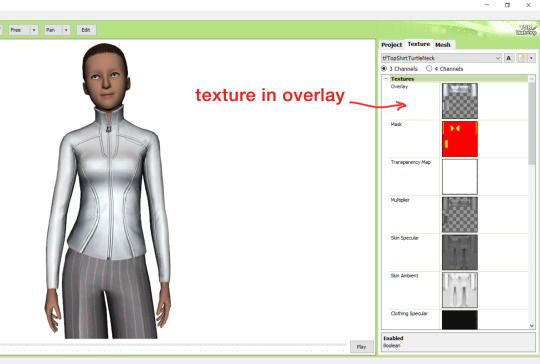
it looks over-saturated, and almost crunchy. but there's another place you can import the recolor into: stencils.
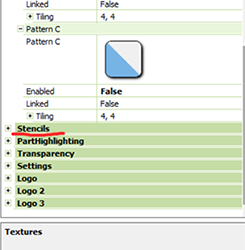
stencils will be found at the bottom, under patterns. hit the plus sign next to stencils to open it.
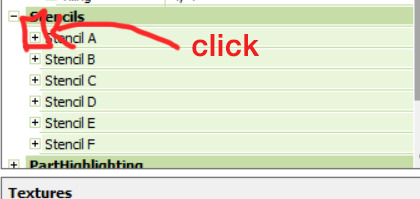
opening it will show you this:
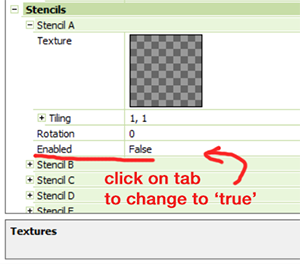
by default, it will be enabled as false. import your recolor into the texture tab as you would do for any other texture tab. make sure you tick the 'false' to 'true.' stencils override overlays, so if you want to use an overlay, enable stencils back to 'false.'
here's what the recolor imported into stencils looks like:

here's the two side by side:
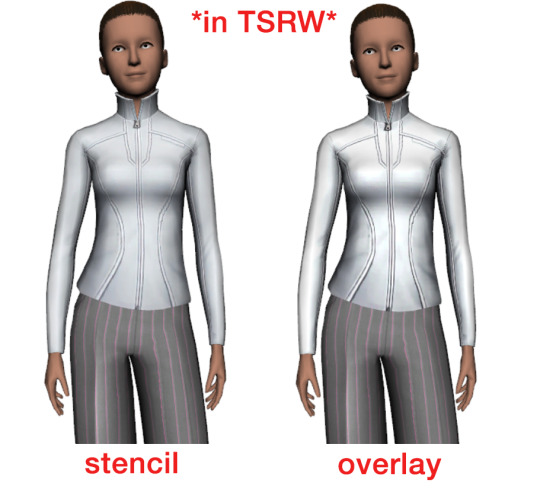
see how different they are? let's see how they are in game:
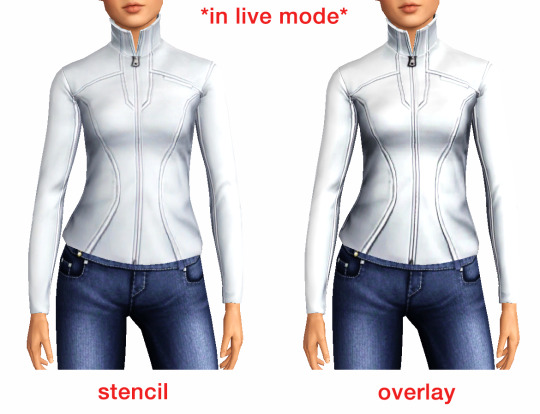
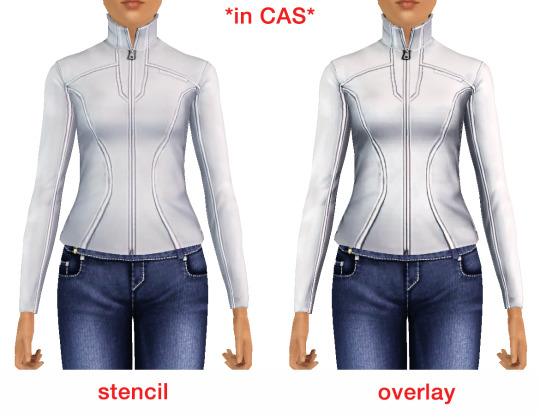
click on the pictures to really see the difference in quality. since TS3 uses DDS. format, it compresses the texture, which results in the crunchy texture. importing the recolor into the overlay tab makes the DDS. compression more noticeable. it ultimately is up to you and whichever one you prefer, but do keep it in mind.
the overlay tab is good for small details that you want to maintain on all recolorable presets, like zippers, buttons, tags, etc. just look at EA clothes for reference, especially their shoes and male clothes.
another thing you can see from the images are the bumps on the mesh. doing normal maps can help you keep those same details on the recolorable presets without importing the recolors.
-----------------
DDS. settings:
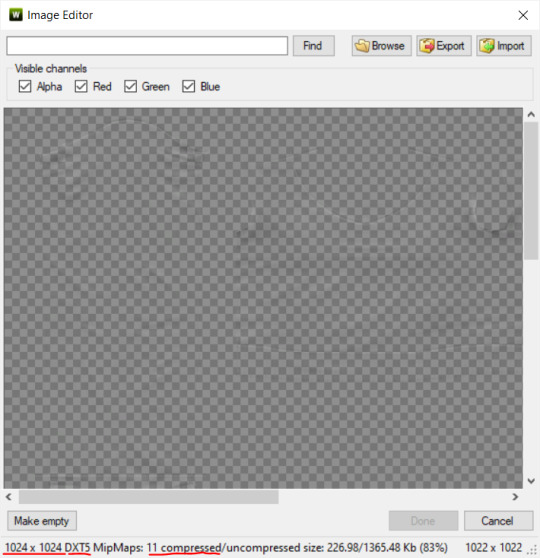
something I also see and used to do myself is bloat package files with large file sizes, specifically normal and specular maps, as well as masks. the Sims 3 Tutorial Hub provides a link to plain maps, but the file sizes are unnecessarily big.
let's look at some of EA's maps in TSRW:
here's the specular from one of the basegame sweaters. notice the image size, DXT format, and compression size.
a lot of converters don't want the shine on regular clothes, so we use a plain, black specular map. but ask yourself, why do you need a 1024 x 1024 purely black specular map with no details?
let's try sizing it down:
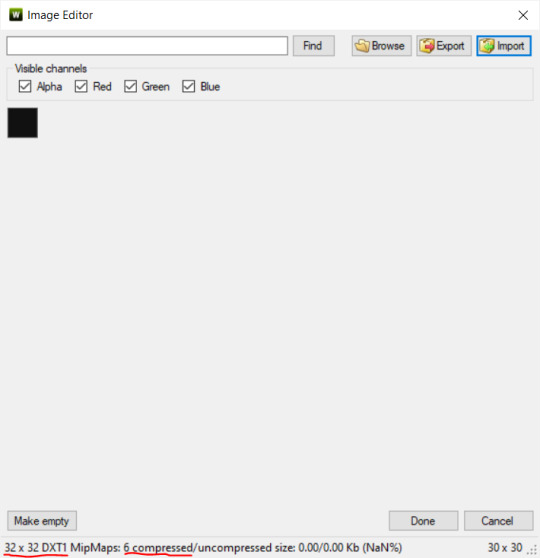
notice the difference between the image and compression size. instead of bloating the package file, we can keep it down by using a 32x32 plain black specular map instead, since there aren't details we want from the specular map.
same goes for normal maps:
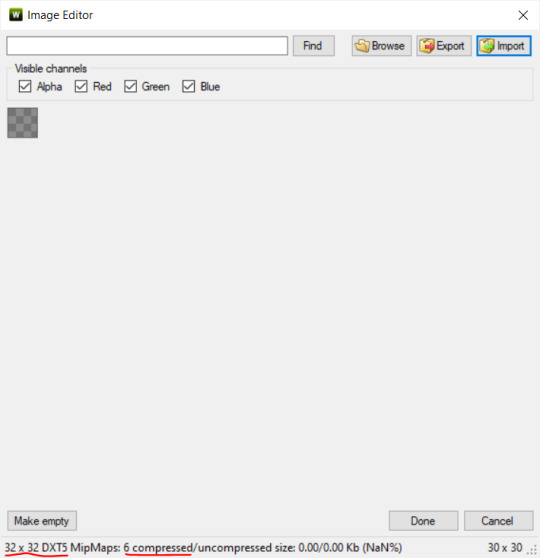
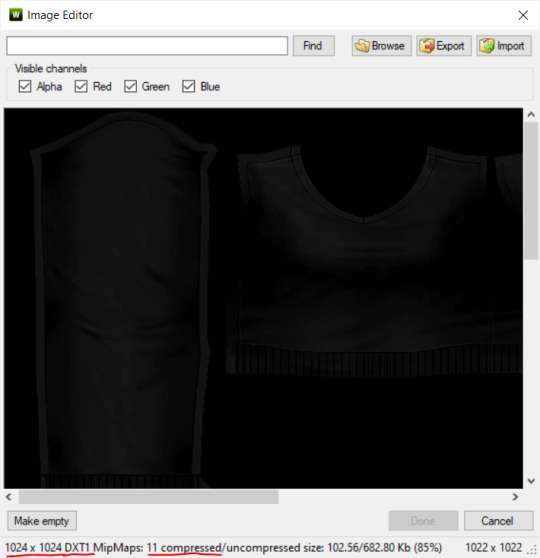
and masks (meant for 1 channel only):

now, notice how I underlined the info about DXT MipMaps. see how the normal map has a different number there compared to the specular map and mask.
the reason these textures use different DXT is because of the colors and alpha channel.
here's how my DDS. settings appear when saving:
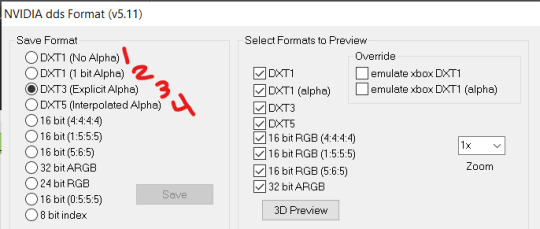
DXT1 (no alpha): this keeps only the 3 color channels and has the strongest compression. it results in half the file size as DXT3/5. 3 channel masks should be saved with this, as they don't need an alpha channel.
DXT1 (1 bit alpha): this includes an alpha, but only black or white. it also results in half the file size as DXT3/5.
DXT3: this one is rarely used for TS3 textures. it really is only used for overlays. it compresses the same as DXT5, but may not be the best for images with smooth-blended alpha regions (Neely).
DXT5: multipliers and normal (bump) maps should only EVER be saved with this. it's best for colors but has a larger file size. this is why it's important to reduce the multiplier and normal map image size, especially if you don't make a normal map.
if you DO decide to do a specular and normal map, they should be regular image size, 1024x1024, and saved in the right format.
here is more information on which textures should use which compression.
-----------------
Adult to Teen Conversions:
the default for converters is obviously AF and AM. a lot of people want the items for teens too. I've seen several converters just enable it in TSRW:
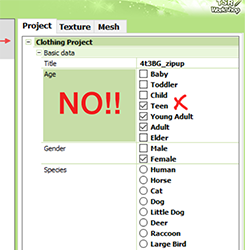
please don't do this. it's honestly the lazy route. you can hardly ever get away this, specifically because of the body differences between adult and teen.
some major issues with this include gaps, seams, and unnatural body characteristics:
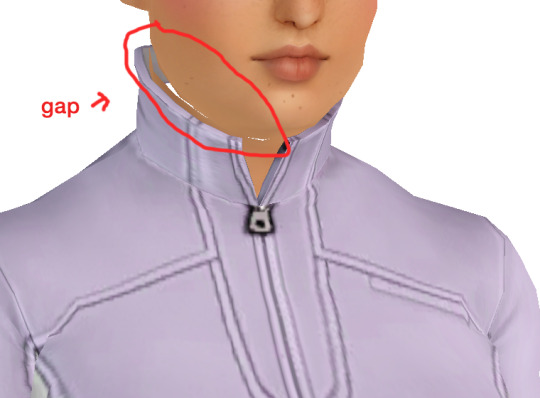
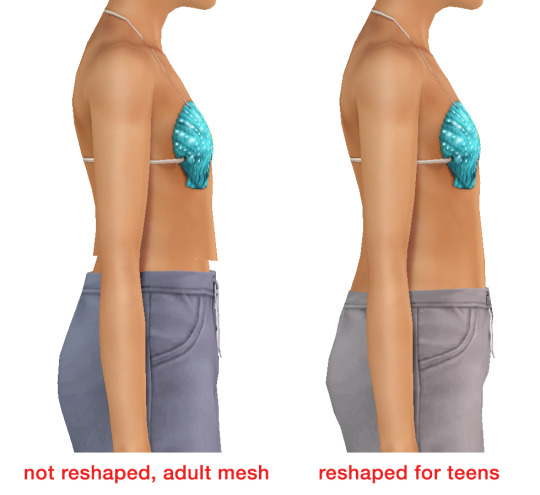
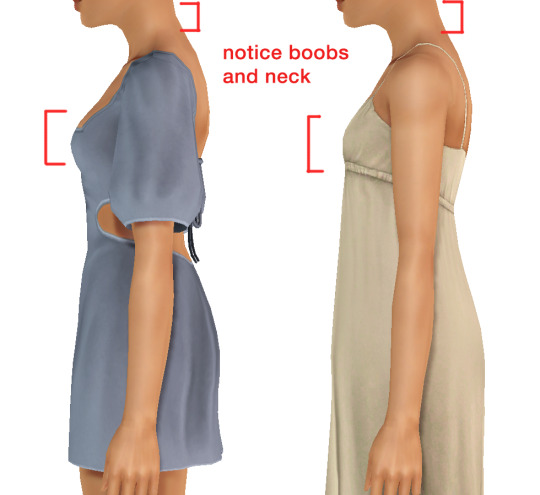
so please, either skip the teen mesh entirely or spend the time reshaping the mesh. @/sweetdevil-sims has a great tutorial on converting meshes from AF to TF here. the inevitable seams on TF meshes are also now fixed, thanks to @/thornowl with their new version of mesh toolkit.
@pis3update
---------------
here are reduced file sizes and corrected settings of the plain mask, specular, and normal:
download
Sources:
Neely, G. ‘Buckaroo’. Working with DDS/DXT Files. Available at: https://www.buckarooshangar.com/flightgear/tut_dds.html (Accessed: 28 May 2024).
199 notes
·
View notes
Text
BG3 Photomode Tutorial #2.5: More Scene Manipulation
Chapter 0: Overview
Chapter 1: Script Extender Debug Console
Chapter 2: Scene Manipulation
Chapter 2.5: More Scene Manipulation
Chapter 3: Otis_Inf Camera Tools
Supplement: Mods and Resources
In continuing from the last tutorial, I wanted to talk about how you find and play cutscenes. There's a couple ways to do this but I will show you my way because I think it is the most thorough way if you need to figure out what flags you may need to edit in order to get this working. It'll also give you the tools you need to troubleshoot flag settings.

In the above screenshot, you can see a cutscene that is meant to be played in the Shadowcursed lands: The cutscene where you play the Lyre to summon Kar'niss. It is a complex scene with tags to resolve and multiple NPCs - some of which aren't humanoid.
I will show you how to find a scene based on a snippet of dialog, how to locate its name and UUID so you can plug it into this command:
Osi.QRY_StartDialogCustom_Fixed("SCL_Drider_Caravan_HalfOrcCaster_865adfae-1b72-1ed2-f961-d55abd4fb7b1","S_GOB_DrowCommander_25721313-0c15-4935-8176-9f134385451b",Osi.DB_Avatars:Get(nil)[1][1],"S_Player_Gale_ad9af97d-75da-406a-ae13-7071c563f604","S_Player_Astarion_c7c13742-bacd-460a-8f65-f864fe41f255", 1,1,-1,1)
Warning: Please keep in mind, this is still a very finicky process. Again, take it slowly. And please don't be afraid to ask for help if you're struggling. Once you get the hang of it, you can pull out scenes and troubleshoot them into playing with ease.
There's also a good chance I'm glossing over something and not explaining it clearly/accurately. Please send me an ask, DM, comment to clarify anything that's confusing!
BG3 Dialog Reader
In order to do this my way, you'll need to download BG3 Dialog Reader and generate HTML files that include all the dialog of the game. There's already a very lovely tutorial on how to do this, so I recommend you follow it. EDIT: Or download their parsed files from their Google Drive: BG3 - parsed dialogue (1.7).zip
You've probably seen posts in this format before:

So you should now have HTML files located somewhere on your system. You need to search for a line that you'll find in the cutscene you want. Now you need to ask yourself: What line can I search for that is unique to that cutscene so that if I search for it I will get exactly what I'm looking for?
In the Drider-Lyre scene I recall an NPC asking "Did you bring the lyre?" so that's what I searched for. I use the Everything search tool because it's awesome and search for the file like so:

You will need to take a look at this file later, but for now, just take note of the name: SCL_Drider_Caravan_HalfOrcCaster. This is the first half of what you need to complete the first parameter in the command at the beginning. And we are going to use this to find the UUID.
Finding the UUID
To find the UUID, you're going to need another tool. The BG3 Modder's Multitool. Go to their GitHub, look along the right column and click on the link in the Releases section.

After that, click on bg3-modders-multitool.zip to download it. Extract the files to a new folder somewhere handy and run bg3-modders-multitool.exe.
In BG3 Modder's Multitool, click on Configuration and set the bg3.exe location to your Baldur's Gate 3 executable (E:\Program Files (x86)\Steam\steamapps\common\Baldurs Gate 3\bin or something along those lines). The Documents folder should auto-populate but you may want to double check it.

Now click in Search Index. It's going to start a process where it searches through the BG3 files. This can take a while the first time, but will be instant after that.

Once it's complete, you can now take the name of the scene and pop it into the new Index Search window that popped up.

In the results on the left, there will be a lot of files that list it, but I generally look for ones that say Assets\Dialogs\[PAK] and end in _merged.lsf and click on it. Then click Convert & Open.
This should open in Notepad or Notepad++. Now search this file for "SCL_Drider_Caravan_HalfOrcCaster" - keep in mind there can be MULTIPLE results. Note that the first instance you will get is SCL_Drider_Caravan_HalfOrcCaster_AtTower. This is the wrong scene.
You are now looking in the code a couple lines above that string for a value that is an ID type and has a value that's a lot of letters and numbers. This is the UUID.

So you have what you need to create this first parameter. Combine SCL_Drider_Caravan_HalfOrcCaster with the string of letters and numbers separated by an underscore. Like so:
SCL_Drider_Caravan_HalfOrcCaster_865adfae-1b72-1ed2-f961-d55abd4fb7b1
Plugging into the StartDialogCustom Command
Note that this copies straight in to this command in the first parameter:
Osi.QRY_StartDialogCustom_Fixed("SCL_Drider_Caravan_HalfOrcCaster_865adfae-1b72-1ed2-f961-d55abd4fb7b1", "S_GOB_DrowCommander_25721313-0c15-4935-8176-9f134385451b", Osi.DB_Avatars:Get(nil)[1][1], "S_Player_Gale_ad9af97d-75da-406a-ae13-7071c563f604", "S_Player_Astarion_c7c13742-bacd-460a-8f65-f864fe41f255" ,1,1,-1,1)
Now on first glance this looks pretty much like other times I've shown you this command, except note that there's FOUR actors. When a cutscene doesn't play at first (after double checking the UUID), this is very often the reason why. This is the minimum because the roles for the half-orc and Karniss need to be filled. First position is Kansif the Half-Orc, second is Tav, third is Brawler Vez, and fourth is Kar'niss.
Note: Kar'niss CAN be played by a non-Drider NPC - they will float angrily around carrying the lantern. It's hilarious. Try it. Here's when I tried it with my Tav:

Setting and Clearing Flags
Now. Depending on where and when you play this scene, the scene may or may not play or it will quit early. There could be a few reasons for that. The UUID could be wrong, the number of actors could be wrong, or a flag could be set that's not supposed to be set.
Let's have a look at the BG3 Dialog Reader file for this scene to see what flags are in use.

By default you should be able to see checkflags (blue) and setflags (orange). Look at the top of the page for a reminder of what the colors mean. The blue check flags are checking to see if the flag is set or not. If SCL_Drider_HasMet_CaravanFirstTime = False then you have met the drider caravan yet and this line will play. You will notice that after that is the orange SCL_Drider_HasMet_CaravanFirstTime setflag. That means the game will NOW set the flag as you have now met the Caravan for the first time. There may be occasions where you need to change the flags to get a cutscene to play. Here's the good news: There's handy commands for that!
print(GetFlag("flag",Osi.DB_Avatars:Get(nil)[1][1]))
Osi.ClearFlag("flag", Osi.DB_Avatars:Get(nil)[1][1])
Osi.SetFlag("flag",Osi.DB_Avatars:Get(nil)[1][1])
The bad news is you will have to find the UUID for each flag! So we gotta go back into BG3 Modders Multitool and search for the flag SCL_Drider_HasMet_CaravanFirstTime
Thankfully, you'll only get one result and the big string of letters and numbers is the UUID you need.

Now you combine them like you did with the cutscene name and UUID before, separated by an underscore: SCL_Drider_HasMet_CaravanFirstTime_39e94029-84f7-418d-ddce-8947bcbb7688
So let's say the cutscene isn't playing because you're on a save where that scene has already played. Clear the flag on your Tav: Osi.ClearFlag("SCL_Drider_HasMet_CaravanFirstTime_39e94029-84f7-418d-ddce-8947bcbb76", Osi.DB_Avatars:Get(nil)[1][1])
And I think we will leave it at that. I realize this was a LOT to cover. Go through this very slowly. It will take time to understand what is happening here.
And as always, if you have something you're trying to do and you're struggling with the directions, I can try to help! Please send me a DM, Ask, whatever else and I'll gladly help you with whatever you're trying to do.
Thanks for reading and sticking through this so far!
#okay just... if you don't know coding#take a deep breath and tackle this one section at a time - this is a lot#bg3 photomode#bg3 photography#mog's bg3 virtual photography tutorial#bg3#bg3 virtual photography#baldur's gate iii#baldur's gate 3
53 notes
·
View notes
Text
I don't think androids store memories as videos or that they can even be extracted as ones. Almost, but not exactly.
Firstly, because their memories include other data such as their tactile information, their emotional state, probably 3d markers of their surrounding...a lot of different information. So, their memories are not in a video-format, but some kind of a mix of many things, that may not be as easily separated from each other. I don't think a software necessary to read those types of files are publicly available.
Even if they have some absolute massive storage, filming good-quality videos and storing them is just not an optimal way to use their resources. It's extremely wasteful. I think, instead, their memories consist of snapshots that are taken every once in a while (depending on how much is going on), that consist of compressed version of all their relevant inputs like mentioned above. Like, a snapshot of a LiDAR in a specific moment + heavily compressed photo with additional data about some details that'll later help to upscale it and interpolate from one snapshot into the next one, some audio samples of the voices and transcript of the conversation so that it'd take less storage to save. My main point is, their memories are probably stored in a format that not only doesn't actually contain original video material, but is a product of some extreme compression, and in this case reviewing memories is not like watching HD video footage, but rather an ai restoration of those snapshots. Perhaps it may be eventually converted into some sort of a video readable to human eye, but it would be more of an ai-generated video from specific snapshots with standardised prompts with some parts of the image/audio missing than a perfectly exact video recording.
When Connor extracts video we see that they are a bit glitchy. It may be attributed to some details getting lost during transmission from one android to another, but then we've also got flashbacks with android's own memories, that are just as "glitchy". Which kinda backs up a theory of it being a restoration of some sort of a compressed version rather than original video recording.
Then we've also got that scene where Josh records Markus where it is shown that when he starts to film, his eyes indicate the change that he is not just watching but recording now. Which means that is an option, but not the default. I find it a really nice detail. Like, androids can record videos, but then the people around them can see exactly when they do that, and "be at ease" when they don't. It may be purely a design choice, like that of the loading bar to signalise that something is in progress and not just frozen, or mandatory shutter sound effect on smartphones cameras in Japan.
So, yeah. Androids purpose is to correctly interpret their inputs and store relevant information about it in their long term memory, and not necessarily to record every present moment in a video-archive that will likely never be seen by a human and reviewed as a pure video footage again. If it happened to be needed to be seen — it'll be restored as a "video" file, but this video won't be an actual video recording unless android was specifically set to record mode.
121 notes
·
View notes
Text
lets talk about game files what a new an interesting concept
splatoon textures, along with all bfres textures, are stored using S3 compression, or "BCn" it's a series of formats from BC1 to BC7
this is only used in nintendo's ".bntx" format, and of course the industry standard for DirectX textures, ".dds"
(bntx can describe multiple images at once, like all the textures for an entire scene can be one bntx file, while dds only allows one image per file)
It's a bit similar to JPEG where things are stored in little chunks, jpeg is 8x8 and bcn is 4x4. JPEG uses combinations of cosine functions and fourier transforms to represent each block while bcn is fucking wizardry idk but it changes on each version.
Coloured textures in splatoon 3 use "BC1" It's a format which allows 3 colour channels and a single bit alpha channel. It kinda sucks, a normal image has 3 channels each with 8 bits of colour, but bc1 uses 5 bits red, 6 bits green, 5 bits blue. And somehow the alpha is stored in there through wizardry. It's 16 bits per pixel rather than 32 and compresses really well and u can barely notice it so whatever yay
Single colour textures, like roughness, alpha, metalness, anything black and white which represents data rather than colour is "BC4". It only supports one channel so it can be a pretty small file for the data it contains. 8 bits per pixel but again, only one channel, no alpha at all, but you wouldn't need it
That accounts for maybe 80% of the textures in game, and 19% goes to "BC5" which is nearly exclusively used on Normal Maps. Instead of a colour or some data, it represents a direction using 2 channels. It's really cool because, if you have an X and a Y channel, for a direction, you can calculate the Z channel with no loss of information!!
This is why some normal maps are yellow instead of blue!
Nerd Shit: the blue channel is just sqrt(1 - x^2 - y^2), so if you have a yellow normal map, you can use math nodes in blender to convert it to a 3 channel one. That equation is actually a rearranged version of the Pythagorean Theorem!
another interesting thing is that BC5 textures sometimes calculated in a weird format, "SNORM" (signed normalized) which allows for negative numbers! For a byte, it maps [0, 255] to [-1, 1]
Nerd shit: it's actually [0, 127] to [0, 1] and 128 turns to -1, and [129, 255] to [-1, 0), note the last one does not include 0, a value of 0xFF is just slightly less than 0. By having two negative ones, the interval of [-1, 1] is represented with evenly spaced values unlike a float, which gets more precise as it goes to 0
the final 1% is BC6 and unlike where the value of a pixel is gotten from signed or unsigned bits, it's stored as floats! floats can store basically any number but you lose precision at really large numbers, but hell even at low numbers. Splatoon 3 uses BC6 for the skyboxes! by having the numbers as floats, you can parts to be extremely different. The largest difference in a normal image is a pixel with brightness 1 to a pixel with brightness 255, which is 255x more. A float technically can be infinitely times more, but it allows you to also have a lot of detail in the dark parts, while having detail in the lighter parts too! if you're making a realistic scene, it would make sense that the sun would have to be more than 255x brighter than the rest of the sky. even if your monitor cant display things that bright, it allows for much more realistic lighting
switch toolbox doesnt allow you to export to an easily usable format which supports floats, i can export it as a dds but not many programs can use that, and even less use ASTC. I want to get it to export to EXR but thats gonna take a bit.
thats my explanation on why i haven't ripped skyboxes that was the whole point of this post. bye
33 notes
·
View notes
Text
so, new spotify update.
(pt : so, new spotify update.)

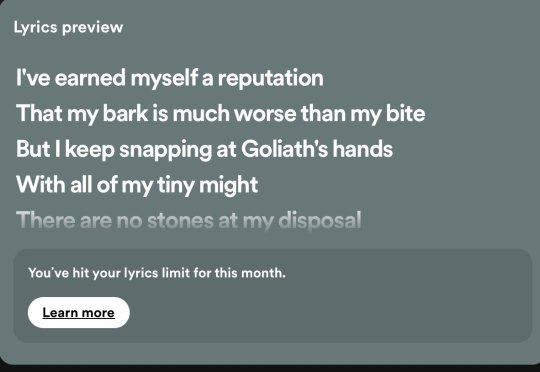
[id 1/ a screenshot of spotify on a grey background. text reads, in bold, "There's a monthly limit on lyrics". text under in grey reads, "Every time you tap "Show lyrics", it will count towards your limit. To get full access to lyrics, switch to Spotify Premium." A button in green reads, "Show lyrics", and under it, another button reads "Dismiss." /end id]
[id 2/ a screenshot of spotify on a slate grey background. Text reads above, "Lyrics preview". more text under, in bold, reads, "I've earned myself a reputation / That my bark is much worse than my bite / But I keep snapping at Goliath's hands / With all of my tiny might / There are no stones at my disposal". at the last line, it fades, and a box reads, "You've hit your lyrics limit for this month." a button under in white reads, "Learn more." /end id]
(screenshots courtesy of @thatweirdqueer , my boyfriend <3)
my boyfriend came across this message after clicking show lyrics once. they're forcing a limit on looking up lyrics to a song in their own app, and we need to talk about it.
at this point, spotify premium has been so forced onto us, that spotify is practically not even a free app. if you skip one too many songs, you have to listen to five or more ads. the dislike and like features they've implemented do nothing. everyday i boot up spotify, it flashes a larger than life ad with a button so small i can barely see it, just to dismiss myself. it tracks if you've bought premium to market these ads to you to guilt you into getting it back. you can't even download songs from it without premium. it's a barely functioning free app with everything locked behind a paywall.
if you want good lyrics for free, without having to pay a corporation for them, id recommend azlyrics, lyrictranslate, and searching the music artists channel. azlyrics doesn't have every song, which is a guaranteed, but its extremely easy to navigate, doesn't have many ads, and lays its lyrics out in a manner thats extremely easy to read. lyricstranslate has lyrics translated from many different languages, and can even translate songs into other languages on a whim. its run by people who can translate them, and is free to modify if you find a mistake. searching up the song on the artists channel (NOT the youtube owned topic) can help wield results as to what the lyrics are. one such example of this is femtanyl, who writes all of their lyrics in the descriptions of their videos.
adding onto this, if you'd like to download videos for free, whether it be mp4 or mp3, id recommend searching youtube to mp3 in an incognito tab! (id recommend this because some sites send you to rather sketchy websites sadly. they are efficient, you just have to ensure what you download is what you want. plus, it keeps it out of your search history if you share a browser with someone!) its easy, just copy the link of the video you want and paste it into the box. then, choose what file format you want it to be downloaded in, click convert, and now you have your own file downloaded for free. i've used this method for years now, and it hasn't failed me.
in conclusion, FUCK capitalism, DELETE spotify, and USE ALTERNATIVES.
-badger
75 notes
·
View notes
Note
AITA for deleting my classmate's online output in retaliation for previous grievances, & WIBTA if I kept this up?
📚🧪🗑️
(↑ so I know Tumblr didn't toss it into the void)
Take your time reading this before the poll. Trust me, everything matters.
I (16NB) am a student that migrated from the regular 10th grade sections into the top section of my school's STEM program via passing the admission test. I'm part of the very few that made it from the regular sections into such a prestigious senior high strand (which had only 3 sections and ±30 students per section), and the rest of my classmates and batchmates come from specialized programs that they were in since 7th grade. Naturally, they don't know me, and wouldn't think much of me due to my previously "mediocre" background. But really, I was only able to join the STEM strand this year because of financial difficulties during the lockdowns, so my parents could only afford to put me through the regular sections from grades 8 to 10.
Amongst my specialized program classmates was this girl, who I will call V for anonymity. V (16F) struck me as aloof and reserved at first. Our class seating arrangement dictated that I sit near the window farthest from the door, and V near the room exit, so we were 3 columns and one aisle apart, and had no one-on-one interactions so far due to this.
The entire school year in my school is split into two semesters, two quarters each semester, so four quarters. In Q1, I tried signing up for the strand-exclusive club that was practically a boost for report card grades, the STEM club, and we used printed forms. I filled in my form, and V collected the forms from everyone who signed up to give to the STEM club leader. We waited a week for confirmation of our acceptance (which was our forms being given back with a red stamp and the leader's signature) and everyone except me got them back. I asked V if she received my form. "No, you didn't give me any," she had said. I was denied another form by the leader, who accused me of lying about me having already given the form.
I didn't ask for a rivalry, but I had no choice but to be wary.
In Q2, our Earth Science professor gave us a lab activity and grouped us by random. I ended up in a group with V in it. I actively participated in the activity by helping prepare the materials and answering the guide questions on the activity sheet given by our professor, but I was stumped when it came to a question that required some research. Our professor allowed us to assign someone by group to take the activity sheet home and submit a picture instead when we ran out of time, so I went to my group's chat and asked them to wait for me as I finished the answer for that particular question. It took me an hour or so before I finally got the answer. I gave the answer to my groupmates, but V said that they had already turned it in, confirmed by my other groupmates. I asked them "Why did you hurry the submission? We had plenty of time left to refine and finalize the answers." They didn't reply, and they didn't answer me when I brought it up the next day in person. I went to my professor and explained the situation, even providing screenshots of my group messages as proof, but he didn't believe me. However, he did let me write down my answer to the question I was doing research for.
By then, I suspected V had convinced them to submit the activity sheet without me, and going back to Q1, also got rid of my membership form when she had the opportunity. I think she also might have lied to the professor that I wasn't even participating in the lab activity, and damn if he was gullible enough to fall for it.
Come Q3, this current quarter. Our professor in Literature gave us homework to be submitted in Google Drive. I did mine, converted it into the required file format, and had uploaded it to the Drive folder when I came across V's output. I figured it was time she got what was coming when she ruined my reputation to the teaching staff, so I deleted it. I secured my own folder so nobody but I can edit/delete it, just in case. The next day after that, V had nothing for submission and let's just say took some hits when the professor scolded her, and I have plans to get rid of more of her future outputs since we're relying on online tools for turning in homework.
On one hand, I feel a bit bad for doing that, and in addition I'm also scared I may be caught/traced. But on the other, I felt that it was only fair that she experienced even a fraction of humiliation that I faced during Q1 and Q2.
I dunno, Tumblr, AITA for that, and WIBTA for continuing with my plans?
What are these acronyms?
79 notes
·
View notes
Text
Tiny Tip #2
So, you've decided to take up creative writing! You open up your preferred writing program and go to open up your last file, which is your 20,000 word first draft of a novel-- until, uh oh! An error message pops up, saying the file is corrupted, can't be retrieved, etc!
Or, say lightning strikes your house, and fries your computer--!
Or, a cat comes scampering across your computer desk, sending your computer crashing to the floor where it promptly explodes in a million prices --!
How to you avoid losing all your hard work in these scenarios?
✨By Backing up your work regularly✨
You should take steps right now with any important documents you have on your computer!
Here's some very simple ways you can back your work up, from completely free to paid services:
Each day that you make changes to your main writing document(s), make a brand new copy with the "Save-as" function, and label each one with that day's date, so you have a complete timeline of documents from day one to current day, instead of all being one single document.
Email the Docx / ODF file to yourself once a day, and if you have more than one email, or a trusted friend/family member, email it to them as well in case you somehow lose access to your account.
use Google Docs to back up your documents or for cross-platform writing, or if you use Google Docs as your main writing program, back up your writing locally to Libreoffice and all other methods mentioned above. It only takes 1 issue with logging into your account or a service outage to lose access to your work on google docs!
Use 4thewords as another online cloud service to back up your writing and write cross platform
Use A cloud drive service to back up your works once a day, such as Google Drive, Mega, One Drive, IDrive, Sync Drive, etc to back up your works once a day
Use Calibre to convert your document into an ebook format or PDF, and send it to your phone as an extra backup, and a handy way to reference your writing on the go.
use Google Docs to back up your documents or for cross-platform writing, or if you use Google Docs as your main writing program, back up your writing locally to Libreoffice and all other methods mentioned above. It only takes 1 issue with logging into your account or a service outage to lose access to your work on google docs!
#writing#tiny tips#BACK YOUR WRITING UP YOU NEVER KNOW WHAT WILL HAPPEN#BACK IT UP AT MINIMUM ONCE A DAY OR ANY TIME YOU MAKE MAJOR CHANGES#bold text#large text
20 notes
·
View notes
Note
Hey love your art and brushes been following you on a side acct. I would have asked on it if I knew how. But anyway, I was wondering if you could do a tutorial or a breakdown of your process. It just seems real daunting when Ive looked up how to do it myself. So you got an easy way to explain making brushes? It would be greatly appreciated.
Hi! Thank you so much for the kind words!
For editing the brush tips and textures, I mostly use desktop Photoshop for this, however this can work on other art programs too.
Procreate makes it easier as you can load up your resources with minimum hassle as it can also help you tile the textures. Having them edited the former way makes it easier to carry them over to different software.
Here's a rough breakdown of what I do (for brushes made out of traditional resources but the process is similar for digital-made ones as well):
🔶 Draw/make your future seamless textures and future brush tips. I make these on one page and just select and edit them separately in Photoshop.
🔶 Scan them (I usually do these on either A4 or A5 pages at around 400 dpi).
🔶 Import them into Photoshop.
🔶 I separate the the brush tips so they’re on a transparent background. Here's how you do this (🔹Clip users just go to Edit > Convert Brightness To Opacity):
🔹Adjust the saturation/brightness/levels so the brushes are solid black against a clean, white background.
🔹Double click on the "Background" layer to turn it in a regular one (it should be called Layer 0).
🔹Go to Channels.
🔹 Click on the dotted circle. You will see your brush tips' contour selected.
🔹Press Delete. Brush tips should now have a transparent background.
🔹 You might have duplicate or darken the brush tips so they're not partially transparent:
🔶 Brush tips are almost ready. I save as .png one version that is solid white (for Procreate... and Sai if I remember correctly) and another that is solid black (other art programs).
🔶 For the textures, I do them separately.
🔹Copy and open them in a different canvas.
🔹Set them to black and white and edit the brightness/contrast however you like(or directly set them to Grayscale mode).
🔹Make them tile-able using the Offset filter in Photoshop and patch up misalignments using the Clone Stamp Tool and Spot Healing Brush Tool.
🔹The textures should now be seamless. You can verify them a bit with the Offset filter a few times if you need to double check.
🔶 The resources are saved as .png and ready to be imported into the program of choice! The method of importing depends on each software.
🔹Photoshop: Open up your resources and go to Edit > Define Brush Preset and Define Pattern. Then you pick a random brush, add in your stuff, edit to your liking and from the Brush Settings tab you click the + button:

🔹Clip: Load up your resources. Set them to Grayscale (if they're not already set), then you go to Edit and use Convert Brightness To Opacity On The Textures(no need to do that for the brush tips). Afterwards you go to Edit, then to Register Material and add them that way.
🔹Procreate: This is by far the easiest. You make a new brush in Procreate then simply go to its settings and add in your resources.
🔹Sai: I don't remember this one well so I'll have to revise this at some point.
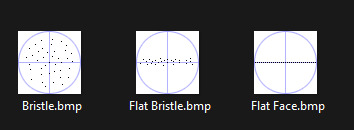
For both Sai 1 and Sai 2, you need to have your resources saved in Grayscale and a .bmp file set to 8 bits(<< Sai 2 might not need this last thing). You also need to manually add them to the program's folders(the example below is for Sai 2).

The textures should be at a resolution of 1024 x 1024 or smaller. Sai 1 uses only pixel, Bristle brushes like so:
(Sai 2 can use actual brushes and Bristle-like ones as well).
You will have to convert your resources to that format and, right now, the way I personally made this work is by loading up some already existing texture/brush tip and then downsize the resources to fit on top of that canvas.
Then I save them separately like that. There is a tutorial that gets into depth here: https://www.deviantart.com/darlingmionette/art/SAI-Tutorial-Custom-Brushes-162081137 and there's another here: https://www.deviantart.com/sylvanimus/journal/Tips-for-making-custom-brushes-blotmaps-for-SAI-768194979
Sai 2 is a bit more permissive but you still have to have your resources saved as .bmp and grayscale. You can actually use your brush tips properly and not some compressed, pixel-y variants of them. I still load them on top of some pre-existing brushes and save them separately like that to make sure they load into the program.
They also need to be white against a solid black background.
ALSO... If you make custom brush tips, they need to have an .ini file next to it with the same name in the "brshape" folder. Like this:
I hope this makes any sense. I might have to go back to this and edit it further.
5 notes
·
View notes
Note
hello, thanks for uploading the audio rip of kaji fes day 1 and 2! is it possible if you make a ISO image rip of the Bluray and create a torrent file for it ? :) we usually download some ISO from jpopsuki just few days after release but somehow nobody have uploaded ISO of kajifes there yet XD

Hello there. Sorry for the delay, I've been holding off on replying to your question for a while. To be fair, when I saw this in my inbox just a DAY after my response to the Kaji Fes. MP3 ask, I was more than a little annoyed.
It's not like your message is inherently rude or anything (in fact, it's a bit more polite than the usual stuff I get) but it tells me TWO things about you:
You either purposefully ignored everything I wrote in that Kaji Fes. MP3 post or you never actually saw my original post and got the download link from someone who reposted it to another site. If you had made an effort to read my response from a few days ago, you would know that I always planned to share rips but first, I needed to receive my package. People are really out there thinking I have immediate access to everything. That is a misconception! The truth is, just like so many of us, I am at the mercy of endless shipping/customs procedures and have to wait very long for stuff to arrive at my place. Then I need to find the time to do all the ripping/encoding while working a full-time job and also having a life.
You've never actually visited my blog and thought it would be a good idea to use your first time here to make a huge request. I seriously doubt that you are one of my regular followers or lurkers because in all of my years running this blog, I've never ever provided t0rrents so I have no idea where you would get that idea from. Yes, I share a lot of content but I do this by uploading reasonably HQ files in converted formats to Google Drive for archival purposes. Early on, I considered providing ISO files but they proved to be too troublesome to handle on a personal cloud (they take too long to upload/download and use up way too much storage space - I already pay more than enough for my current plan). Also, I wholeheartedly believe that those who want raw files should simply BUY the Blu-rays and do the ripping themselves. You can't have high standards like that and not be willing to invest the necessary money and time. Contrary to what people may believe (based on the content I share), I am a big proponent of supporting artists by buying their releases. My main goal is to make life easier for overseas fans who struggle to overcome the countless hurdles between us and Japanese media but that certainly doesn't entail providing everything in the highest quality imaginable. To sum things up, all you can ever expect on my blog are encoded files which should have high enough quality to satisfy the vast majority of people.
Anyway, enough about that. I have good news! My package FINALLY arrived yesterday. BANZAI! Depending on how busy I am, I will hopefully be able to get the files uploaded by Thursday *fingers crossed*
21 notes
·
View notes
Note
Hi! Happy 4k celebration 🥰 Can you share how you make your gifs or make a gif tutorial?
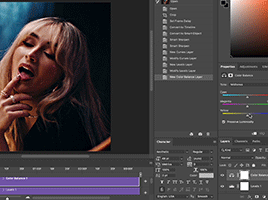
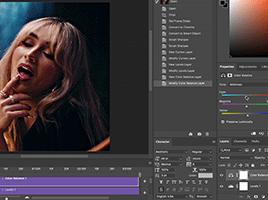
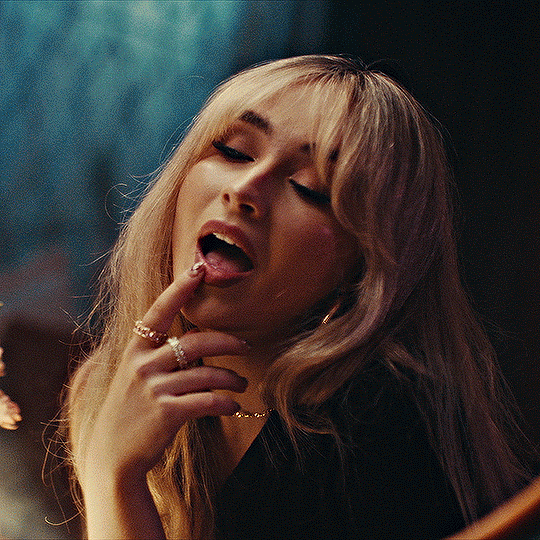
hi !! tysm <3 i'm more than happy to give you a little tutorial on how i make my gifs ! of course, my process is not the same to other gifmakers and may not always work for everyone but i hope it helps !
for this tutorial, i'm using the most recent edition of photoshop (2023) on my mac. full explanation under the cut.
full disclaimer: most of what i've learnt about photoshop and the giffing process is through pure trial and error. this won't work for everyone and others may think it's a little weird, but this is just how i make my gifs !!
1.find your scenes.
finding your scenes is sometimes very time consuming but you want to get it right the first time !! for this tutorial, i'm using a music video in mp4 format.
2. loading your scenes.
to load your scenes, you want to go: 'file' > 'import' > 'video frames to layers'. i know that this step varies on the user because some people like to go to timeline first, but i'd advise starting in frames first !
after that, a screen like i've depicted below will pop up. i've also annotated everything for you as well.
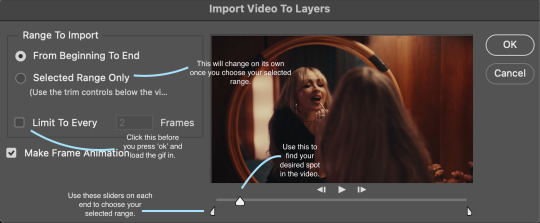
so, select your desired range, press 'ok' and then it will all load into ps !
3. setting up your gif.
i'm grouping this all into one step, but it's broken down into a few things.
the first part of this is: cropping. the recommended dimensions i follow are on this guideline here, but for the sake of this tutorial i'm just going to crop my gif 540x540 (as a w x h setting). the crop tool is on the left hand tool bar.
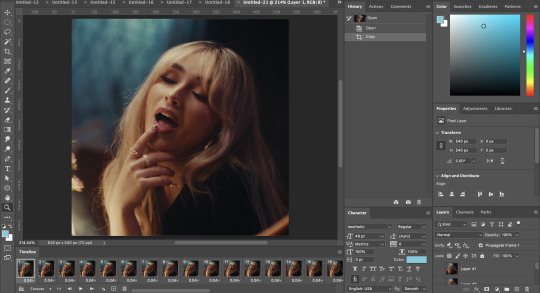
now, my gif looks like this. from here, i'm going to click on the timeline (the space along the bottom that has every frame). from there, click on the three lines to get this menu (i've circled where to go + what you'll click):

from there, go 'select all frames' and then click on any of the frames NUMBERS (where it says 0.04 with an arrow besides it, or whatever yours says) then change the frame rate. with most youtube videos i will use 0.08 as my desired frame rate, but when i'm gifing a show or something, it loads in as 0.02, so i change it to 0.05. 0.05-6 on any normal screen cap should be fine, but obviously you can change it depending on if it looks right or not.
from there, you've basically done the first half of the basics. now, you'll want to click on this button:
and now you'll be taken to the video timeline ! from here, select command + option + a (this is for mac, i think it would be control if you're on another device) then, right click on your layers and go 'convert to smart object'.
from here, i'll sharpen my gif before i colour. for this step i have two alternative sharpening settings first one by anyataylorjoy (rb to download !) and the other by maygrant (please ask !). the first one is tuser maygrant's and the second one is tuser anyataylorjoy's. i typically use morgan's for all my basic gifs but anyataylorjoy's for creative sets. every user has a different preference but just find what's good for you !

4. colouring your gif.
definitely the most tedious, this can be a little bit of a hassle depending on the scene. if the colouring isn't riddled with heavy yellows or cyans, colouring is usually a breeze but if it is, it can be hard.
CURVES

the circle with the arrow dropdown and that's half grey-white is the circle you want to click on to find curves. it'll open a menu and curves will be at the top.
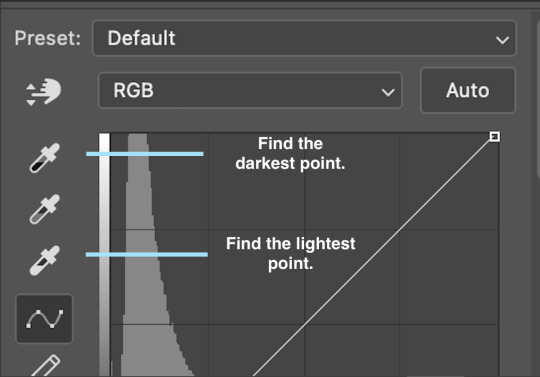
you'll see a little menu like above appear. now, select the dropper i've indicated as being the "light point" and then, using the zoom tool, we're going to zoom in and find the brightest point on the gif. this is typically where the light source is.
in this section here, i can see a couple of bright points. using the dropper, i'll click on the closest to white (note: i find that white rarely changes the colouring of the gif, so if there's like, a really really light yellow, for example, click on that) and then i'll do a similar process with the "dark point" dropper, finding the darkest spot, which is usually in shadows or in the corners. unlike with the light dropper, you want the closest to black, whether that's a dark dark brown or dark dark blue.
now, we can see how the colouring has changed:

optional: you can change the white line on the curves menu, which can make it lighter, or darker in different points of the gif.
LEVELS
levels is an optional step, but i recommend it on very light gifs, or if you want to add a little more depth. probably don't do it on an already very dark gif.
the levels menu looks like this:
the far left slider adds shadows and the far right slider makes it lighter. on this particular gif, i only need a little bit of depth to her face and i only need to contrast that a little bit. by just dragging the slider a little bit:
this is the result:
with levels, it can very quickly alter skin tone/make your gif look bad !! with levels, i don't think you need to go above 1-12 in adding depth.
OPTIONAL: BRIGHTNESS/CONTRAST
brightness/contrast is optional !! only add it if it's necessary :)
COLOUR BALANCE
a colour balance layer is great for fixing the tones for the gif !!

this one's pretty self explanatory. if you want it to be more yellow, slide it towards yellow. if you want it to be more red, slide it more towards red, etc etc. i've attached some gifs showing how i change tone:
but just play with it until it looks right. be very careful with skin tone !! colour balance can very easily whitewash/colour wash and that is not something encouraged, in the slightest.
SELECTIVE COLOUR
a selective colour layer is basically a "final touch" to colouring. where colour balance just kind of does an overall change of the gif, selective colour allows you to alter your specific tones, ie. reds, magentas, blues, etc. for me, i'll do the bulk of getting my desired colouring with colour balance, but if it overcorrects reds, for example, i'll add some cyan to red tones in selective colour, to diffuse that.
currently, in my gif, it's very red/yellow heavy. to balance that out, i want to add cyans. so, on the drop down list of the selective colour menu, i'll select 'red' and then i'll ADD cyans (so move the slider to the right, not the left to decrease) and then repeat that on other tones that i want to correct, with different colours.
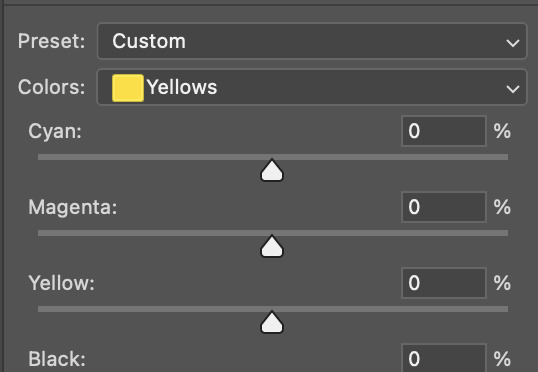
with each of the sliders, just add or decrease how much of that colour is in that tone. once again, be mindful of skin tone and whether it is appropriate or not.
with selective colour, if there are any standout colours (eg. in my gif, there's a big patch of cyan) that don't interrupt their face (eg. reds and yellows are always in faces) and change the way the subjects look, you can change those colours to make it more vibrant. so, in this gif, i'll enhance the cyans and blues and magentas to make the colours pop more.
5. saving your gif
once your happy with the colouring of your gif and done what you need to do with it, save it as a smart object with all your colouring layers, then go to 'file' > 'export' > 'save for web (legacy)...' . play back your gif, and it should be all good !! congrats on making your gifs !
i've included a playback of each layer, which is staggered to show each layer come into effect.
in order: nothing -> curves -> levels-> brightness/contrast -> colour balance -> selective colour.
hope this helped !!
#*tutorial#gif tutorial#ps help#ps tutorial#userriel#userautie#userraffa#usernorah#userrsun#usercats#thingschanged#**l.myeditss
129 notes
·
View notes
Text
Tutorial 3D model to sims2
second part
Now we are going to move our clothes to place them more or less in their corresponding place and to be able to continue increasing and decreasing their size until we find the perfect size
(groups, click in the name of our clothes : "default" , click select ...the clothes will turn red , click model, click move)
and now ... If you click on X and move the mouse, the clothes move up and down but in a straight line. If you click on Y, the clothes move right left in a straight line.If you click on Z it moves wherever you want without control (This works like this when you have chosen the front view, if you choose the left or right view things change, I will explain it later) It is important to say that you must have only one letter pressed, that letter will turn orange when you are using it, and the other two letters will remain gray
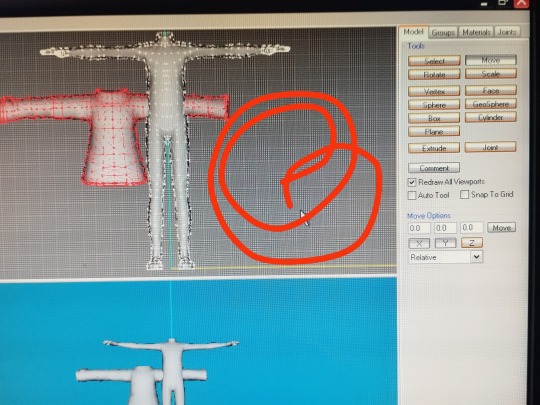
move the clothes until you have them placed more or less in the place you want and change the size until you have the desired one.
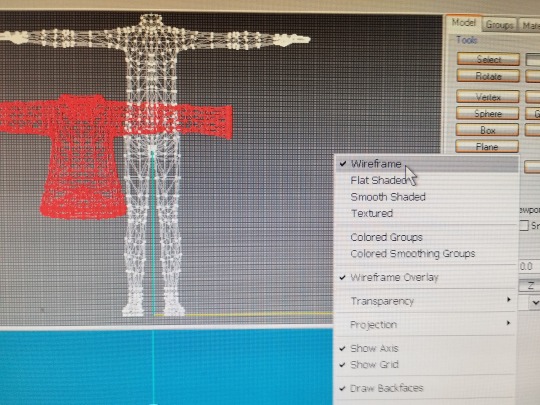
To keep in mind, if you are not very familiar with milkshape, there are 4 windows that are the views or projections of the model, left , front , top and 3D .They come by default when you open the program, but you can change the view you want whenever you want
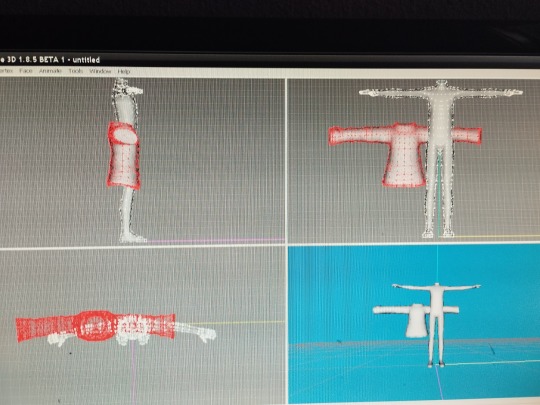
you click on a window, right-click with the mouse, click on projection and choose the view you want… 3D front back left right top or bottom
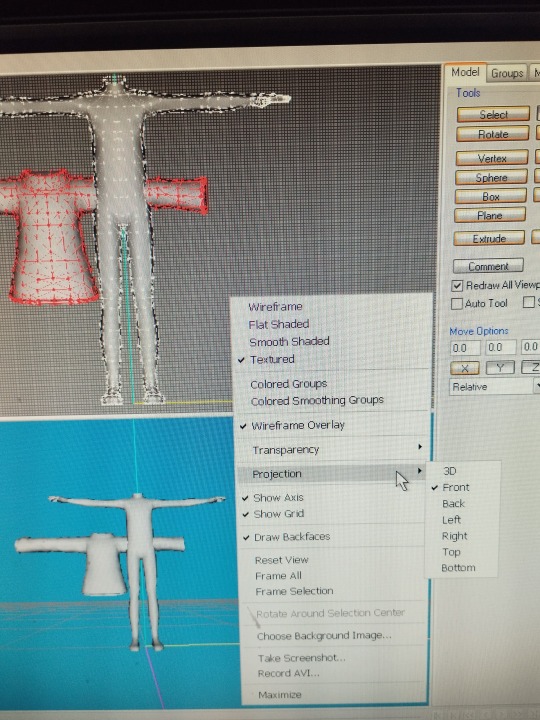
You can also choose the way you see your model… also in the same window you choose wirefame, flat shaded, smooth shaded or textured (textured I will explain it later because for this we need the png with the texture of the clothes)
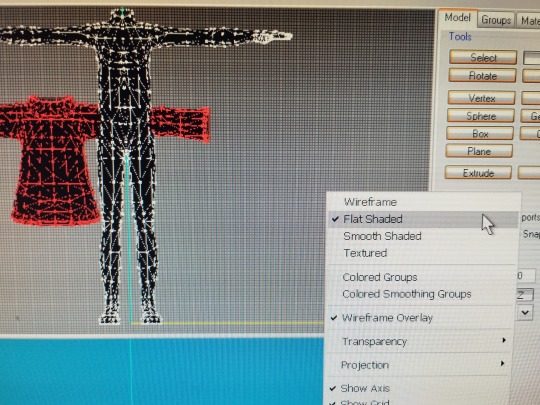
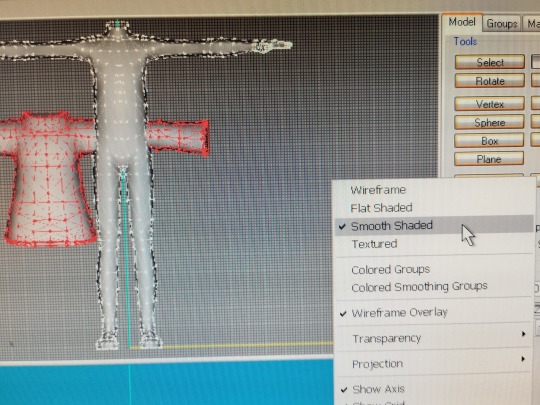

we can change the view and choose right or left to continue adjusting our clothes to the body
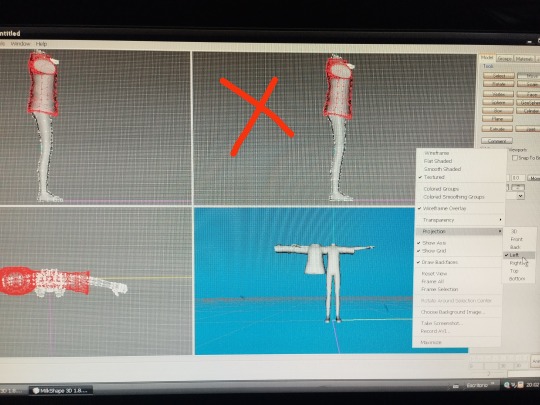
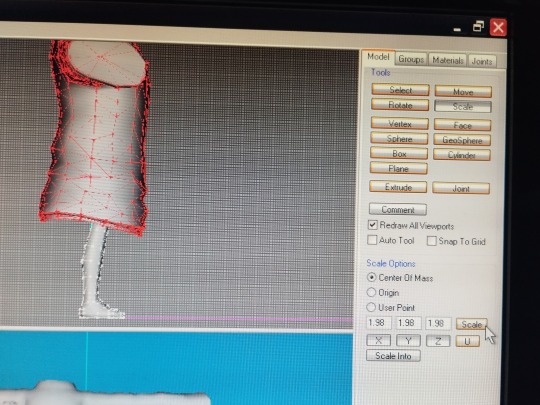
now the way to move the clothes by choosing the letters X and Z changes, if we click on X we will move the clothes where we want without control, if we click on Y we will move them left or right, if we click on Z we will move them up or down
we move it until we place it as we wish, if we see that the clothes are still too wide, we can narrow it, we continue with the right or left view, click on scale, and the same as the other time … 1.98 in the three letters will make the clothes wider and 0.98 in the three letters will make the clothes smaller.
when you have the perfect size, it's time to save our project … in case we mess something up we don't have to start again from scratch.
file, save as ... name you want and save it in the folder you want to save it in
but we have not closed the project yet 😅
now we delete the base body ... group, click on body name and delete only our clothes have to be seen
now is the time to bring it to life, we need bones 🦴
click on file export half-life SMD (at the top of the page), enter the name of our project and save it in our folder, you can use the same name as before, nothing happens because this is a different format and it will not delete the previous one.
important , check the box " with vertex weights". and click ok , close the milkshape
now we need a model, a piece of clothing, from the sims game, that is similar to the one we are working on, or any clothing that you have downloaded from another simmer, but that is similar, for example, if it is a long-sleeved sweater … look for a long sleeve sweater, if it is a short sleeve t-shirt look for a short sleeve t-shirt.
we need the mesh of these clothes to extract the GMDC... this is done with the SimPe program
if you already know how to do it, perfect, you save me the explanation and you save yourself from reading all this part, but if you have never done it … I am going to explain it , I have learned it following tutorials that I recommend you to read (and that I thank enormously to the simmers that have made them) to familiarize yourself with the programs we use.
tutorials needed in your life :
3t2 clothes tutorial of Serenity falls @rented-space
4t2 clothing tutorial of @vulrien-sims
all tutorial of @blueheavensims
tutorial of @deedee-sims
4t2 clothing tutorial (video) @mdpthatsme
....to be continued
21 notes
·
View notes
Note
love your blog so much! and im wondering how you archive/document your day-to-day life and the information that you take in — whatever form: books, lyrics, trees, etc etc — ? im struggling so much w forgettttttting
i love this question! i’ve always longed to have a beautiful and consistent journal, but it’s something i struggle with maintaining organically so i’ve tried some different structures over the past few years. long-winded answer under the cut 💗
back in 2021, i was making a monthly journal on google slides which i really liked because it's so natural to integrate images. i just made a month of it public here as an example of what it was like.
from 2022 - now, i've been doing a new concept where on the last day of every season i write long, list-y answers to these prompts:
art that has been resonating with me (includes music, books, movies, visual art, anything really). i'll usually write a few words about it... "Decision to Leave dir. Park Chan-Wook—the eye shot! the eye shot with the ants crawling on it" or "'Train Ride' by Ruth Stone: 'Release, release; / between cold death and a fever, / send what you will, I will listen. / All things come to an end. / No, they go on forever.'" or "Chunky misshapen pearls and other organic, shiny shapes"
my favorite memories from the season... examples from past lists include "Swimming hole with Zoë where I stuck a twig in my hair and we waded around on our hands like crocodiles" and "Walks in my snowsuit at night, one in particular where the Gemenids meteor shower was just starting"
a checkup on 5 of my current projects/goals. currently these are 1. learn to lift weights, 2. write 50 "identical" poems, 3. write a new syllabus, 4. practice mindful spending, 5. improve at woodworking.
a checkup on 5 of my core values. currently these are 1. adventure, 2. connection, 3. play, 4. sensuality, 5. sustainability.
reevaluating projects and values to focus on next
since you mentioned wanting to remember things-- when i'm putting this together i draw extensively from my tumblr archive/likes, calendar, photos app, recent playlists, and letterboxd and storygraph accounts. curating this kind of ephemeral data into a more permanent and thoughtful record is really satisfying to me. i privately call this method "wrapped" a la spotify... like i'll have a big entry for "fall 2022 wrapped" and then "winter 2023 wrapped" and so on. i do all this on the app notion and file the seasons on one big page so it's easy to click into one and remember what i was doing and thinking about. (i also converted my dream journal to a notion database. i've logged about 300 dreams in here and love that i can tag by character/feature.)
over the years i've also kept a more classic diary via text documents that's less structured, just spitting out whatever's on my mind with the date at the top. i tend to do this frequently for a while, then ebb off, then restart another doc, rinse and repeat. i also have a few physical notebooks (including these two) but the digital stuff is way more extensive as i prefer to write on the computer.
if i were going to recommend any of this, i would say the visual format of the slides journal was really compelling because i liked the aesthetic freedom but i also love the "wrapped" lists because they seem to cut to the core of an era's texture. in the future i'd like to try to integrate these aspects together! 📓
30 notes
·
View notes
Text
Freedom Through Code
People always tout the career-related benefits of learning to code, but something I've noticed in my years writing it is that there's a sense of freedom that comes with it. I can just like, do things that I want or need to do. Learning some basic Python opened up so many doors for me, if I wanted to know something or if I wanted to do something I could just do it myself. Some examples:
Need to rename a ton of files (like removing something that a converter added to the file name)? Just use a for loop!
Need to convert a list of text from one format to another? (like point form list to a CSV that excel can use) Just use string.split and some slicing to rejoin everything.
Writing a math proof and need to come up with a counterexample for something? Just brute-force it if the case is based on integers. (very helpful for modular arithmetic problems)
Need to do a task that's actually like 9 really different steps? You can usually just write a program to do it in 15 minutes.
Doing a really complicated math problem and want to be able to check you punched a number in? Desmos works great, but if you need to use custom functions that aren't supported, just write it all up in Python. You might run into some small floating point weirdness, but it'll be minor enough to ignore.
There are a TON of tools online that you can make yourself in the Python shell faster than you could google and find them. Even if you never want to touch the computer science space with a 10 foot pole, learning major skills like this grants you a unique kind of freedom that you can only achieve by turning an arcane space into one that's just foggy.
9 notes
·
View notes