#Copy Command Output to Clipboard
Explore tagged Tumblr posts
Visit Tumblr Blog
Explore Tumblr blogs with no restrictions, modern design and the best experience.
Last Seen Tumblr Blogs


Fun Fact
The “We are the 99%” Tumblr blog became the slogan for the Occupy Wall Street movement.
Text
Copy and paste at the Linux command prompt
You can use the xclip command in Linux to manipulate the X11 clipboard, handling copy and paste in the command prompt and scripts. See xclip and xsel examples:
Read more:
-> How To Copy Command Output To Linux Clipboard Directly
-> How do I copy a file to the clipboard in Linux?
14 notes
·
View notes
Text
Now that I have this bash script from the command at stack overflow to remove line breaks I can more readily write html post and put them into the submission syntax for pytumblr.
#!/bin/bash tr '\n' ' ' < "$1" | sed "s/\('[0-9]\{4\}\)/\r\n\1/g"
I name the script stringit, keep it in ~/.local/bin/, using the UI to make it executable and make it trusted, and go into the terminal and enter stringit article.html and it outputs into the terminal a version without linebreaks and I copy that into my clipboard, put it in featherpad, escape the apostraphes ' with a backlash as \', and then copy the escaped text into the pytumblr syntax, which is a totally different thing but yeah.
I love HTML since I can possessively modify it. First time I ever needed it for anything was for fanfiction archival, although I am much better than I used to be, little things like needing a converting a legible article into a single line of HTML I still don't know how to do until recently.
1 note
·
View note
Text
Graphic design Illustrator & Corel
Those things can save your time from clear your graphic program clipboard all the time,
reinstall it or install instead another versions - avoid errors in Adobe Illustrator program:
When working with archived files:
To open the files properly - at first extract them -
its more about AI Vector files rarther than PNG files that can be open up straight from rar.archive without any problem,
PNG - click the file from Winrar archive & see it immediately in your gallery viewer even if you not yet extracted them.
Vectors - because sometimes in some Illustrator or other graphic programs the file may behave like there is no action/or command was set up at all & the file just won't open or for example in Adobe Illustrator may appear a notion that "there is not enough space to open the file",
if that's the case you just need to open the file from the graphic program open command (not from archive or the folder after extraction) & then everything is fine.
If there is still problem to save(mostly) or open (not common) - so rename the file after extraction it may be ID:1 err (file name characters) or the default program language that your using(alphabet).
If you resave the files after you making colour or shape changes its better to save them in a brand new name when it comes to serial files or long names or maybe files with a name in a different alphabet language than the graphic program you working on,
& than you avoid errors when saving file - errors like there is no option to export file in high definition(300pp) or at all,
or as an interactive Vector,
if there is still an error & you can't save the file after renaming the file,
than it's better to give a different name or save in a new folder or both mentioned previously,
after that you can rename the file again, if you are working by file name or thats make your work easyer...
this kind of problem source more frequent in serial file long names with numeric order -
ID:1 err & similar to.
If Illustrator & Corel Draw opened together -
when you make a copy paste to Corel Draw from Adobe Illustrator (possible in some cases) or from Corel to Illustrator (usually without any problem).
or save the file firstable in another version like EPS or else(not cdr or ai).
The benefit to merge Corel Draw & Adobe Illustator is the nodes size(Corel draw have more mesure units).
You can even output those nodes/ancors to Illustrator without install/write any script or add on, because Corel draw allready have similar to Adobe Illustrator working space version built in, so they can interact well.
Disadventage that Corel Draw have too much complex colour filling system by default, number of colour code digits - 9:3( you fill 3,3 times if you want/need speceific colour code).
#graphic design#graphics#adobe illustrator#corel draw#eysneyabalance#eysneya balance#dopemainequation#digital art#vector#vectors#png#image files#illustrator#ai#cdr#eps#interactive vector#graphic article#web design#graphic design article#cdr & ai#ai & cdr#bitmap#bitmaps
4 notes
·
View notes
Text
20 years a blogger

It's been twenty years, to the day, since I published my first blog-post.
I'm a blogger.
Blogging - publicly breaking down the things that seem significant, then synthesizing them in longer pieces - is the defining activity of my days.
https://boingboing.net/2001/01/13/hey-mark-made-me-a.html
Over the years, I've been lauded, threatened, sued (more than once). I've met many people who read my work and have made connections with many more whose work I wrote about. Combing through my old posts every morning is a journey through my intellectual development.
It's been almost exactly a year I left Boing Boing, after 19 years. It wasn't planned, and it wasn't fun, but it was definitely time. I still own a chunk of the business and wish them well. But after 19 years, it was time for a change.
A few weeks after I quit Boing Boing, I started a solo project. It's called Pluralistic: it's a blog that is published simultaneously on Twitter, Mastodon, Tumblr, a newsletter and the web. It's got no tracking or ads. Here's the very first edition:
https://pluralistic.net/2020/02/19/pluralist-19-feb-2020/
I don't often do "process posts" but this merits it. Here's how I built Pluralistic and here's how it works today, after nearly a year.
I get up at 5AM and make coffee. Then I sit down on the sofa and open a huge tab-group, and scroll through my RSS feeds using Newsblur.
I spend the next 1-2 hours winnowing through all the stuff that seems important. I have a chronic pain problem and I really shouldn't sit on the sofa for more than 10 minutes, so I use a timer and get up every 10 minutes and do one minute of physio.
After a couple hours, I'm left with 3-4 tabs that I want to write articles about that day. When I started writing Pluralistic, I had a text file on my desktop with some blank HTML I'd tinkered with to generate a layout; now I have an XML file (more on that later).
First I go through these tabs and think up metadata tags I want to use for each; I type these into the template using my text-editor (gedit), like this:
<xtags>
process, blogging, pluralistic, recursion, navel-gazing
</xtags>
Each post has its own little template. It needs an anchor tag (for this post, that's "hfbd"), a title ("20 years a blogger") and a slug ("Reflections on a lifetime of reflecting"). I fill these in for each post.
Then I come up with a graphic for each post: I've got a giant folder of public domain clip-art, and I'm good at using all the search tools for open-licensed art: the Library of Congress, Wikimedia, Creative Commons, Flickr Commons, and, ofc, Google Image Search.
I am neither an artist nor a shooper, but I've been editing clip art since I created pixel-art versions of the Frankie Goes to Hollywood glyphs using Bannermaker for the Apple //c in 1985 and printed them out on enough fan-fold paper to form a border around my bedroom.

As I create the graphics, I pre-compose Creative Commons attribution strings to go in the post; there's two versions, one for the blog/newsletter and one for Mastodon/Twitter/Tumblr. I compose these manually.
Here's a recent one:
Blog/Newsletter:
(<i>Image: <a href="https://commons.wikimedia.org/wiki/File:QAnon_in_red_shirt_(48555421111).jpg">Marc Nozell</a>, <a href="https://creativecommons.org/licenses/by/2.0/deed.en">CC BY</a>, modified</i>)
Twitter/Masto/Tumblr:
Image: Marc Nozell (modified)
https://commons.wikimedia.org/wiki/File:QAnon_in_red_shirt_(48555421111).jpg
CC BY
https://creativecommons.org/licenses/by/2.0/deed.en
This is purely manual work, but I've been composing these CC attribution strings since CC launched in 2003, and they're just muscle-memory now. Reflex.
These attribution strings, as well as anything else I'll need to go from Twitter to the web (for example, the names of people whose Twitter handles I use in posts, or images I drop in, go into the text file). Here's how the post looks at this point in the composition.
<hr>
<a name="hfbd"></a>
<img src="https://craphound.com/images/20yrs.jpg">
<h1>20 years a blogger</h1><xtagline>Reflections on a lifetime of reflecting.</xtagline>
<img src="https://craphound.com/images/frnklogo.jpg">
See that <img> tag in there for frnklogo.jpg? I snuck that in while I was composing this in Twitter. When I locate an image on the web I want to use in a post, I save it to a dir on my desktop that syncs every 60 seconds to the /images/ dir on my webserver.
As I save it, I copy the filename to my clipboard, flip over to gedit, and type in the <img> tag, pasting the filename. I've typed <img src="https://craphound.com/images/ CTRL-V"> tens of thousands of times - muscle memory.
Once the thread is complete, I copy each tweet back into gedit, tabbing back and forth, replacing Twitter handles and hashtags with non-Twitter versions, changing the ALL CAPS EMPHASIS to the extra-character-consuming *asterisk-bracketed emphasis*.
My composition is greatly aided both 20 years' worth of mnemonic slurry of semi-remembered posts and the ability to search memex.craphound.com (the site where I've mirrored all my Boing Boing posts) easily.
A huge, searchable database of decades of thoughts really simplifies the process of synthesis.
Next I port the posts to other media. I copy the headline and paste it into a new Tumblr compose tab, then import the image and tag the post "pluralistic."
Then I paste the text of the post into Tumblr and manually select, cut, and re-paste every URL in the post (because Tumblr's automatic URL-to-clickable-link tool's been broken for 10+ months).
Next I past the whole post into a Mastodon compose field. Working by trial and error, I cut it down to <500 characters, breaking at a para-break and putting the rest on my clipboard. I post, reply, and add the next item in the thread until it's all done.
*Then* I hit publish on my Twitter thread. Composing in Twitter is the most unforgiving medium I've ever worked in. You have to keep each stanza below 280 chars. You can't save a thread as a draft, so as you edit it, you have to pray your browser doesn't crash.
And once you hit publish, you can't edit it. Forever. So you want to publish Twitter threads LAST, because the process of mirroring them to Tumblr and Mastodon reveals typos and mistakes (but there's no way to save the thread while you work!).
Now I create a draft Wordpress post on pluralistic.net, and create a custom slug for the page (today's is "two-decades"). Saving the draft generates the URL for the page, which I add to the XML file.
Once all the day's posts are done, I make sure to credit all my sources in another part of that master XML file, and then I flip to the command line and run a bunch of python scripts that do MAGIC: formatting the master file as a newsletter, a blog post, and a master thread.
Those python scripts saved my ASS. For the first two months of Pluralistic, i did all the reformatting by hand. It was a lot of search-replace (I used a checklist) and I ALWAYS screwed it up and had to debug, sometimes taking hours.
Then, out of the blue, a reader - Loren Kohnfelder - wrote to me to point out bugs in the site's RSS. He offered to help with text automation and we embarked on a month of intensive back-and-forth as he wrote a custom suite for me.
Those programs take my XML file and spit out all the files I need to publish my site, newsletter and master thread (which I pin to my profile). They've saved me more time than I can say. I probably couldn't kept this up without Loren's generous help (thank you, Loren!).
I open up the output from the scripts in gedit. I paste the blog post into the Wordpress draft and copy-paste the metadata tags into WP's "tags" field. I preview the post, tweak as necessary, and publish.
(And now I write this, I realize I forgot to mention that while I'm doing the graphics, I also create a square header image that makes a grid-collage out of the day's post images, using the Gimp's "alignment" tool)
(because I'm composing this in Twitter, it would be a LOT of work to insert that information further up in the post, where it would make sense to have it - see what I mean about an unforgiving medium?)
(While I'm on the subject: putting the "add tweet to thread" and "publish the whole thread" buttons next to each other is a cruel joke that has caused me to repeatedly publish before I was done, and deleting a thread after you publish it is a nightmare)
Now I paste the newsletter file into a new mail message, address it to my Mailman server, and create a custom subject for the day, send it, open the Mailman admin interface in a browser, and approve the message.
Now it's time to create that anthology post you can see pinned to my Mastodon and Twitter accounts. Loren's script uses a template to produce all the tweets for the day, but it's not easy to get that pre-written thread into Twitter and Mastodon.
Part of the problem is that each day's Twitter master thread has a tweet with a link to the day's Mastodon master thread ("Are you trying to wean yourself off Big Tech? Follow these threads on the #fediverse at @[email protected]. Here's today's edition: LINK").
So the first order of business is to create the Mastodon thread, pin it, copy the link to it, and paste it into the template for the Twitter thread, then create and pin the Twitter thread.
Now it's time to get ready for tomorrow. I open up the master XML template file and overwrite my daily working file with its contents. I edit the file's header with tomorrow's date, trim away any "Upcoming appearances" that have gone by, etc.
Then I compose tomorrow's retrospective links. I open tabs for this day a year ago, 5 years ago, 10 years ago, 15 years ago, and (now) 20 years ago:
http://memex.craphound.com/2020/01/14
http://memex.craphound.com/2016/01/14
http://memex.craphound.com/2011/01/14
http://memex.craphound.com/2006/01/14
http://memex.craphound.com/2001/01/14
I go through each day, and open anything I want to republish in its own tab, then open the OP link in the next tab (finding it in the @internetarchive if necessary). Then I copy my original headline and the link to the article into tomorrow's XML file, like so:
#10yrsago Disney World’s awful Tiki Room catches fire <a href="https://thedisneyblog.com/2011/01/12/fire-reported-at-magic-kingdom-tiki-room/">https://thedisneyblog.com/2011/01/12/fire-reported-at-magic-kingdom-tiki-room/</a>
And NOW my day is done.
So, why do I do all this?
First and foremost, I do it for ME. The memex I've created by thinking about and then describing every interesting thing I've encountered is hugely important for how I understand the world. It's the raw material of every novel, article, story and speech I write.
And I do it for the causes I believe in. There's stuff in this world I want to change for the better. Explaining what I think is wrong, and how it can be improved, is the best way I know for nudging it in a direction I want to see it move.
The more people I reach, the more it moves.
When I left Boing Boing, I lost access to a freestanding way of communicating. Though I had popular Twitter and Tumblr accounts, they are at the mercy of giant companies with itchy banhammers and arbitrary moderation policies.
I'd long been a fan of the POSSE - Post Own Site, Share Everywhere - ethic, the idea that your work lives on platforms you control, but that it travels to meet your readers wherever they are.
Pluralistic posts start out as Twitter threads because that's the most constrained medium I work in, but their permalinks (each with multiple hidden messages in their slugs) are anchored to a server I control.
When my threads get popular, I make a point of appending the pluralistic.net permalink to them.
When I started blogging, 20 years ago, blogger.com had few amenities. None of the familiar utilities of today's media came with the package.
Back then, I'd manually create my headlines with <h2> tags. I'd manually create discussion links for each post on Quicktopic. I'd manually paste each post into a Yahoo Groups email. All the guff I do today to publish Pluralistic is, in some way, nothing new.
20 years in, blogging is still a curious mix of both technical, literary and graphic bodgery, with each day's work demanding the kind of technical minutuae we were told would disappear with WYSIWYG desktop publishing.
I grew up in the back-rooms of print shops where my dad and his friends published radical newspapers, laying out editions with a razor-blade and rubber cement on a light table. Today, I spend hours slicing up ASCII with a cursor.
I go through my old posts every day. I know that much - most? - of them are not for the ages. But some of them are good. Some, I think, are great. They define who I am. They're my outboard brain.
37 notes
·
View notes
Text
Which are The Best Scraping Tools For Amazon Web Data Extraction?

Web scraping is the method of extracting data from the internet. You'll usually want to analyze, evaluate, reformat, or transfer data into a worksheet after you have it.
Web extracting has numerous applications, but we'll emphasize just a couple today: obtaining service and product information from markets. Retailers utilize this information to gain a better understanding of the business and its competitors.
In reality, the benefits can be enormous. To oppose your competitor's approach, you must first understand the concept. Knowing their rates, for instance, can provide you an advantage in sales by offering a special offer or selling at low rate. Amazon is one of the most popular online shopping destinations. People use it to order groceries, books, laptops, or even hosting plan solutions daily.
Amazon has the largest database for items, reviews, retailers, and market dynamics as a prominent e-commerce site. It's a gold mine for website data scrapers.
We'll look at the top APIs for scraping Amazon data without getting prohibited. This blog will save your precious time if you're looking for the finest tool to extract data from Amazon.
Let's get started!
Reasons Behind Scraping Amazon Data
If you try to sell any product online, some of the necessary steps are:
Competitor Analysis
Enhancing Your Product And Value Proposal
Learning Market Tendencies And Manipulating Them.
By extracting amazon data, you can simply collect, compare and monitor competitive product details, such as pricing, ratings, and availability. You cannot only assess their cost management, but can also uncover amazing offers for resale.
In the blog, we are providing few web scraping tools for scraping amazon data.
Why Use Web Scraping API?
Amazon is among the biggest online stores in history. As a result, Amazon has one of the largest databases of information about customers, items, ratings, sellers, market dynamics, and even user temperament.
Before we learn the specifics of data extraction, it's worth noting that Amazon does not support internet scraping. This is because the page structure differs depending on the product categories. Simple anti-scraping techniques are in place on the website, which may prevent you from gathering the information you seek. Aside from that, Amazon can tell whether you're scraping it with a scraper. Besides that, Amazon can detect if you are scraping it with a bot and will immediately block your IP address.
Amazon Web Scraping Tools For The Job
We'll scrape using a terminal and some curl requests to get the job done as quickly as possible even without the need to create a new project for each application we test. To test out, we've chosen five promising web scraping APIs.
Let us take each of them for a test and search out which is the best web scraping tool for amazon data scraping.
1. Web Scraping API
Web Scraping API is a program that enables us to scrape any web resource. It uses a simple API to extract HTML from any web page and returns ready-to-process data. It's useful for extracting product data, processing real estate, HR, or financial data, and even tracking market data. We can get all the information we need from a specific Amazon product page using Web Scraping API.
For instance, find an exciting product on the Amazon market.
The product page seen in the image above will be scraped.
Secondly, let’s get the product’s page
URL:https://www.amazon.co.uk/dp/B088CZW8XC/ref=gw_uk_desk_h1_vicc_sh_cto_kif0321?pf_rd_r=RYXBGN8C757Y9BD6W38B
We will be taken to the application's dashboard after creating a new Web Scraping API account. To test the application, Web Scraping API offers a free plan with 1000 requests. For what we're going to do, that's more than enough.
We'll go to the dashboard page and click the "Use API Playground" button. We can see the complete curl command here, which will assist us in scraping the Amazon product page.
Let's copy and paste the product's URL into the URL field. The preview of the URL command on the right will alter as a result of this.
After you've finished this step, copy the curl command and copy this into a new terminal session. If you follow the above procedure, you should have something similar to this:
When we press enter, Web Scraping API will return the product's page in HTML format.
According to our results, Web Scraping API was able to successfully obtain the required information in 99.7 percent of the situations, with a success rate of 997 out of 1000 queries and a 1-second latency.
2. ScrapingBee
ScrapingBee allows you to scrape without even being blocked using both traditional and premium proxies. It concentrates on collecting all the required data for rendering websites in a real browser (Chrome). Developers and businesses can scrape without worrying about proxies or headless browsers thanks to their vast proxy pool.
Let's try scraping the same Amazon page we scraped earlier. Make a new ScrapingBee account, browse to the app's dashboard, and paste the previous URL in the URL input.
In the "Request Builder" area, click the "Copy to clipboard" button. Open a terminal window and paste the copied code and hit “ENTER”.
With this command, we'll scrape the same page on the Amazon marketplace so that we can compare the results from each API.
According to our investigation, ScrapingBee was able to correctly obtain information in 92.5 percent of the situations with a rather large latency of 6 seconds.
3. Scraper API
Web scraper API is a development tool for web scrapers or a tool that extracts any data using a simple API call. The web service will manage proxies, browsers, and CAPTCHAs, allowing developers to achieve raw HTML from any website. Furthermore, the product will achieve a balance in functionality, dependability, and use.
We'll create a fresh account on Web Scraper API and use 1000 free requests for evaluating their crawling technology, exactly like we did before. We will be forwarded to the following page once we have completed the registration process:
ScraperAPI does not appear to offer the ability to change the curl query by writing the new URL at the first sight. This isn't a large deal. We'll start a new terminal window and paste the code from the "Sample API Code" field.
As we can see, the default URL that it’s being scraped is “http:/httpbin.org/ip”. We are going to change it to the escaped version of the product’s page URL presented at the top of the section. Change the previously presented link with the following one:
The final command should look something like this:
After pressing enter, the HTML code for the product's page will be shown. Of course, you can manipulate the generated data structure with Cheerio or any other markup parser.
ScraperAPI appears to be the finest option, with a success rate of 100% and a latency of less than one second.
4. Zenscrape
Zenscrape is a web scraping API of sorts that will return the HTML of any website, allowing developers to collect data faster and efficiently. By solving Javascript rendering or CHAPTCHAs, the program will allow you to fetch the website content seamlessly and reliably.
Once we complete the registration process as before, we will be readdressed to the dashboard page.
Copy and paste the product’s page URL in the URL input.
Scroll down to the middle of a page to get the curl command we need to scrape the Amazon data. Copy it to the clipboard by clicking the “Copy to Clipboard” button, then paste it into a new terminal window. It should look like this:
Unlike other web scraping tools, the result that will be displayed would be in HTML page format.
According to our analysis, Zenscrape has a 98 percent success rate, with 98 successful requests out of 100 and a latency of 1.4 seconds. This ranks it lesser than the preceding tools, but it has one of the most intuitive and elegant user interfaces, and it gets the job done.
5. ScrapingAnt
ScrapingAnt is a web harvesting and scraping solution that offers its users a complete online gathering and scraping experience. It is a facility that manages Javascript processing, the headless browser informs the management, proxy variation and rotation, and proxy diversity and rotation. This scraping API has the high availability, dependability, and feature flexibility to meet the needs of any organization.
As before, we go through the same process, initially, create an account on Scraping Ant and make use of its 1000 free requests for scraping amazon product data.
Replace our URL in the URL input field, copy the curl command to a new terminal window, and hit ENTER.
This will yield an HTML structure that we can parse using Cheerio or another markup parser. ScrapingAnt's key features include Chrome page rendering, output preprocessing, and scraping requests with a low risk of CAPTCHA check triggering.
According to our analysis, ScrapingAnt has a success rate of 100 percent and a latency of three full seconds. Although has one of the highest success percentages on this list, the 3-second latency is a major issue when scraping a large amount of Amazon product data.
Final Thoughts
We sought to figure out what the effective tool for the occupation was during this process. We were able to examine and analyze five scrapers and discovered that the outcomes were not that dissimilar. They're all capable of getting the job done in the end. Each scraper's delay, rate of success, amount of free requests, and pricing makes a difference. When it comes to scraping Amazon data, Web Scraping API is a good choice because it has one of the smallest latency (1 second) and a near-100 percent success rate. It has a free tier for those who don't need to make a lot of requests, as well as 1000 free inquiries if you just want to play about with it.
AScrapingBee is another web scraper we certify, however, the results are unsatisfactory. We have a hard time getting the information we needed on our Amazon goods with a success rate of only 92.5 percent and a somewhat long latency.
ScraperAPI is also one of the fastest scrapers we've come across. It has better effects in the level of technical criteria, with only a 1-second delay and a 100% success rate. Its disadvantage is the user interface, which appears to be the most basic. Another flaw is the price plan, which does not have a free tier.
Zenscrape features the most user-friendly interfaces of any scraper we have evaluated. WebScrapingAPI is the only one that comes close. Zenscrape has a 1.4-second latency and a 98 percent success rate.
ScrapingAnt is the most recent scraper we tested. It's an excellent option for extracting the Amazon information we require, but it's a little slow, with such a latency of around 3 seconds and a rate of success of 100%.
Finally, when it collects Amazon product information, all of the web scrapers we examined perform admirably.
Instead of trying yourselves, we recommend contacting iWeb Scraping services for genuine amazon data scraping delivery.
We are always available to deliver the best services.
https://www.iwebscraping.com/which-are-the-best-scraping-tools-for-amazon-web-data-extraction.php
1 note
·
View note
Text
Laptop on Rent Delhi, Noida, Gurugram INDIA
55 Laptop Shortcuts To Increase Your Productivity
Ever been in a situation when you are in a productive zone while working on your laptop and you have to take a moment to use the mouse or drag your cursor to complete your next action? How does it feel?
The moment your momentum takes a pause is one of the worst feelings ever because you're riding the horse of maximum productivity who just ate the creative power bar and is forced to slow down only to reach that highest gear of efficiency again.

We all have been there and through these situations. It doesn't feel right at all. First of all, we rarely achieve this samurai state of working in our day and then when we achieve it we are taking a break only because we are unaware of the few hacks or shortcuts we can take to avoid such pit-stops and continue to ride our momentum to task completions.
So here are a few keyboard shortcuts to save our precious seconds and streamline our work process. We should practice these regularly and add them to our arsenal.
Windows logo key to the rescue
Open or hide start screen - Windows Key or CTRL + Esc
Maximize/minimize your window - Windows Key + Up/Down Arrow (Up arrow for maximize and Down arrow for minimize) Laptop on Rent
Cycle through apps on the taskbar - Windows Key + T
Switch between open apps - Windows Key or Alt + Tab
Switch to Desktop - Windows Key + D or M
Shutdown options - Windows Key + X
Take a screenshot - Windows Key + PrntScr
Snap. Split the screen evenly between two to four applications.
Snap a window to the left side of the screen - Windows Key + Left Arrow
Snap a window to the right side of the screen - Windows Key + Right Arrow
Now snapping into the quarters after dividing the screen into 2 parts -
Windows + Up Arrow or Windows Key + Down Arrow
It's important to lock your computer whenever you walk away - Windows Key + L or to switch users.
Output your screen to a projector, connect to external monitors or broadcast to a wireless display - Windows Key + P
Open my computer or file explorer to view all your drives and folders - Windows Key + E
Move app from one monitor to another - Windows Key + Shift + (Left/Right) Arrow Key
Open ease of access center - Windows Key + E
Open quick link menu - Windows Key + X
Open Run dialog box - Windows Key + R
Search quickly in your computer - Windows Key + F
Find other PC's in your network - Windows Key + Ctrl + F
Selection and actions
Selecting a required area requires precision. And our touch screen PC's and sometimes even the mouse fail to deliver this accuracy.
Select all of the content in a given window - Ctrl + A.
Select rows in an Excel spreadsheet, blocks of text in Word or files in File Explorer - Shift + Click the first row or the first line, hold down the Shift key and then click the last row or line.
Iterate through words and select the desired area as per your requirements - Shift + Arrow Key.
Select two or more non-adjacent items at the same time - Hold down Ctrl and Ctrl + Click all the items. If you click without Ctrl being pressed down, you'll lose all the previous selections.
Basic actions that can be taken now –
Copy the content - Ctrl + C
Cut the selected the area - Ctrl + X
Paste the cut or copied content - Ctrl + V
Open formatting options in MS Word after selection - Ctrl + D
If you want to skip the wide variety of options presented by the Format Dialog Box simply use -
To make the text bold or to remove the bold effect - Ctrl + B
To make the text italic or to remove the italic effect - Ctrl + I
To add or remove the underline on the selected area - Ctrl + U
Everyone loves a fresh piece of content. Thesaurus or online search for particular words can add these vibes to your language. To do so, highlight the word and press Shift + F7 and Word shows a comprehensive list of related terms in a panel on the right side of the screen.
If you want to reverse your recent actions use UNDO - Ctrl + Z and if you want to reverse the undo command use REDO program - Ctrl + Y. If nothing was undone then the Redo option will not do anything.
If you want to order a print, use this command - Ctrl + P
Open task manager to view the currently active tasks and manage them in case a task is not responding - Ctrl + Alt + Delete
Permanently delete files by skipping their entry to recycle bin - Shift + Del
Zoom in - Ctrl + plus sign(+) | Zoom Out - Ctrl + minus sign(-)
Shutdown windows - Alt + F4
Save your work - Ctrl + S
Rename a file - Fn Key + F2
Rename multiple files at the same time by selecting all the files at once using the shortcuts mentioned above and then press F2. Enter the new name and Vola, all your files will have the same name and a number in the end.
Browsing made easy
You don't need to rush to your mouse to take you to the previous page. Alt + Left Arrow takes you to the previous page of the current tab and Alt + Right Arrow takes you forward. Computer on Rent
Eliminate unwanted format when you paste in a snippet of text from a web page or any other document by using Ctrl + Shift + V. This copies the content into your browsers clipboard, free of all the formatting provided by the page or document owner and from there you can select and paste the content into your desired file.
Restore the recent opened tabs in case you wildly closed the tab you were working on using CTRL + SHIFT + T. This works for all the major web browsers such as Chrome, Firefox, Edge, Internet Explorer.
Select or highlight cells or rows while editing a spreadsheet in Excel or Google Docs by using Shift + Space. Furthermore you delete the selected rows using Ctrl + minus sign(-). In case you wish to select all the rows below or above the current row, use Ctrl + Shift + Up or Down Arrow.
Hide or reveal the bookmarks bar using Ctrl + Shift + B
Open bookmarks menu in chrome in a new tab using Ctrl + Shift + O
If you want to send your email with the speed of light after you're done composing it use Alt + S Outlook or other desktop mail clients. If you want to perform the same lighting action in Gmail use Ctrl + Enter.
Initiate a quick reply to an email in Outlook using Ctrl + R
You can create your own custom keyboard shortcuts in Gmail by switching on the keyboard shortcuts settings.
Update, reload, Refresh the stuck pages using F5 or Ctrl + R in any Windows web browser.
Search the web pages for a particular phrase or your desirable words using CTRL + F
If you like what you are reading on the internet it's better to bookmark that page and revisit it and gain precious seconds by not taking your cursor or mouse to the star button, using CTRL + D.
Rent A PC
1 note
·
View note
Text
10 Command Prompt Tricks That You Should Know
10 Command Prompt Tricks That You Should Know
Hello guys, With an interface as attractive as Windows 10’s is, it’s easy to forget that the OS comes with a command line interface as well. Well, you might have forgotten the Command Prompt. A lot of things that the Command Prompt (also known as cmd) can let you do, are not even available in the GUI (graphical user interface) of the Windows OS, so it’s definitely something you should be using.…
View On WordPress
#10 Command Prompt Tricks#Autocomplete#Change the Color of the CMD Window#Change the Prompt Text in Command Prompt#Change the Title of the Command Prompt Window#cmd#cmd tricks#Command Cycling and Command History#Copy Command Output to Clipboard#Create a WiFi Hotspot#Encrypt Files using Command Prompt#Hide Folders using Command Prompt#List all Installed Programs#Open CMD Window Inside a Directory
0 notes
Text
How to make your terminal suck less
There comes a point in any Linux user's life where they have to figure out which terminal emulator to use. Chances are if you are using a desktop environment like GNOME (default with ubuntu) or KDE you’ve stuck with the stock terminal and not given it any thought, right? But doing this leaves a lot out when it comes to having a comfortable experience on Linux.
There are may options for terminal emulators, you could choose the slick-looking Hyper.jsor the GPU accelerated alacrity maybe even the utility-focused terminator. Each of these inherently has its pros and cons but ill have to say, in my mind, there is a terminal to rule them all - st.
st, also known as suckless terminal, is a small, lightweight, and fast terminal emulator from the suckless community. Before we talk more about st, we must talk about the driving force behind suckless. The suckless philosophy is to ‘focus on simplicity, clarity, and frugality. [to] keep things simple, minimal and usable‘ which means a lot for their programs, they are all fast light and efficient but on top of this, they have unrivaled modularity and customizability due to the simple, readable nature of their source code. This means that the members of the community can develop patches and changes independently of the master source code.
So why does this make st so good?
I’m glad you asked because there are a lotta things.
It can run on anything
It’s speedy as
there are no messy config files
It supports UTF-8 out of the box
clipboard support
true 256 colors
To someone who hasn’t done much research around the topic, this all seems kinda lackluster, but when you find something like even the beloved URXVT has issues with the clipboard every feature you can get is a bonus. What makes this even more impressive is this
| Emulator | Lines of code | |----------|---------------| | xterm | 65K | | urxvt | 32K | | st | <5K |
How do I get started
Now, that's easy, the steps are:
Clone the source repo
Make any config edits
Run sudo make install
1. Clone source repo
I have a GitHub repo with the patches I use applied e.g.
follow URLs by pressing alt-l
copy URLs in the same way with alt-y
Copy the output of commands with alt-o
Compatibility with Xresources and pywal for dynamic colors.
Default gruvbox colors otherwise.
Transparency/alpha, which is also adjustable from your Xresources.
zoom/change font size
copy text with alt-c, paste is alt-v or shift-insert
and lots more view it here
Download my fork with:
git clone https://github.com/manfromth3m0oN/st.git
2. Config edits
Now st does not have ‘traditional’ config files, this is because you don't just download a binary and run it, you compile st from source. So to edit the config of st enter into the cloned folder with cd st Now open config.h with your favorite text editor (I recommend nvim). All of the options are commented so I won't go over them here. There is nothing essential to change, unless you don’t use sh then you need to change the static char *shell = "/bin/sh"; line to your appropriate shell (e.g. ZSH or fish etc)
3. Compile and install
This step is probably the easiest all you have to do is install with sudo make install This works provided you have make and gcc installed if you don't just use:
sudo apt-get install make gcc OR sudo pacman -S make gcc OR install make & gcc with whatever package manager you have
Now you can start using st
Now just start the st binary however your distro or wm/de does so for i3 edit your i3/config file
# start a terminal bindsym $mod+Return exec st (or whatever *termname is in config.h)
Closing thoughts
st is not a terminal built for someone who is brand new to the Unix ecosystem, but using it from the beginning can teach you a lot about how your system runs. Use st, and all the other suckless utilities for that matter, to help further your understanding of Linux so that you can be the most efficient user you can. After all, that is what the modern Linux philosophy is.
Thank you all for reading
~ M
5 notes
·
View notes
Text
How Do I Merge Tracks? — Crazy Discussion board
These audio cutter software program program capabilities not only let you trim pointless parts from audio recordsdata, but also embody features like multi-format support, phase trimming, merge functionality, and a lot more. The Merge Clips dialog field launches. Though the audio quality is usually a bit staggering for the consultants as you may discover a slight bounce on the merge point, it does a good job for the novice. The fact that Merge MP3 is a portable software and requires no set up makes it wanted. So, you possibly can simply download the program, export it to your thumb drive and it is possible for you to to hitch MP3 files in conjunction on any LAPTOP with Windows OS. Repeat the process until all the audio tracks are merged. You can merge audio-only clips with different audio-only clips; a video clip will not be required for a merged clip. You can use just one clip containing video. Sadly, this system helps splitting solely the MP3 format, but when MP3s are all you need to work on, then this lightweight software is a good device to make use of. Just a few more issues to think about when playing MP3s on a automobile CD player or other in-automotive leisure system. Obtain and set up Merge MP3 if you want to convert audiobook information in MP3 format (see Resources). Be aware: For performance reasons, the Mass Merge Duplicates command processes a maximum of one hundred information. To merge greater than a hundred information, run the command repeatedly until all duplicates are merged. In addition to standard MP3 format, MP3 Toolkit helps most of popular audio & video formats like WMA, WMV, MP4, WAV, OGG, FLV, MOV, M4P, M4A and more, also supports prime quality audio like FLAC and APE. With MP3 Toolkit, you are able to convert, minimize, merge, rip and document MP3. With the monitor within the clipboard left click on the location of the other track the place you want to paste your music into. Should you just want to merge, click the position on the very end of the track and press Ctrl-V to add the music there. You'll be able to select any other place when you favor Merge MP3s that.
Nothing might be of as high stage as MP3 Cutter and Joiner that helps break and merge mp3s MP3 and WAV files in no time. You'll be even joyful to find that it will get installed actually quick (not various seconds) and also you see it in your desktop in a flash. The principle interface has two separate tabs, every for cutting and joining. After your audio recordsdata are merged and transformed to your chosen filetype, choose the "download" button and save the file to your computer or gadget. Again, it can save you it to your machine, a file-sharing medium like Dropbox or Google Drive, or you possibly can simply listen the merged audio on the web site. Official music video for "Would That Not Be Nice" by Divine Fits, taken from the album A Thing Called Divine Matches, out now on Merge Data. Apowersoft Free Online Audio Editor is an efficient tool which designed for editing audio information quickly. It enables you to reduce, trim, cut up, merge, copy and paste audio with nice ease. Using it, you additionally will be capable to append, combine, overwrite audio or add varied effects into it. It supports plenty of media file formats which embody MP3, AAC, OGG, FLAC, WAV, M4A and many different extra, so simply import the audio and re-create it instantly. Does exactly the one thing it must do completely. My venture involved making an attempt to merge 4 dozen or so tracks, so as, from every folder so each folder constituted one track, with every folder representing about an hours value of fabric. I anticipated to be able to do this easily in Audacity and was very, very flawed; it might've taken a half hour each in Audacity. With this software, I only had to Choose All in every folder and drag & drop them. They landed in the same order and took lower than 20 seconds to finish every. Only 20 seconds. I used to be anticipating flaws at such pace and located none; it labored perfectly on my cellphone. As soon as the recordsdata are dragged & dropped into the device, you simply Choose All again and choose Merge from the file choices. You may even enter metadata besides. Merge MP3 cho phép người dùng có thể thay đổi thứ tự các file Mp3 được ghép nối để có bản nhạc hoàn chỉnh theo ý muốn của mình. Người dùng cũng được hỗ trợ công cụ để nghe trước những file Mp3 này trước khi được ghép lại với nhau. Additionally to reverse would be nice, to slit mp3s into multiple recordsdata (preferably with silence detection). Choose to play the new output file that features the 2 MP3s you merged collectively. When the Merge Data dialog field opens, rigorously assessment the changes that can be made to the target record. One of the major avantages is that you can do batch adjustments. Load the recordsdata you wish to merge and begin the process. Mp3 Cutter Joiner will do it. When you intent to upload your tracks to OSM then don't upload this merged model. As an alternative upload a separate observe for each of your gadget. Alternatively, you possibly can merge music with the Audio Joiner internet app. That app merges MP3, M4A and WAV recordsdata together. This is how one can mix sound information with Audio Joiner. Audio MP3 Cutter Mix Converter lets customers cut MP3 for ringtones, merge two or more audio information, combine audio clips and alter the metadata fields like Artwork Cover, Music Album title, and so on.multi observe, Convert from one format to a different - MP3, AAC, WAV and the record of app options goes on.

Is there an easier approach to merge a number of mp3 files and save them as a single audio wav file? Let me know within the feedback. The ID3 tag of the first mp3 file might be used for the merged file (utilizing mp3cat -tag). Fortunately, there are some native tools constructed into Salesforce that will help you discover and merge duplicates. There are numerous ways to address the issue, however here is one easy example in Salesforce Lightning. Because MP3Wrap strips and replaces the ID3 tags with its personal data, ID3 is used to copy the tags from one of many information. MP3Val repairs any errors in the pre-merged files copied into the merged file or produced throughout the merging course of.MergeMP3 helps batch mode operation, joining total folders stuffed with audio information with just a few mouse clicks. Word: Ebix recommends clicking Sure when the system asks whether the supply contact ought to be deleted. If the supply file is just not deleted, two information with the same information will exist in the database. Additionally, some information is actually moved, not copied, to the target record. In consequence, referred contacts, documents and time log info are no longer present within the source file after the merge.
1 note
·
View note
Text
How To Merge PDF, MP3, Video And Text Paperwork In Windows 10
These audio cutter software program functions not only let you trim pointless components from audio files, but additionally embody options like multi-format assist, segment trimming, merge functionality, and a lot more. Weeny Free Audio Cutter must be another audio merging and splitting software program for you. The software program supports MP3, OGG, WMA and WAV information as the enter audio formats, the DRM protected WMA files excluded. Due to the built-in audio editor of Weeny Free Audio Cutter is very helpful for creating custom ringtones or managing lengthy audio recording files. One more reason to decide on the software program must be the completely different parameters you possibly can choose to regulate the audio information, such as the sampling frequency, merge mp3s channel mode and audio bitrate. Just add multiple audio information into the record, merge mp3s and merge these recordsdata into one audio file with the software program now. For MP3 Merger, it does not matter if the audio information you're merging are available in a single or different formats. Merge MP3 can be part of mp3 files in a wide range of audio formats, encoded with completely different codecs utilizing completely different settings. It's straightforward to hitch information you downloaded together even when all of them come in several codecs. One of many nifty things about Windows is that you can do numerous cool stuff using the base command line utilities that include the operating system. The copy command, for example, can truly merge MP3s into one. It is a free tool which can merge MP3 information. It could actually merge from 2 to 9999 MP3 information into one MP3 file to allow you to have the ability to handle your seperated MP3 musical recordsdata higher. After I open my apps, I have to click on "Run As Administrator", and the few events I forgot to do this and simply opened the app and tried merging the recordsdata, NOTHING happened - no merger handed off. Aside from merging, Free Merge MP3 additionally works as an audio converter which allows you exchange between practically all audio codecs in batches. Whereas Free MP3 Cutter Joiner performs the functions it advertises and exactly splits audio information, it doesn't have many different features. You'll be able to merge an unlimited number of recordsdata into an enormous MP3 file, however be careful not to exceed the free house on your exhausting drive when creating the new file. Becoming a member of MP3 files leads to a separate track saved in a folder of your choosing, so in case your enter files whole 2GB in measurement, your output file will take up the identical amount of hard drive house. Note: For efficiency causes, the Mass Merge Duplicates command processes a most of 100 data. To merge greater than 100 information, run the command repeatedly till all duplicates are merged. Moreover customary MP3 format, MP3 Toolkit helps most of widespread audio & video formats like WMA, WMV, MP4, WAV, OGG, FLV, MOV, M4P, M4A and extra, additionally supports top quality audio like FLAC and APE. With MP3 Toolkit, you are able to convert, reduce, merge, rip and report MP3. With the track within the clipboard left click on on the situation of the other monitor the place you wish to paste your music into. Should you just need to merge, click on the place at the very end of the observe and press Ctrl-V so as to add the music there. You possibly can select some other place should you choose that. No designer should work in a vacuum, and any piece of design can profit from a second set of important eyes. My expertise working with Merge's art director, Maggie Fost, was a constructive one despite the challenge we faced by advantage of working in several cities (Windfall, RI, and Durham, NC) and communicating via electronic mail and phone. Each of us would have most well-liked spending at least a while collaborating throughout the table from each other, however that is not at all times doable. Regardless, I consider the challenge benefited significantly from every of our insights and contributions to the design course of. The processing speed of Fre MP3 Joiner is remarkably good, because it took it beneath 5 seconds to merge 21 minutes of audio. Aconvert is another functional and great online mp3 merger software. The program helps merging of audio with identical bit price and format and can add up to 200MB. Mark Delete source constituent to delete the record when the method is full. To confirm that all info was merged accurately, do not mark this checkbox. The report could be deleted manually later. I would like to be able to merge a few MP3 tracks into one. The merge tracks characteristic lets you choose a monitor and merge it in an present one. A cool function once you have used 2- above: you'll be able to merge again the drum tracks onto one once you're carried out. If more than one duplicate entry exists, the Individuals-Merge Individual window shows the quantity of duplicate information in the type of a percentage that you would be able to select. Audio Editor - Merge, Break up And Edit is a sound modifying program for macOS. This software permits you to edit any audio file on your pc. You may immediately edit songs and recordings by slicing, copying, pasting and deleting the selected areas. The app is easy to make use of, you can save and open your venture. You can do your all working on timeline, it's so handy. The Spider Audio 's splitter circuit has but more uses. Routing a Remix aux send output to the splitter input allows you to create a 4-method parallel effects chain (simply take each cut up of the signal to an impact of your alternative). Using effects in parallel produces a different sound to chained results, permitting each processor to cleanly add its own therapy to the combo, unaffected by the others. The impact outputs will in all probability should be blended somewhere, so why not use the merging circuit on the identical Spider Audio, if nothing fancy is required? Simply take the last stereo output from each of the four chains and patch them to the inputs of the merge circuit. The merged output can then be routed to the original Remix send's aux return (see screen, right).
Bid now within the Merge Records auction to benefit the Southern Poverty Legislation Center and their initiatives to combat hate and bigotry. Auction winners obtain an exclusive edition of Superchunk's vinyl 7" launch. Whenever you export a undertaking to a format, reminiscent of a WAV or MP3 file, Audacity will merge the tracks together into both a stereo or mono file, relying on what you could have selected in your preferences. Why would anyone need to merge audio information collectively? In many situations, having a single audio file is just extra convenient than combating a number of fragments. For instance, you may wish to stick pieces of recorded conversations together to have a single presentation. Or you might need to merge fragments comprising a recording of a class, lecture or presentation. Lastly, you might just need to eliminate the clutter, merging a zoo of different formats into thematic mixes.
1 note
·
View note
Text
Observe Split And Merge
The Document Merge utility consolidates the contents of a "source" document into a "goal" file to create a single, merged file. The Merger allows you to take multiple audio information, rearrange them in irrespective of order you need, then export it as a single combined audio file. That method, I on no account need to open GarageBand or each other multi-monitor audio software program program. You may reduce audio recordsdata into MP3 or mix completely different MP3 into one file with ease. In order that they launched Merge. At this time, starting a small label can be as simple as firing up the laptop computer; pressing "File"; burning CDs and then posting samples on MySpace. However 20 years ago, the method was just a little more mysterious. As a part of the merging process, you choose the contact record you want to stay energetic and the opposite report to be merged and archived. Wild Apricot doesn't provide a mechanism to search for attainable duplicate data. Subsequent is go to the editor and spotlight the a part of the music that you just need to merge then hit the Edit button followed by Copy. After which move to the succeeding observe, on the boards editor move the cursor on the end of the track and press Edit > Paste Repeat this process till all of the mp3 information that you simply wish to merge for you project is completed. Merging, although not difficult, can feel intimidating—significantly if you're new to it! The most common error individuals make is attempting to complete the process too rapidly. Take your time as you merge to make sure you are coming to the right conclusions, retaining essentially the most accurate information, and documenting your conclusions. Also, the extra you realize about your ancestor while you begin the merging process, the simpler the process can be and the extra assured you'll feel that you are making the best judgment calls. This Sunday, June 4th, is Merge Information Night time at Durham Bulls Athletic Park and we're celebrating the occasion with a day full of songs from the Merge catalog. I do know that cat also works with textual content files, however what other file varieties might be merged by simply using cat and nonetheless stay usable (e.g., film files, and so on.) If anyone is aware of about this I'm very curious. The aim of the positioning is to mean you can create a video from a single MP3 and merge it with a picture as a cover. Merge MP3, MP3 Toolkit and Free MP3 Cutter Joiner are three different software program tools you may be a part of sound information with. By merging audio files, you may bring your music assortment together. Notice: For efficiency causes, the Mass Merge Duplicates command processes a most of a hundred records. To merge more than a hundred data, run the command repeatedly till all duplicates are merged. Moreover customary MP3 format, MP3 Toolkit supports most of in style audio & video formats like WMA, WMV, MP4, WAV, OGG, FLV, MOV, M4P, M4A and more, additionally helps top quality audio like FLAC and APE. With MP3 Toolkit, you are able to convert, cut, merge, rip and report MP3. With the observe within the clipboard left click on on the placement of the other monitor the place you wish to paste your music into. In case you just need to merge, click the place on the very finish of the observe and press Ctrl-V so as to add the music there. You can select any other position in case you choose that. Congratulations! You have just merged your first audio signal, and subsequently cut up it up again, effected different parts of it, after which re-united them as one sound with contrasting effects on both sides of the stereo spectrum. Not too shabby for twenty minutes value of work. I wouldn't use the setup I've used to show you how one can work with the Spider Audio in a manufacturing setting, but you must definitely know your approach round one of Reason's most neglected and deceptively easy devices and be capable of come up with tons of, if not hundreds, of fascinating and insane results. Free Merge MP3 is a handy audio merging device that may simply combine, merge or join MP3 information into one MP3 file to allow you to be capable of manage your separated MP3 musical information better. You'll be able to add audio information with completely different formats, together with WMA, MP3, MP2, MPGA, WAV, OGG, CDA, VOX, UNCOOKED, G721, G723, G726, MPC, AIF, AIFF, etc. On the same time, it could possibly also convert audio recordsdata between totally different audio codecs and the output quality is maintained very effectively. Exact parameters adjustment & format presets are supplied for skilled or informal use. LB: Definitely. TheyвЂve been on the label longer than virtually every other band. I think part of what makes Lambchop a quintessential Merge band is their weirdness, or the accidentalness of it all. Merge is unintentional; we started a document label, and it actually worked out, which is form of shocking. Lambchop was an outlet for Kurt WagnerвЂ"he was a carpenter, he worked installing flooring, and within the evening to blow of steam heвЂd go to this bar along with his mates and play with whoever wanted to get on stage. It somehow grew to become a successful band that has bought a lot of data over its lifetime, and has been critically acclaimed and brought very seriously.
A person can't be merged with a company If the profiles represent the identical entity, edit the profiles so that they are the identical sort of report. Do you've got one, or more, recordsdata you might want to merge collectively? If so, there are many applications accessible for Windows 10, and different platforms, that enable you to hitch numerous file codecs collectively. This is how one can merge MP3s, video files, PDFs (Moveable Doc Format) and txt text information collectively in Windows 10.The revered indie label Merge Data celebrated its ten-yr anniversary with Oh, Merge, a set of largely rare and unreleased tracks from a few of its most interesting artists. The album displays Merge's diversity, showcasing previous-faculty indie rock from Guv'ner, Spent, and label founders Superchunk together with the post-rock of Ganger and lo-fi electronica of Third Eye Basis , while still finding room for the pop classicism of East River Pipe , Impartial Milk Resort , and the Ladybug Transistor, who turn in a rendition of the Bee Gees ' "Massachusetts." The Mad Scene, the Magnetic Fields, Lambchop, Pipe, and Portastatic also contribute worthy tracks to Oh, Merge, making it a wonderful retrospective of a distinctive and achieved label.
1 note
·
View note
Text
4 notes
·
View notes
Link
nice to know some basics about shell and clipboard and file editing
0 notes
Text
Virtualbox is an open-source Type 2 hypervisor developed by Oracle. It can be used for home and enterprise purposes to create virtual machines that share the host’s resources. This tool was first developed in 2007 and from that time onwards, it has gained high popularity dues to its high performance and rich feature set. Virtualbox is a cross-platform tool that can be installed and used on Windows, Linux, OS/2, Solaris, macOS e.t.c. Virtualbox Guest Additions comprise a set of drivers and applications with the ability to optimize the performance and usability of the Virtual Machine. They are usually installed inside a Virtual machine after the guest OS has been installed. They offer the following features: Mouse pointer integration that provides seamless mouse support. You do not need to press the Host key to prevent the mouse from being captured by the guest OS. Drag and drop allows one to copy files between the Host and guest systems. Shared clipboard ton allow copy and paste between the host and guest systems. Shared folders allow one to share/exchange files between the host and guest systems. Time synchronization for better time synchronization between the host and guest. Better video support that provides accelerated video performance and automatic resolution adjustment. Automated logins also make it possible to automate logins on the guest. Seamless Windows that allows seamless running of the guest and host windows This guide will demonstrate how to install VirtualBox guest additions on Rocky /AlmaLinux 9 and enjoy the extended Virtualbox features. #1. Installing VirtualBox Before we begin, you need to have Virtualbox installed on your Rocky Linux 9 / AlmaLinux 9 system. The below guide can be used to achieve this; Install and Use VirtualBox on Rocky / AlmaLinux 9 Once installed, proceed as shown below #2. Install Build Tools and Kernel Headers After installing the Rocky /AlmaLinux 9 as the guest operating system, install the following build tools and kernel headers. sudo dnf install epel-release -y sudo dnf install dkms kernel-devel kernel-headers gcc make bzip2 perl elfutils-libelf-devel Ensure that both the kernel-devel versions and the kernel versions are the same: $ rpm -q kernel-devel kernel-devel-5.14.0-70.17.1.el9_0.x86_64 $ uname -r 5.14.0-70.13.1.el9_0.x86_64 If they do not match, update Kernel: sudo dnf update -y Now reboot the system for the changes to apply; sudo reboot now Now the two should be of the same version. #3. Install VirtualBox Guest Additions Now you are set to install VirtualBox Guest Additions on the Rocky /AlmaLinux 9 VM. There are two ways how you can mount the VirtualBox Guest Additions CD. These are: Using the Command-line Using the Virtualbox GUI First, identify the Virtualbox version on the host system: $ VBoxManage --version 6.1.36r152435 Option 1 – Using the Command-line From the VM’s command line, download the guest additions. Check out the latest release from the VirtualBox downloads page. You can pull the ISO file using wget to the /tmp directory: wget https://download.virtualbox.org/virtualbox//VBoxGuestAdditions_.iso -P /tmp Example on downloading latest release: sudo dnf -y install wget curl VER=$(curl -s https://download.virtualbox.org/virtualbox/LATEST.TXT) wget https://download.virtualbox.org/virtualbox/$VER/VBoxGuestAdditions_$VER.iso -P /tmp Mount the downloaded iso file to /run/media/ sudo mount /tmp/VBoxGuestAdditions_*.iso /run/media/ Install the guest additions in the Rocky /AlmaLinux 9 VM sudo /run/media/VBoxLinuxAdditions.run Sample Output: Verifying archive integrity... All good. Uncompressing VirtualBox 6.1.36 Guest Additions for Linux........ VirtualBox Guest Additions installer Copying additional installer modules ... Installing additional modules ... VirtualBox Guest Additions: Starting. VirtualBox Guest Additions: Building the VirtualBox Guest Additions kernel modules. This may take a while.
VirtualBox Guest Additions: To build modules for other installed kernels, run VirtualBox Guest Additions: /sbin/rcvboxadd quicksetup VirtualBox Guest Additions: or VirtualBox Guest Additions: /sbin/rcvboxadd quicksetup all VirtualBox Guest Additions: Building the modules for kernel 5.14.0-70.17.1.el9_0.x86_64. Power of the VM: sudo shutdown now Option 2 – Using the Virtualbox GUI You can also download the ISO file on your host system and mount it onto your Rocky /AlmaLinux 9 VM: Navigate to the VM’s Devices tab and load the VirtualBox Guest Additions CD Once loaded, proceed with the installation as above #4. Configure VM to use the Guest Additions Now there are several things we can configure. These are: Drag and drop & Shared Clipboard USB drive Shared Folder Drag and drop & Shared Clipboard Navigate to the VM’s settings->General->Advanced settings to enable drag and drop and shared clipboard between the host system and guest. USB drive This allows the host and guest system to access and use a single USB drive. To enable this, navigate to USB, and select the controller. You can now click on + to add the USB device. Shared Folders This is used to create folder shares between the host and guest system. To configure this, click on Shared Folders and set the host folder to be shared, the share name then the required permissions. You also need to specify a mount point on the VM as shown. Now power on the VM and enjoy the awesomeness. Once the system powers on, log in and verify if the shared folder is available at /mnt You can also switch between several view modes. You can also try drag and drop or the shared clipboard with copy and paste as shown. Final Thoughts The VirtualBox guest additions really play a big role in a closer integration between the host and guest operating systems. Now you can easily use the Rocky /AlmaLinux 9 with the extended Virtualbox featured. I hope this was significant.
0 notes
Text
Copy matlab text clipboard

#COPY MATLAB TEXT CLIPBOARD FULL#
#COPY MATLAB TEXT CLIPBOARD CODE#
#COPY MATLAB TEXT CLIPBOARD OFFLINE#
#COPY MATLAB TEXT CLIPBOARD PLUS#
#COPY MATLAB TEXT CLIPBOARD FULL#
See :help 'clipboard' for the full story -) gVim
:let :let clipboard setting has some more options (such as exclude filters) but.
You can also assign to these registers just like any register with let: Register, and p will paste the system's clipboard. Now, just using yy will go to the system's clipboard, instead of Vim's unnamed
Set it to unnamedplus to use + (CLIPBOARD, ^C).
Set it to unnamed to use * (PRIMARY, on select).
Referring to it manually all the time, you can set the clipboard variable: If you want to "automatically" interface with the system's clipboard instead of You could maybe use this as more convenient keybinds: noremap y "*y You can use these registers as any register. Only have a single clipboard, and both registers refer to the same thing (it On Windows & OS X there is no difference between + and *, since these systems
#COPY MATLAB TEXT CLIPBOARD PLUS#
+ uses CLIPBOARD mnemonic: CTRL PLUS C (for the common keybind).
* uses PRIMARY mnemonic: Star is Select (for copy-on- select).
Vim has two special registers corresponding to these clipboards: OS X and Windows systems only have one clipboard.įor X11 systems there are also number of tools that synchronize these clipboardsįor you so if they appear to be the same, you may have one of them running.
CLIPBOARD - This is copied with (usually) ^C, and pasted with ^V (It's.
PRIMARY - This is copy-on-select, and can be pasted with the middle mouse.
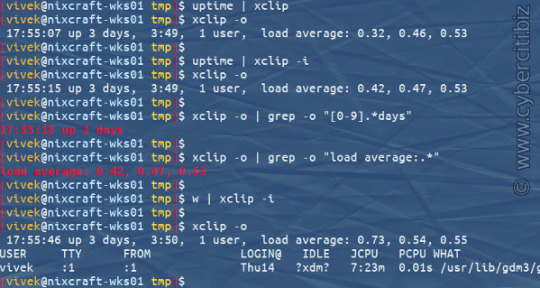
There are two clipboards which are independent of each other: When that time comes, you'll be glad xclip is there.For X11-based systems (ie. And, as I've discovered on a few occasions, you don't know when you'll need it. It is, however, one of those little utilities that really comes in handy when you need it. I'm sure you can find more uses to fit your needs. Is that all you can do with xclip? Definitely not. For example: cat /etc/letsencrypt/live/website/fullchain.pem | xclip -sel clip Combining the cat command and xclip is faster and more efficient than using an editor. I generate the HTTPS certificates for those sites using a tool called Certbot, and I need to copy the certificate for each site to GitLab whenever I renew it. Two of my websites are hosted using GitLab Pages. By using this command, I can convert a Markdown-formatted file to HTML using Pandoc and copy it to the clipboard in one fell swoop: pandoc -t html file.md | xclip -sel clip That said, many of those editors have an HTML mode.
#COPY MATLAB TEXT CLIPBOARD OFFLINE#
However, I never use a CMS's WYSIWYG editor to write-I write offline in plain text formatted with Markdown. Quite a bit of my writing goes into some content management system (CMS) or another for publishing on the web. Why not use xclip and the tail utility to quickly and easily do the deed? Run this command to copy those last 30 lines: tail -n 30 logfile.log | xclip -sel clip Opening the file in a text editor, scrolling down to the end, and copying and pasting is a bit of work. Say you're a system administrator and you need to copy the last 30 lines of a log file into a bug report. The pipe redirects the output of one command line application to another. There are other ways you can use xclip, and those involve pairing it with another command-line application. Chances are, you won't be doing that very often. Using xclip with other applicationsĬopying the contents of a file directly to the clipboard is a neat parlor trick. If you're one of those people (I am!), using the -sel clip option ensures you can paste what you want to paste. Many people are conditioned to use a right-click menu or to press Ctrl+V to paste text. What's the difference between the two commands (aside from the second one being longer)? The first command works if you use the middle button on the mouse to paste text. There are two ways to do that with xclip. Let's say you want to copy the contents of a file to the clipboard.
#COPY MATLAB TEXT CLIPBOARD CODE#
Or, if you're adventurous, grab the source code from GitHub and compile it yourself. To do that, use your distribution's package manager.
10 command-line tools for data analysis in Linux.
0 notes
Text
Best dxf to gcode converter

These letters corresponds to different types of commands. Everywhere you look in the code you will mostly see letters with numbers behind them. Each new line called block in the G-code can be roughly regarded as a new command. G-code has many dialects or variants, but most or all adhere to certain common rules. G-code is the most widely used programming language for controlling industrial machines such as mills, lathes and cutters as well as 3D-printers. Okay, thanks.The third suggestion on why to do such a thing involved creating toolpaths for machines. Cookies This site uses cookies: Find out more. Passionate about tech and science, always look for new tech solutions that can help me and others. It is a good DXF to GCode converter software as it allows you to generate GCodes for two different types of physical design engraving machines. However, this software only provides the output GCode on its interface that you can copy to clipboard but cannot save in a file.

To generate GCode for the Graving machine, you have to specify only a few parameters like X-coordinate, Y-coordinate, Angle, Cutting Parameters, Speed feed of cutetc.Īfter that, you can start the GCode generation. Ambiano pressure cooker hard boiled eggsĪpart from DXF, it does not support designs of any other file format. Besides this, you can also define various Toolpath parameters stepover, max depth, max length, angle, offset direction, etc. To create and edit designs, you can use its designing tools like Shapes Circle, Rectangle, Curve, etc. This output GCode generated by this software is specially designed for LinuxCNC software that can operate various machines like drive milling machines, lathes, 3d printers, laser cutters, etc. As soon as you import a DXF file, you can view its design on the main interface along with the name of all the entities and layers on the side panel of this software. 5 Best Free DXF to GCode Converter Software For Windowsīefore starting the conversion, you can define printing parameters namely number of plotter units per inch and resolution of the spline segment. In addition to that, you can also batch convert DXF to GCode as well as batch convert other supported files to Gcode at a time using it. After making changes to the design, you can start the conversion process. Plus, it is quite simple to use and anyone can operate it with ease. Go through the list to know more about these software. Plus, you can also make changes to input designs through some converters before performing the conversion.Ī few of these converters also give you the ability to include instructions related to designing machines and designing process to the Gcode.Īfter that, you can start the conversion process. In some software, you can also view the designs present in a DXF or another supported file. To efficiently perform the conversion, some of these software also let you batch convert DXF files to GCodes at a time. You need to feed the GCode of a DXF design that you want to physically create to designing or engraving machines. If you have any comments or suggestions on the program, please use this to communicate that information.This conversion is performed because you cannot directly create a physical design through a CNC machine or 3D printer feeding a DXF file. In order to make the Operational Amplifier Windows 3. The program was tested on windows xp professional. Particularly with opamp can use a simple calculation program is free sample circuits with electronic information displayed Inverting and Noninverting op amp, a good program can do calculations with ease. Op Amp Designer inverting non-inverting calculation. Visit them at Net Earlier in writing Proteus isis isis Library Model File can use in model simulations and I shared library files new files. Fincato, assumes no liability for use or misuse. Use this sofware at your own risk, the author, Paul D. No warranty for fit nor purpose is implied. It serves my purpose and it may be of some use to you. This was a quick and easy hack to get an image onto a PCB. Finally click on Output PCB choose and select and output filename. You may also scale the image and perform simple transformations. Although a color image may be chosen the program only looks for BW pixels. To use this program click on Input Bitmap Choose. Then paste the image onto your circuit board design.
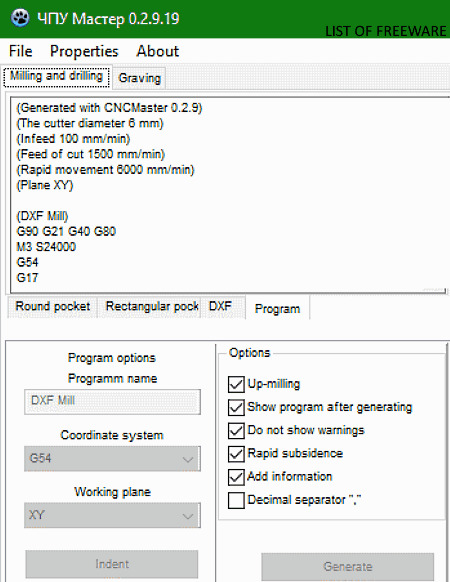
The ouput of this program is a generic Protel PCB file. This program was designed to allow importing of bitmap images onto a Protel PCB. Protel printed circuit converter program that you can use in a drawing program.
0 notes