#Customizable Formatting Options
Explore tagged Tumblr posts
Visit Tumblr Blog
Explore Tumblr blogs with no restrictions, modern design and the best experience.
Last Seen Tumblr Blogs


Fun Fact
Users from the US are the majority of Tumblr visitors.
Text
Purecode | Customizable Formatting Options
For those seeking greater control over their code, HTML formatter tools offer a range of customizable formatting options.
#Customizable Formatting Options#purecode#purecode ai company reviews#purecode software reviews#purecode ai reviews#purecode company#purecode reviews#HTML formatter tools
0 notes
Text
⭐ So you want to learn pixel art? ⭐
🔹 Part 1 of ??? - The Basics!
Edit: Now available in Google Doc format if you don't have a Tumblr account 🥰
Hello, my name is Tofu and I'm a professional pixel artist. I have been supporting myself with freelance pixel art since 2020, when I was let go from my job during the pandemic.


My progress, from 2017 to 2024. IMO the only thing that really matters is time and effort, not some kind of natural talent for art.
This guide will not be comprehensive, as nobody should be expected to read allat. Instead I will lean heavily on my own experience, and share what worked for me, so take everything with a grain of salt. This is a guide, not a tutorial. Cheers!
🔹 Do I need money?
NO!!! Pixel art is one of the most accessible mediums out there.
I still use a mouse because I prefer it to a tablet! You won't be at any disadvantage here if you can't afford the best hardware or software.
Because our canvases are typically very small, you don't need a good PC to run a good brush engine or anything like that.
✨Did you know? One of the most skilled and beloved pixel artists uses MS PAINT! Wow!!
🔹 What software should I use?
Here are some of the most popular programs I see my friends and peers using. Stars show how much I recommend the software for beginners! ⭐
💰 Paid options:
⭐⭐⭐ Aseprite (for PC) - $19.99
This is what I and many other pixel artists use. You may find when applying to jobs that they require some knowledge of Aseprite. Since it has become so popular, companies like that you can swap raw files between artists.
Aseprite is amazingly customizable, with custom skins, scripts and extensions on Itch.io, both free and paid.
If you have ever used any art software before, it has most of the same features and should feel fairly familiar to use. It features a robust animation suite and a tilemap feature, which have saved me thousands of hours of labour in my work. The software is also being updated all the time, and the developers listen to the users. I really recommend Aseprite!
⭐ Photoshop (for PC) - Monthly $$
A decent option for those who already are used to the PS interface. Requires some setup to get it ready for pixel-perfect art, but there are plenty of tutorials for doing so.
Animation is also much more tedious on PS which you may want to consider before investing time!
⭐⭐ ProMotion NG (for PC) - $19.00
An advanced and powerful software which has many features Aseprite does not, including Colour Cycling and animated tiles.
⭐⭐⭐ Pixquare (for iOS) - $7.99 - $19.99 (30% off with code 'tofu'!!)
Probably the best app available for iPad users, in active development, with new features added all the time.

Look! My buddy Jon recommends it highly, and uses it often.
One cool thing about Pixquare is that it takes Aseprite raw files! Many of my friends use it to work on the same project, both in their office and on the go.
⭐ Procreate (for iOS) - $12.99
If you have access to Procreate already, it's a decent option to get used to doing pixel art. It does however require some setup. Artist Pixebo is famously using Procreate, and they have tutorials of their own if you want to learn.
⭐⭐ ReSprite iOS and Android. (free trial, but:) $19.99 premium or $$ monthly
ReSprite is VERY similar in terms of UI to Aseprite, so I can recommend it. They just launched their Android release!
🆓 Free options:
⭐⭐⭐ Libresprite (for PC)
Libresprite is an alternative to Aseprite. It is very, very similar, to the point where documentation for Aseprite will be helpful to Libresprite users.
⭐⭐ Pixilart (for PC and mobile)
A free in-browser app, and also a mobile app! It is tied to the website Pixilart, where artists upload and share their work. A good option for those also looking to get involved in a community.
⭐⭐ Dotpict (for mobile)
Dotpict is similar to Pixilart, with a mobile app tied to a website, but it's a Japanese service. Did you know that in Japanese, pixel art is called 'Dot Art'? Dotpict can be a great way to connect with a different community of pixel artists! They also have prompts and challenges often.
🔹 So I got my software, now what?
◽Nice! Now it's time for the basics of pixel art.
❗ WAIT ❗ Before this section, I want to add a little disclaimer. All of these rules/guidelines can be broken at will, and some 'no-nos' can look amazing when done intentionally.
The pixel-art fundamentals can be exceedingly helpful to new artists, who may feel lost or overwhelmed by choice. But if you feel they restrict you too harshly, don't force yourself! At the end of the day it's your art, and you shouldn't try to contort yourself into what people think a pixel artist 'should be'. What matters is your own artistic expression. 💕👍
◽Phew! With that out of the way...
🔸"The Rules"
There are few hard 'rules' of pixel art, mostly about scaling and exporting. Some of these things will frequently trip up newbies if they aren't aware, and are easy to overlook.
🔹Scaling method
There are a couple ways of scaling your art. The default in most art programs, and the entire internet, is Bi-linear scaling, which usually works out fine for most purposes. But as pixel artists, we need a different method.


Both are scaled up x10. See the difference?
On the left is scaled using Bilinear, and on the right is using Nearest-Neighbor. We love seeing those pixels stay crisp and clean, so we use nearest-neighbor.
(Most pixel-art programs have nearest-neighbor enabled by default! So this may not apply to you, but it's important to know.)
🔹Mixels
Mixels are when there are different (mixed) pixel sizes in the same image.

Here I have scaled up my art- the left is 200%, and the right is 150%. Yuck!
As we can see, the "pixel" sizes end up different. We generally try to scale our work by multiples of 100 - 200%, 300% etc. rather than 150%. At larger scales however, the minute differences in pixel sizes are hardly noticeable!
Mixels are also sometimes seen when an artist scales up their work, then continues drawing on it with a 1 pixel brush.

Many would say that this is not great looking! This type of pixels can be indicative of a beginner artist. But there are plenty of creative pixel artists out there who mixels intentionally, making something modern and cool.
🔹Saving Your Files
We usually save our still images as .PNGs as they don’t create any JPEG artifacts or loss of quality. It's a little hard to see here, but there are some artifacts, and it looks a little blurry. It also makes the art very hard to work with if we are importing a JPEG.

For animations .GIF is good, but be careful of the 256 colour limit. Try to avoid using too many blending mode layers or gradients when working with animations. If you aren’t careful, your animation could flash afterwards, as the .GIF tries to reduce colours wherever it can. It doesn’t look great!

Here's an old piece from 2021 where I experienced .GIF lossiness, because I used gradients and transparency, resulting in way too many colours.
🔹Pixel Art Fundamentals - Techniques and Jargon
❗❗Confused about Jaggies? Anti-Aliasing? Banding? Dithering? THIS THREAD is for you❗❗ << it's a link, click it!!
As far as I'm concerned, this is THE tutorial of all time for understanding pixel art. These are techniques created and named by the community of people who actually put the list together, some of the best pixel artists alive currently. Please read it!!
🔸How To Learn
Okay, so you have your software, and you're all ready to start. But maybe you need some more guidance? Try these tutorials and resources! It can be helpful to work along with a tutorial until you build your confidence up.
⭐⭐ Pixel Logic (A Digital Book) - $10 A very comprehensive visual guide book by a very skilled and established artist in the industry. I own a copy myself.
⭐⭐⭐ StudioMiniBoss - free A collection of visual tutorials, by the artist that worked on Celeste! When starting out, if I got stuck, I would go and scour his tutorials and see how he did it.
⭐ Lospec Tutorials - free A very large collection of various tutorials from all over the internet. There is a lot to sift through here if you have the time.
⭐⭐⭐ Cyangmou's Tutorials - free (tipping optional) Cyangmou is one of the most respected and accomplished modern pixel artists, and he has amassed a HUGE collection of free and incredibly well-educated visual tutorials. He also hosts an educational stream every week on Twitch called 'pixelart for beginners'.
⭐⭐⭐ Youtube Tutorials - free There are hundreds, if not thousands of tutorials on YouTube, but it can be tricky to find the good ones. My personal recommendations are MortMort, Brandon, and AdamCYounis- these guys really know what they're talking about!
🔸 How to choose a canvas size
When looking at pixel art turorials, we may see people suggest things like 16x16, 32x32 and 64x64. These are standard sizes for pixel art games with tiles. However, if you're just making a drawing, you don't necessarily need to use a standard canvas size like that.
What I like to think about when choosing a canvas size for my illustrations is 'what features do I think it is important to represent?' And make my canvas as small as possible, while still leaving room for my most important elements.
Imagine I have characters in a scene like this:

I made my canvas as small as possible (232 x 314), but just big enough to represent the features and have them be recognizable (it's Good Omens fanart 😤)!! If I had made it any bigger, I would be working on it for ever, due to how much more foliage I would have to render.
If you want to do an illustration and you're not sure, just start at somewhere around 100x100 - 200x200 and go from there.
It's perfectly okay to crop your canvas, or scale it up, or crunch your art down at any point if you think you need a different size. I do it all the time! It only takes a bit of cleanup to get you back to where you were.
🔸Where To Post
Outside of just regular socials, Twitter, Tumblr, Deviantart, Instagram etc, there are a few places that lean more towards pixel art that you might not have heard of.
⭐ Lospec Lospec is a low-res focused art website. Some pieces get given a 'monthly masterpiece' award. Not incredibly active, but I believe there are more features being added often.
⭐⭐ Pixilart Pixilart is a very popular pixel art community, with an app tied to it. The community tends to lean on the young side, so this is a low-pressure place to post with an relaxed vibe.
⭐⭐ Pixeljoint Pixeljoint is one of the big, old-school pixel art websites. You can only upload your art unscaled (1x) because there is a built-in zoom viewer. It has a bit of a reputation for being elitist (back in the 00s it was), but in my experience it's not like that any more. This is a fine place for a pixel artist to post if they are really interested in learning, and the history. The Hall of Fame has some of the most famous / impressive pixel art pieces that paved the way for the work we are doing today.
⭐⭐⭐ Cafe Dot Cafe Dot is my art server so I'm a little biased here. 🍵 It was created during the recent social media turbulence. We wanted a place to post art with no algorithms, and no NFT or AI chuds. We have a heavy no-self-promotion rule, and are more interested in community than skill or exclusivity. The other thing is that we have some kind of verification system- you must apply to be a Creator before you can post in the Art feed, or use voice. This helps combat the people who just want to self-promo and dip, or cause trouble, as well as weed out AI/NFT people. Until then, you are still welcome to post in any of the threads or channels. There is a lot to do in Cafe Dot. I host events weekly, so check the threads!
⭐⭐/r/pixelart The pixel art subreddit is pretty active! I've also heard some of my friends found work through posting here, so it's worth a try if you're looking. However, it is still Reddit- so if you're sensitive to rude people, or criticism you didn't ask for, you may want to avoid this one. Lol
🔸 Where To Find Work
You need money? I got you! As someone who mostly gets scouted on social media, I can share a few tips with you:
Put your email / portfolio in your bio Recruiters don't have all that much time to find artists, make it as easy as possible for someone to find your important information!
Clean up your profile If your profile feed is all full of memes, most people will just tab out rather than sift through. Doesn't apply as much to Tumblr if you have an art tag people can look at.
Post regularly, and repost Activity beats everything in the social media game. It's like rolling the dice, and the more you post the more chances you have. You have to have no shame, it's all business baby
Outside of just posting regularly and hoping people reach out to you, it can be hard to know where to look. Here are a few places you can sign up to and post around on.
/r/INAT INAT (I Need A Team) is a subreddit for finding a team to work with. You can post your portfolio here, or browse for people who need artists.
/r/GameDevClassifieds Same as above, but specifically for game-related projects.
Remote Game Jobs / Work With Indies Like Indeed but for game jobs. Browse them often, or get email notifications.
VGen VGen is a website specifically for commissions. You need a code from another verified artist before you can upgrade your account and sell, so ask around on social media or ask your friends. Once your account is upgraded, you can make a 'menu' of services people can purchase, and they send you an offer which you are able to accept, decline, or counter.
The evil websites of doom: Fiverr and Upwork I don't recommend them!! They take a big cut of your profit, and the sites are teeming with NFT and AI people hoping to make a quick buck. The site is also extremely oversaturated and competitive, resulting in a race to the bottom (the cheapest, the fastest, doing the most for the least). Imagine the kind of clients who go to these websites, looking for the cheapest option. But if you're really desperate...
🔸 Community
I do really recommend getting involved in a community. Finding like-minded friends can help you stay motivated to keep drawing. One day, those friends you met when you were just starting out may become your peers in the industry. Making friends is a game changer!
Discord servers Nowadays, the forums of old are mostly abandoned, and people split off into many different servers. Cafe Dot, Pixel Art Discord (PAD), and if you can stomach scrolling past all the AI slop, you can browse Discord servers here.
Twitch Streams Twitch has kind of a bad reputation for being home to some of the more edgy gamers online, but the pixel art community is extremely welcoming and inclusive. Some of the people I met on Twitch are my friends to this day, and we've even worked together on different projects! Browse pixel art streams here, or follow some I recommend: NickWoz, JDZombi, CupOhJoe, GrayLure, LumpyTouch, FrankiePixelShow, MortMort, Sodor, NateyCakes, NyuraKim, ShinySeabass, I could go on for ever really... There are a lot of good eggs on Pixel Art Twitch.
🔸 Other Helpful Websites
Palettes Lospec has a huge collection of user-made palettes, for any artist who has trouble choosing their colours, or just wants to try something fun. Rejected Palettes is full of palettes that didn't quite make it onto Lospec, ran by people who believe there are no bad colours.
The Spriters Resource TSR is an incredible website where users can upload spritesheets and tilesets from games. You can browse for your favourite childhood game, and see how they made it! This website has helped me so much in understanding how game assets come together in a scene.
VGMaps Similar to the above, except there are entire maps laid out how they would be played. This is incredible if you have to do level design, or for mocking up a scene for fun.
Game UI Database Not pixel-art specific, but UI is a very challenging part of graphics, so this site can be a game-changer for finding good references!
Retronator A digital newspaper for pixel-art lovers! New game releases, tutorials, and artworks!
Itch.io A website where people can upload, games, assets, tools... An amazing hub for game devs and game fans alike. A few of my favourite tools: Tiled, PICO-8, Pixel Composer, Juice FX, Magic Pencil for Aseprite
🔸 The End?
This is just part 1 for now, so please drop me a follow to see any more guides I release in the future. I plan on doing some writeups on how I choose colours, how to practise, and more!
I'm not an expert by any means, but everything I did to get to where I am is outlined in this guide. Pixel art is my passion, my job and my hobby! I want pixel art to be recognized everywhere as an art-form, a medium of its own outside of game-art or computer graphics!

This guide took me a long time, and took a lot of research and experience. Consider following me or supporting me if you are feeling generous.
And good luck to all the fledgling pixel artists, I hope you'll continue and have fun. I hope my guide helped you, and don't hesitate to send me an ask if you have any questions! 💕
My other tutorials (so far): How to draw Simple Grass for a game Hue Shifting
28K notes
·
View notes
Text
Dynamic Banners: Making Your Business Stand Out!

Draw attention to your store, reinforce your brand, promote a sale, or convey any messaging that you want customers to know. Custom business banner is a good option for advertising as they are wallet friendly, memorable, simple to make, durable, and can effectively announce discounts and special offers.
Banner House offer personalized Business banners with photos, images, logos, symbols, special greetings and messages. We can custom design any theme business banner as per your requirement.
#advertising sign#business banners#Custom banners#Signage solutions#Promotional materials#Advertising banners#High-quality printing#Eye-catching designs#Brand visibility#Indoor banners#Outdoor banners#Durable materials#Large format printing#Customizable options#Professional graphics#Trade show banners#Marketing campaigns#Effective communication#Attention-grabbing#Versatile applications
0 notes
Text


hello pals ✨
I'm opening another type of commissions ! Little fancy portraits to use as icons for your socials or your dnd adventures 🧙♂️
Price is 130 euros, made beforehand through paypal invoice, and includes 1 character, front-facing or profile, with limited accessories. Canon or oc, I don't mind :> I'll need visuals references for the character, and eventually the colors you'd like me to use.
There are 7 option to pick for each customizable elements, for the moment. I'll try to add more options whenever I have the time and the inspiration strikes. I can send you a higher version for the crests by mail, I understand on such a little format there are a bit hard to decipher 🙈
Once your choices are made, you can send them to me with your character references under this format 1/A/a (number is for flower, caps for the frieze, and lowercase for the crest).
The crests can be a bit embellished, in the sense that I can put little dangly baubles here and here, if you wish !
If you're interested by this format or have any questions, you can send me a mail at [email protected] 💌
149 notes
·
View notes
Text

The end of the year can be tough for a lot of people. My goal is to make it a little bit brighter! Announcing once again the return of..
The Portal Holiday Spirit Initiative!
To help bring a smile to people's faces this year, I am sending FREE Portal-Themed Holiday Cards to anyone who requests one!
This year's cards follow the same format as last year: there is only one card design, this time featuring artwork from your's truly! The cards are still customizable to any Winter Holiday of your choosing, but you'll have to wait for your card to arrive in order to customize it (the method takes cues from the Portal game's sense of humor, and is very much on-brand).
This year is PHSI's 6th year! I'm so grateful to everyone who has participated over the years, whether you've reblogged and shared, requested cards, helped with artwork, or helped in other ways. You all are so amazing! Thanks for volunteering your time, talents, and support to help make PHSI a special fandom tradition!
If you would like to receive a Portal-Themed Holiday Card:
Visit bit.ly/PHSI-2024 ...
Answer the questions in the forms...
Wait for your card to be sent!
It's that easy! Card Requests are now open, and close on December 20th in order to give me enough time to make and send all the cards before the end of the year. Please submit sooner rather than later so I have time to finish them all!
Also, please don’t be afraid to request a physical card if you don’t live in the US! The card service I use says they ship worldwide and, while it might take a bit longer for you to receive your card depending on what country you live in, the cards will get mailed to whatever address you provide, domestic or foreign. Last year I mailed/emailed a total of 111 cards to the United Kingdom, Canada, United States, Brazil, Romania, Poland, Australia, Germany, India, Japan, and New Zealand!
I’m glad to be a part of the Portal Fandom and hope to bring a smile to others in the Fandom this year, just as in years past! Designing and emailing Holiday Cards takes time and effort, and sending physical cards is expensive. While it isn't a requirement to receive a card, I would greatly appreciate if you'd like to give $4 to cover the cost of your card or someone else's. Please visit ko-fi.com/247testing and click the Donate button if you want to help out. Thanks!
Answers for common questions and concerns below:
Worried about providing a mailing address, for whatever reason?
PHSI has an eCard option! All you need to provide is a name for me to call you by and an email address to receive your card!
Worried about requesting a card because you don’t live in the US?
PHSI mails to any address provided, whether domestic or foreign! However, please wait patiently for your card, due to the current global rate of shipping.
Worried that you can’t give $4 to cover the cost of your card or someone else’s?
Requesting a card from PHSI has been and will always be FREE! However, giving $4 to the initiative helps me pay for the printing service and postage to mail physical cards. I gratefully appreciate any contributions received, even if it’s just a comment saying thanks!
Worried because you don’t know how to support the artist of the card you received?
The artist’s social media is listed on the back of every card featuring their artwork. Look them up, commission them, reblog their art, and support them however you can!
Worried because you haven’t received your card yet?
Double check your email inbox and junk folders. I send everyone an email that either confirms your Holiday Card has shipped or includes your eCard! Physical cards take 1-2 weeks to arrive. If your physical card fails to show up after the first week of January, please reach out to me and I’ll send you a replacement eCard!
Worried because you received your card and don’t know what to do now?
Make a post about it! Include pictures, videos, or anything you’d like, and tag me in the post (@24-7-testing) so I can reblog it! If you don’t want to show your card off, that’s ok too!
#PHSI 2024#portal holiday spirit initiative 2024#6th year of phsi!#psa#please boost#portal fandom#still alive#aperture science#aperture laboratories#portal#portal 2#fandom tradition
259 notes
·
View notes
Text
digital notes guide part 1/5: setting up your aesthetic note-taking system 🎀


posted by: glowettee
hey study angels! ♡ mindyyy heree
omg so many of you have been asking about my digital notes setup, and i'm so excited to share all my secrets! this is going to be a 5-part series on creating the most aesthetic and effective digital notes ever. i'm going to start with the basics! this is super exciting because digital notes are literally unlimited, no wasting paper, and no perfect handwriting required.
♡ choosing your digital notebook
because the right foundation changes everything:
notion (my personal fave):
amazing for linking different pages
super customizable layouts
can embed literally everything
aesthetic cover images
databases for tracking progress
easy table of contents
goodnotes:
perfect for iPad users
feels like writing on paper
pretty digital stickers
custom paper templates
easy organization system
beautiful handwriting options
onenote:
works across all devices
infinite canvas (so dreamy!)
easy subject dividers
voice recording option
drawing capabilities
♡ essential digital tools
make sure you have these ready:
hardware needs:
reliable device (laptop/tablet)
stylus if using tablet (worth the investment!)
external keyboard (for faster typing)
good lighting for screen
comfortable study space
backup charging cables
software must-haves:
note-taking app of choice
cloud storage system
screenshot tool
pdf annotator
calendar app
backup system
♡ creating your aesthetic setup
because pretty notes = happy studying:
color scheme selection:
choose 3-4 main colors
pick 2-3 accent colors
create highlight palette
save hex codes
make color meaning system
maintain consistency
font selection:
main text font (i use garamond)
heading font (something cute!)
emphasis font
quote font
size hierarchy
spacing rules
♡ basic organization system
keep everything findable:
folder structure:
semester folders
subject folders
unit folders
topic folders
resource folders
revision folders
naming convention:
date_subject_topic
use consistent formatting
add emoji indicators
number sequence system
status markers
importance levels
♡ template creation
work smarter not harder:
essential templates:
lecture notes template
reading notes template
study guide template
revision notes template
project planner template
weekly overview template
template elements:
header section (date, subject, topic)
learning objectives area
main content space
summary section
question bank area
revision checklist
setting up your digital note system might take time, but it's so worth it! think of it like creating your perfect study sanctuary - every detail matters!
the next post will be getting into actually taking notes during class (and making them both pretty and effective!). for now, focus on setting up your perfect system.
pro tip: don't get too caught up in making everything perfect from the start. your system will evolve as you use it, just like how my notes looked completely different freshman year!
xoxo, mindy 🎀

#digitalnotes#studywithrme#studytips#productivity#studygram#studentlife#organization#girlblog#girlblogger#girlblogging#that girl#dream girl#it girl#self care#self love#glow up#becoming that girl#self help#self improvement#self development#study#studying#studyblr#college#rory gilmore#study blog#studyspo#study aesthetic#study motivation#wonyoungism
141 notes
·
View notes
Text
♡ Budget / Expenses Spreadsheet ♡ (Customizable)
Hi guys!!! I've gotten a few asks about budgeting and handling money better — a post on that is in the works now — but I figured I would share the budgeting/expenses Google sheet that I made and have been using for about two years.

This is a link to the spreadsheet & under the "read more" I'll kind of go into detail about what it is, how to use it, and how to customize it to fit your needs.
I like using Google Docs because it's easy to access on both phone and computer so regardless of where you are you can quickly open it up and note down if you spend something or see how much you have left to spend on something. (I'll make a follow-up post at some point going over the process of making a reasonable budget and all that good stuff a little bit later, this post is really just about what the document is and how to use it ^-^)

You need to make your own copy of the spreadsheet so that you can start to edit and use it! When you open up the document click on "File" then select "Make a Copy"

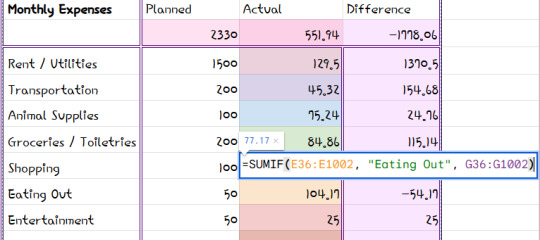
2. Now that you have your own copy let's look at the "Monthly Expenses" part of the document.

This is the main part - your monthly expenses. I have it broken down into different categories so I can see how much money I'm spending on what, and notice if I'm spending too much on something. DO NOT EDIT THE COLOURED BOXES. Those are auto-updating, so you don't want to edit them or they won't auto-update anymore.
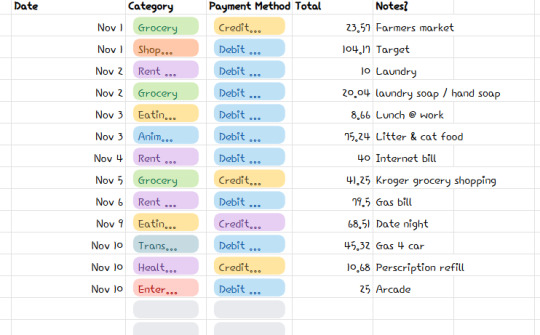
The monthly expenses table pulls data from this table down towards the bottom of the spreadsheet. This is where you can note down anything you spend money on. You have a drop-down menu to select what category the purchase falls under, what payment method you used, the total, and any notes about the purchase. The document will automatically add up any values for a category and put the total into the table at the top - that way you don't have to do any math at all its awesome.
CHANGING CATEGORY NAMES (please pay attention to this since if you change category names without following these steps it will not work anymore) You need to change the category name in 3 different places.
1- Change the name on the "Monthy Expenses" table 2- Change the name in the formatting code in the "actual" part of the "monthly expenses table" When you click on the value under the "actual" part of the monthly expenses table you should see something that looks like "=SUMIF(E36:E1002, "Eating Out", G36:G1002)" then just change "Eating Out" to whatever your preferred category name is.
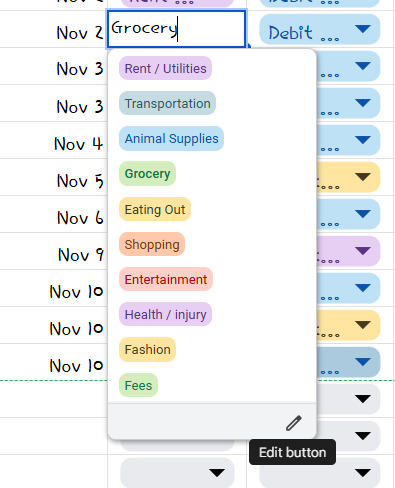
3- Change the name in the drop-down options of the daily purchases part of the document When you click on the dropdown menu, click the edit button. That will open the menu on the right-hand side of the screen, scroll down and change whichever category name you want to edit to the preferred category name.

Make sure that it is spelled the SAME WAY in all 3 of these places or it will not work properly!! I also made a short video showing how I would change the category "nicotine" to "fashion" to show you how it's done:
Once you've done that everything should auto-update properly, and the spending chart will update with the new name as well no need to edit the pie chart at all.
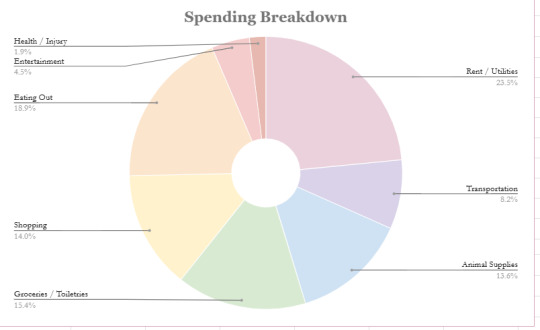
And this pie chart will automatically update to show you a visual of how much money you're spending on what (comparatively).
If you want to change the category names of the payment methods those you can just change in the drop-down edit menu - the names of those do not affect anything so you can change their names, add new ones, delete ones, whatever you want to do and you don't have to worry about anything else getting messed up.
3. The monthly income table is just tracking what your projected income vs. actual income was for the month
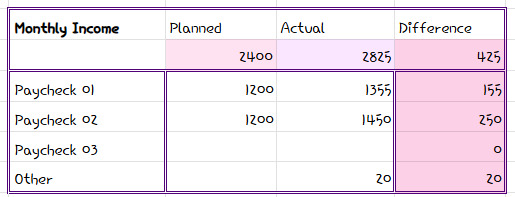
again, don't type in the coloured boxes, they will automatically update. I mostly use this as a sort of starting point for planning my budget so that I can sort of see how much money I expect to have for the month so I can plan around that number. This doesn't affect anything else in the document, so if you don't like it you can honestly delete it.
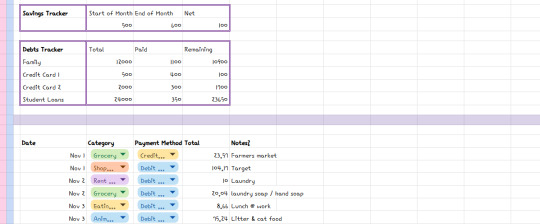
4. Savings and Debts trackers
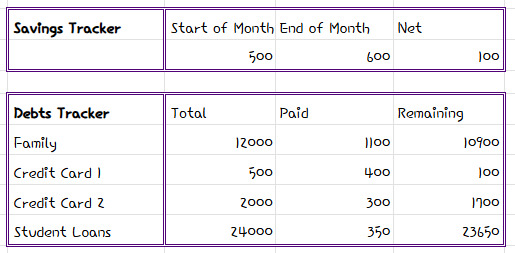
Again, these aren't tied to anything else in the document so you can delete them if you like. I mostly use these to see whether my savings are going up or down, and keep track of how much money I owe to other people T-T. One note I will make is that the debts tracker does not take interest into account so I honestly just manually update it every month. (It is not a very extensive tracker, and if you need to manage debt there are honestly better ways to do it than this, I just kind of have it in here as a visual for myself).
If you run into any issues or have any trouble formatting / customizing the document feel free to shoot me a DM or an ask and I will help you out!
And again, post about budgeting and fiscal responsibility and all that jazz coming later, but for now try it and see if you like it! See if you can log every purchase you make for a week! That way you'll be able to start seeing what you tend to spend your money on the most, and how much money you spend, and then we can kind of build a budget later on with that in mind ^-^
˗ˋˏ ♡ ˎˊ˗ I hope it's helpful! ˗ˋˏ ♡ ˎˊ˗
#expense tracking#resource#I mean I guess it's a recourse#I don't know how to tag this#documents#jiraiblr#landmineblr#i hope this all makes sense!!!
113 notes
·
View notes
Text
Friendly reminder that Wix.com is an Israeli-based company (& some website builders to look into instead)
I know the BDS movement is not targeting Wix.com specifically (see here for the companies they're currently boycotting) but since Wix originated in Israel as early as 2006, it would be best to drop them as soon as you can.
And while you're at it, you should leave DeviantArt too, since that company is owned by Wix. I deleted my DA account about a year ago not just because of their generative AI debacle but also because of their affiliation with their parent company. And just last month, DA has since shown their SUPPORT for Israel in the middle of Israel actively genociding the Palestinian people 😬
Anyway, I used to use Wix and I stopped using it around the same time that I left DA, but I never closed my Wix account until now. What WAS nice about Wix was how easy it was to build a site with nothing but a drag-and-drop system without any need to code.
So if you're using Wix for your portfolio, your school projects, or for anything else, then where can you go?
Here are some recommendations that you can look into for website builders that you can start for FREE and are NOT tied to a big, corporate entity (below the cut) 👇👇
Carrd.co

This is what I used to build my link hub and my portfolio, so I have the most experience with this platform.
It's highly customizable with a drag-and-drop arrangement system, but it's not as open-ended as Wix. Still though, it's easy to grasp & set up without requiring any coding knowledge. The most "coding" you may ever have to deal with is markdown formatting (carrd provides an on-screen cheatsheet whenever you're editing text!) and section breaks (which is used to define headers, footers, individual pages, sections of a page, etc.) which are EXTREMELY useful.
There's limits to using this site builder for free (max of 2 websites & a max of 100 elements per site), but even then you can get a lot of mileage out of carrd.
mmm.page

This is a VERY funny & charming website builder. The drag-and-drop system is just as open-ended as Wix, but it encourages you to get messy. Hell, you can make it just as messy as the early internet days, except the way you can arrange elements & images allows for more room for creativity.
Straw.page
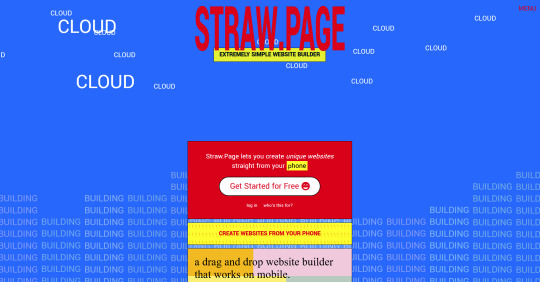
This is an extremely simple website builder that you can start from scratch, except it's made to be accessible from your phone. As such, the controls are limited and intentionally simple, but I can see this being a decent website builder to start with if all you have is your phone. The other options above are also accessible from your phone, but this one is by far one of the the simplest website builders available.
Hotglue.me

This is also a very simple & rudimentary website builder that allows you to make a webpage from scratch, except it's not as easy to use on a mobile phone.
At a glance, its features are not as robust or easy to pick up like the previous options, but you can still create objects with a simple double click and drag them around, add text, and insert images or embeds.
Mind you, this launched in the 2010s and has likely stayed that way ever since, which means that it may not have support for mobile phone displays, so whether or not you wanna try your hand at building something on there is completely up to you!
Sadgrl's Layout Editor

sadgrl.online is where I gathered most of these no-code site builders! I highly recommend looking through the webmaster links for more website-building info.
This simple site builder is for use on Neocities, which is a website hosting service that you can start using for free. This is the closest thing to building a site that resembles the early internet days, but the sites you can make are also responsive to mobile devices! This can be a good place to start if this kind of thing is your jam and you have little to no coding experience.
Although I will say, even if it sounds daunting at first, learning how to code in HTML and CSS is one of the most liberating experiences that anyone can have, even if you don't come from a website scripting background. It's like cooking a meal for yourself. So if you want to take that route, then I encourage to you at least try it!
Most of these website builders I reviewed were largely done at a glance, so I'm certainly missing out on how deep they can go.
Oh, and of course as always, Free Palestine 🇵🇸
#webdev#web dev#webdesign#website design#website development#website builder#web design#websites#sites#free palestine#long post#I changed the wording multiple times on the introduction but NOW I think im done editing it
490 notes
·
View notes
Photo

A coding challenge by southcodes
06. anything that counts as grid/masonry/colcade/multi-column
Haze
static preview / get code | buy me a coffee
features
two columns
up to 7 customizable links
optional sidebar width
optional posts width (for both single and grid posts)
supports Tumblr's new posts format (NPF)
localization strings
responsive
full list credits
#theme#themehunter#theme hunter#theme-hunter#tumblr theme#tumblr themes#responsive theme#southcodeschallenge
552 notes
·
View notes
Text
Hey Twitter(/Reddit) alternative seekers
Okay, fandom. Everyone's all worked all the time about this or that new alternative to Twitter and how it's either awesome or it sucks. I'm here to tell you about an OLD alternative: Plurk.
(Note that this was originally formatted for Twitter so forgive the jank thread paragraphing)
Disclaimer: This information is specifically aimed at people who use Twitter for fandom purposes; it is not intended to cover the exhaustive list of things that people use Twitter for (professional networking, art/photography promotion world news, etc). It's friend-centric rather than follow-centric, at least as the existing site culture goes.
So what is Plurk? It's a threaded microblogging platform dating back to 2008 that has only ever seen extremely niche use in English-language use. (Its primary userbase is Chinese-speaking.) It has a purely chronological timeline and a lot of privacy features that you haven't seen since the LJ era (assuming you're old enough to remember that).
Plurk functions through an exclusively-chronological timeline on your homepage (desktop) or in the app. Algorithmically sourced content? We ain't got it! (There is a different page for viewing top content but you have to go there specifically.) Instead, your timeline shows your own content and the content of other plurkers you friend or follow, and the occasional ad (MUCH more occasional than Twitter).
Each top-level plurk can be replied to, and this creates a chain of replies that can be used for conversation. Unlike Twitter and Reddit, replies don't form branching threads; each plurk is only one stream of conversation. Plurks with unread replies will be lit up as unread; however, they can be "muted" to stop them from giving you notifications.
(Two small caveats: You cannot mute your own plurks, and there is actually a cap of around 200 muted plurks. Mutes will fall off from the oldest, so you'll sometimes see an ancient plurk pop back up on your timeline if someone comes back to it. You can just mute it again.)
Your plurk timeline has a global privacy control. If your timeline is set to private, only people you have friended can see what you say on there. If your timeline is public, then anyone who comes to you page can see what you've posted, AND logged-in users can share your post on their own timeline with the "replurk" function (works just like a normal retweet), as well as reply to it.
There is also an "anonymous" option, which anonymizes you and also the names of everyone who replies (it randomly generates names like "lemon354" and "libra262" for repliers to differentiate them). Anonymous plurks will stay within your timeline if your plurk is set to private, but can be replurked if it's public.
BUT WAIT, THERE'S MORE, because individual plurks can also be given specific privacy levels: -> Friends only (if your timeline is public but you don't want this one getting around) -> Private to "cliques," which are Twitter circles but you can have more than one -> Individual users (including those not on your friends list - this is plurk's equivalent of DMs)
Your own plurk homepage is also insanely customizable, if you want to break out the CSS or even just have a custom background. You can also alter your display name (though the character cap is VERY short), and your display name color, as well as the standard avatar change. Usernames cannot be changed as a free user, but can be changed by paid users (more on paid options in a second).
Plurk also has its own image hosting, and a pastebin-alike plaintext called Plurk Paste that has no character limit. (The character limit for top-level plurks is longer than Twitter's.)
It also has CUSTOM EMOTES in addition to its (somewhat wild) default selection. They're similar to Discord's customs, except that you can use GIFs from the get go; what's restricted is the number of slots you have as a free user. (And size is capped at 48x48 px.)
Plurk has ads, but they're mostly unobtrusive (and can be clocked entirely with ad blockers, but I didn't say that). Plurk keeps the lights on through a subscription model called Plurk Coin, which is very cheap (under $2.50 USD/month) and can be gifted to other users. Coin gives you a number of benefits including the "Except" privacy option, more username colors, response editing, and a bunch more custom emote slots.
Concerned about harassment? Plurk has one of the most robust blocking systems in social media that I've ever seen. You block someone, and they can't see you (even by going to your profile) and you can't see them. That's it, done. Full no-contact.
NSFW/18+ content is allowed. There's a specific flag for it when you first post a plurk. Plurk does expect you to use that tag when appropriate, but is otherwise very forgiving of NSFW content, at least in my experience. (Again, though, English plurk is a very small community ATM).
The thing to remember about Plurk is that it is very much a remnant of an older internet, from the days before algorithms. Like Tumblr, it's a social media where you won't see anything if you don't reach out to follow and friend people. It predates "going viral" as a goal of internet usage. The goal is to talk to people.
As an aside: Since I originally wrote this up, I've seen rumors about Japanese fanartists moving to plurk and even seen one or two mentions of it in the wild on my Twitter timeline as people talk about following those artists. Fantastic! If that's you, then I hope you find this slightly more in-depth guide to features helpful.
If this sounds up your alley, I've made a public plurk specifically for Twitter refugees to come meet people and get more information on how plurk works! You can find it here.
Twitter version: [link]
Please replurk to spread this information about!
EDIT Sept 7 2024: You can mute your own plurks now, whoo!
711 notes
·
View notes
Note
How old does your blog have to be to see the desktop blog view thing?
You can just make it happen whenever you want!
In your browser, set it to desktop mode (available in the dropdown dots menu) and then just type in a user's name first, then tumblr.com
Example:
Fangirltothefullest.tumblr.com
If they have set up a desktop version it'll show
Users older than when mobile became a thing will have desktop versions as they are more customizable. You could even add music if you had the html code for a player.
If you wsnt one yourself, you have to enable custom themes.
Log into tumblr on your browser either on desktop or on mobile. I suggest logging in through desktop mode on your phone's web browser and opening the log in in a new tab so it stops trying to pop up the app.
Once logged in you can disable desktop mode in your browsers drop down to see things easier.
It'll probably up like this otherwise and be a formating nightmare.
Now.... once it's OFF desktop mode,
Go to the blog you want and hit blog settings in the drop down.
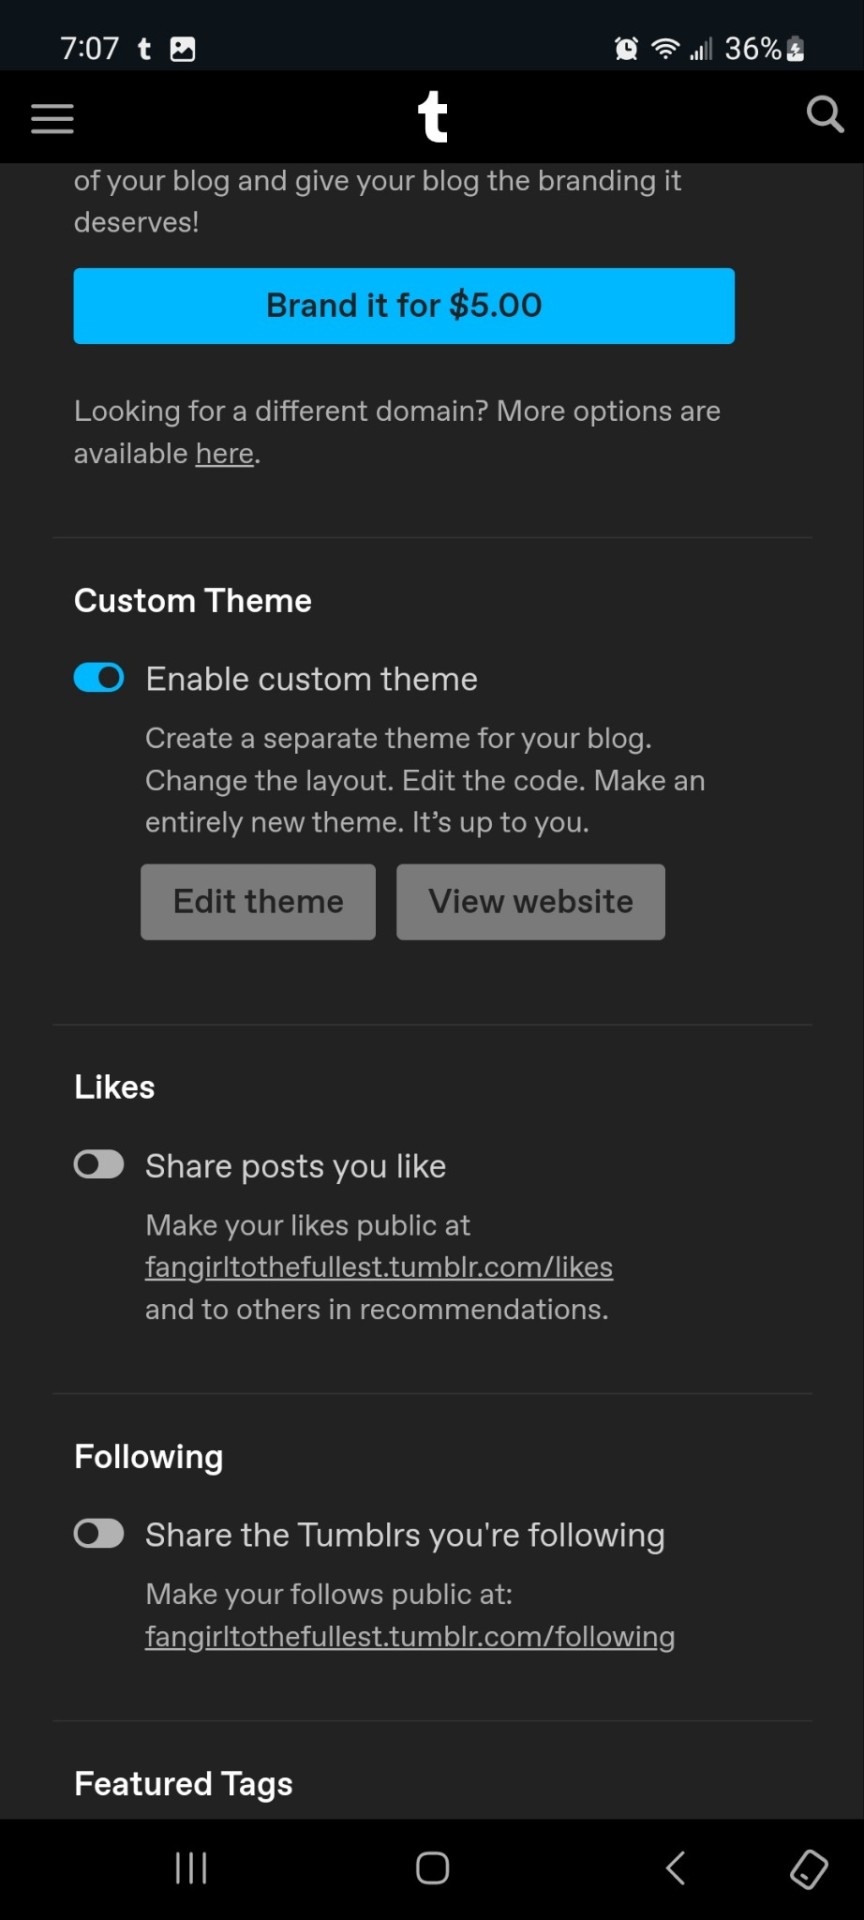
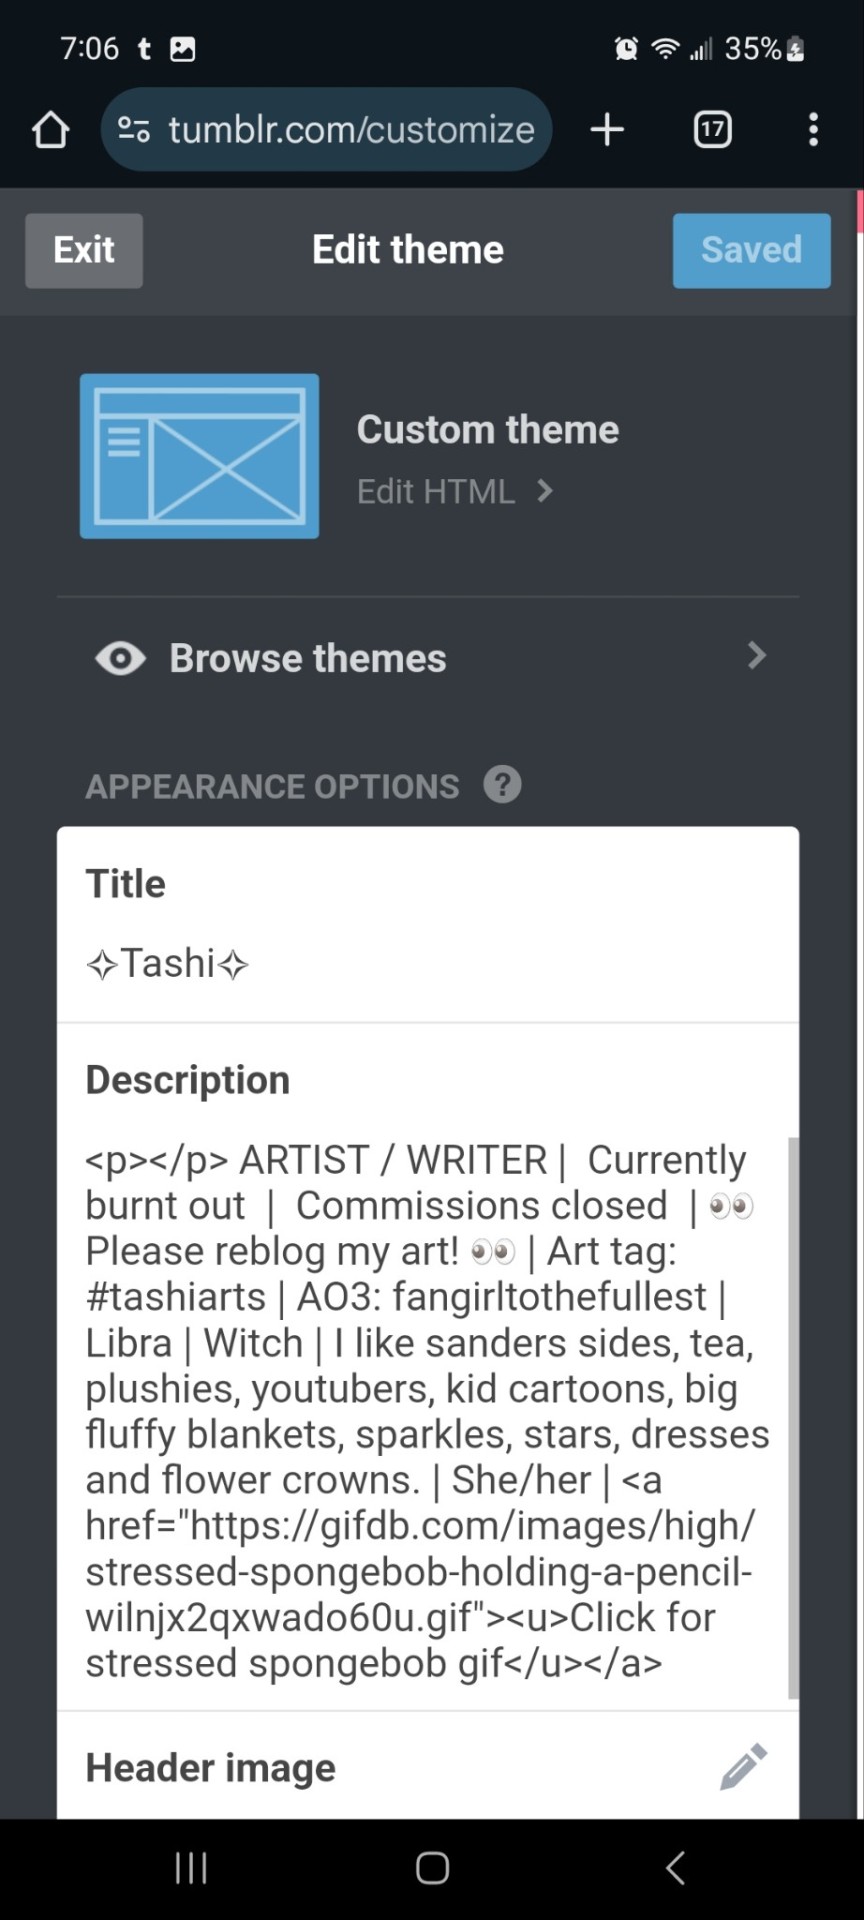
Enable the custom theme and hit the edit theme button. You'll be taken to a place that looks likethis:
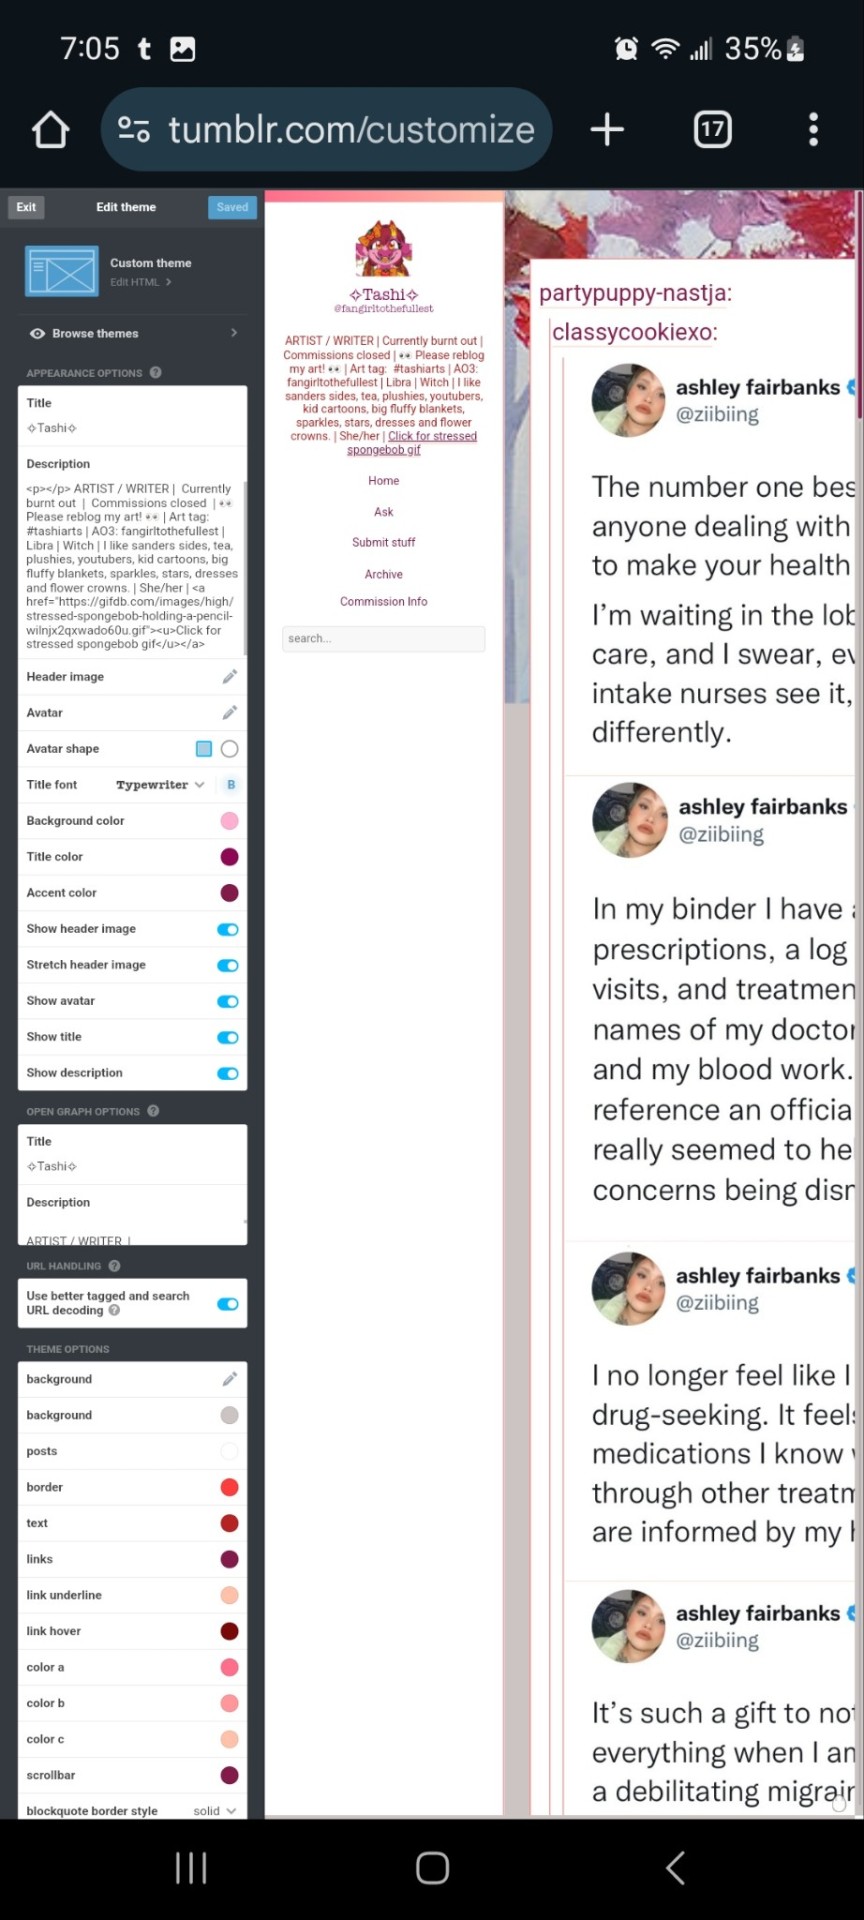
You can zoom in to hit the browse themes button:
It'll bring you here:
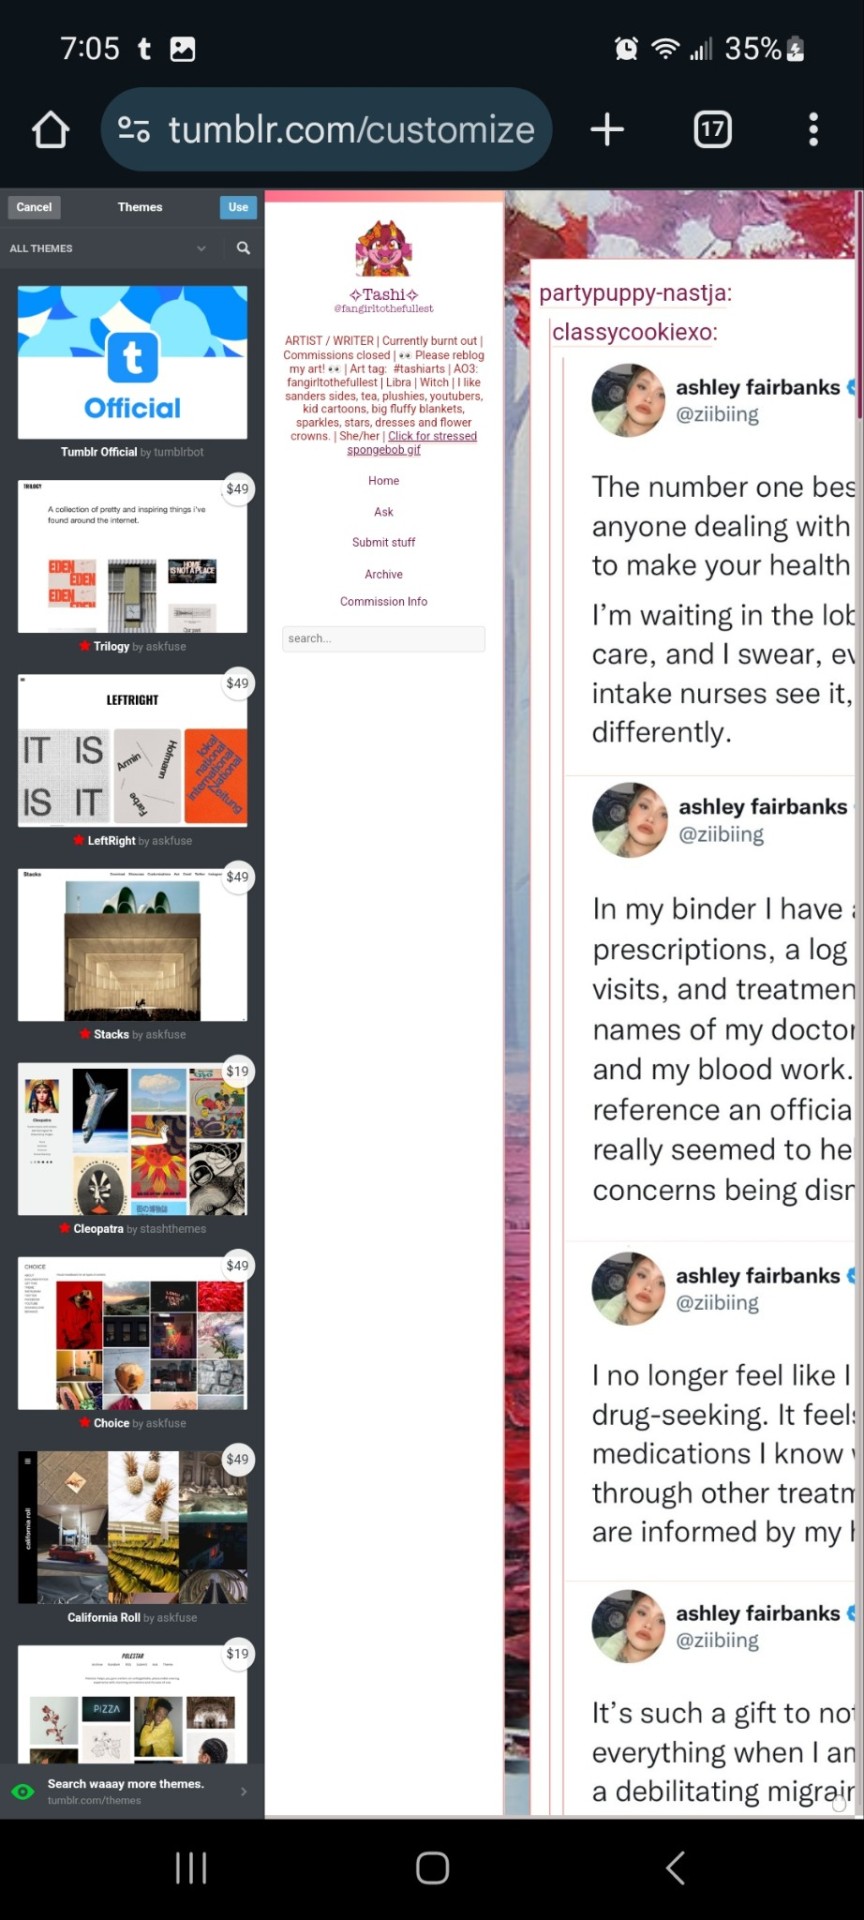
And you can choose what style you want! Hit save and you'll notice it gives you options to play around- choose a background, colour scheme. Fonts etc. Play with the html!
On a regular desktop this is easier to see so I suggest doing this on a laptop or pc.
Also fun fact you can hide secret messages in the html coding and if someone pops open the page source they'll see the surprise message in the code. XD just a fun thing if anyone wants to... say... make their own arg or send out secrets etc.
You CAN create whole pages with this feature too but they are unreliable and after this long it might be broken? So... yeah.
NOW REMEMBER: TO ACCESS THE DESKTOP PAGES YOU HAVE TO CHANGE THE LINK!
Forfeature. As a said above, my desktop link is fangirltothefullest.tumblr.com
I believe the mobile version has it as tumblr.com/fangirltothefullest.
Only people who have made a desktop version will have their blog show up if you'd like to test this festure.
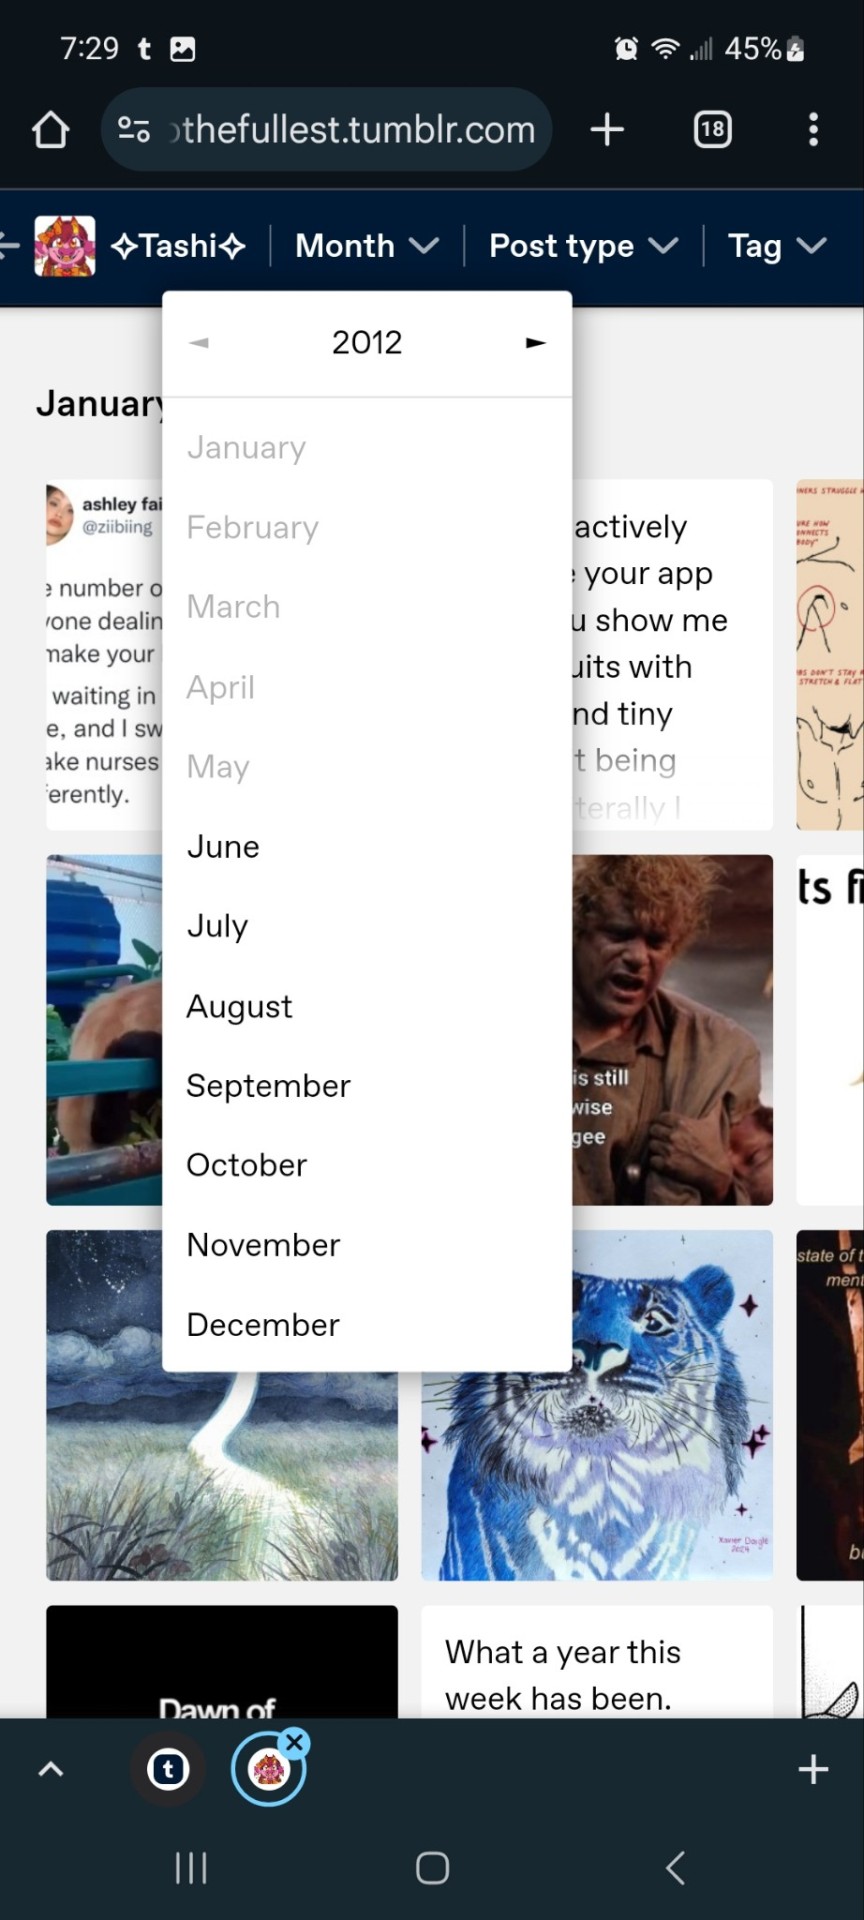
Also this is how you access everyone's blog archive! Because blog archives exist!
Mine would be:
Fangirltothefullest.tumblr.com/archive and you can't open it in mobile or it'll just pop up the mobile version which doesn't exist.
You wsnt this page which let's you find the earliest things a blog has posted. So I created this blog in june 2012 lol.
It works for tags too to show you ONLY the contents of that specific tag
Fangirltothefullest.tumblr.com/tagged/tashiarts/
And if you want a tag in order you add /chrono to the end to get it chronologically sorted from the earliest posts in the tag.
Fangirltothefullest.tumblr.com/tagged/tashiarts/chrono
I hope this helps!
NOW EVERYOE GO HAVE FUN MAKING COOL DESKTOP VERSIONS OF YOUR BLOGS!
31 notes
·
View notes
Note
Since you've mentioned that you use Scrivener as a word processing software, I have a bit of a weird-ish question. I have looked at the programme and it seems incredibly useful, and then I looked at the pricetag and- gulp.
I currently use Word which costs 5 euros per year thanks to university, but am thinking about switching to another programme that isn't related to my uni as I feel too paranoid about my smutty fanfic ideas being looked at by my uni and them disapproving of my writing. XD (Word keeps marking "fuck" with a squiggly line and suggesting I choose another word to avoid offending my readers, but if canon doesn't give Barclay some holographic MMF action taking place during "A Fistful of Datas" and turning both his holographic partners into holographic Data and therefore inducing maximum tension and insecurity due to feelings in poor sandwiched Barclay whenever he meets actual Data after that, I will have to write it myself! :P )
According to the website where one can buy a Scrivener license, one pays for the current version of it and will have to buy later versions anew if I haven't misunderstood. You seem to have used it for quite a while, and I haven't managed to find out when the different versions came out. I know the current one is 3, but I am unsure how much time passed between 1 and 2 and 2 and 3, and am unsure whether it's a good idea to buy a license now or whether it would be wiser to wait if it's likely that another version might be released in the near future (that is within one year for example) because then I might wait a little while with my purchase, heh. It probably sounds quite stingy but I am solely getting it for my tiny and too seldom indulged hobby of writing fanfic, and currently have to kinda sorta pay more attention to my wallet and where its contents go, so to say, which is why I'm hesitant.
The question basically is: As a (probable?) long-time user, do you think it's likely a new version of Scrivener will be released within the next year or so or do you think it's likely the current version will be tha latest to purchase for a longer while than 1-2 years?
I hope this rambly mess makes sense, haven't really slept for quite some time, so I am sorry if this is terribly incomprehensible. Sorry for the weird stingy question. Have a nice day and I hope you have slept and will sleep better than I currently do, heh!
--
I've only used it for like three years.
A quick google suggests that Scrivener 2 was released in 2010. 3 was released in 2017 basically to keep up with OS changes.
(IDK what you searched, but this isn't hard to find, dude.)
Scrivener is a fairly... old-fashioned style of software, I guess I'd call it. Some dude wrote himself a program to write his own novel and then people liked it. Some other guy decided to port it to Windows.
They update approximately never. When they do, recent buyers of the old one upgrade for free and everybody else gets like half off. The trial period is 30 days of actual use. The current retail license for 3 is only like sixty bucks. It's a commercial product, but... not like you've been trained to expect by your average modern software that wants to nickle and dime you at every turn.
Do you need Scrivener? Well, no. Not unless you want customizable high-level ebook output formatting and fancy features like that. You could just use some other free option if you just want to type stories in something that isn't Word. But Scrivener is priced extremely low for what it is.
159 notes
·
View notes
Text

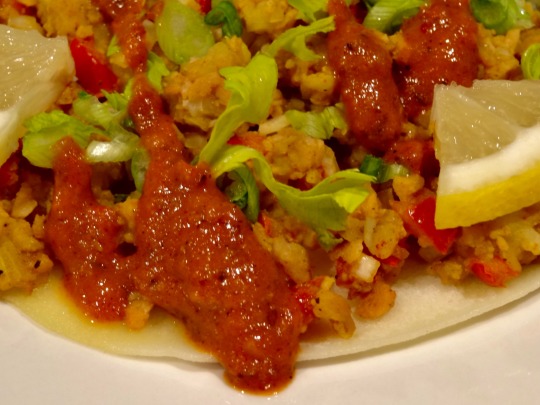
[ID: First image is a thin crèpe topped with ground 'meat,' herbs, and tomato, and garnished with lemon. Second image is a close-up of the same crèpe with a thick red sauce drizzledover it. End ID
𑐔𑐟𑐵𑑄𑐩𑐬𑐶 / चतांमरि / Chatamari (Newari rice crèpe)
𑐔𑐟𑐵𑑄𑐩𑐬𑐶 / चतांमरि (chatā̃mari), sometimes called "Newari pizza," are rice crèpes made plain or with a savory topping. Chatamari are a popular festival food among the indigenous 𑐣𑐾𑐰𑐵𑑅 / नेवा: (Naivāḥ / Newa) people, most of whom live in the 𑐣𑐾𑐥𑐵𑑅 𑐐𑐵𑑅 / नेपाः गाः (Naipāḥ gāḥ / Nepa Valley) in central Nepal. [1] They are regarded as a near-compulsory addition to the table for holidays including 𑐴𑑂𑐩𑐥𑐸𑐖𑐵 / म्ह पूजा (mha pūjā) and 𑐡𑐶𑐐𑐸 𑐥𑐹𑐖𑐵 / दिगु पूजा (digu pūjā), when they are served as snacks and appetizers.
A chatamari consists of a thin, fried crèpe, fluffy on the inside and crispy around the edges, and an optional juicy, well-spiced topping. Common toppings are vegetable (with black-eyed peas, potato, and/or soy chunks); meat (with minced chicken or buffalo and tomato); a cracked egg; or some combination thereof. Ginger, garlic, red onion, cumin, turmeric, and sometimes red chili powder and coriander add bite and aroma. To cook chatamari, a thin layer of batter is spread on a tawa, and the batter is topped; the whole is then covered with a clay conical lid and left to steam.
This recipe is for a 𑐎𑐷𑐩𑐵 / कीमा (kīmā; minced meat) chatamari with potato, but you can try replacing the meat substitute with cooked black-eyed peas, replacing the potato with more meat, or replacing the meat and potato with vegetables of your choice (try green peas, julienned carrots, and green onion)—the basic format of this dish is highly customizable.
The Nepali language is increasingly the language of broadcast, education, and even the home, to the detriment of other languages including the Newa language Nepal Bhasa (𑐣𑐾𑐰𑐵𑑅 𑐨𑐵𑐫𑑂 / नेवा: भाय्, nevāḥ bhāy). Scripts historically used to write Nepal Bhasa and Sanskrit have been almost entirely replaced with Devanagari. 𑐥𑑂𑐬𑐔𑐮𑐶𑐟 / प्रचलित (prachalit; lit. "common") was the script used by literate Newa until it began to decline at the turn of the 20th century; the 1960s governmental policy of सांस्कृतिक एकता (Nepali: sā̃skr̥tik ektā; cultural unity) further marginalized it.
Revival efforts have begun, which claim Prachalit (and the ornamental script Ranjana, also used to write Nepal Bhasa and Sanskrit) as parts of Newa identity, and seek to teach them at fairs and in workshops. A process of "ethnicity-building" and identity formation within Nepal, including pushes to use students' mother tongues as the language of instruction (with Devanagari as a "common" script) and to use minoritized languages in television and radio broadcast, have been ongoing since the 1990s.
[1] Terminology is given in Nepal Bhasa unless otherwise specified, in Prachalit followed by Devanagari script. "𑐔𑐟𑐵𑑄𑐩𑐬𑐶," "𑐡𑐶𑐐𑐸 𑐥𑐹𑐖𑐵," and "𑐎𑐷𑐩𑐵" are my transliterations from Devanagari into Prachalit. Latin transliteration is ISO 15919 standard except: "च" ([t͡ʃə]) is rendered "cha" and not "ca." Where two Latin phrases are given, the first is ISO from Devanagari, and the second is the typical English-language spelling or phrase.
Recipe under the cut!
Patreon | Paypal | Venmo
Ingredients
Makes 4 large.
For the topping:
3/4 cup (74g) textured vegetable protein + 1/2 cup (118mL) broth
Or 1 1/2 cup ground beef substitute of choice
1 russet potato (200g) (optional)
2 roma tomatoes, minced or thinly sliced
1 small red onion, minced or thinly sliced
1 green chili, diced or thinly sliced
1/2-inch chunk (5g) ginger, peeled and grated or pounded
2 cloves garlic, grated or pounded
1 tsp ground coriander
1 tsp ground cumin
1 tsp ground turmeric
1 tsp red chili powder (substitute sweet paprika to reduce spice level)
1 tsp meat masala (optional)
2 Tbsp neutral oil (if not including 'egg')
Cilantro, to top
For the egg (optional):
2 Tbsp yellow mung flour or chickpea flour (besan)
1/4 cup coconut milk
1 tsp kala namak (black salt)
You may also use any other egg substitute. This one is inspired by Vietnamese bánh xèo. The coconut milk provides binding and fat; the final topping will not taste of coconut. You may replace it with any neutral oil.
For the batter:
1 1/2 cup (240g) white rice flour
About 1 1/2 cup (350 mL) cool water
Mustard oil, to fry
The chatamari in the photo is served with achar.
Instructions
For the batter:
1. Measure flour into a bowl. Pour in water slowly while whisking until a smooth, pourable batter (the consistency of crèpe batter) forms. Set aside to rest while making the filling.
For the filling:
1. Peel and cube potato, then boil until soft. Mash thoroughly with a bean masher or fork.
2. Hydrate TVP in broth or stock (I used water with 1/2 tsp vegetarian beef stock concentrate) for 10 minutes.
3. Mix potato, minced tomatoes and onion, ground 'meat', spices, and 'egg' together in a large mixing bowl until well-combined.
To assemble:
1. Heat a large tawa, comal, or nonstick skillet on medium. Fill a ladle with 100 mL (a bit less than 1/2 cup) of batter, and pour it into the center of the skillet; it should become round on its own. Thin it out a bit with the bottom of the ladle.
2. Cover the top of the batter with the topping, leaving a bit of space on the edge. Optionally, add about 2 tsp of oil around the edges of the chatamari to crisp.
3. Lower the heat to low and cover. Cook for 7 minutes. Remove chatamari onto a plate.
If the rice pancake cracks, your batter is too thin; try resting it, uncovered, for 5-10 minutes, then stirring it and trying again.
4. Raise heat to medium for a minute. Add another ladle of batter, top the chatamari, add oil, lower the heat and cover to cook as before. Repeat until batter or filling runs out.
97 notes
·
View notes
Text
Yesterday I finished moving to Firefox so here's some extensions. First, the serious ones:
AdBlocker Ultimate: Your run-of-the-mill adblock. I chose this one instead of uBlock since I'm fairly sure uBlock was giving me problems on Chrome and I don't wanna repeat the experience. You can use the "Block Element" feature to get rid of all the new annoying Tumblr features, it's easy.
ClearURLS: Removes tracking from URLs.
Decentraleyes: Protects from tracking & targeted ads.
DuckDuckGo Privacy Essentials: More tracking, cookies, etc etc protection.
Privacy Badger: More tracking protection.
Shinigami Eyes: Marks transphobic blogs/accounts/profiles red.
Alright now some less serious, more fun ones:
Enhancer For Youtube: Gives you a highly customizable utility bar with features like simple screenshotting, pop-up players, volume enhancement, & other things. Also has the ability to alter your YouTube theme and toggle settings that'll stop pesky YouTube tabs from automatically starting.
Firefox Color: Custom themes for dummies! It doesn't customize everything but it gets pretty close. I think this would be a good tool for folks who need high contrast themes and can't find pre-made ones suited to their needs. Also comes with a few pre-made themes you can either use or use as bases.
LanguageTool: A spelling and grammar checking program that works in many languages and on all websites!
OneTab: Turns tabs into lists. Fantastic for when you're knee-deep in hyperfixation/special interest territory, or even for research.
Turbo Download Manager: Helps with frustrating downloads.
Video DownloadHelper: Gives you options to download any video from your tabs in multiple formats. Also has the option to download and convert to another format. [Update: This one requires a paid subscription AND externally downloaded program for these features. Nevermind.]
XKit Rewritten: Most Tumblr users already know of xKit but I'm including the link nonetheless! This kit makes Tumblr on PC enjoyable.
Custom Scrollbars: Makes your scrollbar pretty :)
Also, Firefox has their own page of useful add-ons, like Facebook containers and note-taking extensions. There's also a ton of themes. I don't think any of these are advertised on the main add-ons page? So I might as well mention it.
cheers :)
#making this post because personally it took me forever to switch from Chrome just cause I couldn't bear to fully customize a new browser#A lot of these are advertised on the add-ons main page so they're easy to find but the links are useful anyways#You don't have to use all the privacy ones simultaneously btw. I know that. I like having options tho#Pro tip for people struggling to switch from Chrome on android: if you select all your tabs and click the 3 dots in the upper right corner#you can share them all as links. then it's just a matter of putting them in a document and opening them in firefox or wtv#or you can be like me and just leave them in the document for later use.#firefox
272 notes
·
View notes
Text

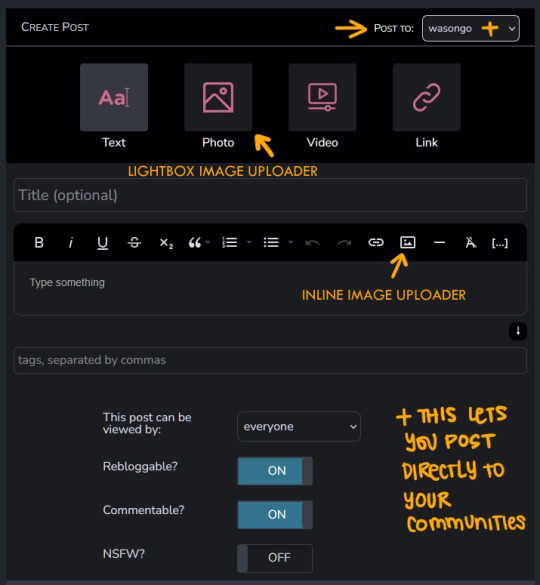
I think I got a lot of new followers recently because twitter keeps going to shit. However, as you probably know I can't and don't post nsfw art here.
You can find my NSFW socials on my pinned post. I think a lot of people are hesitant to join platforms which aren't fully available to the public yet but if you'd like to keep up with my nsfw art I'd like to:
Urge you to visit my website and subscribe to my RSS feed for gallery updates!
Suggest you follow me on either Pillowfort or Cohost (18+).
In the last year I have started using PF and Cohost more than Mastodon, as they've implemented new features and their posting system is more in line with what I enjoy: robust tagging and filtering, ability to post MANY images, and readmores for long posts.
If you've been hesitant to join either of those platforms since you don't know what to expect here's a small-ish review of both purely from my experience as someone who: a) enjoys profile customization b) likes to have an organized art gallery that is filterable by tags.
This review is aimed at artists looking for NSFW spaces to post! UI screenshots might have suggestive terms and images. Proceed with caution.
Edit: Good grief tunglr, if you open this on the web dash the images aren't shown in the neat galleries I put them in to make the post shorter. Head on over to the permalink if you'd like a better looking post!
Let me just say that if you're looking for a review on more technical aspects of these platforms, like security and moderation policies. I'm not your guy. You'll have to look elsewhere for that. I'm focusing on QoL UI and community aspects.
Though both these platforms allow nsfw, please make sure to read their ToS/Community Guidelines for rules on what is and isn't allowed. Though as far as I'm aware they have pretty similar rules.
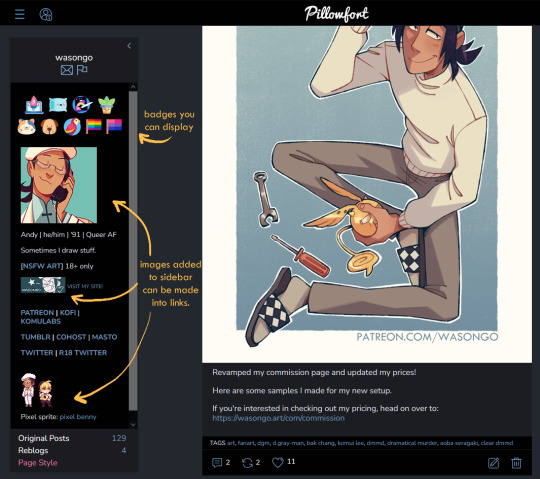
Pillowfort
Overview::
Pillowfort has more years under its belt being available to users than Cohost does, as such I THINK the artist/fandom userbase atm is larger, which means you might see more activity there. UI as of right now is very comfortable and the site runs pretty smoothly. Loading times are very decent. Posting is easy, though the image uploader is a little wonky (they are working on fixing this). You are able to create and manage communities based on interests or themes, which people can follow or join and all post in the same space. You can personalize your profile by adding images, links, and formatted text to your sidebar, as well as customize your own profile colors. Tag searches in my experience yield results of both art and aesthetic irl porn and gifs. If that's something you miss from ye olden tumblr days it might be worth a look.
Pros:
Posts have privacy options (everyone, logged in, followers, mutuals, only me)
Has a DM system
Posts have Commentable, Rebloggable, NSFW toggle
Can post MANY images on a single post
Readmore feature for long posts
Robust tagging system
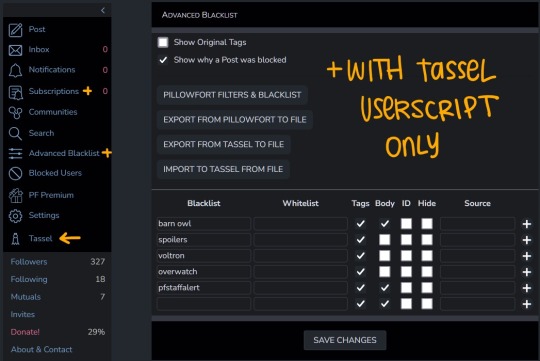
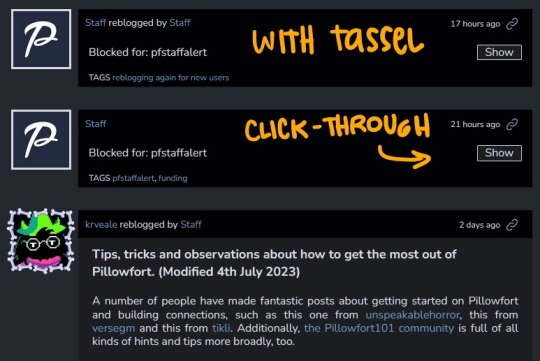
Robust filtering system: hide or click-through warning (by installing Tassel userscript only)
Customizable profile colors, Light/Dark mode for whole website
Communities you can follow/join for shared interests
You can filter posts on profile by tag
You can filter posts on profile by "original poster" or "reblog"
Cons:
wonky image uploader, cannot upload multiple images at once
Cannot search for multiple tags at once
Search for terms with periods in them is currently broken (ex. "D.Gray-man" will not yield any search results)
Communities have few moderation features atm
Without Tassel installed the filtering system is pretty garbage atm (you can either show or hide nsfw or filtered tags completely, with no click-through warnings)
No multiple account/side blog feature yet
Some inline image formatting options are broken atm
Default endless scrolling
No progressive web app for mobile atm
For a more in depth explanation of PF's UI and features you can check out this official post.
Here are some images of the UI.

---
Cohost
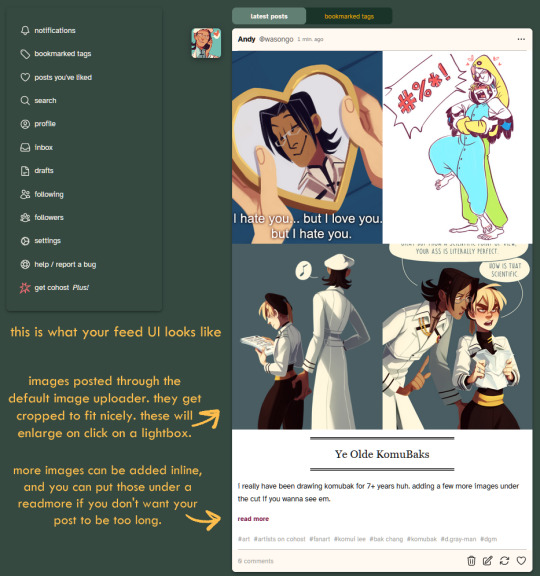
Overview::
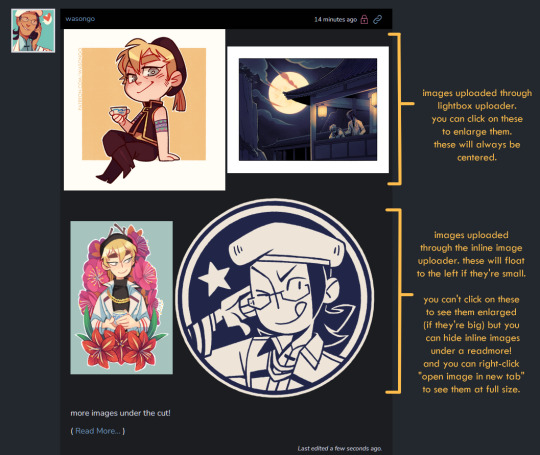
Cohost feels like it has a small artist/fandom userbase at the moment. However, to make up for that it has a pretty slick UI, it works great as a progressive web app on mobile, and it recently implemented an ASK system similar to tumblr's! Everything loads pretty quickly, and you can switch between your "latest posts" feed and your "bookmarked tags" feed. You can access your likes as a bookmark system, but as a whole "notes" and engagement numbers except for comments are not visible anywhere (this is wonderful for my personal mental health). It has a simple post editor and though the image uploader only allows 4 images that will load with lightbox, there's a workaround to upload MANY inline images if you want. The catch is you'll need to use a bit of markdown or html to do that. (more on that below) Though you can't personalize your profile colors, you can add personality to your page by making very cool pinned posts and adding images to your sidebar.
Pros:
Animated avatars! (listen i like having my animated komui icon)
You can make multiple "pages" (blogs) which function independently for comments/asks. switching between pages is effortless
Ask system, with anon toggle (you cannot reply privately atm tho)
2 Factor Authentication
Progressive web app for mobile works like a charm
You can preview your post before you post it
Posts have a NSFW toggle and you can save drafts
Can post MANY images in a single post (bit of a workaround as you'll need to upload your images to a draft first and then add them to a new post with some markdown or html code)
Readmore feature for long posts
Robust tagging AND filtering system (show, click-through, hide completely), plus CW system to give your posts additional click through warnings you deem necessary
You can do incredibly cool things with HTML and inline CSS on your posts
You can filter posts on profile by tag, and you can have pinned tags
Toggles for hiding reblogs, replies, and asks on profiles
Paginated browsing instead of endless scrolling (things load faster)
No engagement numbers visible ANYWHERE
Cons:
Image uploader does not let you upload multiple images at once. Limit to 4 images (can upload more as inline images with code)
Advanced post formatting (ex. bold, italics, bullet list, inline images etc.) has to be done through markdown or html + css which is not the friendliest for those who don't know any code (there's a button for a markdown cheatsheet when you post tho!)
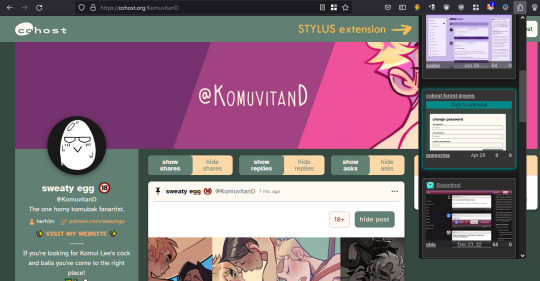
No dark mode, or customizing profile colors atm (however there are workarounds to changing site colors with Stylus extension)
Cannot search for multiple tags at once
Cool things you can do with CSS on your posts might look very bad on mobile
Since you can do some crazy things with CSS on posts, you might come across eye straining visuals and movement on some posts. There are settings to tone this down, and people are pretty good about tagging things, so with some good filtering you should be able to avoid this however.
A little quieter on the artist/fandom front (but we can change that)
Here are some images of the UI.


If you made it to the end of this review thanks for giving it a look! If there's something vital you might want to know that I missed in regards to UI and posting features let me know and I will try to answer. But again, this is not a technical/security issues/bugs review so don't ask me about that.
Lastly, I've been seeing a handful of NSFW artists I follow on twitter hopping on bluesky. I REALLY suggest you do a little research on the owners and platform to see if you think joining is worthwhile, since I have a feeling many artists might not want their alternative to be a site owned by crypto advocates (and also a billionaire). Some basic research will get you there. Just take heed and use your best judgement. On that note Cohost is strictly against crypto (I'm guessing PF might be too but I don't have a link that I can point you to confirming this atm).
I believe community driven and supported platforms are the way to go. If you end up thinking either of these two places are worth your time, do consider getting your friends and favorite artists on board or supporting them! You'll get added perks on both platforms if you become a supporter. PF recently added the ability to have MULTIPLE AVATARS (PFPs I think they're called nowadays) which I think is super cool (i really miss that from LJ days).
Again, thanks for reading and I hope to see some of you there!
241 notes
·
View notes
Note
idk if you’ll see this but uhh. All the Startouched AU fics rotate in my brain still, along with just being a genuinely incredible series of fics I enjoy. I wanted to know if you uploaded them somewhere else besides AO3?
AO3 loves not letting me enter reader-view 70% of the time (I have poor eyesight) and most of the images no longer load or aren’t there anymore (which makes me very :<<<). If not that’s cool, I just wanted to let you know.
And also thank you for your amazing works, honestly up there with some of my favorite fics ever written.
AAA THANK YOU SO MUCH???
To answer your question: some chapters of the first fic were posted to my old Tumblr blog. But that is not the best way to read it either, as it's incomplete + Tumblr isn't built for multi-part fanfics like that.
That being said, it is possible to download fics from AO3 in many formats. Both EPUP and HTML should be customizable enough to suit your vision needs! As far as I can tell, that may be your best option. Once I fix the images (which, I should still have the original artworks around here somewhere, but no promises) I can show you how to download the fics ^^
#borb answers#You can download any fanfic off of Ao3 for offline reading BTW#Or for accessibility reasons like this#Or for your own personal archive!#Some ppl even do it to physically bind copies of fanfics which is SUPER COOL#Real talk one of my favorite works of art is this physical copy of My Immortal that's tacky as hell#Has sequins and black feathers glued on it. Absolutely AMAZING.#anyways yeah I'll get to fixing the images for you now lol
11 notes
·
View notes