#Fanbinding
Explore tagged Tumblr posts
Visit Tumblr Blog
Explore Tumblr blogs with no restrictions, modern design and the best experience.
Last Seen Tumblr Blogs


Fun Fact
In 2020, 27% of US Tumblr users had an annual household income of over $100,000.
Text


My personal goal is to try and make fanfic binding as accessible to everyone as possible, so here are some resources on how to make a fanfic hardcover for under $25.
This is a barebones bind for the broke college students and such. Happy to field questions, too!
Here's a proposed budget breakdown:


Loosely organized thoughts:
Fanfic bookbinders often share typesets amongst each other. Never pay for a typeset for a fanfic.
You'll hear a lot about grain direction for your printer paper, but as a newbie on a budget without your own printer, settle for some nice 92 bright paper. If you like the hobby, splurge after but expect to pay at least 2-3x more for short grain paper.
Printing is a pain because some copy shops won't let you print intellectual property smut, and it's very expensive. You are better off bartering instead or looking for a free printer on Buy Nothing.
You know the thick paper wrapping that comes with online orders? It's a good weight for endpapers if you need to scrounge. Paper grocery bags or gift bags (birthday presents) might work, too.
Ask your local library to give you covers from books they are throwing out. Ask for outdated textbooks (those covers are built like tanks) or three-ring binders that are too busted to be binders anymore.
Obtain a used book that was mass produced (so your destruction of it does not impede anyone's access) and maybe even become a little vindictive with it.
If you can afford it, I recommend the Olfa SVR knife (~$10)
If you can afford it, upgrade your ruler to a t-square.


I really hope this resource is helpful! I want to stress how possible this is and encourage people to cherish what they love through art.
If you are interested in fanfic binding and have a little more disposable income, I have an affordable Fan Fiction Bookbinding Starter Pack that I carry on my site. I pack them myself and drop them 1x/month on the 15th.
8K notes
·
View notes
Text
as per a request in my local renegade server: here is my process (such as it is) for the stenciled covers i've done for my binds. obviously, huge thanks to everyone in the renegade discord for teaching me most of what i know about bookbinding. this tutorial only exists thanks to the resources they've made available and the conversations i've had there.
material list
vinyl cutter (i have a silhouette portrait 3) + mat + blade
stencil vinyl (i have this one, but have had some adherence troubles with it. unclear whether this is just The Nature Of Stencil Vinyl or whether there's a better brand out there. adhesive vinyl can also be a viable option, although i haven't personally experimented with it yet.)
transfer tape (i have this stuff. it's fine.)
weeding tools (i have this hook and a very fine tip pair of tweezers. i highly recommend getting a hook, especially if you—like me—are haunted by the specter of carpal tunnel. get an off-brand one or get one on sale, though. i only have the silhouette brand one because it was on clearance.)
acrylic medium (i have this one because it was on sale at the time i was buying acrylic medium. when i replace it, i will be replacing it with a matte one. the gloss definitely has a noticeable sheen that i don't love.)
acrylic paint (literally any paint will do. i've been mostly using the decoart extreme sheen because it's $4 at michaels. you may be noticing a theme here.)
stiff stenciling brushes (the ones i have are similar to these but cost even less. again, there's a theme here.)
an iron and some parchment paper (jury is still out on whether using heat to "set" the pattern is necessary, but i do feel like it melts the paint a bit into the bookcloth and lessens the extent to which the pattern sits above the bookcloth.)
your trusty bone folder
instructions and a truly hideous number of words under the cut.
step 0.5: discern what will make a good stencil and what will make you hate yourself, your life, and the art of bookbinding
there are a LOT of different ways to put titling on a book. you could do a paper cover with a printed design or paste paper labels onto bookcloth or foil your title onto your cover with heat activated foil. the best method depends on what kind of design you have in mind, what tools you have available to you, and what materials you're working with (for example, i've had very bad luck getting acrylic paint to adhere to Allure bookcloth, but Allure does foil like a dream).
as far as stencils are concerned, you can kind of sort cover designs into three categories:
BEST for stencils: big, bold shapes on larger format books (think letter folio or letter/legal quarto)
OKAY for stencils, but you might hate yourself: intricate detail at a large enough form factor for it to be cut well by your vinyl cutter
BAD for stencils, you will die and it will hurt the entire time you are dying: lots of intricate detail and lots of fine lines
below are examples of category 1, 2, and 3 (all designed for letter folio). to be clear, category 3 can technically be possible, depending on the design. but only undertake it with the awareness that you will die, and it will hurt the entire time you are dying.

step 1: design a thing to put on your cover
i'm not going to go too in depth on this because cover design is a HUGE can of worms. a few pointers, though:
i never start designing my cover until my text block is done. this allows me to design my cover at "full size" based on the measured size of my text block and cover boards.
i fully lay out my cover in a separate program before exporting a transparent PNG to silhouette studio (or whichever proprietary software you have to use to communicate with your particular vinyl cutter). i use affinity designer. some free options would be inkscape (if you want to work with vectors) or gimp.
i design my cover on a document with dimensions of (HEIGHT of boards + 20 mm) x (WIDTH of boards or spine + 20 mm) and 10 mm margins. the area within the margins represents the actual dimensions of the thing i'm designing, while the area outside of the margins creates a mask that prevents me from getting paint on things i don't want paint on (like the covers, if i'm creating a spine stencil).
i always outline my document with a 3 or 4pt black line. this creates the outer edge of my stencil and provides my vinyl cutter with a cut line. if you're working with a smaller vinyl cutter (like the cricut joy) there are ways to jigsaw designs together from smaller pieces of vinyl, but i'm not the person to ask about that. i specifically bought a portrait so that i didn't have to worry about that.
here's an example of one of my affinity files from a recent cover. i've exaggerated my outline to make it clearer. you can also see that i use affinity to experiment with color combinations. before i export, i turn all my elements black and make any backgrounds transparent, meaning that the PNG i import into silhouette studio looks like the one on the right.

step 2: cut and weed your stencil
again, not going to go terribly in depth here. there is a veritable army of youtubers out there with tutorials about how to use [insert propriety vinyl cutter software here]. but, again, a few pointers:
with my particular vinyl cutter and stencil vinyl, i usually cut my stencils with the material set to "washi," depth at 1, force at 13, and speed at 4. google, experiment, see what works. also, you want to put your stencil vinyl on the mat with the blue vinyl facing UP, and you don't want to mirror your design. with stencils, what you see is what you get.
i cut my vinyl a bit bigger than necessary because i'd rather waste a bit of vinyl than have to worry about a stencil falling off the edge of my vinyl because i misaligned it on the mat.
unlike HTV, you will be weeding out all the black parts of your original image. be prepared to hate the letters "e" and "a" forever, because you will have to somehow keep the little eye of them in place while you pry out the rest of it.
step 3: apply your stencil to your case
alright, now let's get into the meat of it. i always stencil after my case is finished but before i case in my book. this means that if i totally fuck it up, i can trash the case instead of the entire book.
additionally, i completely stencil my spine first (as in lay down stencil, paint, remove stencil) and then stencil my covers. i've found that it's easier when you don't have stencils overlapping and sticking to each other.
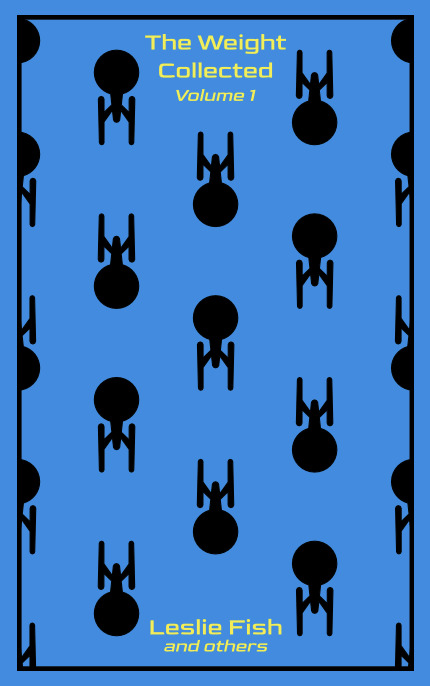
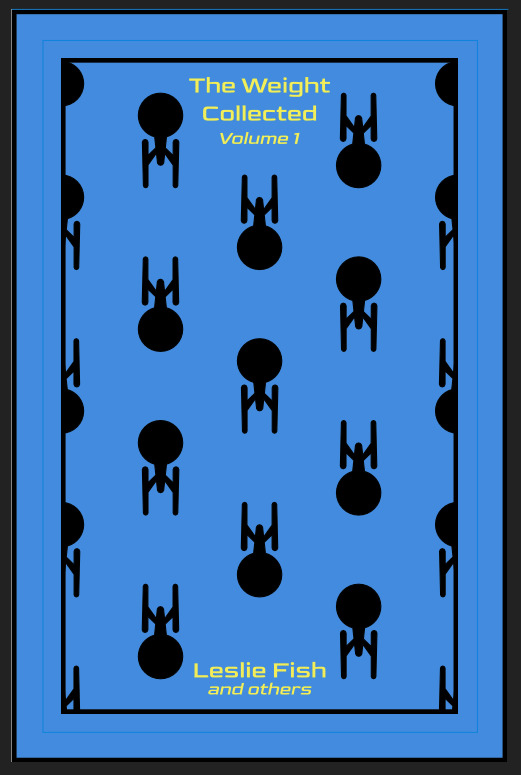
OPTIONAL STEP: mark guides onto your cover to help you position your stencil. whether or not i do this step depends on the design. a lot of the time, i just eyeball it. but for some designs, precision is key. for those projects, i use my ruler to mark out guides in white chalk for where i need certain elements of the stencil to fall. (i used guide marks for the "penguin clothbound" copies of the The Weight Collected that i've been using as an example in this post—the black rectangular boarder would've made uneven placement REALLY obvious.)
use transfer tape to remove your vinyl from its slick backing. what i've found is that you really, really don't want your transfer tape to be too sticky. you want it just barely sticky enough to pick up the stencil if you rub it down with a bone folder or your fingernail. i have a piece of transfer tape that i stuck to my jeans a bunch of times and then proceeded to use for 8 books in a row. it is, frankly, still a little bit too sticky. i have rolled it up so that i can use it for the next 8 books, at which point it will presumably be the right level of stickiness.
position your stencil. when you're happy with it, rub it firmly down with your bone folder. then do it again. then use your fingernail to score down over the titling text. then pray. in my experience, stencils prefer to stick to transfer tape rather than bookcloth. ymmv.
start at one corner of your stencil. carefully begin peeling back the transfer tape. i've found that essentially folding back the transfer tape (like, the corner that's been freed from the stencil being folded back away from the stencil) helps the tape to release. go slowly, rubbing down with the bone fold as necessary.
after you've finally manage to pry the tape off, go back and smooth down the stencil and firmly rub it down to get it to adhere to the bookcloth as thoroughly as possible with as few ripples or air bubbles as possible.
step 4: paint time!
here is a secret that the renegade discord taught me that i am now passing on to all of you: before you put any paint on your stencil, put down a layer of clear acrylic medium. the medium will finish the job of pasting down the stencil to your cover, and any leaks that happen in the process will be clear medium instead of colored paint (and will therefore be basically unnoticeable). ergo:
stipple a thin coat of acrylic medium over your stencil. you want to use an up-and-down daubing motion, not a brushing motion. brushing will get paint under your stencil. let dry.
after your medium is dry, stipple a few thin coats of your colored acrylic paint onto your stencil. let dry between coats. (i usually find that two coats is enough.) again, try to keep your coats thin. you don't want a thick layer of paint because that will create a raised surface above your bookcloth.
let your paint fully dry. i usually leave it overnight, but if i'm feeling especially impatient, i still make sure to at least give it a good three or four hours.
peel up your stencil. your weeding tools will once again come into play here to pry up little bits and pieces of stencil (like the stupid eyes of the "a"s and "e"s that were so annoying during the initial weeding stage).
step 5: optional setting stage
again, jury is still out on whether or not this is necessary, and the effects are pretty subtle. but i do it every time anyway. some tips:
use an iron on very low heat (i keep mine at the low end of the synthetic setting) and with steam turned OFF
keep a piece of parchment paper (NOT waxed paper. you want the slick paper that you put under cookies to keep them from sticking to the pan.) between the iron and your cover.
press the iron down, don't rub it like you're ironing a shirt. it's possible to smear your paint doing that (ask me how i know).
i usually lay the iron down on a section for 10-15 seconds at a time, then lift it and move it to another section.
start with less of everything (less heat, less time) and build up. always better to be conservative with this.
i usually continue until the paint is warm to the touch, then move onto another section. after it's cooled, i evaluate if i feel like it's melted into the cloth enough. if not, i repeat the process.
step 6: BOOK
congrats, you have put a design on a book cover. the world is your oyster. go forth and make books. become ungovernable.


58 notes
·
View notes
Text
enemies to lovers but it's me x sewing endbands


#tension still not quite where I want it but y'all. Y'ALL.#I'm actually enjoying the process now???#crazyyyyy#fanbinding#my stuff
36 notes
·
View notes
Text


Kushiel's Legacy
by Jacqueline Carey
♥️💛💜
If you have never seen the original cover designs for this series, I don’t recommend looking them up. I’ve never liked them very much. It was for this reason that this series stayed in my mind as one that I knew I would rebind one day. I am not a great artist, but I was sure I could create a set of pleasing covers that could be proudly displayed on a shelf.
The book edges were marbled during the last SoCal @renegadeguild meet up earlier this year.
#bookbinding#handmade#handbound book#book binding#arts and crafts#bookbinder#hand bound book#fanbinding#book art#handmade books#kushiel's dart#kushiel's legacy#jacqueline carey#renegade bookbinding guild#renegade bookbinding#renegade publishing#renegadepub#renegade bindery#hand bound books#rebind
21 notes
·
View notes
Text


Fanbinding of The Humbling River by mysterycyclone on ao3
link to the fic
The book is an a4 quarto, so is about 15cm x 10cm. It is 528 pages long and is about 3.5cm thick.
This one was my first attempt at rounding a book, which I think is now my preffered way of doing things. It makes the book look more elegant and professional. I also attempted painted edges for this one as well, I just used watered down acrylic paint, with a layer of silver to start and then speckled some black and white on top. I'm very pleased with how it turned out.
The endbands were also a first attempt at using more than 2 colours, which did make things more complicated but I like how it turned out so I think it was worth the extra hassle.
The text paper for this one is 75gsm sugarcane paper, the endpapers are handmade pastepapers and the cover material is heritage metallic buckram. The heritage buckram is my new favourite bookcloth, it's such a lovely material to work with and has a lovely texture to it.
For the body text I used the font courier new, title font is powderfinger and the chapter headers are powderfinger type. I felt like these fonts somewhat went with the vibes of the fic, they give it a nice feel as well.
I enjoyed reading this fic a lot and I really enjoyed making it into a physical copy, it'll now be taking its place on my bookshelf :)
20 notes
·
View notes
Text

carved myself a little stamp of my bindery logo! 🥹
#been meaning to do this for a while now!#have been wanting to include a little homemade tag with my author copies hehe#linocut#printmaking#fanbinding
16 notes
·
View notes
Text
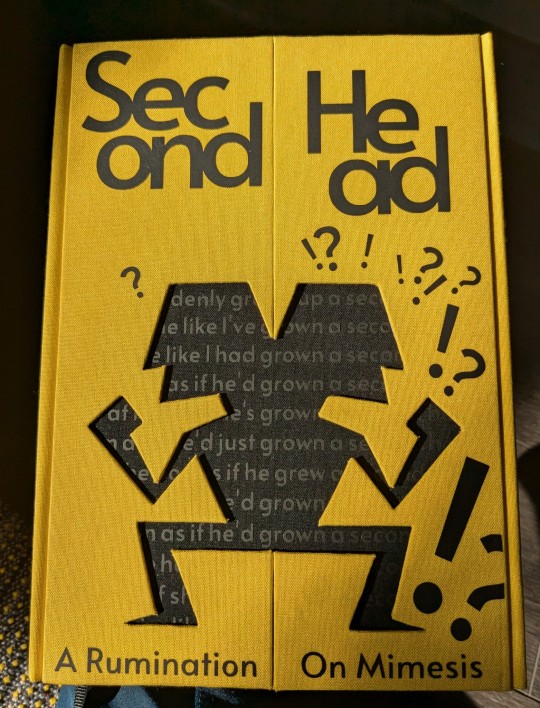
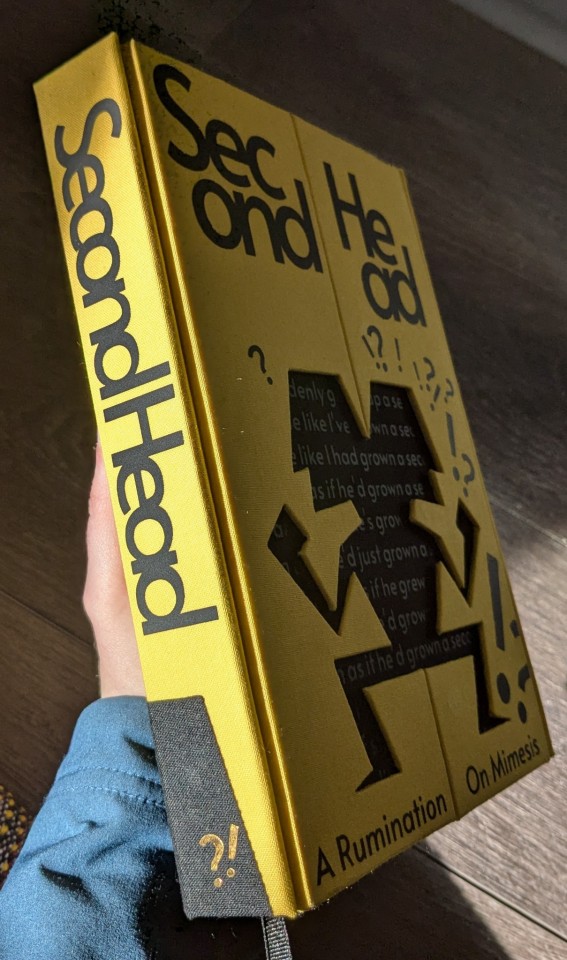
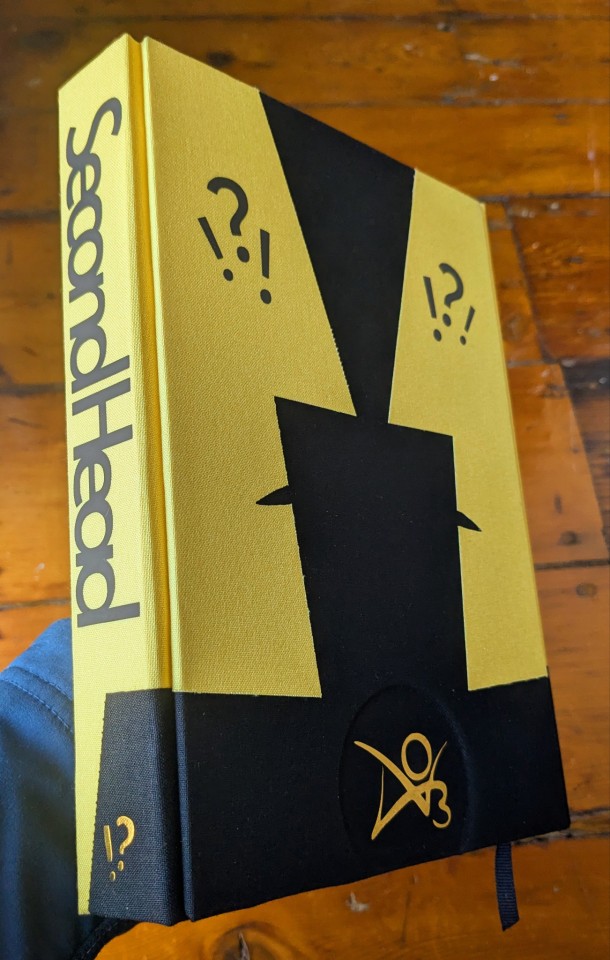
Alright. I'm calling it done before it kills me. This is Second Head. It's an Art Book containing instances of the phrase "second head" in fanfics found on AO3. I'll explain much, MUCH more in the cut.

So when I say 'art book', I mean this is an intrinsic piece. I have no motivations aside from personal amusement and interest in outcome. A lot of money was lost/transmuted into free frustration in this project and I have no claims, obviously. I will prolly be the only person alive to read this.
THAT SAID. I have noticed in my years reading fanfic, there's a few linguistic shibboleths that arise in authors who also have experience in the mines. I think there's not a soul alive who hadn't wandered across a 'ministrations' when reading Narutos oral sexing. There's- Hold on. Here's some pix.
There's an impulse, I think, to in-group even when performing a creative act. A feeling that there are certain ways one Should go about the act, by virtue of seeing it performed that way. Especially so when 'training' at the act is often just Doing. Double Dog Especially when the act is exclusively for oneself with very little oversight. Which is to say, we make what we see and we make what we think we should make. At least, at first.
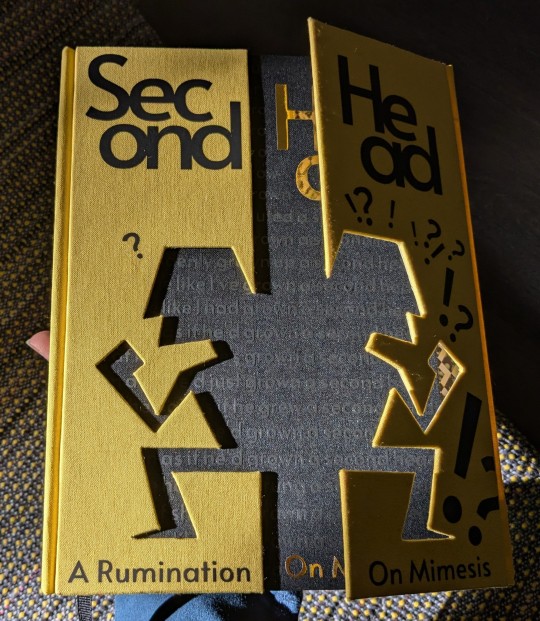
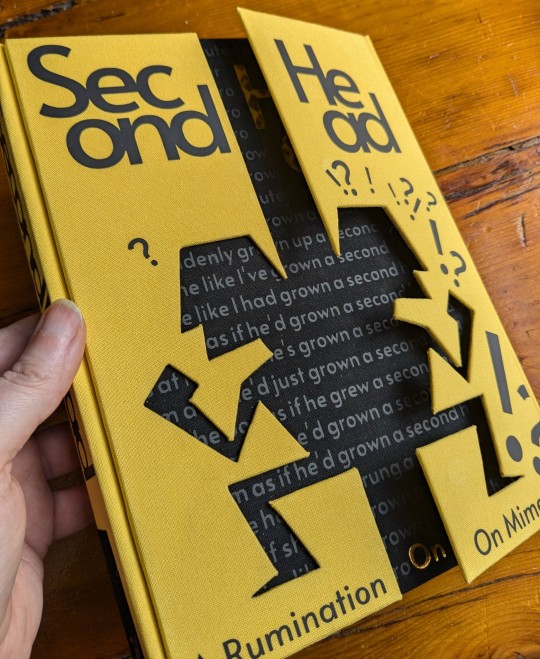
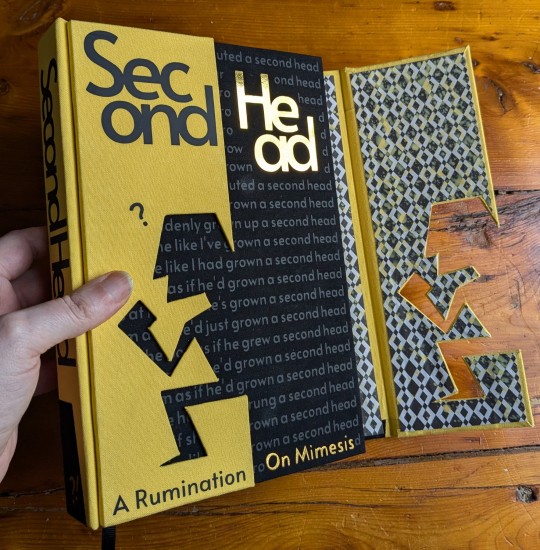
Now, I've been noticing 'grew a second head' (to insinuate surprise) in fanfic for some time. I've never seen it used Outside of fanfic. (Edit to add: I am not making the argument the phrase is from fanfic. Nor do I Believe it is from fanfic. Jesus Hopping Christ, people. That's not what this project is about.) That may speak to my own bad habits but it got me curious. So a friend and myself downloaded a mirror of AO3 from July of 2024. He did some code- Stuff to scan the mirror for "second head" and of the ~13 million works, ~70k (English) results were returned. That's a rounding error, honestly, but Far FAR more than I expected.
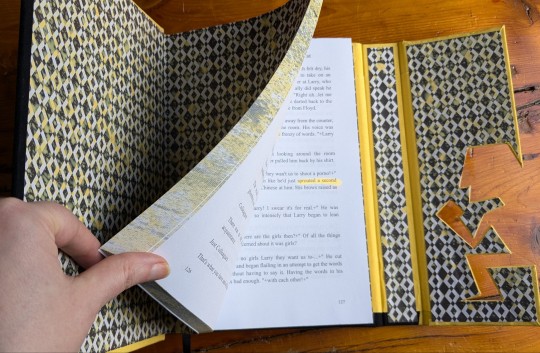
This book is 401 such examples that I personally selected for a variety of reasons. The number itself was arbitrarily chosen. Each page is separate fic, the roughly 300 words around our key phrase.
I don't think repetition or mirroring is a negative thing. I think it's quite charming. Nor do I think it's a sign of a 'bad' artist or 'bad' art. I think it's a signifier of personhood, of belonging, of enthusiasm. Of culture shared and wishing to share. I think it's real sweet. I always smile when I catch a 'grown a second head' in a work.
And it's really fucking funny when it's John Sherlock getting a sloppy toppy. Bless.
Edit: Fixed a very VERY funny error.
Edit: I am not making the argument that the phrase is exclusive to fanfic or, fucking forbid, FROM fanfic. I'm stating this Again because we skim here. Also- If you would like slamdunk my ass by stating the phrase predates the Internet or your GenX parents use it, please use 'sailboat' in your comment so I know you're specifically trying to kill me.
Edit Edit: You know what? Fine. I DO think this phrase came from fandom. I think ENGLISH came from fandom. I think YOU came from fandom. I think EVERYTHING came from fandom. The Sun, the Moon, the Seas- Fandom. Specifically Sonic Mpreg. The second head was Shadow the Hedgehog crowning. Congrats!
7K notes
·
View notes
Text
Listen to your elders
So last week I posted abut the importance of downloading your fic. And then three days later AO3 went down for 24 hours. No one was more weirded out by this than I was. But while y’all were acting like the library at Alexandria was on fire I was reading my download fic and editing chapter eight of Buck, Rogers, and the 21st Century. And also thinking about what I could do to be helpful when the crisis was actually over.
So first off, I’m going to repeat that if you’re going to bookmark a fic, you really need to also download the fic and back it up in a safe place. I just do it automatically now and it’s a good habit to get into.
But let’s talk about some other scenarios. Last October I lost power for over a week after hurricane Ian. Apart from not having internet or A/C I did find plenty to do, I collect books so I had plenty to read, but maybe, unlike me, your favorite comfort reads aren’t sitting on a bookshelf. So let’s do something about that, shall we?
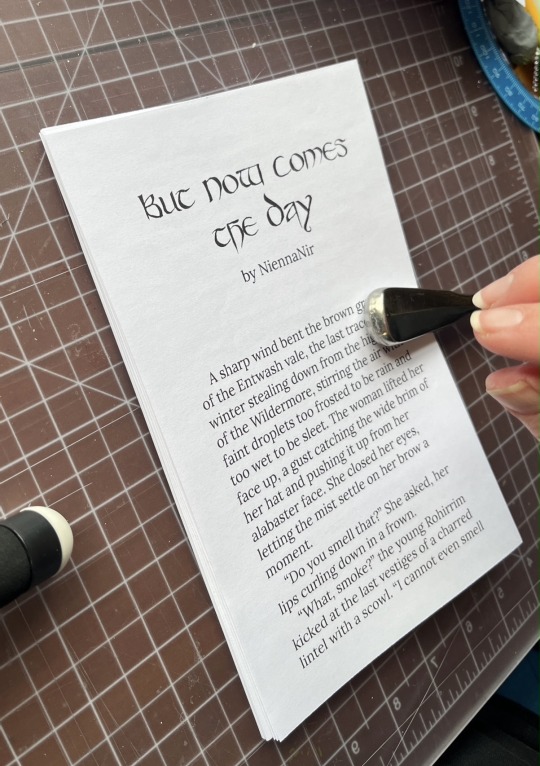
In olden times many long years ago around 1995 we printed off a lot of fic. It was mostly SOP to print a fic you planned to reread and stick it in a three ring binder. And that’s totally valid today too, but you can also make a very nice paperback with a minimum amount of skill and materials.
Let’s start with the download; Go to Ao3 and select your fic, we’ll be working with one of mine. This method works best with one shots, long fic tends to need a more complicated approach. Get yourself an HTML download

Open up the HTML download and select all then copy paste into any word processor. Set the page to landscape and two columns, then change the font to something you find easy to read, this is your book, no judgement. This is all you have to do for layout but I like to play a little bit. I move all the meta, summary, notes to the end and pick out a fun font for the title:
No time like the present to do a quick proofread. Congratulations, you’ve just created your first typeset. On to the fun part.
Now you’re going to need some materials: 8.5x11in paper ruler one sheet of 12x12 medium card stock (60-80lb) scissors pencil pen or fine tip marker sheet of wax paper white glue two binder clips 2 heavy books or 1 brick butter knife
You’ll also need a printer, if you’re in the US there is almost a 100% chance your local library has a printer you can use if you don’t have your own. None of these materials are expensive and you can literally use cheap copy paper and Elmers glue.
Print your text block, one page per side. Fold the first page in half so that the blank side is inside and the printed side out:
use the butter knife to crease the edge. Repeat on all the sheets. When you’ve finished, stack them up with the raw edge on the left and the folded edge on the right. I used standard copy paper, because you’re only printing on one side there’s no bleed to worry about. Take the text block and line everything up. Use the binder clips to hold the raw edge in place.
Wrap the text block in the wax paper so that the raw edge and binder clips are facing out. I’m going to use my home built book press but you don’t need one, a brick or a couple of books or anything else heavy will work fine.
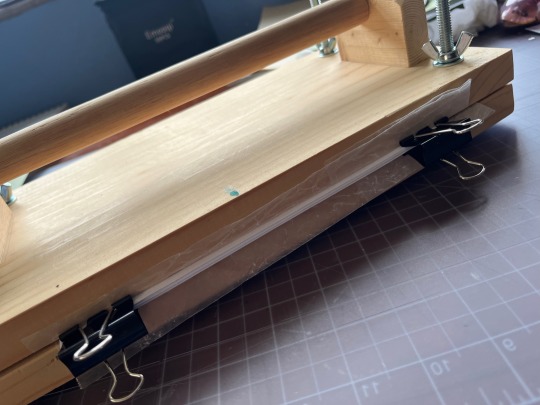
Once the text block is anchored down, take off he binder clips and get out the glue.
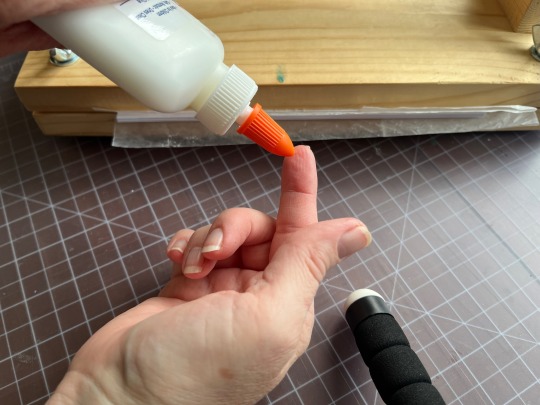
You can use a brush but you don’t need one, smear some glue on that raw edge.
Go make a margarita, watch The Mandalorian, call your mother. Don’t come back for at least an hour
In an hour smear some more glue on there and shift your brick forward so that the whole book is covered. This keeps the paper from warping. While glue part 2 is drying we’ll do the cover. Get out your 12x12 cardstock
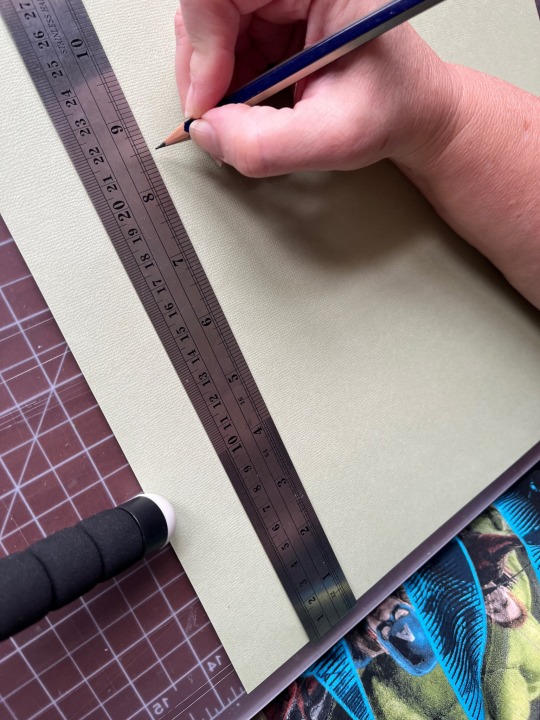
Mark the cardstock off at 8.5 inches and cut it. Measure in 5.5 inches from the left and put in a score line with the butter knife (the back edge not the sharp edge)
Carefully fold the score line, this is your front cover. You have some options for the cover title, you can use a cutting machine like a cricut if you have one, you can print out a title on the computer and use carbon paper to transfer the text to the cardstock. I was in a mood so I just freehanded that beoch. Pencil first then in pen.
Take your text block out from under your brick. Line it up against the score mark and mark the second score on the other side of the spine
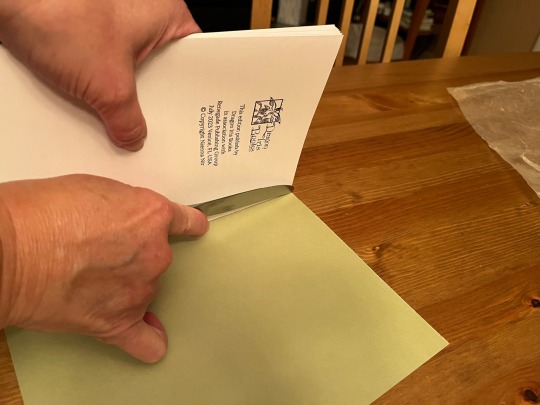
Fold the score and glue the textblock into the cover at the spine. Once the glue dries up mark the back cover with the pencil and then trim the back cover to fit with your scissors.
Voila:
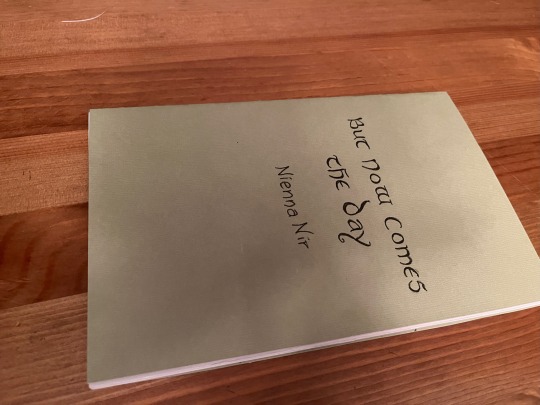
I’m going to put this baby on the shelf next to the Silmarillion.
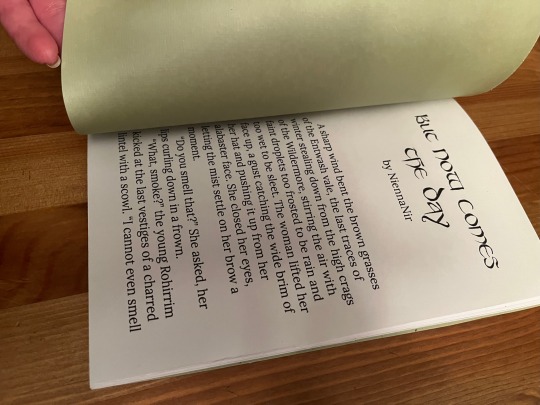
The whole process, not counting drying time, took less than an hour.
If you want to make a book of a longer fic, I recommend Renegade Publishing, they have a ton of resources for fan-binders.
22K notes
·
View notes
Text


Theseus’ Guide to Ruining a Perfectly Good Boat by @stump-not-found !!!
forgot to take photos of the endpaper—will do that next time i’m at home, it was so fun to figure out :) also, what a nifty fic!! can’t wait for the rest of the fic so i can do this all over again >:D
#gravity falls#billford#gf theseus’ guide#theseus’ guide to ruining a perfectly good boat#bookbinding#fanbinding
1K notes
·
View notes
Text


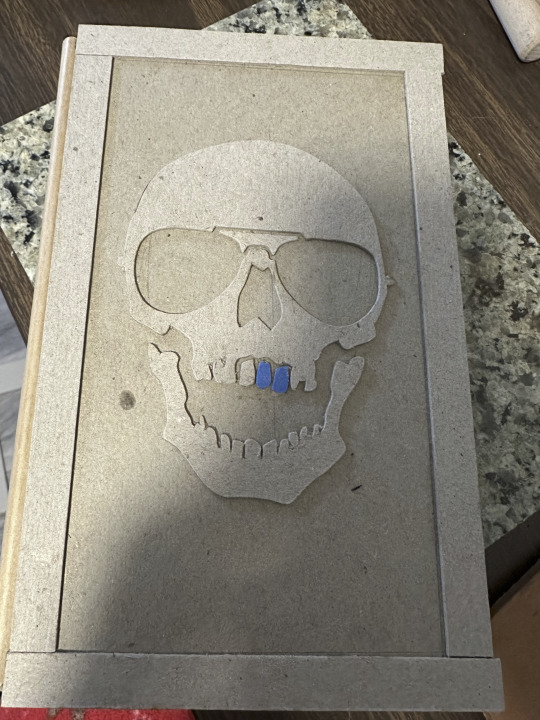
Fanbinding(ish): Gideon the Ninth, by Tamsyn Muir
Leather on bookboard, with hot foil stamping on the spine. The endpapers are a Japanese wave design, partially as a reference to Canaan House being on the water, and is also a reference to the fact that this book was a birthday present for @eebeesee, who is a giant weeb. (Fun fact: I bought that paper in 2012 and have been waiting uh, 11 years, to find the perfect project for it.)
Process under the cut.
Remember two months ago when I said I wasn't wild about doing another paperback-to-hardback conversion? Well. More fool me. (I did try and find a sewn hardback to take apart, but apparently this book was not sold as a sturdy hardback. Cue rant.)
I've tried debossing with leather before, so obviously, for embossing, I decided I'd just pick the most complicated design possible. I had to modify the skull a bit--taking out the IX, which did NOT cut well, and I had to make the lines around the glasses thicker.
After several hours of cricut cutting and experimentation, here is the cover pre-leather. (I also had to floss the skull's teeth with an awl to get some fuzz out, which I found very funny.)
Then, leather:
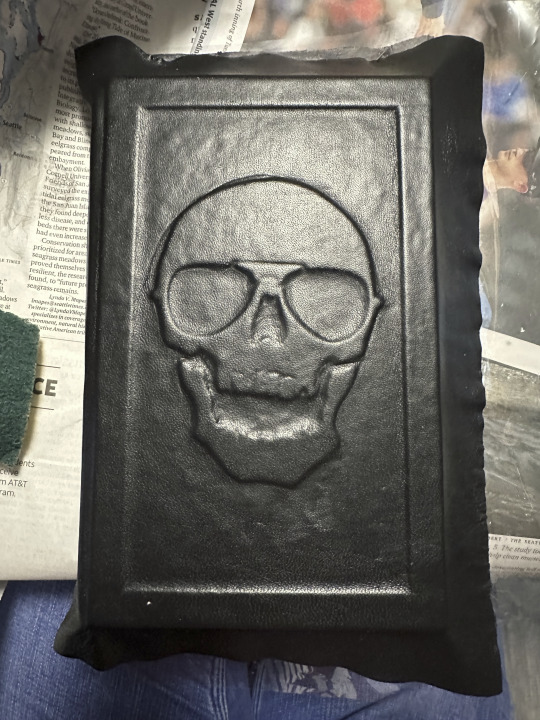
As you can see, I lose a lot of details in the teeth there, so I went around the edges with a heated brass stylus.

I bought a special skull stamp for the spine: it definitely wasn't made for heat, because while it did serve the purpose, it also came with a metal handle which made handling it awkward. (Oven mitts did not give me the necessary amount of dexterity. I ended up sort of wrapping a paper towel around the handle. My cousin has since informed me that we do own fire resistant gloves, but I did not remember this at the time.)
The stamp was also a pain to get even: it had to be at juuuuust the right temperature and pressure, or you'd either get too much or too little, as shown. It was also pretty picky about foil, but the brass color matched the endband cloth and insides best anyway, so that worked out. (White was a definite no.)

The other fun bit of this was doing the edges: I did them with black foil, but as we established in my earlier foiling experiments, that's not the most reliable. I think I got the best results so far on the top, but kept getting flakes on the others. I ended up painting the outside edge with ink, and then foiling on top of that. The bleed onto the pages ended up looking pretty neat, but since I hadn't done it on the top, I didn't do it on the bottom so that it wouldn't look weird on the inside. I'm not sure the foil added as much gloss as I was hoping for so next time I might just do the ink.
It did mean that I had to separate all the pages twice; I ended up bringing this to my girlfriend's haircut appointment and working on it in the corner. I hope it was the most strangely specific thing the stylist had seen someone doing when they tagged along.
#gideon the ninth#the locked tomb#fanbinding#eratta#leather bookbinding#rebinding#leather tooling#op
1K notes
·
View notes
Text


"Gritty Kills Tony Stark" by Copulation Matrix.
Bound in April 2023
❤️🔥A very short fic about restorative justice. ❤️🔥 Cased in orange faux fur with guillotine pendant decoration ❤️🔥 The signs held up by the people on the endpapers are the original tags on Ao3, and they are waving banners with the Flyers logo and Ao3 logo on them. ❤️🔥 Modified artwork of "La mort de Maximilien de Robespierre" by Giacamo Alprandi c.1799)
3K notes
·
View notes
Text
The Art of War: Technoblade Edition


Being a longtime Techno fan(since like early 2019? Hypixel Skyblock my beloathed), of course I had to make a copy of The Art of War. Also, it was a good excuse to finally read it, but just a regular copy wasn't enough. Of course not. The Art of War, by Sun Tzu: The Technoblade Edition! (Shoutout to MIT for having the translation for free online. And Lionel Giles I guess for actually translating it all those years ago).
This copy marks every single instance he quotes The Art of War in The Potato War series, plus a couple other few choice quotes at the start of some chapters(with a couple other easter eggs!) I then designed the cover to look like an enchanted book, because my little headcannon is that it's his copy he carries around in game. It is specifically an enchanted book because normal books don't have the belt (boring).
The ender chest was a gift from a dear friend of mine many years ago. I got so excited about finishing this bind that I instantly ran off to do a photo shoot with it :)
Progress pics and rambling, a per usual:


Really trying not to enter this hobby wallet first so this bind was a total fuck around and find out process:
My printer decided it didn't wanna print double side it and grabbed two pieces of paper, so originally I was gonna just reprint that page, but then I found a header error AND all the em-dashes mysteriously missing, except only in the body text?? Anyways when I reprinted it was fine and I had the correct off white/cream paper by then. End papers aren't super visible, but they're handmade recycled purple paper :)
Used graph paper as the stencil...don't do that. It was way too thin and the paint seeped under. I also didn't have silver paint. Make a proper stencil, guys. It's worth it.
Yolo-ed the cloth and glue for every single cover up 'til now, but this was the one that failed (third pic) and I ended up redoing the cloth from scratch, this time with acrylic medium/cornstarch paste filled cloth.
Tbh I'm not sure if I ordered brass or gold clasps?? Not that it matters?? But trying to find clasps big enough without getting 100 of them was rough. That is all.
But we did it! And now I have to go make another for a friend who saw it and instantly asked for one. The laser printer wasn't exactly cooperative but fuck it we ball.
Blood for the blood god. Technoblade never dies.
#fanbinding#bookbinding#technoblade#the art of war#mcyt#mcytblr#technoblr#violoncello bindery#complete binds#year bound: 2025#case: flatback#id in alt text#the art of war technoblade edition
869 notes
·
View notes
Text
Finally at a decent point to share my 5 volume bind of the Cadence of Part-time Poets by motswolo! Wanted to make letters easily accessible since I think abt Tonya’s letter to Remus an unhealthy amount. Decided to make a box to hold everything and based it off the box of Remus’s mother’s records… it’s a bit janky in some ways but we’ll pretend that’s intentional and authentic🫣
528 notes
·
View notes
Text


Handmade embroidered hardback copy of Red Valley S1 transcript
#red valley#red valley pod#red valley podcast#audio drama#bookbinding#embroidery#fanbinding#(please be gentle it's my first hardback ever and my first time embroidering on a stiff cloth. hell of a process but i had lots of fun.)#(really happy with how it turned out)#(LMAOO APPARENTLY THis has been in my drafts for ... since november............. i haven't posted this before???)#(weird time to post considering….. but it's honest work ig....... )
738 notes
·
View notes
Text
saw a post this morning that got me thinking about bookbinding and the inherently transformative and collaborative nature of fandom, so:
edit: i guess i should have clarified: hand-bound books for PERSONAL use, not for profit or resale! i think that's something obvious to me as a bookbinder but not to writers/artists so i thought i'd clarify
6K notes
·
View notes