#Free pattern making tutorial
Explore tagged Tumblr posts
Visit Tumblr Blog
Explore Tumblr blogs with no restrictions, modern design and the best experience.
Last Seen Tumblr Blogs


Fun Fact
In 2020, 44% of users from Denmark used Tumblr daily.
Text
Scandi Pants Pattern Drafting: Tutorial for Beginners
In this post, you will learn how to self draft comfy scandi pants sewing pattern . Are you looking for a fun, beginner-friendly project that will add a comfy, stylish piece to your wardrobe? You’re in the right place! In this tutorial, I’ll show you how to draft your very own Scandi pants pattern from scratch. Whether you’re new to sewing or just want to create a custom pair of cozy,…
#Beginner pants pattern#Comfy fit pants tutorial#DIY clothing patterns#Drafting clothing patterns#Drafting pajama pants#Easy pants pattern drafting#Free pattern making tutorial#How to draft pants pattern#pattern drafting tutorial#Pattern making for beginners#Scandi Pants Pattern#Self-draft sewing patterns#Simple sewing projects
3 notes
·
View notes
Text
how to grub your karkat
or you can use this for any other plush or if you wanna make a whole new plush entirely or whatever

disclaimer im not a professional in any sense of the word and theres anything technical im doing wrong or you think you can do it better by all means dont hold back
Things you’ll need
sewing machine unless youre really dedicated but doing it by hand is gonna be an agonizing feat i promise. I just used a straight stitch for everything
Fabrics: for the main body i suggest a minky or something soft, for the inner lining something in the same color as the main body and ideally with some stretch, and anything black for the legs. Less than a yard of each will do
if youre using minky or anything furry get a lint roller. Trust me
stuffing, i used polyfil
threads that match your fabrics
good fabric scissors
sewing needle for hand sewing/fixes
karkat plush (optional)

Heres the pattern i came up with! They are numbered for your convenience and pieces with the same numbers are going to be part of the same row of segments. cut everything out on the black lines (Make sure when you’re printing to fit the image to the page size.) on the left we have the belly pieces, the right is the main body, and we have the foot in between
Im using a relatively thin minky fabric, im sure you can use whatever but something with some fluffiness kinda helps to mask any imperfections in the sewing. When drawing out your patterns keep in mind what direction your fibers settle in and try to keep it consistent
On the wrong side of the fabric measure out at least a half inch seam allowance around each piece of the pattern, i used a centimeter and that worked but had me sweatin a bit.

For the main body pieces fold your fabric in half before you cut so you can have 2 of each segment that are mirrored to each other, i also extended all of the #1 pieces an additional centimeter/half inch at the top so we can fold them over at the very end. I highly suggest numbering the insides of all the cut pieces, especially in a way where you will remember what direction they are each meant to sit

After you’ve numbered all your pieces, set them aside and start making your feet!
Each of the 6 legs is made of two pieces, but i because i only had a swatch of the black minky i made up for the rest with some random black scrap fabric from an old project. Try to keep your fabric consistent if you can lol
I didnt give these pieces any more seam allowance on the fabric but i recommend adding a centimeter or half inch to the base of it to extend the length and have some more wiggle room

like so
Instead of cutting out 12 individual pieces and struggling to stitch them all together i started with 6, then pinning each piece real tight with the right/furry side down onto my secondary fabric, and slowly stitching around the shape real close to the edges- DO NOT CLOSE THE FLAT SIDE as we are going to stuff the feet through here

Now cut the shape out of the fabric and repeat till you have 6 feet

Now flip those bad boys inside out, stuff up, and if you wanna you can match them to their best pairs

now grab a pair of feeties and your #1 pieces and line them up, in this picture my belly #1 piece is shorter bc i forgot to add the extra centimeter and i recut that once i realized. Line those sides up with the right/furry parts touching and with the feet in between, flip it around to make sure everything's sitting the way you want it

Note. i didnt realize until later but i sewed my feet in upside down. save yourself the time it takes to fix it and dont make the same mistake
Straight stitch these layers together and repeat with the next two segments our good friends #2 & #3

Repeat this for the #2 and #3 sections but NOT THE #4, that part doesnt need feet! just line those edges up right/furry sides together and sew


the secret to the squish of the suit is making this inner lining from another fabric and stuffing it! I used what i had leftover from a stretchy red fabric for a kanaya skirt. For this we need to make a new pattern for each section, making sure it follows the curve of the round edge but the piece itself is shorter, almost like youre removing the seam allowance you added. Mine is a centimeter shorter on the top and on the bottom and reaches to the middle

Make one of these for each numbered segment,you only need to make half the pattern and you can fold your fabric in half on a crease and you end up with one symmetrical piece (bars)

Now you need to pin these pieces right on top of the wrong side of your numbered furry sections and line up the straight edges like so (disclaimer for LOTS OF SCARY NEEDLES !!)

Admittedly i didnt estimate how long these pieces needed to be very accurately and overshot it a bit, if you start pinning it from the middle and continue outwards on either side thatll ensure its not too lose and you can cut off any excess after
The only exception is piece #1, if you recall we gave this #1 section extra seam allowance. This is so we can sew down that excess at the neck later and hide any of the inside that might show once its all put together. Do not connect the top edge to the inner lining! Since i added an extra centimeter earlier im gonna leave that hanging and pin + sew down the inner lining a centimeter lower than the top edge. LEAVE THE CURVED EDGES OPEN! DONT SEW THEM TOGETHER! those stay open to stuff

Straight stitch the lined up edges together

Now you have all these skinned pieces of little freak and we need to connect all these segments together making sure to sew UNDER the existing stitches so we dont see those on the outside when its all put together


Inside looks like a bit of a mess but thats fine bc its not the part that matters
Now stuff it! you might need a stick or pencil or something long and thin to get stuffing into the middle bits

Now thats its stuffed you can finally close those curved edges. Try not to sew over a thick mound of stuffing, push it in a little further to give yourself some space and you can fluff it back out after everythings closed. I cut off that excess lining fabric after sewing

Ough… they filleted my boy…
Finally, match up all the edges and lines and HAND SEW them right sides together. You will destroy your machine trying to work around that stuffing i promise. You also have an excuse to get up from your work desk and sew on a couch or smth. I used a standard backstitch for a tight finish and again, make sure you sew under any existing stitches so they arent visible on the outside!

Speaking of the outside, once you stitch everything together you can very gently flip this sucker inside out

This is @hatamonu’s cat Cocaina, aka Coco. Her perfectly square figure made it into my grub files somehow so shes essential to the tutorial

Check the fit and all thats left to do is roughly baste stitch down that excess neck fabric onto the stuffed lining and youre set! I gave the thread slight tugs as i went to tighten the opening a bit put dont tighten it too much

tadaaaaa

It fits pretty snug but starts to slip a bit with motion. Heres a bounce test

If you do shake your baby make sure to safety pin the plush to the suit so he doesnt prematurely shed his exosekeleton
Now spread that baby fever and show your baby to the world


pics from the ALA 2025 homestuck meetup and supplied by para.dox.cos
Tysm for coming along this ride with me especially if you followed the prototype journey on twitter, much thanks to my more sewing savvy friend for the solution to my grub dilemma and for helping me design and build my dolorosa cosplay <3 much love and hopefully many more homestuck cosplays and meetups to come in the future!
#homestuck#homestuck cosplay#karkat plush#karkat#karkat vantas#cosplay#tutorial#homestuck grub plush#plush pattern#long post#ALA 2025#anime los angeles#dolorosa#the dolorosa#apologies if this is hard to follow or utterly incomprehensible please note i am making shit up as i go and results may vary#feel free to ask any clarifying questions and ill do my best to answer#no i will not be selling these#technically i have more minky left than i know what to do with but the cost would have to justify the pain in the ass it all was to complet#and i dont think anyone will pay that price#send me suggestions of red characters to make plushes out of
426 notes
·
View notes
Text
#free quilt pattern#free sewing pattern#free project#free tutorial#free quilt tutorial#i just wanna make a bunch of those blocks
4 notes
·
View notes
Text

youtube
#free crochet pattern#crochê#crochet tutorial#crocheting#tejido#crochet flower#unchinetto#crochet youtube#crochet easy#crochet flowers#crochet flower motif#crochet flower pattern#crochetdesign#crochet decor#crochetapplique#crochetaddict#how to crochet#how to make it#Youtube
5 notes
·
View notes
Text
yes i can crochet but no do not ever ask me to make a granny square
#miles thots#i can’t figure it ouuuuuutttt#i’m about to watch a video tutorial bc i can’t follow the patterns#i tried 3 free patterns and even bought a pattern and i can’t understand what i’m supposed to be doing#i can usually follow a pattern really well but granny squares just don’t make sense to me#crochet talk
2 notes
·
View notes
Text
No-Sew Penguin Crochet Pattern - Complete Tutorial
Lately life has given me penguins…. everywhere. And so I have been working away on my pattern for a penguin. At this stage I am super happy with how he has come out, and so many versions are floating about the country. This version is completely no-sew – but if you are new to no-sew, feel free to leave the pieces separate and sew them on at the end. My penguin family For this penguin, he will…

View On WordPress
#amigurumi#craft#crochet#crochet pattern#free#free amigurumi#free crochet#free crochet pattern#free pattern#free penguin pattern#market makes#no sew#no sew amigurumi#pattern#Penguin#penguin amigurumi#video tutorial
2 notes
·
View notes
Text
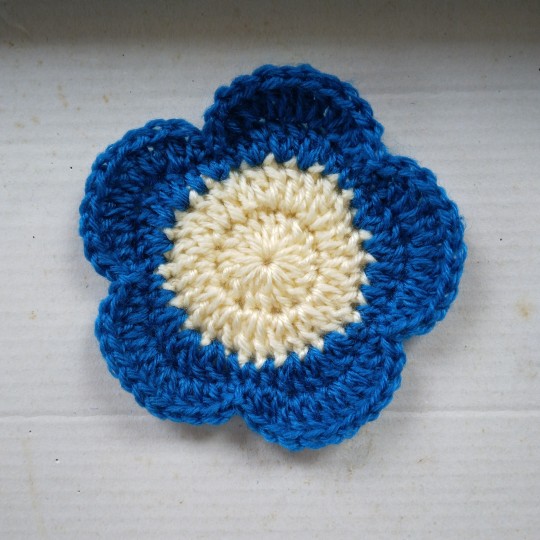
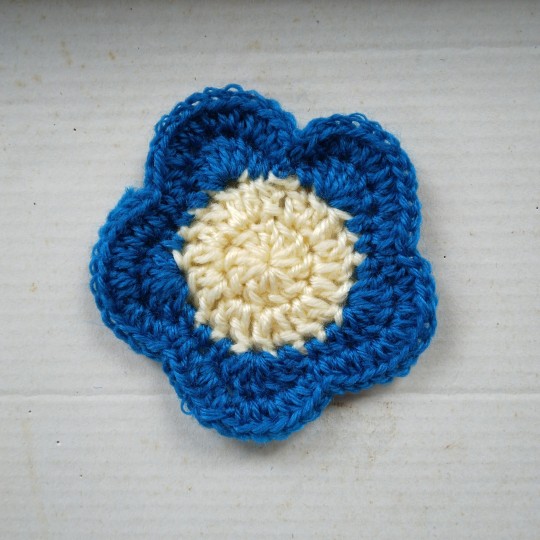
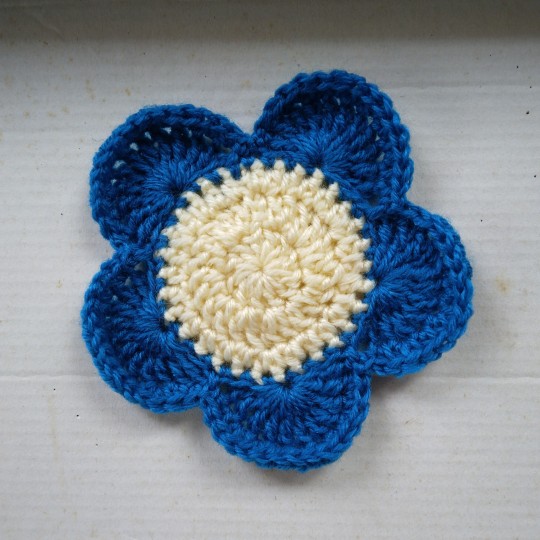
(◕‿◕✿) i love this flower.
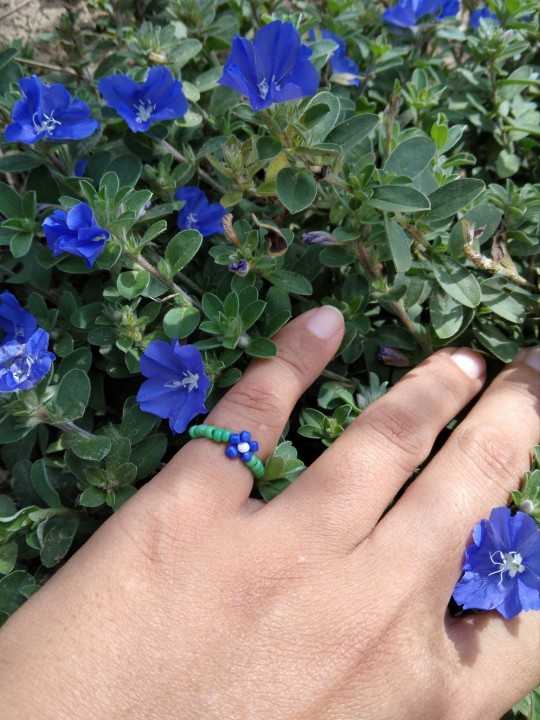
✿ inspiration from Blue Daze flower.
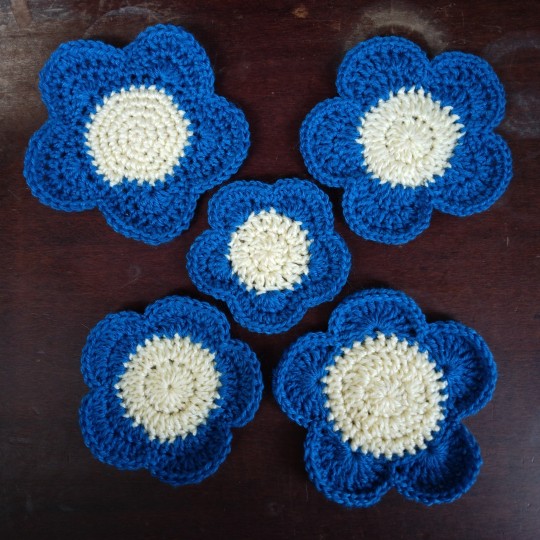
(✿◠‿◠)here's 5 version of flower (coaster things) that I found on youtube that have 5 petals ✿ i use same yarn & hook size 4.5mm.
1. tutorial/pattern by >>Leonela Cevallos
2. tutorial/pattern by >>Daniela Flores
3.tutorial/pattern by >>Asyosh Handmade
4.tutorial/pattern by >> Ohmeohmycrochet

5.tutorial/pattern by>> Hayhay crochet

o (◡‿◡✿) I just want to see /make which 1 is better for me to make.
✿ the easy pattern (for me) is from Leonela Cevallos
✿ but I like pattern from Asyosh handmade
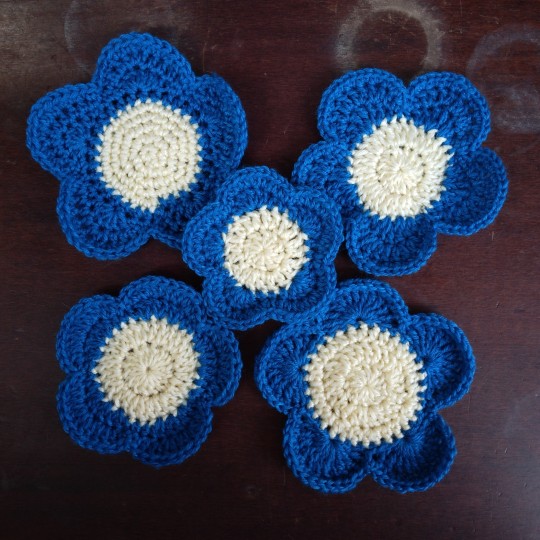
✿ this is fun..If you know any of flower coaster that have 5 petals please reblog with pattern/tutorial because I may trying to make it again... add it to the collection :)
#crochet#flower coaster#coaster#handmade#blue daze#blue flower#cute#free pattern#tutorial#how to make
12 notes
·
View notes
Text
Onigiri bag tutorial added! As always, if it's been a while since this reblog, it's worth checking the main post to see if I've added anything. I'll always update this post with a link when I share new free patterns
Links to my free sewing patterns! - big manta ray - smaller manta ray - monster friend (those monsters with horns I’ve been making lately, but without horns) - pie slice - Fred, the Fish of Minimal Effort - tiny cat (aka Jiji) - mini mothman - whale shark/donut whale shark - juggling frog/toad (aka my smallest, simplest frog pattern of the three I’ve made) - large frog - tiny hedgehog - minecraft bee - minecraft zombie - blorbo - Strawberry Hearts quilt pattern - starfish - little octopus - canvas tote - basic bat and ghost - mini mushroom friends Tutorials: - flannel baby blanket tutorial - onigiri bag tutorial - tomato pattern design walkthrough (how I design the pattern, not a link to the pattern itself)
#sewing patterns#my sewing patterns#free sewing patterns#the onigiri bag tutorial is not quite a pattern? in that I did not give exact sizes#it's more a guide to assembly so you can make whatever size you want
12K notes
·
View notes
Text
How to Make Leather Earrings: Easy DIY Tutorial
1 note
·
View note
Text
Women's Cropped Knit Sweaters & Button-Down Jackets Products Reviews.

Button-Down Cropped Knit Sweaters & Jackets for Ladies
Product details
Fabric type: 50% Viscose, 30% Nylon, 20% Polyester
Care instructions: Machine Wash
Origin: Imported
Closure type :Pull On
About this item
Fit Type - Regular. Size up if between Bust sizes.
Size - S=US(4-6), M=US(8-10), L=US(12-14), XL=(16-18). More details in rich description.
Material - 50% Viscose, 30% Nylon, 20% Polyester, Stretch - Medium Thickness - Medium, Softness - Medium.
Washing - Machine wash cold gently with like colors. Do not bleach or iron.
Features - Women's cardigan sweaters, button down, long sleeve, cropped, striped. This elegant women's fall fashion top perfect for casual, lounge, work, dating, and travel wear.
Read More Click Buy Product
Beast products Reviews
1.Looks good — plays well with my wardrobe
Perfect! This apricot color is just a whisper of color, simply lovely. Thumbs up on the quality of material as it is thick and appears to be well constructed. As shown, it is a boxy shape and pretty generous in proportion. Sizing correct. This piece goes with EVERYTHING in my wardrobe except for one pink blouse. That is impressive! This is that neutral piece that blends beautifully with both lights and darks, much prefer this over a white sweater.
2.Excellent quality, great fit.
This sweater is beautiful, warm and soft. Really elevates an outfit. I read that it pills easy so I plan on washing inside out on cold.
3. Very good quality
The fabric feels very good. Looks much more expensive than it cost.
3.Love these lady sweaters
High quality sweater here and I purchased in two colors. Simple, comfortable and smart outfit with a jean or yoga pant and stylish sneaker or can be dressed up with dress slacks and a dressier shoe. Washes well on delicate and dry flat or on a rack. Buttons are good quality. Wear buttoned up or open with a tank top. Great for transitional temps as well as cooler weather any time you want to look put together. True to size.
#cropped sweater#knit sweater#knitted sweater#knitted cropped sweater#knitting a cropped sweater#cropped knit sweater pattern#cropped knit sweater tutorial#how to knit a sweater#how to make a cropped sweater#cropped knit sweater pattern free#cropped sweater knitting pattern#styling a cropped sweater#cropped sweater for adults#long sleeve cropped sweater#how to wear a cropped sweater#cropped cardigan#styling a cropped sweater in winter#sweater
1 note
·
View note
Text
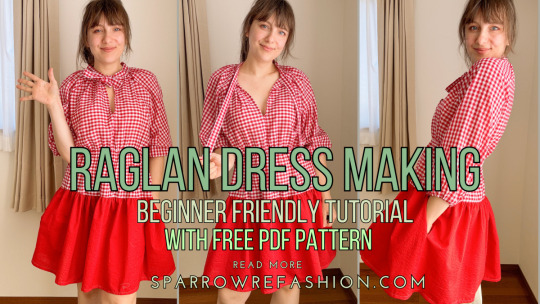
How to Sew a Ruffle Reglan Dress with Pockets (Free Pattern Included)
In this post, you will learn how to sew ruffle raglan dress with free PDF patterns. Do you want to learn how to sew a ruffle reglan dress with pockets from a free pattern? This is a great project for beginners and experts alike, as you can customize it with your favorite fabric and style. In this post, I’ll show you the step-by-step process of making this dress, from choosing the fabric to…
View On WordPress
#balloon sleeve raglan dress#DIY#dress making#fashion#free pattern#puff sleeve raglan dress#raglan dress#ruffle reglan#sewing#sewing hacks#sewing lovers#sewing tips and tricks#sewing tutorial#spring fashion
10 notes
·
View notes
Text
This is an excellent beginner pattern, and it requires only that the pieces you're working with be at least 5x5 inches. They can be scraps, charm packs, FQs, layer cakes, or whatever else that meets the cutting requirements. It's a very small baby quilt, but you can make it larger with more blocks. I intend to make this, and the small size makes it great for machine quilting on a standard sewing machine.
#free quilt pattern#quilt pattern#free quilt tutorial#quilt tutorial#quilt#I plan on making one of these VERY soon
5 notes
·
View notes
Text
i hate that thing i do where i prioritize drawing/painting/sculpture above like every other form of art. like if i fill a sketchbook that's more of an accomplishment than this cool hat i made. maybe the equivalent to that is crafting an entire outfit down to making the pattern myself. or filling a box with Stuff I Sewed. idk, i think drawing is just valued so so so much online and i watch all those sketchbook tours and i'm like Wow! these people are so motivated and these sketchbooks are so cool and filled with personality and just. so dense with creativity and I Wish I Could Do That but i already do. i just don't do the 'one sketchbook a month' thing. i have The Yearning but not the drive to draw that much and i need to just value what i'm already doing that's easy for me to do right now.
#i (and i think a lot of other people) are definitely not meant to stick to one thing their entire lives#and ESPECIALLY not one artistic style. it PISSES me off when kids are like 'how do i Find My Art Style??'#it's like. when you find a label and you try to fit yourself into that label instead of doing self exploration and finding a label that fit#YOU. or just doing away with labels entirely#it doesn't piss me off in a Kids These Days kinda way but in a Don't You Know It's A Trap kinda way#humans crave variety!! fuck#dude you don't have to stick to one thing forever. branch out!! hold my hand. come with me. i will show you#sketchbook tutorials are so. inspirational to me. like they make me feel good. it feels good to look at peoples' art and it's a bonus#that it's such a personal thing they're sharing. but they're all the same and they also make me feel endlessly hopelss#so i avoid them like the plague. i think my problem is that i hate art school and being told what to do with my art#guidance with a specific thing you're working on is one thing but so much of it is like 'you need to develop these skills to do art good'#and like. you really don't. if that's boring and you hate it and it makes you wanna die then don't do it#fuck around with ms paint and 'perfect your craft' on there and like#find people who like your art and whose are you like and collaborate because community is a part of it also#make a quilt. follow a pattern. make your own fucked up pattern and then realize there's an easier way to make a pattern#do. mud sculptures. buy some dollar store clay.#don't spend more than you have to on art supplies. use a mouse to draw for goodness sake it's so freeing#i'm mad about nothing if you couldn't tell. i'm very sleepy and i want to make art but i don't have the energy#gonna make another hat later
1 note
·
View note
Text


ೃ⁀➷ intertwined—eren offers to let you practice braiding his hair.
.ᐟ fluff, drug usage (weed), bf!eren yeager

“rennie, can you please stop fidgeting?”, the bristles of your Hello Kitty brush made yet another pass through his nutmeg strands. a frustrated tug dragging his lazy neck back onto its slot against your pajama pants.
your living room was a cozy mess—pink cushions scattered across the fuzzy carpet and the faint scent of eren’s incense mingling with the lazy drift of smoke from his blunt. the moonlight flickered through the sheer curtains, casting a dimlit iridescence over the room as you both lounged in this safe haven you called home.
the victim in question was your lovely boyfriend eren. he swore his only intention was to pass by and bring you takeout from your favorite restaurant. somehow that led to asking about the video playing in your background. the next moment he was surpassing your doorstep and sitting on a pillow before your tv.
your sore fingertips paused to collect the remote and rewind the tutorial for what felt like the hundredth time. again—the stylist’s annoyingly chirpy introduction blared throughout your entire house.
then they were scrambling back to the side of eren’s slanted head. it’s a pace that seemed almost too impossible to keep up with. you sat crisscrossed behind eren who’s shirtless back leaned against the couch. his legs sprawled out and red eyes low-lidded from tranquility—or maybe the weed. your presence serenaded eren, and this just so happened to be the perfect excuse to be in it.
“ugh! okay…so i section it into three parts…”, you sheepishly whispered, more to yourself than to eren. he was all for being glued at the hip, but not if that meant you being this hard on yourself. “this is so humiliating. what girl doesn’t know how to do a simple braid—and at my big, old age on top of that”.
eren took a slow drag from the burning stick, a sympathetic smile plastered on his plump lips while he exhaled. “hey, you’ve got this,” he soothed you amidst the thick fog, words punctuated by lazy curls of smoke.
you huffed softly, more in self-beguilement than frustration. “thank you for both your cooperation and the kind words,” it was a light tease as you gently parted his hair with your comb, trying to mimic the swift motion on screen without entangling your own worries.
“eh, call it free therapy,” eren nodded stiffly, “plus you get to learn a new skill. it’s a win-win.” his high might’ve slurred every intricate thought that dared to hit his cloudy brain. including the fact that he’d been glued to your floor for nearly two hours. your own patience had thinned like a thread, fraying at the edges with every failed attempt at achieving the same smooth finish as the girl in the video. yet, comfort lingered as you both sported matching face masks. the thin sheet long dehydrated against both of your tired features. when he wasn’t scrolling through his phone, he kept ahold of your nearby knee.
up until that final section, each braid was knitted with the same undying dedication. the split worry of tugging too hard and keeping the pattern intact consuming you whole. your wrist’s rhythm settled into something ritualistic and steady, tying the ends together with a tighter grip. finally you tied off the last one.
an unknown breath you were holding escaped while eren clawed up the side of the couch. poor boy—his jelly limbs nearly collapsed before he stood tall again. a nervousness washed over you as he made his way to the mounted mirror. you make out the backside of his reflection, a look of flattery could be seen as he rotated his neck to check out your artwork. you’re no renowned hairstylist—each braid varied in tightness and thickness. some ends levitated off the nape of his neck while others conjoined the neighboring braid. but, all eren saw was your unmistakable handwork. he saw the countless hours you sacrificed to bunch each strand of hair into its own group.
eren’s pupils gleamed with sincerity, he adored your efforts. “babe, i love them,” he turned to you while swooning over his new hairdo, a rosy hue overtaking his cheeks. “they are absolutely perfect.”
your shoulders slouched as you took in the sight of his wonky, puffy hairline. you’d given this style every fiber your being could muster up, yet it wasn’t nearly as neat as the scene behind him. your heart fluttered at eren’s words, at the simple honesty and appreciation in his gaze. “but ren, they’re nothing like the video. they’re uneven and that one is literally falling apart in the back,” you pointed out, a hint of insecurity lingering in your tone.
“and that’s my favorite part,” he reassured, taking the cushion next to you and slipping a palm into yours. his legs stretched out as he leaned closer to nuzzle his nose into your neck. “this is you. that makes them better than any tutorial.”
for the first time all night a smile crept onto your face. a genuine display of how soft his words had you. you gave eren’s hand one last squeeze before bringing your digits back to his head. one swipe along the top allowed you to feel all the authentic imperfections that were misplaced hairs and lopsided linework. these mismatched braids were every bit of you— delicate, rough, flawed…yet complete.
as eren settled into his spot, your head dipped down to his shoulder. his familiar scent, the mixture of lingering aromatics, and your closeness made everything feel just right. it didn’t need to be a masterpiece; it simply needed to be yours. intertwined in ways beyond braids, these were the kind of memories you cherished forever.

#6slux#eren yeager#eren jaeger#eren aot#aot x black y/n#aot#attack on titan#aot x black reader#attack on titan fanfiction#aot eren#eren x reader#eren x black fem!reader#eren x y/n#eren fluff#fluff#attack on titan eren#black writers#black reader#black y/n#eren x you#eren x black reader#eren yeager x you#aot fanfiction#writing#comfort
526 notes
·
View notes
Text
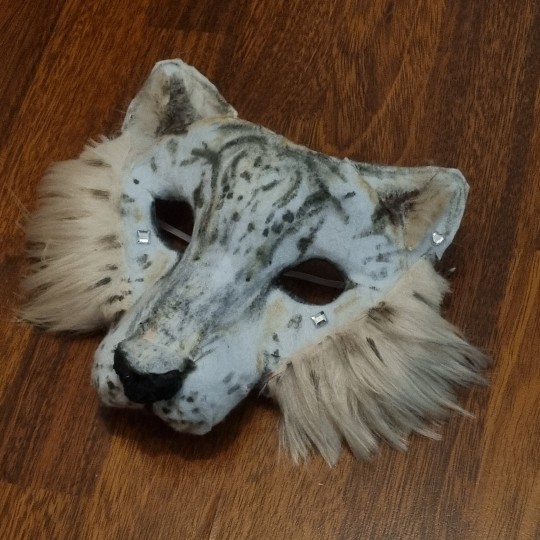
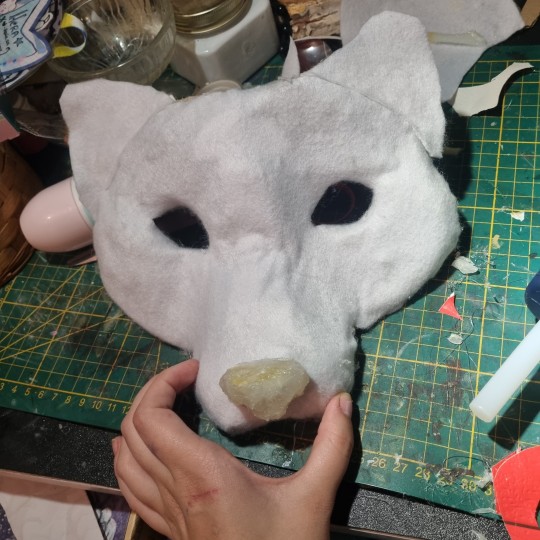
Long awaited Hera's mask tutorial (no cat base, low budget)
example of the masks I've made, here:
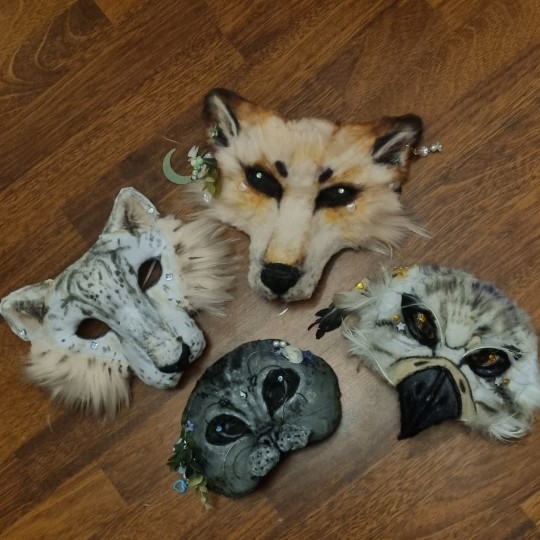
Author note: I have a 3 year experience, and I got used to making gear like this, so if you are trying masks for the first time, you might find some difficulties.
also, the whole thing Is REALLY "trust the process"... Anyway here we go!
You need: Cardboard, paper(optional), hot glue gun, felt/something to fur it/any material is okay if it works, foam (optional), basic tools like scizzors
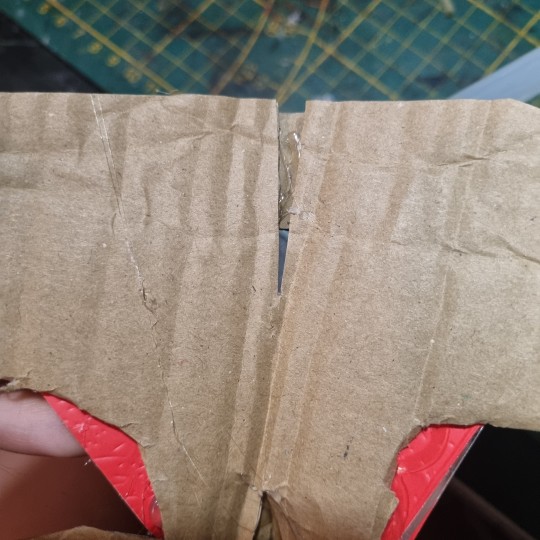
1. Cardboard forming
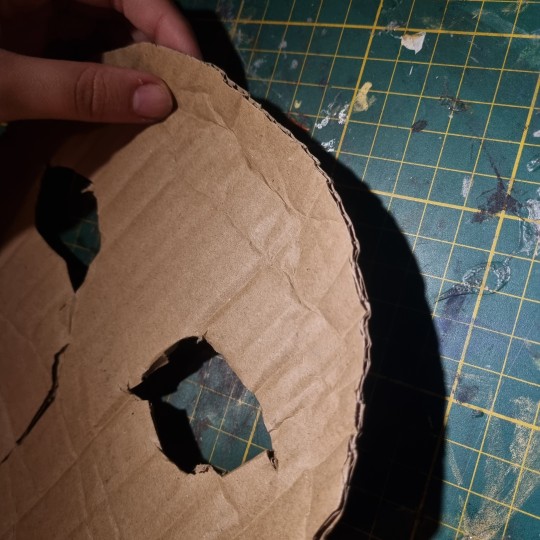
You need a piece of cardboard that's kinda a little bigger shape than your face, and measure where the eyes should be, so you can see well.
you can make the mask symmetrical by bending it in half, but it's optional
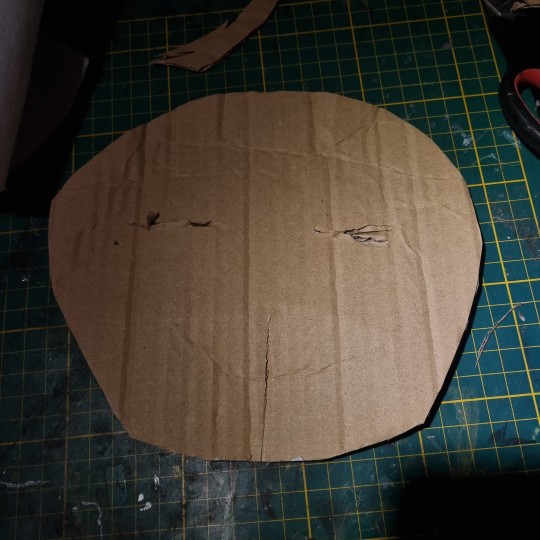
the first picture down there shows the back of the mask, don't be scared to pull it in and out, I'd say, you need to form the mask shape with your fingers VERY GOOD.
it really depends on what species you wanna make, I'm making a snow leopard rn!
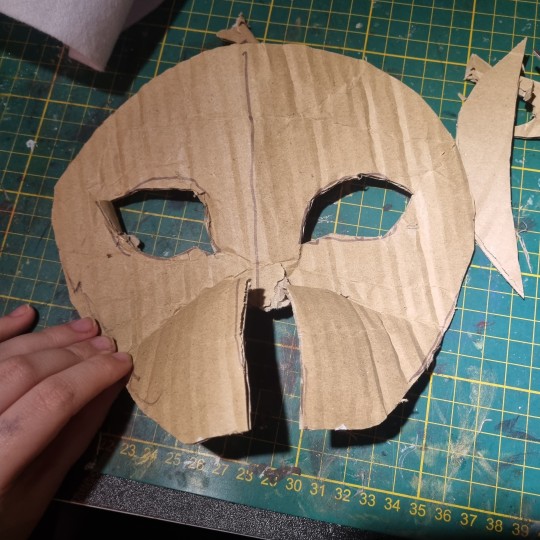
you can even cut it almost in half, and shape it to your liking
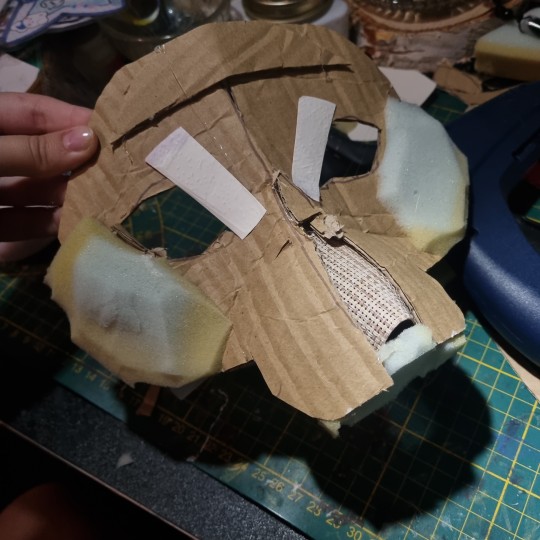
2. Texture
for this part, when you have your BaseOfTheBase ready, you need to make it more 3d, so it doesn't seem flat. small pieces are a key.
u can use various materials to recreate the real look, for example - foam that is easy to work with, and maybe more cardboard pieces layered on eachother. also you can use the pieces to glue the whole thing down together so it's sturdy.
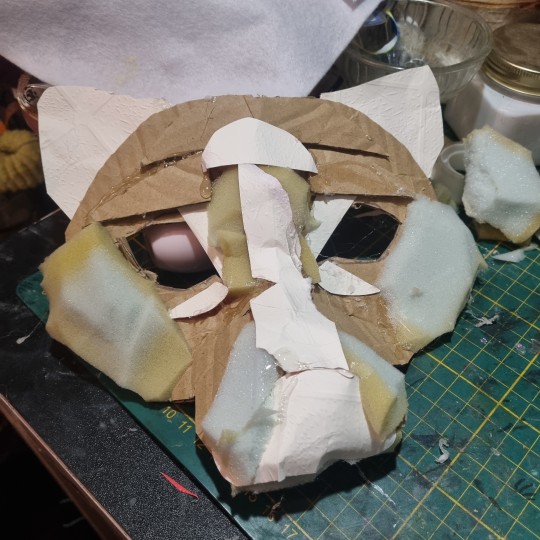
I smooth it out with paper too, so the fleece/felt/fur sticks better to the mask and doesn't leave unnecessary bumps..
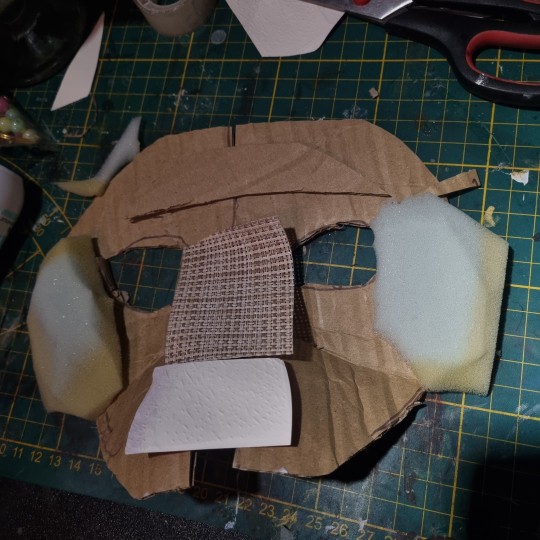
you use the bends like that to create a 3d effect, and expand the mask a little.
That's what I came up with! I added alot of paper pieces to smooth it down ^^
3. furring/felting, and the final touches
this part may be kinda tricky, so i reccomend you to watch various of felting tutorials on cat masks, cause this works basically the same!
I didint take any more photos rly, but here's the final product, and only felted one. (the nose is made out of hot glue)
I don't really want to elaborate on how to do the patterns, since you're the one who's customising the mask, but I like to use alcohol-based markers to make them! acrylic paint is also okay ^^
I hope I helped in some way !
If you have any questions, feel free to ask <3
#alterhuman#therian#nonhuman#bird therian#therian gear#snow leopard#art#therian art#tutorial#aviankin#birdkin#therian mask#mask making#otherkin
912 notes
·
View notes
Text
("Sonic") Hands Study
I get asked a lot how I draw hands, and particularly how I draw hands in the "Sonic" style. Let me preface by saying I am mostly self-taught, so please do your research and study what techniques work best for you. The following demonstration is what I personally use to help me draw hands in general and–more specifically–how I draw “Sonic” hands. This is less of a tutorial and more of a series of observations.
*And remember, there are always exceptions to the rules!*
I personally believe before you can go about stylizing hands, you have to understand how to draw hands in the first place. Afterall, I think you have to know the rules before you can best bend/break them. Think about super stylized hands in animation like the characters from Atlantis or Hercules. Even though these hands are unlike what we see in real life, they still look and feel ‘natural’ because the artists understand how hands function and are able to bend the rules while still demonstrating proper anatomy.
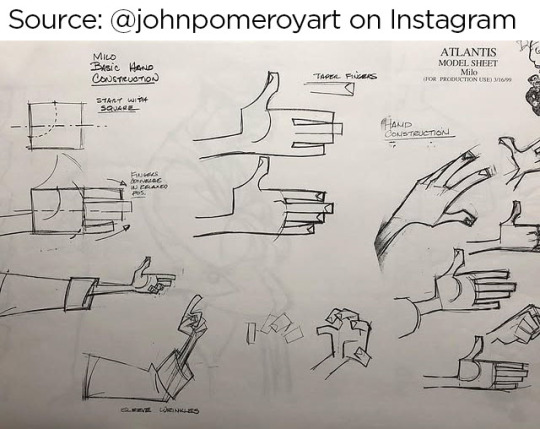
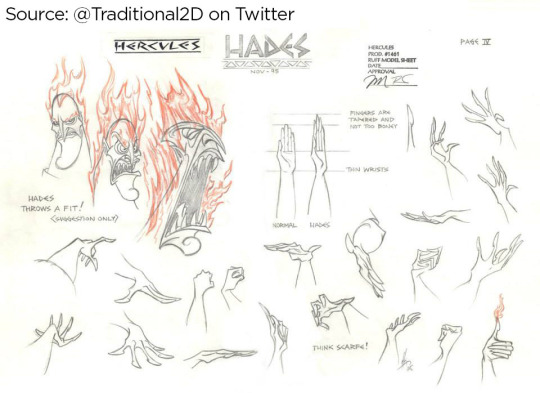
Sources: [x] [x]
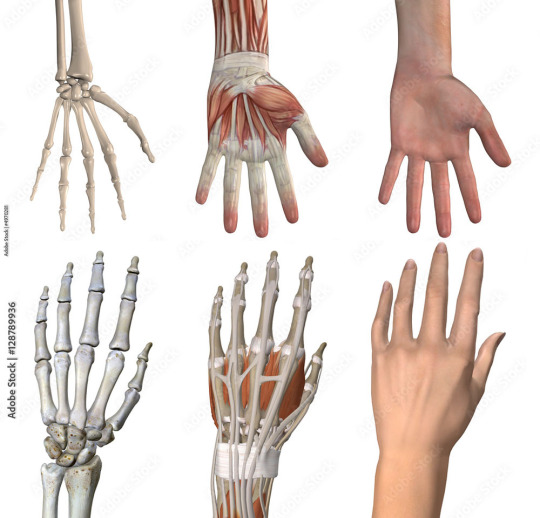
I highly recommend studying the anatomy of a hand. It’s educational and fascinating! There are plenty of free resources online!
I understand many people find hands intimidating to draw, but the best way to learn how to draw anything is by breaking it down into shapes. Everything is made up of shapes.


3 is the magic number
In simple terms, our hands can be seen in patterns of 3. Your palm can be broken into 3 segments that can move semi-independently. Your fingers are composed of 3 segments each (proximal, middle, distal). There are 3 phalangeal joints per finger. The average shape a person’s fingertips make when aligned is a triangle (a 3-sided shape), with the middle finger being the highest most point of the triangle and the other fingers cascading down (there are exceptions to this rule). Keeping the number 3 in mind will help you remember how hands/fingers articulate.
Everything is connected
Even though elements of your hand can move somewhat independently, every movement influences the other segments of the hand. Notice when you put one finger down how (most likely) at least one other finger moves slightly? Or notice how you can only do certain gestures with the assistance of your other fingers or sections of your palm? Keeping in mind how segments of the hand affect the others will help make your drawings feel more organic and less stiff.

I usually start with the palm (or back of the hand) first and that determines where everything else falls into place.

Once you grasp how hands work, that’s when I believe you can determine how stylized you want to get. There is a very large range of drawings hands from super realistic to very simplistic.

If you’re wanting to emulate a certain style, you have to study it and learn how it works.
"Sonic" hands
As far as Sonic hands go, it depends on which version you’re best hoping to emulate. Notice how the styles vary even throughout the franchise?
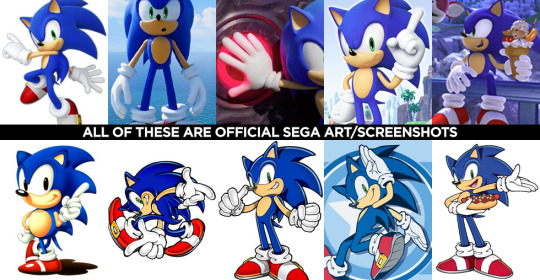
In the 3D video games, Sonic characters tend to have what I classify as more ‘cartoon-y’ hands while in illustrated media, it often leans more towards realism. (Note I said ‘leans towards,’ not full realism). How and why is that?
Let’s break it down into shapes again, Sonic Style! Pt 1
In many of the 3D rendered media, the characters’ fingers are made of more round shapes. The models also don’t conform to realistic proportions. The tips of the fingers are usually larger than the segments closer to the palms (the middle and proximal phalanges), and this helps to deviate them from a more realistic look. Speaking of proportions, the hands overall tend to be disproportionately larger than the rest of the characters’ bodies. This also makes it feel more like a cartoon, even without resorting to a super simplified, 3-fingered hand like Mickey Mouse or Bob Belcher.

Breaking down shapes, Sonic Style! pt 2
Illustrated samples vary depending on the artist/studio, but I’ve noticed that in general, illustrated Sonic characters’ hands tend to have more square/rectangular shapes. The phalanx proportions often resemble what we see in real life, with the fingertips tapering down in size compared to the segments closest to the palm. The overall size of the hands in proportion to the body are still larger than that of real humans, but they tend to be closer in proportion compared to their 3D counterparts. This is why in illustrations, the characters are more capable of crossing their arms, interlacing their fingers, or making other natural hand gestures.

Also, notice in these examples, there’s more detail to the hands than what you’d find on a Looney Tunes character? There are often folds in the material of the gloves, some knuckle definition present, more natural bends to the fingers. However, the hands are almost never as detailed as that of say, a Dragon Ball character where you’re seeing muscle tendons, veins, definition of each finger segment, finger nails, etc.

Sources: Dragon Ball Z, The Looney Tunes Show
MY STYLE
With all that in mind, I happen to find the sweet spot for the Sonic character style right in this range:

Everyone has their own preferences and it’s up to you to decide what you like best, but this is what I prefer.
MY STYLE - Cont’d
I use a blend of the two previous Sonic styles I mentioned, Cartoon-Round + SemiRealistic-Square. I like to go with a more “Squoval” shape (rounded squares) to the fingers. I try to keep the fingers in a naturally proportionate scale with the ends tapering down in size, but the overall size of the hands are still bigger than what you’d see in real life. I like to add a bit more detail when warranted, but I personally rarely resort to definition in the tendons/veins or complex wrinkles in the bends of the fingers (unless it suits a specific character or emotion).

Like I said, this is less of a tutorial and more a series of observations. But perhaps looking at hands in the way that I do might help you with your own drawings! You should absolutely do your own studies to find what works best for you. But I hope you found this helpful in some way!
#study#art study#hands#drawing hands#cartoons#sonic#reference#long post#advice#tutorial#sth#sonic the hedgehog#sonic trash
420 notes
·
View notes