#Hatching and Cross Hatching shading techniques
Explore tagged Tumblr posts
Visit Tumblr Blog
Explore Tumblr blogs with no restrictions, modern design and the best experience.
Last Seen Tumblr Blogs


Fun Fact
Tumblr has 16.74 million mobile monthly users in the US.
Text

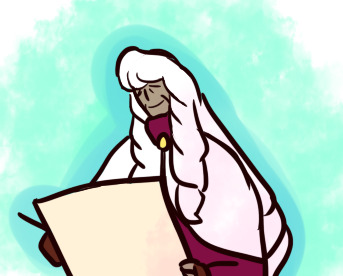
I had some help w/ the bg on this one, but I helped him with some hemming, so it's all fair. Anyway, this is silverleaf fungus. She infects host plants. You probably can't eat this, but I dunno. I'm not a scientist. :D
#art#drawing#sketch#any tips?#traditional art#cute#line art#funguary#fungus#funguary2024#shading#shading techniques#stippling#cross hatching#scribbles#psychadelic
9 notes
·
View notes
Text
laying in bed with a headache but closing my eyes just makes me focus on the pain more so i’m staring at this piece of artwork that i made in high school that i’ve got hanging on my wall now and. god man i’ve always loved this piece but looking at it harder rn its composition is just so perfectly done i couldn’t recreate it better if i tried
#it’s all black and white pen#it’s a bunch of disembodied hands doing/holding various things#and each element flows into the next#and i used all of the different shading techniques they teach you i.e. stippling hatching cross-hatching solid-blocking and sketching etc#and it’s just so well balanced#like all of the particularly dark/bold spots balance each other out and the same goes for the brighter spots#i’ll have to edit out my name but i think i’ll post it here just to show it off bc mannnn i’m so damn proud of it#i miss making art but i think that was just my magnum opus
0 notes
Text
More European Renaissance Art Vocabulary

for your next poem/story
Halo - The gold circle or disk placed behind the heads of Christ and saints, a symbol of their sanctity or the light of God.
Hatching - The drawing or engraving of fine parallel lines to show shading. When the lines intersect each other, it is called cross-hatching.
Horizon Line - The line where the sky and earth appear to meet. The horizon line is drawn across the picture at the artist’s eye level.
Hue - A particular variety of a color, shade, or tint.
Lunette - A semicircular shape.
Magus - A member of the ancient Persian priestly caste, skilled in Eastern magic and astrology. In the New Testament, the Magi are the three wise men who came from the East to pay homage to the newborn Christ Child.
Majolica - Tin-glazed earthenware.
Palazzo - An Italian word used to describe a large building. It may be a mansion or palace, or an official government building like a town hall, court, or embassy.
Passion, or The Passion of Christ - The events surrounding the Crucifixion of Christ; a popular subject for religious drama, painting, and sculpture.
Perspective - A technique that artists use to represent the three dimensional world on a two-dimensional surface, such as a piece of paper, canvas, or wood panel. Using perspective, an artist can create the illusion of depth or space and show the proper proportion between objects. Without perspective, a painting or drawing will appear flat.
Pictorial Space - The illusion of three-dimensional space created on a two-dimensional surface.
Predella - An Italian word for the series of small paintings that form the lower section of large altarpieces. It usually has narrative scenes from the lives of the saints who are represented on the main and side panels of the altarpiece.
Putto - From the Latin word meaning “male child.” In 15th- and 16th century poetry and painting, putti are depicted with wings and connected with the god of love, Eros, also known as Cupid.
Red - In Christian paintings, a symbol of the blood of Christ or the Passion.
Relief - A raised surface; for example, sculpture that is carved or modeled and which projects from a background.
Star - In Christian paintings, a symbol of divine guidance or favor. The Star of the East guided the three Magi to Bethlehem.
Triumph - An ancient Roman tradition honoring the return of a victorious general, who paraded his soldiers, prisoners, and spoils through the city streets.
Tromp L’oeil - French for “fool the eye”; a style of painting intended to trick the viewer into believing that the minutely observed objects shown are part of the viewer’s three-dimensional world.
Vanishing Point - The point where parallel lines appear to meet on the horizon line.
Source ⚜ More: Word Lists ⚜ Part 1
#renaissance#art#terminology#writing inspiration#writeblr#dark academia#writing reference#langblr#spilled ink#creative writing#light academia#literature#writers on tumblr#poets on tumblr#writing prompt#poetry#art reference#michelangelo#writing resources
224 notes
·
View notes
Photo

🦆 Stories about birds Boston, Phillips, Sampson, 1851. Original source Image description: Black and white historical illustration of a single ostrich standing on grass with a distant landscape featuring trees and clouds in the background. The ostrich is shown in profile, highlighting its long neck, large body covered with detailed feathers, and strong legs with prominent claws. Below the image, the text reads "THE OSTRICH." The style reflects mid-19th century book illustration techniques, with fine linework and cross-hatching for shading.
28 notes
·
View notes
Text
hazza <3 (he’s my muse in a way)

not me having to physically remind myself where my light source is
i’ve been playing around with this cross hatching kinda shading technique, so have this george doodle since i’m obsessed with him fsr
material used: sketchbook, graphite pencil, white coloured pencil, white gel pen, black fine liner, kneaded eraser, photo reference (from get back)
#chat don’t be mean i’m trying ok#i suck at drawing#skye’s silly thoughts#my silly bug boys#georgie#jdhdjdj#my pookie dhdjhd#george harrison#the beatles#my art#the beatles fanart#tw smoking#? i guess so
35 notes
·
View notes
Text
I decided to compile a list of art prompts for my friends based on my past history of drawing and working with classes.
Feel free to use any ideas you like for yourself!
Have you drawn:
[Original Characters: OCs] [Canon is also fine] -oc crack -Date Start! (Any fanfic tag applicable) -oc family eating together or other any homely activity -ocs fighting -oc sharing their craft -ocs interacting with animal -oc trusting someone with a secret -ocs swimming (beach day/lake day/tubing/diving) -oc preening/with eachother -oc 'final boss' doing cool or evil stuff -ocs performing a feat of strength magic or agility -ocs hiking or traveling any landscape -oc sick day -Species swap/Outfit swap -ocs in clothes they would NEVER wear -If their outfit is inspired from a specific culture, depict with an outfit from a different one (The more details you research, the better) -The Flashback Episode | The Tragic Backstory -The Montage -ocs but child/adult -ocs but animal -ocs but furry/furry but oc -ocs but they're in the wrong genre -oc or your own dream -Young oc participating in an activity you once had and miss -Draw how your parents/extended family/guardian would perceive your oc -Draw how your oc perceives themself -ocs expressing with Animal Crossing emotions [X] -Your friends ocs/interacting with yours -ocs interacting with canon characters [Perhaps who inspired them?] -ocs in a style of your choosing -In silhouette
[Visualization] -Your inner/sleep paralysis demon personified -Your art block personified out of spite -The Hyperfixation -The game you last played -The media you last laughed or cried at -The last book, fic, podcast, or audio skit you liked drawn with characters -Draw a frame of your own music video of a song you've never seen one for -Depict your likes/dislikes -'Mary Sue' yourself -Caricature of what you hate about your art -Doodle what you like about other people's art that you want to learn -Chibify/Cartoonify your favorite foods -Give an inanimate object of your choice googly eyes -Draw yourself as a… -Combine two or three animals you like [Actual art advice I got from elementary]
[Analyzation]
Draw Any: -A Flower, Vine, Tree, Stump, Moss, Fern, Vegetable, Fruit, Mushroom, Rock, Shell, Cloud, Slime -A Cat, Dog, Bird, Bunny, Mouse, Horse, Deer, Goat, Giraffe, Cow, Yak, Elephant, Rhino, Lion, Tiger, Fox, Bat, Snake, Gecko, Monitor, Eel, Seal, Swordfish, Ray, Shrimp, Crab, Lobster, Shark, Sunfish, Manta, Flounder, Whale, Cephalopod, Frog, Butterfly/Moth, Beetle, Stickbug, Mantis, Bagworm, Millipede, Anteater, Coral, East style Dragon, West style Dragon, Hydra, Phoenix, Unicorn, Jackalope, Griffon, Manticore, Hippocampus [add 'myth' before searching], Kirin, Tanuki, Nekomata, Tengu, Kitsune -3 Different subspecies of any of these animals or plants -Depict them overweight or underweight -Turn them into an animal sidekick -Take a small piece of one of these and try to texture it -Shrink or Enlarge -Emphasize what you like most about the animal to a ridiculous degree. If you like whiskers, draw them extremely long. If you like tails, draw a super floppy tail. If the wings, draw them huge or add multiple. If you like a dragon's fire breath, draw Trogdor The Burninator -Depict how you think the previous prompt's animals would survive or struggle with these new traits
[Technique] -Shade with only dots -Shade with only hatched lines -Digitally shade with only 3 different colors -Color using one of the random pallets online [X] -Draw swirlies, rainbows, and zigzags with different colored crayons -If digital, Hue-slide [Hue and Saturation] an existing landscape or character and doodle them in the changed colors -Paint/Digitally on top of a real-life picture using it's own colors below -Draw or paint in a medium you are unfamiliar with -Mix paints until they match the colors in a reference (Basics|Sheet) -Draw in mspaint/crayon (badly or not is your choice) -Draw without lifting the pencil or erasing -Draw with your eyes closed -Draw with your nondominant hand -Draw basic 3d shapes -Draw 3d shapes connecting with one another -Draw basic 3d shapes aligned on a 1, 2, 3 point perspective -Draw an organism from memory, trace it 3-10 times, then try to draw it again -Draw any skeleton -Draw The Meatman (Muscular System) -Draw skelly muscled or visible version of hands, feet, elbows, legs -Noses, eyes, ears, lips, eyebrows -Booty, Genitals -The back -Draw Gestures with a time limit of your choosing [X] -Coat an entire sheet in charcoal, then erase a picture into it. For digital, use the eraser to draw a picture into a fill-tooled canvas -Draw a character without using a solid outline -Acquire a bunch of stickers or some stamps, then try to cover up an entire piece of paper or object in them with as little empty space left as possible without overlapping -Take a piece of paper and create as many differently drawn lines or shapes as you can manage. Make sure to fill the page with them.
Ummmm I guess feel free to tag me if you really liked drawing one of these?
#art help stuff#amateur stuff#prompts#Obviously more can be added however anyone sees fit for themselves or their friend group#I'm not really good at these but it's been a long while since I've seen one so I figured I should cover the basics#I would have liked to add more varied mythical animals but the internet does not easily come up with results for them <_<#Nimue#Sage#oc#I'm also obviously cartoonish-inclined so these may not help as much for draftsmanship and realism#Huh the colors messed up at points. Ah well
6 notes
·
View notes
Note
Your art is so good! I love the art style you use in the Red Rabbit! What artists were your inspiration for this style?
Thank you!! I'm so glad you like it all I want is for other pervs to find my work and enjoy it.
As for artistic inspo I would say my main influence is @barbatusart and @meanbossart 's seminal ultraviolent gay snuff comic SAD SACK ! Truely I would be nothing without Sad Sack. If you like my comic at all I beg you to go read it, it's like 1000+ pages of absolutely depraved and incredible work.


I also take a lot of inspo from Berserk, both in terms of design/aesthetic and technique. Miura is who I look to for like, technical skills on shading, cross hatching, and dip pen work! Also I LOVE how brutal the violence is in Berserk I eat that shit up.


4 notes
·
View notes
Text
Wanna see some really lazy cross hatching mixed with cel shading so it looks passable? Yeah ya do!

I was listening to a video instead of writing and decided I might as well have some fun and do a little more with this. It makes the mane and tail look really flat but I think I would genuinely rather die than try this technique on shading hair.
4 notes
·
View notes
Note
Hey, artist question here: as a great sketch artist, do you think you could give some advice to another sketch artist who likes drawing things as mostly monochrome pencil pictures and hardly ever colors them, but at the same time feels insecure about it because it feels like a sign of laziness?
...I'm speaking for a friend, of course.
Not sure if I'd say "great" but I'll see what I can do,
Firstly, don't be afraid about doing sketches or not coloring a piece and feeling "lazy", not all art has to be colored or finished. In fact the best thing about sketches is that they don't have to be finished, they're just sketches.
Second, I'm speaking from the traditional art side of it since I'm not well versed in the sketch-side of digital art. As such, I'd say it's about knowing the values of shading the subject is supposed to be. Knowing how dark or light something is supposed to be (James Gurney has a great book called, "Color and Light" which I recommend. Sure it's mostly about color, but it can also be applied to monochrome at points), and then knowing how to shade the subject. If we take some of the characters I regularly do, such as Anne and Marcy. Both of their hair is darker than Sasha's but Anne's is lighter and so I don't apply as much pressure when I shade her hair in vs when I shade in Marcy's black hair. Granted I tend to shade their hair in a more solid however the same principle can be applied to the various shading techniques used to fill out blank space (hatching, cross-hatching, etc etc). Studying shading techniques might be helpful in giving some depth or whatever to a sketch than if it was just black-and-white.
Third, Idk if you're using a basic graphite pencil or if you are using a color sketch pencil but play around with different pencils and see what works for you. Sometimes playing around can help figure out what you were missing. I do like using the normal graphite pencils but I don't like how easily and quickly they smudge (a lot of my early Weekly Leilana sketches are smudged all to hell in my sketchbook) and while the color sketch-pencils also smudge, at least it looks a bit better than the regular grey graphite.
Study other ppl's sketches, those that you like or find impressive or what to emulate and try and figure out how they did it. Have fun, get messy and be creative with sketching. Lineart and color is already stressful enough, let's not panic about sketching too much.
Not sure if this is useful but it was the first things I thought of as I'm thumbnailing some stuff atm
9 notes
·
View notes
Text
The Charm of Pencil Rendering: A Guide for Students Studying Multimedia
Pencil rendering is still an effective and expressive technique that links us to centuries of artistic history in an age where digital art and technology rule the art world. Learning pencil rendering as a multimedia student can help you become more creatively flexible and have a deeper understanding of artistic fundamentals. Precise control, depth, and texture are made possible by pencil rendering, which is timeless and essential to all artistic mediums. This tutorial will assist you in starting your adventure into the world of pencil art, regardless of your level of experience or desire to improve your abilities.

Understanding how to Render with Pencils
Pencil rendering is the process of producing artwork with depth, shading, and textures using colored pencils, graphite, or charcoal. Pencil rendering uses manual methods that call for patience and control, in contrast to digital art, which is created on a computer. The subtle tone changes, delicate lines, and the depth created by layering and shading are what make this art form captivating.
Key Tools to Begin
Sketchbook and Paper: Select high-quality paper with the appropriate texture (rough for improved graphite adherence, smooth for fine details). For a variety of shading effects, graphite pencils come in grades ranging from harsh (H) to soft (B). Charcoal Pencils: Perfect for expressive strokes and deep, rich blacks. Blending Tools: To even out shading, use cotton swabs, tissues, or stumps. Erasers: Precision erasers for fine details and kneaded erasers for delicate accents. For intricate work, use sharpeners and mechanical pencils ( optional for mechanical pencils ) to guarantee precise lines and constant sharpness.
Crucial Techniques to Learn
Sketching and Line Work: Learn to manipulate your lines by starting with basic forms. Shading and Blending: To add depth and texture, use master hatching, cross-hatching, stippling, and smooth shading. Light and Shadow: To produce realistic drawings, comprehend how light interacts with surfaces. Composition and Perspective: To create more dynamic artwork, learn about depth, symmetry, and balance. Texturing and Layering: To create representations that are richer and more realistic, gradually add layers.

Connecting Digital Art and Pencil Rendering
You can use your understanding of pencil rendering as a solid basis for digital design, animation, and other multimedia projects as a multimedia student. Hand-eye coordination is improved, contrast and form are better understood, and creativity that may be transferred to digital platforms is fostered by practicing conventional approaches. Consider taking a picture of your pencil work or scanning it, then utilizing programs like Photoshop or Illustrator to enhance it digitally.
Getting Inspired and Creating Your Own Style
Finding your own style is one of the most thrilling parts of pencil rendering. Begin by studying the pencil works of famous painters such as Albrecht Dürer, Leonardo da Vinci, and contemporary masters of graphite. Try a variety of shading methods and subjects to find what appeals to you. Still life drawings, architectural sketches, portraits, and nature can all be excellent sources of inspiration.
The secret to improvement is patience and practice.
Pencil rendering requires commitment and time to learn, just like any other ability. Make time for consistent practice sessions, push yourself with novel approaches, and don't be scared to make mistakes—they're a necessary part of learning. You can grow more quickly by participating in art communities, attending workshops, and asking for helpful criticism.

In conclusion A fun and engaging technique that lets you convey your ideas with accuracy and depth is pencil rendering. Incorporating pencil rendering to your workflow as a multimedia student can enhance your digital creations and expand your creative horizons. The process of using pencils to create art is just as rewarding as the finished product, whether you are sketching, shading, or experimenting with mixed media. Grab your pencils, enjoy the process, and unleash your inner artist!
2 notes
·
View notes
Text
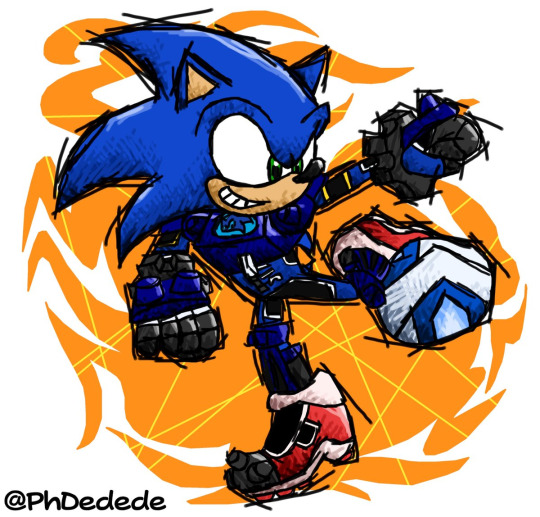

I redrew my Mario Strikers-style Sonic from a few months ago with some of the new techniques I've picked up since then. New on left, old on right.
Biggest difference is in the shading, specifically highlights and using cross-hatching for the darker spots. I've also noticed that official Strikers art tends to be a lot less messy-looking on the characters face - which makes sense, it's the most immediately recognizable part of a character - so I've been implementing that into my art. You'll notice Sonic's eyes and muzzle look a lot less jagged than the rest of his body.
I was already really happy with the posing so I don't change too much. This was pretty much just me tracing over the old art and giving it some more detailed touch-ups. Really like how the new one came out!
#mario#mario strikers#super mario#mario fanart#super mario fanart#mario strikers fanart#mario strikers artstyle#sonic#sonic the hedgehog#sonic fanart#sonic the hedgehog fanart#sth#sth fanart#artist rambles#art redraw
35 notes
·
View notes
Text
•♤10 Plants & Flowers: Shading Techniques♤•


Mediums: Alcohol markers,colored pencils & oil pastels
-----------------•|♡|•-----------------
Man. Another one of my assignments!
This was fun to do,stressful,but fun! I like how most of these came out,and I liked working with different shading techniques that I'd never worked with before. It was nice.
I really want to post some of my own art again,but I'm just swamped with schoolwork lately...and I don't really have the time. But,I think I'll make some.
The shading techniques I used were hatching,short dashes,contouring, cross hatching,stippling, cell shading (or block shading, I guess),scribbles,zigzags, 3's, and circles!
Bye for now!
-KoalaSnooze
#traditional art#art mediums#small artist#color pencil#alcohol markers#oil pastles#artists on tumblr#traditional artist#my art#artwork#art assignment#°|koalasnooze|•#KoalaSnooze#actual art#flowers#plants
2 notes
·
View notes
Note
Can you make a step-by-step shading tutorial? It would be REALLY helpful.
Of course!! This will be a longer post, with a blend of text and images, so buckle in.
Shading can be difficult, so I mentally break it down from step to step. There are a few things to remember, which I'll state below.
There is also the medium that you're using to keep in mind of. Dry mediums (graphite, charcoal, pens, etc) work best with some shading techniques while wet mediums (watercolor, oil, markers, pastels, etc) are best with others. Digital is unique and honestly depends on the person and their preferences. <- keep in mind this overall point is dependent on the artist and some people like to use wet medium shading techniques for dry mediums (or vice versa).
All the works I have posted now have been with graphite or digital. At the moment I'm struggling with my digital style, so we will focus on graphite instead.
Before I even begin to explain my steps, there are some stylistic shading preferences to go over.
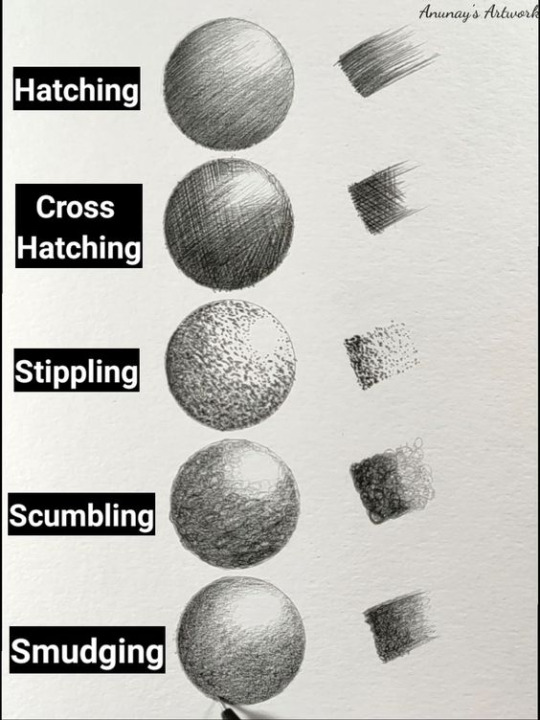
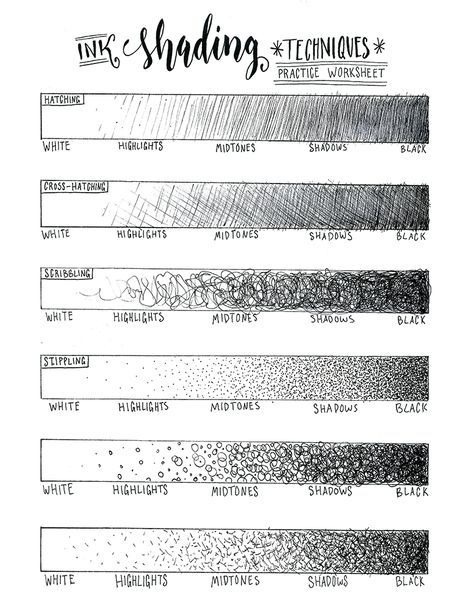
I'm a huge fan of hatching and cross-hatching, but they're not the only ways to shade in dry mediums or with ink. Above are two different images showing different ways to shade, one on a sphere and one as a gradient value scale.
I know many people might get annoyed by it, but I find making 5-value scales extremely helpful. It shows you which values you struggle with and could potentially practice with more. I always struggle with going dark enough (or hitting the 5th value) and it can be seen in my value scales before I practiced going darker.
////
Step-by-Step
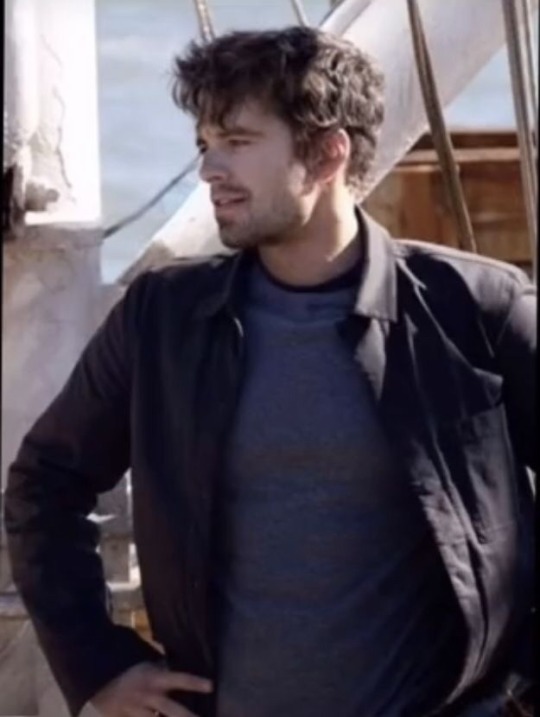
Reference: Sebastian Stan behind the scenes in 'The Falcon and the Winter Soldier'
---
Step 1: Sketch. Establish forms & features. Lines are loose and angular, with minimal curved lines.
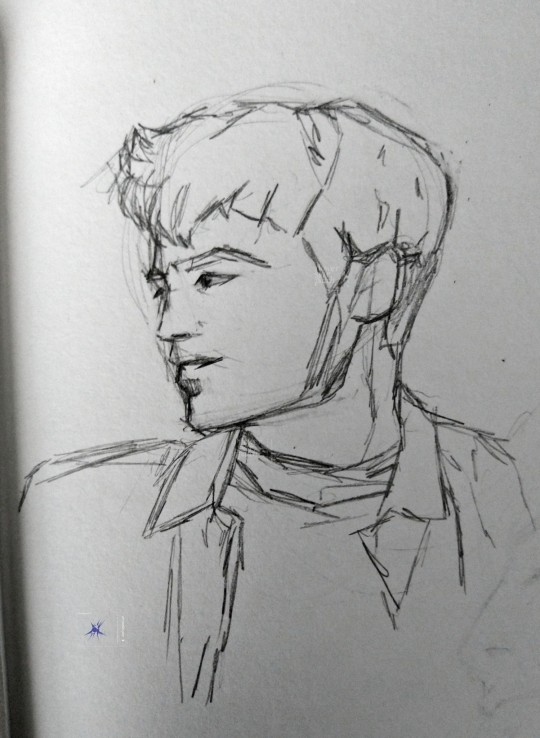
Step 2: Hatch in mid-tones lightly & loosely. (Sorry for blurry photo)

Step 3: Hatch in more detail in denser parts of the face & light areas' shading.
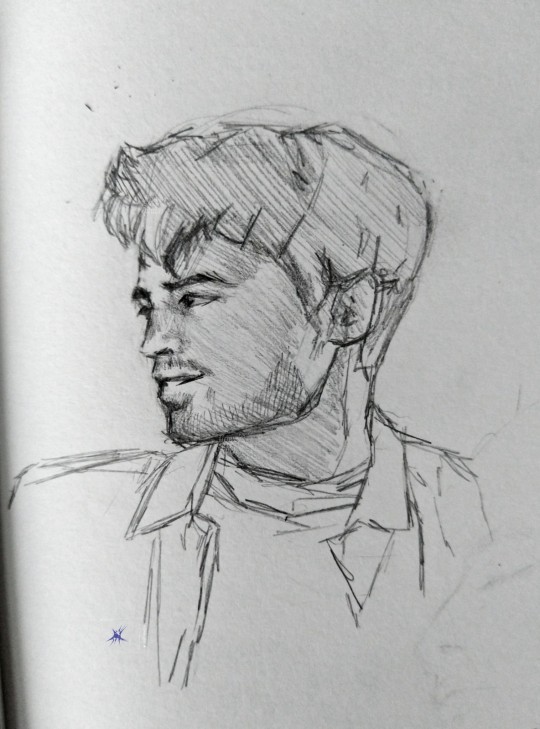
Step 4: Hatch in gradual curves to the face & block in clothing's shadows and darkest points. (Both photos)
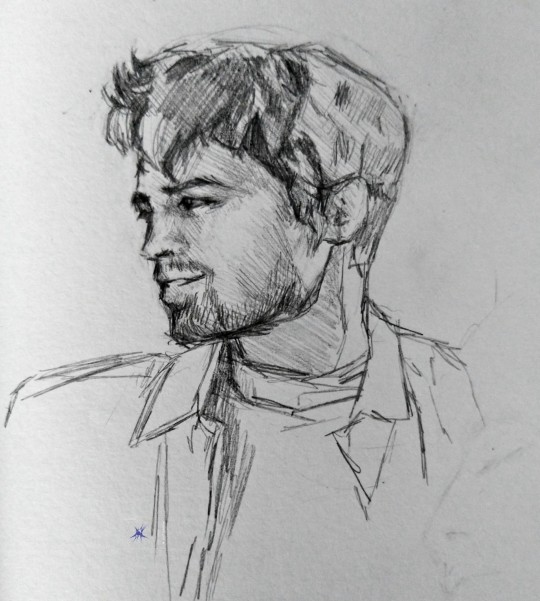
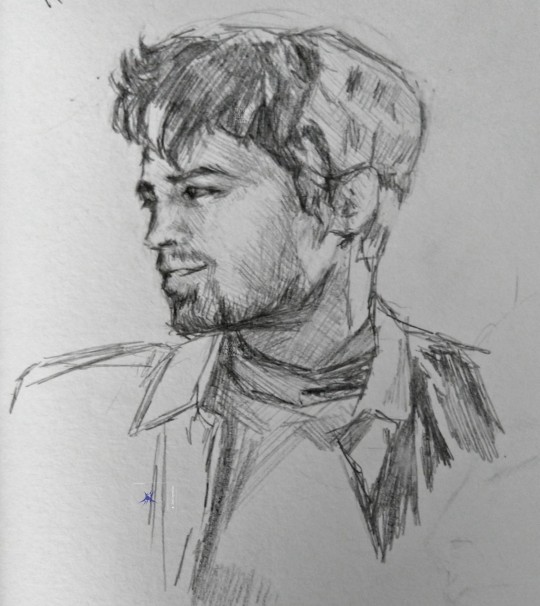
Step 5: Finish hatching overall, add/adjust shading and lines around small or delicate features, remove hatching where unneeded
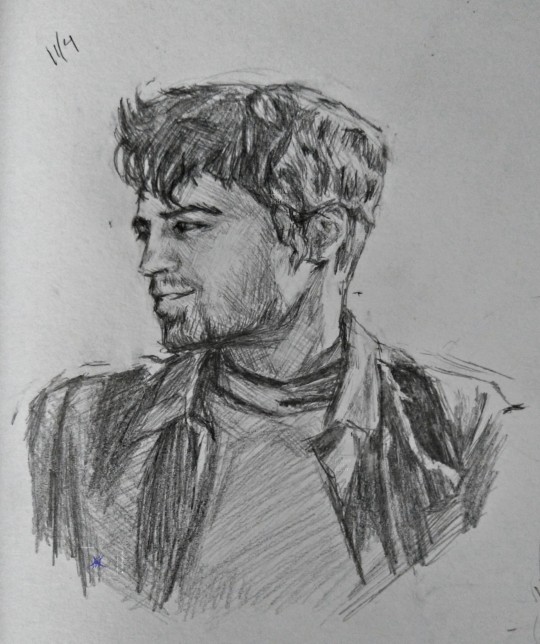
^ isn't the final product, i probably will take a kneaded eraser to it and adjust further. it also doesn't 100% match the reference due to stylistic choices & lack of some skill.
////
Well, that's as much as I can think to include that is my process or is necessary for shading in my eyes. Let me know if you'd like me to explain a step in more detail, or if something didn't make sense. Hope this helped!
drawn 11/4/2023 - instagram • patreon • carrd
#inbox#my art#tutorial#art#answered#art practice#sketch#bucky barnes#sebastian stan#in progress#drawing#graphite#wip#in progress photo#asks#art progress#work in progress#art tutorial#art tips#pencil drawing#drawing tips#art help#art advice#how to shade#shading tips#the falcon and the winter soldier#james buchanan barnes#seb stan#james bucky barnes#james bucky buchanan barnes
14 notes
·
View notes
Text

youtube
In my landscape art piece, I used colored pencils to create the background, applying techniques I learned from a YouTube tutorial. The video taught me various methods such as blending, shading, and cross-hatching, all of which I incorporated into my work. Blending helped me achieve smooth transitions between colors, giving the sky and fields a natural, soft look. Shading allowed me to add depth and dimension, especially in areas with trees and hills, while cross-hatching gave texture and detail to the ground and other elements, adding a dynamic feel to the composition.
3 notes
·
View notes
Text
Languishing on the sofa as I may be today, I still found something creative to keep me occupied. There’s only so many Leverage re-runs a fellow can watch without going stir-crazy so I picked up my shiny new Apple pencil and treated myself to learning how to draw A Karlach.

Drawing is not a skill I’ve ever really picked up but I’ve been tremendously motivated lately by the combined factors of getting deeper into embroidery design + a massive heartstopping crush on every single Baldur’s Gate character. My end goal here today was to try and figure out what combinations of lines and shading really make a face look like A Person instead of just a pointy ended oval, using techniques that will translate well to embroidery stitches. So I traced a screenshot to get the outline and then went to town with cross-hatching.

I ended up with something not terribly far off from a design I might be able to embroider. Love that beginner’s rush when you learn a new skill and you feel so proud because you aren’t yet good enough to detect all the flaws in what you just did, eh? ;)
10 notes
·
View notes
Note
Hi! This is not an ask, just an undercover hello.
You're making me famous out there in the Tumblr world😁! I feel I need to post a work in progress sketch tomorrow, just pencil work with support lines and stuff still there. Is there a way I can post it to you, without anybody else seeing it? So you can tell me if it's "postable". It's just a small sketchbook page with 2 early stage sketches of Charlie's face from a little different angles. But I think I can see they are going to be good. I bought three new black ink pens today one 0,8 mm for line work, one 0,5 mm for face details and stuff like that and a 0,2 mm I figure could be good for shading with cross hatching and similar techniques I don't know the name for in english. I found my charcoal pencils so I bought an eraser pen for highlights. I also got myself a 32 box of good colour pencils. They are a little bleak but that will make blending easier. So I stocked up a little so I should be able to do a decent drawing now. We'll see if I got something to show you tomorrow or on wednesday.
Speak to you later!
yeah! you can just send me the image in our dms! I look forward to seeing it!!
2 notes
·
View notes