#How DLP works
Explore tagged Tumblr posts
Visit Tumblr Blog
Explore Tumblr blogs with no restrictions, modern design and the best experience.
Last Seen Tumblr Blogs


Fun Fact
Tumblr’s website traffic is steadily declining.
Text
Data Loss Prevention (DLP) is a cybersecurity strategy that detects and prevents unauthorized access, sharing, or leakage of sensitive data. DLP solutions protect intellectual property, customer information, and confidential files across networks, endpoints, and cloud environments. Discover how DLP safeguards your business data effectively with advanced tools from Sangfor.
0 notes
Text
Worked on drafted & dumb a bit and now I’m thinking so much about Javy & Bradley’s dynamic in this universe. Javy who has been friends with Bradley cuz of Nat, and loves Bradley (and of course Jake is his bestie) then Bradley and Jake come back from Rhode Island together and Javy trying to make sense of them together. And listening to them talk about each other then and you know he loves that they get to double date now
Also thinking about their dynamic in DLP which is very diff. Kinda don’t get along at first but they both love Jake and just the hijinx they get into trying to save Jake together at one point, Bradley running Hell in his absence and just determined to do anything to get Jake back. Javy helping him, realizing exactly how much Bradley would do for Jake and he respects that. (I have a whole idea I’ll prob never write about this specifically)
44 notes
·
View notes
Text
Spent several hours figuring out how yt-dlp works so I could make this video of a few of my Phighting voice claims
#phighting#phighting!#sword phighting#skateboard phighting#katana phighting#ban hammer phighting#rocket phighting#venomshank phighting#medkit phighting
16 notes
·
View notes
Text
3Dprintum
Objectum attraction to 3d printers. Including, but not limited to, small, medium, large, plastic filaments printers (FDM/FFF), resin printers (SLA, DLP, MSLA). Yes, even concrete ones

The rainbow line represents ribbon cables/dupont jumper wires that sometimes are exposed, especially on FDM printers, or plastic/resin/other material that it works with. Depends on how you want to see it.
The darker lines are the layers of filament, because FDM printers print in layers, from top to bottom.
And stringing (the light strings that can be visible on almost white line).
Oversimplified explanation of what stringing is👇
What is stringing? Imagine using a hot glue gun to draw lines on paper. If you move the glue gun from one spot to another without stopping the flow, thin strands of glue will stretch between the two points. In 3D printing, the printer’s nozzle melts and extrudes plastic, and if it doesn’t stop properly when moving between different areas, it can leave behind thin, unwanted plastic strands—this is called stringing.
#objectum#techum#3Dprintum#printer#printer objectum#3d printer objectum#3d printer#flag coining#flag making#objectum flag#objectum coining#has id
17 notes
·
View notes
Text
everything just stops.

A 'DARKEST LITTLE PARADISE' DRABBLE.
pairing: min yoongi x reader
warnings: mafia au (but no specific details in this particular drabble), mentions of past accident, mentions of sex work, yoongi & oc reminisce and spend time together
masterlist + disclaimers.
note: in case u didn't know, i'm still currently on my aug-oct vacation (see details in pinned post!) and this post was scheduled in advance :> anyw this is a calm chapter/drabble compared to the previous ones bc hey, our dlp!couple deserves a break ok? as always, feedback is much appreciated!
— prev: and all the pieces fall | next: run away with me?

"I'm gonna miss you 'round here, sweets."
You chuckle at your coworker's tone, whiny and teasing from the other line of the phone call.
"You're acting as if I'm never coming back," you say. "It's only three weeks, you know."
"And that's three weeks too many," she whines but you know it's all in jest. "Besides, I wouldn't it past that man of yours if he spoils you rotten. You won't even want to come back to work after three weeks."
You pout as if she can see you.
"He's not my man..."
"Sure," she drawls. "Whatever you say, sweets."
"It's true!" you insist. "He's just— He's, uhh... Yoongi is..."
Three knocks on your front door.
"...here," you finish, blinking at the clock.
"And that's my cue to hang up," your coworker declares cheekily. "Bye, love you, be careful, enjoy your date—"
"It's not a date—"
She hangs up.
You sigh, before summoning your courage and moving to open the front door. Yoongi stands before your dingy apartment in his immaculate, high-end clothing, and even though he's been here a couple times before, you still can't get used to the sight.
"Hi," he greets you softly.
"Hi," you whisper back just as softly.
"Ready to go?"
You nod before stepping out and locking your door. The two of you then walk out and head to Yoongi's car. After strapping yourselves in and driving away, you turn your head to gaze out the window.
"Where to, this time?" you ask him mindlessly.
It's been weeks since your birthday, since that night Yoongi told you everything, and it's become routine at this point for him to take you to the different places in your forgotten past.
So far, you've already visited your old childhood home, your old high school, the coffee shop you used to go to, the ice cream shop you part-timed at, even the spots where Yoongi used to take you on dates.
Unfortunately, nothing has sparked your memories yet. But you don't really mind. After all, you believe everything Yoongi told you, especially since they lined up with the blanks you have with your life's timeline.
What you're after, with these little memory lane trips you take with him, is to get back in touch with your childhood, get a feel of what your life had been like, and get to know the relationships you had with people from your past.
Especially your relationship with Yoongi.
"I was thinking we could just drive around the neighborhood this time. No particular destination in mind," he finally answers your question. "What do you think?"
You beam.
"I think it's perfect."
And true enough, 'perfect' is what you use to describe how your afternoon with Yoongi goes – with the both of you getting takeout and parking at a local fast food's lot. It feels inncredibly nostalgic – stuffing your face with greasy junk food while he sips his iced coffee and toggles with the radio.
"I like this," you remark. "Feels familiar."
"We used to do this in high school," he tells you. "Before..." he trails off.
Before the accident.
You sigh. All those weeks spent with him, you somehow managed to avoid talking about the heavy things. But now, you can't avoid it any longer.
"It's okay, you know," you say to him. "You don't have to walk around eggshells with me. You can talk about the accident."
He nods, but doesn't say anything.
"You know, I always used to think you were so familiar," you reveal, reminiscing about all those times Yoongi visited your room at the brothel and how he never once felt threatening. "I always felt comfortable with you, compared to my other clients. Now, I know why."
"Maybe, deep down," he mumbles, "you remember me. Maybe somewhere in the back of your mind, you recognized me."
"Maybe... It happens during sex, too, you know," you tell him cheekily. "I get deja vu sometimes when you're balls deep inside me."
He chuckles. "Yeah, well, we were just as wild back then, too."
You laugh along with him. The laughter lingers for a while before he speaks again.
"I almost told you the truth so many times before," he confesses. "But I didn't want to overwhelm you."
"It's fine, Yoongi."
A minute passes.
"I also almost told you I love you before," he admits in a whisper. "So many fucking times."
Your breath hitches.
"Before... What about now?" you ask hesitantly.
He gazes into your eyes, leaning closer and closer.
"I still do," he whispers.
And then his lips touch yours.

COPYRIGHT 2023. ALL RIGHTS RESERVED.
#bts x reader#min yoongi x reader#yoongi x reader#bts suga x reader#suga x reader#bts imagines#bts fic#min yoongi imagines#min yoongi fic#yoongi imagines#yoongi fic#bts suga imagines#bts suga fic#suga imagines#suga fic#bts x you#bts x y/n#min yoongi x you#min yoongi x y/n#yoongi x you#yoongi x y/n#bts suga x you#bts suga x y/n#suga x you#suga x y/n#cat.writes
237 notes
·
View notes
Text
Second update on my Review VII (WA 2025): Stop Pedophiles! Protect kiddies!
Tomorrow is the WA state election. If you are curious about the minor parties contesting the election, I hope the index to my reviews is helpful in demystifying them.
And yes, you’re seeing the title correctly, this is a second update on my original entry about the party whose name has drawn more comments than any other party name this election: Stop Pedophiles! Protect kiddies! (SPPK) My initial review was based on as much information as I could find at the time, and upon picking up a few more scraps I wrote an update earlier this week.
Well, guess what. I have found their website. I thought I couldn’t find it. Nobody I spoke to could find it. Then I realised it had been staring me in the face the whole time: the WA Electoral Commission lists all candidates including contact details, which can be either an email address or a phone number. Some candidates have generic email addresses for their party, and this is true of SPPK: six candidates have their contact as [email protected]. So, I followed that, and whaddaya know, stoppedos.org is indeed their website.
It's not a terribly informative website, mind you: the website exists primarily to direct potential candidates to a contact form, with the party seeking submissions by 6 February. It doesn’t appear to have been updated since the party submitted their slate of candidates to the WAEC. To the extent that the website tells us anything about the party, it sheds little more light than the farcical how-to-vote cards I mocked in my first update—although it does show that they are aware of how to spell “paedophiles” the Australian way, as they shift between spellings.
SPPK seems to be convinced there are networks of paedophiles throughout society, and they would create a policing body to ferret out these paedophiles within “our government agencies, within churches, within schools and in daycares”. Nobody expects the SPPKanish Inquisition! I can’t help suspecting this is the sort of paranoia you develop if you spend all day consuming far-right conspiracist social media nonsense from the US and believe Pizzagate is real.
Beyond this the website just states they are “a conservative movement”, which rather understates things: A. Wilson, the candidate listed second, appears to be a man called Andrew Wilson with a lengthy history of being associated with white supremacists. The rest of this entry is largely based on some tips received from @dividebygaming, which I very much appreciate. This ABC article covers Wilson’s history from the late 2000s to the late 2010s, beginning in NSW with a neo-Nazi group attempting to hijack control of the NSW Humanist Society. Wilson then moved to Perth and ran a controversial and fortunately unsuccessful campaign for the Mosman Park council in 2017. The report also discloses that he worked with Radomar Kobryn-Coletti (11th candidate for SPPK, whom I mentioned in my first update) making far-right memes for Clive Palmer and Fraser Anning, including antisemitic content, and that both men belonged to a fascist group that attempted to take over the NSW Young Nationals.
Most of the SPPK slate are listed only by their first initial and last name, without their full first name. This is highly unusual: nobody else for any other party has done so. It seems to be to provide some degree of anonymity or deniability for candidates, and I think it’s fair to say that until proven otherwise one should be very wary of any SPPK candidate who has not given so much as their first name for the ballot.
In my previous entries, to save space I omitted two details about other SPPK candidates that on reflection are worth noting. Hugh Dolan (SPPK lead candidate and party secretary), before he stood for the DLP at Victoria’s 2022 state election, stood as the lead candidate for the Jacqui Lambie Network in Victoria at the 2016 federal election. Andrew Middleton (3rd candidate for SPPK) ran for the No Mandatory Vaccination Party as their lead candidate in the Mining and Pastoral Region at the 2021 WA state election. I reviewed No Mandatory Vax for the 2022 election and b_auspol covered their WA 2021 tilt.
It's also worth checking the WAEC’s live donation tracker. SPPK have received $64,561 in donations, which an ABC infographic indicates is the seventh most any party or individual has received this financial year behind Labor, Liberal, Greens, Nats, Kate Hulett (Fremantle teal independent), and Australian Christians. Of that total, $54,560 alone has come from Hugh Dolan across five donations between 26 October 2024 and 18 February 2025. The remaining $10,001 comes from two donations (one of $1!) on 4 November 2024 from the Frank McManus Foundation.
Why is this interesting? Well, recall from my original review that SPPK were originally registered in 2024 as the Democratic Labour Party, and that the DLP over east has disowned the SPPK as having “absolutely no association with us”. The Frank McManus Foundation is… uh, an official fundraising body of the DLP (also a separate home page calling it the “DLP Frank McManus Foundation”). It is named for the party’s founder. It seems the Victorian branch was telling porkies when they claimed to have “absolutely no association” with the WA DLP-cum-SPPK.
So, I have two speculative interpretations based on the above content. First, although SPPK seems obscure and hard to locate online, their website contact form soliciting candidates has probably circulated in private or low-visibility far-right settings, which would explain how 3edgy5u far-right meme machines have ended up on their ballot. Second, the DLP has not been honest in disowning the SPPK as unrelated and never related; this suggests that rumours I've heard of strong internal bickering and fractiousness have substance. Did Dolan move to WA, start a branch, and then fall out with members over east? It seems the DLP originally at least tolerated this branch and supported it financially, but events early this year (the name change? the candidates?) have made them keen to present themselves as having nothing to do with the party on the ballot.
To conclude, if you are voting tomorrow and distributing preferences all the way, I strongly encourage you to place SPPK last or very nearly so. I am personally intermingling their candidates with similarly unpleasant indies Peter McLernon and Aussie Trump.
#auspol#ausvotes#WAvotes#WApol#WAvotes25#WA Election#WA#Election 2025#Democratic Labour Party#Stop Pedophiles! Protect kiddies!#cranks#definitely cranks#weak or no preference
10 notes
·
View notes
Text
stim gifs in photopea
[PT: Stim gifs in photopea /End PT]
Hello! This is my (lengthy) tutorial for how I make GIFs for stimblr using Photopea. It's not going to be as extensive as how I make for shows, celebrities, etc, because I have different processes for both, however I'm still aiming to cover everything I think necessary!
It'll be split into multiple sections with headers, so feel free to skip whatever you want if you don't find it necessary :•] Reblogs appreciated if you found it useful, but no pressure obviously!
Sections:
Getting your video
Importing into Photopea
Making the GIF
Sharpening the GIF
Coloring
Exporting & Optimization (in EZGIF)
End results, and misc tips and comments
1. Getting your video
[PT: 1. Getting your video /End PT]
Short section! These are the ways I download and source videos for use
Youtube - yt-dlp (installation instructions)
Instagram
Tiktok (Allows without watermark)
Pexels
For yt-dlp, check out this basic list of commands I made solely for downloading material to GIF! If you have further questions, either send me an ask or refer to the github page.
2. Importing into Photopea
[PT: 2. Importing into Photopea /End PT]
There are two ways to import into Photopea, the first is importing footage directly, and the second is screencapping (which I won't cover in detail, but this tutorial is for installing the program I use on mac & how to use it, and this is for installing on windows)
Option 1: Importing footage directly (see end for comments)
On the home page of Photopea, you'll want to click "Open from computer", and select your clip, upon selecting you'll be presented with a popup like below

All that really matters here is where you see "30 FPS", that's the videos native frame rate. I always put whatever that number is as my frame rate because I find it to be the best, but you can use different presets (Like ezgif, which gives you 12, 20, etc). The less frames you have, the chopper it will be. If you plan to slow it down later, I'd also recommend having more frames so it looks smoother after slowing.
Now you just have to wait for it to load all the frames, then you're set!
Option 2: Importing screencaps
This is my personal way of doing things, so this is assuming you've installed a screencapping program and already have your frames ready.
For this, when you click "open from computer", select the first frame and open it by itself. Once that's loaded, look in the top left at the "File" tab, select "Open & Place", then ctrl + shift to select the rest of your frames. Once they've all loaded in, you can either rasterize them now, or wait until after cropping and resizing (goes faster then).
What's important though, is use the shift key to select all your layers, in the top left open the "Layer" tab, hover over "Animation" at the bottom to expand it, and select "Make frames". With your frames still selected, hit the folder button in the bottom left.

Without this, Photopea won't recognize this as an animation, therefore you'll be unable to export it as a GIF.
3. Making the GIF
[PT: 3. Making the GIF /End PT]
3A. Cropping
To begin with cropping, select the crop tool, which is the fifth one down on the left bar (if you hover over, it will say the name), or the "C" key on the keyboard.
Along the top now, you should have some new options. The dropdown menu that says "Free" is going to be how you select an aspect ratio or fixed size, and I always set to 1:1 since most people on stimblr use square GIFs, but you can do whatever works for you! Make sure to leave "Delete uncropped pixels" unchecked, because that lets you move stuff around later without having to recrop.
Crop your animation down as you see fit, then either hit the enter key, or the check button along the top bar. If you're unhappy with the placement, you can undo it OR, select all your layers, then use the move tool (First icon on the left, or the "V" key) and drag it around as you see fit.
3B. Resizing
With all your layers selected still, open the "Image" tab in the top left, towards the bottom select "Image Size", then select what you want to resize to.
Tumblr's exact GIF sizing
1 per row: 540px
2 per row: 268px
3 per row: 177px
HOWEVER. For stim GIFs, I find the quality difference so negligible, you can resize to what you want. It's also better for it to be bigger and scale down, then smaller and scale up. For this reason, I typically do 268px no matter what, or 300px.
As far as resampling goes, leave it turned on, and I personally leave it on bilinear, but the different options vary slightly, so experiment and see what works for you!
If you're happy at this step, go ahead and skip down to exporting! But when doing this way, I do recommend sharpening for better quality at smaller size.
4. Sharpening the GIF
[PT: 4. Sharpening the GIF /End PT]
The fun thing about this section is you get to experiment and find what works for you! I'll give you my personal method, but you can play around, add and remove bits, etc until you get something you're happy with!
4A. High pass
High pass is my personal favorite way to sharpen GIFs, and for stim GIFs I'll often use only this.
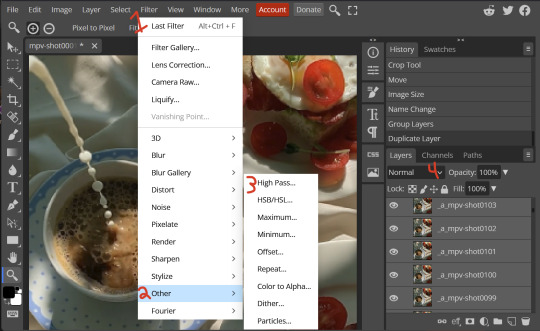
(Steps 1-3 in image) To do, start by right clicking the *Folder* all your frames are in, and select "Duplicate Layer". Select all the frames in Only the folder on top, then go to the "Filter" tab along the top left, hover over "Other", and select "High Pass". The grey look is entirely normal! I normally set my high pass at 2-4, but play around with this step and find something you like!
Select the *Folder* all your high pass frames are in, and change the blending mode (fourth step in image) to "Soft Light", it should be on "Pass Through" initially. With that done, you've used high pass on your GIFs! If you're content here, skip the next section about smart sharpening, and see about merging animation folders under it.
4B. Smart Sharpen
Note: I recommend testing your sharpening settings on one layer BEFORE applying them to all layers, as it will be easier on your computer.
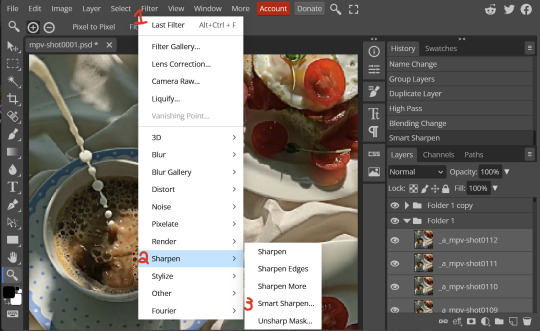
I utilize this in addition to high pass usually, but you can do it all by itself as well! To begin, select all the frames in your folder (if you used high pass, select the frames in the *Bottom* folder). Open the "Filter" tab on the top left, hover over "Sharpen", and select "Smart Sharpen". Now find what you like!
For stim GIFs, if I used high pass, I'll go for 75-110% amount, and a .1 radius. I personally don't like the look of an over sharpened GIF, so I only use smart sharpen if I want to enhance some small details high pass didn't touch enough, which is why I use so little. If you don't like high pass, you might use more here!
4C. Combining animation folders
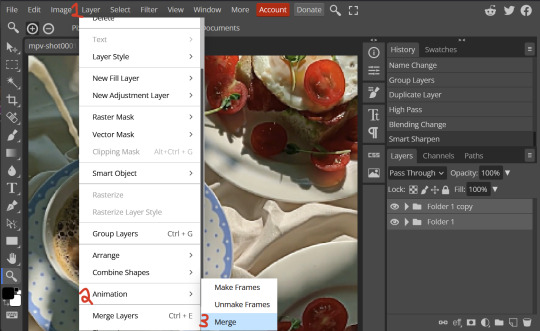
If you used high pass, you'll notice you have two animation folders. To fix this, select both folders using ctrl + shift, open the "Layer" tab, hover over "Animation", and select "Merge". It will give you a popup to confirm, and you can go ahead and accept!
If you don't merge these, Photopea will think they're two GIFs in one document, rather than only one, which is why this step is so important.
As a note, once you merge these folders, you can no longer shift the frames around to change where they are in the crop like you could earlier.
5. Coloring (Image Heavy)
[PT: 5. Coloring (Image Heavy) /End PT]
This section is going to be less of a tutorial and more a basic rundown of the adjustment layers and what they do. Coloring will change from GIF to GIF, and you can do light or intense coloring, so this is just a guide to begin with, but really just play around and find what you like!
To access the adjustment layer menu, in the bottom right where "New Folder" was, the one directly next to it that looks like a circle made of two half-circles, will bring up your adjustment layers.
As a note, I always group my adjustment layers in a folder above my animation, for ease of hiding to compare with and without.
5A. Levels
Levels is one I almost *Always* use on a GIF because it makes it look cleaner to me. In the first box, sliding the black square on the left *increases* the blacks, sliding the white square on the right *increases* the whites, and the one in the center changes the general brightness up or down.
Sliding the black box on the bottom bar *decreases* the blacks, sliding the white box *decreases* the whites.
If you change the channel from RGB to another option, you can change the balance of reds/cyans, greens/magentas, or blue/yellows, I personally don't touch this for stim GIFs. In the RGB channel, I set the top black box at ~10, and the top white box at ~245 usually.

5B. Curves
This is another way of adjusting brightness, blacks and whites, or color balance. By adjusting the dot in the bottom corner you adjust blacks, the top corner adjusts whites, and if you make a dot in the center, it adjusts general brightness! You can also make multiple dots to separately adjust some values. By changing the channels, you adjust color channels rather than white/black.

5C. Exposure
This is another way of adjusting the lights and darks of the GIF. Sliding the exposure up and down will add/take away light from the lighter parts of your images. Adjusting the gamma correction up and down will add/take away shadow from the darker parts of your image. Offset increases/decreases the brightness of the whole thing but I almost never use it.

5D. Vibrance
Vibrance is what I like to think of as a "softer" way to increase intensity of colors, instead of using a Hue/Saturation layer. It affects warmer colours more intensely than cooler colours, whether you use the vibrance or saturation slider. The saturation slider here is more intense than the vibrance one, but less intense than saturation in a Hue/Saturation layer.

5E. Hue/Saturation
This one is simple! Sliding the hue slider changes the colour, sliding the saturation slider increases/decreases saturation, and sliding the lightness is basically like directly adding black/white to a color. I use lightness only sparingly.
What's cool here, is you can adjust the range to target a specific batch of colours! If you find your reds are too bright compared to everything else, you can target the saturation of them specifically.

5F. Color balance
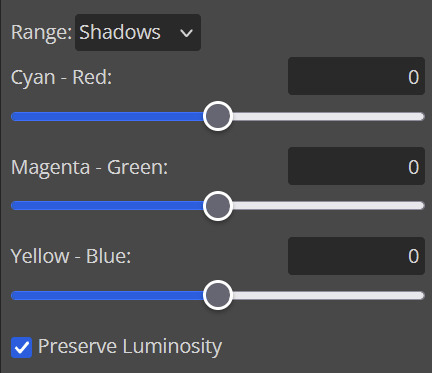
This is a simple way to adjust the base colors of an image, by changing it to be more cyan or red, magenta or green, or yellow and blue. This can be useful for making a GIF appear warmer or cooler!
I almost only touch the shadows & midtones, and highlights sparingly. "Preserve Luminosity" preserves the highlights and shadows of the image, so by unchecking it, you can achieve some more intense results.
5G. Black & White
The black and white layer is useful because you can change exactly how light or dark a color appears after making it black and white. For that reason, I prefer it over a gradient map if I need to make something black and white.
5H. Photo filter
Photo filter is a simple way to add a color filter over the entire image, and adjust how strong or weak it is. "Preserve luminosity" once again just keeps the darks and whites of the original GIF.

5I. Channel mixer
I couldn’t even begin to cover channel mixer here, but this is for very intense color edits (I typically use it when I'm trying to make a GIF fit a board). However, here's another tutorial solely about channel mixer if you're interested in taking a crack at it!
5J. Selective color
Finally, selective color allows you to adjust the amounts of color or lightness/darkness of a specific batch of color.
By changing the color channel, you can affect different batches of color. The cyan slider controls cyan/red, the magenta slider controls magenta/green, the yellow slider controls yellow/blue, and the black slider controls black/white.
Checking the "absolute" is essentially like "Preserve Luminosity" in the other layers. With absolute, it's like shifting the color one way or the other, and without absolute, it's like adding to the pre-existing color.

6. Exporting and Optimization
[PT: Exporting and Optimization /End PT]
6A. Exporting
With all that done, we're ready to finish it up! To finish your GIF, open the "File" tab in the top left, go to "Export As", and select GIF!
Here you can rename, adjust the size (WILL ruin the sharpening you did), the quality (I leave at 100%), and the speed.
Another important thing to note is the "Dither". If you leave dither off, you can potentially encounter color banding, which is where (typically gradients) with look like strips of color, rather than smooth. This is because GIFs only have 256 colors they can render, so if something has too many, it bands.
By checking dither, it can get rid of color banding, at the cost of dots on the image (around where the worst color banding is usually). Sometimes the dots aren't noticeable and this is the better option, however it will Also increase your file size. It's up to you if you want to use it!

6B. Optimization
This is technically an optional step, as tumblr's GIF size limit is 10mb, so as long as you're under that, you can post, however, smaller GIFs load faster and I personally find are better for use in stimboards where you're loading a lot of GIFs! So to help this, let's head on over to the optimize section of ezgif. My personal goal is UNDER 4.5MB, ideally under 4MB.
The two main things I recommend are Lossy GIF, or removing frames, and I always start with Lossy GIF. I do anywhere from 5-15, and usually this will bring down GIFs a lot if you made them in Photopea! My example GIF was 6.7 MB to begin with, and afterwards it was 4.2MB.
However if you find that to be not enough, you can remove frames. When you remove frames, it speeds the GIF up, so I also recommend slowing it down (this is why I set my frames high in the beginning as well). I typically do "Remove every 4th frame" and slow it down to 75%-85%.
7. End results, and misc tips and comments
[PT: 7. End results, and misc tips and comments /End PT]


(source) The first GIF is without sharpening/colouring, the second is with sharpening but no colouring, and the third is with sharpening and colouring. I didn't color it much besides making it slightly warmer, but I hardly ever do much anyways!
As for misc comments:
In firefox, when you import footage directly, sometimes it glitches and tries to load 4000 blank frames, which is extremely resource intensive on a computer. The solution is import the footage in chrome, save as PSD, then open the PSD in firefox. (Or work in chrome but why do that /half silly). The other solution is screencap which I do since I do this often, but both work fine.
In firefox, sometimes you're unable to slow the GIF down upon export and it will export faster than it actually is. Slowing the video down to 50% restores it to native speed I've found, and you can do this in ezgif before other optimization.
When colouring, my number one tip is slide something all the way up first, then adjust down! By seeing it at max, you have a better idea of what's getting adjusted.
If you have any questions, drop me an ask :•]
And that concludes our tutorial! My apologies for the length, but I wanted to cover every possible thing here. It definitely seems like a lot, much more than working in ezgif, but when you get used to what you're doing, it goes extremely fast (even if you spend extra time screencapping). I personally find it worth it for the ability to sharpen GIFs alone, but as well as more detailed coloring opportunities.
Thank you for reading, I hope this has been useful!
#i did it :•]#not stim#stimblr#gif tutorial#photopea#big thanks to talos for proofreading this :3 🖤💚🖤💚🖤💚🖤
78 notes
·
View notes
Note
I was wondering if anyone had the same experience as me with posting comments on fanfics;
I used to post the simple "Great work, love it" or simply copy some quotes from the work and describe how excited it made me feel or how well it worked with the rest of the fanfic. Now, I didn't post comments on every fanfic I read only the ones I subscribed to since there were quite a few authors on Tumblr who spoke about receiving comments and how it made their day, or how when they were down they'd read through the comments and feel better. I did this until I stumbled on one of the DLP's threads while I was in HP fandom where the comments similar to mine were ridiculed for being 'too generic' and 'weirdos who comment on every chapter' and suddenly when I began to write the comment my mind would just go 'what if I'm bothering the author' or 'What if they think I'm weird for commenting on more than one chapter'. Then I would remember the DLP thread [the whole thread revolved around mercilessly tearing down comments users found on fanfic.net, some of the comments were boarding on harassment of authors or too pushy, but a good deal of them were nothing but 'Love the work' and something to that effect] and delete the comment. Since then, I have never commented on the work no matter how much I adore it, only put kudos and bookmarks, so when I saw one anon mentioning comments I was wondering if anyone had similar experience.
--
This push and pull between "No one comments!" and "This kind of comment is stupid!" has been going on in fandom literally forever.
127 notes
·
View notes
Text
downloading youtube subtitles/captions en masse (or videos, with diff options) & searching them
i wanted to take a playlist and download all of the autogenerated captions so i could then search them. here's the solution i've come up with. tried to cover even the basics here and not assuming you have any particular experience with installing/using stuff in command line
all these instructions will be for windows (11), the wiki has instructions for other OSes
install yt-dlp this can be used to download youtube and thousands of other sites' videos with a high level of customization, and fortunately for me also allows the option of downloading the subtitles without the video. i didn't really want to download 600+ videos for my project!
https://github.com/yt-dlp/yt-dlp -> download the yt-dlp.exe (see for other OSes)
put it in an executable path, i just added a new one to make things easier, see under the cut for detailed instructions
install ffmpeg this is needed for a variety of things, but specifically for my case, i need it to convert the .vtt file that youtube gives us (which is very cluttered to read because it has formatting info in it too) to .srt which is text and timing only
https://www.ffmpeg.org/ -> same deal as yt-dlp, ditto the executable path - i downloaded this one: https://www.gyan.dev/ffmpeg/builds -> ffmpeg-release-essentials.zip
install srt_fix (for cleaning up autogenerated captions) to fix the doubling of text caused by how youtube creates the autogenerated captions:

before fix -> after
https://github.com/bindestriche/srt_fix -> create a folder in your path with the .exe's called 'yt-dlp-plugins' and copy the folder with srt_fix in it there (so the final path of the srt_fix.py for me is: C:\Users\ns\bin\yt-dlp-plugins\srt_fix-1.0.1\yt_dlp_plugins\postprocessor)
there are other methods of installation on that page as well as a link to the general yt-dlp plugin installation documentation
install grepWin if you want to search the text of the files quickly (which was the whole point of this project for me 🤪) grepWin is a good option, made by the person who did tortoisesvn. at some point i might look into putting these on The Internet somewhere that would be searchable and link to the original videos/timestamps, but right now, i just wanted a quick way to search them.
https://github.com/stefankueng/grepWin - click on the release on the right
documentation with direct link to current release: https://tools.stefankueng.com/grepWin.html
now we're ready to go!
open powershell (start->windows powershell) and navigate to where you want the files to be placed, for example: (ps: press tab after writing a couple letters and it'll fill out the dir name automatically)

paste your command (using one of the panel videos for example):

yt-dlp -t sleep --write-auto-sub --convert-subs "srt" --skip-download --use-postprocessor srt_fix:when=before_dl https://youtu.be/tjqkei7nLhw?si=EfaEnVnf-oCv1kxt
replace with the video or playlist you're interested in. recommend starting with a video first :) if it seems to be bombing out repeatedly, stop with ctrl+c
the flags are needed as follows:
-t sleep - if you don't use this, youtube will stop the download after 300 videos and make you wait an hour, this adds some delays to get around that
--write-auto-sub - this is to grab the autogenerated captions as opposed to the uploaded/created versions
--convert-subs "srt" - to use ffmepg to convert the vtt subs into an srt file
--skip-download - to not download the actual video, we only want the subtitles
--use-postprocessor srt_fix:when=before_dl - this is calling the srt_fix specifically when using the skip-download flag

when it's working correctly, it'll look something like this and the folder will contain two files per video, the original srt and the -fixed srt with the non-duplicated text

the file it creates is named (by default, this can be changed, see the docs) video title [youtube video id] - aka plop that string on the end of this url and it'll pull up the source video https://www.youtube.com/watch?v=
and lastly, searching! obviously this is where things kind of break down, because common words are more likely to be understood and captioned correctly; but proper names, sketchy audio quality, mumbling, etc is going to miss a lot. just for kicks, i thought i'd see if it ever got mark of cain:

detailed instructions on adding a new entry to the path environment variable below - just be careful with this

open system properties - search for that in the start menu or enter environmental - it'll pull it up
in the system properties window -> click environment variables

double-click the user variable Path

click New and put the path. i made a new folder at my profile folder level (ns) called 'bin' for this:

so the path i entered was %USERPROFILE%\bin

#tutorial#yt-dlp#youtube#captions#powershell#downloading videos#panel transcript project#i have no idea what to tag this lol#this is beyond niche content but maybe someone somewhere out there also has a project this might be handy for
4 notes
·
View notes
Note
hey, thank you again for the giant RWBY archive.
im curious as to how exactly you downloaded the raw mp4s from Crunchyroll and Roosterteeth.
i use yt-dlp! which will work for downloading from any unencrypted/not DRM-protected streaming service.
20 notes
·
View notes
Note
Do you have any tips or guides on how to make gifs?
I do! Firstly, this guide here is probably the best guide I've seen for gif making. It's concise and easy to follow, and it's what I used to learn myself. They have a lot of resources as far as programs go, but I'll list what I use below. As always, never download and install anything from unknown sources without doing your own due diligence. Run everything through your antivirus and/or virustotal before installing always always always!
This is kinda long, so imma put it under the cut lol. Also note that I use windows (Win10), so things may not work the same way for mac or linux
Before you can actually make the gifs, you need a way to download high quality videos! I like jdownloader 2 because I find the interface to be user friendly, it gives you the option to download multiple elements (like srt files), and it works with more websites than lots of other video downloaders (and their user support is leagues better as well). My second choice is yt-dlp, which isn't necessarily more complex but might look a little more intimidating. Both are great programs, but a quick note about jd2: DO NOT download it from anywhere else but the link above. The developers package adware in all their installers EXCEPT for that one (I hate it too, and I think it's fundamentally unethical, but at least they're up front about it and they have an adware free version). Both methods automatically download the highest quality video available in your source link, so you don't have to worry about fiddling with that.
Now on to extracting frames! My method of choice is ffmpeg. It looks more intimidating than it is, and it's honestly the best way to extract frames imo. Like yt-dlp, it uses your computer's command console, which means you'll need the relevant command lines to run it. This tutorial is great to get you started, and it includes a command line for if you only want to extract frames from a specific part of your video. If you want to extract every frame from the entire video, you can either input the start and end times of the video into that command line, or you can use this version (I use both depending on what I'm doing):
ffmpeg -i "file path" "out-%05d.png"
Always make sure you're working with png files. To make quality gifs you have to start with quality images, and png files, unlike jpg, are lightweight and lossless, meaning you won't end up with compression artifacts and fuzziness
To get the file path for your video, select the file, then in the upper left hand corner of your window select home > copy path. It will copy the path in quotes, so replace the entire section "file path" with the path you just copied. Then copy and paste the entire line into your command console. The tutorial above says this as well, but be sure to create a folder for your frames, go into that folder and click the file path bar at the top of the window, then type "cmd" to open the console. This will ensure your files are dumped in that folder
So now you need a way to actually MAKE the gif. This is... a little more tricky. You can use gimp, I think, though it's certainly not my program of choice. You could buy PS but like... ew. OR you could do what I did and arr it. I use a portable version of CS6 that I downloaded literally a decade ago, and unfortunately the website I got it from isn't up anymore. I did a quick search and found this on reddit, but again, do your due diligence before downloading and installing anything!
Now I'll talk a little bit about my actual process. The actual process of making frames into layers into a gif I got from that first tutorial I linked. I took that process and made an action on PS so that I never have to do it manually again because I'm lazy and my memory is dogshit and I didn't want to have to consult a guide every time I wanted to do something lol. Everything else I learned through experimenting and my own experience as a photographer, so I encourage you to play around with everything to see what you like and what works for you
For coloring, I fiddle with levels, brightness/contrast, and color balance adjustment layers until I'm happy with how it looks. You can use curves instead of levels if you want finer control (or if you want to produce effects like matte), but levels works just as well and has a histogram right there in the panel, which makes it easier to adjust the exposure based on the image's actual data
For sharpening, I have a couple of custom actions I use. Here's what they look like:

The first one (bound to the F2 key) gives a smoother appearance, and I like to use it for kpop gifs where the subjects are already airbrushed and smooth without much texture, or wide shots where detail isn't super important
The second one (bound to the F3 key) is the one I use when I want to preserve texture in the image. Closeups of people where you can see their skin texture, or busy images with lots of detail benefit most from this one
The basic gist of it is, the "sharpen" filter does exactly what it says on the tin and it's usually all the sharpening an image needs, and the "surface blur" filter erases or dampens artifacting created by the sharpening filter. Sometimes I'll run the action twice, or use them both in combination to get the effect I want. Here's what the difference looks like in practice, featuring two very cute dudes:
F2 sharpening action


F3 sharpening action


You'll notice in the first two gifs, there's not much in the way of texture to preserve. Yoongi's skin is smooth and airbrushed, and the scenery is all metal and concrete shot with a wide aperture, which makes the background nice and blurry and smooth. In the second set, Jesse has facial hair and stubbly texture on his throat that I wanted to preserve, so I used the action with the lighter surface blur
My advice on all of this though, again, is to play around with it and see what you like! And if you have any more questions, feel free to ask! I'm by no means an expert, but I'll do what I can to help!
edit: oh, a quick note about speed! The tutorial I linked above mentions changing the delay to 0.05, and that's great for full speed gifs! But if you want them slow like my gifs above, I set the delay to 0.08. Sometimes I'll slow them down even more by setting the delay to 0.09 or 0.1, but any higher and you start to lose some of that smoothness
15 notes
·
View notes
Note
Do you know any way I could move my playlists out of spotify and onto a different app/website?
Hello ! I have Oh So Many tools for you >:D
Migration
Firstly, the simple migration tools. There are multiple services that allow you to do that, depending on the target platform. Here's the ones for Apple Music and Youtube Music. Deezer have their built-in tools.
I don't know many streaming services, but I would recommend using Youtube Music : with the help of Newpipe or alternatives, you can listen to your playlist with no ads for free :) And you can mix in youtube videos in your playlists - very cool when a specific version of a track isn't on streaming services ! Plus Newpipe has a very handy download tool
Download
Secondly, I wanna talk about downloading. Having your own library with the files accessible anytime are a must, to my sense. It will greatly improve your battery life and reduce your mobile data usage. And you can keep them your whole life !! Make mixtapes on CDs for your friends !!! And- ok let's get to the point
From other services
The go-to tool for downloading music and videos is yt-dlp. It's the base of most DL tool out there ! The vanilla version is a command-line tool, but there's a few apps with an interface. If you're on PC, I like to use Parabolic for that. I *think* LibreTube has batch download ? NewPipe only has single download. Seal does it but is a bit clunky.
From Spotify
Spotify is infamous for being very good at protecting its files against download. They make breaking changes regularly, making it hard to find reliable, durable tools. Usually, the solution is to hack into the official Spotify app, and get the data from there. On PC, you can use OnTheSpot to hook into the official app. You can also mod the official app with Soggfy (windows only). I wasn't able to find any working Android app as of April 2025. Seal used to do it but not anymore, and popular options are discontinued or getting sketchy.
There are also tools that allow you to download music from CSV files
Backups
Finally: Backup !!! Your !!! Playlists !!! While pretty unlikely, it is possible that you may lose access to your account for one reason or another. Playlist.cloud (the very first link) allow you to do that. If anything goes wrong, you'll be able to restore all your playlists from these CSV files !
If you want to go even deeper : Soulseek is the gold standard for peer-to-peer music sharing (use an interface). With community scripts, you can even input your CSV list and have it downloaded.
ℹ️ Why should I trust any of these apps ? Github links are scary
A very wise consideration ! Some of these apps I used myself, so I can vouch for them. The rest is taken from FMHY (Free Media Heck Yeah), **the most comprehensive resource for piracy and free media access**. Here are the quick links to Migration and Download. I cannot overstate how good this resource is. Read it, bookmark it, this will be your best ally for the years to come !!! All recommendations on this website are curated by experimented communities. They are mostly safe and up to date.
Closing thoughts
Thank you for your patience ! I spent a lot of time researching this answer, so the information would be as useful, complete and accurate as possible. Tech companies makes it as hard as possible to escape them, so this can be an arduous journey. I hope this will be helpful, and your migration will be smooth !
Love and Piracy <3
5 notes
·
View notes
Note
How do I make an account for your youtuber downloader? Its asking me to make an account when I try to download some music
Thats a problem with YouTube itself unfortunately that yt-dlp doesn't have a fix for (that doesn't get your YouTube account banned in most cases) yet, I have a work around in place so that refreshing it and trying it again should fix it but I have to do some more programming on actively suppressing proxies that hit that error to deal with that better soon.
9 notes
·
View notes
Text
ZINE CONTEST (with prize)(≧▽≦)
I have a Zine contest from NOW until Feb 24th (autism holiday). Pls read more about how to submit, the prizes and why I'm so hyped.
This is for BOTH people who consider themselves artists and those who don't. It doesn't have to be a comic. A ZINE CAN BE ANYTHING :D It can be a tech tutorial, it can be a comic, it can be flash fiction, it can be a local history guide, it can be Street Fighter II Turbo strategies printed out to be left in arcades, it can be anything!
The video below explains the process better than I could probably in text (I suck at conveying thing through text). My video also has a tl;dr that I would appreciate everyone read before submitting.
There's some other stuff below, but if you're more visual, like not the reading type (like me) then feel free to skip and just head to the video description to jump in.
Also, you may know me for my "Raspberry Pis are for paypigs" video where I try to advocate for the upcycling for ewasted Chromebooks.
I've been into the idea of leaving around Zines for a while. Every time I walk into a coffee shop or local business, I think "wow, I really would wish there was something cool to read." So I started making things to put there: 8 small 2.5 inch panels, folded into one 2.5 inch square for those interested to unravel. I put them inside of these origami boxes that a learned how to make, ones with a logo printed on them.
So far I've made: a zine template (I call it a dog ear zine for some reason), a template for the box to put them in, a zine about using yt-dlp, a zine about a reindeer working IT (along with a collaborator) and (coming soon) a zine about a monster in a cave doing stuff. All of the odg LibreOffice Draw template files to make your own zines or print out mine are on my archive.org page (linked at top of my Tumblr). I'd really like other people to try this 8 panel 2.5 inch zine format, and I'm willing to bribe people with sweet, sweet Gabe Newell bucks to do it. You can submit as many zines in this format as you want. Just make sure they're printed out and have pictures of both the front and back (plus other pictures if you want) . In the video I mentioned you can use my submit page, which is probably the easiest for me to keep track of. You can also use the #dogearzine hashtag to enter. Please read the video description before entering, though (which includes Youtube's and Tumblr's terms of service, though this is more of a youtube thing).
youtube
Also, and this is completely unrelated, there's a lot more to me than just the faux-clickbait Wojak thumbnails. I like doing tech, wrestling, japanese, vidya and other videos, but I love to throw art in whenever I can shoehorn it in. Like, the video where I go over inchworm, butterfly, colors 3D and flipnote sudomemo - colors 3D on a hacked 3DS was my sister's first experience with digital at (she's moved up to an iPad and Procreate). So, it hold a special place in might heart, as a lot of the things I talk about do. I made a Whomp video because I miss Ronnie. I made a Rockbox video because I wished more people used dedicated MP3 players and knew where and how to download music. I want to help people do interesting things. And I also want to thank anyone who read all of this. You are cool. I hope everyone who's able to can compete in this contest and challenge themselves to get out of their comfort zone, to try something new! Also, also, thanks for liking these posts, people on Tumblr. You all have cool blogs. (^o^)丿
#zine#contest#zine contest#youtube#zine template#archive.org#comic#challenge#fun#chromebook#raspberry pi#wojak#zine ideas#fun ideas#steam#Youtube
24 notes
·
View notes
Text
yt-dlp: An Installation and Use Guide
This guide specifically walks through how to download and use yt-dlp on Windows, but if you have a Mac, you should still be able to follow along. Just make sure to download the Mac version of software whenever the option comes up. I'm also going to be assuming that you have a 64-bit Windows system. The standard today tends to be 64-bit for PCs, but if you're not sure and you want to double check then go to Settings -> System -> About -> Device Specifications -> System Type.
This guide also focuses on the command line version of yt-dlp (accessed on Windows by typing cd in the search bar). If you prefer to access the program through a GUI, you'll need to download additional software. Here's a link to help you get started. (LINK)
If you have any specific questions that you can't find an answer to within the linked resources, feel free to reach out and I'll do my best. Also, as someone who can be incredibly computer illiterate at times, I'm writing this guide in a way that explains a bunch of things I used to be confused about, so sorry if it goes over something in too much detail.
Resources:
These are just some handy links in case you run into a problem.
The yt-dlp GitHub page (has literally everything you might need)
The r/youtubedl wiki, includes a list of common errors and FAQs
Installing:
Click on this link. It will take you directly to the section on the yt-dlp GitHub page where you can download the program.
Feel free to download whichever version works best for you, but I recommend scrolling down to RELEASE FILES and downloading the version that works for your system from the Recommended section. I've included a picture below.
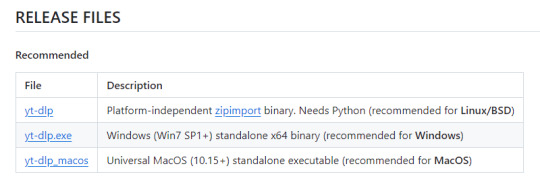
Once you've clicked on your version (yt-dlp.exe for Windows users), yt-dlp will download automatically. It should show up in your Downloads folder.
FFmpeg:
To merge video and audio files (which helps you get the best quality from youtube possible), you also need to download FFmpeg.
Scroll down even more to the DEPENDENCIES section.
Click on that first link. It will take you to the FFmpeg webpage. Clicking on Download in the sidebar will take you to a page full of different versions of FFmpeg. DO NOT CLICK on the big green button in the middle of the page. What we need is a version that is already compiled.
Find the section that looks like this (titled Get packages & executable files):

If you're Mac, pick accordingly. If you're Windows or even Linux, I actually recommend you download from this webpage. It contains the same versions as the Windows builds by BtbN but is instead managed by the developers of yt-dlp.
Find the one titled "ffmpeg-master-latest-win64-gpl.zip" (I've included a highlighted picture below for reference).

That will download and go into your Downloads folder too.
Setting up a Folder:
The easiest way to use yt-dlp is by placing it and FFmpeg into a folder. You can store the folder wherever you want, but you will need to remember (and type out) the path to the folder every time you want to use yt-dlp, so I recommend not making it too deep.
What I did was make a folder titled "yt-dlp" within my Desktop folder.

Move the yt-dlp application from your downloads folder to your new yt-dlp folder.
IMPORTANT: Assuming you also placed the yt-dlp folder into your Desktop folder (and assuming you are a Windows user), then the full path to your new yt-dlp folder should be C:\Users\YOUR_USERNAME\Desktop\yt-dlp. Fill YOUR_USERNAME in with whatever your profile is called on your PC.
For the FFmpeg zip you downloaded, extract the zip file into your new yt-dlp folder by clicking the zip, clicking Extract all from the tool bar, and then entering the path to your yt-dlp folder. Everything within the zip is already stored into a folder, so you don't need to create a new folder just for FFmpeg.
Now you're ready to go!
Using:
This section is going to be almost exclusively Windows-focused because I've never used a Mac before and I don't know how the Mac command line varies from the Windows one. I'm also not going to go into any details. If you want more info or to explore the options, I recommend checking out the links in the Resources section.
Type cd and then press enter into the Windows search bar to bring up the command line. If you've never used the command line before, this is what it looks like:
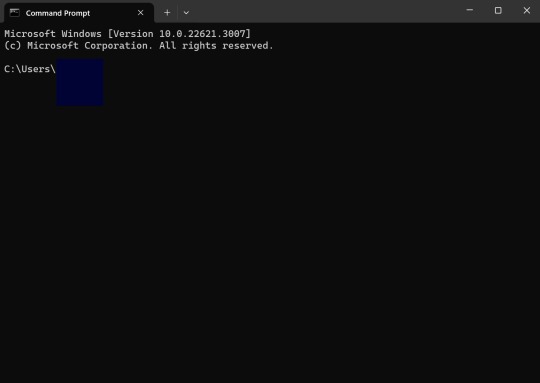
I covered up my username with that blue square.
Type the following into the command line:
cd Desktop cd yt-dlp
This will take you to the same place where your yt-dlp application is stored. You must cd into the appropriate folders every time you want to use yt-dlp.
YouTube, Twitch, and Most Websites:
Find a link to whatever YouTube or Twitch video that you want.
Into the command line, type yt-dlp followed by the link you want to use. This is what it should look like (the red is what you type):
C:\Users\YOUR_USERNAME\Desktop\yt-dlp> yt-dlp https://www.youtube.com/watch?v=hECaXfk2Wo4
Press enter and viola! Your video should download! It will automatically go into your yt-dlp folder.
Twitter:
Twitter forces you to log into an account to view a video, so you have to give yt-dlp your account information if you want to download anything. I understand being wary of doing this.
The easiest way of going about this is by typing:
yt-dlp https://www.youtube.com/watch?v=hECaXfk2Wo4 -u YOUR_TWITTER_USERNAME -p YOUR_TWITTER_PASSWORD
And then your video should download as normal.
Alternatively, you can use your browser cookies as explained here.
Updating:
Here is the section on the GitHub that explains updating. Basically, type yt-dlp as if you want to download a video, but instead of also adding the link, add -U at the end.
Uploading:
If you want to upload a video or clip to tumblr and it's not working, my number one advice is to rename the video file to something simple and add .mp4 at the end. If that doesn't work, try converting it (either with yt-dlp itself or an online website). Sometimes you just have to fiddle with things before they work the way you want. Good luck!
#yt-dlp#youtube-dl#speaking#i generalized this but i use yt-dlp almost 99% for various clips which is why I'm putting this post here for you guys
14 notes
·
View notes
Text
youtube
So, here's some simple thoughts I had about Sonic x Shadow Generations. I was trying to push this one out real fast, but ended up with some technical problems and other stuff you can read about below the cut.
This video was a small technical nightmare to put together because I'm experimenting with new stuff. I capture a lot of my own footage when I can, and when I can't, I go out of my way to find the cleanest, highest quality version of what I'm looking for. That in itself can take a lot of time, but then I usually have to download it off of Youtube. For years, I've used a suspicious website called Keepvid (don't go there) to download Youtube videos, but recently I saw someone recommend a piece of software called "Stacher".
Stacher is basically a front end for another piece of software called "yt-dlp", which was the subject of a lawsuit a couple years ago -- basically, Youtube (Google) was claiming it was illegal to download Youtube videos, and was specifically targeting yt-dlp in the hopes of getting rid of it. A judge ruled that downloading Youtube videos is in fact totally reasonable and legal, and yt-dlp was allowed to keep existing. All of this is because yt-dlp is the best way to download Youtube videos, but it's command line software. I'm no stranger to command line (I've used FFMPEG), but I do tend to prefer having an interface to work with, which Stacher provides.
I picked up Stacher because Keepvid was starting to not work so well. Youtube is implementing new video formats and Keepvid was consistently only detecting 720p30 downloads. Stacher on the other hand will grab the absolute maximum possible resolution, which in this case was 4K60. Which is great! Even though I am downsampling to 1080p60, it still means I'm getting very sharp, very clean source footage. Except Vegas doesn't really like whatever 4K60 format Youtube is using, so I have to transcode it using Handbrake, which for even a 10 minute video can take upwards of an hour.
And then there's editing. My poor little 2015 CPU (Intel Core-i5 4690K) really struggles to work with 4K footage, which probably doubled the length I spent in Vegas putting this together. On top of the hours spent transcoding. So you can really start to see how all this adds up and delays what should have been out by, like, the 12th.
And if I couldn't get it out fast... I do wish I'd spent maybe a little longer explaining some of my opinions. I get the gist across but in particular when talking about what I think is cool about this level design, I think I could have explained a bit more.
Sonic games make you feel so railroaded and there are little hints in this footage of breaking free of that. There's a bit in the footage we've seen where Shadow runs around inside of a tube. This is interesting because:
This is a level design feature that makes total sense with Sonic style physics
This is a level design feature they barely ever use
There's an alternate path where, if you're fast enough on the draw, you can take a grind rail on top of the tube.
Not only would most Sonic games never have this tube section at all, if they did, they would not let you skip the tube and run on top of it. And if you go on top of the tube, there's more than just one grind rail up there, to boot!
So I see something like that, and it gives me a different vibe than most 3D Sonic games typically get. And that makes me excited!
As always I think these work best when I take a step back and think a little. Better Late Than Never is my brand.
#sega#sonic the hedgehog#sonic team#sonic x shadow generations#sonic generations#remaster#shadow the hedgehog#video#youtube#reaction#Youtube
9 notes
·
View notes