#I recommend this user 10/10 experience
Text

Commission done by @miilkcandies for my girls from my Final Fantasy XV fic this is me trying
#Final Fantasy XV#ffxv#commission#miilkcandies#I recommend this user 10/10 experience#look at my girls! look at them!!!#I am twirling my hair I am giggling I am kicking my legs up#my fic is yknow it's yknow but the art is just *chef's kiss*#also I have been sitting on it for like two weeks or so and I only now got around to posting it#I am a donkey#I mean they technically aren't Noctis and Prompto#but they very much are Noctis and Prompto#Promptis#my god how awesome this art is honestly
24 notes
·
View notes
Text
um i dont think hip joints are supposed to do that . 😀👍
#user experience is terrible i dont recommend skeletal structures at all. 2/10 experience#/j#funguy🍄
8 notes
·
View notes
Text
whichever one of yall hooked me up w/ someone for a new mc skin (i have my guesses but i dont wanna wrongfully call anyone out). blows u a kiss
#.txt#also shoutout to tumblr user dragongirldick who is the one actually doing the skin for me#12/10 experience so far i love artists and furries and furries who are artists and supporting people who were actually recommended to me
2 notes
·
View notes
Text
"Me Time" Calendar Traditions Mod (PUBLIC - 10/9TH)
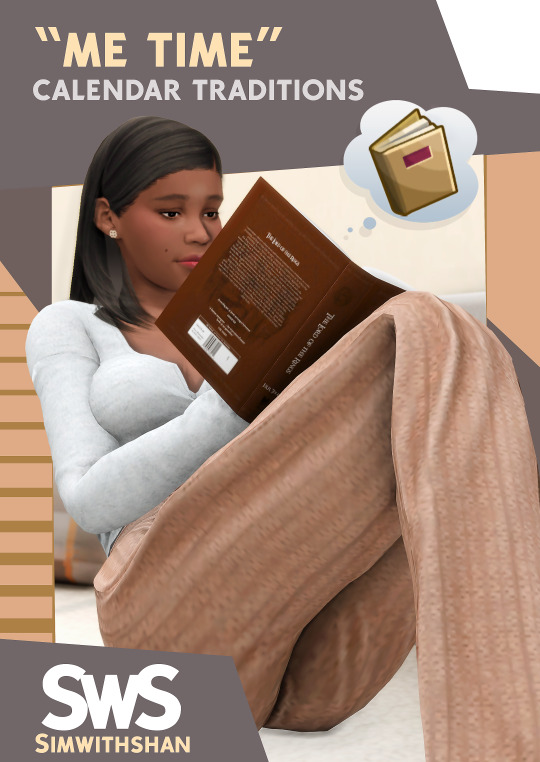
Hi everyone, I am thrilled to introduce my latest mod, "Me Time" Calendar Traditions. This mod offers a straightforward and clean experience for your Sims, enhancing their calendar with structured activities to accomplish.
Each "Me Time" activity requires your Sims to complete just one specific task based on what you've scheduled. For instance, if you've marked Friday as "Beach Day," your Sim's goal is to head to the beach.
I designed this mod to be incredibly user-friendly, ensuring that it can be enjoyed without any added pressure. After all, the purpose of a scheduled planner is to simplify life, right?
"Me Time" Calendar Traditions includes 12 activities for your Sims to add to their calendar:
Cafe Day: Enjoy a visit to the cafe, whether alone or with friends.
Beach Day: Head to the beach for a relaxing day, alone or with company.
Lazy Day: Take a well-deserved nap to complete this tradition.
Gaming Day: Dive into some gaming to fulfill this activity.
Meal For One: Prepare and savor a meal exclusively for yourself.
Novel Reading Day: Spend quality time reading a book.
Picnic Day: Unpack your picnic basket and enjoy a delightful meal outdoors.
Tend To Plants Day: Show some love to your plants by tending to them.
TV Series Day: Watch your favorite TV series or shows to mark this day.
Thrifting Day: Explore the thrift store and create a unique outfit. Note that this requires certain expansion packs to work correctly.
Paint & Sip: Engage in either painting or enjoying a drink at the bar to complete this activity. You can choose one or both based on your Sim's preferences.
Live Stream Day: Open up a livestream from your tech/gaming career to participate in this event.
You have the flexibility to install only the traditions you prefer, allowing for a customized experience. Keep in mind that certain traditions may require specific expansion packs to function correctly. If you do not have Highschool Years, than you know Thrifting would not work for you and etc. Most of these traditions are compatible with the base game.
Additionally, I recommend using the "Zebru - More Icons" mod to enhance your calendar with a variety of icons for a visually pleasing experience.
Here is a video link on how to use the mod
DL
1K notes
·
View notes
Note
Do you have any tips on for people starting a comic and wanting to post to tumblr? Like pacing ect. Or well any experience you’ve had with your comics? Love your content as well ❤️
If it’s simply for fun, and you’re just trying to gain experience, my biggest advice would be to just START. Don’t worry about it looking perfect. Don’t worry about comparing it to other’s comics. Just try something, and if you find it’s not working, you can always change things up. I have gone through several styles and page layouts since starting. Do I wish those first pages of EW looked just like what I’m doing now? Yes, but if I’d waited around for perfection I would have never started. And I wouldn’t have had nearly as much fun creating it! If people like it, that’s great, but your art is for you. If you’re growing and learning and having fun, then you’ve accomplished something!
Now for some less preachy advice 😂…
—If your comic is gonna be hosted on Tumblr specifically, I would say, make sure you keep the 10 image limit in the back of your mind when you’re pacing things. That can definitely cause some headaches down the line. If you don’t plan ahead, and end up hitting it, you’ll have a sudden cut in your flow. This last update I knew it was gonna be long, so while I did plan, but I could’ve planned better.
—Variety is key!!!!!
Composition changes keep your viewers from getting bored. Sometimes I’ll find myself falling back into the bad habit of just doing the simple back and forth with two characters talking straight on, but changing the camera angle, making establishing shots when you change locations, and over the shoulder shots, etc etc…All these will make for a more interesting viewing. You may think a character needs to be in every single panel to make it interesting, but if you have a lot of dialogue, a simple plain shot—either in top of a solid background, or just over something boring, like a glance at the set, etc—this will let people focus on the words rather than splitting their focus.
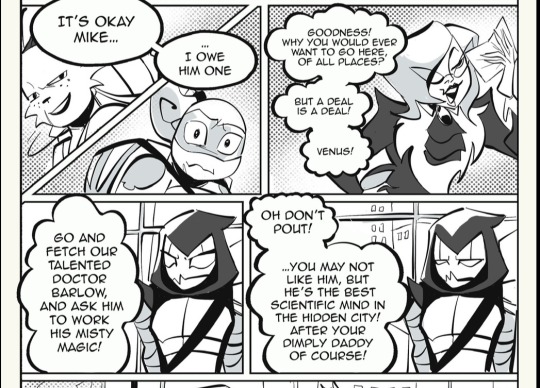
Variety applies to shading as well—whether you’re using color or black/white. Variety in values are SO important for comics. You’re shoving a ton of information in a limited space, so try to keep your values different for items that are close together….it can make things very confusing and turn your line work into indistinguishable blobs if you shade without this in mind.
(Using this panel as an example….)
The top two panels have a variety of darker values and a halftone background—so the next two with Venus, I kept rather simple. I could’ve colored the buildings behind her, but then, she might’ve gotten lost amidst all the grey. There’s not really any trick or solid rule to this, but once you develop your creative eye, you’ll make these choices without even thinking about it.
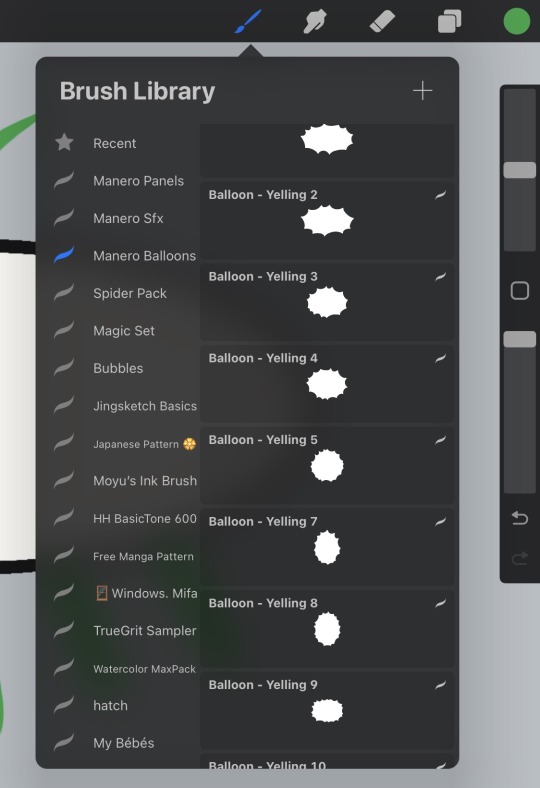
A few links to helpful tools (they’re all procreate centered I’m afraid 😅)
Outline brush — a free tutorial for Procreate users. This brush kinda mimics the CPS feature that lets you create panels with a nice black outline. I used this brush very often, and it really gives your panels a professional look. Fair warning, it can be glitchy, but it’s free…
Manero Comic Bubbles and sfx — These brushes are not free, so I would recommend maybe getting in your groove before you try them out. They’re by no means necessary, but I’ve just started using them, and they save me so much time. There’s a HUGE selection of shapes, and they go on with a solid white background, so you don’t have to worry about coloring around your dialogue balloons.

#rottmnt#ask slushie#slushie rambles#I could probably think of more stuff but my brain is fried I’m just really putting the rambling in that slushie rambles tag
249 notes
·
View notes
Text
Lin kuei movie headcanons 🎬🗡
As a film girlie I saw another user talking about how the Lin kuei brothers wouldn't really be into the mean girls so it made me think what kind of movies would they be into
Bi-han
I cannot picture this man being into comedies or romance, so if you're down for some 10 ways to lose a guy or the notebook enjoy watching that by yourself.
Comedies,no the only time we see this man crack a smile is when he's saying something snarky to his opponents in the intros.
Likes Quentin Tarantino movies like kill bill and inglorious bastards,not a big fan of pulp fiction because he thinks the characters and plot are silly but he enjoys the martial arts and revenge plots in other Quentin movies.
He will like movies where the main character is problematic but he doesn't understand that the audience isn't supposed to be rooting for them eg,scarface,taxi driver and joker(2019)
I also see him fucking with kung fu panda💀
Kuai liang
Similar to bi-han,can appreciate a good action movie but leans more towards movie's that make you think, such as interstellar, inception,shutter Island and the Truman show.
Definitely a Christopher nolan fan,I can see him liking the dark knight trilogy.
Unlike bi-han he would not put down watching a romance movie.
I see him enjoying 10 things I hate about you.
Unlike bi han he would watch films like scarface and taxi driver but criticize the main characters
Tomas
Opposite of bi han loves romcoms and classics.
I assume Johnny would def give tomas movie recommendations which consist of classics and action.
Doesn't like action as much as the others,I feel like Tomas's views are different from the other two men even though all of them basically grew up around violence Tomas uses films to escape from his real-life experiences.
Enjoys light hearted stuff with drama like Wes Anderson,he enjoys the cinematography of his films.
Not really a movie but he would watch sitcoms.
Enjoys movies like The royale Tenenbaums, the mask,Shrek 2
#mortal kombat x reader#mortal kombat 1#mk1 2023#tomas vrbada#bi han sub zero#kuai liang#scorpion#mortal kombat headcanons
82 notes
·
View notes
Text
Accessible BG3 Mods For The Visually Impaired!
As someone with a vision disability, I have a hard time reading small text, distinguishing menu options, and so on. So of course I stay on the look out for accessibility mods.
I'm gonna link some of the mods I use (and some that might just be useful) for other PC users that are struggling with vision issues with this game. Be sure to check the mod pages for specific installation instructions for each mod as well as any dependencies or compatibility issues with other mods.
Do note that these mods were compiled based on my own experiences with low vision, eye strain, and trouble distinguishing small objects/words so they may not be useful for everyone. If you have any suggestions for things to add to the list or if any links are broken, please let me know!
Also please show some love to these modders if their mods helped you 😄
Better Maps All In One
Link Here
With this mod you can remove the grid overlay on the map which reduces visual clutter. There is also an option to make the minimap larger and a recent update says that colorblind support has been added for NPC markers!
Bigger Mouse Cursors
Link Here
Does what it says on the tin, makes all mouse cursors larger.
Darker Paper
Link Here
Providers a darker background for all readable items (books, notes, etc.) which may reduce eye strain for some.
Comic Sans (Font Replacer)
Link Here
Can be useful for those with dyslexia or vision impairments.
Better Context Menu
Link Here
Adds related icons to all context menu options and (optionally) makes the context menu larger.
Increased Font Size
Link Here
Does what it says on the tin, increases font size with options ranging from 10% to 55% increases.
Note: If using in conjunction with the Comic Sans mod, the author of this mod recommends starting with the 10% size and increasing if needed as the Comic Sans mod already starts larger by default.
Less Annoying Magic Effects
Link Here
Disables VFX for many spells, status effects, etc. (see mod page for list). Useful for reducing eye strain, visual clutter, or headache inducing effects. There is an optional configurable version so you can remove only certain effects, though I haven't tried that myself.
Bigger Customize Dice Button
Link Here
Does what it says on the tin, makes the button to customize your dice larger.
145 notes
·
View notes
Text
Survey recruitment; I gave feedback as a later consultant & Tuttle is another Autistic AAC user who was involved in the project from the start. Shares are Definitely Helpful :)
Are you an autistic adult who uses speech and other tools (such as augmentative and alternative communication [AAC]) to communicate?
If you answered yes, please consider participating in this survey at this link:
We are interested in learning about the speech, AAC, and assessment experiences of autistic people who use speech and AAC. We are curious if a modified version of the Communicative Participation Item Bank (CPIB) can be a reliable tool for clinicians to utilize in measuring the internal experiences of speaking autistic people. Regarding assessment, we are interested in understanding how their speech efficacy, or the extent to which one can use speech to completely communicate their intended meaning, was measured and considered in the evaluation process and if the evaluation resulted in a recommendation of an AAC tool.
The survey includes a mix of multiple choice, slider, and written response questions and is estimated to take between 10-20 minutes.
No identifying information will be collected in this survey.
Please reach out with any questions or concerns via email.
We thank you in advance for contributing your insight on this important topic!
Karina Rayl, B.S. (Lead Investigator)
Graduate Student
Speech and Hearing Sciences
Portland State University
Email: [email protected]
Pang Lee Herr, B.S. (Lead Investigator)
Graduate Student
Speech and Hearing Sciences
Portland State University
Email: [email protected]
Brandon Eddy, M.A., CCC-SLP (Co-investigator and Faculty Advisor)
Associate Clinical Professor
Speech and Hearing Sciences
Email: [email protected]
Amy Donaldson, Ph.D. CCC-SLP (Co-investigator and Faculty Advisor)
Associate Professor
Speech and Hearing Sciences
Email: [email protected]
Tuttle (External Collaborator)
Email: [email protected]
Alyssa Zisk, Ph.D. (External Collaborator)
Email: [email protected]
#aac#actuallyautistic#disabilty#autism#aac user#actuallydisabled#disabled researchers#autistic researchers#yes it's a research post and yes the two 'external collaborators' are both autistic aac users#please only use our emails for things related to the research but that is what they're for
54 notes
·
View notes
Text
Getting Linux-y (for Windows refugees)
a casual users' GUIDE to the basics
Linux ? isn't that for nerds ??
yes. no. we're breaking down stereotypes here !! this post is aimed at casual users who care about freedom + privacy, are sick of the direction Windows is heading, or just curious c:
i'm talking social media, email, web browsing, online shopping, pdfs, document writing, funny meme edits, youtube/netflix/plex, spotify, dvds + cds + mp3s etc.
i'll mention gaming and running specific Windows-only software briefly, but that's outside the casual scope i'm going for d:
Arm thyself ! and decipher !! arcane secrets be upon ye !!
it's key knowledge time !! ^w^
Linux isn't Windows, but it's not completely alien :o
much like Tumblr, one curates their Linux experience. there are flavours of Linux (terminology: distribution/distro) aimed at power users who like to DIY, and there's ones aimed at normal folk that are ready to go. for the sake of this GUIDE i'm recommending Linux Mint:
its interface is similar to Windows,
it's popular as a user-friendly choice
and it has both excellent support and software
(note: i ran Mint for years, and when coming back to Linux i chose it for my gaming pc because it's easy to set up and well-supported)
key information:
Linux doesn't use drive letters :o
your C: drive is / (terminology: root directory)
your personal files (C:\Users\Username) live under /home/username (terminology: home directory)
other drives (internal and USB drives) live under /mnt/drive-label or /media/username/drive-label (terminology: mount point)
Technical Note: all hard drives and SSDs, before they get a mount point, are referred to as /dev/sdX (eg /dev/sda, /dev/sdb etc.) for HDDs and SATA SSDs (partitions are /dev/sda1, /dev/sda2 etc.), and /dev/nvmeXn1 (/dev/nvme0n1, /dev/nvme1n1 etc.) for NVMe drives (partitions are /dev/nvme0n1p1, /dev/nvme0n1p2)
however, Mint manages all this for us and stuff just shows up in your File Manager much like they do in Windows Explorer c:
Software is typically managed similar to the way App Stores work; Mint has Software Manager that lets you install common programs
the only wrinkle here is Mint supports both Mint-specific sources and a thing called Flatpak, which is like a universal App Store for all Linux distros
the Update Manager keeps both your core system and your programs up-to-date. unlike Windows, by default it will only update when you tell it to ! no more rebooting into Windows Update and waiting 10 years ^w^
it's possible to have both Linux and Windows on the same laptop (terminology: dual-booting); you choose which one each time you turn your laptop on
the Linux Mint Forums are a good place to ask questions, seek advice, and maybe even offer your own !!
additional places: Official Community Website, community-maintained subreddit, community-maintained Discord Server, Official Troubleshooting Guide
i think that's the basic info taken care of.
Let's start with the preparation, or PRE-paration
for this GUIDE you'll need:
a USB drive (4GB+)
Linux Mint ISO file
Balena Etcher (to put the ISO file on the USB drive)
i recommend reading through the info on the Mint homepage and following their installation guide for good step-by-step guide w/ screenshots ^^'
we're gonna make a 'Live Image' on our USB drive - this means we can testdrive the system before we install it. try before you buy !! wait, it's free -- uhh.. walk before you run ??
Download the ISO file using the above link. i recommend the Cinnamon Edition, unless you have a very old PC, in which case pick XFCE
Download Balena Etcher
Plug in your USB drive and open Etcher
Follow the onscreen prompts to select the ISO file and your USB drive
Alright, let's fire her up ! ^u^
now we have our USB drive it's time to boot it. because Windows is, well, Windows, you may need to disable Fast Boot in order to access the BIOS/UEFI. :c you may also have to disable Secure Boot in the BIOS/UEFI depending on your computer. this is usually found in the Boot, Security, or Authentication tab.
now we're ready !!
Power on your computer and press F1/F2/F6/F10/F12/DEL to access your BIOS or Boot Menu
Select your USB drive
A screen will come up where you can select Linux Mint (or will say Automatic Boot in X seconds)
You shall be greeted by a desktop that looks something like this

have a look around !! there's a menu in the bottom left that has programs and system settings and logout/reboot/shutdown options. the taskbar at the bottom displays icons of running apps (and pinned ones). the bottom right has your clock and system tray w/ network, audio etc.
this is a great time to get a feel for how everything works ! open some programs !! investigate the System Settings. connect to your WiFi (in the system tray next to the sound and clock).
when you're ready, double-click the "Install Linux Mint" icon on the desktop. the installer will walk you through setting everything up. i recommend following the official installation guide's walkthrough as it explains everything from setting your timezone to installing Mint by itself or alongside Windows, with screenshots showing each step. it also has an important section on installing drivers. the slideshow during installation also does a good job at showcasing the available software.
Welcome Screen
after installing and rebooting, a Welcome Screen pops up that offers a nice interface for picking a system theme/colour, installing drivers, and setting up backups etc.
Let's talk software !! :D
Mint comes with some software pre-installed. these are probably the main ones:
Archive Manager (like 7-Zip or WinRAR)
Celluloid (a video player; VLC is available to install if you prefer)
Drawing (an image editor similar to Paint)
Document Viewer (PDF viewer)
Firefox (Tumblr's favourite web browser)
LibreOffice (like MS Office - it even supports MS Office file format !)
Rhythmbox (like Windows Media Player or iTunes)
Software Manager (like the Microsoft Store/App Store; GET OTHER PROGRAMS HERE !)
System Monitor (like Task Manager)
System Settings (like Control Panel)
Terminal (like Powershell/Command Prompt; outside the scope of this post but good to have)
Text Editor (like Notepad)
Timeshift (like System Restore points, or macOS Time Machine)
Web Apps (similar to an old iOS feature - make Netflix.com into an app etc.)
Update Manager (manages updates)
Available in Software Manager:
Audacity
Discord
DOSbox
Dropbox
OBS
Spotify
Transmission (torrent client)
VLC
and much more !
these are all official apps !
How's that checklist ?
i mentioned some casual tasks at the start of this post. let's work through them !
Social Media, Online Shopping, Youtube/Netflix/Plex and general Web Browsing
Difficulty: easy
Windows Similarity: identical
Method: open Firefox. browse to your_site.com.
note: i recommend the web version of Plex as the app can be buggy
Email
Difficulty: easy (webmail), medium (mail client)
Windows Similarity: identical (webmail) or similar (mail client)
Method: webmail - open Firefox. browse to your_email_site.com. sign in
client - open Software Manager. search for Geary (similar to Mac Mail), Evolution (similar to Outlook), or Thunderbird (same as on Windows). click Install. open Geary/Evolution/Thunderbird, follow the first-time setup.
PDFs
Difficulty: easy
Windows Similarity: similar
Method: open Document Viewer from the application menu. File -> Open, browse for your PDF. OR, open File Browser, browse for your PDF, double-click to open
Document Writing
Difficulty: easy
Windows Similarity: similar
Method: open LibreOffice Writer from the application menu. on first launch it may ask if you want a traditional (Office 2003) or Ribbon (Office 2007 onwards) layout. use it as you would MS Word. there's also Calc (Excel), Impress (Powerpoint), Draw (Publisher) and Base (Access)
Funny Meme Edits (aka MS Paint level of image editing)
Difficulty: medium
Windows Similarity: similar
Method: open Drawing from the application menu. File -> Open for your image. the left toolbar provides options to resize, add text, crop etc. pro tip: remember to click the tick button on the bottom right when you do anything !
Spotify
Difficulty: easy
Windows Similarity: identical
Method: open Software Manager, search for Spotify, click Install. then open it from the application menu.
DVDs
Difficulty: easy
Windows Similarity: similar
Method: insert your DVD. Mint may ask what you want to do (choose play/open with Celluloid). if it doesn't, then open Celluloid from the application menu, click the + icon in the top left, click "Open Disc" and choose the DVD you inserted.
CDs and MP3s
Difficulty: easy
Windows Similarity: similar
Method: CDs - insert your CD. Mint may ask what you want to do (choose play/open with Rhythmbox). if it doesn't, then open Rhythmbox from the application menu. it should automatically see your CD.
MP3s - double-click your MP3 file.
Gaming and Windows-only programs
i said i'd briefly mention this (probably good bc the post is getting loonnggggggg), so here we go.
gaming on Linux has come a long way. Steam can be installed from Software Manager and supports a few titles natively, as well as the option to run some Windows-only games using compatibility software called Proton. the website ProtonDB is very handy for looking up compatibility for specific games. i'll drop a proper GUIDE on Linux gaming another time.
Windows-only programs. sometimes you need specific software and it only has a Windows version. it happens. there's similar compatibility software that allows eg Photoshop to run, called WINE (Proton is actually based on this). again, this is outside the casual scope of this post, but i'll drop a GUIDE on this too (as i use the same software to manage both my Windows-only programs and my Windows-only games).
Finale !! FINI !! Fuck me that's a lotta words !!
okay, we got to the end ! you should have Linux Mint installed, you should have your basic programs ready to rock (and know where to get more !!), and know where to get help from official Linux Mint sources as well as community-run ones <3
please drop any questions in the notes, or as an ask. i shall tag those asks #DATA_REQUESTS/GUIDES/LINUX in addition to my usual #DATA_REQUEST tag
i'll also provide the following GUIDEs/REPOs as i have time:
Flatpak (that universal App Store i mentioned earlier)
Gaming (including using Proton + Bottles for Windows games)
Windows software (using WINE + Bottles)
and if there are any specific GUIDEs (eg terminal basics, how to configure xyz in System Settings etc.) or REPOs (eg links to other people's GUIDEs, software recs, screenshot galleries etc.) i'm happy to provide those as and when i have the time !! have fun !!~
#daemon.md#GUIDES#GUIDES/LINUX#linux mint#linux#free software#foss#open source#this post is like 5x the length i expected it to be bc brevity ain't my style#oopsie#i know i should provide more screenshots but i'm tired after writing this#so i'll include some in a reblog ??
1K notes
·
View notes
Text
Best Tools to Track Your NaNoWriMo Progress
The NaNoWriMo site allows anyone who signs up for a free account to set their word count through their dashboard. There are plenty of other resources to help you too, but if that’s not your style, these are other tools to track your NaNoWriMo progress. See if you like any before November begins to tackle your manuscript even faster.
Note: None of these are paid promotions or affiliate links. They’re just recommendations based on what I and other writers have found helpful in the past!
1. FocusWriter
Writers often start exploring the world of creative writing tools by downloading FocusWriter. The free program hides everything on your screen except your document and shows a custom background instead, like the wooden background below.
Use the settings to customize each writing experience and keep track of your daily NaNoWriMo word count goals. It even spell checks for you, which speeds up your editing process.


2. NovProg
NovProg is a free writing resource that’s best for people who don’t want any hassle on their screens. If you’re into graphs, this might be the tool you love. The program makes graphs of your daily word count progress so you have more visual encouragement during your NaNoWriMo experience.


3. Scrivener
Scrivener is a popular software within the creative writing community. You can use the free trial to see if it’s your thing before Scrivener requires a $51 purchase for Mac users or $60 for PC users.
It’s expensive, but popular for a reason. The program has file organization options for planners and writers who don’t outline their work. Save character outlines, track your word count, save photos, and store links to inspirational Scrivener corkboards.
The software also lets writers research from within Scrivener. You won’t need to open a Google tab (and potentially whatever internet distractions await you) to double-check information or even transcribe an interview.

4. MyWriteClub
Name and update your word count goals automatically by writing alongside MyWriteClub. The simple progress bar even updates with encouragement from friends who use MyWriteClub. Their notes will pop up under your word count as you work on your NaNoWriMo projects together. It takes away the loneliness that can sometimes come with writing stories by yourself.
If you don’t have any in-person friends doing NaNoWriMo, there are global writing sprints available for MyWriteClub users. The 15-minute focus sessions connect writers as they work on their word count goal for the day. It might be the encouragement you need to stay on track, especially if you get bored writing by yourself.

5. Fighter’s Block
Merge your love of video games and creative writing with Fighter’s Block. After setting your word count goal within the website, you’ll become a character fighting a monster. The monster wants to destroy your words, but your word count progress keeps it at bay.

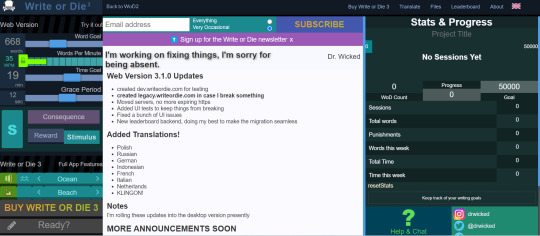
6. Write or Die
This is another infamous tool in the creative writing world. It’s what you might want to try when you need extreme help with knocking out your daily word count.
Input your word count goal and start writing. If you slow down or miss your goal, the program deletes random chunks of your work. You’ll get a few warnings, but the deletion often happens sooner than writers expect. It’s better to use this program when you know what you need to write, but need a push to stay with your manuscript until you’re done for the day.
Change the settings outlined in yellow below to match what you need from your writing experience. There’s also a setting to get encouragement instead of your work deleted, if you’d prefer that. Click the Ready button and your screen updates—you’ll have a blank space to work in the middle.
You can purchase this program for $10 for both Mac and PC, but the free version works for many writers who just want to do short writing sprints.
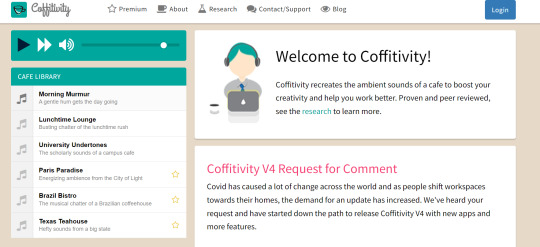
7. Coffitivity
Writing with background noises is one of my favorite things to do when I need to focus. It helps me stay away from anxious thoughts or external distractions. If you don’t want to use YouTube or another music app while you write, Coffitivity is here to help.
This program has a library of background noises that recreate ambient environments, like coffee shops. The low chattering and clinking of dishes could help you stay focused or defeat any writing anxiety associated with looming NaNoWriMo deadlines.
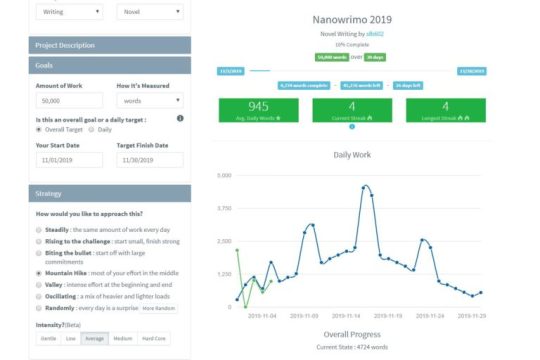
8. Pacemaker Planner
Remember how I mentioned that breaking your goals down makes NaNoWriMo easier? That might seem impossible if you’re not usually making lists and goals for yourself outside your writing routine.
Pacemaker Planner removes the guesswork. If you give it your overall word count, your final deadline (November 30), and how much time you estimate you’ll have for your writing each day, it’ll calculate your daily word count for you.
The graphing option also adds more flexibility to your goals. Let’s say you’ll be more free in the middle of November than the beginning or end. Select the Mountain Hike strategy. The program recalculates your daily goals according to your preferred writing strategy so you’ll get higher word counts when you’re actually free to write.
The free version is great for NaNoWriMo purposes, but there’s also a Premium version you can get to plan your full yearly calendar and daily schedule, if you enjoy the program.
-----
You don’t have to cross your fingers and hope to conquer NaNoWriMo this year. Try these tools while they’re still time to explore your options. Whether you want to plan the whole month or turn your word count into a game, you’ll have more success after seeing which tools are at your disposal.
#nanowrimo#nanowrimo 2023#nanowrimo resources#nanowrimo tips#writer's block#writeblr#writing tips#writers of tumblr#writing#creative writing#writing inspiration#writing community#writing help#writing advice#writing resources#writer things#writers life#writers block#writers on tumblr#writerscommunity#resources#free resources#creative writing resources
68 notes
·
View notes
Text
Tumblr tip sheet for twitter refugees
i’ve seen a lot of different advice posts but none that had what i consider all the key advice in one spot, so here we are. long post ahead.
-
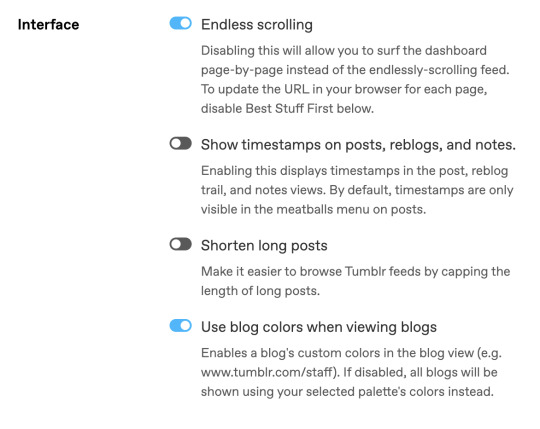
1. your dash can be put into reverse chronological order and it is a BETTER experience if you do that
Go to your settings -> Dashboard -> Preference
Turn “Best Stuff First” OFF
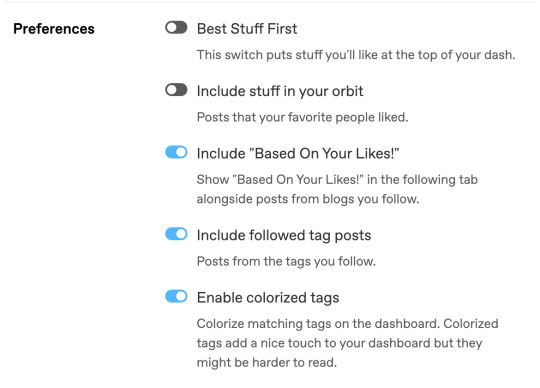
2. you can (and likely should!) turn off algorithmic content
Under the same menu. Settings -> Dashboard -> Preferences
There are two algorithms on tumblr.
One is “In your orbit” and I fucking hate it. i want to see the content that I like, not that some random person i follow likes. if i wanted to see that content on my dash, i’d follow the people who put it there.
The other is “based on your likes” and it is hilariously bad because if you like a post for something you don’t normally like or follow (e.g., when I watched a new movie and liked one post about it), you’ll suddenly get a dozen posts about that thing and only that thing.
I keep it on because it’s hilariously bad, but i honestly recommend turning it off. it routinely recommends shit to me that i hate and i have to keep telling it that i am “not interested in this post” for things tagged with my nOTP, but until / unless i filter that ship tag out entirely, i will keep being serviced those
3. filtering / blacklisting is your friend
this is true on every platform, not just tumblr. i’m sure veteran twitter users are well-versed in it, but just as a reminder. you will be expected to filter your own content/dash here on tumblr, and if you complain about seeing something that was properly tagged, you will be rightly mocked as a clown.
Settings -> Account -> Content You See
you can filter both tags and post content. There’s a completely innocuous post i absolutely hate that does rounds and is never tagged, and i almost unfollowed a mutual for how much i hate that post and them reblogging it so much. but i typed a specific sentence from that post into the “filtered post content” options and BOOM - haven’t seen it since. glorious.
4. content controls are your friend
under the same “Content You See” menu. You are automatically opted OUT of seeing this stuff, so you MUST opt in to see mature content.
you’ll want to determine your own preferences, but i prefer to see all of the mature content types that may be hit with a community label.

5. long posts are (probably) your friend
tumblr cuts posts over a few lines if you have this turned off, and it’s really annoying and really truncates your experience of the website. THIS is itself a long post!
part of the quintessential tumblr experience is being annoyed by the “do you love the color of the sky” post.
seriously, this isn’t twitter. we aren’t here for 280 character bite-sized posts. i 10/10 recommend keeping long posts on.
Settings -> Dashboard -> Interface
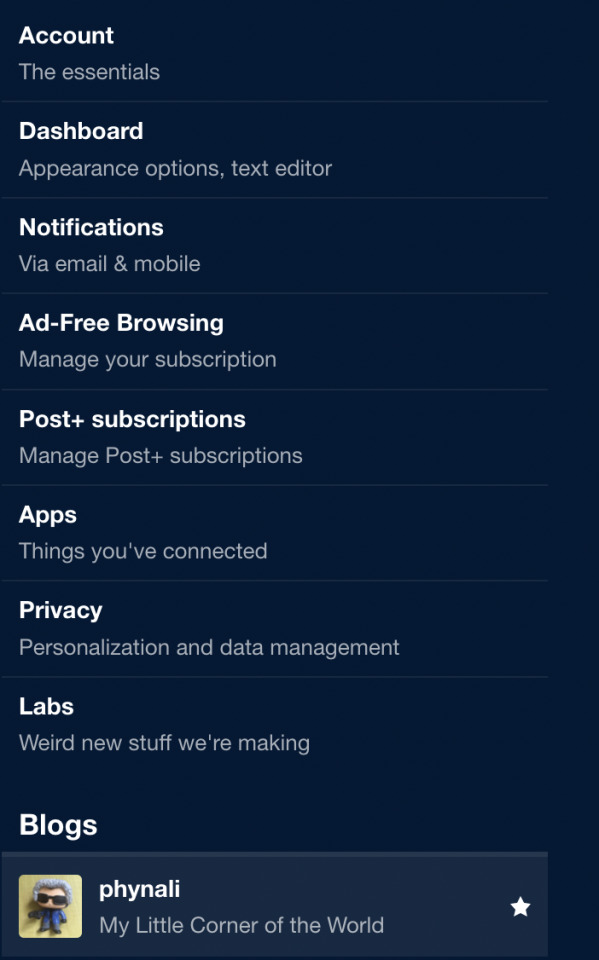
6. blog-specific settings
there is also a menu for additional settings (including updating the appearance etc) for each blog you have (your main, and any sideblogs).
this is near the end of your options under Settings -> Blog Settings (click the individual blog to update)
under your blog settings you can...
- enable your custom theme (which you should! this is turned off for new users but personalizing your page is part of the experience)
- decide if you want people to know what posts you’re liking and who you’re following. i do NOT, so these are off. internet privacy is allowed on tumblr, and don’t let anyone bully you into thinking you need to make everything public for their supervision. consume all the problematic content your little gremlin content desires and tell people to fuck off if they take issue with that.
- determine if and how others can interact with your blog!! there some settings about asks, messaging, tipping (if you’re here to make $$), whether people can even SEE your blog, if it’s searchable, etc. tumblr gives power and control back to the users! use that power!
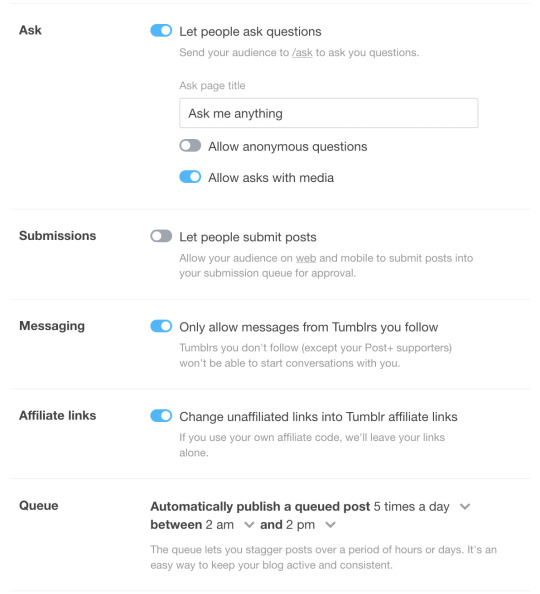
here, you can specifically set your “Ask” preferences to on or off, and to accept or NOT accept asks from anonymous users / logged out users.
if you’re here to interact with friends or just vibe, or don’t reblog a lot of asks games or encourage anon inbox messages, and/or especially if you’re getting harasment and don’t want to deal with shitty users, it is okay to turn off anons, and i ENCOURAGE you to do so.
i keep it on for my fandom sideblogs and off for my main and this makes me happy. do what makes you happy.
7. etiquette and interface
- change your icon so no one thinks you’re a bot
- reblog posts so your account isn’t empty. also, with algorithmic content turned off by most users, YOU are the algorithm, and interaction on this website is strongly encouraged. making or reblogging posts part of the experience and sort of the whole point
- reblog tagging: individual preferences apply. instead of adding a comment on a reblog, users will often add their thoughts in a tag, if they aren’t specifically looking to engage in a dialogue or add on to the post itself. other users can then decide to copy their tags (often with “prev” for “previous” appended) or even copy/paste them into a comment on their reblog, which is your tags “passing peer review”. people also tag to index posts so their blog is more searchable, and to include trigger warnings and content warnings related to a post. you can also choose to not tag anything. it’s your blog, do what you want.
- tags are how people find new content. if you make a new post and want people to find it, they will be searching the tag related to that content, so tag it accordingly. people can also follow tags and get notifications when new posts are made into that tag.
- do not censor words! this isn’t tiktok or twitter. we say ‘fuck’ and ‘kill’ here. if you write “unalive” or censor swears or triggers, people’s content filters do not work, and you will have undermined their ability to curate their content, moderate their experience, and avoid triggers. don’t do that. just spell out the whole goddamn word, please.
- you can make sideblogs under a single account! this means you have your main, which you interact (like, reply, and follow) from, but which can be used to have a space for all your posts and reblogs on a given topic (fandom, hobby, fixation, whatever). you can also direct message to/from a sideblog and accept asks etc.
- if you use tumblr in your browser, there is an add-on called XKIT. this used to be a tumblr user staple and allowed for a lot of functionality that tumblr didn’t used to have. tumblr has since very much upped their game, but it can still be worth using XKIT if you’re regularly in a browser and not on the app. for example, it includes some ad-blocking capabilities. I use “New Xkit” and have a few personalized settings with it.
- posts go around forever on this site and new memes crop up every day, retreat, and then resurge out of the blue randomly. this makes for tumblr-wide in-jokes that circulate for years, like “do you love the color of the sky” and the “color theory children’s hospital” post. if you don’t get these, you can ask and i’m sure tumblr will deliver, but you can also wait around and follow more people and these will turn up eventually.
- your dash is what you make it. your interaction is what you make it. you have control, you are not at the mercy of algorithms and advertisers if you don’t want to be. paying for ad-free browsing is an option. they even give you the option to toggled your ad settings within ad-free browsing. seriously - you. have. the. control.
this is something that we love about tumblr and one of the things that makes it our hellsite (affectionate) instead of our hellsite (derogatory). if you’re finding your experience to be negative but still want to stick around, i encourage you to block accounts or content that makes you unhappy or anxious, to follow the accounts that bring you joy, and to adjust your settings into whatever makes you happiest and least stressed out.
#tumblr#twitter#twitter refugees#tumblr tips#fellow tumblr veterans what did i miss?#long post#long post for ts#ts was tumblr savior aka an extension from about a decade ago that people used for content filtering#i think before xkit existed?#and some of us still use the 'for ts' tags because people use to blacklist/filter content based on that wording#i guess it's not really needed for long posts anymore since people can turn those off in their dash preferences now#but old habits die hard#anyway this barely touches on the unique tumblr culture but i hope that culture sticks around despite an influx of new users
566 notes
·
View notes
Text
unhelpful tips and resources for gifs&gfxs
Hi everyone, I don’t know how useful this post will be but I wanted to share some of the things I learned through the years of creating content for tumblr and also new information I find every now and then. I see lot of new people who start creating content here and I want to help with what I know.
Note: I won’t upload any tutorial of mine or anything because I believe the resources I will link here will be more useful than just a tutorial that I won’t be able to explain well because English is not my first language. Let’s start!
First of all, few words about tumblr and how it works. Tumblr is a site with many communities. Every user has its own blog that can post many kinds of content, including a text,photo,video,audio,art etc. When you first join the site it might be overwhelming but in reality, it is not (*whispers* I personally find instagram harder to understand how it works).
Like every site tumblr has its own search bar, tags, likes, reblogs(share on fb,rt on twitter),and follows. When you search a blog to follow and you see their posts you can like their post by tapping on the heart and share(reblog) by clicking on the two arrows button that looks like the recycle icon.
What does reblog mean and do?
Reblog is as we said the “share the post” of facebook, with reblog you don’t repost someone’s content but you share it with your followers and help it to be seen bymore people that way you actually help the creator to promote their creations.
Likes
Unlike, instagram,twitter and facebook, when you like something the website doesn’t recommend the post to your followers unless they go to your blog via their phone and go to your likes page, if you have it unlocked, so basically, likes don’t help with supporting creators as much as reblog does.
Tags
Tagging system on tumblr, in my opinion, is pretty fun both for the op of a post and for the reblogger. With tagging you can organize all the posts on your blog by anything you like. For example, if you tag artworks as #art and you want to find a certain artwork you reblogged a time ago you can just go to the tag and find it.
For op you can use tags the same way as other sites to promote your work, as I remember the first 5 tags will be shown on the general tag like if you search on tumblr #artwork and you have the tag #artwork on the first 5 it will be shown there.. but I am not sure if this changed.
Creating a post
As you can see from your dashboard(timeline on twitter) you have the option to create a text form post, a photo form post.. etc. You can experiment with all of these, don’t be afraid. I will focus on photo form posts because we will talk about gifs and gfxs.
The photo form(with the camera icon) post, is what most content creators use to post their creations like designs/graphics,art/fanart/photography, and gifs.
The site allows you to post 10 photos(if you want to post more I think Text form allows more).
The size of your photos and gifs must be under 20mb for photos and under 10mb for gifs.
As for dimension, tumblr has its own dimension but you can always post whichever you want, the bad thing is that the quality will be reduced on the dashboard and the viewer will have to click on every single photo in order to see the original quality. Here are the dimensions:
For a single photo/gif per columna it is 540px horizonatally
For 2 photos/gifs per columna it is 268px x 268px
For 3 photos/gifs per columna it is 177px x 178px x 177px (be careful the middle one always has to be 178px)
Themes
When you feel comfortable with using tumblr, you can customize your blog with beautiful themes that talented people have shared here!
You can find and learn about themes here: @/theme-hunter
Gifs/gfxs
In this part, I will provide links and tutorials for gifs and graphics, But first of all you need a program for content creation. The most common one is Photoshop, you can buy a subscription from Adobe(it is expensive) or you can find crack version on the internet.
Chaoticresource has a whole tag for photoshop and many more programs for you to start with photoshop. Not only that they have a whole list of resources for both giffing and graphic making. You can find their tag list with everything you need to here.
Here are some tutorials on how to make a gif
Tutorial by: misty-quigley
Tutorial by: kylos
Tutorial by: hayaosmiyazaki
Tutorial by: cal-kestis
Tutorial by: gr-ogu
Tutorial by: misfitsexual
Tutorial by: unbrokencolorings
Tutorial by: josefnewgayden (also has many resources)
Tutorial by: dunkzilladaddy
Tutorial by: theedorksinlove
Tutorial by: ashleysolsen (with more resources)
As you can see there are many different ways to gif, experiment with as many as you like and choose one you feel more comfortable with.
Usergif and deenafier and cillianmurphy have collected many tutorials in their page/posts so I recommend reading them.
Some random yet helpful tutorials I have and I find myself going back here and there are:
The coloring tutorial by @/ daisylouisejohnson
The coloring tutorial by @/magnusedom
The color table tutorial by @/ggroupsdaily
The coloring tutorial by @/lee-haechan here and here
Coloring tutorial by @/binariesuns
Layer mask tutorial by @/daisylouisejohnson
Transition tutorial by @/fionagallaqher (and coloring tutorial)
Blending tutorial by @/linda-darnell
Blending tutorial by: @/morningstr
Channel Mixer tutorial (REALLY IMPORTANT IMO) by @/zoyanazyalensky
Glitch effect tutorial by @/nobodynocrime
Glitch tutorial by @/sarah-snook
How to fix orange-washed characters by @/zoyanazyalensky
Colored background tutorial by @/rafael-silva
Sharpenning gifs by @/joelmillrr
Coloring tutorial by @/yelenafbelova
Coloring tutorial by @/yenvengerberg
Don’t be afraid to experiment with gifs, try different styles and most important have fun!! I know thereis a lot to learn but trust me, it can be pretty fun! Good luck!
Now for graphics.. all I have to say is just have fun and experiment, experiment and experiment more! Here is a list ofresources I have collected that helped me improve my skills and find resources.
Where to find fonts/textures/vectors/mockups.
deviantart (everything)
unsplash (photos)
pixeden (mockups,photos)
graphicburger (mostly mockups)
freedesignresources (everything)
spoongraphics (mock ups)
graphicgoogle
rawpixel (photos)
digitalbrushes (brushes)
zippypixels (mockups)
dafont (fonts)
fonts by google
behance( under the tag freebie)
pinterest
fonts.ilovetypography (fonts)
gvfxarmy on twitter did an amazing job collecting resources.. you can find them here
List of youtube channels that will help you with tutorials and educational information on graphic design
Envato Tuts
Madia Designer
elliotisacoolguy
Brad Colbow
LearningScreen
PiXimperfect
The Futur
The Futur Academy
Jeremy Mura
Blue Lightning TV Photoshop
Nemanja Sekulic
Digital Art Creation
Will Paterson
Nobu Design
Satori Graphics
Logo Design Ideas
Adobe Creative Cloud (recommend to watch some of the livestreams they are interesting)
Gareth David Studio
Spoon Graphics
PSD Box Official
creatnprocess
Jamie Windsor
Dansky
Daily Photoshop Tutorials
How to Graphic Design
Photoshop Tutorials - PSt
Yes I'm a Designer
Photoshop Tutorials
PHLEARN
Some other sites and links that i find interesting:
designbolts
thefutur free resources
The most important compositional principles in graphic design(article but check the site too)
The power of color (article, check the site too)
bezier.method (site to practice the pen tool)
aiga
httpster.net (site for inspiration)
access.mymind (color inspiration)
How to design a logo (article)
How to design a logo (article 2)
The Importance of Branding in 21st Century (article)
Color combinations
Lastly here you will find books and more resources for graphic deisgn! Thanks to @/isaaczara_ on twitter
That’s it! Hope you find this post helpful! I tried my best to not forget anything!
Have fun on tumblr and on creating your content! Don’t give up and have fun creating!
#masterpost#a rushed masterpost#long post#hope it helps#resources#its not the masterpost i said i ll make its a similar one
246 notes
·
View notes
Text
The Algorithm is AI Art
Last year, I used DALL-E to create a series of images for a digital tarot card deck I was making for my personal use. When I shared some of those images here on my blog, I got a massive amount of push back and even threats in my inbox. I'm still putting my thoughts together on that experience but it did make me realize that most people don't seem to realize they're supporting the AI art they hate so much - to the tune of millions and even billions of dollars per year depending on the platform - almost everyday through the algorithms they use.
So if you genuinely hate AI art, I'm here to tell you that you've got to do what you can to get rid of and not use the algorithms in your life. That kind of support is more materially complicit with AI's intrusion on art than someone making a few images for themself ever could be.
Yes It's Possible
For many platforms, especially when they're accessed on desktop, it is possible to greatly reduce your contact with the algorithm. I use browser extensions to cut out the AI curated feeds on YouTube, Facebook, and Reddit. I mostly use Instagram on desktop to answer messages.
I generally do not use Instagram, Facebook, and other apps that do not allow users to control their feed on mobile. I know Instagram is mobile only - when I use it on mobile, I download it, upload what I want, then delete the app again.
I am considering cutting these out entirely again once this phase of my experiment for a zine I'm writing is over because honestly, they're not worth it, but that's a different post...
I also really recommend either making a separate email account or getting ruthlessly organized in your current one, so that you can sign up for artist's newsletters and other forms of human centered curation. RSS readers like Feedly can also be a good alternative.
The point here isn't perfection - the point is doing what you can. Not because it will change companies - but because it's better for you and the artists you care about.
Why?
Algorithms in these spaces determine who's work gets shown and more importantly - who gets paid enough to continue making their art.
AI has consistently been shown to reproduce and even exaggerate biases already present in society. This video by Ann Reardon of How to Cook That talks about YouTube's lack of transparency about the potential for a sexist bias in YouTube's algorithm and shows that in the top views at least, there's a clear slant toward male creators. The only woman in the top 10 does not show her face in her videos - unlike most of the men in the top 10. This discrepancy is even larger the further down the list you go.
Who gets shown is who gets paid enough to keep making their content/art. Less pay means people can afford to put out less content/art and can't scale - meaning less diversity in content/art.
What art gets shown influences what inspires new art and content to be made. You are seeing art directly shaped by AI everyday - and more than that - by continuing to click on what it serves up to you, you support it.
This AI influence on real world art has become so normalized that people consider it as natural a force of nature as wind. It's not. This was designed - and it can be redesigned.
I want to be careful not to overstate the influence of a click either - your clicking on something you choose is not a form of activism. Your clicks cannot retrain the algorithm at scale. A lot of people have the misconception that you can train "your" algorithm but what the algorithm on your feeds is doing is actually comparing your clicks to it's database of similar user profiles and their behaviors to decide what to suggest to you. Your clicks don't retrain the AI as a whole, they just match you with a different user type.
The real reason I think those concerned about AI in art need to find ways to take control of their feeds is because it ensures you're able to support a diverse array of creators through your views and it ensures that what you're taking your inspiration from isn't what the AI decides is worthy of attention.
I realize there are those who are reading this who either might not have been old enough to remember or even weren't born when YouTube basically took your Subscriptions off the front page. It used to be they would pop up at the top of the front page. Then it got knocked down on the front page. When it got shoved into it's own sidebar link and then that link progressively minimized through redesigns - there was actually an outcry about it.
People warned that this would lead to a watering down effect, where smaller channels didn't get the chance to grow like already established ones would. Creators of marginalized identities saw their views drop dramatically. Similar things happened when Facebook and Instagram fully took away a user's ability to have a chronological feed (this was possible in the early days). I know of more than a few creators who fully had to step away from their work because of the change over. I miss their art.
And then the outcry petered out. The companies didn't lose users over it so nothing changed. Eventually people got used to it and the protests went away. These companies now know they're "too big to fail" and can ignore user outcry until people acclimate the new normal that serves them. This normal serves them because it does actually increase engagement and keeps you on the platform for longer - which means less time spent on your own creative activities, yet another way they impact what art gets made.
TL;DR: if you hate AI's impact on artists and their employment opportunities, take control of your feeds. Make your own. Choose what you click. Take back your time and make more art.
31 notes
·
View notes
Text
an actual, not joke guide to tumblr for new users
tumblr as it stands is VERY anti-capitalist. most brands and celebrities that come here should just be ignored and left to rot. the only person i know of that seems to defy this rule is neil gaiman but thats mostly because hes been here for so long
that being said, this rule DOESNT apply to small, user owned businesses. If you have a small business like something on Etsy or Redbubble, promote it.
tumblr doesnt really run on algorithms the way twitter does. you need to go thru tags and actually find people you like and want to follow. otherwise, this website will be VERY EMPTY. you can follow tags which will recommend you random posts from random blogs in that tag youre following, but otherwise you NEED to curate your own tumblr experience
Most users will block empty blogs that have no icons. this website has a bot problem, and a lot of bot blogs will be empty with no icons. If you dont wanna be blocked, you need to update at least sometimes and have a bio with an icon and maybe a header.
If you use tumblr on desktop, GO GET TUMBLR SAVIOR/X-KIT RIGHT NOW. this will make navigating tumblr on desktop SO MUCH BETTER. You can block certain posts if theyre annoying without blocking op, you can turn off ads, you can turn on quick-reblog to make reblogging shit easier. its so fucking good
Blocking someone on here will not stop their posts from popping up on your dashboard if theyve been rb'd by someone else, so to prevent this you need to go to account settings, go to content you see, go down to "filtered post content" NOT FILTERED TAGS and add ops username. If you have Xkit be sure to turn on tweaks, and select "hide filtered posts entirely". this stops working when OP changes their username but its better than nothing
While twitter did have the option to turn off replies, it did not have the option to turn off quote retweets, but you can turn off reblogs here and turn off replies!
tumblr has a LOT of different kinds of communities, some of which have rarely breached this website. If the idea of someone who thinks theyre Naruto or a dragon reblogging from you makes you upset, either build a good tolerance from some of the "weirder" aspects or use the block button and filters to your advantage
tumblr doesnt have the same policies as twitter does when it comes to 18+ content. Tumblrs CEO has already made a post describing why. people still post adult content anyway with different tags
Tumblr does not have the same censorship rules the way twitter does. Yes you can use the words like "death" and not have to use something like "unalived" or "d3ath" to prevent your post from being suppressed or having your account shadowbanned/blocked entirely. its actually ENCOURAGED you use the original words so tumblrs filtering system will pick it up
i have been on this website for the last 10 years across multiple accounts. If any newbies have questions, PLEASE ASK, and i will do the best i can to answer. Fuck the gatekeepers, welcome to tumblr, twitter refugees!
252 notes
·
View notes
Text
Uk supermarket tierlist because I saw a TikTok and their tierlist was simply wrong so here is mine
1. Lidl, cheap and not as crowded as Aldi. Very similar stuff but with a better overall vibe. Love Lidl <3 Get the app for shopping and get your partner in crime to get the app too but only use one of yours, every season or so they’ll hand out £5 off vouchers if you’re not a regular user of the app. The cat treats are good too. They’ve recently increased their cat food selection to have some more common brands now which is good too. Their own brand licki licks are the best bang for your buck on the market and highly worth trying for picky cats or cat meds.
2. Aldi, go there if you can’t go to Lidl. It’s too loud and crowded for me and the queues are annoying. I’m honestly not a fan. The queues remind me of primarks a Saturday. The stuff is cheap though
3. Sainsburys, go there when you’re feeling fancy ✨ genuinely though I go there once every so often for a special shopping experience. The blueberries are MASSIVE. Don’t get scammed by the garlic chives though, they’ll register as 2.25 but they’re actually £2.00. They have a decent cat food selection, a lot of fancier stuff too like Blink and scrumbles.
4. Asda, you go here when you need some specific and Aldi / Lidl don’t sell it. The vibes are fine, it’s not too crowded but it’s realll expensive for somewhere that used to be affordable, thanks for that one rishi (you don’t deserve my capital letters, you improper noun). The cat food selection here is okay but should be better. There’s not much range here but they have your classics like whiskas and felix.
5. Home bargains, SO MUCH FUN. Like fuck actually getting groceries, this is the trip of a lifetime. Don’t go there too often cause the novelty will wear off but god damn if the shit isn’t cheap and handy. Good for the occasional stroll, recommend going once every 6 months for funsies. You can go more often if you’re rich like that but we can’t afford that in this household. Limited cat food options, a lot of weirder unknown brands and paste texture cat food which hashbrown refuses to eat.
6. Morrisons is here next for sentimental value. Also breakfast was good here as a child and I like how much stuff they have. I like their cat food range but it’s not as good as Sainsburys.
7. Tesco, my fellow brits will hate me for this one but I don’t like the vibes of Tesco. The people there are just as poor as me but give off the vibe of feeling too proud to go to Lidl, like suck it up, the red bell peppers are 59p and the ones at my Lidl are huge. I weigh them sometimes for fun and they’re around 300grams, just go to Lidl. Decent selection of cat food too and they do seem to care about the price and affordability of it.
8. Green Co op, stuffs hella expensive for some reason and you can’t use the green co op card in the blue co op and vide versa which is really annoying but my sister likes going here so it’s eighth. The sweet selection is fine though.
9. Blue co op, we don’t need blue co op
10. Marks and Spencers, bomb cookies and gift stuff. Not much else, too expensive and we aren’t here living the lavish life.
Dishonourable mentions
11. Iceland, decent cakes but why go here when the range sells them too and the range is so much more fun to look through
12. Waitrose, who can afford this and why haven’t we eaten them for sustenance yet???
14 notes
·
View notes
Text
!! PLEASE SHARE AND REBLOG THIS POST ASAP !!
Update: 7/9/2023 (I will update the listings if they are added to the stores.)
Drawing Tablet Buyer's Guide 2023
Are you looking for help to get into digital art? Are you confused for what models would you pick? Do you want success in your art career? Then this blog is for you. These are the buyer's guide for artists who wanted to take approach on digital art. As always, you don't need a latest and greatest tools just to make good art. Your handy mouse and a trusty old tablet can do fine art at the time. My Intuos 4 L still works today, even if it was released on 2009.
Here are the basic categories you'll fit into: Beginner, Intermediate and Professional.
Beginner - This is where you start making digital art for the first time.
Intermediate - These are experienced artists who are on mid-range level at a greater value.
Professional - These are same as intermediate but who are on to take approach an high-end level to mimic the meaning art.
There are three types of pen tablets for you to decide. These have pros and cons on these tablets.
Pen Tablet - A pen tablet doesn't require a screen and can benefit for a user experience such as good posture, portability and pricing, but this requires hand-eye coordination as this type of tablet has a steep learning curve and drawing on it feels unnatural to use.
Pen Display - A pen display is a monitor that can be drawn into. It is easier to learn how to use pen displays and can mimic a sketchbook you were drawing. However, there are issues such as bad posture, expensive pricing and limited portability. Sometimes, your hand gets in the way through pinpoint cursor while drawing.
Pen Computer - These are pen tablets that can be used by themselves and don't require a computer, it can be portable for travel use. However, they are very expensive, limited to none upgradability, difficult and costly repairs and have a short battery life. As such, I do not recommend getting these pen computers for these reasons above and instead look for other mobile tablet alternatives such as iPad Pro, Surface Pro 8 or Samsung Galaxy Tab.
Here are the list of drawing tablet recommendations based on three categories.
NOTE: Prices may vary due to sale discounts so I only put links to the official store from drawing tablet brands so I'm gonna keep the original price for future references. However, Amazon is safer for returns and good units and eBay is the way to go for second hand offers.
If you're an osu! player looking for a pen tablet, I'd suggest getting an Intuos Pen and Touch Small 2013 (PTH-480) on eBay. One by Wacom Small (CTL-472) has the same performance yet cheaper. The only good alternative that doesn't suck is Gaomon S620. I recommend getting OpenTabletDriver for that purpose.
If you want to invest digital art, I highly recommend getting a medium size tablet for larger hand gestures.
Beginner
Pen Tablet: $30-100 Range
Wacom:
One by Wacom Small (CTL-472) - $49.95
One by Wacom Medium (CTL-672) - $99.95
Huion:
Huion HS611 - $79.99
Huion Inspiroy H1161 - $89.99
Huion Inspiroy 2 S/M/L - $49.99 - $89.99
Huion Inspiroy H640P - $49.99
Huion Inspiroy H950P - $59.99
XP-Pen:
XP-Pen Deco Fun XS/S/L - $29.99- $49.99
XP-Pen Deco 01 V2 - $59.99
XP-Pen Deco M/MW - $49.99 - $69.99
XP-Pen Deco L/LW - $69.99 - $89.99
Pen Display: $170-420 Range
Wacom:
Wacom One (DTC-133) - $399.95
Huion:
Huion Kamvas 12 - $239.99 w/ stand
Huion Kamvas 13 - $264.99 w/ stand
Huion Kamvas 16 (2021) - $419 w/ stand
XP-Pen:
XP-Pen Artist 10 (Gen 2) - $169.99
XP-Pen Artist 12 (Gen 2) - $249.99
XP-Pen Artist 13 (Gen 2) - $299.99
XP-Pen Artist 16 (Gen 2) - $399.99
Intermediate
Pen Tablet: $100-200 Range
Wacom:
Wacom Intuos Small Wireless (4100WL) - $59.95
Wacom Intuos Medium Wireless (6100WL) - $199.95
Huion:
Huion Inspiroy Dial 2 - $139.99
Huion Inspiroy Giano - $199.99
Huion Inspiroy Q11K V2 - $139.99
XP-Pen:
XP-Pen Deco Pro S/SW - $99.99 - $129.99
XP-Pen Deco Pro M/MW - $129.99 - $159.99
Pen Display: $260-1300 Range
Wacom:
Wacom Cintiq 16 (DTK-1660) - $799.95 ($649.95 on Amazon)
Wacom Cintiq 22 (DTK-2260) - $1299.95
Huion:
Huion Kamvas Pro 13 2.5K - $399.99
Huion Kamvas Pro 16 2.5K - $599.99
Huion Kamvas 22 Plus - $549
Huion Kamvas 24 Plus - $899
XP-Pen:
XP-Pen Artist 12 Pro (2019) - $259.99
XP-Pen Artist 13.3 Pro (2019) - $279.99
XP-Pen Artist 15.6 Pro (2019) - $369.99
XP-Pen Artist Pro 16 (2021) - $449.99
XP-Pen Artist 22R Pro (2020) - $599.99
XP-Pen Artist 22 (Gen 2) (2021) - $499.99
XP-Pen Artist 24 Pro (2020) - $899.99
XP-Pen Artist 24 (2021) - $799.99
Professional
Pen Tablet: $140-500 Range
Wacom:
Wacom Intuos Pro Small (PTH-461) - $249.95
Wacom Intuos Pro Medium (PTH-661) - $379.95
Wacom Intuos Pro Large (PTH-861) - $499.95
XP-Pen:
XP-Pen Deco Pro MW (Gen 2) - $139.99
XP-Pen Deco Pro LW (Gen 2) - $179.99
XP-Pen Deco Pro XLW (Gen 2) - $199.99
Xencelabs:
Xencelabs Pen Tablet Small - $199.99
Xencelabs Pen Tablet Medium - $279.99 for standard, $359.99 for bundle, $379.99 for special edition
Pen Display: $800-3500 Range
Wacom:
Wacom Cintiq Pro 13 (DTH-1320) - Formerly $799.95 but less than $379.99 on eBay
Wacom Cintiq Pro 16 (2021) (DTH-167) - $1599.95 ($1529.99 on B&H Photo Video and Amazon)
Wacom Cintiq Pro 24 (DTK-2420) - $2199.95
Wacom Cintiq Pro 24 Touch (DTH-2420) - $2699.95
Wacom Cintiq Pro 27 (DTH-271) - $3499.95
Huion:
Huion Kamvas Pro 16 4K Plus - $899
Huion Kamvas Pro 24 4K - $1299
XP-Pen:
XP-Pen Artist Pro 14 (Gen 2) - $419.99
XP-Pen Artist Pro 16TP - $899.99
Xencelabs:
Xencelabs Pen Display 24 - $1899
Resources:
Brad Colbow: YouTube | Brad.site
Teoh Yi Chie: YouTube | 2nd Channel | Parka Blogs
The Seven Pens: YouTube | Website
#mekkyz' golden award#digital art#drawing tablet#pen tablet#pen display#buyers guide#recommendation#wacom#huion#xp pen#xencelabs#beginners#intermediate#professional
70 notes
·
View notes
Last Seen Blogs

midforde
one hell of a butler
aomarc
- A.O. Marc -

ash-draws-sometimes
Ashton

ecommercedevelopmentsolutions
Untitled
almond-brrito39
insert_pronouns