#Mac to Windows file transfer
Explore tagged Tumblr posts
Visit Tumblr Blog
Explore Tumblr blogs with no restrictions, modern design and the best experience.
Last Seen Tumblr Blogs


Fun Fact
Forty percent of Tumblr users are between the ages of 18 to 25.
Text
MacDrive Standard
While Windows dominates the operating system market, many users also choose Mac OS X, likely drawn by Apple’s signature sleek interface. Switching between Windows and OS X can sometimes be challenging, but MacDrive Standard simplifies this process. MacDrive Standard is a specialized tool designed to allow Windows users to seamlessly access Mac-formatted drives, making it especially useful for…
#Access Mac drives on Windows#Cross-platform drive management#Mac disk management tools#Mac disk repair#Mac to Windows file transfer#Mac-formatted hard drive access#MacDrive Standard#Windows and Mac compatibility
0 notes
Text
Restore Mac Screens with Certified Apple Experts
Your Mac’s screen is more than just a display it’s a gateway to your digital life. Whether you use your Mac for work, design, entertainment, or communication, a cracked, flickering, or unresponsive screen can bring everything to a halt. When that happens, there’s only one smart move: restore your Mac screen with certified Apple experts.
Certified Apple technicians are trained to diagnose and repair Mac screen issues using official Apple methods and genuine parts. This ensures your display performs exactly as intended—sharp, vivid, and fully functional. If you're facing screen issues, don’t settle for guesswork. Let the experts restore your Mac with precision and peace of mind.
Why Mac Screen Repairs Need Certified Experts
Mac displays are known for their exceptional clarity, color accuracy, and advanced features like True Tone, Retina resolution, and ProMotion refresh rates. These aren’t your average laptop screens—and that means repairing them requires specialized knowledge and care.
Here’s why working with certified Apple experts matters:
Apple-trained technicians understand the internal architecture of every Mac model, from MacBook Air to iMac.
They use genuine Apple parts—not aftermarket displays that can degrade visual performance.
Certified professionals follow Apple’s repair guidelines and safety protocols, reducing the risk of further damage.
Choosing non-certified repairs might seem cheaper upfront, but it often results in reduced screen quality, software incompatibility, and even voided warranties.
Common Mac Screen Issues That Experts Can Fix
Mac screens can be damaged in many ways, whether it’s accidental or due to internal hardware failure. Certified Apple technicians are trained to repair or replace screens affected by:
Cracks, chips, or shattered glass
Flickering, flashing, or dim backlights
Lines across the screen or color bleeding
Dead pixels or ghosting images
Black screen while the system is running
Screen not detecting or turning on
Issues with True Tone or Night Shift features
Certified experts use Apple’s diagnostic tools to identify not just the surface problem but any hidden issues that may be contributing to screen failure.
The Certified Apple Repair Process
When you take your Mac to an Apple-certified expert—whether at an Apple Store or an Apple Authorized Service Provider (AASP)—you can expect a transparent, professional repair experience.
1. Initial Assessment
The technician inspects the screen for physical and functional damage. This includes visual checks and asking about how and when the issue started.
2. Diagnostic Testing
Using Apple’s proprietary diagnostic tools, they assess the screen and all related internal components, including the logic board, GPU, and cables.
3. Repair Estimate
If your device is under AppleCare+, you’ll usually pay only $99 for screen repairs. Without coverage, you'll get a detailed cost estimate based on your model and damage level.
4. Screen Restoration
The damaged screen is removed and replaced with a genuine Apple display. Certified technicians follow exact protocols to ensure a clean, safe repair.
5. Final Testing
After installation, the system is tested to confirm color accuracy, brightness, touch functionality (if applicable), and general display performance.
Most certified Apple repairs are completed in 1 to 3 business days, though some high-traffic Apple Stores and service providers may offer same-day screen replacement.
Benefits of Using Certified Apple Experts
Here’s why restoring your Mac screen with certified Apple professionals is the best option:
Genuine Apple displays – Preserve Retina quality and system compatibility
Trained and tested technicians – Professionals certified by Apple standards
Warranty-backed repairs – Your repair is protected by Apple’s limited warranty
AppleCare+ coverage – Reduced repair costs if enrolled
Reliable turnaround – Fast, accurate repairs with no corner-cutting
This level of service helps ensure your Mac performs at its best long after the repair is done.
Where to Get Certified Mac Screen Repairs
Certified Apple experts are available in several official channels:
Apple Stores (Genius Bar) – Schedule an in-person appointment for hands-on support.
Apple Authorized Service Providers (AASPs) – Trusted local technicians trained by Apple.
Apple’s Mail-In Service – Ideal if you prefer to ship your device for repair.
All of these options provide access to the same high-quality repair standards, genuine parts, and warranty protections you expect from Apple.
When your Mac’s screen is damaged, don’t take chances with unverified repair shops or third-party components. Instead, restore your Mac screen with certified Apple experts who deliver precision, performance, and reliability every time.
With their training, access to genuine Apple displays, and diagnostic tools, certified technicians will have your Mac looking and functioning like new in no time so you can get back to doing what you love, distraction-free.
#Mac Data Recovery/Transfer#Mac Liquid Damage Repair#Mac Logic Board Repair#Mac Screen Repair#Mac Hard Drive Upgrade/Replacement#MacBook Pro Graphics Card Repair#Mac Password Removal#Mac Battery Replacement#Mac Keyboard Replacement#Mac Data Recovery#Mac Deleted Files Recovery#Windows Data Recovery#Windows Deleted Files Recovery#External Hard Drive Data Recovery
0 notes
Text
complete beginner's guide to [kpop] giffing, as explained by me!
keep in mind everyone has a different style and process, so there are some things in mine that may not feel intuitive or helpful - if so, don't include it! if you can make the gif, and have fun doing it, that's good enough. this post also assumes interest in specifically kpop giffing, but can for the most part apply to other content as well. i would just recommend different sharpening and coloring for those.
separated by headings (not images, since i need those... for examples) - if you are skipping to a specific section, look for the orange text of what you are looking for!
table of contents: - picking your programs - additional tools and programs (optional) - finding files - importing to photoshop (vapoursynth, screencaps, etc) - photoshop shortcuts and actions - sharpening - coloring - export settings - posting on tumblr
programs:
if you already have photoshop / your giffing program installed and set up, go ahead. if you don't, i would recommend looking here to get photoshop. please make sure you follow instructions carefully and safely! i do know photopea is an alternative people use, and i'm sure there are others. i unfortunately don't know any tutorials to link and probably won't be much help in regards to those programs, but i'm sure there are some floating around on tumblr!
my gif process uses photoshop, so this tutorial assumes that as well. if you use a different one, you might be able to transfer this to what you use, i'm not really sure :(
additional tools and programs: - handbrake: upscaler, found here. i make my own settings and generally only use this on lower quality sources to give vapoursynth a better chance with encoding in higher quality. - davinci resolve: a program i use to make clips appear 60fps when they are choppy or too few frames for the gif to look nice, and occasionally to do pre-photoshop coloring! i use the free version. i do not use this all the time and it is a big program, so definitely don't get it if you think you'd forget to / not want to use it. - yt-dlp: open source, downloads pretty much any file i could want quite well. i use this for most of my downloads and for subtitles as well. does require some knowledge of code, or, at the very least, willingness to troubleshoot set-up. find it here! i can share the command lines i run for: video, audio, vid + sub. - 4k+ downloader: what most people use for youtube-source sets, i believe. you have a limited number of downloads per day on the free version, thus the other downloading programs. - jdownloader2: no limit but sometimes a little slow or will refuse to download because of not being logged into an account, etc. a good download alternative if you plan on downloading a lot and yt-dlp is too much. - vlc: free program, standard on some devices, good for viewing files. - mpv: excellent file viewing, can also deinterlace and screencap (if you do not have / use vapoursynth) - vapoursynth: mac users beware, it's not optimized or set up and is a huge headache. windows users, once you get it set up, it's golden.
finding files, what to look for, and how to use them: how to use is explained here, with a focus on smooth and nice speeds! but finding the file is the first step, so let's head there.
stages: k24hrs (invite only, feel free to private dm or send an ask off anon for a file - i will do my best to get it to you); kpopbuzzhub; sharing korea torrent (requires a torrent app); twitter (shrghkqud (only has recent files) and a few other uploaders, requires much more active searching). there are a few other places you can look, but it is often more trouble than it is worth (or costs $). i am also always willing to help people find materials, so you can ask me to help you look for something or to link a source i used for whatever set.
music videos: also sometimes on k24hrs. i use vimeo a lot (color graders, directors, etc., will upload clearer versions). sharemania.us has some kpop mvs, typically bigger groups (i.e. blackpink). this is a place i check for ggs. and if none of these places or searching for torrents on btdigg, or on google in korean works, i just download the highest quality setting from youtube.
other types: like vlogs and fancams, normally directly downloaded from youtube, instagram, or twitter using yt-dlp or sites specifically for the app (i.e. twittervideodownloader).
what do i look for? 1080i for stages (or 1080p) are often super nice as they're a .ts. 2160p/4k is often ideal, but it also depends on your computer and what you are comfortable working with! generally - not always due to ai upscale - a bigger file size (in the gbs, high mbs like 800) is better and has more detail that will look clear when you work on it. older stages (2nd gen and before, some 3rd gen) and music videos often always are lower quality due to camera quality, and much harder to find. if you have to use the youtube upload for a stage, it is definitely doable, but it may be slightly disappointing in the quality you want to achieve. it depends on what you're comfortable posting and making!
how do i use them? if you use vapoursynth, scenedetect (encode/process whole video) or timestamp (just a small clip) your file - if upscaling, using davinci resolve, or any other pre-processing, do that first. it will pull up a resizer and a program and once you encode, it will give you an output file using the size and settings you put. this will import to photoshop. if using mpv or another screencapping method, take your screencaps (again, all pre-processing first) and prepare to import. there are two ways to do that for screencaps. you can also just watch whatever you downloaded, i'm guilty of downloading concert files just for fun 😅
in the next sections, i will be using four different files of varying quality and sources to explain my steps. hopefully that is helpful!
example file 1 (4k and 60fps, obtained using yt-dlp) example file 2 (1080i, obtained from k24hrs) example file 3 (1080p HD, obtained using yt-dlp) example file 4 (pulled from the gg archive i use, master)
importing to photoshop (vapoursynth and mpv explained): using example file 1, i am processing in vapoursynth - i always do one extra second before and after the clip i actually want so it doesn't cut off any frames i'd like. i adjust my sizes based on what works best for tumblr (540px for wide, 268px for 2 column, and 178 for 3 column). i always use finesharp 1.5 (this setting is up to you! i used to use .7, so totally ok if it changes over time, too!) when you export in vapoursynth, you need the y4m header. i use export to mov preset.
when importing to photoshop using a video (so vapoursynth, video files, not screencaps):


i recommend making your selected range a little bigger than the frames you want so they don't accidentally not get included. delete any extra frames while in the frame animation and then turn it into video timeline. i turn all my layers into a smart object (select them all by clicking the bottom layer and then shift-clicking the top one, or use (on windows) ctrl + alt + a to have it select faster). set timeline framerate (if you want to, i always use 60).


now your smart object is ready to sharpen and color!
using example file 2, i am processing mpv - i hit 'd' until deinterlace is on 'auto'. find the clip you'd like and hit your screencap shortcut (alt+s) for me - your screencaps should be super clear, it depends on how you set up your software (if mpv, what compression you told it). screencaps can take up a ton of storage so i recommend only screencapping what you need and deleting them after. when you hit your shortcut, play the file to the end of the clip you went and hit the screencap shortcut again to stop. your frames should be in the folder you designated as pngs now. delete extra frames now!
you now have two options: import as is, which can be a little slow, or turn them into dicom files. importing as is is done through stack. it will prompt you to select what is being loaded - change Use: to folder, and let it process. it will be slow. hit ok when the file list updates.

when it is done loading: create frame animation -> make frames from layers -> reverse frames. i would crop now using the crop tool for processing speed, and then proceed to do video timeline, smart object, and frame rate. when cropping: on the top, above your document names, the second image should show up on the crop tool - this can set your dimensions. i zoom and crop screencaps using this.


the other option is DICOM files, and what i use. when you have your pngs, do alt + d in the folder (windows), type cmd, and run this command: ren *.* *.dcm. press enter. it will update the files. on macOs, just rename the file type to .dcm.

then, import as so (it will prompt you to select the folder your .dcm are in, and will not work if the files are not actually DICOM). i find it much faster than the stack import. crop when it is done importing for processing time, like the other screencap import style.

create frame animation -> make frames from layers -> video timeline -> smart object from layers -> 60 fps.
photoshop shortcuts and actions: (windows) - ctrl + alt + a: select all layers - ctrl + shift + alt + w: export as image - ctrl + alt + shift + s: save for web (legacy) - this is the gif one!
actions are imported or created, i've shared my sharpening ones before. there are plenty you can find (or make) for a variety of things, such as aligning objects to a fixed position on all docs, doing the screencap reverse and import for you, etc. they are imported using load actions - select the [downloaded] .atn file and it'll pop up.

sharpening: explained here, and has my actions (feel free to use). very important to the quality and clarity of the gif. the better the file, the clearer a gif looks, sharpening can only do so much. play around during this step!
coloring: very much the most personal taste stage of giffing. i explain my process here. in kpop giffing, we tend to focus on unwhitewashing. other giffing tends to be more aesthetic tastes and fun since the source has better colors to work with.
export settings: these are what i use! you need the 256 colors. i do not recommend lossy or interlaced. i think bicubic sharper is the clearest i have tried.

posting on tumblr: use these dimensions FOR GIFS. edits can be different. height is up to you - i would not go over 800, but i think my quality looks weird past 600 range anyways.

example gifs: yeji, from example file #1, imported using vs. uses no. 1 sharpening (altered) from my pack. colored. zhanghao, from example file #2, imported using mpv and the load via stack. uses no. 4 sharpening (altered) from my pack. colored. taeyeon, from example file #3, imported using mpv and the load via dicom. uses no. 1 sharpening from my pack. colored. eunbi, from example file #4, imported using vs. uses no. 2 sharpening from my pack. colored.


if your gifs don't look how you want right away, that's okay! it takes time. my first ones were not great either. i am always improving on and working on my gifs. good luck and have fun hehe ♡
#i do not feel that qualified to answer this so caveat im not the best. and please also take ideas from my lovely moots and their resource#tags and tutorials / shared things. they are all so good#m:tutorial#resources#long post#flashing tw#userdoyeons#awekslook#ninitual#useroro tuserflora#useranusia#userchoi
85 notes
·
View notes
Text
How to play the original Secrets Can Kill in 2025 without game discs
oh my god I almost just wrote 2015 instead of 2025
I've successfully been playing the original SCK for the past couple hours (including "changing discs" and reopening save files), but it's possible I could run into problems later, so no promises that this is a perfect solution.
This method still requires installing the game files, so I think it'll only work on Windows, sorry Mac users. I'm using Windows 11. I was also able to install and open the game on a Windows 10 computer, but I didn't actually attempt to play it there.
All you need are copies of the game .iso files and a virtual hard disk drive program. The post got long, so details are under the Keep Reading. It's not actually complicated, but apparently I talk a lot lol
The .iso files:
.iso files are digital replicas of optical discs (CDs, DVDs, etc). You probably don't have the original Secrets Can Kill discs, so you will need to...acquire these files.
[NOTE: My personal ethics say to not pirate shit from small studios or independent creators. HeR is a small studio and if people don't buy stuff from them, they can't afford to make new games. However, the original SCK is abandonware and literally can't be purchased, so imo, it's perfectly acceptable to pirate it.
I want to strongly discourage anyone from pirating any of the other games which can be purchased. They have 50% off sales all the time (including through today, 1/5/25) and a bunch of the games are as low as $5 when on-sale. The digital downloads don't come with any kind of restrictive licenses, so if you get a new computer, you can transfer the files and keep your games forever. Pls keep supporting HeR so that we can maybe keep getting new games]
I recommend getting the SCK .iso files from archive.org. That link will take you to a software search for Nancy Drew Secrets Can Kill. As of this post, there's only 1 result that's actually for the original SCK.
Anytime you're downloading software from a site where anyone can upload stuff, there's always a possibility of viruses. Check and see if the uploader seems sketchy (Are there comments on any of their uploads warning about viruses? Is the account brand new?). You could run the files through a virus checking program, but apparently .iso files frequently throw false positives. The SCK uploader seemed legit, but I initially downloaded and installed these on an old computer that I don't use, just in case.
There will be a bunch of files available to download. You specifically need to download the "ISO IMAGE" files. There should be two of them- disc 1 and disc 2. After downloading, I recommend moving the files out of your downloads folder because you'll need to access them frequently.
The virtual hard disk drive program:
Like I said above, .iso files are digital copies of physical discs. Similarly, the way to use the files is via a digital version of a physical disk drive. "Mounting" the .iso files to a virtual disk drive is analogous to inserting a disk into a physical drive.
Windows 8 and above has a built-in ability to mount .iso files, but when I tried that, I got a notice that the file was corrupted. The internet recommended that a dedicated program might have more functionality. I chose the Elby Virtual CloneDrive program, which is free.
Installing the game:
After downloading and installing the virtual disk drive software, navigate to your .iso files, and right click on the file for disc 1. Scroll to "Open with", and choose "Mount Files with Virtual CloneDrive". It will now show up as a CD drive in This PC in the file explorer:

Double-click to open the drive and scroll to "setup.exe". Open the file to run the game installer.
The game will install in a typical way. I think the only non-default option I chose was "No, I will install DirectX myself". I didn't actually install DirectX, but everything is working fine ¯\_(ツ)_/¯ idk, maybe now it's built-in to Windows or something.
Running the game:
To run the game, just open the game shortcut like a normal program. If you can't find the shortcut or didn't create one during the install, go to your C: drive -> Program Files (x86) -> Nancy Drew -> Secrets Can Kill -> Game.exe
In order for the game to run, you need to have Disc 1 still mounted to your virtual drive. Unless you specifically unmounted it, it should still be there, but if you get a pop-up that says to insert the disc, the problem is probably that the disc isn't mounted.
I was expecting that I would have to run the game in Compatibility Mode to handle that it was made for fucking Windows 98, but I didn't have to do anything. It just worked with no adjustments. A miracle!!
Changing discs:
The original Secrets Can Kill was too big to fit on a single disc at the time it was made! They split it across multiple discs by location. The school is on disc 2, while all other locations are on disc 1. So if you need to move from the diner to the school for example, you have to change discs.
When you need to change discs, you'll get this screen:

WITHOUT closing the game program, minimize the game. Easiest way is by either pressing the windows key or alt+tab. Navigate to your .iso files, right click on the new disc, and choose Mount.
Navigate back to the game and click OK. Easy as that!
Whenever you fully exit and re-open the game, you have to open it with disc 1 mounted. So if you saved while at the school, you'll open the game with disc 1, load your save, and immediately switch over to disc 2.
And I think that's everything! Phew! This got a lot longer than I planned on. Feel free to send me questions if you're having trouble, but I may not know the answer. I'm not an expert in this stuff, I just spent some time poking around at it last week is all.
Have fun! Go manatees!
142 notes
·
View notes
Text
Transferring your Kindle library to calibre: The Easiest Way
For people who are trying to get their Amazon Kindle libraries imported into calibre, this is the easiest method I have found.
Pros:
easy if your entire library fits on your Kindle
Faster and less clicking than manually downloading each book onto your computer from the Amazon website and then importing it into calibre
It allows you to import "Docs" from your Amazon Digital Content as well as "Books"
Does not require you to understand coding language or how to use scripts
This method should continue to work after February 26th (when Amazon will no longer allow manual downloads from its website to your computer)
Cons:
you have to use whispersync (only a con if you can't use or are opposed to using whispersync)
Doesn't work if you don't own a Kindle
These instructions are for the latest edition of calibre in Windows, but it works similarly on Mac (typos ahead because I am dictating this and my dictation does not spell calibre nor many other things correctly):
On your Kindle:
Download every Book and Doc you have stored in the Kindle cloud. You have to do this one at a time so it's boring, I did it while watching TV and listening to podcasts.
On your desktop:
Download and install calibre
Open caliber
Click on preferences from the top menu, roll down to add plugins
Install the KFX input plugin
Do an internet search for "NoDRM" caliber plug in. The latest version is 10.0.9. download and unzip the file folder. There are zipped files inside that folder. Leave those zipped files alone.
Go back to caliber, go to preferences, select advanced, select tags. You have the option of importing plugins from your desktop. Choose that option. Through that option, go to the folder you just unzipped and click on the "NoDRM" or "DeDRM" zip file. It should install.
IMPORTANT: click on customize plugin. A screen will appear where you can enter the serial number from your Kindle. You must enter a serial number or this plugin will not work.
Connect your kindle to your computer using a USB cable. A device icon should show up on the menu at the top of your caliber window. Click on the device icon.
A list of all the books and documents you have downloaded onto your Kindle should appear in the library window. Select all of them using the ctrl-A keyboard shortcut. Right click and choose "add to library".
Wait until caliber says you are done importing. Then you can disconnect your Kindle.
You've done it! If you want to convert everything to a more universal file type like EPUB, go to your library, select all, right click, choose Convert Books > bulk convert, choose EPUB as your output format in the top right corner of the window, then hit okay in the bottom right corner of the window. Wait for the process to complete before quitting caliber!
If you get a message saying that you cannot open your Kindle books or that they cannot be converted, it's probably because you did not enter your serial number, you did not save it, or you entered it incorrectly. Go back to the plug-in settings and check on them. Other than that, I can't give you any tips because I only figured all of this stuff out yesterday!
85 notes
·
View notes
Text
Offline Library
In light of all the Ao3 issues lately I'm gonna throw this up as something people should consider doing. Make your own library of your favorite fics and any you might like to read in the future/are currently reading.
How do you do this? To start: Calibre & ReadEra app
Calibre is a free ebook management software, available on windows, mac, and linux - but also comes in a portable version you can put on a flash drive. Ebooks are very small files, 100s of fics can easily take less than 1GB of space. You can create categories for everything and all the tags on the fics will stay attached to them. You can download directly through ao3, or you can use the browser extension Ficlab which can make the process a little quicker, plus give you a book cover(or you can add your own cover). Epub or Mobi format is best.
ReadEra, is a free reading app with no ads that you can tell to only access a single file where you keep your ebooks. It's open source and the Privacy Statement and Terms & Conditions are very short and easy to read. You can transfer files from Calibre to your phone, but this is also a good option if you don't have a PC to use Calibre. You can make folders to organize all your fics.
Quality of life plugins for Calibre: Preferences > Plugins > Get New Plugins
Look up: EpubMerge, EpubSplit, FanFicFare, Generate Cover (restart calibre once you've added them all) Fun fact, with FanFicFare, you can download new chapters to update fics that are currently in progress directly in Calibre instead of having to open up ao3.
Also, to be clear - back them up for yourself only, don't you fucking dare repost them anywhere.
You can also backup Kindle books (and you should) with Calibre, though that's a bit more complicated; instructions under the read more
Firstly what is DRM? TLDR: digital rights management (DRM) is meant to prevent piracy, however, this also means you never really own your ebooks. If Amazon decides to take down a book you bought? That's it, it's gone and it doesn't matter that you paid for it.
Removing DRM If you're on PC and don't have a kindle device, you'll want kindle version 2.4.0 or it won't work in Calibre.
In Calibre, navigate to Preferences > Plugins > Load Plugin From File - DeDRM - Use the latest Beta or Alpha release, follow instructions on the github page
Preferences > Plugins > Get New Plugins
Look up: KFX Input
You'll have to restart Calibre once you install so just add them all at once before you restart it.
If you need some troubleshooting help setting anything up just ask and I'll try to help!
48 notes
·
View notes
Text
The General!Series - Part Four: Moving On: Beau 'Cyclone' Simpson x Reader

A little get well soon gift for my girl @dizzybee03
Tagging: @kmc1989 @justameresimp @agentorange9595 @lxaah11 @librarian1002
Broken Buttons (feat: Harmon Rabb)- Beau discovers the real reason you broke things off with him.
Messy - Companion piece to Broken Buttons - Beau discovers the truth about what happened that night.
Choices - Companion piece to Broken Buttons and Messy - Beau and you discuss your choices moving forward.

Sitting in court is excruciating but Beau endures it, he endures it because no matter how fucking horrified and nauseated he is, you must feel it tenfold. He can’t imagine what it must be like to sit in front of a room of your peers and describe what that man did to you, to have your story questioned and torn apart, to have someone tell you to your face that you were asking for it. They try to paint you as unstable, the kind of woman who intended to sleep her way up the ladder, whose now crying wolf because she was rebuked.
He almost punches the prosecution attorney in the mouth for the shit he says to you. It’s only Mic Brumby’s iron clad grip on his arm that stops him from launching himself across the table and strangling the man.
It’s the physical evidence that’s the worst.
You had the competency to go to the hospital afterwards, you’d been bleeding, scared when the doctor had seen you. You’ve worked with enough women through your time in Victim Support Services to know the procedures, you needed the morning after pill, medication to counteract anything that son of a bitch might have given you.
The hospital had logged you under an anonymous patient I.D. It’s something they do for victims of sexual assault when they collect evidence, when they’re not ready to file a police report.
It sickens Beau to hear the injuries you’d sustained, he hadn’t realised how violent it was, not until then.
You’re found not guilty of the offense. The jury of your peers accepts that you acted in self-defence when you broke the General’s nose, that you were too traumatised to attend work in the aftermath.
Your case, it opens doors for other women it’s happened to because you weren’t the first woman he did it to, you weren’t even the last. He’s arrested during a charity function for victims of sexual assault and the fucking irony of that astounds Beau.
You spend an hour in the shower after you give your testimony, before you fall asleep on the couch with your head in Beau’s lap. He spends the whole night, his fingers running soothingly through your hair as he begins to plan the next steps.
You’ve told him you can’t stay in Washington, that Admiral Chegwidden has granted you a transfer back to San Diego. There’s too much trauma attached to this place.
He spends the next couple of days helping you pack up your things. You throw away more away than you keep because you don’t want the bad memories following you. Harmon Rabb and Mic Brumby turn up on moving day to help carry the boxes down to the truck. Besides him, they’re the only two people who’s touch you don’t flinch away from these days.
“Thank you.” Beau tells Harm when the two of them are alone in the apartment, grabbing the final few boxes. “For bringing me here, for fighting for her.”
“Don’t thank me.” Harm says, his voice gruff as he crosses his arms over his chest and stares out of the window. “It happened on my watch. I was there that night, I should have stuck around but me and Mac were going through some shit…”
Harm shakes his head, his jaw clenching.
“It never should have happened.”
Beau sighs, shifting the box he’s carrying to his other hip.
“Ally doesn’t blame you and neither do I.” Beau tells the other man. “If it wasn’t that night, it would have been another. You heard the testimony, once he had her in his sights…”
It was the same with all the others, that son of bitch had enjoyed the chase, it made catching his prey all the more sweeter. He treated every single one of those women like a trophy, something to be hunted down, caught.
“I need you to promise that you’ll check in every once in a while, tell me how she’s doing.” Harmon says, his palm rubbing over the back of his neck.
“I will.” Beau tells Harm as he picks up the remaining box and heads towards the apartment door. “Ally may need a little time but I’ll make sure to keep in touch.”
“She’s going to get through this.” Harm reassures him as they step out into the hallway, he waits as Beau closes the door behind him, locking it up for the final time. “It’ll take some time but she has it in her.”
“I know.” Beau says as he slips the key into the mailbox for the landlord to pick up. “If anyone can make it through something like this, it's her.”
Love Beau? Don’t miss any of his stories by joining the taglist here.
Interested in supporting me? Join my Patreon for Bonus Content!
Like My Work? - Why Not Buy Me A Coffee

#beau simpson#beau simpson x reader#beau cyclone simpson#beau cyclone simpson x reader#top gun maverick#tgm
102 notes
·
View notes
Note
Helloo again,
I know I sent an ask about “transferring files” like an hour ago, but I wanted to look into it cuz there has to be a better way. And there is for chrome users ;D (this could also work on Mac but again, I have no idea i only tested this on PC, sorry!)
this involves more steps than the “save to disk,” but you get to keep all your saves (not just your game but every web itch.io game that someone has played. at least from my testing)
on your old PC/laptop:
windows key + R (brings up the ‘Run’), and once you see it, type in %appdata% and from there simply follow this:
%appdata% >> (if it lands you on roaming just go to AppData) local >> Google >> Chrome >> User Data >> *profile* file (i used ** to indicate the profile you used to play the game, which can be ‘Default’ or ‘Profile #’) >> And look for ‘Local Storage.’
note: you can just copy the entire *profile* file, but from my tests, you only seem to need ‘Local Storage.’ That said, if just the ‘Local Storage’ file alone doesn’t work, just grab the entire *profile* file. both methods work. And if you go the entire *profile* file route, just do the same thing but with that file:
once you have the ‘Local Storage’ file, email it to yourself or upload to Drive (i recommend Drive if it’s a heavier file).
Thennn
on your new or other PC/laptop:
download chrome first (but make sure it’s closed before next steps)🙂↕️. Also, download the file from email or Drive or whatever, and repeat the same thing really
Windows + R >> %appdata% >> local >> Google >> Chrome >> User Data >> *Profile* file >> delete the ‘Local Storage’ file that’s already there and drag in the ‘Local Storage’ from your old PC/Laptop.
note 2: if you went the whole *profile* file route just stop at >> User Data, and delete the ‘Default’ profile on your new chrome. And if your old *profile* file isn’t already named ‘Default,’ change its name to ‘Default.’ Honestly, you can play around with the name and name it ‘Profile #’ if you like that more, and you don’t have to delete the new chrome’s ‘Default’ file. Try it all it’s up to you
was this explanation overkill? Absolutely. but what am I if not excessive. As long as it can help someone preserve their hard earned saves i am content to be dramatic 💛
I was also gonna use yellow text highlights instead of orange (to somehow make this less confusing) to match your blog aesthetic in case you decided to respond do this essay of an explanation, but tumblr does not give out yellow easily, how sad 😔
51 notes
·
View notes
Text
I've been at my local computer club for 10 minutes and following shit happened:
- everyone made fun of someone who installed windows and they recommended a py installer for bottles for that one program he needed instead
- people were surrounding another guy trying to transfer files from a blackberry to a mac
- some dude threw cables at another guy
- i left my laptop at home, when i mentioned it, some guy placed two macbooks in front of me and said (threateningly) "replace the motherboards."
- i got a keychain sd card reader for free because why not
i am now returning home and gathering supplies (my trusty thinkpad and my pc ssd)
38 notes
·
View notes
Note
Hello! Sorry for the bother but do you know how the live 2D files of Tokyo debunker is accessed? I'm like so hyped about this help- Let me know if you could answer for me! THANK YOUUUU
I'm on the way to work so I'll just copypaste what i sent to someone else over DMs. Lmk if you run into any trouble, but it'll be like 8+ hours before I get to it
Hiya! No need to apologize for the sudden message. I just woke up so sorry for the wait!
I can explain the process for you and get screenshots to hopefully help out, and if you have any problems with it you can let me know!
You'll need:
An android phone and a way to transfer files between your phone and computer(a wire is preferable in my experience)
I think you need a windows or linux computer? I'm not sure if the necessary programs will work on mac.
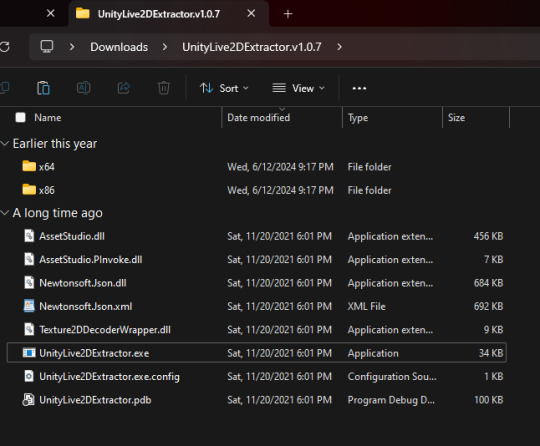
AssetStudioGUI https://github.com/Perfare/AssetStudio
UnityLive2DExtractor https://github.com/Perfare/UnityLive2DExtractor/releases/tag/v1.0.7
First you'll need to transfer the game files to your computer. I assume you already have that part done so I won't walk you through it.
Next go into AssetStudioGUI and go into 'Debug' and turn off 'Show error message' to save yourself some headache
Now you need to open the folder with the files in AssetStudio. This will probably take a long time. Get yourself something to eat or play a game or read or something!
Once everything is loaded you'll need to find one of the live2d files. For tokyo debunker the easiest way to do this is just to go to "Filter Type" and filter to "Texture2D". I don't know the file structure or naming convention for Twst, but the image you're looking for should look kind of like this

Right click and choose "Show original file".
Copy the FOLDER that this file is in to another folder.
If you haven't already extracted L2DExtractor, do that now. You should have these files.
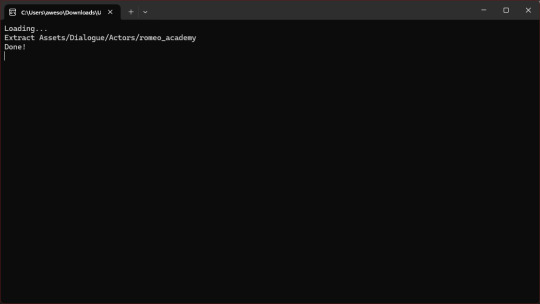
Open the L2DExtractor FOLDER in another tab or window. Then drag the folder that you copied before to "UnityLive2DExtractor.exe" in the UnitLive2DExtractor folder that you have in a separate window. (You can also copy it and right click→paste it INTO THE EXE FILE if dragging is difficult.)
You should get a command prompt(the black box with text in it) with the name of the asset in it. Wait until it says "Done!" Close the command prompt.
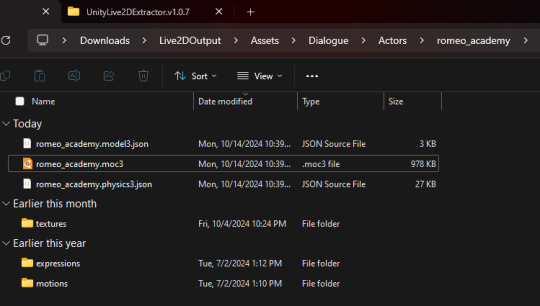
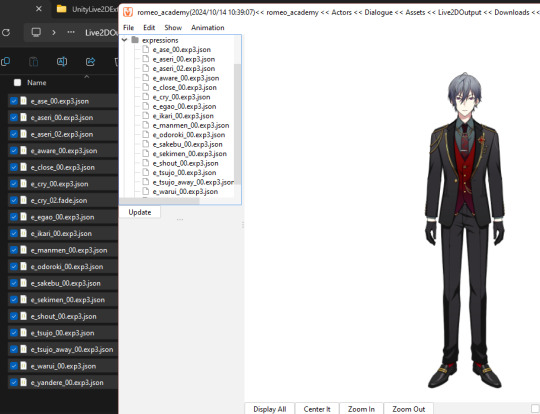
Go to the folder that you put the asset folder in. You should now have a new folder named "Live2DOutput". That will have a folder in it. Go into the folder until you find the asset you just extracted.
You should now have the .moc3 file, textures, and motions! You can open the moc3 file with Live2D's Cubism Viewer which you get off of their website. It's free.
If you don't have the expressions in there you'll have to extract them separately! I always have to extract them separately and I'm not sure why, but it's easy enough once you know where they are.
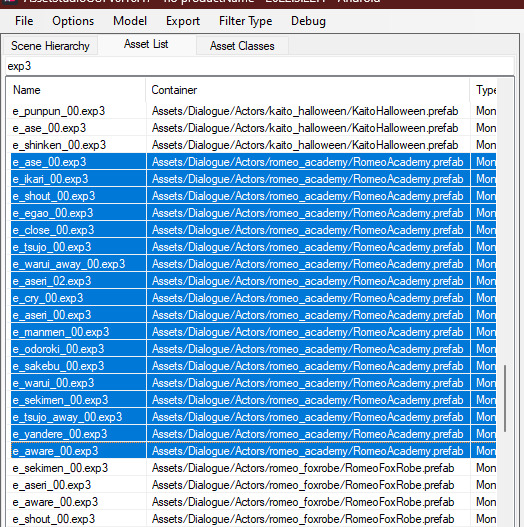
Open AssetStuido back up and change your filter to "MonoBehavior"
Search "exp3"
Order by Container and find the character character and outfit you just extracted(in this case I just need to find "romeo_academy". The name of the asset you extracted should be in the container path.
Highlight only the .exp3 files that go to this asset.
Go to "Options→Export options"
Change "Group exported assets by" to "Do not group". If you want to do any datamining in the future you're probably going to want to change this back to "container path" or else you'll just get a ton of files in one folder, so don't forget you did this! If you're only using assetstudio to get the l2d files however you can leave it as is.
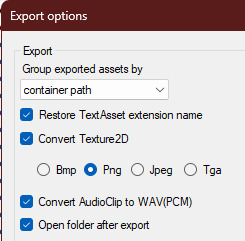
Press "OK"
Right click on one of your highlighted exp3 files
Choose "Export selected assets"
Navigate to the folder with the moc3 file in it. Make a new folder. The name doesn't matter because you'll have to manually move the expressions into l2d every time, but I just use "expressions" for simplicity
Extract the exp3 files into here.
Once they're extracted you can select them all at once and drag them into the Cubism Viewer window OF THE CORRECT CHARACTER. This will instantly import all of the expressions.
You're done! You can view and play with them all you want. But you'll have to do every character individually and then export their expressions separately.
Hope that helps. If you need anymore help let me know.
#ridiculous-reina#danie yells answers#do i have a tag for explaining this stuff? idr.#datamining cw#just so it'll come up if i search datamining or something ugh
20 notes
·
View notes
Text
youtube
This has been around for a few months, but I'm only just hearing about it. Artic Base for homebrew 3ds lets your physical 3ds connect wirelessly to a modified version of the Citra 3ds emulator (available for android, linux, mac, and windows), so that the emulator can read game files from the 3ds and write save files back to it. You are emulating the game - contrary to some youtube videos you are NOT streaming the game from the 3ds - but all the files are taken from and go back to the 3ds, so there's no piracy involved and no need to find or download roms. Unless the games on your 3ds are themselves pirated, in which case shame on you you naughty child!
This allows a switch-like experience where you can play a game portably on your 3ds, then when you get home boot up the same game and the same save file to play on a bigger screen in higher resolution with a more comfortable controller via citra, saving your game back to the 3ds. It also lets you take advantage of Citra's ability to play multiplayer online even though the 3ds servers are down by emulating a local connection over the internet. It's also an easy option to stream or record gameplay if you're into that without the trouble of installing a capture card mod onto your 3ds.
Now, granted, this was all already possible by copying save files back and forth from your 3ds memory card to your computer, but to do that you still had to go through the bother of setting up citra and getting your game files on there - either by finding roms or by dumping the files yourself. That could be a pretty significant hassle, but Artic base handles it all for you.
There is a downside - every time you load or save anything in your game, that data has to be transfered between your 3ds and Citra over wifi, which does add a delay and some slowdown whenever that's happening. But most of the time gameplay runs very smoothly.
Anyway, Artic Base requires a modded 3ds. Instructions can be found HERE. The process isn't very difficult, but read the directions carefully and take your time, as there's always a risk of breaking a device when installing custom firmware if you mess something up. Don't rely on video guides for this process! if the video is out of date, it might give you instructions that are no longer correct for the current methods and files!
Even if you're not interested in Citra, modding adds so much utility to the 3ds that you really should look into it if you have one. Button remapping, using larger memory cards (I wouldn't go over 128gigs), backing up save files, backing up entire games so you don't lose access to them if the aging cartridges go bad, even community ports of entire games like Doom or Off or Fallout, access to the pretendo network which is slowly rebuilding online functionality for 3ds and wii, the ability to stream from your computer to your 3ds, access to h-shop to download game updates and patches no longer available from nintendo after the e-shop's closure, and so much more.
Anyway, once you have a modded 3ds, Artic Base can be found on the Universal Updater app. I prefer the .cia version over the .3dsx version, so you don't have to go through Homebrew Launcher every time you want to use it. If you want to install it manually instead, it can be found HERE.
You also need a modified version of Citra to connect to your 3ds, which can be found HERE.
30 notes
·
View notes
Note
After I deleted a bunch of projects (thankfully non-critical, though representing a great deal of work in total) during a recent fresh OS install, I realized that my backup practices are practically non-existent. Any tips or sources on getting started making, and eventually automating, effective backups?
I am stealing the concept here from jwz's backup guide, but I am recommending different tools, focusing on personal files only, and also addressing Windows. jwz's guide is a good reference:
Doing a way, way better job than most people of backing up one single system is very easy. Let us begin.
The most basic step of having decent backups is getting your hands on two external hard drives at least big enough to hold your entire system, and putting a label on them that says "BACKUP ONLY DO NOT USE FOR ANYTHING ELSE I AM BEING FOR REAL HERE"
Once you've got those, plug one into your system wherever it spends the most time. If you have a desktop then that's solved, if it's a laptop hopefully you already have a USB hub you plug it into when you sit down to work or whatever and you can just leave it there.
Now set up regular scheduled backups to that device. On Windows and Mac, there's a built in tool for backing up your system to an external drive. We'll assume that you just want to back up your user files on Windows and Linux, since doing full system backups isn't tricky but is kind of unnecessary.
(Ugh. Windows seems to be trying to phase out Windows Backup and Restore in favour of their File History thing. That's annoying, let me log in to windows and check how this actually works. Mac in the meantime)
Mac has Time Machine. Time Machine is extremely good, and you can tell Time Machine to save its backups to a disk. Point Time Machine at your external hard drive and tell it to schedule a backup however frequently you want. If anything goes wrong in the future, you can ask Time Machine to look at that backup disk and it'll show you a few versions of whatever you backed up there. I'm not a Mac user but I think you can even use Time Machine to transfer between an old computer and a new one.
Windows now has File History which I have never used in my life, they added it after I stopped using Windows. Same idea though, pick some folders and back them up to an external storage device. If anything goes wrong, use File History to go back through that device and find the version of the file you wanted. I don't know if there's still a way to access the older Backup and Restore system.
On Linux, my favoured way to manage simple desktop backups is Deja Dup, a GUI for Duplicity. Duplicity can do a lot more than just backup to a disk, but we'll start there. Install Deja Dup, open it up, and follow the prompts to back up your user files to the external drive. Deja Dup can also do backups to remote storage servers, Google Drive/Onedrive, and commercial storage providers like Amazon and Backblaze. It will even encrypt your backups if you are worried about Amazon spying on your files or whatever. If something goes wrong, point Deja Dup at your backup drive and it will offer you a suite of restore options covering a few versions.
Now, you have a permanently plugged in hard drive that will always get rolling backups you can restore from. These aren't safe from, say, ransomware, or your house burning down, but at least you won't lose anything when you update a computer or accidentally delete something and have an ohshit moment.
Now you take that other drive you bought, and do the same backup you're already doing to that. Now you go put it somewhere else where it's readily accessible and won't be accidentally used for anything, keep it at the office, give it to your dad, whatever. Set a reminder on your phone for once a month. Once a month, go get that drive, run another backup, and put it back. You now have better backups than many medium sized businesses.
This is impractical to scale beyond one PC, but if we're being honest even when I had like half a dozen laptops, only one contained much of value. Back up the system you care about.
Don't worry too much about making sure your backups are space efficient, like, yeah it would be a good idea to exclude game installs and stuff from your backups to save space but if that sounds daunting or time consuming literally do not do it. Decision paralysis is brain poison, just back it up and sort it out later. 2TB external hard drives are cheap.
FURTHER STEPS YOU CAN TAKE:
Easy Cloud backup: Backblaze personal backup on Windows and Mac is $6/month and pretty easy to use. If you are struggling to keep track of a monthly remote backup, or you want an easy remote backup. Backblaze is a reasonably reliable company and one of the Go To Companies in the world of data reliability. Yes, it's a cloud subscription. If you don't want that don't use it.
Network backup: If you have access to a storage server, that can be a good way to make a remote backup without having to shuttle disks around. That could be a physical server if you maintain some kind of lab, or it could be a cloud storage provider like Backblaze B2 or Onedrive or whatever. Deja Dup specifically supports backing up to a lot of different network storage providers, and even if you only have a fifty or sixty gigabytes of network storage on hand, your most essential personal files can probably fit in there.
Drive failures: Eventually one of your drives will fail, either your storage drive or your backup drive. If the storage drive fails, well, that's what the backup is for, go get a replacement and restore from the backup. If your backup drive fails, well, that's why you have two of them. As soon as humanly possible go get a replacement drive, and substitute it in for the dead one.
101 notes
·
View notes
Text
Reliable Apple Expert Care for Your MacBook
Your MacBook is more than just a sleek piece of technology it’s a powerful tool that supports your work, creativity, and daily life. When it runs into issues, whether hardware or software-related, you need repair services that you can trust. That’s where reliable Apple expert care comes in.
Apple-certified technicians offer the knowledge, experience, and tools required to provide professional and accurate MacBook repair and maintenance. Whether you own a MacBook Air, MacBook Pro, or a newer Apple silicon model, choosing Apple expert care ensures your device receives the attention it truly deserves.
What Makes Apple Expert Care Reliable?
Reliability comes from consistency, certification, and commitment to quality. Apple-trained professionals are held to high standards, ensuring each MacBook is repaired with the utmost precision and care.
Here’s why Apple expert care is considered the gold standard:
Certified training from Apple
Access to proprietary Apple diagnostic tools
Use of genuine Apple parts
Commitment to data protection and privacy
Repairs backed by Apple’s limited warranty or AppleCare+
These experts know every corner of your device—from the internal components to the software interface—and follow strict protocols to maintain performance and safety.
Common MacBook Issues Solved by Apple Experts
Apple experts are prepared to handle virtually every MacBook issue you might face. Whether the issue is minor or major, certified technicians know how to resolve it efficiently and reliably.
Battery Replacement
Experiencing rapid battery drain or shutdowns? Apple experts offer battery replacements calibrated to your specific MacBook model, restoring reliable power and runtime.
Screen & Display Repairs
Cracked screen? Flickering display? Experts can replace or repair your Retina display with genuine parts that preserve brightness, clarity, and touch sensitivity.
Logic Board or Hardware Failure
If your MacBook won’t start, freezes, or shows kernel panics, it might be a logic board issue. Apple-trained technicians can identify the problem and repair or replace the faulty component with care.
Keyboard & Trackpad Issues
From stuck keys to laggy trackpads, Apple experts offer dependable solutions to restore smooth input functionality—whether it’s a butterfly, Magic, or standard keyboard.
Water or Liquid Damage
Spilled something on your MacBook? Prompt, professional care from Apple experts can minimize internal corrosion and salvage your device using Apple-standard procedures.
🧩 macOS & Software Issues
Running slow? Apps crashing? System won’t boot? Apple experts can reinstall macOS, fix software bugs, and restore performance without data loss.
Why Trust Only Certified Apple Technicians?
Choosing a repair provider not backed by Apple could put your device and data at risk. Unofficial repairs may involve generic parts, improper tools, and lack of training—leading to more issues later on.
In contrast, Apple experts provide:
Diagnosis using official Apple tools
Service that adheres to Apple’s technical guidelines
Repairs that maintain warranty and AppleCare+ eligibility
Professional handling of sensitive data
Accountability and service quality checks
You can always count on consistent, high-quality outcomes when working with certified Apple repair providers.
Where to Find Reliable Apple Expert Care
Apple expert care is available at several trusted locations, including:
Apple Stores (Genius Bar) – Trained in-house Apple technicians offer diagnostics and repairs using official tools and parts.
Apple Authorized Service Providers (AASP) – Local certified shops that meet Apple’s rigorous repair standards.
Independent Repair Providers (IRP) – Certified third-party service providers with access to Apple’s tools, resources, and genuine parts.
To find the most convenient and reliable repair location, visit Apple’s official service locator and book an appointment based on your issue.
What to Expect from Apple Expert Service
Here’s how a typical Apple-certified repair experience works:
Initial Diagnostics Experts run an in-depth device assessment using Apple’s own diagnostic suite.
Transparent Service Estimate You receive a clear repair timeline and cost—no hidden fees or guesswork.
Certified Repair or Replacement Repairs are performed with Apple-approved procedures and original parts.
Quality Check The device is tested to ensure it functions exactly as expected.
Warranty Support Repairs are backed by Apple’s 90-day limited warranty or longer if covered by AppleCare+.
This streamlined, professional process ensures your MacBook is restored to top performance without delays or surprises.
Your MacBook deserves expert attention from professionals who truly understand its unique design and functionality. With reliable Apple expert care, you can feel confident that your device will be handled with the same precision and quality that went into building it.
From diagnostics to full hardware repairs, Apple-certified technicians provide the trustworthy service your MacBook needs so you can get back to creating, working, and staying connected without missing a beat.
Don’t take chances. Trust the experts who know Apple best.
#Mac Data Recovery/Transfer#Mac Liquid Damage Repair#Mac Logic Board Repair#Mac Screen Repair#Mac Hard Drive Upgrade/Replacement#MacBook Pro Graphics Card Repair#Mac Password Removal#Mac Battery Replacement#Mac Keyboard Replacement#Mac Data Recovery#Mac Deleted Files Recovery#Windows Data Recovery#Windows Deleted Files Recovery#External Hard Drive Data Recovery#USB Data Recovery Calgary#iPhone Data Recovery#iPad Data Recovery#iPhone Screen Replacement#iPhone Battery Replacement#iPhone Other Repairs#iPad Glass Screen Replacement#Apple iPad Battery Replacement
0 notes
Text
Ok guys time for a fun piece of lore that is not annoying at all.
Last year, for my birthday party, I wanted to have a projected playlist of kpop music videos to play throughout the party so I could torture my friends set the ambiance in a way that made me feel joy. The problem with that was that one of the people coming was the young daughter of a family friend, who found like a million different things scary.
I didn’t know what this kid specifically found scary, but I wanted her to feel welcome, so I ruled out any possible scary music videos (for example I cut out Future Perfect by Enhypen because a guy gets set on fire in that one) honestly most of the victims of cutting were Enhypen, Ateez, and 3rd gen girl groups, oh HERES another fun fact, the kid’s dad is also super conservative, so any outfits that could be considered too suggestive were also a no-go (goodbye Heart Attack by AOA 🥲), AND on top of that I just didn’t want to play anything that would weird all the locals out too much (absolutely NO Sticker and Savage, though it breaks my heart) but anyways,
I was able to muster up 2hrs of safe, family friendly, local safe kpop, and then had to edit it together into one big long video, because I did NOT want a single YouTube ad at my birthday party, absolutely the fuck not. I was also very particular about the order the videos would play in, because I couldn’t shuffle it like I would if it was on YouTube. I want to say I spent like 2 months on this thing?
Then there was the issue of exporting it. My computer does not project very well for some reason unbeknownst to me, so I would have to compress this ungodly file and put it on one of my parents laptops. The problem here was that I use windows and my parents both use Mac, and if I wanted to give them the file, I needed to recalibrate any stick drive I used. After like an entire day of mucking around with stick drives, we concluded that it would be better in the long run to just pay for a month of Dropbox premium and put it on there.
Then, of course, we needed to log onto Dropbox on my mother’s ancient MacBook Pro (one of 3 computers in the house that would project correctly) and by some miracle ended up logging on. The file transfer was taking literally forever though, so I had to retry it like a million different times. (This is the night before the party by the way)
Fast forward to the next day, and would you believe my luck, the kid who was afraid of stuff and the rest of her family didn’t show, so I could’ve been blasting Brought The Heat Back this entire time, and the only other person who was actively into the same kpop groups as me didn’t show either, and to top it off, there was a higher concentration of “go with the flow” friends at the party than there were “what’s next on the to-do list” friends, so we ran late on karaoke and Did Not Use the Fucking Playlist
And that was the story of my playlist 🙏🏻🥲
3 notes
·
View notes
Text
The more I write, the more I understand why Google (in this case, specifically google drive) has such a chokehold on the world.
There is just no other platform that covers all the bases when it comes to the different services and abilities I want to have available for my work.
Google Drive offers a cloud storage i can access on pretty much any device that can download the app or access a browser, and if I'm willing to stoop to using chrome (im not), I can even access/edit my files offline. I can share my files with anyone else that also has access to the app or a browser easily and directly, and give them varying amounts of access to the work. I can have conversations with them INSIDE the document, either in the chat window or through leaving comments on the work itself, all in real time, and easily respond to suggestions from others without having two versions of the project open and skimming for the differences.
There's even an ao3 script I can use for google docs that adds in the html coding I need to make my formatting work properly on the archive.
In an attempt to move away from google drive, I tried a few other options, and none gave me the freedom/services that I need/want from a writing platform. There are file-sharing websites that would let me send a document to someone else, but no way to transfer back comments unless they reformatted the file, edited it, then sent it back for me to reformat. Plus those websites almost always require the other person to also have an account with them. There are offline options, like Scrivener, which is what I use currently for a few different fics, and while it has lots of options, there are almost none that relate to intercommunicative work with editors or Betas or anyone else. Because everything is saved to my computer rather than a cloud, I can work offline, but I'm limited to only being able to access my work from a single device, unless I save everything to an external harddrive and plug it in whenever I want to work. I can't access it on my phone, or share it with others, or leave comments within the work for referencing later. Because it uses its own formatting, I can't even copy/paste writing into it or out of it. In order to put anything in ao3 from scrivener, I have to download the file in a specific format, then re-upload it to google drive and run it through the script i have, THEN copy/paste it into ao3. In order to get any perspective from an editor/beta, I still have to download it and upload to drive, then share the file with the person I want. Then, either I make the changes in the drive document, then Re-download and Re-upload it to scrivener and have to completely recreate the chapters/files that I had working for me, or just have both versions open and only make changes in the scrivener version and just keep downloading/uploading it over and over again to drive. I believe the mac version of scrivener is supposed to let you send documents more easily to other people who ALSO own scrivener, but it's not the kind of back and forth sharing that I would want. It's just a faster file-share than downloading and e-mailing it to someone.
No matter where I look, i cannot find any other platforms that offer the ability to save your work to a cloud (without it ONLY being hosted on the cloud, like Drive. I just want to be able to save a copy of it so that my work is in two places) then share it with others easily, and allow them to make edits/suggestions/comments within the document, while still letting you retain the ability to work on your documents offline when you so choose. Why then, do I not want to use google drive, if it offers everything I'm looking for? Because google fucking sucks. If my documents get to more than like 60 pages long, the entire page starts lagging, as if I'm asking the page to load a massive picture instead of basic text. There is no fix except to make an entirely new document and repaste the words. Drive also kicks me offline at random, despite my internet working literally everywhere else on my computer, and while my work is offline, I can't make any changes, so I have to deal with random pauses in my writing where i'm just waiting for it to reconnect. I can't use the offline edits feature without using a chrome browser. Plus, it breaks constantly, buttons on the screen going missing and documents corrupting in strange ways. In short, it's google. I don't want to use it. But for some reason NO ONE else has made a platform that actually works like google drive, but isn't shit. I don't know whether what google drive offers is actually that difficult to recreate without the concessions that google forces people to put up with, or if no one making websites/platforms understands that this is what people need/want.
The hoops writers have to go through in order to do any collaborative work (and in fandom, that's SO Much more common) outside of google drive is infuriating, and made more so Because google drive exists. I wouldn't be so annoyed that I'm not getting All the options that I want from one platform, if it weren't for the fact that drive is sitting RIGHT THERE proving that it's totally possible for it to exist. it's just that no one's made it, or if they have, it's locked behind a massive paywall.
#personal#rant#writing rant#I hate google but drive is the only reasonable option for people who need beta-work midway through their writing process#NO i do not want to write out the entire fic or even entire chapters before being able to get advise/help/opinions from my beta#Yes that makes me picky and prissy and NO i don't care
21 notes
·
View notes
Text
Backup Your Kindle Books!
Amazon is getting rid of the "download and transfer via usb" option on Feb 26th!

So what this means is you can no longer get hard copy files to your kindle device with this method.
Where to start:
Calibre is a free ebook management software, available on windows, mac, and linux - but also comes in a portable version you can put on a flash drive. Ebooks are very small files, 100s of books can easily take less than 1GB of space.
And if you want and alternative reading app for your phone:
ReadEra app is an ad free reading app that is a good alternative to the kindle app if you need it. They also have a premium version for a one time payment of $15 which has a few extra features if you want them.
How to backup your books:
Details on your options to get your files this post has the most updated information and links needed.
what is DRM? TLDR: digital rights management (DRM) is meant to prevent piracy, however, this also means you never really own your ebooks. If Amazon decides to take down a book you bought? That's it, it's gone and it doesn't matter that you paid for it.
Removing DRM (extra instructions if needed) If you're on PC and don't have a kindle device, you'll want kindle version 2.4.0 or it won't work in Calibre.
In Calibre, navigate to Preferences > Plugins > Load Plugin From File - DeDRM - Use the latest Beta or Alpha release, follow instructions on the github page
Preferences > Plugins > Get New Plugins
Look up: KFX Input
You'll have to restart Calibre once you install so just add them all at once before you restart it.
You can find the folders with your ebooks under documents -> my kindle content, each book will have it's own folder and you're looking for the .azw file. If it says .azw3 double check the pc app version because that format will not work with DeDRM. Download a single book first, drag and drop it into Calibre and double click it to open and test that DeDRM is working properly. You should be to convert all the .azw files to epubs or any other format you want. To do this, either look in the top menu for 'convert books' or right click on the individual file to convert it, you can do this one at a time or select to convert in bulk. If you have 100s or even 1000+ books? focus on getting the files backed up first, once you have the book files you can take your time actually getting them into calibre.
If you need some troubleshooting help setting anything up just ask and I'll try to help!
#kindle#amazon kindle#ebooks#drm#e reader#amazon#ebook library#calibre#posting cause the other posts I'm seeing don't have enough info on everything that's needed
13 notes
·
View notes