#Photoshop video tutorial
Text

'ello folks, my Cleanup tutorial is finally done and out!
hope you find it useful
#Animation#Tutorial#Advice#Lesson#The Lion King#simba#animation#Disney#character design#how to#2D#traditional animation#frame by frame#Adobe#Photoshop#Animate#Flash#After Effects#Premiere#Video#Film#Drawing#Tips#Gestures#cleanup#lines#krita#toon boom#procreate#tvpaint
1K notes
·
View notes
Text
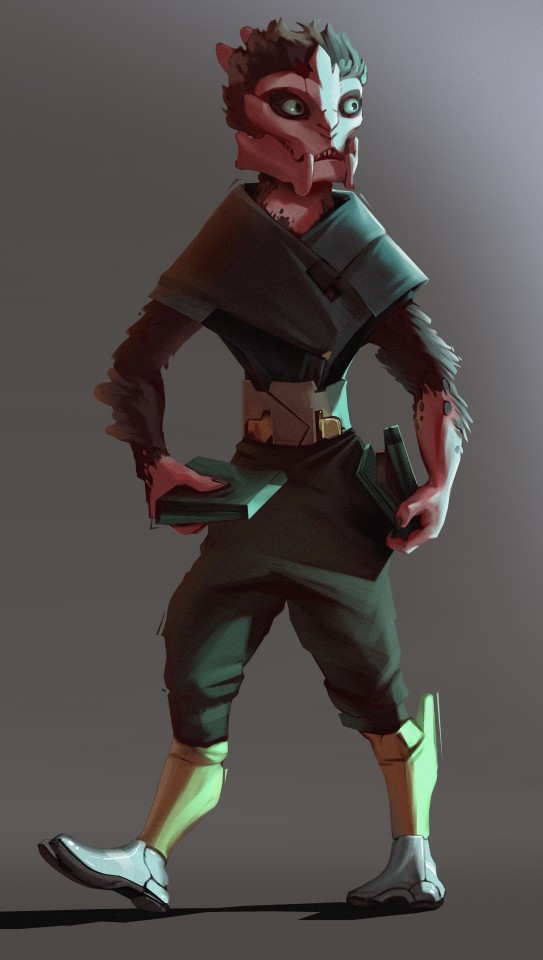
Turian kid concept for 3D modeling / part 1
Music: AES Dana feat. Miktek
#mass effect#turian#turian kid#concept art#tutorial#art#digital art#2d drawing#photoshop#video tutorial#drawing process#polsav
115 notes
·
View notes
Text
How To Gif: Glass Shatter Effect
By popular demand (ie, 7 people who voted in this poll), here is a tutorial on how to do the glass shatter effect I used to create the first gif in this set.
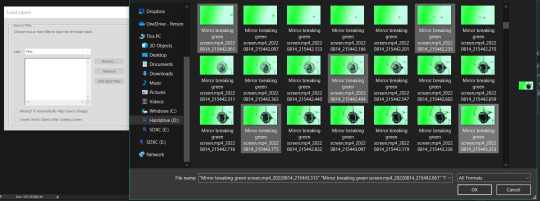
I use Photoshop CC 2015 (yes I know it's old) for my gifmaking, but you should be able to apply everything to newer versions of Photoshop. For this tutorial I'll be assuming you know the gifmaking basics, but if not, I would recommend this tutorial, which is the process I use to make gifs. Note that this particular process involves saving all of the frames, importing those frames into Photoshop, and then using an action to convert to a smart object.
Keep reading below the cut to learn how to do this effect!
Before I could start making this gif, I needed three things; the two scenes that I wanted to use, and a video of the glass shattering effect. I already knew the scenes I wanted, so then I took to YouTube to find a video which I can't for the life of me find again (edit: thanks to add1ctedt0you in the replies for linking this video!), but it looked like this:
Something like this is what you want. Ideally the green part would be entirely white, but as long as there are two clearly different colours you can usually work with it.
This looks a lot slower than the gif that I made, but that's not because of the frame rate - which is exactly the same above as in the final gif - it's just because there are extra frames in this slower one that I cut out. In the video I used, the glass shattering happened very slowly. I didn't want that, so I ended up skipping several frames when I loaded the frames into Photoshop before using my gifmaking action. I just did this by manually selecting one frame, skipping the next several before selecting another frame, and repeating this until I had selected 60 frames.
After using my gif action, I had a smart object of the glass shatter effect that looked like this:
That's a much better speed! It still wasn't quite where I needed it to be though. I needed this in black and white, so I slapped a hue/saturation adjustment on the smart object and set the saturation all the way down to -100.
Okay great, I could start putting the gif together now.
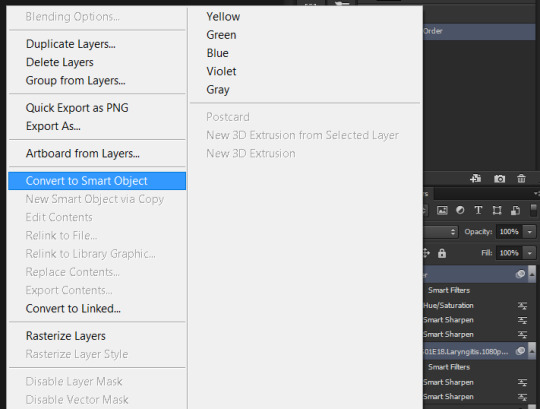
First, I made a copy of the glass shatter smart object, because I'll need that later. Then, I pulled in frames from the scene that I wanted to appear in the hole after the glass shatters, and I used those to create a new smart object with my gif action (we'll call it Scene-bg). I pulled Scene-bg into the same window as the glass shatter objects. Then I created a new smart object by combining one of the glass shatter objects with Scene-bg, which I did by selecting both layers right clicking, and selecting "Convert to Smart Object".
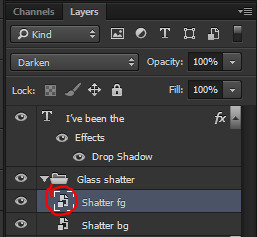
I renamed this smart object to Shatter-fg. I opened it by clicking on the little icon next to the layer name in the layers window here:
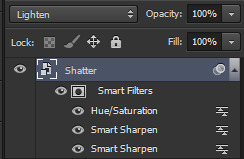
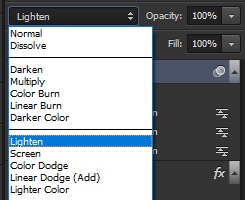
The most important thing here is that the shatter effect object should be the top layer, and I set the mode to "lighten". This will make sure that the lightest colour of either this layer and the layer behind it is displayed; that means that anywhere that's white in our shatter animation will still show up, but anywhere that's black we'll see what's in the layer(s) behind it.
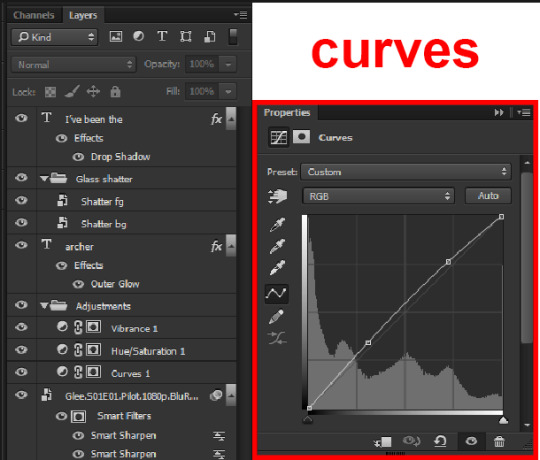
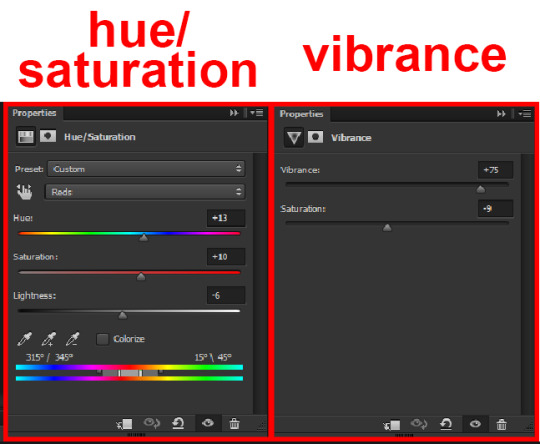
Then I threw some adjustment layers between them to get the colouring I wanted. I used a curves layer, a hue/saturation layer, and I also added text with an outer glow layer effect. Here's what the layer order looked like and the settings I used for each layer:
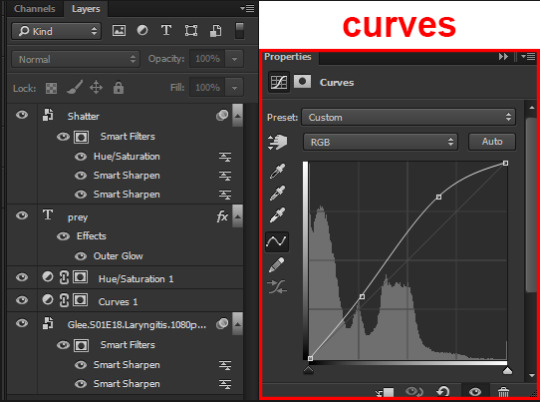
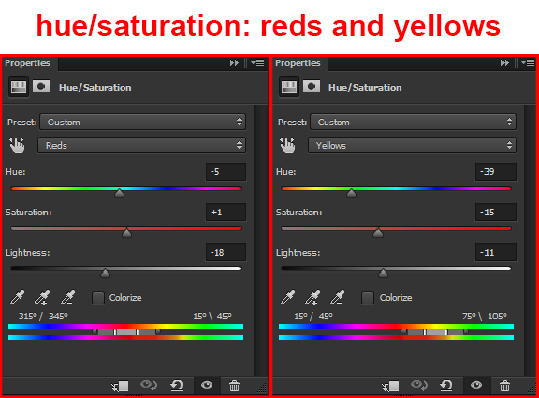
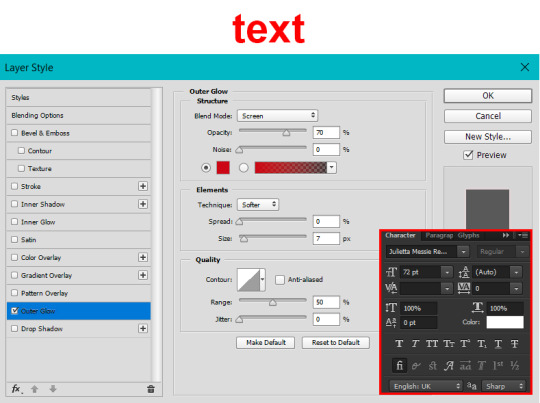
After this process, Shatter-fg looked like this:

Okay nice, this is starting to look like something! I saved this and went back to the main file with the other glass shatter object.
I needed to invert that other glass shatter object. There's a weird quirk with the version of Photoshop that I use where it doesn't like it when I apply specifically an invert adjustment to a smart object (it appears correctly when editing, but not on export) so I did this by creating a new smart object which included a separate invert layer, but if you have a newer version of Photoshop you can probably just apply the invert adjustment directly. Just note that you'll need to do one of these options; it won't work if you add a separate adjustment layer in the main file, it needs to be applied specifically to the smart object (which we'll now be calling Shatter-bg). It looked like this after I inverted it:
Once that's done, I made sure Shatter-fg was the layer directly above Shatter-bg, and set the mode of Shatter-fg to "darken" and Shatter-bg to "lighten". Since Shatter-fg is set to darken, it will be visible only when it is darker than the layer behind it. By setting Shatter-bg to lighten, I've guaranteed that the layer behind it will always be lighter (ie, white) in the places we want Shatter-fg to be visible, and will be black otherwise. Once I update those settings, this is what the gif looked like:
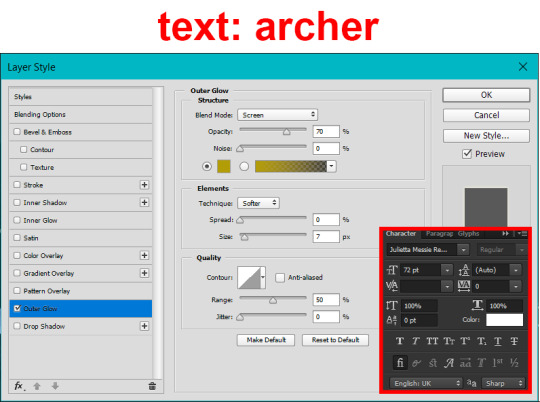
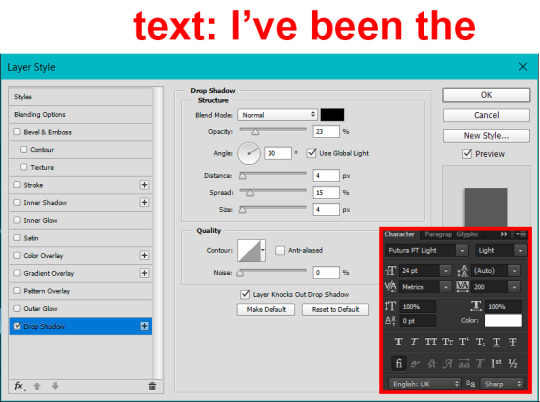
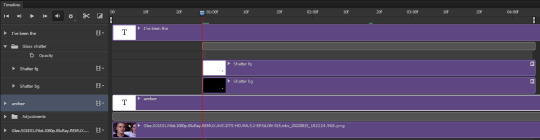
This is all there is to the glass shatter effect itself. Next I pulled in frames from the second scene to fill in the black areas. This layer needed to go below both glass shatter layers, so that it only shows through where the black. Then I added adjustment layers and some text. I used curves, hue/saturation, and vibrance adjustment layers, and I also added the "archer" text below the glass shatter layers so that it would be hidden to reveal the "prey" text. The other text I added above all of the layers, since I wanted this to be visible all the time. Here is the layer order and all of the settings I used for each of the layers:
I also grouped Shatter-bg and Shatter-fg and shifted them on the timeline so there would be some time to see the background gif before the shatter effect starts.
And that's all! Then it''s just a matter of exporting the finished product:
This is the first gifmaking tutorial I've ever made, so I hope I was able to be reasonably coherent and helpful! I'd love to hear if you make anything by following these steps, or even if you just feel like you've learned something reading through this. And if you have any outstanding questions, feel free to reply or send me an ask and I'd be happy to answer!
#gifmaking#tutorials#gifmaking tutorial#gif tutorial#photoshop#photoshop tutorial#usergif#gleesource#my tutorials#mine#how to gif#tw mark salling#mark salling tw#not tagging as glee because it's not actually about that but wanted the tw tags just in case#this was so much more effort to put together than I thought it would be lmao#I was like oh yeah I've already made the whole gif I just need to go back and explain how I did that...#it took A WHILE#anywayyyy it was fun though so I'm glad I did it#would love to know if anyone finds this helpful or interesting or tries out the effect or something similar!#you can also just grab the black/white gif I included above if you want to do the effect since I can't find the video... sorry lol#but yeah you have my permission to steal the black/white gifs for gifmaking purposes if you would like#just don't like. post your own tutorial claiming you made it or something?? but like you don't need to credit me or anything obviously.#ANYWAYYYY#I feel like... a LITTLE pretentious thinking I'm good enough at making gifs to be qualified to make a tutorial#but like it's fineeee everything is fine#gonna finally post this now enjoy byeeee
109 notes
·
View notes
Text
How to fix the ugly coloring in Stranger Things 4 on Photoshop in less than 2 minutes.
Not guaranteed to work with every scene, but worth a try.
#stranger things#stranger things 4#gifs#gif coloring#coloring tutorial#color correction#photoshop#photoshop tutorial#my tutorials#my videos
32 notes
·
View notes
Text
Photoshop Tutorial - Alternate way to make gifs

If you have a version of Photoshop that does not allow you to use Import Frames to Layers or Load Files into Stack, this tutorial is for you! Please note my laptop isn't the greatest, so I couldn't record in the best quality, but I hope you get all the information that you need. Enjoy!
youtube
#photoshop tutorial#gif making#gif tutorial#photoshop gif tutorial#photoshop#photoshop cs6 extended#tutorial#my videos
16 notes
·
View notes
Text
Transform your designs with a chalk effect in Photoshop! Learn how with Graphic Designer India.
For more tips and tutorials,
visit : https://www.instagram.com/virtualrealdesign
visit our website: https://graphicdesignerindia.in/
#designer#graphic design#photoshop#phototshoptutorial#photoshoptips#tutorial#art tutorial#art tip#art tools#graphic art#tips#design tutorial#viral video#viral#viral trends#trendingnow#reels
2 notes
·
View notes
Text
scale & split tools (my beloveds): a mini tutorial
as promised, I'm sharing a stupid-simple but highly satisfying & time-saving way of making your GIFs perfectly symmetrical, customized to highlight exactly what you want, and for making multi-GIFs without having to export/re-import GIFs...ever!
#gif making#gif tutorial#video tutorial#photoshop#photoshop tutorial#gap the series#freenbecky#again- be gentle people 🤪#i hope this helps you as much as it's helped me!#mor's tutorials
56 notes
·
View notes
Text
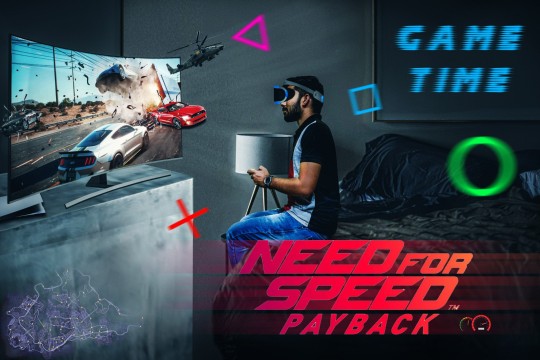
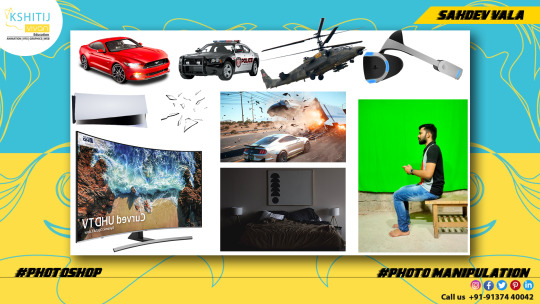

Photo Manipulation
#Adobe #Adobephotoshop #photoshop #kshitijvivan #sahdevvala #artwork #Photoshoptutorial #photoedit #photoediting #graphics #graphicdesigner #designer #creativegraphics #creativedesigner #creativedesign #educationvala #education_vala #parthsir #educationvala.com #educationvalanews #creativeagency #socialmediabanner #socialmediabannerdesign #photomanipulation #creativephotomanipulation
#adobe#kshitijvivan#photoshop#sahdevvala#photoshoptutorial#educationvala#photomanipulation#manipulation#photo manipulation#educationvala.com#education vala#parthsir#sahdevsir#photo manipulation tutorial#photo manipulation video
6 notes
·
View notes
Text
9 notes
·
View notes
Text


I did a sorta tutorial thing on creating simulated Demon Lord Reincarnation (PC) screens by Photoshopping the original high-resolution, full color public domain Javardry character art: https://youtu.be/aZcSCRTzWSA?t=68
#demon lord reincarnation#art#character art#javardry#photoshop#tutorial#game#game art#games#video game#video games#pc game#pc games#making
3 notes
·
View notes
Text
youtube
Okay I finally finished the thing I recorded my last digibash for... It's a video tutorial!
I wish the audio quality was a bit better, but with any luck it's at least watchable
#Youtube#maccadam#digibash#transformers#video#tutorial#i didn't mention it in the video but you don't have to use photoshop#i've used gimp in the past and it works just as well
2 notes
·
View notes
Text
#Photoshop#photography#newpost#frases#letras#wattpad#movies#punk#film#goth#soft grunge#90s#tutorial#tiktok#Video#Viral#Tumblr#poets on tumblr#trending
11 notes
·
View notes
Note
dreamy, i want to start using screencaps (i've been using the import video frames to layers) but i can't seem to find a free software for windows :( do you possibly have any recs?
oh boy.
i do have a recommendation! i use mpv which is a player u can get for free! however. the setup is a bit complicated and can be Very intimidating and scary. but i would 100% recommend it bc once u got thru the setup it's extremely easy to use and works very well
i recommend following this tutorial but if u need any help feel free to dm me i can walk u thru it if u want
#like i'm a tech savvy person and i wont even lie setting that up was scary#like they pulled out the command lines and i was like girl if this is a virus that's gonna be my 13th reason#but it's all good and now it works fantastically#so def do give it a try if u feel up for it#personally i would say tho that u don't _need_ to work with screencaps unless u use 4k files#like i can't see any difference tbh it's just a different method#but it's def useful to know!#as i said do hit me up if u think it's scary or need any guidance that the tutorial doesn't provide bc I KNOW#oh also u don't need to use import video frames to layers as long as the video is not too long u can just slap the video in photoshop#and work on it directly. btw#asks
3 notes
·
View notes
Text
its already out click in the link below
youtube
Reimaging memories: learn how to colorize your black and white photo | photoshop tutorial
its already out click in the link above
#photoshop tutorial#photoshop#adobe photoshop#youtube tutorial#learn photoshop#photo edit#beginner photographer#colorized#tutorial#digitalart#photoshop tips#photoshop template#adobe#learning#photography#photoshoot#photographer#photo editng#video editing#Youtube
4 notes
·
View notes
Video
youtube
beetle color
#youtube#video process#tutorial#digital painting#digital drawing#study#painting#nature#photoshop#huion#process#art
3 notes
·
View notes
Note
How do you mąkę your gifs that they are ALWAYS such an AMAZING quality? Do you mind sharing your proces?
first of all thank you so much!! and yeah sure I can!!! I only use topaz clean when it comes to performances on music show or if the video is shitty af, when the video is shitty I use smart sharpen with topaz clean and when it's not I only use smart sharpen (1st one is lens blur, amount: 500%, radius: 0.3 / 2nd one is gaussian blur, amount: it depends, radius 10) I suggest to play with the sharpening bc it depends with what you’re giffing, the quality etc… I tempt to add an other smart sharpen layer sometimes too with the same settings as the first one especially when you gif with HQ videos, BUT I don’t use the same settings at all for all the videos, and I dont know about the others but I think the sharpening really depends on the colouring, it’s not very clear, but the colouring made it all!
#I hope it's clear bc enligsh aint my first language#i use photoshop and vapoursynth for the gifmaking you can find any tutorial on tumblr or youtube its really pretty much the same for everyon#everyone*#especially for the kpop giffers#when it comes to movies i think ppl tempt to use a screencapping method#who consists of importing picture by picture on photoshop a scene instead of a video#you can find a tutorial with that too
4 notes
·
View notes
Last Seen Blogs

purplepost-blog1
Cup Of Tae

prouddly-me
Transition Diary
ineffable-ace
dawn breaks like a fallen vase

mighty-cacy
Darling Little Idiot
moeji
m o e j i 🌿