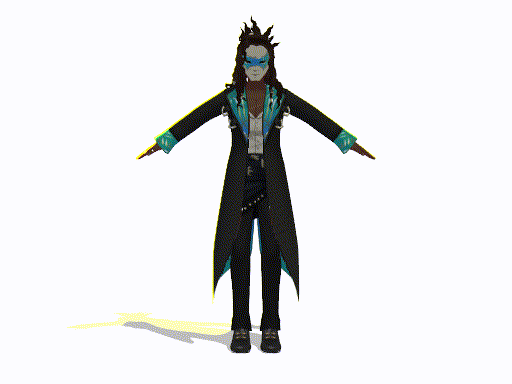
#Tool Model 3D Models for Projects
Explore tagged Tumblr posts
Visit Tumblr Blog
Explore Tumblr blogs with no restrictions, modern design and the best experience.
Last Seen Tumblr Blogs


Fun Fact
The average Tumblr user visits about 67 pages every month.
Text
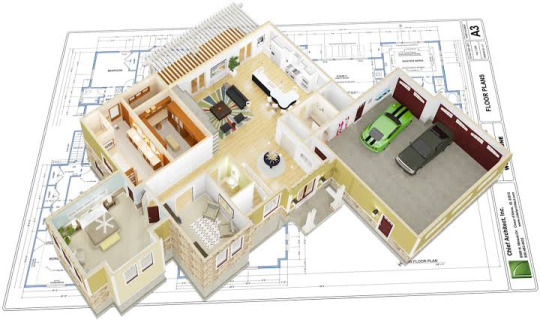
Top 5 Home Design and Construction Software
The home design and construction industry has evolved significantly with the advent of technology, leading to the development of sophisticated software tools that enhance design processes, improve collaboration, and streamline project management. Here, we explore the top five home design and construction software options available today, highlighting their features, benefits, and suitability for…
View On WordPress
#3D modeling software#Archicad review#architectural design tools#architectural visualization software#AutoCAD for architects#best home design software#BIM software#CAD software#Chief Architect features#collaborative design tools#construction project management tools#construction software#home design applications#home design software#interior design software#residential design software#Revit alternatives#SketchUp benefits
0 notes
Text
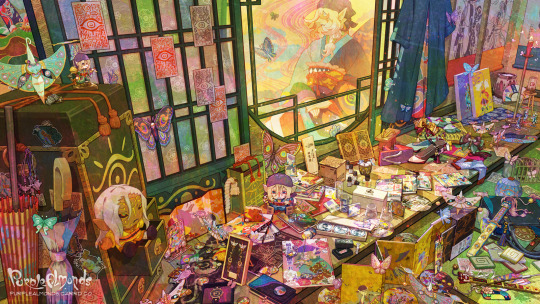


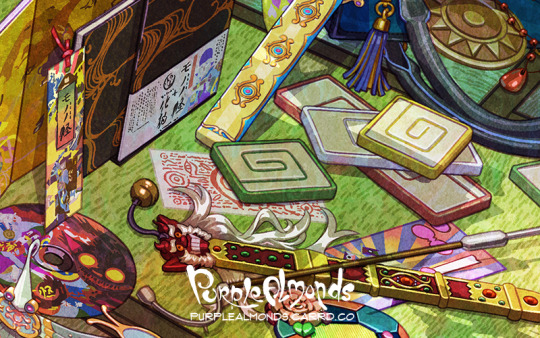

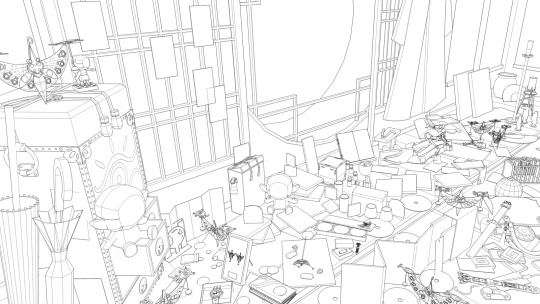
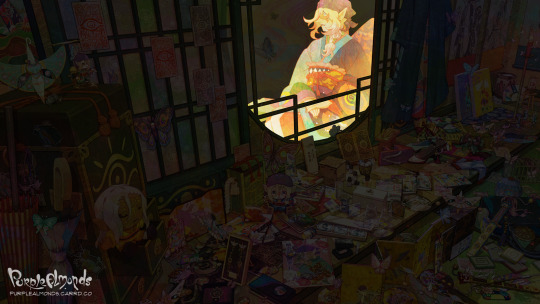
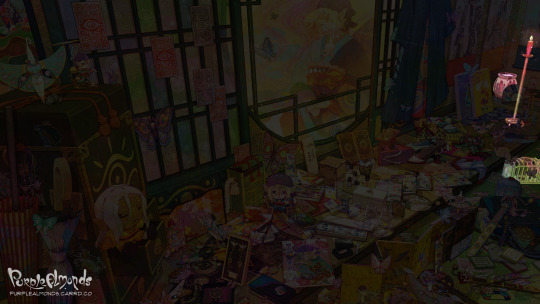
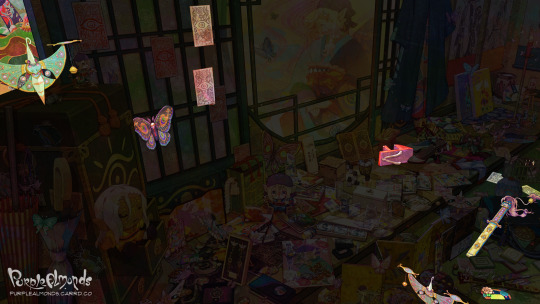
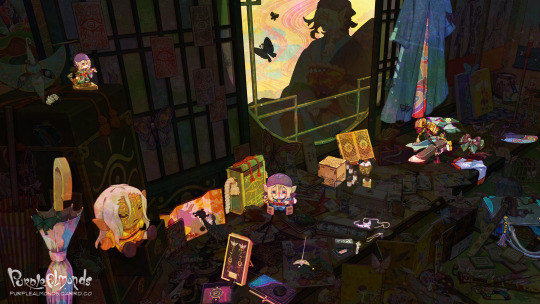
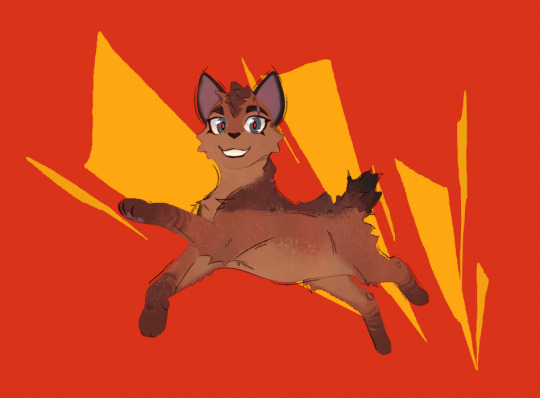
Finished this just in time for the new trailer drop! This is my Mononoke illustration featuring assorted merch from the anime, movie, and stage play! How many can you recognize? ⚖️👹
(Yes, please send answers in the replies! Answers, progress pics, artist commentary will be drafted on a separate post when I'm less tired) ⭐️ UPDATE 04/03/24: Abridged artist commentary is now available under the cut! For the full version, please see the Google Doc linked in the replies.
👁️Overview
Late last year, I rather belatedly discovered Mononoke’s 15th anniversary came and went, and with it, an entire swath of new content to manically pore over. This is an illustration of the various Mononoke merchandise, props, and set dressing I discovered.
---
🔎Scope
Some fun facts regarding the work that went into this illustration!
Not including research time, this project ran for roughly two months, consuming much of my waking hours outside of my full time and freelance jobs.
While the illustration does not depict all of my findings, it does feature over 120 unique props and set dressings!
The majority of the props and set dressing were modeled to varying degrees of detail in SketchUp.
To model prep, I often put together schematics on Photoshop or Illustrators. Some were created from scratch. Others were created with the liberal usage of the Photoshop transform and perspective warp function.
The master file is 1.5GB. The dimensions are 6400x3600 at 300 dpi, and contains over 2,200 layers.
Near the end of production, the master file became so unwieldy I created a separate working file. This way, I could create assets lag-free then import the layers into the master file.
---
Past this point is where most of the commentary cuts were made for the sake of brevity. Again, look in the replies for the Google Doc link containing the full version with a table of contents for easier navigation!
---
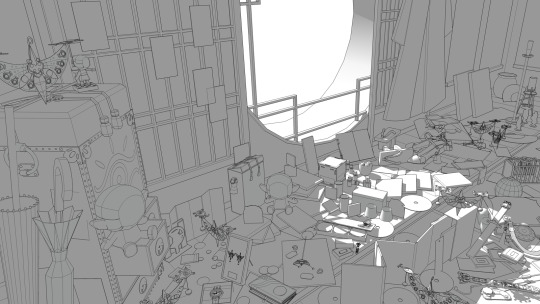
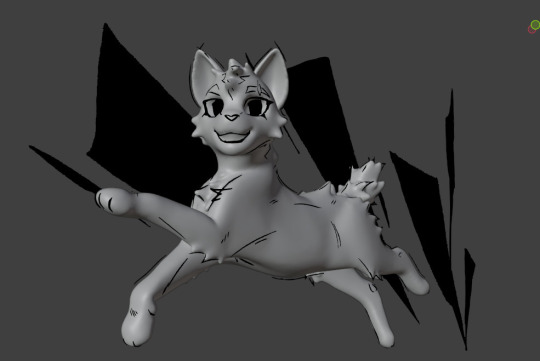
🗳️3D Layout
As you can see, the backbone of this illustration is the 3D model. I spent perhaps 30-40% of my production time on this stage.
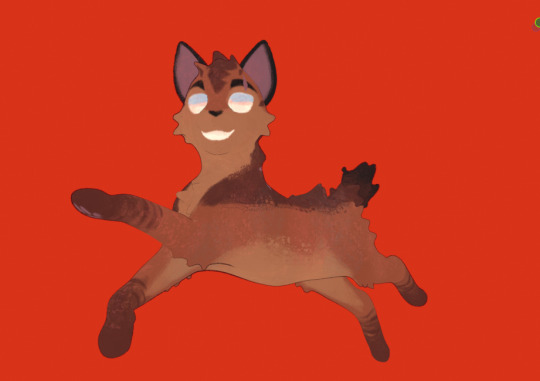
And this is the lit version. The lighting ultimately got downplayed in favor of showcasing the vibrant colors. I like how simple it looks though!
---
🎬Production-Based Set Dressing
In addition to merchandise, I wanted to insert set dressing and props from the various Mononoke productions.
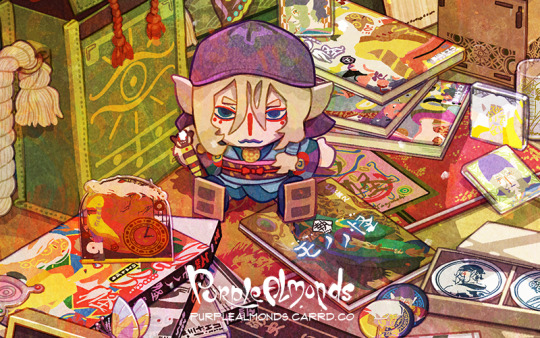
🦊Kusuriuri
It’s odd to have a section dedicated just to him, but his unique appearance warrants it. His garb and overall appearance is an amalgam of the anime and movie. The original intent was ambiguity– kind of like the blue/black vs. yellow/white dress phenomena a few years back. But after doing the color flats, I rather liked how the rich, unaltered colored fit with the overall composition so it became more blatant. I’m surprised that nobody has commented on this since I published the illustration. Maybe because I didn’t feature him in a close-up?
🐈 kai ~Ayakashi~Bake Neko (2006)
Finding props iconic to this story arc (outside of the Kusuriuri’s tools of trade, of course) was somewhat difficult. While the environment was richly decorated, it mainly consisted of 2D artwork which I wasn’t keen on retracing. I opted to paint objects that characters interacted with or featured heavily in the show.
Salt Jar
Candlestick
Rat Trap
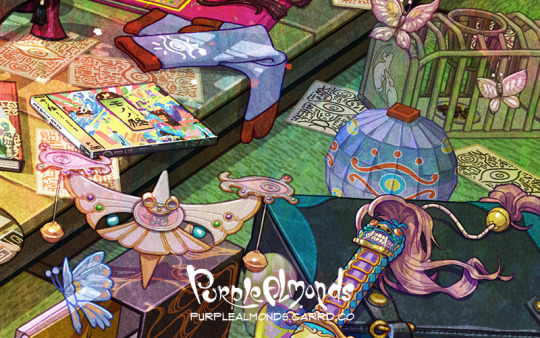
🦋Mononoke (2007)

The props fall into three distinct categories here: Kusuriuri’s tools and trinkets; things featured in the opening and ending credits; and objects iconic to each of the five story arcs in the series. I tried to keep most of them clustered on the tatami, but as space grew scarce some props trickled up onto the deck as well.
Medicine Box
Exorcism Sword
Tenbin
Paper Talisman
Mirror
Ring
Geta Sandal
Necklace
Paper Umbrella (Zashikiwarashi)
Daruma Dolls ( Zashikiwarashi)
Gunpowder Ball (Umi Bozu)
Smoking Pipe (Nopperabou)
Genjiko Blocks (Nue)
Train Ticket (Bake Neko)
Lantern (Anime OP)
Butterflies (Anime EP)
☂️Mononoke: Karakasa (2024)
Pretty slim pickings for the new movie since I only had the teaser, first trailer, and movie poster to reference from. Kusuriuri’s tools of trade were a given, but finding memorable and narratively significant objects was a tad troublesome.
Thankfully, the set dressing ended up (however subconsciously) strikingly similar to the movie’s environment design, down to the green tatami and multicolor shoji screen. I suppose at this point I was so immersed in Mononoke content that its aesthetics subconsciously informed my design choices!
Exorcism Sword
Tenbin
Paper Talisman
Comb
Movie Poster
Butterfly (Custom design)
---
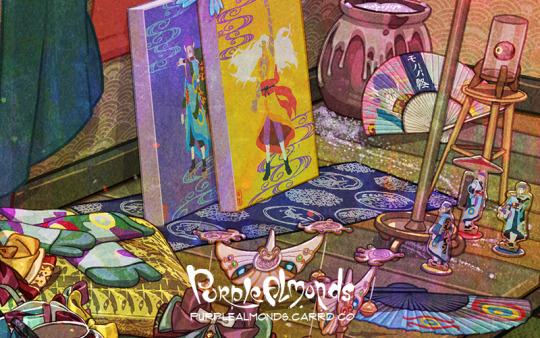
🪭Official Merchandise
Goods related to canonical narratives and/or productions.

🎊15th Anniversary
Mononoke Shu - A light novel by Hideyui Niki & illustrated by 2964_KO
Whiskey Glass & Box
📖 Key Frame Art Books by Hashimoto Takashi
Ayakashi Key Art Frame Book (2010)
Key Frame Art Book vol.9 (2017)
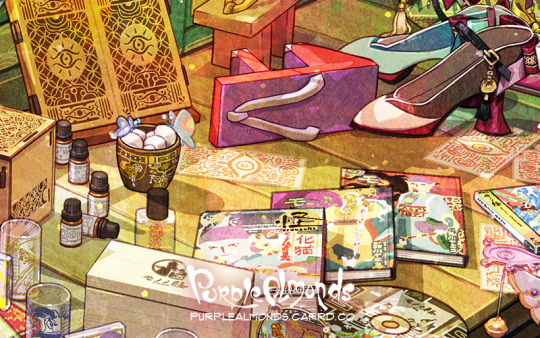
📚Manga by Yaeko Ninagawa
Kai Ayakashi: Bake Neko Vol. 1-2
Kai Ayakashi: Mononoke Prequel
Mononoke Vol. 1-10
🎭Butai Mononoke
Bakeneko Pamphlet
Zashikiwarashi Pamphlet
Zashikiwarashi Acrylic Standees
Zashikiwarashi Manegi
💿Physical Media
Official OST CD
DVD Box Set
Yokai Pattern Fabric
---
Common Collab Merchandise
This category consists of goods that are generally more affordable and feature graphics from the source material with minimal alterations.

Amnibus
Wall Scrolls
Tenugui Fabric
Shot Glasses
Minoyaki Bean Plates
ANIGA-TER
Stickers
Can Badges
Canvas Prints
Anique
Diorama Acrylic Stand
Acrylic Blocks
Challenge Kuji
Kusuriuri & Hyper Clocks
eeo Store Online
Folding Fan
Keychains
Can Badges
gj character G
Cushion
Acrylic Charms
Neo Gate
Satchels
Mini Badges
Mini Badges by Mame Shinoda
---
High-End Collab Merchandise
Goods which derive motifs from the characters, props, and patterns from the production and transform them in an elevated manner through abstraction or usage of precious materials.
gj character G
Exorcism Sword Ring
Goodsmile
Kusuriuri Nendoroid Figurine
Folding Screen
Kusuriuri & Hyper Plush
Tote Bag
Kaya
Umbrella
Tenbin Kanzashi
Tabi Socks
Dress
Kotobukiya
Figurine
Mayla
Pump Heels
Kusuriuri & Hyper Hairpins
Tenbin Earrings
Hyper Earrings
Noitamina Apparel
Perfume
Tenbin Necklace
Folding Fan
Super Groupies
Purse
Wallet
Watch
Tsumuji Design
Exorcism Sword Necklace
Ofuda Bracelet
Useless Use Lab
Fragrance Set
Air Purifier
Three-Sided Mirror
#mononoke 2007#mononoke 2024#mononoke fanart#medicine seller#kusuriuri#モノノ怪#mononoke anime#薬売り#mononoke#fan art#purplealmonds#2024
1K notes
·
View notes
Text

TAUVE SIMS - BEGINNERS CC COURSE (LEARN HOW TO MAKLE CC IN 45 MINUTES)
Hey everyone!! I’ve seen many of you asking for a course on how to make CC, so I’ve been working hard to make that happen for you.
In this course, you’ll learn all the basics you need to create (for starters) a shirt but the same method can be used to make pants, dresses, and much more.
3D CLOTHING MASTER STARTER KIT
One-time purchase – USD 42
46-minute video tutorial (with everything written down, no guessing what I just said).
Includes all project files, base models for Marvelous Designer and Blender.
Premium brushes to start designing right away.
Tips that took me over a year to figure out.
Direct links to the exact tools and resources I actually use.
Checklist of all key steps so you don’t get lost during the video.
Everything is explained step by step, assuming you know nothing. yes, even how to operate Blender. (This is the shortcut I wish I had when I started.)
Not for resale or redistribution. All files are for personal use only.
BUY HERE
#sims4cc#sims4#sims 4#sims#my sims#simscas#simslookbook#simdump#download#ccfinds#ts4 download#ts4 cas#ts4 custom content#ts4 lookbook#ts4#ts4 sim download#ts4cc#ts4 simblr#ts4 screenshots#ts4 legacy#ts4 gameplay#the sims 4#sims 4 cc#thesims4#sims4ccfinds#the sims4#sims4clothes#sims 4 build#sims 4 cc finds#sims 4 cas
82 notes
·
View notes
Text
Some old art of my Owlk engineer, Eris, designing the Stranger's solar sails! Enjoy a big ramble about him and his job because I love this silly man:
Eris works on the design team for the Owlk space program, specialising in energy and propulsion technologies for the ships, satellites, and probes. Having a design philosophy of functionality and beauty, Eris enjoys going all-out with his work. He has received special recognition for his solar panel designs in particular, which borrowed from the unparalleled efficiency found in photosynthesizing plants.
When designing the Stranger's solar sails, Eris took inspiration from plants, but also the opening of insect elytra; the ballooning behaviours of silk-producing invertebrates, in which they sail from tree to tree using electric fields and air currents; and how flying creatures will use thermal updrafts to soar higher while expending less energy. Already familiar with how solar energy impacts technology from his work on solar panels, he proposed the use of this energy to propel the Stranger through space.
As travelling the distance between stars presented the major roadblock in the plan to reach the Eye (regarded as the Interstellar Propulsion Problem), Eris was lauded for his contributions, promoted to being one of the main engineers overseeing the Stranger's design.
More information about his general design process below!
When designing for a project, Eris uses all of the tools at his disposal. His first weapon of choice is always his pencil, and he will sketch out potential sources of inspiration on paper until the design concept begins to take form. Based on the initial project parameters he's been given, he drafts up a blueprint for his components.
Next, he must further conceptualise his designs. This is where the most valuable tool of the trade comes into play—the Vision Torch! Vision Torches serve many purposes for Owlks, from allowing them to nonverbally communicate to creating photographs from memory alone. Owlk engineers LOVE Vision Torches for how easy they make effectively communicating ideas. They allow concepts to be visualised in 3D, basic functionality to be shown through animations, and are even able to interface with computers. Eris might even 3D print a model using a Vision Torch to help him visualise his concepts as he works.
The space program is extremely collaborative, and Eris works on just a small part of the overall project, so being able to easily share ideas with others and see how all the individual components of a satellite or ship interact is vital. When discussing with more than a single other Owlk, Eris can use a Vision Torch linked to a holographic display to present concepts to a crowd. Concepts can also be tweaked in real time this way!

[Here's an example from the game of Owlks building the simulation with Vision Torches and a holographic display!]
With a Vision Torch, concepts can also be directly uploaded to a computer terminal. This is where a lot of the real work gets done - calculating weight, materials needed, stress testing in simulations, calculating trajectories, making precise tweaks to finalize the design, you name it. This also allows other Owlks working closely with Eris to access the most current design for their own tests.
This is an iterative process - as other Owlks finalize their components, as weight limitations are further restrained and material needs are calculated, Eris often has to go back to an earlier step and rework his concept. Fortunately, he thoroughly enjoys getting to be creative in his work (and doing math) and treats every project as a puzzle that needs to be solved! The only time when he's not excited to go back to the drawing board is when a last-minute adjustment from his peers means he needs to work long hours to get his work done in time for launch.
#outer wilds#outer wilds spoilers#echoes of the eye#echoes of the eye spoilers#outer wilds oc#my art#eris#my workaholic son#someone needs to tell him to take a break#please
68 notes
·
View notes
Text
dont worry guys i figured it out 👍
If i ever learn how to make hairs i swearrrrr i swear it will be so over.
#basing this off of a hairstyle i whipped up in vroid studio in about 5 minutes#which i like a LOT being able to 3d 'sketch' a hairstyle using the vroid tools#and then i can have refs of it from whatever angle(s) i want bc its a 3d model#doesnt look like you can export the hairstyles as an obj anymore but thats fine i was gonna have to remake them for the sim head anyway#now the real challenge is gonna be FINISHING the project#i am... very hard to motivate#simoleon
17 notes
·
View notes
Text
I'm not quite confident enough to do a tutorial on my 3d stuff cuz I'm new and still fighting uphill against my lack of blender knowledge, but heres a little breakdown to help visualize the scene in my last post for those curious.
Heres the fully rendered scene.
This is the scene in the viewport shading. It doesnt look this way when I'm working on it, but this makes it more obvious whats a traditional 3d model, and what are the drawn grease pencil elements.
A little horrific lol, but this is the scene without any of the grease pencil turned on. The model is textured like a regular model. Ucupaint is a free addon that has made texture painting in blender much easier. I don't spend much time on the topology, and I just use the smart UV project instead of unwrapping manually. Once this stage is complete, I move on to drawing the grease pencil elements :)
While I do use a paid addon, specifically Deep Paint, to model and for some materials, plus the texture painting brushes that come with it, its absolutely not necessary to do stuff like this. The GP to Mesh tools in Deep Paint are my favorite, and the creator does offer GP to Mesh as its own standalone addon thats way cheaper than Deep Paint. I have to shout it out because its been so helpful.
48 notes
·
View notes
Text
Falling and Filament
Pairing: Harry x Designer reader (curvy or plus size whatever you feel they should look like. This is my preference 😌)
Summary: He loves watching you work but there will always be casualties
Word Count: 1.3k
Warnings: Minor burn injury. Fluffy 💗
✨masterlist✨ read the rest of Harry x Designer Reader there
...
Harry was always in awe of your artistic endeavours. Every time he thought he had seen it all, you’d surprise him with something new—whether it was sketching intricate designs, sculpting digital models, or, his personal favourite, watching you bring those 3D models to life. The fact that you could design something on a computer, print it physically in just an hour, and hold the finished product in your hands was nothing short of magic to him.
But today, instead of watching you create, he was watching you fix—crouched over your 3D printer, sleeves rolled up, hands skillfully unscrewing tiny parts as you diagnosed whatever issue had put a pause on your latest project.
Harry sat on the floor beside you, his chin resting on his palm, completely fascinated by the whole process—even if he didn’t fully understand what you were doing.
“I swear, Y/N, I think you could build an IKEA shelf in under an hour,” he mused, watching as you carefully adjusted a setting on the machine.
You chuckled, eyes still focused on your work. “That’s easy if you have the instructions and a little patience.”
Harry scoffed. “Yeah, except IKEA furniture is impossible—too many tiny parts, too many confusing details. How do you make sense of stuff like this?”
You didn’t even look up, just shaking your head with a small laugh as you continued your work. “Because I like problem-solving. Besides, once you do it enough times, it’s just second nature.”
Harry watched as you pushed a thin plastic string through a tube, demonstrating with ease. “What happened to your printer, anyway?” he asked.
“Oh, just some basic maintenance,” you replied. “The nozzle’s clogged, so I just need to swap it out.”
Harry frowned slightly, watching as you fed the filament through. “This is the filament,” you explained. “It’s what comes out of the nozzle to form the print.” You gestured toward the machine as a small blob of plastic sluggishly oozed out of the tip. “See? It’s clogged. It should be coming out in a steady, clean stream.”
Before he could ask another question, you grabbed a small tool and began unscrewing the copper nozzle with practiced precision.
And then—
“Ow!”
Harry’s head snapped up. “What? What happened?” His voice was immediately laced with concern.
You shook your hand out nonchalantly, blowing on your fingers. “The nozzle slipped. It was still hot.”
Without hesitation, Harry reached for your hand, gently cradling it as he examined the small red mark where the nozzle had landed. His brows furrowed, and without thinking, he blew softly over the irritated skin. “Be careful, Y/N, please,” he murmured, his voice softer now.
You smiled at his concern, shaking your head. “Harry, don’t worry too much. I’ve done this a million times. When you work with your hands, you get used to a few injuries here and there.”
“That doesn’t mean you should keep burning yourself,” he mumbled, still holding your hand like he could protect it from any future harm.
You gave his fingers a reassuring squeeze before pulling away to finish the job. With a few more careful turns, you secured the new nozzle into place, giving it one last check before straightening up. “And… done.”
Harry watched in amazement as you ran a quick test, the printer coming to life with a soft whir. The filament now flowed smoothly, a perfect, clean stream extruding from the nozzle.
You turned to him with a satisfied grin. “Now I can finish my other projects. C’mon, you can watch me.”
Harry stood, shaking his head in disbelief but smiling nonetheless. “You’re ridiculous,” he said fondly, wrapping an arm around your shoulders as you led him toward your workspace.
...
A little while later, Harry found you hunched over your latest 3D print, carefully slicing off imperfections with a precision cutter. He leaned against the table, watching you work.
“But I do wish you were more careful,” he said, frowning slightly as you dragged the blade along the plastic, removing small bumps from the surface. “You already burned yourself today, and now you’re using a sharp tool on a tiny piece of plastic.”
You snickered, not even looking up. “I actually do know when to stop, you know.”
Harry arched an eyebrow. “Oh yeah?”
You nodded, still focused. “It’s when I get too angry.”
That made Harry pause. “Wait—what?”
You giggled at your own ridiculousness, finally looking at him. “If I’m getting too frustrated, I know it’s time to stop before I accidentally take off a whole chunk of my model… or my own finger.”
Harry groaned, running a hand down his face. “That’s not reassuring, love.”
You just grinned and turned back to your work. “Relax, I have it under control.”
“I don’t know if I believe you,” he muttered. “You did just burn yourself like twenty minutes ago.”
You shrugged, pressing your lips together to hide another laugh. “That was a heat-related incident. This is a precision-related incident. Different categories.”
Harry let out an exaggerated sigh. “Bloody hell. You’re going to give me a heart attack one day.”
You just smirked, holding up your freshly cleaned 3D model. “And yet, you love watching me work.”
Harry crossed his arms, shaking his head but smiling nonetheless. “Yeah, yeah. Just don’t make me have to call for medical help, alright?”
You shot him a wink. “No promises.”
And with that, you turned back to your project, Harry staying right by your side, watching with equal parts amazement and exasperation as you worked your magic.

Later that evening, the two of you were curled up on the couch, a quiet moment settling between you. The TV was on, but neither of you was really paying attention. Instead, you were absentmindedly tracing your fingers over Harry’s hand, feeling the rough texture of his fingertips.
“Well, your work does have casualties too,” you mused, pressing your thumb lightly against one of the hardened spots. “Your fingers are so calloused from playing the guitar.”
Harry smirked, flexing his hand under your touch. “Part of the job, love.”
You hummed thoughtfully, still running your fingers over his. “And, you know… you fall a lot, Harry. I’m surprised you haven’t broken an ankle yet.”
Harry gasped dramatically, placing a hand over his heart. “How dare you?”
You grinned. “I dare because I’ve seen the videos. I’ve seen you trip over nothing—on stage, on the street, probably in your own house.”
Harry rolled his eyes, but his lips twitched in amusement. “It’s called commitment to the performance. If I fall, I do it with style.”
You laughed, shaking your head. “No, Harry. You fall like a baby deer learning how to walk.”
Harry groaned, flopping back against the cushions. “Unbelievable. My own girlfriend, bullying me.”
“Just speaking facts,” you teased, poking his cheek.
With a mischievous glint in his eye, Harry suddenly grabbed your waist, flipping you onto your back as he hovered over you. “Alright, let’s talk about your track record, shall we?”
You gasped in mock offense. “Excuse me?”
“Oh, don’t think I’ve forgotten about you burning yourself earlier. Or the time you dropped your phone on your face. Or when you tripped over your own 3D printer cord and almost wiped out.”
You let out an indignant squeak. “That was one time!”
Harry raised a brow. “It was last week, love.”
You groaned, covering your face. “Okay, fine. Maybe we’re both accident-prone.”
Harry chuckled, leaning down to press a kiss to your forehead. “Match made in heaven, then.”
You peeked at him through your fingers. “Yeah, yeah. But if you ever actually break something from falling, I told you so.”
Harry smirked. “And if you ever lose a finger to that cutter, I told you so.”
You both burst into laughter, tangled together on the couch, fully accepting that neither of you was particularly graceful—but at least you had each other to soften the blows.
...
I need to include more design jargon in this series.
#harry styles fluff#harry styles husband#harry styles imagines#husband!harry#harry styles smut#harry styles#harry styles blurb#harry styles blurbs#harry styles one shot#harry styles fic#harry styles fanfiction#harry styles x y/n#harry styles fiction#harry styles fanfic#x reader#harry styles au#one direction fanfiction#solo harry#harry styles x gf!reader#harry styles writing#harry styles x you
66 notes
·
View notes
Text
Obscura boys 3d model notes/process 😝😝
With the final dude created and this little project coming to a close I thought it'd be fun to put together a little overview with some of my thoughts about each one

Up first we got Oleander
I decided to do oleander first because I knew he would be the most annoying. And he was. Though I'm not sure if that's moreso because of him or because he was the third vroid model I made ever. He definitely took the longest but I also think he turned out really nice 😋 as long as you ignore his jacket clipping through itself every time he moves
4/10 overall experience
After oleander I made Keir because he is boring. because his black and brown color pallet and practical fashion sense seemed like a nice pallette cleanser. Though I never could've imagined just HOW FUCKING ANNOYING HIS GIANT BOOBS WERE OH MY GOD TRYING TO DRAW STRAIGHT LINES ACROSS HIS MASSIVE HONKERS WAS A NIGHTMARE THEY WARP AND DEFORM EVERYTHING WITHIN A 10 MILE RADIUS��️‼️‼️‼️‼️ also his hair was super annoying but it was doable. He probably took the least amount of time all together but I kept putting it off so it took way longer
6/10 overall experience
After Keir I made Francesco because I asked on the discord who I should make next and 1 person said Fran 😎😎😎 he went pretty fast I felt, maybe it was because I was getting the hang of vroid finally or maybe it's cause I was listening to Pinkerton. it all went pretty well except for THAT STUPID FUCKING MIDDLE PART OH MY GOD YOU WOULDN'T THINK IT WOULD BE BUT IT WAS THE WORST HAIRSTYLE I HAD TO MAKE HANDS DOWN NO COMPETITION AND THEN WHEN I CONVERTED HIM TO PMX ALL THE PHYSICS WERE WHACK AND HE LOOKED LIKE HE HAD HORRIBLE STATIC CLING SO I HAD TO FIX HIS HAIR AND EXPORT HIM A SECOND TIME‼️‼️‼️‼️ but other than that he was smooth sailing and very polite
8/10 overall experience
And last but not least Cirrus
Ok I think I cheated for this one.. Like there's this vtuber named Pallas in the discord who already made Cirrus assets for vroid and they graciously let me use them so I didn't have to make the scarf, the shoes, or that dangly charm thing he has which are all the hardest parts so all I really did was make the hair, the mask, and the robe which I did lickety split😝😝😝 I'm not complaining though
9/10 overall experience
WAIT WE'RE NOT DONE YET🤯🤯🤯🤯 BONUS MODEL

my vespersona Lepidoptera
She was the second vroid model I made ever and she has the jank to prove it 😎😎😎 but without her the other dudes would not exist because what's the point of making 4 boyfriends if there isn't somebody for them to be 4 boyfriends for. And I guess I also learned a lot about making textures and using the hair tool and vroid in general and the separate program that can make textures transparent even though I didn't use it for any of the obscura dudes
I don't really have anything to say about her process besides making your own ocs is a cakewalk compared to characters you didn't make because you know what their back looks like even if you haven't drawn it
8/10 overall experience
Ok now I'm done 😋 thanks for reading
#ok i did technically make a model between my first one and lepidoptera but he was so simple i dont think he counts#obscura vn#original character#my art#obscura game#vespersona#lepidoptera (oc)#cirrus obscura#otome game#obscura keir#obscura oleander#obscura francesco#rotten raccoons#obscura vesper#vroid model
57 notes
·
View notes
Text
How to Add 3D Models to TS3
Required Applications:
Blender - https://www.blender.org/
TSRW - https://www.thesimsresource.com/workshop/
Milkshape & Plugins - https://sims3tutorialhub.tumblr.com/resources
NVIDIA Texture Tools, Photopea, or GIMP (or anything else that allows you to save an image as a .dds file)
Recommended:
S3PE - https://www.simlogical.com/ContentUploadsRemote/uploads/189/ - Used to make = object base game compatible and available in CAW
Sims3Multi Pack Extractor - https://modthesims.info/d/364038/delphy-s-sims-3-pack-multi-extracter-updated-5th-sept-2009.html - Used to convert a sims3pack into a package file
This will also require showtime, since the object we will be cloning will be from that pack. I'm not sure if there's a base game object with a light/illumination map that we can use. If you don't want the windows of the building(s) to light up or anything lighting up on whatever object you are adding then you can try and find a base game object to clone.
Step 1: Export .obj file from Blender
Step 2: Import .obj into Milkshape
Step 3: Rename object in Milkshape to group_0, then export file as .wso (in order to export it as a .wso, you need to have the TSRW plugins for Milkshape installed)
Step 4: Open TSRW - Create New Project - Choose Object
Step 5: Under The Sims 3 choose Uncategorized Objects under Object by Category. In the search bar, type in 'hill' and choose the 'Sign City Hill' object. Name your project (make sure to rename both project name and title)
Step 6: First, choose where you want your object to show in the catalog. I just choose decor (function category) and miscellaneous decor (function sub category). Go to the mesh tab and using the button of the box with the green arrow, import your .wso file. For the first pop-up click yes. For the second, click no.
Step 7: Under Group 0, click on the three dots beside 'material'. This is where you will import your textures. Before doing so, you must make sure the images are in .dds format. Simply add your image into any application that supports importing/exporting .dds files. I personally save with BC3/DXT5 compression and don't keep mipmaps. Some say to save the mipmaps, but because I use 2K textures it adds a lot more to the file to save them so I don't. Once you've got them in the correct format, import them into the object's materials. For the detail map I simply import a small blank white texture. The diffuse is the main color texture, the multiply map is the ambient occlusion map (if you do not have it, I'm pretty sure you can just add a blank white texture too), and the self illumination map is what allows part of the mesh to light up. If you do not want anything to light up you can just add a plain black texture. Click done and exit out once all textures are replaced.
Step 8: Click the drop down that reads 'high level of detail' and choose the shadow lod. Click on the blue arrows beside the import icon. A pop-up will show; check the box under medium detail and click ok. You will see that once you've done that, the object's shadow will change.
Step 9: Click file - save as and save .wrk file (just in case).
Step 10: Export to Sims3Pack
Extra - Make Object Base Game Compatible
1. Convert .sims3pack to .package using Sims3Multi Pack Extractor
2. Open S3PE and open package file you want to edit
3. Find OBJD tag and double click on it
4. Change group number to 0 and click ok.
5. Save package
Extra 2 - Make object appear in CAW
1. Open S3PE and open package file you want to edit
2. Find OBJD tag and highlight it by clicking on it once
3. At the very bottom of the window, click on 'Grid'
4. Click the arrow beside 'CommonBlock' to open the tab
5. Beside the version, change the C to E and click commit
6. Reopen the 'Grid' and go back into the 'CommonBlock' tab. If you scroll down, you will now see 'IsVisibleInWorldBuilder', change it from false to true.
7. Scroll down until you find 'BuildCategoryFlags'. Replace the number with 0x00008000.
8. Click commit and save the file.
Let me know if you have any questions! TSRW is very finicky and sometimes things can go wrong. There are some things that I may not know how to fix, but I will try my best to help.
37 notes
·
View notes
Text
Katelyn the Firefist
ITS FINALLY DONE
I'm not gonna lie I feel like you guys only made Katelyn win the poll because of the same name thing as like a joke but I think it turned out pretty good
I spent about 8 hours on this drawing alone, plus another 6 or so on other references and studies and I used procreate with only the default brushes
I referenced primarily Vi, Jinx, and Leblanc for her face and studied a lot of Noxian soldiers for the armor
I took the background from this fortiche because there was no way in hell I would have had the energy to draw it
I'll probably upload the speedpaint later this week if you guys want
also if anybody wants to try this out with another character here are some tips I've found
Use the Lasso Tool for the hair just trust me it's gonna be the most difficult part of shading and picking out shapes
whatever character you base the eyes off of DO NOT REFERENCE ANY OTHER PART OF THEIR FACE, otherwise it's just gonna look like that arcane character in a different wig
reference concept art as well as screenshots, as well as any other fortiche projects in the same artstyle like the KDA music video or the Seconds animatic
anyone who says you need a special brushpack is LYING, if you actually know how to render I know you can just use a round brush but I used a square brush and an dry ink for the details cause I'm not as good at it
no matter what you do it's not gonna look perfect because in reality if you wanted to draw the same character multiple times and be consistant you need to get a 3D model and THEN do the painting and just pose the character, which I would actually do if not for my laptops inability to open blender
#theladyofrosewater#art#minecraft diaries#mcd#aphblr#aphverse#mcd katelyn#katelyn the firefist#aphmau
75 notes
·
View notes
Text

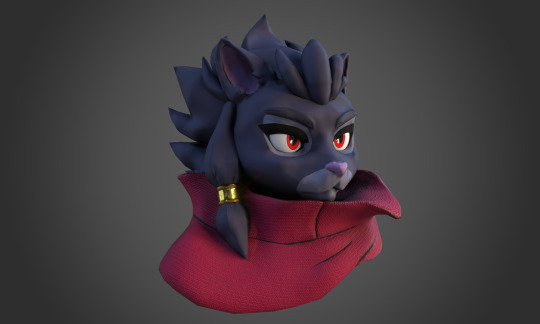


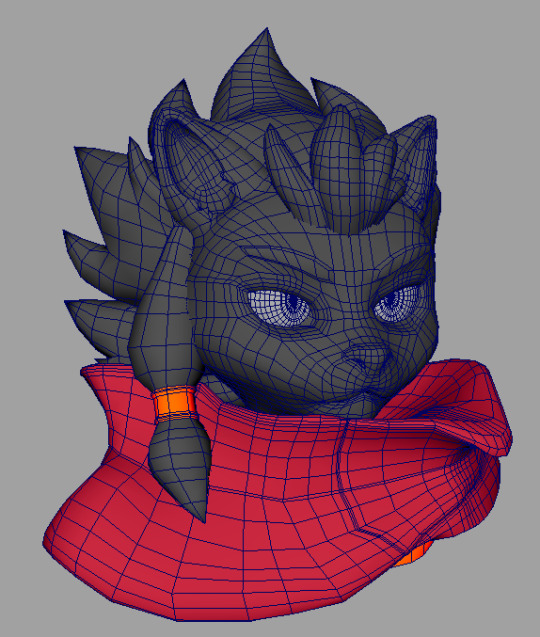
It's time for my once-a-semester update on why I've been so slow to post lately! I've been learning Zbrush for college, and I've been hard at work mastering the tools to make this Clairen model you see here!
For the class, we were asked to pick an existing character we could find reference of and model them throughout the semester. I picked Clairen from Rivals of Aether, because she's one of my favorites, she's got enough of a furry face that I get to try to adapt the human-oriented lessons to a different structure, but bipedal enough that I don't stray too far. I had a fun time getting used to all the little aspects of digital sculpting.
I then got it 3D printed for my college's student showcase! Picture 2 is actually the print on display at said showcase. I also showed off Mainframe and my recent group project Prison Break there (Prison Break will get its own post toward the end of the semester), along with my animations from last semester. It was a fun time!
Clairen was modeled using ZBrush, with a lowpoly bust modeled in Maya and textured in Substance Painter.
Rivals of Aether belongs to Aether Studios.
#rivals of aether#zbrush#3d printing#3d modeling#clairen#panther#furry#3d printed#digital sculpting#digital art#my art#fan art#anthro#fanart#rivals of aether fanart#rivals of aether 2#3d model#maya#autodesk maya#substance painter#render
46 notes
·
View notes
Note
Hello! Big fan. I was curious if you have any advice for learning topology?
my biggest piece of advice is "learn how to do everything manually first and only automate once you know how it works so that you can tell when it's gone wrong." because some of the automatic tools like decimate will absolutely fuck you up and nobody talks about that. a lot of the time it's better to use things like dissolve edge so you have control over things. there are even parts of meshes I triangulate by hand because I want to make sure the crease isn't cutting into the silhouette weirdly.
my second biggest piece of advice, especially when working with video games/mods, is "always start with fewer polygons than you think you need." it's easy to get lost in the sauce on small details but a lot of the time, especially with older or more stylized games like TS4 and Skyrim, less is more and the textures/normals will do a surprising amount of heavy lifting in terms of conveying shape and detail. It's also a lot easier to add a few loop cuts or subdivide than it is to cleanly reduce your poly count if you've overdone it, so start with big shapes and only add detail/refinement where it's needed. which is why I pretty much always box model instead of sculpting when I'm making meshes for mods.
As for generally learning how to do it from the ground up, I'd highly recommend checking out some youtube tutorials on it, this one is great for learning the basic fundamentals/terminology you'll run into in most other videos and it's useful in general if you're new to 3D modelling:
youtube
and this is one I particularly like for applying those basic principles in an animated/character mesh; the video deals with topology for a humanoid face but the principles can be applied to animals or pretty much anything else that needs to move and bend (the rest of the series is good as well):
youtube
if these don't work for you there are a ton of other options out there, so if you just search youtube for topology tutorials you'll probably find something that suits your needs/learning style. topology is good to know no matter what kind of project you're working on but it's especially important if you're making stuff for video games/mods where you really want to optimize your mesh as much as you can.
20 notes
·
View notes
Note
Are there any primitives or operations you wished parametric CAD software had?
This is tricky, because parametric CAD is what I learned to design on so its feature set feels "natural".
I don't really think so! Most of the obvious innovations are already covered, SolidWorks can take a model back and forth between parametric and primitives modelling in its own weird way, Inventor has really great design for manufacture features, from what I've seen SolidEdge has done some clever stuff with the solver to help you design parts that are customizable as you go down the chain. Who knows what's going on in NX these days, not me. There's definitely some holes in the sense of individual packages lacking features, but almost anything you can ask has been implemented somewhere, by someone.
Good quality design for manufacture tools really do help, I remember doing sheet metal stuff in Inventor back before they cut off free Inventor access and being able to see your generated sheet and bend allowances so clearly was great, and now even OnShape has pretty solid design helpers.
A thing small shops and hobbyists would probably like is better handling of point clouds and photogrammetry for matching parts, since you're much more likely to be working with parts and projects where you didn't do all the design, I've spent many hours trying to accurately model a mating feature, but even that's like. Pretty good these days, importing 3D scans into an editor is pretty standard and the good CAD packages will even let you pick up holes and clean up point clouds directly from the scan.
I'm not that much of a mech eng, and never really was, my CAD is mostly self taught for simple tasks, real mechanical designers no doubt have better opinions on this, @literallymechanical probably has thoughts on T-splines.
37 notes
·
View notes
Text

One page about Eiyu Club film "Battle Holography Wind" from HEROINE magazine Volume 2 (2004). This edition focused on independent heroine tokusatsu production companies such as Eiyu Club, Center Island, and more.
English translation below the cut:
[Text in upper right corner with red and yellow background]
Indie Heroine Special Edition!!
[Black text in the middle of the page, and then the large, headlining orange text below it]
The spirit of a righteous female warrior dwells in 3D images!
Battle Holography Wind!
[Text below middle-top image of Wind and the enemy facing off]
Apparently, she even fights heroes. According to the setting, it seems the characters battle each other via 3D projections.
[Text directly below the hand of the largest photo of Wind]
This masked heroine stands out with her flashy coloring. The body armor attached to the upper half of her body is really cool.
Wind has often been in dangerous situations, which makes us nervous, but she's pretty tough. Keep an eye out for Wind's cool movements! The suit actresses of Action Team “IF” are incredibly skilled.
[Text below far left top image of Dekanattan and Wind fighting]
A terrifying monster appears. Wind is in a desperate, life-or-death situation. Man, this creature… It's huge.
[Text to the left of image of Wind holding a large pencil]
Wind is the result of a collaboration with Action Team “IF”. She is a battle heroine who engages in fierce showdowns with both monsters and heroes. Her agility in action scenes is far better than other heroines, and the battle sequences also reach an impressive level. She's truly a model battle heroine.
[Text below image of Wind holding a large pencil]
Wind’s movements are so cool that once you see them, you'll become addicted.
[Text in yellow “data” box]
Battle Holography Wind (2003)
Wind is a holographic character born from the futuristic fighting 3D game machine "Character Tool". Today, she fights powerful characters with her unique weapons. (This work is a film adaptation of the original heroine Wind created by Action Team IF”, and is presented as a joint production with “IF”.)
[Text above bottom image of Wind kneeing Dekanattan]
This monster is seriously intense. Will Wind overcome the odds and defeat the giant beast, or will the monster come out on top? You’ll have to watch the film to find out. Personally, I think it’s amazing to see a heroine stand up against an enemy that’s bigger and stronger than she is—but at the same time, I kind of want the monster to win too.
[Text directly below Wind’s main large image]
Free Video Group
Eiyu Club
Wind
A character created with the futuristic 3D fighting game machine "Character Tool." "Character Tool" is a game in which characters created on a computer are projected in 3D and made to fight each other. Characters have basic profiles such as monsters and heroes, and on top of that, individual abilities are set to make them into your own character. Wind is a compact female character, but is agile and highly skilled.
(Appears in Battle Holography Wind)
[Text to the right of the bottom image of girl in a schoolgirl uniform]
This is Mio Misaki's debut work. She also played the role of Luna in "Ausencia Memoria". She looks cute in her uniform.
[Text below group picture of the crew]
A commemorative photo after the shoot. Everyone looks like they're having a great time. I wonder if they shot this in a park somewhere?
13 notes
·
View notes
Text
Hey trans and queer and wonderful people, did you know that you can make anything you want? Did you know that you have a mind that can imagine and learn and a body that is able to use anything as tools?
Sewing is amazing and so useful, you can make your clothes fit better or fix up old or secondhand pieces to keep them lovely and wearable for longer!
If you learn to crochet, you can make anything from cool bracelets for the homies to big ol blankets and cat toys or stuffies. Personally, I've got a cat who chews cables that aren't protected, so i crochet rainbow yarn around em or use green and add leaves for decoration.
If you draw or do papercraft you can make drafts for larger projects that you need to ask for help with, you can bring your wildest dreams into as much detail as you care to put the effort for.
If you 3d model you can do shit i cannot even concieve of as a 2d creator and that FUCKS you're cool and i respect u from a distance bc the software y'all use hurts my head but you know you're lit as hell.
If you cook, host, mix beverages of any variety, you create threads between people and i adore you, you're so important. Draw your people together and be love, create beautiful spaces in time, that skill is so special and wonderful.
There's so many other ways to create, there's so many things you can do and be able to look at with pride and a sense of satisfaction. You deserve that shit. You're wonderful. I love you.
#trans#transgender#lgbtqiia+#lgbtqia#lgbtq#lgbt#pride#for every hateful anon i get i will make more and more of these posts#y'all aint doin shit to me#i love me and i love my community
25 notes
·
View notes
Note
PLEASE SHARE ART TIPS
Art tips have arrived <3
1. Sketch from real life, this means sitting down and taking 20 minutes to sketch what’s on your desk or the view outside your window. Work loosely and inaccurately at first but then slowly start to focus more on the details.
2. Learn to see the shapes that build up an object or creature. Work on something that is small and relatively simple like a cube or cylinder at first and then slowly work up to animal legs, planes of the face, or human anatomy.
3. I highly recommend adding diversity to your work! try and include a variety of styles, body types, races, features and cultures! This can ONLY improve your art as you’re learning how to work with different shapes and colors. The only thing to consider with this tip, is that if you are going to depict real people or cultures (whether directly or indirectly) you need to research and make sure you’re doing so in a respectful way!
4. If you like a certain creators artwork and you want your art to look like theirs find a small part of their art and try to fit it into your own style, for example, the way that the show arcane shades the eyes, or the way that into the spiderverse uses small dots and lines to add texture.
5. TRACE TRACE TRACE! trace 3d models, photos you’ve taken, reference images. it’s totally fine to trace as long as you’re being legal and professional about it by this I mean DONT TRACE OTHER ARTISTS WORK unless you have permission! You are free to trace my work and even use it as a reference image or a compositional reference if you’d like!
6. Draw for yourself and no one else! Take the time to create projects or pieces simply bc you want to. Don’t let people pressure you into sharing your work if you don’t want to, and remember that your creative work has inherent value no matter how ‘good’ it is.
7. Art can be so many different things and it is a tool that you can manipulate to your liking. If you’re unhappy with how your art looks, try drawing something in the opposite of how you usually draw it. If your current style has highly stylized features, see what happens if you try and draw the features smaller.
8. Don’t throw out your earliest art! You’ll wanna look back on all your progress! I still have my first sketchbook ever and boy howdy is it such a jump from then to now. It’s quite encouraging to look through how much you’ve improved!
Hope these helped anon <333
21 notes
·
View notes