#also pro tip: make a folder like that
Explore tagged Tumblr posts
Visit Tumblr Blog
Explore Tumblr blogs with no restrictions, modern design and the best experience.
Last Seen Tumblr Blogs


Fun Fact
Mobile US users spent an average of 115.8 minutes on Tumblr app monthly.
Note
i just wanted to pop in and say that you just seem so brimming with life and emotion and color and i was wondering how you generated it all because golly, that's a lot of personhood. excellent work. keep being vast
oh thank you! this was really lovely to read & it brightened what’s otherwise been a little bit of a shit week. so, just for you, i wrote up a how-to.
a 10-step guide to being vast:
step 1: be a person with a complex & unique way of experiencing the world (you have already achieved this!)
step 2: be willing to say yes to anything* once. maybe even twice, to make sure the first time wasn’t a fluke. it will be hard and you won’t always like it, but it will be worth it.
*with consideration for your health & safety, of course. but this step is about getting you outside of your comfort zone. it’s okay to be uncomfortable.
step 3: spend time with the world. go to all sorts of places and do all sorts of things. (this does not require money, only creativity and courage.) pay attention to what happens around you. notice the big picture and the small details. look for beauty in everything.
step 4: feel what it’s like to be yourself. the sensations, the emotions. sit with them. experience them. give them names. make friends with them—even the uncomfortable ones. this is the hardest and most painful step, but also the most important in my experience. i wish i could promise that you’ll stop being sad, or afraid, or angry. that doesn’t happen. but you’ll grow into someone who’s also joyful and brave and kind. i can promise that.
step 5: try to be the best version of yourself whenever you can. remember that the best version of yourself in this moment is not always the same as in every other moment. have grace for yourself when you don’t succeed—because your best self right now would have grace for your past self’s mistakes. figure out how to take good care of yourself & do that.
step 6: ask “how?” and “why?” about everything. even if the only person you ask is yourself & your duckduckgo searchbar. don’t stop until you get an answer that makes sense. teach yourself how to do things. do them badly so that you can do them well.
step 7: practice drawing connections. now that you know these two things, how are they related? now that you have these two skills, how can you use them together? this is a tough skill, but it’s critical to being an active force in your life.
step 8: make friends with interesting people (this will happen naturally as you work through these steps). and then, be vulnerable. text first. love hard, even when it hurts. let them be vulnerable too. life is too short to hold things back. remember that nothing is required, but everything is permitted, and you get to make your life look however you want. above all, be kind. not nice—kind. and remember to be kind to yourself, too. repeat step 5 as often as necessary. it will be necessary, and that’s okay.
step 9: tell me* about all of it. get really specific. if you don’t have the right words, look them up. if it’s funny or an emergency you can make up new ones that feel right.
*this is a genuine offer. i would love to hear about it all. but it could also be your journal/therapist/best friend/cat/followers who read the tumblr tags. just make sure you put it outside of you somewhere so it doesn’t get stuck.
step 10: congrats! you’re a vast, complicated, interesting person who’s brimming with life and emotion and color!
#feel free to reblog this actually i DO think it’s good advice for people#askposting#k talks#this is going in my little folder of things i look at when the world doesn’t feel bright to me anymore thank you#also pro tip: make a folder like that#everything that’s ever made you go ‘oh. this makes me really feel good about myself :)’#print it out or save screenshots to a google doc or phone photo folder or write it down or whatever works for you#it’ll be good motivation for when the going gets rough#and before anyone says ‘oh op clearly doesn’t have x’ wrong. i have all of those things and probably some extras you didn’t even think of#kay’s guide to living a big life
27 notes
·
View notes
Text

As storytellers, realism and continuity are important to us, and they're sometimes hard to achieve within the confines of the game. I’m personally a big fan of posing Sims in open doorways, and unless you want to be limited to the CC options that exist, you’re stuck having to make some poor Sim walk in and out and pausing at just the right moment for the desired effect. But it’s actually very easy to edit a door in Blender to make your own open version!
I initially learned about "posing" objects from surelysims' Wicked Whims posing tutorial, which I highly recommend as a whole. However, it might be a little overwhelming to learn a whole new posing system for the sake of a screenshot or two, which is where this tutorial is meant to come in. Some of my explanations might seem overly simplistic, but I wanted it to be approachable even for beginners. I am far from an authority on using Blender or making CC, and I'm sure there are flaws in this process or easier ways to achieve certain things, but it works well enough for my purposes and I hope it will work for yours too. 💗
Now, onto the tutorial...
Figure out what door or gate you want to create an open version of. If it’s from the vanilla game, all you need to do is make note of its name. If it’s CC, find the package in your mods folder, make a copy, and paste it into My Documents > Sims 4 Studio > Mods. This will allow you to find it in S4S in the next step!
Open S4S. On the main screen, make sure “Standalone Recolor” is checked under the “Object” button, then click the button.

A new window should pop up (if it’s your first time doing this, it may take a while to load). At first, it will show every single object in the game. If you know the name of the object you’re looking for, you can use the search bar to find it. You can also use the filtering options to narrow the selection down by category, game pack, and whether it’s vanilla or custom content. Here, I’ve filtered the search to only base game doors. Once I find the door I want to adjust, I click on it and hit “Next.”

This will pop up a window prompting you to save a new file. Place it somewhere you know you’ll be able to find it easily later and name it accordingly. This file will ultimately contain your mesh edit, so you don’t want to lose it! I suggest placing it in a dedicated folder, on your desktop, or in your Mods folder directly.

On the next screen, you’ll be looking at the contents of the package itself. For this tutorial, you don’t need to worry about grabbing anything but the mesh. Click on the “Meshes” tab and then “Export Mesh.” You’ll again be prompted to save.

Open the mesh file you just saved in Blender. (If the view is funky to start, I recommend hitting 1 on your keyboard’s number pad to get a forward-facing view.) [It should also be noted I’m using Blender 3.6, so my screenshots and the location of certain settings may be different than in earlier or newer versions.]
You’ll see that there are actually multiple meshes involved (and the number can vary from object to object). Right now, we’re only concerned with the “rig.” If you’re familiar with posing, you’ll know that all Sims have a rig that is used to move different parts of their bodies around. Objects also have a rig, and objects that can open will have “bones” that control their moving parts. So click on “rig” and then change “Object Mode” in the bottom corner to “Pose Mode.”


Now, if you hit A on the keyboard, it will select all bones and you can see where they’re located. As far as I can tell, all doors have two bones that control their swinging movement. They both do essentially the same thing. I tend to stick with the top bone, which is called something like “bind_doorSwing.”

Pro-tip: If you’re having trouble seeing or selecting the rig's bones, you can change the view on the right side of the screen to “dope sheet.” Then when you save the position of the bones, just like when posing a Sim, by selecting all with A then clicking I and selecting “Location & Rotation,” the list of available bones will pop up there.


Rotate the door open using this bone or bones, if it’s a double door. On double doors, I recommend rotating each side individually rather than trying to rotate them together, as you may get unexpected results. You can use the R+Z combo on the keyboard to limit the direction of movement. (You can also use this in combo with numbers to swing them more precisely. For example, if you want a 45 degree swing, you can press R+Z+45.) Specifying the Z axis allows you to only swing the doors open and closed while restricting their movement in other directions.

Once you’ve got the doors swung open to where you want them, hit A to select all bones, then hit I and select “Location & Rotation” to save the position. (If you’re a poser, this maneuver is already familiar to you - and you know how important it is! If you skip it, the new position won’t save and the doors will revert back to closed.)

That’s it! You don’t have to do anything else to the mesh. Save your file in Blender. If you want to keep it separate from the original door mesh, save as instead and name it something different. (This is why you may want a dedicated folder, since the number of files does add up!)
Reopen the package you made earlier in S4S (or simply return to it if you’ve kept it open). From the same place you exported the mesh, you will now import the edited mesh. Hit “Import Mesh,” navigate to your edited Blender file, and you should now see your edited door replace the original. Since it’s the same mesh, all the swatches will still work perfectly with it.

You’ll notice that you’ve only replaced the “LOD 0 (High)” version of the mesh. When you click the drop-down menu, you’ll see that there are also medium and low detail versions, as well as shadow meshes at all levels of detail. If you’re only making an object for personal use, you don’t have to worry too much about LODs. You can probably just import the same mesh into LOD 1 and LOD 2 and be fine (so long as your computer isn't a potato). And if this is just for you, I honestly wouldn't even touch the shadow LODs.
The only other thing you might do is go back to the “Catalog” tab and alter the object name so you can find it easily in the game catalog. You can also edit the description, price, etc. if you so desire. Hit “Save.”

Test in game! If the package isn’t already in your Mods folder, move it there. As long as you didn’t mess with any of the tags, it should still be in the door section of build mode and work perfectly as a functional door. The door swinging animation will look different, and you could probably get rid of it if you wanted, but that’s above my current skill level and I don’t think it’s really necessary for our purposes. If all you need is an open version of a very specific door for storytelling purposes, it gets the job done.


(First screenshot: doors swung open as intended, second screenshot: doors swinging in the opposite direction as they’re walked through)
These steps can also potentially be used to create open versions of other in-game objects like gates, books, chests/boxes, etc. I’m only just beginning to experiment with minor mesh edits, but once you get the hang of it they can often be faster and easier than trying to line up the best circumstances to get the perfect shot in-game. I might make more tutorials for small edits like this that help with storytelling realism and continuity in the future!
#ts4#sims 4#ts4 storytelling#ts4 tutorial#sims 4 storytelling#sims 4 tutorial#this is the first tutorial i've written so do let me know if anything's confusing!!!#*tbw
276 notes
·
View notes
Text
Simverses Blowtorch Mod Updated+ Updated Empty Save file

Maxi's worlds emptied of era specific stuff – made for simmers who wants themed hoods of their choice.
Now updated for EP 17 & 18 - Ravenwood & Nordhaven
NOTE: This mod must be installed in your Game Files, not the Mod Directory. See included Documentation PDF for instructions.
So, you found T.O.O.L, the super useful mod by Twisted Mexi, and learned how to decorate your sim world.
But there is this problem with Maxis houses and items, which do NOT fit in your sim world. So far, the most used method has been to hide them, as in either move them away (if even possible) from sight or use a hider/override to make them invisible. That method has its limits, is very tedious (need to find, make an override, ect. , and there are SO MANY items)
Blowtorch has another approach. It takes out the items (houses, vehicles, modern deco, well - all silly deco really) from the world. You can then place nicer deco or game items instead.
The items are not hidden from catalogue, so you can place the same items back but in a different place if you so wish. Or use cc deco. Make the world medieval, or Victorian, or sci-fi, or whatever.
HOW DOES THIS WORK?
This mod edits the preloaded deco in the world. It changes game files – and the changes will affect all your saves, old and new. If you decide that you want the deco back, you can do it either with the GAME REPAIR function or using the backup of the original folders that I included in the Blowtorch zip.
You can either use all my edited files – or the ones you want. If you for example want Willow Creek to be as it always has, but want a blowtorched Oasis Springs, just delete the Willow Creek files before installation, and keep Oasis Springs. In the included Documentation PDF there is a list with all the subworlds - their in game names and their names in the game files. (PRO TIP: Do read the documentation file.)
I have blowtorched almost all the hoods in the worlds, both EP and GP: s (See list below for exceptions.) If you don’t have all EP/GP I recommend to delete the ones you don’t have before installing.
(Save the zip with the mod somewhere safe so you can add new worlds when you add a new EP/GP with a world.)
Here are some general rules I went by:
- All landmarks, architecture deco, street deco, vehicles, with special effects - blowtorched
- Functional objects: outside tables, playground items, and such – blowtorched. Place them again where you want them!
- All lights, both streetlights and built in hood lights, blowtorched.
All palm trees, ever pink trees, wispy modern beeches, and other modern plants, blowtorched. (I of course kept the palm trees in Sulani and Selvadorada)
- Visual effects belonging to vehicles and other stuff mentioned above, blowtorched. No modern yachts, no airplanes.- The lights are gone. The world will be dark at night if you don’t place streetlights or such.
- ALMOST ALL THESE THINGS (not the built in lights, not moving visual effects like cars and rats) are still available in the catalog (debug, live edit) items though. So, if you still want a modern, but DIFFERENT hood, you can place them again, as you want them. This is a big advantage compared to hiders – those usually hide the items also from the catalogue.
WHAT I KEPT
I kept the seasons stalls, where they are available (if you have the Seasons EP.) They can also be placed, but as they are in conditional layers (changes with the seasons) this can't be done by placing them manually.
I kept all spawners. All the fishing spots and all the bugs, frogs, dig sites, wild growing plants.
Lighting mod included
This mod also includes the Sunblind lighting mod by Softerhaze. Lighting mods also change these files, so I added Sunblind with the creator's permission. Read more about their mod here.
This updated version includes the update from Softerhaze after EP 18.
https://softerhaze.itch.io/sunblind?download Read more here!
(You do not need to download or install their mod; it is included in the Blowtorch mod.)
If you want another lighting mod or no lighting mod, you need to edit the files manually.
This is done by replacing the resources “Sky Box Texture Data” and “World Timeline Color” in each world file.
ECO LIFESTYLE NOTE!
Unfortunately the Evergreen Harbor world that came with Eco Lifestyle (EP 9) has some special evil magic and the deco needs hiders anyway. If you play with that world and want it to be BLOWTORCHED, install the file ELHoodHidersMerged in your Mods folder.
Other recommended mods:
Check out T.O.O.L and Twisted Mexis other mods here: https://twistedmexi.com/Mods/
To add deco stuff outside lots:
T.O.O.L – at Tmexis page you also find information about his CAW-project, still in alpha testing.
I also recommend his Better Build/Buy mod, and his toggle mods, especially the Strangerville Story Toggle on if you want to use Strangerville as a normal world. And also his that enabled build/buy on the Secret Lab lot – in new saves.
Zerbu has a couple of super useful mods:
All Worlds are Residential https://zerbu.tumblr.com/post/173398784785/the-sims-4-mod-all-worlds-are-residential
Venue changes https://zerbu.tumblr.com/post/160347810775/the-sims-4-mod-venue-changes
Twelfth Doctor has a great mod for travelling to all the hidden/special lots, so you can edit them: https://td1sims.tumblr.com/post/635457539495084032/travel-to-venue
Q&A about Blowtorch mod
1. Can I use this on my old saves?
Answer: Yes. The mod does not affect the saves, or your CC, or anything other than the game files in the Windows directory. You can easily uninstall the mod by using the backup files (included) or do a Game Repair.
2. Why are there stuff not deleted? Annoying modern fences in Windenburg Ugly Modern Business district, for example?
Answer: some items are a part of the world mesh and is not yet possible to edit. If there will be a solution later, I will update the mod.
3. Will I have to update the mod after patches and new expansions?
Answer: Yes, probably, if the patch overwrites and updates the world files. It will NOT affect your saves and you just need to reinstall it and all is back to blissful blowtorched state.
If the patch/ep/GP does not include a new world, you just reinstall the mod (see instructions) as you installed it the first time. I will make updated versions asap when new worlds are released.
4. I don’t have EP X or Y – can I use the Blowtorch mod?
Answer: Yes, but I recommend deleting the folders for EP/GP you don’t have. See list in the PDF-file with documentation.
Where to find nice themed hood deco to use with Blowtorch?
You can basically use any item, from game or CC, to decorate hoods. Try out the options with T.O.O.L to change the size of objects!
I already posted some Hood Deco CC – and I have much more to come. I have been converting/editing/creating and preparing hood deco from Sims Medieval, Sims 2 and Sims 3 and other games – my CC is medieval/historical themed but I hope for other creators to add to the hood deco options in the future.
Download Blowtorch and see more pics on my Patreon (always free) - and again, do not forget to read the Documentation.
70 notes
·
View notes
Text

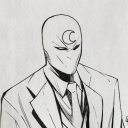
HOW TO: Make an iPhone Layout + Downloadable Template
Hi! I've gotten a few messages asking for a tutorial on my iPhone gifsets — but instead of only doing a tutorial (that would probably be triple the length this one already is), I decided to turn my layout into a template with all the bits and bobs! In the "tutorial" under the cut, I'll share everything you'll need, a free template download, and quickly go over how to use this template. :)
Disclaimer: This template uses Video Timeline and this tutorial assumes you have a basic to intermediate understanding of Photoshop.

PHASE 1: THE ASSETS
1.1 – Download fonts. These are the fonts used for all assets I've included in my template: – SF Pro or SF Pro Display (Regular, Medium, Bold): Either version works, they look nearly identical. You can download directly from https://developer.apple.com/fonts/ or easily find it via Google – Bebas Neue: Free on Google Fonts, Adobe Fonts, and dafont – Times New Roman (Bold): Should be a default font in Photoshop

Make sure to download and install any of the fonts you don't already have before opening my template. That way, once you open the template file, all the settings (font size, weight, spacing, color, opacity, etc.) are as intended.
1.2 – Download my template. Before you use my template, all I ask is that you don't claim or redistribute it as your own and that you give me proper credit in the caption of your post. Making these iPhone gifsets takes me a longgg time and turning this layout into a template took several hours too.
DOWNLOAD TEMPLATE VIA KO-FI ← This template is completely free to download (just enter $0), but if you feel inclined to tip me, I appreciate you! 💖

BTW this template also includes some of my frequently used icons!
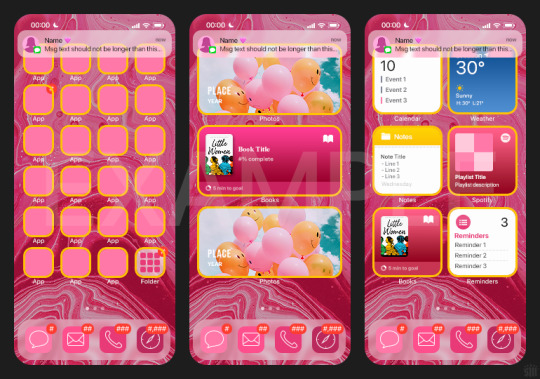
NOTE: If, for some reason, you open the template and see the pop-up shown below, click "NO" — otherwise, the fonts will be all messed up:
And if you see this triangle with an exclamation point by a text layer, don't double-click it — it'll mess up the font as well:

PHASE 2: THE GIFS
I'm just going to briefly go over gif sizes and my recommendations. Also, keep in mind when grabbing your scenes, you'll want all of these gifs to be the same amount of frames.
2.1 – Background Gif: 540 x 540 px. I recommend this size so you have a good amount of visibility for the gif behind the iPhone wallpaper. I also recommend making this black and white (or in my case, black and white with a slight blue tint — idk I just like the way it looks) so the wallpaper coloring can stand out.
2.2 – Wallpaper Gif: 230 (w) x 500 (h) px. Keep in mind the very narrow dimensions of the wallpaper! And also keep in mind that you'll have a bunch of apps and widgets covering the image. I try to use wide shots (or layer my clips into looking like wide shots). Also, keep in mind your color scheme for your set and your character's aesthetic! I tend to focus on one or two colors for the wallpaper.
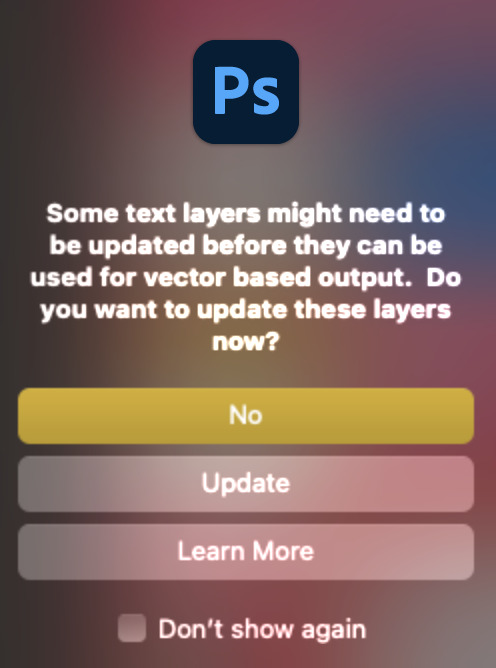
I usually position the wallpaper to the side with 20px bumpers, so there's lots of space to see the background:
2.3 – Large Photo Widget Gif: 201 (w) x 96 (h) px.
2.4 – Small Photo Widget Gif: 94 x 94 px.
PHASE 3: THE TEMPLATE – "IPHONE" FOLDER
In this section, I'll try to quickly walk you through how to use this template and some bits that may require extra instructions. I'll be going through each folder from top to bottom.
3.1 – Status Bar. Time, Service, and WiFi are pretty self-explanatory. In the Battery folder, you can use the shape tool to adjust the shape layers labeled "Fill (Adjustable Shape!)" to customize the battery level.
3.2 – Message Notification. Again, these are pretty self-explanatory. I've already masked the circle for the contact photo, so you can simply import any photo and use the transform tool to shrink it down. The circle is 24x24 px. If you don't want to use a photo, there's another folder called Default Initials.
If your message text can't fit the text box, the message should end with ellipses which is how iOS caps off long texts.
3.3 – Blurred Banner (IMPORTANT) This folder is easy to miss because there's only one placeholder layer in there. On iPhones, the area behind a banner notification and the dock get blurred (including the wallpaper and any apps).
What to do: Make a duplicate of the apps in Row 1 and/or widgets that intersect the message banner, convert them all into one smart object, apply a Gaussian Blur filter (Radius: 3.0 pixels) on the smart object, and move the smart object into this masked folder!
(There's another masked folder in the Wallpaper folder for the dock which I'll go over in that section.)
3.4 – Apps Turn off the yellow guide if you don't need it to keep things aligned and turn off layers you don't need by clicking the eye icon. Replace the "App" placeholder text with your app name, change the color or gradient of the square to compliment your color scheme, and add your custom app icon overlay!
If you can't find an app icon you need from the ones I provided, flaticon.com is a great resource. Also, if you can only find the filled version of an icon, check out this tutorial for how to make any text or shape into an outline.
Also, each app folder has 4 notification bubble options (1-4 digits). Again, you can toggle these on and off as you need!
3.5 – Big Widgets I like using these when my wallpaper has A LOT of negative space to fill. I included the Photos and Books widgets in my template, but there are lots of widgets available on iPhones. You can check some of the other ones I've done here, or if you have an iPhone, simply try adding some widgets to your phone!
There are also widgets bigger than these, but they would take up half of the phone screen which is why I don't use them for these edits.
3.6 – Small Widgets The only thing I'll say about these — because they're pretty straight forward — is there are a lot more weather themes than I included in my template. Also, if you set your character's phone to evening, the weather widget will show a dark background (sometimes with stars), so keep that in mind.
Speaking of, I've included Light Modes and Dark Modes for, I think, every applicable widget.
3.7 – Page Dots These barely perceptible dots indicate that your character has more pages of apps than shown in your gifset (so if an anon tries to come at you, you can just say "it's on the next page of apps" /j /lh)
3.8 – Dock Again, the dock has notification bubble options and I've included the default app designs, custom filled designs, and custom outlined designs for iMessage, Phone, Email, and Safari (there's also a FaceTime alternative if that's how your character rolls). These are usually the apps people keep in their Dock, but this is fully customizable too. So, if your character is, like, super obsessed with Candy Crush or something and needs it in thumb's reach — you can put it in the dock.
3.9 – Wallpaper This whole folder is masked already to a 230x500 px rounded rectangle.
Inside, you'll find another "Blurred Portion" folder for the area behind the message banner notification and the dock.
What to do: Duplicate your gif layer and place it in this folder, remove any sharpening filters, and apply a Gaussian Blur filter (Radius: 3.0 px). Be sure to add any coloring/adjustment layers ABOVE this folder and your original sharpened gif layer.
PHASE 4: EXPORT
We made it!
I hope this template makes it super easy for you to recreate this layout! If you decide to try it out, feel free to tag me with #usernik.
If you notice anything wonky about the template, kindly let me know so I can fix it! And if you have any questions about how to use this template, please don't hesitate to send me a message! I just ask that you try to be specific in your question so I'm able to answer you the best I can!
#gif tutorial#completeresources#userpickles#usersmia#userabs#usertreena#alielook#userkosmos#usershreyu#userzaynab#tuserabbie#useryoshi#usersalty#tuserlucie#usernanda#userelio#userhella#usercats#gfx*#resource*
957 notes
·
View notes
Text
in light of deviantart being pro-israel, i will be pulling all of my resources from the platform and uploading it to a very free archive. the first to be uploaded? all of my fuckin' PSD's. all free. and more will be added to this folder. this is a general archive to keep my stuff safe, but also great for anyone who just wants a trove of my PSD colorings. it is, once again, super free of charge, but you are more than welcome to tip/donate if you feel generous. idk just make sure to give my infodoc a read regarding rules and usage and an update log if you feel so compelled. again, it is free of charge, so you can input $0 if you'd like, but please do consider tipping bc i put my whole dick, balls, pussy, giblets, and other bodily fluids into this.
DOWNLOAD / PURCHASE : [ KO-FI ]
#icon psd#rp psd#free rp psd#rp icon psd#free psd coloring#psd colorings#free rp resources#idk what yall tag anymore lmfao#*#psd#psd pack#psd: poc friendly#<---mixed in btw
199 notes
·
View notes
Note
idk if anyones asked this yet but what program do you use? i wanna try get back into digital art but i have no clue what software to draw with
CRACKS MY KNUCKLES you've come to the right guy. here's a list of all the software i've used over the course of my digital art journey
apps i used on a touchscreen tablet:
ibispaint x: this was my favorite for AGES. lots of tools if you use the paid version which as far as i remember isn't very expensive. basically has everything you need for basic digital art
autodesk sketchbook: this one's also fine, not as nice as ibispaint but also has plenty of tools. it lacks a few though like clipping masks (when i used it) so i mainly used ibispaint. this one's completely free though
software i use(d) on my laptop:
medibang paint pro & firealpaca: both free, VERY similar in layout and amount of tools (medibang has a more easily accesible downloadable tool catalogue though), both very good to get into digital art on a laptop because they're very easy to navigate. i still use firealpaca for lineart occasionally cos it looks nice
krita: more difficult to navigate in a lot of places imo but also has a TON of tools. layers, folders and such ARE easier to sort through than medibang & firealpaca though! i used this one for a long time. ps when you first use it though you HAVE to look at the pen pressure curve because when i first installed it it was all fucked up and i thought i couldn't use the software at all LMFAO
clip studio paint (paid): the software i use currently! by far the best i've used. it's got a fuck ton of useful tools that can go over your head completely so make sure to scour for tips, i discover new stuff every week. despite that it has a lot of hidden tools it's still easy to navigate the basic stuff! it cost me 40 ish bucks and it was worth it 100%
31 notes
·
View notes
Note
How'd you manage to get your gifs so high quality?
Hey! So I actually struggled with this for a while, so let me show you what I've started to do. Not that I think my gifs are particularly amazing but.
Video quality
The most important is quality, try and make sure your downloading 1080p minimum. If your a pirate like me I recommend this and use this to download them. For Better Man (which is a movie) there was the 2160p, so I went for that option even if it was 26gb, it takes time to download but it's worth it.
A tip, which helps me with TV shows in particular, try and look for AMZN in the title, because their usually good quality. For a 40 minute episode your looking for a file size of at least 2gb or above.
Screenshots
Now your going to want to screenshot the scene that you want to gif, I use Elmedia Player. You'll need the pro version, which costs $19.99, it's a one time fee. In my opinion it's worth it, however you can also use VLC, but it's more complicated to set up.
If your using Elmedia Player, you want to go to settings > capture and have it set up like this:

It's important, "frame by frame" is checked because if not you wont be able to make a coherent gif. You'll also want to pick a folder in the "save screenshots to" section, to make it easier.
For example for Better Man, because it's a movie, I divided it into scenes like this:

Simply because it's easier to access everything. Otherwise if your gif'ing multiple scenes you'll end up with so many screenshots you'll get overwhelmed.
Than go to playback > record a series of screenshots. It'll take a minute so I suggest doing it section by section.
If your using Elmedia, the files will be in the .tiff format, if your using VLC it'll be .png, both are fine.
In photoshop
Cool, so now open photoshop, I'm using cc 2024, however this should work on older versions as well.
Your going to go File > Script > Load Files into Stack

Your going to get a pop up:

Click browse and select all the screenshots you want to use for this gif, I usually limit it to about 80 frames because of size. Be mindful you can only upload a gif of 10mb or less on tumblr.
Once you have them uploaded, it's going to look like this:

Hit the "sort by name" to make life easier, and than okay. Once you do that your screen should look something like this, depending on your workspace.

If you don't see the timeline at the bottom, your going to want to go to window > timeline. Once you've done that, your going to want to click, "create video timeline." You can see it at the bottom of the screenshot above.
The bottom section, is going to look like this:

You want to click at the bottom, where there are the three squares (left hand side), so that it's converted to a frame. It'll now look like this.

What you want to do next is have the frame in the timeline highlighted, and also highlight all your layers in the layer panel.
Your than going to go to this section (below) and right click.

You should get a panel (below). Your than going to click "Make Frames From Layer".

Once you've done that, your going to highlight all frames in your timeline, as well as the layers in your layers panel and click "Flatten Frames Into Layer."
Once you've done that, highlight all your frames, on both the timeline and layers panel, and hit "Reverse Frames." It's in the same section as the panel above.
What I suggest is put the new frames in your layers panel into a folder, and delete the original .tiff or .png files.
It should look like this:

Now your going to want to go to image > image size and change it to what works best for you.
Than go to image > canvas and adjust that as well.
I use this this guide created by @nonchan1023, remember it's the width which is important. The height is secondary, however for mine I tend to do 540x350/400 and 268x268.

Once that's done, your going to play around with the formatting until your image is in the right position, honestly can't really help you there it's trial and error.
Your then going to go back down to your timeline:

Click on the numbers, they usual are 0.00 before you change them, you'll see a panel (below).

Your going to click on "other" and change it to 0.06 or whatever you think works for your gif. For me I usually go for 0.06, but up to you.
At this point, your going to want to add your colouring, I can do a separate tutorial on that if people want. You'll also want to add text if you like.
I use the font Helvetica Rounded LT Std (Bold Oblique), size 18.

I then add effects to the text, by right clicking the text layer > blending options.
Stroke:

Drop shadow:

Cool, you can leave it like this if you want and head to File > Export > Save for Web (legacy) and save it as what you want. These are my usual settings:

It should look something like this:

However, if you'd like to sharpen your gif, stay with me.
Extra, sharpening gif
Highlight all the frames in the timeline, as well as all the frames in your layers panel, like this:

Click on this panel again:
And then click "Convert to Timeline." At this point your screen should look like this:

Then and this is important, right click your selected layers in the layer panel, as seen above to bring up this panel and click "Convert to Smart Object."

Your screen should now look like this:

Now with the layer in your layer panel selected, go to filter > sharpen > sharpen.
And that's it, you can now go File > Export > Save for Web (legacy) and save and it should look like this:

I suck at explaining things so I really hope this helped someone!
11 notes
·
View notes
Note
Since you don't see many edits here, and i am a dumbass in editing, could you make a tutorial on it? Like: what apps should we use, what should or shouldn't do, devices, etc. Since i personally worship your editing prowess, i couldn't help myself but ask for your guidance sensei. 🙇♀️
I don't use a "special device" to make my edits, just a computer which can run a videoediting software and Wallpaper Engine correctly (in my case it's an Apple Mac Pro 4,1 from 2009 with upgraded RAM and GPU, and also with Windows 10 installed on it, but that's not important). My server pc build out of my spare parts, and it's serves as a network bridge, and a file storge (like a NAS, or something) to store my personal files, like the assets for the edits on HPP. The way I make my edits, is a different story. I like to put the charaters in different scenarios to make the edit more enjoyable. I usually chose one image from my pre-granarated ones, or I use (if i see a, as i call an edit "suspicious" image here on Tumblr or X) an image from my "Likes", or if I can't find any which is good for the scanario in my head I generate one using PixAI's Ebora Pony XL AI model. Than if I have an image, I put together a static version of the edit in Paint.NET (PaintdotNET). Here I cut down the unnecessary and the broken (weirdly generated hands, .etc) parts of the image, and I remove the background if I'd like to use a different one. Than I chose a stethoscope png what are suitable for the edit, but I recently using the hand with stethoscope one which you can see in my recent edits. I also make some barely visble changes to the main image and the stething image. If it's done, and looks good I save them (the base image, the background, and the steting png separately) in a folder. After that it's time to "animate" the edit, which is just using the Wallpaper Engine's built in Shake effect, if that part is done, I record the animated soundless edit using OBS, which is usually a 5-6 minutes raw mp4 file. Than I put the raw recording into the video editor which is my case is the Wondershare Filmora X. I chose one of the heartbeat and bearthing audios from my server (if it's needed I modify it a bit in Audacity), and speed them up to mach with the animation. I make the breathing way quieter to have the heartbeat in focus, also i duplicate the hb sound to make a stereo effect, which means the I make the left side a bit louder and add more bass to it than the right side, which make a really good heart pulse effect (ROLL CREDITS). Also in here I add some video effects, cut down the unnecessary parts, I cut down the video to 2 minutes to become uploadable for X, than it's time to export it. After I exported the final edit, i check it for mistakes and I fix them if i find any, and the fixed version gonna be uploaded to Tumblr and X. This whole process is 2+ hours usually, but it's could be more for longer and more complex edits. But you doesn't need to follow my way to make edits, if you ever used a photo editor and a video editor before, and you know how put a transparent png on an image, and a greenscreen video on another one, you good to go. There is a lot of ways you can make an edit, so you can chose one which are suitable for you. If you still need help, you can join the Cardio Editor's Hub, there are lot of other people who gladly gives you some tips and tricks. Good luck, have fun! :D
10 notes
·
View notes
Text
Pure Adrenaline. | Insane!Katsuki Bakugou x Therapist!Reader (smut)
SYNOPSIS | When you had dropped out of UA high right before your third year of high school as a soon-to-be Pro Hero, you had signed up to train as an intern for a prestigious and high-rating mental health facility just on the outskirts of Musutafu, Japan. Making almost nine million yen a year, a five star rating among all your patients, and you loving your job, you're basically set for life! But when a familiar name slips its way into your folders, you're left dumbfounded in your office chair, memories of unwanted pasts flooding the nerves of your brain.
TW | mentions of: drugs, needles/detailed insertion of needles, chopped up body, mentions of flesh being scattered around a penthouse, blood, vulgar descriptions of sexual intercourse, hatred toward spouses, mental health issues, being in a strait jacket, mentions of abusive behavior towards loved ones, k1ll1ng. TOXIC RELATIONSHIP! DEAD DOVE DO NOT EAT! INCLUDES | Yandere!Bakugou, cnc!!!! lots of cnc!!! kn!fe play, drawing blood during !nterc0urse, slapping, 1nterc0urse on desk, f1ng3r1ng, ch0k1ng, 1nterc0urse while on the phone, d3gr4d4tion, WATERSPORTS MENTIONED, g3tt1ng caught dur1ng 1nterc0urse, dacryphilia, r3v3ng3 s3x, use of "daddy", reader and katsuki doing ahegao, cr34mp13, corruption k1nk, cnc!!!!!!!! dead dove: do not eat DISCLAIMER/S | I am not a licensed therapist nor am I studying to be one. Research is done but some details are/may be inaccurate. THERE WILL BE WATERSPORTS MENTIONED BUT NOT TO AN EXTREME EXTENT. Katsuki goes insane after the war. My first time posting on here and my first time writing in three whole executive years. Also my first time doing smut. Please be kind. Any criticisms/tips are highly appreciated.
I DO NOT CONDONE ABUSE, TOXIC RELATIONSHIPS, MURDER, OR THE USAGE OF DRUGS.
AGAIN, WATERSPORTS MENTIONED. YOU HAVE BEEN WARNED!!!

You weren’t wishing for this. And yet, the universe still took it upon itself to give it to you.
Katsuki Bakugou, your first (and only) ex-boyfriend, is on the news. But not for another heroic act like you would have expected, the opposite actually.
You remember being on cloud nine. Katsuki was your first of firsts. First hug, first kiss, first boyfriend, first time. You were lucky. You knew you were. You had everything a girl can desire: a pro-hero job opportunity with good pay, amazing classmates, amazing parents, amazing gifts, amazing boyfriend.
Except, the boyfriend wasn’t really acting like– you know. A boyfriend.
Tragic, really. It was all supposed to be true love, like what the stories say. Though you got a little confused about the “love” part.
The first signs were subtle: tighter grip on your hand, glaring at literally anybody at all who talks to you, kissing you a little too hard in public. The next signs, however, had you wondering if someone was actually out to get you: Denying you permission to go to simple parties, telling you what to wear, yelling at some poor freshman for looking at you for five milliseconds.
Then, there were the signs that lead you to finally try to break it off: yelling at you whenever you mention hanging out with anyone else that isn’t him, accusing you of cheating on him so randomly in the middle of an already bad day, ignoring you for days because he is fully convinced you’re fucking his friends, and of course, guilt-tripping you.
And every time, every ear-deafening, glass-shattering, painful argument, it always ended in sex. The routine started when you both have just turned eighteen. You couldn’t deny that it felt good. He always knew what buttons to push, what places to hold, what positions to do. But it was always the lack of aftercare and the painful things that were said after that makes you cry alone in bed, naked. With him just leaving you there, nobody to wipe your tears like he used to.
You had absolutely no idea where it came from. That’s why, after the war, just right before ending your second year at UA, you disappeared without warning. You had silently dropped out of UA, and blocked Katsuki on every and all online platforms, even making new accounts but not posting anything just to be safe. You didn’t want to leave your friends behind of course, it broke your heart at the mere thought of it. But you had to, there was no chance of you staying after he openly threatened to “kill ‘em and wring their necks all around the fuckin’ dorms”.
You left. You left and did anything and everything to stay away from Katsuki and everybody who’s associated with him.
So why, after eight quiet years, did his name pop up in your referral folder?
After glancing at his name on paper one last time, then up at your phone.
PRO-HERO DYNAMIGHT ARRESTED FOR ALLEGED MURDER OF HIS OWN FIANCE, AWAITING TRIAL | MORE THAN 10 HEROES CALLED TO THE SCENE
The letters blinked at you in red and blue. Somehow, it timed perfectly with your heartbeat, which seemed like it was pounding in your ears nonstop. You wanted to decline. You wanted to march to your higher-up’s office and demand a change in the assignments of clients. That thought lingered in your brain before three, clear knocks reverberated in the dark, chillingly blank room you were in.
One of the double doors squeaked open. A humble but tired looking police officer was peeping out the crack.
“Mornin’ ma’am. Officer Tanaka reporting for duty. I’m here to tell ya your client has arrived.” he tipped his hat off to you and you smiled subtly.
“Right, yes, I..” you clicked your phone off and slipped it into your pocket. “I’m so very sorry sir, but, may I ask a question if you don’t seem to mind?”
The officer nodded. “Fire away, madam.”
“Why, of all people, of all highly-ranking therapists in this facility, am I the one chosen for this? I don’t have the required number of patients nor cases to deal with such a high-risk patient such as this.” you looked at him pleadingly, as if to make him consider just letting another doctor handle it.
The officer cleared his throat and adjusted his belt. “Well, madam, he asked for you, specifically.”

Twenty-three minutes. Twenty-three minutes and 37 seconds have passed since you two have been staring at each other.
But those familiar, ruby eyes had been boring into your soul for what seemed like twenty-three years.
It’s awkward, no doubt. But somehow, you two had been uncomfortable enough to sit here in complete silence for whatever reason. Then, as if it was like a bomb was dropped into the room, the booming, raspy voice you’ve been so scared of hearing again spoke up.
“So, ‘s where you end up now? Some kinda looney-bin on the outskirts of the city?” You could practically hear the grin in his words. Your eyes remained fixed on his.
“A mental health facility, yes,” you stated quite professionally. You don’t know how you do it at this point, speaking like a king but faltering like a fool. One thing you do know is, that won’t fool Katsuki.
“Ain’t no need to be so formal now babe, ‘m still yer good ol’ Suki. Just got some blood on me, ‘s all.” You furrowed your eyebrows at him. He grins like he was making a joke. “Not my blood, though, so you ain’t even gotta worry ‘bout me,” he made a noise that was between a grunt and a chuckle, his biceps flexing against the chain-like restraints the government put on him. His hands, though, were bound by quirk-cancelling cuffs, which were glowing a ghoul-like cyan blue.
“I’m not here to be worried, Bakugou.” you placed a set of photos down in front of him. “I’m here to find out why you killed your fiance. That’s all I’m interested in.” You tapped your perfectly-painted white nail onto a photo labeled #1, which included the mangled carcass of what was once a human body, only now it was reduced to busted-out ribs with only what looks like to be part of one lung, kidneys, and half of the liver left.
“What did you do to her? Did you happen to use your quirk in killing her?” You look up at him again. He was blankly staring at the photo, like it was some paperwork he forgot to sign. “Well?”
“Yeah. I blew ‘er up.” You were surprised at the casualty of his tone. With an internal quiver, you opened your mouth. “Why? Did she do something?”
Katsuki guffawed. “Oh, she did somethin’ alright. First, she forced me to do things I didn’t wanna fuckin’ do.” You squinted. “Like?--” “Like fuckin’ forcing you to marry her! Then she started goin’ on and on about me not buyin’ her enough gifts. Then she started fuckin’ my intern behind my back, like I was some dipshit idiot ASSHOLE!” the chains around him shook with vigor, and you can tell he was trying to break free from the way he was trying to pull on them.
A moment of silence ensued before you spoke again. “She cheated on you, then? That’s why you killed her?”
Katsuki’s scowl curled into an eerie grin once again. “Nah, that ain’t it.”
You were starting to grow impatient. You slammed your hands on the table, and despite Katsuki flinching, you yelled at him. “Then why!? Why would you kill someone because of just that!?”
His eyes were wide, but soon they relaxed. Something evil churned in his iris as he cocked an eyebrow at you. “‘S ‘cause she wasn’t you, princess.”
Your eyes widened. Was he fucking serious? You stood up, dashing your way into the door with your breath huffing. “Alright– okay, that’s it, we’re done for the day–” you yelped at the sudden grip on your wrist and you were pulled backward just as you were making it past his table and fell on his lap, your ass awkwardly hanging in the air. You immediately pushed on his knee to try and get up, but he was quick to push you back down face-first in between his legs. You felt a strong slap against your ass and you were pushed forward, your head now hanging off of the side of his right thigh and your hips resting just right above his left.
You yelled for help but received just another spank. He firmly trapped both your wrists in his one hand and palmed your ass.
“What the fuck– let me go, you fucking asshole!” You gasped as you saw the cuffs laid there on the floor right in front of your face. You hear him laugh cruelly at your reaction. “Sorry, babe, all that yellin’s just got me turned the fuck on.” you scream as you feel his thumb hook onto the waistband of your skirt and pull them down, revealing your red thongs you didn’t even remember you were wearing that morning.
“Fucking hell, princess, you have no damn idea how much I missed seeing that fat ass,” you feel him painfully grope and slap the fat of your ass before hooking his index finger under the handle of the thong, stretching it, and letting go as it snaps so perfectly back on your hips.
“Damn, just f’me? Fuck baby, I missed you too,” You feel his breath come close to your still-clothed pussy and yelp as he blows on it. You feel yourself twitch and he clicks his tongue. “Awh, yer pussy feelin’ lonely down there? I can help with that,” despite your screams of how people were watching through the cameras, he rips the thong apart and immediately digs his fingers inside your disgustingly slick-wet folds.
“Fuckin’ slutty skank, you’ve been wantin’ this don’t you? Silly bitch thought she could run the fuck away from me for eight fuckin’ years!” Katsuki slaps your pussy harshly, sending a spray of your juices everywhere on him. A drop of those juices happened to land right on his bottom lip, and how disgustingly sexy it was to see him lick it up.
You were scared, angry, and so turned on all at the same time, that you couldn’t help but feel a familiar pressure sitting atop of your bladder and immediately squeezed your legs together. “Oi. Don’t fuckin’ hide from me, bitch. Show me that pretty fuckin’ pussy or I might just have to take it by force.” You shook your head. “I-I– n-need to– eek– ‘m gonna—” you squirmed and two little spurts escaped from between your legs. Katsuki paused, realized what was happening, then growled in pride.
“Well shit, baby, didn’t know you liked to play like that,” He shoved one of your legs off his knee and hit your pussy again, making you scream and finally letting go, completely wetting his crotch and part of his tank top.
“Fuuuck yeah baby, just like that, fuckin’ sexy little shit,” he continued to finger the rest out of you, the entirety of his crotch and thighs absolutely soaked, making a puddle of wet on the marble floor. You feel tears welling up in your eyes and running down your cheeks because of the sheer embarrassment you were feeling, but somehow, it didn’t stop you from being aroused.
One more cry from you about the CCTV right on you two, he finally took it upon himself to blow up the damn camera and seal off the metal doors by welding the metal in between the crack just enough to close it shut.
Multiple bangs from the police were then heard, but it was obviously too late. The only hope for you now is to wait for other Pro-heroes to arrive at the scene and break you out of this hell hole and bring you back home. But for now, you have to endure whatever torture Katsuki takes out on you.
“Sit up,” he started, “Wanna see you.” He props you up so you’re sitting on his lap facing him. Your nose stung at the scent of him. Smoke, copper, and a slight sweet tang.
He still held your wrists against your back. He almost scoffed at how hard the authorities were banging on the thick metal of the office doors. You cringed at the idea of the authorities mindlessly depending on the (now very useless) quirk-numbing cuffs that were now busted into halves on the floor. You remember spending so much of your time thinking about what to say to Katsuki instead of how to restrain him when things get out of hand.
His eyes seem to read what was on your mind. He kept observing you, seeing if you had tried to thrash and squirm as hard as you could against him, but nothing cured his itch. His wicked grin once again fell into a scowl but picked up until it showed his pearly-white canines. “Been missin’ you lately,” He leaned in and placed a kiss just right under your ear lobe. You shudder, feeling him inhale your perfume.
“I never meant to hurt you, baby, jus’ wanted to keep ya safe,” he muttered lowly against the cartilage of your ear. “Safe.. and happy. You ain’t deserve that subpar shit, you need the real deal,” You had figured he was talking about all those guys who approached you before that were later chased away by Katsuki. “Y’need a man. A real fuckin’ man, a man like me.” He kept on kissing multiple parts of your neck in between those words. You feel heavy, heavy shame for leaning into his soft lips, the lips that you oh so very miss so much even after disappearing all those years ago.
He stopped suddenly and firmly– almost harshly gripping your face between his two large, thick hands, leaving yours limp and later gripping his wrists desperately. The insides of your heart hoped that he would feel the trembles in your fingers and let you go, but your shame kept hoping he would keep talking to you like this: faces dangerously close, his eyes glowing in content and desperation, thumbs slowly rubbing circles just under the far-end corner of your eyes. “‘M still your man, aren’t I? Still your Suki?” He mocked your voice with a girly tone in saying the last word, mimicking how you used that nickname on him before when you both were still happy.
You knew what this entailed. The signs were clear now. All those years of studying the human mind made you come to this conclusion: he was still reminiscing off of those happy memories, feeding off only on to the past love that was given and felt from those flashbacks of his.
“If– if you hated your fiance so much, why did you agree to be with her?” your heart thumped at each syllable you managed to choke out. You feel his chest twitch as he hissed.
“I tried to move the fuck on– stupid idea. I figured I needed a cheek to kiss, a body to hug, a pussy to fuck,” somehow, his eyes grew brighter with each pause. “Miss you so fuckin’ much, I had no damn idea how to forget you.” You were relieved internally as you feel his grip on you weakening, you figured if you can get him to focus on talking about anything– something else, maybe, maybe he’d be distracted enough to lose his grip, maybe giving you a chance to strike at him.
You sense his attention stray away from you.
“W-where… where did you meet her?” he clicked his tongue. “Some stupid party raccoon eyes threw. You remember her, don’t you, angel? She used to take photos of us while we were high on the champagne we snuck inside the dorms,” he eerily stared into your eyes in some kind of sick twisted loving way. “You still look so beautiful in those. Couldn’t look away.” You could swear you see hearts forming inside the black of his pupils. You tried to debate whether or not he could be diagnosed with Bipolar Personality Disorder. Your studies recall you. Reduce dissociation. Reduce emotional flooding. Distraction.
“Tell me more,” your voice manages to slow and drop down to an octave. Your shaking hand ever so hesitantly stroking the middle of his chest. Maybe he would calm down if given affection?
He huffed, seemingly of satisfaction. “She… went up to me. Asked me for my number. Gave it to her.” He snaps back into reality. “But… she wasn’t you, sweetheart. Never. She forced me to put that damn ring on her and now she’s dead.” Your breath hitches. He made it seem like a lifelong goal. “I’m here, I’m here now and you are too.” His grip tightened on your face again. You go pale. “Let’s run away, princess. Run away and make a life together. Take me back, c’mon please? I won’t yell at you no more, never again, not unless you misbehave like you used to.”
Your heart aches. You can see how far he’s gone down the hole, and somehow you feel like he’s dragging you in, too.
“I know you feel overwhelmed right now, Bakugou–” “Stop fucking calling me that.” Suddenly, your cheekbones ached. Your lower body is cold due to it being exposed. His grip made you wake up from your subconscious mind and realize what you really were doing: on your ex’s lap, clothes torn on the floor, unwanted juices and a puddle of shame under you — you have to get out. Your clit has unbearably been rubbing against his belt and you could swear that your hips were rocking on their own.
“Katsuki,” you breathed, “Katsuki. I know you’re being overwhelmed right now but–” You winced under the pain. “But we aren’t together anymore.” You yelped loudly at the feeling of being slammed onto the table where the pictures of Katsuki’s crime lay. He manages to trap your calves on his shoulders and hold your forearms past his neck. “You said we could take a break!” his hot breath was on you, now. “And I don’t think you have the fucking right to make me wait for eight whole fucking years. Do you have any idea how much I missed waking up next to you, training with you, loving you?”
“That wasn’t love, Katsuki! It was anger, your anger at me!” a slap resonated around the room, and you could swear a bruise was starting to form on your ass.
“Because you chose others over me!” He leaned in closer, trapping your wrists in one hand before the other reached down below, messing with his belt buckle. “But now… there ain’t gonna be nobody that you will choose but me.” You see his cock spring out from his gray Calvin Klein boxers, and you forget to breathe.
Pre-cum was leaking everywhere. It made his cock look even more delicious to look at. His pink, angry tip slapped against his lower abdomen. He pumped his length and you can estimate it to be at least seven and a half inches and at least two inches thick, bigger from when you’ve last seen it. “Fuck, look what you do to me, sweets,” He stroked it, one, two, three times. “Look at what you’ve done to me, for the past eight years. She couldn’t get me wet like this, not ever.” You feel your greed take over you.
“Katsuki… please.” you didn’t know what you were begging for, him to stop and let you go back home safe, or keep going.
“Im’ma fuck you numb, ma, fuck you ‘till you’re squirting cum,” He’s lining up at your entrance. You couldn’t care less of who was watching anymore, all you can think of now was how good he looks over you. You whined at him, trying to lift your hips so he can get inside of you even faster.
He giggled maniacally, wheezing at your pathetic attempt. “Fucking slut,” He trikes your clit again, sending another gush of juices leaking down your quivering hole down to the cracks of your ass. “Couldn’t wait for me to get inside and ruin that bitchy fucking whore-hole of yours, hah?”
He plunged in and you swear you can feel him nudging your stomach. A bulge on your lower tummy rises and Katsuki presses on it. He didn’t even let you ease onto his length before pounding your pussy raw, maniacally giggling and laughing replacing moans every time he goes balls-deep inside.
“Oh fuck– oh fuck, daddy!” you blurted out, your hands balling into fists against the cold, hard table they were pinned on. Katsuki knew he didn’t need lube from how wet you were already. “Fuck, daddy, shit– fuck!” you wail.
“Yeah, you fucking whore, scream for me,” he cackled into the air, watching your tongue loll out and your eyes cross. “You’re one sick bitch, aren’t you? Fucking a muderer– a hero turned villain– you’re just as bad and insane as me— fuck! Soaking yourself just ‘cos of the – shit– fear you’re getting off of, huh, slut?”
“Y-yes, yes,” You nodded frantically. You can feel him pistoning in and out of your poor, abused womb, the feeling being even more enhanced with his hand pressing down harshly where his tip is.
“Freaky fucking bitch. Maybe you should listen to your own advice, huh? Psycho slut.” You feel yourself getting wetter at his words and clench harshly around him. He growls before wrapping his meaty hands around your neck sending your hands flailing to his wrists, scratching them and he fucks you even faster, harder.
“N-not– hic! – not a s-slut–” you choke out. “Oh for fuck’s sake, listen to yourself! You bitch and wail like a grade A whore. Nasty bitch, gushing on my fucking cock even though I could just blow your head into fucking pieces,” you tighten around him even more.
“Oh, shit,” he chuckles. “You’re done for, aren’t you? Yeah, that’s my fuckin’ girl, alright, my good slutty bitch-whore,” he raises a hand and slaps your face, making you moan.
“I have a gift for you,” he reaches into his pocket, a switch blade poking from his hands. “We used to play with this, remember? And you fuckin’ loved it,” You gasp lightly as blood stains on shiny metal stare back at you. “‘S just her useless blood, don’t worry baby, still very sharp for us to play with,” he grins at you and somehow, you smile back as he rips your collared white shirt open, revealing your perfect tits that drooped apart like he always admired. He leans in and licks your already-fallen tears, and moans in utter bliss.
Katsuki presses the knife just below your chin as he fists your hair. You mewl at the sensation, feeling your tongue drop out even more. Somewhere in between, you scream in pleasure when his tip nudges just right on your spongy, sensitive spot. Your pussy clenches around him like never before, and he wails. “Hnngh, oh– fuck yeah!” His words have a drawl between them, and you can see his eyes cross and his tongue drop out as well, his mouth making a perfect O shape for him to moan the loudest he’s ever had. Your screams and moans accompany his as well– you knew it’s been a long time since anybody else made you feel like this.
It was enough to drown out the shouts from the authorities and emergency staff outside and their banging, but you couldn’t care less. You were on cloud fucking nine again, and you swear you see stars.
He bites on the base of your neck, his sharp canines drawing just enough blood for him to lick up and savor the taste. You whine. “Awww, little baby having a hard time down here?” He speaks in the most sickening baby voice you’ve ever heard from him. You choke out. “Daddy– daddy please, please, lemme– hic! –lemme cum, cum on yer cock,” You bit your lip.
Katsuki laughs again. “Open.” He slaps your right cheek twice and you open your mouth again, tongue on display just for him. Without warning he spits and lands a glob of his saliva right on your tongue before forcibly closing your jaw, watching your throat shift as you swallow his spit. He slaps your face one more time before letting go of the knife and choking you again.
“Nasty bitch, fuck you,” he pistons deep into your spot again and again until you’re convinced it was bruised purple. “You know how many needles they tried sticking into me before comin’ here? How many pills they tried to shove in my fuckin’ mouth? Wanna know how that fuckin’ feels like?” You can feel your tits harshly bouncing up and down repeatedly.
Without thinking you nod, like a puppy desperate for treats, slipping in little uh huh’s in between before you feel his fingers being shoved inside your mouth, his fingertips threatening your gag reflex. He showered in your agony, listening to you gag and cough against his fingers, smiling at how your cheeks get so damn red and your eyes get so teary from the feeling.
You feel a big knot on your lower abdomen form, as well as the familiar pressure once again on your bladder. Once he takes his fingers out of your mouth, you squirm and thrash against him. “Daddy! Daddy, I’m gonna cum, gonna cum so hard, wanna squirt everywhere!” you squealed, your words drawing embarrassingly as your tongue twitched just over your chin. His face contorted into a fucked-out smile, with his eyes crossed once again and drool dripping from his chin like a starved, angry dog.
“Fuck yeah, bitch, cum on this cock, fucking milk it, you damn whore!”
He slaps your ass one more time before you screamed like hell, your toes curling inside your shoes while long gushes of your juices sprayed on him and you, and just like back then, he rocks your hips back and forth against his cock, making you ride your orgasm out before you creamed and shivered as his cum filled you up, painting his cock milky white.
He pulled out, before cupping her hand just infront of your entrance, catching the stray cum and squirt from your wet, twitching, fucked-out pussy, and shoved it back in with his fingers.
“Oh– oh my god,” you shook. “I’m your god, bitch?” Katsuki chided, rubbing your clit ever so slowly. “Y-yes, yes, daddy.”
Merely five seconds after, the metal doors crashed open with the loudest bang. A large shadow loomed over both of you as your body froze. You hadn’t even realized that the shouting and banging outside stopped.
Thick, black, heavy boots stomped against the marble floor as the figure crept in closer. You slightly shift to the side to see countless bodies of civilians, staff, and police piled up on one another (poor officer Tanaka was seemingly decapitated). Your breath catches itself.
The figure gripped Katsuki’s shoulder, but he didn’t seem to mind. The shadow leaned closer and you cower in fear.
“Was I too late to the party?” A charming, mischievous raspy voice emanated from the face of the tall figure you swore was so damn familiar. “Sorry, there was a… delay.”
Red Riot loomed over your frozen, pale, fucked out body and licked his lips. He dug his middle finger into your seeping cunt before bringing it up to his mouth and sucking it, his finger leaving his lips with a loud pop. You hear Katsuki moan at the sight. Eijirou then went back down and rubbed your clit in delicious circles. “Think you have room for one more, doll?”
Fuck you, universe.
#katsuki bakugo x reader#katsuki bakugo x y/n#katsuki smut#katsuki x reader#bakugou katsuki#bnha bakugo katsuki#katsuki bakugo mha#katsuki x you#katsuki bakugou#bnha eijiro kirishima#kirishima x reader#bnha kirishima#kirishima eijirou#mha kirishima#mha smut#kiribaku#kirishima x bakugou
2 notes
·
View notes
Note
Hello!
First of all, I love, love, LOVE your videos. I’ve watched your Letters from France video maybe 20 times, even your abandoned WIP is a masterpiece.
I’ve dabbled in ship edits (one average video so far), but I would appreciate any tips about it from a clear master of the arts!
If not, I 10000% understand, trade secrets and all that.
Thank you for your videos and your time!
Gosh...a masterpiece? Thank you so much!
Definitely find the type of fanvids that bring you joy to watch AND to make (character studies, action vids, fake trailers 😏, longer form or something shorter etc.). No point spending hours on an edit if it's not fun for you.
Find video editing software that you like (for me it's Premiere Pro, After Effects, and Sony Vegas. Plus I like to use Audacity for some additional sound editing). Have a large library of music (with fake trailers you will also need some sound effects).
With footage try to find something with 6ch audio (it makes it easier to separate music from the dialogues).
Watch some YT tutorials on coloring (I know it hilarious coming from me because I mostly ignore it but they are very useful. Just stay away from tiktok coloring - they are here "to steal and kill and destroy").
Have a folder with videos you find inspiring - it really helps to just watch fantastic edits (even if they are not in your style).
The last thing is the most important: don't worry if you won't get a lot of comments/reblogs of your fanvid. I have edits watched for 80k times with 6 comments ¯\\_ (ツ)_/¯. It sucks but it is what it is.
Hope this helps!
4 notes
·
View notes
Text
So I got a comment from @dreamstormdragon asking for tips on how to get VRoid models to work in Blender.
I realized my answer is wayyyy too big for just a reply, so I'm making a whole post about it!
Without further ado, here's my VRoid-Blender workflow:
1 - Use a later version of VRoid Studio. Do not use the beta version! I think I'm currently using v1.28.0.
2 - Use an addon to make .vrm files compatible with Blender. The one I use is the “VRM Addon for Blender”, which you can find here: https://vrm-addon-for-blender.info/en/
Make sure your version of Blender is higher than 2.93. Installing addons is pretty easy, all you have to do after downloading the zip folder is open Blender > got to Edit > Edit Preferences > navigate to the Addons tab > Install > click your zip folder > hit the checkmark to activate it > done! After installing, you should be able to import .vrm files by going to File > Import > clicking the new .vrm option. If you encounter any problems while installing, I recommend watching a video on how to install Blender addons.
3 - So now your VRoid is in Blender. Epic! Most imported VRoids come with a default rig, but it's very basic and has no IK abilities. IKs let you move the hands and feet of the model, by extent automatically bending the arms and legs of said model. It makes posing a lot easier than manually changing each individual bone’s position.
So I use more addons to change that: “Auto Rig Pro” and “Auto Rig Pro: Quick Rig”.
Auto Rig Pro lets you easily make a new, more complex rig for your VRoid character. However, it does mess up the original facial rig, so that's why I use Quick Rig on VRoids. It lets me just add IKs to the default rig, without having to make a new skeleton! It's awesome!
BIG WARNING: You have to already have Auto Rig Pro in order for Quick Rig to work. You can't download Quick Rig by itself because it's connected to Auto Rig Pro. Which sucks because Auto Rig Pro is no longer free (I got it for free during a giveaway for Blender’s anniversary).
You can download Auto Rig Pro here: https://blendermarket.com/products/auto-rig-pro
Download Quick Rig here: https://blendermarket.com/products/auto-rig-pro-quick-rig
Auto Rig Pro has different pricings ranging from $40 USD to $182 USD depending on the features you want, but Quick Rig costs just $10 USD. The installation process is basically the same as the VRM addon earlier. Again, if you have any trouble installing it, watch a tutorial!
4 - But what if you don't want to spend money? Here's my previous rigging process:
Instead of using Auto Rig Pro and Quick Rig, I used the addons featured in this YouTube video: https://m.youtube.com/watch?v=-k1eKcQz29o&pp=ygUUdnJvaWQgbWl4YW1vIGJsZW5kZXI%3D
Basically, the addons shown in this video let you convert the default VRoid rig into a Mixamo rig, which comes with IKs! The video has download links in the description for each addon that you will need, and it also shows how to use them. Best part, all the addons are free!
I animated my Bluey model using a converted Mixamo rig, so it works pretty well. I just like Auto Rig Pro/Quick Rig more because it's a simpler, cleaner process. But both options get the job done, so choose whichever works more for you!
7 notes
·
View notes
Text
Day 4: For the love of Note-taking
I am a person that loves to learn and take notes, but I tend to run into the problem of over-consuming. I’m a big idea type of person so I have many things I want to try but if I don't have a system most ideas are stuck in my head taking up space that can be used for creating.
I need a system that can be used in all parts of life that will help me capture my ideas and build on them. I reintroduced myself to the concept of a second brain. A second brain is essentially a methodology for saving and systematically reminding yourself of ideas, insights, and connections you’ve made through your experiences. It's used to free up your brain space and ensure you are creating valuable things from the information you consume.
It's a pretty simple concept that is achieved through a 4-step process:
CODE
Capture the ideas and insights worth saving
Organize for accountability
Distill down to the essence
Express your unique ideas and experiences
———————————————————————
Capture the ideas and insights you think are work saving
Keep your notes in a centralized place so you will always know where things are
Make conscious decisions about what you consume
Only keep what resonates, that way everything has a purpose.
Decided that I will use OneNote as my one-stop shop. I also started using a read-later app as a way to save articles for later and it has a tagging feature which is amazing!
——————————————————————-
Organize for accountability
When it comes to note-taking, the simpler and more flexible the organization method the better.
Pro-tip: Avoid making a perfect hierarchy of folders from the get-go
PARA Method: Everything in your life can fit into one of the below categories
Area: Long-term responsibilities
Projects: Short-term responsibilities
Resources: Topics or interests that will be useful in the future
Archives: Information that is inactive
I adopted the PARA method for my work OneNote, I have the tabs sectioned out for the different categories and I also have a section that I named inbox. The idea here is that everything has a place but try not to overthink it. The more flexibility you give yourself the better.
Pro-tip: Start with a clean slate. Move all existing files into an archive folder with today's date.
This is the main issue I had with the methodology, when I first tried to implement the PARA method I thought I had to use it on existing information. Needless to say, it was overwhelming and I ended up giving up. This time starting fresh took the weight of what to do will all the old information and allows my system to grow with me and helps reshape my method of thinking. It also helps that I didn't delete anything. If I need an old piece of information, its always there.
——————————————————————-
Distill down to the essence
Create actionable, bite-size summaries and focus on the main points
Summarize progressively, save an excerpt, create a summary, and create a summary of the summary.
I know it sounds a bit redundant BUT this allows you to see the note in different ways and you always want to leave a note better than you found it.
Add value to each note every time you touch it
Highlighting the most important parts
Add a link to reference later
Defining key terms in case you forget
Inserting placeholders when you leave off so you know where to pick up
You always want to enhance your notes and design them for your future self.
——————————————————————-
Express your unique ideas
For me, note-taking is also an art form. It's how I express my interests and thoughts. I love that anything you want to learn is at your fingertips and I love sharing what I find in hopes that it helps someone else.
I also find informational blogging therapeutic. If I have a problem, goal, or task I usually make a post about it which helps me to not only think through my thoughts but also as a way to showcase what I learned. I feel like I found my voice and note-taking helps me not only learn and stay organized but also keeps me sane most days.
I'm excited to perfect my craft and the best part is that there is no finished product, you’re always improving!
——————————————————————-
Music Challenge Day 4: A song by a new artist you just discovered
My Pick: Muni Long is not a new artist but I've fallen in love with her voice and her pen is nice!
My Aunt: Sza is new to her and she loves her.
#soft black girls#black femininity#soft black women#self love#spotify#black wellness#wellness journey#mindfulness#productivity#note taking#second brain#self love journey#blackgirlbloggers#organization#self improvement#positive thoughts#100 days of mindfulness
52 notes
·
View notes
Text
How to Create Designs That Work for Your Print-on-Demand Business
Running a print-on-demand business is both exciting and challenging. Whether you're selling on platforms like Redbubble or managing your own store, creating designs that resonate with your audience is the key to success. But how do you craft designs that not only look great but also sell? In this blog post, I’ll guide you through the process of creating designs that work for your print-on-demand business, with tips and tricks tailored to help you stand out in a competitive market. Let’s dive in!
Why Design Matters in Print-on-Demand
In the world of print-on-demand, your designs are your product. Unlike traditional retail, you’re not selling physical inventory—you’re selling ideas. Your customers are drawn to your creativity, so your designs need to:
- Capture attention: Bold, unique designs stand out in search results.
- Resonate with your audience: People buy designs that align with their personality, values, or interests.
- Fit the product: A design that looks great on a t-shirt might not work on a mug or phone case.
Understanding these principles is the first step to creating designs that work for your business.
Step 1: Know Your Niche
The most successful print-on-demand businesses are niche-focused. Instead of trying to appeal to everyone, target a specific audience.
- Research your audience: Who are they? What are their interests, hobbies, or values?
- Find trending niches: Use tools like Google Trends or Redbubble’s trending searches to discover what’s popular.
- Create for your passion: If you’re passionate about your niche, it will show in your designs.
For example, if your niche is cozy, minimalist designs, you could create products that appeal to people who love hygge-inspired aesthetics.
Step 2: Brainstorm Unique Design Ideas
Once you’ve identified your niche, it’s time to brainstorm ideas. Here’s how to get started:
- Use keyword research: Tools like Redbubble’s search bar or Pinterest Trends can help you find popular themes.
- Look for inspiration: Check out competitors, social media, or even nature for fresh ideas.
- Think seasonally: Holidays, seasons, and special events are great opportunities for themed designs.
Pro tip: Keep a notebook or digital folder for design ideas. Inspiration can strike at any time!
Step 3: Master the Tools of the Trade
You don’t need to be a professional graphic designer to create stunning designs. With the right tools, anyone can make high-quality artwork.
- Free design tools: Canva, GIMP, and Inkscape are great for beginners.
- Professional software: Adobe Photoshop and Illustrator offer advanced features for experienced designers.
- Mockup generators: Use tools like Placeit to see how your designs will look on products.
If you’re new to design, start simple. Minimalist designs with clean lines and bold typography are often bestsellers.
Step 4: Optimize Your Designs for Products
Not all designs work on every product. To maximize sales, tailor your designs to fit specific items.
- Consider placement: A design that looks great on a t-shirt might need adjustments for a mug or sticker.
- Use high-resolution files: Print-on-demand platforms require high-quality images to ensure sharp prints.
- Test your designs: Upload them to mockup tools to see how they look on different products.
For example, if you’re creating a design for a phone case, make sure the key elements aren’t cut off by the edges or camera hole.
Step 5: Write SEO-Friendly Titles and Tags
Even the best designs won’t sell if no one can find them. That’s where SEO comes in.
- Use relevant keywords: Include terms your audience is searching for, like “minimalist phone case” or “funny coffee mug.”
- Write descriptive titles: Instead of “Cool Design,” try “Retro Sunset Design for T-Shirts and Stickers.”
- Add detailed tags: Use a mix of broad and specific tags to improve your visibility.
For example, if your design is a cozy winter illustration, your tags might include “winter mug,” “cozy vibes,” and “holiday gift ideas.”
Step 6: Promote Your Designs
Creating great designs is only half the battle—you also need to market them.
- Leverage social media: Share your designs on Instagram, Pinterest, and TikTok.
- Engage with your audience: Respond to comments and messages to build a loyal following.
- Collaborate with influencers: Partner with creators who align with your niche to reach a wider audience.
You can share behind-the-scenes content, like your design process or mockups, to connect with your audience on a personal level.
Step 7: Analyze and Improve
Finally, track your performance to see what’s working and what’s not.
- Check your analytics: Platforms like Redbubble provide insights into your sales and traffic.
- Experiment with new designs: Test different styles, themes, or niches to see what resonates.
- Listen to feedback: Pay attention to customer reviews and comments to improve your designs.
Remember, success in print-on-demand is a marathon, not a sprint. Keep learning and adapting as you go.
Final Thoughts
Creating designs that work for your print-on-demand business takes time, creativity, and strategy. By understanding your niche, mastering design tools, and optimizing your listings for SEO, you can build a successful shop that stands out from the crowd.
You have the power to turn your ideas into products that people love. So, what are you waiting for? Start creating today and watch your business grow!
Looking for unique, cozy designs that inspire and stand out? Visit my Redbubble shop to explore a collection of creative products made just for you!
#Print-on-demand business#Redbubble tips#How to create designs#Print-on-demand design tips#Redbubble design ideas#Niche marketing for POD#How to sell on Redbubble#Print-on-demand success#Redbubble SEO tips#Best tools for POD#Graphic design for beginners#Trending print-on-demand niches#How to optimize designs#Print-on-demand marketing#Redbubble product ideas#Cozy design inspiration#Minimalist design tips#Seasonal design ideas#How to use Canva for POD#Redbubble mockup tips#Passive income with POD#How to sell art online#Redbubble shop strategies#Print-on-demand trends#How to grow a POD business#Print-on-demand branding#Redbubble keyword research#Social media for POD#Redbubble artist tips
3 notes
·
View notes
Text

this was requested by a few people so, without further ado, below the cut i’ll explain how to make an edit of the eras tour poster like the ones that can be found here. i’ve seen different versions of these floating around twitter/tiktok/etc for a while but let’s be honest..the picsart ones don’t look as cute. i use photoshop 2020, but older versions should work just fine since this edit doesn’t involve anything too fancy!
now, i started with the original poster and carefully removed all of the images to create a base template that i’ve used for all the posters since. i don’t really feel like explaining how to do that because it feels kinda unnecessary when i can just link it to you. so go ahead and start by downloading my base template, which you can find here.
once you have that open, you’ll want to gather your images. you’ll need nine images that should be at least 300x300px in dimension and one much larger image to serve as the center png. how big this needs to be depends how large the subject of the photo is, but it should probably be around 2000px. keep in mind that the subject shouldn’t be too wide either, or else it will block the surrounding photos when you try to position it. for example, the below image wouldn’t be a good option because her arm would cover at least one of the other eras.

once you have your photos picked out, you’re gonna want to drag the nine smaller ones into the document and crop/scale/position them so that there’s one in each square. remember that the template layer should be above the photo layers so that they’re contained within the frame. once you’ve done that, it should look something like this:

now it’s outlining time. first, make a new transparent layer and place that between the photo layers and the template layer. it’s really REALLY important that you remember to always paint on this transparent layer and NOT directly on the photos, as we want to be able to edit the photos later without also editing the borders. i used a website like this to find the color codes of the backgrounds on the original poster, so i’ll just put them here for you:
debut: #bcd5b8 fearless: #f4cb8a speak now: #cfb6d4 red: #a45865 1989: #c0e6f9 rep: #5f5c57 lover: #f8bad3 folklore: #d3d0c9 evermore: #ceb69c
you’re gonna want to select the paintbrush tool and set it to 20px and choose the “soft round” setting in the general brushes folder (this will make sure that you don’t have any harsh edges). then, change the color of the brush to whichever era you’re starting with, using the hex codes above. now you’re ready to go in and start painting! on your transparent layer, outline the edges of the subject of your first photo. you don’t have to be super precise with this because the soft edges allow for more error!
once you’ve done that, go ahead and change the brush setting back to hard round in order to fill in the surrounding edges, like so:
and voilà! pretty easy, right? now you just have to do that eight more times for each era, using the corresponding hex code for your brush color. and again, ALWAYS REMEMBER TO PAINT EVERYTHING ON THAT TRANSPARENT LAYER!!! pro tip: you can use the rectangular marquee tool to contain the square of the era that you’re working with so you don’t have to worry about staying inside the lines. once you’ve done that, it should look something like this (just ignore that the reputation background is too light, i used the wrong color and didn’t notice until later):

ok now you’re gonna want to download this lovely psd pack in order to color the photos (you could also color them yourself, but i’m bad at coloring so i took the easy way out). open that up, and drag the first one over for whichever era you’re starting with. position it so that it’s directly above the corresponding era’s photo and then right-click the psd and select “ungroup layers” (you wanna do this because you won’t be able to create a clipping mask from grouped layers). then, with all the layers of the psd selected, you’re gonna wanna right-click and select “create clipping mask.” this should make it so that the filter is only visible on that era’s photo. now just repeat that process for each era! once you’ve done that, you should have eras-colored filters over each image, like so:
now it’s png time! i’m not gonna explain how to make a png here because it would take too long and i’m such a perfectionist that the way i make pngs would probably get me locked up. however, here’s a really useful, in-depth tutorial on the subject if you’ve never made one before. go ahead and make your png and drag it into the document once you’re done. scale/resize/crop the png so that it fits nicely in the center of the document (and remember that this should be the topmost layer at this point, right above the template layer, so that it’s visible). it should look something like this now:

now you’re gonna do the same thing for the center psd that you did for all the other eras, by creating a clipping mask from the “midnights” era filter:

now all that’s left is the text! you have a few options for this part depending on what kind of edit you’re making. for the eras edit series, i made a png of each album title and positioned that in the center, like this:
i’ve also seen a lot of people making edits of these for their pets/grandparents/themselves, in which case you probably want to put a name of some sort in there. i made a sample of this to show you. first, you’re gonna want to download this font. it’s not the exact font from the poster because that one costs money, but this one looks almost exactly the same once you stretch it vertically. once you’ve installed the font, make a new text layer and write whatever word you want. change the font size until it roughly matches that of the surrounding words (remembering that it won’t be as tall). then, right click the text layer and select “convert to smart object” so that you can stretch it and then select edit > transform > warp. a number of dots should appear around the text, which will allow you to pull the top and bottom edges of the word so that it looks as tall as the original font. once it roughly matches the poster font, press enter to exit out of warp mode. the text will also look blacker than what's on the poster, so just right click on the text layer/smart object, select “blending options,” and reduce the opacity until it matches. this is what i got:
now you could stop there, but i like to mess with it a little (bc perfectionist) and go back and tinker with the paintbrush/clean up the edges and alter the brightness/contrast so that the images match each other a little better. after doing all that (and fixing the rep background color), this is what i ultimately ended up with (i also changed some of the images cause i didn’t like them):

and that’s pretty much all there is to it! i’ve never made a tutorial before so idk if i explained too much or didn’t explain enough but please please feel free to message me if you have any questions/require further clarification on anything!!! ok thanks bye!:)
53 notes
·
View notes
Note
awww you got a new job? that is so nice, I am so happy for you! I have been looking for a job myself this days but I am awful at interviews. Any tips?
~Ina
My aunt is a hiring manager, so I’m just gonna dump a bunch of stuff at you that she’s told me.
Wear black slacks and a nice shirt, blouse or button up, and a blazer or cardigan over it. Keep jewelry to a minimum. Wear nice black shoes. No sneakers, boots, or sandals.
arrive early, a greet your interviewer with a firm handshake.
Remember: Your interviewer is just another human being, and in the interview itself they are on the same level as you. You are presenting yourself as a candidate, but remember that they are also presenting the business as a place for you to invest your time in. Stay professional, but there’s no need to be overly formal. If you notice something in their office, a sports team, pictures of kids, any merch, comment briefly on it to build rapport. Simple things like, what they thought of the game, or what their favorite episode of parks and rec were, can foster positive relationships even in a short time. I once got a women talking for 15 minutes about her husbands store because he and I worked for the same company. Pro-tip, people love talking about their pets.
during the interview itself, keep your posture engaging by facing the other person and leaning in slightly. Try not to be too rigid. If there are two, turn slightly to whoever is talking immidiately. Keep a notebook or folder with a copy of your resume with you, and a pen as well. Have a list of pre prepared questions written down, for instance;
‘how did your business respond to the COVID-19 pandemic?’
‘What are the expectations for me specifically, should I be chosen for the position?’ ‘
‘What does the day to day workload entail?’
‘Can you give me more details on *thing they mentioned earlier*’
‘What’s something you know about this business/position now that you wish you’d known when you started?’
The questions are the hardest part for me, so I try to prepare them ahead of time.
when they ask you questions, don’t feel like you have to answer right away. You can take a minute to think of your answer, or ask them to rephrase if it didn’t make sense. This shows you’re paying attention, especially if it’s not one you prepared for ahead of time. Typically you’ll be asked about prior experiences, times you worked through challenges or disagreements with your coworkers or customers, values, etc.
Always make sure that you right down what the advertisement said the pay rate was, and before the interview is over make sure you get the details on salary, PTO, and health care. Whoever said don’t talk about pay in an interview is an idiot, you don’t want to waste your time on a place that you can’t pay your bills at. At the end of the interview shake hands with them, thank them for their time and consideration and walk confidently out.
In a day or two give the place a call or email them to ask if they’ve made a decision yet. You want to seem eager to work, but not desperate.
24 notes
·
View notes
Note
Hi, I love your profile and sims! I’m ‘kind of’ new to the sims world! I’ve been playing since 2018, but not religiously. I just wanted to ask about your mods folder (sorry if it states somewhere on your profile these kind of questions aren’t allowed, i’m new to tumblr too and still understanding how it works). Feel free to ignore this question if it’s not allowed. I understand that by having lots of folders within the mods folder it can make the game lag. I just wanted to ask how your mods folder looks? As I want to keep mine tidy and be able to find certain cc easily. I’m also in the process of buying a pc as I am currently using a macbook and have so much cc it’s starting to not work… If you have any tips or suggestions with having a pc (if you have one yourself) and how your set up looks, I would really appreciate it. Thank you!! 🤍
Hello darling and thankyou so much! 🤍 Welcome to tumblr 💁♀️🤍
I think lag in your game mostly depends on what kind of computer/laptop you're using. I have just over 50gb at the moment and my game still runs as smooth as it does vanilla ( no mods at all ). I know some people who have 100gb+ and they don't have lag issues either. Again I think it boils down to the computer itself, and what it can handle
I personally chose to go for a custom built computer so that I could choose my own parts as I really wanted a computer that could handle a lot of mods and also I wanted my game to run nice and smoothly, my partner is a bit of a nerd when it comes to computers so he knew exactly what kind of specs I needed
When it comes to my mods folder I am super organised, that way when patch day comes I know exactly where everything is to be able to take it out of my mods folder until its updated etc. I'll pop in some photos of what my folder looks like so you can see below. Trust me it didn't always look like this 😂
If you're struggling with lag then a short term fix would be to have a good clear out of your mods folder and delete everything that you don't reach for often, you can even go as far as deleting swatches of clothes and build buy items that you don't like. I cleared around 5gb last week just by removing swatches from some build buy items that were high in mb's. For example, I had a bed frame that was 320mb in size so I deleted all of the swatches except for the one that I liked the most lol
What my mods folder looks like


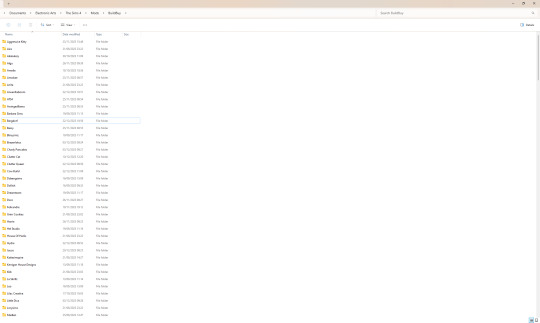

The only suggestion I will give regarding picking a computer out is to take your time and do your research! I really rushed my build and didn't want to wait for the white case that I liked so I ended up with the black one I have now that doesn't match my set up at all haha
When getting your computer the main things to look out for is making sure you've got enough storage and a good graphics card, obviously everything is important but these two for me where the main ones I focused on. If you do go custom built for example, you can always upgrade your parts very easily, where as if its pre built I'm not too sure if the cases are universal to fit different brands of parts in if that makes sense?
I am in no way a pro, I had alot of help from my partner when it came to building my computer. If you need help when the time comes feel free to give me a message and I can run things by my partner to help you choose what parts or pre built etc
I'll leave a few photos below of what my setup looks like, I just got the aurora collection for christmas and I also have the razer quartz collection too ( I prefer the aurora lol ). I can easily recommend you some good equipment also if you're not into the aurora or razer products. If you're looking for set up inspo then I would highly recommend browsing through Pinterest, that's where I got the majority of ideas for the aesthetic of mine. Pink and white are my favourite colours, hence the colour palette haha
If you need any help at all with specs or anything else at all feel free to pop me a message or reply to this post 🤍

19 notes
·
View notes