#and doing small basic edits to a pre existing code is easy
Explore tagged Tumblr posts
Visit Tumblr Blog
Explore Tumblr blogs with no restrictions, modern design and the best experience.
Last Seen Tumblr Blogs


Fun Fact
25% of US internet users with an annual income of $80-100K use Tumblr.
Text
Im making a neocities to replace and improve upon this blog. Very exciting development
#sometimes i feel like a town crier but like#only for things that interest me personally#like just a dude on horseback riding through town at 4am like#''I GOT MY TAX RETURN BACK. IT WAS $103.''#and people go back to sleep#anyway coding is both easier than i ever thought and also very very hard#like#very easy to do super super basic stuff#and people have done a lot of work to make it super easy to get started#there are html generators i found that do the basic foundation leg work for you to start#(super appreciate the people who made those)#and doing small basic edits to a pre existing code is easy#but uh#things get so much more complex#and when you KNOW theres a small error somewhere but you cant find it???#finding the error is like. lowkey brain melting#keeping track of everything when its still in progress is hard#and alao tbh ive always struggled to like#perceive the concept of software#like theres just this disconnect in my head#i have a brick of plastic and metal in my hand#and i can generally understand how it was constructed in specific ways to channel electric charges in a way to cause certain effects#but then the idea that you have this lengthy hypothetical and nontangible logic exercise just. SOMEHOW contained within it.#and that is the key to the physical item doing what you want it to#my brain just really struggles with that#so talking about code too in depth confuses me no matter how accessibly its phrased#just. its a math problem. its word problems. its logic problems. i can solve puzzles.#i cannot comprehend the continuum between the thought puzzles and the chunk of physical material in my hands#anyway#devilman am i right
1 note
·
View note
Text
Reverse-Outlining Revision Method with Plottr
So in my editing guide, I give a step-by-step method for structural editing that I find really useful, and I wanted to do a visual follow-up to kind of show what that process looks like. I’m using Plottr for this, because I was gifted a copy of the software in exchange for them using my horror-writing beat-sheet as one of the templates, but you could just as easily do this with Scrivener, scrap paper, or any other organizational system you like.
Whether you’re a fellow pantser who struggles with story structure (hi!) or you’re an outliner who needs to make sure your draft matches up to your vision (or the second draft has a good structure), this will work for you!
Step One: Write a one-sentence log-line of the story + jot down the major themes

There’s space for this in Plottr. I’m doing Neverest.
Premise: A woman’s search for her missing husband’s body on Mount Everest sends her into the grip of ancient forces that don’t want her to leave.
Themes: Putting your name on something doesn't make it yours; colonialism and the urge to conquer and codify; relationships as a form of control and change vs understanding
You’ll also want to write a one-page overview summary of the story, similar to what you’d put in a query letter. Here’s mine:
One year ago, Sean Miller -- journalist and mountain climbing enthusiast -- reached the summit of Mt. Everest, and was never seen again. Unable to move on without knowing the truth of what happened, his wife Carrie flies to Nepal to meet with Sean’s best friend and former climbing partner, Tom. They assemble a small crew and begin an expedition up the peak in search of Sean’s body and a better understanding of what might have happened in his final days.
Guided by a travel journal left behind from her husband's expedition, Carrie ventures into the frozen, open-air graveyard of the world's tallest peak. But as Sean’s diary and Carrie’s experiences reveal, climbing the mountain is more than a test of endurance; it’s a battle of wills with an ancient and hostile force protecting the mountain — and the dead do not rest easy at the summit.
Doing this helps you to identify the core elements of your story -- the characters, the conflict, and the stakes. You should be able to answer the questions: who is the main character, what do they want, what’s stopping them, what happens if they succeed/fail.
In this case:
The main character is Carrie, the wife of a journalist who disappeared while summiting Mt. Everest (character)
She wants to find his body and get closure about his death/understand how and why he died (what does she want)
But there are supernatural forces at work that led to his death and now have the same in store for her (conflict/stakes)
Step Two: List out every scene in the book
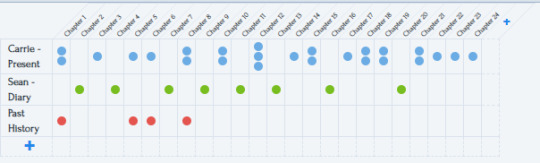
Plottr is an outlining software, so it makes this step really easy (and conveniently color-codes things for me at the same time!). There are multiple views this can take, but this one screenshots well so I used this one for the example.
Basically what you want to do is write down everything that happens, scene by scene. You can color-code them however you want -- in my case, I have three narrative threads, so I made a timeline for each one. Then I just mapped out all the scenes -- across 24 chapters, each dot is a scene, and you can see that some chapters have multiple scenes and also that the primary and secondary plot alternate chapters.
When you look at it this way, you can tell really clearly that the tertiary plot needs some work -- it’s only there for four scenes in the first third of the story. I either need to cut it completely and incorporate any essential information into the other plots, or I need to expand it.
In this particular case, I decided to expand because 1.) my word count is low, and I’d like to fill in more story and 2.) a big theme I want to explore in the story is what it’s like to love someone who’s deeply passionate about something you don’t understand -- so this tertiary plot is a great place to explore that and fill in more characterization that should add some depth to the primary and secondary stories.
I can also see at a glance that I have a variable number of scenes in each chapter. Sometimes that makes sense (the green ones are diary entries, so it’s logical that one chapter = one entry) but sometimes it hints that those chapters could be a little thin and need more content. If I’m looking to add additional conflict, I should do it in those blue chapters that only have one dot as opposed to the ones with multiple dots!
Step Three: Look at the overall shape and adjust for pacing and genre
Plottr has a bunch of templates pre-loaded into it that make this easy, but you can also just google various different story structures and beat sheets such as Save the Cat or the 3 Act Structure etc. But just look at the overall map of story beats and see how they line up with the outline you’ve made:
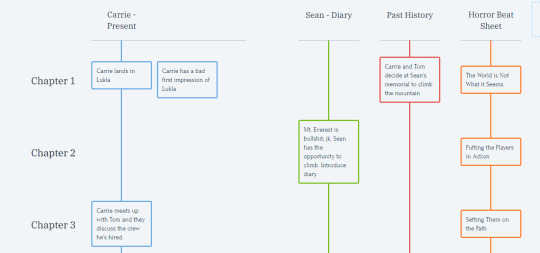
This is just a small snapshot view, but you get the idea -- when you look at the scenes side-by-side with the beat sheet, you can see some things. For example, it sure would make more sense if the flashback scene where Carrie decides to embark on this journey got its own chapter and lined up better with the “putting the players in action” plot point rather than being smooshed into the first chapter with the introduction to the world! The fact that I’ve got it smashed into that first chapter is probably a sign that my opening scenes/chapter itself is a bit thin and needs to be fleshed out a little more.
Step Four: Figure out what you need to adjust and make the changes accordingly
So after looking at everything mapped out this way, I’ve got a little list of things I need to do:
Come up with more scenes for that red plotline
Rearrange some things a little bit to better fit the structure I want
Figure out some more blue scenes to fill in the gaps caused by rearranging things and smooth over the pacing/amp up the conflict/alleviate some areas where critique partners hae expressed confusion
I also moved around the categories in Plottr (you can drag-and-drop storylines and chapters) to make it a bit easier to see everything all at once. Basically you can edit the story’s outline first, to save you the confusion of manually moving around whole paragraphs/chapters in your actual story document.
Now, I haven’t finished that step yet for this particular project (there’s a lot of brainstorming to do re: filling in those gaps!) BUT I did want to skip ahead to show you the next step (let’s pretend this is a TV cooking show where the finished pie is pulled right out of the oven).
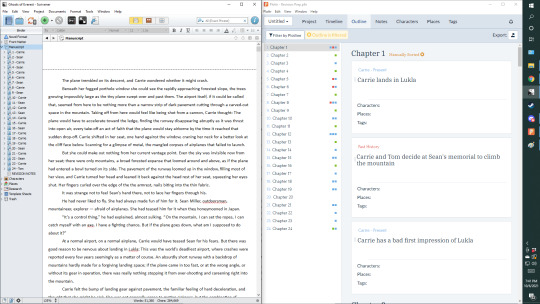
Step Five: Re-Type everything based on your new scene list
This is a really neat thing about Plottr. If you swap from the “Timeline” view to the “Outline” view, you get these editable text windows where you can type whatever you want, and it’ll keep it organized into chapters and scenes.
So, just pull up your original in one window, and the Plottr screen (or other outlining/drafting device) in another. Dual monitors are great for this but we make due. Now, retype the original document into the new document, making changes as you go to fit the new outline and also cleaning up language and so forth as you go. For example, this time around I’ll be changing Carrie’s blue timeline scenes to present-tense instead of past, so I’ll rewrite them in present tense in the new window.
Once all that is said and done, in Plottr you can export the file directly into Scrivener or Word. (If you’re not using Plottr, you’ll have to figure out for your own self how to transfer the final product into a final document -- I trust you can sort through that). From there you’ve got a fresh clean copy of a second draft all ready to go for the final copy-edit/proofread/polish/formatting and then you’re off to the races!
I hope this was helpful for you! I talk more about editing in my Gumroad guide here: https://tlbodine.gumroad.com/l/jkLpr
If you’d like to receive all of my existing + future guides and support me in making more content like this, consider subscribing to my Patreon: https://www.patreon.com/tlbodine
And you can pick up a copy of Plottr here: https://plottr.com/
This post isn’t sponsored or anything, but I did get a free copy of the software from the developer and I think it’s pretty neat. It’s still in beta so new features keep getting added, and the team that makes it are very nice and responsive to feedback.
#writing advice#writing tips#outlining#editing#how to edit#editing advice#writeblr#writing#share to save a writer
23 notes
·
View notes
Photo
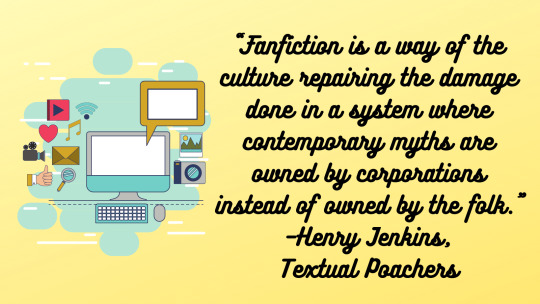
WORDS FOR WRITERS: The Value of Fanfiction
There’s been a lot of chatter on social media these last few weeks, recycling that trashy, self-aggrandizing, tired old “hot take” that reading and writing fanfiction is somehow bad for you as a writer.
Before we go any further, let me give a clear and definitive answer to this take:

No, reading and writing fanfiction will not make you and does not make you a bad reader or writer.
Period.
Why? Here’s the TL;DR version:
1) Reading and Writing, any kind of reading and writing, will make you a better reader and writer. And it’s enjoyable, to boot.
2) Fanfiction has been around as long as Original Fiction, so we’d know if there was any negative impact by now (spoiler alert: there isn’t.)
3) Practice is Practice, so matter what medium you get that practice in.
4) Comprehending and writing fanfiction is harder than writing original fiction because you have to hold the Source Media Text in your head at the same time as you’re reading/writing a different story. It improves your understanding of storytelling.
5) No hobby, no matter what it is, so long as it doesn’t harm anyone else or yourself, is bad. And that goes double for if you decide to keep it a hobby. Not every fanfic writer wants to write original fiction, and that’s just fine. Not every hobby has to be monetized.
Okay. But what do they mean by “fanfiction”?
“Fanfiction is fictional writing written by fans, commonly of an existing work of fiction. The author uses copyrighted characters, settings, or other intellectual properties from the original creator as a basis for their writing.”-- Wikipedia
Basically – it’s when you take elements (setting, characters, major themes or ideas) of a Media Text (a novel, a movie, a podcast, a comic, etc.) and create a different story with those elements. You can write a missing scene, or an extended episode, or a whole new adventure for the characters of the Media Text. You can even crossover or fuse multiple Media Texts, or specific elements, to create a whole new understanding of the characters or their worlds.
Similar to fanfic, you can also create fanart, fancomics, or fansongs (“filk”), fancostumes (“cosplay”), and fanfilms. These are called Fanworks or Fancrafts.
Fanfiction is usually posted to online forums, journals, blogs, or story archives and shared for free among the public. Before the advent of the internet, fanfiction was often printed or typed, and hand-copied using photocopiers or ditto machines, and distributed for free (or for a small administration fee to cover materials) among fans at conventions, or through mail-order booklets (“zines”).
Fanfiction has existed pretty much since the beginning of storytelling (A Thousand and One Nights, Robin Hood, and King Arthur all have different elements attributed to them by different authors retelling, twisting, adding to, or changing the stories; there’s no single-origin author of those tales.)
There are billions on billions of fanfics out there in the world—and while a majority of them are romance stories, there are also adventures, comedies, dramas, thrillers, stories based on case files, stories about the emotional connection between characters when one is hurt and the other must care for them, historical retellings, etc. There are also stories for every age range and taste, though be sure to take heed of the tags, trigger warnings, and age range warnings as your browse the archives and digital libraries.
As a reader, it’s your responsibility to curate your experience online.
So why are people so afraid or derisive of fanfic?
People who are hard on fanfic say that…
· It sucks.
o Well of course it sucks! As it’s a low-stakes and easy way to try out creative writing for the first time, the majority of fanfiction is overwhelmingly written by new and young writers. Everything you do when you first try it sucks a little bit.
I’m sure no figure skater was able to immediately land perfect triple axels ten minutes after they strap on the skates for the first time in their lives. No knitter has ever made a flawlessly perfect jumper on their first try. No mathematician has ever broken the code to send a rocket into space after having just been taught elementary-school multiplication. So why on earth do people think that new writers don’t need to practice? I can promise you that Lin-Manuel Miranda’s first rap was probably pretty shaky.
· It’s lazy or it’s cheating.
o Listen, anyone who tells you that writing anything is lazy clearly has not sat down and tried to write anything. Writing is tedious. It is boring. It takes hours, and hours, and hours to get anything on the page, and then once it’s on the page you have to go back and edit it. UGH. There is nothing about being a writer—even a fanfic writer—that is lazy.
o And anyone who tells you that trying to tell a fresh, new story within the limits and confines of a pre-existing world and have it make sense is cheating, then they have no freaking clue how hard it is to be creative with that kind of limitation placed on you. It’s harder when you have a set of rules you need to follow. What you do come up with is often extremely interesting and creative because of those limitations, not in spite of them.
o The argument that using pre-made characters, settings, tropes, and worlds to make up a new story is cheating is also complete bunk. Do those same people also expect hockey players to whittle and plane themselves a whole new hockey stick from scratch before each game? No, of course not. And yeah, a baker can grow all their own wheat, grind the flour, raise the chickens and cows so they can get eggs and milk, distill the vanilla, etc. Or a baker can buy a box mix. Either way, you get a cake at the end of the process. Whether you write fanfic or original fiction, you still get a story at the end of the process.
· It makes you a worse writer.
o * annoying buzzer noise * Practicing anything does not make you worse at it. And reading stories that are not edited, expertly crafted, or “high art” will also not indoctrinate you into being a bad writer. If anything, figuring out why you don’t like a specific story, trope, or writing style is actually a great way to learn what kind of writer you want to be, and to learn different methods of constructing sentences, creating images, and telling tales. Or you know, just how much spelling and grammar matter.
· It’s not highbrow or thoughtful enough.
o Sometimes stories are allowed to be just comfort food. Not every book or story you read has to be haute cuisine or boringly nutritious. You are allowed to read stories because they’re exciting, or swoony, or funny, or just because you like them. Anyone who says differently is a snob and worth ignoring. (Besides, fun silly stories can also be packed with meaning and lessons—I mean, hello, Terry Pratchett, anyone?)
· It makes you waste all your time on writing that can’t be monetized.
o No time is wasted if you spend it doing something that brings you joy. Not every hobby needs to be a money-maker and not everyone wants to be a professional writer. You are allowed to write, and read, fanfic just for the fun of it.
· It’s theft.
o According to Fair Use Law, it’s not. As long as the fanfic writer (or artist, cosplayer, etc.) is not making money on their creation that directly impacts or cuts into the original creator’s profit, or is not repackaging/plagiarizing the original Media Text and profiting off it’s resale, then Fan Works are completely legal. So there.
How, exactly, does fanfic make you a better writer?
Fanfiction…
· teaches you to finish what you start.
o The joy of being able to share your fic, either as you’re writing it, or afterward, is a big motivating factor for a lot of people. They finish because they get immediate feedback on it from their readers and followers. Lots of people have ideas for books, but how many of them do you know have actually sat down and written the whole thing?
o Fanfic is also low-stakes; there’s nothing riding on whether you finish something or not, so you have to inspire yourself to get there without the outside (potentially negative) motivation of deadline or a failing grade if you don’t get the story finished. You end up learning how to motivate yourself.
o Fanfic has no rules, so you write as much or as little as you want, stop wherever you think is a good place to end the story, write it out of order, or go back and write as many sequels or prequels as you like. Again, it’s totally low-stakes and is meant to be for fun, so you can noodle around with what it means to write a “whole” story and “complete” it, which teaches you how you like to write, and how you like to find your way to the finish line.
· teaches you story structure.
o Before you can sit down and write a story based on one of your favorite Media Texts, you’re likely to spend a lot of time consuming that text passively, or studying it actively. Either way, you’re absorbing how and why Media Text structures the stories it tells, and are learning how to structure your own from that.
o Once you’re comfortable with the story structure the Media Text you’re working in is told, you’ll probably start experimenting with different ways stories can be told, and find the versions you like to work with best.
· teaches you how to write characters consistently.
o Fanfic is really hard because not only do you have to write your fave characters in a way that moves the story along, but they have to be recognizable as those fave characters.
o This means you have to figure out their body language, verbal and physical tics, their motivations and they way the handle a crisis (fight, flight, or fawn?), and then make up the details you may need for your story that you may never see on screen/the page, like how they take their eggs or what their fave shampoo is, based on what you already know about them. That takes some top-notch detective work and character understanding to pull off.
o Once you know how to do that, just making up a whole person yourself for original fiction is a breeze.
· Teaches you how to hear and mimic a character/narrator voice.
o You have to pay close attention to how an actor speaks, or how a character’s speech patterns, dialect, work choice, etc. is reflected on the page in order to be consistent in your story.
o And all of this, in turn, teaches you how to build one for yourself.
o I have a whole series of articles here about building a narrative voice, if you want to read more on constructing an original voice for your narrator.
· Teaches you how to create or recreate a setting.
o Again, like achieving character consistency, or mimicking a character or narrative voice, it takes work and paying attention in order to re-create a setting, time period, or geographical region in a fanfic—and if you’re taking your characters somewhere new, your readers will expect that setting to be equally rich as the one the Media Text is based in.
o Which, again, teaches you how to then go and build an original one for yourself.
· teaches how to take critique.
o Professional writing is not a solitary pursuit. In fact, most writing is not entirely the work of an author alone. Like professional authors work with editors, critique partners, and proofreaders, some fanfiction writers will sometimes work with beta-readers or editors as well. This are friends or fanfic colleagues who offer to read your fanfic and point out plot, character, consistency, or story structure errors, or who offer to correct spelling and grammar errors. This is a great way to practice working with editors if you decide to pursue a professional career, and also a great way to make friends and strengthen your community and skill set if you don’t.
o Many fanfic sites offer readers the opportunity to leave a comment on a fic, rather like a reviewer can leave a review on GoodReads or Amazon, or any other online store or blog, for a novel they’ve read. Sometimes these comments/reviews are 5 star and enthusiastic! Sometimes they are… not. The exact opposite in fact. As you get comments on your fanfic, and learn to ignore the ones that are just mean rather than usefully critical, you gain the Very Important Skill of learning to resist firing back at bad comments or reviews, while enjoying the good ones. It also teaches you how to ignore drama or haters.
· Teaches you how to exist within a like-minded community.
o While the actual writing part of writing is solitary and sometimes tedious, nothing is ever published into a vacuum, whether it be fanfiction or original. Besides your editing/critique/beta reader group, you will also likely develop friendships, a support network, and mutuals. It’s always great to uplift, support, cheer on, and celebrate one another’s accomplishments and victories, whether the writing is fanfic or original.
· Teaches you that it’s okay to write about things important to you, or your own identity.
o You can change a characters ethnicity, cultural background, sexuality, religion, or disabilities to match yours, and talk about your lived life through the megaphone of that character. Or, you can insert original characters based on you, your desires, and experiences.
o Once you’re comfortable writing in your #ownvoice in fanfic, you can approach it in original fiction, if you like.
o See my article titled Your Voice Is Valid for more on this.
What if I want to be a professional writer?
Notice how I didn’t say “real writer”. Any writer who writes any kind of story is a ‘real’ writer. I mean, pinch yourself—you’re real, right? The difference is actually between being an “amateur” writer (a hobbyist who does not write for pay), and a “professional” (who is paid for their writing). Just because you only play shinny on the street with your friends, or in a house league on the weekends, it’s doesn’t mean you’re not still as much of a hockey player as someone who plays in the NHL.
Writing fanfiction before or at the same time as writing original fiction that you intend to sell is a great way to learn, or practice, everything I’ve mentioned above. If you read it widely, it will also expose you to different story telling styles, voices, and tropes than your reading of published fiction.
· Can I sell my fanfic?
o No. For fanfiction to remain under the umbrella of Fair Use Law, you cannot profit off your fanfiction. There’s some grey-area wiggle room around things like charging a small amount for a ‘zine or a PDF to cover administrative costs, but zero wiggleability around, say, selfpublishing your fanfic and charging heaps for it.
· Can I “file off the serial numbers”?
o “Filing of the series numbers” is when you take a fanfic you’ve written and essentially pull it apart, remove everything that’s clearly someone else’s Media Text, and reassembling the story so that it’s pretty much a completely original piece of creative writing.
o Yes, you can sell these, provided your filing is rigorous enough that you aren’t likely to be dinged for plagiarism. It’s widely known that Cassandra Claire’s Shadowhunters was once Harry Potter fanfic, and that Fifty Shades of Gray was once Twilight fanfic. But did you know that my Triptych started life as an idea for a Stargate Atlantis fic? There’s lots of stories out there that were once full fics, or the idea for the novel was originally conceived for a fandom, but written as original instead.
o So long as you’re careful to really rework the text so that it’s not just a find-name-replace-name rewrite, you should be fine.
o Be aware, though, that the agents and editors you might pitch this novel to know how to Google. They may discover that this is a filed-off story, and depending on their backgrounds and biases, might be concerned about it. There’s no need to inform them of the novel’s origin straight off in your pitch/query letter, but you may want to have a frank discussion with them about it after it’s been signed so they can help you make sure that any lingering copywrited concepts or characters are thoroughly changed before publication.
o Should you take down the original fic-version of the novel while you’re querying/shopping it? Well, that’s up to you, and whether you’re comfortable with an editor/agent potentially finding it.
· Should I be ashamed of my fic, or take it down, or pretend I never wrote fic?
o What? Why? No! I mean, I have hidden some of my most immature work, but I’ve left pretty much my whole catalogue of fanfic online and I don’t deny that I was/am a ficcer. Why? Because it’s a great repository of free stories that people can read before they buy one of my books, so they can get a taste of how and what I write. Also, you will be in good company. Lots and lots of writers who are published now-a-days started in fandom, including:
Steven Moffat
Seanan McGuire
Rainbow Rowell
Claudia Gray
Cory Doctorow
Marissa Meyer
Meg Cabot.
Naomi Novik
Neil Gaiman
Lev Grossman
S.E. Hinton
John Scalzi
The Bronte Sisters
Andy Weir
Sarah Rees Brennan
Marjorie M. Liu
Anna Todd
...and me, J.M. Frey
How fanfic can harm.
Like with anything else, there are ways that reading and writing fanfiction can actually harm you, or others, but it has nothing to do with the reading or writing of fanfiction in and of itself.
· Some creators may prefer that you don’t (and may or may not follow up with legal action).
o Anne Rice famously went after fanficcers in the 90s who wrote fanfic of her work, handing out Cease & Desist notices like confetti.
o 99% of creators don’t care. Those who do will generally have a notice on their websites or social media politely asking fancreators to refrain. Mostly this is due to their general discomfort over the idea of anyone else getting to play in their worlds. The best thing to do is respect that request, and find a different fandom to write in.
· Flamewars and fandom fights leading to bullying and doxing.
o Regrettably, just like any other community filled with people who have different favorites, opinions, and preferences, there will inevitably be clashes. It’s up to you to decide how to react to negative interactions, and how to model positive ones.
o Don’t forget, you curate your online experience, so don’t be afraid of that block button.
o Also, don’t be the jerk who goes after people for liking different aspects of the fandom. Everyone is entitled to interact and like a Media Text their own way. “Don’t yuck my yum,” as they say.
· Trying to make money on other people’s IP/Media Text (law suits, etc.)
o It doesn’t belong to you, so don’t try to make money on it.
o There’s a grey area here in terms of selling prints/plushies/jewelry/etc. and there’s no hard line about where one copyright owner will draw the line, and another won’t. Warner Bros. owns the film rights for both Harry Potter and Hunger Games, but I’ve seen Harry Potter-themed bars spring up while fans wanting to make Hunger Game fanfilms have been shut down. A friend of mine sells hand-made fandom-inspired items at cons—there is no rhyme or reason to what she gets told to stop making and what she’s left alone on.
o Best thing to do if you’re told to stop is just so stop, move on, and find a different fandom to be active in.
· Writing Real Person Fanfic (“RPF”) can be considered a violation of consent.
o This article sums it up pretty well, but basically… if you decide to write RPF, be aware that they person you are writing about is a real person, with real thoughts, and emotions, and they may feel violated by RPF. If you decide to write it, never send it to the people it’s about, and always clearly tag it so other can choose to engage with it, or avoid it.
o Also be aware that it could ruin their love for what they do. For example: the friendships between the members of 1Direciton became strained and the band eventually disintegrated because people wouldn’t stop sending band members smutty stories or art of them having sex with one another, and it made them too uncomfortable to continue in the band.
· Showing/sharing fanfic & fanart outside of its intended context. Fanworks are for fans, and there are definitely issues if…
o It’s shown to celebrities/actors/creators.
Shoving your fantasies onto the people who create or portray your fave characters is rude, and wrong, and also kinda gross. If they seek it out themselves, that’s one thing, but the same way you wouldn’t throw it at a complete stranger, don’t throw it at them. You may love the characters these people play, but they are not their characters, and they are not your friends.
It may also really weird them out and ruin their love for what they do.
o it’s shown to writers working on the series.
There was a famous case where a fanficcer sent a story to a novelist, and the novelist was accused of plagiarism by the ficcer when their next novel in the series resembled the plot of that fanfic. There was a whole court case and everything.
Because of this, writers of TV shows, books, etc. don’t want to (and often times, legally can’t) read your fanfic. They don’t want to get accidentally inspired by what you’ve written, or worse, have to throw out something because it resembles your fic too closely. Just let them write their stories the way they want, and if they choose to seek out fic, they will.
o it’s mocked by celebrities.
I’m not letting Alan Carr and Graham Norton off the hook. If it’s super rude and gross to shove fanworks at actors/writers/creators when you’re a creator, then it’s doubly rude for anyone to take a story or art made for a specific audience (the fans), by a specific community (the fans), lift it out of it’s context, and invite the public to mock it while also shoving it at the actor/celebrity in a place where they are literally cornered and can’t leave (i.e. the chat-show sofa). Man, it really steams me up when they do that. It’s rude and it’s tone-deaf, and it’s not fair.
And most of the time they do it, they don’t even ask the artist or writer for permission, first, which is just…. Uuuuugggghhhh. It may be fanfic, but it was still created by someone, and you should always ask permission before publicly sharing something created by someone else.
Grrrrrrr.
In Conclusion
If someone tells you that reading or writing fanfic is bad for you as a creator, tell them to get bent.
Famous Fanfic
· Hamilton by Lin-Manuel Miranda
· Wicked by Gregory Maguire
· Wicked: the Musical by Stephen Schwartz
· The Phantom of Manhattan by Fredrick Forsyth
· A Study in Emerald by Neil Gaiman
· Sherlock by Mark Gatiss and Steven Moffat
· The Dracula Tape, by Fred Saberhaugen
· Paradise Lost, John Milton
· Inferno, by Dante
· The Aeneid, by Virgil
· Ulysses, by James Joyce
· Romeo & Juliet, by William Shakespeare
· The Once and Future King by T.H. White
· A Connecticut Yankee in King Arthur’s Court, by Mark Twain
· The Three Musketeers, by Alexandre Dumas
· Pride & Prejudice & Zombies, by Seth Grahame-Smith
· Phantom, a novel of his life by Susan Kaye
· …and so many more.
#words for writers#fanfiction#fan fiction#fan fiction is good for you#writing#am writing#writing community#writing fanfiction#writing fanfic
14 notes
·
View notes
Text
Wellesley Underground Interview with Founders (Sara Hess ‘08 and Shavanna Calder ‘08) of Feminist Fashion & Beauty Magazine, MUJER!
Need a break from the politics? Dive into the making of Issue No.2 of MUJER! Magazine. Interview by Camylle Fleming ‘14.


1. Wellesley Underground (WU): Tell us about the origin of MUJER! Magazine and bring us up to speed on the November launch.
Sara Hess ‘08, Editor in Chief: MUJER! has been a long time coming for us. Ever since Shavanna and I were swapping clothes from each other’s closets when we were roommates at Wellesley, we’ve had an interest in fashion and over the years we’d often played around with the idea of doing a fashion related project together. MUJER! came about in late 2017 when I had reached a point of being really frustrated with fashion magazines (all of the ads and the Photoshop, the lack of any real content and focus on hyper consumption). I also was disappointed to see that several of the fashion bloggers I’d followed over the years and enjoyed for their authenticity were following the same route as they transitioned from blogs to Instagram and started posting highly stylized Photoshopped pics that were all sponsored and very phony. Finally, I had recently turned 30 and it then occurred to me that I was older than nearly all the models I saw in the major fashion publications, which is insane when you think about it. I told Shavanna what I was thinking of doing-- a feminist fashion and beauty mag, all models 25+, no Photoshop on their faces or bodies, more racial and ethnic diversity, a focus on more sustainable production and consumption and no ads. Shavanna is an amazing stylist and has a great eye for design so I was super excited when she agreed to be creative director. I was living between Mexico City and New York at the time. I had developed some contacts in the fashion industry in Mexico and really admired the fashion scene there, which is one of the reasons we went with the name MUJER! It took us about 6-7 months to produce the content for the first print edition which was published in September 2018.
2.WU: How did fashion and beauty become sites of contestation and rebellion for you two?
Sara: I grew up in a small town in rural Pennsylvania and was constantly getting in trouble for breaking the dress code at my public school. It’s ironic because I was definitely a major nerd-- not your typical rebel. In junior high, I was really upset to find out I had not been accepted to the National Junior Honor Society. I asked one of my teachers why and he told me that it was because the shorts that I wore to school were often too short. Honestly, it was not my intention to be risque. I was just awkwardly going through puberty and had legs that were too long for my body and it was impossible to find shorts that were long enough and didn’t look dorky. After that, I went through a punk rocker phase, where again clothing is a form of rebellion. I was totally into the early Gwen Stefani punk looks. I would get picked on a lot by classmates but then a few months later everyone would be wearing what I had been wearing before, which would be my cue to change styles because I never wanted to look like everyone else. For me, it became a way to stand out and to push back against conservative influences.
Shavanna Calder ‘08, Creative Director: I can’t say that I’ve thought of fashion for most of my life as a site of rebellion. I just wore what I liked and (especially as a kid) what was on trend.
I had hip surgery 5 years ago and have struggled to be able to wear heels after that. In some ways that forced me to rethink how to dress for formal situations (without heels). Though I am working towards wearing heels again through physical therapy (my profession requires it), I’ve found a certain level of pride in showing other women that we can still look dressed up/professional etc. without wearing heels. Also embracing flatforms has been fun!
I think beauty, more so, has always been a site of contestation and rebellion for me as a Black woman. Growing up and having hair that was different than most of my friends. Makeup and hair supplies that we had to drive an extra distance for. Reading different magazines than my friends because teen vogue (at that time), seventeen etc never catered to me (thank God for Essence). Now, being natural, my hair oftentimes is a point of rebellion/contestation as I educate and ask for the things that I need as a Black artist instead of accepting the burden of sitting in silence.

Founders Shavanna + Sara (above)
3. WU: On social media, you’ve discussed the initiative of “showing women as they actually exist in the world”. Can you describe some of the images you two grew up with and how they are in conversation with MUJER!
Shavanna: In some ways growing up when I did, I feel like I did get to see images of women (more often) without photoshop and a ton of contouring etc because that just wasn’t on trend. It’s one thing I miss about the early 2000’s. That being said, the rest of the content oftentimes centered around ways to get men, look flirty etc etc. For us I think “showing women as they actually exist in the world” goes beyond imaging to the content of the magazine (the stories and issues that are discussed) as well as the lack of harmful ads encouraging women to alter their bodies by buying certain products etc. We are able to highlight a diverse group of female identifying folx and the complexity of us instead of the monolith that I often see portrayed.
4. WU: What are the ways in which your Mexico City base contributes to the core principles of MUJER!
Sara: Mexico City is just my heart and soul. I don’t know how else to describe it. It makes me turn to mush as though I’m talking about someone I’m in love with. The creative and design scene here is out of this world funky and unique and I really feel that I can wear anything going out here at night. People are elegant and cool and put a great deal of thought into how they present themselves. The fashion scene is authentic and fun and nowhere near as pretentious as it is in other parts of the world. We try to reflect this creativity and sincerity in MUJER! as well.
Shavanna: Additionally I’ll say that people have really embraced us there. There is an openness, flexibility and sense of collaboration that has made it super easy to throw any ideas we have out there and run with it (more than I’ve seen in other parts of the world).
5. WU: For those of us who are new to publication production, can you walk us through the steps of creating content, finding models, artwork, all without the filler of advertisements?
Sara: We are also new to magazine production, ha! We started by basically bringing together people we knew from the fashion world here in Mexico City. I have a dear friend, Jenny. She’s a stylist from Sweden and was working on the sets of reality shows here so she kind of kicked me into gear to do the first beauty shoot. She had a lot of experience doing shoots so she helped me get a great photographer and scout a location and models. We’ve really been blessed with meeting all of the right people at the right moment. We found a wonderful lead graphic designer, Celina Arrazola who happened to know the neighborhood where all the printers are and was an expert in hand binding books. Advertisements were never an option so we self-finance the production, which was and is intense.
Shavanna: Yes, as Sara mentioned we’re incredibly new to this and are (honestly) still figuring a lot out as we go. However, generally we come up with ideas/stories together that excite us, that we haven’t seen in other fashion magazines. We then reach out to female identifying folx to help us realize these ideas (because we want to support female entrepreneurs as well). The hardest part will be figuring out how to make it sustainable (and take the more of the financial burden off of Sara) and we’re in the process of sorting that out the best way we can!
5a. WU: Okay, same question. Add COVID, go:
Sara: Now, because of COVID, our plans to do another print edition were derailed so we decided to do a digital edition-- everyone featured sent in their own photos and instead of printing we created a PDF version of the magazine, with Celina’s excellent graphic design of course.
It essentially made printing the way we did with the first edition impossible. That was a very manual process that involved visiting the printer in person multiple times and Celina handbound the magazine, with me struggling to be useful to her by folding the pages. This time we went all digital.
Shavanna: In addition we had to become creative since we could no longer conduct shoots or interviews in person. Everything was done via email (except for Sultana’s shoot which happened pre-COVID). All other photos were submitted by the women in the issue. Whilst I missed many aspects of being in person, in some ways the challenge allowed us to lean in to our mission of showing women as we truly are. It also allowed for us to have a remote intern via Wellesley which was awesome!

6. WU: How do you want to grapple with the plurality of feminism(s) in the pages of the magazine?
Shavanna: By being truly intentional about seeking out diverse voices. By celebrating those voices and by taking our readers feedback to heart. Outside of the folx who are interviewed or featured in our magazine we attempt to employ women in the creation of the physical product as well (design, photography etc). The end result is something that has been touched by women from various parts of the world and from different walks of life.
7. WU: Can you share the story of how the magazine gained its title? How do you respond to any pushback and claims of appropriation from Latinx individuals for your usage of the word “Mujer”?
Sara: For starters, we were founded in Mexico City and at least half of our readers are native Spanish speakers. The publication, like many of its readers, is also bilingual. For the interviews and articles that are originally done in Spanish, we leave them in Spanish, only translating key quotes into English and vice versa for pieces that are originally in English. The title is also a global call to women that goes beyond the English-language paradigm.
8.WU: The fashion and beauty industry can carry both an air of superficiality and apoliticism. Tell us what people get wrong about the experience of working within it.
Sara: I think this is hard for us to get into because we are not really working in the fashion and beauty industry-- we are working parallel to it and trying to pick the piece we enjoy while also creating something new and different for women that makes them feel empowered, not inadequate.
Shavanna: Yes neither Sara nor I really work within the industry (nor have we prior to the magazine). I’ve worked as a stylist from time to time, but that’s about it. For the most part we’ve been consumers who were unhappy with what we were consuming and figured we could do something about it.
9. WU: In an effort to not over-glorify the value of success and “making it”, let’s talk about failure. Can you share with our readers what went wrong in the process of producing MUJER!?
Sara: Before our Chilanga shoot, Shavanna and I got horrible food poisoning. Like, nearly had to go to the hospital.
Shavanna: Yes we were living on pepto bismol and had just started eating plain bread and pasta the day of our shoot, but we powered through! Honestly this magazine has felt like a contribution to society that we were meant to be a part of, so despite obstacles that have come up, we know that we can’t be sidetracked.

10. WU: How do you react to the “self-care” trend and it’s correlation to the consumption of beauty products? Relatedly, how do you two take care of yourselves?
Sara: I’m an introvert who fakes being an extrovert, but I definitely know I need alone time so I try to make space for that. As of late, I try to use more natural/ organic beauty products and just less of everything period. Also sleep. Sleep is so important. Finally, I’ve decided I will deal with drama in my professional life because I feel like that’s where I’m making a contribution that’s important but I try to minimize drama in my personal life as much as possible.
Shavanna: I try to take care of myself by reminding myself that rest is ok and necessary (so hard). Practicing my faith/meditation. Asking for what I need. Going to therapy (physical and mental health). Exercising. Connecting with loved ones (friends and family). Being kind to myself.
11. WU: As a follower of your Insta page, I find myself lingering on your original posts, staring into the faces of the individuals you capture. It makes me realize how my brain has been trained to see the same faces featured in public spaces, so much so that they’ve become invisible. Can you share the favorite photos that you’ve captured and why they stand out to you?
Shavanna: My favorite photos are of Wellesley alumna Solonje Burnett. I’ve always admired Solonje’s fearlessness and creativity and I think we truly captured her essence in these. Though she is beautiful, the interview is about so much more and highlights her as the complex, multifaceted woman that she is (instead of just her beauty routine or what her house looks like).
12. WU: What does the day in the life of an Editor-in-Chief look like? How about a Creative Director?
Shavanna: We’re very collaborative. I don’t think we really have hard and fast rules as to who does what necessarily as much as it’s a partnership. One of us will propose an idea (in between juggling the rest of our lives) and we’ll discuss pros and cons and greenlight what works best and aligns with our values. We also just hold each other accountable. Right now there isn’t a typical day in the life as well just because we both have other jobs (though it would be amazing for Mujer! to continue to take off in a way that allowed us to devote more time to it).

13. WU: Both of you currently have worked with higher education institutions (Harvard + NYU). Can you tell us a bit about your “day jobs” and the types of opportunities they have afforded you in relation to the Magazine?
Sara: While I was working at HBS, I co-authored a case study on Monocle magazine which has helped to inform some of our thinking around the business model for MUJER!
Shavanna: I worked for almost 7 years at NYU, first at Stern and then within the Faculty of Arts & Science. In terms of opportunities? I’d say actually, for me, anyway the two aren’t related. My time at NYU influenced my acting career more so than Mujer! by giving me some flexibility and certainly financial stability.
14. WU: Lastly - a question you ask your features in the upcoming digital issue: how have you been gentle with yourself during this time?
Sara: Uff, I have been eating a lot of ice cream and taking breaks when I need to. I turned off the New York Times news alerts on my phone. I still read the news everyday but this has helped a lot.
Shavanna: Uff indeed. Hm sometimes I remind myself that the fact that I’m functioning is enough. This quote from Audre Lorde has been getting me through: “Caring for myself is not self-indulgence, it is self-preservation, and that is an act of political warfare.”
Working out and going for walks, journaling, therapy, being in touch with my spirituality, limiting myself on social media (or at least certain groups or accounts), listening to my body in terms of what it wants (whether that be food or change of environment). Talking to friends when I have the energy always brightens my day and constantly reminding myself to take things one moment/day at a time. This is all incredibly hard and I’m grateful to those who have been gentle with me when I struggle to be gentle with myself.
Check out the MUJER! Covid-19 digital issue here: https://www.mujerrev.com/mujer-sale Given the increase in domestic violence and gender based violence around the world during the pandemic, a portion of the proceeds from the issue will go to two organizations helping womxn that are survivors of domestic abuse and human trafficking: Women of Color Network - Blue Lips Campaign and El Pozo de Vida.
MUJER! Homepage: https://www.mujerrev.com/ MUJER! Instagram: https://www.instagram.com/mujerrev/
2 notes
·
View notes
Text
How to Build an Author Website – Learning to Build a Site
In our last installment of “How to Build an Author Website,” we discussed finding the right hosting provider, the details of securing a domain name, and how to ensure you were getting a good deal that has everything you need!
This time, we’re down to the nitty gritty – learning how to build a site. As mentioned in the “Budget” article of this series, you do have the option of hiring a professional designer who can handle all of this for you. For that matter, they may be able to make the site far more complex and ‘beautiful’ than what you can manage personally. They’re professionals, after all; it’s their craft. They could probably write their own very nice stories, but if they wanted a bestseller, they’d come to you!
Nonetheless, they want a pretty penny for their expertise, and if you lack the budget or have confidence in your self-teaching abilities, you can certainly create a fantastic author site all by your lonesome. After all, that’s what Lena did, author of Behind Closed Doors: Trusting The Unseen and the dynamite gal providing us with some insider knowledge on building your own author site.
Here, we’ll dive into learning to build our own author sites, from scratch, with no previous experience.
Custom Build or Pre-Built
Now ‘from scratch’ can absolutely mean from scratch. However, we don’t recommend starting with a blank page and a dream, as this would require more coding knowledge than any of us are really willing to gain (unless you want to dual as a web designer and a writer; then by all means!). That leaves you with two other options:
Custom Build
This involves taking one of the most basic templates you can be given via your hosting provider and completely redeveloping it.
Pro-Tip from Lena: “I would suggest any of the WYSIWYG websites (“what you see is what you get,” in the industry’s shorthand). A lot of hosting providers offer these types of websites nowadays, and they are very easy and straightforward to build and design with. You design these sites with blocks and image or text boxes, and it’s so much easier to both build and edit the site with these functions. Many providers also offer functions with easy drag and drop function that can add things like dividers, social media galleries, videos, widgets, plug-ins, etc.”
Divi on Wordpress, for example, is one such plug-in. Though it does charge a fee to use, it makes web designing more intuitive and less coding intensive.
This option will also allow you to create, nearly from scratch, your own ‘shop function’ – should you decide to sell your works off the site itself, as well as link to Amazon, Barnes & Noble, and so on.
Pre-Built
This one is about using an existing template that has the look and features you like, and then redesigning it to be personalized to your tastes. This will be less thorough than the above option, but can still achieve the purpose you’re seeking. So, for example, the template you choose may have a social media plug-in, two set dividers, and then a few pre-set locations for photos.
In this, you’ll mainly aim to change the color scheme, add a banner or picture section higher or lower in the layout, and customize what other features it allows you to work on.
Advantages
Less investment. You don’t need to buy plug-ins such as Divi for more advanced reworking.
Faster to set up. With fewer customizations and less time necessary for learning how to customize, you can have your site up and running in two days or less.
Leaves room for later improvement. As time goes on, if you decide you’d like to upgrade to a more customized layout, you have all the opportunity in the world. For now, it does the job pretty well.
Disadvantages
You may end up looking similar to other sites, who also sought to lower costs and time.
May not be as custom-tuned as you’d like it. Since this site will be your digital ‘first impression’ on readers, you may be disappointed that it doesn’t emulate your aesthetic as well as you’d prefer, or that it doesn’t provide as many options as you’d like to treat your viewers with.
Online Classes vs. General Internet Research
If you choose the custom-build site, or decide on a more in-depth approach to designing your own website, you’ll need some extra know-how.
Of course we rely on the internet for a lot of our answers, including some things that could put us on a watch-list (hey, that information about C4 was really important for the one scene!). But then again, the internet can only offer so much for a single query. Would you be better off seeking online classes to show you the ropes? Let’s weigh the pros and cons.
General Internet Research - Advantages
Well, it’s free! If you’re willing to type in enough queries, follow enough links recommended in articles or videos you find, and can Google terms that fly over your head (with a willingness to follow those rabbit holes as well), you can absolutely become more fluent in designing a site without spending a dime.
You get more opinions, and that means more options. While an online class will perhaps give you a more thorough look in a shorter span of time, you are limited to the knowledge and opinions of that teacher. Maybe they have a bias to a certain hosting provider, or perhaps they dislike certain widgets. Google will give you all sorts of insights and opinions, which translates to a better-rounded look at the practice. You may even find someone willing to offer you uncommon but useful hacks! (Life-hacks, not regular hacks. Those are in bad taste.)
More control over your learning process. If you’re quick to pick up new concepts, then general internet research allows you to go where your knowledge level takes you. Skip ahead and become well versed in the terms, take advice on one plug-in and run with it before exploring the others, or get a feel for the entire process and then dive into practice! You get to choose your own pacing, so while some may need a several-week class, you could arguably do it in a week.
Disadvantages
Unreliable, to an extent. The internet being the internet, not everything you find will be entirely helpful or factual. As such, you’ll have to look up multiple sources and then compare notes by yourself to decide what is really helpful and what can be discarded.
Beginner’s guides aren’t always beginner friendly. Since you’ll be asking a broad question in an even broader room, you won’t get a customized answer every time. This means you’ll have to swift through a lot of information and try to figure out what’s beginner friendly and what’s way over your head! That leaves you with the task of then finding something beginner friendly.
Takes time. Sadly, since you’re looking to glean knowledge ‘needle in a haystack’ style, this will take a fair amount of time – and time that you can’t necessarily schedule in advance. You just have to start and see when it is you feel confident enough to put that knowledge into practice.
Online Classes - Advantages
Concise. By entering a class, you’re avoiding all the fluff and white noise of the internet. You know exactly what you’ll be taught and how long you can expect it will take.
You have peers just like you, and a teacher to answer specific questions. While the internet leaves you to ask the void over and over again until you find someone who maybe answered a question similar to yours, a class gives you a closed group of people just like you, who may ask the questions you’re thinking. At the minimum, you likely have access to a teacher who can answer your questions - or at least guide you to an answer.
Trackable. Most classes offer a promise of what you’ll find at the end; you’ll be able to do ‘this’ amount of web design, or build a site like ‘this.’.
Disadvantages
Costly. While you can certainly find free classes, most of those which give you the advanced tools necessary to fully customize your site will cost money. It’s an investment, but it still hits the budget.
Limited. Sadly, you will be limited to what this exact class teaches, and that may leave gaps in your knowledge that must be filled with other classes or even internet research! You may also be restricted to that specific teacher’s opinion on web design, which, while valuable, could result in you missing out on a life-hack that may have worked perfectly for you.
Time consuming. While this seems counter-intuitive to the facts above, a class will be scheduled over several weeks. It’s unlikely to find a quality one which takes only days, and that means you’re committed to waiting for more information. The internet could let you speed along at your own (perhaps much faster) pace.
Resources
Whichever you choose, here are a few great places to start:
Website Builder Expert
Research-Backed Web Design Tips
The Site Wizard
Free Web Development Courses
All in All
That finishes up this article, so check out our next installment in this five-part series, where we discuss how large or small your author site should be according to industry standards, as well as explore whether or not a site negates your need for social media.
Thanks for reading, and happy writing!
#website building#author site#author website#self publish#writing advice#L S Andersson#Behind Closed Doors#Behind Closed Doors: Trusting The Unseen#iawt#building an author site#learning to web design#web design from scratch
149 notes
·
View notes
Text
Dev-It-Yourself: A Place to Start
I'm a hobbyist games developer not professionally taught in any capacity beyond A-Levels, and one of the biggest hurdles to me actually getting stuck in was feeling as though I didn't “know” enough. I felt, as many do, that I had to be an expert at coding, art, animation and so forth. This was, until I realised, there are actually plenty of resources, tutorials, books, YouTube videos, blogs, and much more besides all dedicated to discussing games, the culture around games, design and development processes and much more besides. I firmly believe that restricting yourself to learning exclusively about video games and nothing else, no other media -be it print or film-, is restrictive and reductive to both the medium and yourself. Plenty of hobbyist/independent developers, such as myself, have used these sources to aid our learning, and frankly, I don't see there being any shame in it in any capacity. If the information is out there, use it. Create with abandon.
Of course, in my other series I talk about how playing games can help too but it is much more than just “playing” games, in the same way I was taught way back when to always be 'reading' [ie, analysing] films as I watched them. As always, I'd say take this advice with a pinch of salt- I'm no professional, I do this in my spare time at an average-ish level. But, this is just a collection of personal resources that have helped me. Later on in the series, I'll be laying out how I've planned, conceptualised, designed and made games I've worked on in all stages. Again, purely anecdotal – I'm no expert.
One of the first places I'd suggest any prospective dev would look to for practice and inspiration would be the modding community. There are plenty of games out there which provide modding tools with them, and these can be a good place to go and practice level design, gameplay concepts, and just messing with basic code structures. GMOD, Half Life, Bethesda Games, even DOOM wads can be great places to begin; you can get a feel for yourself for things that work, how to fit things together organically, even using full conversion mods to take asset creation out of the equation to focus upon writing for a small time. This is where I started, though none of those mods came out, it became a great place for me to practice and eventually, grow confident with concepts.
In a similar vein, there are a few software packages that come with assets and engines inbuilt that can be great ways to practice and develop skills such as level design, writing, and so on; software such as RPG Maker, which comes in all sorts of modules, can be surprisingly versatile. You can use it to make levels from assets known as RTP that come with the engine, use assets provided by the community, or modify pre-existing assets for your own needs. Again, this is something I practiced with a lot as its modular coding system -which comprised of a lot of drag-and-drop and clickables- helped me familiarise myself with logic systems popular within coding, as well as how to design levels to look and “feel” good. And, once you've gotten familiar with the basics you can familiarise yourself with basic tileset rules, layers, and interfaces – and, with a bit of creativity, these can become unique ways to make games. I've seen scanned-in images, photographs, hand-drawn assets all utilised with RPG Maker to make something wholly unique. Check out Middens and Mortis Ghost's OFF for two examples of unique, stylised art created with RPG Maker in two completely different styles.
For practicing code at a base level, a basic grasp of HTML is often a great place to start. Software like Twine enables you practice both story-telling,and basic code from hyperlinks and hypertext to more complex code such as branching choices or choose-your-own style adventures. You can even incorporate text, audio and macros which, again, is a higher level of code, though by no means as difficult as it can be, it can be really useful for practicing basics of these skill-sets.
The reason I suggest most of these as good starting bases is one primary reason: asset creation takes a long time. Making your first project might well be forefront in your mind but I've learned, mostly through trial and error – and a lot of error at that – is that you need to focus on specifics when teaching or learning. If you try to learn coding, asset creation, animation, all at the same time it is possible but often not manageable, or at least not in my experience. By saying to myself “I'm going to focus on HTML”, it has allowed me to properly learn and understand the fundamentals without getting distracted by art direction too. All of the software I have recommended comes with in-built assets or at its core requires no asset use at all and this is useful for zeroing in on what you need to focus upon. Maybe you're already good at level design, and through experimentation you realise this and decide to focus upon animation or character deisgn.
And, when you want to take that next step these programs also have, either through the ability to edit or bring in your own assets, ways to practice and hone your other skills in relatively streamlined ways. RPG Maker tileset functionality was important for me to learn two things: multi-frame animations, and how to correctly place tilesets. Neither is particularly complex, but if you get one bit wrong in a tileset it can throw the whole asset off, and whittling down the animations to four key frames, to communicate the essentials, was a useful skill to learn even as I expanded to larger animations.
Another piece of software that I have found invaluable was PICO-8, a virtual console that you build and execute games with and, the slightly more complex but still ultimately easy for beginners Voxatron, from the same people. Everything in that is inbuilt so you build your assets and code within the engine, then the virtual console does the rest. It allows for easy exportation and initial conceptualisation – I've heard that the first build of Celeste was built in it.
Once I felt as though RPG Maker had taught me all it could, I moved on to looking for open-source games engines for more complex experimentation. I've dabbled with Unity, Godot, and a few others besides that. I use Game Maker a lot these days, just because it agrees with me the best. What works for me and what works for you will probably be entirely different, so don't take my word for it- look into documentation, experiment with the engines mentioned yourself, find what works for you. And remember, most importantly; everyone starts somewhere, don't give up because your first idea/s don't come together as you anticipated, or end up “rubbish”. Keep going, keep creating.
5 notes
·
View notes
Text
Version 324
youtube
windows
zip
exe
os x
app
tar.gz
linux
tar.gz
source
tar.gz
I had a great week. The downloader overhaul is almost done.
pixiv
Just as Pixiv recently moved their art pages to a new phone-friendly, dynamically drawn format, they are now moving their regular artist gallery results to the same system. If your username isn't switched over yet, it likely will be in the coming week.
The change breaks our old html parser, so I have written a new downloader and json api parser. The way their internal api works is unusual and over-complicated, so I had to write a couple of small new tools to get it to work. However, it does seem to work again.
All of your subscriptions and downloaders will try to switch over to the new downloader automatically, but some might not handle it quite right, in which case you will have to go into edit subscriptions and update their gallery manually. You'll get a popup on updating to remind you of this, and if any don't line up right automatically, the subs will notify you when they next run. The api gives all content--illustrations, manga, ugoira, everything--so there unfortunately isn't a simple way to refine to just one content type as we previously could. But it does neatly deliver everything in just one request, so artist searching is now incredibly faster.
Let me know if pixiv gives any more trouble. Now we can parse their json, we might be able to reintroduce the arbitrary tag search, which broke some time ago due to the same move to javascript galleries.
twitter
In a similar theme, given our fully developed parser and pipeline, I have now wangled a twitter username search! It should be added to your downloader list on update. It is a bit hacky and may be ultimately fragile if they change something their end, but it otherwise works great. It discounts retweets and fetches 19/20 tweets per gallery 'page' fetch. You should be able to set up subscriptions and everything, although I generally recommend you go at it slowly until we know this new parser works well. BTW: I think twitter only 'browses' 3200 tweets in the past, anyway. Note that tweets with no images will be 'ignored', so any typical twitter search will end up with a lot of 'Ig' results--this is normal. Also, if the account ever retweets more than 20 times in a row, the search will stop there, due to how the clientside pipeline works (it'll think that page is empty).
Again, let me know how this works for you. This is some fun new stuff for hydrus, and I am interested to see where it does well and badly.
misc
In order to be less annoying, the 'do you want to run idle jobs?' on shutdown dialog will now only ask at most once per day! You can edit the time unit under options->maintenance and processing.
Under options->connection, you can now change max total network jobs globally and per domain. The defaults are 15 and 3. I don't recommend you increase them unless you know what you are doing, but if you want a slower/more cautious client, please do set them lower.
The new advanced downloader ui has a bunch of quality of life improvements, mostly related to the handling of example parseable data.
full list
downloaders:
after adding some small new parser tools, wrote a new pixiv downloader that should work with their new dynamic gallery's api. it fetches all an artist's work in one page. some existing pixiv download components will be renamed and detached from your existing subs and downloaders. your existing subs may switch over to the correct pixiv downloader automatically, or you may need to manually set them (you'll get a popup to remind you).
wrote a twitter username lookup downloader. it should skip retweets. it is a bit hacky, so it may collapse if they change something small with their internal javascript api. it fetches 19-20 tweets per 'page', so if the account has 20 rts in a row, it'll likely stop searching there. also, afaik, twitter browsing only works back 3200 tweets or so. I recommend proceeding slowly.
added a simple gelbooru 0.1.11 file page parser to the defaults. it won't link to anything by default, but it is there if you want to put together some booru.org stuff
you can now set your default/favourite download source under options->downloading
.
misc:
the 'do idle work on shutdown' system will now only ask/run once per x time units (including if you say no to the ask dialog). x is one day by default, but can be set in 'maintenance and processing'
added 'max jobs' and 'max jobs per domain' to options->connection. defaults remain 15 and 3
the colour selection buttons across the program now have a right-click menu to import/export #FF0000 hex codes from/to the clipboard
tag namespace colours and namespace rendering options are moved from 'colours' and 'tags' options pages to 'tag summaries', which is renamed to 'tag presentation'
the Lain import dropper now supports pngs with single gugs, url classes, or parsers--not just fully packaged downloaders
fixed an issue where trying to remove a selection of files from the duplicate system (through the advanced duplicates menu) would only apply to the first pair of files
improved some error reporting related to too-long filenames on import
improved error handling for the folder-scanning stage in import folders--now, when it runs into an error, it will preserve its details better, notify the user better, and safely auto-pause the import folder
png export auto-filenames will now be sanitized of \, /, :, *-type OS-path-invalid characters as appropriate as the dialog loads
the 'loading subs' popup message should appear more reliably (after 1s delay) if the first subs are big and loading slow
fixed the 'fullscreen switch' hover window button for the duplicate filter
deleted some old hydrus session management code and db table
some other things that I lost track of. I think it was mostly some little dialog fixes :/
.
advanced downloader stuff:
the test panel on pageparser edit panels now has a 'post pre-parsing conversion' notebook page that shows the given example data after the pre-parsing conversion has occurred, including error information if it failed. it has a summary size/guessed type description and copy and refresh buttons.
the 'raw data' copy/fetch/paste buttons and description are moved down to the raw data page
the pageparser now passes up this post-conversion example data to sub-objects, so they now start with the correctly converted example data
the subsidiarypageparser edit panel now also has a notebook page, also with brief description and copy/refresh buttons, that summarises the raw separated data
the subsidiary page parser now passes up the first post to its sub-objects, so they now start with a single post's example data
content parsers can now sort the strings their formulae get back. you can sort strict lexicographic or the new human-friendly sort that does numbers properly, and of course you can go ascending or descending--if you can get the ids of what you want but they are in the wrong order, you can now easily fix it!
some json dict parsing code now iterates through dict keys lexicographically ascending by default. unfortunately, due to how the python json parser I use works, there isn't a way to process dict items in the original order
the json parsing formula now uses a string match when searching for dictionary keys, so you can now match multiple keys here (as in the pixiv illusts|manga fix). existing dictionary key look-ups will be converted to 'fixed' string matches
the json parsing formula can now get the content type 'dictionary keys', which will fetch all the text keys in the dictionary/Object, if the api designer happens to have put useful data in there, wew
formulae now remove newlines from their parsed texts before they are sent to the StringMatch! so, if you are grabbing some multi-line html and want to test for 'Posted: ' somewhere in that mess, it is now easy.
next week
After slaughtering my downloader overhaul megajob of redundant and completed issues (bringing my total todo from 1568 down to 1471!), I only have 15 jobs left to go. It is mostly some quality of life stuff and refreshing some out of date help. I should be able to clear most of them out next week, and the last few can be folded into normal work.
So I am now planning the login manager. After talking with several users over the past few weeks, I think it will be fundamentally very simple, supporting any basic user/pass web form, and will relegate complicated situations to some kind of improved browser cookies.txt import workflow. I suspect it will take 3-4 weeks to hash out, and then I will be taking four weeks to update to python 3, and then I am a free agent again. So, absent any big problems, please expect the 'next big thing to work on poll' to go up around the end of October, and for me to get going on that next big thing at the end of November. I don't want to finalise what goes on the poll yet, but I'll open up a full discussion as the login manager finishes.
1 note
·
View note
Text
Airtable Ical

Airtable Calculations
Airtable Calendar View
Airtable is a low-code platform for building collaborative apps. Customize your workflow, collaborate, and achieve ambitious outcomes. Get started for free. Generate iCal Calendar URLs for Airtable Records. A calendar integration with all your record data. If you need help with Airtable or setting up one of our extensions, you’ve came to the right place! Random Number and ID Generator for Airtable. Generate a random number. Find a plantswap event near you. Affiliate Programs Some of the links on my blog are affiliate links and at no additional cost to you, I will earn a small commission if you decide to make a purchase. Airtable is a low-code platform for building collaborative apps. Customize your workflow, collaborate, and achieve ambitious outcomes. Get started for free.
Want to sync your calendar app with Airtable? Here are all the ways you can set that up.
If you use Airtable to plan and schedule, you may have an external calendar app that you’d like to keep in sync. You have a few methods at your disposal if you want to set this up, depending on the needs of your workflow.
Let’s take a look at your options:
One-way sync: Airtable → another calendar app One-way import: Another calendar app → Airtable Two-way sync with Zapier
One-way sync: Airtable → another calendar app
You might manage your calendar outside of Airtable but also have a series of events in Airtable that you’d like to include on your calendar as well. In this case, you only need a one-way sync that takes the events you have in Airtable and syncs them to your favorite calendar app. This method requires the least effort and setup.
To begin, open up the base you want to work with and navigate to the table that contains the events you want on your calendar. If you have more than one table with events, you can just repeat the following steps for the other tables as well.
Create a new calendar view (or select one that you’ve already created for this table).
Choose any date field in your table to populate the calendar’s events. If you have two date fields that create a range, you can add one as an end date here as well.
With your calendar set up, click the share button in the table toolbar and look toward the bottom of the options. Click iCal subscription link to copy it to the clipboard.
Subscribe to that link in your calendar app and you’re all set!
Airtable Calculations
For more in-depth instructions on how to use these subscription links in popular calendar apples like Microsoft Outlook, Google Calendar, and Apple Calendar, check out this support article. It will walk you through this process visually if you need some extra help and offers assistance on subscriptions for specific apps toward the end.
One-way import: Another calendar app → Airtable
In some cases, you may want to move events in the other direction. When you need to perform a one-way import that takes events from your existing calendar app and imports them as new records in Airtable, you can achieve this with the calendar import block (a pro account feature).
To set up the import process, you’ll need to grab copies of your calendars as ICS files so they’re in the proper format for import. ICS is an open standard for digital calendars, so most calendar apps should export in this format (or at least offer it as one of its export format options). Here are instructions on how to export to ICS format for the most popular calendar apps:
Once you have your ICS file(s) ready to go, navigate to the base you want to use and follow these steps:
Choose the table you want to use for your calendar import.
Click the Blocks button in the toolbar to open your blocks dashboard (if it isn’t open already).
Add the calendar import block to your base.
Grab an ICS file you want to import and drag it onto the block to begin the import process.
Match up the event information from your calendar with the fields in your chosen table. You’ll see real examples of the imported data arranged in the way you select on the right side of the block so you’ll know if anything’s mismatched.
Click the Create records button when you’re ready and wait for the import to complete.
Now everything in your exported calendar should show up in the table you chose in Airtable. You can repeat this process for any other calendars you need to import now or in the future. For a video walkthrough of this process, check out this support article.

Two-way sync with Zapier

If neither one-way method fits your workflow, you can set up two-way sync using a third-party tool like Zapier. This allows you to add events in Airtable and another calendar app and have them show up in both. Setting up a two-way sync with Zapier can range from simple to complex depending on how much you need to accomplish. Some of this process requires multi-step zaps, so make sure you have an account type that allows this.
Zapier can grab new and updated events from Google Calendar and Microsoft Office 365 but not Apple Calendar. Zapier can also perform similar operations with services like Cronofy. However, Zapier can only find new events in Airtable, so any updated records in Airtable won’t sync through standard methods. You can work around this limitation but it requires a more complex setup. Let’s start with the easy stuff first and worry about the more complex details afterwards.
Airtable Calendar View
First, if you use Google Calendar, you’re in luck—you can just use these pre-made zaps to set up sync. Again, this will not sync updated records from Airtable but we’ll discuss workarounds in a bit. If you use a different calendar app, however, you need to create a set of zaps that work in a similar way. Let’s go over the basic steps in this process.
Sync new calendar events to Airtable
Create a zap that triggers on a New Event added to your calendar. Google Calendar has the unique option of triggering on new and updated events in a single trigger. Other apps tend to split these actions up, so we’ll focus on new events first.
Choose the calendar that Zapier should watch, test the trigger to get sample data to work with, and then create a new action step that uses Airtable.
If you haven’t used Airtable with Zapier before, make sure to follow these setup steps before you continue. When you have Airtable connected, choose New Record as this step’s action and fill in Zapier’s template so that the sample calendar data you got from your trigger setup matches with the correct fields in your Airtable base.
Test this step to make sure the sample calendar data shows up in your base where you expect it. If it does, turn on your zap and you’re good to go.
Sync updated calendar events to Airtable
Much like new events, you need to create a zap with a trigger from your calendar app of choice. This time, however, choose Updated Event as the trigger type.
Just like with new events, choose the source calendar that Zapier should watch for updates, test the trigger to get sample data, and create a new action step that uses Airtable.
For your Airtable step, choose Find Record as your action and set it up to search your table of choice for the event that you want to update. You only need to search for something unique, such as the title of the event, and you can use the sample data you acquired in your trigger step to fill this in.
Add another Airtable action, but this time choose Update Record. Fill in the template for this step with all the calendar information acquired in the first (trigger) step. You’ll also need to specify which record to update. You’ll find an option toward the top of the template that allows you to choose a record ID. From the list of options, choose Use a Custom Value. A new field called Custom Value for Record ID will appear and you can add the record ID from your second step (Find Record) so Zapier will know to update the record it found.
When you're finished editing the template, test this step and check Airtable to make sure the record updated properly. If everything worked as expected, you can finish up and turn on your zap.
For some extra help, check out this support article on setting up multi-step zaps just like this one.
Sync Airtable records with another calendar app
That takes care of sync from your calendar app to Airtable, but not the other way around. Unfortunately, Zapier can only trigger on new records add to a table and not updated ones. You can work around this limitation with a last modified time field and a complex zap. You can follow the initial instructions in this article to learn how to do that.
Alternatively, if you don’t require updates to sync, you can create a simple zap that adds new records to your favorite calendar app by following these steps:
Create a new zap with an Airtable New Record trigger. Alternatively, you can also use the New Record in View trigger if you prefer.
Test the trigger to make sure it finds something new to pull in. If Zapier can’t locate anything, just add a new record to your chosen table and test again.
Create a new Add Event (or equivalent) action for your calendar app of choice. Match up the event fields with the information acquired from your Airtable base in the trigger step. This is simply the reverse of the process we used earlier to add events from your calendar app to Airtable.
Test the step to make sure that information from Airtable gets added as an event in your calendar. If it all worked out, you’re good to go.
With all of that in place, your calendars should sync nicely with Airtable. If you make any changes to your base that might affect sync, just remember to update your zaps accordingly. Adding new fields won’t cause any issues, but Zapier can get confused if you rename fields used in a zap. You can still rename these fields if you like, but be sure to update your zap if you do so everything remains in sync.
0 notes
Text
Everything You Need to Know About Website Builder

What is a Website Builder?
A website builder is a platform or program that permits you to easily and quickly set up a website. These website maker assist you with getting your website ready so you can start establishing your online presence, a unique .com, or .whatever outfitted with your brand's own elements, content, and contributions, custom-made to your particular business objectives.
Website builders regularly highlight drag and drop program that allows you to customize elements on a page with layouts chosen over a small bunch and sometimes hundreds of available website page templates.
Website builders exist in both online and offline formats, the main difference being internet connectivity. An online website builder will not need any software downloads, it will basically work through your internet.
Benefits Of Website Builder
You can work on it whenever required and at any place with internet connectivity, so you can build on the go. Most online website builders accompany hosting services, so you don't need to stress over that additional technical work. This is a simple-to-utilize alternative for beginners.
On the other side, offline builders work as downloadable software programs, where your computer has your files & documents until you're prepared to upload them to your web host. With this alternative, you can work on your website offline, however, this will require somewhat more technical skill. Besides, you need a plan from a web host, which you'll have to purchase separately.
A website builder works essentially like this:
1. From your website builder's library, pick a template that best meets your requirements.
2. Edit the template's in-built elements with a click and add your own content like pictures, video, social buttons, and text to customize your website.
3. Publish your website!
What are the Pros of Website Builders?
A website maker app is an excellent tool for entrepreneurs and business owners hoping to establish a strong online presence - simply and quickly.
Is going with a website builder ideal for your business? Let’s do some dynamic decision-making with a decent pro list.
1. Website developers don't need extensive coding or specialized skills
Let's be honest - we are not all computer experts and that is alright to get a webpage fully operational with a website builder, you don't need to be. In the event that you know how to click, you can build a wonderful website with text, pictures, videos, and beautiful layouts and it's actually you don't need to compose a single line of code.
2. Website builder set up your website in a snap
As an entrepreneur, you have tons of tasks to do. Save your valuable time by utilizing a website builder to improve the site creation process. In a matter of minutes, you can make your own interesting website from a collection of pre-designed and eye-catching layouts equipped with your brand's content, pictures, and videos.
3. Wide Options, choices & alternatives
Stressed that you will get stuck with a cookie-cutter site that looks very much like every other .com out there?
A decent website builder assists you with standing out from the crowd. With a full library of decisions, enhanced layouts, attractive and easy-to-design elements, and customization alternatives, you can make your website stand out.
4. You don't need to be a professional graphic designer.
So perhaps you weren't an enthusiast of art in school - no issue. You don't have to understand color theory, or have photo-editing skills, or be knowledgeable in typography to make an engaging website.
website builders do the hard work by offering pre-bundled designs that looks sharp. They additionally permit you the freedom of customization, so you can give your website your very own touch within an expertly designed template.

What Should You Look for in a Website Builder?
1. Convenience
You decided to utilize a website builder for its convenience, so don't stuck with one that requires a Ph.D.(or even advanced coding skills to work. Search for a simple, easy-to-use interface that permits you to build a website effectively - regardless of your website building experience. Avoid the expectation to absorb more information and start building a wonderful website right away.
2. Top-notch Templates
Your audiences can spot a modest-looking website from a mile away. Pick a website builder that has top-caliber, proficient-looking templates that are perfect and attractive. This is your opportunity to establish a strong first impression, so stay away from website builders that don’t have top-notch templates.
3. Quick Updates
Have you heard? Content is the final deciding factor. Your website needs top-notch content, regularly published, updated, in order to make and keep receiving traffic to your brand. Ensure your website builder makes it simple to add and change up the content on your website.
4. Social Compatibility
A most ideal situation is that the audience connects with you in a large number of ways than one. Your site builder should permit you to link and show social media symbols to help visitors - regardless of whether they are Instagrammers or tweeters - engage with you further. Ensure whatever website builder you pick can consistently integrate your social platforms.
5. Form Builders
Your visitors will need simple and clear approaches to connect with and reach you - regardless of whether it be to submit a grievance, questions, or compliments. Ensure that your website builder has the tools to make forms audiences can easily explore.
7. Customization Options
Indeed, even with a pre-formatted layout, you need to have the option to give your website a bit of your brand's obvious flavor. An A+ website builder ought to give the opportunity to add your very own contacts and customization alternatives, such as fluctuating text styles, text styles, or shading plans. You do you.
#website builder#website maker#create a website#website maker app#websites app#best website builder#online website builder
0 notes
Text
Squarespace Vs. Wix
New Post has been published on https://walrusvideo.com/squarespace-vs-wix/
Squarespace Vs. Wix
Disclosure: This content is reader-supported, which means if you click on some of our links that we may earn a commission.
Wix
takes the prize for simplifying the process of making a website. Its drag-and-drop interface, hundreds of apps, and wider pricing options mean anybody can whip up a website without breaking a sweat.
Squarespace
has a better selection of design templates but its customization options require more technical confidence. Squarespace also outperforms Wix’s blogging and ecommerce tools by a very small margin, but the more flexible Wix has something for everyone.
Squarespace or Wix: Which is Better?
Squarespace’s sleeker, more professional-looking template designs are best for creatives who place a high value on aesthetics. Its grid-style editor requires a little bit of time to get to grips with, making it better for those with technical experience.
Turn your ideas into a visually-appealing Squarespace website for free.
Wix is best for beginners who want an easy way to create a website pronto . It has a drag-and-drop interface so building a website is as straightforward as solving a kiddie puzzle. It also comes with hundreds of templates and features to give users creative freedom regardless of their skill level.
Start your own free and stunning Wix website today
.
A Review of The Best Website Builders.
A good website builder spells the difference between an idea that grows into something big and one that fizzles out. To give you a head start, I’ve mustered up my experiences with building websites and reviewed
the top website builders
that may fit your needs.
Wix has proven once again why it’s considered a major player in the industry. Squarespace, though not included in the list, has its own perks that appeal to those with a specific set of criteria.
Squarespace Wins
Unlimited storage space: All of Squarespace premium plans come with unlimited bandwidth and storage so you can host unlimited files while ensuring media files will download smoothly. While the majority of Wix plans do offer unlimited bandwidth, none of them provide unlimited storage so you can’t just upload any files to your heart’s content.
Structured page editor : Squarespace doesn’t have the exact drag-and-drop functionality Wix is famous for. Its page elements are packed inside content blocks which you can move around and snap into rows and columns. Restrictive as it may appear, though, this feature helps you create your page within a more controlled environment, which can help prevent inadvertently sloppy designs.
High-quality, professional-grade template designs : Wix may offer more template choices but Squarespace trumps its competitor in terms of quality. It has over 60 template designs that are not only aesthetically superior but also easier to navigate both for the builder and viewer. Regardless of what template you choose initially, you can customize or replace it with another one anytime.
One-click color palette customization : Squarespace takes the guesswork out of choosing the right color theme that matches your brand. All you have to do is select a palette and Squarespace will apply it throughout your website.
Like Wix, Squarespace also offers the freedom to pick specific colors for individual elements. But since most users don’t have a design sense, Squarespace’s preselected color schemes take the headache and guesswork out of your site’s aesthetics.
Well-thought-out in-house features : Squarespace may have fewer features than Wix but what it lacks in numbers it makes up for in execution. Its in-house features are meticulously designed and built into its editor so you can manage your website even without installing third-party extensions.
Its restaurant menu editor, for example, uses a markup language so adding items is like filling out a simple form. In contrast, Wix accomplishes the same task through a relatively more tedious process that requires several clicks.
Squarespace’s donation system is likewise superior to Wix’s because it goes beyond providing a donation button by offering donor-specific checkout, donor email receipts, and suggested amounts.
Seamless podcast syndication : Starting a podcast? Squarespace also beats Wix’s basic podcast player by being the only one in the industry to offer syndication. With this feature, you can submit your podcast to Spotify or Apple Podcasts where a legion of potential fans can discover you.
Curated third-party apps : Whatever Squarespace lacks in-house, it offers as a third-party extension. Even Wix’s in-house features that Squarespace doesn’t have can be matched by a third-party counterpart so you won’t miss out on anything.
For example, the Wix Events app enables visitors to book tickets online whereas Squarespace can be integrated with Eventbrite to do the same thing. Similarly, integrating Memberstack with Squarespace accomplishes the same thing as the Wix Members app.
Ready-to-use blogging tools : With Squarespace, you can start blogging and showcase your best content to the world right off the bat. Unlike Wix that requires you to install a separate blog app, Squarespace has built-in blogging tools.
Basic features like post tagging, categories, comment moderation, and drafts will help you create professional-looking blogs regardless of your industry. Working with multiple authors is also a breeze as Squarespace allows you to collaborate with them on a single post or assign them different roles.
Sophisticated ecommerce functionality : When it comes to building your online store, Squarespace gives Wix a run for its money. It offers the same basic features you’ll find in Wix like custom email receipts, point of sale system, and automated cart recovery.
To maximize your profits, however, Squarespace steps up its game by offering features that Wix doesn’t. These include gift cards to help with your brand promotion. You can also use “back in stock” and “low stock” notifications to create a sense of urgency without being too pushy.
24/7 online support : Should you encounter technical issues with your Squarespace website, you can reach out to their customer support team via email, Twitter, or live chat. These online channels allow their team to get to the bottom of your issue faster.
Squarespace has excluded phone support because their existing support channels allow them to troubleshoot your issues comprehensively without the need to put you on hold.
Squarespace Losses
Lacks intuitive drag-and-drop interface . Squarespace’s page editor works like a minimalist grid system so you can’t drag and drop elements as freely as you can. Less freedom means less opportunity to play around with the design. It also takes a longer time to get used to so Squarespace is not as beginner-friendly as Wix.
Limited creative control : Squarespace’s biggest advantage is also its disadvantage. The “structured” editor may enable you to customize a website design within the realm of what’s acceptable but it also means you have less creative control.
The templates are on par with professional designs but you can’t edit, move, resize, or re-color the page elements as easily as you can with Wix. You also can’t display both the site title and logo at the same time.
Limited template designs . Fewer design choices also make it more difficult to stand out. Most photographers, for instance, trust Squarespace to host their portfolio sites.
With limited templates to choose from, they’re more likely to pick the same template. As a result, they may end up with portfolio websites that have the same look and feel as other sites in their industry.
Less generous ecommerce plans : Squarespace outnumbers Wix’s ecommerce features but you won’t benefit as much if you’re only subscribed to its basic plan.
Squarespace’s basic ecommerce features cost $18 per month (Business plan) while its Wix counterpart is a tad higher at $23 per month (Basic Business plan). However, you won’t save as much with a basic plan as Squarespace charges a 3% transaction fee unless you upgrade.
You also won’t have access to some crucial features like abandoned cart recovery if you’re not under the Advanced Commerce Plan that costs $40 per month.
By contrast, Wix charges no transaction fee on any of its ecommerce plans and offers abandoned cart recovery even to those in the basic plan.
Wix Wins
Scalable pricing : Wix has a wider range of pricing options so you can start your website anytime and easily scale as it grows. The free plan is available for beginners who are still learning the ropes and are not bothered by Wix-sponsored ads and subdomains.
If you want a custom domain, you can switch to the most basic plan for only $4.50 a month. From here, you can upgrade to any of the three higher website plans or start an online store for as low as $17 per month for the Business Basic Plan. Squarespace, on the other hand, only offers four pricing tiers starting with the Personal plan at $12 per month. It doesn’t come with a free plan and most of the important features are only available in higher plans.
Beginner-friendly interface : Wix’s drag-and-drop editor remains its top selling point. It gives you a template to create a simple website in minutes without learning how to code. Squarespace is also a “no-coding” website builder, but its grid-style editor makes it cumbersome for some beginners. With Wix, you can have full control of the layout and even add functionality by dragging and dropping widgets on your page.
More in-house apps: Name any feature you want your website to have and Wix has an app for it. Do you want to create a forum? Look for Wix Forum in the App Market and install it for free. Planning to add a live chat to connect with your visitors in real-time? Try Wix Chat, another in-house app you can add for free. If none of the built-in Wix apps is what you’re looking for, don’t worry as there are still over 200 free and premium third-party extensions to choose from.
Free email marketing tools : With this built-in feature, you can send email campaigns to your contact list and even create workflows to manage your own sales funnel. Measure how well each of your campaigns is doing through the stats tracker that lets you see how many people open and engage with your emails.
Wix’s email marketing tools are part of the Ascend all-in-one business solution that gives you access to other marketing tools like live chat, social media integration, and SEO tools. The best part is you can have access to a limited number of features for free or upgrade to one of the three paid plans to enjoy the full benefit.
Robust SEO features : Wix has its own game plan to help your content rank high on Google. What’s great is Wix puts all its strategies in one place so users can learn SEO themselves and improve their online presence. The SEO Wiz contains step-by-step tutorials, achievement updates, and tons of other learning materials so you can start improving your site’s visibility even if you never heard about SEO before.
Multiple customer support channels : Unlike Squarespace, Wix offers phone support so you can rest assured that humans and not bots are handling your concern. Wix also provides support through forums, social media, and email but not through live chat. In case you get stuck or confused while working on the page editor, there are small question marks on the screen that you can also click to get quick solutions without leaving the page.
Automatic backup-and-restore feature : Wix is a proactive website builder that anticipates unfortunate events and has developed a counteracting feature in case they happen.
Through Site History which you can find inside your site Settings, you can restore a previous version of your website. You can restore revised versions of your site regardless if it’s saved manually or automatically.
Best of all, the previously saved version of your site can be restored without affecting published blog posts and changes made in your email list.
Wix Losses
Underwhelming template designs : Wix focuses on quantity over quality when it comes to design. Its over 500 customizable templates easily beat Squarespace’s 70+ designs. But with more choices comes more time wasted picking and overanalyzing which one suits a website idea best.
A “quantity over quality” approach also leads to many Wix templates failing to make a great first impression. While there are hidden gems, it takes time to find them as they are outnumbered by generic templates, some of which are downright cheesy.
Unstructured page editor : Wix’s drag-and-drop interface has its own flaws. While it helps even non-pros create websites quickly, the changes you make in the desktop version may not necessarily sync to its mobile version. For instance, when you move an image from the top of the page to the bottom, the same change won’t reflect in the mobile version unless you make the same change twice. With Squarespace’s structured editor, movements are much more restricted but any change you make will reflect in both screens.
Complicated color changes : Wix lacks the preselected color palettes that Squarespace has, so changing text and background colors are not as straightforward. This is the downside of having more freedom to manipulate page elements. You may be free to choose the colors of individual page elements but if you don’t have a background in design, knowing which colors will work best without preset recommendations can be really tough.
Limited bandwidth and storage space : Wix doesn’t have the unlimited resources that Squarespace offers in all its plans. Therefore, the cheaper your Wix plan is, the more restrictions you’ll get on how many files you can store and how much traffic your website can get per day.
Wix’s cheapest plans, Connect Domain and Combo, only offer a bandwidth of 1 GB and 2 GB, respectively. This is enough if your website receives only a handful of visitors per month. However, once a website gets at least 1,000 visitors a day, it will require about 8.5 GB of bandwidth monthly, something that Wix only provides starting with its Unlimited plan that costs $12.50 per month (billed annually).
Mediocre blogging tools : You can create a decent blog with Wix but if you’re looking for more features, you’ll get it from Squarespace. Wix is capable of scheduling posts, adding tags or categories, and saving drafts. However, it doesn’t allow comment moderation so you can’t filter comments and publish only those you approve of. On top of that, Wix doesn’t have a built-in blogging feature. You have to add the free Wix Blog app yourself before you can start creating content.
Limited flexibility for free plans : When you start a free website with Wix, you won’t pay for anything but it comes at the cost of flexibility. The Wix subdomain, ads, and the look of a free site tend to come off a lot less professional. If you want to experiment with a free site, that’s fine, but you’ll have to upgrade to premium Wix plans to really establish your own brand.
Comparing The Top Website Builders.
Do you want to build a website from scratch without touching any codes? With a website builder, you can do that and more. If you want to get started,
here are the best website builders I recommend
:
Wix
— Best for general use
Weebly
— Best for beginners
Shopify
— Best for ecommerce
WordPress
— Best for content management
Wix is the undisputed website builder of choice
if you want to quickly launch a website even without the technical know-how. Its drag-and-drop interface requires a short learning curve while its hundreds of templates and features allow you to elevate your website any way you want.
But for a more professional site with a stronger design aesthetic and more customization options, especially one you’re willing to take some time to build,
Squarespace will be the better choice
.
See How My Agency Can Drive Massive Amounts of Traffic to Your Website
SEO – unlock massive amounts of SEO traffic. See real results.
Content Marketing – our team creates epic content that will get shared, get links, and attract traffic.
Paid Media – effective paid strategies with clear ROI.
Book a Call
#gallery-7 margin: auto; #gallery-7 .gallery-item float: left; margin-top: 10px; text-align: center; width: 33%; #gallery-7 img border: 2px solid #cfcfcf; #gallery-7 .gallery-caption margin-left: 0; /* see gallery_shortcode() in wp-includes/media.php */
Go to Source Author: Neil Patel
0 notes
Photo

11 Free Email Marketing Tools to Save You Time and Money
Marketing trends and channels evolve over time. While some trends come and go quickly, one of the channels that has remained more or less the same is email. In fact, email continues to be the top channel for content marketing with both B2C and B2B marketers. 87% of B2B marketers and 77% of B2C marketers use it to nurture their audience.
It can even help you amplify your other marketing channels such as social. With that said, marketers still face a ton of challenges in their email marketing efforts. One of these key challenges is simply the amount of time it takes to create a great looking email from scratch. Without efficient tools, marketers may end up spending a lot of time creating and sending out emails that don’t exactly look stunning. This hinders productivity while dragging down your email marketing ROI.
A lot of companies settle for this situation because they’re not ready to invest in a tool to simplify the process. However, email marketing tools don’t necessarily have to be expensive. You can find plenty of free email marketing tools that can help you save time and money.
If you’re looking for a social management solution to complement your email marketing, test out a free 30-day trial of Sprout Social:
Read on for our list of the top free email marketing tools:
1. HubSpot Email Marketing
HubSpot, probably best known for their marketing automation platform, recently launched a free email marketing tool that can support a lot of a small business’ transactional email needs.
Whether you need to send kickback emails from lead offers, thank you emails after purchase, or just promote current campaigns, HubSpot Email Marketing’s free version can do that. One of the best parts of HubSpot’s free email tool is its ease of use. The tool features a handy drag-and-drop visual editor, and it also comes equipped with ready-made templates to get you up and running immediately.
What makes HubSpot Email Marketing stand out is, of course, its native integration with other HubSpot tools, such as the free-forever CRM. Once you start an account, you get access to both tools so you can create a centralized contacts database, organize it in lists, and manage and track email performance.
2. Sender
Sender is one of the best free email marketing tools in the market with features to ensure deliverability. It lets you create stunning newsletters without any HTML knowledge. Just choose from a template and customize it with elements like images, videos and text. You can even personalize your newsletters for each recipient to create an even bigger impact.
Sender’s robust analytics feature is one of the top reasons why it’s on our list. It lets you track who opened your emails and clicked on the links, when they were opened and more. It even helps you build accurate buyer profiles based on your subscriber actions, so you’ll be able to optimize your existing email strategy and craft compelling offers.
3. Sendinblue
Sendinblue is a marketing communication platform that features both email marketing tools and additional functions such as customer relationship management and landing page creation. With over 70 design templates, Sendinblue’s email design functions make it easy to create a great-looking email. Plus, all of these templates are responsive, and you can preview your results to can ensure your design looks the way you want on any screen format.
After you design your email, you can use features like A/B testing and segmented recipient lists to take the manual effort and guesswork out of optimizing your campaigns and targeting your ideal audiences.
4. Omnisend
Omnisend is a sophisticated ecommerce marketing platform that integrates all your communication platforms in one place. Its free plan includes only email, but it’s more than enough to support the email marketing efforts of small and medium businesses. It allows you to automate your email delivery using behavioral triggers and easily time your communications based on your customers’ convenience.
You can utilize its comprehensive audience insights to send out more relevant email marketing messages. Design attractive newsletters using time-saving features like the Product Picker, which lets you select all the products you want to include in your email. You can also include scratch cards, discount coupon codes and gift boxes to further optimize your email performance.
5. SendPulse
SendPulse advertises itself as a multi-channel marketing platform, but its email marketing feature is the most popular. It comes with a ton of professionally-designed email templates that you can easily customize using a drag-and-drop editor. You can then set up these customized emails to be automatically sent out at the right time based on user behavior, event trigger and other variables.
SendPulse’s subscriber rating feature is an excellent way to identify your most valuable subscribers. It lets you analyze the open and click rates as well as the read and unread rate of each subscriber. You can even set replaceable text fields to personalize your emails by name, gender, date of birth, age and job role.
6. Benchmark Email
Benchmark Email is a great option for an email marketing tool to design responsive emails that look great no matter which device they’re viewed on. If you need to add images to your email, you can even edit the image right on the platform. The email editor lets you add effects, stickers and text to effectively send across your message.
You have the option to choose from tons of pre-designed templates based on industry, type and occasion. For the more HTML savvy, you can even use the code editor to build emails from scratch. The dual view feature lets you see your email design as you’re editing it, which simplifies the whole email creation process.
7. Mailchimp
Mailchimp is a leader in email marketing tools that you’ve probably heard of. Their free plan provides you with basic email marketing features such as email creation and scheduling. What makes this a great email marketing tool is its smart recommendations feature, which provides you with valuable audience insights to optimize your marketing efforts.
Designing emails on the platform is easy using the Content Manager, where you can store your images and files for easy access. Mailchimp lets you automate your emails at crucial steps of the buyer journey, so you can easily send out welcome emails, order confirmations, abandoned cart reminders and more.
8. MailerLite
Sophisticated features like the landing page builder and the pop-up customizer make MailerLite stand out among free email tools in the market. In addition to the basics like the drag-and-drop email builder, the tool comes with a rich text editor and a built-in photo editor to create stunning emails.
You can create responsive landing pages to match the emails that you send, which will improve your chances of driving conversions. You can run split tests on different variations of your email to see what works best to drive clicks and conversions. MailerLite also provides you with a comprehensive campaign report that contains important stats like click rate, unsubscribe rate, open rate and more.
9. Mailjet
Mailjet comes with intuitive and collaborative tools to help you build effective email marketing campaigns. Customize any of the pre-designed templates and create responsive emails to impress any recipient no matter which device they’re using. If you work with a team, you’ll love the platform’s real-time collaboration feature that allows for seamless collaboration.
This email marketing tool also lets you add dynamic content so you can create personalized and relevant emails for each recipient. This helps you get much better results out of your email marketing campaigns. You can also integrate the platform into your CRM and easily manage your mailing list through a single dashboard.
10. Moosend
Moosend is an excellent email marketing tool that lets you automate repetitive tasks and saves you time. You can design behavioral email campaigns based on your subscribers’ information and/or activities. You can use its advanced segmentation feature to send highly accurate emails to each recipient, increasing open rate and click-through rate as well as ROI.
This tool provides you with a detailed campaign performance report so you know exactly how to optimize your campaigns and get even better results. You can even integrate it with some of your favorite apps to seamlessly pass on vital information between different tools. It’s also one of the only free email marketing tools that won’t include its logo in your emails.
11. EmailOctopus
EmailOctopus is a simple email marketing tool that runs on the Amazon SES infrastructure. While the free plan doesn’t offer as many features as some of the other free email marketing tools on this list, it does allow a lot more emails per month than most of them.
You can send out unlimited emails from as many email addresses as you like. This makes it the perfect solution for a small agency or entrepreneur representing other brands. It also integrates with third-party apps like MailOptin, WordPress and Zapier so you can seamlessly exchange customer data between different tools.
Bottom line
Most of these free email marketing tools come with robust features even without the need to upgrade to a paid plan. Small businesses and marketers should be able to make the most of them while saving time and money. Even if you need to upgrade to accommodate your business needs, you’ll find that many of the paid plans are affordable and flexible enough to fit your budget.
#email marketing#best email marketing software#Best Email Marketing Tool#make money 2021#make money as an affiliate
0 notes
Text
Local Website Design for Local Businesses: The Step-by-Step Process

A business doesn’t have to do e-commerce to benefit from having a professionally designed website. Most local brick-and-mortar businesses nowadays rely on their internet presence to connect with customers and bring them into the store. The majority of consumers are now searching for local products and companies before they shop or while they’re out. Without a website, a local business cannot hope to capture those potential customers.
If you run a local business and need to build a website or upgrade the one you have, there is help available. A local web designer who understands your business and your market is the best partner for the job. While the process of building a website is unique for each client, local web designers go through the following general steps.
Step One: Establish the Purpose of the Site and the Target Audience
The process of building a website begins with a conversation between the designer and the client. It is essential to discuss the goals of the business and the purpose of the site. A website is just one element of an overall marketing strategy, so the discussion needs to establish how the site should contribute to that strategy.
For example, will the website be used for e-commerce? Will it be used to develop an email marketing list by collecting information from users? Will it be a platform where the business can interact with customers? Will customers find the website when they use specific keywords in a Google search?
One of the keys to answering these questions is to know the target audience. A local web designer who is a member of the client’s community will have an in-depth understanding of the client’s target customers. This knowledge includes who they are, where they live, when they shop, and how they shop. These details are essential in customizing a website’s user experience for specific groups.
Step Two: Choose a Domain Name
Once the site’s purpose is established and the target audience or audiences defined, the next step in building a website for a local business is choosing a domain name. Though a relatively small detail, the right domain name, and URL will help customers find the site when they search.
For example, a great domain name is easy to spell and remember. Your domain should be short and descriptive, not too broad or too narrow in focus. The name should avoid numbers or unusual spellings that would make it hard for users to remember. A geotag, such as a city name, in the URL can help local customers find the site when searching for a nearby business.
A local web designer can help you choose a domain name that will positively represent your business and brand. In turn, this will help to improve your search engine page ranking.
Step Three: Select a Theme
A theme is a basic visual template that provides a distinct look and style to a website. A theme includes a background color or image, text styles, and the layout of text and images on the page. The theme of a website is a crucial design element because it needs to convey the business’s brand. It also needs to provide all of the information local customers need to find. This information would include the name of the business, its location, and its phone number. This information should be displayed consistently on every page within a website.
There are many pre-made themes available to choose from, and most can be customized. While it is possible to build your theme from scratch, there are benefits of using a pre-made theme. First is cost, having a theme built for you saves you the time of coding a site from the ground up. Second, a well-built theme should already be responsive and display well on all browsers.
A local web designer can either design an entirely new theme or customize an existing one. The theme should align with the website’s goals and work well for every customer. Since users tend to encounter similar sites over and over, opting for a unique design will help your website stand out and grab your customers’ attention.
Step Four: Design the Overall Structure of the Site and Build the Pages
The next step in building a website is the actual construction of the pages that will make up the site. This phase has to start with an overall plan for the site’s architecture. To make this plan, the web designer and client need to discuss what kind of content the site will feature. In addition to a home page, a website might include an about page, pages for each type of service or product, pages for each physical location, a blog, an FAQ, and an e-commerce component, to name a few.
The key to putting these elements together is to create a streamlined architecture. The architecture should be easy to navigate, both for human visitors and for search engines. Web designers need to consider how to categorize content, what menus and sub-menus to use, and where to place internal links from one page to another. Sub-menus are particularly valuable for targeting content to specific audiences (for example, customers at a particular location or shoppers interested in a specific category of products).
With well-constructed architecture, a website loads quickly will be easier to navigate and will be pleasing to the eye. When choosing a local design agency, it’s a good idea to look at other sites they have built and notice how they are structured.
Step Five: Make a Plan for Creating and Updating Content
In the past, many businesses published their websites as if they were print ads, merely displaying information on a single static page. Modern sites, however, are more comparable to magazines in that they publish fresh content regularly. Moreover, websites need to provide a call to action on every page, encouraging users to interact with the site by filling out a form, for example, or subscribing to a newsletter.
While a web designer does not typically create content for a client’s website, a local design agency can help with content creation in a couple of ways. First of all, a local website designer can offer insight regarding the types of images, videos, and articles that will work well to engage local customers. He or she may also be able to recommend local writing or editing professionals who can assist with content creation.
Additionally, a website designer will install a content management system (CMS). Having a CMS, like WordPress, makes it easy for business owners and their employees to update content on their own. By making a plan for creating content and by encouraging teamwork, business owners can start publishing their content regularly.
Step Six: Test the Website
Testing is one of the most critical steps in the process of building a website. The best design and most engaging content have no value if users can’t see it or if it takes too long to load. Additionally, with more than 50% of traffic coming from mobile phones nowadays, it’s more important than ever to make sure a business website is responsive.
However, testing isn’t limited to checking a website’s basic functionality. A web designer will also test the site for usability by having others go through the site and report any problems or confusion. This type of testing will ensure that every menu or link is named correctly and sends the user to the expected content. It can also help to check pathways and make sure there are not too many clicks from one point to another in a user’s journey.
Before a website is made public, thorough testing should be conducted. However, continued testing will also be needed. A web designer should conduct ongoing testing and analysis of the site’s performance to determine when updates are required.
Step Seven: Optimize the Website for Local Searches
This step isn’t a separate step. Search engine optimization (SEO), mainly local SEO, should be a consideration at every point in the process of building a site. In general, SEO encompasses all of the aspects of web design that make a website visible to search engines. These aspects include keyword usage in URLs, title tags, and content, inbound links, site architecture, and outbound links, to name a few. All of these features help search engines crawl the site and recognize the site as an authority on the keywords it features.
Local SEO is a little different in that it is specifically designed to benefit businesses with a physical location. Local SEO focuses on optimizing a website’s Google My Business listing, the information in Google’s knowledge panel, Google Maps listing, and contact information (known as NAP for the name, address, and phone number) listed on other websites. These listings determine the sites that show up when a user searches for a product, service, or business “near me.” Even without those words, searches products and services are often interpreted by a search engine as having a local intention.
The purpose of local SEO is to help customers find a business at the moment when they are trying to find something online. That moment could be when they’re searching for a place to eat, for example, or a place to shop. A local website designer with local SEO experience should have experience with helping their clients use their websites to bring customers into their business.
Step Eight: Site Maintenance
Websites need regular maintenance; thus, providing ongoing updates and support is an integral part of the web design process. For example, any plug-ins added to increase a website’s efficiency, speed, or functionality will need to be updated as bug fixes, and improvements are added. Updates to browsers and operating systems will also require changes to the website to ensure that it works well for all users and provides the highest possible level of security.
Besides, a website will need to be updated in response to traffic and performance data as well as strategies used by the competition. A business may also choose to update a site to rank for new or different keywords.
Reasons to Hire a Local Web Design Agency to Build Your Website
There are many advantages to going local when hiring a website designer. For one thing, the logistics are more straightforward. Face-to-face meetings are typically more productive than Skype calls and emails. In-person meetings also better allow for the web designer to get to know the client. This, in turn, helps them really get a feel for his or her business and website needs.
Also, local web design agencies are experts in the local community. They are familiar with the local business climate, and their understanding of local audiences and their distinctions is much deeper than that of a distant company with no local experience.
What to Look for in a Local Website Designer
When hiring a local website designer, it’s crucial to find a person or team you’ll enjoy working with. One of the first things to consider is the quality of the work they have already done. Before hiring an individual or agency, check their portfolio to see if their style appeals to you. If it does, then follow up with some of their customers and learn more about other business owners’ experiences with the agency.
It’s also a good idea to interview a website designer before committing. It’s essential to find someone who listens to your ideas, demonstrates expertise, has extensive experience, and understands responsive web design.
Hiring a SEO St Petersburg, FL is the best way to get a professionally designed website that responds to the needs of your business and your customers. With personalized attention and ongoing support, a local design agency can make sure that your website is helping your profits and your business to grow.
0 notes
Note
I've got the strangest feeling that the level designers of Sonic Forces just plain don't give a shit.
Don’t ever make this assumption. Unless you’re working the worst retail/restaurant/customer service job ever, very few people go in to work every day with the goal of not caring. At least in theory, you do not make it to the production level of video game development by not caring.
It’s far more likely that something about Sonic Team’s development pipeline is gumming up the works. Supposedly, Hedgehog Engine 2 uses PBR. PBR stands for “physics-based lighting” which in general terms means complex, natural light simulation. Lighting in older games would fake effects like shadows, where unique shaders would have to be written for every object in every possible condition. PBR simulates light so that you simply assign properties to surfaces and they react naturally. Think of it like this: in older games, to make something reflective, you had to custom-write code to make that one object reflective. If you wanted to make a different object reflective, it would require separate code files, even if you were simply copying and pasting the code from the previous object.
With PBR, you simply tell the engine, “this surface is reflective.” And that’s all you have to do. The core lighting physics engine simulates the properties of light and makes it reflective. PBR is for light what Havok was for gravity. (That’s a hamfisted example, but whatever)
The benefit of PBR is that, again, in theory, it means that modifying lighting is incredibly easy. Think back to that Sonic Unleashed example for Hedgehog Engine – it would take an entire renderfarm of I dunno, a dozen PCs all crunching numbers a full 24 hours to generate lighting data for just one level. What this means is that last minute edits for levels in Sonic Unleashed were undoubtedly very difficult to make because changing the position of one object could necessitate re-rendering all of the lighting data, which would take another 24 hours.
PBR is why something like Metal Gear Solid 5 is so impressive, because it is incredibly easy for them to change the time of day, move objects around to create new missions, etc. PBR removes some of the limitations of pre-rendered lighting.
Not only that, but that pre-rendered lighting data took up a lot of space on the disc. Notoriously, Sonic Unleashed could have supported much higher resolution lighting than it shipped with, but there simply wasn’t enough space on the DVD for it (so they sold the full-resolution lighting data as a bonus with the DLC, bringing a full-size-install of Sonic Unleashed up to something like 9gb+).
So PBR solves a lot of problems for level designers if implemented properly. No tedious rendering time, less data bloat, everybody wins.
But if that’s the case, then why does Sonic Team seem to be so afraid of changing its levels? They gave a talk recently about how they design their levels, about how they design around flow, and it was all of the most basic advice you can imagine.


But most importantly, what I think this could show off is an unwillingness to modify their level geometry. Like the people who build the environments and the people who place rings and enemies are two different entities. Once the level geometry is set in stone, it can’t be modified. But that doesn’t make any sense.
(Of course, really, I’m just parroting Dario, here, who apparently doesn’t know how to make twitter threads, so either I link 15 individual tweets or I just link his profile and let y’all go digging for what he said about his observations on Hedgehog Engine 2)
Either way, I don’t think they “Don’t give a shit” especially not if they’re out there giving presentations on their level design methodology as if they are proud of what they can do. I think they probably have limitations they are working within, are making the best of those limitations that they can. Unfortunately, instead of making long-term solutions, they’re doing quick and dirty patchwork like constructing massive sections of a stage out of cubes they’ve glued together, because that’s faster and easier than significantly changing an existing piece of artwork (or re-writing a part of the engine).
It sucks, but it also plays in to what I’ve been saying all along: They spent four years coming up with the idea of Sonic Forces and have only spent the last, say, 18 months actually developing that idea in to a game. Which for a modern 2017 game is kind of no time at all. Games like Breath of the Wild, Super Mario Odyssey, Assassin’s Creed, Shadow of War, etc. all take 3-5+ years of active production to get where they are.
Assassin’s Creed is actually a special case: it used to be that Ubisoft would alternate between a Team A and a Team B for those games. Each team would get two years to work on the next game, which meant that there was a new AC game every year. Even at two years per game, Assassin’s Creed built a reputation for being the buggiest, jankiest games on the market, and it only got worse when development moved to the Xbox One and PS4, where environment complexity increased tenfold. So now, Ubisoft is spreading AC games out – we get them every two years, which means the teams get four years to develop each game. This gives developers more time to polish each game, and, in turn, deliver a better, more robust and less buggy end product.
Now, most of the examples I just listed were open world games. But given how fast Sonic moves, his stages need to be similarly sized. There are obviously ways to speed up the creation of large worlds, but the ultimate point in all of this is that Sonic Team might not be taking advantage of those shortcuts and with so little time to develop their games, the end result is obviously suffering for it.
But don’t assume they don’t care. There are a million other reasons this could be a problem – and only a very small percentage can be fixed in the time allotted, and that’s assuming they even realize they are problems to begin with.
It’s also entirely possible – and I know this will sound crazy, but hear me out – that whoever they have as their level design manager just isn’t good at their job.
59 notes
·
View notes
Photo

Why We Moved a 20-Year-Old Site to Gatsby
We knew we had a problem.
In 2019, SitePoint was getting Lighthouse Speed scores under 10 on mobile, and between 20 and 30 on desktop.
Our efforts to control UX bloat were failing in the wake of a publishing business environment that sprang new leaks just as we’d finished temporarily plugging the last one. Our reliance on advertising, controlled by external parties, was a major obstacle to improved site performance. Our traffic growth had turned into decline.
On a site that provided people with a place to come and learn to code with best practices, this was not a good look. And it wasn’t a site we could feel proud of, either.
To make matters worse, operational bottlenecks had arisen that made adaptation a tricky logistical business. Our team was struggling to make changes to the site: having focused on our Premium experience for several years, we were down to one developer with WordPress and PHP experience. To test out code changes, the team would have to wait in a queue to access our staging server.
It wasn’t energizing work for anyone, and it certainly wasn’t efficient.
It was time to make some changes, and we set out to look for a solution. After a lot of research, we decided that Gatsby would be a great fit for our team. It would play to our talent strengths, help us solve all of the issues we had identified, and allow us to keep using WordPress for the backend so the editorial process wouldn’t need to change.
Why We Moved to Gatsby
[caption id="attachment_176594" align="aligncenter" width="1522"] The end result.[/caption]
Early in the research process, Gatsby started to look like a serious frontrunner. SitePoint isn’t a small site, so we knew that the tech we chose had to be able to handle some pretty intense demands. Gatsby checked all of our boxes:
We could code everything in React, a tech that every member of the front-end team knows and uses daily.
Gatsby is super fast at its core — performance was at the heart of this project, and we could start from a good footing.
The entire site is rendered as static, which would be great for SEO.
We could build it as a new project, which meant no worrying about the existing codebase, which brought a huge amount of legacy code with it.
We could use Gatsby Cloud, allowing the team to get feedback on the build at any time just by pushing the branch to GitHub.
DDoS attacks on WordPress wouldn’t cause us issues, as the front-end is completely stand-alone.
More Maintainable CSS with styled-components
Since we were going to rebuild the site from scratch, we planned to make some design changes at the same time. To help with this work we decided to use styled-components.
styled-components keeps the site’s styling easy to maintain, and we know where to look when we want to change the style of something — the style is always with the component.
How We Made the Build Happen
We started by following Gatsby’s basic docs and pulling in our posts with the gatsby-source-wordpress plugin.
This was a big initial test for us: we had to see if it was even possible to use Gatsby for our site.
After 20 years of blogging, we have over 17,000 posts published. We knew the builds would take a long time, but we had to find out if Gatsby could deal with such a massive amount of content. As you’ve probably figured, the test delivered good news: Gatsby works.
A quick tip for other teams working with large sites: to make development a better experience, we used environment vars to prevent Gatsby from fetching all of the site’s posts in development. There’s nothing quite like a 60 minute hot reload to slow progress.
if (hasNextPage && process.env.NODE_ENV != "development") { return fetchPosts({ first: 100, after: endCursor }); }
From this point, we ran into some limitations with the WordPress source plugin. We couldn’t get all the data we needed, so we moved to the WordPress GraphQL plugin.
We use Yoast to set our metadata for SEO, and had to ensure we were pulling in the correct information. We were able to do this with WordPress GraphQL. By doing it this way, the content team could still edit metadata the same way, and the data would still be dynamic and fetched on each build.
During the build, we would have three or four people in the team working on parts of the new blog. In the past, if they wanted to get feedback they’d have to push to our staging server and make sure nobody was already using it.
We found that Gatsby Cloud was a great solution to this issue. Now when someone pushes to a branch in GitHub, it creates a build in Gatsby Cloud along with a preview link. Our developers could share this link and get immediate testing and feedback much more effectively than before.
This faster feedback cycle made it easy to have multiple people on the team working on the build and put an end to a major bottleneck.
Launch Day Fun
On the big day, we launched the new site and ran through our initial tests. The new blog was flying — every page load felt instant.
We ran into some problems on SitePoint Premium, which started running into slows and even crashes. The culprit was a new element on blog pages that pulled in the popular books people were currently reading. It would do this via a client-side API call, and it was too much for Premium to handle due to the amount of traffic we get on the blog side.
We quickly added some page caching to the API to temporarily solve the issues. We realized we were doing this wrong — we should have been sourcing this data at build time, so that the popular books are already loaded when we serve the page to the user.
This is the main mindset shift you need to make when using Gatsby: any data that you can get at build time should be fetched at build time. You should only use client-side API calls when you need live data.
Once we’d re-written the API call to happen during the build, the first load of a blog page was even quicker — and Premium stopped crashing.
What We Still Need to Solve
While it’s hard to overstate how much better our on-site experience is today, there are still a few pain points we need to solve.
If a new article is published, or if content is updated — as it is multiple times per day — we need to re-run the Gatsby build before these changes show up.
Our solution for that right now is a simple cron job that runs at pre-scheduled times over the course of a day. The long-term solution to this is to add a webhook to the WordPress publish and update button, so that a new build is triggered once pressed.
We also need to get incremental builds running. Right now, the entire site needs to be rebuilt each time, and given our content archive, this can take a while. Gatsby just introduced incremental builds as we went live, and we’re working on implementing this on our site. Once that’s set up our builds will be much faster if the only thing that has changed is content.
Our speed score is still not where we want it to be. While the site feels subjectively very fast, we are still not getting consistent scores in Lighthouse. We want to get both mobile and desktop into the green zone (scores of 90+) for optimal user experience and SEO.
Would We Do It Again?
A launch of this type would normally be a pretty nerve-wracking event, and take a lot of work from the team on launch day.
With Gatsby, our launch was really easy. We just had to move WordPress onto a new domain, and point sitepoint.com at the Gatsby version of the site.
Then we sat back and watched the numbers to see what happened to our traffic. Within a few days, the data was starting to come in and we were seeing a 15% increase in traffic. User engagement metrics were up across the board. And we hadn’t even removed our ads yet (which, you may have noticed, we’ve since done).
It’s not hard to figure out why the effects were so immediate. We had better SEO running on static HTML and CSS pages, and massive speed improvements made possibly by the move to Gatsby.
Since we made the move, we’ve increased our Lighthouse speed scores from 6-15 on mobile to the 50-60 range, and from the 30s on desktop into the 70s. We wanted to ensure speed remained top of mind with this change, so we’re using a great tool called Calibre that runs speed tests over a number of top pages each day and alerts us to the scores. We are using this tool to continue to improve our score, so I hope to have another article for you in three months when we get everything to stay in the 90+ range.
The team loves working in Gatsby. The blog codebase was something that nobody wanted to work on. Now, everyone wants to take those cards thanks to the great developer experience.
If you’ve been eyeing a move to Gatsby and wondering if it’s ready for prime time, take our advice — it’s worth the switch.
Continue reading Why We Moved a 20-Year-Old Site to Gatsby on SitePoint.
by Stuart Mitchell via SitePoint https://ift.tt/2O3eMp5
0 notes
Text
Version 320
youtube
windows
zip
exe
os x
app
tar.gz
linux
tar.gz
source
tar.gz
I had a great week. The downloader overhaul is in its last act, and I've fixed and added some other neat stuff. There's also a neat hydrus-related project for advanced users to try out.
Late breaking edit: Looks like I have broken e621 queries that include the '/' character this week, like 'male/female'! Hold off on updating if you have these, or pause them and wait a week for me to fix it!
misc
I fixed an issue introduced in last week's new pipeline with new subs sometimes not parsing the first page of results properly. If you missed files you wanted in the first sync, please reset the affected subs' caches.
Due to an oversight, a mappings cache that I now take advantage of to speed up tag searches was missing an index that would speed it up even further. I've now added these indices--and your clients will spend a minute generating them on update--and most tag searches are now superfast! My IRL client was taking 1.6s to do the first step of finding 5000-file tag results, and now it does it in under 5ms! Indices!
The hyperlinks on the media viewer now use any custom browser launch path in options->files and trash.
downloader overhaul (easy)
I have now added gallery parsers for all the default sites hydrus supports out the box. Any regular download now entirely parses in the new system. With luck, you won't notice any difference, but let me know if you get any searches that terminate early or any other problems.
I have also written the new Gallery URL Generator (GUG) objects for everything, but I have not yet plugged these in. I am now on the precipice of switching this final legacy step over to the new system. This will be a big shift that will finally allow us to have new gallery 'seachers' for all kinds of new sites. I expect to do this next week.
When I do the GUG switch, anything that is supported by default in the client should switch over silently and automatically, but if you have added any new custom boorus, a small amount of additional work will be required on your end to get them working again. I will work with the other parser-creators in the community to make this as painless as possible, and there will be instructions in next week's release post. In any case, I expect to roll out nicer downloaders for the popular desired boorus (derpibooru, FA, etc...) as part of the normal upcoming update process, along with some other new additions like artstation and hopefully twitter username lookup.
In any case, watch this space! It's almost happening!
downloader overhaul (advanced)
So, all the GUGs are in place, and the dialog now saves. If you are interested in making some of your own, check what I've done. I'm going to swap out the legacy 'gallery identifier' object with GUGs this coming week, and fingers-crossed, it will mostly all just swap out no prob. I can update existing gallery identifiers to my new GUGs, which will automatically inherit the url classes and parsers I've already got in place, but custom boorus are too complicated for me to update completely automatically. I will try to auto-generate gallery and post url parsers, but users will need GUGs and url classes to get working again. I think the best solution is if we direct medium-level users to the parser github and have them link things together manually, and then follow-up with whatever 'easy import' object I come up with to bundle downloader-capability into a single object. And as I say above, I'll also fold in the more popular downloaders into some regular updates. I am open to discuss this more if you have ideas!
Furthermore, I've extended url classes this week to allow 'default' values for path components and query parameters. If that component or parameter is missing from a given URL, it will still be recognised as the URL class, but it will gain the default value during import normalisation. e.g. The kind of URL safebooru gives your browser when you type in a query:
https://safebooru.org/index.php?page=post&s=list&tags=contrapposto
Will be automatically populated with an initialising pid=0 parameter:
https://safebooru.org/index.php?page=post&pid=0&s=list&tags=contrapposto
This helps us with several "the site gives a blank page/index value for the first page, which I can't match to a paged URL that will then increment via the url class"-kind of problems. It will particularly help when I add drag-and-drop search--we want it so a user can type in a query in their browser, check it is good, and then DnD the URL the site gave them straight into hydrus and the page stuff will all get sorted behind the scenes without them having to think about it.
I've updated a bunch of the gallery url classes this week with these new defaults, so again, if you are interested, please check them out. The Hentai Foundry ones are interesting.
I've also improved some of the logic behind download sites' 'source url' pre-import file status checking. Now, if URL X at Site A provides a Source URL Y to Site B, and the file Y is mapped to also has a URL Z that fits the same url class as X, Y is now distrusted as a source (wew). This stops false positive source url recognition when the booru gives the same 'original' source url for multiple files (including alternate/edited files). e621 has particularly had several of these issues, and I am sure several others do as well. I've been tracking this issue with several people, so if you have been hit by this, please let me if and know this change fixes anything, particularly for new files going forward, which have yet to be 'tainted' by multiple incorrect known url mappings. I'll also be adding some 'just download the damned file' checkboxes to file import options as I have previously discussed.
A user on the discord helpfully submitted some code that adds an 'import cookies.txt' button to the review session cookies panels. This could be a real neat way to effect fake logins, where you just copy your browser's cookies, so please play with this and let me know how you get on. I had mixed success getting different styles of cookies.txt to import, so I would be interested in more information, and to know which sites work great at logging in this way, and which are bad, and which cookies.txt browser add-ons are best!
a web interface to the server
I have been talking for a bit with a user who has written a web interface to the hydrus server. He is a clever dude who has done some neat work, and his project is now ready for people to try out. If you are fairly experienced in hydrus and would like to experiment with a nice-looking computer- and phone-compatible web interface to the general file/tag mapping system hydrus uses, please check this out:
https://github.com/mserajnik/hydrusrvue
https://github.com/mserajnik/hydrusrv
https://github.com/mserajnik/hydrusrv-docker
In particular, check out the live demo and screenshots here:
https://github.com/mserajnik/hydrusrvue/#demo
Let him know how you like it! I expect to write proper, easier APIs in the coming years, which will allow projects like this to do all sorts of new and neat things.
full list
clients should now have objects for all default downloaders. everything should be prepped for the big switchover:
wrote gallery url generators for all the default downloaders and a couple more as well
wrote a gallery parser for deviant art--it also comes with an update to the DA url class because the meta 'next page' link on DA gallery pages is invalid wew!
wrote a gallery parser for hentai foundry, inkbunny, rule34hentai, moebooru (konachan, sakugabooru, yande.re), artstation, newgrounds, and pixiv artist galleries (static html)
added a gallery parser for sankaku
the artstation post url parser no longer fetches cover images
url classes can now support 'default' values for path components and query parameters! so, if your url might be missing a page=1 initialsation value due to user drag-and-drop, you can auto-add it in the normalisation step!
if the entered default does not match the rules of the component or parameter, it will be cleared back to none!
all appropriate default gallery url classes (which is most) now have these default values. all default gallery url classes will be overwritten on db update
three test 'search initialisation' url classes that attempted to fix this problem a different way will be deleted on update, if present
updated some other url classes
when checking source urls during the pre-download import status check, the client will now distrust parsed source urls if the files they seem to refer to also have other urls of the same url class as the file import object being actioned (basically, this is some logic that tries to detect bad source url attribution, where multiple files on a booru (typically including alternate edits) are all source-url'd back to a single original)
gallery page parsing now discounts parsed 'next page' urls that are the same as the page that fetched them (some gallery end-points link themselves as the next page, wew)
json parsing formulae that are set to parse all 'list' items will now also parse all dictionary entries if faced with a dict instead!
added new stop-gap 'stop checking' logic in subscription syncing for certain low-gallery-count edge-cases
fixed an issue where (typically new) subscriptions were bugging out trying to figure a default stop_reason on certain page results
fixed an unusual listctrl delete item index-tracking error that would sometimes cause exceptions on the 'try to link url stuff together' button press and maybe some other places
thanks to a submission from user prkc on the discord, we now have 'import cookies.txt' buttons on the review sessions panels! if you are interested in 'manual' logins through browser-cookie-copying, please give this a go and let me know which kinds of cookies.txt do and do not work, and how your different site cookie-copy-login tests work in hydrus.
the mappings cache tables now have some new indices that speed up certain kinds of tag search significantly. db update will spend a minute or two generating these indices for existing users
advanced mode users will discover a fun new entry on the help menu
the hyperlinks on the media viewer hover window and a couple of other places are now a custom control that uses any custom browser launch path in options->files and trash
fixed an issue where certain canvas edge-case media clearing events could be caught incorrectly by the manage tags dialog and its subsidiary panels
think I fixed an issue where a client left with a dialog open could sometimes run into trouble later trying to show an idle time maintenance modal popup and give a 'C++ assertion IsRunning()' exception and end up locking the client's ui
manage parsers dialog will now autosort after an add event
the gug panels now normalise example urls
improved some misc service error handling
rewrote some url parsing to stop forcing '+'->' ' in our urls' query texts
fixed some bad error handling for matplotlib import
misc fixes
next week
The big GUG overhaul is the main thing. The button where you select which site to download from will seem only to get some slightly different labels, but in truth a whole big pipeline behind that button needs to be shifted over to the new system. GUGs are actually pretty simple, so I hope this will only take one week, but we'll see!
1 note
·
View note
Text
Pipedrive Review 2020 — The Best Sales Pipeline Software |Get 30 Days Free Trial Coupon Inside

Managing Sales is all about closing deals as quickly as possible. Doing this requires you to focus on the most profitable deals, which are likely to convert. As picking out such deals requires several hours of data crunching, you need to find the right technology to speed things up.With the right sales pipeline software, you can easily simplify this time consuming and frustrating task. As a result, you save time, money and make the right business decisions. In this Pipedrive review, we would tell you how you can save several hours by automating tasks and simplifying the decision-making process through this highly intuitive interface.
We know the challenges involved in picking out the right deal by aggregating data from various sources, analyzing it and then re-thinking which leads to prioritize.
Obviously, you need to focus on leads that are most likely to convert into customers, but how do you find them? We know that finding such leads can be overwhelming. In this Pipedrive review, we’ll tell you exactly how you can pinpoint your best leads, without spending too much time and money on it. Did we say ‘money’? For additional savings, don’t forget to check out our Pipedrive promo code towards the end of this review.
What is Pipedrive?
Pipedrive is a powerful sales pipeline software, which allows businesses to focus on commercially rewarding deals. This pipeline management software makes it easier for small businesses to manage their sales processes by identifying and focusing on the most profitable deals.
Pipedrive’s interface is divided into deals, activities, contacts, and statistics, which collectively help you make the right business decisions. Its intuitive software recommends the best resources to execute specific sales-related tasks and more.
Add and Follow-up deals effortlessly
Depending on your skill and convenience, you can add in leads straight from another platform, or a spreadsheet. You can do this by uploading spreadsheets or integrating Pipedrive with other CRMs — the choice is yours. Once you do that, you can easily access lead-wise communication from anywhere through Pipedrive’s easy-to-use mobile application.
You can then add deals by clicking on the ‘add deal’ button and can also classify the deals based on its various stages. You can then design communication for each one of them, which allows you to build an effective lead conversion strategy. Also, you can add custom activities to each deal and assign them to a particular team member.
If you are a new manager, then Pipedrive won’t let you down. This pipeline management software will recommend the best resources to carry out particular tasks for you, which is awesome. Once you have allocated the right activities to your most efficient team members, then half the battle is won. You can then take a look at the dashboard to keep track of what’s happening with that particular deal. So, you don’t have to waste your time on meetings or follow-up emails.
Customize Pipedrive based on your needs
Pipedrive can help you store all your data, exactly like you want to, and sort them according to your preferences. So, if you are an Admin, you could add custom data fields just like the ones you have in your spreadsheets. Also, you could add filters to the custom fields as you do to any other field. This means you can narrow down the exact data that you want.
For example, if you want to classify your leads based on campaigns, then you could add a custom field called ‘Campaign Name’ and then import relevant data from the spreadsheet. Next, you could easily use the filters and classify all the data based on campaigns. This lets you know exactly how many leads you got from a particular campaign, which lets you ascertain how profitable that campaign was.
Import Data and Manage Duplicate Records
If you run a lead generation campaign, then it is more than likely that you have all the information regarding your potential leads inside a spreadsheet. Now, this data could be clean or may have duplicate records that need to be fixed. Duplicate records are multiple records that may belong to the same person or the ones that have similarities.
The only way to sort this out is by hiring someone to manually classify the entries, which would make this task more expensive and time-consuming. This is where Pipedrive, a pipeline management software can make things easier. So, if you have multiple records belonging to the same person, then based on the other fields, Pipedrive decides the best course of action.
For example, if the First Name, Last Name, Organization fields are all the same, but the phone numbers are different, then Pipedrive merges the two records into one. So, when you hire resources to call up these leads, you save up more money, which would otherwise be spent on calling the same person twice.
Skip Files
Pipedrive may come across entries that could be incomplete or have some other issues that need to be fixed. So, if Pipedrive isn’t sure of what to do with a particular record, then it isolates such entries into a brief report. For example, if there are an equal number of similar and varying fields in certain records and Pipedrive cannot decide whether these include duplicate or unique records, then Pipedrive does what no other sales Pipeline software can — it isolates the data and puts it into a Skip file.
A skip file is a collection of unimported data, which needs to be rectified before you can re-import it into Pipedrive. Skip files include isolated data that was not imported into Pipedrive due to some very specific reason. To help you fix it quickly, Pipedrive provides details of each record that it skipped along with the record-wise reason for doing so. So, you can manually correct the errors in the skip file and then import the same into Pipedrive. This saves time, maintains data integrity, and also saves money.
Automatic Emails at different Deal Stages
Pipedrive is truly the best sales pipeline software that allows you to shoot automatic emails to your leads, at different stages of the deal. So, if you set automatic emails to be shot to all leads in Phase D, then this happens automatically when you move a particular deal from Phase A to Phase D. You can continue to do this until the deal is won or lost, so this pipeline management software allows you to automate communication, besides letting you manage and sort out the customer data.

Workflow Management
No Pipedrive review can be complete without stressing on how effectively this sales pipeline software facilitates workflow management. Besides automating stage-wise emails, you can also tag an activity to a certain team member, each time the deal is moved to a particular stage. So, if you want John to send an exclusive discount coupon to certain leads that are within a specific stage, then you can automate it.
So, every time the lead is moved into that particular stage, John gets notified to send a discount coupon to that particular lead. Once John is done with the task and receives a response, he then moves that deal into the next stage. You can then have Peter making calls and talking to each of those qualified leads that John moved into the next phase. It’s that simple! In fact, you can also set a specific time for John or Peter to complete their individual tasks.
The coolest thing about Pipedrive is that this pipeline management software lets you choose one of its pre-designed templates and customize it according to your convenience. However, you could also choose to create it from scratch. Coming to who gets to manage the workflow, Pipedrive keeps it pretty straightforward.
This pipeline management software allows multiple Team Managers to work at the same time, without interfering with each other’s workflows. Every Administrator has the power to enable or disable a workflow. However, when it comes to editing a workflow, an Administrator can only edit the one that he has created.
Also Read : Ontraport Review 2020: The Best CRM Software For Your Business
Lead booster
Pipedrive’s Lead booster allows you to create a fully customized chatbot to automate conversations, boost engagement and to capture leads. So, by automating the most asked queries through this tool, you can greatly reduce the lead response time and increase your conversions. You can even book meetings automatically with your customers and channelize it to your employees.
Plus, the lead booster is completely customizable, and you can make it appear like an existing part of your website. To do this, start by configuring the lead booster’s look and feel according to your brand’s logo and existing website design. Next, you can personalize your chatbot like you want it to appear and give it a name. So, if you run a restaurant business, then you could have an egg-shaped bot with a funny name that resonates with your brand. You can then choose a conversation template, depending on your sales strategy and customize it with the necessary information.
Pricing
Pipedrive offers four pricing plans that you can choose from — Essential, Advanced, Professional and Enterprise. The Essential plan is the most basic plan and is priced at $12.50 per month. Next comes the Advanced plan, which is priced at $24.90 per month and comes loaded with useful features that enable tracking and automation.
If you wish to subscribe to a plan that makes it easier to collaborate and cascade activities, then the Professional plan would be the most suitable. This plan is priced at $49.90 per month, however, if you have over 10 users and certain other special requirements then you must opt for the Enterprise plan, which is priced at $99 per month. You can get a 14-Day free trial for each of these plans and try them out before subscribing to the paid plans.
Coming to Lead Booster, this is a stand-alone product offered by Pipedrive which is not included in any of the four plans. So, if you wish to add Pipedrive’s lead boosting chatbot to your website, then you would have to buy that as an add-on. However, the Lead Booster is quite affordable at $32.50 per month. So, although the Lead Booster does not come bundled up with any of the other plans, Pipedrive keeps it pocket-friendly, which is great for small businesses.

Essential Plan
Priced at $12.50 per month/user
Customize Pipelines and Fields
Manual Linking of Emails to contacts and deals
Advanced Plan
Priced at $24.90 per month/user
Sales Task Automation
Easy Tracking
Professional Plan
Priced at $49.90 per month/user
Sales Task Automation
Easy Tracking
Enterprise Plan
Priced at $99 per month/user. Minimum 10 users.
All of the Above
Dedicated Support
Managed Data Transfer
Conclusion
In this Pipedrive review, we have highlighted only the most striking features of this sales pipeline software. This gives you a snapshot of how this simple and easy-to-use pipeline management software can save you hours of work and help you make profitable business decisions. However, while trying out this pipeline management software, make it a point to use our Pipedrive promo code to ensure additional savings.

Originally Published On: SaasTrac
About The Author SaasTrac is one of the trusted places where users can find reviews on different Saas Products, Software, and Platforms. Our major goal is to let users know the detailed and the most helpful information possible about every product — the good, the bad, and the ugly in the SaaS space.
#Pipedrive Review 2020#Pipedrive 2020#Pipedrive Review#Pipedrive#Best Sales Pipeline Software#Sales pipeline software#pipeline management software
0 notes