#and then when i resize the gif down i make a new file so i have the larger original if i need to make modifications
Text
Poe's Giffing Tutorial (From One Beginner to Another)
Hey, everyone! So, I've been thinking about this for a while, and decided to finally make it happen. This post aims to be a giffing tutorial that isn't a bunch of technical jargon that nobody except experienced giffers understands. This is for the person that I was when I first started out: someone who wants to make gifs, for free, without having to learn the entirety of a new program. As such, if you're already familiar with the basics, this probably won't be super helpful to you.
In this, I'll cover the basics of actually capturing a gif, the how-to of color correction (though without getting into the nitty-gritty detail of it), some basic text effects, and some more decorative effects like overlays and ~fancy coloring. I'll also show you the program I use to resize gifs.
I don't have a fun quip to lead us into the next part, so, uh, let's just dive in.
Tools*:
A PC capable of handling heavy processor loads (I use a mid-range gaming laptop; it's a little slow sometimes, but it works)
Whatever you're giffing (obviously...)
ScreenToGif (a free, basic screencapture program)
Photopea (a free, in-browser Photoshop dupe)
RedKetchup (a free file resizer/converter)
*Note: These are not the end-all, be-all of gifmaking. They may not even be the best tools for the job! But they're free, they work well, and they're relatively intuitive.
Step 1: Capture your gif.
I'm going to use ScreenToGif for this. The first thing I do is open the program and click Recorder, which opens the recording interface.

I click and drag (or manually input dimensions in the boxes next to the recording button in the lower right corner) to set my dimensions, and then I press record. The red "Record" button will change to a blue square that says "Stop," and a timer will appear in the upper right corner, showing how many seconds your gif is.
Generally, I'll pause the video 5-10 seconds before my desired start time, to give myself a buffer (you'll be able to delete those frames later), start the recording, and then start the video. You'll probably find a system that works for you once you do it a few times.
Once the scene that I want to capture is done, I'll click the blue "Stop" button, and the overlay will close itself. A few seconds later, depending on how long/complex/large your gif is, the program will pop up with a new window where you can edit. Here's what it looks like:
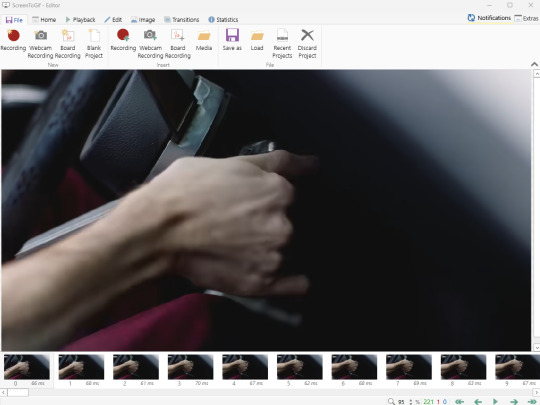
You can do a lot with ScreenToGif, but we'll be using the dead simple stuff today. Click the "Edit" tab, fourth from the left, and this will show up.

"Delete All Previous" and "Delete All Next" are our friends here. Go to the FIRST frame that you want in your gif, using either your arrow keys or just dragging the slider, and select it. Then hit "Delete All Previous." This will make that frame the first frame of your gif. Then, go to the LAST frame of your gif, and hit "Delete All Next." This makes the last frame of the scene that you want the last frame of the gif. You can also use the "Delete" option to delete frames by selecting them with your cursor if you want a more manual option.
Now you have your raw gif! Go to the "File" tab, the first one on the left, and select "Save As" from the menu. You want to make sure that it's saving as a .gif file, not an .mp4 or .apng --- you can check this up at the top. Don't worry, though, as .gif is the default, so unless you change it, you should be golden. Select whatever folder you want to put it in, name it, and save it.
You could absolutely stop here. It is by no means required to color your gifs or slow them down or any other number of things associated with giffing. But if you want to, here's how I do it.
Step 2: Edit your gif.
Head on over to Photopea. You'll see this:
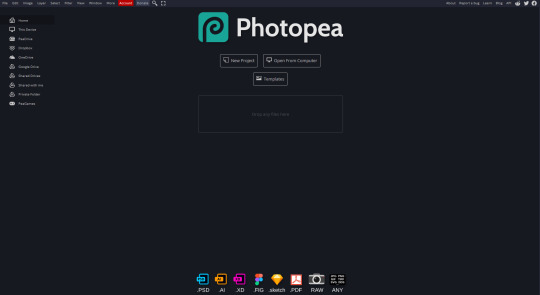
What we want is the "Open From Computer" option. Click it, and your File Explorer will show up. Navigate to whatever folder you saved your gif in and select it by double clicking or clicking once and hitting "Open."
It'll open in a new workspace that looks like this.
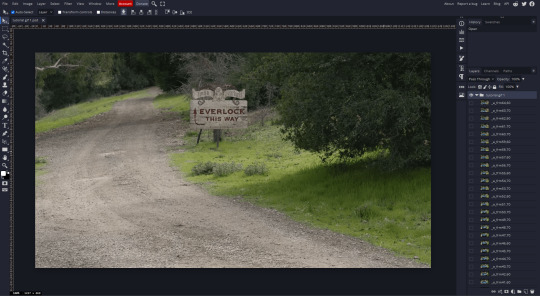
You may be saying, "Gee, Poe, that sure looks a lot like Photoshop!" Yes, it absolutely does. If you're familiar with Photoshop, you will most likely be able to find your way around Photopea just fine, and can probably go from here. But if you're not familiar with Photoshop, here's the basics.
First thing's first: gifs are frequently pretty fuzzy/blurry. Luckily, sharpening them is easy.
Select all your frames (the list on the right with all the numbered layers) by clicking one end, scrolling up/down, holding Shift, and clicking the other end. Then go up to the tabs and do Filter > Sharpen > Smart Sharpen. This will automatically sharpen each frame using a percentage; the default is, I believe, 150%, and this is usually what I use because I am fundamentally lazy.
If you don't select all your frames, only the one that you're currently on (the one highlighted in a lighter color) will get the effect applied to it. This goes for basically anything you do, so it's good to get in the habit of selecting all.
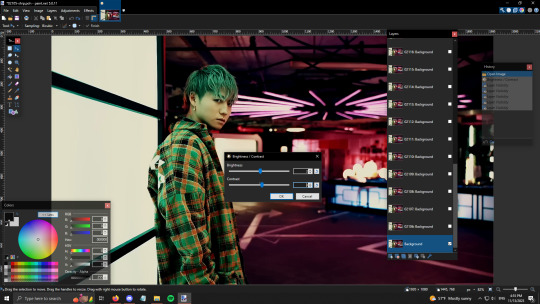
Now that it's sharpened, we can color it. Go up to the tabs again, and go to Layer > New Adjustment Layer > [whatever you want to adjust]. Most commonly in Escape the Night, you'll have to adjust brightness, because there's a lot of dark, moody scenes; Season 3 is also especially yellow/orange tinted, so you'll probably want to color correct it, too, using the Color Balance adjustment layer. This is a total guessing game based on the exact scene you're doing and my method is just selecting random things and adjusting sliders until it looks good (remember: fundamentally lazy). Honestly, I'm not an expert in coloring gifs, so I won't pretend to be — especially since people can and do write entire posts just dedicated to it. For this gif, I'm just lightening it a little.
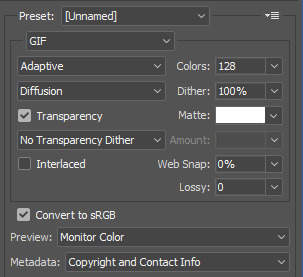
And if this is all you want to do — no text, no effects — you're done! Go to File > Export As > GIF. It will take a few moments to load, so don't panic when your page freezes. A new window will pop up that allows you to do things like set looping, time, etc. but you can also just "Save" and you're done!
But let's say you want something fun. Maybe you'd like to overlay a quote or make it a cool color. If that's the case, continue on...
Step 3: Make your gif shine.
Three parts in this: text, fun colors, and overlays. You can combine these three to do some awesome things, and they're all very simple to do, once you know what you're doing. Think of them less like steps and more like a mix-and-match deal. You can use one, two, or all three!
So, here we go.
Option 3a: Add some text.
The easiest option of the three, this one works exactly like you think it does. The uppercase T symbol on the sidebar will create a new text layer where you can type something and set a font, size, and color.

I'll spare you the lecture on typography that I could give you — you can find better ones than I could make. Generally, though, you have a decorative/display font for headings and emphasis, and then a different, more generalized font for subheadings and other things. In this, the display font is Heavy Heap, which was used on the Season 3 tarot cards, and the general font is a relatively generic serif font.
(Sidenote: you can load fonts into Photopea! Just go to a font website like Dafont, download the font you want, and then open it as you would any other file by going to File > Open and selecting it from your files. You should get a message that says "Font [Your Font Name Here] Loaded," and then you'll be able to use it in your design. That's how I got Heavy Heap in there.)
You can change size and color with these, which will show up at the top when you select the text tool. Keep in mind that if you're making changes after you type something out, you will need to select (highlight) the text you want to change — it won't do it automatically.

I will admit that Photopea's text editor is not the cleanest, simplest, or nicest to use, especially at first. I came from Canva where it was much faster and easier. The downside, of course, is that Canva is highly limited with what you can do.
There are also ways to warp the text, change the blending, and do outlines, but I'll leave that for another time as to avoid making this any longer than it already is.
Option 3b: Make it a cool color.
You have a couple different ways to do this. Probably the most intuitive is to go to Layer > New Adjustment Layer > Photo Filter. Select the color box, pick the color you want using the picker or a hex code, select your desired density, and click OK. Boom, color over your gif.
It defaults to this vintage-y orange, but you can pick whatever color your heart desires.
However, I usually use a different method using Gradient Maps. This is also pretty easy; Layer > New Adjustment Layer > Gradient Map. If you leave it black and white, by the way, you get a B&W gif (you can also just select the Black and White option in the Adjustment Layer menu). Click on the gradient, select the white square on the right side of the gradient line, and then select the square down at the bottom of the window and change it to whatever color you want.

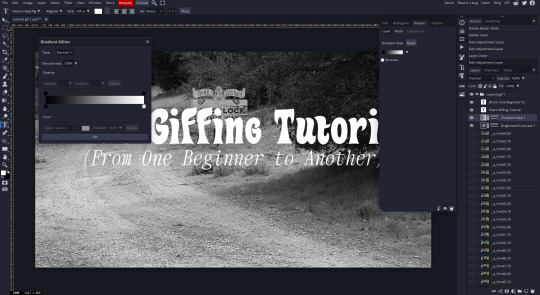
For this gif, I'm leaving it B&W.
(You can have a lot of fun with gradient maps. Play around with them!)
Option 3c: Overlay another gif on top.
Ooookay, so, this is the most advanced and tedious of effects to do (at least of the ones documented in this post), but it's worth it, I promise. For this, you'll need at least one other gif. I usually use a base gif that's relatively neutrally colored, oftentimes B&W but sometimes just faded or pastel, plus one (or more than one) colored, brighter gif. These are, of course, just guidelines — combine whatever gifs you want. The only real requirement, per se, is that they have the same amount of frames. If they don't, it'll look weird. (But if you do end up with two gifs that have different amounts of frames, you can delete the difference right in Photopea, so I don't stress about it too much.)
You also generally want to add text after this step, so if you're planning on doing this, save the text for last.
First things first: color your gifs the way you want and then save both of them. Then re-open them both in Photopea. Yes, this is annoying. I did say it was tedious.

So now I have both of them in my navbar, labeled as "tutorial base" and "tutorial overlay."
Go to your overlay gif and right-click on the gif folder. This is the top layer with a little arrow and folder icon next to the name of the gif.

Select "Duplicate Into" and then pick your base gif in the popup. In my case, it's named "tutorial base."

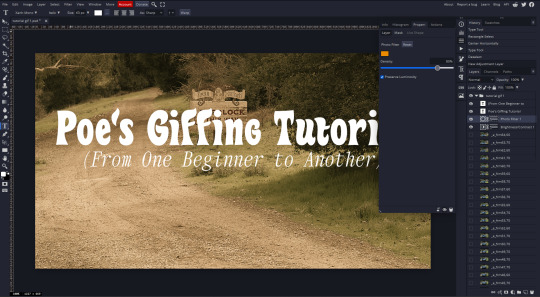
Now you'll click over to your base gif, and you'll see that your accent has been put on top of your base. Now you get to have fun with blending!
Right click on the overlay gif's folder again. Then, select Blending Options, which is the first menu item. It'll bring up a popup with all sorts of options for styling your layer.

The default setting is Pass Through, which is what we see here. If you want, you could just change the opacity to get your desired effect.
You could also play around with blending options such as Overlay, Color Burn, Lighten, and Screen. Every gif is different, and every gif will look different with different options, so experiment and see what looks best! You may have to go back and recolor it a few times, so I recommend just keeping the project open in your navbar for easy access.
For this gif, I think I'll go with Darker Color at 67%.
One last step, and then you're done with blending!
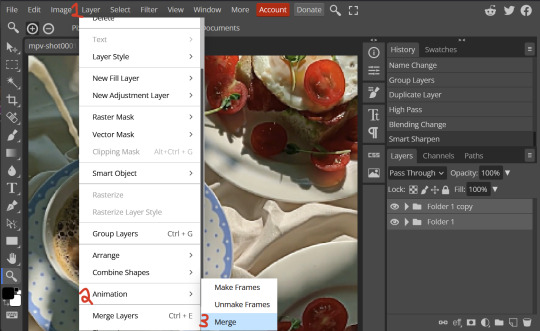
Go to Layer > Animation > Merge. This will merge each frame of your animation (the gifs) with each other, meaning that they'll play at the same time. If you forget this step, as I do frequently, you'll go to save your gif and find that it plays as a sequence.
Once you've merged your gifs, you can add texts, more effects, PNG overlays, whatever you want! Congrats! You did it!
Step 4: Resize your gif (if necessary).
Maybe you've made a gif, and it's beautiful, and it's amazing, and you wanna show everyone...but it's five million megabytes and you can't send or post it anywhere. Tumblr's max file size is 10 MB, while Discord's (standard) max file size is..7 MB, I think? Either way, if you try to upload something bigger than that, you'll get an error message and the familiar taste of disappointment.
Never fear, Redketchup is here!

This is Redketchup, and it's super simple.
Go to "GIF Resizer" under Animation Tools. Upload your gif, then scroll until you see the Resize GIF section. Input the percentage you'd like to reduce it by (presets are 25%, 50%, and 75% smaller, but you can set it manually, as well).
This is also the step where you can slow it down if you desire if you didn't do it in Photopea — it's in the next section down. Set the speed, if you'd like, and then go down to the bottom and hit Download.

It'll take you to a preview tab where you can check if your gif is small enough. If it is, hit Download again up in the top left, and that's that! Go share your gif with the world!
Conclusion:
Thank you for reading! I am by no means an expert gifmaker, but I want to spread the love and give other people the option to do it. I wouldn't know any of this stuff without the people who taught me, and I'll put a list of tutorials down at the bottom that I referenced when I was first learning to make gifs.
At any rate, if you use this post to make a gif, feel free tag me or send it to me so I can see! And for those of you who are on the fence about learning or starting to gif...
Do it. I double-dog dare you.
:)
References:
Blending Gifs by @the-mother-of-lions
Photopea Coloring Tutorial by @heroeddiemunson
Merging in Photopea by @bellamyblakru
And, though not a specific reference, I frequently browse @usergif for inspiration (they have tutorials there, as well, but I haven't checked them out yet).
#gifset#giffing#gif tutorial#how to gif#how to make a gif#photopea#escape the night#etn#I wrote this instead of socializing at my family's thanksgiving dinner#because that's just who I am
123 notes
·
View notes
Text
stim gifs in photopea
[PT: Stim gifs in photopea /End PT]
Hello! This is my (lengthy) tutorial for how I make GIFs for stimblr using Photopea. It's not going to be as extensive as how I make for shows, celebrities, etc, because I have different processes for both, however I'm still aiming to cover everything I think necessary!
It'll be split into multiple sections with headers, so feel free to skip whatever you want if you don't find it necessary :•] Reblogs appreciated if you found it useful, but no pressure obviously!
Sections:
Getting your video
Importing into Photopea
Making the GIF
Sharpening the GIF
Coloring
Exporting & Optimization (in EZGIF)
End results, and misc tips and comments
1. Getting your video
[PT: 1. Getting your video /End PT]
Short section! These are the ways I download and source videos for use
Youtube - yt-dlp (installation instructions)
Instagram
Tiktok (Allows without watermark)
Pexels
For yt-dlp, check out this basic list of commands I made solely for downloading material to GIF! If you have further questions, either send me an ask or refer to the github page.
2. Importing into Photopea
[PT: 2. Importing into Photopea /End PT]
There are two ways to import into Photopea, the first is importing footage directly, and the second is screencapping (which I won't cover in detail, but this tutorial is for installing the program I use on mac & how to use it, and this is for installing on windows)
Option 1: Importing footage directly (see end for comments)
On the home page of Photopea, you'll want to click "Open from computer", and select your clip, upon selecting you'll be presented with a popup like below

All that really matters here is where you see "30 FPS", that's the videos native frame rate. I always put whatever that number is as my frame rate because I find it to be the best, but you can use different presets (Like ezgif, which gives you 12, 20, etc). The less frames you have, the chopper it will be. If you plan to slow it down later, I'd also recommend having more frames so it looks smoother after slowing.
Now you just have to wait for it to load all the frames, then you're set!
Option 2: Importing screencaps
This is my personal way of doing things, so this is assuming you've installed a screencapping program and already have your frames ready.
For this, when you click "open from computer", select the first frame and open it by itself. Once that's loaded, look in the top left at the "File" tab, select "Open & Place", then ctrl + shift to select the rest of your frames. Once they've all loaded in, you can either rasterize them now, or wait until after cropping and resizing (goes faster then).
What's important though, is ctrl + shift to select all your layers, in the top left open the "Layer" tab, hover over "Animation" at the bottom to expand it, and select "Make frames". With your frames still selected, hit the folder button in the bottom left.

Without this, Photopea won't recognize this as an animation, therefore you'll be unable to export it as a GIF.
3. Making the GIF
[PT: 3. Making the GIF /End PT]
3A. Cropping
To begin with cropping, select the crop tool, which is the fifth one down on the left bar (if you hover over, it will say the name), or the "C" key on the keyboard.
Along the top now, you should have some new options. The dropdown menu that says "Free" is going to be how you select an aspect ratio or fixed size, and I always set to 1:1 since most people on stimblr use square GIFs, but you can do whatever works for you! Make sure to leave "Delete uncropped pixels" unchecked, because that lets you move stuff around later without having to recrop.
Crop your animation down as you see fit, then either hit the enter key, or the check button along the top bar. If you're unhappy with the placement, you can undo it OR, select all your layers, then use the move tool (First icon on the left, or the "V" key) and drag it around as you see fit.
3B. Resizing
With all your layers selected still, open the "Image" tab in the top left, towards the bottom select "Image Size", then select what you want to resize to.
Tumblr's exact GIF sizing
1 per row: 540px
2 per row: 268px
3 per row: 177px
HOWEVER. For stim GIFs, I find the quality difference so negligible, you can resize to what you want. It's also better for it to be bigger and scale down, then smaller and scale up. For this reason, I typically do 268px no matter what, or 300px.
As far as resampling goes, leave it turned on, and I personally leave it on bilinear, but the different options vary slightly, so experiment and see what works for you!
If you're happy at this step, go ahead and skip down to exporting! But when doing this way, I do recommend sharpening for better quality at smaller size.
4. Sharpening the GIF
[PT: 4. Sharpening the GIF /End PT]
The fun thing about this section is you get to experiment and find what works for you! I'll give you my personal method, but you can play around, add and remove bits, etc until you get something you're happy with!
4A. High pass
High pass is my personal favorite way to sharpen GIFs, and for stim GIFs I'll often use only this.
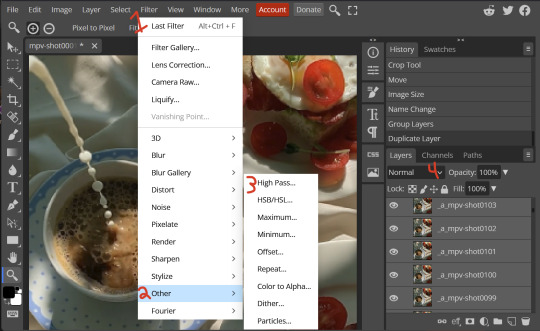
(Steps 1-3 in image) To do, start by right clicking the *Folder* all your frames are in, and select "Duplicate Layer". Select all the frames in Only the folder on top, then go to the "Filter" tab along the top left, hover over "Other", and select "High Pass". The grey look is entirely normal! I normally set my high pass at 2-4, but play around with this step and find something you like!
Select the *Folder* all your high pass frames are in, and change the blending mode (fourth step in image) to "Soft Light", it should be on "Pass Through" initially. With that done, you've used high pass on your GIFs! If you're content here, skip the next section about smart sharpening, and see about merging animation folders under it.
4B. Smart Sharpen
Note: I recommend testing your sharpening settings on one layer BEFORE applying them to all layers, as it will be easier on your computer.
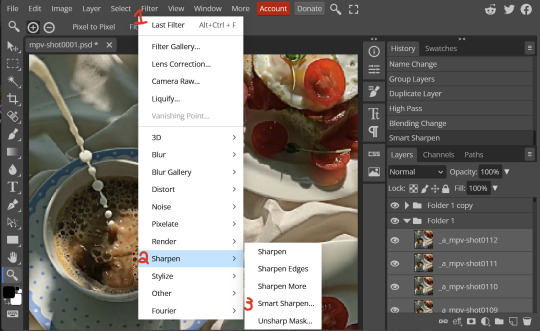
I utilize this in addition to high pass usually, but you can do it all by itself as well! To begin, select all the frames in your folder (if you used high pass, select the frames in the *Bottom* folder). Open the "Filter" tab on the top left, hover over "Sharpen", and select "Smart Sharpen". Now find what you like!
For stim GIFs, if I used high pass, I'll go for 75-110% amount, and a .1 radius. I personally don't like the look of an over sharpened GIF, so I only use smart sharpen if I want to enhance some small details high pass didn't touch enough, which is why I use so little. If you don't like high pass, you might use more here!
4C. Combining animation folders
If you used high pass, you'll notice you have two animation folders. To fix this, select both folders using ctrl + shift, open the "Layer" tab, hover over "Animation", and select "Merge". It will give you a popup to confirm, and you can go ahead and accept!
If you don't merge these, Photopea will think they're two GIFs in one document, rather than only one, which is why this step is so important.
As a note, once you merge these folders, you can no longer shift the frames around to change where they are in the crop like you could earlier.
5. Coloring (Image Heavy)
[PT: 5. Coloring (Image Heavy) /End PT]
This section is going to be less of a tutorial and more a basic rundown of the adjustment layers and what they do. Coloring will change from GIF to GIF, and you can do light or intense coloring, so this is just a guide to begin with, but really just play around and find what you like!
To access the adjustment layer menu, in the bottom right where "New Folder" was, the one directly next to it that looks like a circle made of two half-circles, will bring up your adjustment layers.
As a note, I always group my adjustment layers in a folder above my animation, for ease of hiding to compare with and without.
5A. Levels
Levels is one I almost *Always* use on a GIF because it makes it look cleaner to me. In the first box, sliding the black square on the left *increases* the blacks, sliding the white square on the right *increases* the whites, and the one in the center changes the general brightness up or down.
Sliding the black box on the bottom bar *decreases* the blacks, sliding the white box *decreases* the whites.
If you change the channel from RGB to another option, you can change the balance of reds/cyans, greens/magentas, or blue/yellows, I personally don't touch this for stim GIFs. In the RGB channel, I set the top black box at ~10, and the top white box at ~245 usually.

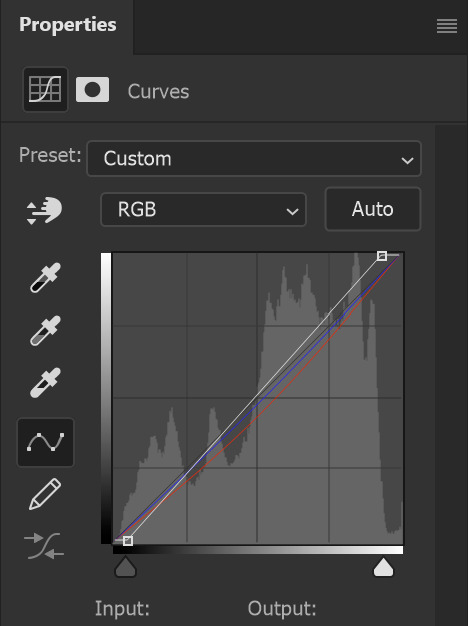
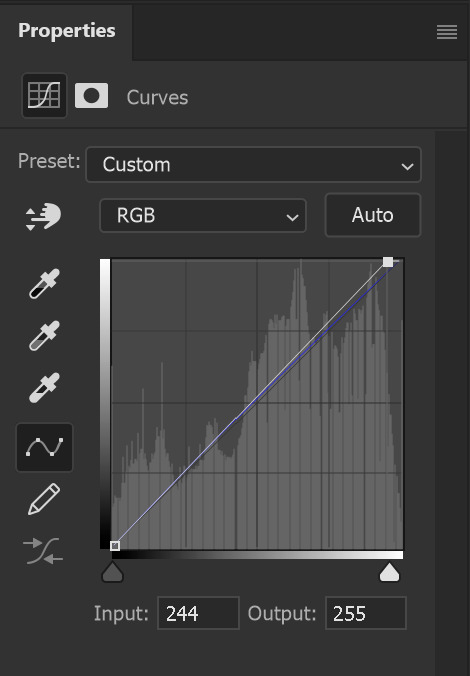
5B. Curves
This is another way of adjusting brightness, blacks and whites, or color balance. By adjusting the dot in the bottom corner you adjust blacks, the top corner adjusts whites, and if you make a dot in the center, it adjusts general brightness! You can also make multiple dots to separately adjust some values. By changing the channels, you adjust color channels rather than white/black.

5C. Exposure
This is another way of adjusting the lights and darks of the GIF. Sliding the exposure up and down will add/take away light from the lighter parts of your images. Adjusting the gamma correction up and down will add/take away shadow from the darker parts of your image. Offset increases/decreases the brightness of the whole thing but I almost never use it.

5D. Vibrance
Vibrance is what I like to think of as a "softer" way to increase intensity of colors, instead of using a Hue/Saturation layer. It affects warmer colours more intensely than cooler colours, whether you use the vibrance or saturation slider. The saturation slider here is more intense than the vibrance one, but less intense than saturation in a Hue/Saturation layer.

5E. Hue/Saturation
This one is simple! Sliding the hue slider changes the colour, sliding the saturation slider increases/decreases saturation, and sliding the lightness is basically like directly adding black/white to a color. I use lightness only sparingly.
What's cool here, is you can adjust the range to target a specific batch of colours! If you find your reds are too bright compared to everything else, you can target the saturation of them specifically.

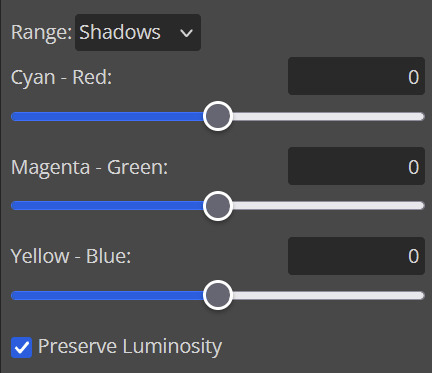
5F. Color balance
This is a simple way to adjust the base colors of an image, by changing it to be more cyan or red, magenta or green, or yellow and blue. This can be useful for making a GIF appear warmer or cooler!
I almost only touch the shadows & midtones, and highlights sparingly. "Preserve Luminosity" preserves the highlights and shadows of the image, so by unchecking it, you can achieve some more intense results.
5G. Black & White
The black and white layer is useful because you can change exactly how light or dark a color appears after making it black and white. For that reason, I prefer it over a gradient map if I need to make something black and white.
5H. Photo filter
Photo filter is a simple way to add a color filter over the entire image, and adjust how strong or weak it is. "Preserve luminosity" once again just keeps the darks and whites of the original GIF.

5I. Channel mixer
I couldn’t even begin to cover channel mixer here, but this is for very intense color edits (I typically use it when I'm trying to make a GIF fit a board). However, here's another tutorial solely about channel mixer if you're interested in taking a crack at it!
5J. Selective color
Finally, selective color allows you to adjust the amounts of color or lightness/darkness of a specific batch of color.
By changing the color channel, you can affect different batches of color. The cyan slider controls cyan/red, the magenta slider controls magenta/green, the yellow slider controls yellow/blue, and the black slider controls black/white.
Checking the "absolute" is essentially like "Preserve Luminosity" in the other layers. With absolute, it's like shifting the color one way or the other, and without absolute, it's like adding to the pre-existing color.

6. Exporting and Optimization
[PT: Exporting and Optimization /End PT]
6A. Exporting
With all that done, we're ready to finish it up! To finish your GIF, open the "File" tab in the top left, go to "Export As", and select GIF!
Here you can rename, adjust the size (WILL ruin the sharpening you did), the quality (I leave at 100%), and the speed.
Another important thing to note is the "Dither". If you leave dither off, you can potentially encounter color banding, which is where (typically gradients) with look like strips of color, rather than smooth. This is because GIFs only have 256 colors they can render, so if something has too many, it bands.
By checking dither, it can get rid of color banding, at the cost of dots on the image (around where the worst color banding is usually). Sometimes the dots aren't noticeable and this is the better option, however it will Also increase your file size. It's up to you if you want to use it!

6B. Optimization
This is technically an optional step, as tumblr's GIF size limit is 10mb, so as long as you're under that, you can post, however, smaller GIFs load faster and I personally find are better for use in stimboards where you're loading a lot of GIFs! So to help this, let's head on over to the optimize section of ezgif. My personal goal is UNDER 4.5MB, ideally under 4MB.
The two main things I recommend are Lossy GIF, or removing frames, and I always start with Lossy GIF. I do anywhere from 5-15, and usually this will bring down GIFs a lot if you made them in Photopea! My example GIF was 6.7 MB to begin with, and afterwards it was 4.2MB.
However if you find that to be not enough, you can remove frames. When you remove frames, it speeds the GIF up, so I also recommend slowing it down (this is why I set my frames high in the beginning as well). I typically do "Remove every 4th frame" and slow it down to 75%-85%.
7. End results, and misc tips and comments
[PT: 7. End results, and misc tips and comments /End PT]


(source) The first GIF is without sharpening/colouring, the second is with sharpening but no colouring, and the third is with sharpening and colouring. I didn't color it much besides making it slightly warmer, but I hardly ever do much anyways!
As for misc comments:
In firefox, when you import footage directly, sometimes it glitches and tries to load 4000 blank frames, which is extremely resource intensive on a computer. The solution is import the footage in chrome, save as PSD, then open the PSD in firefox. (Or work in chrome but why do that /half silly). The other solution is screencap which I do since I do this often, but both work fine.
In firefox, sometimes you're unable to slow the GIF down upon export and it will export faster than it actually is. Slowing the video down to 50% restores it to native speed I've found, and you can do this in ezgif before other optimization.
When colouring, my number one tip is slide something all the way up first, then adjust down! By seeing it at max, you have a better idea of what's getting adjusted.
If you have any questions, drop me an ask :•]
And that concludes our tutorial! My apologies for the length, but I wanted to cover every possible thing here. It definitely seems like a lot, much more than working in ezgif, but when you get used to what you're doing, it goes extremely fast (even if you spend extra time screencapping). I personally find it worth it for the ability to sharpen GIFs alone, but as well as more detailed coloring opportunities.
Thank you for reading, I hope this has been useful!
#i did it :•]#not stim#stimblr#gif tutorial#photopea#big thanks to talos for proofreading this :3 🖤💚🖤💚🖤💚🖤
59 notes
·
View notes
Note
hi sorry if this has been asked before, but i've been looking on your faq page for aska regarding your gifs? especially how yo make them - I'd like to create some too but it's so complicated😅
i use photoshop (not paid for lmao i downloaded a version off here years ago from like. 2016) + kmplayer + if it's game gifs, i use nvidia shadowplay to record
i'll put this under a cut because of images/length
i open my footage in kmplayer, and use the frame extraction function over the timespan of the clip i want to gif. these are the settings for that:
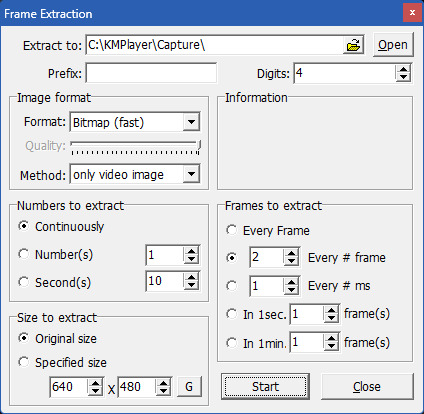
normally for games, i record in 60fps and extract every 2nd frame, but sometimes i extract every frame and scroll through to delete duplicates made from stuttering etc. for everything else like movies/tv, i extract every frame. normally, i try to go for around 100 frames, but you can have more or less depending on your final gif size, and also you can always trim your gif down when you're in photoshop, but more frames = longer import time
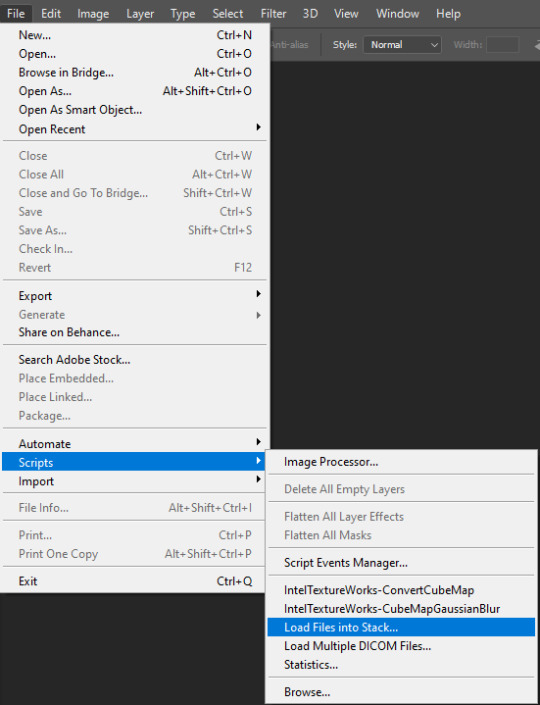
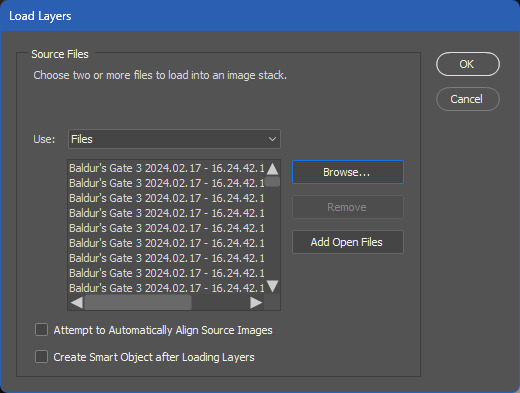
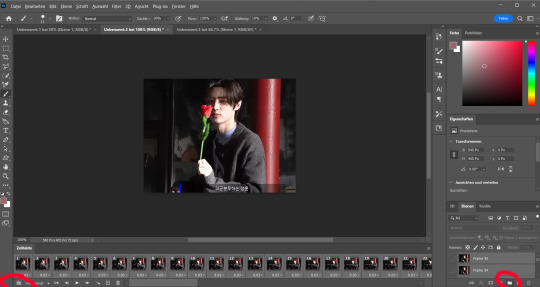
then in photoshop i go to file > scripts > load files into stack and select all the frames i want to go into the gif i'm making
for the method i use, you need a version of photoshop with timeline animation, and make sure the timeline i displayed (window > animation)
now the next part has a lot of little steps, but they're fairly easy to get the hang of once you've done it enough. it's basically muscle memory for me now but i still do sometimes do things in the wrong order lmfao
anyway. the steps are as follows:
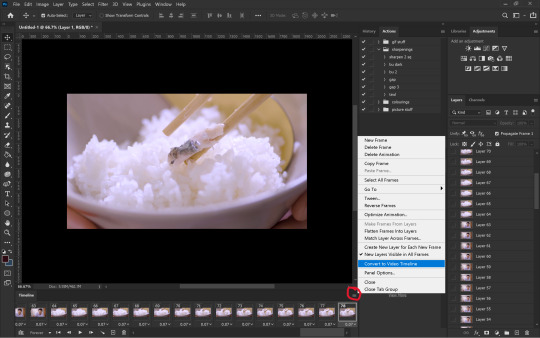
click 'create video timeline'
click the 3 little boxes in the bottom left
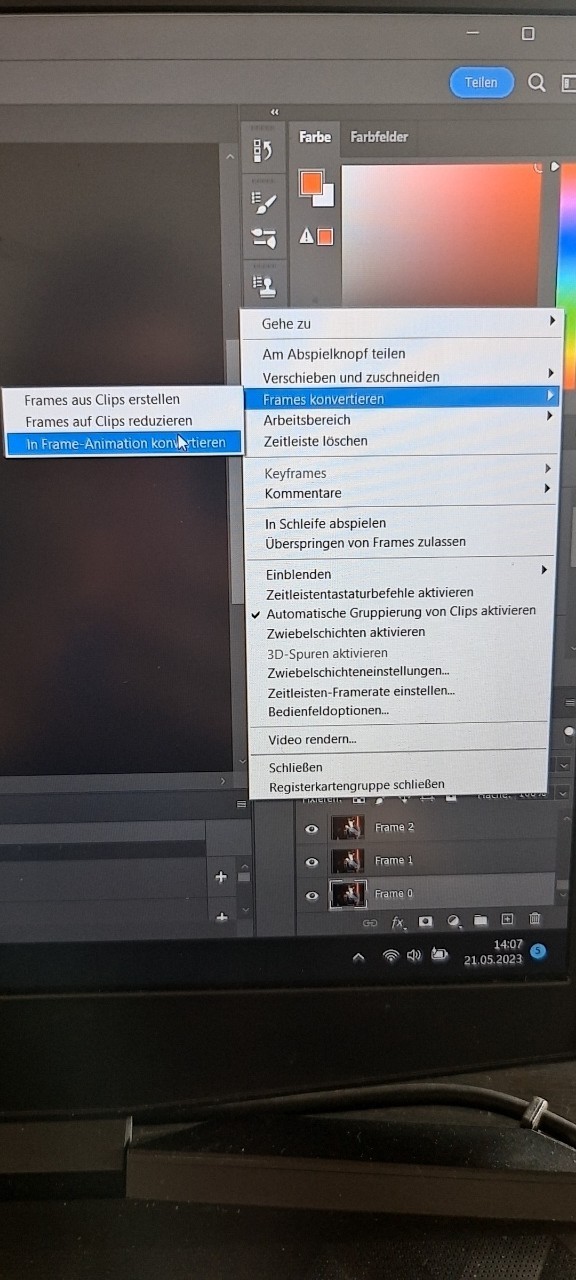
in the right menu, choose 'make frames from layers'
when thats loaded, open the menu again and choose 'reverse frames'
click the last frame and change from 5 seconds to no delay
make sure you choose 'forever' instead of 'once' in the bottom left
select all frames (you can select the last one, then scroll back to the first and shift click to select them all, or just click 'select all' in the menu, i'm just used to doing it the first way for some reason lmao)
in the right menu, choose 'convert to timeline'
then select all the layers (can use shift click again)
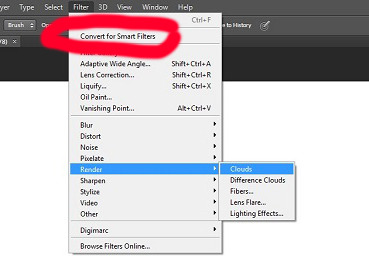
and finally go to filter > convert for smart filters
here's a very small shitty gif of the process for a visual aid (a gif of a gifmaking guide... wow)
now you have a gif, basically! but you still need to resize and sharpen and edit, etc. i've posted about some of the things i do before but not really in detail because i mess around every time and don't always do the same things. and you don't have to do much! just do whatever looks good to you :')
tumblr's gif dimensions are 540px width for wide gifs, 268px width for two small gifs, and three small gifs are 177px for the two outer gifs, 176px for the middle one (don't ask me why they did that)
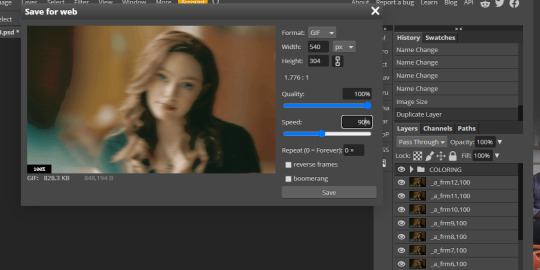
once you're done with that, you can export the gif by going to file > export > save for web (legacy). these are usually my settings:
but i might change the colors to 264 if it's a smaller gif, or even to 64 if there are less colours and i can get away with it. for example in these gifs, i only used 64 colours since they were pretty brown/monochrome anyway, but something a lot more colourful would look terrible with 64 colours
the gif needs to be max 9.99MB, but if it goes over, you can always adjust it in the next step. once it's exported, i open it again
select all the frames and click the little arrow on one of the frames, then change the timing. i almost always use 0.05, but you can experiment with what you like the look of
then if the gif's over 9.99mb i just delete frames from the beginning and/or end until it's under the limit. then export it the same way as before (overwrite the old one or save it as a new file if you like) and you're done!
#ask#gif tutorial#kinda. i suck at explanations so maybe this isnt the best LOL#if you need me to clarify anything pls lmk! i always wanna help people learn new stuff if i can
16 notes
·
View notes
Text

Updated Gif Making Tutorial!
What you will need: Google Chrome. Quicktime Player. Photoshop.
TLDR version
Turn off graphic acceleration in Chrome and relaunch.
Use Quicktime Player to record the screen.
Trim the recording and upload it to Photoshop.
Turn the layer into a Smart Object. Resize Image to 540 width. Apply Smart Sharpen Filter.
Add adjustment layers as needed to correct color. Suggested Adjustment layers: Exposure, Brightness/Contrast, and Color Balance.
Save for Web (Legacy) set to Gif 256 colors Loop Forever. Must be under 10M for Tumblr.
So I have changed my process and I figured I should document it for whenever I inevitably forget how to do it. This is definitely for more intense gifmaking so if you are just wanting to do something less intensive, you can still do step one of this tutorial but then use something like GIPHY Capture to record the gifs. You can do basic gif captures and add text with it but you won't be able to get the same quality without doing a little editing. Most of my older stuff was done with Giphy Capture and some of those gifs I would use this tutorial to edit. Even then, they weren't the quality I wanted so now I use this process.
Anyone who is just starting out doing this, super important first step - you need chrome. It sucks but you need it to do the screen recording later on. Once you have chrome downloaded, go to the three dots in the top right hand corner >Settings> System>make sure that the Use graphic acceleration when possible is NOT CHECKED. You will see in the first gif mine was already turned off (greyed out with toggle to the left side). When you initially turn it off then it should give you an option to relaunch (note that because mine was already off I did not need to relaunch).
Now for the screen recording. First go to whatever streaming site you have the media you want to gif on it. For this tutorial I used Abigal that I streamed through Movies Anywhere. You should be able to screen record from pretty much any site but be aware of the quality. VUDU/Fandago at Home will only let you stream in SD on Chrome so that is why I use Movies Anywhere. I then use Quicktime Player to record. I keep it on my dock so I just go down to it and tap it to open a menu at the top of my screen. On that menu, go to File>New Screen Recording and a menu will pop up on the screen with options of what to record. Use the Record Selected Portion then adjust the size to match the size of the video. Once you hit record you can play the media and then it will record until you hit the little stop button on the top right of your menu bar.
Once the recording is done, you can trim it and save it. I HIGHLY recommending trimming down the screen recording before moving the file into Photoshop. Otherwise it will be such a pain when it comes time to edit. Also, your screen recording original will still be saved usually on your desktop if you want to trim down multiple parts of the video into different gifs.
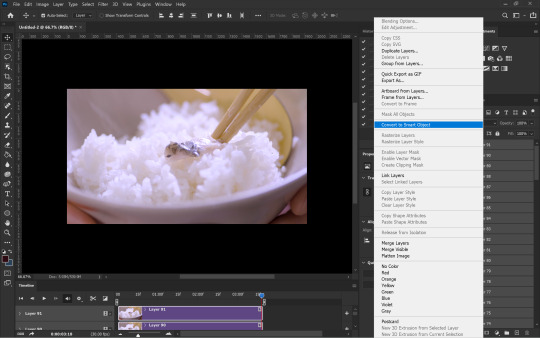
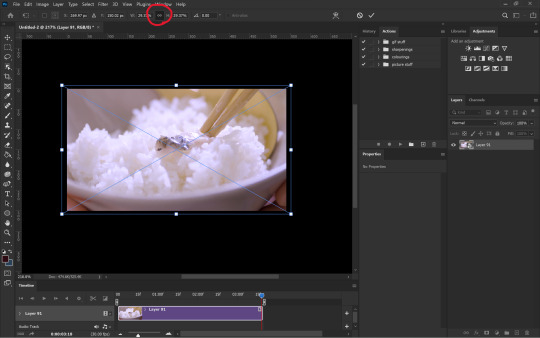
Next, you drag the trimmed file into Photoshop and turn it into a Smart Object by right clicking the layer and selecting Convert to Smart Object. This will allow you to add filters which you will want to do if nothing else but to sharpen the layer. Then you should resize the image to an appropriate gif size (I use 540 x 335ish for my gifs because I find it just looks nice but you can mess around to find what dimensions work best for you).
After you resize your image, go ahead and go to Filter > Sharpen > Smart Sharpen and set the amount to 500%, radius .3, reduce noise to 10%, and Remove to Gaussian Blur. Hit OK and then you should notice your gif looks clearer. After that, you are free to play with the Timeline to adjust timing (you may have to double click the Smart Object layer to change the trim of the layer but once you have adjusted it just exit out of that project and it will automatically save the trim to the original PS document you are working in), add shapes/text, add adjustment layers, etc. I would recommend an added Exposure, Brightness/Contrast, and Color Balancing layer then play with those settings until the color looks right. Be sure to save the file once you get the coloring down so you can just drag and drop other screen recordings into the PS document and it will copy those settings to it. Just remember to do the Smart Object and Sharpen Filter on every new screen recording layer you drop in.
Once you are ready to save, go up to File>Export>Save for Web (Legacy). It may take Photoshop a moment to load this menu. There will be a circle of loading white dots you will just have to wait out. Once the menu does load, select Gif from the menu just under Preset. Make sure the colors are set to 256 to get the best quality gif. Also check in the bottom left hand corner under GIF that the size is under 10M or tumblr will hate it. You may have to adjust the length of you gif if it is over that size. Also, select Forever under looping options and that the dimensions are reasonable. Tumblr hates anything bigger than 540 wide which is why that is my standard width. Once your settings are right, hit Save and then now you are ready to upload to Tumblr!
#Gif tutorial#Gif making#I am still learning so this process will get refined the more I practice#Now back to giffing Abigail#Reference#I should also note I DID NOT do any sharpening or adjustments to the tutorial gifs#I was just trying to get this tutorial out fast
9 notes
·
View notes
Text
GIF MAKING IN PS
i've never done anything like this before so hope it makes some kind of sense.
so before you get into making gifs first thing so will need is some sort of editing software (i use ps 2022) and some raws obviously. most of the shows i gif are on yt so its pretty easy to get them and you can use any kind of yt to mp4 converter.
so once you have all of this i guess we can get started!!! on a daily basis i do not follow all these steps because you can easily turn them into actions on ps, which means that it would take just seconds. so although it may look lengthy its pretty simple
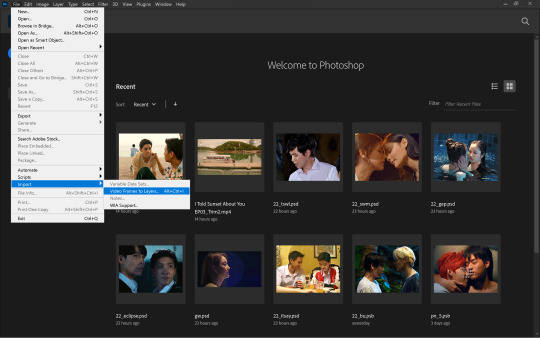
the first step to making gifs is importing the raws. you first want to go to file>import>video frames to layer. this will open up your file explorer from where you can choose your desired file. you may want to make sure your file isn't an mkv one but an mp4 before you do this. also if your raws are large, perhaps a whole episode or longer than 30 minutes, it might help to trim it down beforehand to make it easier to work with.
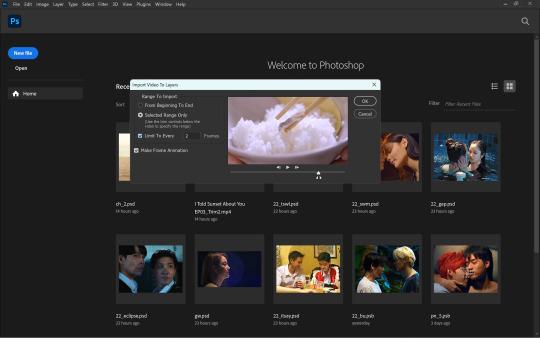
once you select your file, this window will open up. here, you can move the sliders to select the exact part of the clip you want for your gifs. (when files are larger, it would be more difficult to capture smaller parts of the clip using the sliders) although optional, selecting the limit to every 'x' frames will help reduce the size of your gifs while not making it look too choppy. i do 'every 2 frames' for regular scenes and leave it unchecked for anything in slow-mo. more than 2 usually makes the entire thing look sped up and choppy so i wouldn't recommend it. although it depends on the raws ideally you want something around 80 frames for one gif.
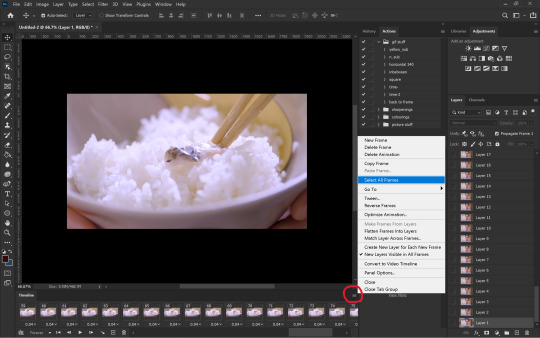
once you press okay on the above step, your workspace will open up and from here we can start making the gif. the first step would be to set the time delay. this is two ensure that the gif doesn't look sped up. for this you want to first select all the frames as shown above.
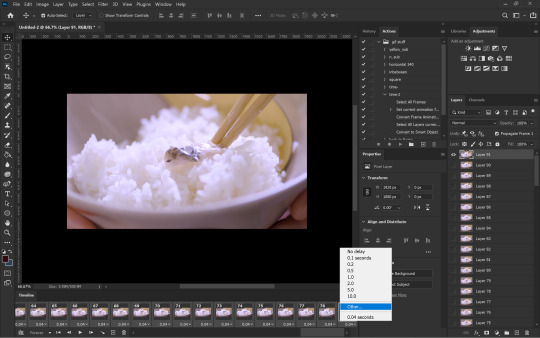
next, you can click on the downward arrow on any frame to change the time delay. i usually prefer 0.07s which you can set in other...
once you've set the time delay, you have to convert the frames into timeline as shown above.
now that you have your timeline as seen on the left side, all you have to do is convert everything into a smart object. for that you have to first select all the layers using the shortcut Ctrl+Alt+A and then right-click on the layers followed by convert to smart object
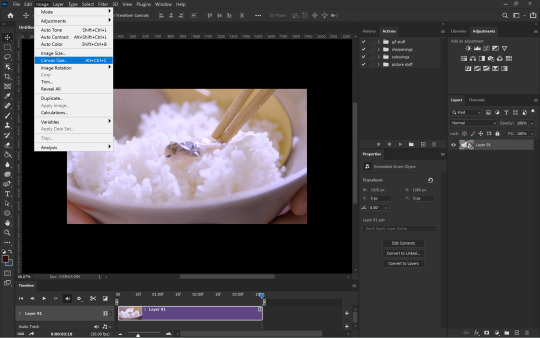
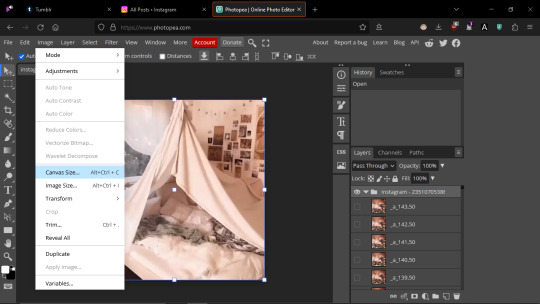
now you can see that the many layers have been converted into one layer making it easier to work with. the next step is to resize the gif. the original dimensions would make the gifs too large to fit tumblr's size limit, this can be done by going to image>canvas size
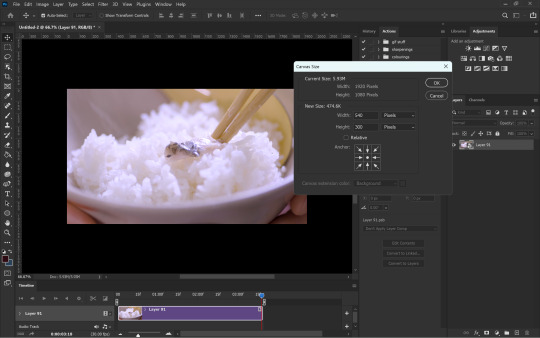
to ensure that tumblr does unnecessarily crop your gifs you want to make sure width is always 540px if there's going to be only one gif in a row. the height can be anything depending how you want your gif to look.
you can adjust the gif onto the new canvas using Ctrl+T to transform the layer. always ensure the height and width are linked to make sure you don't squeeze the image weirdly.
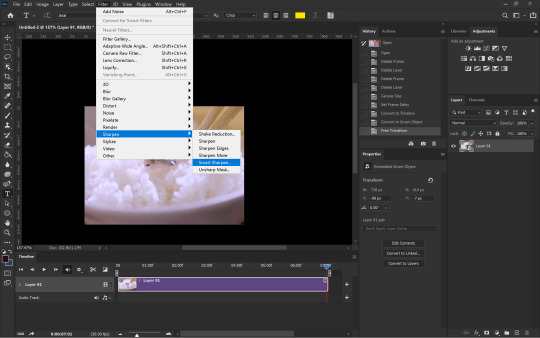
after resizing the gif, i next sharpen the gif (which is my least favourite part). you can sharpen by going to filter>sharpen>smart sharpen while the noise filter is in filter>noise>add noise
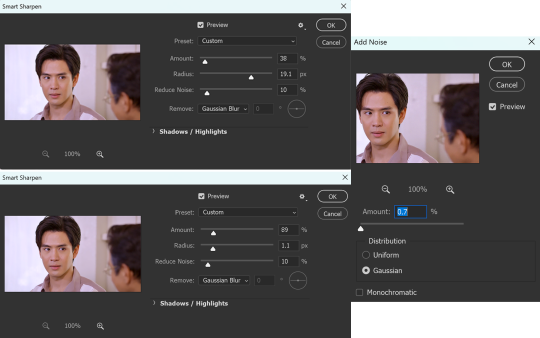
although i don't always stick to the same sharpening, these are the settings i use the most.
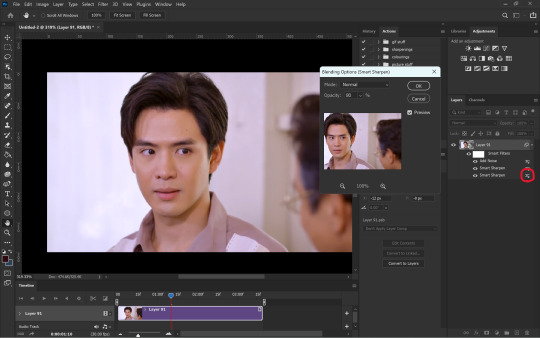
once i'm done with the sharpening i like to soften the first smart sharpen filter. for this i change the blending option of the first filter to 80%. this is entirely optional.
once sharpening is done, you can colour and edit however you like using any of the adjustment layers. i mostly prefer curves and selective colour. these are the curves i used for this particular gif to remove the purple/redness it had going on. in RGB mode the white slider adds brightness and the grey one darkness/contrast. then you can individually use the red, green and blue modes to adjust the colours. i only used selective colour here to adjust the skin tones a bit so i haven't added that.
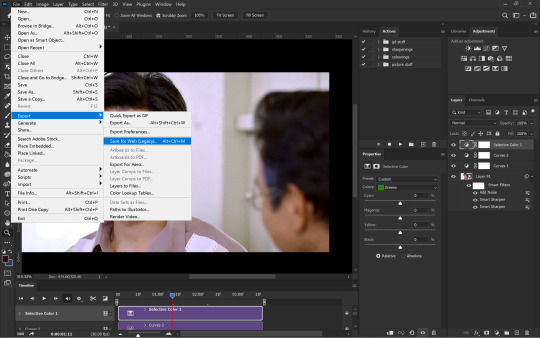
once done with colouring all you have to do is export the gif from file>export>save for web (legacy)
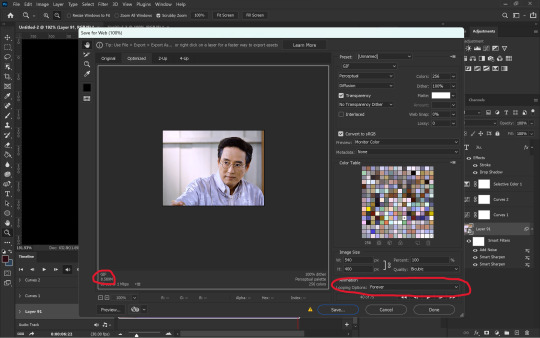
in the last window you have to make sure your looping is forever and that your gif is below 9.5MB. although tumblr says max gif size is 10MB, at least for me nothing over 9.5MB uploads.
and THAT'S IT (i say after a whole one page essay) your gif is ready!!! honestly i don't know if this is the easiest or most convenient method but this is just how i do it. also i use actions for everything other than colouring so it isn't as time consuming as it looks. you can also set shortcuts for importing and exporting to save time. this can be done from edit>keyboard shortcuts
since you made it to the end here is an extra bit on captioning
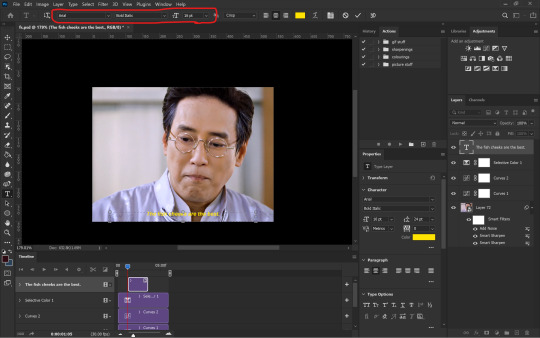
you want to start with a normal text layer and center it at the bottom of the gif. i use arial bold italic in size 16. next to make it look better we can add an outline and shadow to it through the layer style. and you can open up this window either by clicking the fx option at the bottom right or double-clicking the text layer.
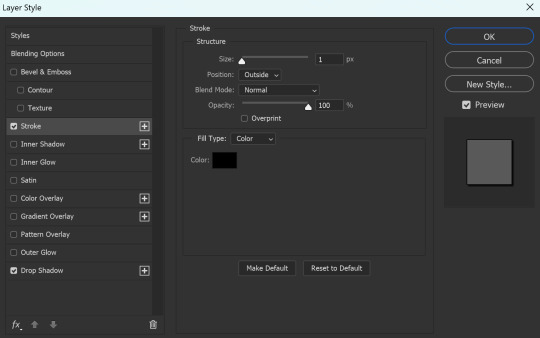
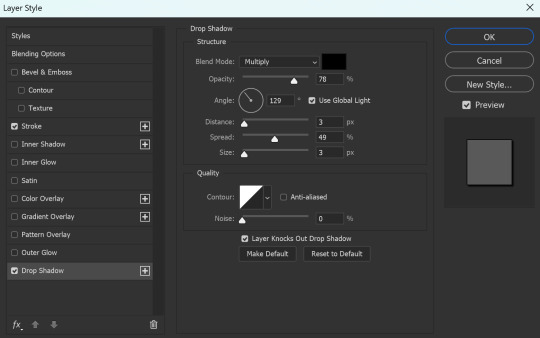
these are the settings i use for the stroke as well as the shadow
now it is ACTUALLY the end!!!
#gif making#ps tutorial#gif making tutorial#photoshop tutorial#hope this makes some sense 😭#i made the important stuff bold so that you don't have to necessarily read through the whole thing#i had to go take a look at my actions cause i had actually forgotten my settings in the first place
89 notes
·
View notes
Text
Photoshopping/giffing tips and tricks pt. 2
[in addition to this post i previously made]. Before we start, I want to say that i’m no expert in any way, and everyone should work in ways they're most comfortable with, i just want to share some knowledge i collected over the years with everyone who might find it useful and maybe improve their skills in making content. So, let’s get started! WARNING: IMAGE/GIF HEAVY!
Save workspaces. You can have multiple workspaces for different needs. For example, i’m making gifs more often, but sometimes i make edits as well, so having to switch the timeline panel off when it gets in a way, then go back to the view menu, then bringing it back again... idk, call me lazy, but it seems like a few extra clicks for me 💀 What you can do instead is save your current workspace and easily switch between them any time you want. To do that, align all your tools and menus as you want, then find this icon at the top right corner

Scroll down to New Workspace, and this window will pop up


Name your workspace however you want, and chose what you want to save. You can save keyboard shortcuts, menus and tools. When you click save and change your layout, nothing will happen. That is because you need to reset your Essentials workspace first (the one that’s usually the default). Now when you switch between your workspaces (if you saved multiple) everything should work as expected
How to change the speed of gif without converting to frame animation (PS 2021 and above). THANK GOD Adobe fixed the glitch where the frame rate gets all messed up when you switch to video timeline, so i would suggest upgrading whatever version of PS you currently have if you can, working with timeline is MUCH easier in my opinion. To change the speed, after you imported the video (photoshop reads only .mp4’s btw, so be sure to check if you have the correct format), click the little play button

and type in whatever number you want: 25% — the lowest value, but you can also speed the gif up by entering a number higher than 100%. Remember to do that BEFORE you convert your gif to a smart object (& before resizing it, bc after applying the changes video automatically converts into a smart object), because once you convert it, the speed can’t be changed without going back a few steps). When you slow a gif down, photoshop “eats” some parts of it (usually towards the end), so you need to extend the gif by dragging it to the right until you reach the end of your scene to fix that
Normal speed

Slowed down to 60%. Sometimes slowed down gifs may look choppy, i explained the trick on how to fix it in pt. 1 (click the first link in the post).

Use plugins. There are so many great ones! For example, i found this plugin called Better Grids: it creates grids and converts them into shapes or frames AUTOMATICALLY based on the numbers you set within the plugin. It’s a lifesaver for me when it comes to photosets! DL (Google drive. M1 Mac users: for the plugin to work, you need to run Photoshop under Rosetta mode first. To do that, right-click the app, go to get Info and check Open using Rosetta if you have that option available)
If your disk space allows, do not convert media. It’s time consuming, messes up the original quality, and usually extremely hard on processors, especially not very powerful ones. Instead, just change the container to open your file in photoshop, It’s faster & less power consuming. I use Subler (mac) and Avidemux (mac & windows) to change the container to mp4, bc for me it’s the simplest ones to use
Handy thansform tool trick. When you try to fit your image into a certain sized canvas, this is probably what you’ll caught yourself doing
there's actually a much faster and easier way to resize stuff. when you activate transform tool, you'll see these boxes with numbers in the top panel
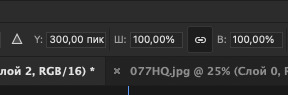
watch what happens when i change one of the numbers

isn't that neat? (make sure that little chain button is checked to mantain proportions. x and y values are for stretching the image horizontally or vertically)
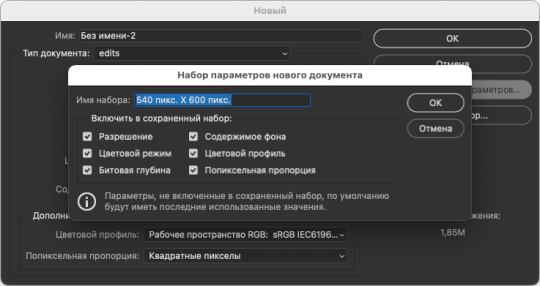
Save document presets. In new document window, type in your desired dimmensions, then click "Save Preset", choose which options you want to save, name it however you want, click ok and you're done — congrats, now you have a saved canvas preset for further use!
So, i hope these little tips were useful. Have fun creating guys 🌸
44 notes
·
View notes
Text
Gif Making, the Broke Bitch Way
I've been considering making this tutorial for awhile, because not all of us can afford PhotoShop and doing it the way I do it does take some finagling.
For this tutorial, you will need:
A video you want to gif - I usually find them off of YouTube
Paint.net - the free version, I emphasize the free version. The paid for version doesn't play as nicely with plugins
midora's 'GIF Animations and Images' FileType Plugin (.GIF, .AGIF) plugin - have a tutorial on installing plugins for Paint.net)
ffmpeg - have a tutorial on installing ffmpeg because I struggled hardcore with that
VLC - for clipping larger videos down into smaller clips
Tutorial continues under the cut because it's fucking long and I ramble.
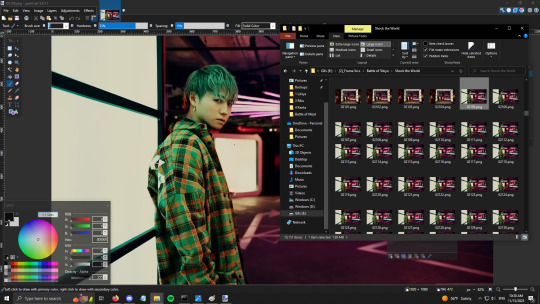
For this video, I will be breaking down SHOCK THE WORLD into frames.

Here, I already have it downloaded.
I have a special folder for breaking things down into frames and I've copied the file over into that folder.

Now, I'm gonna change the name of the file because that's motherfucking atrocious and I'm not fucking typing that out in ffmpeg.

Much better.

Now type in cmd in the address bar and hit enter. That'll bring up the command screen, where you type in
ffmpeg -i [nameoffile].mp4 %04d.png
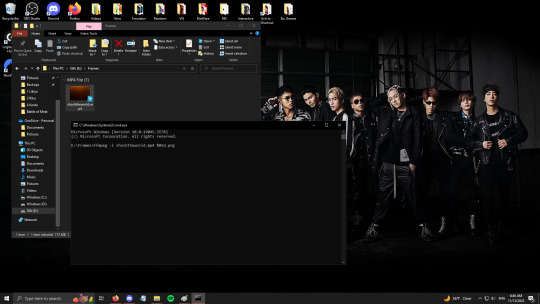
Notably, I actually wrote ffmpeg -i shocktheworld.mp4 %05d.png because this video is 7 minutes long, so I wanted 5 digits in the file name instead of 4 just in case. You would be amazed at how many frames a video breaks down into when every second of footage is 23.99 frames.

And good thing I did. The text in the red box says 'frame=10707', which means it broke the video down into 10,707 frames.
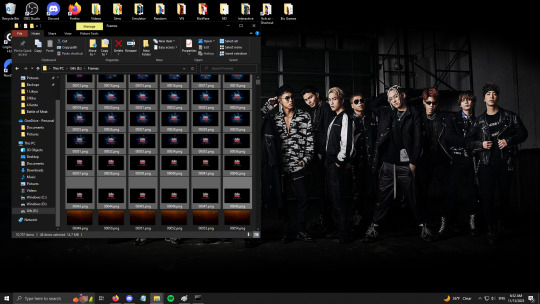
You don't have to do this, but I go through and delete the frames that say RhythmZone at the beginning and the ones at the end, because I don't need them and these files are huge.
Now I move the images out of the Frames folder and into their new home.
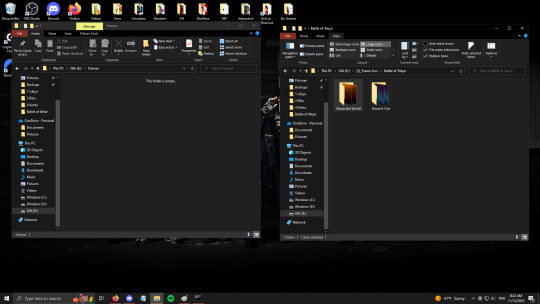
Now that the frames are in their proper folder, it's time to find what we want to gif. I like this shot of Leiya, he looks pretty.

Now we have to decide how many frames we want our gif to be. Most of my gifs are between 25 and 35 frames - like the birthday gif sets are 28 frames, the Ray of Light second outfits are 37, and the MV gif sets are 30 frames of moving gif (45 frames w/promo pic).
In this case, I think we're gonna for for 30 frames. That's a decent amount. So first open up the first image - I just drag it into Paint.net from File Explorer because it's easier that way.
You can drag each frame you want in individually like that, too, just hit 'add as layer' every time. What I prefer to do is select all of the ones I want and drag them in at once. Just hit the 'Add as layer' button and magic happens.

Sometime when doing this, Paint.net drops the layers in in the wrong order, so it's always a good idea to go through and check that all of the numbers are in the right order. From this one, you can see that 2133 and 2134 ended up at the bottom, so I had to drag them back up to the top.
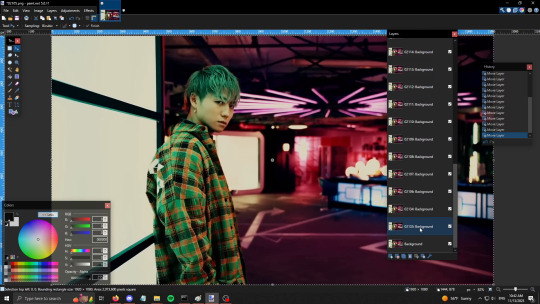
One way that I check that my frames are in the right order is I resize the file down to a much smaller size - 600x338 is what they tend to end up becoming when I do the previews - and then I go to Save As -> Save as AGIF format and preview the gif.

Technically, we could just call it quits here. You have the frames, you have them in the right order, you can truly just hit Save and move on with your life. This is the gif, saved just as it is, using the default settings for making a gif.

It's not as much a problem here, but sometimes the default settings move a little slower when you have all the frames. This is currently set at 1 frame per 100ms. I default to 1 frame per 80ms instead. The difference is slightly more obvious in these two gifs, I think, because there's more movement.

Gif on the left is 100ms per frame, gif on the right is 80ms per frame. It's a little faster and, in my opinion, truer to the actual music video.
But! Since I am a Picky Bitch, as well as a Broke Bitch, I don't usually leave my gifs at this point. I do two extra steps on every gif.
Step 1. Sharpen all the frames.
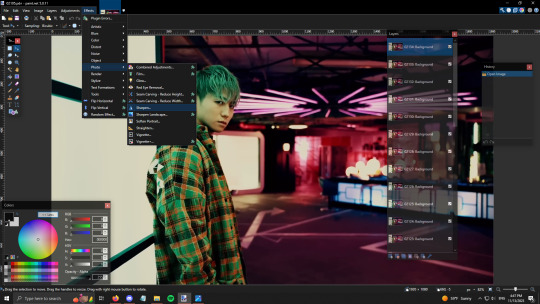
Unless it looks bad, I just take the default sharpening settings. Ctrl+F repeats the most recent effect you've applied. Considering each frame needs adjusted individually, I suggest you memorize that command. 😂


No sharpening left; sharpened right. The difference is subtle, but I prefer to sharpen my gifs to reduce chances of the gif looking blurry later.
Step 2. Brightness and contrast!

This step is a lot more finagling - I often do multiple tries and I'll compare the frame I've edited with the frame above it to see if I like the difference. The reason why I always do Brightness/Contrast - especially Contrast - is because I feel like it unifies the colors and takes off the sort - grey edge the gifs sometimes have if I don't do Brightness/Contrast.
Once you're happy with the Brightness/Contrast you have, you get to apply it to every single frame 😂 Ctrl+Sht+T is the shortcut.

So... Difference isn't as strong as I'd like it here. 😅 The one I modified is on the right.

I think the difference is more obvious with these two. On the left, is the one that hasn't been Sharpened or had the Brightness/Contrast affected. On the right is the finished version I actually posted. The left one just feels - greyer, to me, the colors aren't as vibrant or sharp.
#thistale makes things#thistale rambles#tw flashing gif#gif making the broke bitch way#thistale gifs
9 notes
·
View notes
Text

anonymous asked 💬 Hello there! Could you please make a tutorial on how you combined gifs and images in your edit THE RECENT FASHIONS OF JENNA ORTEGA? It's incredible. Thanks!
tysm for this ask 🫶🏼 below the cut is a step by step on how to do this kind of set. i will be using photoshop 2023 for this tutorial.
original inspiration was taken from sith-maul’s zendaya lookbook gifset !
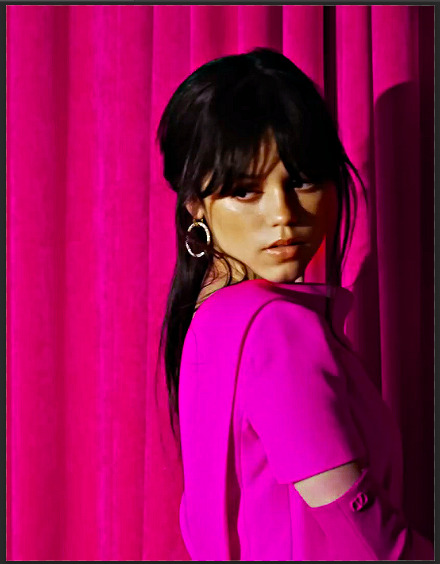
step 1: cropping
for this style to work, your gif needs to be tall. the best dimensions are 540x700. make sure you don’t have too many frames because the bigger the crop, the bigger the file size !!
the other thing you want to do is crop it a little to the left or to the right, whichever works best. this is so you can slot in the photos of the outfit :)
step 2: colouring
to make the whole thing more cohesive later on, how you colour your set is important. for the demonstration, i’m using a clip of jenna from her interview with who what wear, which has a lot of easy to manipulate colours. because the main colour is obviously pink, i’ll use a colour balance layer, a selective colour layer and a hue/sat. layer.
be mindful when using hue/sat and colour balance that you’re not whitewashing your subject or dramatically altering their skin tone. if there is low movement in the gif, you can use layer masks to prevent this.
you can see here that there’s a huge difference in the old vs. new colouring, which is what we want !!

step 3: source your pics
probably the easiest step. you can either just google search for pictures [person] [event/photoshoot] is the best way to search for that, or you can search for something on pinterest. you want one picture that’s ideally head to toe, plus another showcasing the outfit from around waist up.
step 4: edit the photos.
now that we’ve got our photos, load those into ps. once loaded in, you’re going to want to go to select > subject and then go option + cmd + x (for mac, i’m sorry idk the windows prompt !) and then just paste that on a new layer.
depending, the photo may select some of the background. but there’s really nothing you can do about that, so you just have to tidy it up manually using the eraser tool.
now my photo looks like this !

crop the photo to the same size as your gif and repeat the same process for the other photo.
step 5: placement of the photos
first off, duplicate your photos onto the gif. then, resize them to your liking. ideally, you want the full shot going from top to bottom on the gif, and the medium shot positioned down from it.
i also make the medium shot a little bit smaller, so we can highlight the head to toe. as well as that, put the head to toe shot behind the medium shot by swapping their layer orders.
here’s a ss of what mine looks like, just to give you an idea.
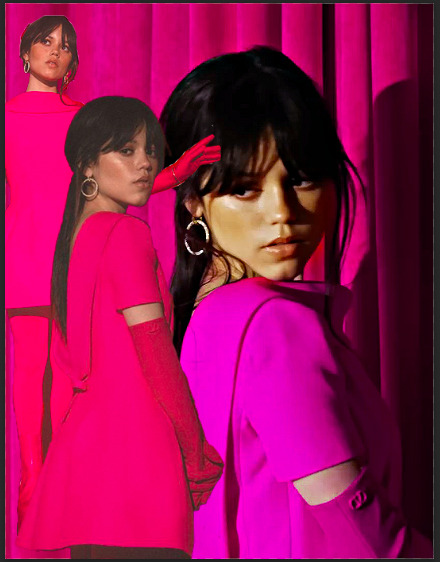
step 6: colouring the photos
first stop: add a black and white gradient map. completely ignore the fact the gradient map will go over everything; we’ll fix it in one sec ! colour the photos as normal: curves, levels, anything you do in your normal colouring process. just make sure all the layers are underneath your gradient map layer !
on top of it all, add a gradient layer and change it to a colour in the outfit. you can click and drag it in all different directions to get to a good point. don’t forget to change the angle of it so it fits best !
for example, here’s mine:
you can see that the gradient gradually goes up on the outfit, leaving it almost half half.
now, select all the layers that are over the first picture and right click > clipping mask. this clipping mask will make sure that all your colouring layers ‘clip’ only to your picture. DO NOT select the picture layer as well. this should be what you have:

the arrows show that it has clipped to the subject.
now, just repeat those colouring steps on the other pic so you’re starting to look like this:

OPTIONAL: i usually change the blending mode of my gradient layer to ‘colour’ so it blends nicer on the picture, it’s not compulsory, but the result looks better. you can also choose to sharpen your pictures if you like !
step 7: typography
there’s two main things you want: the title of it (this could be a fashion brand or maybe a show/film name if you want to do this for a character) which will be in a statement font as well as the location or the date (could be the episode and the episode air date or the film premiere date) to start, create your layer above the colouring layers for the gif, but below the pictures of your person.
for this tutorial, i’m using the font ‘magazine’ but you can really use any font you want, as long as it stands out against the cover.

next up, you’ll want to search ‘map pin point png’ on google and get your little pin point icon. this will be so you can add the location and the date, or whatever you want to add. i change the font that i use for the subheading, just to switch things up ! you can do whatever you like though.

here’s what i’ve got for my subheadings. make sure that you’re placing it in the empty space on the bottom corner, not on top of your pictures.
and that’s it ! you can add any other finishing touches that you’d like, or do any other effects that you want. this is simply a base for you to work off, but you can change things wherever you deem it necessary to improve upon. apologies for this being so long 😭 hopefully it helped a little though !
#*tutorial#asks#gif tutorial#clubgif#userriel#tusercat#usercim#usersmia#userv#thingschanged#userzesty#userlp#userpjo
42 notes
·
View notes
Text
STIM GIF TUTORIAL!!!
Over-explained process on how I make gifs, using a recently made gif that took a lot of effort + went thru ALL possible steps i usually do. So. yeah.
First of all: I use Firefox and the adblock extension UBlock Origin , you should too. (I also use Windows, but i can't say i recommend that.)
Find your video source
I use mostly youtube and instagram.
for instagram I use: https://fastdl.app/
for youtube i use: https://yt5s.com
You may use whatever downloader you're comfortable with, it doesn't matter really. either way, USE AN ADBLOCKER!! Something that will block pop-ups.
I will be using this video: https://www.instagram.com/p/CCgrjLJnDWO/ !

TRIMMING THE VIDEO
Trim video into short sections will make it easier and faster to turn it into a gif! I use the windows editing software to do this. Open the video and go down to the pen icon, click it and then click "Trim"

This pops open a new window! (The volume settings do NOT carry over (very stupid) so i recommend having your headphones either off or turned very low.)
On the timeline on the bottom, there is three things. Start and End are both blocks, and your viewing point is a little circle with a line. Don't worry about cutting exactly to the point you want, we can get it exactly to the frame later. Then save the trimmed video! I like to name them "trim 1" "trim 2" ectera if i have multiple.

STABILIZING THE VIDEO
This video is kinda very shaky! (Which is also why i am using it for this tutorial). But we can fix that!
(not every video will need stabilizing. Most don't. Some shaky videos I leave shaky, because stabilizing them looks weird. this is all personal preference)
I use this website for stabilizing: https://pixiko.com/tools
alas, it leaves very large watermarks a corner of the video. Which usually isn't an issue for vertical videos that I will crop, but this one is square. So we will make it vertical
AVOIDING PIXIKO WATERMARK BY RESIZING VIDEO! (sidequest)
go to photopea!: https://www.photopea.com/
we will revisit this later.
File -> Open -> Select your mp4 file -> Open
It will then pop up asking for what frames per second(fps) you want! It will also display the original video's information in this order:
Pixel size (540 x 640 px), Original amount of frames(221 frames), Video size (345.3 MB decoded)
Length of video (7.37 seconds), Original video's fps (30 FPS)
Then it will have a slider! Here you can input whatever fps you want on your gif. More frames means smoother gif, but higher file size. Less frames means a choppier gif, but lower file size. I usually use 12, 15, or 20 fps. If you want to slow down your video later, you should probably put your frames higher so the slowed video won't end up looking choppy.

Then open it up! It might take a while to load. When it does, go up to "Image", click, then go down to "Canvas Size"
Awesome, new window popup. Here you can change the canvas size. The little chain icon locks the ratio (the number:number next to it). We won't use that. The little grid with the circle in it is where the image will anchor from, you click different squares of the grid to change it. Anchoring it just means that spot will stick the same, and canvas will expand/shrink from it. For now we are keeping it in the middle.

We will change the height of the gif, since Pixiko adds watermarks to either the top or the bottom of the video.

Awesome. We have transparent bits on the top and the bottom that we will crop out later. Now Photopea doesn't let me export files as mp4s, and Pixiko doesn't let me upload gifs. So we will over-complicate this even more!
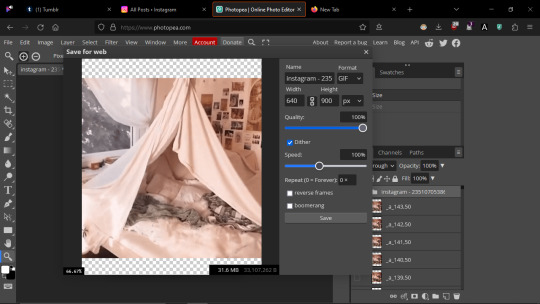
File -> Export As-> GIF.
A popup might appear asking about if you want to resize your gif smaller. In this case I wont.
Wow! A new window! These are all the stats of your new gif. Previous things already explained are previously explained.
"Quality" is a slider that effects how many colors and how many details are in your gif. It saves minor space, but it's such a small change that I won't recommend lowering it.
"dither" is a checkbox that effects if your gif is dithered or not. Dithering is little pixelizations of color added to blend things better. It takes up a lot more space, but looks better in most cases. By default it is off, and instead the colors of the video are more segmented and can look like cell-shading. This saves some space, but it doesn't look good for certain small details or color gradients. I will turn dither on.
"Speed" is how fast or slow the gif plays.
"Repeat (0 = Forever) is how many times the gif will repeat itself. By default it should be 0, meaning it will loop forever. You can change this if you want, but that means the gif will only play that many times before being frozen forever.
"reverse frames" plays the gif in reverse.
"boomerang" means the gif will go 1,2,3,4,3,2,1 ; it will complete itself normally and then reverse to the beginning.
OKAY AWESOME. Save your gif and pack it up to move to YET ANOTHER website, ezgif!
Ezgif: https://ezgif.com/
Head over to "Video to GIF", then to the "GIF to Mp4" below that.
Select your file and press the blue upload button! This might take a while to load!

Then scroll down, press the blue "Convert GIF to Mp4" button. Wait for your video to process and then download it!
OKAY WE FINALLY GO BACK TO PIXIKO
STABILIZATION BACK ON TRACK!!!!!!
Here's the website again: https://pixiko.com/tools
Go to the tools section (up on top) and then scroll down to Video stabilizer (in "SEPERATE TOOLS" category). Or you could just ctrl+f it.

From that point on it is just uploading the video, waiting(a while), and then downloading your new stabilized video!! Awesome!
PHOTOPEA CONTROLS (canvas size, color editing, deleting frames) (the fun part)
NOW go back to photopea. Upload your gif (File -> Open -> select file -> open). You will have to put your fps again!
Ok. Now you must learn how Photopea organized gifs. Gifs are their own folder, and inside that folder each frame is a file. 'layer 1' plays first and 'layer 2' plays second. Layers outside of the folder, and below it, will display behind the gif as a still image. (cool for transparent gifs, or if you need to stretch out a gif)
To view each layer/frame, press the square next to it's image+name. If there's an eyeball, it's visible. If there's an empty box, it's not. All layers in the folder will show up in the gif, even if they are all empty boxes, so don't worry about that!
You can shuffle frames or delete them, but keep them inside the folder. (and keep the folder "Pass Through". You can change individual layer types though)
You may delete specific frames! If your trim of the video wasn't perfect, you can delete the ends/starts here!
Here, i deleted a frame in the middle of the gif. it was awkward and made the gif jump weirdly. Cutting it out made it a little choppy, but i prefer that look to how it looked before.
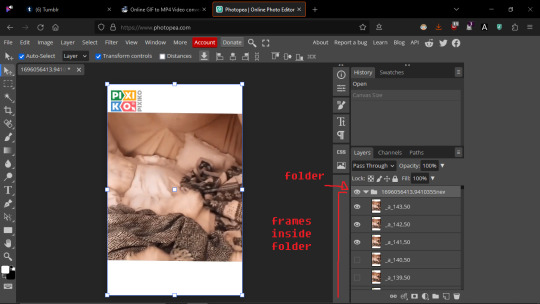
awesome. Okay, first, go to the left side of the screen and select the first tool (an arrow). On the top of the screen, next to "Auto-Select" find the dark box saying "Layer". Click it and switch to "Folder".
This makes it so when you move things, you will be moving the entire folder/gif and not just singular frames.

On tumblr, images that are sidebyside will "crop" (if you click on it it's full size) to whatever the lowest height ratio is in that image row.
This means, if you have a row of 1:1 , 3:1 , 1:3 (width:height), the whole row will crop down to 3:1 and your gifs will all be rectangles.
example:

SO, I crop my gifs to 1:1.
Awesome. Okay, go up to Image -> Canvas Size. and crop the gif down to 1:1. You may have to move your image to get the things you want in frame. Use the cursor tool for this, and just click and drag.

awesome. now here's the fun part.
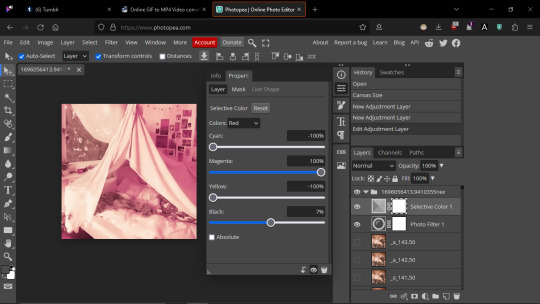
THE FUN PART (editing, colors, pizazz)
You can add effects to your gif, such as changing its color. Mostly changing its color.
Select the folder by clicking on it, this makes it easier to get your effect into the right place (though you can drag it around). Anything below the Adjustment layer is effected, and anything above isn't.
Then go down to the bottom, below the layer window, and click the half-filled in circle. A popup will appear with lots of different effects! You can mess around with all of these. For this one I will be using "Photo Filter" and "Selective color"
Photo Filer applies a color over the entire image. By clicking the orange (default) color block, you can pick the color you want. Density slider is basically the opacity. "Preserve Luminosity" means it will keep the brights and darks of the original image.
Now!! If you ever loose your adjustment sliders: select the adjustment layer, then go up to the little button that has little sliders/horizontal lines in it. Click that, and it should pop back up.

Selective color lets you pick basic colors and turn up certain amounts for them. I can make red more magenta, and yellows more cyan, or whites more magenta.
"Absolute", as far as i can tell, just turns up the effect more strong. I usually turn it on when i want to really effect something.
There is many other adjustment layers you can use! I will not explain them all, you can explore yourself.
ONCE YOU ARE HAPPY, you can export the gif! File -> Export as -> GIF.
set your speed and if you would like dither or not.
Now, this file may be HUGE. A quick way to deal with that is to turn down the pixel size of the image. Make sure the little chain between Width and Height is selected(dark). This keeps the ratio the same (and you will only have to edit one number instead of both).
I will shrink my image down to 400 px.
You can check how large your file size in within the little viewer, in a black box on the bottom. Tumblr's highest file size is 10 MB, so this gif is too big at 12.8 MB. WE SHALL FIX THAT!
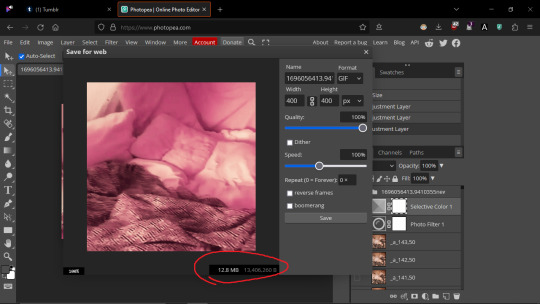
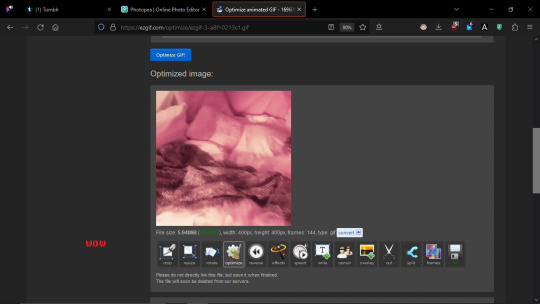
EZGIF OPTIMIZATION
head BACK to ezgif! This website has many good ways to optimize gifs.
Click the "Optimize" tab. Select your file and upload!

awesome. Ezgif explains itself well, and is a great website, so i will just explain a few things that aren't explained.
Clicking through the bar of "crop, resize, crop, optimize," Ectera will keep the same gif you uploaded.
Say i used lossy gif, pressed the blue button, watched a cat dance as it loaded, then got my compressed gif.
A new bar appears below this new gif! If you'd like to keep this gif, you should click this bottom bar. Now i can click "Resize" and go resize my gif, and it will transfer this same gif over. ( i do recommend resizing before doing any compression/lossy gif though)
Now i will explain a way of lowering fize size: deleting certain frames.

In optimize, there is an option to remove every certain frame. This makes the video more choppy, but is a good way to save space. Say I remove every 2nd frame,
original:
every second frame removed:

A LOT FASTER!!!!! this is because it's literally cutting it in half. each frame waits like, 20 milliseconds, so removing every second frame is cutting that total time in half. I fix this by going to the speed tab!
50% slower for every 2nd frame,
66% slower for every 3rd frame,
75% slower for every 4th frame

here's the same every second frame removed gif slowed down.

looks better! Very choppy, but that's just because there's so many frames missing. If you do remove frames, I recommend just using every 4th frame becase it's hardly noticeable.
Ezgif explains everything else well, so i will let it explain itself.
THAAANKKS FOR READING here's a link to the actual gifset made
3 notes
·
View notes
Text
A longish way about doing a blurred motion gif. This whole thing can be tweaked and you can add more layers or adjust how much blurring you are doing to each frame as well. Whatever you really want to do. If this helps you at all please like / reblog.
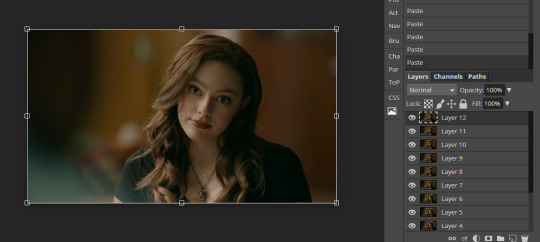
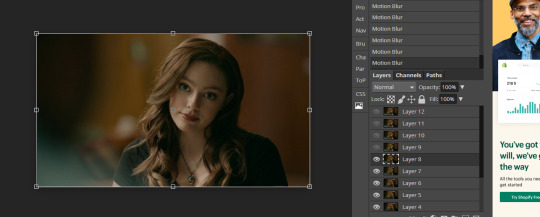
Lay down twelve duplicate files. I planned a switch in the images between 6 and 7 so after I laid down 6 there is suddenly a new image for 7-12. Now unclick every layer but LAYER 1. Make sure to select layer one.

Now go to FILTER > MOTION BLUR and then I used these settings. I then clicked okay.
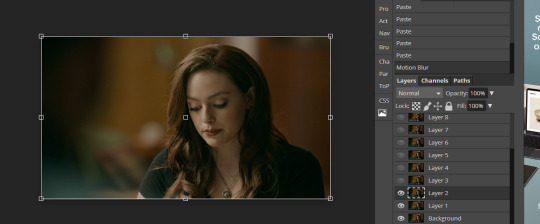
I clicked on layer 2 now and I went to FILTER > LAST FILTER. Click that once
So you are going to click LAST FILTER again. So what you are going to do is for layer three you are going to click last filter three times. For layer four you are going to click last filter four times and so on until you have gotten to layer six which you will have clicked that button six times.
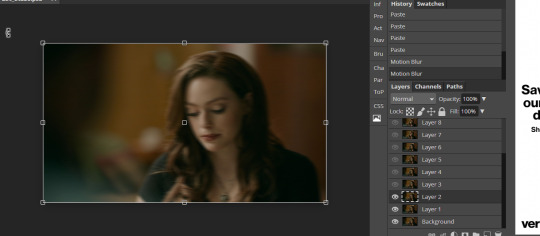
So onto layer seven. You are going to want to go backwards. Instead of doing it seven times I’m going to go click last filter a total of six times.
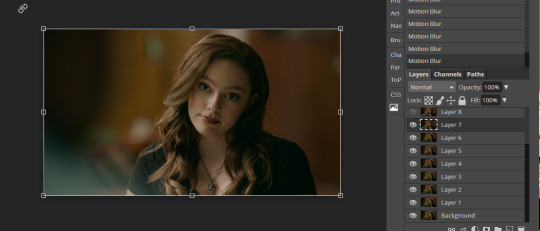
So on layer 8 I will hit last filter a total of five times. Keep doing this going back to down to only hitting that button twice. Your last layer should be number one and that for me is where I just don’t hit last filter.

So the the whole thing is done by hand and it is a pain but in the end you will have a blurred motion gif. Now onto actually renaming your gif set.

_a_frm0,100 is going to be the name of your background layer. I’m going to explain now what you are going to be changing now for each layer.

When you change the names of each layer you are going to be changing this. So the next layer that is right now layer one will be _a_frm1,100 and so on.
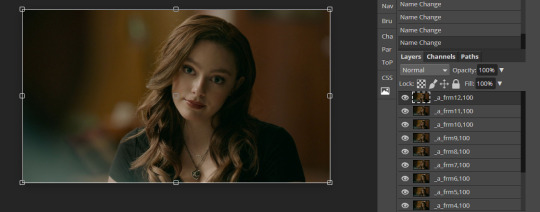
I renamed every single layer in this style. It is a lot of tiresome work but in the end the results should be good and worth it.
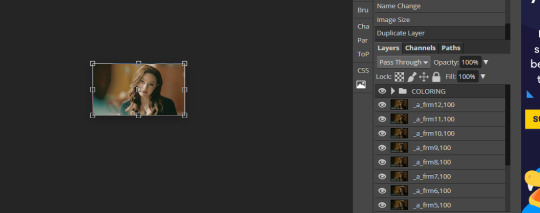
Add your coloring on top of your layers. Resize this. Add some text if you want or even some pretty textures and don’t rename any of those.
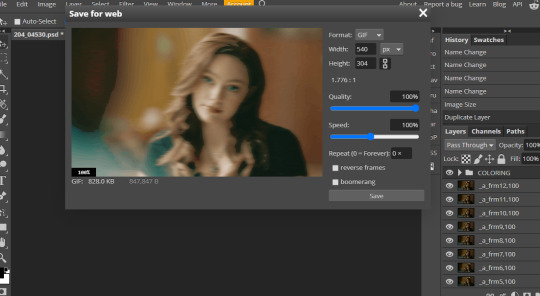
So the whole thing will be a little fast when you go to save it for the web. Change the speed.
Now you can always go in and add more layers to your gif or something to slow it down or whatever you are wanting just I’m not going to get into it all right now as this is to show the basics of a blurred motion gif.
10 notes
·
View notes
Text
Blur Tutorial
This will be a hopefully understandable tutorial on how I blur text or logos on my gifs. As said, my photoshop is set to German so if something is not clear, feel free to hit me up.
At the point where this tutorial starts, I already sharpened and resized the gif to what I want.
Anyways, let’s hop in.
The first one I try to explain is the one, were the text or logo is fixed in one spot and doesn’t move around. This is the easier one and I love when this happens :D after sharpening and sizing it looks like this (no coloring done yet).

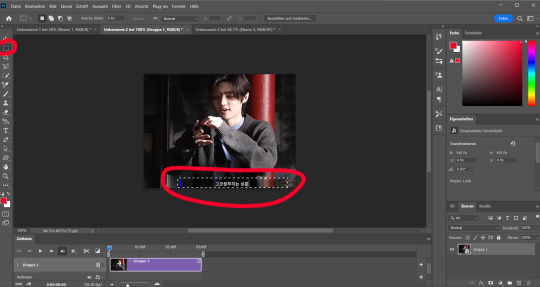
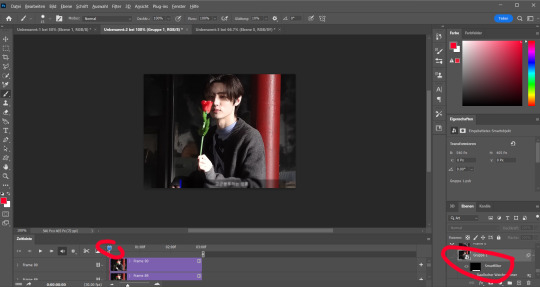
The work begins. Now you put all frames into a group and the timeline gets switched in the left corner. You do both on the symbols I circled on the picture below.
After that you go to the top bar and select filter. There you choose “convert for smart filters”. I stole a picture from someone else as for some reason my photoshop doesn’t allow me to make print screens of the menu. Ignore the one that the person opened and click on the one I circled red.
As of now the gif is ready to be worked on. Next you use the tool on the side which let you select a part of your gif. Then you select the part that should get blurred.
Go back to the filter menu and choose the right filter option. For me it is called “Weichzeichnungsfilter”. I think in English it could be the blur one or the noise, but I am not sure here. I apologize. By now I’m annoyed by my computer, so I took a photo of my screen. Again, I apologize.
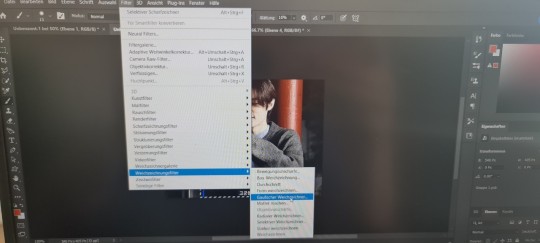
Now this little window pops up and you can change how blurred it should get. I change the number all the time, depending on how the text is or if it is a logo etc. Here I choose 1.8

Now we nearly done. Next step is to get the gif back into frames. You go on the 3 strokes above each other on the right side of the timeline bar. Convert into frames -> frames to clips (again I hope it’s something like this in English)
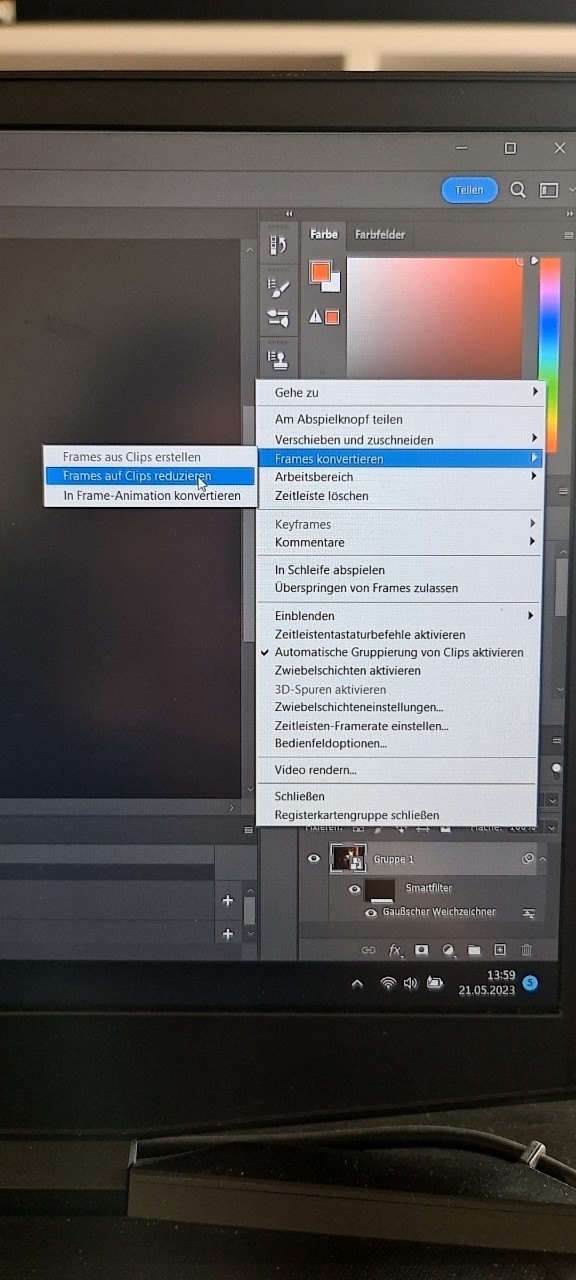
If this is done make sure you’re at the start of your timeline with the ‘bar’ which decides where on your gif you are right now. Also, delete the frame I circled in the picture below.
Back to the menu on the side but choose the first option now. (Frames from clips)
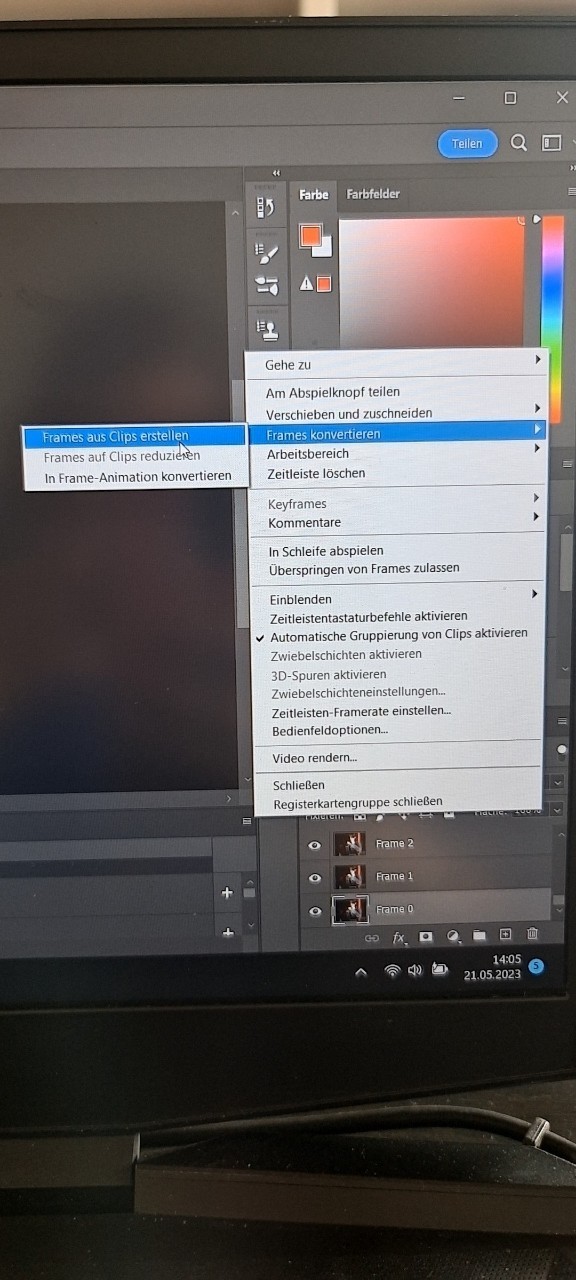
Nearly same step again but now you choose the most down option next.
Done we are :D this is how I blur a none moving caption/text or logo :D it looks like this now

Then there is the other thing that can happen which is the text moves on the gif. There you can either select the frames in which the text moves and blur them separately. For example, like here.


I copied out the frames with this caption in a new work file and put it back on top of the ones in the original file after blurring.

If the caption moves around the whole gif I do it manually and if I say that, I mean it. I go on a frame and select the section. Make sure you select the frame on both, timeline, and frame list. The first time you have to choose the blur in the menu after that you can use ctrl + alt + F to put the filter on the next frame etc.
This is the end of my tutorial and I apologize for it. I’m not good at making tutorial and my pc worked against me on top. Still, I hope this was helpful and if there are any question, I will happily answer them or try to help. Thank you for reading this mess and finally, this is my way of doing it. Maybe there are easier ways to do it out there but yeah.
1 note
·
View note
Photo

— i think it’s been a year and a half since i posted my last tutorial! with a few more requests (and me learning new things) i decided to make a new and updated tutorial 💎
— this is a VERY image heavy tutorial and it is also very long! i’ve put it under the cut <3 like there are OVER 50 images...this is more of a masterpost really. if there is something that does not make sense, feel free to ask!! i will more than happy to clarify!
— i promise the header gif was once good quality but for some reason, i did something to it and it became weird. please ignore that 😭

the first step is to make the gif! i’ll try to go through everything, step by step! there are different methods to make gifs but i’ll only be explaining the method i use. but i’ll link some incredible tutorials from other content creators later :D
i’ll be using photoshop. make sure you use a version of photoshop that allows you access to the timeline option! there was a weird update where the adobe timelines were not compatible with the m1 macbook chips so look out for that!
— the first thing you need is an .mp4 video. i use the in-built screen recorder on a macbook (which you get by pressing command + shift + 5). i usually just record the section of the video that i need but some people use programs such as 4k video downloader (which also works very well but i stopped using it because i was worried that i was using too much data downloading longer videos!)
— i’ll be using a clip of jeonghan from the hot music video! when you open photoshop, go to file > import > video frames to layers
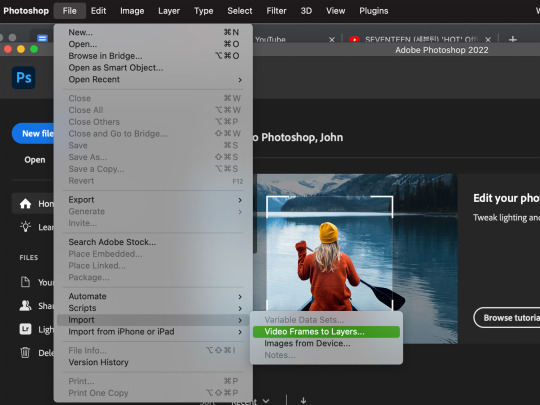
— this will open up your files and from there, you should select the video that you want to make a gif out of!
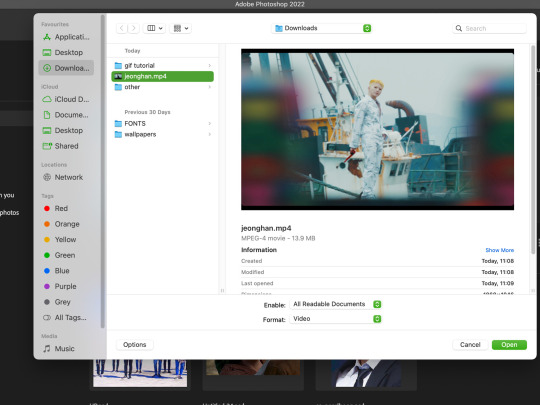
— once you have selected the video, you will get a pop-up and it has a little trimmer (that i’ve highlighted in the blue box!) that you can use to find precisely what you want to gif. the little triangle that i’ve placed in the yellow box is like a slider than you can use to preview the video!
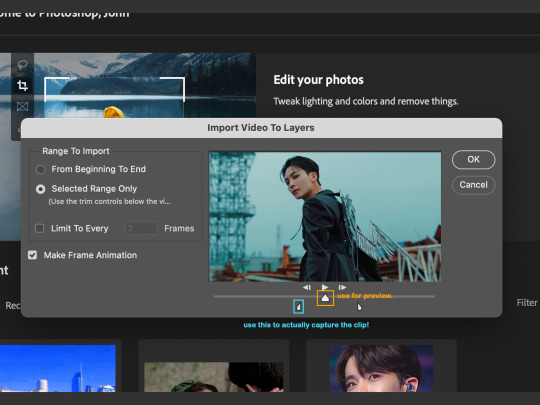
—now your specific video clip will be opened as a bunch of layers and you want to press the small button (i am so sorry 😭 i don’t know what it’s called) and it will do something (which, even after three years of making gifs, i still don’t what its called) but just press it!! i’ve highlighted it in the yellow box!!
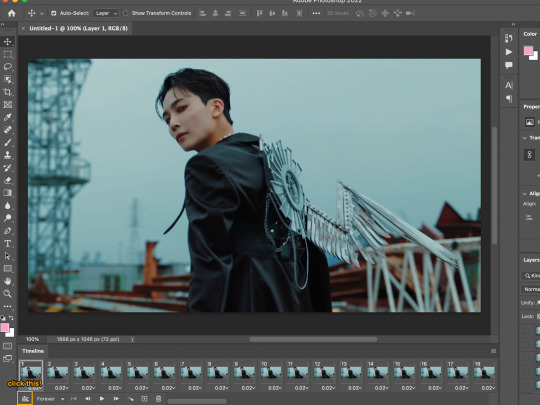
— then select all the layers and right click and then convert to smart object. this will make it a lot easier for you to sharpen and colour your gif at a later stage.
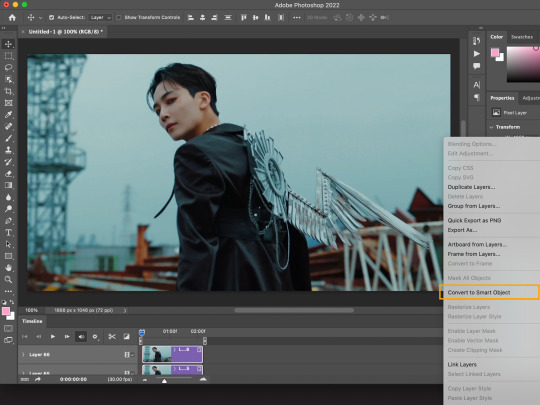
— if you still think your gif has unnecessary frames/scenes, use the small trimmers in the timeline to trim the gif even further!
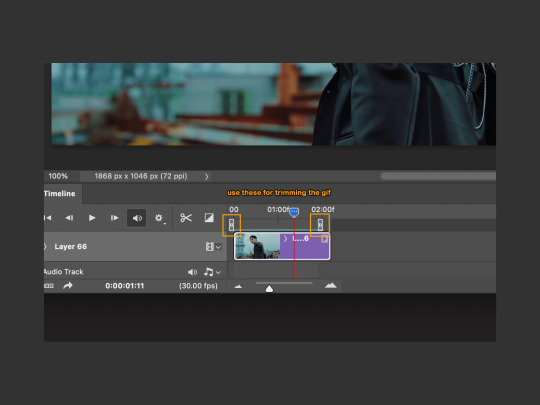
— now at this stage, your gif is technically ready but the chances are that the gif is too large to be posted on tumblr. tumblr has a 10mb gif size limit (praying that they don’t go ahead with the bad updates) so we want to bring that gif size down into a gif that can be posted onto the dashboard.
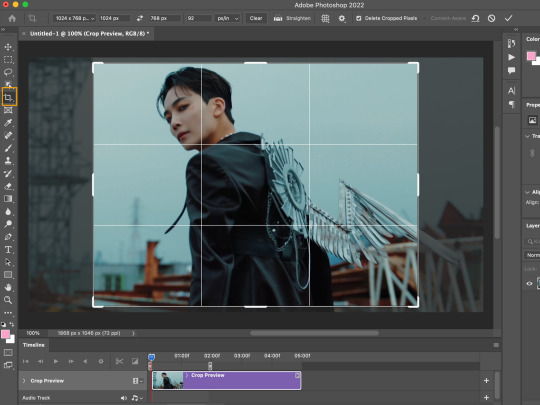
— go to image > image size! something very interesting that you can also do when resizing your gif is changing the resample settings (look at this post by @usergif here!)
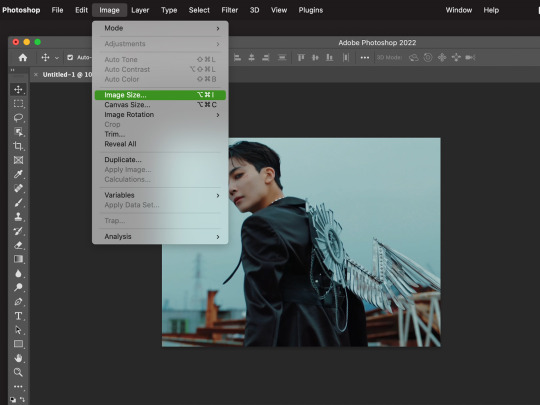
— now there are many sizes you can make your gif but if you want a recommended size for a single gif on the dashboard - check this out! the width should always be 540px but the height can vary!
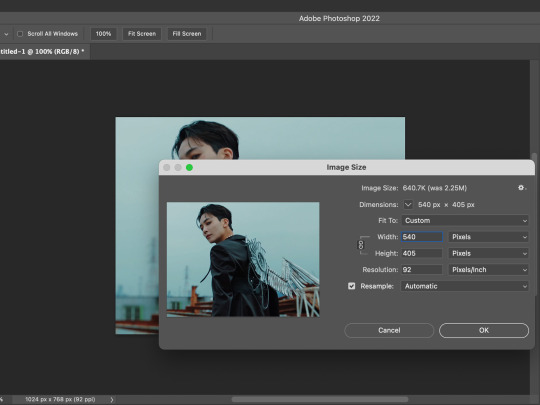
— now that your gif is ready (unsharpened and uncoloured - but this is just the base gif tutorial) we can now save the gif! go to file > export > save for web. don’t make the same mistake as me back in 2018 when i was trying to make lotr gifs but i kept clicking save as...and it would save as a still image.
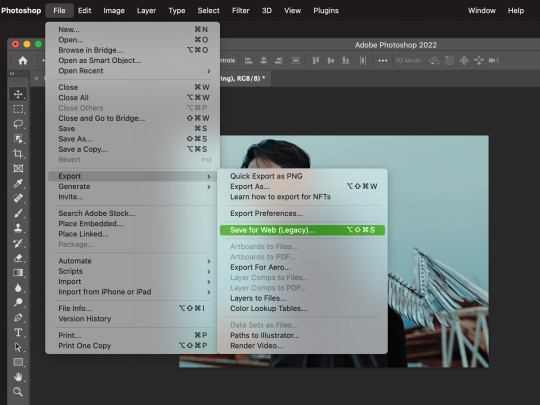
— saving settings can vary! but these are the ones i use and they usually work for me! make sure that your looping is set to forever otherwise your gif will play out and then stop :(
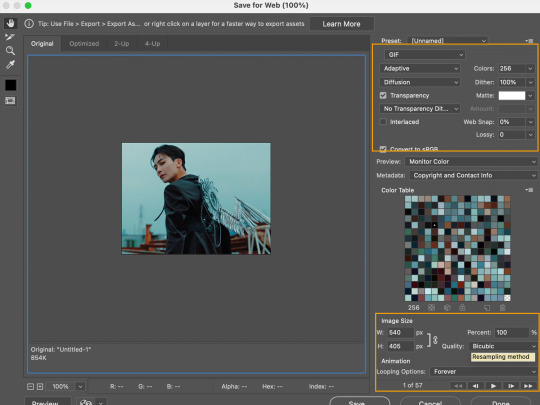
— and this is our final gif! it has no sharpening or colouring but its a functioning gif on its own :D


— i enjoy this part the most!! there are so many different ways that you can colour a gif and it is all up to personal preference! but this is first the basic colouring on a gif. you should go to layer > new adjustment layer > curves.
you’ll see three eyedroppers on the side (black, grey and white)! we’re going to be using the black and white ones! when you click the black eyedropper, you’re going to click it onto the darkest pixel in the gif. and then take the white eyedropper and place it onto the whitest/lightest pixel in the gif! it makes a huge difference!
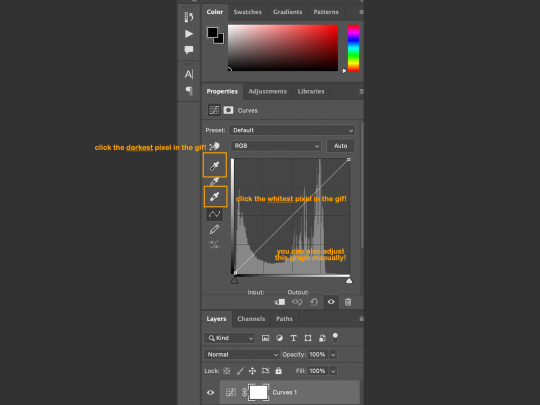
— as you can see, the difference is immense. that cyan sort of washed tone has been lifted from the gif!

— the gif on the left is a comparison of only the curves layer against the original gif. the gif on the right includes some extra adjustments that may help your gif :D
the two little skin-tone rectangles compare jeonghan’s skin tone without selective colour and then WITH selective colour (respectively). the rectangles near the bottom-right corner show just one example of how you can play and adjust hues with selective colour!


— now i’ll show an example of how this might with a more yellow/darker toned scenes. for some reason, so many shows love turning the brightness down on their scenes and its up to gifmakers to actually make the scenes visible 😭 i’ve taken a small clip of halime sultan from dirilis ertugrul!
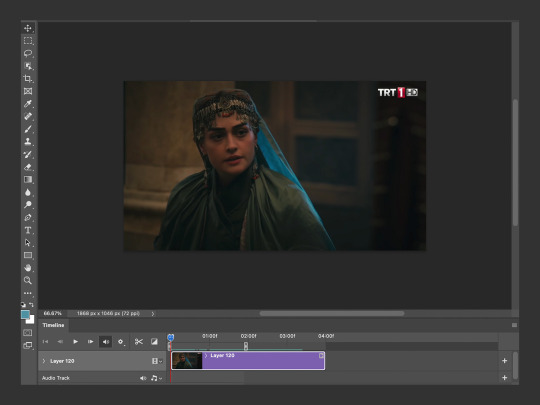
— i resized the gif but i have not added any adjustments yet to it!
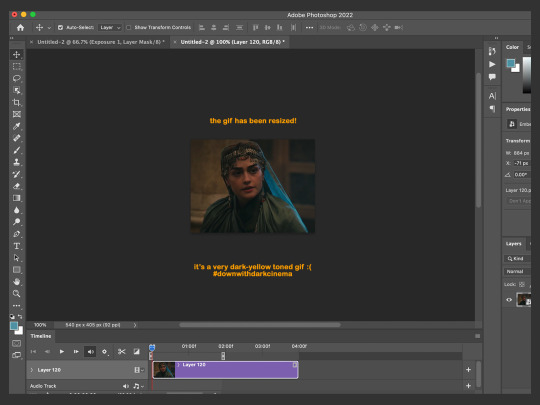
— i created a new curves layer and i took the black eyedropper, placing it on the darkest pixel i could find (a fold in her headdress) and this is how the gif looks now. arguably it looks worse but this is a necessary step for the final gif.

— so now i took the white eyedropper and placed it on the lightest pixel i could find. it was a reflection on the metal decor on the headdress. and it brightened the gif up quite a bit!! but here is where things can get interesting...

— this is an alternative use of the white eyedropper! in this case, i placed the dropper on the highlight reflection on her cheekbone (which was originally tinted a more blue with red on the edges) and this also brightened up the gif but it gave it a more green/yellow hue!!
this is important and something that is so useful for me because basically if your gif is too BLUE-hued, find the lightest blue-ish pixel but if it is too YELLOW-hued, then find the lightest yellow-ish pixel. you can easily manipulate the tones in the gif this way!
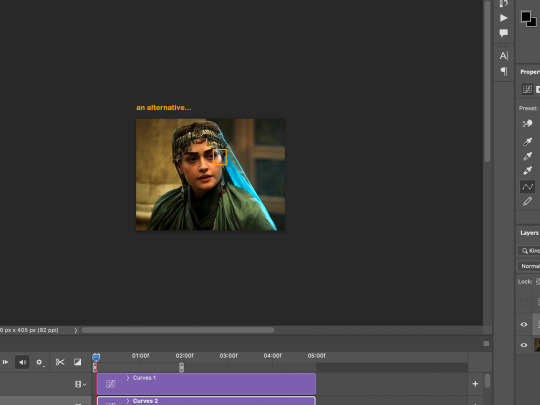
— so on the left i have the final gif!! and on the right i have a comparison on how the lighting has improved so much from the original gif!

— now i could go on forever about all the ways you can colour a gif but we would be here forever, and you would be scrolling forever so instead, i put together some colourings that you can download here!

— cheers: it brings out the reds and orange and it turns greens into teals and blues!
— selemzar: if you’ve watched historical turkish dramas, especially ones with tribe/city sets you know that they love their yellow hues! this one gets rid of the yellow cast on a scene <3
— httyd: a very basic psd that turns blues into greens and brings out skin tones!
— up: i use this one very often (and named it after the mv in which i first made it). its a psd for bright and vibrant gif colourings that focuses on making the blue colours as bright as possible!

— i’m gonna be honest...i am not a huge expert in this area and my knowledge of sharpening is limited to photoshop’s own features. there are so many softwares and programs you can use to clean up a video and to make it smoother and sharper such as avisynth and topaz!
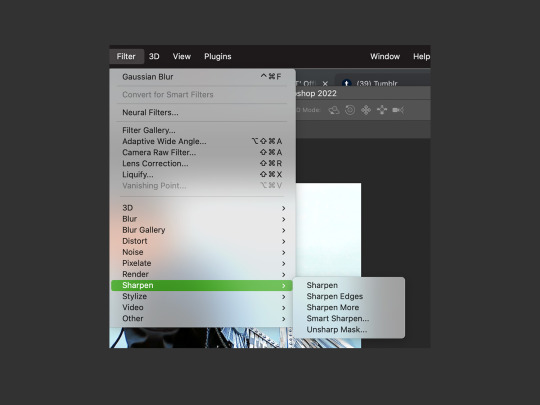
— this is the sharpening i use the most nowadays! it has two layers of differing smart sharpens and then a layer of noise on top. it usually works well for me except noise increases the size of the gif a LOT so my gifs are never too long 😭

— this is one that i used to use all the time. it gives a very glowy look to the edges and i’ll use it if the video is lower quality as this sharpening covers up some of the weird pixel squares!

if you would like some more clean and comprehensive sharpenings, then take a look at these!
this tutorial by most beloved @woozi / this tutorial by @trashcora / this tutorial by @haleths / or this one from @hyunfelix
— another thing i like are matte gifs!! i haven’t made many of them but they are such a neat effect to add onto gifs - especially stage/live gifs! so here i’ve made my base gif of heeseung and given it some base colouring (curves and selective colour)

— now i saw this tip from another blog (an nct/wayv blog im so sure but i cannot remember the url for the LIFE of me) but what i remember is that you add a levels layer (and with the three numbers under the graph in order: it’s 20 / 1 / 250 and then with the numbers next to output levels it’s: 20 / 240) and then you add a solid fill colour of #2f2f2f and set it to screen and you get the results below!


— often if you’re giffing a music video / a film / a show, there are people speaking and you want to add subtitles!! i like to use the font: arial rounded mt bold and then i open the character window and click on the bold and italic T <3
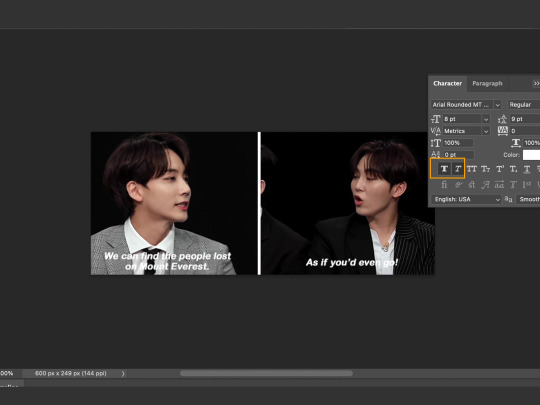
— now we have the basic subtitles, but they are not as easy to read against jeonghan and seungkwan in the background so we’re going to right click on the text and go to blending options and then you add a shadow behind it!
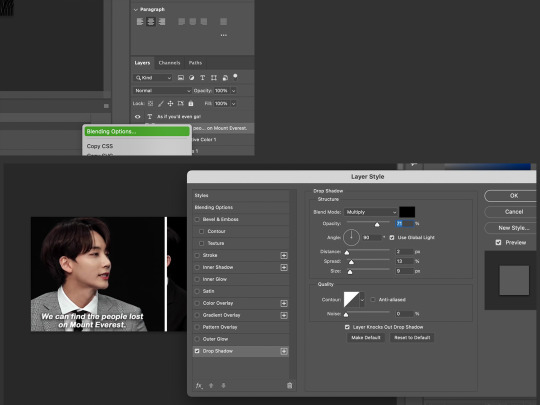
— i personally find that subtitles look nicer with a stroke as well, so you can add a stroke (any size of your choosing) and set the position to outside.
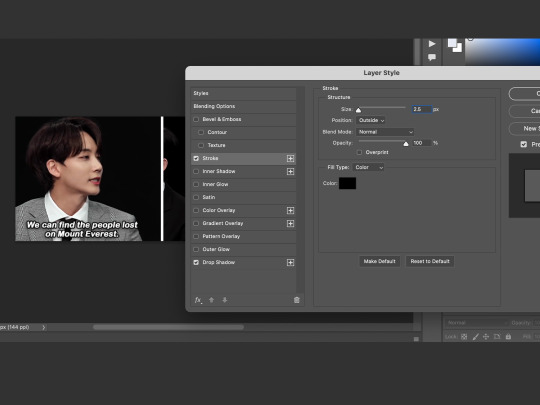
— and here we have subtitled gifs!!! if there is more than one person speaking, you can change the colour of the gifs and my go-to secondary colour is #fda700 :)
— if you want to learn how to blur captions, i recommend this tutorial by @chanstopher

— now that i’ve gone through the basic tutorials for making gifs, let’s take a look at some fun effects!!
a place that i really recommend learning these things from is @usergif as they have super cool tutorials and a directory as well that you can access here <3
— if there is one thing i love...it’s gradient backgrounds. and also this video of seventeen and thus i will show both in this next tutorial! i’ve started off with this seokmin clip and i’ll add some adjustments to it.
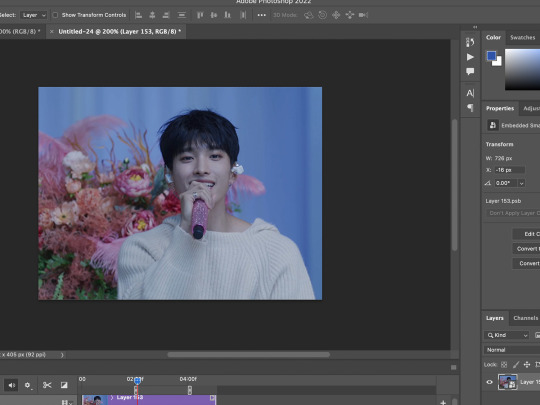
— so now that i’ve added curves, exposure, colour balance etc (all the basic adjustments) we’re ready to add the gradient!
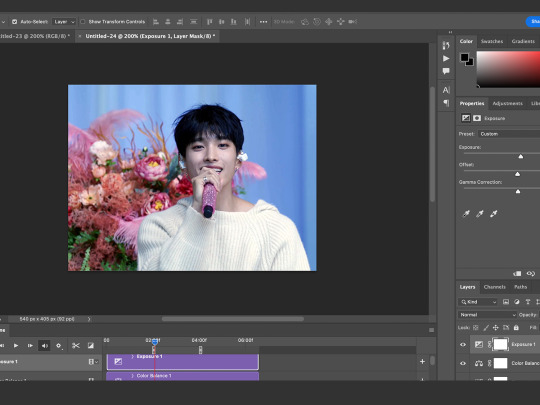
— go to layer > new fill layer > gradient!

— a small pop-up comes up and click on the gradient (in this case that blue-transparent bar) and another pop-up will appear! here you can make your own gradient or choose a pre-set gradient (there are heaps of good options)
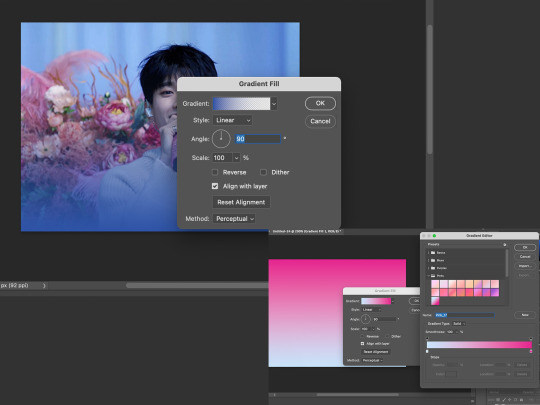
— once you’re satisfied with the gradient, you can click OK and then set the gradient layer to hard light. you can play with different settings but this is the one that i prefer the most!

— now convert the gradient to a smart object!
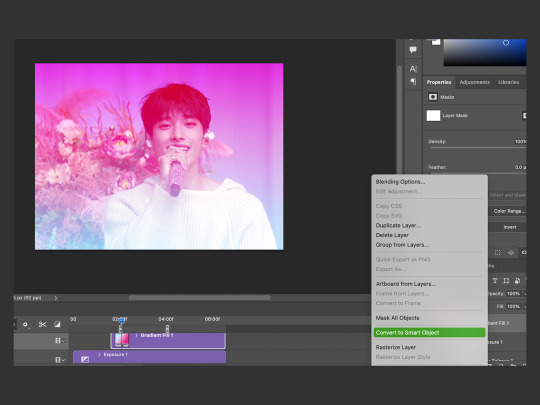
— in the small yellow box, i’ve highlighted the layer mask button and you should add one to your gradient layer! a layer mask will be useful because if you make a mistake later on, you can simply make another layer mask and start again! also bring out a soft brush (hardness set to 0%) and make sure the brush colour is BLACK. a black brush erases the layer mask and a white brush brings it back. use the brush and you can erase over the subject in the gif!
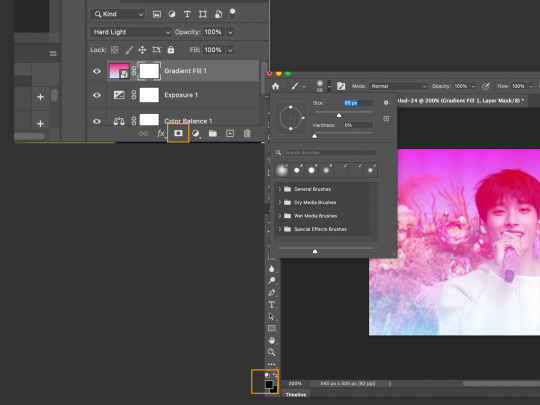
— so now we have a seokmin-shaped hole in our gradient (if he is not a heart🧡 why heart shaped?) but the edges (even with the 0% hardness) are still too sharp and we want to soften the gradient!
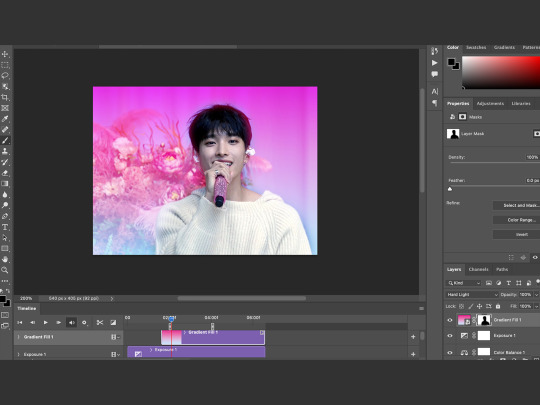
— go to filter > blur > gaussian blur and play around with the blur settings till you find a gradient edge that satisfies you! you don’t want it to be so soft that the gradient ends up covering the subject again but not too hard either.
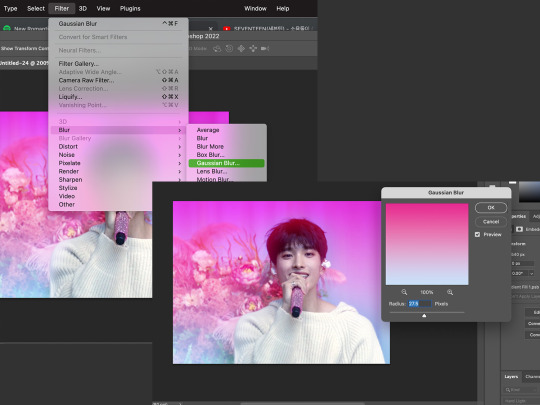
— and this is our final gif!! the gradient background is really so versatile and it adds pops of colour to your gifs (and can be very useful in covering pesky pixel ugly-coloured backgrounds!)

— another effect that i love so much is adding gradient text and pngs to gifs! i feel like they just make the gif so much more fun and interesting <3 so here i’ve got a gif ready (its been coloured and resized) and i want to add text and an image onto it!
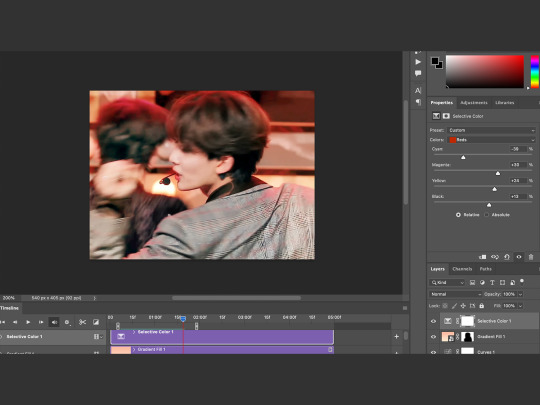
— in any font you like, and any size you like, you can type out your text but make sure that the text is WHITE (otherwise you won’t achieve the same gradient effect)
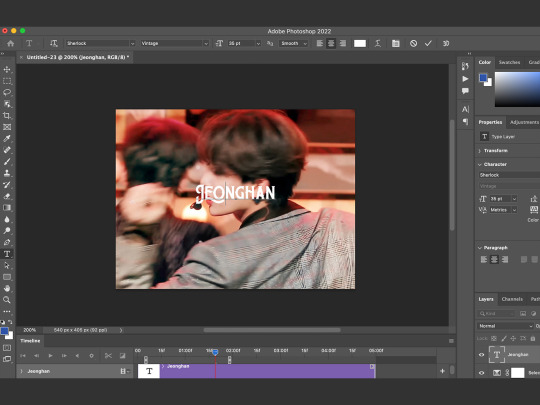
— i love adding transparent pngs and a site i like to use is called nicepng.com as they’re free to use and they have a great selection of transparent images! i looked up an angel image (for beloved jeonghan ofc) and i downloaded one! i prefer images that have a thicker outline as this helps the gradient appear more clearly!

— i downloaded the png and placed it on the gif. but the original png was NOT white so i need to make it white. for that, i made a small white rectangle and placed it in a clipping mask over the angel wings and then merged the layers. then you can reposition the text and png to wherever you want them to sit in the image.

— now we’ve reached the gradient part! set the text to EXCLUSION (this will let your text have that see through property and if you don’t want it to look transparent, then you can keep it on normal). then go to BLENDING OPTIONS and go to gradient overlay. here you can select the gradient that you would like!
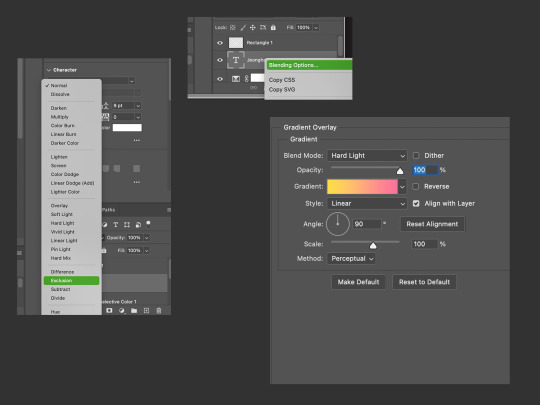
— once you’ve selected a gradient to your liking, click OK and then make sure that the blend mode of your gradient (in the gradient overlay box) is set to HARD LIGHT. in the previous step, if you did not change the white text to Exclusion, then you can keep the gradient blend mode on normal. i also like to add a shadow on my text as it helps it stand out a bit more!

— so i did the exact same process to the angel png (exclusion > blending options > gradient on hard light) and there we have our final gif! its such a versatile and fun effect that can liven up your gifs!!
there are countless more effects and tricks and tutorials that you can use to make your gifs but we would be here for another fifty years so i will add some links below of some incredible tutorials that i often refer back to!
if there was anything that i said above that didn’t make sense (because after a while, my brain turned to mush), you can always come and ask for clarification :D
colour isolation tutorial by @simoneashly
my own tutorial on blending over @kgifsource
an amazing guide on colouring those heavily yellow tinted scenes by @nobodynocrime as well as this amazing glitch effect tutorial!
the tutorials from which i learnt blending gifs together are these two: this one by @jackarthurdavenport and this one by @yenvengerberg
a guide on vapoursynth and colouring by one of my favs @wonublr
and this comprehensive guide on gif making in general by @soonhoonsol <3
#tutorial#gif tutorial#usergif#allresources#photoshop tutorial#completeresources#pshelp#kpop gif tutorial#photoshop#usernik#userbecca#cheytermelon#userjoanna#userkitty#tusermanny#usershreyu#usermarcy#aleksbestie#ANYWAY 48 hrs later...
1K notes
·
View notes
Text
i've received a couple asks for a tutorial of how i create gifs. i know there are really great tutorials out there already. personally, i find photoshop too tedious, time-consuming, unstable, and with varying end results due to file size constraints for tumblr.
so, what's my secret for saving time and not jumping through hoops for clean gifs? i cheat. honestly, ezgif does most of the work for me.
for my step-by-step process, see below!
record your gameplay using geforce experience. another free option is obs studio. if you use reshade/gshade, then you'll need one of these programs to capture the game as you see it.
next, upload your video to ezgif and trim the it down to roughly 10 seconds (or less). this is the start time and end time you see just below the video preview. you can use the video controls to see where you want to start and stop in real-time.
then, change the image size to original (up to 800px) and frame rate to 10 (max 30 seconds). you can push the frame rate higher for shorter gifs, but i've found it's unnecessary and this frame rate keeps the file size down.
method should automatically load up as ffmpeg and doesn't need to be touched. directly below that, check the option to optimize for static background.
your settings should look like this once you've uploaded the video and made the adjustments listed above:
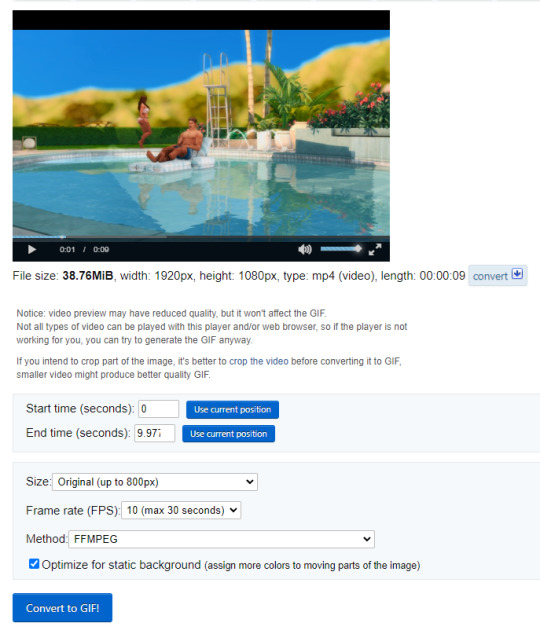
now convert to gif! it may take a few seconds, but your gif will appear below this button. notice the file size, width, height, and frame total? we need to keep the file size under 10mb for tumblr. i generally try to keep it under 9.5mb because tumblr can be finnicky about it and sometimes rejects anything close to 10mb.
if you're already under 10mb (9.5) and like the current aspect ratio, then you can right-click and save your gif as-is. if you're still over the maximum file size or want to change the image ratio, let's continue!
optimization
under your new gif, you'll see the crop feature. click through so we can change the aspect ratio. this is up to your preferences, honestly. you can select from the automatic ratios (a lot of folks like 1:1) and then center the box freely. personally, i prefer a 5:4 ratio that isn't listed on the site. since i know the ratio in pixels to fit tumblr's dashboard width, i type my custom dimensions into the fields. (width: 540, height: 430) but you can input whatever you like.
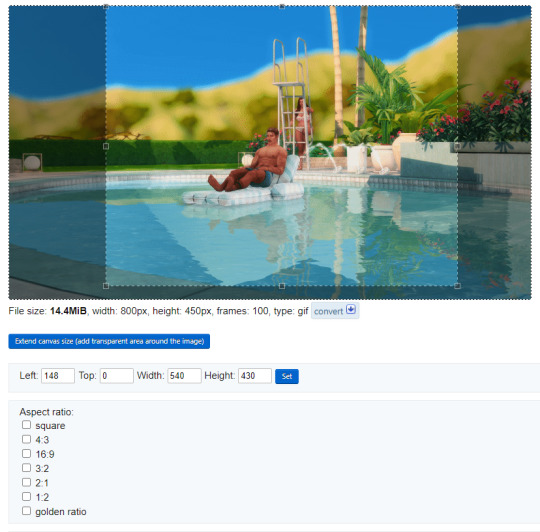
convert your gif again for the cropped dimensions. this should hopefully have you around the 9.5mb file size.
if not, click the optimize link below your gif. from the drop down list under optimization method, select remove every 4th frame, then convert one last time for the smallest file size without losing quality.
if you're still over because you have a lot of shifting colors or you're using a gif longer than 10 seconds, then you can either keep dropping frames off or resize the gif to smaller dimensions.
when you're done, right-click and save your gif so you can then upload it to tumblr. never, ever direct-link from ezgif. these previews you see on their site self-destruct after a few minutes and i can't guarantee that tumblr will publish them. always save and upload.
note: a lot of shifting colors in your original video may create unwanted pixelation. the image is having to move colors around in an attempt to stay smooth. even with that pixelation, i've found this method maintains an overall smoother texture than photoshop.
that's it! i hope this helps making gifs easier and faster for everyone since you don't really need any fancy or paid programs. if you have any questions or find errors in this tutorial, send me an ask!
happy simming!
507 notes
·
View notes
Photo

ZOOM OUT TO MULTI-GIF LAYOUT:
Brady Bunch-Inspired Gif Transition Tutorial
↳ some anons asked me here and on @usergif for a tutorial on this gif from my benedict bridgerton set. if you know the basics of gif-making, this is a very easy effect to recreate! (despite what this monster below the cut would make it seem)
★ STEP 1: Crop, resize, convert, and color your Big Gif
To preface, I mainly work in Video Timeline. My process for making these gifs was roughly: import screencaps in Frame Animation (aka Load Files into Stack), crop, resize, convert to smart object & Video Timeline, and color.
The big gif is 540x540px.
(Number of frames/screencaps is going to matter down the road. But it doesn’t ~technically~ matter how many frames your Big Gif is. This moment with Benedict was sadly only 38 frames. Ideally, I would’ve had a longer scene so I wouldn’t have to make the gif repeat after it zooms out. It would look more seamless that way.)
★ STEP 2: Crop, resize, and color your Small Gifs
In this gif, I have 9 Small Gifs sized to 180x180px. Yes, this is bigger than normal Tumblr dimensions and that’s because I always resize my gifs 2-3px bigger so I can crop out the transparent border that appears otherwise.
Re: number of frames — to save some frustration down the line, especially if you’re not used to working with multi-gif canvases: make all your Small Gifs the same number of frames. This will mitigate duplicate frames when you export.
Because my Big Gif scene was so short and all the reactions from other characters in the Small Gifs were so short, I also had to duplicate my frames so they’d loop once. All of my small gif scenes were 24 frames, so I copied and pasted the same 24 frames after for a grand total of 48 frames per Small Gif.


Side note: My process is very... perfectionistic. You could technically pull this off with just 8 Small Gifs and 1 Big Gif. But I... did not and decided to make Benedict’s gif at both sizes. Because resizing affects the number of pixels your gif has, quality will vary when you transform it later on. By doing what I did, when the Big Gif transitions to the Small Gif, it's at the best possible quality and sharpness. Choose your own adventure ✨
★ STEP 3: Create a template using shapes
Here are the dimensions for all my Small Gifs:

Top & Bottom Rows: 177x177px, 178x177px, 177x177px
Middle Row: 177x178px, 178x178px, 177x178px
Whenever I work with layouts, I like to make my own template using filled shapes so I can (A) see how the final layout will look and (B) select the shapes to create layer masks! So, I just made 9 squares at these sizes.
Be sure to remove any background layer! You want the gutters (the spaces between the squares) to stay transparent.
★ STEP 4: Arrange your gifs into a layout
Bring all the gifs you pre-made into one file, so you have a mess that looks like this:

Side note: These gifs are resized, but I’ll explain later why they don’t look cropped anymore due to preserving cropped pixels.
I like to put all my individual gifs in their own groups and use layer masks because I like the control it gives me. (Here’s a super handy tutorial from Kate via @usergif on how to use layer & clipping masks if this is new to you!)
Here’s how my layers panel looked with everything organized:

Since I made my shapes beforehand, all I had to do was Command+Select a square and click the “Add Layer Mask” button at the bottom of the layers panel for each group.

(If you're working with scenes where the original lighting fluctuates across all the scenes, using layer masks would be helpful to contain your coloring only to a certain gif. I was pretty lucky with this scene because my coloring of the Big Gif worked decently with all the other scenes. So, I just put all my coloring in a group and masked out the gutters.)
Layer masks will also crop the Small Gifs to the correct sizes and remove the extra 2-3px buffer I left when I originally resized my gifs to 180x180.
★ STEP 4: Arrange your gifs on the Timeline
Since we’re doing a transition effect, you’ll have to “stagger” your gifs in a sense. The Big Gif will play first, so you should place this gif at the beginning of the Timeline. And as it shrinks, the Small Gifs will start to play behind it. Here’s what my Timeline looked like:

I started the zoom out animation halfway through the Big Gif — you can see where it starts at the first keyframe diamond on the “BIG GIF” clip. So, I placed all my Small Gifs (which are in the lighter gray group folders, including the small version of Benedict’s gif) so they begin where the animation begins. You can see the gray bars indicate where the Small Gifs begin.
Be sure to click the “Go to Next Frame” arrow ⏭ a few times to check that your Small Gif frames are synced with the Big Gif frames. If you place your Small Gifs at a weird spot, this could create duplicate frames when you export too. If you don’t see the Big Gif moving in sync with the Small Gifs, just shift the Small Gifs over a frame until they’re *NSYNC! bye bye bye, duplicate frames
★ STEP 5: Create a Clipping Mask
Side note: Here’s the “depends-on-your-giffing-process” step. I mentioned before, I do not delete cropped pixels when I crop. This just allows me flexibility to move my gif around if I decide halfway through making the gif that I don’t like the way I cropped something. So, this is always unchecked for me:

If you do delete cropped pixels, you won’t need to do a clipping mask. You can simply animate the Big Gif itself, and not do the extra step of animating a shape. I have to do this because my gif is not technically “cropped” into a square. The rest of the gif is just hidden with a mask.
First, take the shape you originally used to mask the small version of your Big Gif. For me, this is the top-middle 178x177px rectangle. Put this shape under the Big Gif clip and convert it into a smart object (right-click > Convert to Smart Object). In my experience, you have to convert it to a smart object for the transform animation to work.
In your layers panel, you’re going to use a clipping mask to clip the Big Gif to the shape: right-click the Big Gif layer and choose “Create Clipping Mask.” A bent arrow pointing down will appear if you did it right!
This essentially conforms the Big Gif to the confines of the shape. (You can learn more about clipping masks in Kate’s mask tutorial I linked earlier.) Here’s what that looks like in the layers panel:

I’ll explain why I have a copy later... it’s just me being a perfectionist again 😭
★ STEP 5: Animate the Zoom Out Effect
Let’s place the keyframes! We’re only going to be using the Transform tool for this, so only use that keyframe:

Oh jeez, I’m not working in numerical order, I’m so sorry... 😬 (my perfectionism is selective)

Keyframe 4: With the playhead (the red vertical line with the blue slider on top - it’s offscreen and not visible in my screenshot, sorry) positioned over where you want to end your animation, put a keyframe on your SHAPE. Since your shape is still at its small size, this will ensure your Big Gif ends up the exact small size you made it in your template when the animation finishes.
Keyframe 3: Move the playhead to where you want to start the zoom out effect. Command+T (or Edit > Free Transform) to open the transform tool, and enlarge the shape so it fills your whole 540px canvas again. Once the shape is big, put a keyframe on that spot.

Keyframe 1: Put a keyframe on your Big Gif exactly at the same spot you just placed Keyframe 3. This is where the Big Gif zoom out animation will start.
Keyframe 2: Move the playhead back to the same spot as Keyframe 4. Command+T and resize the Big Gif so it matches the size of the Small Gifs.
↳ If you decided not to be Type A like me, you can do this less exact than I’m about to explain, but here’s what I did with my method:
Since I already cropped a Small Gif version of my gif, I had to make sure my resized Big Gif matched it perfectly. This is super easy to do. Just look at the Properties tab for your Small Gif and take those dimensions. On your Big Gif, click Command+T and resize your Big Gif to match your Small Gif’s dimensions and make sure the gifs are aligned. You can lower the opacity of one gif for a sec to check if they’re properly lined up.
Now, when you play your timeline, you should see your Big Gif zoom out to a Small Gif! And because your Small Gifs start when the Big Gif starts to shrink, the Small Gifs will be revealed as the Big Gif zooms out.
Back to why I have a clip called “BIG GIF copy.” First, I didn’t line up Benedict’s Small Gif so it would continue where the Big Gif left off — I did that intentionally though. But mostly, this is me being too perfectionistic again. I split my clip (using the scissor tool in Timeline) so I could add a tiny Gaussian Blur after the animation ended and the Big Gif was fully shrunken down.
It helped the shrunken Big Gif match the small version better. 🤡
Feel free to be more normal than me.
★ STEP 6: Animate the Zoom In Text
Create a text layer and type whatever you want it to say. Here’s the Brady Bunch font I used. I put a 4px white stroke on the outside too!
Size your text so it fits inside the center 178x178px gif — this is the starting “small” size. Place this text layer toward the end of your gif. You can see my text starts very close to the end:

We’re going to use the same method as before with transform keyframes.
Star Keyframe: With your text still at the starting “small” size, put a keyframe at the beginning of the text layer.
Hexagon Keyframe: Move the playhead just shy of the end of your gif, add a keyframe, and Command+T to make your text bigger! I made mine just slightly bigger than the center gif so it “bled” into the gutter.
★ STEP 7: Convert back to Frames and delete duplicate frames
This step is SO important for a smooth-looking gif.
The thing about animating in Photoshop Timeline is the placement of keyframes is a bit more “fine tuned” than where actual frames land. The animations play very smoothly and continuously vs. screencaps which are separated by milliseconds or whatever it is. This causes Photoshop to compensate with duplicate frames. If you don’t do this step, your gif will look choppy to a trained eye. This is my made-up explanation which sounds logical enough for me. 👩🏻🎓
(Don’t know how to convert back to frames? Try this handy action from Rizz/@anyataylorjoy!)
Once you’re back in frames, click through each frame and delete any duplicates. Duplicates will only exist where you have animations. My animations gave me 11 duplicate frames — a few when the Big Gif zooms out and a few when the text zooms in.
Export your gif and make sure you have transparency checked so your gutters stay transparent:

And there you go!
A Brady Bunch-inspired gif fit for calling out your fav Clown (affectionate) Character — “Sure, Jan” style.

I hope this made sense! 😅 Please let me know if you have any specific questions!! We have lots of other tutorials at @usergif so be sure to check those out too!
#resource#tutorial#completeresources#usershreyu#userkosmos#useralison#userstar#usernums#tuserkay#uservalentina#usercim#userk8#userannalise#useryoshi#userelio#tuserabbie#usersole#gfx*#resource*
878 notes
·
View notes
Photo
HOW TO: Make an Animated Sound Wave Overlay
In this tutorial, I’ll show you a quick and easy way to get this animated sound wave effect that’s unique to any song you choose! (You can check out a similar effect in my Obi-Wan Kenobi and Miles Morales gifsets too.) Disclaimer: This tutorial assumes you have a basic understanding of gif-making in Photoshop.
PHASE 1: Make Sound Waves Using VEED.IO
You can do this using several methods like downloading sound wave videos on YouTube and making them into gifs (which I’ve done before too!). But I’m going to show you how to make sound waves specific to the song of your choice using a free site called VEED.IO
1.1 – Upload a YouTube link of your song to VEED.IO
Open VEED.IO and click Choose Video! Try to find a studio recording if you can, instead of a clip of the film/tv scene which might have distracting background audio that could influence the sound waves.


UPDATE 09/17/23: At the time of writing this tutorial, VEED.IO allowed you to upload a YouTube link directly. However, I’ve been made aware that this doesn’t always work with the new version of VEED.IO. As an alternative, you can instead download the YouTube video using any video downloader and use the “Upload a File” method instead!
1.2 – Make the video a black screen.
If the video you used isn’t already fully black, click on your media in the timeline and toggle over to the Adjust tab. Pull the Brightness slider all the way down to -100 until the screen is completely black. This black background is key to getting a seamless blend on your gif later!
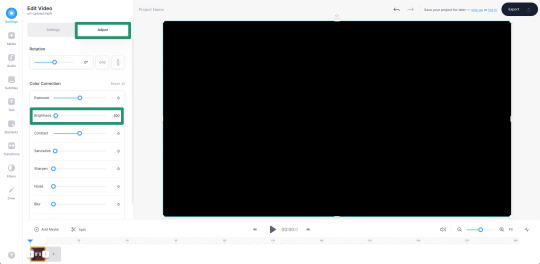
1.3 – Insert sound waves.
Click Elements in the left sidebar and navigate to Sound Waves. Select any sound wave design you prefer! I like the vertical, rounded orange bars. Don’t worry about the color when you choose, we’re going to change it to white later!
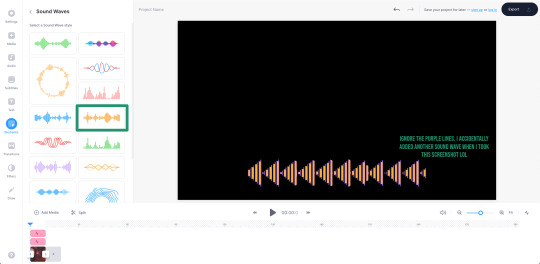
1.4 – Trim your audio clip.
It’ll depend on the amount of frames in your gif, but you shouldn’t need more than 10 seconds of your song. You can choose to trim based on the scene of your gif, the lyrics you’re going to type on the gif, or even just choose a section where the music goes wild and the sound waves move a lot. In this Max gif, I took a clip toward the end where the lyrics are: “I’d be running up that road, running up that hill, with no problems” because it matched the main clip I giffed.
Use the white parallel lines to drag the clip where you want it to start and end:

1.5 – Adjust the audio decibel controls.
(Disclaimer: As with most things, I know almost nothing about what I’m doing here. 🤡) I just know that I don’t want the bars of my sound wave to be clipped like they are below, so I have to change the decibel range so the loudest part of my audio doesn’t go “outside the lines.”
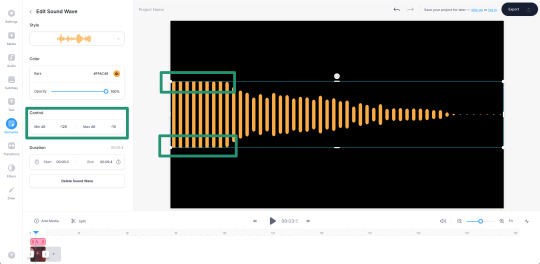
I changed my minimum to -100 and my maximum to 25:
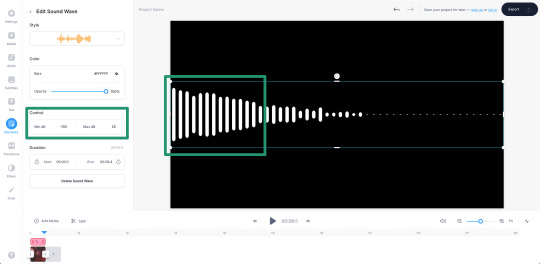
1.6 – Make your sound wave white.
Still in the Edit Sound Wave window, change the color of the bars to white. It doesn’t matter what color you want your sound wave to be in your final gif — we’ll change it later! White is the best base for any color, especially if you want the gradient/exclusion effect in the overlay.

1.7 – Resize the sound wave to your liking.
Use the corner sliders to enlarge the sound waves. I always prefer making a big gif smaller than trying to make a small gif bigger (and grappling with a low quality image). So I like to resize my sound wave as big as possible, cutting out any bars that don’t move so I can have a high-quality animation in the end. :)

1.8 – Export as a gif.
One of the most convenient things about VEED.IO is that you can export the sound wave as a GIF! So you don’t have to screencap it yourself. Click the export button in the top right corner, select Export Video, and then download it as a GIF.
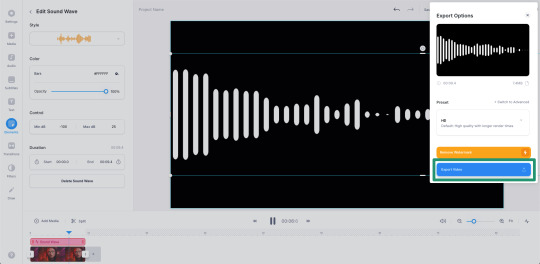
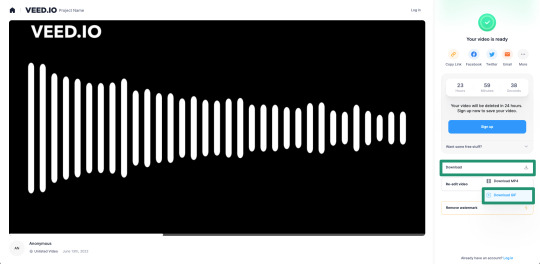
And here’s the sound wave gif I got:
Don’t worry about the watermark, we’ll take care of that in Phase 2. :)
PHASE 2: Overlay Sound Waves On Your Gif
Note: I’ll be working in Video Timeline for the most part of this section! If you want to see my process in Video Timeline, here’s my step-by-step gif-making tutorial.
2.1 – Make your base gif.
This is all up to you and your style! I like to make my sound wave gifs color-focused and I think blending adds a nice touch. Also, my gif is 540x540px.
Now, one of the most important things to remember is this: make sure your frame delay starts out at 0.05 seconds, even if you work in Video Timeline like me. This is crucial to make sure you don’t get duplicate frames when adding the sound wave gif.
2.2 – Import your sound wave gif.
Create a new file by opening the gif you exported from VEED.IO. Change the gif’s frame delay to 0.05. This is to match the base gif so that when you convert to Timeline, you don’t get duplicate frames! (Note: I also deleted the first frame of mine because all of the waves weren’t moving.)
2.3 – Resize the VEED.IO gif and convert to Video Timeline.
For my gif, I resized the sound waves to 505px width and then I used the Sharper action in this action pack to convert to Video Timeline. (You can read more about how I use these actions in the gif tutorial I linked above!) You can also remove the sharpen filters if you feel you don’t need them!
2.4 – Hide the watermark.
Create a layer on top of the gif layer and use the Marquee tool to make a box around the watermark. Use the Paint Bucket tool to fill that box with black so the watermark disappears.
Select both layers (the black box layer and your gif layer), right-click, and select Convert to Smart Object to merge the layers together.
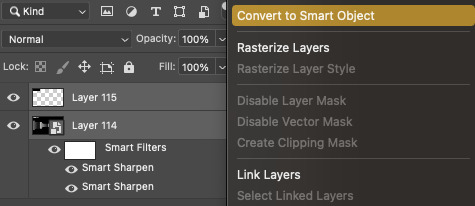
2.5 – Drag/duplicate the sound wave gif over to your base gif.
Either click and drag the sound wave layer into the tab with your base gif OR right-click the layer, select Duplicate Layer, and choose the document you want to paste the gif to! Make sure the sound wave layer is above your base gif!
2.6 – *OPTIONAL* Create a music player overlay.
This is just a style I came up with because I’m currently obsessed with rounded shapes. But you don’t need to have the semi-circle music player for the sound waves! I just like how it looks. For my design, I just made a white ellipse, created my own shapes for the play and skip buttons and masked them out, set the blending mode to difference, and added a gradient overlay.
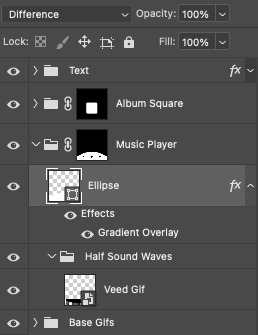
I won’t go into my design in a lot of detail here because this is a style choice that’ll be unique to how you want your gifs to look. Plus, this is just a tutorial on how to make animated sound waves. But if you have specific questions about my gif style for these kinds of sets, feel free to ask me at my main @sith-maul :)
2.7 – Set the blend modes.
Put your sound wave gif in a folder and set the folder’s blend mode to Exclusion. Put that folder inside another folder, and set this folder’s blend mode to Pass Through (it should do this by default). Here’s a screenshot that hopefully explains this clearer:

Now, your sound waves should have gone from looking like this:
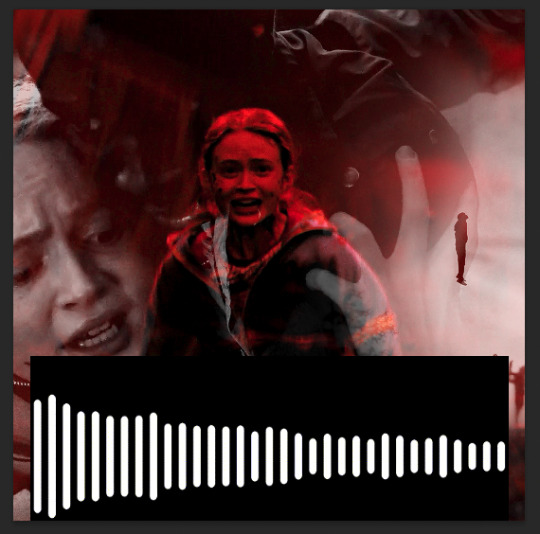
To this:

You can totally stop here if you like this look! But I want my sound waves’ color to match the rest of my gif, so...
2.8 – Add a gradient map.
Within the sound wave gif folder (the one set to Exclusion), add a Gradient Map layer above the sound wave gif:

I recommend going for a Black to Color gradient because the black will help the background of the sound waves stay dark and fully blended with the rest of your gif. I went with this Black to Red gradient:
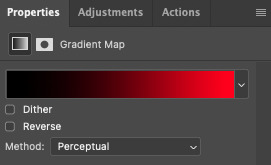
Now my sound wave gif looks like this:

But I don’t like how there’s now some cyan peeking through where the bars touch the lighter gray parts of my gif. So, let’s add one more adjustment layer.
2.9 – Add a Hue/Saturation layer.
In the outer folder (the one set to Pass Through), add a Hue/Saturation layer so it’s above the other Exclusion folder:

Decide what color you want to get rid of (in my case, cyan), go to that color channel, and adjust the hue slider until that color matches your main color as best as possible!
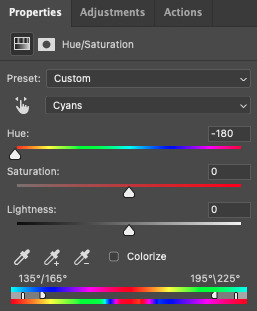
PHASE 3: Export Your Gif!
As always, when you convert your gif back to frames, do a quick double-check that you didn’t end up with any duplicate frames before saving your gif. Again, you can read more about how I do these steps in my gif tutorial here.
Finally, with just a little extra nudging layers around, my gif looks like this now:
Of course, for my actual gif, I created a music player design — so I decided to only use the upper half of my sound waves to fit inside the half circle.
I’m sure you know how I did this already, but in case you don’t, just move the sound wave gif down the canvas to your liking until only half of the waves are visible! I like using this method where my sound wave gif is under a gradient overlay because of how dark it makes the sound wave bars and how I don’t have to get rid of any cyan colors:
But that’s it! I hope you found this tutorial helpful and easy to follow! If you have any questions, my main inbox is open @sith-maul. If you decide to try out this effect, feel free to tag me with #usernik or tag us with #usergif ! Thanks for reading :)
#gif tutorial#completeresources#userkosmos#usershreyu#uservalentina#useralison#usernums#tuserkay#usercim#userannalise#useryoshi#userelio#tuserabbie#uservivaldi#userstar#usernorah#usersole#*usergif#*tutorial#by nik#stranger things spoilers#flashing gif
462 notes
·
View notes
Photo
Zoom In Gif Effect!
This tutorial assumes you already know how to make gifs
If not, you can see the way I make mine here
This tutorial will be in two parts: static zoom and moving zoom.
I haven’t really seen any other tutorials for this, so if there is one and I missed it, I’m sorry. This is just how I figured out how to do the zoom effect!
STATIC ZOOM
So this will be just focusing on one frame, a still image, zoomed in on.
You want to start off when you’ve compressed your gif into frames/the frame rate is correct/the gif is made essentially exactly how you want it to look, so that means sharpening/colouring/etc. Depending on where you want your zoom, you need to select whichever frame you want to start on. For ease of tutorial purposes, and because I think this is a funny moment, we’re starting on the very last frame.

You want to open the little three row menu, and click on “new frame”. It’ll just copy the last frame you have, and you can do this as many times as you like, obviously dependent on the size of the gif and the tumblr gif size limit. I’m going to do it about 15 times.

So from frames 52-65, these are all duplicates of the final frame (51).

Now, if you want to zoom in on the same vertical spot, I reccomend using the guide tool, to make sure the placement of your zoom is central (we will talk about moving the gif later). For this, you want to go to view > new guide.

It doesn’t really matter about the placement of the guide generally, as you might want to zoom in on different places, not necessarily the middle. I recommend dragging it to where you want it, so just make sure it’s vertical to start, and click ok. As you can see, in this case, Andrew’s face is directly in the middle of the gif.

Here’s where the irritating part comes in for static images. For every duplicate frame you made, you need a corresponding duplicate layer, so that you’re not working on the same canvas for each frame (otherwise it won’t reigster that you’re ‘zooming’ in on the image).


As you can see, each frame corresponds to a different visible layer (the eye). When you zoom in on a moving gif, you don’t have this problem, as each frame just moves along its partner layer; but with a static zoom, you need to make the duplicate layers for the frame to correspond to.

Once you’ve done this you can slowly (so it looks smooth) zoom in on layers. By pressing ctrl/command and T, you can increase the size of your image, moving frame by frame, increasing the size little by little.

The gif size is 540px by 400 px, so I’ve decided to zoom in by 10px height each time, until I run out of frames. When resizing the image, always remember to hold down the shift button as you drag, so that the gif resizes in the same proportions. Once you’re finished, click enter to save the changes.
However, once you do the first one, you’ll notice the layer is now in the wrong position. You can leave it like this if you want it to zoom at an angle, but if you want it centrally, you can either drag it back to the middle (using the guide, as well, a guide) or, you can use photoshop’s tools to do so:
Control/command A selects the entire image, and then this button on the top toolbar will place it in the middle again, like so. Make sure you have the move tool selected to ensure you can see these symbols.

In this case, I’m only centering the gif vertically, not horiztonally. I’m going to talk a bit more about that in the moving zoom section. But essentially you want to keep going along the layers and frames, zooming in. As you can see - I labelled mine so I didn’t get confused about the height sizes.

And in the end, you can save as usual [file > export > save for web (legacy)], and you should end up with something like this:

I just added the text for giggles, showing the type of things we can do with these gifs.
MOVING ZOOM
Arguably easier, as the frames already have corresponding layers, so you don’t have to mess around with duplicating them or anything like that.
The reason I showed the above step is because I feel like it’s important to know how to do it statically, to understand the mechanisms you’re working with, etc. Editing layers and frames can be tricky, because if you mess one thing up, it can sometimes negatively impact all the frames that came before it, and it can be hard to rectify that. So I would say just be careful and take your time!
I went back and remade the gif, just to give myself some more frames to work with at the end. If it’s too big (sidenote: it was, haha), I’ll just delete some off the beginning/end of the gif, before I save.

For the first zoom, I do exactly what we did above, except you can just work along the frames and layers as provided. I zoomed in by 20px height this time, so 400px, 420px, 440px, etc. I used the same method of one single vertical guide, moving the gif into the middle, and then moving onto the next frame. That ended up giving me this:

However, the most effective zoom is probably when you keep the gif ‘central’, as if you really are zooming in on one point. The best method I found for this was to add another guide, this time horizontal, and pick a reference point you want to use as your ‘centre’. In this case, I used the shiny little tip of Andrew’s nose as my middle.
Note: this doesn’t have to be the middle of the gif, it just has to be a central point. Think of it as your gif expanding out from this anchor point, like when you resize your canvas and it shows you this:


Then go along, zooming and resizing, but make sure this time that you not only align centrally with the vertical line, but that whatever you chose as the ‘middle’ point, aligns with your horizontal marker as well. You could use the layer aligners in the top toolbar for this as well, but that only really works if your zoom is dead centre, which mine may look like it is, but it wasn’t.

In the end, you should get something that looks like this:

You can also move the placement of the zoom, it doesn’t have to be zooming towards the centre of the gif itself. As you can see here, I moved the frames closer and closer to the top left-hand corner, because I wanted it to appear as if Din was getting in Boba’s face about this argument:

You could also zoom in and out, (just enlarge the layers and remember your heights, then size the images down in reverse order), or make the gif shake (move the image slightly to the left and then right as you zoom, I haven’t tried it, but I’d recommend doing AT LEAST three frames on each side (for each direction), as otherwise I’d assume it’ll move too quickly and won’t look smooth), by doing the same things. It’s just about the placement of the frames and layers. The same principle can apply to zooming in on text, moving it up/down/etc, on each frame of the gif.
Post that inspired this tutorial!
I hope this makes sense and I hope it’s helpful! If you have any questions, feel free to drop me an ask! I’m not an expert by any means, but I’m sure we can figure it out together 🥰
#usertom#i hope this makes sense tom!! 💙#gif tutorial#photoshop tutorial#zoom gif tutorial#completeresources#pscentral#yeahps#chaoticresources#allresources#tutorial*#userveronika#usertix#userleah#userbaz#userwild#usermills#flashing gif tw#i hope it's okay to tag you all!!! just thought you might find this interesting 🥰
844 notes
·
View notes
Last Seen Blogs

mcslipperyrichard
Untitled

sibyllegoesblogging
Seitenweisheiten

samansasamusa
Life of Sam

dieuhoapanasonicvn
Sans titre

krystaleckhart
Krystal Eckhart