#animation tutorials
Explore tagged Tumblr posts
Visit Tumblr Blog
Explore Tumblr blogs with no restrictions, modern design and the best experience.
Last Seen Tumblr Blogs


Fun Fact
Total funding amounts to $125.3M.
Text
RBing for my own personal reference!!!
I've been working on an animation project lately after many months of not touching the medium and it's reminding me how much I have left to learn (┬┬﹏┬┬)
So grateful for people who do breakdowns and discuss the principles like this <3 <3
ALSO GO WATCH MONKEY WRENCH BECAUSE IT'S LITERALLY SO GOOD AND COOL!!! NO ONE IS DOING IT LIKE THEM IN INDIE ANIMATION!!!!
Been going through a lot of animation reels this past week and a bit and one prevailing thing I noticed was that a lot of animators either struggle with, or completely disregard, the timing and pacing of their frames. Timing and spacing is (to me) utterly essential to create some nice, smooth and well flowing animation, otherwise it can look very jittery, jumpy, volume will fluctuate greatly and won't look too good.
This clip here should help show you how I place my keys, breakdowns and inbetweens to get some nice movement. (I wish I had room for timing charts!)

As you can see from the timeline grab here, a lot of this is on 3's, with a few 2's here and there. Even some 4's to help ease. With proper placing of frames even 3's and 4's can look smooth!
AND, if you have toon boom, and you wanna have a deep dive into this file, I've attached it below so you can really have a good look!
#after all this time im still an idiot about timing#ive gotten so much better though and im proud of myself for that!!!!#animation#indie animation#timing and spacing#animation principles#Animation tutorials#zeurel
4K notes
·
View notes
Text

holy shit is that an Evbo 360™️
#parkour civilization#evbo#my art#decided to try out animating#immediately let my hubris get the better of me#every beginner animation tutorial: start by trying to animate a bouncy ball#me: no
8K notes
·
View notes
Text
Heres a quick turorial on how i make the snarl mask. If anyone needs a better explanation i can make another video, but for now i hope this helps.
#tutorial#mask#mask tutorial#cardboard#cardboard art#cardboard mask#cardboard sculpture#animal art#werewolf#snarling#snarl#snarling werewolf#werewolf mask#wolf#snarling wolf#werewolf shark#wip
2K notes
·
View notes
Text

Here, before you go,*reaches into my pocket, dusts off some lint* take this with you.
#just messing around with animations in csp#ill look up a tutorial eventually#but not today lol#emmrich volkarin#emmrook#da4 emmrich#emmrich x rook#datv#dragon age emmrich#veilguard#dragon age the veilguard
2K notes
·
View notes
Text

"karasu search how 2 cheer human up"
"karasu search difference between sad human and zoning out human"
"karasu search how long is it safe for humans to zone out for?"
(+ a longer look at each scene:)

#art#gif#obey me#this was meant to be a quick test. it was not quick. i think this is was the longest i've spent on drawing something since rolling ik#for some reason procreate keeps fucking up the colours on export and i'm too tired to figure out how to make it stop#can you tell that satan and lucifer were animated first?#funnily enough satan showing ik his book was pretty simple but lucifer walking was like. impossible. he kept turning out fucked up#i was so worn out by the end of it that everyone else's animations are way simpler#(the walk still doesn't look right but i've made peace with that.... i should've done some tutorials or smth first)#(such is my hubris: when i try to do new art things it's mainly by brute-forcing my way through it and hoping it works)#jtta ik#obey me lucifer#obey me mammon#obey me leviathan#obey me satan#obey me asmodeus#obey me beelzebub#obey me belphegor#anyway i'd like to experiment more with trying to animate things in future so!! look forward to that?
6K notes
·
View notes
Text
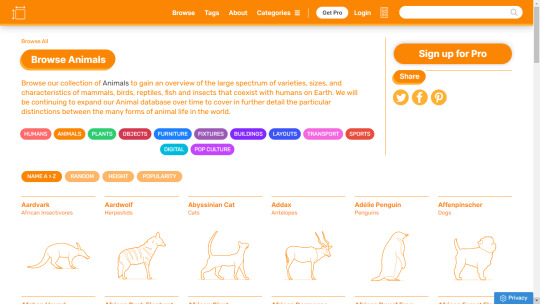
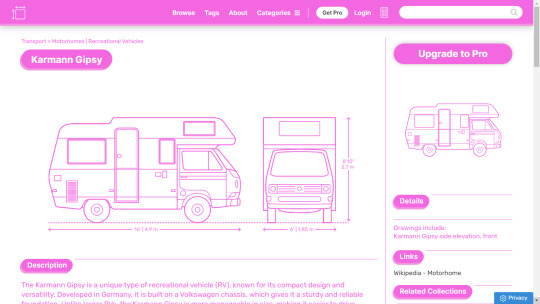
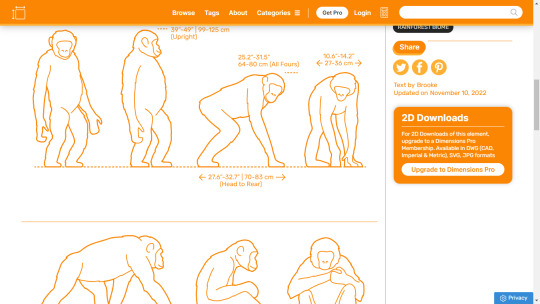
I've found this nifty reference website for artists called www.dimensions.com that has a database of exact measurements for various objects, plants, and animals
They have a premium version with 3D models that I haven't tried yet, but it's definitely very informative if you're trying to get the anatomy and proportions for different species of animals right!
5K notes
·
View notes
Text
#French American cartoons#political satire comics#cultural comics#christmas themed illustration#holiday cartoons#free vector art & graphics#funny cartoon vector illustration#lessons in digital illustration#cartoon animation courses#animation tutorials#stock cartoon illustration#royalty free cartoon logo
0 notes
Text
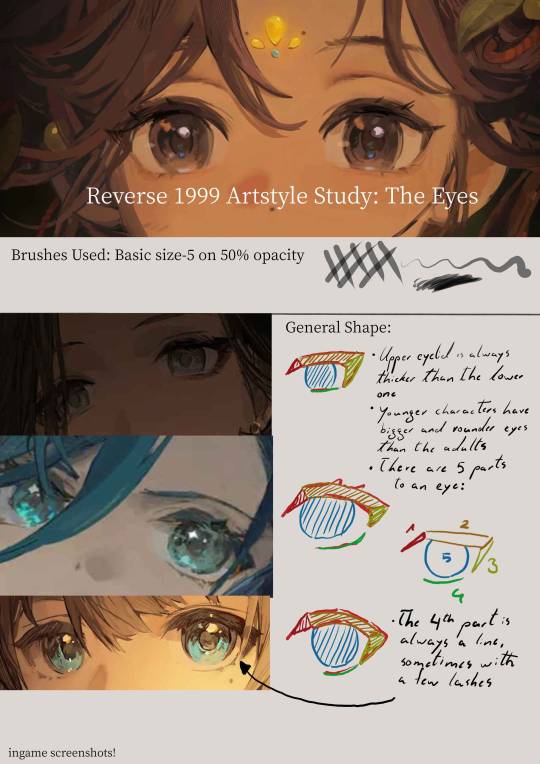
Disclaimer: I do not actually know how they paint the eyes,this is just me guessing their process purely from observations
Transcript:
General Shape:
- Upper eyelid is always thicker than the lower one
- younger characters tend to have bigger and rounder eyes than the adults
- there are five parts to an eye: 1. the upper eyelid corner(towards the nose) ; 2. the upper eyelid main part ; 3. the upper eyelid corner at the back ; 4. the lower eyelid ; 5. the iris
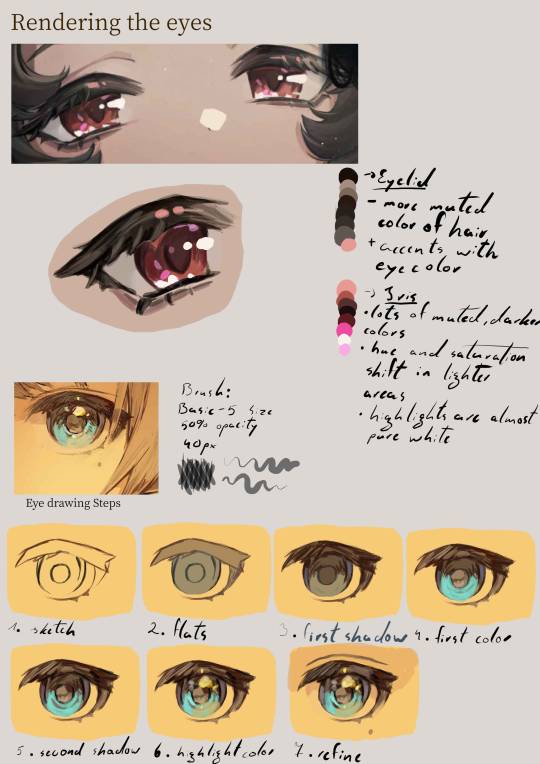
Eyelid:
- more muted color of the hair + accents with saturated eye color
Iris:
- lots of muted darker colors
- hue and saturation shift in lighter areas
- highlights are almost pure white
Eye drawing Steps:
sketch
flats
first shadow
first color
second shadow
highlight color
refine
#art style#art study#eye#eyes#anime eyes#godofart#r1999#r1999 fanart#reverse 1999#drawing guide#guide#art guide#art tutorial#drawing tutorial#fanart#art#digital art#illustration
2K notes
·
View notes
Text


Made more tiger sharks!!!
731 notes
·
View notes
Text


A knight and friends.
#art#digital art#original character#character design#2d animation#animation#oc#animated gif#cartoon#tutorial#art tutorial#animation tutorial#how to#knight#medieval#steed#horse#bird#pet#quest#adventure#dnd#d&d#fantasy#king arthur#arthurian#derp#derpy#equestrian#armor
636 notes
·
View notes
Note
Could I pretty please get some tips on drawing Blurr? I don’t know what I’m doing unfortunately
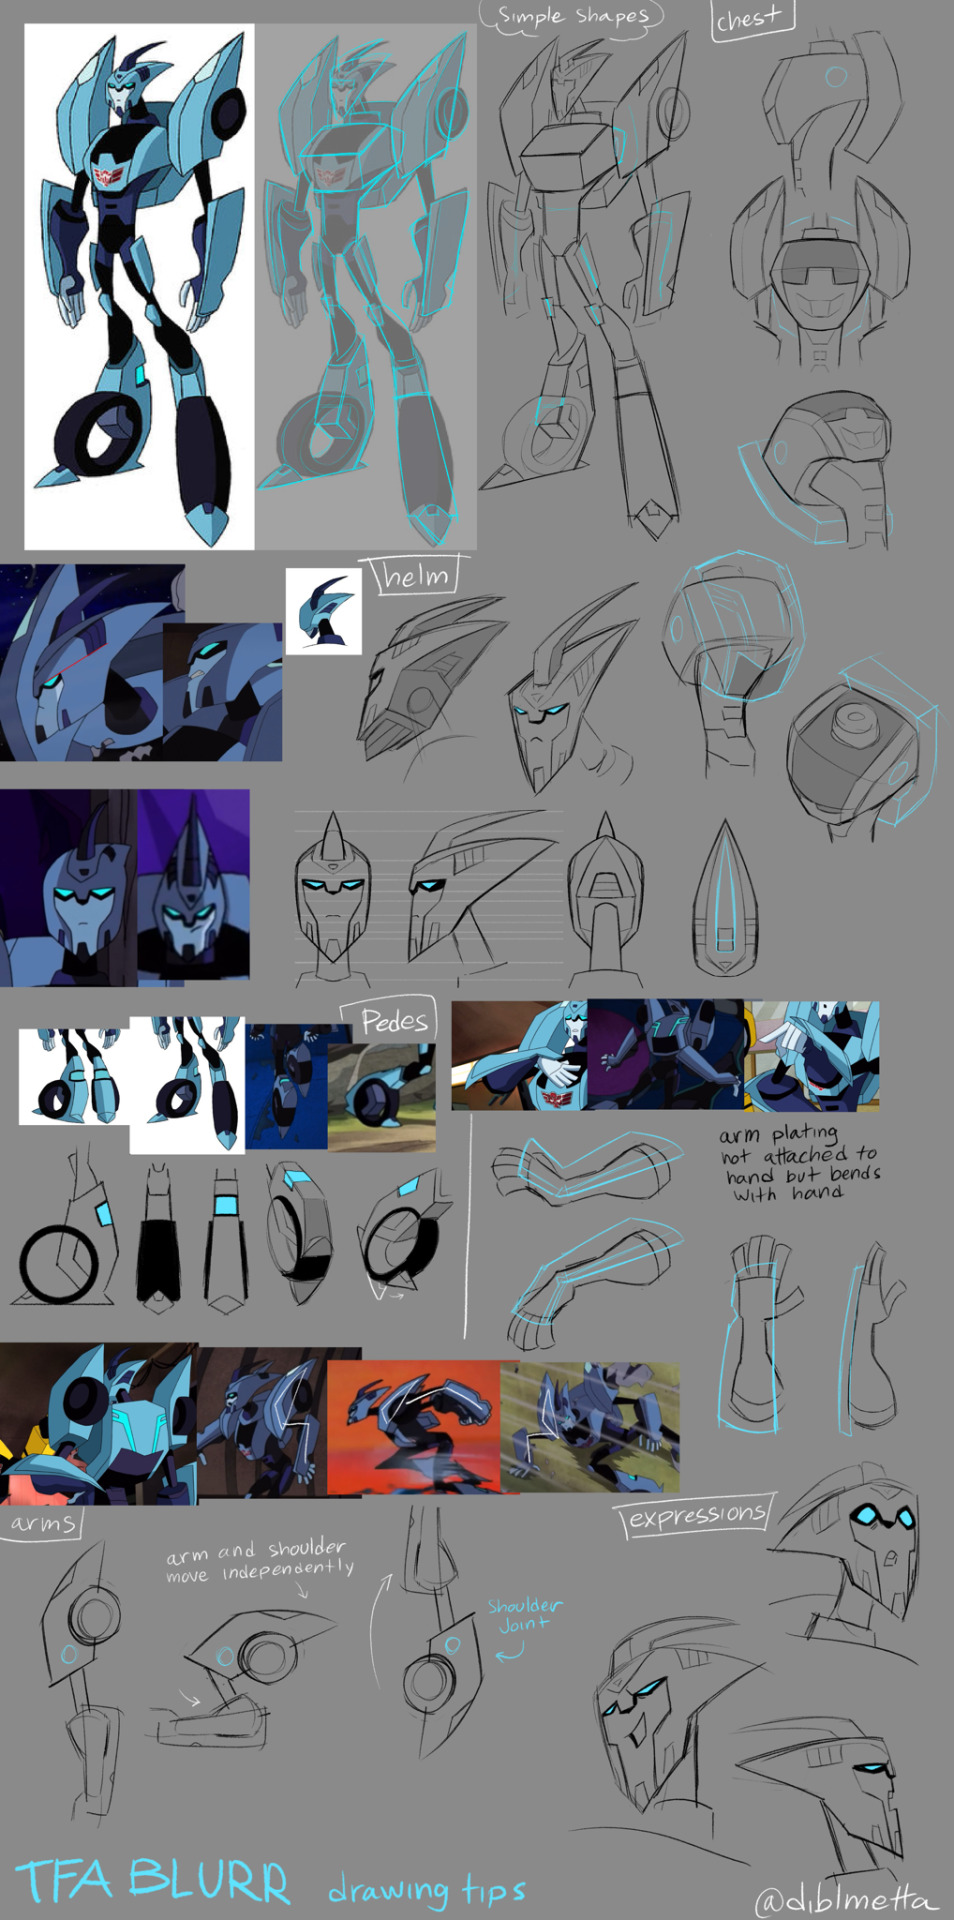
Hope this helps!
My advice is to always use tons of references but he’s drawn pretty inconsistently in the show so I just cherry pick my favorite styles and mix them together
#myart#transformers#robot#diblmetta#transformers animated#tfa#maccadam#undertale#blurr#blurr tfa#tutorial#drawing guide
407 notes
·
View notes
Text
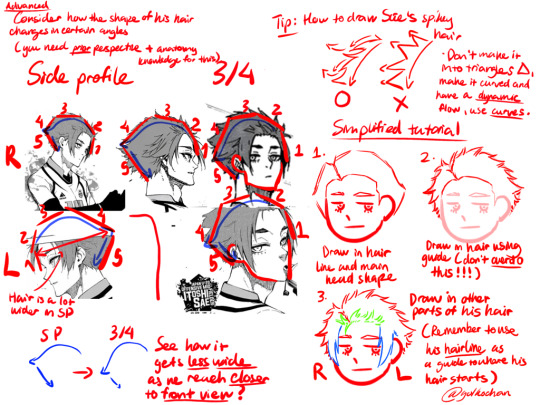
sae hair tutorial since his hair is so fucked up

#bllk#blue lock#bllk x reader#bllk manga#bllk x you#🍳.art#art tutorial#art tips#artists on tumblr#itoshi sae x reader#sae x reader#sae itoshi x reader#bllk sae#bllk fanart#blue lock sae#itoshi sae#sae itoshi#bllk anime#blue lock fanart#itoshi sae x y/n#itoshi sae x you
820 notes
·
View notes
Text
Since I’ve posted this elsewhere to better explain the mechanics for those that didn’t fully understand the tutorial I posted, I thought I’d post here as well. I also go over the ear mechanics on this.
Basically play around and see what works, but I hope this helps if you’re still struggling.
#art#animal art#mask#wolf#wip#cardboard art#cardboard mask#cardboard sculpture#cardboard#cardboard craft#werewolf#snarling werewolf#werewolf snarl#wolf snarl#snarling wolf#werewolf mask#wolf mask#tutorial#explanation
628 notes
·
View notes
Text

A guide how to draw cheeseball 🧀🐭
1K notes
·
View notes
Text
programmed my oc into a game for the aesthetic
#i hope this gives off the vibe of an old game#2 days of modeling#1 day of following a coding tutorial#i felt so happy to draw the little gifs on the screen again#im so sick of 3d (i will do it again)#oc#oc animation#oc art
692 notes
·
View notes
Text
how to grub your karkat
or you can use this for any other plush or if you wanna make a whole new plush entirely or whatever

disclaimer im not a professional in any sense of the word and theres anything technical im doing wrong or you think you can do it better by all means dont hold back
Things you’ll need
sewing machine unless youre really dedicated but doing it by hand is gonna be an agonizing feat i promise. I just used a straight stitch for everything
Fabrics: for the main body i suggest a minky or something soft, for the inner lining something in the same color as the main body and ideally with some stretch, and anything black for the legs. Less than a yard of each will do
if youre using minky or anything furry get a lint roller. Trust me
stuffing, i used polyfil
threads that match your fabrics
good fabric scissors
sewing needle for hand sewing/fixes
karkat plush (optional)

Heres the pattern i came up with! They are numbered for your convenience and pieces with the same numbers are going to be part of the same row of segments. cut everything out on the black lines (Make sure when you’re printing to fit the image to the page size.) on the left we have the belly pieces, the right is the main body, and we have the foot in between
Im using a relatively thin minky fabric, im sure you can use whatever but something with some fluffiness kinda helps to mask any imperfections in the sewing. When drawing out your patterns keep in mind what direction your fibers settle in and try to keep it consistent
On the wrong side of the fabric measure out at least a half inch seam allowance around each piece of the pattern, i used a centimeter and that worked but had me sweatin a bit.

For the main body pieces fold your fabric in half before you cut so you can have 2 of each segment that are mirrored to each other, i also extended all of the #1 pieces an additional centimeter/half inch at the top so we can fold them over at the very end. I highly suggest numbering the insides of all the cut pieces, especially in a way where you will remember what direction they are each meant to sit

After you’ve numbered all your pieces, set them aside and start making your feet!
Each of the 6 legs is made of two pieces, but i because i only had a swatch of the black minky i made up for the rest with some random black scrap fabric from an old project. Try to keep your fabric consistent if you can lol
I didnt give these pieces any more seam allowance on the fabric but i recommend adding a centimeter or half inch to the base of it to extend the length and have some more wiggle room

like so
Instead of cutting out 12 individual pieces and struggling to stitch them all together i started with 6, then pinning each piece real tight with the right/furry side down onto my secondary fabric, and slowly stitching around the shape real close to the edges- DO NOT CLOSE THE FLAT SIDE as we are going to stuff the feet through here

Now cut the shape out of the fabric and repeat till you have 6 feet

Now flip those bad boys inside out, stuff up, and if you wanna you can match them to their best pairs

now grab a pair of feeties and your #1 pieces and line them up, in this picture my belly #1 piece is shorter bc i forgot to add the extra centimeter and i recut that once i realized. Line those sides up with the right/furry parts touching and with the feet in between, flip it around to make sure everything's sitting the way you want it

Note. i didnt realize until later but i sewed my feet in upside down. save yourself the time it takes to fix it and dont make the same mistake
Straight stitch these layers together and repeat with the next two segments our good friends #2 & #3

Repeat this for the #2 and #3 sections but NOT THE #4, that part doesnt need feet! just line those edges up right/furry sides together and sew


the secret to the squish of the suit is making this inner lining from another fabric and stuffing it! I used what i had leftover from a stretchy red fabric for a kanaya skirt. For this we need to make a new pattern for each section, making sure it follows the curve of the round edge but the piece itself is shorter, almost like youre removing the seam allowance you added. Mine is a centimeter shorter on the top and on the bottom and reaches to the middle

Make one of these for each numbered segment,you only need to make half the pattern and you can fold your fabric in half on a crease and you end up with one symmetrical piece (bars)

Now you need to pin these pieces right on top of the wrong side of your numbered furry sections and line up the straight edges like so (disclaimer for LOTS OF SCARY NEEDLES !!)

Admittedly i didnt estimate how long these pieces needed to be very accurately and overshot it a bit, if you start pinning it from the middle and continue outwards on either side thatll ensure its not too lose and you can cut off any excess after
The only exception is piece #1, if you recall we gave this #1 section extra seam allowance. This is so we can sew down that excess at the neck later and hide any of the inside that might show once its all put together. Do not connect the top edge to the inner lining! Since i added an extra centimeter earlier im gonna leave that hanging and pin + sew down the inner lining a centimeter lower than the top edge. LEAVE THE CURVED EDGES OPEN! DONT SEW THEM TOGETHER! those stay open to stuff

Straight stitch the lined up edges together

Now you have all these skinned pieces of little freak and we need to connect all these segments together making sure to sew UNDER the existing stitches so we dont see those on the outside when its all put together


Inside looks like a bit of a mess but thats fine bc its not the part that matters
Now stuff it! you might need a stick or pencil or something long and thin to get stuffing into the middle bits

Now thats its stuffed you can finally close those curved edges. Try not to sew over a thick mound of stuffing, push it in a little further to give yourself some space and you can fluff it back out after everythings closed. I cut off that excess lining fabric after sewing

Ough… they filleted my boy…
Finally, match up all the edges and lines and HAND SEW them right sides together. You will destroy your machine trying to work around that stuffing i promise. You also have an excuse to get up from your work desk and sew on a couch or smth. I used a standard backstitch for a tight finish and again, make sure you sew under any existing stitches so they arent visible on the outside!

Speaking of the outside, once you stitch everything together you can very gently flip this sucker inside out

This is @hatamonu’s cat Cocaina, aka Coco. Her perfectly square figure made it into my grub files somehow so shes essential to the tutorial

Check the fit and all thats left to do is roughly baste stitch down that excess neck fabric onto the stuffed lining and youre set! I gave the thread slight tugs as i went to tighten the opening a bit put dont tighten it too much

tadaaaaa

It fits pretty snug but starts to slip a bit with motion. Heres a bounce test

If you do shake your baby make sure to safety pin the plush to the suit so he doesnt prematurely shed his exosekeleton
Now spread that baby fever and show your baby to the world


pics from the ALA 2025 homestuck meetup and supplied by para.dox.cos
Tysm for coming along this ride with me especially if you followed the prototype journey on twitter, much thanks to my more sewing savvy friend for the solution to my grub dilemma and for helping me design and build my dolorosa cosplay <3 much love and hopefully many more homestuck cosplays and meetups to come in the future!
#homestuck#homestuck cosplay#karkat plush#karkat#karkat vantas#cosplay#tutorial#homestuck grub plush#plush pattern#long post#ALA 2025#anime los angeles#dolorosa#the dolorosa#apologies if this is hard to follow or utterly incomprehensible please note i am making shit up as i go and results may vary#feel free to ask any clarifying questions and ill do my best to answer#no i will not be selling these#technically i have more minky left than i know what to do with but the cost would have to justify the pain in the ass it all was to complet#and i dont think anyone will pay that price#send me suggestions of red characters to make plushes out of
424 notes
·
View notes