#mask tutorial
Explore tagged Tumblr posts
Visit Tumblr Blog
Explore Tumblr blogs with no restrictions, modern design and the best experience.
Last Seen Tumblr Blogs


Fun Fact
In February 2021, Tumblr had 518.6 million blog accounts.
Text
Heres a quick turorial on how i make the snarl mask. If anyone needs a better explanation i can make another video, but for now i hope this helps.
#tutorial#mask#mask tutorial#cardboard#cardboard art#cardboard mask#cardboard sculpture#animal art#werewolf#snarling#snarl#snarling werewolf#werewolf mask#wolf#snarling wolf#werewolf shark#wip
2K notes
·
View notes
Note
How did you make the Okidogi mask? I kinda wanna make one myself :D
Good question, anon!
So, the things you'll need is
- 2 sheets of green construction paper
- 1 sheet of red construction paper (I used red since I didn't have pink. Both will work)
- 1 sheet of white paper (can be printer or thicker paper, but preferably thicker)
- Glue or tape
- Cardboard (any will do, I used some old scraps I had lying around, but preferably 12 inches for all sides)
- Scissors
- Yarn
- Scrap paper and pencil
- Ruler
- Hole Puncher

This was what I used for the mask.
So, to start, you'll need to sketch out Okidogi's mask to get all the proportions right.
Here's an image for reference

Thankfully, his mask is symmetrical, so what I did was grab a sheet of paper and fold it in half, then draw half of the mask (with help fo my ruler) so that when I cut it, it'd be symmetrical. Saves time.
(Example)

I then taped the sketch onto the cardboard and cut it out into the general shape of Okidogi's mask.
Once I did that, I got the green construction paper and traced the outline of the mask and the details.
Then I would cut out the details like the face marking, the white part of the ears, the muzzle, and the eyes.

I assembled them on the mask so I know where they'd go.
(It's a bit off center due to my fan)
I used cardboard for the muzzle to make it 3D ish, and I glued the other parts on the muzzle (like his nose)
While waiting for that to dry, I grabbed the other green sheet of construction paper and carefully covered the mask with it. (To cover up any writing or creases)
Then I glued the markings and such on. I then grabbed my pencil and stabbed the corners where the eyes were. Using the scissors, I cut out the eye holes so I could see.

I glued the markings and the muzzle on, and when it was dry, I grabbed my hole puncher and made two holes where the yarn would go. (I messed up here, hence why there's tape.)

And boom! You should have a mask!
A lot of this was trial and error (mostly error) so feel free to have me clarify anything.
#ask and ye shall receive#pokemon#pokemon okidogi#okidogi#pokemon okidogi mask#pokemon mask#pokemon violet dlc#pokemon scarlet dlc#pokemon scarlet and violet dlc#pokemon dlc spoilers#pokemon dlc#teal mask dlc#pokemon the teal mask#pokemon the loyal 3#loyal 3#the loyal 3#loyal three#the loyal three#the heroes of kitakami#heroes of kitakami#the festival of masks#mask tutorial
6 notes
·
View notes
Text

Oh shit John Doe birthday... *scrounges art folder*... uhhhh... (;ŏ﹏ŏ)
#don't look at me#happy birthday John Doe#let your freak flag fly#dom!john rights#masked#malevolent#malevolent podcast#malevolent fanart#john doe malevolent#my art#i saw a high shine tutorial and blacked out and woke up with this on my tablet
444 notes
·
View notes
Text
Long awaited Hera's mask tutorial (no cat base, low budget)
example of the masks I've made, here:
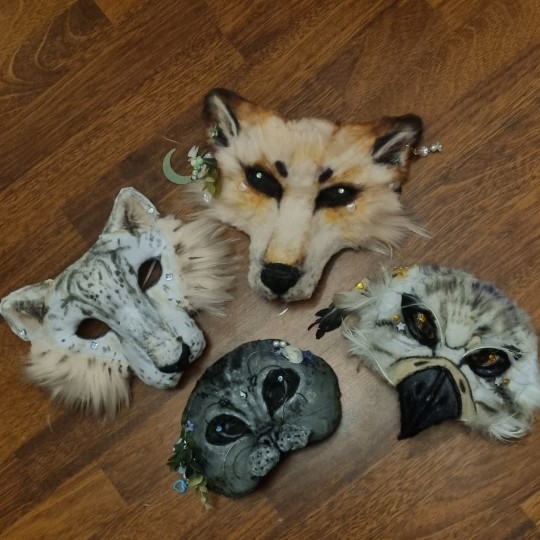
Author note: I have a 3 year experience, and I got used to making gear like this, so if you are trying masks for the first time, you might find some difficulties.
also, the whole thing Is REALLY "trust the process"... Anyway here we go!
You need: Cardboard, paper(optional), hot glue gun, felt/something to fur it/any material is okay if it works, foam (optional), basic tools like scizzors
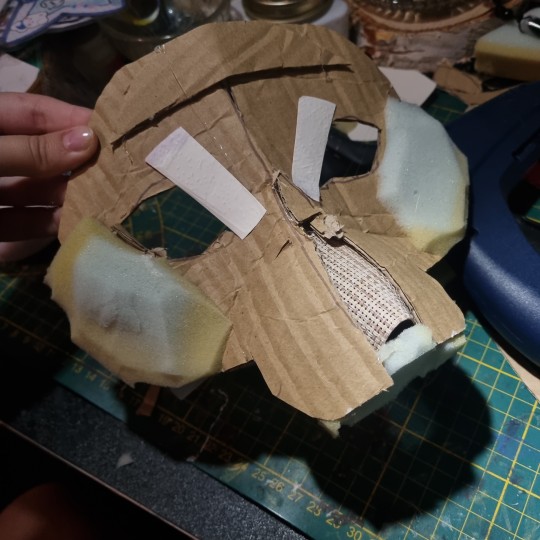
1. Cardboard forming
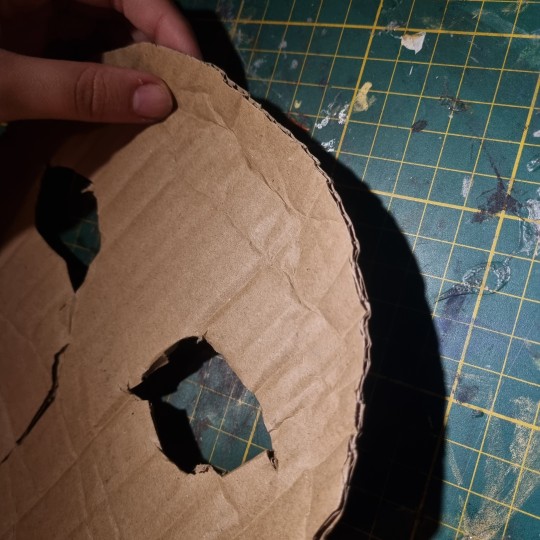
You need a piece of cardboard that's kinda a little bigger shape than your face, and measure where the eyes should be, so you can see well.
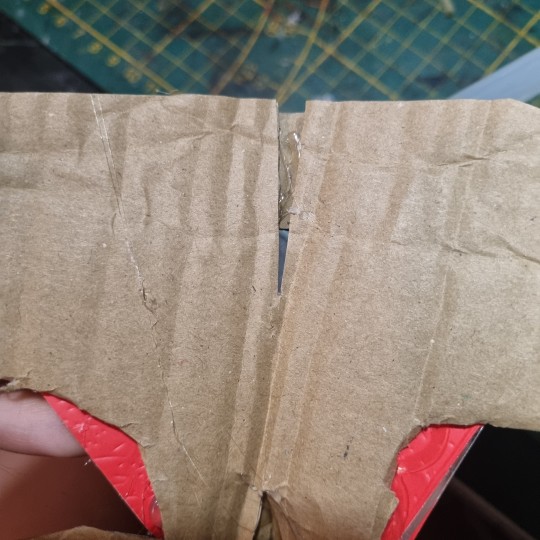
you can make the mask symmetrical by bending it in half, but it's optional
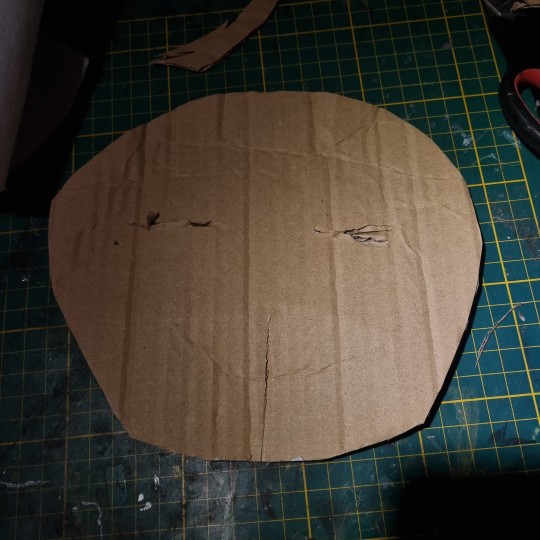
the first picture down there shows the back of the mask, don't be scared to pull it in and out, I'd say, you need to form the mask shape with your fingers VERY GOOD.
it really depends on what species you wanna make, I'm making a snow leopard rn!
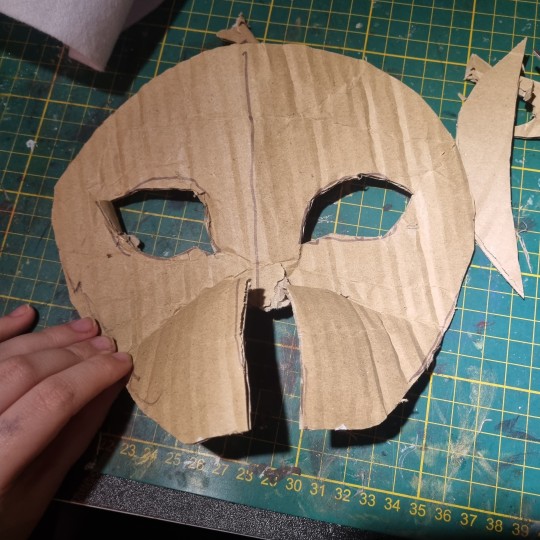
you can even cut it almost in half, and shape it to your liking
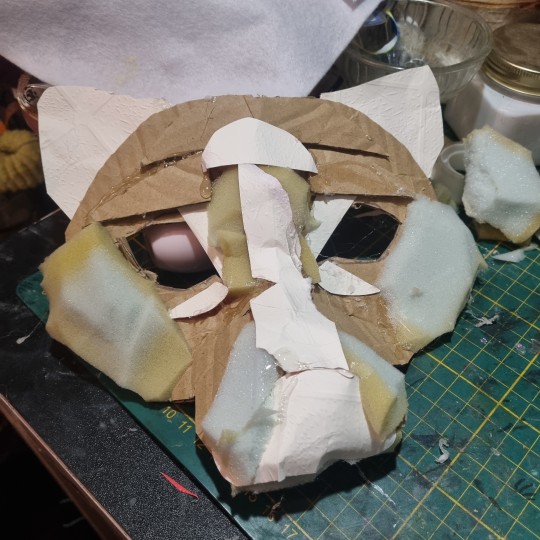
2. Texture
for this part, when you have your BaseOfTheBase ready, you need to make it more 3d, so it doesn't seem flat. small pieces are a key.
u can use various materials to recreate the real look, for example - foam that is easy to work with, and maybe more cardboard pieces layered on eachother. also you can use the pieces to glue the whole thing down together so it's sturdy.
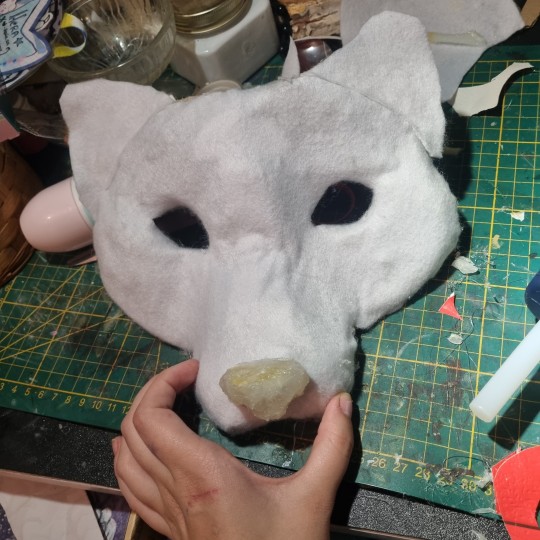
I smooth it out with paper too, so the fleece/felt/fur sticks better to the mask and doesn't leave unnecessary bumps..
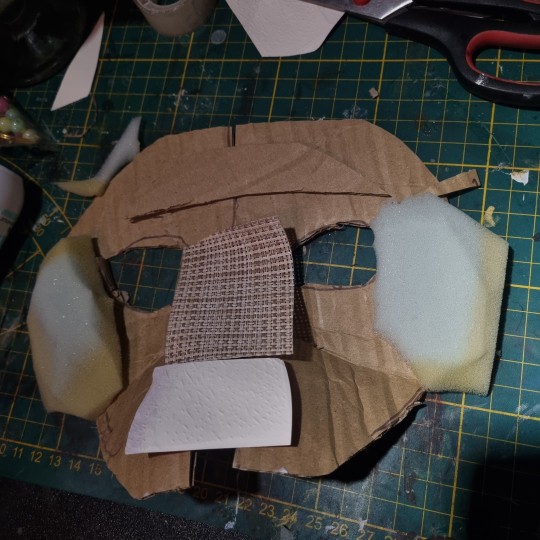
you use the bends like that to create a 3d effect, and expand the mask a little.
That's what I came up with! I added alot of paper pieces to smooth it down ^^
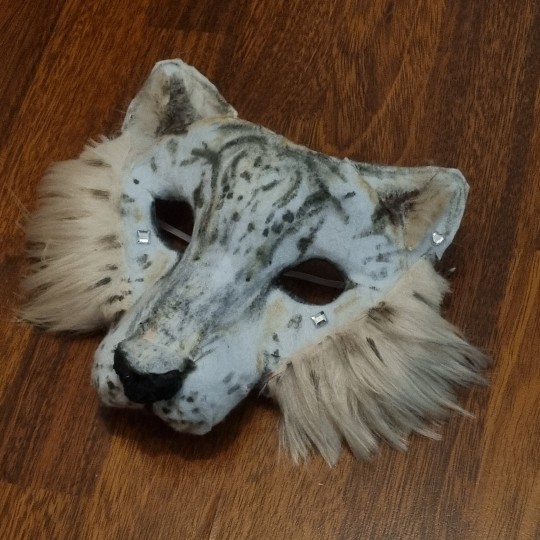
3. furring/felting, and the final touches
this part may be kinda tricky, so i reccomend you to watch various of felting tutorials on cat masks, cause this works basically the same!
I didint take any more photos rly, but here's the final product, and only felted one. (the nose is made out of hot glue)
I don't really want to elaborate on how to do the patterns, since you're the one who's customising the mask, but I like to use alcohol-based markers to make them! acrylic paint is also okay ^^
I hope I helped in some way !
If you have any questions, feel free to ask <3
#alterhuman#therian#nonhuman#bird therian#therian gear#snow leopard#art#therian art#tutorial#aviankin#birdkin#therian mask#mask making#otherkin
912 notes
·
View notes
Text

— how to recolor gifs ( easy ) tutorial
website used :
https://ezgif.com/instagif

#૮ ´ ཀ `𓏼 ა#rentry#rentry resources#rentry stuff#rentry graphics#rentry decor#rentry inspo#rentry divider#rentry pixels#rentry dividers#rentry frame#rentry icons#rentry mask#rentry template#rentry tutorial#tutorial#nahida#genshin impact
819 notes
·
View notes
Text
How do you clip GIFs onto masks?
[PT: How do you clip GIFs onto masks? /END PT]
Right click on your mask layer, click Select Pixels.
Click the Folder icon and then the Raster Mask icon on the bottom right. This should create a new folder.
Duplicate your gif into your project, either by clicking and dragging it into it or by right clicking and duplicating it into your project.
Simply put your gif into the folder that you made earlier and adjust it as needed. (make sure you have the WHOLE GIF FOLDER selected and have AUTO-SELECT OFF! otherwise it'll only edit one frame)
Export it as a gif and you're done.
You CAN do this with images that have faded borders, but it is important to note that gifs will make masks with any fading solid if you export it as a gif. Exporting it as a webp will keep the fading, though.
#𐐪 tutorials and help.#𐐪 from praysia.#𐐪 by praysia.#photopea#photopea tutorial#edit help#editing help#rentry resources#masks#rentry masks#how to#how-to#photopeablr#photopea resources#editblr
457 notes
·
View notes
Text


jagged, crystalized and pixelated tumblr banner masks!
for the 2 anons that asked!
okay to repost, just dont claim as yours. and free to use (its what they were made for, duh!)
keep in mind gifs dont mesh well with translucent colors if youd like to use these with them :0
#🌫️ i know what you dread | creations#anonymous#carrd resources#rentry resources#rentry#web graphics#rentry tutorial#rentry inspo#rentry gif#rentry decor#rentry graphics#rentry template#image masks#edit resources#editing resources
1K notes
·
View notes
Note
do you have a tutorial or pattern available for your cardboard masks? i love the shape and proportions of them
i went ahead and made an illustrated tutorial that i hope will be helpful :) thank you btw!


I started this mask on the snout, which is originally a flat rectangle. then i fold it into 3 parts, so it becomes kind of like a hollow shape. then the top front corners get snipped but only part way! just enough so they can be folded in and create the muzzle shape. the edges can be trimmed to make the nose pointed and the muzzle lips rounded.

after this i cut a long straight rectangle and bend it a bit before attaching it to the nose bridge. then i cut out two parts for the cheeks which should be flat on the edge which they attach to the muzzle, and round on the egde which forms the side of the face. these should also be slightly bent to create a rounded cheek. the step after this can be tricky, which is cutting two more straight rectangles and then bending them to bridge together the forehead strip to the cheek pieces. this step ends up really defining the shape of the face depending on how bent/long/tight you make them

after that I cut out little triangles to fill in the gaps to create an appropriately sized eye, and for this one I also added some strips to form eyelids. the ear shape varies depending on species but i generally try to bend them a bit to add depth (admittedly the cat ear shape i've illustrated is based on the pattern for Furby ears lol)

the final touches for me are making the eyes out of mesh and attaching elastic using paperclips, and then you can paint/felt/fur/decorate it however you want!

yayyy yippeeeeeee I hope that helped :3 have fun
452 notes
·
View notes
Note
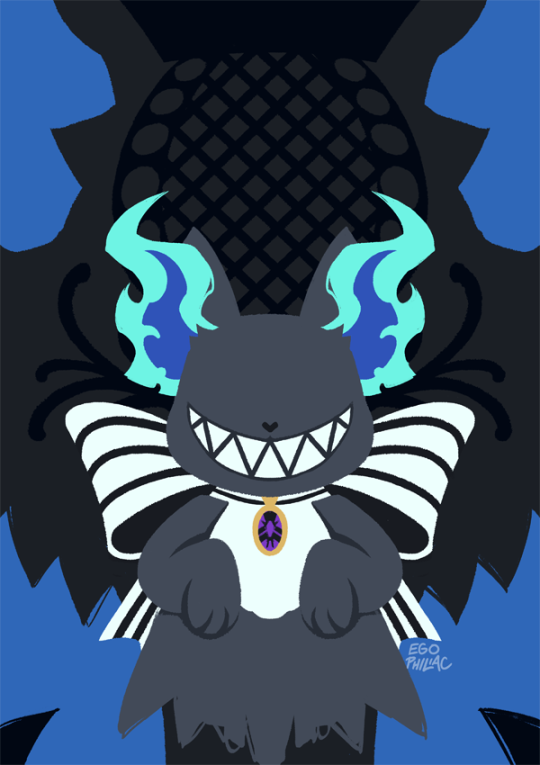
hi! this is Insomniac Anon here!!! I noticed on some of ur artworks (specifically the unique magic posters), that u have a textured look to em, like paper or grain ... i wanted to ask how u get that effect? is it a brush, a filter, or like an overlay/png u use ... ? pls tell me!! ;v; I really like how the texture looks, so i wanted to know how 2 do it since ure a very big inspo 2 me LAWL ... I've been doing art practices in diff styles i find, so, i wanted to know a bit more how you do it :^D
thank you! :D :D :D it's usually photos/textures of paper that I've messed around with; I have a bunch of free/paid/ones I took myself. anytime I see good photos of paper I add it to the collection...it is my weakness. 😔
I mostly use Photoshop, but this should work in any program that supports blending modes (also I did this in like an hour to use as an example, please forgive it :')
image by itself before texturing:
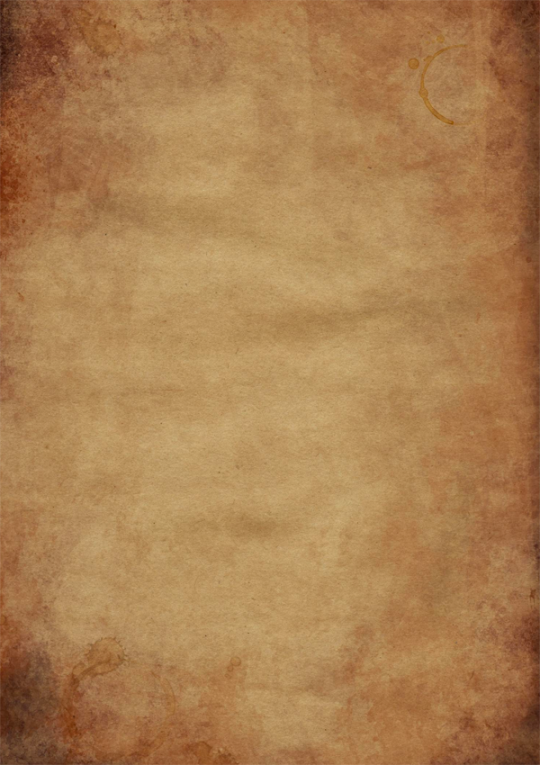
with the texture pasted in (for this one I'm using this public domain one from Pexels):
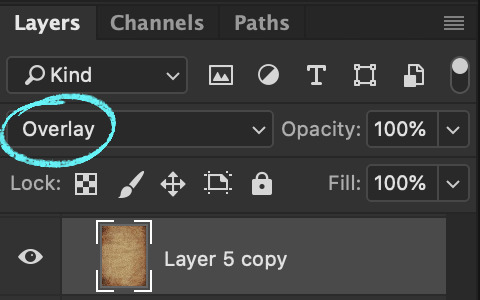
then mess around with the blending mode to see how it looks -- in this case I went with overlay, but soft light and hard light are usually good ones too, it really depends on the texture:
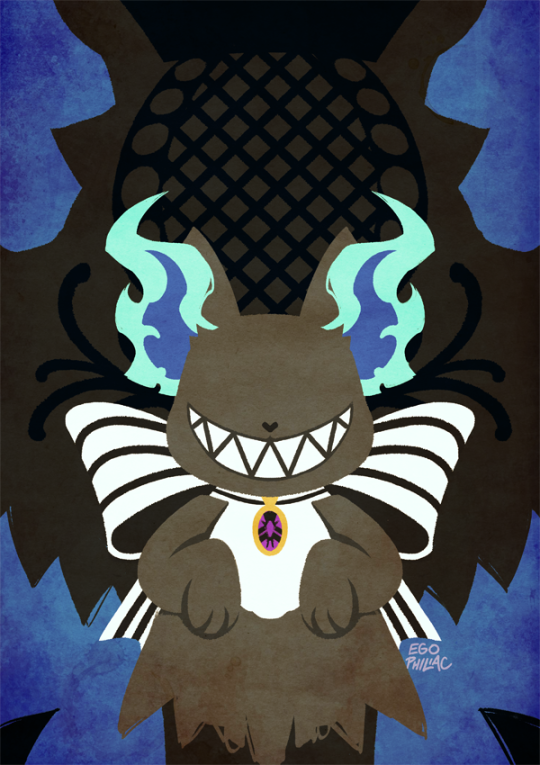
then with a bunch of messing around with opacity/colors/saturation/levels/adding in a bit more texture until I like how it looks:
et voilà, texture! (waves hands)
#art#how do art#twisted wonderland#it's a general tutorial i guess but just cause it's grim#usually i end up using a couple different papers on top of each other with bits masked out/levels super messed with and the like#it is super fun to just mess around with and throw things on and see how they look!#but it is also very easy to waaaay overdo so uhhhh exercise caution i guess. less is often more and all#once you start layering textures on there it's just difficult to stop#dangit art stop being so fun#(this also tends to screw with your colors and values a lot so always check and adjust as you go!)#(if you don't want any color influence at all you can just turn the saturation of the paper layer all the way down so it's pure grayscale)
428 notes
·
View notes
Text

If you've been wondering why certain TS2 makeup items change the color of your Sim's eyelashes or the inside of the mouth - that's why↑ Which brings me to my question:
TS2 players, have you introduced tongues to your game?
#ts2 poll#sims 2#the sims 2#-- this is totally not a#ts2 tutorial#I've played for a long time without tongue masks but once I added it there was no going back#now seeing black cavity when sim opens their mouth makes me anxious - I've just edited ~30 bits of makeup covering tongue masks
93 notes
·
View notes
Text
youtube
I will be doing a talk over so captions can translate it later, but this has been in the works for a couple of days now and I need a break.
It’s not the best, but this is how I have done these. If you need further explanation please check my other tutorials for more details.
Music https://bsky.app/profile/lefayexe.bsky.social
#werewolf#snarl mask#cardboard#cardboard art#cardboard mask#cardboard craft#art#animal art#werewolf mask#tutorial#mask tutorial#walkthrough#mask walkthrough#wolf#wolf mask#snarling#snarl#kinetics#snarling mask#animated mask#snarling werewolf#snarling wolf#wolf snarl#werewolf snarl#art mask#Youtube
50 notes
·
View notes
Text
How do i Make Icon masks (Tutorial)
I USE ALIGHT MOTION!! you can actually create icon masks on ibispaint or other app i just use alight motion beacuse thats where im more comfortable in, i havent do icon masks for month so i was curious about making tutorial
#rentry tutorial#❁ 🌊 tutorial ꒱꒱#tutorial#icon masks#icon mask#icon masks tutorial#pfp mask#pfp masks tutorial#graphic tutorial#❁ 🌊 masks ꒱꒱#graphic resources#rentry graphics#rentry
53 notes
·
View notes
Note
How do you pick colors for the gore rendering? I'm mesmerized withe the vibrant yet mildly sickly tone of colors you use, that along with the paint marker way of shading is amazing, I love it
thanks!! admittedly I've been meaning to do more studies and such bc I'm missing out on a lot of things imo but here's my lazy guy method where I put varying reds down regardless of lighting....
i generally go between dark reds and lighter pinks/oranges, and then have some "blue(grey or just Less Red Reds" and green/yellow. green and red are just fun to work with so I think a lot of my drawings have that. Pinks and greys can be fun too so I'm trying to do more w those..... bleh. I'm very much not an expert at drawing or anatomy so. You know how it is. Here's a picture i tried to explain with a while ago

#not a tutorial but more of how i think abt it....#kind of like a tube#to be honest i#need to get back onto studies bc i want to do more stuff with like. membranes and shit but this is my Easy Quick Mindless method of doing i#i usually paint all on one layer too so my layers are like#basecolor to clipping mask on -> all shading -> lines -> a little bonus stuff sometimes#and i generally dont use layer effects. feels weird to me idk#rbs Off because its not really a tutorial. just me thinking#cw gore#iguess?
75 notes
·
View notes
Note
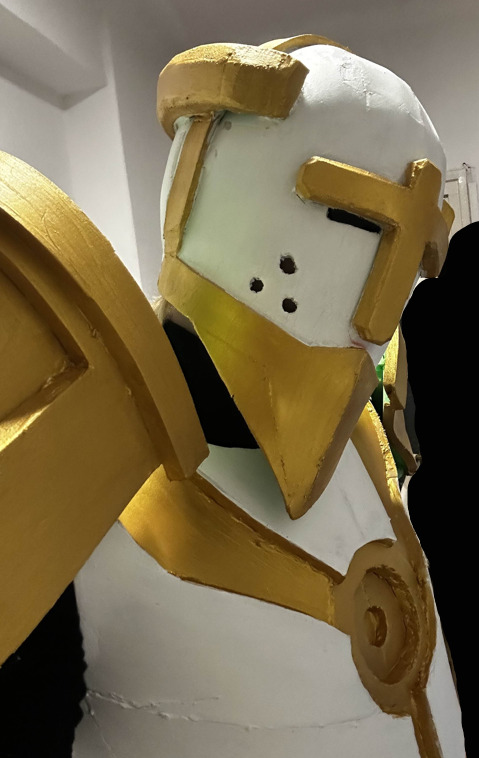
Am i allowed to ask how did you make such a majestic Gabriel helmet
Hi, sorry for the late answer, but thank you, and of course!

Disclaimer: most of the times when making cosplays, I just fuck around and find out. Meaning: I won't have templates for most things, exact pictures of the process, or measurements. I included everything I could, and explained everything I can.
Making costumes for me is lots of trial and error, and it still is to this day, as I am by any means NOT a professional. Obviously it'd be easier if I'd invest in sketching things out more and measuring, but that's completely on me.
I hope that nonetheless this somewhat helped, even though it's not a very good "tutorial"...
Please do check out the "Notes:" section at the end of the post for more thoughts, further help, and other stuff!
Tutorial below the line:
𓂃𓂃𓂃𓂃𓂃𓂃𓂃𓂃𓂃𓂃𓂃𓂃𓂃𓂃𓂃𓂃𓂃𓂃𓂃𓂃𓂃𓂃𓂃𓂃𓂃𓂃𓂃𓂃𓂃𓂃𓂃𓂃𓂃𓂃𓂃𓂃𓂃𓂃𓂃
Materials used: ● Paper ● EVA foam ● Pins ● Modeling paste ● Water based prime ● K100 & K40 sandpaper (probably better if you use a mini sander/polisher) ● Hot glue, super glue, white glue ● White and gold acrylic paint ● And of course: scissors, razor blade,

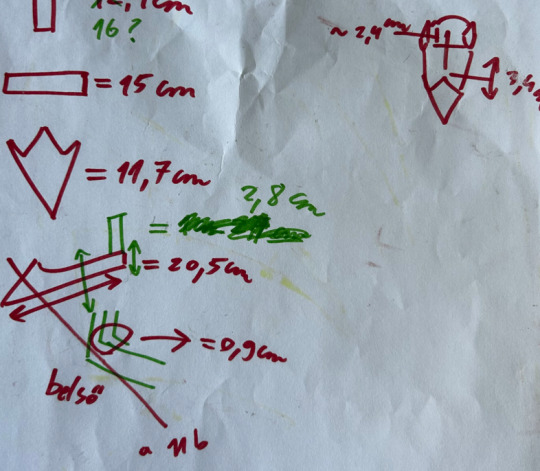
1. Sketching and measuring: One of the first things that is advised to do for anything and everything is to sketch your ideas out. It doesn't have to make sense to other people, if you yourself understand what you're trying to depict. Also make lots of notes, brainstorm, just generally put ideas out so things are more clear for you as you progress. This also includes measuring your head from front, side, and around. When you did, you can then use this very helpful and free template, which you can print out with the measures of your head. Seriously, shoutout to this template, it saved so much time whenever I made most of my masks.
𓂃𓂃𓂃𓂃𓂃𓂃𓂃𓂃𓂃𓂃𓂃𓂃𓂃𓂃𓂃𓂃𓂃𓂃𓂃𓂃𓂃𓂃𓂃𓂃𓂃𓂃𓂃𓂃𓂃𓂃𓂃𓂃𓂃𓂃𓂃𓂃𓂃𓂃
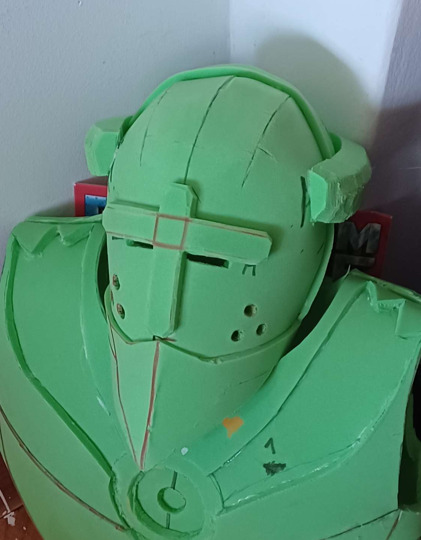
2. Applying the features: The way I put his features on the base template is by using the previous sketches and measurements. But what I do, is I cut them out in paper first, to see if they look good on the base by attaching them on the foam with pins. If it does, I trace it onto the foam, then cut it out a bit longer, to see if by any chance it looks better longer, if not, you can just cut the foam again.
The cross and halo were pretty easy: ● You can just draw a cross and cut it out (if you want to make it "pop out/3D", glue a layer under the shape like how I did in the picture). ● For the halo, it depends on how thick your foam is; ¹you could just cut out three long lines, which are then glued together to make a half circle, then apply it on the head, but I had to do it a bit tricky. Not sure how to explain it exactly, but when I cut a line for the halo, I also had to cut the end a bit "tilted", so I can glue a mini foam triangle shape to it, then cut a line with a tilted cut at the end again, then glued it to the other end of the triangle, and I continued this process as needed. With this, I made a half-circle for the halo. The "beak" is a bit tricky: I had a bit of trouble with this for the first time too, but here is how I did it: ● As you can see on the picture, it's in three seperate parts. The front is a triangle-ish shape with a 'peak' at the bottom of the cross. Under that is another triangle, and then it connects to the part that wraps around the head. ¹: This is because if you just cut out the entire shape of his "beak", and glue it together like that, it'd look like as if he got stung by a bee, because the foam is dense, and it'd pop-out a little. At least for me, it was a reoccuring issue with other parts as well. But again, this depends on the thickness and stretchiness. So tl;dr, you need to make sure that the foam is not "tense", you need to make it "relaxed" by placing multiple parts together to make the desired shape (same case with the base head, halo, etc.). For the cracks in the foam: I used modeling paste to fill those gaps in as much as I could, then used sandpaper to smooth out the edges and excess. For the holes on his cheeks: This is not a recommended idea, as it ruins the foam, but: I literally just grabbed my hot glue gun, and stabbed where the holes would be with the hot tip of it. Not advised, because the foam becomes dense and sticky at that area. It'll also be hard to paint. Mask's vision?: Quote the disclaimer: My peripherial is absolutely terrible in this mask. The front view is okay-ish. What I did for the vision is I cut two thicker lines out of the foam right under the cross, so it's somewhat hidden as well.
𓂃𓂃𓂃𓂃𓂃𓂃𓂃𓂃𓂃𓂃𓂃𓂃𓂃𓂃𓂃𓂃𓂃𓂃𓂃𓂃𓂃𓂃𓂃𓂃𓂃𓂃𓂃𓂃𓂃𓂃𓂃𓂃𓂃𓂃𓂃𓂃𓂃𓂃𓂃
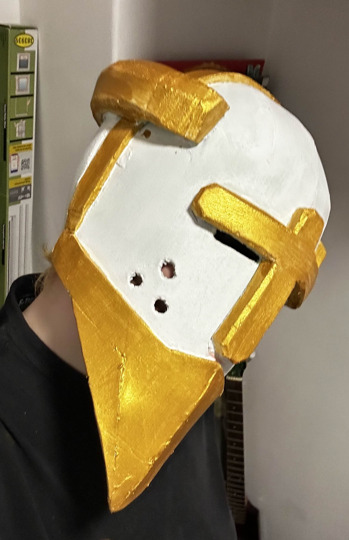

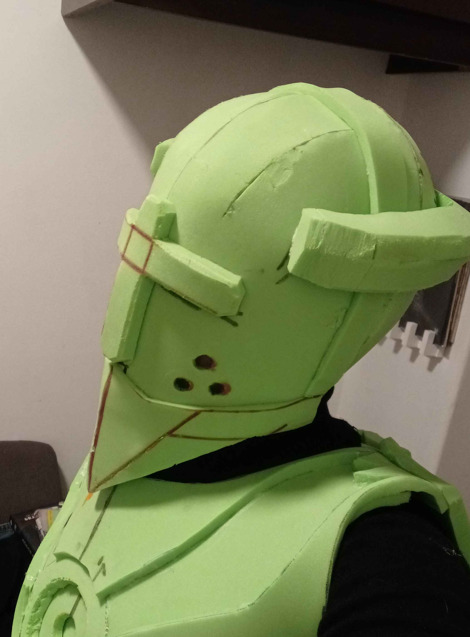
3. Painting and coating: My biggest enemy is the combination of paint and foam. Seriously, I can not begin to explain how much money I have spent on just paint and glue, in attempt for the paint to not chip off, but it still does. (if anyone has better advice for this please let me know!!) Here's what I did so the paint kind of sticks there: Firstly, an advice that I wish I had gotten much, much sooner before starting this project: Coat the area that you want to paint with white glue! This helps so that the paint can stick there longer, and it won't pop-off more easily. You can also try primer, but white glue is better in my opinion, primer just makes it a bit more dense. Then I used a lot of white acrylic paint. If you can just buy white foam, please do so. It'll save so much time and money (and insanity too). I think I had at least 10-15 coats so it looks fully white (the picture is not even the finished one). Note: I don't recommend using spray paint. It dries and chips down faster, also not very stretchy. It's cheaper, easier, but it won't last for long. I unfortunately stumbled into this issue, and it was not a cool thing to see.
I also recommend using a vivid gold color. Previously, I used a more realistic one, but it just looked washed and sad. Give Gabriel some life with that shiny, glittery gold!
𓂃𓂃𓂃𓂃𓂃𓂃𓂃𓂃𓂃𓂃𓂃𓂃𓂃𓂃𓂃𓂃𓂃𓂃𓂃𓂃𓂃𓂃𓂃𓂃𓂃𓂃𓂃𓂃𓂃𓂃𓂃𓂃𓂃𓂃𓂃𓂃𓂃𓂃𓂃

4. After refining edges and making sure that the painting looks nice and sharp, you're done! Again, I hope this somewhat helped. It's a shame that I don't really keep my templates and progress photographed, since it's more just for myself and for fun. I don't really post online anyways.
But, if you have any further questions, or if there's still some confusion, or if something is not exactly clear, let me know!
𓂃𓂃𓂃𓂃𓂃𓂃𓂃𓂃𓂃𓂃𓂃𓂃𓂃𓂃𓂃𓂃𓂃𓂃𓂃𓂃𓂃𓂃𓂃𓂃𓂃𓂃𓂃𓂃𓂃𓂃𓂃𓂃𓂃𓂃𓂃𓂃𓂃𓂃𓂃
Notes: ● I had really thick foam, so I had to manually make it thinner at times. I think foam around 4-5mm. thickness is good for a helmet. The thicker the sturdier; keep that in mind. ○ Again, if you can, please buy foam in the desired colors, so you wouldn't have to deal with a lot of painting. ○ On this topic, breathing is a little hard if the foam is thick, and it also gets warm very quickly. I use a balaclava so my skin doesn't stick to the foam when using it for a long time. If you can endure warmth for a long time, this project especially for you! ● I usually make my helmets smaller in size, so it looks more "accurate". Basically, it's just good for my head, therefore it's not very comfortable. I advise making it a little bigger than your actual head size for comfort. ● The helmet itself took me about 4-8 days max. all-in-all. Unsure about this exactly, because I don't usually look at the time when I make costumes. ● Please be careful with using darker colored sharpies!! It took me a while to hide them with the white paint especially. ● Don't be afraid to put personal creativity into the mask! My previous masked had horns instead of halo, but I just wanted to make this one more accurate. It depends on you! ○ Huge inspiration for the costume was dotflare's Gabriel model, especially for the smaller details. Please check them out, the model is free as well and very beautiful. If you can run blender, it'll help you so much with making the cosplay. ● As mentioned, I usually cut foam a bit longer to see how it'd look. Sometimes, it's actually better than the original measurement, but also, it could save mistakes if the size is not good after-all. ● As mentioned², no spray paints!! It chipped off for me and I thought I was going to cry. However, I'm unsure how spray paint works with white glue covered foam. It could be tried out on a piece of foam, maybe it works. ● Last thought: For the vision: you could try hiding the hole for your eyes with white mesh. ● This post kind of reads like a certain book from Mark Z. Danielewski, which was really not on purpose when I started making this post.
#cosplay#gabriel ultrakill#ultrakill#ultrakill gabriel#gabriel#costume#mask#helmet#help#“tutorial”#my cosplay
30 notes
·
View notes
Text
PRAYSIA. An editing resource sideblog. See under cut for further information and helpful links. We do all our editing in Photopea.
OUR TO-DO. RENDERS DRIVE.
Inbox is always open for questions. Want to Request?
Helpful Links: Upscale Images, Image Splitter, PhotoMosh, Text Symbols, UniCodes, Word Combiner, Remove Gif Background, Download Videos from MOST Sources, Gradient Maps, Tons of Laces.
Tutorials: How To Mask Renders via Critical Galaxy, Photopea for Dummies.
Misc Help: Site that has TONS of PNGs.
This will be updated as needed, so be sure to check back before asking for something please!
If you know us, it is likely from our past edit blogs @necromii, doveish and v-rtue, none of which we use anymore.
#𐐪 asks.#𐐪 tutorials and help.#𐐪 important.#𐐪 from praysia.#𐐪 by praysia.#𐐪 from [user].#𐐪 by [user].#𐐪 chatting.#𐐪 praysia's renders.#𐐪 promo.#⠀⠀⠀⠀⠀⠀⠀⠀⠀#transparents#dividers#frames#masks#psds#gifs#buttons#stamps#pixels#pngs#overlays
270 notes
·
View notes
Text
Luxury DIY At-Home Spa Treatments
Here are some DIY spa treatment ideas to pamper yourself at home without breaking the bank:
Sugar Scrubs for Silky Skin:
Invigorating Citrus Scrub: Combine brown sugar with olive oil, lemon zest, and a few drops of lemon essential oil for a refreshing and uplifting experience.
Calming Coconut Coffee Scrub: Mix together coconut oil, brown sugar, and ground coffee for an exfoliating scrub that leaves your skin feeling smooth and invigorated.
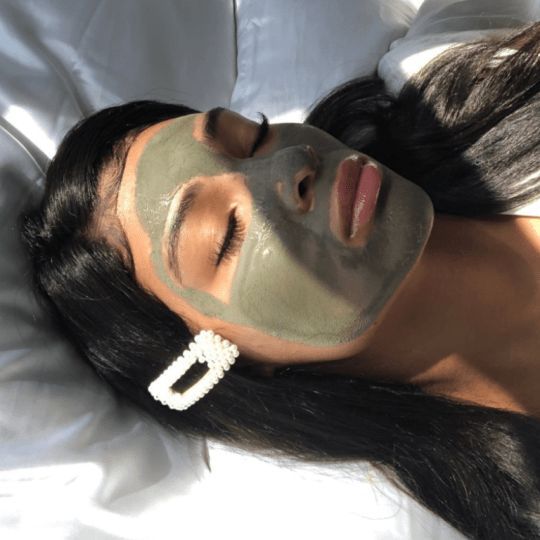
Nourishing Face Masks:
Hydrating Honey Oat Mask: Mash together ripe avocado, honey, and oatmeal for a mask that deeply hydrates and soothes dry skin.
Brightening Yogurt Mask: Combine plain yogurt, lemon juice, and a touch of honey for a mask that helps brighten and even out your skin tone.
Relaxing Bath Rituals:
Stress-Relief Lavender Bath: Add Epsom salts, dried lavender flowers, and a few drops of lavender essential oil to your bath for a calming and stress-relieving soak.
Muscle-Soothing Bath with Essential Oils: Draw a warm bath and add Epsom salts, a carrier oil (like almond oil or jojoba oil), and a few drops of muscle-relaxing essential oils like peppermint or rosemary.
Bonus Tips:
Set the mood with calming music and flickering candles.
Light aromatherapy diffusers with relaxing scents like lavender, chamomile, or sandalwood.
Make yourself a cup of herbal tea to sip on during your treatment.
Don't forget to pamper your nails with a DIY manicure or pedicure.
Remember, these are just a few ideas to get you started. With a little creativity, you can create a luxurious and relaxing spa experience at home using ingredients you might already have on hand. Enjoy your DIY spa day! Want to dive more into this topic? Watch How to bring *luxury* into your life while on a budget
#spa#face mask#tutorial#body scrub tutorial#luxuryonabudget#affordableluxury#budgetluxe#treatyourself#selfcare#mindset#high value mindset#high value woman#that girl#green juice girl#self love#self esteem#levelup#self improvement#self worth#leveling up#pink pilates princess#level up journey#glow up#self growth#self confidence#self development#self care#it girl energy#it girl#advice
111 notes
·
View notes