#at least when it’s -60 below f I can put on more layers
Text
It’s summer again which means I get to play the game of “the air conditioning in some building is up HIGH but if I wear warm clothes I’ll die two seconds after stepping outside
#emma posts#pick your poison and I pick air conditioner up really high#can’t get heatstroke from that#maybe put on a blanket if it’s a house#but outside its like ‘find a way to cool off or die’#at least when it’s -60 below f I can put on more layers#when it’s 110 above f it’s like ‘find shade. go in water. or die’#if you leave the air conditioned buildings I mean#apparently humidity also makes it harder to regulate your body temperature?#and it gets really humid here#it’s either a drought period because global warming is fucking weather part up#or it’s normal and this place gets DAMP#I have been to places that were dry af in the heat#and had way less water and thick plant life#I felt like the water in my body was being sucked out of my skin the moment I stepped outside#it was worse than when we’ve had droughts here#picking my mosquito hell over that intense dryness#even when it gets bad enough that some plants die and the water levels are down and the wind always kicks up dust#it’s still somehow wetter than a drought in Montana#no idea how that works but it does#this year has been more wet than two and three years ago#but it’s only the start of summer so we’ll see#in 2020 or was it 2021 my family went to visit a state park with a waterfall and the thing was about as strong as a normal shower head#about as much water too#the time before that it was raining and the thing was an actual waterfall with the entire river full#it was unsettling when there was practically nothing#where I live it’s just water-water-water#and even just the closest other state is more dry#so not being very wet at all was weird af#I saw droughts before but two years in a row gets bad
0 notes
Note
Hi! I was just wondering if you use Reshade (Or Gshade?) when playing Sims 2? I've never used either and I'm worried if Sims 2 could handle it? Your Sims 2 posts are so pretty and I'm wanting my own to look at least half as good! Thank you so much!
Hey Anon! I hope you're doing well!
Unfortunately I don't actually use Reshade or Gshade for either Sims 2 or Sims 4. I just play a normal, boring, unsaturated game. I'm sorry I can't help you with that part. But I'm still gonna try to help! Don't worry!
Everything you see on Simblr is done through the power of editing... Here's a quick tutorial (It wasn't actually quick, it took me hours to reply to this) if you'd like to learn more on how I get my screenshots to look the way they do.
I use Gimp which is 100% free, as opposed to Photoshop's monthly fee. At this point I'm way more comfortable with Gimp so I wouldn't make the switch even if I had the money to spare.
Saving Templates as xcf Files
I’m not a tech or graphic design genius so correct me if I’m wrong, but I’m guessing xcf files are the equivalent of psd files. These are the types of files you need to open if you want all of your layers to show up. When you have all of your layers ready, you need to do “save as” and then make sure you’re saving your project as a .xcf.

Using xcf files I made reusable templates for my screenshots so everything is already saved when I want to edit. I just have to open up the screenshots as new layers into the xcf templates and it's done! It literally takes two minutes to do!
Sims 4 is a bit more complicated because I add moodlets, notifs and icons, but the process is generally the same.
Before & After:

Above are two images edited differently depending on the lighting. The image on the left uses the 25% opacity layer while the image on the right uses the 75% opacity one. You can definitely see the difference. They're way brighter and crispier.
My Layers:
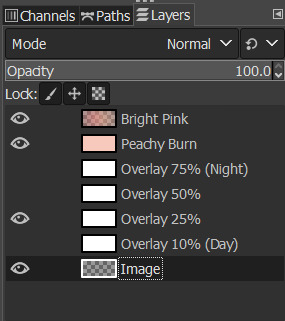
This is what my layers look like. I renamed some of them for your convenience so don't be confused when the images below have different names.
Top Layer (Bright Pink)
The pink-peach gradient is what makes my images bright and pink. I love that it removes the bluish glow from Sims images. The mode is "overlay" and the opacity is set to 60%.
2nd Layer (Peachy Burn)
This layer makes the image crispier. It's a little darker and the contrast is better in my opinion. It's super touchy though so you barely have to have any opacity at all for it to work. The mode is "burn" and the opacity is only 15%.
Layers 3 to 6 (Brightness)
So these are the layers that REALLY make all the difference. Depending on the lighting in the original screenshot I use a different layer to brighten up my images even more.
If it's bright and my sims are outside I'll likely use the 10% one since I don't need to lighten up the image much. If it's really dark I'll likely go for the 75% one.
For most indoor screenshots I will use the 25% opacity one which is the one that's already toggled on when I open up the template.
Layer 7 (The Image)
This is more or less just a placeholder. I usually put my screenshots between this layer and "Overlay 10% (Day)". You don't have to do anything with it. If all of your layers are toggled on properly then the image should already look edited the moment you add it to the template.
Previews
This is what it looks like when I open a random screenshot as a new layer. As you can see, I'm using the 25% opacity layer. Every other opacity is toggled off, which you achieve by clicking on the little eye icon at the left of the layer.

This is the original image with every other layer turned off. It's what I see in-game when I play.

As you can see, it's very dark and unappealing. What can we do to change that?
Here's me turning on every single layer in gif form. You can clearly see the difference the "Overlay ##%" layers do to help brighten up the image. You can also see why I'd choose 75% over 10%.
A final note or two:
If you've read this far and found this tutorial useful (it literally took me hours to do so I hope someone took away something from it LOL) then you're welcome!
I'm just gonna low-key add the link to my Ko-Fi here in case this post gets a lot of views and anyone would like to donate. 😂😂 I'm having a hard time financially so it'd really help. No pressure though, especially if you're also struggling to pay the bills.
30 notes
·
View notes
Note
hi admin! i really love your gifs, for performances especially because they are just so smooth!! how ?? i try but idk if its me or tumbkr ruins it with the little dither stuff ;/
Hello, anonie! 🍂 Thank you so much it means a lot to me 🧡🌺
So I make my gifs with Avisynth, Photoshop and Topaz (denoise & clean). Also, I use files with quality over 1080p (2k, 4k), for performances - .ts & .tp files. I download them from Google drive, with Torrent or 4kdownloader. I'll link sources below, where you can find Avisynth and high quality files. And for the most part, tumblr ruins files once you upload them, but later on, I don't know if it's just me, the gifs become better looking? At least on mobile 🙈
Firstly I cut the gif with Avisynth. I usually use 30 fast setting since I have no patience, esp for 4k or .ts & .tp files; for other files I use 60 fast. That changes speed for gifs in Photoshop tho. With 30 fast setting the speed will have to be 0,05 and with 60 fast - 0,03 to run smoothly. I also never use sharpen tool on Avisynth, I think it's unecessary.
I import the video to Photoshop, delete the frames I don't want, convert to Smart Object, do the coloring, add Topaz setting. But just one more thing before that. Make this setting look like this. Saves quality of your gif.
Lastly I flatten frames to layers, takes ages for Topaz to load, but it's worth it. I then adjust speed and export the gif. If you don't have Topaz, I suggest making your "Lossy" setting on 20-30 in your Export settings. At least the gifs look evenly grainy and not pixelated. That worked for me when I didn't have Topaz for gifs. For dither - put it at 100%. Well if you want to know my export settings, you can find them here.
I think for quality coloring is really important, because I manage to f*ck up even the best quality video once I'm into coloring and I'm having fun with it 🙊💜
Useful tutorials for giffing: here; here; here; here; here; here; here.
Sources: avisynth; kpop24hrs (registration is closed for now, but they open it from time to time); twitter (I linked the post where someone made a list of users uploading .ts files); 4sashi (idk how to use it, but you can try it).
I hope this helps and if you need any tips or help, send me an ask or message me, I'll try to help 🎃
8 notes
·
View notes
Text
🌷 Tulips 🌷
Scientific Name: Tulipa
Care:
🌷 Tulips prefer a site with full or afternoon sun. In Zones 7 and 8, choose a shady site or one with morning sun only.
🌷 Soil must be well-draining, neutral to slightly acidic, fertile, and dry or sandy. All tulips dislike areas with excessive moisture.
🌷 Tall varieties should be sheltered from strong winds.
🌷 You’ll want to space bulbs 4 to 6 inches apart, so choose a large enough planting site.
🌷 Plant tulip bulbs in the fall, 6 to 8 weeks before a hard frost is expected and when soils are below 60 degrees F. This is usually during September or October in the north, and November or December in the south.
🌷 Nature never intended for bulbs to loll about above ground, so don’t delay planting the bulbs after purchase.
🌷 In southern climates with mild winters, plant bulbs in late November or December. The bulbs will need to be chilled in the refrigerator for about 12 weeks before planting. (Bulb suppliers often offer pre-chilled bulbs for sale, too.)
🌷 Prepare the garden bed by using a garden fork or tiller to loosen the soil to a depth of 12 to 15 inches, then mix in a 2- to 4-inch layer of compost.
🌷 Plant bulbs deep—at least 8 inches, measuring from the base of the bulb. And that means digging even deeper, to loosen the soil and allow for drainage, or creating raised beds. Remember, the bigger the bulb, the deeper the hole it needs.
🌷 Set the bulb in the hole with the pointy end up. Cover with soil and press soil firmly.
🌷 Water bulbs right after planting. Although they can’t bear wet feet, bulbs need water to trigger growth.
🌷 If you’re planning to raise perennial tulips, feed them a balanced fertilizer when you plant them in the fall. Bulbs are their own complete storage system and contain all of the nutrients they need for one year. Use organic material, compost, or a balanced time-release bulb food.
🌷 To deter mice and moles—if they have been a problem—put holly or any other thorny leaves in the planting holes. Some gardeners use kitty litter or crushed gravel. If ravenous voles and rodents are a real problem, you may need to take stronger measures, such as planting bulbs in buried wire cages.
🌷 If it rains weekly, do not water. However, if there is a dry spell and it does not rain, you must water the bulbs weekly until the ground freezes.
🌷 Rainy summers, irrigation systems, and wet soil are death to tulips. Never deliberately water a bulb bed unless in a drought. Wet soil leads to fungus and disease and can rot bulbs. Add shredded pine bark, sand, or any other rough material to the soil to foster swift drainage.
🌷 Apply compost annually to provide nutrients needed for future blooms.
🌷 In the spring, when leaves emerge, feed your tulip the same bulb food or bone meal which you used at planting time. Water well.
🌷 Deadhead tulips as soon as they go by, but do not remove the leaves!
🌷 Allow the leaves to remain on the plants for about 6 weeks after flowering. The tulips need their foliage to gather energy for next year’s blooms. After the foliage turns yellow and dies back, it can be pruned off.
🌷 Large varieties may need replanting every few years; small types usually multiply and spread on their own.
Magickal Properties:
Protection, love, happiness, prosperity, abundance
Correspondences: Venus (planet), Earth (element), Feminine (gender)
🌷 Love is one of the strongest properties of tulips. They can be used to increase desire, build relationships, and open the heart.
🌷 Can be used in magic regarding gratitude, simplicity, happiness, beauty, and prosperity.
🌷 Different colored variations of tulips can aid in different types of magick.
🌷 Sometimes associated with dream work and fame.
🌷 Use as a centerpiece to increase the sensory appreciation of a meal or gathering.
🌷 Sweep your aura with a few stems to shroud yourself in a veil of magnetism and desirability.
🌷 Use to assist with grounding- if you're feeling anxious, plant tulips, spend time with them, or take a few drops of tulip flower essence under your tongue. (I very quickly tried to double check if this is safe or could have any health side effects, but I couldn't find anything. I'll have to take time to look into it further. If anyone here knows, feel free to share your knowledge!) The tulip's substantial bulb and alignment with the physical world helps with that grounding energy.
🌷 A poultice made of tulip flowers can treat and soothe rashes, stings, scratches, and minor burns.
🌷 Tulip oil can be used as a house freshener or added to baths and massage oils to uplift vibrations.
🌷 A tulip bulb on your altar will help you attract as well as keep a lover.
🌷 Helps with connecting with love intentions and letting go of fear.
🌷 Because they regrow every year, tulips can be associated with renewal/rebirth and a new perspective.
🌷 Because tulips rise as the sun rises and go down as the sun sets, they are believed to be very in tune with it, making them perfect for any association with the sun.
🌷 Resonates with the heart chakra. If your heart, physical or emotional, could use strengthening, add a few drops of the flower essence to your drinking water or bath. (Again, is this stuff safe to drink or not?)
🌷 As tulips share qualities with love goddesses, they're great additions to love goddess altars or rituals (goddesses like Hathor, Aphrodite, Venus, or Parvati).
🌷 Because they vary in color, some crystals that go best as a duo with tulips are aura quartz, fluorite, opal, and rainbow quartz.
🌷 Solar Charm: At dawn, gather a tulip that's just opening as you recite this incantation, "At sunrise let my mind be keen, alert, and wise; at sunset, put the spell to rest." Carry the flower with you until sunset, then bury the petals in the earth for a good night's sleep.
🌷 Prosperity Spell: Gather a handful of tulips seeds and scatter all but two to a southerly wind saying, "Silver and gold, silver and gold, one to have and one to hold. To the winds fly, fall, and free, bring to me prosperity!". Put the last two seeds in your wallet or purse to attract money.
🌷 Carry tulips or having them on you brings good luck.
🌷 Growing tulips brings peace to a home.
🌷 Can be worn for protection and prosperity.
🌷 It is said that pixies and fae love to live in them.
Other Info:
🌷 Tulips are probably one of the first flowers cultivated solely for their beauty and designs of these flowers can be found on pottery jars dated from 2200 to 1600 B.C. Tulips were also found on the border of a 19th century Byzantine fabric. Though they must have been known to them, tulips were not mentioned at all by Greek or Roman writers.
🌷 European explorers and traders first encountered tulips in the gardens of Turkish sultans in the early 1500's. In 1554 the Austrian ambassador, Ghislain de Busbecq, bought some of the bulbs for a great price and brought them back to Vienna. They were given to Charles de Lecluse, a Flemish botanist, which lead to the beginning of the love of tulips in Holland. After about 20 years, de Lecluse started teaching in the Netherlands and took some of the seeds and bulbs of tulips there. Though he had been meaning to sell them to make a little extra money, the bulbs were stolen and soon tulips were growing throughout the country.
🌷 By 1634 Holland was hit with tulipmania and the price per pound was often more than that of precious metal. When interested in the solid-colored flowers began to wane, breeders began producing unusual blossoms because striped, feathered, and marbled varieties brought higher prices.
🌷 Stripes and some other color variations are actually caused by a virus and not a mutation, making it impossible to get the same coloration from seed. These must be bred from an offshoot of the parent bulb.
🌷 In 1637 traders and dealers began to realize that bulb prices were artificially high and did not reflect the actual value of the bulbs. As the tulip market toppled, the result was economic depression and true hunger and poverty in many areas. Especially hard hit were the many farmers who, hoping for a quick fortune, had begun to grow tulips instead of food.
🌷 Learning from mistakes made by the Dutch, the Turkish government passed strict laws during the "Age of Tulips" in Turkey between 1703 and 1730. Bulbs could be bought and sold only in the capital city, and punishment for breaking this law was exile.
🌷 The government also kept careful records, and at one time these records indicated that the Turks had over 1,5550 varieties of tulips.
🌷 One story is told of an English trader who received a shipment of cloth from Turkey. Along with the cloth was what he thought were onions. He ate some of them and enjoyed them so much he asked his gardener to plant them in the vegetable garden. Imagine his surprise when he found the glorious tulip blossoms growing among the vegetables the next spring.
🌷 Tulip bulbs are quite edible and some even call then tasty. They can be substituted in any recipe for onions. One recipe for tulip-tomato sauce calls for sauteing two minced tulip bulbs with parsley and garlic, then adding four cups of chopped tomatoes and simmering for one hour. The stamens and ovaries, sauteed in butter, are supposedly quite good, tasting something like asparagus.
🌷 Tulips were first brought to America by the Dutch colonists who settled in the northeastern part of the country. The popularity of these flowers in those communities is obvious from the prevalence of the tulip in Pennsylvania Dutch designs from that period.
🌷 The name tulip is derived from the name for the Turkish hat, turban. When traders and visitors came to Turkey to see the famous gardens, the gardeners kept pointing out that tulip blossoms resembles upside-down turbans, or tulibands, as the Turkish called them. Soon visitors began to refer to these flowers as tulibamds, and this was eventually changed to tulip.
🌷 A Persian legend tells of the origin of tulips. A young man, Farhad, was in love with a beautiful woman, Sharin. One day Farhad received news that his lover was dead. In his grief, he jumped off a high cliff, and where his body landed, there the tulips began to grow. The saddest part was that the message was sent by a jealous rival, and Sharin was actually still alive.
🌷 Tulips are indigenous to the northern temperate zones from the Mediterranean coast east to Japan. T. sharonensis, or the Sharon tulip, is thought to be the "rose of Sharon" mentioned in the Song of Solomon in the Bible. The Sharon tulip grows on the Plain of Sharon, found between Carmel and Jaffa.
🌷 Tulips are considered the symbol of perfect love, and the Turks used them as a love potion. If a tulip was given to a girl, the color of the petals determined the meaning of the flower. Red petals meant a declaration of love. Yellow petals meant hopeless love, and variegated petals meant beautiful eyes. A black center meant a heart burned with love.
Tulip Varieties and Uses
Queen of the Night:
- A deep purple, so dark it can be mistaken for black.
- Good for moon rituals, power and ambition spells, and banishing spells.
Princess Irene:
- Standard variety comes in shades of orange and red.
- Red flowers are good for love magick.
- Orange flowers are good for attraction and encouragement.
Leen Van Der Mark:
- Comes in yellows and reds.
- Plant yellow ones near your front door and under windowsills to protect your home and its inhabitants from those who would cause harm.
Pim Fortuyn Triumph:
- White in color.
- Good for any rituals having to do with purity or cleansing.
- Place cut Pims in vases around your house each spring to bring a fresh and clean feeling to your entire home.
Tulip Poultice
To treat and soothe rashes, stings, scratches, and minor burns.
To create a poultice, warm 2-4 flowers in hot water. Dip a towel into hot water and place the petals within the towel. Lightly crush the petals and apply them to the affected area. Hold in place for 10 minutes using the warm towel. Petals can also be combined with castor oil, especially when treating burns and insect bites.
10 notes
·
View notes
Photo

Bae Mu-yeol/Marlin Bae Personality Profile
Slytherin Primary, Ravenclaw Secondary, Hufflepuff Secondary Performance - Type 5 - ISFJ-T - Neutral Good - Taurus Sun, Aquarius Moon, Libra Rising
Psychoanalyzing Marlin is interesting because there exists two Marlins - if not three - inside the same person at the same time. There’s the Marlin that he originally grew up to be and in some ways still is underneath all the layers of grief and trauma that have warped him into a different kind of person as a base, and that warped version of him has been further twisted by both himself and all of the lies he’s telling Nemo, and by fairy society’s stipulations for being allowed the safety of a Hollow.
To talk about Marlin, you have to talk about him like Shrek. Bitch got layers. And all of his layers are there for a reason. Some are like a peacoat, worn mostly for the Look ™ , but kept safely in the coat closet when not necessary. Others are are permanent as the bones beneath his skin.
What is your character’s Hogwarts House/Hogwarts Houses? What trait do they most relate to? What trait do they least relate to?
Slytherin Primary, Ravenclaw secondary, with a Hufflepuff Secondary Model (or Performance hm)
Y’all. I straight wasn’t even gonna touch Sorting Hat chats because it honestly confused/es the hell out of me. But I braved it and holy COW did I come up with some stuff for Marlin! Actually. It more jumped out at ME like “HEY HELLO YES.” So now here’s my super extra ™ analysis.
I initially through Marlin was a Ravenclaw Primary with a Puff Secondary, but it quickly became clear to me that a bitch was way off.
The below excerpt from Sorting Hat Chats is what made me realize Marlin was very much a Slytherin primary.
A Slytherin does not generally feel guilty for valuing themselves [...] or for sacrificing other things for the safety and happiness of the people they love […] An exception to this is a Slytherin who’s managed to kick themselves out of their inner circle. For whatever reason, they don’t feel like they deserve their own help or kindness. Their “me and mine” priorities are still apparent but now it’s only “mine.” They fiercely and selflessly prioritize the individuals they love, value, or feel responsible for, while excluding their own self.
Marlin’s “mine” is only one person right now. His son, Nemo. Nemo is his entire world and everything he has done since losing his wife has been in an attempt to keep Nemo safe and make him happy. Marlin is perfectly content with living a lonely existence in a Hollow where few fairies want much to do with him, if it means Nemo is safe. He misses his parents, cousins, siblings, and friends from his Hollow in South Korea, but he feels no guilt for literally ditching all of them to whisk Nemo away to Swynlake’s Hollow because he deemed Swynlake a safer place to raise his son.
As a Constructed House, Slytherins build a morality system to follow and make judgements with. Unlike the Ravenclaw, who holds this built system at the heart of the way they interact with life, this is a supplemental thing for the Slytherin. Their core morality is felt, an empathic need to protect and support their own, but that strong sense of personal loyalty gives little hint about what to do in situations that don’t involve the Slytherin’s people directly.
Marlin’s self-sacrificing nature led me to believe he’d be a Hufflepuff at first. But it soon became clear to me that Marlin would only help the bleeding man on the road to Jericho if doing so would not cause any harm or any potential for harm to his “mine”, to Nemo. If presented with the hypothetical of pulling a lever to heal all the sick in the world at the cost of Nemo, Marlin wouldn’t pull the lever and would not at all regret it. While Nemo would probably beg his father to trade him to the literal rest of the world, Marlin would never even consider it.
Regarding his Ravenclaw secondary which I thought was his Primary:
Ravenclaws’ efficacy often relies on what situation they are in: what the problem is they have to solve and whether or not they’ve prepared the proper tools for that problem. [...] Do they know how to ride horses? Speak Greek? Do they have contingency plans for earthquakes, zombie apocalypses, or a surprise visit from the in-laws?
If they’ve already built themselves a tool set for a situation, they’re likely to excel at it. If they have not, they’re likely to blink a few times while they try to either invent something new for themselves or to cobble up something approximate from their existing resources.
Marlin is a jack of many trades and a master of few. He has a wide set of skills he’s picked up largely out of necessity. In order to make enough human money to pay for his son’s dance classes, Marlin has to occasionally find work outside of the Hollow. Over the years he’s done yardwork, has worked some construction jobs, was a seasonal laborer on a farm in Besydus, occasionally works with temp agency in NTO primarily at banquet halls, and has thrown himself into learning new skill sets all the time because he needed the money to make Nemo happy.
While he’s learned few of these skill sets to perfection, he learned them well enough to get what he needed.
Socially, Marlin can navigate the social politics of fairy society and talk with humans about topics he’s versed in - literature, music, East Asian particularly Korean culture, philosophy - but he would (figuratively) die if asked if he supported Liverpool or Manchester.
He isn’t an improviser at his core, he likes to have a plan, but he can sometimes improvise by pulling on his previous knowledge.
As for his Performance/Model of Hufflepuff Secondary. Fairies are communists. They put community first. And Marlin is a very bad fairy communist. He values him and his above the rest of the community. His being his son. And having lived in mundus Seoul for years with his wife, he became accustomed to treating community as important but not the end all be all. But in order to keep being allowed to live in the Hollow, he’s crafted a nice respectable fairy of himself.
What is your character’s Enneagram? How does the “basic fear/desire” influence their actions?
Enneagram Type 5w6 - The Problem Solver
Perceptive, Innovative, Secretive, and Isolated
Basic Fear: Being useless, helpless, or incapable
Basic Desire: To be capable and competent
Fives are alert, insightful, and curious. They are able to concentrate and focus on developing complex ideas and skills. Independent, innovative, and inventive, they can also become preoccupied with their thoughts and imaginary constructs. They become detached, yet high-strung and intense. They typically have problems with eccentricity, nihilism, and isolation.
Honestly, this Type 5 page read Marlin for filth, y’all. I believe that this is probably the most...consistent one. Meaning, he’d still have been this personality type even if he hadn’t lost his wife and developed the depression, PTSD, and anxiety following that. Because while current!Marlin has given into isolation most, ideal!Marlin would have more of a nihilist streak, and both versions of Marlin are/would be quite eccentric.
Negative-to-neutral qualities of Type 5s would have manifested in less severe ways in Marlin without his big trauma, but have just run wild in him now.
The basic fear and desire bit is interesting because like. Marlin in the state he is now literally only cares about Nemo and taking care of him. Untainted Marlin was just so vibrant and chased after several interests outside of his son, but now, he only cares about being a good father. So literally every action is an attempt to be good to Nemo because that’s the only thing, to him, he is even capable of being good or bad at is being Nemo’s father. He has no worth or purpose apart from raising his son.
What is your character’s MBTI? Out of the four elements, which is strongest and which is weakest?
MBTI: ISFJ-T- The Defender
Love only grows by sharing. You can only have more for yourself by giving it away to others. - Brian Tracy
I- 81%
S - 51 %
F - 60%
J - 69% (nice)
T - 68%
Damn, so honestly I feel like Marlin’s personality type either changed over the years, or, his inclination toward certain traits changed. Particularly, the introvert v. extrovert one. Marlin has always leaned more toward the introvert side, however, 81% is high for Marlin in his natural ,untraumatized state.
He has always been someone who needed to rest after being extra social and recharge, but he used to genuinely enjoy things like parties, events, concerts, and even hosting groups of people at his and So-yeon’s home. Like, I’d say he naturally would exist at about 60% introversion, but because of over a decade of isolation and extreme loneliness on top of his depression and PTSD amplifying his need to not be too drained too often by other people/fairies, it’s got him at over 80% now.
His lowest being Sensing v. Intuition at 51% toward the Sensing side honestly tracks. Because he does lean more toward that side but not strongly. He’s damn near in the middle here. From myersbriggs.org,
Sensing (S)
Paying attention to physical reality, what I see, hear, touch, taste, and smell. I'm concerned with what is actual, present, current, and real. I notice facts and I remember details that are important to me. I like to see the practical use of things and learn best when I see how to use what I'm learning. Experience speaks to me louder than words.
And
Intuition (N)
Paying the most attention to impressions or the meaning and patterns of the information I get. I would rather learn by thinking a problem through than by hands-on experience. I'm interested in new things and what might be possible, so that I think more about the future than the past. I like to work with symbols or abstract theories, even if I don't know how I will use them. I remember events more as an impression of what it was like than as actual facts or details of what happened.
Marlin leans toward the first just barely.
What is your character’s moral alignment? How does this affect their decision-making process? What about their relationships to authority, their family, their friends?
Projection: Lawful Neutral
Self: Neutral Good
Fairy society is Lawful Neutral and you can’t change my mind:
Lawful neutral is the philosophy that law and order are desirable ends in and of themselves. It is a philosophy of pure equitistic collectivism. This philosophy holds that the best way for all beings to pursue a rational self-interest is within the framework of a strong social order. By putting the needs of the state or social order ahead of individual desires, each being can advance the self-interest of the collective as a whole. Lawful neutral can also be associated with ethical equitism and natural law philosophies. As the philosophical "average" of altruism and egoism, equitism holds that harm to others should be minimized when advancing the self and that harm to the self should be minimized when advancing others.
Lawful neutral philosophers generally maintain that there is metaphysical order in the multiverse and thus may support doctrines of hard determinism, predeterminism, fatalism, predestination, and/or necessitarianism. They may believe in fate or destiny. They tend to be moral objectivists, holding that values exist in the external world independently of and external to our comprehension of them; that they can be found and known; and that they must be used as principles for human judgments and conduct.
Marlin himself, however, is Neutral Good, which can sometimes conflict with expectations from fairy society.
Neutral good is the philosophy that goodness should be advanced by using whatever means provide the most benefit. It is a philosophy of altruistic consequentialism. This philosophy holds that people should behave altruistically and balance the needs of the collective as a whole and the needs of the individuals making up the collective. Neutral good can also be associated with act utilitarianism and ethical altruism.
Neutral good philosophers generally maintain that there is metaphysical balance in the multiverse and thus may support doctrines of soft determinism, pragmatism, conventionalism, and/or instrumentalism. They may believe in free will or choice. They could also embrace skepticism or suspend judgment on philosophical issues. They tend to be moral relativists, holding that values differ from society to society, from person to person; that they are conditioned by the peculiarities of the society in which they arise; that they are not universally applicable at all times or in all places; and that they are correct or incorrect, desirable or undesirable only relative to whether or not they conform to a common norm or to common acceptance.
What is your character’s sun house? What trait do they most relate to? What do they least relate to?
Taurus Sun short description:
He is strong-willed. He has charm, and he is tolerant and stoical. He likes pleasure and the
good things in life. Appreciates the Arts.
Weaknesses: obstinacy, laziness. He can be materialistic.
Aquarius Moon short description:
He is sociable, intelligent, and lucid. Thanks to great sociability, he has many friends. He is
modern, original, inventive, non-conformist, and is likely to bring new life to everything he does.
Potential issues: He is eccentric with sharp mood swings. Complex love life.
Ascendant is Libra
Everybody seems to like Libra Ascendant natives. They just come across as nice, pleasant, and fair. Look a little closer at their lives, and these nice people may have had quite a few problems in their relationships. Some of them have had a string of relationships, and it can be hard to imagine why! These natives attract others to them effortlessly. Besides, they simply don't know what to do with themselves without a significant other. Libra rising generally appear to be smoothing everything over. They have charming smiles, a gentle approach with others, and an easygoing image. Even if they were not endowed with good looks, they are attractive. Most pay a lot of attention to their personal appearance -- the colors they wear, their hair, the way they walk.
HONESTLY. Marlin’s entire natal chart read him for filth.
Like
-81 Opposition between the Sun and Lilith
There is a self-destructive side to you that should be managed by confronting your fears.
FFS this is an ATTACK.
1 note
·
View note
Text
Pumpkin and Hazelnut Tart with Toasted Marshmallow
Today is a very special day for two reasons: 1. Jorge and I are celebrating our seven year Anniversary!! 2. It’s also the fourth annual Virtual Pumpkin Party and I’m bringing this spiced pumpkin tart with hazelnut crust and toasted marshmallow topping to the table.
First, let’s talk tart. The base of this recipe is a buttery, crumbly crust flecked with crunchy bits of toasted hazelnuts. It pairs surprisingly well with the luscious pumpkin filling contained within. Spiced with cinnamon, ginger and nutmeg, this pumpkin custard is fairly traditional; however, I do add a splash of bourbon for some depth of flavor. The tart is finished with a layer of halved marshmallows that gets toasted under a hot broiler. They’re crispy on top and melty and gooey underneath. The combination of golden hazelnut, spiced pumpkin and toasted marshmallow is warm, comforting and so damn delicious. I like to call this type of dessert rustic fabulous. It’s fun and special, but not fussy and difficult to make.
Sara from Cake Over Steak has hosted the Virtual Pumpkin Party for four years in a row, and it’s my favorite blogger bash of the year. In 2018, about 60 bloggers have gotten together to share a creative mix of pumpkin recipes both sweet and savory. A big thanks to Sara for hosting and organizing this party!! Continue reading below for my pumpkin tart recipe along with some of my favorite picks from this year’s Virtual Pumpkin Party.
The ingredients here are pretty straight forward, but I do want to mention:
This tart is prepared in a 4 x 14 rectangular tart pan, so the quantities are slightly paired down compared to a traditional pumpkin pie recipe.
I recently discovered that my local grocery store (Ralphs) carries canned organic pumpkin, and it’s delicious!! There seems to be a lot more pumpkin products available now, so definitely take a look to see if there’s something better than the classic brands.
I am able to purchase hazelnuts without their skins, and I love them. They’re a lot easier to work with. If you can only find hazelnuts with the skins on, then check out instructions here on how to remove hazelnuts skins. And if you can’t find hazelnuts at all, try pecans instead!
If you live in San Diego, head over to Specialty Product and check out their pumpkin patch. That’s where I got all these beautiful pumpkins and gourds!
Let’s talk about this hazelnut crust for a moment. I just love hazelnuts. They’re rich and grassy, and when toasted, give off an intoxicating aroma filled with golden warmth.
The flavor of toasted hazelnut pairs well with a lot more than just pumpkin. You can use this hazelnut crust as the base for a fruit tart filled with vanilla cream, or a chocolate tart drizzled with salted caramel. Try it as the crust for a maple pie, sweet potato pie or even, a pecan pie (and put hazelnuts on top instead). It’s really versatile!
The texture of this hazelnut crust is definitely on the crumbly side (not flaky), and it couldn’t be easier to prepare. Simply combine flour, toasted hazelnuts, salt and sugar in a food processor and pulse until a coarse meal forms. Then you pulse in cold butter and water. The finished crust will have a crumbly texture, but will hold together if pinched. From there, just press the crust into an ungreased tart pan, and let chill in the fridge for 20 minutes. At this point it’s ready to bake!
Making this Pumpkin & Hazelnut Tart with Toasted Marshmallow isn’t too complicated; however, there are a few periods of resting and cooling required, so make sure you plan your time accordingly. Here’s a little breakdown
Prepare the crust, press it into the tart pan, and let chill in the fridge for 20 minutes.
Pre bake the crust and let cool for 15 minutes.
Fill the crust and bake for 30 – 35 minutes.
Let tart cool completely (about 2 hours).
Top tart with marshmallows and toast them under the broiler.
Serve and enjoy!
Similar to a pumpkin pie, this tart really does need to cool completely before serving. This cooling period allows the custard to fully set up, so when you cut into it, it will keep it’s shape. You can make the crust one day in advance, and keep chilled in the refrigerator. Prepare the tart the day you are going to serve it. Try to toast the marshmallows just before serving for the best texture.
Throughout the week, I’ll be checking out the other Virtual Pumpkin Party dishes and sharing my favorites here:
Ingredients
For the crust:
3/4 cups skinless hazelnuts, toasted and chopped
1 cup all purpose flour
2 tablespoons granulated sugar
3/4 teaspoon fine grain sea salt
1/2 cup (1 stick) chilled unsalted butter, cut into cubes
3 tablespoons ice water
For the filling:
1 cup pumpkin puree (not pumpkin pie filling)
1/3 cup firmly packed light brown sugar
3 tablespoons sugar
1 1/2 teaspoons all purpose flour
1/2 teaspoon ground cinnamon
1/4 teaspoon ground ginger
1/4 teaspoon freshly grated nutmeg
1/4 teaspoon salt
1 whole egg plus 1 egg yolk
1/2 cup heavy cream
3/4 teaspoon vanilla extract
1 1/2 teaspoon good quality bourbon
27 - 30 halves big marshmallows
Instructions
Start by making the crust. Place hazelnuts, flour, sugar and sea salt into a food processor and pulse until the texture resembles a coarse meal. Add butter and pulse a few times until the butter is the size of peas. Add water and pulse just until the dough starts to come together. It will look crumbly, but should hold together when pinched. Add a little more water if needed.
Transfer the dough to an ungreased 4 x 14 tart pan with removable bottom, pressing the dough evenly into the sides and bottom of the pan. Cover with plastic wrap and chill in the fridge for at least 20 minutes (or up to 1 day).
Preheat an oven to 350°F and set an oven rack to the middle position. Place the tart pan on a rimmed baking sheet, and bake until the crust is lightly golden (20 - 25 minutes). Transfer to a wire rack and let cool for 15 minutes.
Meanwhile, prepare the pumpkin filling. To a large bowl, add pumpkin puree, brown sugar, white sugar, flour, cinnamon, ginger, nutmeg and salt, stirring to combine. Add the egg, egg yolk, cream, vanilla and bourbon, and stir until smooth. Place the tart pan back on a rimmed baking sheet, then pour the filling into the cooled tart crust just to the top of the crust. Not all of the filling will fit in the crust - you'll have just a smidge leftover.
Bake tart until the filling is just set (30 to 35 minutes). Transfer to a wire rack and let cool completely (about 2 hours).
Just before serving, top the pumpkin tart with an even layer of marshmallow halves. The cut side down and the rounded side up. You should be able to fit 9 or 10 rows of 3. Place the tart under a hot, preheated broiler just until the marshmallows turn golden brown. Keep an eye on this as the marshmallows can burn quickly, and move the pan around as needed to ensure even toasting.
Here are the other recipes I’ve brought to the Virtual Pumpkin Party:
15

Source: https://www.kitchenkonfidence.com/2018/10/pumpkin-and-hazelnut-tart-with-toasted-marshmallow
1 note
·
View note
Text
Taming Blend Modes: `difference` and `exclusion`
Up until 2020, blend modes were a feature I hadn’t used much because I rarely ever had any idea what result they could produce without giving them a try first. And taking the “try it and see what happens” approach seemed to always leave me horrified by the visual vomit I had managed to create on the screen.
The problem stemmed from not really knowing how they work in the back. Pretty much every article I’ve seen on the topic is based on examples, comparisons with Photoshop or verbose artistic descriptions. I find examples great, but when you have no clue how things work in the back, adapting a nice-looking demo into something that would implement a different idea you have in your head becomes a really time-consuming, frustrating and ultimately futile adventure. Then Photoshop comparisons are pretty much useless for someone coming from a technical background. And verbose artistic descriptions feel like penguin language to me.
So I had a lightbulb moment when I came across the spec and found it also includes mathematical formulas according to which blend modes work. This meant I could finally understand how this stuff works in the back and where it can be really useful. And now that I know better, I’ll be sharing this knowledge in a series of articles.
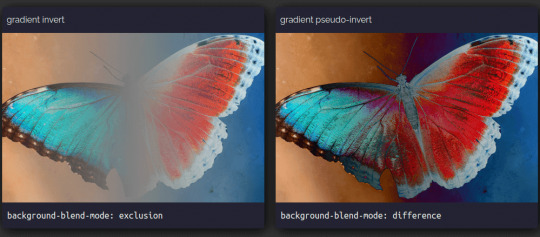
Today, we’ll focus on how blending generally works, then take a closer look at two somewhat similar blend modes — difference and exclusion — and, finally, get to the meat of this article where we’ll dissect some cool use cases like the ones below.
A few examples of what we can achieve with these two blend modes.
Let’s discuss the “how” of blend modes
Blending means combining two layers (that are stacked one on top of the other) and getting a single layer. These two layers could be two siblings, in which case the CSS property we use is mix-blend-mode. They could also be two background layers, in which case the CSS property we use is background-blend-mode. Note that when I talk about blending “siblings,” this includes blending an element with the pseudo-elements or with the text content or the background of its parent. And when it comes to background layers, it’s not just the background-image layers I’m talking about — the background-color is a layer as well.
When blending two layers, the layer on top is called the source, while the layer underneath is called the destination. This is something I just take as it is because these names don’t make much sense, at least to me. I’d expect the destination to be an output, but instead they’re both inputs and the resulting layer is the output.

Blending terminology
How exactly we combine the two layers depends on the particular blend mode used, but it’s always per pixel. For example, the illustration below uses the multiply blend mode to combine the two layers, represented as grids of pixels.
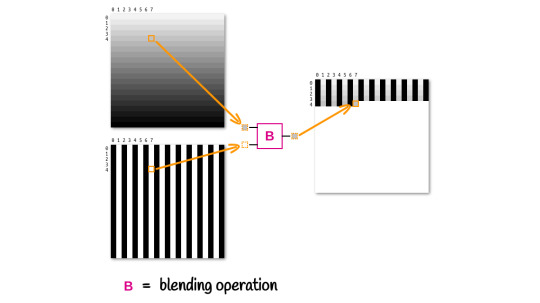
How blending two layers works at a pixel level
Alright, but what happens if we have more than two layers? Well, in this case, the blending process happens in stages, starting from the bottom.
In a first stage, the second layer from the bottom is our source, and the first layer from the bottom is our destination. These two layers blend together and the result becomes the destination for the second stage, where the third layer from the bottom is the source. Blending the third layer with the result of blending the first two gives us the destination for the third stage, where the fourth layer from the bottom is the source.

Blending multiple layers
Of course, we can use a different blend mode at each stage. For example, we can use difference to blend the first two layers from the bottom, then use multiply to blend the result with the third layer from the bottom. But this is something we’ll go a bit more into in future articles.
The result produced by the two blend modes we discuss here doesn’t depend on which of the two layers is on top. Note that this is not the case for all possible blend modes, but it is the case for the ones we’re looking at in this article.
They are also separable blend modes, meaning the blending operation is performed on each channel separately. Again, this is not the case for all possible blend modes, but it is the case for difference and exclusion.
More exactly, the resulting red channel only depends on the red channel of the source and the red channel of the destination; the resulting green channel only depends on the green channel of the source and the green channel of the destination; and finally, the resulting blue channel only depends on the blue channel of the source and the blue channel of the destination.
R = fB(Rs, Rd) G = fB(Gs, Gd) B = fB(Bs, Bd)
For a generic channel, without specifying whether it’s red, green or blue, we have that it’s a function of the two corresponding channels in the source (top) layer and in the destination (bottom) layer:
Ch = fB(Chs, Chd)
Something to keep in mind is that RGB values can be represented either in the [0, 255] interval, or as percentages in the [0%, 100%] interval, and what we actually use in our formulas is the percentage expressed as a decimal value. For example, crimson can be written as either rgb(220, 20, 60) or as rgb(86.3%, 7.8%, 23.5%) — both are valid. The channel values we use for computations if a pixel is crimson are the percentages expressed as decimal values, that is .863, .078, .235.
If a pixel is black, the channel values we use for computations are all 0, since black can be written as rgb(0, 0, 0) or as rgb(0%, 0%, 0%). If a pixel is white, the channel values we use for computations are all 1, since white can be written as rgb(255, 255, 255) or as rgb(100%, 100%, 100%).
Note that wherever we have full transparency (an alpha equal to 0), the result is identical to the other layer.
difference
The name of this blend mode might provide a clue about what the blending function fB() does. The result is the absolute value of the difference between the corresponding channel values for the two layers.
Ch = fB(Chs, Chd) = |Chs - Chd|
First off, this means that if the corresponding pixels in the two layers have identical RGB values (i.e. Chs = Chd for every one of the three channels), then the resulting layer’s pixel is black since the differences for all three channels are 0.
Chs = Chd Ch = fB(Chs, Chd) = |Chs - Chd| = 0
Secondly, since the absolute value of the difference between any positive number and 0 leaves that number unchanged, it results in the corresponding result pixel having the same RGB value as the other layer’s pixel if a layer’s pixel is black (all channels equal 0).
If the black pixel is in the top (source) layer, replacing its channel values with 0 in our formula gives us:
Ch = fB(0, Chd) = |0 - Chd| = |-Chd| = Chd
If the black pixel is in the bottom (destination) layer, replacing its channel values with 0 in our formula gives us:
Ch = fB(Chs, 0) = |Chs - 0| = |Chs| = Chs
Finally, since the absolute value of the difference between any positive subunitary number and 1 gives us the complement of that number, it results that if a layer’s pixel is white (has all channels 1), the corresponding result pixel is the other layer’s pixel fully inverted (what filter: invert(1) would do to it).
If the white pixel is in the top (source) layer, replacing its channel values with 1 in our formula gives us:
Ch = fB(1, Chd) = |1 - Chd| = 1 - Chd
If the white pixel is in the bottom (destination) layer, replacing its channel values with 1 in our formula gives us:
Ch = fB(Chs, 1) = |Chs - 1| = 1 - Chs
This can be seen in action in the interactive Pen below, where you can toggle between viewing the layers separated and viewing them overlapping and blended. Hovering the three columns in the overlapping case also reveals what’s happening for each.
CodePen Embed Fallback
exclusion
For the second and last blend mode we’re looking at today, the result is twice the product of the two channel values, subtracted from their sum:
Ch = fB(Chs, Chd) = Chs + Chd - 2·Chs·Chd
Since both values are in the [0, 1] interval, their product is always at most equal to the smallest of them, so twice the product is always at most equal to their sum.
If we consider a black pixel in the top (source) layer, then replace Chs with 0 in the formula above, we get the following result for the corresponding result pixel’s channels:
Ch = fB(0, Chd) = 0 + Chd - 2·0·Chd = Chd - 0 = Chd
If we consider a black pixel in the bottom (destination) layer, then replace Chd with 0 in the formula above, we get the following result for the corresponding result pixel’s channels:
Ch = fB(Chs, 0) = Chs + 0 - 2·Chs·0 = Chs - 0 = Chs
So, if a layer’s pixel is black, it results that the corresponding result pixel is identical to the other layer’s pixel.
If we consider a white pixel in the top (source) layer, then replace Chs with 1 in the formula above, we get the following result for the corresponding result pixel’s channels:
Ch = fB(1, Chd) = 1 + Chd - 2·1·Chd = 1 + Chd - 2·Chd = 1 - Chd
If we consider a white pixel in the bottom (destination) layer, then replace Chd with 1 in the formula above, we get the following result for the corresponding result pixel’s channels:
Ch = fB(Chs, 1) = Chs + 1 - 2·Chs·1 = Chs + 1 - 2·Chs = 1 - Chs
So if a layer’s pixel is white, it results that the corresponding result pixel is identical to the other layer’s pixel inverted.
This is all shown in the following interactive demo:
CodePen Embed Fallback
Note that as long as at least one of the layers only has black and white pixels, difference and exclusion produce the exact same result.
Now, let’s turn to the “what” of blend modes
Here comes the interesting part — the examples!
Text state change effect
Let’s say we have a paragraph with a link:
<p>Hello, <a href='#'>World</a>!</div>
We start by setting a few basic styles to put our text in the middle of the screen, bump up its font-size, set a background on the body and a color on both the paragraph and the link.
body { display: grid; place-content: center; height: 100vh; background: #222; color: #ddd; font-size: clamp(1.25em, 15vw, 7em); } a { color: gold; }
Doesn’t look like much so far, but we’ll soon change that!

What we have so far (demo)
The next step is to create an absolutely positioned pseudo-element that covers the entire link and has its background set to currentColor.
a { position: relative; color: gold; &::after { position: absolute; top: 0; bottom: 0; right: 0; left: 0; background: currentColor; content: ''; } }

The result we now have with the pseudo-element on the link (demo)
The above looks like we’ve messed things up… but have we really? What we have here is a gold rectangle on top of gold text. And if you’ve paid attention to how the two blend modes discussed above work, then you’ve probably already guessed what’s next — we blend the two sibling nodes within the link (the pseudo-element rectangle and the text content) using difference, and since they’re both gold, it results that what they have in common — the text — becomes black.
p { isolation: isolate; } a { /* same as before */ &::after { /* same as before */ mix-blend-mode: difference; } }
Note that we have to isolate the paragraph to prevent blending with the body background. While this is only an issue in Firefox (and given we have a very dark background on the body, it’s not too noticeable) and is fine in Chrome, keep in mind that, according to the spec, what Firefox does is actually correct. It’s Chrome that’s behaving in a buggy way here, so we should have the isolation property set in case the bug gets fixed.

The mix-blend-mode: difference effect (demo)
Alright, but we want this to happen only if the link is focused or hovered. Otherwise, the pseudo-element isn’t visible — let’s say it’s scaled down to nothing.
a { /* same as before */ text-decoration: none; &::after { /* same as before */ transform: scale(0); } &:focus { outline: none } &:focus, &:hover { &::after { transform: none; } } }
We’ve also removed the link underline and the focus outline. Below, you can now see the difference effect on :hover (the same effect occurs on :focus, which is something you can test in the live demo).

The mix-blend-mode: difference effect only on :hover (demo)
We now have our state change, but it looks rough, so let’s add a transition!
a { /* same as before */ &::after { /* same as before */ transition: transform .25s; } }
Much better!

The mix-blend-mode: difference effect only on :hover, now smoothed by a transition (demo)
It would look even better if our pseudo grew not from nothing in the middle, but from a thin line at the bottom. This means we need to set the transform-origin on the bottom edge (at 100% vertically and whatever value horizontally) and initially scale our pseudo to something slightly more than nothing along the y axis.
a { /* same as before */ &::after { /* same as before */ transform-origin: 0 100%; transform: scaleY(.05); } }

The mix-blend-mode: difference effect only on :hover, now smoothed by a transition between a thin underline and a rectangle containing the link text (demo)
Something else I’d like to do here is replace the font of the paragraph with a more aesthetically appealing one, so let’s take care of that too! But we now have a different kind of problem: the end of the ‘d’ sticks out of the rectangle on :focus/:hover.

The problem illustrated: the end of the “d” sticks out when we :focus or :hover the link (demo)
We can fix this with a horizontal padding on our link.
a { /* same as before */ padding: 0 .25em; }
CodePen Embed Fallback
In case you’re wondering why we’re setting this padding on both the right and the left side instead of just setting a padding-right, the reason is illustrated below. When our link text becomes “Alien World,” the curly start of the ‘A’ would end up outside of our rectangle if we didn’t have a padding-left.

Why we have padding on both lateral sides (demo)
This demo with a multi-word link above also highlights another issue when we reduce the viewport width.

The problem with multi-line links (demo)
One quick fix here would be to set display: inline-block on the link. This isn’t a perfect solution. It also breaks when the link text is longer than the viewport width, but it works in this particular case, so let’s just leave it here now and we’ll come back to this problem in a little while.

The inline-block solution (demo)
Let’s now consider the situation of a light theme. Since there’s no way to get white instead of black for the link text on :hover or :focus by blending two identical highlight layers that are both not white, we need a bit of a different approach here, one that doesn’t involve using just blend modes.
What we do in this case is first set the background, the normal paragraph text color, and the link text color to the values we want, but inverted. I was initially doing this inversion manually, but then I got the suggestion of using the Sass invert() function, which is a very cool idea that really simplifies things. Then, after we have this dark theme that’s basically the light theme we want inverted, we get our desired result by inverting everything again with the help of the CSS invert() filter function.
Tiny caveat here: we cannot set filter: invert(1) on the body or html elements because this is not going to behave the way we expect it to and we won’t be getting the desired result. But we can set both the background and the filter on a wrapper around our paragraph.
<section> <p>Hello, <a href='#'>Alien World</a>!</p> </section>
body { /* same as before, without the place-content, background and color declarations, which we move on the section */ } section { display: grid; place-content: center; background: invert(#ddd) /* Sass invert(<color>) function */; color: invert(#222); /* Sass invert<color>) function */; filter: invert(1); /* CSS filter invert(<number|percentage>) function */ } a { /* same as before */ color: invert(purple); /* Sass invert(<color>) function */ }
CodePen Embed Fallback
Here’s an example of a navigation bar employing this effect (and a bunch of other clever tricks, but those are outside the scope of this article). Select a different option to see it in action:
CodePen Embed Fallback
Something else we need to be careful with is the following: all descendants of our section get inverted when we use this technique. And this is probably not what we want in the case of img elements — I certainly don’t expect to see the images in a blog post inverted when I switch from the dark to the light theme. Consequently, we should reverse the filter inversion on every img descendant of our section.
section { /* same as before */ &, & img { filter: invert(1); } }
Putting it all together, the demo below shows both the dark and light theme cases with images:
CodePen Embed Fallback
Now let’s get back to the wrapping link text issue and see if we don’t have better options than making the a elements inline-block ones.
Well, we do! We can blend two background layers instead of blending the text content and a pseudo. One layer gets clipped to the text, while the other one is clipped to the border-box and its vertical size animates between 5% initially and 100% in the hovered and focused cases.
a { /* same as before */ -webkit-text-fill-color: transparent; -moz-text-fill-color: transparent; --full: linear-gradient(currentColor, currentColor); background: var(--full), var(--full) 0 100%/1% var(--sy, 5%) repeat-x; -webkit-background-clip: text, border-box; background-clip: text, border-box; background-blend-mode: difference; transition: background-size .25s; &:focus, &:hover { --sy: 100%; } }
Note that we don’t even have a pseudo-element anymore, so we’ve taken some of the CSS on it, moved it on the link itself, and tweaked it to suit this new technique. We’ve switched from using mix-blend-mode to using background-blend-mode; we’re now transitioning background-size of transform and, in the :focus and :hover states; and we’re now changing not the transform, but a custom property representing the vertical component of the background-size.

The background layer blending solution (demo).
Much better, though this isn’t a perfect solution either.
The first problem is one you’ve surely noticed if you checked the caption’s live demo link in Firefox: it doesn’t work at all. This is due to a Firefox bug I apparently reported back in 2018, then forgot all about until I started toying with blend modes and hit it again.
The second problem is one that’s noticeable in the recording. The links seem somewhat faded. This is because, for some reason, Chrome blends inline elements like links (note that this won’t happen with block elements like divs) with the background of their nearest ancestor (the section in this case) if these inline elements have background-blend-mode set to anything but normal.
Even more weirdly, setting isolation: isolate on the link or its parent paragraph doesn’t stop this from happening. I still had a nagging feeling it must have something to do with context, so I decided to keep throwing possible hacks at it, and hope maybe something ends up working. Well, I didn’t have to spend much time on it. Setting opacity to a subunitary (but still close enough to 1 so it’s not noticeable that it’s not fully opaque) value fixes it.
a { /* same as before */ opacity: .999; /* hack to fix blending issue ¯_(ツ)_/¯ */ }

Result after fixing the blending issue (demo)
The final problem is another one that’s noticeable in the recording. If you look at the ‘r’ at the end of “Amur” you can notice its right end is cut out as it falls outside the background rectangle. This is particularly noticeable if you compare it with the ‘r’ in “leopard.”
I didn’t have high hopes for fixing this one, but threw the question to Twitter anyway. And what do you know, it can be fixed! Using box-decoration-break in combination with the padding we have already set can help us achieve the desired effect!
a { /* same as before */ box-decoration-break: clone; }
Note that box-decoration-break still needs the -webkit- prefix for all WebKit browsers, but unlike in the case of properties like background-clip where at least one value is text, auto-prefixing tools can take care of the problem just fine. That’s why I haven’t included the prefixed version in the code above.

Result after fixing the text clipping issue (demo).
Another suggestion I got was to add a negative margin to compensate for the padding. I’m going back and forth on this one — I can’t decide whether I like the result better with or without it. In any event, it’s an option worth mentioning.
$p: .25em; a { /* same as before */ margin: 0 (-$p); /* we put it within parenthesis so Sass doesn't try to perform subtraction */ padding: 0 $p; }

Result when we have a negative margin compensating for the padding (demo)
Still, I have to admit that animating just the background-position or the background-size of a gradient is a bit boring. But thanks to Houdini, we can now get creative and animate whatever component of a gradient we wish, even though this is only supported in Chromium at the moment. For example, the radius of a radial-gradient() like below or the progress of a conic-gradient().
Bubble effect navigation (demo)
Invert just an area of an element (or a background)
This is the sort of effect I often see achieved by either using element duplication — the two copies are layered one on top of the other, where one of them has an invert filter and clip-path is used on the top one in order to show both of layers. Another route is layering a second element with an alpha low enough you cannot even tell it’s there and a backdrop-filter.
Both these approaches get the job done if we want to invert a part of the entire element with all its content and descendants, but they cannot help us when we want to invert just a part of the background — both filter and backdrop-filter affect entire elements, not just their backgrounds. And while the new filter() function (already supported by Safari) does have effect solely on background layers, it affects the entire area of the background, not just a part of it.
This is where blending comes in. The technique is pretty straightforward: we have a background layer, part of which we want to invert and one or more gradient layers that give us a white area where we want inversion of the other layer and transparency (or black) otherwise. Then we blend using one of the two blend modes discussed today. For the purpose of inversion, I prefer exclusion (it’s one character shorter than difference).
Here’s a first example. We have a square element that has a two-layer background. The two layers are a picture of a cat and a gradient with a sharp transition between white and transparent.
div { background: linear-gradient(45deg, white 50%, transparent 0), url(cat.jpg) 50%/ cover; }
This gives us the following result. We’ve also set dimensions, a border-radius, shadows, and prettified the text in the process, but all that stuff isn’t really important in this context:

The two backgrounds layered
Next, we just need one more CSS declaration to invert the lower left half:
div { /* same as before */ background-blend-mode: exclusion; /* or difference, but it's 1 char longer */ }
Note how the text is not affected by inversion; it’s only applied to the background.

Final result (demo)
You probably know the interactive before-and-after image sliders. You may have even seen something of the kind right here on CSS-Tricks. I’ve seen it on Compressor.io, which I often use to compress images, including the ones used in these articles!
Our goal is to create something of the kind using a single HTML element, under 100 bytes of JavaScript — and not even much CSS!
Our element is going to be a range input. We don’t set its min or max attributes, so they default to 0 and 100, respectively. We don’t set the value attribute either, so it defaults to 50, which is also the value we give a custom property, --k, set in its style attribute.
<input type='range' style='--k: 50'/>
In the CSS, we start with a basic reset, then we make our input a block element that occupies the entire viewport height. We also give dimensions and dummy backgrounds to its track and thumb just so that we can start seeing stuff on the screen right away.
$thumb-w: 5em; @mixin track() { border: none; width: 100%; height: 100%; background: url(flowers.jpg) 50%/ cover; } @mixin thumb() { border: none; width: $thumb-w; height: 100%; background: purple; } * { margin: 0; padding: 0; } [type='range'] { &, &::-webkit-slider-thumb, &::-webkit-slider-runnable-track { -webkit-appearance: none; } display: block; width: 100vw; height: 100vh; &::-webkit-slider-runnable-track { @include track; } &::-moz-range-track { @include track; } &::-webkit-slider-thumb { @include thumb; } &::-moz-range-thumb { @include thumb; } }

What we have so far (demo)
The next step is to add another background layer on the track, a linear-gradient one where the separation line between transparent and white depends on the current range input value, --k, and then blend the two.
@mixin track() { /* same as before */ background: url(flowers.jpg) 50%/ cover, linear-gradient(90deg, transparent var(--p), white 0); background-blend-mode: exclusion; } [type='range'] { /* same as before */ --p: calc(var(--k) * 1%); }
Note that the order of the two background layers of the track doesn’t matter as both exclusion and difference are commutative.
CodePen Embed Fallback
It’s starting to look like something, but dragging the thumb does nothing to move the separation line. This is happening because the current value, --k (on which the gradient’s separation line position, --p, depends), doesn’t get automatically updated. Let’s fix that with a tiny bit of JavaScript that gets the slider value whenever it changes then sets --k to this value.
addEventListener('input', e => { let _t = e.target; _t.style.setProperty('--k', +_t.value) })
Now all seems to be working fine!
CodePen Embed Fallback
But is it really? Let’s say we do something a bit fancier for the thumb background:
$thumb-r: .5*$thumb-w; $thumb-l: 2px; @mixin thumb() { /* same as before */ --list: #fff 0% 60deg, transparent 0%; background: conic-gradient(from 60deg, var(--list)) 0/ 37.5% /* left arrow */, conic-gradient(from 240deg, var(--list)) 100%/ 37.5% /* right arrow */, radial-gradient(circle, transparent calc(#{$thumb-r} - #{$thumb-l} - 1px) /* inside circle */, #fff calc(#{$thumb-r} - #{$thumb-l}) calc(#{$thumb-r} - 1px) /* circle line */, transparent $thumb-r /* outside circle */), linear-gradient( #fff calc(50% - #{$thumb-r} + .5*#{$thumb-l}) /* top line */, transparent 0 calc(50% + #{$thumb-r} - .5*#{$thumb-l}) /* gap behind circle */, #fff 0 /* bottom line */) 50% 0/ #{$thumb-l}; background-repeat: no-repeat; }
The linear-gradient() creates the thin vertical separation line, the radial-gradient() creates the circle, and the two conic-gradient() layers create the arrows.
CodePen Embed Fallback
The problem is now obvious when dragging the thumb from one end to the other: the separation line doesn’t remain fixed to the thumb’s vertical midline.
When we set --p to calc(var(--k)*1%), the separation line moves from 0% to 100%. It should really be moving from a starting point that’s half a thumb width, $thumb-r, until half a thumb width before 100%. That is, within a range that’s 100% minus a thumb width, $thumb-w. We subtract a half from each end, so that’s a whole thumb width to be subtracted. Let’s fix that!
--p: calc(#{$thumb-r} + var(--k) * (100% - #{$thumb-w}) / 100);
Much better!
CodePen Embed Fallback
But the way range inputs work, their border-box moving within the limits of the track’s content-box (Chrome) or within the limits of the actual input’s content-box (Firefox)… this still doesn’t feel right. It would look way better if the thumb’s midline (and, consequently, the separation line) went all the way to the viewport edges.
We cannot change how range inputs work, but we can make the input extend outside the viewport by half a thumb width to the left and by another half a thumb width to the right. This makes its width equal to that of the viewport, 100vw, plus an entire thumb width, $thumb-w.
body { overflow: hidden; } [type='range'] { /* same as before */ margin-left: -$thumb-r; width: calc(100vw + #{$thumb-w}); }
A few more prettifying tweaks related to the cursor and that’s it!
CodePen Embed Fallback
A fancier version of this (inspired by the Compressor.io website) is to put the input within a card whose 3D rotation also changes when the mouse moves over it.
CodePen Embed Fallback
We could also use a vertical slider. This is slightly more complex as our only reliable cross-browser way of creating custom styled vertical sliders is to apply a rotation on them, but this would also rotate the background. What we do is set the --p value and these backgrounds on the (not rotated) slider container, then keep the input and its track completely transparent.
This can be seen in action in the demo below, where I’m inverting a photo of me showing off my beloved Kreator hoodie.
CodePen Embed Fallback
We may of course use a radial-gradient() for a cool effect too:
background: radial-gradient(circle at var(--x, 50%) var(--y, 50%), #000 calc(var(--card-r) - 1px), #fff var(--card-r)) border-box, $img 50%/ cover;
In this case, the position given by the --x and --y custom properties is computed from the mouse motion over the card.
CodePen Embed Fallback
The inverted area of the background doesn’t necessarily have to be created by a gradient. It can also be the area behind a heading’s text, as shown in this older article about contrasting text against a background image.
CodePen Embed Fallback
Gradual inversion
The blending technique for inversion is more powerful than using filters in more than one way. It also allows us to apply the effect gradually along a gradient. For example, the left side is not inverted at all, but then we progress to the right all the way to full inversion.
In order to understand how to get this effect, we must first understand how to get the invert(p) effect, where p can be any value in the [0%, 100%] interval (or in the [0, 1] interval if we use the decimal representation).
The first method, which works for both difference and exclusion is setting the alpha channel of our white to p. This can be seen in action in the demo below, where dragging the slider controls the invrsion progress:
CodePen Embed Fallback
In case you’re wondering about the hsl(0, 0%, 100% / 100%) notation, this is now a valid way of representing a white with an alpha of 1, according the spec.
Furthermore, due to the way filter: invert(p) works in the general case (that is, scaling every channel value to a squished interval [Min(p, q), Max(p, q)]), where q is the complement of p (or q = 1 - p) before inverting it (subtracting it from 1), we have the following for a generic channel Ch when partly inverting it:
1 - (q + Ch·(p - q)) = = 1 - (1 - p + Ch·(p - (1 - p))) = = 1 - (1 - p + Ch·(2·p - 1)) = = 1 - (1 - p + 2·Ch·p - Ch) = = 1 - 1 + p - 2·Ch·p + Ch = = Ch + p - 2·Ch·p
What we got is exactly the formula for exclusion where the other channel is p! Therefore, we can get the same effect as filter: invert(p) for any p in the [0%, 100%] interval by using the exclusion blend mode when the other layer is rgb(p, p, p).
This means we can have gradual inversion along a linear-gradient() that goes from no inversion at all along the left edge, to full inversion along the right edge), with the following:
background: url(butterfly_blues.jpg) 50%/ cover, linear-gradient(90deg, #000 /* equivalent to rgb(0%, 0%, 0%) and hsl(0, 0%, 0%) */, #fff /* equivalent to rgb(100%, 100%, 100%) and hsl(0, 0%, 100%) */); background-blend-mode: exclusion;

Gradual left-to-right inversion (demo)
Note that using a gradient from black to white for gradual inversion only works with the exclusion blend mode and not with the difference. The result produced by difference in this case, given its formula, is a pseudo gradual inversion that doesn’t pass through the 50% grey in the middle, but through RGB values that have each of the three channels zeroed at various points along the gradient. That is why the contrast looks starker. It’s also perhaps a bit more artistic, but that’s not really something I’m qualified to have an opinion about.
Gradual left-to-right inversion vs. pseudo-inversion (demo)
Having different levels of inversion across a background doesn’t necessarily need to come from a black to white gradient. It can also come from a black and white image as the black areas of the image would preserve the background-color, the white areas would fully invert it and we’d have partial inversion for everything in between when using the exclusion blend-mode. difference would again give us a starker duotone result.
This can be seen in the following interactive demo where you can change the background-color and drag the separation line between the results produced by the two blend modes.
CodePen Embed Fallback
Hollow intersection effect
The basic idea here is we have two layers with only black and white pixels.
Ripples and rays
Let’s consider an element with two pseudos, each having a background that’s a repeating CSS gradient with sharp stops:
$d: 15em; $u0: 10%; $u1: 20%; div { &::before, &::after { display: inline-block; width: $d; height: $d; background: repeating-radial-gradient(#000 0 $u0, #fff 0 2*$u0); content: ''; } &::after { background: repeating-conic-gradient(#000 0% $u1, #fff 0% 2*$u1); } }
Depending on the browser and the display, the edges between black and white may look jagged… or not.

Jagged edges (demo)
Just to be on the safe side, we can tweak our gradients to get rid of this issue by leaving a tiny distance, $e, between the black and the white:
$u0: 10%; $e0: 1px; $u1: 5%; $e1: .2%; div { &::before { background: repeating-radial-gradient( #000 0 calc(#{$u0} - #{$e0}), #fff $u0 calc(#{2*$u0} - #{$e0}), #000 2*$u0); } &::after { background: repeating-conic-gradient( #000 0% $u1 - $e1, #fff $u1 2*$u1 - $e1, #000 2*$u1); } }

Smooth edges (demo)
Then we can place them one on top of the other and set mix-blend-mode to exclusion or difference, as they both produce the same result here.
div { &::before, &::after { /* same other styles minus the now redundant display */ position: absolute; mix-blend-mode: exclusion; } }
Wherever the top layer is black, the result of the blending operation is identical to the other layer, whether that’s black or white. So, black over black produces black, while black over white produces white.
Wherever the top layer is white, the result of the blending operation is identical to the other layer inverted. So, white over black produces white (black inverted), while white over white produces black (white inverted).
However, depending on the browser, the actual result we see may look as desired (Chromium) or like the ::before got blended with the greyish background we’ve set on the body and then the result blended with the ::after (Firefox, Safari).

Chromium 87 (left): result looks as desired; Firefox 83 and Safari 14 (right): cloudy from being blended with the body layer (demo)
The way Chromium behaves is a bug, but that’s the result we want. And we can get it in Firefox and Safari, too, by either setting the isolation property to isolate on the parent div (demo) or by removing the mix-blend-mode declaration from the ::before (as this would ensure the blending operation between it and the body remains the default normal, which means no blending) and only setting it on the ::after (demo).
Of course, we can also simplify things and make the two blended layers be background layers on the element instead of its pseudos. This also means switching from mix-blend-mode to background-blend-mode.
$d: 15em; $u0: 10%; $e0: 1px; $u1: 5%; $e1: .2%; div { width: $d; height: $d; background: repeating-radial-gradient( #000 0 calc(#{$u0} - #{$e0}), #fff $u0 calc(#{2*$u0} - #{$e0}), #000 2*$u0), repeating-conic-gradient( #000 0% $u1 - $e1, #fff $u1 2*$u1 - $e1, #000 2*$u1);; background-blend-mode: exclusion; }
This gives us the exact same visual result, but eliminates the need for pseudo-elements, eliminates the potential unwanted mix-blend-mode side effect in Firefox and Safari, and reduces the amount of CSS we need to write.

Desired result with no pseudos (demo)
Split screen
The basic idea is we have a scene that’s half black and half white, and a white item moving from one side to the other. The item layer and the scene layer get then blended using either difference or exclusion (they both produce the same result).
When the item is, for example, a ball, the simplest way to achieve this result is to use a radial-gradient for it and a linear-gradient for the scene and then animate the background-position to make the ball oscillate.
$d: 15em; div { width: $d; height: $d; background: radial-gradient(closest-side, #fff calc(100% - 1px), transparent) 0/ 25% 25% no-repeat, linear-gradient(90deg, #000 50%, #fff 0); background-blend-mode: exclusion; animation: mov 2s ease-in-out infinite alternate; } @keyframes mov { to { background-position: 100%; } }

Oscillating ball (demo)
We can also make the ::before pseudo the scene and the ::after the moving item:
$d: 15em; div { display: grid; width: $d; height: $d; &::before, &::after { grid-area: 1/ 1; background: linear-gradient(90deg, #000 50%, #fff 0); content: ''; } &::after { place-self: center start; padding: 12.5%; border-radius: 50%; background: #fff; mix-blend-mode: exclusion; animation: mov 2s ease-in-out infinite alternate; } } @keyframes mov { to { transform: translate(300%); } }
This may look like we’re over-complicating things considering that we’re getting the same visual result, but it’s actually what we need to do if the moving item isn’t just a disc, but a more complex shape, and the motion isn’t just limited to oscillation, but it also has a rotation and a scaling component.
$d: 15em; $t: 1s; div { /* same as before */ &::after { /* same as before */ /* creating the shape, not detailed here as it's outside the scope of this article */ @include poly; /* the animations */ animation: t $t ease-in-out infinite alternate, r 2*$t ease-in-out infinite, s .5*$t ease-in-out infinite alternate; } } @keyframes t { to { translate: 300% } } @keyframes r { 50% { rotate: .5turn; } 100% { rotate: 1turn;; } } @keyframes s { to { scale: .75 1.25 } }

Oscillating and rotating plastic shape (demo)
Note that, while Safari has now joined Firefox in supporting the individual transform properties we’re animating here, these are still behind the Experimental Web Platform features flag in Chrome (which can be enabled from chrome://flags as shown below).

The Experimental Web Platform features flag enabled in Chrome.
More examples
We won’t be going into details about the “how” behind these demos as the basic idea of the blending effect using exclusion or difference is the same as before and the geometry/animation parts are outside the scope of this article. However, for each of the examples below, there is a link to a CodePen demo in the caption and a lot of these Pens also come with a recording of me coding them from scratch.
Here’s a crossing bars animation I recently made after a Bees & Bombs GIF:

Crossing bars (demo)
And here’s a looping moons animation from a few years back, also coded after a Bees & Bombs GIF:

Moons (demo)
We’re not necessarily limited to just black and white. Using a contrast filter with a subunitary value (filter: contrast(.65) in the example below) on a wrapper, we can turn the black into a dark grey and the white into a light grey:

Discovery: two squares/ four triangles (demo, source)
Here’s another example of the same technique:

Eight triangles (demo, source)
If we want to make it look like we have a XOR effect between black shapes on a white background, we can use filter: invert(1) on the wrappers of the shapes, like in the example below:

Four bars (demo, source)
And if we want something milder like dark grey shapes on a light grey background, we don’t go for full inversion, but only for partial one. This means using a subunitary value for the invert filter like in the example below where we use filter: invert(.85):

Six triangles (demo, source)
It doesn’t necessarily have to be something like a looping or loading animation. We can also have a XOR effect between an element’s background and its offset frame. Just like in the previous examples, we use CSS filter inversion if we want the background and the frame to be black and their intersection to be white.

Offset and XOR frame (demo).
Another example would be having a XOR effect on hovering/ focusing and clicking a close button. The example below shows both night and light theme cases:
CodePen Embed Fallback
Bring me to life
Things can look a bit sad only in black and white, so there are few things we can do to put some life into such demos.
The first tactic would be to use filters. We can break free from the black and white constraint by using sepia() after lowering the contrast (as this function has no effect over pure black or white). Pick the hue using hue-rotate() and then fine tune the result using brightness() and saturate() or contrast().
For example, taking one of the previous black and white demos, we could have the following filter chain on the wrapper:
filter: contrast(.65) /* turn black and white to greys */ sepia(1) /* retro yellow-brownish tint */ hue-rotate(215deg) /* change hue from yellow-brownish to purple */ blur(.5px) /* keep edges from getting rough/ jagged */ contrast(1.5) /* increase saturation */ brightness(5) /* really brighten background */ contrast(.75); /* make triangles less bright (turn bright white dirty) */

Discovery: two squares/four triangles — a more lively version (demo)
For even more control over the result, there’s always the option of using SVG filters.
The second tactic would be to add another layer, one that’s not black and white. For example, in this radioactive pie demo I made for the first CodePen challenge of March, I used a purple ::before pseudo-element on the body that I blended with the pie wrapper.
body, div { display: grid; } /* stack up everything in one grid cell */ div, ::before { grid-area: 1/ 1; } body::before { background: #7a32ce; } /* purple layer */ /* applies to both pie slices and the wrapper */ div { mix-blend-mode: exclusion; } .a2d { background: #000; } /* black wrapper */ .pie { background: /* variable size white pie slices */ conic-gradient(from calc(var(--p)*(90deg - .5*var(--sa)) - 1deg), transparent, #fff 1deg calc(var(--sa) + var(--q)*(1turn - var(--sa))), transparent calc(var(--sa) + var(--q)*(1turn - var(--sa)) + 1deg)); }
This turns the black wrapper purple and the white parts green (which is purple inverted).

Radioactive 🥧 slices (demo)
Another option would be blending the entire wrapper again with another layer, this time using a blend mode different from difference or exclusion. Doing so would allow us more control over the result so we’re not limited to just complementaries (like black and white, or purple and green). That, however, is something we’ll have to cover in a future article.
Finally, there’s the option of using difference (and not exclusion) so that we get black where two identical (not necessarily white) layers overlap. For example, the difference between coral and coral is always going to be 0 on all three channels, which means black. This means we can adapt a demo like the offset and XOR frame one to get the following result:

Offset and XOR frame — a more lively version (demo).
With some properly set transparent borders and background clipping, we can also make this work for gradient backgrounds:

Offset and XOR frame example — a gradient version (demo).
Similarly, we can even have an image instead of a gradient!

Offset and XOR frame — an image version (demo).
Note that this means we also have to invert the image background when we invert the element in the second theme scenario. But that should be no problem, because in this article we’ve also learned how to do that: by setting background-color to white and blending the image layer with it using background-blend-mode: exclusion!
Closing thoughts
Just these two blend modes can help us get some really cool results without resorting to canvas, SVG or duplicated layers. But we’ve barely scratched the surface here. In future articles, we’ll dive into how other blend modes work and what we can achieve with them alone or in combination with previous ones or with other CSS visual effects such as filters. And trust me, the more tricks you have up your sleeve, the cooler the results you’re able to achieve get!
The post Taming Blend Modes: `difference` and `exclusion` appeared first on CSS-Tricks.
You can support CSS-Tricks by being an MVP Supporter.
Taming Blend Modes: `difference` and `exclusion` published first on https://deskbysnafu.tumblr.com/
0 notes
Text
2.27.2021
Peacock Gudgeon (Tateurndina ocellicauda)
Number: 6 (ideal is one male per two females)
Diet: Omnivore
Water Conditions: 72-77° F, KH 5-12, pH 7.0-7.8
Max. Size: 2½ inch
Six little peacock gudgeons arrived alive and well on Thursday. And then I promptly tried to murder them when I was transferring them from their bag into a small bucket in the sink to drip acclimate them. The bag flopped sideways as I was pouring and all of them went into the sink. I am super lucky that I don’t ever pour fish into anything on the side of the sink with the garbage disposal.
So three immediately slid into the drainer with the rest of the water, and I gently nudged the remaining three into it, then in one motion picked up the drainer and dumped them all into the container, which held about a half inch of their original water (the only thing that made it directly into the container). I whisked them right to the qt tank setup, where I’d already started the drip acclimation into a bucket, and slid them below the drip, then let them sit there for about an hour, checking on them every 10 minutes.
It was by no means ideal, since they didn’t have much time to adjust to the new water before it dominated, AND they had a shock, AND who knows what bacteria is lurking in the sink drainer (I don’t clean it that often, which in this case meant no real soap residue), but all six of them were still alive. I dropped them into the qt tank and they all hid immediately in the pvc pipes.
Later that night, I fed them a smattering of frozen bloodworms, which they devoured, and then the next morning, I fed bug bites, which they also devoured. I couldn’t quite verify that all six were there, so I just hoped they were all alive and fed. Since they’re really small right now (only about an inch/inch and a half, smaller than the adult rice fish), I figure they’ll need to be fed twice a day, so they’ll be on the same schedule as the bebe ricefish. I’m also changing about 40% of their water daily, as the seeded sponge filter doesn’t seem to be keeping up with any water, starting even before I put fish in the qt tank. Ammonia is kept locked up with Prime and StressGuard, but consistently reads .5 ppm every evening, 0 nitrites, 0 nitrates. Because of this, I am considering only qting them for 2 weeks instead of 4.
As of this morning, all six are quite active and adjusting to their environment. I have verified two females and two likely males, and not sure about the other two. The qt tank is on the ground and they are tiny, so I’ll have to wait until I can see them better.
Since little gudgeons are micropredators, I do hope they like to snack on snails and baby ricefish/eggs. I have too many ricefish and they are prolific egg layers, and their current setup is really conducive, apparently.
We’ll see if they stop laying, as I am moving the ricefish today to the 40 gallon tank. It is nearly done cycling and can process 2ppm ammonia in 48 hours. The ricefish come with their own 20 gallon sponge filter that handles their bioload quite well in their 9 gallon pond, so it’ll have 60 gallons-worth of filtering and should be able to more than handle their bioload. I will have to test daily for a week or so to see if the 40 gallon parameters stay steady.
I don’t expect that I will be able to transfer the babies that are smaller than the net, or even that those that I do transfer smaller than a cm will survive. However, I swear there are at least 30 in there, along with the four adults (two males, two females). I will likely need to aquaswap them if they keep breeding like this!
0 notes
Text
Growing Tomatoes: Planting to Harvest
How to Choose Tomatoes
Even if you don't have a lot of space, you can grow a crop of juicy tomatoes. The secret: choose a variety that matches the type of planter and support you'll be using. With more and more options available each year, here's our guide to selecting the perfect plant: in general, it's best to choose determinate (bush) varieties, which are more compact. Indeterminate types can get quite tall — up to 10' or more! however, there are also shorter indeterminate varieties so check plant tags for mature heights.

Choosing tomato varieties can be confusing because there are so many, so use our tomato chooser to help you pick the best for your garden. Our article “ learn tomato terms ” explains some basic (but important) tomato terms, such as hybrid, indeterminate vs. Determinate, and vfn (disease resistance). It’s a good idea to grow a range of varieties, including at least one or two disease-resistant types, since, of all veggies, tomatoes tend to be the most susceptible to disease.
The primary distinction between the varieties is determinate and indeterminate varieties. Determinate varieties are bushy and compact which grow without any support, and indeterminate varieties are vining, usually large. While you can grow almost any tomato cultivar in a pot, you should choose determinate ones when growing tomatoes indoors. Here’s a list of best tomato varieties for containers, check that out. Also, read the pointers below to decide:.
Another important consideration is whether the tomato cultivar you choose is determinate or indeterminate in growth habit. Determinate (d) tomato plants grow to a certain height and then stop. They also flower and set all their fruits within a relatively short period of time. This is an advantage if the tomatoes are being grown primarily for canning purposes. Determinate plants tend to be smaller plants, and are better suited for caging, staking, or containers. Indeterminate tomato plants grow, flower, and set fruit over the entire growing season. When supported, indeterminate plants continue to grow taller and tend to get “viney” if not pruned; consequently, they will need taller stakes and cages. Some of the indeterminate cultivars can easily grow to 8 feet tall. Without support, the indeterminate plants will grow into a big jungle!.
Many roma tomatoes are resistant to early blight , fusarium and verticillium wilt, diseases that plague tomatoes. Always choose seeds or seedlings that are vf resistant. If you see a water-soaked area near the blossom end (bottom) of the fruit, your tomato may have blossom end rot, which is basically a calcium deficiency. To help avoid this problem don’t plant your tomatoes until the soil has warmed up and keep the soil evenly moist.
youtube
Your tomatoes will do much better if they are out in natural sunlight and receiving natural rainfall. If possible, try to put them in a patio or balcony location where there is no roof or overhang to block sun and rain. Patios bush out pretty thickly, so choose a container that’s at least a foot in diameter or width. Plant seeds no more than a 1/4 inch deep, and water and fertilize immediately. If you start with seedlings, create a hole big enough for the soil clump the plant arrived in, soak the hole with water, and place the seedling, soil, roots and all, in the hole. Firm up the soil around the base of the seedling, and be sure the bottom leaves are not covered in dirt. Fertilize the same day with liquid fertilizer.
How to Plant and Care for Tomatoes
Finally, remember that your tomatoes will need the right care in order to thrive. This means watering with about one to two inches of water per week, with heavy soakings once a week being preferred to several lighter sprinklings with the hose. If you’re growing indeterminate varieties, you’ll want to remove the first few side branches as they appear, a process known as “suckering. ” leave two to three main stems. Stake your plants to keep the fruit off the ground and help conserve space. As the plants grow, tie them to the stakes at a few different heights just below fruit clusters.

You can also use tomato cages to trellis your plants.
How to grow your own tomatoes. A complete how to guide on growing tomatoes, including what are the best varieties to grow in our climate as well as when and where to grow. Also included is planting and transplanting, crop care, pests and diseases (including tomato blight and aphids), harvesting, and storage.
Hundreds of choice tomato varieties abound–enough to confuse gardeners. Tomatoes come in every shape, size and color. Huge tomatoes that take two hands to carry are related to tiny grape tomatoes no larger than the top of a thumb. Purple, yellow, orange and red tomatoes all spring from the same gene pool. Perfect round tomatoes, oblong tomatoes, little marble-sized tomatoes, and huge scrunchy looking tomatoes grow around the world. Tomatoes that grow as a never-ending vine share space with tomato plants that grow in a compact, shrub form. For your summer tomato garden, choose several tomato varieties, as each variety is best suited for its own culinary responsibility, and each takes specific care and tending.
By bernie ruckdaeschel tomatoes are loved by most gardeners. At james park community gardens there are very few plots which have no tomato plants. However, this fact can present a problem if the plants are not properly cared for, like: garden hygiene, proper air circulation, watering, mulching, and fertilizing. For this reason i have changed my approach to raise tomato plants.
From containers to expansive garden plots, growing tomatoes is a popular and relatively easy way to harvest at least some of your own produce. In fact, tasty and easy-to-grow tomatoes are the most popular garden vegetable. However, tomato pests and diseases such as tomato wilt can harm your crop. Don't let those potential problems scare you away. Growing healthy, pest- and disease-free tomato plants is relatively simple. Keep your plants healthy by rotating crops, planting disease-resistant varieties, spacing plants properly, mulching, and watering at least 1 inch per week.
Via rare seeds this is a unique tomato if i’ve ever seen one. It is a cherry tomato that is black in color. Now, i’ll tell you upfront, i’ve always had great luck with cherry tomatoes. It seems that very little can take these guys down. Actually, i have to be careful when i plant them because each year i’ll have a bunch of volunteers that come back to my garden and produce very heavily.
How to Harvest and Store Tomatoes
Knowing when to harvest and how to store your tomatoes once harvested is a must. I like to harvest tomatoes when they are red but not overly ripe unless i’m going to eat them immediately. The reason i like them red but not too ripe is that they will turn to mush by the time i’m ready to use them.
Don't Crowd Tomato Seedlings
Deciding when to transplant tomato seedlings is easy. When tomato seedlings are three or four inches tall and have their second pair of leaves, it's time to take them out of their crowded containers and put them into deeper, roomier ones. (if you started seedlings in individual containers at least three inches square, simply thin out the weaker plants by snipping them off at the soil line and leaving the strongest one. ).
Mulch Tomatoes After the Soil Has Warmed
Tomatoes are in many regions among the most popular fruits grown in gardens, because with most varieties freshness is a major factor in the quality of harvested fruit. Growing conditions[ edit ] tomato plants needs acidic (5. 0 to 6. 0 ph) soil, a balance between the three primary fertilizer nutrients, and thrive in warm weather. Inexpensive ways to naturally increase soil acidity include using pine needles as mulch, and mixing either used coffee grounds or sawdust into the soil. Pine needles (and the soil under pine trees) are very acidic, and though used coffee grounds are not very acidic, they and sawdust cause a chemical change in the soil, lowering its ph. Fresh coffee grounds or a 4:1 solution of water and coffee can be used for a quick, direct boost in acidity. Tomatoes do not need high calcium content in order to produce good fruits.
Mulching can help to insure an even supply of moisture is available to the tomato plant. Try putting down a layer of newspaper 5 to 10 sheets thick between the rows (soak the papers in water first, so they won't blow away) and then cover the newspapers with dry grass clippings, bark mulch, etc. Something new in mulches is burpee's red mulch. It's a reflective material that works like black plastic to warm the soil early in the season, and it increases production of top quality early tomatoes.
Tomatoes should be set in the garden when the weather has warmed and the soil temperature is above 60°f. These conditions usually occur about april 5 in southern oklahoma and about april 25 in northwestern oklahoma. Temperatures below 50°f impair tomato growth. Before planting, remove pots or bands from the transplant root ball. Peat pots can.
Marie iannotti if you are not going to leave plastic on the soil, hold off on putting down mulch until after the ground has had a chance to warm up. Although mulching conserves water and prevents the soil and soilborne diseases from splashing up on the plants, if you put it down too early, it will also shade and cool the soil. Because tomatoes love heat, allow the sun to warm the soil in the spring. After temperatures remain warm, both during the day and at night, you can add a layer of mulch to retain moisture.
Tomatoes need about 1 to 2 inches of water per week depending on the type of soil they are growing in. If rainfall does not provide this quantity, water plants thoroughly once or twice per week. One or two heavy soakings are better than many light sprinklings. Consider using drip irrigation or soaker hoses around your plants. These methods will help conserve moisture and avoid getting the foliage wet which can cause disease. Hoses can be laid near each plant above the soil but under the mulch layer.
Weeds should be controlled by shallow hoeing. Pull weeds near the tomato plants or cover with soil. A four inch mulch of straw will prevent weed growth, conserve water and keep flat grown tomatoes off the ground. Black plastic may be used in place of organic mulches. It is particularly important that unstaked plants be mulched with clean straw, black plastic or some other suitable material to keep the fruit off the ground and prevent rotting.
0 notes
Text

hey y’all, so here is my lame and ugly editing tutorial / normal routine that i do to my screens for my story, or any random edit i do. so i use two programs, gimp and pixlr. i use gimp primarily to blur my background or to apply a lens flare. for pixlr, i use it to resize, add light effect layers, text, and basically other photo editing options like contrast, brightness adjustment, etc. but for this tutorial specifically i’ll be only highlighting how i blur my pictures and add light leaks/layers onto them. :) thought i’d put this out there since there are some that are like me, without photoshop (or reshade) and are wondering how else to get their pics lookin cool n pretty -- check out the details below the cut to see how i do it! ;)
!!if your mobile im so sorry lol!!

step one: open up your gimp program and pull up the desired photo you’d like to edit. i normally keep my resolution at 66.7%. make sure the program also opens up a toolbox (sometimes it doesn’t, if it doesn’t go onto the top headers under Tools and then click Toolbox and then it should appear).

step two: so to BLUR my bg, look at your toolbox, and click the Lasso Tool i circled on the picture above. now, unlike photoshop where it’ll be able to outline automatically, on gimp you unfortunately have to freehand it (the struggle, i know, but you can do it lmao) so i basically outline along the edges of my sim and then make my way around so it can capture the background to be blurred. once you’ve connected your first point to your second, it’ll show up outlined like above.


step three: on the top of the screen there’s header options (lol idk how else to term this) to implement the blur action click Filters and as the picture shows, the drop down menu will have a Blur option, hover over it and click Focus blur. this is what i personally use, there are other options for blurring as seen.

step four: once you click Focus blur, this will pop up. it will show you a preview of how it will look and has options to change its type of depth, just play around with it til you’re content with it (ex on the tab Model --> Softness option which can increase the depth of blur also). however i just go with its automatic settings and click ok.

step five: now because you have to freehand with the Lasso tool, you will come across imperfections when outlining your sim. so after you’ve done the Focus blur, there will be patches of very obvious un-blurred parts around the sim. so to fix this what i do is click the Convolve tool. this is just a freehand tool to blur things out (which you can also do if you’re lazy or impatient at trying to outline the sim with the Lasso tool)
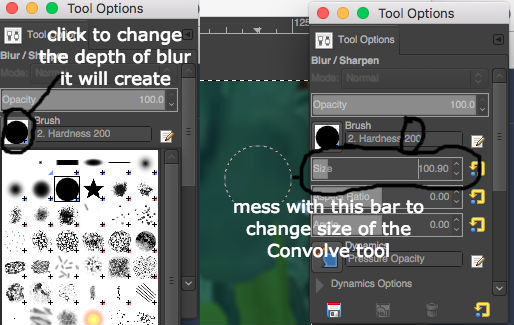
step six: so once you’ve clicked the Convolve tool, this box should pop up. on the picture to the left, click the black dot and it’ll open up different types of brushes seen above. choose the biggest dark dot. this will then change the option that’s seen next to it ‘Hardness 100′, however it says 200 because i manually put that to make it a stronger depth. (going any higher though doesn’t do anything). then, on the right, you can mess with the size bar to change the size of the tool. you’d make it like 100-500 if you want to blur out a big portion of the picture, or around 10-50 if you’re getting into small cracks and creases of a picture or detailed areas.
and that’s it for blurring! now save your photo by going File --> Export As --> Export.

OKAY that is all for GIMP, now onto PIXLR:
step one: so you have your pixlr program open, open up the picture you just saved from Gimp by pulling up File --> Open Image. i first like to resize my pictures first, i resize it to 800x430. after resizing them i’ll add my light leaks/effects. i basically grab these photos from google, all i enter in is “light leak overlays” and pick whichever i like and save it to my desktop. i also make sure the size of the pictures i find are at least 1,000x wide. i normally only use two layers for my pictures, one will be seen below.

step two: to open up that layer onto the picture, go under the header options Layer --> Open Image As Layer, so find the picture on your desktop and upload it. this will be called Layer 1. the more layers you add, it’ll then just be called Layer 2, 3, so forth...

step three (optional): it should then pop up like this over your image. hover onto the Move Layer cursor that i circled above to move the image around so that you can get the light leaks in a place you desire for the photo. but of course if you’re already content with where its at, just move on to the next step.

step four: once you’ve got your layer in your desired spot, go on to the right hand side, and there’ll be boxes and one of them will say Layers. make sure Layer 1 is highlighted as that will show the changes you’re about to make to the photo, if its not highlighted you will not see results. to make your original photo visible with the layer effect still on, click on Mode: Normal and a dropdown menu will appear. Choose Screen (can also do Layer). then mess with the Opacity so that you can both see the original photo as well as the light leak. i normally set my opacity to 50-60%, it’s not too harsh on the light and not too dim. just right. ;) lmao

step five: so the picture above is basically the after-look. (i also added another layer which is that light leak on the side, same process). and just to do my touch ups, i use the Sharpen tool for my sims’ faces or any details i want to stand out. then this is where i mess with other adjustments like brightness, saturation, etc, add grain. all of those options can be found under the Adjustments and Filter tabs. and like i wrote above, make sure on the Layers box, the Background is highlighted in blue as that’s the layer you are working on now.
and VOILA, this should be your result. (ft my ever so lovely Luna<3)

!!please please if you have any questions don’t be afraid to drop me an ask. this was probably horribly explained! i tried! but this is also my little give back to my followers! thanks for 800 and almost nearing 900! you guys r da best. kisses n hugs to you all <333!!
169 notes
·
View notes
Photo
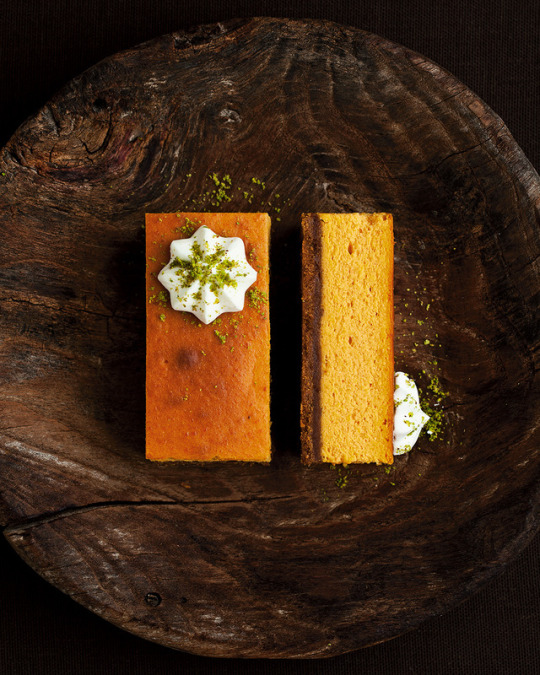
RECIPE: Deeply Pumpkiny Pumpkin Cheesecake (from The Artful Baker by Cenk Sönmezsoy)
Fitting 4.4 pounds of apples into a Bundt cake (Deeply Appley Apple Cake) felt like the biggest victory of my culinary adventure until I managed to squeeze 6.6 pounds of pumpkin into eight slices of cheesecake. That’s right: you’ll be eating close to a pound of pumpkin in every slice.
I owe this victory to Cook’s Illustrated. The magazine’s tip for achieving a concentrated flavor as well as a smooth and creamy texture in pumpkin cheesecake is genius—blotting canned pumpkin puree with paper towels to remove excess moisture before mixing it with the rest of the ingredients.
I always prefer to cook from scratch, so using canned pumpkin is out of the question for me. If you’d like to take a shortcut and have a favorite brand, feel free to use it, so long as you remove excess moisture as explained below.
Serves 8 to 10
CRUST
3½ tablespoons (1.7 ounces; 50 grams) unsalted butter, melted and cooled, plus more for pan
1 cups (210 grams) Cinnamon and Ginger Wafer Crumbs (see below)
FILLING
6.6 pounds (3 kilograms) fresh pumpkin
1¼ cups (250 grams) granulated sugar
14.1 ounces (400 grams) full-fat cream cheese, at room temperature
3 large eggs, at room temperature
1 cup (240 grams) heavy cream, at room temperature
GARNISH
½ cup (120 grams) Crème Fraîche, lightly whipped
2 tablespoons (11 grams) blanched pistachio flour
Set a rack in the middle of the oven and preheat the oven to 350°F (175°C).
Butter the bottom and sides of a 9-inch (23-cm) square baking pan. Line the pan with two overlapping strips of parchment paper that are the width of the pan bottom and long enough to cover the bottom and sides with 2 inches (5 cm) of overhang on each side. Butter the lower parchment to secure the top sheet.
To make the crust:
In a medium bowl, stir and mash the wafer crumbs and melted butter with a fork until the crumbs are evenly moistened. Scrape the mixture into the prepared pan and press it with the back of a spoon into an even layer on the bottom only. Bake until set, about 12 minutes. Set the pan on a wire rack to cool completely. Leave the oven on.
To make the filling:
Peel, seed, and cut the pumpkin into 1½-inch (4-cm) pieces. Measure out 4 pounds (1.8 kilograms) of pumpkin flesh for the pumpkin puree (reserve the rest for another use, such as a soup). Arrange the pumpkin in an even layer on a large rimmed baking sheet lined with parchment paper. Bake for 1 hour 10 minutes, stirring once halfway through the baking time. Set the sheet on a wire rack and let cool for 10 minutes. Reduce the oven temperature to 325°F (160°C).
Transfer the baked pumpkin pieces in batches to a fine-mesh strainer set over a large heatproof bowl and press hard with a silicone spatula until only coarse fibers are left in the strainer. Discard the solids left in the strainer after each batch. Scrape any puree clinging to the bottom of the strainer into the bowl.
Scrape the strained pumpkin puree onto a rimless baking sheet lined with three layers of paper towels and spread it evenly with a small offset spatula. Place three layers of paper towels over the puree and press lightly to blot. Once the paper towels on top are completely wet, peel them away and place another three layers of paper towels on top. Place another rimless baking sheet over the towels and carefully flip the whole thing so that the bottom baking sheet is now on top. Remove the top baking sheet and peel away the wet paper towels. Continue to blot and flip until the paper towels come up with only traces of moisture. It will take 4 to 5 rounds. You will have about 1¾ cups (400 to 450 grams) of pumpkin puree. (The pumpkin puree will keep, wrapped airtight, in the refrigerator for up to 3 days or in the freezer for up to 1 month. Bring to room temperature before using.)
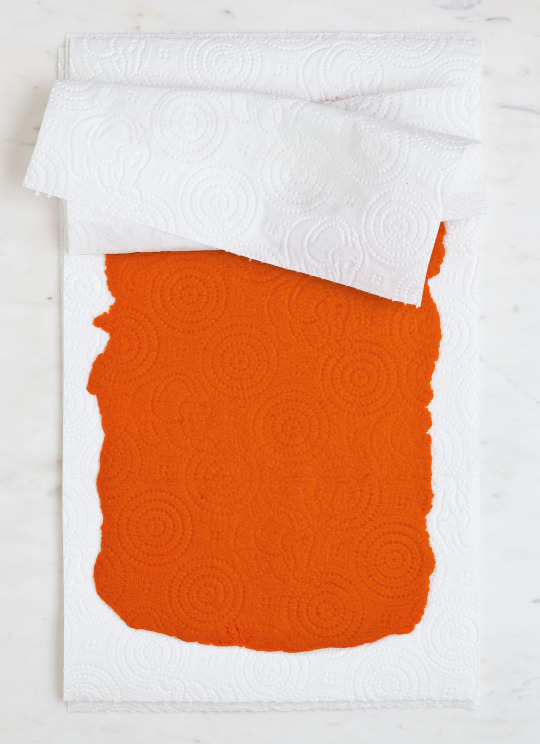
Measure out 1½ cups (390 grams) of the pumpkin puree (you may wish to sweeten the remaining puree to enjoy later as pumpkin butter), transfer it into a medium bowl, and stir in the sugar.
In the bowl of a stand mixer fitted with the whisk attachment, beat the cream cheese at medium speed until smooth, about 5 minutes. Add the sweetened pumpkin puree and beat until blended, about 3 minutes. Switch to the paddle attachment. Add the eggs and cream and beat at the lowest speed until blended, about 5 minutes, scraping down the sides of the bowl as needed. Meanwhile, put a kettle of water on to boil.
Scrape the batter into the prepared pan and spread it evenly with a small offset spatula.
Set the pan inside a large roasting pan and set it on the oven rack. Pour in boiling water until it reaches halfway up the sides of the pan. Close the oven door. Bake until the center of the cheesecake jiggles slightly when the pan is gently shaken, about 1 hour 15 minutes. Turn the oven off, prop the door slightly open with a wooden spoon, and let the cheesecake cool in the oven for 1 hour. Carefully remove the pan from the water bath and set the pan on a wire rack to cool completely. Cover the pan with a sheet of aluminum foil, poking holes in the foil with a fork to prevent condensation, and refrigerate for at least 5 hours, or preferably overnight.
To garnish and serve:
Using the parchment overhang as handles, lift the cheesecake out of the pan and transfer it to a cutting board. Cut the cheesecake in half, then cut each half crosswise into 4 or 5 equal rectangles. Transfer the pieces to a serving plate. Fit a small pastry bag with a medium closed 7 pointed star tip (Ateco #846), twist the tip of the bag, place it in a small glass, and fold the top of the bag down over the edge of the glass. Scrape the crème fraiche into the bag, unfold the cuff, and twist to enclose the crème fraiche. Holding the pastry bag at a 90-degree angle to the surface of the cheesecake, pipe a star onto one end of each rectangle. Sprinkle the pistachio flour evenly over the crème fraiche stars and serve cold.
Storage:
The cheesecake slices will keep, covered with an aluminum foil tent (poke holes in the foil with a fork to prevent condensation), in the refrigerator for up to 5 days.
CINNAMON & GINGER WAFER CRUMBS
Makes 1¾ cups (210 grams)
¾ cup (105 grams) all-purpose flour
¼ cup (40 grams) confectioners’ sugar
Pinch of fine sea salt
4 tablespoons plus 1 teaspoon (2.2 ounces; 60 grams) cold unsalted butter, cut into small pieces
1 tablespoon (20 grams) maple syrup
½ teaspoon (2 grams) ground cinnamon
½ teaspoon (2 grams) ground ginger
Set a rack in the middle of the oven and preheat the oven to 350°F (175°C).
In the bowl of a food processor fitted with a metal blade, process the flour, sugar, and salt until blended. Add the butter pieces and pulse until coarse crumbs form. Add the maple syrup and process until the dough gathers around the blade, about 1 minute.
Scrape the dough onto a large sheet of parchment paper. Cover with another sheet of parchment and roll out the dough to an even thickness of ⅛ inch (3 mm). Transfer the dough and parchment to a baking sheet and peel off the top parchment.
Bake until golden on top and light brown on the edges, 14 to 16 minutes. Remove the baking sheet from the oven and transfer the wafer with its parchment onto a wire rack to cool completely.
Break up the wafer into large pieces and transfer them to the food processor. Pulse until crumbs form, about 1 minute. The crumbs are now ready to use in recipes.
Storage: The wafer crumbs will keep in an airtight container at room temperature for up to 3 days, in the refrigerator for up to 1 week, or in the freezer for up to 2 months.
A collection of more than 100 extraordinary desserts—all with photos and meticulous instructions—by Cenk Sönmezsoy, creator of the internationally acclaimed blog Cafe Fernando.
Written, styled, photographed, and designed by Cenk Sönmezsoy, The Artful Baker shares the inspiring story of a passionate home baker, beginning with his years after graduate school in San Francisco and showcasing the fruits of a baking obsession he cultivated after returning home to Istanbul. Sönmezsoy’s stories and uniquely styled images, together with his original creations and fresh take on traditional recipes, offer a thoughtful and emotional window into the life of this luminary artist.
The Artful Baker is comprised of almost entirely new content, with a few updated versions of readers’ favorites from his blog, such as Brownie Wears Lace, his signature brownies topped with blond chocolate ganache and bittersweet chocolate lace (originally commissioned by Dolce & Gabbana and awarded “Best Original Baking and Desserts Recipe” by Saveur magazine); Raspberry Jewel Pluot Galette, a recipe inspired by Chez Panisse’s 40th year anniversary celebrations; and Devil Wears Chocolate, his magnificent devil’s food cake that graces the cover of the book.
Each chapter highlights a variety of indulgences, from cookies to cakes and tarts to ice creams, including recipes like Pistachio and Matcha Sablés; Tahini and Leblebi (double-roasted chickpeas) Swirl Brownies; Sakura Madeleines; Sourdough Simit, the beloved ring-shaped Turkish bread beaded with sesame seeds; Isabella Grape and Kefir Ice Cream; Pomegranate Jam; and Blanche, a berry tart named after the Golden Girl Blanche Devereaux.
Every recipe in The Artful Baker has gone through a meticulous development phase, tested by an army of home bakers having varying levels of skill, equipment, and access to ingredients, and revised to ensure that they will work flawlessly in any kitchen. Measurements of ingredients are provided in both volume and weight (grams). Where a volume measurement isn’t useful, weight measurements are provided in both ounces and grams.
For more information, click here.
#abramsbooks#abrams books#artful baker#the artful baker#cenk sonmezsoy#pumpkin cheesecake#free recipe#recipe friday#recipe#baking#baker#fall recipe#pumpkin#pumpkin recipe#cheesecake#cheesecake recipe#cafe fernando
9 notes
·
View notes
Text
How to Choose the Best Mechanical Keyboard in 2020
We spend a lot of time talking about the best CPUs or GPUs to make your computer more awesome, but you might be forgetting one upgrade that can change the experience drastically for the better: a mechanical keyboard. I make no secret of my obsession with mechanical keyboards as both a hobby and a tool of my profession. Naturally, I spend a lot of money on them. You don’t need to, though. Mechanical keyboards have never been cheaper or better, and it’s an upgrade you’ll benefit from greatly. You might be spending more time than usual at your computer as we all hunker down to limit the coronavirus pandemic, so this is a good time to jump in. But…which board should you get? And what’s all this about switches? We’re here to help.
What Makes a Keyboard Mechanical and Why You Should Have One
The keyboards that come with desktop computers are usually some version of the rubber dome design. You push the key all the way down, and the contact on the dome triggers a press. The downside is that the rubber membranes are mushy, inconsistent, and you have to push all the way down every time. Laptops aren’t much better with their scissor switches. They offer a little tactility, but the low travel and mushiness are still grating over time.
A mechanical keyboard can best be described as any board with switches that actuate before the point of bottoming out. For example, Cherry-style metal contact switches. When you press the key down, a stem moves into the housing and allows metal contacts to touch. This is what fires off each letter. Other types of switches are considered mechanical but have entirely different mechanisms. Topre switches are popular but rather expensive. These switches have a stiff rubber dome and a conical spring. Here, the actuation is triggered by a change in capacitance of the spring as you press, and the tactile bump comes from the dome collapsing. There are also Alps-style metal contacts, buckling springs, and Hall effect switches. These are all fairly uncommon in modern boards, though.
Using a mechanical keyboard can make you a much more effective typist thanks to the precise and consistent feel of the keys. Many switches also have high tactility that helps you estimate when a press will register, allowing you to release and move on to the next key without bottoming out. For gaming, you can use switches that are much smoother and faster to actuate than the keys on cheap membrane boards. The sound of a clicky switch can also be fun, provided you don’t have nearby coworkers to annoy.
Mechanical boards are also built to last. Each switch is good for millions of presses. Even with heavy use, a good mechanical keyboard can last many years. Enthusiasts actually harvest switches from decades-old keyboards with bad electronics to use in newly build custom boards.
Choosing a Form Factor
The first step in choosing the right keyboard is deciding what layout you want. The traditional full-size board is still the most common, but you might want to use your mechanical transition to change it up. A full-size board has all the keys you need to operate a computer without worrying about any function layers. There’s a full number pad as well. The main drawback of this size is that it’s rather large and inefficient. You have to move your hands rather far to reach everything and the number pad means your mouse will be pushed farther away from your main typing area. This is why I don’t like full-size boards personally.
The next step down is tenkeyless (TKL), sometimes known as 80 percent keyboards. These boards still don’t rely on function layers for basic features, but there’s no number pad. There’s still a number row, of course. If this sounds stressful to you, just give it some thought. How often do you really need a dedicated number pad? Unless you’re doing data entry, you can probably do just fine without one. This makes the board much smaller and brings the mouse in closer.
The next step down in mainstream boards is 60 percent, which has become popular in the last few years. A 60 percent board just has the alphas, number row, and modifiers. There are no dedicated arrow keys, no F-row, and no number pad. All those features are there, but they’re in the function layer. So, you hold function and press a different key. For example, the arrows are usually Fn+WASD or Fn+JIKL. The main advantage of the 60 percent form factor is that it’s compact and efficient once you get used to the function layer.
If none of those do it for you, there are some more exotic layouts that are just catching on. The 65 percent size is smaller than a TKL, but you get arrow keys and a few more keys like delete, page up/down, and so on. This is a good middle ground that I’m personally very into. The WhiteFox is a 65 percent board. They don’t take up too much space, but they reduce your dependence on function layers.
There’s also the super-small 40 percent category. These boards have just alpha keys and a few modifiers. They’re essentially pocket size and usually have at least two function-key layers to get all the basic keyboard commands covered. If you get good with a 40 percent board, you can be extremely efficient as everything is so close together.
Choosing a Switch
So, you know what size board you want, but what do you want typing to feel like? Cherry’s main mechanical switch patents expired a few years ago, so there are a ton of clone switches that are Cherry-compatible. The vast majority of boards use Cherry and Cherry clone switches, so let’s go over those.
The first order of business should be to get a switch tester. You can get one for under $20 on Amazon that has all the major Cherry variants: blue, green, brown, clear, red, and black. These switches come in three different varieties: clicky (blue and green), tactile (brown and clear), and linear (black and red). Each of those categories is split into a heavier and lighter version. Here’s a chart with the weights of each. Note: the “color codes” of clone switches are usually the same for switches with the same properties.
I can’t tell you which switches you will prefer, but I’ll note that heavy typists tend to use tactile and clicky switches, but blacks are a common choice as well. Don’t make a final decision yet, though. Your goal should be to figure out how what general type of switch you like and what weight feels best. Cherry is not the only game in town anymore, so you might be able to mix and match some of these properties to find the perfect switch.
Some of the most popular Cherry-compatible switches come from Gateron and Kailh. Gateron switches look like Cherry switches, but Kailh has a variety of innovative choices. For example, the “box” switches like the Pale Blue below are less wobbly than traditional Cherry-style stems.
Kailh x Novelkeys Box Pale Blue switch.
If you find you like tactile switches, you may consider trying a Topre board. There are very few switch testers with Topre domes, so you might need to jump in with a real keyboard like the HHKB2. Keep in mind, if you fall in love with Topre, that limits your choice of boards and keycaps. It also means you’ll spend a lot more on the keyboard.
Picking a Pre-Built Board
Now you know what pieces you want, so the challenge is finding the right board. I will say off the bat that I think you should steer clear of “gaming-oriented” boards. They try to lure you in with flashy lights, but they require annoying, buggy desktop software and often use poorer quality clone switches. Cherry, Gateron, and Kailh are all respected switch manufacturers.
A good starting point is WASD Keyboards, which makes boards in full, TKL, and 60 percent form factors. The 60 percent option is actually a re-branded Poker 3, which is available from multiple retailers. This is an excellent little board with programmable layers and a full aluminum case. WASD has a full selection of Cherry switches, as well as some more exotic options like Zealio and Cherry. That’s rare in pre-build keyboards. MechanicalKeyboards.com has numerous options like the aforementioned Vortex Poker 3, but also well-reviewed boards from Ducky, Leopold, and more.
All of the above boards are priced competitively but are not particularly inexpensive. Rantopad makes some nice TKL boards with Gateron switches. Those are a little cheaper than Cherry switches, but I think they’re just as good. You can get these for under $100.
I’m also very much a fan of the Magicforce 68 (above), which is a 65 percent board that can be had for around $60-70 with either Gateron or Cherry switches of your choice. These boards are excellent values and a good way to try a switch out in practice without dropping a lot of cash. Drop (formerly Massdrop) also has several high-end 65 percent and tenkeyless boards available most of the time. The Alt is a fully-programmable compact 65 percent, and the Ctrl is a similar tenkeyless.
Input Club’s Kono Store has a number of solid boards under the Hexgears brand. IC’s own WhiteFox, NightFox, and Kira boards are sold out at the moment. When and if they come back, those are great options for a bit more money.
Getting in Deep
So you have a keyboard, now what? Depending on how crazy you want to get, you can start customizing your board with custom keycaps and cables. You could even just decide to build your own keyboard. But why would you want to do that? With a custom board, you can put your experience with switch testers to work and find the perfect switch. Most of the cool, innovative switches in the keyboard world aren’t used in retail keyboards.
The aforementioned Zealio switches are popular and come in many variants. There are also numerous Kailh switches that offer additional spring weights and click designs that don’t have a Cherry equivalent—check out the selection at retailers like NovelKeys. There are a handful of hot-swappable boards out there, but you’ll probably have to learn to solder if you want a keyboard with these exotic switches.
The KBD75 from KBDfans.
If you want a custom board but are apprehensive about soldering, KBDfans might be your best bet. This China-based keyboard manufacturer sells DIY kits, but there are also finished boards in stock on its website. You can even buy a DIY kit of certain boards and pay $17 extra to have it assembled with the switches of your choice.
If you don’t want to jump right into custom boards, you can still jazz up your mechanical keyboard with some custom keysets. Just make sure you get a board with a mostly standard layout. You can look at the bottom row to get a good idea of whether or not a board is standard. It should have 1.25-unit modifiers and a 6.25-unit space bar. Anything else and custom keysets get more expensive and rare.
Most keysets are sold in group buys, which you have to join prior to production, then wait for the set to be produced. This can take months and gets pretty confusing. The easiest way is to join buys organized by Massdrop. You can also buy some custom sets straight-up from companies like Pimp My Keyboard and Originative. Almost every custom keyset is MX-only. If you get a Topre (or the rarer Alps), you’re out of luck here.
Expect to pay at least $60-70 for a basic set and well over $100 for a high-end custom set. You get what you pay for, though. Keycaps made from PBT or thick double-shot ABS are more durable and pleasant to type on than the caps that come with keyboards. Even the nicer mechanical keyboards don’t go all out on the keycaps. I guess they assume you’ll buy something fancy if you care that much.
The Zephyr with GMK Nautilus keycaps.
If you do decide to build a custom board, be prepared to spend at least a few hundred dollars on the kit. These keyboards are in high enough demand to command high prices, but not enough to be in mass production. So, you can easily spend $500 or more before you even get to keycaps or switches. The Zephyr above is a $600 kit that includes a PCB, plate, and case. A more modest custom kit might cost $250-300.
I’m going to close by mentioning something that sounds absolutely bananas to people who aren’t into the hobby, but you’ll get a kick out of it, I assume. For additional customization, there are “artisan keycaps.” They’re hand-sculpted and cast single keycaps that are meant to be used as decoration on keyboards (see above). They are mostly made in small batches and sold in raffles, as well as the occasional group buy on Drop. They’re expensive, and you’ll pay even more if you miss the group buy and have to buy second-hand from someone in the community. Maybe this guide will be your first step along the way to that kind of incoherent madness. I’m sorry.
Check out our ExtremeTech Explains series for more in-depth coverage of today’s hottest tech topics.
Now read:
How to Build a Star Trek: The Next Generation Mechanical Keyboard
Building a NASA-Themed Mechanical Keyboard
PCMag’s guide to the Best Mechanical Keyboards
from ExtremeTechExtremeTech https://www.extremetech.com/computing/241872-choose-right-mechanical-keyboard
from Blogger http://componentplanet.blogspot.com/2020/03/how-to-choose-best-mechanical-keyboard.html
0 notes
Text
Multyday trip guidence for hikers
Do you have hiking or camping on your agenda? Mapping out your wilderness nutrition needs is important: There's plenty to consider besides simply grabbing an energy bar or a bottle of water. Follow these tips to ensure you have a nourishing and safe food experience on your next outdoor adventure.
Have a Plan
Your food and water needs are generally higher than usual on activity-based excursions. Pay extra special attention to packing plenty of fluids for hot weather adventures. Some other key considerations before your hiking or camping trip include:
• Length of the trip
• What foods and beverages you'll carry
• How you'll eat and drink
• If bringing a cooler is an option
• What food-related tools you'll need
It's Essential to Stay Hydrated
Pre-hydrate by drinking at least 4 cups of water before a hike so you have less to carry. Then, a good rule of thumb is to plan for about 2 cups of fluid for every hour of hiking. Make sure you can bring or access clean drinking water during your hike.
what to wear on a hike and still look cute
http://www.savvyhiking.com/what-to-wear-on-a-hike-and-still-look-cute
For a Hike or Day Trip...
You can pack perishable foods, such as sandwiches, just be sure you have a cold source (such as an ice pack) to keep foods properly chilled to below 40°F. The more you stash in a backpack, the harder it is to hike, so opt mainly for non-perishable foods that are relatively lightweight and nutrient dense, such as:
• Trail mix
• Nuts, seeds, nut-based bars or nut butter packs
• Fresh, whole fruit that doesn’t require refrigeration such as apples, bananas and oranges
• Dried or freeze-dried fruits and veggies
• Energy bars, chews or gels
• Granola or granola bars
• Ready-made tuna salad pouches
• Whole-grain tortillas
• Shelf-stable, dried jerky, such as poultry, salmon or meat jerky
keto hiking food
http://www.savvyhiking.com/tips-to-choosing-keto-hiking-food-for-a-multi-day-hike
For Camping or Multi-Day Trips...
It's a little more challenging to pack food for days at a time. The first day you'll be able to eat perishable foods if you have a cooler; but after that, map out your meals so you'll have what you enjoy and need. Otherwise, include any of these shelf-stable, easily-packed basics to sustain you:
• Easy-to-carry foods mentioned above
• Ready-to-eat cereal
• Fruit or vegetable puree in squeezable pouches (such as applesauce)
• Poultry or fish pouches, or canned fish, poultry or meat in individual or regular servings
• Individual packets of mayo, mustard, taco sauce and/or soy sauce
• Whole-grain pasta, couscous, rice mix, pancake mix, hot cereal, dried soups and dehydrated foods (if you have the ability to boil drinkable water)
• Marshmallows — for a campfire dessert, of course
• Bottled water, and possibly powdered beverage mixes
ecotek outdoors hybern8
http://www.savvyhiking.com/top-3-sleeping-pads-for-hiking-great-value-for-your-money
Don't Forget Proper Food Safety Practices
Always follow good food safety practices — from packing to plating. Remember that perishable food cannot be kept out in hot weather (90°F or higher) for more than one hour; in mild weather for more than two hours. Otherwise, these foods become unsafe to eat and should be thrown out. Bring these food safety essentials:
• Disposable wipes, hand sanitizer or biodegradable soap
• Bowls and plates
• Kettle or cooking pot
• Eating and cooking utensils
• Can opener
• Ice packs, if applicable
• Trash bags
• Portable water filters or water purification tablets
• Thermometers for cooler and cooked meat, if applicable
And follow these food safety rules:
• Wash hands often. This includes before and after eating. If you’re unable to wash your hands, a hand sanitizer with at least 60 percent alcohol may help reduce bacteria and germs.
• Keep raw meats and ready-to-eat foods separate. Use extra plates that you've packed — one for raw and one for prepared foods.
• Cook to proper temperatures. Use a food thermometer to be sure cooked food has reached a safe internal temperature.
• When possible, refrigerate promptly below 40°F. Of course, if you don't have a fridge, pack perishable food, including meat or poultry, with plenty of ice or ice packs in a well-insulated cooler to keep the temperature below 40°F. Store leftovers in small, clean covered containers in the cooler only if it still has ice. And keep the cooler in as cool a place as possible.
• Asheville is an outdoor lover’s paradise, in large measure because of its many scenic hiking trails. Enthusiasts come from far and wide to explore the Blue Ridge Mountains. However, you don’t have to be a seasoned hiker to enjoy what nature has to offer. Whether you are beginner or simply want an easy nature jaunt suitable for the entire family, these trails fit the bill.
• The loop of the Graveyard Fields trail is one of the most challenging and popular hikes in the area. The flat valley of the Graveyard Fields Lower Falls offers an easy stroll, although no less captivating. The trail wends through colorful thickets of lush mountain laurel and rhododendron. There are even blueberries in late summer! A multi-stair boardwalk leads to the Lower Falls and two splendid waterfalls.
• Located on an isolated tract of Pisgah National Forest property near Old Fort, just south of I-40, Catawba Falls is an easy trek along the Catawba River with a gradual uphill climb leading to one of Western North Carolina’s most beautiful waterfalls. If you’re feeling particularly adventurous, take a short stroll along one or two of the short side trails.
• Hikers who make their way through the tunnels of rhododendron, birch trees and wildflowers of the Craggy Pinnacle Trail will be rewarded with 360-degree views unparalleled anywhere in the Blue Ridge Mountains. Even though the Craggy Pinnacle is just a 30-minute drive from Asheville, the mile-high elevation can put it in a completely different weather zone. Expect temperatures to be 10-15 degrees lower which, depending on the season, can be a good or bad thing. Be prepared.
lattcure outfitters sleeping bag
https://www.hikingbay.com/finding-the-best-lightweight-sleeping-bag-for-hiking
• The challenging 1150 mile Mountains-to-the-Sea trail runs from the Great Smoky Mountains to the Outer Banks but you can jump on a pristine segment near Asheville. The Lunch Rocks trail begins at the Folk Art Center and terminates at Lunch Rocks. See the rocky outcrops rock system and the unique high elevation forests. When you reach your destination, soak in the splendid view of Haw Creek valley while you take a breather and enjoy lunch. This is mandatory at a place called Lunch Rocks.
• The interactive Great Woodland Adventure at Chimney Rock State Park is a perfect nature walk for families with small children.
• Tips for the Novice Hiker
• Dress appropriately and in layers. Choose breathable, quick-drying material like nylon or polyester for your outerwear. Good shoes are critical; tried-and-true ones even more so. This is not the time to test drive a new pair.
• Carry the necessities. There’s no need to pack for a weekend expedition but don’t forget the essentials – water, a snack, a fully-charged cell phone, bandaids and a whistle to summon help, if necessary.
• Take a trail map. And follow the prescribed route to protect yourself and the surrounding habitat.
• Check the weather. If inclement weather is in the forecast, postpone or cancel your outing rather than mar your first hiking experience.
• Tell a friend. Let someone where you’re going and when you expect to return.
0 notes
Text
What Does skin care Mean?
Points: The citric acid in lemon juice is a superb cleanser, and so is milk. Yogurt can be a very good cleanser, as well as a very good softener. This is important due to the fact using lemon juice on your own will make your skin sense stretched and dried.
Any use of this information is in the user’s discretion. For stepto remedies or emergencies and medication adjustments, remember to consult with a healthcare Experienced.
It is completely Okay to make use of egg white masks proposed previously mentioned for oily face. The truth is, it helps to deep cleanse your pores and remove surplus Dust.
Summer months is almost on us and we're super enthusiastic! But as temperatures rise and we spend much more time outdoors, we even have to acquire the suitable basic safety measures essential. Listed below are our greatest strategies on how to remain safe all summer!
Your just lately seen goods and highlighted tips › Check out or edit your browsing background
Implement moisturizer or lotion though your skin continues to be moist. Use facial moisturizers and creams with your face, and lotions or body butter on your body. Change the kind of moisturizer or lotion you use dependant upon the year.
bdw i have an issue … Can a woman take in tangy oranges in the course of her intervals …. I indicate vitt c contented eatables
Differing types of honey masks for acne are applied for various skin types. For https://www.wikihow.com/Establish-an-Effective-Skincare-Routine , dry skin, oily skin, and delicate skin could reap the benefits of diverse kinds of honey masks. Underneath are many of the most generally utilised combinations, and you should be able to find the a single that matches your preferences.
We turned to our Senior Technological innovation Chemist, Clara Le Berre at Formulation Technology in R&D to give us the specifics in order that we will all remain Solar clever this year! Examine now Ask The Pro SKINCARE CLAIMS: Simple fact OR Fantasy? The natural beauty sector is usually a jungle where by the survival on the very well browse applies. Do your research, get to be aware of the skin you might be in and come across your ideal skin care match! We will help you form out exactly what is accurate or Phony, burst the myth bubbles and manual you the place to put your hard work (and dollars!).
• Those with oily skin can apply a handmade face mask geared up by including two tablespoons of eco-friendly clay, just one tablespoon of powdered milk, and a little bit h2o in freshly squeezed orange juice taken from the medium-sized orange.
We're going to use your info to deal with your account and requests and for research and analytics. We may possibly share your facts with reliable events performing on our behalf and other The Body Store companies.
Honey includes a hefty serving of antioxidants for moisturized and vibrant skin. Polyphenols in honey demolish free of charge radicals that cause oxidative tension in skin cells, therefore slowing down the aging strategy of skin.
How I use it is the fact that I mix orange peel powder coupled with chickpea flour, lemon n a pinch of turmeric. My face is blessed using a wonderful glow n shine
This mask might glimpse relatively Odd on This web site meant for natural and organic solutions, but using Aspirin – Honey Mask for dealing with acne is also an effective and simple solution.
Top skin care Secrets
Instructions: To variety this anti getting older skin care face mask which also contains a lightening influence, place all of the substances inside a blender, or mash by hand within a bowl. Use your fingers to distribute the mask more than your face and neck and depart it on for a minimum of 30 minutes, ideally for a longer period, in advance of eradicating.
Co-authored by wikiHow Staff members
If you want the many benefits of the antioxidants and caffeine, you could do what I’ve been performing these days and set a fall of inexperienced tea extract (or coffee extract!) inside your moisturizer. Really like!!! I’ve been utilizing this one >>
[1] It really is Light enough to make use of on sensitive skin, and if you add other ingredients to it, it might help with other skin ailments as well, such as extreme oiliness or discoloration.
The egg white not only enable nourish and firm your skin, nevertheless it will also help tighten the pores[one] Discard the egg yolk or reserve it for an additional recipe. You may use the egg yolk for making a nourishing face mask. Check with the section in this article on earning a nourishing face mask to learn the way.
We use cookies to make certain we supply you with the greatest experience on our Internet site. This consists of cookies from third party social networking Sites and ad networks. These kinds of third party cookies could monitor your use on Boldsky web pages for much better rendering.
but I've sensitive acne inclined skin (with a few new wrinkles as well :/ I'm only 27 decades outdated even though) is it Alright for me?!
Effects from the usage of any products or expert services stated on the site may differ with regards to the person and thedermreview.com tends to make no warranty concerning the final results it's possible you'll encounter.
Im likely to consider your mask this week I just want to clarify heat h2o to open pores, utilize mask beaten egg whites with witch hazel, usel facial cleanser and moisturizer immediately after
An egg white mask is made out of Uncooked eggs that have had their yolks taken off. Once the eggs are separated, the egg whites are combined right into a frothy foam after which spread above the skin of the face until they dry.
A further actually amazing advantage of coffee placed on the skin is usually that it increases the manufacture of collagen and elastin. The caffeine in coffee minimizes great strains and shields against the lack of humidity, which makes it The perfect choice for anti-growing old.
Certainly, you'll be able to peel it off. It may be difficult to do if you employ a skinny layer nevertheless. I don’t Believe it could assist get rid of facial hair; at least it hasn’t for me so far.
Some fruits During this face pack like orange, lime and lemon is abundant source of citric acid. So be careful while incorporating this fruit juice for the reason that an excessive amount can result in acid burns. In case your skin is sensitive, you need added aware of this fruits.
Mash the banana and incorporate exact same degree of yoghurt and mix both equally the ingredients well. Now utilize this paste all over the face and palms and go away for 20 minutes to dry and after that rinse it off.
The yeast face mask Diaries
(ii) Skin beneath the eyes is rather fragile and involves daily moisturizing to help keep it clear of problems and wrinkles. Castor oil acts for a loaded moisturizer that may be used each day for trying to keep the skin underneath the eyes soft and supple and also avoiding wrinkles from appearing.
Thanks Martha & yes I entirely agree with you..From time to time It truly is much better to make use of the regular kitchen area products and solutions for skin care than substantial-stop skin care products and solutions.
I have really oily skin and a few open up pores on nose and chiks.What exactly i do for lowering these open pores at the earliest opportunity
I work with a girl that's in her 60's. She came in glowing just one morning just previous week, she appeared young and refreshed. She instructed me concerning this. She says it will eventually have a yr off of you. So Really don't snicker till you are attempting it....
Ooo! Adore that, Elizabeth! I used to put aloe on my face (and hair!), but haven’t in awhile. I blew from the leaves on my aloe plant so swiftly undertaking that, but I like the thought of obtaining the huge types and undertaking it the way you do.
Let your acne and tough skin complications go away You'll be able to use these treatments to remove dark circles:
My skin sort is regular,Oily only Once i get up in morning.I dont want to chance my face skin,i would like to moisturize my face but don’t understand how..I don’t think on these nowadays creams.I need purely natural things.Can u pls guidebook me for glowing crystal clear skin.
Lately I am observing dry skin all around my eyes and my lips. Could you be sure to suggest any home remedies for that. Any guidelines for eliminating black head for my teenager daughter…Value your reply and thank you a great deal for putting up amazing guidelines. Extremely helpful..
Method: Have a ripe banana and mash it which has a spoon or even a fork inside a bowl until it sorts a smooth lump free pulp. Include 1 tsp. of honey and 1 tsp. of lemon juice and mix the ingredients carefully. Clean your face by using a gentle soap and utilize a soft towel to pat it dry.
This mask by itself gained’t dispose of the acne episodes. You might have to try this mask together with other home-cure.
It is fairly common understanding that oranges certainly are a godsend for your personal skin. What isn’t emphasised adequate, nevertheless, is the fact that On the subject of rejuvenating your lackluster skin, probably the most potent Section of the fruit is, in truth, it’s peel.
On this economy, why spend $30 or even more on a leg wax when you are able to do it you? I've many pals who wax their very own legs And that i identified a recipe for just a sugar "wax" to the Double X Web page for Females. Editor Hanna Rosin shares her family members's recipe.
I have a small, compact pimple on my forehead(tzone) from so many years, I have consulted the dermatologist also they gave some creams for software, Until I exploit Individuals creams,my forehead is obvious after I ended using once more smaller acne will begin on my forehead.
Soon after getting rid of this mask choose an ice dice protect it that has a clear fabric and utilize this into your face as it will eventually clog the open up pores and provides you a refreshing on the lookout skin.
New Step by Step Map For yeast face mask
In Girls of coloration, skin may perhaps appear ashy or boring from useless skin buildup. These face masks, coupled with typical exfoliation and day-to-day use of moisturizers should soothe dry, chapped skin.
You'll be able to nonetheless it's advised you use a darkly colored glass bottle, not plastic, for purity. Unquestionably use within a couple of days because the oil properties will reduce with time and warmth.
Natural and residential designed products are good for face since it dose not occur side influence. I like organic and natural face clean & I continue to keep it in my hand bag. Reply
Omg thank you quite valuable I just completed washing my face Using the Banana,limon,honey and let me explain to u my skin is flawless I really like how you don't have to use to many ingridience.. And u get an excellent outcome incredibly pleased thank u:)
Masks really should stay on for ten-15 minutes. I like washing masks off having a steaming warm washcloth. I run a washcloth less than hot water, squeeze out the excess water and after that press to my face for an entire moment. I then gently clean from the mask in a circular motion. Washcloths are good for exfoliating.
In the morning, a splash of lukewarm water is all you require. In https://en.search.wordpress.com/?src=organic&q=skin+care+tips have Tremendous oily skin, you could cleanse your skin once again in the morning. Never ever clean your face with scorching or chilly drinking water (both can result in broken capillaries).
Generating your own personal homemade face masks and scrubs is pretty easy. Why pay for a retail outlet-bought face mask when You can utilize essential ingredients uncovered across the property to create masks that cost pennies?
It can be your decision. You ought to do it following washing your face, and that is Generally completed each morning and night. A lot of people use masks in the night, as which is after they have one of the most time.
so remember to recommend me the answer for each.I'm incredibly thankful for you make sure you take care of my problem.am expecting your reply
According to the BBC, a person through the name of Sam Edwards from Wrexham, Wales credited honey with conserving his leg! Right after staying Lower by a koi carp, he grew to become infected with Mycobacterium marinum and made a scarce skin ailment.
Having said that, https://www.facebook.com/steptoremedies/posts/2087800381313231 of currently aren't your mother's toners of a pair many years back. They are much far more gentle, stuffed with antioxidants and skin brighteners and might make even the driest skin seem vivid.
Response: Any honey will do, but I highly endorse utilizing raw, unfiltered honey for the face mask as it retains much more in the potent therapeutic Homes.
I would want to uncover something which support the skin to return to a firmer point out… it just began to turn into a little bit… euh… slack… at certain space.
two. Insert coffee powder, sugar and cinnamon powder into your coconut oil and mix every one of the ingredients jointly.
Not known Factual Statements About honey face mask
This pimple-battling face mask has 3 powerhouse elements you can come across in each individual kitchen. It’s uncomplicated to generate and Tremendous reasonably priced; you merely can’t afford to miss the various Gains!
How frequently to make use of this face mask? Never use each day, as in excess of exfoliation of skin is not really required. Use it ever alternative day or 3 occasions weekly.
I have attempted lots of dwelling facials, but I've never heard about, or tried using a banana mask right before. This is so remarkable :). I can not hold out to test it. Many thanks for sharing, and also you're images are wonderful.
[30] Some gurus suggest avoiding lemon juice all collectively, as They're acidic and may irritate skin by disrupting the skin’s pure pH harmony. Safer choices contain pineapple or papaya blended with simple unsweetened yogurt.[31] Some industry experts alert from using sugar to exfoliate skin, as it may cause little tears with your skin, building your skin rough, dry, and flakey In the end.[32] Other experts advise in opposition to sugar and declare that it really hastens ageing by binding to proteins such as collagen.[33]
I think I’ll actually Merge three and 4 for the reason that I have dry and inflamed skin. Among the benefits of employing these components is that they received’t respond badly with each other like atore purchased ones could possibly!
Clean your face with heat water to open up up your pores. Employing clean up arms or maybe a cotton ball, apply the mixture on to your face, staying away from the sensitive areas about your mouth and eyes.
Depart on for 5 to quarter-hour. You'll probably sense some light tingling and tightening. This is actually the mask accomplishing its position! If your skin starts to melt away, nevertheless, wash the mask off immediately.
Hi Amy right after readin your remark I had been ready to reach the summary that coconut oil is another point I respond to that makes me vulnerable to cystic acne always.
Thank you, KoraleeP and WhiteMuse! Glad to carry banana face masks in your focus, These are really effective nonetheless very easily offered and pure.
You are able to do the egg white facial as aspect of the weekly skin servicing regime. For face masks specific to preventing excessively oily skin, take a look at this hub as a substitute: ...
thanks a great deal of Kelly.. My skin appears so very each time right after i use this mix.. my skin recuperating as well .. And that i constantly do utilize this combine in advance of any significant function plus the glow genuinely lasts pretty prolonged more than enough for until the top of activities.. enjoy u
I ponder what my Duchess will imagine all of that scrumptious egg on my face. Duchess is my attractive cat.
This written content is accurate and legitimate to the most beneficial in the writer’s know-how and is not intended to substitute for formal and individualized suggestions from a professional Specialist.
This stone mask from the pre-ceramic neolithic period dates to 7000 BC and is probably the oldest mask on earth (Musée "Bible et Terre Sainte")
pineapple face mask for Dummies
Honey is made up of a hefty serving of antioxidants for moisturized and vibrant skin. Polyphenols in honey wipe out free of charge radicals that cause oxidative stress in skin cells, thus slowing down the ageing means of skin.
https://www.youtube.com/watch?v=SB0QLruqRrQ : The apple honey mask will work very best when it’s contemporary. Put simply, immediately after preparing, you shouldn’t keep it in the refrigerator to use afterwards. Because it is so quick and straightforward to arrange, make it just before you decide to utilize it.
Also, you can increase aloe vera to the combination. It can be full of antioxidants that fight totally free radicals together with vitamin E together with other nutrients that nourish and enrich your skin, which makes it much more elastic and clean.
I started out working with black tea bags as my warm compresses, and afterwards I would dab honey above the soar. Within just one-2 times, every one of the an infection experienced drawn to the surface and my chills/fever went absent. Sorry for the details, but I'm a real believer in purely natural medicines and people two individual encounters are what manufactured me the believer that i'm now!
Software: Apply a layer of the Kelp – Aloe Vera – Honey Mask totally on your face and also other influenced areas. Go away it on for fifteen to twenty minutes after which you can rinse with lukewarm water. A couple of minutes later on, clean your face once more with chilly water.
Ultimately, scrub your skin with this mask and depart it for nearly 50 % one hour to get gentle, glowing skin. It really works as a normal bleach and decreases Solar tan when applies about three times in a week for at least per month.
Don’t rub or massage when you wash it off as you don’t want the components to exfoliate your skin more. It'll depart your skin dry, causing your oil glands to provide extra sebum, which may result in extra acne!
I cherished the eggwhite, lemon and honey mask and I'll utilize it 2 times weekly. What recipes am i able to use for everyday to strengthen my sagging skin, lighten the dark marks beneath my eyes and enable my turkey neck?
@Llzziforan: It's not encouraged to keep on any face mask on right away. Ideally you should continue a face for quarter-hour. Somebody basically requested me about preserving their yogurt face mask on for the whole night And that i gave precisely the same response. You'll find the comment below: ...
• Give a wholesome glow to the skin by mixing 3 tablespoons of orange juice in half a cup of organic and natural honey and smearing this Resolution on to your face and neck for twenty-twenty five minutes.
Avocado has great humidity in it and it hydrates the skin making it supple and delicate. Banana is helpful against inflammation and skin cracks.
Aid me make sure you I have a nasty skin brought on by pimple scars and black heads. Is this egg yolk and lemon is nice for my skin
No person will test any facial products which do not fetch any Rewards. Bananas have an awesome benefit on your health and in addition to on our skin. These are:
I LOVE applying coffee masques in addition to scrubs–so much better and cheaper than retailer-bought items!! Your skin seems remarkable btw
The Definitive Guide to orange face mask
How it works: Avocado is good for hydration and it exfoliates and cleans up your pores. Banana Conversely assistance cutting down growing older symptoms.
Egg whites assist tighten skin, creating them a powerful household treatment for lowering look of crow’s-feet less than and close to eyes.
Just implement a spoon of Uncooked honey about the face as being a mask and go away it for approximately twenty minutes. Rinse off. Repeat some times weekly.
Uncooked honey by itself is Beautiful, but you can also blend and match other food-centered elements to tailor your mask to the unique skin style.
Once you place the egg white on, lay an individual layer of divided tissue paper in excess of your face. Then utilize much more egg about that, after which peel it off.
Rub the solution in circular motions more than your skin for 3 to 5 minutes. You needn’t be as careful while you ended up with all your face, since the skin on the rest of Your system is considerably less delicate.
"My face desired a little assist with moisturizing, and this assisted me with that. " Rated this information:
four. Banana Face Mask to fight wrinkles: A number of people phone bananas as pain-free, cheap all-natural Botox, and they rightly accomplish that! Bananas are filled with strong nutrients to remarkably diminish the looks of wrinkles, and make your skin look youthful and radiant.
• Just rubbing contemporary orange peel on the face helps lighten skin colour. In https://www.facebook.com/steptoremedies/posts/2088296957930240 , it tightens the skin and increases the feel.
I used to be performing some research on utilizing honey for acne, and I stumbled on this informative article. Here’s an interesting quotation:
Elizabeth is the founder and creative director with the Nourished Lifetime. Her mission is to assist folks look for a more well balanced (a lot less nerve-racking!) method of residing a happy, healthful life. Go through more about Elizabeth here.
Are aware that incorporating create in your combination will reduce its shelf life. Basically, You should not produce a major batch, in any other case it could go negative just before You should utilize everything. Additionally, when you increase fruits or veggies towards your facial treatment method, you should definitely refrigerate it.[19]
It is best to use these masks on clean, dry face. Wash your face ahead of to eliminate the Dust and microbes from the skin.
Other benefits of coffee face masks consist of their electric power to scale back face inflammation. This homemade mask is going to be your very best ally for people times after you have not received Significantly rest or have slept terribly and you simply get up with a little puffy face.
The 5- https://www.youtube.com/watch?v=h9_M3FLWmVk For pineapple face mask
Our partners use cookies to ensure we tell you about promotion which is relevant for you. For those who go on devoid of Altering your settings, we'll presume that you're content to get all cookies on Boldsky Web-site. On the other hand, you may improve your cookie configurations Anytime. Learn more
This is always what I take advantage of. I have super dry skin that flakes regardless of the(using this type of exception)even coconut oil doesn't do it for me but olive oil is HG when it comes to hydrating my skin it is the another thing that true leaves it glowing
Suggestions: It provides Great final results, nonetheless it does consider time to see them. If you don’t right away see a modify, don’t hand over. You could’t assume effects inside of a day or two. Also, the combination is greatest utilized when freshly designed.
Now, this is the delightful face pack you need to certainly try. Coffee and cocoa are each rich in antioxidants and Focus on problems completed by no cost radicals.
Exfoliate your skin after weekly. This could assistance buff absent People dead skin cells and go away your skin sensation silky-easy. You use scrubs, loofahs, and exfoliating sponges. Make sure you make use of a gentler exfoliator on your own face than on the remainder of your body.
Masks are a well-recognized and vivid factor in lots of folk and regular pageants, ceremonies, rituals, and festivals, and in many cases are of an ancient origin. The mask is Generally a A part of a costume that adorns the whole physique and embodies a tradition important to the spiritual and/or social lifetime of the community as entire or a particular team inside the Neighborhood. Masks are used Virtually universally and retain their power and mystery both for their wearers as well as their audience.
Right before strong transparent supplies for example polycarbonate had been invented, visors to shield the face needed to be opaque with smaller eyeslits, and had been a kind of mask, as frequently in mediaeval fits of armour, and (one example is) Outdated Norse grímr intended "mask or visor". Disguise
No HTML is authorized in opinions, but URLs is going to be hyperlinked. Responses aren't for marketing your article content or other sites.
There are numerous banana face mask Gains a single just needs to know about which mask is finest for what skin type. For this, we're in this article that can assist you as We've got categorized the face masks dependant on different skin care requires.
Also referred to as The recent Face Mask, it really is composed of honey, cinnamon, nutmeg, and lemon. It’s the lemon that triggers the burning sensation, but that’s if you place over 1/2 a teaspoon!
Warning: Verify If you're allergic to any with the elements while in the mask by making use of it on a small patch on the wrist and after that await some hours. If rashes surface or in case you clearly show other signs or symptoms of allergy, tend not to use this mask on the face.
The most beneficial face mask for acne can’t be purchased at a dear Section retail outlet. Actually, it only contains a person component and it’s probably by now in the pantry! It’s certainly one of my personalized favorites: the Uncooked honey mask.
Masks are utilised all over Europe, and they are routinely built-in into regional folks celebrations and customs. Old masks are preserved and might be found in museums and also other collections, and far analysis is undertaken in the historical origins of masks. https://en.search.wordpress.com/?src=organic&q=facial+mask signify character spirits, and Consequently lots of the related customs are seasonal.
https://www.youtube.com/watch?v=LLyzh-nGTmg
The best Side of coffee face mask
You will find quite a few ways available to get ready a face mask in the home. Nonetheless, be careful While using the precision with the substances. In case the proportions go up or down – the face mask may not show the precise outcomes.
Prevent skin-harming foods. This includes processed or refined carbohydrates together with unhealthy fats. Consuming a lot of of such make your skin age quicker. Stay away from consuming a lot of sugars likewise.[fourteen]
If you can and you have the mandatory ingredients, then it's necessary. Having said that if you do not have the necessary ingredients or time, then allow it to be Regular although not every day.
Using tobacco can make your skin glimpse more mature and contributes to wrinkles. Cigarette smoking narrows the small blood vessels within the outermost levels of skin, which decreases blood move and tends to make skin paler. This also depletes the skin of oxygen and nutrients that are crucial to skin health and fitness.
Moreover, cigarette smoking boosts your danger of squamous cell skin cancer. If you smoke, The easiest method to protect your skin is usually to Stop. Question your medical professional for ideas or solutions that will help you stop smoking.
Increase the olive oil or coconut oil. You'll need 2 teaspoons of olive oil. The olive oil will moisturize your face, leaving the skin experience gentle and smooth. If you don't have olive oil, You can utilize coconut oil instead, that is also extremely moisturizing.
Ahhhh, the basic brown sugar scrub. There truly is not an improved natural exfoliant than brown sugar. It isn't going to tear the skin like oatmeal or salt can do. As well as, it tastes delightful if it in some way tends to make its way into your mouth.
Orange, rich in Vitamin C, is the best all rounder In relation to your skin. From the peel for the juice all do the job in the best possible approaches to help keep you glowing and nutritious.
Splendor Epic is the Elegance Community that sets a new amount of have faith in and honesty in beauty data. We're driven by a dedication to enhance Women of all ages's life by masking everyday breakthroughs in natural beauty, Life style and Wellness.
Basically unfold the oil more than your skin following a tub or shower, much like you would with typical lotion or system butter. Always examine the label to make sure that the oil you're acquiring is pure rather than combined in with other oils.
Hey !!! Am pleased for getting this coffee idea … It’s improved to try fairly savoring sip on a mug Thanks all .. ..
Have a look at my skin Within this image…You are able to see the difference it can make after the 1st use. Here is how my face appears to be immediately after working with this mask… I'm not sporting virtually any makeup here, just moisturizer.
I take advantage of this mask regularly! I take made use of the early morning’s coffee grounds blend in olive oil or maybe a cream and blend right into a paste. I also place in some turmeric powder. In India turmeric is often used in face masks to make the skin glow and to circumvent skin eruptions.
Invalid e mail address Subscribe to L'Oréal Paris E-mail By enrolling I fully grasp and comply with the privacy plan and terms of service, including the utilization of arbitration plus the waiver of any course or team claim to solve disputes.
banana face mask for Dummies
i do think that egg white by yourself is very efficient in treating skin difficulties, my Tale of acne Once i was 18 was cured by egg white. when i turned 22 a similar get rid of. and now im 27,treating my Grownup acne.just dont be lazy
Mixing egg whites with corn starch would make a cleansing face mask for ordinary skin. The corn starch absorbs and eliminates any Filth or impurities to provide you with smooth and apparent skin.
I attempted which makes it myself nonetheless it bought messy. So I seemed up some honey masks on the internet and this was The most cost effective I could uncover. Can’t defeat 4oz for $15. And theirs have some excellent components added to it. I went ahead and obtained a couple. Test it out:
It is completely Alright to use egg white masks recommended over for oily face. In truth, it helps to deep cleanse your pores and remove surplus Dust.
Solution: Any actual honey will do, but my private preferred is raw, unfiltered honey since it retains more of its strong healing Attributes. I can in fact tell the distinction between the kinds of honey I’ve employed for my honey mask.
I've normally beloved purely natural beauty masks. I have found them productive and healthier than chemical-based kinds. Sometimes they have a little bit a lot more operate to put them together and use, but the outcome could be quite gorgeous. Thanks for sharing!
Theatre in the Middle East, as in other places, was to begin with of a ritual character, dramatising person's connection with nature, the gods, and other human beings. It grew outside of sacred rites of myths and legends performed by clergymen and lay actors at set moments and often in preset places. People theatre — mime, mask, puppetry, farce, juggling - had a ritual context in that it absolutely was done at spiritual or rites of passage for example days of naming, circumcisions, and marriages. Over time, some of these contextual ritual enactments became divorced from their spiritual indicating they usually were being executed throughout the year.
How frequently am i able to do the skin brightening mask? is also the mask reusable or must I create a new batch every time?
Exfoliation will be the stage most people skip inside their weekly skincare schedule. But if you start correctly exfoliating your skin, you'll recognize an Just about speedy big difference.
The proteins which might be contained within an egg white mask support the skin make improvements to and retain its elasticity, which happens to be very important On the subject of decreasing the appearance of wrinkles.
Many of the masks and characters Employed in European festivals belong to your contrasting classes of your 'very good', or 'idealised splendor', set in opposition to the 'ugly' or 'beastly' and grotesque.
Only Adult males have on the masks and perform the dances with large stilts despite the masks representing women. The most stunning representations of female beauty is the Idia's Mask of Benin in current-day Edo Point out of Nigeria. It is thought to are commissioned by a king of Benin in memory of his mom. To honor his useless mom, the king wore the mask on his hip through Distinctive ceremonies.[29]
five. Distribute all of the peels on the tray and place under the Sunlight to dry. Ensure that you address the tray which has a net or a skinny fabric to forestall insects and mud from stepping into contact with them.
This support will allow you to join or associate a Google AdSense account with HubPages, so as to get paid funds from advertisements with your content. No data is shared Until you engage using this type of attribute. (Privateness Plan)
Everything about banana face mask
Be careful never to scratch oneself Along with the egg shells. Check out Every egg batter for shell chips prior to software.
Use this mask with cleanse fingers for your freshly cleaned and dried face. The baking soda may well sting a little, but This is certainly no cause for alarm.
Online video Workforce Analyzed wikiHow is really a wiki just like Wikipedia, which suggests a large number of of our content are penned collaboratively. To build this informative article, eighty four people, some anonymous, labored to edit and increase it with time.
Get an index of critical oils that function for all skin sorts. Not all essential oils get the job done for all skin varieties. Some may possibly melt away or damage sensitive skin, for instance.
Good hub. The egg white mask has existed eternally. I bear in mind my mother discussing how her mother launched her to this. Thanks for bringing everyday living to it once more.
three. The face scrub should not be drippy. Never insert additional olive oil, as this may dissolve the sugar. Adding also very little olive oil is likely to make your face scrub tough and dry that may bring about skin redness.
Listed below are 5 easy recipes to receive you started off. Locate the a single that works for your skin variety or the trouble you need to address.
For those who have an American type coffee equipment, make use of the coffee grinds inside the filter; if you have an Italian design machine, just unscrew and remove the debris remaining between the elements of the cafetiere.
Inexperienced tea and honey work anti-inflammatory magic on skin redness and inflammation. This relaxing combo is Mild plenty of for delicate skin (do a patch examination in the event you’re nervous). Each substances are strong antioxidants to battle absolutely free radicals and maintenance skin injury.
Combining https://www.youtube.com/watch?v=E9DZheR4t1A with banana this mask is a great way to deeply nourish and moisturize the dry skin from deep in just.
https://www.pinterest.com/pin/722616702689548155 've never ever utilised it on my skin however, but I will try out it. Thank you for sharing. I've bookmarked it to refer back I Voted it up and handy.
Skin care includes more than simply cleaning it and utilizing lotion. In addition it requires aquiring a balanced diet, getting enough snooze and physical exercise, and taking care of worry stages. Your exclusive skin style could also figure out any supplemental treatment plans also, such as using exfoliating scrubs or moisturizing masks.
You can buy an awesome scrub or make your very own. See this record of the best facial scrubs or Check out a recipe employing brown sugar and coconut oil in Generate a Face & Overall body Scrub.
To cleanse skin, most Ladies prefer the water method: Use heat h2o to loosen Dust and clogged pores. Use a dime-sized little bit of cleanser, then rinse with awesome or lukewarm water.
The smart Trick of coffee face mask That Nobody is Discussing
In the event the orange peel powder and oatmeal employed with each other feels a little tough on your skin, add a lot more olive oil but don’t allow it to be as well runny as it'll create a drippy mess.
Disclaimer: The articles on This website is generic, informational and adjunctive at very best, but are not able to serve as a alternative for Expert medical advice.
I tried it yesternight …… The results were being awesome …… My face was truely glowy glowy ……. I used the rice powder wnich I've grinded myself…. It's a bit of gritty composition which gave a wonderfull scrubbing xperience ….. stepto remedies in really like with the outcomes….. *Thankyou* *thankyou*
Oats not just nourishes skin of every type and also absorbs excess sebum from in just your pores as it is actually an absorbent. This acne-battling mask provides nourishing, exfoliating and cleansing Added benefits to skin.
Just washed it off. Skin is smother, complexion simply a taaaaaaad bit brighter (not as uninteresting) and perhaps. Pimples and redness just as distinguished, possibly a little bit a lot more (assumed I believe that’s in the cinnamon’s By natural means granular and abrasive texture).
Sit for 15 to thirty minutes to let the face mask settle and have absorbed deep into your skin. Once the time is up, rinse off with heat drinking water, and pat dry which has a clear towel.
Orange peel has impressive Qualities that assistance keep irritating pimples absent. Use a thick coat of this zit-busting orange peel face mask to deep-cleanse your pores and drive out the Grime, grime, excess oil, and germs, all of which cause pimples and blackheads to type within the skin surface.
I attempted the honey and cinnamon mask, and I believe it labored…? It didn’t sting or go away my face crimson, like Others explained. I do think it relies on what skin variety you've. Must I exploit this mask each morning or at night? Does it make a difference After i utilize it?
Mix the above mentioned substances carefully in a small mixing bowl. Coat your face While using the mixture applying thoroughly clean fingers. Let it settle for 15 minutes. Meanwhile, you'll be able to lie down, near your eyes and loosen up since the mask does its magic. Once the time is up, rinse your face, and pat dry having a thoroughly clean towel.
I suffer dry, delicate, blemished matured skin that despise chemical compounds. I'm definitely hoping the peel/coconut ouT suitable thru; do I halt the peel once the blemishes are out & cleared?, how/ with what do I cleanse such skin?, any moisturising & sunblock suggestions? Cheers!
Sure u can eat oranges at time period times, no issue in the slightest degree, vit-c is one of the boon for women/females u can even just take vit-c nutritional supplement whole lifestyle, no have to have of even halting at enough time of pregnancy also, my working day begins with one cup of orange juice i adore it
Honey is of course antibacterial, which will help your skin fight off acne. As well as it's got an an amazing antioxidant capability, and you'd like antioxidants about to overcome the cost-free radicals that damage the skin.
Using a smaller, motorized hand blender, whisk the egg whites until eventually These are marginally stiff for application.
Selecting filter choice will instantly update the products which are exhibited to match the chosen filter option. To remove a filter, click the “reset” or “reset all filters” button.
New Step by Step Map For banana face mask
As everyone knows that a banana is made up of Vitamin B6 so in essence it helps to delay the aging system. In addition it moisturizes the dry skin, as vitamin B6 also tighten the sagging skin and it protects your skin from free of charge radicals.
By: Unfold the paste on to your face, keeping away from your eyes and nostrils. Therapeutic massage the mixture gently into your skin to exfoliate dead cells.
Thank you a great deal of for this great enlightening Hub which may be practical for getting very good face complexion. These days Many individuals are investing an excessive amount funds to keep up their very good skin wellbeing. These natural solutions appear to be more much better than These artificial creams.
Just a little cinnamon oil may be used Together with the coconut oil, but I'd personally only make use of a fall or two in a little jar of coconut oil–more than that may burn up the skin.
I've many pimples considering the fact that seven years n also hvng darkish spots of dat.. i hv tried evry possibl matter.. but nthng get the job done.. my skin kind is Blend.. n m also hvng white heads way too.. even afta gng for cleanse up nthng High definition workd yet.. how banana wl support me.. n in the quantity of dayss…
When implementing organic masks such as this, it is actually preferable to face more than your sink or in the bathroom to forestall undesired messes on the ground.
When you materialize to help make a sizable batch of banana face mask (or every other face mask) don’t fret! Most face masks can be stored while in the fridge for as many as 1 7 days and be employed properly. If just about anything commences smelling funky nevertheless, it’s the perfect time to hit the trash.
There are numerous creams and cosmetics that use caffeine like a key aspect of their formulation, but you do not need to use them to take pleasure in the many benefits of coffee for the skin . You can utilize a handmade face mask in its place!
I've read through and take the privacy plan Pink Hyperlink to Media collects private knowledge for interior use only. Beneath no conditions will your data be transferred to third get-togethers without the need of your permission.
The caffeine written content can help lower swelling and restore the skin's misplaced blush, brightness and vitality. The ground beans are perfect to wash and scrub, while caffeine features a tightening effect on your skin pores.
Avocado is really a prosperous supply of pure fats and in addition includes omega 3 fatty acids. This can make it the ideal component that can be made use of to restore the misplaced moisture of your skin.
In addition to taking away unwanted facial hair, this mask also eliminates any dirt or impurities from your skin.
Carefully exfoliates and scrubs skin cleanse. Absorbs and gets rid of impurities and Dust within the skin’s surface.
Egg whites don’t just function to tighten and nourish your skin, Additionally they are particularly full of collagen and might transform your skin’s elasticity. This subsequently cuts down the looks of wrinkles and crow’s-feet all around your eyes.
Detailed Notes on yeast face mask
So as to obtain the cucumber juice You will need to grate it then squeeze the juice outside of it (grate more than enough cucumber to acquire the quantity of juice you would like).
Exfoliate your skin the moment every week. This may aid buff absent Those people useless skin cells and depart your skin sensation silky-easy. You use scrubs, loofahs, and exfoliating sponges. Make sure to use a gentler exfoliator in your face than on the rest of your body.
The banana face mask presents all the significant nutrients, Even though honey provides moisturization and lemon juice works to be a all-natural exfoliant. When these three components merged together it could make a fantastic mask for acne and inflammation.
I have generally beloved organic attractiveness masks. I have found them powerful and much healthier than chemical-centered types. In some cases they take a bit a lot more do the job To place them together and use, but the effects is usually pretty stunning. Many thanks for sharing!
[24] Use brown sugar for just a gentler scrub and white sugar for an everyday scrub. You should utilize any kind of oil you would like, but coconut oil or olive oil would function greatest. Need one thing much better? Check out salt!
I cherished the eggwhite, lemon and honey mask and I will utilize it two times per week. What recipes can I use for day-to-day to improve my sagging skin, lighten the darkish marks less than my eyes and assistance my turkey neck?
This is often my ‘head over to’ face mask if I feel my skin turning out to be somewhat far too oily, or if I'm struggling from an outbreak. I swear by it.
I've been meaning to pamper myself for a while, And that i imagine that a facial mask is just how to go. I am absolutely thrilled to try these, In particular considering the fact that all of them use affordable objects from a fridge or cabinet.
Orange peel face mask is an incredibly efficient in targeting problems for example blackheads, acne, clogged pores, boring skin and oiliness. Nevertheless, before you make an orange peel face pack, it’s imperative that you initial learn how to help make orange peel powder.
Honey is effective well for tightening our skin and is a great moisturizer. I study your content articles and locate them exceptionally practical. You happen to be this sort of a fantastic author and you simply give us an in-depth information regarding anything you compose.
Author Info
Orange, full of Vitamin C, is the best all rounder In relation to your skin. Through the peel on the juice all do the job in the very best methods to maintain you glowing and healthy.
Just remember to combine your egg white really well each time you use it (by mixing it you are going to get a foamy egg white glance).
Thanks for making your account on EverydayMe. This informative article or product has long been extra to your favorites.
Indicators on sugar face mask You Should Know
Details: Honey has antimicrobial Attributes and antioxidants which might be beneficially sticky. This stickiness pulls absent the dust, lifeless skin, and microbes from the pores whilst the antimicrobial Houses hold the skin from getting infected once more.
:D um really hoping to acquire an excellent result due to the fact um genuinely incredibly impressed by your methods…:D if i dispose of my facial troubles i will Permit you know needless to say In shaa ALLAH…^_^ may ALLAH bless you and hold you joyful often….:D voila!!!
Most people discard the peel of oranges and not using a 2nd imagined the moment They may be carried out Together with the citrusy flesh within just. If you are one of these, right here’s a magnificence treatment that will make you rethink throwing the orange peels away.
[ more info from stepto remedies ] In addition, orange peel also consists of potassium that helps the skin retain its moisture and magnesium that assists fight skin getting old induced by cellular oxidative hurt. Suffice to convey then, which the rightful place for orange peels will not be in your trash can but within your magnificence routine.
In the event you use all of the mixture and may you help save the rest for an additional use? Also, how often should it's applied?
It truly is reasonably frequent knowledge that oranges certainly are a godsend to your skin. What isn’t emphasized enough, even so, is the fact that In relation to rejuvenating your lackluster skin, the most strong Section of the fruit is, in reality, it’s peel.
With each other, they very clear up the skin pores. Honey is actually a organic antioxidant and it's antimicrobial Attributes. This eradicates the microbial bacterial infections that induce acne.
As this mask will get messy, It will be a smart idea to tie or pin your hair back again. You may additionally want to take into account draping a towel over your upper body and shoulders to protect your apparel.
I am thinking if You can utilize these facial masks just for the sake of having fresh skin? Or can it be highly recommended only to use them for acne or other skin irritations?
i have lots of pimples given that 7 years n also hvng dark spots of dat.. i hv tried out evry possibl factor.. but nthng get the job done.. my skin sort is Blend.. n m also hvng white heads far too.. even afta gng for cleanse up nthng High definition workd nonetheless.. how banana wl assistance me.. n in the number of dayss…
Many thanks lots Chandni for the swift replies. Allah bless you considerably! I was gonna use citric acid as it will decrease the ph stage.
Will lemon juice do a similar? If I insert these organic preservatives do you think the mixture will very last 3weeks if I give it as a present? Pls forgive my numerous queries
It truly is your choice. You'll want to get it done following washing your face, that's Typically carried out each morning and night. A lot of people use masks while in the evening, as that's whenever they have by far the most time.
Just give these masks a attempt. They are really basically no cost and you also don’t want to search the world to obtain the mandatory elements. In short, you have nothing to get rid of except your acne. Why not give it a try out?
face mask No Further a Mystery
Here are some actually simple Do-it-yourself face mask recipes that have grown to be highly regarded amid honey lovers. https://www.pinterest.com/pin/722616702689548172 and elements associated with Every single mask are really easy you can get ready it in a few minutes.
Honey is often a all-natural humectant that attracts in humidity from the air, leaving your skin moist and easy, and it can also enable break up excessive sebum That may be clogging up your pores (and leading to pesky pimples).
Put together your face with the mask by washing it with heat drinking water. This tends to open up your pores, which is able to Enhance the effectiveness of the mask. Given that this mask tends for getting pretty messy, you can also pull your hair back again right into a ponytail, braid it, or pin it back again.
On OneHowTo You can even learn the way for making an amazing overall body coffee scrub And exactly how coffee will dispose of cellulite. You will under no circumstances toss away your leftover coffee grinds again!
Suggestions: Use this combination a few to four times weekly (even a each day software is okay), but you should definitely put together it new every time, as it is very uncomplicated to arrange and simplest at that time.
If you can and you've got the required substances, then It's a necessity. Even so if you do not have the mandatory elements or time, then help it become Regular although not every day.
To finish your registration remember to enter the verification code you obtained on the cell. In case you have not acquired the verification code, make sure you SMS REWARDME to 9223347100
Picture: Karen Cox/SheKnows For many who don’t have enough time to whip up a whole Do-it-yourself banana mask, a refreshing banana in opposition to inflamed skin could possibly do the trick.
Home made face masks are full of nature's restorative goodness, in the form on the nutrients, minerals, acids, and oils described in the tables above, without any from the substances that keep-acquired masks have to contain for an prolonged shelf existence.
Blend clay, honey and apple cider vinegar in a little non-reactive bowl (never use metal when dealing with clay). Stir together and gently use on the face and neck. Just after 15 minutes, clear away the mask with heat water, then with chilly water.
Alongside one another, they cited information from 27 references. wikiHow's Content Administration Staff carefully displays the work from our editorial team to make certain that Every single write-up meets our superior benchmarks.
OEM ODM rorec aloe vera olive pomegranate blueberry honey all-natural skin mask for face masks skin care
Decide on one that fits your skin sort and you also are with your approach to identifying many great things about honey in your skin!
In a cheap and straightforward elegance treatment method that may be also good enough to take in, a Do-it-yourself banana face mask might help to relaxed and clean skin with the improve with the seasons.
How https://www.wikihow.com/Have-a-Good-Face-Care-Routine Need To Expect You'll Pay For A Good skin care
Can I shop almond oil as well as the vitamin E capsule fall by putting Every single with each other in a very plastic bottle and employing for several times on my facial skin?
Blend all the above substances in a bowl. Slowly include drinking water until a thick paste is shaped. Employing clean up fingertips, therapeutic massage a thick coat in the combination onto your face in a delicate circular movement.
It isn't hard to make your very own orange peel powder—all you would like are oranges, a blender, and one particular to five times (as a way to give the orange peels the perfect time to dry).
You are able to but it really's encouraged that you just utilize a darkly colored glass bottle, not plastic, for purity. Surely use within just a couple of days since the oil Qualities will lessen with time and heat.
Just how much you exfoliate is up for discussion. Some Women of all ages have skin that will get scaly promptly. Others glance dewy and new with nominal fuss. Dermatologist Dr.
Hello! I have essentially dried my orange peels but.. :-/ I forgot not to include things like the white portion (which you said it shouldn't be). Am i able to even now use it? May perhaps I determine what difference will it make, using 'only the best most component' and 'including the white element'?
This face mask can be excellent for experienced skin as all these 3 ingredients put with each other, are fantastic for lessening the looks of great traces.
What better than finding the benefits of exfoliation and comforting in one face mask? Nicely, the Oatmeal and banana face mask may be the 1 that gives you scrubbing and smoothening impact simultaneously.
. Any greater than that and you’ll be dripping honey all over! I'd a challenge with dripping in the beginning, but after I Slice back again on the quantity of honey I employed, the challenge fixed alone. As well as that it’s a bit more affordable like that, as well!
Implement the combination to your face with your fingers. Perform the sugar-honey combination on to your face together with your finger tips in gentle round motions. Stay away from your eyes and mouth even though implementing.
She was influenced to jot down this web site right after suffering from extreme acne. In the course of this time she made pure, healthy do-it-yourself beauty remedies that fed her skin and assisted her recover.
Egg whites tighten the skin and shrink your pores even though the yogurt nourishes your complexion. It’s like acquiring a Botox cure!
The three panel style and design will guarantee a great healthy, whilst the neoprene content applied to make it will preserve you heat as well. What's more, it has the advantage of staying resistant to water.
Retinoids (which include Retin-A or the greater moisturizing Renova) also get the job done by eliminating the best layer of useless skin cells while also creating collagen within the skin. "Collagen would be the skin's structural fiber," dermatologist Dennis Gross explained in O Magazine
An Unbiased View of pineapple face mask
Incorporate lemon juice and olive oil in container. Guantee that They're perfectly combined. You can utilize the container that you'll be storing the exfoliating scrub in.
Right before robust transparent products like polycarbonate were invented, visors to protect the face had to be opaque with smaller eyeslits, and have been a form of mask, as generally in mediaeval satisfies of armour, and (for instance) Outdated Norse grímr meant "mask or visor". Disguise
Masks are a well-recognized and vivid factor in several folks and regular pageants, ceremonies, rituals, and festivals, and tend to be of an historic origin. The mask is Ordinarily a Component of a costume that adorns The complete entire body and embodies a custom vital that you the spiritual and/or social life of the Group as whole or a particular group within the Local community. Masks are made use of Virtually universally and preserve their ability and mystery both equally for their wearers and their viewers.
Yoghurt, as everyone knows, is often a prosperous natural source of protein and likewise contains lactic acid. This makes it the very best ingredient to hydrate and moisturize the dry skin.
Now that you have your orange peel powder, Allow me to share three face mask recipes that will assist you to enjoy their Advantages:
Include a little heat h2o if essential to keep the lather likely. In the event the lather dies down, incorporate a little bit of h2o. Just don’t add far too much, or the sugar will dissolve.
Stick to The straightforward 15 min keep pack time using this type of mask and pat dry which has a cleanse towel. It is going to depart your skin feeling beautiful and clean.
Ahead of making an attempt any of these facials, test a little area of one's skin ahead of making use of the combination towards your complete face. This is particularly imperative that you do When you have delicate skin.
Goaltender mask, a mask worn by an ice or subject hockey goaltender to safeguard The top and face from harm
Rinse with neat h2o. Rinse your face with amazing h2o till the scrub is totally long gone, after which you can pat your face dry which has a cleanse, dry washcloth.
From the cult of Shiva, found in Anatolia from circa 6,000 BC, the youthful, bare ithyphallic god seems wearing a horned mask.[15] During the Greek bacchanalia and also the Dionysus cult, which involved using masks, the everyday controls on conduct were being temporarily suspended, and other people cavorted in merry revelry exterior their regular rank or position. René Guénon promises that in the Roman saturnalia festivals, the standard roles ended up often inverted.
Their 3 main cults use seventy-8 different types of masks. The majority of the ceremonies of the Dogon lifestyle are solution, although the antelope dance is demonstrated to non-Dogons. The antelope masks are rough rectangular containers with many horns coming out of the highest. The Dogons are professional agriculturists as well as the antelope symbolizes a hard Operating farmer.[28]
Mash up the banana, then mix from the honey. For very best benefits, put the substances within a blender. Insert the juice of the lemon or orange. Apply to face for quarter-hour before rinsing which has a great washcloth or perhaps a steaming heat washcloth. Observe with the regular moisturizer.
They tend to be worn over the face, Though they might also be positioned for result somewhere else over the wearer's human body. In aspects of Australia, large totem masks address the body, whilst Inuit Girls use finger masks throughout storytelling and dancing.[one]
0 notes
Text
Joe’s Weather Blog: Warmth leaves..cold arrives…wintry weather risk too? (SUN-2/3)
Good afternoon…the skies here at the house are breaking up a bit and there is some sunshine starting to poke through. Temperatures are near 60° and we may go up another 5° or so this afternoon. That’s pretty remarkable compared to the minus 23° wind chills of Wednesday morning! No records today but still very doable despite the winds out there. A cold front will put an end to this around daybreak Monday and send temperatures down in a hurry in the morning before leveling off in the afternoon. That push of cold air will be a key to the forecast for the next 3-4 days.
Forecast:
Tonight: Clouds and mild with temperatures remaining in the mid 50s. Breezy too.
Monday: The front should arrive sometime on the northside around 6-7AM and on the south side around 7- 8AM give or take 1 hour. This will mark the end of the nicer weather. Temperatures will drop from the mid 50s to the upper 30s very quickly…perhaps go down a few more degrees and then steady out in the afternoon. Overall highs tomorrow afternoon should be in the 35-40° range. NW winds of 10-25 MPH will make it feel colder too
Tuesday: Increasing clouds and cold. Highs in the upper 20s. There may be a patch or two of freezing/drizzle mist as well although that is not set in stone
Discussion:
An interesting weather week is at hand this week. It doesn’t necessarily mean a LOT will happen for active weather…but there is potential for mayhem for sure. Right now there isn’t a strong signal for a big storm for the KC area per say BUT sometimes little amounts of wintry weather can create issues and that’s what could happen.
Let’s start with tomorrow…just a return back to average after several days of highs in the 50s and 60s (today). The front tomorrow isn’t really overly strong…it’s a typical winter front really BUT since it’s replacing an air mass that is very mild…with a more seasonable air mass it will feel colder for sure as we watch the temperature trend downwards quickly in the morning. Here is the noon surface map showing the temperatures in RED…sub-zero cold up there…
When I see a strong high in the far northern reaches of Canada and that high is building southwards…I tend to think that the models are underestimating the strength of the surface push of the colder air mass.
See that HIGH up towards the NW Territories…that HIGH is forecast to move towards the northern Plains Tuesday.
IF we go up towards Canada…well below zero at the noon hour.
By Tuesday the front will have stalled towards the southern Ozarks, well south of KC.
The cold surface HIGH will be over the SD/MN/ND border…circulating cold surface air towards the region.
The cold dense air will just sort of get stuck here.
The thing is aloft…different story. While we may be in the 20s for highs on Tuesday…above us…let’s say around 5,000 feet different story. Notice we have SSW winds and our temperatures at around 5,000 feet range from +6-+8°C from north to south in the Metro at least. That’s the equivalent of 43-46°F
That is what we call an inversion…warmer air trapping in the colder surface air. The winds at that level are blowing from the SSW to the NNE and that is what we call overrunning. Since the cold air is denser or heavier in a sense…it stays nearest the ground…and the warm air, since it’s lighter, stays above it. In a way…think of oil and vinegar. The graphic below is from the University of Illinois and shows what’s about to happen. Picture that warm front, denoted but the red semicircles towards the lest side…being the front down toward the southern Ozarks in the forecast map for Tuesday above.
Most often “something” happens in these cases. The very act of the warmer air overriding the colder air generates lift. This lift will for sure manifest itself into clouds and from those clouds you often can get some wintry precipitation. Sometimes it can be an ice storm…other times it can be just some light freezing mist/drizzle. I’m on the side of a light, in amounts, event since there is no wave really coming out of the WSW aloft to help to boost that lift even more…
So as a result we need to be on the watch for some light freezing mist/drizzle especially later Tuesday and into Wednesday morning at least. It may not be much at all…but those scenarios are concerning because of pavement impacts.
Wednesday in itself is a toughie. The cold air may erode somewhat as the day unfolds…we’ll be starting in the mid 20s and with luck we may get to near 32° or above during the day. This means whatever falls will have less of an impact.
Then finally a storm shows up later Wednesday into Thursday.
This storm should ride along the front which will remain towards far southern MO. Cold air can be VERY tough to dislodge and I think some of the model data (GFS I’m looking at you) is out to lunch with a push northwards of the storm towards the area.
So with this more southern thought in mind…it’s going to be tough for us to have something really significant. Let’s hope (assume) we’re above 32° Wednesday afternoon (not set in stone yet)…the storm passing towards the MO/AR border will tend to draw down deeper cold air…allowing the removal of this warm layer above us and drag down colder air through the atmosphere. This means the increased potential for at least some snow Thursday morning especially.
This would be followed by some pretty cold air (not like last week-but still cold!) on Friday. IF there is snow on the ground and IF we have clear skies…we may get to near 0°. A lot of assumptions on that one. The snow on Thursday…won’t be a lot but could be “something” more than a dusting.
There are a lot of juggling balls with this as is typical with these wintry mix type events. They often look like one thing from a few days away and turn into something else within 48 hours or so.
More tomorrow morning…
Our feature photo is from Travis Wessel taken this morning with the fog over the ice in Smithville Lake. It was even thicker across far northern MO this morning too! Sort of a haunting picture!
Joe
from FOX 4 Kansas City WDAF-TV | News, Weather, Sports https://fox4kc.com/2019/02/03/joes-weather-blog-warmth-leaves-cold-arrives-wintry-weather-risk-too-sun-2-3/
from Kansas City Happenings https://kansascityhappenings.wordpress.com/2019/02/03/joes-weather-blog-warmth-leaves-cold-arriveswintry-weather-risk-too-sun-2-3/
0 notes
Text
The Healing Benefits of Saffron and How to Grow It
https://healthandfitnessrecipes.com/?p=7985
By Dr. Mercola
Saffron, which is regarded as the world's most expensive spice by weight, is actually the stigmas of the purple crocus flower (Crocus sativus), which blooms once a year. Due to the fragile stigmas needing to be picked by hand, harvesting saffron is a labor-intensive job. As mentioned in the featured video, given the fact each saffron crocus plant contains just three stigmas it takes about 170,000 flowers to produce a single pound of this costly spice.
Notably, about 90 percent of the world's supply of saffron is grown in arid fields across Iran. Most of the crop is harvested by women who earn about $5 per day picking saffron threads by hand. Other countries producing saffron include Afghanistan, Italy, Morocco, Spain, the Netherlands and the U.S. Saffron gives many rice dishes, including paella, its characteristic taste and golden-yellow color. In addition, this prized herb is featured in bouillabaisse, a traditional French fish stew.
When buying saffron, it's best to choose the thread form over the ground spice because it has a longer shelf life. Beware of look-alike ingredients that may be mixed in including red marigold petals, stigmas from lilies or turmeric. None of these "fakes" will impart the distinctive color or flavor of saffron. To ensure you have access to high-quality saffron, you may want to consider growing your own.
What Makes Saffron Special?
If you are not familiar with this prized spice, which is a member of the iris family of plants, you may wonder what makes the bright orange-red stigmas of the saffron crocus so special. According to National Geographic:1
The delicate purple crocus is a sterile triploid, meaning it cannot grow in the wild, nor can it reproduce without human intervention
Being sterile, the plants are unable to produce viable seeds, which means reproduction can only take place when clusters of "corms" (bulbs) are dug up, divided and replanted
Each plant produces just three stigmas/threads; as mentioned above, about 170,000 flowers are needed to produce 1 pound of saffron threads
Saffron is a labor-intensive crop — the plants must be painstakingly propagated and harvested by hand — which explains why high-quality saffron sells for upward of $16 per gram
While it's difficult to pinpoint exactly when and where the cultivation of saffron began, according to one source2 it can be traced back to the Persian word zarparān, which means "having golden stigmas." Ancient texts, dating back thousands of years, also refer to saffron. The offering of adulterated saffron has been a long-standing problem, so much so that the "Safranschou code" was implemented in the Middle Ages to fine, imprison and sometimes even execute those suspected of putting forth fake saffron.3
For millennia, pharaohs, monks, kings and queens have bathed in saffron-scented water, consumed food and drink laced with saffron, offered prayers and sacrifices involving saffron, slept in beds adorned with saffron threads and wore saffron perfumes and saffron-dyed clothing.4 At various times in history, saffron was in such great demand and so highly prized that various thefts and wars have been noted. According to the Independent:5
In the mid-1300s, the Black Death, a global epidemic of bubonic plague, caused the demand for medicinal saffron in Europe to outpace supply; at the time, the spice also was used to alleviate illnesses such as insomnia and stomach ailments
In 1374, the theft of a shipment of saffron resulted in a 14-week "Saffron War" between Basel and Austria
Pirates were said to value saffron more than gold and it was equally prized by American colonists after it was adopted for cultivation by the Pennsylvania Dutch in the 16th century
Tips on Buying Saffron
Because saffron is famously expensive, you may be shocked at the price of it at your local grocery store. You can often find it somewhat more affordably in halal or Middle Eastern markets. Below are some tips on buying saffron:6
For a longer shelf life, choose saffron threads over the ground spice
Select a high-quality brand, or if purchasing it loose from a spice vendor, always buy from a reputable seller
Beware of the many saffron look-alikes, including red marigold petals, lily stigmas and turmeric
Due to its short shelf life, purchase saffron threads in small quantities and commit to use it within a six-month period
Look for saffron threads of deep-red shades and avoid varieties mixed with the yellow styles; the styles, which are attached to the stigmas, add no value or flavor
Choose threads uniform in appearance — wide and flat on one end and tapered at the other
When buying them loose, select saffron threads with a pleasant, fragrant aroma and avoid any with a musty odor
Pick threads that are dry to the touch and a little brittle; keep in mind moisture will cause the threads to become spongy and less fragrant
Why Is Saffron so Good for You?
Given the fact saffron is consumed in very small quantities, you may not think much of its nutritional benefits. In larger quantities, saffron is, however, a good source of iron, which purifies your blood and also helps your muscles store and use oxygen. It also contains magnesium, a mineral your body needs to maintain nerve and muscle function, regulate your heartbeat and promote bone health.
Saffron is high in manganese, which helps regulate your blood sugar, metabolize carbohydrates and absorb calcium, among other things. This vibrant red-orange spice also contains potassium, which is useful to support your adrenal and kidney function, and vitamins B6 and C. Vitamin B6 ensures your brain and nervous system function properly and helps make the hormones norepinephrine, which helps your body deal with stress and serotonin, which regulates your mood.
The vitamin C in saffron boosts your immune system and acts as a potent antioxidant and infection-fighter. In addition to those important vitamins and minerals, saffron contains more than 150 volatile plant compounds, including, most notably:
Crocin: A carotenoid chemical compound responsible for saffron's intense red-orange color, which is also an indicator of the powerful antioxidants and carotenoids in saffron that protect your body from free radical damage
Picrocrocin: A precursor of safranal, picrocrocin is the main substance responsible for saffron's distinctive earthy taste
Safranal: The compound known to provide saffron with its notable aroma
One source claims saffron was used historically to treat more than 90 ailments and has been used as a primary ingredient in herbal health remedies for more than 4,000 years.7 According to National Geographic, saffron has many beneficial uses:8
"Saffron has been used historically to treat everything from heartache to hemorrhoids ... Modern studies have shown the high levels of antioxidants found in saffron may help ward off inflammation in the body and it may be helpful in treating sexual dysfunction and depression. The jury's still out on its reported effects on cardiovascular disease and cancer."
How to Grow Saffron
While you may think saffron too exotic of a spice to grow in your flower bed or garden, you may not realize you can easily grow the saffron crocus from a bulb. In the U.S., saffron crocus blooms in the fall. Remember, each corm (bulb) produces only a single flower and each flower yields just three saffron threads. As such, you'll need to plant a generous number of bulbs to ensure a measurable amount of threads.
Purchase your saffron crocus bulbs from a reputable online retailer or nursery and expect to wait a year after planting for the flowers to bloom. Saffron crocus bulbs do not store well so plant them soon after receiving them, ideally in the early fall. Gardening experts suggest the following tips for growing this exquisite flower, which is best suited for U.S. Department of Agriculture (USDA) hardiness zones 5 to 9:9,10,11
Fertilizing: Although not required, you can help your plants thrive by fertilizing them annually
Dividing: As soon as the flowers fade, you can gently dig up your corms, separate them and replant them immediately; while dividing the corms is not required annually, be sure to do it every few years to ensure they do not become overcrowded and therefore less productive
Mulching: Although saffron crocus is hardy to about to minus 15 degrees F (minus 26 degrees C), if you live in a region where temperatures regularly dip lower, you'll want to add a layer of mulch around the plants as soon as they finish blooming
Planting: Place your saffron bulbs in the ground at a depth of 3 to 5 inches with the pointy end of the corm facing up; depending on the variety grown, plants reach 3 to 12 inches in height
Soil: Saffron plants need rich, well-draining silty soil (pH 6.0 to 8.0); they will rot in swampy, poor-draining soil
Spacing: When planting saffron crocus bulbs, ensure at least 6 inches of spacing on all sides
Sun: Plant saffron crocus in an area receiving lots of direct sun
Yield: About 50 to 60 saffron flowers will produce around 1 tablespoon of saffron spice, so plan on a large growing area if you love saffron
Water: Your plants will do fine with minimal water and you need only water them during the blooming season if you live in an area prone to dry weather; the plants are dormant June through August so do not water them at that time
Saffron Crocus Diseases and Pests
Saffron crocus, as with other bulb-based plants, is prone to damage from bulb-eating critters such as birds, moles, nematodes, rats and squirrels. Rabbits have been known to nibble on the flowers and leaves. The only diseases affecting saffron crocus are rust and corm rot, which is caused by fungal infections such as fusarium, Rhizoctonia crocorum and violet root rot.12
These diseases generally appear in the third or fourth years after planting. Since they do not respond to fungicides (and I would not recommend using fungicides anyway), you can combat these diseases by digging up any remaining healthy bulbs and replanting them in a new location.
Harvesting Saffron
As mentioned, harvesting saffron is tedious, time-consuming work. After the crocus flowers bloom, you'll need to handpick the red-orange stigmas from each plant. For best results, use tweezers to carefully extract them. Obviously, harvesting large quantities of this spice will take time and a lot of effort near ground level.
Once picked, you can spread harvested stigmas on a cookie sheet to dry at room temperature until they crumble easily. The yellow stamens and purple petals of the saffron crocus have no use and can be composted.
Cooking With Saffron and How to Store It
Given its price point, it's good to know that with saffron, "a little goes a long way." Generally, for most recipes, you'll need just a pinch of saffron threads, which should be soaked, dried and crushed before use. In traditional Moroccan cooking, given the fact saffron needs to stand up to other pungent seasonings, larger quantities are commonly used in certain dishes. When cooking with saffron, it's helpful to know 1 teaspoon of saffron threads equals about one-eighth teaspoon of ground saffron.
Most saffron sold from reputable sources is presented in glass jars, which is the perfect storage container. If you buy saffron loose, you will want to store it in a glass jar and maintain it in a cool, dark place. It will retain its flavor and potency for at least six months. After that, you can still use your saffron, but it will be increasingly less flavorful. Homegrown saffron is said to be more fragrant after it is stored in an airtight container away from light for at least one month before use.13
Saffron Is Beneficial for the Treatment of Depression, Heart Disease and More
If you are still not convinced saffron is a spice worth checking out, consider the following research on some of the health benefits of this time-tested herb:14,15
• Cancer: The anticancer potential of saffron was highlighted in a 2013 study published in the journal Pharmaceutical Biology.16 After reviewing the current research on saffron, the researchers stated, "Saffron possesses free radical-scavenging properties and antitumor activities. Significant cancer chemopreventive effects have been shown … Based on current data, saffron … could be considered as a promising candidate for clinical anticancer trials."17
• Dementia: Saffron contains two chemical plant compounds — crocetin and crocin — both of which are thought to support your brain's learning and memory functions. As noted in the video above, a 2010 study involving 46 patients with mild-to-moderate Alzheimer's disease found participants taking 15 milligrams of saffron twice a day for 16 weeks demonstrated "significantly better outcomes on cognitive function" than those receiving a placebo.18 The study authors said, "This … study suggests, at least in the short term, saffron is both safe and effective in [cases of] mild-to-moderate Alzheimer's disease."19
• Depression: A 2014 systematic analysis20 involving six clinical studies on saffron and depression suggests the spice was as effective as antidepressant medications. The study authors stated, "Saffron's antidepressant effects potentially are due to its serotonergic, antioxidant, anti-inflammatory, neuroendocrine and neuroprotective effects. Research conducted so far provides initial support for the use of saffron for the treatment of mild-to-moderate depression."21
• Heart disease: Hypertensive lab rats were shown to benefit from an oral, daily dose of saffron in a 2015 Iranian study.22 Specifically, the rats received 200 milligrams of saffron daily per kilogram of body weight during a five-week period. Saffron prevented blood pressure from increasing beginning in the third week. About the outcomes, the researchers said, "Nutritional saffron prevented blood pressure increases and remodeling of the aorta in hypertensive rats. It may be useful for preventing hypertension."23
• Premenstrual syndrome (PMS): A 2008 Iranian clinical trial24 investigating saffron as a treatment for PMS symptoms in women aged 20 to 45 with regular menstrual cycles suggests 15 milligrams of saffron taken twice daily is effective to relieve PMS symptoms.
A 2011 review published in the Journal of Psychosomatic Obstetrics & Gynecology25 that evaluated several herbal remedies for PMS, as well as the more severe premenstrual dysphoric disorder (PMDD), validated saffron as an effective treatment for addressing bothersome symptoms. The study authors noted, "Single trials also support the use of … Crocus sativus [for PMS]."26
Credits:
Original Content Source
0 notes
Last Seen Blogs