#base construction tutorial
Explore tagged Tumblr posts
Visit Tumblr Blog
Explore Tumblr blogs with no restrictions, modern design and the best experience.
Last Seen Tumblr Blogs


Fun Fact
In 2020, Tumblr had 29.4 million users in the US.
Text
Dune Awakening Base Building 101: Step-By-Step Guide
youtube
New to Dune Awakening? Here’s How to Build Your First Safe Base
If you’re jumping into Dune Awakening and feeling a little overwhelmed by the endless desert, don’t worry — setting up your first base doesn’t have to be complicated. In this Dune Awakening guide, we’ll walk you through exactly how to get your first home up and running. This way, you’ll stay safe, store your loot, and survive the harsh conditions of Arrakis like a pro.
Why Build a Base in Dune Awakening?
Before we dive into the "how," let’s talk about the "why."
Here’s why having a base is essential:
Shelter: Protection from sandstorms and the brutal desert heat.
Storage: Keep your resources safe and organized.
Crafting: Access to crafting stations for building gear and vehicles.
Water Production: Purify blood into drinkable water (yeah, it’s wild).
Convenience: Cut down on the time spent traveling between quests.
A solid base is the difference between thriving and just barely surviving in Dune Awakening.
Step 1: Picking the Perfect Spot
First things first, location matters. When you’re picking where to drop your base:
Stay Near Important Areas: Close to trade centers, quest hubs, or mining spots.
Flat Ground: Building on even terrain makes everything easier.
Safe Distance from Enemies: Don't plop your house right next to high-level enemies or dangerous wildlife.
Resource Access: Make sure you have easy access to granite, metal, and salvageable parts.
Pro Tip: Have a second base ready if you’re traveling long distances. It saves a ton of walking (and running from worms).
Step 2: Gather Your Materials
You can’t build if you don’t have the goods. Here’s what you’ll need:
Granite Stone: For walls, floors, and general structure.
Salvaged Metal: Essential for generators and crafting stations.
Fuel Cells: To keep your generator running.
Blood Samples: For water purification (gross but necessary).
Spend some time farming these before you start construction. Trust me, it’s way easier when you’re prepared.
Step 3: Placing Your Sub-Thief
Now that you’ve got your stuff, it’s time to actually start building.
Equip your Construction Tool.
Find a Build Zone that’s clear and flat.
Place your Sub-Thief Structure — it acts as the foundation for your new base.
This step officially marks your territory. Congrats, you're one step closer to surviving Dune Awakening!
Step 4: Build the Basic Structure
Next up: walls, doors, and a roof.
Walls: Surround your base to protect against storms and wandering enemies.
Doors: Make sure you leave a spot to get in and out.
Roof: Shade is life on Arrakis. Don't skip this.
Heads up: You’ll need a lot of granite for this part. If you run out, go mine more before continuing.
Step 5: Install Power
Your base won’t be much good without energy.
Place a Generator inside or nearby your base.
Insert Fuel Cells to keep everything running.
Check Fuel Levels Often. Running out of power mid-sandstorm is not a vibe.
Having power keeps your crafting stations and purifiers online — absolute essentials for surviving Dune Awakening.
Step 6: Set Up a Water Purifier
You’ll get real thirsty real fast on Arrakis.
Place a Blood Purifier inside your base.
Deposit Blood Samples into the machine.
Harvest Water over time.
Water is everything here, so get this up and running ASAP.
Step 7: Crafting Station Time
Once you have shelter and water, you’ll want to start crafting better gear.
Build a Crafting Station with salvaged metal.
Use it to craft weapons, armor, and vehicles.
Soon you’ll be making things like sandbikes that help you cross the desert way faster.
Step 8: Expand with a Refinery
If you really want to step up your game:
Place a Small Ore Refinery at your base.
Use it to refine raw resources like copper into ingots.
Stockpile materials for bigger, better gear.
While optional for a first base, having a refinery speeds up progression massively.
Step 9: Upgrade and Maintain
Building a base is just the start. Keeping it running is just as important.
Here are a few maintenance tips:
Always have spare fuel cells.
Top off water supplies regularly.
Repair any damage after storms.
Expand storage when you run out of room.
Think of it like keeping your car tuned up — regular care saves headaches later.
Step 10: Plan for Multiple Bases
Once you get the hang of it, don’t limit yourself to just one home.
Build secondary bases near new quest zones.
Set up safe houses along trade routes.
Abandon old bases if they’re no longer useful.
More bases = more flexibility and more survival options in Dune Awakening.
Key Takeaways
Pick smart locations for building.
Gather plenty of granite and salvaged metal.
Always have a functioning generator and blood purifier.
Keep crafting stations handy for upgrades.
Never stop farming for fuel cells and metal.
Think about building multiple bases as you progress.
Mastering base building early gives you a huge edge over the harsh environment and unpredictable threats on Arrakis.
Conclusion: Your First Step to Thriving on Arrakis
Learning how to build a base in Dune Awakening is the foundation for everything else you’ll do in the game. With a safe, functional home, you’ll be better equipped to tackle quests, survive storms, and outlast the desert's many dangers.
Set up your first base following these Dune Awakening tips, and you'll be way ahead of other beginners trying to figure it all out the hard way. Good luck out there — and don’t let the sandworms bite!
🎮 Level 99 Kitchen Conjurer | Crafting epic culinary quests where every dish is a legendary drop. Wielding spatulas and controllers with equal mastery, I'm here to guide you through recipes that give +10 to flavor and +5 to happiness. Join my party as we raid the kitchen and unlock achievement-worthy meals! 🍳✨ #Gaming #Haplo Gaming Cook #Gaming Chef #Gaming Cook
For Enhanced Guides Visit Us: https://haplogamingchef.blogspot.com
#dune awakening#base building guide 2025#dune awakening beginners guide#how to build base dune awakening#dune awakening survival tips#base construction tutorial#dune awakening shelter building#desert base design#spice harvesting base#dune awakening resource management#best base locations dune awakening#base defense guide#dune awakening building materials#sandworm protection structures#water conservation systems#base expansion strategy#dune awakening crafting guide#beginner base layout#survival base essentials#desert survival mechanics#Youtube
0 notes
Text
Cantina Collection

Straight from Oga's Cantina comes this cobbled together industrial set.
A bit later than planned but finally here. All items are very low poly as they are all frankenmeshed from the original bar back counters.
The textures are all composites and rearrangements of the originals, as a result they are not seamless - but we'll say it just adds to the look that they've just been made from whatever scrap metal was around!
Also as the cabinet doors all have the same rust pattern, it looks odd/repetitive on very big kitchens but works fine for small spaces.
There is only one swatch for all items except the seating, which comes in the same colours as the originals.
All items are base game compatible, except the resized bar backs which require Journey to Batuu.
See below for further details, pictures and download links.
Comfort (5 items):


Industrial Bar Stools x 2 - Low Back & No Back
Industrial Dining Chairs x 2 - Low Back & No Back (shown with original JtB high back chair)
Metal Dining Chair (shown with original JtB bar stool)
Surfaces (16 items):


Kitchen Counters & Islands


Bar Table
Dining Tables x 2


Coffee & End Tables
Console Tables x 3


Smaller Replicas of the original Cantina Barbacks x 5 - resized to match the height of regular counters NOTE: You'll need to use bb.moveobjects on to align these properly. JOURNEY TO BATUU PACK IS REQUIRED.
Industrial Shelf
Decor (2 items):
Metal Splashbacks x 2
Activities & Skills (3 items):


Oga's Bars x 2
Sabacc Game Table NOTE: BGC but JOURNEY TO BATUU is required in order to change the game type to Sabacc. Without this it will function as any other base game card table.
Download All (Downloads ZIP file from Google Drive)
Pick and Choose (Opens Google Drive folder)
If there's any problems with any of these items or you have any constructive feedback, suggestions or questions, please just get in touch, I'm still learning every day!
My TOU
Credits
All textures and meshes are edited or frankenmeshed from in-game EA assets.
@myshunosun - for their gorgeous sona dining chair which I cloned in order to have an object with the necessary transparency for the chair and bar stool - can be downloaded here.
Lizbot3000 - for their base game bar tables, which I cloned for my bar table and can be found here.
@ravasheencc - for her Crop It Like It's Hot Backdrops which I used to take some preview photos and can be downloaded here.
CC created using Blender, Sims 4 Studio & GIMP. Preview images using Canva Pro.
Everyone on the S4S forums and the Creator Musings discord group for all the tutorials and advice/help.
#always free cc#alwaysfreecc#custom content#download#journey to batuu#maxis match#my cc#sims 4#sims 4 buy mode#sims 4 cc#sims 4 custom content#sims 4 futuristic cc#sims 4 industrial#sims 4 industrial cc#sims 4 futuristic#sims 4 journey to batuu#sims 4 maxis match#sims 4 star wars#sims 4 star wars cc#star wars cc#star wars sims#star wars sims 4#the sims 4#ts4 cc#ts4#ts4 bb#ts4 buy cc#ts4 custom content#ts4 download#ts4 futuristic cc
221 notes
·
View notes
Note
Do you have any advice or tips with drawing? Any will help me I hope you have a good day
I think it would help to analyze references in the beginning, to build up a visual library

I was taught at university to first see the general masses, the silhouette. This method is called “general to particular”. And due to this stage, it is much easier for you to perceive the image, the composition as a whole, rather than running straight away to draw eyes, hands or other details
Starting with a silhouette also helps to create character designs in the future ✍️

Then you can already outline the construction, the middle forms. Again without small details, but you can leave a hint of them with the help of auxiliary lines.
I don't really work with tone so much at this stage, I just showed you how you can even use it to outline light shading (also common masses)

It also helps to do chopped, rough construction with a couple lines. I would generally advise practicing confidence in hand movements and understanding of general shapes. How clean your sketches are will help you navigate more easily in the future. And general shapes affect mostly how you can stylize body parts, how you understand their construction based on simple geometric shapes. It's a mistake to think that working with a reference is a one-to-one repetition of the original image. Artists use some kind of distortion of proportions, changing details or a little pose based on experience to make a character or work more dynamic

And then you can go into detail 💅
--------
I mean, already as in my experience I say that repeating or re-learning the base, which is lines, shapes, improves your drawing skill.
Because the faster you get through sketches, the faster you can move on to other stages of drawing, and still make fewer fundamental mistakes
And if you want to study anatomy, plastic anatomy would be the way to go for artists. I worked up my anatomy by looking at books and tutorials from the authors belowotome ↓


The authors of this book post tutorials using 3D models on Pinterest and ArtStation
I realized for myself that I am not a classical artist, that learning from the works and books of old academic masters is boring and not interesting to me. My approach is to analyze not only nature, but also 3d models. Analysis of 3d models helps with understanding of shapes in space, light shading and “what are occlusions” for game rendering ↓

Like this :D. But this is already relatively my old work and now I can do better, but I'm lazy
I hope my tips were helpful 🗣️
134 notes
·
View notes
Text

⸸ Sawmill Construction Set by Hexameter [customsims3] ⸸ Resurrected Link ⸸
[...]
Old fashioned Sawmill in Riverview ========================================== Included: 10 Objects to build an old fashioned sawmill After I started to make a millwheel for my game in February 2010 I thought I needed other objects, too. Thus I ended with 10 new objects which you can use to build a sawmill of former times. That's why I called the set Sawmill Construction Set (SCS). Here you can get package files of them in order to build lots of your own. See the picture. All objects are cloned from base game objects only. Some of the objects are intended to fit one to the other in a special way, but of course you also can use each object without the others. It depends on what you want to do. For better understanding (at least I hope so) I wrote a small advice you can download. I don't want to call it a tutorial. For other information see the pictures within the text. The most interesting object is the millwheel. It spins slowly (I hope it will) and can be used for every other type of water mill. Enjoy decorating your buildings with these objects if you like them! ------------ The lot itself was built with all EPs installed, without using any other content than EA-objects and those objects Riverview came with. If you don't like to build a lot use this one. But: It also contains the ten objects I made by myself, all cloned of base game objects only, including an animated millwheel. I called the collection of objects Sawmill Construction Set because I think it contains all you need for an old fashioned sawmill. The lot is set up as commission stocks with a lot size of 40x50. If you are interested in the objects, please read the text files I wrote, so I don't have to repeat all here and nobody is bored from the beginning. Enjoy the objects if you like them and build lots of your own! (Base game users can get the set as package files hexameter ------------------------- Credits: TSR for Workshop Peter&Inge Jones for s3oc and s3pe Wes Howe for his MilkShape plugins Regina for her Build World, that was very helpful to test my objects, and of course for testing and feedback.
📎 The Archive Includes PDF Build Tutorial 🎓
86 notes
·
View notes
Note
Ozz! I'm trying to get into drawing, but I'm absolutely horrid at it and have no idea where to begin. Do you have any tips for beginners? Also, what program do you use? I've heard Krita is good, have you heard of it?
Also, also, remember to hydrate properly and get a good amount of sleep and do lots of self-care! <33 we love you and your content; you make the world a brighter place ^^
~ 🐇
If you want to start from the very bottom, there's a website where the first lesson is drawing a line, quite literally. It builds your confidence with basic shapes, then moves on to more complex topics like textures, shapes in space, construction of real life objects and so on.
I've had it in my bookmarks for...gosh, years now. I should definitely pick it up again, haha.
I also follow Alphonso Dunn on YouTube, he has hundreds of art tutorials and exercises.
As for software, I briefly used Krita years ago and it was nice! It had a very easy interface and the brushes worked well if you wanted to reproduce traditional art. The only reason I didn't stick to it was because I already had PaintTool SAI and Photoshop at the time. When I got my first graphic tablet, I started with Paint.NET, though it was very simplistic.
The general consensus online seems to be Krita for painting or MediBang if you're into drawing anime. In terms of paid software, I think Clip Studio Paint is very popular and has a lot of resources, from brushes to 3D models. Photoshop is classic, but it can be overwhelming if you're new to digital art.
I personally use Procreate because it came with my iPad and it has a very simple menu. Some professional illustrators say it lacks the advanced options you'd find in other programs, and I do agree it may not be enough if you want to go beyond merely drawing. To add text and make small edits, I'll put the doodle through Photoshop, for example.
Free software: Krita, MediBang, Gimp, KRESKA.art (no installation required)
Paid software: PaintTool SAI, Adobe Photoshop, Procreate, Clip Studio Paint
If anyone has more suggestions or tips, feel free to drop them in the comments!
88 notes
·
View notes
Text
Sewing medieval: Tunics and gores

If you want to sew medieval you're probably going to have to deal with gores. They are a handy way of adding a lot of width to a garment while keeping the shapes of the fabric very simple. You can create your own pattern for a square cut dress or tunic with gores very easily with just a few measurements!
Today I'm sharing some links to garment information and tutorials (some of which contain technique advice), and some links to pure technique posts.
Garment focused
Some archaeological finds of tunics and gowns, organised by type
A couple of dresses and tunics with cutting diagrams and very basic sewing instructions (website-wise we're back in 1999 here isn't that cool)
A guide to a recreation of the Bocksten tunic
A blog post on the Bocksten tunic (some of the images are broken but there are some very useful considerations in the text)
An "Easy Men’s Tunic for Renaissance Fair" - This one is not based directly on a historical find but the construction is solid enough. A good starting point. You can lengthen it to make a dress.
A "simple medieval & viking dress" this one has the fancy medieval s-sleeve design if you want to get into that. I haven't tried it yet. Can be shortened to make a tunic.
Technique focused
Putting a gore in a medieval garment - Handcrafted History has a bunch of great tutorials. I found this one invaluable when I made my tunic.
How to insert a small sleeve gore - if you're making a garment with tighter sleeves, you may want to add something like this for ease of movement

This information will be in some of the links as well but: depending on your fabric you may wish to flat fell your seams after you've put your garment together. It's very satisfying.
52 notes
·
View notes
Text
Hey folks!
It has been a while! Well, we wanted to announce some big things coming your way!
WWC Askbox: Soft Re-Opening
Wednesday, Nov 1, 2023 to Thursday, Nov 30, 2023
In light of the recent attention WWC has received by the writeblr community, and the reception to our Guide to Academic Research—the mods have decided that we will temporarily reopen to your questions and test some important changes to the site! As you may have noticed, we've taken a much-needed break to catch up on our personal lives and restore our inspiration to answer the hundreds of Q&A that we receive.
Once the submission window is up on Nov 30, we will evaluate how our new system is going, tinker some more, and reopen once again once the construction dust clears.
New Rules and FAQ!
We are pleased to announce our new and improved Masterpost, which we hope will be a more centralized, more informative resource for those new and returning to WWC.
Brand-new FAQs, with new answers and content for further reading
Code of Conduct and other etiquette rules
The Ask Tutorial—a guide to writing a good ask that we’ll answer!
Moving forward, all followers are required to go through the masterpost to submit a question so they are aware of the new rules, terms & conditions.
Read the masterpost here and ask your question!
New Process
We're piloting out our own personal askbox via Google Forms. This will help us streamline the process and keep track of everyone’s questions.
We are also introducing the Deletion Log, a public, anonymous ledger that lets you know if your question (identified by a number code) has been deleted due to a rule violation, and what you can do to resubmit. Check out the Deletion Log here.
Want to submit an ask?
The below are topics of asks that we will get to right away, based on the mods who are currently active.
Black
Chinese
Colonialism
Iranian/Persian
Japanese (INCLUDING: Anime fanfic questions! Only Mod Rina will be answering anime questions, and only if she feels that the ask would make for an educational post.)
Jewish
Mixed race
South Asian: Hindu, Indian, Punjabi, Sikh (please remember that when asking about South Asia you must indicate region & time period)
Taiwanese
Writing/Publishing industry
Coming Soon: Writingwithcolor.org
We've made tremendous progress on writingwithcolor.org and are almost ready to show off the more permanent residence of WritingWithColor! However, it'll take a lot of time to fully transfer posts and links. To get the new look and all its benefits to you faster, we plan for a soft launch of the content. This will include back and forth linking between WritingWithColor.org and our home on Tumblr. We'll try to keep things seamless and your viewing experience on Tumblr shouldn't be too interrupted. Launch date is coming soon!
New Mod Applications
We still have some applications from our last call of mods and folks to respond to. So if you haven’t heard back, sorry for the delay, but no worries—we will get back to you as we start shaking the dust off our bones and getting back into Q&A. Once we are ready to invite more mods again, we'll continue our outreach.
A Special Thanks To You All
We want to thank you for your continued support, whether it’s been viewership, spreading the word about us, or sending us a tip that supports our domain and future projects for you all. The whole team really appreciates it. We will keep bringing you our best advice and guides on all things good writing with inclusivity.
Be well and keep writing!
~WWC
724 notes
·
View notes
Note
Hii- I...☝️🥹 um, I don't actually quite know what to say to my idol. But believe me when I say I am absolutely besotted by your art 🫶💐
I actually got introduced to your page via your COD Valentine's Day cards, and have been stalking your account consuming your art like a hungry fella since then.
Did you know: You actually inspired me and my IRL friends to do art? :3 If you don't mind, any tips for self-learning beginners? 📝
And, sorry if this is a whole lot to read—just wanted to let you know that you are such a great artist! And I hope you know that. Great is an understatement, though 🙂↕️
omg??? thank you so much qwq it seriously means a lot to me!! <3
a small heads up, i'm not a pro or an art teacher, so these tips are just based on my own experience as a self-taught artist:
just draw. sounds simple, but practice really does make perfect. i always struggle with motivation at the beginning of a drawing, but trust me, the flow state kicks in once you get started
references are your best friend! omg, they make such a difference, especially for bigger pieces or anything you're unsure about
learn from other artists, but don’t just copy. figure out how they do things and put your own spin on it. for me, studying comic artists helped a lot with simplifying anatomy in a way that makes sense (im still learning though xD)
don’t overwhelm yourself! focus on one thing at a time. if you’re doing a composition study, don’t get too caught up in tiny details or textures—focus on the big picture first
listen to your body and mental health. take breaks, stretch, and don’t be afraid to step away for a bit. sometimes a quick walk can clear your mind and recharge you
dont compare yourself to anyone but your past self and if you post stuff/have art blog - dont pay that much attention to likes/reblogs n etc, they dont define you or your art
more under the cut!
i also recommend to check out these: again, dont overwhelm yourself with new information, this section is more of an archive/compilation of where you can find some different stuff
YT channels
Sinix Design - I LOVE HIS TUTORIALS SO MUCH.
Ethan Becker - art tips and critisism
Adam Duff LUCIDPIXUL - honestly i dont really know how to describe his content. it feels like an art podcats but more..personal? just check his channel out and you'll see it for yourself
moderndayjames - more animation based but still a lot of helpful tutorials
Dan Beardshaw - found him through anatomy tutorials but he has A LOT MORE than just them, please check him out!!
Videos
this specific video helped me understand that light is not that complicated
in this video, the author shares how they learned art, and i think they nailed the 4th tip perfectly
another lighting video
part 1 of a "how to splash art" series which goes over almost everything you need to know. this series more of a guide cause you still need to go into a depth for each topic but i just have to share it anyways, other parts can be found in the description
Books / Libraries (google drive links)
anatomy for sculptors - helps a lot with anatomy simplification and understanding
a big library with art books and other resources
another library with some books
MORPHO BOOKS!!!
Constructive anatomy by George B.Bradgman
lmk if something doesnt work or you have something else to add!! :]

30 notes
·
View notes
Note
i really like how much depth your art has, do you think you could show how you break down bodies when sketching if that makes sense? it’s something i struggle with a lot in my art! 。゚(゚´ω`゚)゚。
ok apologies in advance, this is probably going to be a really long and tangential rant about art that may or may not actually help you in learning how to construct bodies. im just gonna put it under a cut to save everyone from seeing this huge text wall.
i dont think its gonna be possible for you to replicate my methods here, because theyre mostly just really specific shortcuts for finding certain proportions and reference points for anatomy, which i'm fairly versed in, but not as much as i'd like to be. the shortcuts you'll need will be different from mine. im glad you think my art has depth, that is something i am trying to seek very intentionally right now, and i dont think im even close to the depth of form i am actually aiming for. so like. this makes making a tutorial kind of inherently hard. nevertheless, i threw this quick sketch together after like 3 failed attempts. (i was doing those attempts digitally, ended up giving up on that and going back to traditional because its what im most comfortable with rn)
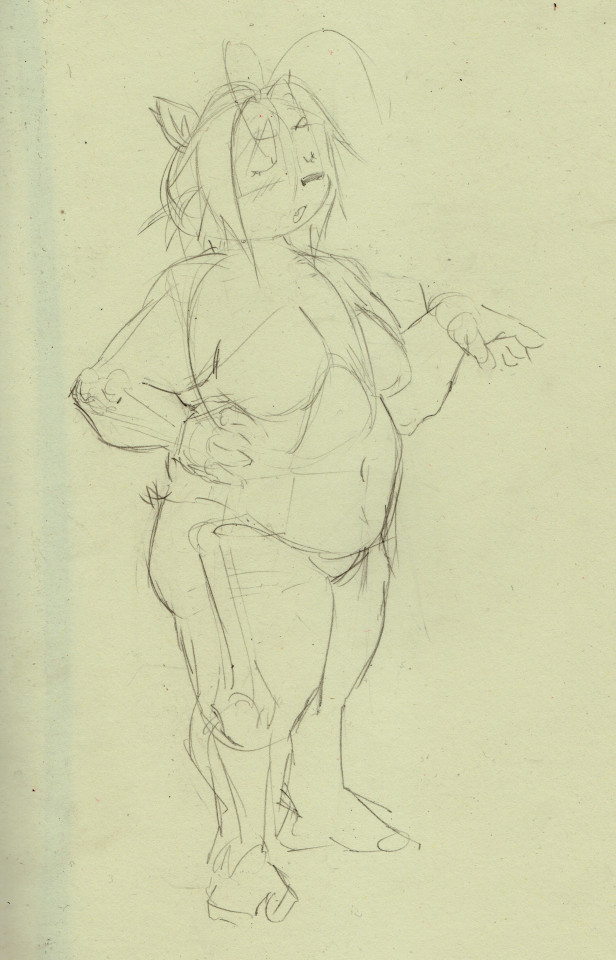
i didnt get all the steps i took to get here because scanning that much would be cumbersome but ill try to explain how i got here. i start with the head almost every time.

i use a lot of symbolic/graphic shapes when drawing heads and dont stick to using forms very often besides the circle at the center of the head, which i use as the base to form these graphic shapes around. think of it like "wrapping" the ball in various textures and masses. the eyes are usually "textured" onto the head, notice how the her left eye looks narrower then her right. of course i try to make sure her bangs sit along the curve of the sphere and her ears look like they sit on opposite sides of the head. its easy to forget that part, making the head look unsymmetrical. the particular masses of leica's head would be her snout, which is just a curve extended slightly outside the diameter of the ball, and her hair, which are two strange organic shapes that are quite hard to draw, two hair sprig anime antennae things (forgive me, i forgot the word for them,) and the back of the head, which i usually need to extend slightly. its a little too extended here, needs more on the top, i fix this in the final pass. this was a quick sketch, so i didnt focus too hard on the forms of the head beyond the most essential ones for her design, but i sometimes highlight the form of cheeks with curved hatching, or try to make the eyes appear more sunken-in as they are on human faces. i dont know how to proportion the neck and torso correctly until i draw the head, so i always do it first. next, i did the torso.
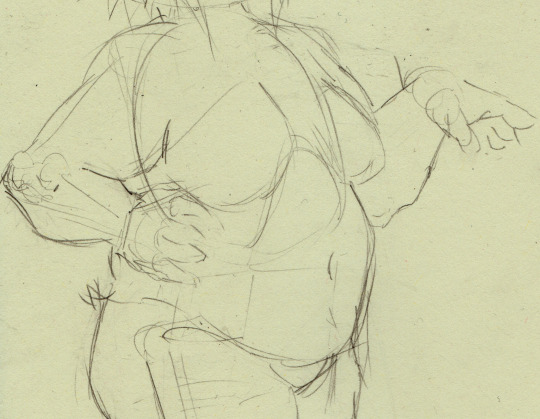
so heres why i said that you probably wont be able to replicate this approach. you do kind of just have to practice anatomy, i cant just make it make sense because im not very good at explaining this stuff, but ill try to go through what i did here. so, i generally use simplified bone shapes to find proportions and reference points, as well as more complicated shapes like those of elbows and knees. i try to study fairly often because im not satisfied with here im at with this stuff yet. of course, i dont think i'll ever be. so i'll usually start with the ribcage, add a shoulderblade out the back to find the shoulder, the armbones come out of that, the bone in the upper arm connects to the ulna with a sort of three-pronged attachment, one big knurl in the middle, which forms the thrust of the elbow, two little ones on the side. i think those are part of the ulna but i dont remember. see, you dont really have to know what exactly they do as long as you know what they look like. the ulna does some goofy rotation shit i dont understand, connects to the wrist, and then we have a hand, which, i mean, im not good enough at hands to even be telling you how to do it, but i just have a big squarish mass and some little hotdog fingers coming out of that. you can see on her left hand that ill have a big circle forming the the area on the hand where the thumb attaches... theres more depth to the hands, i think you can easily find better tutorials then i could offer. anyway, under the ribcage theres the pelvis, represented with a box. ill get into that when i talk about the legs. i wanna briefly talk about the way i add the flesh and fat to the bones.
so, i really can't give a comprehensive crash course on anatomy, but i can point you towards the morpho series, which is where i get most of this stuff from. you can get very far with the volumes Simplified Forms, Fat and Skin, and Skeleton and Bone Reference Points. moving on, i just kind of have a feel for where the masses attach by now. the important thing to remember when drawing fat characters like this is that the fat should "hang" from the bones and flesh, drooping down slightly. leicas fat hangs substantially, so she's not very wide despite her weight. this is important to her character design i feel. i almost always draw characters naked first when doing serious drawings because it will come in handy knowing where the forms of the body are when i add the clothing. by focusing on the way her body looks naked, i can modify the impression of those forms when adding clothes, and when i add them later on in this drawing, leica will take on the distinctive boxy look i try to draw her with.
if you look at the arm, youll see that the place the line of bone sits is very high compared to the whole mass of the arm, the flesh and fat of the arm "hang" from the bone, and then the upper arm squishes against the bent forearm too. even if the anatomy in the arm is indistinct, it can still look convincing when the forms act realistically against one another. the elbow has much less fat connected to it, so its more bony then the rest. this isnt actually consistent on all people so like, think about that kind of thing when designing characters, like i was talking about before, fat can sit in infinite different ways. maybe if i was doing a more objective anatomy lesson i'd draw cath, because i do have a sort of vague understanding of muscle placement that doesnt come through here, but probably would if i was drawing a scrawnier character. let me know if you want that.
a word on the breasts too: they hang a bit lower then you'd expect, keep that in mind. the attachment point is also angled, as the line shows. the line starts roughly in the middle of the torso and ends around the armpit, but the form of the breast can go underneath the armpit or even connect around the fold of fat in the back. many things to think about. i love boob shapes. ok lets finally get on with it and talk about the legs.
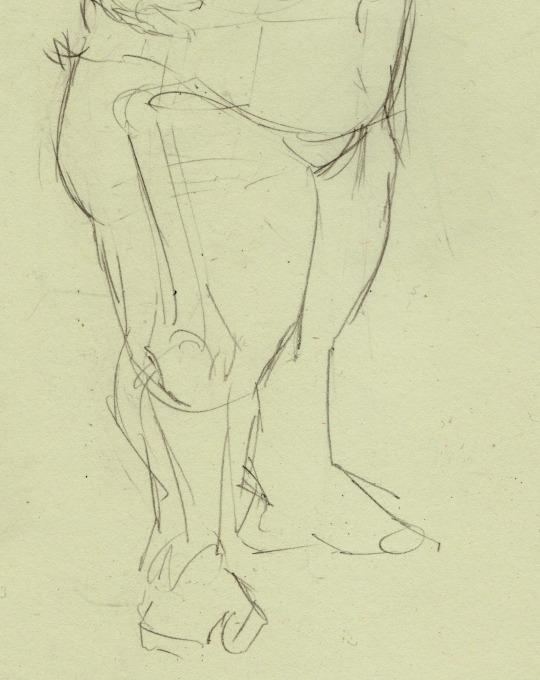
so, the really specific shape of the pelvis doesnt matter that much unless youre drawing a really thin character, so its just a box here. out from the sides of the pelvis, extending out more then you'd expect, is the femur, which ends in a similar joint to the arm. this shape helps me figure out the form of the knee. two masses on each side with a bunch of complex and weirdly shaped bones forming the kneecap, which i have omitted because i dont yet know shit enough to include them. i am learning though. so, obviously the feet are just scribbles here because im just gonna put her feet in socks anyway. you really dont have to do more then you have to. a few tips i can offer here, the butt should hang a bit too when drawing fat characters, i think the butt is supposed to start just below the pelvis if i remember, but take that with a grain of salt. i also didnt really do that here but its hard to tell because she's facing mostly forward. again, i dont think i can really communicate what's going on here. morpho has a lot of great drawings explaining the shapes and muscles of the legs, all things i might focus on more when drawing a scrawnier character. for this case, i regrettably don't go too hard on the legs. also i should note that legs would usually be much longer, leica is really short so ive exaggerated the proportions to communicate that. i may change my mind on that front in the future and give her more grounded proportions. the important thing to remember with legs is just getting a nice hierarchy of forms going. bigger thigh going into smaller calf going into smaller foot. it mostly comes automatically now.
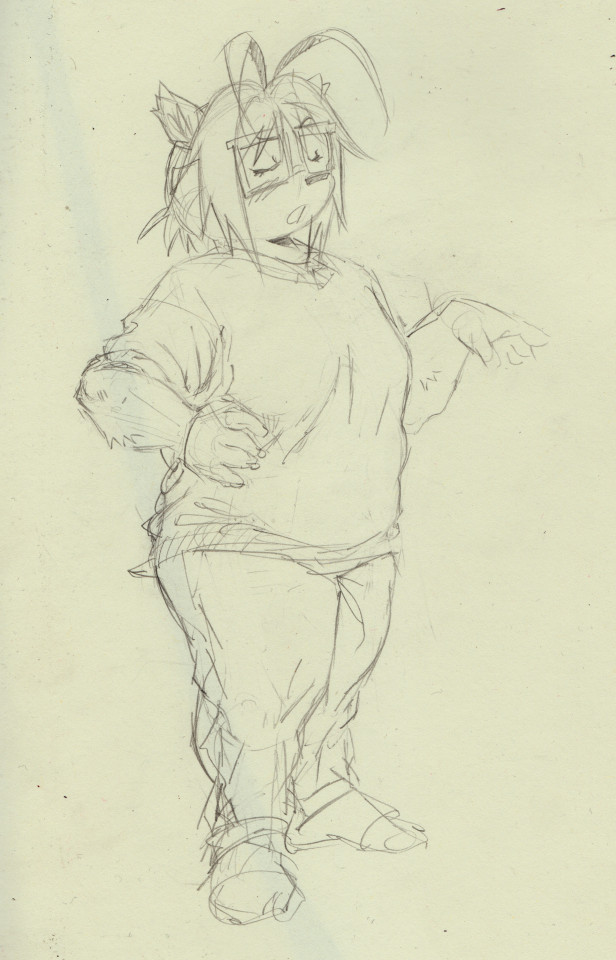
i added the clothing, shaped up her head a bit, added a bit of fur. i put her in her classic outfit, just a sweater and jeans. i enjoy the big thick folds that come out of these clothes, and big areas of white space too. its nice. i try my best to form all the folds around the forms of the body i drew earlier. thats one case where i really really have no idea what im doing and could never explain it in words. its just some fun intuitive play with loops and lines. this is at around the stage for a sketch where i'd do inks, or if it was going to be a finished pencil drawing i'd erase out parts piece by piece and replace them with nicer and more defined lines and tones.
i guess that's all i can offer , i hope that halped.
163 notes
·
View notes
Text
𝕴𝖓𝖙𝖗𝖔𝖉𝖚𝖈𝖙𝖎𝖔𝖓 𝖙𝖔 𝕹𝖊𝖛𝖎𝖑𝖑𝖊 𝕲𝖔𝖉𝖉𝖆𝖗𝖉'𝖘 𝕷𝖆𝖜 𝖔𝖋 𝕬𝖘𝖘𝖚𝖒𝖕𝖙𝖎𝖔𝖓
I had received a question on how to begin manifesting and realized that it also would be beneficial to have my own "tutorial", for lack of better words, to pin on my page. For any personalized manifesting or shifting advice, feel free to send an ask on my profile.
𝕿𝖍𝖊 𝕷𝖆𝖜 𝖔𝖋 𝕬𝖘𝖘𝖚𝖒𝖕𝖙𝖎𝖔𝖓

The Law of Assumption is a theory first proposed by writer, speaker, and mystic "Neville Goddard". Neville insists that we are the creator, or operant power, of our reality. Reality is "us" pushed out. He postulates that God, the universe, or whatever higher power you may believe there is; is within us. Every assumption we have about ourselves or our life's circumstance that we believe to be true has manifested into our "3D", the physical, tangible reality. Everything, good or bad, that you assume to be true manifests into the outer world. That is the Law.
So how do we take advantage of this Law? How do we actively create and take control of our physical realm? To quote Neville: "Now can you believe that you are now the man that you would like to be, though at the moment of the assumption, reason denies it?
"Can you perceive a scene, which if true, would imply the fulfillment of your desire? You can of course imagine it, but can you believe it?" What Neville is alluding to is that: in order to experience the thing we want to have (ie: money, a relationship, a career, a different life completely) we must assume to already have it. "My assumption, though false, if persisted in will harden into fact."
Everything has already happened. Everything that you can imagine exists. Time does not exist. It is a 3D construct. Nothing can exist in our 3D reality without first existing in the plane often referred to as the "4D". This is our inner world, or imagination, and where the "3D" receives information from.
𝕳𝖔𝖜 𝖙𝖔 𝕸𝖆𝖓𝖎𝖋𝖊𝖘𝖙 𝖚𝖘𝖎𝖓𝖌 𝖙𝖍𝖊 𝕷𝖆𝖜
1. I want something. Be specific. "I want $1000. I want to be in a relationship with so-and-so." 2. Imagine that you have it. Imagine a scene and the feelings associated with having your desire. Feel the money in your hand. Give life to the image you have of it. If you cannot visualize, that's okay. The feeling is the important part anyway. 3. Know it is done. That was the shift. Now you just wait for the 3D to bring you your manifestation. Persist in knowing it is done regardless of the ways the 3D might try to dissuade you. Regardless of how your mind might make you second guess yourself. This is the time to affirm. This is the time to meditate.
It really is this simple. Ease? Well, that depends on how difficult you make it. Keep in mind that everything in our 3D reality is based on our assumptions. This is the Law. The Law doesn't care how bad you want something. You must believe that you have it and persist in knowing it is coming.
There is always a delay when manifesting. It can take time for the 3D to process information that is coming from higher planes. Whether that be two seconds or two weeks, it's enough time for doubts to accumulate. You MUST know that if you truly have something that nothing is changing that. I'm going to tell you something I wish I heard early on:
To believe you have your desire is to know you have it now, as you are. As imperfect or "undeserving" you may think you are; that doesn't matter. You do not have to work hard for your desire. You don't have to do a million methods. You don't have to go on this big journey and learn everything before you can do it. You can start now. You already started as soon as you became conscious.
For beginners, I do encourage you to start small in your journey. I'm not discouraging you from manifesting big things. Just be mindful that you've gone your whole life being programmed to think "it can't be that easy to get ____." Well, it is. However, when we manifest things we are really attached to or seem really big; early on it might create an environment where we are less likely to believe in our capabilities. Even experienced manifesters get doubts. So, baby steps are always good.
But, don't let me tell you what you can and can't do. If you have an incredible self-concept and believe you can have whatever you want then please don't let me stop you! It's all up to what you believe in. Even doubts, or beliefs that you think are limiting you, aren't. Again, I want to re-emphasize that you don't have to become the person that has your desire. You already have it as you are. Embody it.
I believe in you!
❦ ℜ𝔦𝔫𝔞
#law of assumption#loa#manifestation#manifesting#reality shifting#shiftblr#shifting#law of attraction#loa tumblr#loassumption#neville goddard#reality shift#desired reality
66 notes
·
View notes
Text
Green Lantern SMP: Day 2
Day 1
As the sun rises over the island- which has been dubbed New Oa (much like the real one, this probably won't be the only time it gets trashed)- the Green Lanterns minus Jo take stock of their situation. They have two apples, five uncooked potatoes, and about a dozen wheat seeds, as well as some rotten flesh and bones. The island has been thoroughly deforested, but they do have several oak saplings. Most of their building blocks are gone, having been used in the construction of Hal's Watchtower that has since been reduced to a few sad floating blocks.
John decides that this embarrassment is unbefitting of the Green Lanterns of Earth and takes charge. Keli and Jessica have already begun replanting the devastated farm and using the bonemeal to grow crops, so he leaves them to this task and orders Kyle to light up the island and turn the cobblestone shelter into an actual house. There are plenty of cod swimming in the sea, so Hal and Simon are sent fishing. Guy does not seem to mind dying repeatedly, so he is assigned to explore the caves and find any ores.
Whilst everyone else is thus occupied, John switches to a web browser and begins looking up tutorials on how to build a mob spawner farm (Keli mentioned it was possible but didn't know how to make it herself).
The skeleton spawner is deactivated, but there are still plenty of hostile monsters in the caves when Guy ventures in. He dies no less than seventeen times before he finally finds a vein of iron ore. He is killed another five times before he emerges triumphant with half a dozen lumps of raw iron. Keli smelts these into ingots and crafts him a sword and shield. The deaths become far less frequent after this, and Guy returns with some more iron and a lot of copper. He is annoyed to learn that the latter cannot be used for tools or armor.
Hal and Simon don't actually have fishing rods, so they instead whack the fish with stone weapons. Hal frequently forgets that he needs to breathe and drowns several times. A Drowned starts chucking tridents at them, so the two of them flee "zombie Aquaman" and return to shore with a stack of cod.
By this point, Kyle has finished building a cozy farmhouse, as well as a fence around Jessica's garden. He thinks it's rather plain because he only had cobblestone and oak wood to build with, but everyone else thinks it's magnificent. Especially compared to Hal's "base" from yesterday.
John returns as night falls and begins directing Simon and Kyle to help him turn the skeleton spawner into a proper farm. Jessica opts to stay topside and cook the fish, while the rest of the Lanterns continue exploring the cave network below New Oa. It's an unusually large and complex web, and Hal dies almost as many times as Guy did earlier. He does however, discover a mineshaft...
#jess is enjoying her cottagecore experience while the rest of them fight for their lives in the mines#hal isn't very good at video games lol he's only still playing bc they told him about elytra#guy is just happy to punch shit#jo hasn't said anything in chat but there's also no death message so ig she's fine?#hal jordan#guy gardner#john stewart#kyle rayner#simon baz#jessica cruz#keli quintela#jo mullein#green lantern#lanternfam#green lantern smp#dc comics#incorrect green lantern quotes#minecraft
25 notes
·
View notes
Note
So I found out about you after doing some research on I story in writing that is heavily based on religion. It’s just a document right now, but I would love to make it into to webcomic except my drawing skill arnt really that good. I saw your art and I thought it looked absolutely amazing so I was wondering if you have any tutorials or just plain advice/examples? The way you draw faces and bodies/poses is amazing and I wish I could draw like you 😭
Thank you so much and sorry it’s taken me so long to respond!
The biggest thing about comics is that you need to get comfortable with drawing things you’re not very good at drawing. Generally, these are the basic classic fundamentals you’ll need to study in a more academic sense, meaning you must learn a bit of construction/formal technique that may change your current approach drawing as an action— it’s better not to draw in pure construction lines when studying these:
Anatomy
HAND anatomy
Perspective (1 point perspective is all you really need 80% of the time, but it’s good to know 2 point and beyond as well)
Color theory isn’t NEEDED per se, but it’s a personal pet peeve of mine when I see people haven’t taken time to study it
Unfortunately I don’t have any good tutorials to link because I had a formal education— I’m sure you can find some decent ones on YouTube tho! Gnomon tends to be decent for figure drawing, but you can also look for tutorials made specifically for animation if you have a more simplified style.
Beyond this, it’s really important to get comfortable moving forward from things you’ve drawn “badly.” If I’m struggling too much, especially with an unimportant panel, I usually give myself a time limit of around fifteen minutes to fiddle with it before moving on.
Genuinely tho, the best way to get good at making comics is just to make them. It’s really the only way to practice at it, so I would just reframe art as a “genuine documentation of your skill at a certain time” rather than something that is supposed to be perfect. My art at the beginning of GH is definitely less refined than what I put out now, but it’s a genuine reflection of where I was in my artistic journey at that time, and it’s my opinion that anything genuine you bring to the world is always good.


2020 > 2023
Really, just working on comics consistently will improve your skill exponentially because it’s all applied practice. That being said: Do NOT start redrawing the beginning of your comic once your skill has improved. That is the devil speaking. You’ll never get to the meat of your story if you keep starting again at the beginning! It will be there to redo once you’re done if you so choose.
Anyway—- I’m wishing you the best with your endeavors! Comics are a lot of work, but so worth the effort!
46 notes
·
View notes
Text
♥️ Art resources ♥️
Hey I put together a beginner art resource list! Feel free to share, save, etc. but a lot of people don’t know where to start:
Man is this a holy grail it includes free programs, online courses, tutorials, and scholarships (us based):
A big thing you are taught early on is just hand/eye coordination. Speed drawing, or “gesture drawing” if you’re fancy, is the best practice you can do on a regular basis.As much as you hate hearing “just practice”- it matters.
The best online art course I can think of. It will literally go step by step in teaching you commands and digital painting:
YouTube anatomy holy grail:
The Loomis method for the construction of the head is very popular because it is easy to learn and remember and can be applied to any drawing of the head.
Loomis also has many published books under his name. I’m not saying you can get free books here but if you could well. Careful of fake links with this site, if you don’t see the single login.re it’s the wrong one.
If loomis method books aren’t your style and you are more of a video person try this (this is the first on a short series):
youtube
If you know me I’m barely cracking the surface with digital art but I’m actually trained in professional forensic art and hyper realistic portraits , so here is info on traditional art by media.
Little proof of some training, but if you like this, this is woodless graphite pencils on vellum- just a slightly better quality than a pencil and paper :)
Finally here are some amazing pose references. Adorkastock had moved from Pinterest and is working on their own website so check them out here:
Taco is single handed my my go to for simplified anatomy and it goes my section of the body (people have made Pinterest copies that is separated by parts of the body) but I highly recommend buying it if you’re able!
I hope that this helps at least someone find a resource they needed or wanted! Feel free to dm me or repost with comments or more resources!
#artistsoninstagram#artofinstagram#my artwork#my art#artwork#art#artists on tumblr#digital art#artfight#traditional art#art fight#art reference#art resources#art related#youtube#books#loomis method#art and design#art anatomy#anatomy#art help#resources#gesture drawing#practice#blah#mine#blah blah blah
64 notes
·
View notes
Note
Do you conlang? I was wondering if you had naming languages (or possibly even more developed ones) for pulling the words you use. I tried to search your blog but didn't find anything, wouldn't be surprised if the feature is just busted tho. Your worldbuilding is wonderful and I particularly enjoy the anthropological and linguistic elements.
Ok the thing is I had kind of decided I was not going to do any conlanging because I don't feel like I'm equipped to do a good job of it, like was fully like "I'm just going to do JUST enough that it doesn't fail an immediate sniff test and is more thoughtful than just keysmashing and putting in vowels". And then have kinda been conlanging anyway (though not to a very deep and serious extent. I maybe have like....an above average comprehension of how language construction works via willingness to research, but that's not saying much, also I can never remember the meanings of most linguistic terms like 'frictives' or etc off the top of my head. I'm just kinda raw dogging it with a vague conceptualization of what these things mean)
I do at least have a naming language for Wardi (and more basic rules for other established languages) but the rudimentary forms of it were devised with methods much shakier and less linguistically viable than even the most basic naming language schemes, and I only went back over it LONG after I had already made a bunch of words so there's some inconsistencies with consonant presence and usage. (This can at least be justified because it IS a language that would have a lot of loanwords and would be heavily influenced by other language groups- Burri being by far the most significant, Highland-Finnic and Yuroma-Lowlands also being large contributors)
The 'method' I used was:
-Skip basic construction elements and fully move into devising necessary name words, with at least a Vibe of what consonants are going to be common and how pronunciation works -Identify some roots out of the established words and their meanings. Establish an ongoing glossary of known roots/words. -Construct new words based in root words, or as obvious extensions/variants of established words. -Get really involved in how the literal meanings of some words might not translate properly to english, mostly use this to produce a glossary of in-universe slang. -Realize that I probably should have at least some very basic internal consistency at this point. -Google search tutorials on writing a naming language. -Reverse engineer a naming language out of established words, and ascribe all remaining inconsistencies to being loanwords or just the mysteries of life or whatever.
I do at least have some strongly established pronunciation rules and a sense of broad regional dialect/accents.
-'ai' words are almost always pronounced with a long 'aye' sound.
-There is no 'Z' or 'X' sound, a Wardi speaker pronouncing 'zebra' would go for 'tsee-brah', and would attempt 'xylophone' as 'ssye-lohp-hon'
-'V' sounds are nearly absent and occur only in loanwords, and tend to be pronounced with a 'W' sound. 'Virsum' is a Highland word (pronounced 'veer-soom') denoting ancestry, a Wardi speaker would go 'weer-sum'.
-'Ch' spellings almost always imply a soft 'chuh' sound when appearing after an E, I, or O (pelatoche= pel-ah-toh-chey), but a hard 'kh' sound after an A or U (odomache= oh-doh-mah-khe). When at the start of a word, it's usually a soft 'ch' unless followed by an 'i' sound (chin (dog) is pronounced with a hard K 'khiin', cholem (salt) is pronounced with a soft Ch 'cho-lehm')
-Western Wardin has strong Burri cultural and linguistic influence, and a distinct accent- one of the most pronounced differences is use of the ñ sound in 'nn' words. The western city of Ephennos is pronounced 'ey-fey-nyos' by most residents, the southeastern city of Erubinnos is pronounced 'eh-roo-been-nos' by most residents. Palo's surname 'Apolynnon' is pronounced 'A-puh-lee-nyon' in the Burri and western Wardi dialects (which is the 'proper' pronunciation, given that it's a Kos name), but will generally be spoken as 'Ah-poh-leen-non' in the south and east.
-R's are rolled in Highland-Finnic words. Rolling R's is common in far northern rural Wardi dialects but no others. Most urban Wardi speakers consider rolling R's sort of a hick thing, and often think it sounds stupid or at least uneducated. (Brakul's name should be pronounced with a brief rolled 'r', short 'ah' and long 'uul', but is generally being pronounced by his south-southeastern compatriots with a long unrolled 'Brah' sound).
Anyway not really a sturdy construction that will hold up to the scrutiny of someone well equipped for linguistics but not pure bullshit either.
#I actually did just make a post about this on my sideblog LOL I think in spite of my deciding not to conlang this is going to go full#full conlanging at some point#The main issue is that the narrative/dialogue is being written as an english 'translation' (IE the characters are speaking in their actual#tongues and it's being translated to english with accurate meaning but non-literal treatment)#Which you might say like 'Uh Yeah No Shit' but I think approaching it with that mindset at the forefront does have a different effect than#just fully writing in english. Like there's some mindfulness to what they actually might be saying and what literal meanings should be#retained to form a better understanding of the culture and what should be 'translated' non-literally but with accurate meaning#(And what should be not translated at all)#But yeah there's very little motivation for conlanging besides Pure Fun because VERY few Wardi words beyond animal/people/place names#will make it into the actual text. Like the only things I leave 'untranslated' are very key or untranslatable concepts that will be#better understood through implication than attempts to convey the meaning in english#Like the epithet 'ganmachen' is used to compliment positive traits associated with the ox zodiac sign or affectionately tease#negative ones. This idea can be established pretty naturally without exposition dumps because the zodiac signs are of cultural#importance and will come up frequently. The meaning can get across to the reader pretty well if properly set up.#So like leaving it as 'ganmachen' you can get 'oh this is an affectionate reference to an auspicious zodiac sign' but translating#it as the actual meaning of 'ox-faced' is inevitably going to come across as 'you look like a cow' regardless of any zodiac angle#^(pretty much retyped tags from other post)#Another aspect is there's a few characters that have Wardi as a second language and some of whom don't have a solid grasp on it#And I want to convey this in dialogue (which is being written in english) but I don't want it to just be like. Random '''broken''' english#like I want there to be an internal consistency to what parts of the language they have difficulties with (which then has implications for#how each language's grammar/conjugation/etc works). Like Brakul is fairly fluent in Wardi at the time of the story but still struggles#with some of the conjugation (which is inflectional in Wardi) especially future/preterite tense. So he'll sometimes just use the#verb unconjugated or inappropriately in present tense. Though this doesn't come across as starkly in text because it's#written in english. Like his future tense Wardi is depicted as like 'I am to talk with him later' instead of 'I'll talk with him later'#Which sounds unnatural but not like fully incorrect#But it would sound much more Off in Wardi. Spanish might be a better example like it would be like him approaching it with#'Voy a hablar con él más tarde' or maybe 'Hablo con él más tarde' instead of 'Hablaré con él más tarde'#(I THINK. I'm not a fluent spanish speaker sorry if the latter has anything wrong with it too)
50 notes
·
View notes
Text


a blog for editing resources, including overlays, cutouts, line stickers, psds, tutorials, etc. run by @/grimescum. how to request
please at least skim over everything under the cut. if you dont, i reserve the right to be a little bit of a bitch about it
( ! ) message board –
jan 14 📌 updated tag list!
jan 4 📌 inbox & requests back open!
📌 donate to my ko-fi if you'd like! ♡
( ! ) content – with the exclusion of graphics taken from picsart and occasionally pinterest, i only upload raw, unedited graphics to be used in edits.
– the same generally applies to images of characters; i don't upload cutouts of fanart unless the artist has given permission for their artwork to be reuploaded
– my crediting can be a little wonky at times, but i generally don't credit pictures sourced from large companies such as walmart.
– this blog has no queue, i post whenever i feel like it
( ! ) interaction – spam likes and reblogs are perfectly fine in moderation!! if you're going through an entire tag and liking/reblogging everything you see, i'll block you temporarily
– credit for my work is not necessary, but it is advised to credit the original creators for their work if provided.
– i block freely, mostly according to my main blog's dni. don't be stupid. this also includes r4dqueers and pr0ship.
( ! ) other asks – i read them all! kind comments are part of what keeps me going, so regardless of how quickly i respond to them, know i appreciate every single one deeply.
– you can also ask for a promo!
( ! ) requests – i take requests for finding pngs of or based on whatever you give me, be it a character, prompt, aesthetic, image, etc.
– i'm selective about what i choose to do, so please don't be upset if i decide not to. it's nothing against you personally.
blacklist, media i won't do or will be very picky about: d/smp or related, genshin impact or anything by hoyoverse, kp0p, harry p0tter, p0rn (because of guidelines)
whitelist, media i will do no matter what: any of the fandoms im into!
– i'll also try to find the source of any image you send to me if you can't or don't feel like doing it yourself.
– i have autism, so being as specific as you can helps a ton! there is a difference between edits "based on" and "of" a character to me. also, if you want a certain kind of graphic (ie. a drawn divider rather than an image cutout), please do clarify that
( ! ) tag directory – under construction! a new tagging system is coming soon. for now, please refer to my rentry.
edited by me, fandom, inspo, made by me, op talks, promos, psds, reblogs, resources, tutorials
backgrounds & images, banners/headers, basics, borders (cutouts), borders (drawn), colorable, cutouts, digital scrapbooking, digital stickers, dividers, drawings, fonts, frames (cutouts), frames (drawn), gifs, icons, masks, overlays, patterns, templates/bases, textures
from canva, from flaticon, from google drive, from line, from picmix, from picsart, from pinterest, from pngwing, from roblox
aesthetics
( ! ) miscellaneous links – other links worth putting here.
archive this blog! internet archive (no dl) grab-site (dl) archive bot (dl) httrack (dl) imgdownloader (no dl)
posts 99 resource sites my psds
more resources eros' resources pluto's resources
my resource drive (decode from base64 to get link) aHR0cHM6Ly9kcml2ZS5nb29nbGUuY29tL2RyaXZlL2ZvbGRlcnMvMUxDUGEyV3JnZFpVdHFvNVVPeVZYLTJCWHpJTnVZQVJD
#!! .rblgs#!! .edited by me#!! .inspo#!! .tutorials#!! .psds#!! .op talks#!! .made by me#ℹ️ : masks#ℹ️ : borders (drawn)#ℹ️ : overlays#ℹ️ : cutouts#ℹ️ : digital stickers#ℹ️ : frames (cutouts)#ℹ️ : dividers#🔎 : from pinterest#🔎 : from picsart#🔎 : from canva#🔎 : from line#🔎 : from flaticon#ℹ️ : digital scrapbooking#ℹ️ : textures#❓︎ : text
34 notes
·
View notes
Note
do you have a pattern for that black edwardian-esque shirtdress you made?
Hey all. So one of my sewing posts has gotten a lot of unexpected traffic in the past day. Whenever this happens, it's usually because the tumblr algorithm is pushing the post onto the dash of anyone who follows the sewing tag. So for everyone who is sick of the dress in question assaulting your dash for absolutely no reason, I am so sorry.
@curiouscalembour
Short answer: yes, scroll down to the photos below
Longer answer: kind of, not really, I mean I have a pattern but it comes with no instructions and you're going to enjoy it about as much as most people enjoy scaling up Patterns of Fashion patterns, maybe even less. Also, this is not a tutorial, just an approximate recounting of what I did. So, uh, good luck.
So here's the thing. I don't use commercial patterns because they often have me finishing seams with a serger which I don't own, or constructing garments with the modern bag-lining method which just breaks my brain. I'm also not a professional pattern maker and have no idea how to digitize patterns, so I do all my drafting with good old-fashioned pen and Christmas wrapping paper. I'm also entirely self-taught and learned everything I know about pattern alterations through osmosis from TheClosetHistorian's videos, so I don't know if anything I'm doing here is industry-standard.
I got the original base pattern by tracing a modern button-down shirt that already fits me, and then converting it to be back-closing, then slashing and spreading the pattern pieces to get the desired style lines and amount of pintuck/floof I wanted, and then adjusting the fit over a series of wearable mockups. (5, to be exact. I now have 5 of these things in my wardrobe, and only 1.5 of them are successful.)

So here's^ the yoke piece. Wait, why are there 3 of them? Why do 2 of the pieces have a weird diagonal line running through them with the grid lines all messed up? Because I suck at this, that's why. I frankensteined this pattern from a previous mockup pattern that had a narrower V-shaped yoke and needed to widen it. If you want to digitize this for yourself and clean it up, you'll have to take one of the faint blue squares (they're 1"x1") and make a grid and then overlay that on top of the photo of the pattern shape. The back yoke piece has 2 different grainlines marked because the fashion fabric has a bias pintucked yoke, so its grainline is going to be different from the lining. The fashion fabric is meant to be pintucked beforehand, and then the pattern pieces traced on top of the pintucked panel and then cut out. Oh, and all of these pieces are drawn net, so you'll need to add seam allowance all around. Except at the center back, apparently, where past-Me already added allowance for a bound edge.

The bodice front and back pieces^ are a little more straightforward. No pintucks needed here. The upper edges ease into the bottom edge of the yoke, and the bottom edges gather/tuck down into the waistband. The center front tucks you'll have to drape on a dress form (or on yourself - I pinned a strip of twill tape which was my skirt waistband around my waist and then pinned the excess front bodice fabric onto the twill tape, then covered the raw edges with a dip-waist belt). The center back is a lot shorter than the rest of the bodice because I have a swayback. I learned from a previous mockup that if I leave the back of the bodice longer, I have to constantly tug my shirttails back down into my skirt because it gradually gets untucked throughout the day. These pieces also need seam allowances added. I assembled my bodice by sandwiching the bodice front and back pieces between the fashion and lining layers of my yoke pieces, but it was a bit bulky dealing with the folded back pintucked parts of the yoke seam allowances, so you can finish your seams however you want.
I'm fairly short-waisted, so if you have a longer torso than mine, then you'll want to lengthen the pieces vertically. You want these pieces to be longer than your torso, so that they poof out a little like a subtle muffin top, to get that Edwardian silhouette where the waist looks tiny under the poof:
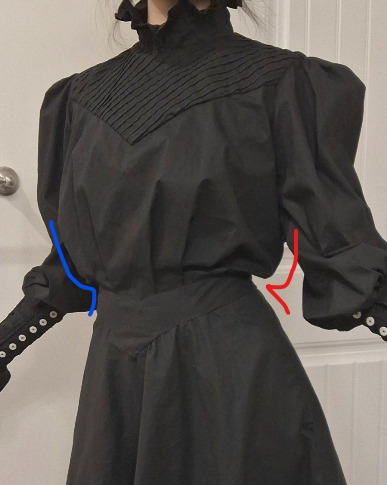

Here's^ part of the sleeve pattern. Again, sorry it's a chaotic mess. I had to use bits of scrap paper and cobble the pattern together. The pattern above is just the upper arm part of the sleeve and ends at the elbow. You'll have to extend about 10" all along the bottom edge to make the smocked part that covers the forearms. I only sewed the sleeve seams closed down to the elbow, then left the seam open from the elbow down to the wrist, so that it closed with rows and rows of buttons and loops. The smocking will give the lower sleeves a bit of stretch, so you might still be able to get your hand through even without the button closure.
This is also a net pattern so you should add seam allowances, but the sleeve is ridiculously puffy already, so forgetting the seam allowances here isn't a big deal.
(I call it my Elphaba shirtdress but it's not an actual replica of anything she wears in the movie. If you want your sleeve to look more like Elphaba's, which is puffy at the shoulders and elbows and fitted around her biceps and forearms, you can change where you add your rows of gathering/shirring.)

And finally, the collar piece. I'm not completely satisfied with how mine gapes at the center front (I think I need to contour/curve it a bit so that the top edge is narrower than the bottom edge), and I think the whole thing could be another inch taller all around, but this is the pattern piece I used to get my finished product. Notice that the back half of the collar slowly curves downward so that the center back is about 1/2" longer than the center front. That's on purpose. If you leave this little detail out, your collar will tilt backwards and make you feel like the front is trying to strangle you.
And because I'm nothing if not inconsistent, this piece features hem allowance already added to the top edge, but no seam allowance pre-added to the bottom edge where it attaches to my bodice yoke, and no allowance for overlap for the center back closure. So be very careful when making and marking your own copy and maybe be a little more consistent than I am?
Speaking of inconsistencies, remember how I drafted my yoke pieces to be cut from an already pre-pintucked panel of fashion fabric? Well, I didn't do that here for the collar. Instead, this collar piece is meant to be cut (on the fold) directly from flat fabric, and THEN pintucked (with lines of vertical pintucking perpendicular to the collar) after cutting. The pintucks are 1/4" deep, spaced 1/4" apart. So the pattern piece you cut out will pleat down to half its original length.
So this:

Becomes this:

Also, note on the pattern piece that I drew a horizontal line across the entire length, running parallel to and about 1.25" below the top edge? That's the point at which your pintucks stop. This gives the collar that ruffle you see at the top.
#sewing#sewing patterns#long post#idk what to tag this as#tricia sews (kind of)#asks#answered#curiouscalembour
13 notes
·
View notes