#boolean tool
Explore tagged Tumblr posts
Visit Tumblr Blog
Explore Tumblr blogs with no restrictions, modern design and the best experience.
Last Seen Tumblr Blogs


Fun Fact
Post activity is at the highest at 4:00 pm EDT; notes peak at 10:00 pm EDT.
Text
ONLY HANDS AND FEET LEFT AND THEN SCALING DOWN. I REPEAT. ONLY THE HANDS AND FEET LEFT!!!!!!
#jaytalking#no more fucking around w booleans#and if it fails in the printing stage then i’ll just be like oh. let me mess around with what might have gone wrong but still this is good#research!! really what i was learning was blender and just applying many different tools to it#or some bullshit like that#lmao
0 notes
Text
fuck it! total shot in the dark time!
#going to the morg#if said shot ends up landing i am going to be SO fuckin taken aback#like u r telling me all i needed to do was use my junior detective skills boolean search tools and make a fb?#all that so i can finally apologize and make things right? yeah ok the zuck can have a smidgen of info (on a burner email)
0 notes
Text
Hmm so if selection domain size point to mesh line count set position to sample index at separated geometry... Does merge by distance have selection? Regardless a selection must be carried to define merge points or nonmerging points with distance 0 (whose positions can then be temporarily offset on Z multiplied by index to ensure distance). This may require singular connection points by letter which may complicate matters quite a bit thinking about it, since each connection would be dependent on the next one, and must be carefully chosen to avoid overlap. Perhaps a better solution would be a more complex jointed connection, but that would be even more difficult to keep from self-intersecting. The real solution is of course Give Me Node Of Fill Like Edit Mode Connect My Verts You Coward. Anyway I should look into mesh circle set position for arbitrary polygon FACE without curve conversion, though this brings its own challenges for sure. The things I do for topology and performance...
#sfw#personal#apparently contextless project planning is a type of post my brain wanted made today so this is how the tablets are doing#like they're more of less aesthetically complete but I need to define their behavior such that unknown details can be procedurally altered#without unexpected behavior or significant performance issues which is why I cannot use mesh booleans and must allow arbitrary text#and ngl I love this part I'm an artist yes but also a programmer and I LOVE defining correct behavior and friendlyinterface#I make tool. even if no one else ever uses it I must make tool good. and pretty.#and hhhhh why can't I spend a year on this project for three weeks time is so restrictive I crave 90+ hours of uninterrupted work#I'm. gonna sleep now. before this becomes an hour long rant of its own instead of only the post in its entirety good night.
1 note
·
View note
Text
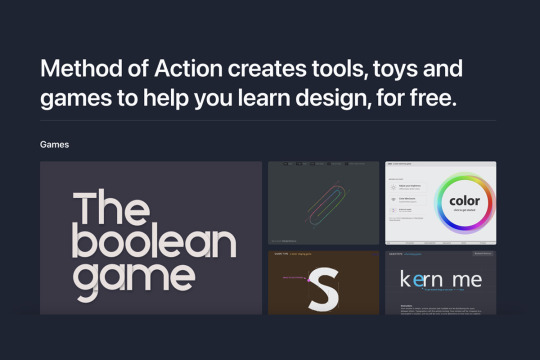
Graphic Design Games
Whether you dabble in graphic design, work as a pro, or plan to major or minor in it for your future career, there's room to improve your skills and have fun with designer games. This week Melissa shares about a site offering 5 games. #MarywoodArt #Design
View On WordPress
#Adobe programs#analogous#Art#bezier#boolean#color matching#complementary#Graphic Design#graphic design games#hue#inspiration#kerning#letter spacing#letterforms#Marywood Art#Marywood Art Department#Marywood University#Marywood University Art Department#pen tool#points and paths#saturation#shape mode#tetradic#triadic#type adjustments#typeface#Typography#vector operations#visual spacing#Where Creativity Works
0 notes
Text
Hello again, Labs here with a recap of our test of Collections! We introduced this prototype back in September and then handed the feature to a handful of volunteers sourced from the notes on that post. Thank you again to all volunteers!
We got so much useful feedback, and wanted to share some of that here, and reveal some next steps we’re taking. There are a couple of big projects cooking in Labs, and Collections has taken a backseat lately, but it is important to us to not leave y’all hanging. We very much want to build things with you here.
Our goal with the volunteer-based super-early phase of Collections was to see if those volunteers actually use the feature, watch what they come up with, and check whether anybody they invite to Tumblr signs up and becomes a regular user of the site. Turns out, nobody did sign up — it’s not as useful of an onboarding strategy as we thought it could be.
However, one piece of feedback we got is that Collections make great custom feeds, which people on Tumblr have been asking for a lot over the years. We hear you loud and clear: you want to supplement the standard Following / For You experience with more intentional control over feed content. That’s really important to us.
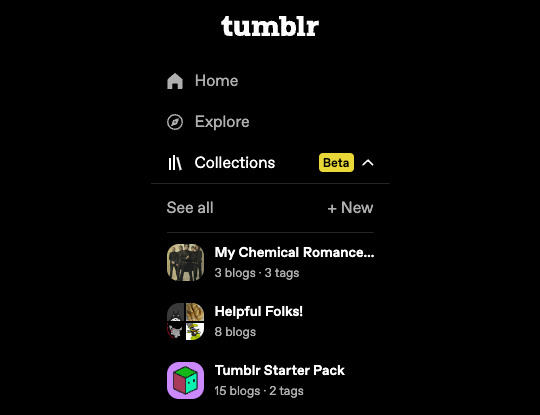
With that in mind, for those in the prototype, we’ve moved the Collections list to the left sidebar / mobile navigation as an expandable area like Account, for quick access. We like this better than putting them in the dashboard tab bar, but it’s still something we’re mulling over:
We also heard the need for more filtering options beyond just blogs and tags. What about only including a blog’s posts that use a certain tag, or excluding posts using a certain tag? Or list tags with a boolean AND operator (“posts tagged [tag] and [other tag]”), not just the OR operator we’re using now for sourcing tagged posts. Lots of ideas on how to further customize what shows up in the feed, and better define what the feed is “for”.
There were other fun, tangential bits of feedback, too, like the desire to make these Collections a collaborative feature, so that more than one person can help build a Collection. There were also several usability issues that came to the forefront, which we’ve addressed. And there were some well-articulated thoughts and questions about etiquette, such as how to seek a blog’s “permission” to be included in a Collection – that’s something we care a lot about, to help prevent this kind of feature from being a source of abuse.
Another piece of feedback we heard repeatedly is the desire for Collections of posts. This is not really what we intended with what we built, but it’s not too far afield either. We totally agree that having better, easier ways of collecting and curating individual posts would be useful, so we’re going to investigate that as a separate project.
With all of this in mind, we’ve split the work on Collections into two separate tracks:
Shaping this feature as a “customizable feeds” solution, away from an “invite others” tool.
Building a new thing for saving and curating static posts.
Stay tuned here on the Labs blog for updates on when/if we’ll be moving these Collections tracks of work to more people on Tumblr. (If you are one of the volunteers who helped us with Collections, you’ll still have access to it for the time being!)
Thanks for reading! And please reach out to us via Support, the replies here, or your reblogs, if you have any more feedback, as always.
784 notes
·
View notes
Note
Hello! Do you have any tips or tutorials you could direct to on how to make 3d sculpting for dolls? I have some 3d sculpting knowledge, but I wouldn't know how to tackle joints for printing
no tutorials unfortunately, since i figured this stuff out for myself. but i can do a quick rundown on how i do it.
firstly, i sculpt my dolls in pieces from the start. i find it easier to keep the joint locations & shapes in mind during the whole process, rather than making a solid statue and chopping it up later. when i'm almost done with sculpting, i add spheres to all round parts of the joints and blend them in; this way i don't need to worry about masking them off during sculpting, or accidentally deforming them.
next, i use the boolean modifier to cut the sockets, as demonstrated on this random wip file.

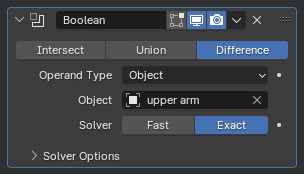
in the case of this shoulder, i would put a boolean difference modifier on the torso, and then pick the upper arm as the object to cut with, and apply.

which creates a socket. because 3d printing isn't always 100% accurate, i leave 1% of tolerance so the ball can actually fit the socket even if both of them warp ever so slightly in printing.
after the sockets, everything else is quite similar. i cut the elastic channels, magnet holes, and hollows inside large parts using a variety of stock shapes and tools i've pre-made to speed things up.

this, for example, is a tool i use for cutting channels into upper arms and thighs. just position the tool in the middle [unlike in this one, where i've accidentally placed it crooked], put a boolean modifier on the part you are cutting, and select the shape as the cutting tool.
i don't know about how anyone else does these things, but this way has worked well for me.
131 notes
·
View notes
Text
so i had a project idea, inspired by DeArrow and my annoyances with e621's search syntax
as many of you probably know, e621's tagging is kinda.. transphobic (refer to the TWYS Policy), to put it very mildly
and on top of that, i find the search syntax inadequate at best (give me my blooming boolean operations!) --
so my first thought when thinking about all that was, well, why not run my own bloody image board; i tend to just make my own damn software if i dislike something anyways
but like you can see how that's a horrible idea, it'd need tebibytes of storage, and moderating what is essentially a furry porn site sounds like a sisyphean nightmare
additionally, e621 has the critical mass problem of for example youtube; people won't switch because it's where all the artwork is, a new site will have next to nothing for a long time --
which leads me to the actual idea, inspired by DeArrow, which is a browser extension that un-clickbaitifies youtube titles and thumbnails
what if instead of running the whole image board, i ran a crowdsourced alternate search and tagging backend?
that'd only need maybe gibibytes of storage which costs next to nothing, and even moderation can in some part be crowdsourced with a vote system, since actual content moderation is handled by e621 already, and the actual artwork is drawn from an existing big platform so building critical userbase mass is much simpler
and all the backend would need to do is run a database with a search system that maps artwork IDs to sets of tags, which the frontend injects in place of e621's own search interface and tag listing; that's light enough that even a like 5-10€ VPS might handle that
alternatively, it could have a dedicated frontend, doesn't matter really --
as for the tagging, there's even a very trivial solution to the transphobia problem
like 97.3% of searches are for appearance rather than canon gender, so just use trait-based tagging (yes i was inspired by Rust lmao)
instead of tagging a character 'female' because they have tits and you can't see what's between their legs, just tag them 'has_breasts', that's most likely what someone is actually looking for anyways
and if gender tags are to be a thing at all, base those on canon gender, or don't include them if that's not known --
anyway guess it's coding time
might make my trainspotting tool first though, idk
7 notes
·
View notes
Note
trick xor treat!
Because of that xor, you get:
Because one of the tools we have to analyze NP problems is 3-SAT, or Boolean satisfiability -- because it's NP-complete, any NP problem can be reduced to it in polynomial time!
16 notes
·
View notes
Note
your pet hotel is so cute!!!! definitely going to be checking back on this to try to adopt a pet next time they're available :3
I might not make another pet available for a good while unfortunately as I explained in this post, but I'm glad you enjoy the concept!
The progress I've been making on my game has been slow at the moment unfortunately, probably because I've been too damn sleepy to do anything after getting home from work due to the time I've had off for Christmas and New Years making me fall back into my natural night-owl rhythm.
I'm not sure how much I wanna reveal of what I programmed so far since I want certain game mechanics to be "hidden" so that the player can be surprised when something happens that they weren't expecting, but I don't wanna show nothing because I don't want people to think that I'm just saying I'm gonna do stuff that I'm never gonna do or that I've given up on it.
Here are the names of all of the classes I've created for the game so far:

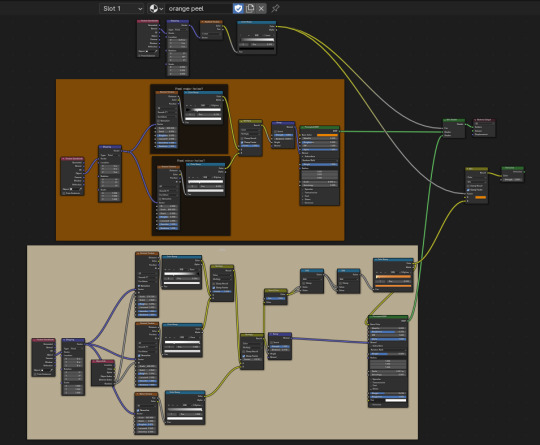
Most of the progress I've made so far has just been adding different marking/pattern/color variations for the pets and handling the "genetics" of the pets, but I'd like to start working on the Room Editor for the game very soon.
Currently in the game there are 34 possible colors that a pet can be, and depending on what fur pattern/markings a pet ends up having it can have up to three of those colors.
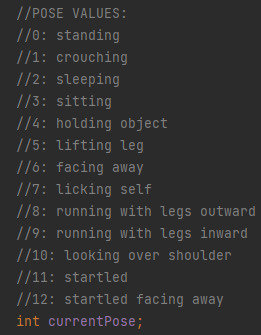
There are 13 main poses that a pet can have, each of which has a sprite for every single possible marking a pet can have in its fur. These are the poses:

There are technically more "poses" than this, but they only change the facial expression of the pet so none of the underlying color sprites need to be changed, only the lines.
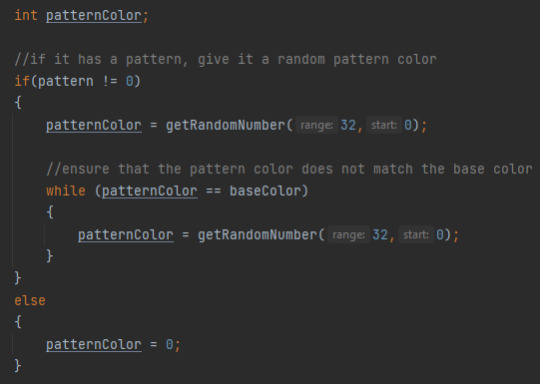
Here's a look at one of the sets of pattern sprites. For each of these, I made the white background transparent and the game changes what's in red to be one of 31 possible colors (there are 34 possible colors a pet can be currently, but three of those are "special" colors that can only be the main body color and not a marking color). As you might have noticed, this is actually the same fur pattern that Rosemary and P Body Sherman in the neocities pet hotel happen to have.

A pet's pose is determined by an integer variable within the Pet class named "currentPose", with each number it can be corresponding with each of the different poses.
There is also a boolean for mirroring the pet, which mirrors all of its sprites so the pet can face the other direction. There's a variable for the degree of rotation of the pet as well if I want to add a behavior for the pets that involves them rolling around on the floor or something.
Here's a snippet of code from the PetGenerator class that gives a randomly generated pet its pattern color.
I've added some more markings since then, but you can see some of these variables and functions in action in the pet visualizer tool I made a while ago.
7 notes
·
View notes
Note
sorry to bother - im trying to figure out how to work with plot flags in frosty editor for dav, and i know you 1. made the bi cassandra mod (my beloved) 2. make modding tutorials. any chance of seeing a tutorial for how you did it? only if it wouldnt be too much trouble!
Well believe it or not, I didn't make Bi Cass in Frosty. I made it with DAI Modding Tool and a hex editor. I don't recommend it. ;)
While the details change between games, the general structure of a conversation (child or linked lines, conditions, actions) really doesn't, so I am going to recommend you check out the first two parts of my Dialogue Modding Tutorial. It was written specifically for Origins and DA2 but the basic overview is largely applicable.
The exact structure of plot flags IS something that differs slightly between the Eclipse engine games and Frostbite games, although their purpose is still the same. Iirc plot flags in Inq and Andromeda each have their own GUID (unique identifier) rather than being a GUID+int pair. They also have counters, sometimes, rather than always being boolean (true/false). And a lot of the time rather than referencing individual plot flags, conversations will reference plot schematics, which are a separate file that can compare the results of multiple flags and other variables. They're a lot like defined flags in the Eclipse games.
Uhhhh in my limited experience making romance mods for Inq and Andromeda, the exact plot flags and plot schematics involved were all very easy to work with, mostly with human readable names and everything, which is always a plus. Other plot flags were uhhhhhhhhhh not always nearly so nice, so it's kind of luck of the draw there.
I don't know if there is anything of use to you in these two other asks I've answered about Frostbite modding but I'll link them anyway just in case: On dialogue modding, and on war table missions. (I never did end up writing that tutorial I mentioned in that one post because I quit Frostbite modding shortly after. Nothing against Frosty editor, however, it's a very good tool and easy to work with.)
If you need any other specific help with Frosty or Veilguard, your best bet is going to be found on Discord. I have links to some servers in my pinned faq.
7 notes
·
View notes
Text
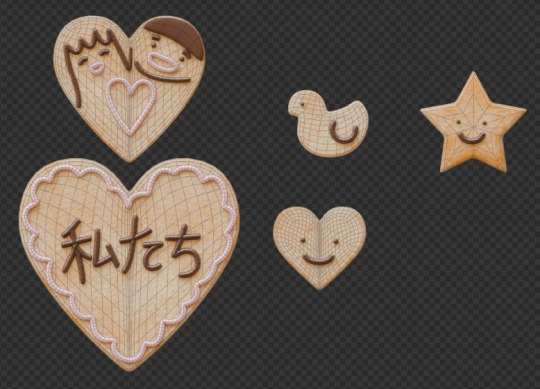
Process - Sunakawa Cake 🎂
A little breakdown of how I made my 3D recreation of the "thank you sunakawa" cake from Ore Monogatari ~

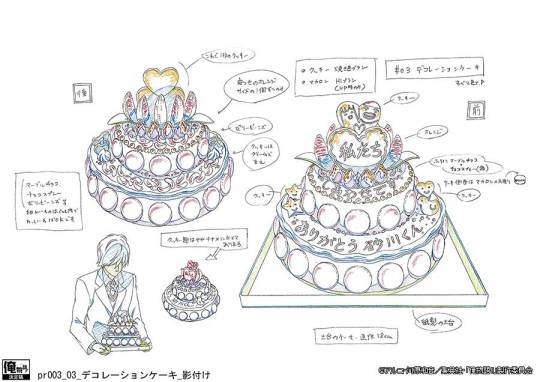
1. Collecting reference
Aside from referencing stills from the anime, I came across the official cake sketch from Madhouse's website! It was really helpful in identifying all the toppings on the cake and other details.


Next was collecting real-life references of all the ingredients I needed to make and taking notes of the shapes, textures and variety.
2. Modelling & Texturing
I go back and forth between modelling and texturing, and jump all over the place so I'll break things down based on the toppings/elements:
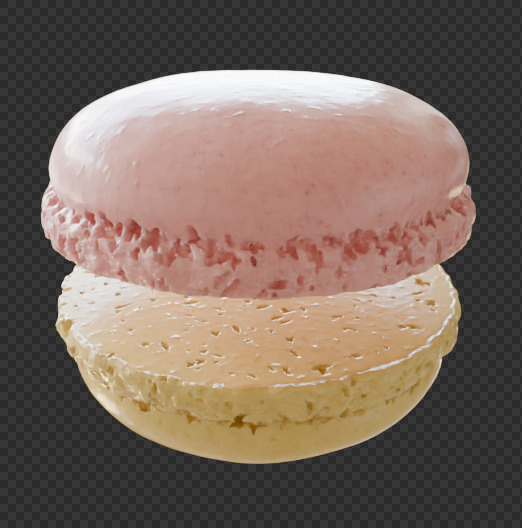
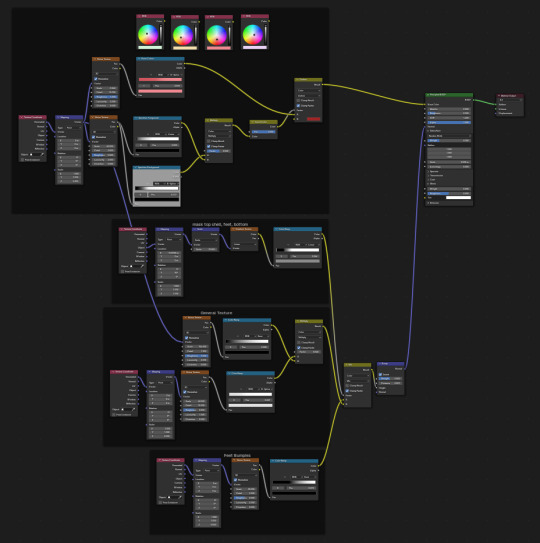
A. Macaron
I referenced Canosie Lab's macaron tutorial here, tweaking the process a little bit; using one mesh instead of two and using particles to distribute the boolean meshes. I ended up with LOTS of vertices, so I made a lower poly version of the macaron and used those to avoid bogging down the computer. As for the texture, I used Blender's procedural nodes, utilizing mostly the noise texture node.

Above: The first row are the lower poly versions of the macaron and the second row are the original meshes with around 200,000 vertices each o_o
B. Cookies
There's not much to it here; I just modeled the cookies and used procedural textures I've made for a previous project (I'll post that project soon!!!)
The icing is made using bezier curves with some bevel depth. I used the draw tool to draw on the cookies. I did the same for the writings on the cake.
C. Strawberries
I've previously made strawberries for another project so I just used those but baked them to a lower poly mesh first. I used Canosie Labs' strawberry tutorial as reference :) I initially used a scaled down version of the regular-sized strawbs, but decided to make a proper mini strawberry 🍓


Left: with scaled down regular strawberries, Right: proper mini strawberries.

I made them super shiny with lots of subsurface scattering to make them look juicy and gummy-like -- not the most realistic but I think they look cuter like this :>
D. Orange slices
The orange slices were the most challenging to make! Did a lot of trial and error to get that pulpy texture oranges have but I managed using a combination of voronoi nodes :") If you look at the pictures below, you can see how the orange looked in the beginning vs. at the end after I refined it some more.
They look fine from a distance but a little janky up close; maybe I'll do a breakdown one day once I figure out a proper node setup.


Above: before & after
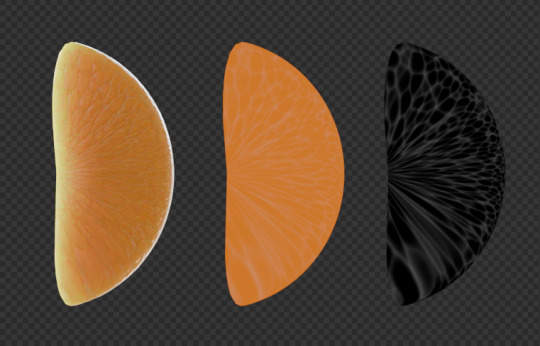
Left to right: rendered, colour only, B/W
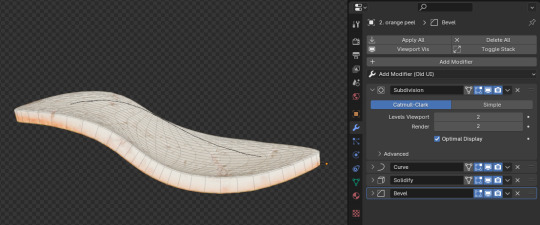
E. Orange peel
A simple plane with a solidify and curve modifier. What's most important here is the texture! I used two different shaders (one for the pith another for the peel) combined using a mask.
F. Jelly beans & choco marbles
A tweaked subdivided square for the jelly beans and subdivided icosphere for the choco marbles. The two use pretty much the same shaders but the jelly beans have more subsurface scattering.
H. Cake
After placing all the toppings, I sculpted the cake (using the multires modifier) a little bit to model the cream that's displaced.

#ore monogatari#sunakawa makoto#process#3d modeling#artists on tumblr#blender#blender 3d#3d model#cake#b3d#3d art#3d render#3d#digital art
30 notes
·
View notes
Text
Blendery adventures for today #1
I guess this is going to ba a series now. Yay
youtube
(I love being stupid)
BEHOLD! I FINISHED TRIANGLE
He is one of the main characters of 𝐿𝑒 𝓅𝓇𝑜𝒿𝑒𝒸𝓉, together with Circle and Square --Who I still haven't started working on...-- . They are all different from one another is personality, appearance and body language. For this fella I want him to be really relaxed. he seldom gets tense and always has a smile on his face, or at least he wanted that to be the case... foreshadowing


(Some concept art test + A-pose)
What I actually did today (and yesterday)
First of all, I was able to fix that atrocious double transformation. When I moved the root of my characters the face would move twice, like in the first video. (Technical jargon)That was because I had a transformation modifier + a parent for the face bones, and for the life of me I didn't know how to have unparented bones in rigify. Turns out there is a bone type that allows unparented bone! Basic.raw.copy, my beloved. Now I have the desired deformation, shown in the second video.
I also implemented those changes to my generic base 2D face rig, and some other models that had the same problem.
Fixed the mouth´s weight paint
Added another deformation for the face, so I could achieve a style similar to my drawings of him, that being a curvature to face, indicating a direction for which he is looking. I was able to use the unparented bone thingy I leraned in this one also.
And lastly, I added some eyebrows to the boy.
Those eyebrows were cheeky to make, because a lot of the modifiers and tools blender has for meshes are not available for curves, which was a problem, because I wanted that smooth deformation you can get with nurbs´ curves. But fear not, to attach the curve to the rig I just did a hook set-up, since I only had 3 verts per brow that was quite simple.
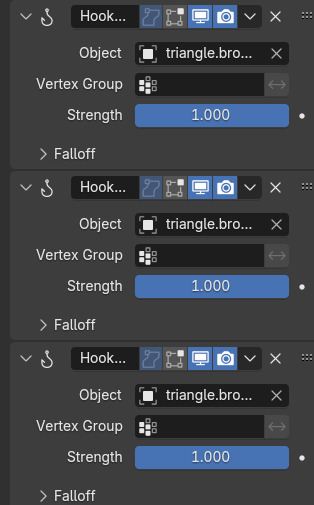
And for hiding the brows (like in the prefeus gif), I wanted to use a boolean, which again, wasn´t available for curves. So I did a really really really simple geometry node setup. (I never use geometry node btw, but I´m glad I did, because it worked really well!)

#blendery adventures#𝐿𝑒 𝓅𝓇𝑜𝒿𝑒𝒸𝓉#my art#my post#triangle#from 2d to 3d#3D#2D#blender#blender3d#geometry nodes#rig#rigging#wip#oc
3 notes
·
View notes
Note
because you mentioned research, do you have any advice or methods of doing efficient research? I enjoy research too but it always takes me such a long time to filter out the information I actually need that I often lose my momentum ;__;
I'm not sure if I'm the best resource for this; I'm so dogged that once I start, it's hard for me to stop. The more tangled or difficult a research question, the more engaging I find it. In addition to loving cats, part of why I have cats is because they are very routine-oriented, and they'll pull me out of my hyperfocus for meals and sleep if I become too caught in what I'm researching; otherwise I don't notice I'm hungry or exhausted. It's not uncommon for me to focus so intensely that I'll look up and suddenly realize I've been researching something for 8+ hours.
But, in general, while it depends on what you're researching, I recommend having an expansive toolkit of resources. Google is fine, but it's only one index of many. I also use other databases and indexes like JSTOR, ResearchGate, SSRN, and Google Scholar (which is helpful for navigating Proquest, too, since Proquest's search function is incompetent). I also use DuckDuckGo, which is infinitely better for privacy than Google and which doesn't filter your searches or tailor them based on your location and search history, so you receive more robust results and significantly fewer ads (this has a tradeoff, which is that sometimes the searches are less precise).
Sometimes, I use Perplexity, but I do not recommend using Perplexity unless you are willing to thoroughly review the sources linked in its results because, like any generative AI tool, it relies on statistical probability to synthesize a representation of the information. In other words, it's not a tool for precision, and you should never rely on generated summaries, but it can help pluck and isolate resources that search indexes aren't dredging for you.
I also rely on print resources, and I enjoy collecting physical books. For books, I use Amazon to search for titles, but also Bookshop.org, e-Bay, Thriftbooks, AbeBooks, Common Crow Books, Paperback Swap, Biblio, and university presses (my favorite being the University of Hawaii Press, especially its On Sale page, and the Harvard East Asian Monographs series from Harvard University Press). This is how I both find titles that may seem interesting (by searching keywords and seeing what comes up) and also how I shop around for affordable and used versions of the books I would like to purchase. (If you don't want to buy books, local and online libraries and the Internet Archive are great resources.)
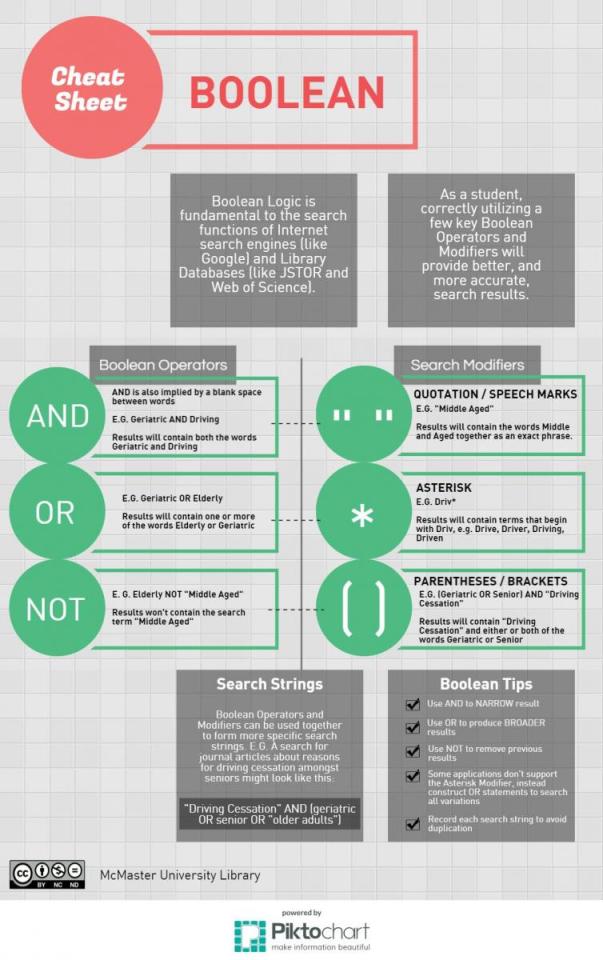
Most relevantly, and I assume most people might already know this, but I can't emphasize its importance enough: use Boolean logic. If you are not using operators and modifiers in your search strings, you are going to have immense difficulty filtering any relevant information from indexes.
8 notes
·
View notes
Note
Hello! I was recently enrolled in Full Sail (Game Art). I was just wondering if you have any advice for moving forward? It's definitely tough since it's really all new to me.
Hey! Somehow caught this in the sea of spam that gets dropped in here. I really need to be more active.
This is a long one, so buckle in.
And for everyone else, I'll be back in a greater capacity soon! Been crazy busy, but you can catch me on my community discord if you'd like to say hi!
First things first. Networking. Take every opportunity at your disposal to get to know people who do what you love doing and are better at it than you. They can offer you so much opportunity for growth and feedback to expedite your work.
Two. They won't teach you every single tool to optimize your workflow. Start watching YouTube videos on Maya plugins, Blender workflows, and hidden Unreal Engine tools. I've found so many neat knick knacks just dabbling on my own. (They didn't teach me booleaning! Wild!) Oh, and figure out what you'd like your discipline to be early, and have artistic reference to back it up. For me, I want to lean into stylized WoW-esque hand painted models and Half Life inspired realism for my scenes. Having a solid direction amplifies your work and portfolio ten fold.
Three. If you can play with the workflow or software early, do so. The game art program has one of if not the most hours required for class work of any program at the university. There will be days you hate it and want to quit- persevere. Get the very best models, UV layouts, texture detail you can, those skills can only serve you later. This can also go back to that first point- talk to your peers and instructors for advice on how to optimize your workflow, because there's always ways to do things more effectively. I find modular and mirror based workflows to be especially helpful for what I do as a 3d environment artist. And on that note, TALK to your instructors. They're there to help. They can offer suggestions to lighten the load on projects and still get amazing results, ESPECIALLY Chops, the visual development instructor! He's fantastic! The sooner you know him the better.
Finally, circling back to the first point again, if you'd like to get in touch, reach out to me on Discord and I can offer some help!
Also wow! I'd really like to know how you found me, haha. Hope this helps, and welcome, Sailor!
2 notes
·
View notes
Note
what software do you use to make the 3d models for your dolls? I've been trying to make dolls and it hasn't been working out very well.
blender. my hottest beginner tip, as somebody who has been doing this for maybe a year so i do fall into the beginner category myself, is to ignore all advice on how to 3d model Properly.
what i mean is that 3d printing is very forgiving. there are no poly count budgets or topology requirements like games or animation have, and a lot of the advice online is geared towards those things. i have no idea how to do low-poly modeling, or anything deeply technical. mostly i just add some balls of clay in object mode, and then go directly to sculpting. the sculpt mode is pretty quick to figure out; if you can do it with clay, you can do it in blender after playing around with the tools for a bit. there's no need to learn everything immediately; you can get pretty far with dolls by just sculpting and figuring out how to use the boolean modifier for joints & other miscellaneous holes.
44 notes
·
View notes
Text
How i made the red crown in blender @mistermattie prt 1
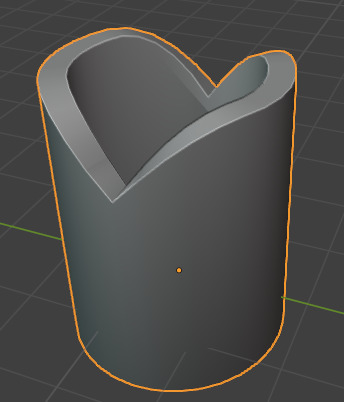
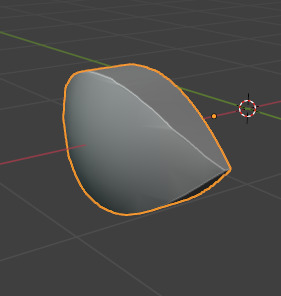
to start with the red crowns shape itself what i did is grab a default cylinder, remove the top and bottom faces to make it a hollow 1 face thick tube and use proportional editing to get that pinchy part of the crown, like this

after that slap a solidify modifier on (make sure its got the offset the right way) and set that to your desired thickness and apply should look like this
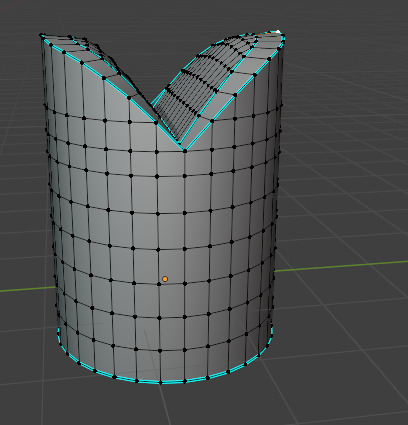
now fill in the top (or leave it hollow if you want), id advise that you try and get the mesh looking something like down below. also add a fair few loop cuts down the main body of the crown (not too many).

and thats the basic shape down! i did things a bit differently than this originally but what i changed here should make the later process easier.
now im not sure if its a good idea to put the process of adding the eye here, as in hindsight there are likely a few ways you could do it (i used Booleans, was rather messy) im not sure if you can trace around an object using something like the knife tool? either way it should resemble this somewhat
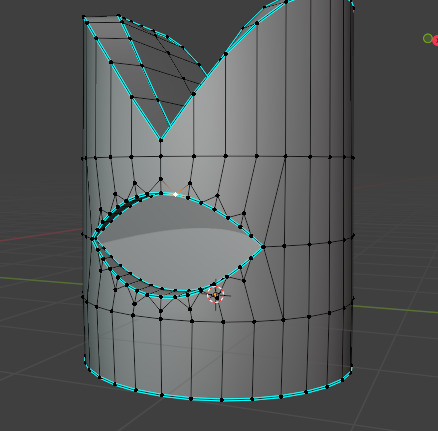
(this is an older mesh of the original as cutting another eye shape would take a lot of time, the way i did it was slicing a shape using booleans ((making sure that there was a square of mesh around the cut)) and then deleting the surrounding faces and manually reconstructing the shape removing verts that didn't line up, somewhat tedious)
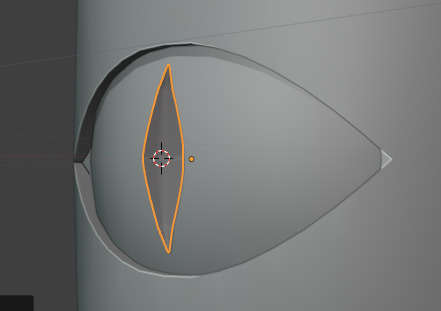
now for the eyeball itself i found the easiest (probs not the best) way of doing it was to add a sphere at the centre of the crown so it looks like this
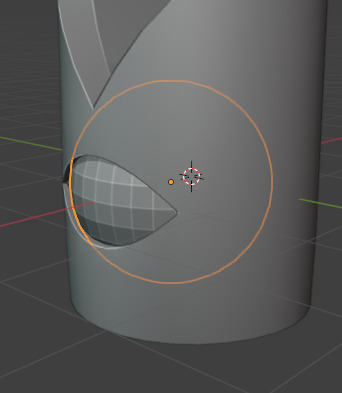
then select the back panel of the eyehole of the crown, duplicate it and seperate by selection, extrude it along the x axis and use a slice boolean on the sphere to get this
(make sure you recalculate normals while in edit mode by using shift + N)
and then remove the back mesh, remove the verts that arent connected to anything and merge the sharp points so they're perfectly centre and boom

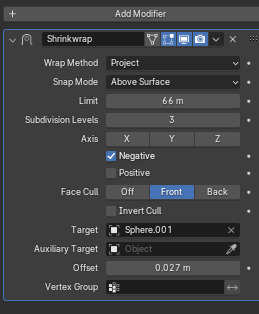
now shove that in the eye socket, make a pupil shaped plane (i just used proportional editing on a circle), make some lines going both horizontally and one down the middle by selecting 2 verts and pressing J, subdivide it, add a shrinkwrap modifier, setting the target as the eye and setting the wrap method as project. set the limit to be something fairly large, probably around 20-40? face cull front set the snap mode above surface and put a very small offset so it isnt intersecting, move the plane behind the eye and it should work!
Note: the subdivision levels severly lag blender if too high, if you notice the shrinkwrap not working so well on the edges of the eye, i'd just scale the eye slightly so it is hidden by the eyelid
and ill end this post here. i wont go over materials or outline as its a bit highly specific but ill give you pointers if ya want. after this is rigging and that'll have to be vague unfortunatly but ill go into detail about the squash and stretch functionality and the eye track (which took me several days to get working)
that should (unless i forgot something) be all of the default stuff. if you have any questions don't be afraid to ask!
5 notes
·
View notes