#cloud tutorial
Explore tagged Tumblr posts
Visit Tumblr Blog
Explore Tumblr blogs with no restrictions, modern design and the best experience.
Last Seen Tumblr Blogs


Fun Fact
The Tumblr app for Google Glass was released on May 16, 2013.
Text
One of the better examples of integrating video game conventions of play into the narrative is how the game mechanics tutorials in the opening stages of Final Fantasy VII (the original) flip the customary script and have Cloud, the player character, be the one explaining things to other characters, thereby establishing the unspoken expectation that his narrative function is to be the guy who knows what the fuck is going on and lending greater weight to the eventual revelation that he has no idea what the fuck is going on.
#gaming#video games#game design#final fantasy vii#final fantasy#cloud strife#tutorials#swearing#final fantasy vii spoilers#final fantasy spoilers#spoilers
3K notes
·
View notes
Text

sheathe your claws, my friend, there are greater battles ahead
#uncanny xmen#marvel tag#storm#wolverine#ororo munroe#james logan howlett#stormverine if you really think about it#shih's art#d-december#I KNOW HER HAIR NEEDS WORK... I'M YOUTUBING TUTORIALS... 😭😭😭#bro i'm so envious of the artists who can draw her hair like the clouds...
252 notes
·
View notes
Text
A quick tutorial on how to draw clouds :


58 notes
·
View notes
Text
I have an image for sugar cloud and I thought I would share my head canons!
• Right as she gets the microphone to sing, she puts on big, white, and fluffy petticoats with paint splattered on it (Representing a Sugar Cloud)
• The choir also during this, grabbed some white Pom Poms with sparkling white glitter and confetti glued on to it, as they essentially cheer Constance with the Pom Pom’s (just ignore how that would realistically sound LOL)
• Also, if they have an ensemble, they can use colorful glowsticks :3
• During her recorder solo everyone (besides Jane or Ocean) would essentially perform a very simple cheer dance before approaching Constance and everyone picking her up and supporting her from the Pom poms. So, it’s like she’s literally on a cloud
• Finally, when the confetti pops, the stage lights become these warm purple and orange colors with swirls to support it :3
Hoped you Enjoyed my own interpretation of Sugar Cloud :)
#ride the cyclone#RTC#rtc musical#constance blackwood#sugar cloud#sugar cloud headcanon#sugar cloud is my second favorite RTC song from the slime tutorial#it goes so hard#Constance makes me cry
32 notes
·
View notes
Text


🚨[FREE PATTERN]🚨
Hello, dear friends! 🤗 While I put the final touches on something really cute and definitely very unusual, I wanted to remind you that I have a FREE crochet pattern for Kawaii Cloud, available in English, Spanish, French, Italian, Dutch, Portuguese, and Danish. Browse through gallery to see all the languages! ��
Happy crocheting, dear friends! 💛💙
#aradiyatoys#olka novytska#diy#adorable#crochet#handmade#amigurumi#cute#crochet pattern#kawaii#cloud#sky#free crochet pattern#free crochet tutorial#kawaii crochet#free pattern#amigurumi pattern#aww#crochet free pattern
108 notes
·
View notes
Text
The rtc slime tutorials playlist i made... hehe (there's only like twelve vids but okay)
#― the angel catalogue !#― abbey !#― sky !#― ride the cyclone !#rtc musical#rtc#ride the cyclone musical#st cassian chamber choir#the ballad of jane doe#noel's lament#space age bachelor man#talia#what the world needs#uranium suite#fall fair#waiting for the drop#sugar cloud#karnak's dream of life#it's not a game it's just a ride#rtc slime tutorials#rtc productions#skysky#idk what else to tag#idk tbh#hello :3#idk how tags work#ride the cyclone#rtc production#playlists
30 notes
·
View notes
Text

A new game has joined my favourites! I wish that more games were like Clair Obscur, Dishonored, Remnant, Prey, Control and BG3: good stories with creative gameplay and beautiful graphics.
So here's a sketch of my fave Expeditioner.
#clair obscur: expedition 33#work in progress#sketch#procreate art#clair obscur lune#i suck at backgrounds so bad but it doesn't matter#I also wish SteamDeck had better graphics😭#she will get anatomy soon I promise#i will find a cloud tutorial soon#adhd artist#fanart
22 notes
·
View notes
Text

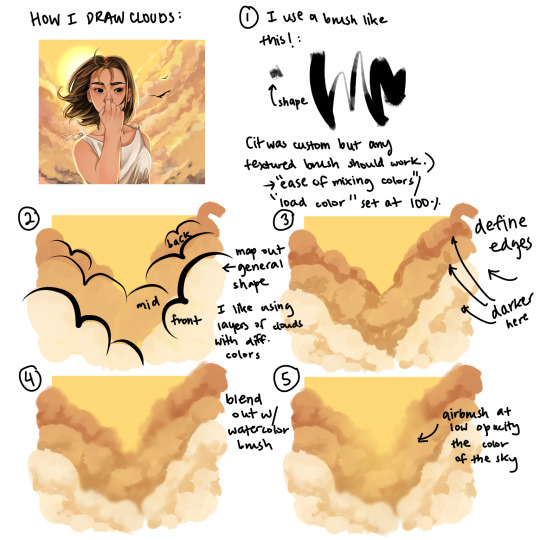
(1) Sketch shape—does not need to be neat my loves.
(2) In a new layer, follow the outline neatly and fill shape
(3) In a new (clipping mask) layer, add a lighter shade to the outer sides where light will hit (I used the noise brush in procreate to do shading).
(4) In a new (clipping mask) layer, add a bit of yellow to that—I’m calling it sun-kissed.
(5) In a new (clipping mask) layer but under (4), use a darker shade of your cloud fill and add a bit of dimension.
(6) Untick the sketch layer, clean it a little if you want and voila!—A beautiful little cloud!
#artists on tumblr#digital drawing#digital art#my art#illustration#clouds#digital illustration#small artist#art tutorial#art#drawing#you can do it#stepbysteptutorial#stepbystepdrawing#stepbytestep#stepbystepguide#tumblr art#tumblr artist
17 notes
·
View notes
Note
Hiya! I absolutely adore the way you draw Seph, esp his hair <33 I’ve really been struggling to figure out how to do that, haha, and was wondering if you have any tips? His bangs are a nightmare lmao
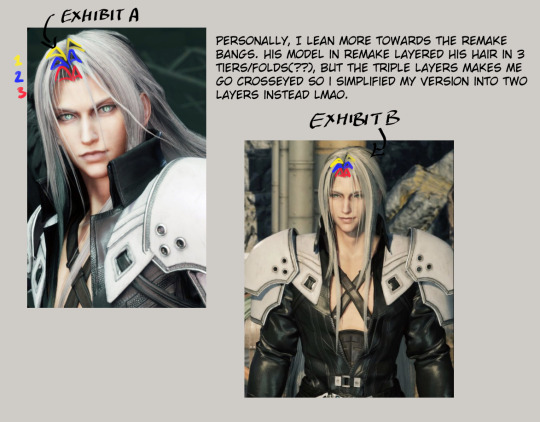
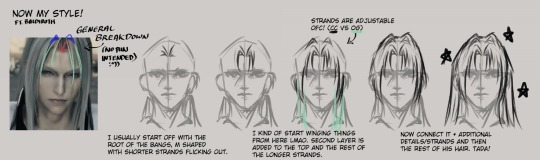
AAAAA TYSM ❤️❤️❤️ also oh lordie, you have no idea how much hell his bangs have given me when I first started drawing him not that it’s gotten much better hahaha (flashback to me drawing it incorrectly for a good few months), but uhhh here’s a sketch page and how I sort of?¿ analyzed and broke down the structure of his bangs (who am I kidding I just one winged it until I sort of got comfortable with drawing it)
There’s definitely different ways to draw it depending on what specific style within the compilation you’re looking at ie. The more exaggerated but simplified version from OG, the one layered version from older games like CC or the three layered one from remake.
Zoom in for more detail :)
#I hate ff bangs with a passion#more like ff hair as a whole#don’t even get me started with cloud or Zack#artichoke and porcupine lookin headass#art tutorial#??? wow ok I didn’t think I’d be making an art tutorial tbh#ff7#ffvii#final fantasy vii#final fantasy 7#my artwork#doodle#sephiroth#tutorial
146 notes
·
View notes
Text

Clouds 2 pixel art, Me, 13 July 2024
ID: a pixel drawing of a backwards-L shaped cloud with yellow highlights.
tutorial from @16pxl on twitter (i think @8pxl on tumblr)
#artists on tumblr#poet's art#art#miso speaks#pixel art#digital illustration#has image id#clouds#tutorial
33 notes
·
View notes
Text

Above the Clouds
Wanted to practice some clouds so I did James Julier’s Clouds Sky Sunrise tutorial. I think they came out quite okay 😊
#procreate#thesathei’s art#procreate tutorial#artists on tumblr#digital painting#default brushes#art practice#clouds#james julier tutorial#nature drawing#cloudcore#cloudy sky#digital art#sunrise sunset#orange
16 notes
·
View notes
Photo

Clouds 2021
I made this following a tutorial, wherein you treat the clouds as boxes, with perspective and everything, in order to create a sense of form and 3dimensionality. I think it turned out well, though I think maybe it would have looked better with the BG gradient reversed to match the directionality of the lightsource. Also unfortunate that I no longer remember what tutorial I did it from. :// If any of you spot it, let me know!
Posted using PostyBirb
6 notes
·
View notes
Text
one of my friends was asking for help so I made a tutorial! hopefully this helps someone else too
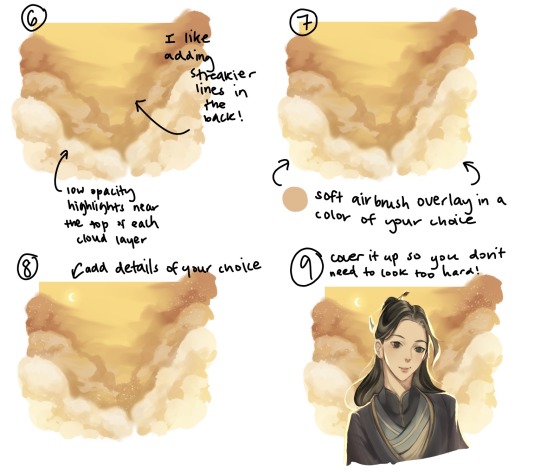
this is obviously not the only or even the best way to do it! this is just what I need to do when I need a quick and easy background
28 notes
·
View notes
Text

#This is about Sephiroth btw#a tutorial by Cloud and Zack#final fantasy vii#ff7#cloud strife#zack fair#sephiroth
24 notes
·
View notes
Text

5 notes
·
View notes
Text
taking a break but holy moly

#digital art#digital fanart#sky cotl#sky cotl fanart#art study#i follow 2 cloud tutorials and suddenly im drawing the best landscapes of my life??? huh??
8 notes
·
View notes