#diy bottle
Text
Red flower in Glass bottle sticker
#bottle sticker#flower sticker#red flower#empty bottles#bottle themed#diy bottle#glass bottle#gardening themed#store themed
0 notes
Text
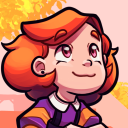
Found a recipe bottle sent by Nana! She used to live on my island, y'know!
From December 23rd, 2020
#animal crossing#animal crossing new horizons#acnh#diy bottle#recipe bottle#sent by nana#and old friend#nintendo#nintendo switch#queue
0 notes
Photo

#animal crossing#nintendo#switch#new horizons#anch#nintendo switch#funny#lol#humor#meme#memes#wholesome memes#dank memes#villagers#diy#bottles#acnh#animal crossing new horizons#ac
2K notes
·
View notes
Text
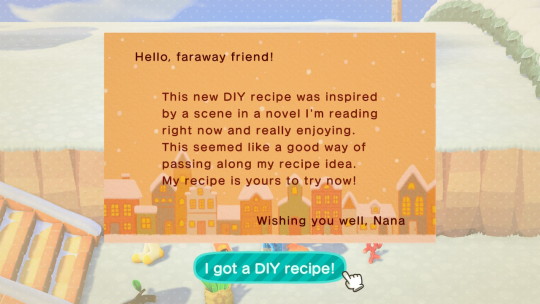
Handmade bottlecap pins !!!!
<33
151 notes
·
View notes
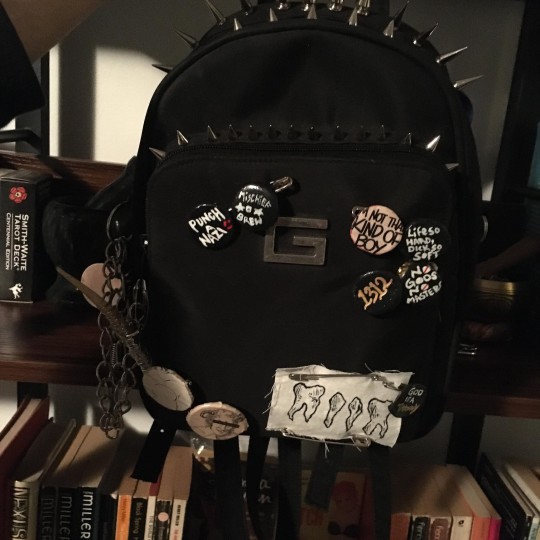
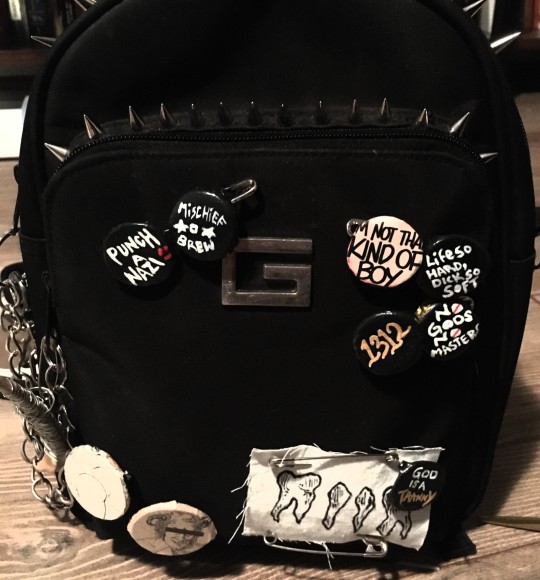
Text
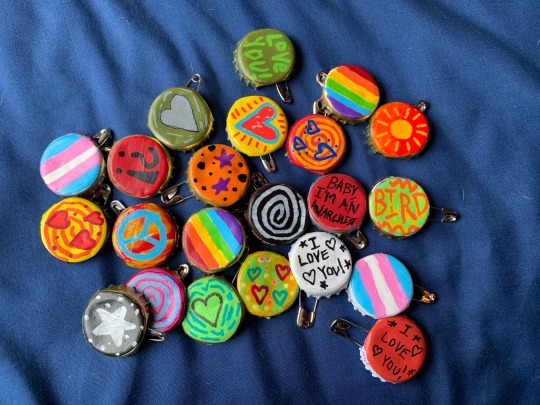
Behold, The Meme Jacket
This jacket arrangement position is called "LOOK AT MY ARMPITS."
Here's a close-up of the collar and lapels with the jacket laying normally:
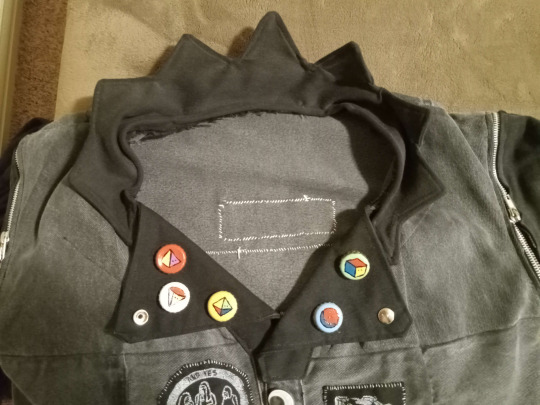
The snaps on the lapels hold them open, but can also be snapped closed, which is nice on windy days.
Here's the front of the jacket as it's intended to be seen:

I was very particular about how I designed and arranged these: much like how the back only has color in the middle, I wanted to keep the bright colors to the center. The two brightly colored patches are meant to read like a two-panel comic, or some sort of call-response thing, whatever. The patches along the bottom are meant to read left to right, almost like a four-panel comic. (The Awesome Face patch is just there because it fit.)
What's not obvious from these pictures is that there are inside pockets, which connect to the zippered side pockets! I don't tend to actually use this feature very much, but it does make the pocket space hugely tall in there.
Another feature I don't tend to use very much is the zip-off sleeves. I think I've only ever taken the sleeves off once (plus a few times when sewing patches on, to make it easier to reach where I was working).
The googly eye buttons are holding up moderately well - I might need to replace one of the eyes by next year. If you're gonna do this yourself, you gotta put a metal keyring of the same size behind the googly eye! Wrap the keyring in a piece of fabric (I used the tubular bit from the bottom edge of a t-shirt), and sew it to the button band. Then, glue the googly eye onto the fabric with enough glue to also glue the fabric to the keyring. (I used superglue for this.)
All in all, it's been an incredibly fun project, and one that I get lots and lots of use out of! I'm sure I'll add to it at some point, but I'm calling its current state "done (v1.0)".
#meme jacket#diy#sewing#battle jacket#diy punk#originally the among us patch was going to be fully saturated colors: red killed green in front of blue#and i actually made that patch#but then i realized i wanted a much paler patch so i started redoing it (thankfully the among us characters were linocuts)#so i printed the scene again in white (the way i did the colors was to paint over the linoprint)#and once it dried i started painting the colors onto them. first light blue. then pink.#as i'm shaking the bottle of green paint i realize i've made a trans pride among us murder scene patch completely by accident#i'm okay with this. hell yeah
196 notes
·
View notes
Text


Projects of the day 🥳 ❤🌻
Buttons and pins, lil cheeky teeth patch and new journal I've patched over!
First buttons I've made so super happy how they turned out, currently hunting down more bottle caps for now!
Buttons - 1312, punch a nazi, T4T, occupy empty property, mischiefbrew, no gods no masters, god is a tranny, im not that kind of boy, life so hard dick so soft, cheeky lil booty (cut out from a old gay magazine) , lil devil man (cut out from a old gay magazine)
Will post photos of the new patches ive made as well! ❤❤
#diy punk#punk#punk diy#diy#punk buttons#punk pins#folkpunk#diy fashion#punk bag#craft update#give me bottle caps please
306 notes
·
View notes
Text
Potion bottle dice kit! You can get one for yourself here
63 notes
·
View notes
Text

pins for the battle jacket!!! theyre so fun to make this is so epic
111 notes
·
View notes
Text
pins i painted today <3

the glare makes these a little hard to read, so the blue one said "pup regressor", and the black ones say "autistically inclined" (my friend called me this as a compliment in reference to me being both autistic and artistically inclined. so. autistically inclined.) and "i struggle with eye contact". im sad the sealant smeared the (shitty) paint on the eye contact one :( but its okkk also i dont rlly like the way the it/its pin looks but idrc rn i spent too much time on it
#punk diy#diy punk#diy craft#diy pins#pins diy#bottle cap pins#it/its#it/its pronouns#pronoun pins#puppy regression#puppy#pet regression#pet regressor#puppy regressor#actually autistic#autism#autistic artist#mine
70 notes
·
View notes
Text
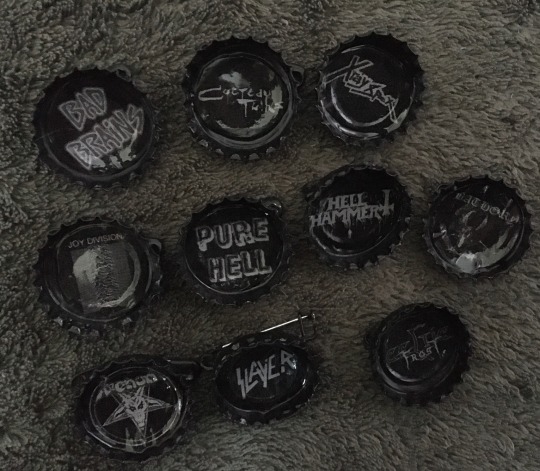

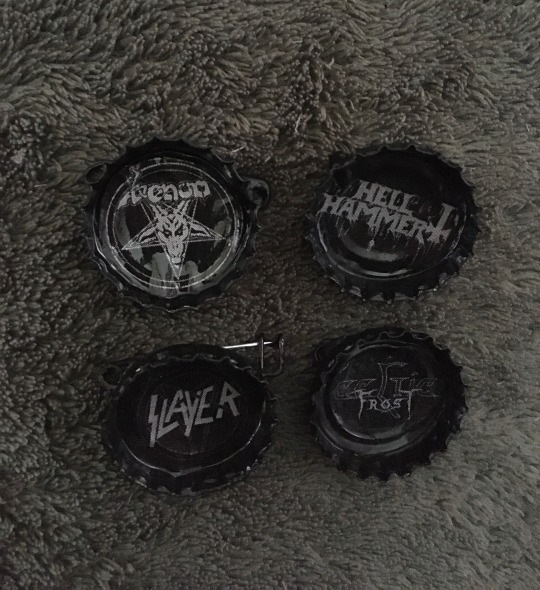
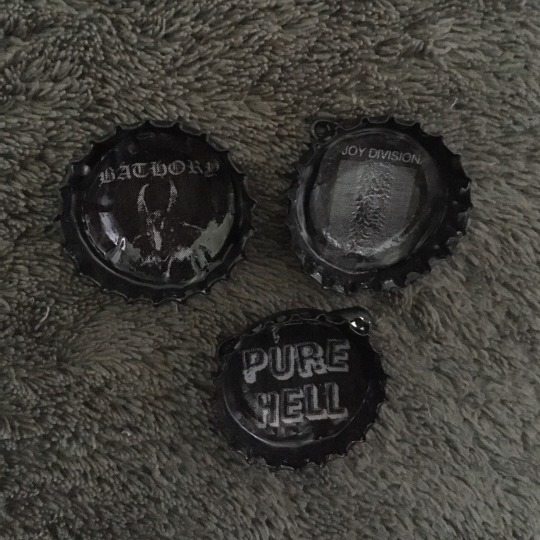

Here's all the bottle cap band pins I've made so far (and a little cermaic pig from a thrift store). I still have plenty more I want to make once I get more caps :)
#pins#bottlecap pins#bottle cap pins#my crafts#my post#bottle caps#diy pins#gremlincore#crowcore#corvidcore#ravencore#magpiecore#x ray spex#cocteau twins#bathory band#bathory#joy division#death metal#black metal#metal bands#goth bands#goth music#venom band#bad brains#slayer#bad brains band#punk diy#diy punk#pure hell band#punk band
104 notes
·
View notes
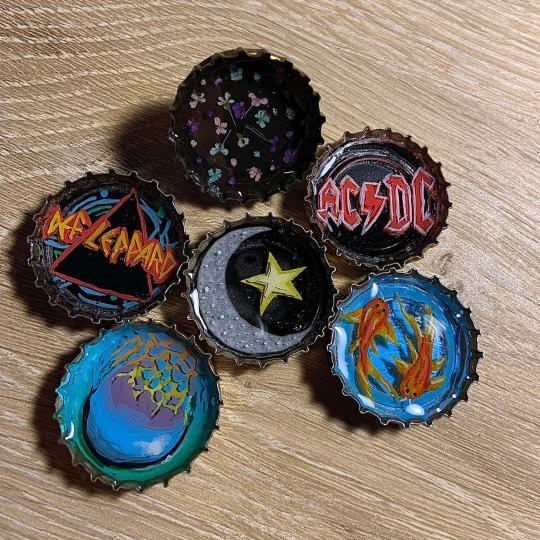
Note
any ideas for what to put on bottle cap pins?
Yes!! I love making bottle cap pins! Here are some I made recently that I just have to attach a pin to!
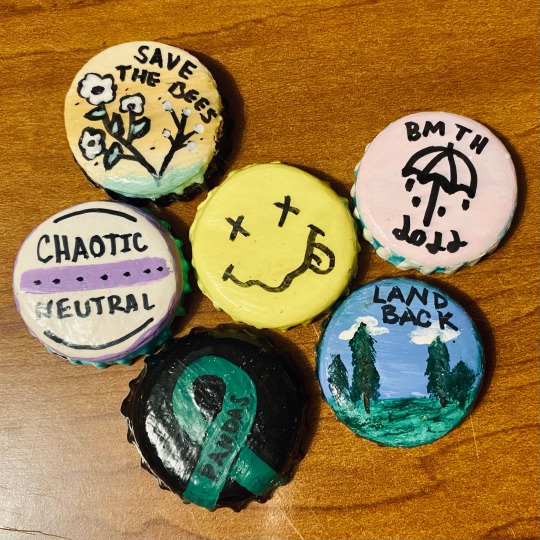
I usually just start painting and then try and figure out something as I go, but heres a list of ideas:
Band Logos
Things related to your stances on issues you care about (hence land back and save the bees)
Gender/Sexuality related stuff (pronouns, colors, symbols, etc)
Symbols (safety pin, the raised fist, religious symbols if you do the religion thing, etc)
Paint a bottle cap and have friends write messages on them for you, put your favorites on your jacket
Paint vinyls or CDs on them (or other circle things)
You can also print out images and adhere them to the caps (I recommend mod podge). Here are some other ideas I snatched off the internet:


192 notes
·
View notes
Text
[ DANNY'S TUTORIALS: BOTTLECAP PIN ]
Hi there!! I'm gonna teach you how to make a bottlecap pin since I've gotten a lot of questions about where I got mine from baby punks and others who just find them cool! I've found that a lot of people buy their pins online from companies that overprice and over-process their designs, and often times steal them from smaller businesses. Punk has been gentrified over the years, so this tutorial acts as a way to reconnect to the roots of DIY fashion made by people with limited resources and time. This is a great way to show your interests, pride in your community, and pretty much anything else you want even if you don't have a penchant for traditional art. Don't worry about it looking good, just try to have fun! At the end of the day, the shittier the job, the more punk it is.
[ Step Count : 6 ]

Here's what you're gonna need! (optional materials have a star next to them instead of a regular point):
-> hot glue gun (in replacement of pliers)
-> safety pin
-> bottlecap (unbent, preferably a twist off)
-> can tab
✮ pencil/pen
✮ sandpaper
✮ paint & paintbrush/posca pens
✮ regular Elmer's glue
STEP 1:
Gather your all of your materials and place them on your workspace. I'm going to paint mine, so I got the sandpaper, paintbrush, and paints as extra materials.
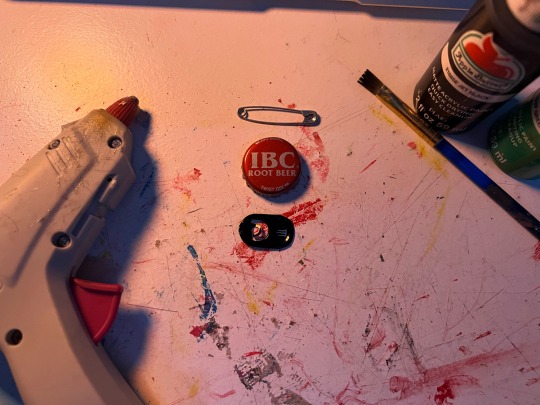
STEP 2:
If you're not going to paint yours, go ahead and skip to step 3. Otherwise, get your sandpaper and your bottlecap, then sand down the surface (A). Paint your base, draw a design with the pencil/pen, and fill it in with your paints/posca pens (B)! After I'm done painting I'll usually seal it in regular Elmer's glue to make sure it doesn't get messed up anytime soon (C). I chose a little green skull since the person I'm gifting this too likes and spooky stuff and green is their favorite color :]

[ Also sorry for the change of scenery, I had to finish at the library cause I was studying. Visiting, donating, and helping your local library is Punk As Fuck. ]
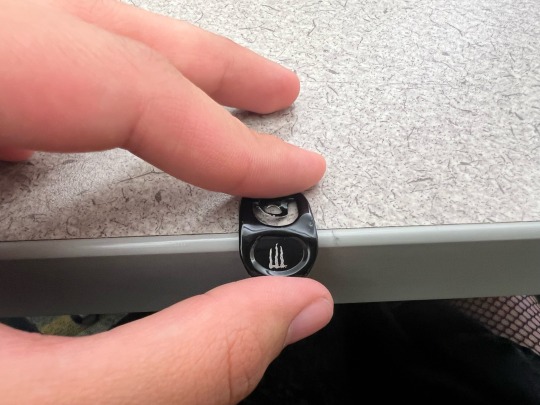
STEP 3:
What you're going to do now is set your bottlecap aside, and take out your can tab. I have joint problems and I can't use pliers, so I bend it over the edge of a table by holding it half over the edge and pushing down to bend the metal. But try not to bend it too much so your safety pin stays in place!
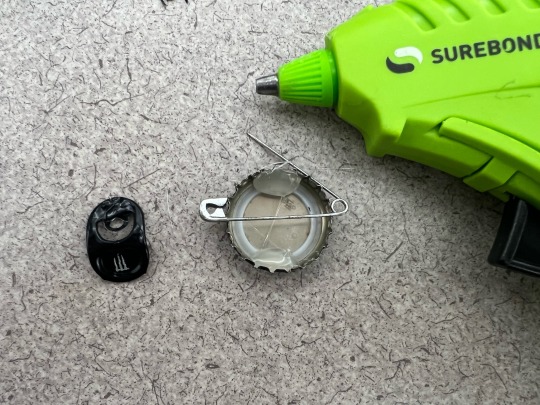
STEP 4:
Okay, here comes the tricky part. Like I said, I have joint issues, so I can't use pliers because they hurt my hands. Instead I'm going to set aside my now bent can tab and bring back my bottle cap, then flip it over. Place 2 hefty drops of hot glue on the bottom and top of the pin, then get your safety pin and open it so you can place it on the back horizontally.
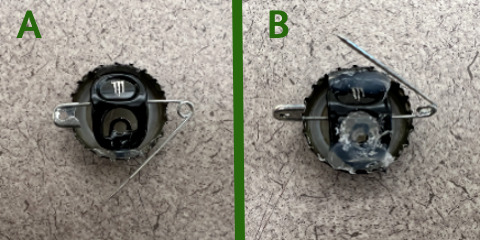
STEP 5:
Now, place your bent can tab on the back of the pin and over the open safety pin, pressing it into the hot glue drops and letting it dry for a little bit (A). If you like, you can also put two more drops of hot glue on the tops of the bent can tab for extra security (B). I also put some hot glue in the middle of the tab's opening for extra security on the safety pin. Please pardon the absolute dogshit photo quality it wasn't cooperating for some reason LMAO
STEP 6 [FINAL]:
Wait for it to dry, then you're all done!! Your very own bottlecap pin. You can attach this to bags, jackets, shirts, pants, and pretty much any material that a safety pin can glide through.

Here's the finished product, as presented by my friend D at the library (everybody say thank you D for modeling)!!
[ -> Next (coming soon:]) ]
#punk#diy punk#bottle cap pin#diy tutorial#punk rock#bottlecap#bottle caps#punk tutorial#diy#diy jewelry#diy accessories#danny's tutorials
476 notes
·
View notes
Text


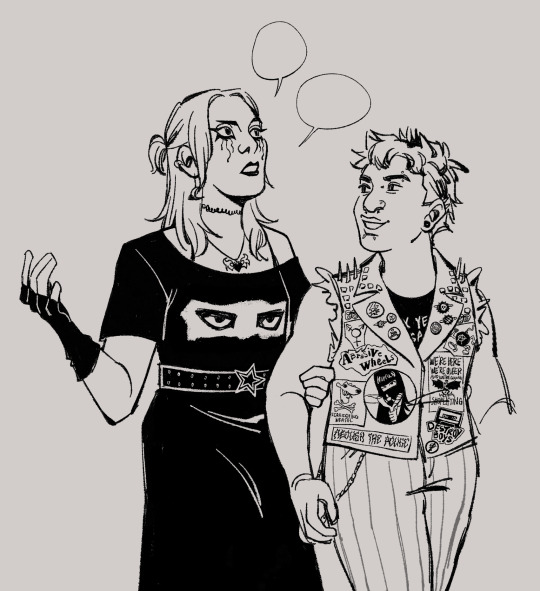
punk spot and goth sarah stuff 🫰
i also made playlists of the kind of music i think they'd listen to :') you can listen to spot's here. most tracks fall under the hardcore subgenre, but there's also a good amount of ska and pop. generally has a chaotic, garage, and/or dated kind of sound, really wanted the kind of stuff that scratches my brain in a specific, rough way
there's also sarah's playlist, which i'm less confident about because i'm wayyy more immersed in punk subculture and music. but. i tried! some gothic rock, mostly punkabilly and gothabilly. i feel like she'd be into music that has that campy slasher feel, so that's the overall mood i was gunning for
#newsies#92sies#uksies#sarah jacobs#spot conlon#drawings#confession idk anything about uksies this is purely based on vibes bcuz the concept of a pinoy nonbinary spot has charmed me#anyways more nerdy stuff ahead i am so sorry >>>#i heart thinking about what characters would be like if they were punk it is so fun#i view sarah as punk usually so it's interesting to compare & contrast her and spot#like sarah i personally cant see modifying her hair or her body much. she'd mostly stick to diying clothes and jewelry#so while she IS punk she's not the kind of punk that most people auto think of#but spot feels like someone who'd /really/ want to lean into all the trappings of punk. being intimidating AND cool#so they're spiky all over. hair piercings jacket are sharp#sarah's battle jacket is a comfortable corduroy material. it's colorful and has random scraps of fabric bcuz the goal is#to make the original jacket last as long as possible#whereas spot's has more inflammatory patches and is strictly black and white and has the sleeves cut off#and has non fabric stuff attached like the spikes and studs and also soda can tabs#because they also strike me as someone who collects random odds and ends. hence the bottle caps repurposed as pins#i also wanted to play around with adding chains and safety pins onto their jacket but alas#ultimately had to prioritize readability#same thing w sarah i wanted to give her layered necklaces and more maximalist elements to her outfit but it ended up muddying everything up#anyways. im insane but specificity is very important to me for punk stuff just because i think#'punk versions of xyz' tend to water down what punk actually is by prioritizing the aesthetics of rebellion without being specific#in What they are rebelling against. which is why these headcanons lack inflammatory political ideas and punk bands#or like they'll just have the circle A sign and it's like ok but do you know what anarchism is and what anarchist praxis looks like#also spot would not be an anarchist tbh they read as more of a commie#they are not doing nonhierarchical based organizing iykyk
28 notes
·
View notes
Text
GOOGLY EYE SKULL PIN

BOTTOM TEXT
81 notes
·
View notes
Note
OBSESSED w the cum bottle cap right next to the ace bottle cap, keep it up !!
thank youuu. I identify as sex positive asexual so i think its very fitting for me :3!

The identity corner of my vest for anyone unsure :3
47 notes
·
View notes
Text

PINS‼️‼️
the genloss one looks better now than it did when i made it
and the
the creeper one hdjshdk
@meerealsssss has a matching cat dad pin
the triangle is uh
is
so
my ghost oc is a fire ghoul
and the triangle is the symbol for fire ghouls
yeah you get it
12 notes
·
View notes
Last Seen Blogs