#essentially whats in a packet mix
Text
'easy chocolate cake recipe!' and the ingredients list is more than 10 things
#catfish speaks#that's not a fucking easy recipe#that's a nightmare#its not easy if one of the ingredients is oil???? what the fuck#its flour sugar eggs butter cocoa powder maybe and that's It#essentially whats in a packet mix#THAT'S easy#also this recipe needs 4 fucking eggs who can spare that many eggs!!!
2 notes
·
View notes
Text
Now that we are in a dungeon meshi lull, I want to share the bread recipe I have been using every single week to have Saturday morning bread with my mother. It's essentially this recipe [x] but for people who have not yet tried their hands at baking, I'd like to break down the process so everyone can have a delicious treat.
To start you will need on hand:
Oven that can get to 425° F
Refrigerator that seals and stays cold
9x13 baking pan- glass or other
Salt- table
Sugar- normal
Flour- all purpose (normal)
Olive oil
Yeast
Either drinkable tap water that can get Hot or water and a microwave
Measuring spoons (teaspoon specifically)(the bigger but not biggest one if you have four)
Measuring cup
A large ceramic bowl
Spatula- the kind for scraping
Hand towels or tea towel- kitchen towels. Cheap towels
Pam or another spray oil (buttered flavored if you have that on accident) - optional but useful
Salt- big and crunchy - optional but useful
A piece of twine you can measure and cut, or a rubber band
Big spatula- flippy kind- optional but useful
Plates, napkins, cooling rack, oven mitts, sponge, dish soap balsamic, dipping bowl(s) - your call on what you need for eating and cleaning
Bread knife - or rip it with your hands like an animal. Or use a normal knife
I always start Thursday night- it takes about 20 minutes to prep, and then do the rest Saturday morning- 5 minutes of prep part 2 + 5 minutes of pre oven prep + 30 minutes of cook time. So the entire process is about 30 minutes and a lot of waiting.
To start, you will want to put two teaspoons of yeast into the ceramic bowl (clean). The glass jars of Fleishman can be found at most grocery and big box stores. If you do not want to buy a whole jar, one of the packets they have is about the right amount (they usually come in 3 packs).
Measure 2 cups of hot water. We want about 110° so too hot to touch comfortably but not scalding. You need your water hot to activate the yeast, but too hot will kill it.
Slowly pour the hot water over the yeast, and sprinkle in a pinch of sugar, and mix this brown water with a spatula (scraping kind) for about 10 seconds before letting it sit for 10 minutes. The yeast eats the sugar and the time allows the years to proof. After 10 minutes you will see a type of foam on top of the water, which is proof the yeast is active.
Measure out two cups of flour and add them to the yeast+water. King Arthur all purpose flour is just fine and dandy, you do not Need bread flour and King Arthur is employee owned.
On top of the flour, add two teaspoons of salt. You can use any salt, and can experiment with different flavor profiles. If you go to spice shops or even Renaissance Faires, you can find flavored salts that add a nice kick. You can also use regular normal table salt.
Use the spatula to mix the flour+salt into the water+yeast until you have a goo.
Add one more cup of flour and mix it in with the spatula. Add the last cup of flour and finish mixing it into a dough.
Make sure to scrape the sides of the bowl and that everything is mixed in. The dough should be unable to hold shape well when pushing it into a ball, and there should be no visible white flour left in the dough.
Pour some olive oil around the dough into the bowl. You can eyeball this (1 tablespoon minimum)- you are not drowning the dough but you do want enough to cover the dough and then some. You can easily swap out olive oils for flavored and infused ones. There are a lot of bootleg oils on the market, but whatever you probably have on hand should be fine for your first bake.
Roll the dough around in the oil with the spatula to make sure it is fully covered. While you are not adding in olive oil properly, you can mix it in a little when oiling it up to make it nice.
Drape a kitchen towel over the top of the bowl so it is fully covered. Take your twine or string and tie it tightly at the top of the bowl and cut it it. This can be reused with this bowl in the future. If you do not have twine, a rubber band will also keep the towel in place. We just want to keep the breathable piece of fabric tight over the top of the bowl.
Stick the bowl in the fridge for like. A day- day and a half. If you started at 10pm Thursday night, it should now be about 10:20 with a spatula, measuring spoon, and measuring cup to clean up. The dough will slowly rise in the fridge and you can move onto the next steps after 24-48 hours.
I wake up at a stupid time like 6am on Saturday.
Spray the pam or other oil on the sides and bottom of the 9x13 pan. You can also just use a paper towel to rub olive oil on the sides. We just want everything greased.
Pour some olive oil on the bottom of the pan and tilt it around to cover the entire bottom. Start with a little and add more if needed. More is not bad- it will give the bread a nice crunch while still being soft inside.
Take the bowl out and use that spatula to gently pull the dough away from the sides of the bowl. The dough will have risen and will seem stringy when pulled away.
Slowly pour the dough into the greased pan until it plops out.
Shake it around a bit and maybe poke at it with the spatula to get it centered and not flipped over on itself. The dough will be expanding for the next 4 hours and you don't have to worry about spreading it in the pan.
Cover with a/the same tea towel and try to get it taut over the pan to keep the towel from touching and sticking to the dough. Trying to get the covers of the pan on top of the edges of the towel may work depending on the towel.
Set that aside for four hours. I go back to bed. At some point between here and the next step you should put some dish soap in your bowl and fill it with water. After a 20 minute soak its easy to wash it clean with a sponge.
9:30 or 3 and a half hours later- pre-heat the over to 425° F. If you want Celsius or other measurements this whole time, its about 280 Celsius, 2 teaspoons is about 10 millimeters or .35 oz (dry) and 2 cups is 16 oz fluid.
MAKE SURE THE OVEN IS EMPTY FIRST. Other trays or pans will take some of the heat and the bake will be off.
Once the oven is done pre-heating (it should beep or have a light indicator for this) wash your hands really really well, and pour some more olive oil on top of the dough. You will carefully cover the top of the dough with oil by rubbing it over with your hands. Make sure it is fully covered. There may be bubbles on the top now- that means you've done it right till now. If not, that's fine it will still be good.
Take your big chunky salt (sea salt works well or chunky kosher salt) and sprinkle it on the dough. You do not want to go too heavy, but it will add a nice texture. If you have a salt container with the cracker thingy you turn to get it out, i do about 6-8 cracks while trying to move it up and down the dough.
Take your clean hands (because you washed after the oil and then again just now after the salt) and spread your fingers out and down like shitty claws. Dimple the bread with your fingers by just poking it a lot. Try to avoid the bubbles if you can for a nice look.
If you ever want to put something on top like rosemary or sliced tomatoes or whatever, now is the time. Not me though.
Stick that baby in the oven roughly center and set the timer for 30 minutes.
While it bakes, get your cooling rack/big plate/serving board out, and your oven mitts. And a bread knife/whatever knife you want to use. And a really big spatula (flipping kind).
When the 30 minutes is up, use the oven mitts to pull out the pan and put it on a heat resistant surface like the top of the oven. Take your big spatula and slide that bad boy down a side and try to wiggle it around until it's under the loaf. If you don't have a big spatula, you can always flip the bread out of the pan by dumping it out onto your rack/board/plate.
With the oven mitts, move the pan to your cooling rack and with one hand tilt it up and with the other use the spatula to slide the loaf out onto the rack.
Set the pan and spatula aside to wash later.
Take your cooling rack and put it amongst friends with the knife. Get some plates. If you have any balsamic vinegar and/or more olive oil for dipping, set that out too. Napkins. Drinks. Delicious in Dungeon on the tv. Live. Laugh. Love. Eat.

#recipes#recipe#bread#foccacia#whaa i wanna make this weekly again but i don't have good anime to watch it with....#at least until october with dandadan...#long post
19 notes
·
View notes
Text
new year, new food crime
I hate it when recipe bloggers tell you the entire rundown of their day before giving the recipe, so just to start off, I'm going to put this here:
3 cups of liquid (water + shrimp water)
3 packets unflavored gelatin
1 tbsp vegetable base (or a bouillon of some kind; that'd probably be fine)
1 large handful of shrimps (approx 20)
3 eggs, hard-boiled and sliced
1 small bag mixed frozen vegetables, thawed
a gelatin mold or bowl with a capacity of 4 cups
now, looking at this ingredients list you might be asking, "hey SBS, what the fuck did you cook this time?" and to that I say: buckle up.
so I've been watching Arne & Carlos' videos for a bit, firstly because I was curious if they were gay (they seem to be), and secondly because I like their knitting patterns
but their channel isn't just knitting! they also cook together, and it's fun and chaotic, and one of the things they cooked…intrigued me.
I don't know how this dish is spelled. cabaret? kabaret? there are only a few recipes for it online, and most of those are not in english. but essentially, it is a Norwegian aspic with shrimp, vegetables, and hard-boiled egg in it.
what is aspic, you might ask? well, it's…I mean…it's meat jello. that's what it is. you cook meat for a while (some recipes say to use pig's feet, snout, etc), and it makes a gelatinous broth, which solidifies when it cools.
delightful!
however, I am not willing to make aspic from scratch for this, so I substituted it with unflavored gelatin packets. hooray!
(apparently in Norway, you can buy packets of instant aspic! but since you can't do that here, I looked up what ingredients are in instant aspic, and after putting them through google translate, decided "huh, seems like gelatin powder with some kind of bouillon", so that's how I ended up here)
this recipe isn't so much cooking as it is…construction. like sure, you heat up the gelatin, but after that it's pretty much just putting stuff together.
and apparently you can make this with pre-cooked or canned shrimp, but I only had the raw frozen kind, so I put them in a saucepan with just enough water to cover them, heated them until they were fully cooked, and then saved the water from the pan to mix in with the gelatin.
so, shrimpy water + enough water to make 3 cups of liquid, and then I mixed in vegetable base until it tasted…fine. (it didn't taste good, it just tasted…okay.)
then I heated up the liquid in the microwave (in a big 4-cup measuring cup), mixed in the three gelatin packets, and there you go! that's all of the cooking done.
now, for the assembly.
I put some of the shrimp all the way at the bottom of the jello mold, trying to arrange it so that it would look nice. I sliced the hard-boiled eggs, and put the prettiest slices of egg around the edges, sprinkling in some vegetables and pouring gelatin as I went.
…and then I gave up on being artistic, and just kinda lumped everything else in, and covered it with the gelatin mixture.
(unfortunately I didn't think to take pictures of the assembly portion of this, because I was multitasking at the time and got distracted, but you'll just have to trust me that it was a tolerable experience, and didn't look very interesting)
after that I chucked it into the fridge (gently), and left it alone while I streamed with makerrcat for a bit, stayed up way too late, and then passed out in a dramatic fashion.
13-ish hours later, I rescued it from its frigid prison.
hmmm

stare into the murky depths with me for a moment. look at this…nightmarish placid soup. this motionless broth.
one of my egg slices definitely didn't get covered all the way.
ah, well.
to unmold this monstrosity, I put it in a bowl of hot water for a minute or so, until it seemed like it could pull away from the edges. it really didn't take much, so if you (god forbid) try this yourself, keep an eye on it. gelatin melts fast.
then I put a plate over the jello mold, and flipped it over.
after a few tense seconds, it released from the mold with a slimy kthnk sound.
carefully. nervously. I lifted the mold.
and then I let out an involuntary "oh!" because…

…it's kind of…eerily beautiful?
like in a horrifying sort of eldritch way, it looks…lovely
vegetables and shrimp and eggs, suspended not just in space but in time, preserved and surrounded by a gelatinous cocoon…

I just like staring at it, okay! I just think it looks cool! so here's another picture of it from the side:
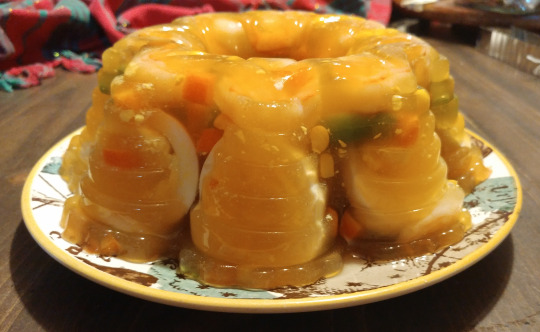
the egg slices…the little bits of yolk…enchanting
it definitely smells like food. but it's unclear what kind. vaguely shrimp-vegetable-egg, but muddled
let's cut into it

oh. oh god. it made kind of a…squelch? when I cut it?
hold on, you have to experience this for yourselves
god. deeply unsettling.

now, seeing what the inside is like is kind of interesting! there are places where the gelatin has sort of splintered apart from being cut, and there are gaps where pieces of vegetable have fallen out.
but...how does it taste?

...
fuck.
I really like it
this bizarre combination of textures is weirdly satisfying! the squish of the egg and the gelatin, the slight crunch of the vegetables and shrimp, it's just…good?
the gelatin itself just tastes vaguely of broth, but I don't mind it! I don't know if I would eat it by itself, but with the shrimp, egg, and veggies, it's perfectly okay!
the shrimp, egg, and vegetables of course just taste (respectively) like shrimp, egg, and vegetables, but that's...fine? I like all of these things, so this is pretty enjoyable!
so, some of the recipes I managed to find mention serving it with sort of a mayo-mustard mix, so obviously I have to try that

this...helps? like, it tastes really pleasant?
not that it was bad before, but it remains an enjoyable experience!
and a video that I saw (but could not understand) seemed to show it served on a piece of bread, again with the mayo-mustard.

this is also fine! I enjoy this too! I don't feel like it needs the bread, but it's all right!
this is bizarre.
I think most people would probably hate this. it's got the look of a 1960s party food (which is probably what it is), and "meat jello" isn't a texture that modern society regularly enjoys, but…I love it.
I actually love this.
I kind of understand now why people call dishes like this a "jello salad", because…I mean, I'm eating it, and my brain is saying, "yup. this is a salad" and I have no fucking idea why, but this right here? salad. for sure.
cold, wet salad.
damp, even.
so like...is this objectively good food? probably not.
but is it fun to eat? I think so.
it's refreshing, somehow. it's light, but also more filling than I expected it to be. I have no idea how much would be considered a reasonable serving, but I intend to figure it out as I go along.
so I'm not saying "go make this!" because although this combination of textures plays well with my brain in particular, I don't think that would be the case for everybody.
but I will be eating the rest of this.
weirdly? weirdly, it's just good.
-
an edit, a few days later:
I have done it. I have consumed the entire thing. and I enjoyed every bite of it.
in fact, I plan on making it again! probably more than once!
food crime? no. food…
(pauses to look up what the opposite of "crime" is)
…food blessing. food virtue. food achievement! food…benevolence.
this is what cabaret is.
at least, that's what it is to me.
(create and consume at your own risk.)
#food crimes#food#beware the tags if you haven't clicked the read more#beyond this point there are spoilers#well. I dunno. can a food crimes post be spoiled? who knows. probably#anyway#you have been warned#cabaret#kabaret#aspic#gelatin#shrimp#by the way#I decided a reasonable serving is about 1/4 of this recipe#that was enough for lunch#serve it with a slice of bread and a glass of milk#and I think that'd probably be enough for dinner#for me anyway#idk how other humans operate#I did genuinely enjoy this by the way#this isn't a joke - I really genuinely loved this#there was something so pleasant about the texture#it's hard for me to explain#but it was delightful#joyous even#and I will make it again#oh! another thing#one thing that's the opposite of ''crime'' is ''justice''#so it could be ''food justice''#which is‚ if I'm not mistaken‚ what happens in a food court
243 notes
·
View notes
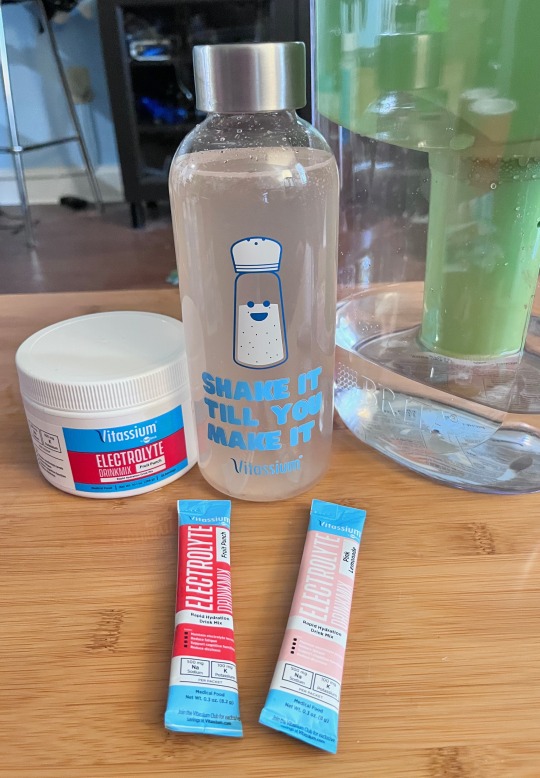
Text
time to shill for Big Salt!!!
Okay, so like I said in my last post, I recently became a ~Vitassium Ambassador~, which is a fancy way of saying that I shilled for this company for free for so long that now they're paying me to do it.
In salt. Much like a deer.
Anyway.
Vitassium is SaltStick's line of products specifically for POTS, EDS, Cystic Fibrosis, Vasovagal Syncope, and other forms of autonomic dysfunction. Essentially speaking, SaltStick has been making electrolyte products for years, and when they realized that a lot of their patients buying them were doing it for medical reasons, they started doing research into creating products specifically for that purpose. And that's how the Vitassium line was born.
Vitassium generally has more salt and less magnesium/calcium/potassium than SaltStick's other electrolyte products, which is good if you need a lot of salt and you don't want to take too high a dose of the rest. Personally, I tend to use a mixture of both of their lines so I can get a little calcium/magnesium boost sometimes but more salt other times. (The amount of potassium is fairly similar in both lines, with a little more in the SaltStick line.)
Either way, it has a lot less sugar than Liquid IV, which I get sick off of due to sugar sensitivities. Like... *googles* 11g of sugar in Liquid IV vs. 2g of sugar in Vitassium, with the same amount of salt in each serving. I have to be pretty careful about my sugar intake, and I suppose I can't speak for everyone, but my stomach handles Vitassium a lot better than most of the other alternatives on the market.
So I've been using it for several years now and I'm really happy with their products! Like -- I may now officially be a shill for Big Salt, but I don't plan on lying or exaggerating anything here. I use their products every day, and sometimes that's the only way I can manage to take a shower.
(My fellow POTS/EDS-sufferers know, the shower struggle is real. lmao)
Anyway, they just sent me one of everything in their Vitassium line. They didn't actually ask me to show it off, but I'm doing it anyway because this is my blog and I cannot be stopped.
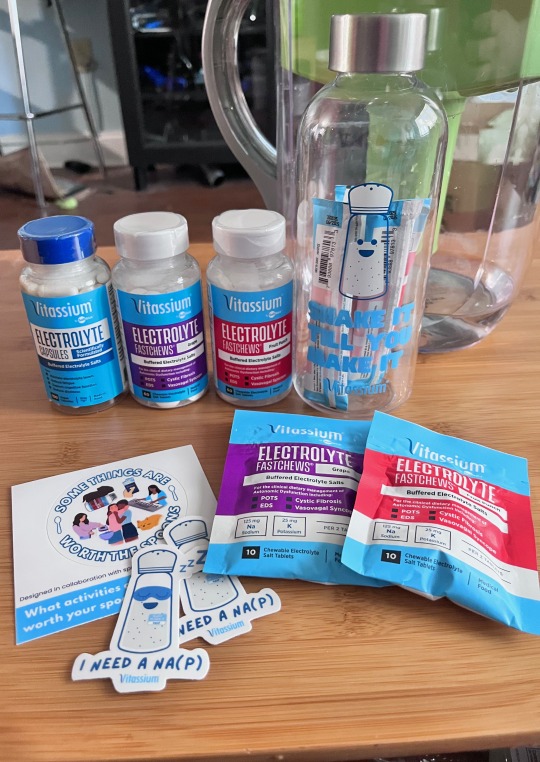
From left to right, we have a bottle of their electrolyte capsules (these are sugar-free extended-release salt pills with a bit of potassium added), both flavors of their electrolyte fastchews (chewable electrolyte candies that provide quick relief... think salty sweettarts), a cute bottle full of packets of their electrolyte drink mix, sample packs of the fastchews, and some stickers.
Personally, I mostly use the fastchews. I've tried salt capsules in the past and had some stomach upset, but now that they sent these to me for free, I guess I'll try them out again. The fastchews are basically sour candy full of salt lmao. (They also have about 2g of sugar per serving, just like the drink mix.) They really are effective, though, so I tend to take them as needed throughout the day.
I usually just keep a bottle of them in my purse, but the sample size bags are resealable and fit well in pockets, bags, etc. I'm happy that they sent me some little sample bags because now I can refill them, haha.
I used to just buy the normal SaltStick fastchews, and my go-to flavors in that line are orange, wild berry, and lemon-lime! I haven't tried the mango because I'm allergic, the peach is okay if very sour, the coconut pineapple is a nice piña colada taste but a little sweet for me, and I really hate the watermelon ones!
(Look, I promised to be honest with you. lmao)
The Vitassium fastchews are newer, and they only come in two flavors so far. I always buy the fruit punch because I despise artificial grape flavor. They just gave me a bunch of grape ones, so I tried them. Good for what they are, but I still hate grape.
(Do any of my chronically ill followers want these? lmk)
The drink mix is the newest Vitassium product! I like it quite a bit; the relief is quicker when you drink it vs. eat it, and speaking as someone who generally hates drink mixes, the flavor is pretty good.
I've tried both the fruit punch and the pink lemonade, and I think I prefer the pink lemonade. The flavor suits the salt a little better, imo, and I think weirdly it mixes a little better?
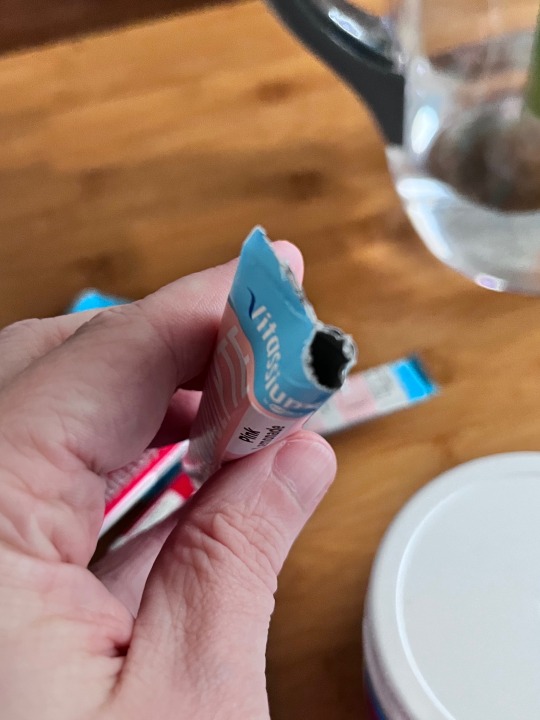
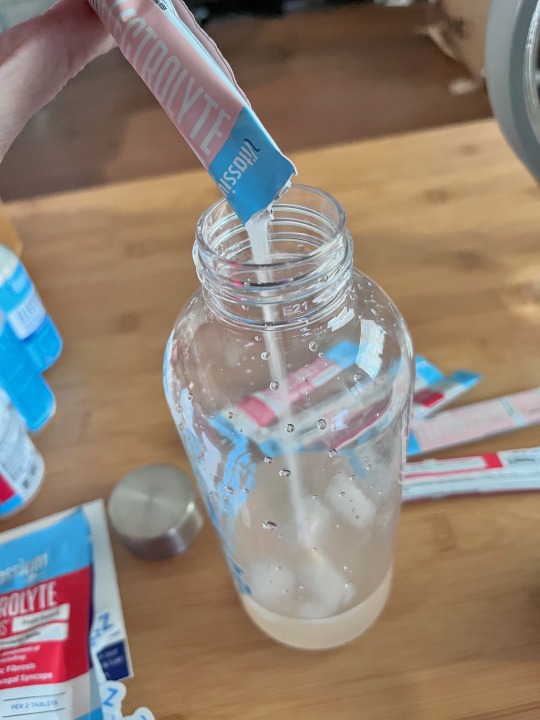
I usually buy the drink mix in the canisters because it's cheaper that way and produces less waste (the canister pictured there is one I already had) but the packets are very handy to keep in your bag. They're easy to tear open and even when you tear off the whole top, the opening is small enough that it pours smoothly into small-necked bottles. I like to put some ice in mine and shake it up.
(Side note: Vitassium has specifically designed all their packaging to be as easy to open and use as possible because they know that so many of their customers have arthritis, EDS, and other connective tissue disorders. Which, as someone with EDS, I truly appreciate.)
Finally, one thing I genuinely like about Vitassium is that they try to make their products as accessible as possible for their customers who use them for medical reasons. They have something called the Vitassium Club, which allows registered users who have a medical condition to get 25% off all their electrolyte products. You don't have to get a doctor's note or anything like that, just send in a quick online form and wait for them to change the status of your account.
That brings the cost of the product down considerably for the people who need it most, which is good because honestly? Electrolyte boosters add up fast when you need to consume that much salt every day.
Uhhhh, I think that's everything for now! If you have any questions, lmk! I'm fairly passionate about this kind of thing because when I was first diagnosed with POTS/EDS like... god, 15 years ago now, they didn't have anything like this. I remember struggling to develop a diet that worked for me with no one to teach me and honestly? That fucking sucked. I don't want anyone to be in that position.
So now here in 2023, I'm happy to pass on any chronic illness-related tips I have. Like drink Vitassium! And add salt while you're cooking, not at the end! The flavor will be less strong that way! And a packet of sugar-free hot cocoa mix will often have as much sodium in it as a bag of chips!
Stay salty, friends. 🧂💜😎
#they asked me what would make me a good shill for Big Salt#and I told them that I know a lot about the use of salt in apotropaic magic#and somehow they still put me in the program#so... there's that. lmao#vitassium#pots#postural orthostatic tachycardia syndrome#vasovagal syncope#ehlers danlos syndrome#cystic fibrosis#long post
115 notes
·
View notes
Note
i'm super bad at cooking and never know where to start because every recipe out there asks for ingredients i simply don't have at home so do you perhaps know what basic ones would be good to stock up on? like eggs and stuff...especially when it comes to spices i have no idea what is okay to use
Haii o/ very honored that you sent me an ask, and ofc I’ll do my best to help! This reply got a bit out of hand so. Long text under the cut. Behold. Feel free to reach out in asks or dms or whatever with any future questions (@ everyone tbh).
Food is, of course, very subjective, so my idea of a perfect list of foods to keep a stock of will not be universal, but I hope this will, at least, give you some ideas if anything.
First of all, I usually mentally break down my typical weekday recipe into vaguely carbs source - protein source - veggies, buy a couple of options for each category and just switch them around for variety. My standard set is
rice / pasta (usually spaghetti re:shapes) / glass noodles
eggs / chicken / tofu / bacon
random pack of frozen vegetables, bell peppers, eggplants, tomatoes, cucumbers, leafy greens. garlic and onions too
I have an option of making egg fried rice with chopped up bacon and added frozen vegetables one day, then blending the leftover vegetables with bell peppers and tomatoes to use as pasta sauce with chicken and spaghetti the next day, then branching out and making eggplant tofu stir fry with glass noodles, then using whatever eggplant tofu stir fry i had left as rice balls filling and making myself a quick vegetable salad on the side… And all those things are easy to make and don’t need much fussing around.
Other options to consider would be potatoes (you can roast them with whatever, boil, fry, etc), buckwheat (my wife doesn’t like it otherwise I’d use it more often), kidney beans and chickpeas for your carbs*; fish and meat for your proteins (those are. a bit too expensive for me usually); carrots, cabbage, leeks etc.
The list looks long, but, again, you just need to pick out a couple of things from each group and throw shit in a pan so to speak. And a lot of them are easily soup-able (boiling water chicken potatoes carrots rice? boom soup. etc), which is another easy base recipe to exploit.
Now to the matter of spices. Salt and pepper are obvious enough, but a good thing to look for are, especially if you are just getting into cooking, spice blends. Something something French Herbs™ something something Taco Seasoning™ something something Seven Spice™ something something Garam Masala™. There’s a lot of different ones, but they are, essentially, a formed flavor profile in themselves, so you don’t need to worry about mixing spices and herbs that might not go well together, and by paying attention to contents you can learn for yourself what individual seasonings are commonly used together.
Also, everyone, hold your judgement real quick and trust me with this, but ooh I always save leftover flavor packets from instant ramen and reuse them in other dishes. Egg fried rice just doesn’t taste right without suspicious red powder courtesy of shin ramen… It’s probably MSG my beloved or something…
While I’m at it, bouillon cubes are handy to have, you can use them for soups, crumble them up in other recipes. Adding one to the water you’re cooking rice in is a great hack at making it more flavourful.
In general, while I do actually have way too much spices (and keep buying more… very excited about my newly acquired dried tarragon…), the ones I’d advise to have for an average person would be:
Salt (ideally both coarse grain and fine grain, but fine grain only serves you just right)
black pepper (both in a mill/grinder and peppercorns), red pepper flakes
paprika, garlic powder, ginger powder
bay leaves, dried oregano, basil, thyme, dill, cinnamon, coriander, cardamon, cumin, turmeric, sumak....
I really got a bit carried away by the end, but. You don't actually need to buy all of them and at the same time, just start with whatever couple of things you'd need for whatever you are cooking and let your collection build up over time, since spices aren't something you need to buy often anyway 👍
Other things I think it’s nice to have in stock in your kitchen would be flour and baking powder, vinegar (distilled vinegar, rice vinegar… I like to have balsamic vinegar too but it’s so expensive it’s ridiculous ngl), soy sauce, cooking oil of your choice (I use sunflower oil, olive oil and sesame oil), panko or breadcrumbs, starch (i have potato starch, cornstarch and tapioka starch, I would suggest just getting cornstarch at first).
* going to clarify here that while beans are often brought up as a source of protein, most are rich in complex carbs, excluding edamame and green beans for example. And since I mostly often cook beans with meat, they check out my daily carbs in my head.
8 notes
·
View notes
Text
what i ate today as a college student 🍜


brunch
yes brunch bc let's all be real here! sometimes, we college students are living on TIGHT budgets and would merge breakfast with lunch just to save a buck!!!! you'd do the same thing but ik you already did that !!!!
anywayyyy... yesterday i cooked myself up some rosé sauce pasta which i honestly thought would last me a week. it isn't. i only have enough for one more meal tomorrow. you wouldn't really expect that the recipe for the sauce is very easy to make with how delicious this tastes. i got the recipe from my friend while i was assisting her when she was cooking. ever since then, it's become my favourite recipe ever. i dream about this pasta when i don't have it.
thankfully, the sauce recipe can be simplified to the point that it's college friendly. just in case someone out there wants to give it a try:
rosé pasta sauce recipe
tomato paste
all-purpose cream
garlic
salt and pepper
sautée garlic in oil until it's almost golden brown. turn down the heat a lil.
put tomato paste in and keep cooking and stirring until the paste has changed colour. put like 2 tablespoons of the pasta water to thin out the sauce.
mix in some salt and pepper. you need it to taste strongly salty and sour bc the cream and pasta will mute the flavours.
mix the cream in and keep stirring until it's all incorporated. taste the sauce if it's to your liking. put some salt if it tastes bland. put some sugar and a bit of pasta water if it's too salty.
turn off the heat and toss your pasta in it, then serve!
i can't put the measurements down bc i just eyeball it at this point according to how much pasta i've made. i found that this was essentially the skeleton of this sauce and when you're able, you can start building on it. personally, i love to throw in some onions, basil, freshly cut tomatoes, and parmesan to really elevate it.
dinner
i wanted to save up whatever was left of my pasta for tomorrow so dug through my small box of fast cookables and settled for instant noodles. this one is calamansi (small lime) flavoured and was bigger than the normal pack.
now this packet was definitely enough for just one cooking. there's always this phenomenon where you cook one pack of instant noodles and it isn't enough, so you cook up another. this was filling enough for me. if i ever get hungry, i can just grab myself a piece of bread or two.
#carbs on carbs???#pasta#pasta recipe#college food#university#college student#student life#dorming#dorm life#uni student#college#university blog#uni blog#uni blogging#college blog#college blogging#girl dinner
8 notes
·
View notes
Text
Jam (40 min)

I have to admit, I grew up a spoiled child. With a grandmother single-handedly supplying the entire town with jam, I never had to resort to the store-bought kind until long after she passed and all her stock was used up. Fortunately, she taught me well. And what better time to put the skill to use than in summer with a plethora of in season fruits at your disposal? The results of a few minutes suffering the heat of stirring in a bubbling pot are well worth the effort in my opinion.
Equipment:
A large pot (and I really mean large, you don’t want this to be more than half full)
Clean jars and fitting lids
A timer
A small plate / bowl that easily has space in your fridge
Funnel (optional)
Oven mitts or a dry kitchen towel
Damp cleaning cloth (or something of the sort)
Ingredients:
These are highly customisable. Depending on the type of sugar you're using, you’ll need up to 1.5 kg of fruit / 1.5 L of fruit juice per 500g packet of gelling sugar (essentially just regular sugar with pectin mixed in). The main difference regarding the sugar is its intended ratio to the fruit. The most common ones I’ve seen are 1:1, 1:2 or 1:3 (sugar:fruit). Other than the jam’s sweetness (obviously) the kind you use will influence how shelf-stable it is. The higher the sugar content, the longer you can store it. That being said, I normally use the 1:2 and I’ve never once ran into the issue of the jam going bad before it was all devoured. (That being well over a year when making a large batch. Some of my grandma’s have been forgotten in the cellar for almost 10 and they still were fine. Just trust your eyes and nose when opening up a jar. And label them with the date made.)
It’s perfectly fine to use frozen fruit. Just let it thaw before you get started.
I recommend adding some lemon juice (about 1 lemon per kg). It helps with thickening the jam and is especially important when you’re using very sweet fruit. The gelling sugar usually has some citric acid added, but I find that adding the fresh lemon helps. Also it offsets the sweetness a bit.
Other than that, go wild! You can add spices, herbs, liquor (you might want to add that after cooking though)... Just make sure you keep the ratio specified on the sugar and you’ll be just fine!
Instructions:
If you’re using fresh fruit, wash it well, pat dry and cut into small pieces. If you prefer a smooth jam, you can blend it.
Add all ingredients to a large pot and mix well. Make sure it’s only about half full max.
Now, most gelling sugar package instructions will tell you to let everything sit for at least a few hours, but honestly, I find that it doesn’t really make a difference to skip this step if you’re in a hurry. It won’t hurt to wait, but it won’t ruin your jam if you don’t.
Before you start cooking, you’ll need to sterilise the jars. (And don’t forget the lids either!) There’s many ways of doing this and a quick online search will give you many results, like putting them through a hot cycle in the dishwasher. Because I don’t have one, my go to method is to first give them a good scrub and then rinse them with boiling water from the kettle, leaving them upside down on a clean kitchen towel until filling. Getting them up to temperature now will also prevent any glass cracking when filling with the hot jam.
While stirring, bring the jam to a boil. The bubbling kind, you really want this going. Once it does start your timer. In most cases it will be 4 minutes, but check the package instructions for specifics. Make sure to keep stirring, you don’t want anything getting stuck to the bottom of the pot.
The jam might produce foam (hence the big pot). If you want to, you can remove it with a spoon, but that’s mainly an aesthetic thing. (Theoretically, the trapped air could contaminate the jam and make it go off faster, but I have yet to witness that happening.)
Once time’s up, reduce the heat to low and spoon out a little bit of the jam onto a plate and put it in the fridge. This is to check if the gelling worked. The jam should start to thicken quickly when cooling. If it’s still too runny, boil it a little longer. If it’s too thick, add a little water.
When you’re happy with the consistency, remove the pot from the heat and start filling the jars. I do this holding the jar in one hand with an oven mitt (because this will get uncomfortably hot very quickly) ladling the jam in with the other. If the opening of the jar is very small, a funnel can be helpful (make sure that is also sterilised!). Fill it up until just about the brim. Now, if there’s any spills, wipe the screw-top clean. You’ll thank yourself later when you try opening it again. Tightly close the jar and place it upside down.
Repeat until you’re out of jam. I always have an odd amount left that isn’t quite enough for a whole jar. That’s fine though. Simply eat that first.
Allow the jam to cool for about 5 minutes before flipping the jars.
Enjoy!
Notes:
While the sugar content certainly plays a role in preserving, the most important thing is that all your utensils are clean. It’s a bit of work, yes, but ending up with mouldy jam would be worse, right?
4 notes
·
View notes
Note
👀 i gotta hear about your homemade pizza
It began as the basic Betty Crocker recipe for dough because I wanted pizza and was too broke to order it. And then I started to play with the proportions. And then I got pretty good at that. So I've spent the last 20+ years doing it. Now we rarely order out for delivery if I've got the ingredients to just make it. It has become a party favorite, a special gift, a treat, a comfort food.
I've made all kinds. This most basic recipe, whole wheat, mixed rye. I've made it super thin so it comes out really crunchy, or thick enough to hold a bazillion toppings. I've made the dough with whey leftover from cheesemaking instead of water. I have dedicated sheet pans specifically for making it. In three sizes. It's a bit of a labor of love for me these days, since it takes a fair amount of energy and I'm short on that a lot. But from what everyone who's had it tells me, it's worth every moment of pain.
A visual for you:

And because I am generous, recipe and instructions under the cut.
This is for the basic dough. It doubles very well, but tripling it leads to some necessary tweaking. And unfortunately, I can't tell you what that tweaking will be because it's case specific (usually the flour to water ratio, which will be totally dependent on your current humidity). In general, I consider that this recipe never comes out quite the same way twice. If you want something smaller, water to flour ratio is essentially 1:2. In the case of halving it, the same amount of yeast won't be too much, but cut back on the oil and salt. It also freezes well, if you're careful about thawing it so it has room to rise. It gets an interesting texture when it's been frozen. Crispier, but also more airy.
1.5 cups hot water (~110-115 F, ~45 C)
2.25 teaspoons yeast (or 1 packet)
1/4 cup extra virgin olive oil (the EV part isn't necessary, but adds nice flavor)
1/2 teaspoon salt
~3 cups flour (unbleached all-purpose is best)
Prep time: ~ten minutes. Rising: at least 20 minutes. Baking: 20-25 minutes (dependent on toppings, more wet stuff means longer cook time).
Bloom the yeast in the water, about five minutes. Add first cup of flour, oil and salt. Mix until there are no lumps (I use a plain old dinner fork with a sturdy handle). Add second cup of flour and mix. You should now have a loose, shaggy mess, not quite strong enough to hold itself together. Third cup should go into the mix in stages, because you may not need all of it. Or you may need more. You should have a soft mass of dough that's a little too much for a fork to mix it. It should be moderately sticky. If it's gooey, more flour. If it's not sticky...well, it won't be as elastic but it's not the end of the world. Don't add any more.
🌟This part is very important🌟. Pizza dough is delicate. This is the kneading part, but you want to be gentle. I do it right in the mixing bowl (remember that bowl must be big enough to account for rising). I only scoop and press for about a minute, or until all the flour is thoroughly mixed in and there are few to no lumps. It shouldn't be sticking to you anymore. If it is, more flour. A dusting at a time. Knead it again. Done? Form a ball in the bottom of the bowl.
Dust the dough with a little extra flour, cover with plastic wrap. Let it rise. This is an excellent time to get your oven pre-heating. For this style of pizza that will be 425 F (218 C), no convection. Don't worry if the oven is ready before the dough is, a fully pre-heated oven will hold its temp better anyhow, and most ovens will say they're ready before they actually are.
When the dough has doubled, or your oven is ready, whichever is last, punch it down, separate into two balls. This dough will make two 10x18 sheets. Coat the sheet pan (and your hands) lightly with olive oil, spread the dough out slowly and carefully so it doesn't tear. It will spring back on you. Get it most of the way there, go prep your toppings (or wait about five minutes), come back and finish it. Make sure it's even and pressed into the corners. Remember, delicate!
Top as you please. My usual is tomato, garlic and onion sauce spread with the back of a wooden spoon. I like part skim, low moisture mozzarella*. And then whatever you want. Favorites in this house are just plain with pepperoni, or pepperoni, bacon and onion. Bake on the lowest rack setting. I do mine for ten minutes, turn the sheet around 180 degrees, then another ten minutes. Cheese should be toasted lightly, edges of the crust should be crispy. It won't get that dark. 🌟In an electric oven, it might take less than 20 minutes! So keep an eye on it.🌟
*I've never made it vegan, so I don't know how that changes times and temps.
When it's done, sprinkle it with grated parmesan or romano if you'd like, but let it rest for a few minutes so it's not molten. Slice and enjoy!
Reheats beautifully in a toaster oven, I don't recommend microwaving it. Eaten cold is always acceptable.
Thanks for the ask. 💕 Have fun with it! And you may never want to order pizza again.
#asks#Lamb's Homemade Pan Pizza#this is also a great project/dinner to make with kids#Lamb the Younger has been able to help me with it since she was five
10 notes
·
View notes
Text
Beginner's Guide to Starting Your Vegetable Garden
Starting a vegetable garden can be one of the most rewarding activities for anyone interested in fresh, homegrown produce. Whether you have a spacious backyard or just a tiny balcony, growing your vegetables is both fun and sustainable. Here's a beginner-friendly guide to help you get started on your vegetable gardening journey.
Choosing the Right Location for Your Garden
The first step in creating a successful vegetable garden is picking the correct location. Vegetables thrive in areas that receive at least 6-8 hours of sunlight per day. Therefore, it's essential to choose a sunny spot. If you're working with limited space, container gardening or raised beds can be just as effective as a large plot in your yard.
In addition to sunlight, consider the soil quality. Good garden soil should drain well while also retaining moisture. If the soil is heavy clay or too sandy, it may need amendments such as compost or organic matter to improve its structure.
Deciding What to Grow
As a beginner, it's essential to start small. Choose a few easy-to-grow vegetables that you and your family enjoy eating. Some ideal options for beginners include:
Tomatoes: A versatile and productive choice.
Lettuce: Proliferates and can be harvested over several weeks.
Carrots: Great for loose soil and ideal for containers.
Peppers: Relatively easy to grow in warm climates.
Zucchini: A fast-growing and productive vegetable.
Consider your climate and growing season. Warm-season vegetables like tomatoes and peppers thrive in summer, while cool-season crops like lettuce and spinach prefer spring or fall. Research which vegetables are best suited for your region's climate and start with those.
Preparing Your Garden Bed
Once you've chosen your vegetables, it's time to prepare the garden bed. If you're using containers or raised beds, fill them with a high-quality, well-draining potting mix. For traditional garden plots, start by loosening the soil to a depth of 12-18 inches.
Remove any weeds, rocks, or debris from the planting area. If your soil quality is poor, consider adding compost or other organic matter to improve its fertility. This will provide your vegetables with the nutrients they need to grow strong and healthy.
Planting Your Vegetables
After preparing the soil, it's time to plant your vegetables. Follow the seed packet or plant tag instructions for spacing and depth. Different vegetables have varying space requirements, so pay attention to how much room they need to grow.
If you're planting seeds, make sure they're spaced evenly and lightly covered with soil. Water them gently but thoroughly after planting. For seedlings, dig a hole slightly larger than the root ball and place the plant in it, covering the roots with soil and gently pressing down to remove air pockets.
Watering and Mulching
Proper watering is critical to the success of any vegetable garden. Most vegetables need about 1 inch of water per week, but this can vary depending on your climate and soil type. Water deeply and infrequently rather than giving shallow, frequent watering sessions. This encourages the roots to grow deeper, making plants more drought-resistant.
Adding a layer of mulch around your plants helps retain soil moisture, reduces weeds, and improves the overall health of the soil. Organic mulches such as straw, grass clippings, or shredded leaves are ideal for vegetable gardens.
Managing Pests and Diseases
One of the challenges of vegetable gardening is dealing with pests and diseases. To reduce the likelihood of problems, consider using natural pest control methods like companion planting, which involves planting certain crops near each other to deter pests. For example, marigolds can repel aphids, while basil can improve the growth of tomatoes.
Keep an eye on your garden for any signs of pests or disease. Early detection is critical to preventing the spread of these issues. Handpick insects when possible, and use organic insecticides only if necessary. Regularly rotating crops also helps minimize disease buildup in the soil.
Harvesting Your Vegetables
The most exciting part of vegetable gardening is, of course, harvesting the fruits (or vegetables) of your labor. Harvesting times will vary depending on the crops you've planted. Root vegetables like carrots and radishes can be harvested when they reach the desired size. Leafy greens like spinach and lettuce can be picked as soon as the leaves are large enough to eat. For vegetables like tomatoes and peppers, wait until they are fully ripe for the best flavor.
Harvest regularly to encourage continued production, especially for crops like zucchini or beans, which produce heavily. Enjoy your fresh vegetables right away, or preserve them by freezing, canning, or drying them throughout the year.
Starting a vegetable garden is a rewarding and educational experience. With careful planning, attention to your plants, and a little bit of patience, you'll be enjoying fresh, homegrown produce in no time. Whether you have a small balcony or a big backyard, gardening can bring a sense of accomplishment and a deeply fulfilling connection to nature.
2 notes
·
View notes
Text
Ch. 37- Your Hands in Mine
Kobeni jostled her keys, trying to turn the door handle with the same hand she was holding onto a bag of groceries with. The thought of simply setting it down came after she'd already begun her arduous task and giving up half way through was out of the question, especially when someone else was watching. A bead of anxious sweat ran down her brow as she struggled to unlock her apartment before the arbitrary time limit she'd assigned herself ran out, until the situation crossed the bounds of normality into awkwardness. With a click and a turn she was saved, breathing a quick sigh of relief before nudging the door open with her shoulder and stepping inside.
She hadn't gone grocery shopping in a long while, her fridge and pantry were mostly barren, holding onto a few scattered packets of instant ramen and things she'd bought impulsively, most if not all dubiously close to their expiration date. She wasn't entirely sure what was meant to go where as she placed her bags on the countertop and began pulling out boxes. Makima had picked out a mix of essentials and ingredients she'd planned to cook throughout the week, not presuming Kobeni was going to be doing much with any of it herself. Before too long she'd packed everything up neatly and began scouring the drawers for cutlery. Kobeni had shuffled her way into a corner in the mean time, not wanting to be in the way and still to paralyzed by the sight of someone performing a task so meticulously.
"I-it's so cool how you can do... all that"
She'd repeated the phrase in her head a dozen times over before finally being able to mutter the words aloud.
"All of what?"
Makima had already begun preparing breakfast after pulling all the needed and seldom used utensils from Kobeni's drawers.
"E-everything I guess..."
It was true enough in part, she was generally impressed with even the simplest things Makima did, but she also wasn't entirely sure how to describe what she was watching.
"I can teach you if you want, it's not all that hard"
As much as she liked cooking for her, the prospect of cooking with her was too inviting for Makima not to pounce at the opportunity.
"R-really?"
Kobeni had wanted to learn how to cook for herself for a while, back home she'd usually have gotten chased out of the kitchen for being in the way so it was all foreign to her. Motivation gathered up to try would usually be lost by the time opportunity presented itself, but with Makima here she was always eager to jump at any suggestion.
"Of course"
Makima outstretched her hand and beckoned Kobeni over.
"Let's start with prep work, if we get all the ingredients ready ahead of time it makes everything else go more smoothly"
She placed her fingers on the knife, pinching it along the dull end and nudging the handle towards Kobeni while taking a step back so she could situate herself in front of the cutting board.
"L-like this?"
Kobeni did her best to mimic what Makima was doing beforehand, sliding the knife across the board and slicing with surprising precision.
"Curl your fingers and press the flat of the blade against your knuckle..."
Makima's voice spoke out from her side but when she looked up from her task in search of an approving glance she was gone. As she turned her head to find her she felt a warm press against her back, slender arms slowly sliding past her waist and Makima's chin resting on her shoulder. Again she froze, this time with a tremble in her knees. She'd been caught off guard again and had the heart rate to prove it as her partner nonchalantly slid her hands past her wrists and gently held her steady. She readjusted Kobeni's grip, sliding her fingers deftly over the girl's hands and moving them as though they were her own.
"Like this"
Kobeni put up little resistance, focusing more on trying to quiet the thumping in her chest and keep her knees from giving out in Makima's embrace.
"Let's go nice and slow while you're still learning"
Her voice was calm and focused, this was in her mind the simplest way of teaching her. She lessened her grip as they went along, easing Kobeni into the process as she got more comfortable with her hands.
"You're pretty good with a knife for someone who supposedly hasn't done this before"
Makima smirked, pulling her hands back and wrapping them around Kobeni's waist. She pressed her lips to the girl's neck and dragged out a kiss as the rhythmic chopping continued. Kobeni let out a bubbly giggle of pride in time for her luck to finally catch up with her, as her fingers unfurled enough for one to slide under the knife.
"A~ah..."
She dropped it and pulled her finger to her mouth to stem the wound. Makima pulled back, quickly going from comfort to concern, pressing it down her emotions until the situation was dealt with.
"Does it hurt?"
She spoke with an uncharacteristic panic in her voice. It was subtle, enough she didn't think Kobeni would notice the momentary slip.
"N-no, just stings... a-a bit"
She felt embarrassed at her slip up, though more so, she was upset at having ruined the moment.
"Run it under some tap water, I've got a bandage in my purse"
Makima darted to her bag and pulled out some supplies, she walked back over to Kobeni.
"Here, let me"
The sheepishly presented her the injured finger, Makima gently dabbing off the water before spritzing the wound with an antibiotic and wrapping it with a bandage.
"S-sorry..."
Kobeni's expression had drooped, her eyes instinctively seeking out the indirect seclusion of the ground beneath her feet to hide away her shame, preempting herself for whatever the worst outcome she could imagine was. Instead she was met with a gentle kiss on her bandaged finger before Makima wrapped her in a hug and pulled her upright again.
"Accidents happen, you'll get better as you practice"
She pulled back once the girl had regained enough of her posture and the frown faded at her touch.
"Still want me to show you how it's done?"
Kobeni may have thought she'd lost her chance but Makima wasn't willing to give up with such ease.
"Y... yes please!"
Her eyes sparkled back to life, reinvigorated and hopeful. The rest of the prep work went smoothly enough, Makima making sure to pay close attention to Kobeni the entire time, loosening the reins when she felt it safe enough to do so.
"With a simple dish like this there's a lot of small things you can do to elevate it..."
When everything else was almost ready she placed a pan into Kobeni's hand and took her to the stove. She cracked in two eggs then began to stir it, letting the girl hold it in place.
"Presentation is important, you eat with your eyes first after all"
She stirred until the bottom began to dry, moving behind Kobeni and grabbing her wrist once more. She moved the pan like a wave, bouncing the egg towards the edge and folding it over like a parcel.
"This way the outside is set just enough to hold it's shape, while the inside remains runny"
Makima slid the omelette onto the awaiting pile of rice she'd shaped earlier, quickly preparing a second herself and bringing both dishes over to the table. She took the knife and cut a slit across the eggs, spilling their contents across the rice.
"Wow..."
It was a simple enough trick, but one the kind of restaurants she was use to going to wouldn't bother with. She took a spoonful and brought it to her mouth, careful not to spill the still runny egg. The flavors danced on her palette as she slowly worked through the bite, savoring every moment.
"I...it never tasted this good when I tried making it"
'Making it' in this instance meant buying a pack of frozen pre-prepared omurice and heating it up in the microwave. It came out gritty and flavorless but she'd forced down every bite, having bought it for herself as a treat and determined not to waste it with the weight of her own expectations baring down on her.
"It doesn't taste this good when I make it at home either"
Makima spoke with a frank and honest tone, enough to grab Kobeni's attention as she dabbed at her mouth with a napkin. She took her spoon and carved off a piece from Kobeni's plate, before outstretching her arm towards the girl and offering it to her. Kobeni sat for a moment as her brain did it's best to process a response, slowly leaning forward and taking a bite. To her surprise it somehow tasted even better than the first, the rice had a more satisfying crunch, the flavors blended even better than before, she noticed every nuance of every spice as it spread across her tongue, pushing it down with a satisfied gulp. She locked eyes with Makima who returned a playful smile.
"There's more to a meal than just the food"
13 notes
·
View notes
Text
M'lis Heart Healthy Essentials

M'lis Heart Healthy Essentials
The M'lis Heart Healthy Essentials cardio drink mix supports the strength and livelihood of the entire cardiovascular system with an impressive suite of all-natural essential heart-healthy nutrients including L-Arginine, CoQ10, L-Citrulline, and more! The heart wants what the heart wants. These natural citrus-flavored, on-the-go packets make it easy to give your body the support vital to a healthy cardiovascular and circulatory system.
This Product Helps To:
Support Cognitive Function
Fight Free Radical Damage
Promote Supple, Age-Defying Skin
Improve Blood Flow
Increase Athletic Performance
Ingredients:
Vitamin C
Calcium
Vitamin D
Niacin
Vitamin B6
Folic Acid
Vitamin B12
Cardio Blend
#M'lis Heart Healthy Essentials#daily essential#health#healthyessential#detoxification#dynamicdetoxqueen
3 notes
·
View notes
Text
Why we love handmade Australian biscuits

Call them what you like, biscuits and cookies have a special place in the heart of every Australian.
Biscuits are a very specific kind of comfort food, and nothing quite says home like a bickie and a cuppa. Visit a cafe and you may be more likely to indulge in a slice of something than an actual biscuit. Chances are you are more likely to order a coffee than the biscuits natural partner; a good old cup of tea.
A biscuit offers familiarity. A friendly face and a listening ear. Studies have shown that when it comes to biscuits we know what we like and like what we know. Supermarket aisles and bakery baskets are not the spawning ground of new invention, but rather a comforting assurance that some things never change.
Are cookies and biscuits the same thing?
Although (outside of the US) the terms cookie and biscuit can be used interchangeably, most of us are referring to two different things. The distinction is however pretty hard to nail down and is often more a part of our own personal lexicon than anything else. Anzac biscuits (for example) are most definitely a biscuit (even though they look quite cookie-like) whilst a choc chip cookie is immediately recognisable as such and highly unlikely to be mistaken for a biscuit.
Certain things defy categorisation at all. Melting moments couldn't be anything other than a melting moment (unless its a yo-yo) and who doesn't love the occasional jam drop?
The truth is that biscuits and cookies share more similarities than differences. So let's just call them bickies and be done with it!
Where do biscuits come from?
Practically everybody associates biscuits with the British, especially alongside or dunked into a cup of tea. Ginger nuts are a particularly British invention, and shortbread has been made in Scotland since the 16th Century. But did the British actually invent biscuits?
Biscuits began in Ancient Rome as 'panis bicoctus' (bread twice-baked) which was essentially just a method of storing slices of dried bread. Arabs were the first to add sugar, as well as fruit and nuts. Sweet biscuits gained in scope and popularity as sugar became more widely available and affordable for the masses.
DID YOU KNOW that sweet biscuits were made to be dunked? Amongst the 17th Century aristocracy hard sponge fingers were dunked in sweet wine.
1846 saw the first industrial biscuit factory in Britain, which became the largest in the world. In Australia, Arnott's first factory was not far behind.
But tea and biscuits were not officially a thing until WWII. Britain was already a nation of tea drinkers yet as sugar became rationed tea became less and less sweet. The story goes that the biscuit manufacturers stepped in and began supplying biscuits so that people could get their sugar fix on the side.
Australian Biscuits
Australia is one of the great biscuit eating nations of the world. We do love our bickies! Yet not all Aussie favourites come out of packet, and many are much loved homemade classics. So what are these quintessentially Australian biscuits that have been passed down through the generations?
Anzac biscuits

Anzac biscuits are Australia's most loved and also historically important biscuit. A fairly robust mix of oats, flour, sugar, coconut and butter they were sent out to soldiers during the First World War. A source of energy and nutrition, with a long shelf life, Anzac biscuits (as they came to be known) were also an important source of comfort and connection to home. You could say that Anzac biscuits really do encompass the true spirit of biscuits.
Our Anzac biscuits are handmade in Australia
Chocolate Chip Cookies
Invented in America in the 1930's, chocolate chip cookies are a firm favourite in Australia and the rest of the world. Hear the word 'cookie' and this is most likely what springs to mind. Choc chip cookies seem to be the one type of biscuit that we don't associate with a cup of tea. Although, as adults, we love them as much as children do the association is a nostalgic one of milk and cookies.
Shortbread Biscuits
Shortbread belies its absolute simplicity. Buttery, and with a shortness so short it simply melts in the mouth, shortbread is made of nothing more than flour, sugar and butter.
Jam Drop Biscuits

Jam drop biscuits are shortbread rounds with a 'drop' of jam baked on the top. A perennial childhood favourite, these are known elsewhere as thumbprint cookies owing to their method of preparation. A indent is made in the raw dough, into which goes a drop of jam before baking.
Ginger Biscuits
Ginger biscuits, also known as ginger snaps or ginger nuts, are all about the crunch. Sweet, spicy, and hard yet not dense, ginger biscuits are the ideal dunking biscuit.
Macadamia Biscuits
There is nothing quite as quintessentially Australian as the macadamia, so it makes sense that they find their way into baking at every opportunity. The subtle taste and oddly crunchy yet creamy texture of these Australian native nuts lends itself really well to biscuits and cookies. Wild macadamia nuts grow in Queensland and New South Wales, and it is said that 70% of the world's macadamias can be traced back to a single tree in Queensland. Forget Tim Tams; if you want a truly Australian biscuit then go for one with macadamias.
Melting Moments

Melting moments are melt-in-the-mouth butter cookies, often sandwiched together with a jam or cream filling. Originally from New Zealand, these super crumbly cookies are made with just four ingredients; butter, flour, icing sugar and cornflour. A derivative of shortbread, the crumb is somewhat softer and melting is actually the only way to describe it. Melting moments were a 1950s staple and feature heavily in memories of childhood baking.
Theoretically, the Australian version of melting moments is made with custard powder not cornflour and is therefore actually a yo-yo. These are not to be confused with the British version of melting moments (also a childhood baking favourite) that involves dessicated coconut and glace cherries.
Who doesn't love a jammy melting moment?
Cream Filled Biscuits
Cream filled biscuits are the opposite of tea dunkers. Sweeter, and creamier, this is where comfort begins to cross over in decadence. Less solitary rainy day cuppa and more celebratory put them on a plate because we have company kinda vibe. Either that or you really want something sweet. Now.
The first commercial cream biscuits produced appeared in Britain and the US around 1908. The British custard cream was a creamy vanilla shortbread biscuit, whilst the chocolatey Hydrox in America was seemingly the forerunner of the Oreo. Over a hundred years on and both nations remain loyal to their roots.
Check out our range of delicious cream filled biscuits
Passionfruit Biscuits
Passionfruit is another particularly popular Australian flavour. Although native to Brazil, these distinctive fruits are grown all over Australia and find their way into many bakes and desserts. Passionfruit creams are a bit of an Aussie institution and favourite of the home baker.
Kids Biscuits
Our lifetime love affair with biscuits most likely began when we were kids. Snack time, play time, break time, after school time. All fuelled by biscuits. Back when sugar was a source of fuel and a little bit of what you fancy definitely did you good.
Biscuits (despite the sugar police) remain a massive part of childhood, and quite thankfully so. Not just for parties, a well timed biscuit can stop tears in their tracks whether your child is a toddler or a teenager. And who doesn't look forward to cookies and milk after school?
And yes, there are parties. Which require colour, and sugar...
Looking for biscuits for a kids party?
Angel Cookies
Our angel cookies are crisp vanilla cookies topped with rainbow coloured sprinkles, made in a slightly smaller size for little hands.
Freckle Biscuits

Also known as smarty cookies or M&M cookies, we like to call these colourful cookies freckle cookies. Loved by kids the world over, these are a non-negotiable kids party treat.
Gluten-free Biscuits
It isn't easy to make baked goods and biscuits that are gluten free that taste (or feel) as good as those made with wheat flour. But the demand for gluten free goods continues to rise so bakers and manufacturers are forced to come up with ways to mimic the magic properties of gluten. The trick with shopping for gluten free biscuits is to find something that is just as good or better than their wheat based counterparts. After all, the whole point is that biscuits and cookies are a joy to eat so why put up with something that doesn't quite get there?
Why not give our certified gluten-free cookies a go?
Dairy-free Biscuits
Many biscuits are made without butter and favour margarine instead. However this does not always guarantee that the biscuits will be dairy free as many brands of margarine actually contain milk solids. If the biscuits do contain dairy it may not show up in the ingredients list, but will always be noted as milk allergens.
Egg-free Biscuits
A lot of biscuits, especially gourmet or handmade biscuits, may contain egg in the recipe. Again, these will be clearly listed in the ingredients and marked as allergens. Our range has a number of egg-free biscuits, including Anzac biscuits which of course traditionally contain no egg.
Our butter shortbread cookies are made without egg
These handmade melting moments are also made without egg
At Opera Foods we supply biscuits wholesale direct to the public. Packaged for your convenience, yet handmade right here in Australia.
This article was reproduced on this site with permission from operafoods.com.au the “Australian Biscuit Manufacturers”.
See original article:- Why we love handmade Australian biscuits
Read the full article
2 notes
·
View notes
Text
Java Burn: The Power Behind Weight Loss and Metabolism Boost:
In today’s fast-paced world, weight loss and metabolism improvement are critical concerns for many individuals seeking to enhance their overall health and well-being. The dietary supplement industry has introduced numerous products, but few have made waves quite like Java Burn. As more people become conscious of their weight and energy levels, they turn to natural solutions that fit into their lifestyle seamlessly. Java Burn, with its unique composition and coffee-compatible formula, is becoming a popular choice for those who aim to lose weight without altering their daily routines. This article dives deep into the intricate details of Java Burn, exploring its ingredients, how it works, and why it stands out among other supplements on the market.

"Java Brun"
What is Java Burn?
Java Burn is a dietary supplement designed to boost your metabolism when mixed with your daily coffee. The product claims to assist in weight loss, enhance energy levels, and improve overall health. Unlike traditional supplements, Java Burn is tasteless, allowing users to easily mix it into their coffee without altering the flavor. The supplement works synergistically with coffee to activate fat-burning mechanisms in the body. The unique selling point of Java Burn lies in its formula, which leverages natural ingredients known for their ability to stimulate metabolic processes.
Why Coffee?
The reason Java Burn is marketed as a coffee-enhancing supplement stems from the thermogenic properties of coffee. Caffeine, the primary component of coffee, is well-known for increasing thermogenesis, a process that raises the body’s core temperature and boosts the metabolism. When combined with Java Burn, the effectiveness of caffeine is amplified, leading to quicker and more noticeable results in weight management.
Click Here to visit Java Brun website.
How Does Java Burn Work?
The key to understanding how Java Burn functions lies in its scientifically backed ingredients. By mixing a packet of Java Burn into your coffee, it helps the body burn more calories throughout the day. Here’s how:
Boosts Metabolism: Java Burn increases the body's natural metabolism, even during periods of rest. This leads to more calories burned throughout the day, accelerating the process of weight loss.
Fat Oxidation: The ingredients in Java Burn are formulated to trigger fat oxidation, where the body breaks down stored fat to use as energy. This is crucial for people who struggle with stubborn fat in areas like the abdomen and thighs.
Appetite Suppression: The blend helps regulate hunger pangs and cravings, preventing overeating. By curbing unnecessary snacking, Java Burn ensures that your calorie intake is controlled, supporting weight loss efforts.
Sustained Energy: Unlike other diet supplements that may cause a sudden spike in energy followed by a crash, Java Burn provides a sustained energy boost throughout the day, enhancing focus and productivity.
Java Burn Ingredients: What Makes It Work?
The effectiveness of Java Burn comes from its powerful combination of natural ingredients, each selected for its proven ability to enhance metabolism and promote weight loss. Below are the key ingredients that make Java Burn a potent supplement.
Green Tea Extract (EGCG)
Green tea extract, particularly EGCG (epigallocatechin gallate), is a potent antioxidant known for its metabolism-boosting properties. EGCG increases thermogenesis, the process by which the body burns calories to produce heat. By elevating the body’s metabolic rate, Java Burn helps users burn more calories, even when resting. Additionally, green tea extract supports fat oxidation, aiding in the breakdown of stored fat for energy.
Chromium
Chromium is an essential mineral that plays a crucial role in regulating blood sugar levels. In Java Burn, chromium is included to help improve insulin sensitivity and reduce sugar cravings. By maintaining stable blood sugar levels, Java Burn helps prevent energy crashes and supports sustained weight loss.
L-Carnitine
L-Carnitine is an amino acid that facilitates the transport of fatty acids into the mitochondria, where they are converted into energy. This process not only helps in burning fat but also ensures that the body has enough energy for daily activities. L-Carnitine plays a pivotal role in Java Burn, as it accelerates fat-burning, especially when paired with caffeine.
L-Theanine
L-Theanine, another amino acid, is known for its calming effects. It is included in Java Burn to counterbalance the jittery effects of caffeine. While caffeine stimulates the metabolism, L-Theanine promotes relaxation without causing drowsiness. This combination enhances focus and cognitive function while supporting fat loss.
Chlorogenic Acid
Found in green coffee beans, Chlorogenic Acid helps reduce the absorption of carbohydrates in the digestive tract, lowering blood sugar and insulin spikes. By reducing carbohydrate absorption, Java Burn aids in preventing fat storage and promoting weight loss.
Caffeine
As a central nervous system stimulant, caffeine boosts metabolism and enhances fat burning. It increases the release of fatty acids from fat tissues, making them available for energy use. In conjunction with Java Burn's other ingredients, caffeine amplifies fat loss and metabolic enhancement, helping users achieve their weight loss goals faster.
Benefits of Java Burn
The unique blend of ingredients in Java Burn offers several benefits that make it a standout product in the weight loss supplement market. Here’s a closer look at what makes it so effective:
Increased Fat Burning
One of the primary benefits of Java Burn is its ability to enhance fat burning. By stimulating the metabolism and increasing thermogenesis, it helps the body burn more calories throughout the day. This leads to quicker and more efficient fat loss, particularly in stubborn areas like the belly, thighs, and hips.
Enhanced Energy Levels
By utilizing the fat stores in the body as energy, Java Burn provides users with a consistent and sustained energy boost. Unlike many supplements that result in energy crashes, the balance of caffeine, L-Carnitine, and L-Theanine ensures that users remain energized without experiencing fatigue later in the day.
Appetite Control
Java Burn helps curb cravings and suppress appetite, making it easier for users to stick to a healthy eating regimen. By reducing the likelihood of snacking and overeating, Java Burn assists in creating a calorie deficit, which is essential for weight loss.
Blood Sugar Regulation
The inclusion of chromium in Java Burn plays a critical role in regulating blood sugar levels. Stable blood sugar helps prevent insulin spikes and crashes, which can lead to weight gain and energy dips. This also reduces sugar cravings, making it easier for users to avoid unhealthy snacks.
Natural and Safe Ingredients
Unlike many supplements on the market that contain artificial chemicals and fillers, Java Burn is made from natural ingredients that are safe and effective. This makes it a reliable choice for people looking to lose weight without worrying about adverse side effects.
Who Should Use Java Burn?
Java Burn is ideal for individuals who are already coffee drinkers and are looking for an easy way to enhance their weight loss efforts. It’s particularly beneficial for people who:
Struggle with stubborn fat in areas like the abdomen and thighs.
Experience energy dips throughout the day.
Have difficulty controlling their appetite and cravings.
Are looking for a natural supplement to boost metabolism.
Want to enhance their daily coffee routine with additional health benefits.
However, it is essential to consult with a healthcare provider before starting any supplement, especially for those with underlying health conditions or sensitivities to caffeine.
How to Use Java Burn
Using Java Burn is incredibly simple. It comes in easy-to-use packets that you can mix directly into your coffee. Each packet is tasteless, so it won’t alter the flavor of your favorite brew. It’s recommended to use Java Burn in the morning with your first cup of coffee to kickstart the metabolism for the day. While the supplement works best with coffee, it can also be added to tea or any other beverage of choice.
Dosage
Each box of Java Burn contains 30 single-serve packets, designed to last a month. It is advised to take one packet per day for optimal results. Consistency is key, so incorporating it into your daily routine ensures that you see maximum benefits.
Final Thoughts on Java Burn
When it comes to achieving long-term weight loss and a metabolism boost, Java Burn offers a practical, effective, and easy-to-use solution. With its natural ingredients and synergistic relationship with coffee, Java Burn stands out as an innovative product for those looking to enhance their weight management journey. Its ability to increase fat burning, boost energy, control appetite, and stabilize blood sugar makes it a versatile addition to any weight loss strategy.
For those seeking an effortless yet powerful way to lose weight, Java Burn offers a convenient approach that fits seamlessly into their existing coffee routine, turning a simple morning cup into a metabolic powerhouse.
0 notes
Text
Burn Fat Naturally with Tea Burn: Discover the Power of Tea Burn Packets
In the quest for effective weight loss solutions, many individuals seek natural and sustainable methods to achieve their goals. One promising product that has recently gained attention is Tea Burn. This innovative supplement is designed to enhance the benefits of your daily tea, helping you burn fat naturally and effectively. In this blog, we'll explore how Tea Burn works, its ingredients, and the advantages it offers. By the end, you'll understand why this product might be the right choice for your weight loss journey.
What is Tea Burn?

Tea Burn is a unique, tasteless, and instantly dissolvable nutritional supplement designed to be mixed with any tea. It promises to amplify the fat-burning potential of your favorite tea by boosting your metabolism and promoting overall health. Developed after years of research, Tea Burn combines several key ingredients known for their weight loss and health benefits. The product is created to be both convenient and effective, allowing you to enjoy your tea while supporting your weight loss goals.
How Does Tea Burn Work?
Tea Burn works by enhancing the metabolism-boosting effects of tea. The blend of super-nutrients in each packet is formulated to support various bodily functions that are essential for effective weight loss. When you add Tea Burn to your tea, it helps optimize your metabolism, leading to increased fat burning throughout the day.
The key to Tea Burn's effectiveness lies in its ability to work synergistically with the compounds found in tea. By combining with tea, Tea Burn ensures that you receive a comprehensive metabolic boost, which can lead to more significant fat loss and improved overall well-being.
Tea Burn Ingredients
The effectiveness of Tea Burn can be attributed to its carefully selected ingredients. Each component is chosen for its ability to support metabolism, fat-burning, and overall health. Here's a closer look at the key ingredients in Tea Burn:
Chlorogenic Acid: This compound, found in green coffee beans, is known for its ability to support metabolism and healthy blood sugar levels. It plays a crucial role in enhancing fat-burning and supporting weight loss.
Camellia Sinensis: This is the plant from which tea is made. It contains compounds that support metabolism, fat-burning, and heart health. Camellia Sinensis enhances the natural benefits of tea, making it an essential component of Tea Burn.
Chromium: Chromium is a trace mineral that helps regulate blood sugar levels and supports metabolism. It is known to assist in controlling cravings and maintaining healthy insulin levels.
L-Carnitine: This amino acid is crucial for fat metabolism. It helps transport fatty acids into the mitochondria, where they are burned for energy. L-Carnitine also supports nutrient absorption and overall energy levels.
L-Theanine: Found in tea leaves, L-Theanine supports cognitive function and reduces hunger. It helps promote calm and steady energy, making it easier to stick to your weight loss goals.
Vitamin Complex: The vitamins included in Tea Burn support immune function, natural energy production, and overall well-being. They help ensure that your body remains healthy and resilient while you work towards your weight loss objectives.
Benefits of Tea Burn
Tea Burn offers several benefits that make it a valuable addition to your weight loss regimen:
Enhanced Metabolism: By boosting your metabolism, Tea Burn helps your body burn fat more efficiently. This can lead to more effective weight loss and a quicker reduction in body fat.
Increased Fat-Burning: The combination of ingredients in Tea Burn promotes fat-burning, helping you achieve your weight loss goals more effectively.
Steady Energy: Tea Burn provides a natural energy boost without the jitteriness associated with some other weight loss products. This helps you stay active and motivated throughout the day.
Reduced Hunger: With ingredients like L-Theanine, Tea Burn can help control cravings and reduce hunger, making it easier to stick to a healthy diet.
Overall Health Support: In addition to weight loss benefits, Tea Burn supports overall health. The vitamins and nutrients in the product help maintain your well-being while you work towards your fitness goals.
Convenience: Tea Burn is designed to be easy to use. Simply add a packet to your tea, and you're ready to experience the benefits of this powerful supplement.
How to Use Tea Burn
Using Tea Burn is simple and convenient. Just follow these steps:
Choose Your Tea: Select your favorite tea, whether it's green, black, or herbal.
Add a Packet of Tea Burn: Tear open a packet of Tea Burn and add it to your brewed tea.
Stir and Enjoy: Stir the tea to ensure that the Tea Burn dissolves completely. Enjoy your enhanced tea and the benefits of Tea Burn.
Consistent Use: For best results, use Tea Burn consistently as part of your daily routine.
Tea Burn Official Website and Reviews
For those interested in learning more about Tea Burn, the official website is the best place to start. The site provides detailed information about the product, including its ingredients, benefits, and special offers. You can also read Tea Burn reviews from other users to see how the product has worked for them.
Many users have reported positive results from using Tea Burn, noting improvements in their metabolism, energy levels, and overall well-being. These testimonials can provide valuable insights into the effectiveness of Tea Burn and help you decide if it's the right choice for you.
Special Offers and Guarantee
Tea Burn is currently available at special introductory prices, making it an affordable option for those looking to try the product. Additionally, every purchase is backed by a 100% money-back guarantee. If you're not completely satisfied with the results within 60 days, you can return the product for a full refund, no questions asked.
Conclusion
Tea Burn offers a natural and effective way to enhance the benefits of your daily tea and support your weight loss goals. With its powerful blend of ingredients designed to boost metabolism, promote fat-burning, and improve overall health, Tea Burn is a valuable addition to any weight loss regimen. By incorporating Tea Burn into your daily routine, you can experience the benefits of enhanced metabolism and achieve your weight loss goals more effectively. Visit the Tea Burn official website today to learn more, read reviews, and take advantage of special offers. Embrace the power of Tea Burn and transform your tea into a powerful tool for burning fat naturally.
#TeaBurnPackets#TeaBurnIngredients#NaturalFatBurner#HealthyWeightLoss#TeaBurnOfficialWebsite#WeightLossSupplement#FitnessJourney
0 notes
Text
Caring for Your Yellow Garnet: Tips for Longevity and Shine
Yellow garnet, a stunning and rare gemstone, captivates with its golden hue and radiant sparkle. Known for its unique beauty and significance, yellow garnet (also known as hessonite garnet) has become increasingly popular among gemstone enthusiasts. However, like all precious stones, it requires proper care to maintain its longevity and shine. In this article, we will explore the essential tips for caring for your yellow garnet, ensuring it remains as brilliant as the day you acquired it.

Understanding Yellow Garnet: What Makes It Unique?
Before diving into the care tips, it’s important to understand what makes yellow garnet distinct. Yellow garnet is a variety of the grossular garnet family, characterized by its warm golden to honey-yellow color. This hue is caused by trace amounts of iron and manganese within the stone. Its brilliance and fire are key characteristics that make yellow garnet so desirable.
Unlike more common garnets, such as the deep red almandine or pyrope, yellow garnet stands out due to its unique color and light performance. It has a refractive index of about 1.73 to 1.75, which contributes to its sparkle. Moreover, it has a Mohs hardness of 6.5 to 7, making it a relatively durable gemstone, although not as hard as sapphires or diamonds. This means that while yellow garnet can be worn daily, it still requires mindful care to prevent damage.
The Importance of Proper Storage
1. Avoid Exposure to Harsh Conditions
Yellow garnet is sensitive to extreme temperatures and harsh chemicals. Exposure to these conditions can cause the stone to lose its luster and, in some cases, lead to cracks or other damage. To avoid this, it’s crucial to store your yellow garnet jewelry in a cool, dry place, away from direct sunlight and chemicals like cleaning agents, perfumes, and hairsprays.
2. Use a Soft, Lined Jewelry Box
To further protect your yellow garnet, store it in a soft-lined jewelry box or pouch. This prevents scratches and other surface damage that can occur when gemstones rub against harder materials. If possible, store your yellow garnet pieces separately from other jewelry, especially those made with harder stones like diamonds or sapphires, which can scratch the surface of the garnet.
3. Avoid Storing in Humid Environments
Humidity can affect the appearance of yellow garnet by causing it to appear duller. To maintain the stone’s brilliance, avoid storing it in bathrooms or other humid environments. Consider using silica gel packets in your jewelry box to absorb excess moisture and keep your yellow garnet in optimal condition.
Cleaning Your Yellow Garnet: Dos and Don’ts
1. Gentle Cleaning Solutions Are Key
When it comes to cleaning your yellow garnet, gentle is the keyword. Harsh chemicals and abrasive cleaners can damage the stone’s surface, dulling its natural shine. Instead, use a mild soap mixed with lukewarm water to clean the gemstone. A soft-bristled toothbrush or cloth can be used to gently scrub the surface, removing any dirt or oils.
2. Avoid Ultrasonic Cleaners
While ultrasonic cleaners are often used to clean gemstones, they are not suitable for yellow garnet. The vibrations produced by these devices can cause internal fractures in the stone, especially if it has any inclusions or imperfections. Stick to manual cleaning methods to ensure your yellow garnet remains intact.
3. Rinse and Dry Thoroughly
After cleaning your yellow garnet, it’s essential to rinse it thoroughly with clean water to remove any soap residue. Residual soap can create a film on the surface, dulling the stone’s shine. Once rinsed, gently pat the garnet dry with a soft, lint-free cloth. Avoid air drying, as this can lead to water spots on the gemstone.
4. Avoid Harsh Cleaning Environments
Cleaning your yellow garnet near sinks or drains can be risky. Small gemstones can easily slip from your hands and get lost. To avoid this, clean your yellow garnet over a soft surface like a towel or use a jewelry cleaning tray with raised edges to prevent any mishaps.
Wearing Your Yellow Garnet: Best Practices
1. Limit Exposure to Sunlight and Heat
While yellow garnet is relatively stable under normal conditions, prolonged exposure to direct sunlight and high temperatures can cause the gemstone to fade or lose its brilliance. When not wearing your yellow garnet jewelry, store it in a shaded area. If you plan to be outdoors for extended periods, consider wearing a different piece of jewelry to protect your yellow garnet from potential sun damage.
2. Be Mindful of Daily Activities
Yellow garnet, like all gemstones, can be damaged by physical impacts or rough handling. When engaging in activities that involve heavy lifting, gardening, or sports, it’s best to remove your yellow garnet jewelry to prevent accidental damage. Additionally, avoid wearing your garnet while swimming, as chlorine and saltwater can negatively impact the stone’s appearance.
3. Apply Cosmetics Before Wearing
Cosmetics, perfumes, and hairsprays contain chemicals that can dull the surface of yellow garnet. To protect your gemstone, always apply these products before putting on your jewelry. This minimizes the gemstone’s exposure to harmful substances and helps maintain its natural shine.
Regular Maintenance: Ensuring Long-Term Brilliance
1. Schedule Professional Cleanings
While home cleaning is essential, it’s also important to have your yellow garnet professionally cleaned and inspected at least once a year. A professional jeweler can clean your gemstone more thoroughly and check for any signs of wear or damage that may need attention.
2. Re-polishing When Necessary
Over time, even with the best care, your yellow garnet may lose some of its polish due to everyday wear. If you notice that your gemstone isn’t as shiny as it used to be, consider having it re-polished by a professional. This can restore its original luster and make it look as good as new.
3. Check the Setting
If your yellow garnet is set in a piece of jewelry, such as a ring or pendant, regularly check the setting to ensure the stone is secure. Prongs can loosen over time, increasing the risk of the stone falling out. A quick inspection can prevent potential loss or damage to your valuable gemstone.
Conclusion
Caring for your yellow garnet is essential to preserving its beauty and ensuring it remains a cherished piece for years to come. By following the tips outlined in this article—proper storage, gentle cleaning, mindful wearing, and regular maintenance—you can keep your yellow garnet looking as vibrant and radiant as the day you first laid eyes on it. Whether it’s a statement piece for special occasions or a daily accessory, your yellow garnet deserves the utmost care and attention. With the right care, this golden gem will continue to captivate and enchant, adding a touch of timeless elegance to your collection.
0 notes
Text
Lunchtime Meal Prep: How to Make Easy 4-Ingredient Italian Shredded Beef
Meal prep — preparing a bunch of meals altogether ahead of time — is a handy way to increase your chances of eating healthy during the week, save money on buying takeout, and save time and bandwidth by batching your cooking.
We’ve previously covered how to make easy, high-protein meal-prep breakfast casseroles.
But what about lunch? Are you tired of buying pricey frozen entrees or getting fast food burgers for your mid-day meal?
Well, I’ve got a recipe for a lunchtime (or dinnertime) meat that’s stupid easy. Really, you’ve got to have every one of your last marbles loose to mess this up.
Crockpot Italian shredded beef is what’s on the menu today, and I’m going to fill you in on how to make it and why it’s the ultimate lunchtime meal-prep meat.
Why Italian Shredded Beef Makes for an Awesome Go-to Lunchtime Meal-Prep Meat
It’s cheap. This recipe calls for a chuck roast. As of 2024, a pound of chuck roast is going for ~$7.50 a pound. Let’s say you buy a 3-pound chuck roast for $22.50, and you divvy that 3-pound chuck roast into a week’s worth of seven 150-gram servings of shredded beef. You’re looking at about $3 per meal (plus the small cost of adding a carb like rice). That’s pretty dang good.
It’s high in protein. A-150 gram serving of chuck roast will give you about 37 grams of protein along with essential micronutrients. The one downside of chuck roast shredded beef is that it’s high in fat. A 150-gram serving includes 23 grams of fat. But the fat makes it tasty and satiating.
It’s easy to make. It takes less than five minutes to make Italian shredded beef. You just put the chuck roast in a crock pot, dump in three other ingredients, and then let it cook for 6 to 8 hours. Stupidly easy!
It’s versatile. You can eat Italian shredded beef for lunchtime or dinnertime and accompany it with a variety of sides. It’s delicious on a sandwich roll, but I often eat mine with some rice or roasted potatoes, or put it in a tortilla.
It’s tasty. It’s slow-cooked beef. Of course it’s tasty and savory.
How to Make Meal-Prep Italian Shredded Beef
Here’s how to make easy Italian shredded beef. You’ll naturally need a slow cooker/crockpot.
Gather the Ingredients
* 3 lbs of chuck roast. The best cut of beef for this, due to its marbling, which helps in creating tender, easily shreddable meat. Alternatively, round or rump roast can also be used.
* 1 cup beef broth. Opt for low sodium if you want to reduce the saltiness of this dish.
* 1 16 oz jar of pepperoncinis, liquid included. (For less spiciness, use less of the liquid.)
* 2 packets of Italian dressing mix
Add Ingredients to Crockpot
Like I said, this is stupid easy. Just put all of your ingredients in the slow cooker. Set to cook on low heat for 7-9 hours. Set it and forget it. Cooking on low ensures the meat becomes perfectly tender and shreddable.
Shred the Meat
Once the beef is tender and easily falls apart, it’s time to shred. Grab two forks and shred the beef in the pot. After shredding, let the beef sit in the juices for a few minutes to enhance its flavor and moisture.
Using Your Crockpot Shredded Beef
Three pounds of chuck roast will give you about seven 150-gram servings of shredded beef. A week’s worth of lunchtime meat.
I put all the meat into one container and store it in the fridge. When it’s lunchtime, I just portion out 150 grams of the shredded beef and pair it with whatever starch I have at the ready or feel like eating that day. That could be rice, potatoes, pasta, tortillas, or a sandwich roll. The possibilities are many.
Alternatively, once your shredded beef has been prepared, dole it out into seven separate dishes along with your preferred starch. For example, you can put 150 grams of beef into seven meal prep containers along with a scoop of rice. Now they’re all completely ready to go. This makes it easy to grab in the morning and take to the office if you don’t work from home. Even if you do work from home, it’s nice to be able to simply grab something from the fridge,… http://dlvr.it/TCXm0J
0 notes
Last Seen Blogs

the-baby-sitters-club
The Baby-Sitters Club

stellarphileistic
˖⁺‧₊˚♡˚₊‧⁺˖

black-owl-nebula
Moon full, head empty

tyraking
ignored;

usa1731
The Cole Farmhouse