#experimenting with using the polygon select tool for shadows
Explore tagged Tumblr posts
Visit Tumblr Blog
Explore Tumblr blogs with no restrictions, modern design and the best experience.
Last Seen Tumblr Blogs


Fun Fact
70% of Tumblr users say the Dashboard is their favorite place to spend time online.
Text
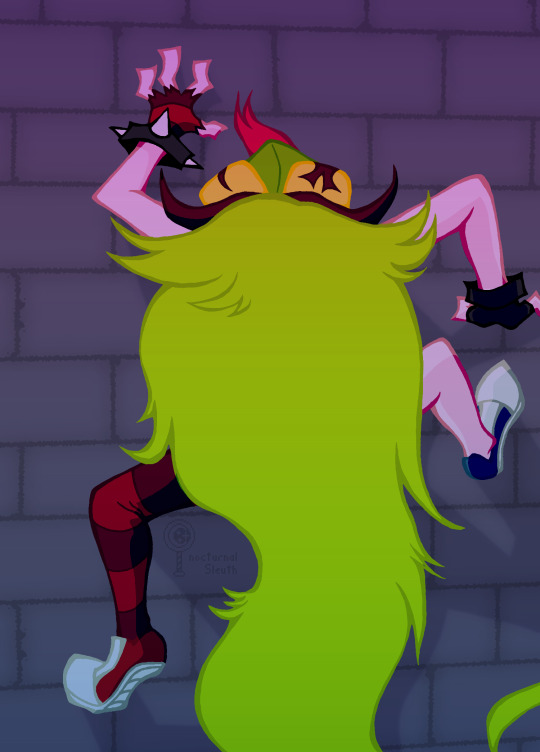
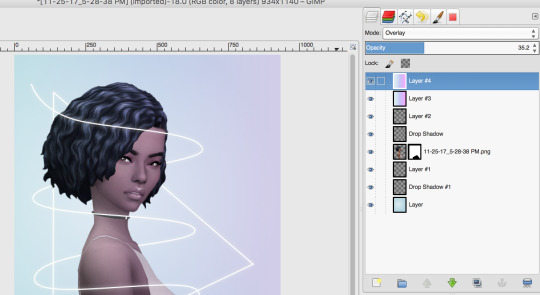
Happy International Women's Day to this fucking thing 🦎💣💥
plain lineart below
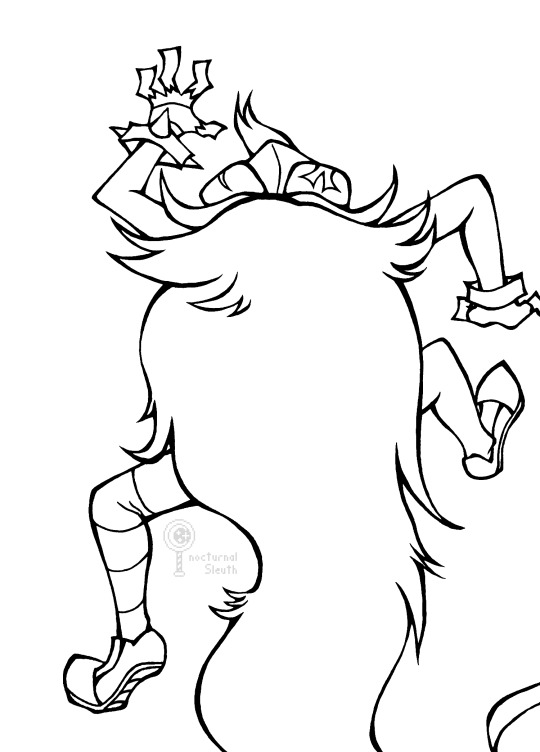
#ns posts#ns art#villanos#villainous#demencia#locked out of my villainous side account... save me demencia...#experimenting with using the polygon select tool for shadows#learning why some artists colour things different for easy selection#i usually just have three layers but maybe i should start doing that#also if u notice the mistake i made its fine she just escaped 💖 smashed it off or smth ✨ shes on the loose#wAIT WHY ARE THERE LINES THROUGH IT LIKE THAT
122 notes
·
View notes
Text
Making-You-In-Spore's Editor Mod List
not mods, but highly recommended for enhanced playing experience
4GB patch - Tutorial - patches spore [and other 32bit programs] to be able to use 4gb of RAM. recommended if playing a highly modded copy, and makes the game more stable.
Reshade & ReSpore - post-processing injector & shader that alters the appearance of spore, giving it more detailed shading and vibrant colors. i use this for gameplay and screenshots. runs on GPU power, so excellent if you have a strong graphics card
HD graphics fix - this doesn't actually seem to work for my copy, but it alters the textures of base spore to be more high-quality.
mods that are absolute must-haves
these mods are ones that i use in almost every creation, and add a lot of QoL to the editors. if i forget a mod in a creature png i post, it will be one of these.
Dark injection - THE spore mod. it's likely a lot of other mods you'll download will mesh well with dark injection. you can turn off whatever you don't want to use through the installer.
Universal Property Enhancer - a library mod that many other mods require
The Smoother - a useful tool for building muscles and smoothing out your creatures' bodies
Enhanced Color Picker - a requirement for super detailed creations, enables hexcode color picking and color wheel selection beyond normal limits of spore
[UPE] Infinite Part Scaling - allows scaling of parts near-infinitely, beyond the limits of the original game
Project Skyncraft - adds new creature skinpaints
Unshackled - adds nodes and limbs for creating custom wings, heads, hands, etc. a little bit unstable, i mostly use this for wings.
Spore Stacker - allows stacking of any part
Subtle Rotations - reduces part rotation snapping
Advanced CE - adds building editor manipulators to the creature editor
Every Part Costs Nothing - self explanatory
Rotate Anything - lets you rotate anything, including feet and hands
Advanced Creature Paint - allows for individual coloring of parts on a creature, like in the building and vehicle editors
Ambient Occlusion Disabler - removes baked-on shadows for creatures
Delta Paints - adds new skinpaints
Valla's Skinpaint Switcheroo - adds duplicates of all vanilla, C&C, and GA creature coat and detail skinpaints into their opposite category
Valla's Vanilla Style Parts - adds several parts which mimic the vanilla style
Delimbiter - increases the amount you can scale limb parts, and allows for more crazy movements of certain limb parts
test drive related mods
these mods are not required to download the creatures i post, but are recommended for the test drive.
No More Creature Editor Animations - turns off the animations that play when you add eyes, mouth, feet/hands, etc
Sevan's TF2 editor animations - adds multiple animations from tf2 into the creature test drive.
Mx3's Dance Animations - adds a multitude of dance animations into the creature test drive.
Tenebris's Creature Test Drive Animations - adds many animations from within the game to the creature test drive.
EditorBG - adds extra editor backgrounds
Ramone Kemono's MMD Drag Ball - high-effort dance mod complete with special effects and a reverse engineered camera system
part mods
these mods add parts to the editors.
DroneParts 2017 - adds many mechanical and polygonal parts useful for machine creatures, i like to use it for building clothes and markings.
New Drone Parts - a sequel to droneparts 2017, compatible with the old version. install both at the same time if you want to be able to use creatures from the old droneparts mod.
Himeric Engine - adds horror-themed parts to the creature editor.
Spore Resurrection Next Steps - adds a few parts to the creature editor and several new textures to the building and vehicle editors.
Dinosaur Parts - adds parts based on dinosaurs and other animals. mostly heads.
Strange And Beautiful - a now-discontinued, reuploaded mod that adds unusual and unique parts to the creature editor
Bionicle parts - adds a few bionicle pieces to the creature editor
Little Box Of Horrors - adds many parts with an overall horror theme. some are animated.
Pandora's Toolbox [1.0] - adds a multitude of basic shapes and polygons to build with
Replicant - adds non-textured animating parts and non-animating parts in a separate tab. good for if you want to use hands, limbs, etc without them animating or adding stats
Armoured And Dangerous - adds a few high detail mechanical looking parts.
Wordsmith 2.1 - adds letters to the creature, building, and vehicle editors
Kaiju parts - adds several parts based on popular kaiju
Organic Help - adds many membrane pieces to the creature editor, for creating wing webbing among other things
Project: Mad Mannequins - adds many human body based parts. and a horse for some reason
A Mouth For All Seasons - adds alternate versions of all vanilla mouths [and all unused cell mouths] with alternate diets
Valla's Captain Badges - adds all space badge models into the captain outfitter and creature editor
Rock On! - adds rock props from spore into the building and creature editors
Anime Parts - adds a couple anime human heads and anime hairs
3 notes
·
View notes
Text
The Technology Behind Stunning 3D Design and Rendering
In an era where visual communication reigns supreme, the ability to create photorealistic and immersive digital experiences has become indispensable across numerous industries, particularly in architecture, product development, and entertainment. This remarkable transformation of abstract ideas into tangible visuals is driven by the sophisticated interplay of various technologies underpinning 3D design and rendering. It's a complex ecosystem of software, hardware, and algorithms that together conjure stunning imagery, enabling creators to visualize, iterate, and present their concepts with unparalleled fidelity. Understanding the technological backbone that powers stunning 3D design and rendering is crucial for appreciating the intricate process involved in bringing digital worlds to life and realizing complex visions with breathtaking realism and precision.
Powerful Software Drives Exceptional 3D Design and Rendering
At the core of any high-quality 3D design and rendering workflow lies powerful software. Programs like Autodesk 3ds Max, Maya, SketchUp, Blender, and Cinema 4D provide the fundamental tools for modeling, texturing, rigging, and animation. These platforms offer extensive features for creating complex geometries, applying realistic materials, and setting up intricate scene compositions. The continuous evolution of these software suites, with constant updates and new functionalities, empowers artists and designers to push the boundaries of what's possible in 3D design and rendering. Choosing the right software, tailored to specific project needs, is the first critical step in achieving stunning visual outputs.
Advanced Modeling Techniques for Realistic 3D Design and Rendering
The foundation of any 3D design and rendering project is the creation of accurate and detailed 3D models. This involves various advanced modeling techniques, including polygon modeling for intricate details, NURBS for smooth, organic surfaces, and CAD integration for architectural precision. Photogrammetry and 3D scanning technologies are also increasingly used to capture real-world objects and environments, translating them into digital assets. The meticulous application of these modeling techniques is what ensures the geometric accuracy and visual fidelity of objects and structures within the 3D scene, making them truly convincing elements in the overall 3D design and rendering.
Material and Texturing for Immersive 3D Design and Rendering
To achieve true photorealism in 3D design and rendering, the appearance of surfaces is paramount. This involves sophisticated material creation and texturing processes. Physically Based Rendering (PBR) workflows are standard, simulating how light interacts with surfaces in the real world based on properties like albedo, roughness, metallicness, and normal maps. Advanced texturing tools allow artists to paint intricate details, dirt, wear, and tear, making surfaces look authentic and lived-in. The careful selection and application of materials and textures are crucial, as they significantly influence the believability and immersive quality of the final 3D design and rendering.
Lighting and Shading for Atmospheric 3D Design and Rendering
Lighting is arguably the most critical element in elevating 3D design and rendering from mere models to captivating scenes. Realistic lighting simulates natural phenomena, using global illumination (GI) to calculate how light bounces off surfaces, creating soft shadows and natural color bleeding. Techniques like ambient occlusion (AO) add depth, while volumetric lighting creates atmospheric effects like fog or dust rays. Shading models define how light interacts with materials, influencing reflectivity, translucency, and subsurface scattering. Mastering these intricate lighting and shading principles is what breathes life into a scene, setting the mood and enhancing the realism of 3D design and rendering.
High-Performance Hardware for Efficient 3D Design and Rendering
The demanding computations involved in 3D design and rendering require powerful hardware. High-end CPUs are essential for processing complex geometries and running simulation tasks, while GPUs (Graphics Processing Units) are the workhorses for rendering, with specialized cores accelerating ray tracing and AI denoising. Ample RAM is necessary for handling large scene files and complex textures. Fast SSDs improve loading times, and robust cooling systems ensure stable performance. Investing in the right hardware infrastructure is non-negotiable for an efficient workflow, allowing artists to iterate quickly and produce high-quality 3D design and rendering outputs in a timely manner.
Render Engines: The Brains Behind 3D Design and Rendering
Render engines are the specialized software components that calculate how light interacts with objects in a 3D scene to produce a final image. There are various types, including unbiased renderers (like V-Ray, Corona, Octane, Redshift) that simulate light paths with high accuracy, and biased renderers that use approximations for faster results. Real-time render engines, found in game engines like Unreal Engine and Unity, are gaining traction for interactive experiences. The choice of render engine significantly impacts the visual quality, rendering speed, and features available for a project, making it a critical decision in the 3D design and rendering pipeline.
Renderexpo: Mastering the Art and Science of 3D Design and Rendering
Bringing together all these complex technologies and artistic expertise requires a specialized team. Renderexpo - 3D ARCHITECTURAL RENDERING SERVICES stands at the forefront of the industry, meticulously leveraging the latest advancements in 3D design and rendering. Our studio employs powerful software, cutting-edge hardware, and a deep understanding of lighting, texturing, and rendering algorithms to transform architectural visions into stunning, photorealistic realities. With a commitment to innovation and visual excellence, Renderexpo utilizes the most effective technologies to ensure that your 3D design and rendering projects are not only visually spectacular but also precisely executed, fulfilling your every creative need.
Conclusion
The journey from a conceptual idea to a stunning visual reality in 3D design and rendering is a testament to the remarkable advancements in technology. It's a sophisticated interplay of powerful software, intricate modeling techniques, realistic material simulations, masterful lighting, high-performance hardware, and intelligent render engines. Each component plays a crucial role in crafting immersive digital experiences that captivate and inform. Understanding this technological foundation not only demystifies the process but also highlights the immense skill and precision required to produce truly exceptional 3D design and rendering. As technology continues to evolve, the possibilities for bringing ever more realistic and compelling visions to life will only expand.
0 notes
Text
Optimizing Game Performance: Balancing Graphics and Speed
When it comes to creating a compelling game, stunning visuals are only half the story. Even the most beautifully designed game can fail if it lags, stutters, or drains device resources. That’s why optimizing game performance is crucial—especially when balancing cutting-edge graphics with the need for smooth, responsive gameplay.
In this blog, we’ll explore key strategies that every game development team can use to maintain that delicate balance between aesthetics and performance.

Why Optimization Matters
Today’s players expect high frame rates, fast load times, and seamless gameplay—whether they’re on a high-end PC or a mid-range smartphone. Poor optimization can lead to frame drops, overheating devices, crashes, or even negative reviews.
For developers, optimization isn’t just a technical task; it’s part of delivering a polished, enjoyable experience.
1. Prioritize What the Player Sees
Not every object in a game world needs to be rendered in full detail. Smart developers use techniques like:
Level of Detail (LOD): Automatically reducing detail for objects that are far from the camera. Occlusion Culling: Skipping rendering of objects blocked from the player’s view. Texture Streaming: Loading high-res textures only as needed.
These tricks reduce GPU load without sacrificing perceived visual quality.
2. Optimize Assets Early
Big textures and complex 3D models might look amazing in design software, but they can choke game engines. Optimize assets before importing them into your engine:
Compress textures without losing visible quality.
Reduce polygon counts where possible.
Bake lighting and shadows instead of relying on dynamic lighting for everything.
By building efficient assets, you make downstream optimization easier.
3. Profile and Benchmark Constantly
Optimization should happen throughout development, not just at the end. Use your engine’s built-in profiling tools (like Unity Profiler or Unreal Insights) to identify bottlenecks early.
Look for:
Scripts eating up CPU cycles
Shaders consuming GPU resources
Memory leaks or inefficient garbage collection
With regular testing, small adjustments can prevent major slowdowns later.
4. Target Multiple Platforms Carefully
If your game is designed for both high-end PCs and mobile devices, you’ll need a scalable approach:
Allow players to select different graphic quality settings. Dynamically adjust resolution or effects based on device specs. Disable expensive effects (like real-time reflections) on lower tiers.
Cross-platform game development is powerful, but requires smart compromises to keep gameplay smooth everywhere.
5. Optimize Code, Not Just Art
Game performance isn’t just about graphics. Poorly optimized code—like inefficient loops, frequent garbage collection, or unbatched draw calls—can bog down a game.
Key practices:
Pool frequently used objects instead of instantiating/destroying them constantly.
Minimize expensive calculations inside game loops.
Use asynchronous loading for assets during gameplay.
Good code hygiene keeps both CPU and memory usage under control.
6. Know When to Sacrifice Visuals
In some cases, improving performance may require turning off certain visual effects entirely—or limiting them to key moments (like boss fights or cutscenes). Prioritize what adds real value to gameplay over what’s just eye candy.
For example:
Use baked lighting for static environments. Replace real-time shadows with static shadow maps. Reduce post-processing effects like bloom or motion blur.
Remember: great visuals shouldn’t come at the cost of a frustrating experience.
Finding the Sweet Spot
At the heart of is finding balance—between artistic ambition and technical reality. Players will notice if your game runs poorly long before they admire your intricate textures.
By approaching optimization as an integral part of development, not an afterthought, you’ll ensure your game looks great AND runs great—across devices, platforms, and play sessions.
#GameDevelopment#GameOptimization#GamePerformance#GraphicsVsSpeed#GameDesign#IndieDev#UnityTips#UnrealEngine#GameProgramming#GamingExperience
1 note
·
View note
Text

Vector Graphics: Mastering Adobe Illustrator
Vector graphics, unlike raster graphics, are composed of mathematical equations defining lines and curves. This makes them infinitely scalable without losing quality, a crucial advantage for various design applications. This inherent scalability is a key reason why institutes like MAAC Institute, which offer comprehensive training in graphic design and multimedia, emphasize the importance of vector graphics in visual communication. Adobe Illustrator, a powerful vector graphics editor, is the industry-standard tool for creating and manipulating vector artwork.
Understanding Vector Graphics
Points and Paths: Vector graphics are built from points connected by paths. These paths can be straight lines or curves, and they define the shape of the object.
Scalability: Vector graphics can be scaled up or down without losing quality. This is because the mathematical equations that define the shape remain unchanged.
Layers and Groups: Vector graphics can be organized into layers and groups, making it easier to manage complex designs.
Color and Fill: Colors can be applied to shapes using solid colors, gradients, or patterns.
Key Features of Adobe Illustrator
Pen Tool: The Pen Tool is the cornerstone of Illustrator, allowing you to create precise paths and curves.
Shape Tools: Illustrator offers a variety of shape tools, including rectangles, ellipses, polygons, and stars.
Type Tool: You can create and manipulate text in various fonts, sizes, and styles.
Color Panel: The Color Panel allows you to choose colors, create gradients, and apply color effects.
Effects Panel: You can apply various effects to your artwork, such as drop shadows, blurs, and 3D effects.
Blend Tool: The Blend Tool allows you to create smooth transitions between shapes.
Pathfinder: The Pathfinder panel lets you combine, subtract, and intersect shapes.
Creating Vector Graphics with Adobe Illustrator
Setting Up Your Document:
Choose a suitable artboard size and color mode (RGB or CMYK) based on your project's requirements.
Drawing Basic Shapes:
Use the Rectangle Tool, Ellipse Tool, and Polygon Tool to create basic shapes.
Use the Pen Tool to create more complex shapes and curves.
Working with Paths:
Use the Direct Selection Tool to edit individual anchor points and paths.
Use the Pathfinder panel to combine, subtract, and intersect shapes.
Applying Color and Effects:
Use the Color Panel to apply colors, gradients, and patterns.
Use the Effects Panel to add shadows, blurs, and other effects.
Creating Text:
Use the Type Tool to create text and apply fonts, sizes, and styles.
Convert text to outlines to edit it as a vector shape.
Exporting Your Artwork:
Export your artwork in various formats, including AI, EPS, PDF, SVG, and PNG.
Real-World Applications of Vector Graphics
Logo Design: Vector graphics are ideal for creating scalable logos that can be used on various media, from business cards to billboards.
Illustration: Vector graphics are used to create illustrations for books, magazines, and websites.
Web Design: Vector graphics can be used to create icons, buttons, and other web elements.
Print Design: Vector graphics are used for print design, such as brochures, flyers, and posters.
Mobile App Design: Vector graphics are used to create icons and other UI elements for mobile apps.
Tips for Mastering Adobe Illustrator
Practice Regularly: The more you practice, the better you'll become at using Illustrator.
Learn Keyboard Shortcuts: Keyboard shortcuts can significantly speed up your workflow.
Experiment with Different Techniques: Don't be afraid to experiment and try new things.
Break Down Complex Shapes: Break down complex shapes into simpler shapes.
Use Layers Effectively: Organize your layers to keep your artwork clean and manageable.
Learn from Tutorials: There are many online tutorials and courses available to help you learn Illustrator.
By mastering the art of vector graphics with Adobe Illustrator, you can create stunning visuals that are both beautiful and functional. This is why institutes like MAAC Institute Pune, with their focus on graphic design and multimedia, provide in-depth training in Adobe Illustrator and its applications. Whether you're a graphic designer, web designer, or illustrator, a strong understanding of vector graphics will be a valuable asset in your toolkit..
0 notes
Text
What folders does an external hard drive need to be used for gaming files on ps4
Gaming Blogs UK Top rated ten
The Gaming sector has been the most influential and profitable organization in quite some time. What Wikipedia is to knowledge, GameSpot is to video games. From video game blogs to reviews to downloads to previews on console games. GameSpot functions each and every nook & cranny of gaming globe. The very best aspect of this gaming website is it supplies an open platform to customers to share their opinions, blogs & reviews on their forum. The website firefoxik.site gaming news is quite superior seeking and features section such as: Pc Gaming, PS4, Xbox One particular, Gametech, 3Ds, Deals & a great deal far more.
Much less developed countries like Indonesia and Philippines have drawn significantly less focus from app publishers. Style and trends in mobile gaming in these countries have been heavily influenced by Western markets, with inroads from China, Japan and South Korea. In Indonesia, globally well known games like Clash of Clans and Candy Crush Saga took 5 of the top rated ten spots by income and 7 spots by downloads in December 2014. In Philippines, global leaders took an even higher share: six of the major 10 spots by income and the complete major 7 by downloads. On the other hand, unlike in Japan or South Korea, Supercell and King did not rely on huge Tv and outside advertising campaigns to acquire users and climb up ranks. It appears that the development in these five emerging Southeast Asian markets was a lot more organic. In Indonesia and Philippines customers have been acquired far more via advertising automation channels such as Facebook.
This steady growth is partially stimulated by the influence of the Asian nations, China, South Korea, and Japan. They produce the most significant revenues from mobile games and place initially on the list of the worldwide gaming market leaders. In contrast to Europe, Asian gamers are a lot more probably to adopt smartphone games, not PCs or consoles.
If you never have a significant gaming group, you have likely noticed that two-player games are challenging to obtain, and definitely excellent ones that are just as terrific for two players are even additional uncommon. I've wracked my memory (and pestered my pals) to come up with a bunch of tabletop games that are a blast for two— not just technically playable without the need of far more.
How TOUGH Be Everyone A Better Salesperson
In the ‘90s, televisions got bigger, and gaming consoles got much more powerful. Nintendo and Sega fought for the top spot with the Super Nintendo Entertainment System, and the Sega Genesis, respectively. You will uncover all the retro games for SNES and Genesis you loved back in the day in one easy spot. From Golden Axe to Mega Man X, all your favored 16-bit titles are readily available at the Retro games retailer.
If you're reading this from a mobile device, possibilities are you have a laptop chip full of games that have intrigued your will need for gaming, however not fairly satisfied it. With the invention of the wise telephone, mobile gaming device, and portable computer system straight out of Star Trek, gaming has far more platforms than ever, along with as numerous blogs as ever.
The Tegra four SoC is a massive improvement over other options in terms of overall performance and gaming technology capabilities. With Tegra 4 on NVIDIA SHIELD transportable, you can now practical experience higher end graphical features native in Android games like sophisticated genuine time lighting effects, depth of field, soft shadows, higher res textures, genuine time smoke and particle simulation, higher polygon counts and considerably much more. This permits developers to really generate freely for Android gamers.
EDIT:I utilised to watch the Feedback video more than at G4 every single week, but it is gone down hill the last few instances I watched it and now that Adam Sessler is not on it and they have that girl from IGN that everyone hates in each and every episode I just cannot be bothered to watch it any far more. Still worth going back and watching some of the older ones though. Klepic utilized to be on that show and back then in the early days was when it was the finest. Back when they in fact talked about gaming news with some semblance of intellect as an alternative of just gushing about what ever game they are told is cool this week.
In March 2017, Green Man Gaming launched its 1st neighborhood language eCommerce site in Germany, 33 providing its customers the potential to shop in German applying their preferred payment solutions. The company also launched its brand new Community platform in March 2017, 34 giving gamers a new neighborhood to connect with every single other, view their gameplay stats, get the latest news and watch well-liked Twitch streamers - all in one particular spot.
Virtual reality is the future in all meanings of the word. The penetration of this concept in all important sectors across the globe and the ever increasing numbers are testament to the fact that this is here to keep. Factors, workings, processes, and game engines all pertaining to the virtual reality business are continuously improving each day. With the intense proliferation of gaming platforms in the previous years there are a quantity of game engines being produced readily available in the market place for the development inside this sector.
The ASTRO Gaming Headset is not your common headset that comes with a assortment of characteristics particularly made for enhancing your music listening practical experience. Instead, the ASTRO A50 is especially created and constructed for the really serious gamer specifically these who play on the Private Laptop or even the PlayStation 4 game console. The ASTRO A50 comes with 7.1 Dolby surround sound technology, providing you exceptionally loud bass and chest-thumping trebles, elegantly amplified to bring you to an out-of-this-globe adventure. The ASTRO A50 is embedded with professional top quality audio drivers in an sophisticated and stylish finish. It comes with its personal docking station, also.
This awesome theme is an complete package of impressive designs and web site management tools to assist you produce a frontend that is confident to wow any gamer out there. With its all-strong theme selections panel and integration with WP Bakery web page builder, you can build breathtaking gaming forums, clan web-sites, news channels and game stores with minimal work.
Some like it wireless. Some favor to go old-college with wires. If you come about to belong to the latter group, you may well want to give the Havit HV -MS672 Wired Mouse It may possibly not have a incredibly outstanding optical sensor that can run in the 16,000s, but its maximum of three,200 DPI should be enough to deliver you with an exceptional gaming encounter. Its DPI settings can also be adjusted to three other levels with the lowest at 800 DPI. The Havit Mouse also comes with breathing LED light effects like 7 circular LED light effects to set the mood in your game.
You initially convinced your self that you would attempt 1 or two board games, but somehow you have ended up spending a lot of cash on new board games and come to accept that board gaming is your new hobby. You spend your paychecks on regular impulse board gaming buys and kick starters. You religiously watch your favourite youtube channel and you have decided to try and obtain matching game players who have comparable tastes for you to play games. You start seeking for the ideal bargains on Amazon and you are kick-beginning each modern new board games coming out. While the huge signal that you're at this stage is that your secret birthday wishlist's for your friends now has board games on it.
Susan distinguishes herself as a gaming blogger due to the fact she emphasizes bringing positivity to the gaming sphere. As the Senior Editor for Escapist Magazine,” Susan also has an influence that some of the other gamers never have for the reason that she has the opportunity to encourage and influence some of the finest up-and-coming minds of the gaming planet.
1 note
·
View note
Text
What amd processor to use in gaming build
Profession In Gaming
Enthusiast Gaming is a media and technology business developing the biggest neighborhood of genuine gamers. Thank you for this entertaining post. This information can be valuable for anyone who desires to play the greatest games. But in addition to my comment I would like to refer a single web site - They have been providing gaming merchandise to both residential and industrial clients. I just enjoy to obtain from this web page as they have a big collection of bubble hockey game and made use of arcade games. Verify out the most recent new arrivals and pre-order these days.
The multitude of gaming news internet websites continues to grow as gaming emerges as anything larger and extra worthwhile than merely a hobby. It would be an understatement to confine the function and purpose of these internet websites to news and evaluations broadcasting for each and every day, the legion of geeks and gamers is strengthened by these extremely gaming news websites. In midst of this competition, there asasdrfgy.site are several internet websites like Virteract which are emerging to the scene and placing in some genuinely superior efforts to provide you with high-quality content.
The X Rocker Pro H3 Audio Gaming Chair can be rightfully thought of as a severe gamer's a single and only gaming lounger. It comes totally integrated with four highly effective speakers to give you a sensational game play. And if that's not adequate of the perfect present for a gamer, its equally amazing subwoofer can turn even the slightest hint of bass into a thunderous boom, further enhancing your all round gaming practical experience. Enhancing your immersive game play are vibration motors that can be completely synchronized with the distinctive bass tones in your game, supplying you with shocks, jolts, and minute vibrations fairly substantially like the tactile feedback of vibration-enabled game controllers.
It appears like a gadget from an alien civilization that's million light years extra sophisticated than ours. That's what several gamers and ordinary world-wide-web users assume about the NETGEAR Nighthawk S8000 This ethernet switch is developed specifically for gaming and streaming, enabling you to experience uninterrupted game plays and film and music streaming. Its 8-port design, coupled with a exclusive method of network site visitors prioritization that comes in 3 various levels, offers users the opportunity to manage multiple connections in a far more efficient manner. The Nighthawk S8000 also comes with a one-of-a-sort QoS management answer that guarantees ultra-high gaming and streaming performance. It's one particular of the most effective gaming routers for a cause.
How To Find The Right GAMING For the Specific Product(Service).
In the ‘90s, televisions got bigger, and gaming consoles got more effective. Nintendo and Sega fought for the best spot with the Super Nintendo Entertainment Method, and the Sega Genesis, respectively. You'll obtain all the retro games for SNES and Genesis you loved back in the day in a single handy spot. From Golden Axe to Mega Man X, all your favourite 16-bit titles are readily available at the Retro games shop.
Game makers can assistance easy leaderboards effortlessly by employing DynamoDB. One such use case is the capability to display major scores for a game. If a gaming enterprise already retailers players' game state in DynamoDB, like players' top scores, the ability to get top rated scores can be implemented by making use of a global secondary index.
The Tegra 4 SoC is a massive improvement more than other options in terms of efficiency and gaming technology capabilities. With Tegra four on NVIDIA SHIELD portable, you can now expertise higher finish graphical characteristics native in Android games like advanced genuine time lighting effects, depth of field, soft shadows, high res textures, true time smoke and particle simulation, higher polygon counts and significantly more. This allows developers to truly make freely for Android gamers.
Is there a video game that you can play day and night? Would you like to share your practical experience with the fellow gamers? By suggests of a gaming blog, you can provide your opinions, evaluation, and thoughts to the gaming community. As soon as you generate a gaming web site , you will attain a solid foundation to establish a greater make contact with with the gaming fans like you, as well as take more step to turn into an influencer in your sector.
Green Man Gaming is one of the world's biggest digital download video game retailers and the initial selection for millions of passionate gamers around the globe. They present a wide range of digital download games from AAA releases to tiny independent games across Computer. Mac, Nintendo and Sony PlayStation. They perform with more than 500 video game publishers, developers and distributors to supply prospects over 5,000 games at competitive prices.
Each and every month more than 700 million people today play games, watch gaming videos, or engage in gaming groups on Facebook. You may well scroll by means of News Feed and find out a new Immediate Game to play with your mates, you could follow a streamer's Page and start watching their content material, or you could possibly get a notification alerting members in your Pokémon Go group about a rare Lickitung spotted in a nearby park.
Working in partnership with Vox Media, Polygon brings its neighborhood original content on video games and their creators. Individuals interested in the gaming culture verify up on Polygon a number of instances in the course of the day for the most current and reputable news, reviews, previews, and videos viral in the gaming globe. Their eclectic Forum houses wide-ranging discussions and opinions on games and gaming trends.
This amazing theme is an whole package of impressive styles and web page management tools to assist you create a frontend that is confident to wow any gamer out there. With its all-potent theme possibilities panel and integration with WP Bakery page builder, you can build breathtaking gaming forums, clan web-sites, news channels and game shops with minimal effort.
The journey to becoming a Guru is an thrilling roller coaster of social emotions. Individuals get extremely attached to their board games, and getting to the final stage of finding rid of games is not a step that everybody takes. What everybody can agree on, nevertheless, is that contemporary board gaming is entertaining, and a excellent excuse to get some friends collectively.
You initially convinced oneself that you would try one or two board games, but somehow you have ended up spending a lot of money on new board games and come to accept that board gaming is your new hobby. You commit your paychecks on frequent impulse board gaming buys and kick starters. You religiously watch your favourite youtube channel and you have decided to attempt and come across matching game players who have equivalent tastes for you to play games. You begin hunting for the ideal bargains on Amazon and you happen to be kick-beginning every single modern new board games coming out. Though the large signal that you are at this stage is that your secret birthday wishlist's for your mates now has board games on it.
Susan distinguishes herself as a gaming blogger for the reason that she emphasizes bringing positivity to the gaming sphere. As the Senior Editor for Escapist Magazine,” Susan also has an influence that some of the other gamers never have since she has the opportunity to encourage and influence some of the greatest up-and-coming minds of the gaming world.
1 note
·
View note
Text
Boxy svg pencil tool

#BOXY SVG PENCIL TOOL FULL#
#BOXY SVG PENCIL TOOL PROFESSIONAL#
#BOXY SVG PENCIL TOOL DOWNLOAD#
View: The interface isn’t as polished as IconDeveloper, not as easy to use as the rest (thats why I haven’t got it at Nu.1), but my god look at the feature list.
#BOXY SVG PENCIL TOOL DOWNLOAD#
↓ 04 – Vectr | Free | macOS | Windows | Linuxįeatures: Easy to use, lightweight, requires no installation (portable) Supports file drag and drop Has multilanguage support (included: English, Chinese, French, German, Hungarian, Italian, Japanese, Korean, Norwegian, Polish, Portuguese (Brazilian), Serbian, Spanish) Help also available in French, separate download Click here to help us by translating the program Sample documents are included Uses dynamic color depth Opens and saves in ICO, CUR, ANI, PNG, XPM, BMP and JPEG formats Can create icons and cursors up to 256×256 32-bit, which can also be PNG-compressed for use in Windows Vista(tm) Can create animated cursors Can handle images up to 1024×1024 and larger Can extract icons and cursors from executable files and icon libraries Can batch convert image files to icons, or to another image format Has advanced selection handling (marquee, lasso and wand tools, saving/loading selections from files) Offers various gradient styles for filling shapes Lots of filters including Remove matte, Drop shadow, Inner/Outer glow and Bevel.
Clones (“live” linked copies of objects), including a tool to create patterns and arrangements of clones.
Embedded bitmaps (with a command to create and embed bitmaps of selected objects).
#BOXY SVG PENCIL TOOL FULL#
Text tool (multiline text, full on-canvas editing).
Shape tools: rectangles (may have rounded corners), ellipses (includes circles, arcs, segments), stars/polygons (can be rounded and/or randomized), spirals.
Drawing: pencil tool (freehand drawing with simple paths), pen tool (creating Bezier curves and straight lines), calligraphy tool (freehand drawing using filled paths representing calligraphic strokes).
#BOXY SVG PENCIL TOOL PROFESSIONAL#
Whether you’re a veteran professional illustrator, a designer building a dazzling website, or a budding artist eagerly experimenting with various styles and techniques, you will find Expression Design an indispensable tool for your creative tasks. The convenience and ease of editing vector graphics in Expression Design can be a cornerstone of your Windows Presentation Foundation (WPF), Microsoft Silverlight, and web images. ↓ 03 – Microsoft Expression Design | Free | Windows Furthermore, with OCIO and OpenEXR support, you can manipulate the view to examine HDR images, and use it in the most cutting edge workflows from the film and visual effects industries.
HDR Support – Krita is the only dedicated painting application that lets you open, save, edit and author HDR and scene-referred images.
Load and save to PSD when you need to take your artwork across different programs.
PSD Support – Open PSD files that even Photoshop cannot open.
The canvas will also look better when zoomed out. With OpenGL enabled, you will see increased canvas rotation and zooming speed.
OpenGL Enhanced – Krita takes advantages of OpenGL for some of its operations.
Or let it be the start of one: Krita comes with a wide variety of icc working space profiles for every need, with a color space browser to visualise and explore them.
Full Color Management – Krita supports full color management through LCMS for ICC and OpenColor IO for EXR, allowing you to incorporate Krita into your existing color management pipeline.
It offers many common and innovative features to help the amateur and professional alike. Krita has been in development for over 10 years and has had an explosion in growth recently. Krita is a complete creative sketching and painting application with advanced, commercial quality features. It is made by artists that want to see affordable art tools for everyone.
1 note
·
View note
Text
Pixelstick bmp bird images on a black background

#PIXELSTICK BMP BIRD IMAGES ON A BLACK BACKGROUND HOW TO#
Rectangular Marquee Tool M Horizontal Type Mask Tool T Magnetic Lasso Tool L PatSchlicTeoSolelect Tool C J Magic Eraser Tool E Polygonal Lasso Tool L HeaSlilnicgeBTrouoslh Tool C J HoBrizaocnktgarloTuynpdeETroaosler Tool ET Lasso Tool L SpoCtrHopeaTloinogl Brush ToCol J Convert Point Tool E Single Row Marque Tool Delete anchor Point Tool MAKING SELECTIOReNctSangular Marquee Tool M Dodge Tool O Pen Tool PĮlliptical Marquee Tool Sponge Tool O Add Anchor Point Tool Teach yourself Photoshop Slice Tool C Background Eraser Tool E Polygonal Lasso tools hairs in your selections Of pixels in your photographs with the Magnetic and including complex, fine details such as fly-away Round up a more complex selection Make more convincing composites by
#PIXELSTICK BMP BIRD IMAGES ON A BLACK BACKGROUND HOW TO#
Your images using Photoshop’s simple rectangular and quickly and intuitively using a brush in theĮlliptical marquee selection tools Quick Mask editing modeĦ6 How to use the 76 Perfect your selections You can do this with the eraser tools select and even edit this path laterĦ4 Photoshop’s marquee 74 Editing selections inĬreate and modify basic selections in Fine-tune a selection marquee Sometimes you’re not trying to cut out With the Pen tool you can create aĪn object, merely erase unwanted surroundings, and pixel-perfect ‘path’ around the object you want to Here’s how they work to create selectionsĦ0 How to use Photoshop’s 70 How to make preciseĮraser tools selections with the Pen tool Tools are the simplest way to select irregularly-shaped tools that use colour and tone differences in the image The Magic Wand and Quick Selection Isolate more complex objects using Learn how to make, modify and perfect them here…ĥ6 Photoshop’s selection 68 Photoshop’s intelligent Selections are the cornerstone of creative compositing. This makes the shadows and highlights match the Emboss section. Shading section, set Angle to 23 degrees and Altitude to 48 of the lighting will match the settings used in the Bevel &ĭegrees. Click the Down Click the Inner Shadow attribute to activate and editĭirection box. Set the StyleĬtrl+T and drag to rotate the text at an angle. the Layers panel to summon the pop-up list. Click the fx icon at the bottom ofĪs Source Sans Pro. The Font menu in the Options bar to a bold font such text will vanish. Set Set the text layer’s Blend mode to Darken. So experiment with other attributes in the Layer Styles panel BEFORE Layer Styles have to offer in relation to your creative projects, In this tutorial we’re only scratching the surface of what Layer Style so that the shadows and highlights in the 3D text You could also change the lighting of the Granite pattern added to it to make the text easier to read.Ī Blend mode helps to mix the original stone with the We’ve used the Emboss Layer Style to give the flat 2D text Used Layer Styles to make it look like it’s carved in stone. The freedom to tweak your text at any time, even after you’ve You would with a word-processing package. That you can edit to change the font and characters, just as The Horizontal Type tool produces filled vector shapes You can adapt the technique to create your own Starting image courtesy of the Type tool, Blend modes and In this tutorial we’llĬhisel some text into the stony surface of our Your images with a huge range of creative effects P hotoshop’s Layer Styles enable you to enhance Style to add simulated depth and lighting effects tree and mountain will be adjusted.Įnhance your photos with embossed text using a Layer Only layers matching the attribute will be visible. Set the adjacent menu to choose a specific below it, choose Layer>Create Clipping Mask. Panel, set the filter drop-down menu to look for attributes of all of the layers below. At the top of the Layers the adjustment layer at the top. Despite labelling and grouping layers it can still take a Set the Filter back to Kind to reveal all the layers.
0 notes
Photo
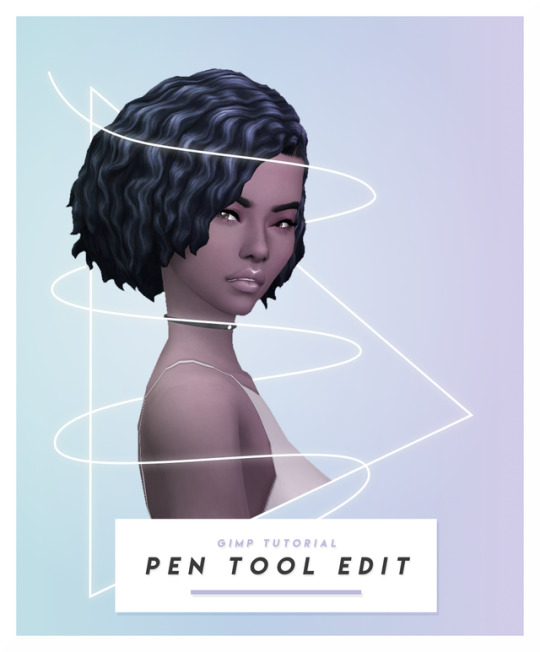
♡ PEN TOOL EDIT - GIMP Tutorial ♡
The Pen Tool (Paths Tool) can be very handy! This tutorial will teach you how to use the pen tool in two different ways. You can download GIMP for free here. Keep reading for the tutorial.
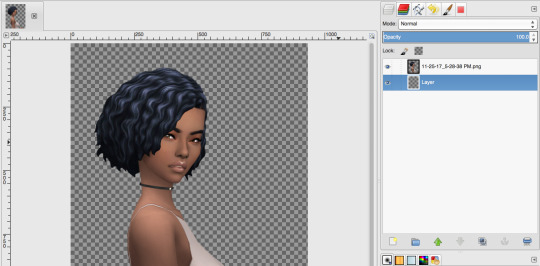
Step 1. Start by cutting out your sim with a transparent background layer. You can find a tutorial here.

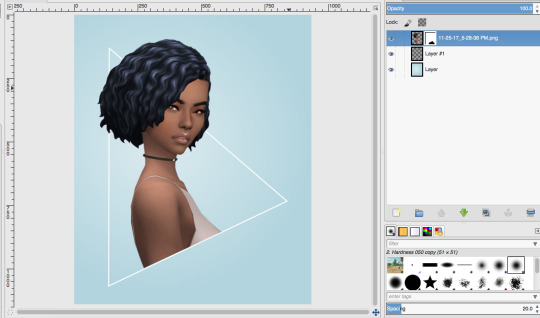
Step 2. On the transparent background layer we are going to add a gradient. Select the Gradient Tool and choose two colors, I used two different light blues. Make sure you have selected FG to BG and I chose a radial shape. I also quickly clicked the reverse tool to make sure the lighter color was in the middle. Click and drag to add the gradient.

Step 3. Next we will add a new layer that our shape will be on. Click the new layer icon and choose Transparency, click OK. Make sure this layer is between your background and sim layer.

Step 4. Let’s get into the Pen Tool (Paths Tool). Click on the Paths Tool Icon and choose a color you will want for the stroke (line). I chose white. To create a shape we will make sure that Polygonal is checked. Create the shape by creating the first point, second point, third point and then connect to the original point by holding CTRL (COMMAND on Mac) and clicking the original point.

Step 5. To add the stroke we are going to click Stroke Path. Make sure you have solid color selected and then you can change the line width to whatever you would like, I chose 4.0px. You can mess with the Cap and Join style if you want. Click Stroke when done.

Step 6. Now we are going to hide the bottom of the sim that is outside of the triangle. Make sure you are on the SIM LAYER and then take the Free Select tool and outline your sim below the triangle. Next go to Select>>Invert. This will flip the selection.

Step 7. Then we are going to right click on the Sim Layer and choose Add Layer Mask...

Step 8. From the options you are going to select Selection. Click Add.
Step 9. That selection should now be hidden and your layers will look like this ^

Step 10. Let’s try some curved path now. Create a new transparent layer and drag it to the top this time. Take the Paths Tool again but this time make sure to uncheck Polygonal. Click to make the first point and then click and drag to create the second point but you will see that the path is starting to curve.
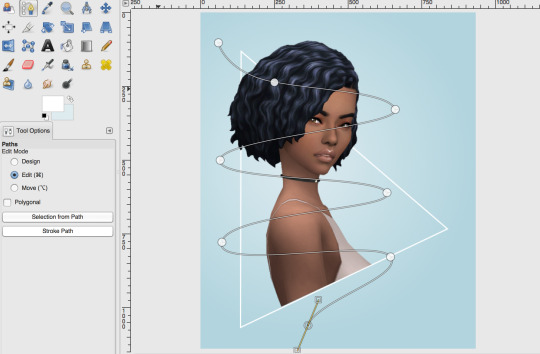
Step 11. Continue to click and drag down and across the image to get something like this. This may take a couple tries but the more you experiment, the easier it will get :) Once again click on Stroke Path to create the stroke.

Step 12. We are going to delete a couple of the selections from the path we just made. Grab the Free Select tool again and select a portion that is covering the face. To delete that selection go to Edit>>Clear. To deselect, go to Select>>None. I deleted every other line that was covering the sim.

Step 13. To add an outer glow to this path we just made, go to Filters>>Light and Shadow>>Drop Shadow...

Step 14. Set the Offsets to 0, I set my Blur Radius to 25 but you can play around with that. The color I chose for my glow is #ffffe3 and I set the Opacity to 70. Click OK to apply.

Step 15. You can apply the glow to both the curved path and the triangle, mind looked like this.
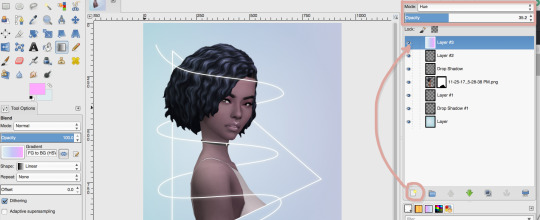
Step 16. I am going to add a little coloring to my image by creating a new transparent layer and applying a light blue to magenta gradient. I set that layer to Hue at about 35%.
Step 17. I then duplicated that gradient layer by pressing the duplicate icon at the bottom of the layers window. I set this second layer to Overlay at about 35%.

Step 18. The last thing I will add is a Border. Go to Filters>>Decor>>Add Border...
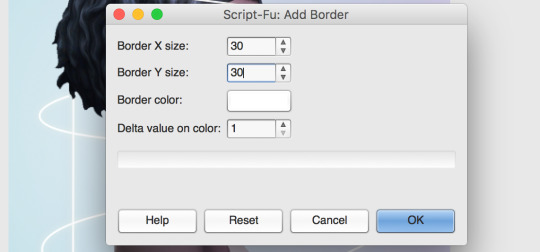
Step 19. I set the Border color to white #ffffff, the size is at 30 and I removed the delta value by changing it to 1. Click OK.

Here is the image! I hope the tutorial was helpful! Remember to practice and keep trying! :D
540 notes
·
View notes
Text
Vector Graphics: Mastering Adobe Illustrator
Vector graphics, unlike raster graphics, are composed of mathematical equations defining lines and curves. This makes them infinitely scalable without losing quality, a crucial advantage for various design applications. This inherent scalability is a key reason why institutes like MAAC Institute, which offer comprehensive training in graphic design and multimedia, emphasize the importance of vector graphics in visual communication. Adobe Illustrator, a powerful vector graphics editor, is the industry-standard tool for creating and manipulating vector artwork.
Understanding Vector Graphics
Points and Paths: Vector graphics are built from points connected by paths. These paths can be straight lines or curves, and they define the shape of the object.
Scalability: Vector graphics can be scaled up or down without losing quality. This is because the mathematical equations that define the shape remain unchanged.
Layers and Groups: Vector graphics can be organized into layers and groups, making it easier to manage complex designs.
Color and Fill: Colors can be applied to shapes using solid colors, gradients, or patterns.
Key Features of Adobe Illustrator
Pen Tool: The Pen Tool is the cornerstone of Illustrator, allowing you to create precise paths and curves.
Shape Tools: Illustrator offers a variety of shape tools, including rectangles, ellipses, polygons, and stars.
Type Tool: You can create and manipulate text in various fonts, sizes, and styles.
Color Panel: The Color Panel allows you to choose colors, create gradients, and apply color effects.
Effects Panel: You can apply various effects to your artwork, such as drop shadows, blurs, and 3D effects.
Blend Tool: The Blend Tool allows you to create smooth transitions between shapes.
Pathfinder: The Pathfinder panel lets you combine, subtract, and intersect shapes.
Creating Vector Graphics with Adobe Illustrator
Setting Up Your Document:
Choose a suitable artboard size and color mode (RGB or CMYK) based on your project's requirements.
Drawing Basic Shapes:
Use the Rectangle Tool, Ellipse Tool, and Polygon Tool to create basic shapes.
Use the Pen Tool to create more complex shapes and curves.
Working with Paths:
Use the Direct Selection Tool to edit individual anchor points and paths.
Use the Pathfinder panel to combine, subtract, and intersect shapes.
Applying Color and Effects:
Use the Color Panel to apply colors, gradients, and patterns.
Use the Effects Panel to add shadows, blurs, and other effects.
Creating Text:
Use the Type Tool to create text and apply fonts, sizes, and styles.
Convert text to outlines to edit it as a vector shape.
Exporting Your Artwork:
Export your artwork in various formats, including AI, EPS, PDF, SVG, and PNG.
Real-World Applications of Vector Graphics
Logo Design: Vector graphics are ideal for creating scalable logos that can be used on various media, from business cards to billboards.
Illustration: Vector graphics are used to create illustrations for books, magazines, and websites.
Web Design: Vector graphics can be used to create icons, buttons, and other web elements.
Print Design: Vector graphics are used for print design, such as brochures, flyers, and posters.
Mobile App Design: Vector graphics are used to create icons and other UI elements for mobile apps.
Tips for Mastering Adobe Illustrator
Practice Regularly: The more you practice, the better you'll become at using Illustrator.
Learn Keyboard Shortcuts: Keyboard shortcuts can significantly speed up your workflow.
Experiment with Different Techniques: Don't be afraid to experiment and try new things.
Break Down Complex Shapes: Break down complex shapes into simpler shapes.
Use Layers Effectively: Organize your layers to keep your artwork clean and manageable.
Learn from Tutorials: There are many online tutorials and courses available to help you learn Illustrator.
By mastering the art of vector graphics with Adobe Illustrator, you can create stunning visuals that are both beautiful and functional. This is why institutes like MAAC Institute Pune, with their focus on graphic design and multimedia, provide in-depth training in Adobe Illustrator and its applications. Whether you're a graphic designer, web designer, or illustrator, a strong understanding of vector graphics will be a valuable asset in your toolkit..
#vfx animation#graphic design#2d animation#ui ux design#game design#vfx course#special effects#animation
0 notes
Text
Demon Girl Edit
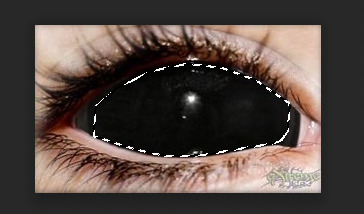
I tried this edit around five times on three different images and black eyes. I definitely wasn’t as simply as I thought but the final edit looks really good. The lighting on the right side of the image isn’t great and brightening it doesn’t help with the shadowing so to take the image/edit further I might use some filters or a different image altogether. I got the full black eye images that I used off the internet. I also chose this image because the eyes were the biggest and the lighting on the eyes was the best. First I tried using the quick selection tool but it would cut off the lashes as well so I just used the polygonal lasso tool.


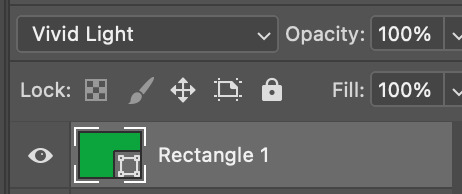
These are three different filter’s I’ve put over the edit that I then sent off, along with other edits from this project, to get printed so I can do an image bleaching process that will give the edits/images a weird effect.


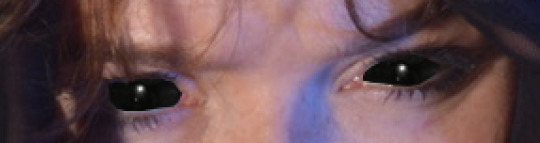
This is an edit that I plan to use as a double page in my magazine. I think the image I picked for this demon girl edit works so much better as I’m able to cut the entire model out and take it further but experimenting with backgrounds and filters. Like my previous edit, I tried using the quick selection tool to cut the eyes out but it wasn’t working so I cut it out using the polygonal lasso tool instead. I used the same black eye as my previous edit, I cut the eye shape of the black eye out but expanded it a bit to fit under all the space of the original cut out of the eyes. I wanted to add some colour to it, so I merged the layers of the model cut out and the black eyes.
I then took a weird/distorted background from my Trends FMP Pinterest board and dropped it onto a new A4 canvas in Photoshop.

0 notes
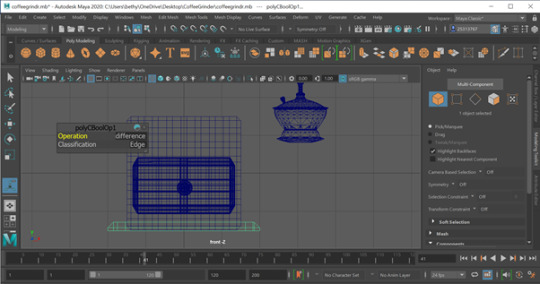
Text
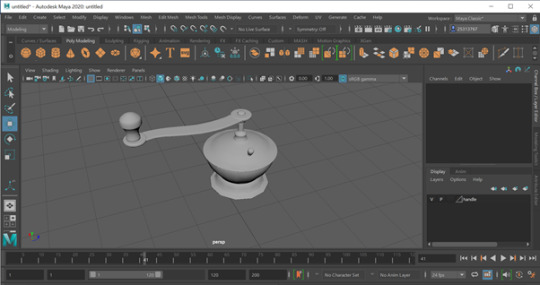
CGI Principles- Coffee Grinder
The second model was a vintage coffee grinder. This one had more three dimensional, curved shapes to it which meant that I would have to learn more tools. Additionally, this task did not have blue prints so I took some artistic liberty on this model, regularly referring to the references provided.
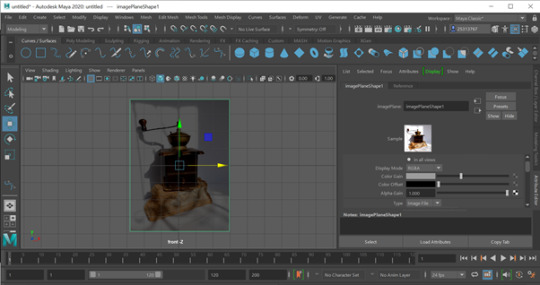
To begin, I set a new project for the files of this task to be saved to before importing the clearest reference image into an image plane. I then altered the opacity of this in the attribute editor so that I could sketch over it and clearly see my lines.

I used the Bezier curve tool, a tool that is also used in graphic design (usually to create vectors) to draw out half of the metal housing.
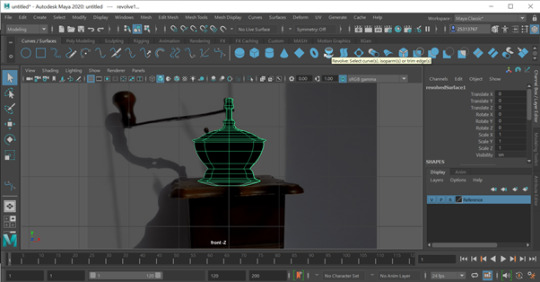
Using the revolve tool, the software completed the rest of the shape. The direction of the mesh had to be reversed, as using this tool inverts it.

This same method was used for the handle of the coffee grinder.
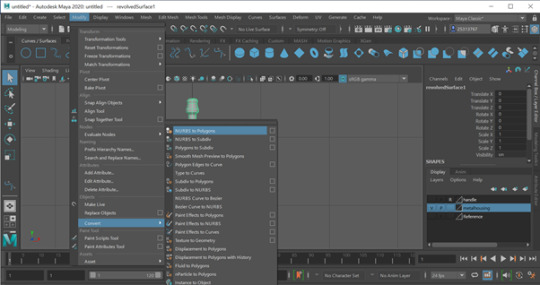
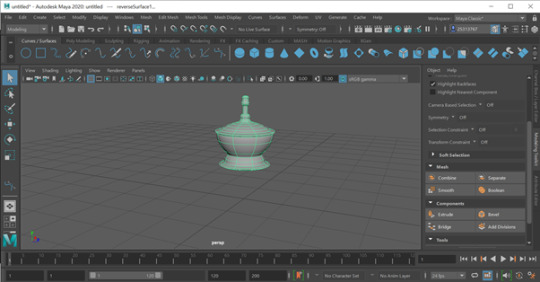
Using modify > convert, I converted the NURBS to a polygon, which are easier to manipulate as I need them.

I then used mesh > fill hole to complete the areas that were not entirely filled in when using the revolve tool, as my mesh wasn’t originally connected.

I then had to reset the pivot point of the mesh’s, as they had unaligned when converting them to polygons. Afterwards, the detailing was attached to the metal housing.

I couldn’t see the top of the grinder’s handle very clearly in the provided reference images, so I found one similar and clearer to model from.

I returned to the method used in my elephant model, where I took a primitive cube and added edge loops, before modifying the vertices so that they took the shape of the handle.

This new shape was then bevelled and scaled down on it’s Y axis.

I then added primitive cylinders to the ends of the handle to act as connectors to join to the knob and the metal housing.
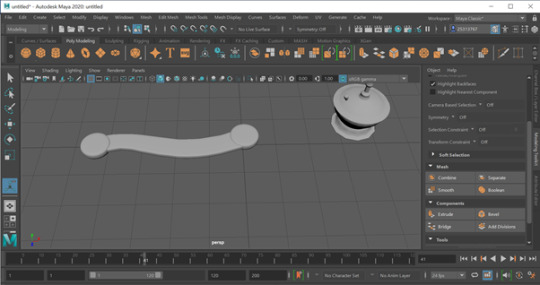
These were then bevelled, combined, and smoothed using the tools in the modelling toolkit.
All these pieces were connected, taking into consideration the scale of each piece. At this point, I heavily referred to the reference provided to ensure pieces were not over or under sized in anyway.

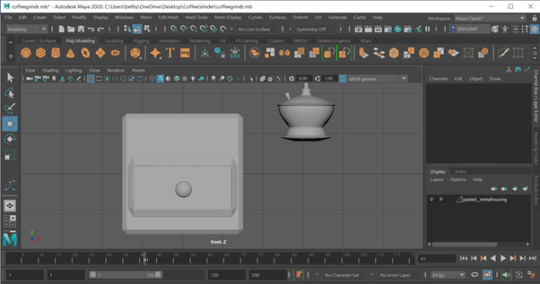
I then moved onto the wooden base of the grinder. The first element of this was quite simple, as it was just a primitive cube with divisions added to it, which was then bevelled.

I found the drawer of the base to be quite challenging to begin with. I bevelled a primitive cube and wanted to inset the face, so that it had a sort of lip to it as it does in the reference. However I found that selecting the main face and extruding was not working, so instead I selected the faces around it and used the transform tools to move them forward. This method broke part of the mesh, however this is hidden inside of the main block of the base so I feel that on this occasion it doesn’t matter too much. In future, I would like to find a better method to work around this error so that the mesh does not become broken.
I took the handle for the drawer from that which is on top of the metal housing, as this not only saved time, but I believe adds some uniform to the piece. I feel as though it made the model feel like a mass-produced item, should it appear in the real world.
For the lower base of the wooden section, I bevelled a primitive cube before adding a second cube and positioning it so it flattened the bottom. I then went to booleans > difference to remove the mesh that I did not need.

In the same essence of the handle, I copied and resized the base. This method meant that the grinder did not have the spectacular curves that appear in the provided reference as I found it difficult to make the CV curves tool to work, but I believe this method is still effective and is similar to that of other vintage coffee grinders.

I then separated the pieces as I needed them to add the individual textures. I made the metal housing metallic with a subtle sheen to it (to add to the vintage look) and ensured the wooden part was rough and had very little sheen to it.
Here is the final model after adding some lighting and shadows.


Overall, I feel as though I managed to achieve the main points of modelling this coffee grinder. I found the revolve and curve tools useful for creating symmetrical shapes and would like to experiment with these tools in the future. I would also like to practice more with shading and lighting, as I feel as though the wooden texture could be more believable.
0 notes
Text
Inner Space - Process 1
Shoes - Illustrator

To create my inner space piece I began by tracing over an image of men's formal shoes, I did this using the paintbrush tool in Illustrator and a touchpad. I could've used a tablet to have more control and smoother lines, but with the grungy sci-fi style I'm going for, the naturally jagged lines from using the touchpad are perfect. I wanted the illustration to be balanced between messy and clear, so once I was happy with it I grouped all the objects together into one. Next I opened this into 'effect > 3D > extrude & bevel' which allowed me to adjust/experiment with the options, here I set the surface to 'wireframe', increased the extrude depth, re-angled all 3 dimensions etc. Once finished I exported the piece as a PNG with a high resolution, I also set the background as transparent so only the drawing is saved.
Grid Landscape - Illustrator

The other aspect of the outcome is a grid landscape which I created using the perspective grid tool, this displayed a temporary grid but not with the correct perspective I needed. To change this I went into 'view > perspective grid' and selected 'one point perspective', a more corridor like perspective.

Next I used the rectangular grid tool to draw out the surfaces, doing so I varied the size and placement of these grids to keep it more interesting. I really like how some of these platforms look like they're floating, because it adds sci-fi and mysterious aspects to the piece.

I then used the rectangle tool to draw out more floating shapes on the sides, I think this looks more interesting than if they were solid walls on the ground because it defies reality. With the same tool I replaced the fill with bright red and laid them over the black shapes, depending on the placement I rearranged some of them to the back. This adds colour to the piece rather than covering it, especially important for the grid pattern to show through.

Last but not least I incorporated shadows to create a more realistic look, although the landscape is very surreal, by adding realistic features, the piece comes to life as we can relate our reality to it. To do this I used the pen tool the draw the shapes of the shadows accurately, with this I opened the 'gaussian blur' effect which softened the edges as a shadow doesn't usually have clear, crisp edges. I then set the opacity to 50% so they only affected the colours, not covered them. The placements of these shadows were carefully decided, I imagined light coming from the left which helped me see where they must go. Once I was happy I again exported it as a PNG, with no background and a high resolution.
Editing - Photoshop

Having created both the shoes and landscape in Illustrator, I brought them both into Photoshop which had a background fill of rich blue. I placed the shoes on top of the platform so it looked like somebody's standing on it, I also added a duplicate with a white colour overlay because of the darker colours behind. I think having the black version of the drawing slightly offset behind, is a subtle but effective way to enhance the contrast and clearness even more.

Next I created a shadow for the shoes by duplicating and flipping it vertically, I then selected 'edit > transform > perspective' which allowed me to drag/slant the object sideways. When doing this I kept in mind the direction of light, so like the previous shadows it would cast to the right. Because it's a shadow you would only see it on a platform, therefore I used the polygonal lasso tool to delete any of the shadow outside of the floor.
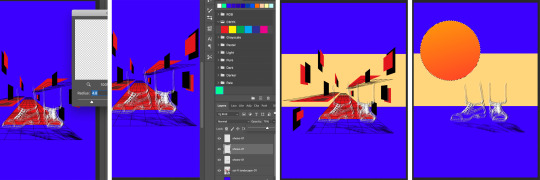
For a more realistic shadow I then softened it using the 'gaussian blur' filter and opacity, this made it stand out less as it's important but not the main focal point. I also incorporated a strip of light colour through the middle of the canvas, bringing in contrast as I think the background looked too boring/plain. Next I drew a circle with the ellipse tool and filled it with a gradient, this represented the sun and source of light which form the shadows.

After this I felt that the piece had too many dark and rich colours, which resulted in looking too busy, messy and unclear. Therefore I selected all the red with the magic wand tool and filled it with light turquoise, however where the shadows were already made on the landscape it didn't select this section. Therefore I selected around these shapes with the polygonal lasso tool, filling them in with the same turquoise as shapes. I then blended it using the 'soft light' option, so it remains a darker shadow. Because this and the beige strip is a light colour, I has to swap the black shoes to lie on top of the white to make it clearer.

0 notes
Text
Digital Collage Experiment: 1
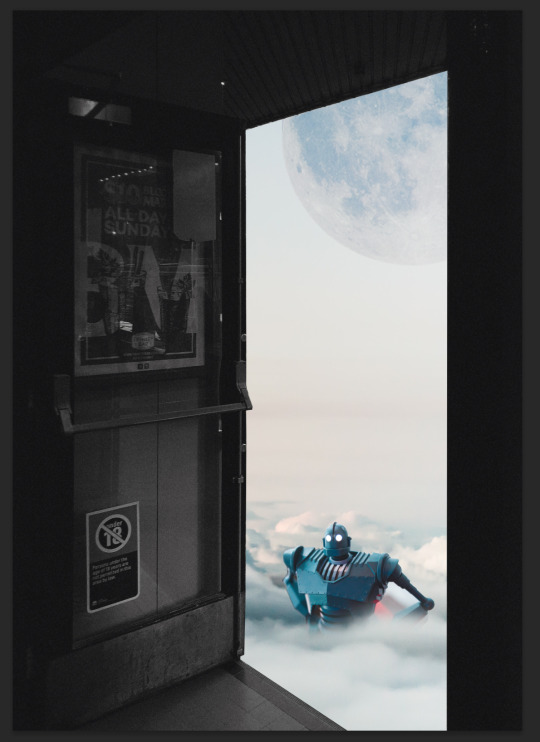
The first step of my digital collage was removing the parts of the image I wanted other images to show through. In this case, that’s everything within the doorway.
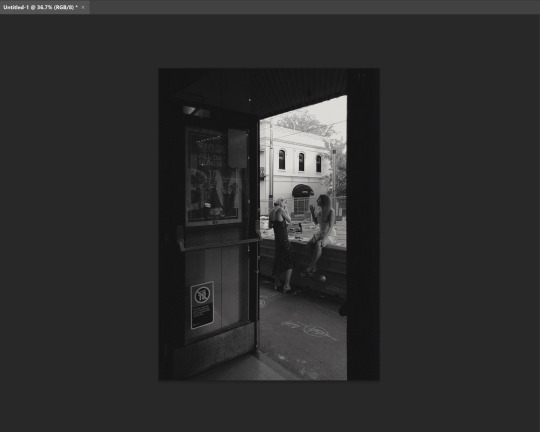
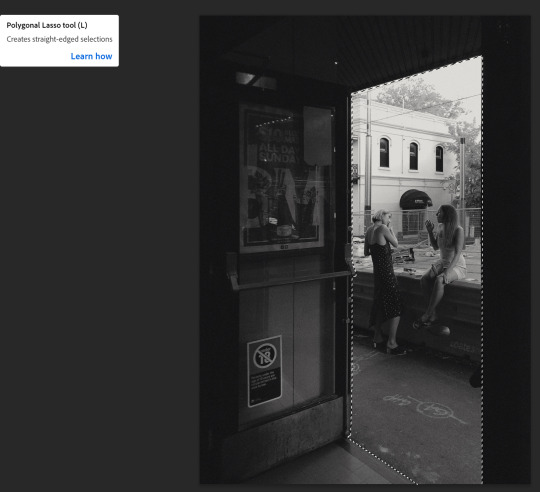
To cut around the shape of the doorway I used the Polygonal Lasso tool. This is a selection tool that makes selections using only straight lines. I thought this was ideal for the rectangular shape of a doorway, and you can see the selection around the doorway in the image below. I then proceeded to delete this part of the image by pressing the DEL key, which only works when the image is rasterized.
For the next step, I pressed CTRL+SHIFT+P to place an image. Here is where I selected an image taken of some clouds that I found on Pexels. I moved the image around to the ideal placement, as some of the image featured mountains. As I wanted the image to just be sky, I made sure the mountains were outside of the artboard.

As the doorway was now a hole in the image, I was able to bring the sky down a layer. This produced the effect of the sky being outside the doorway that you see below. This is the first instance of the design becoming more of a collage.

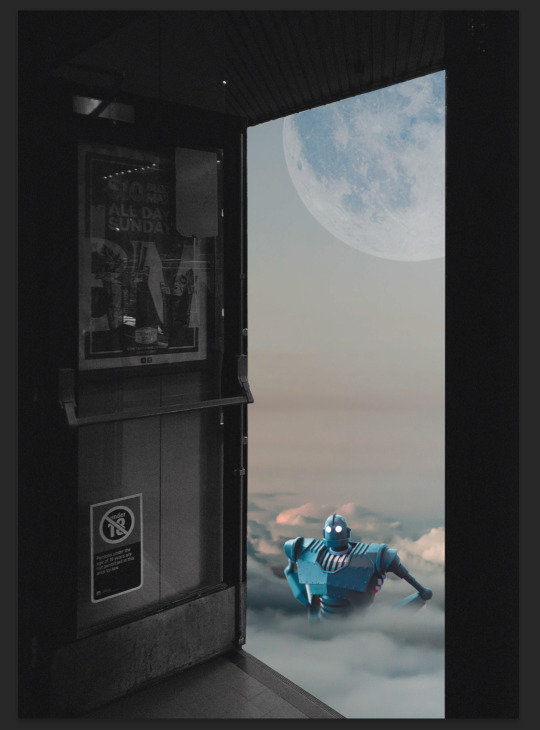
My next step in my design was to incorporate a moon into the sky. I found this image of the moon which I imported using the same CTRL+SHIFT+P shortcut. The resolution of this image was the same dimensions as the artboard so I didn’t have to worry about placement yet.

For this step I scaled up the image to the size of the moon I wanted, and rasterized the image. This allowed me to use the Ellipse Selection tool whilst holding SHIFT to create a perfect circle around the shape of the moon. This created a selection around it, but I wanted to delete everything other than the moon. I did this by pressing CTRL+SHIFT+I which inverted the selection to everything on the artboard other than the moon, which I deleted by pressing DEL. Finally I moved the moon to where I wanted within the design.

After looking longer at the placement, I decided to move the moon to the corner of the design. I did this by scaling up the moon and moving its layer to below the doorway layer but above the sky. This meant the moon would appear to be in the corner of the doorway. It also looked very unnatural in colour because of it coming from a different image, as well as it being daytime in my image. I combatted this by reducing the opacity down to 45%.

Using the CTRL+SHIFT+P command I had used previously, I brought an image of a toy robot into the design.
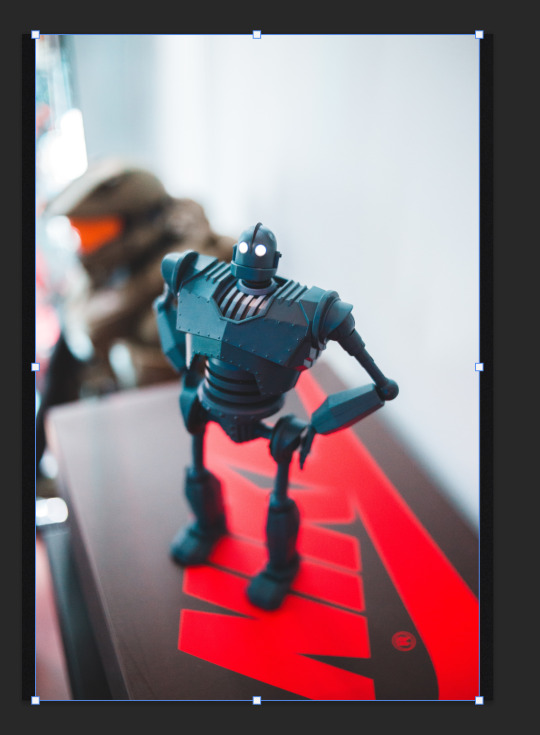
I scaled down the robot and proceeded to start removing the background of it using the Polygonal Lasso tool. I didn’t intend on keeping the legs of the robot visible so I didn’t bother trying to select them. This is fortunate as the legs are out of focus and therefore would of been hard to include.
To make the robot appear to be poking out the clouds, I needed to use a clipping mask. To do this, I drew a selection using the Polygonal Lasso tool which went across the robot and outside the hole in the doorway image. Then, with the robot layer selected, I held ALT and pressed the clipping mask icon in the layers panel. This means the robot will only show outside of that area I selected.

Because it the robot is emerging out of clouds, the clipping mask shouldn’t be a clean cut line. To counter this, I pressed the link symbol on the robot layer and selected just the clipping mask. I then went to Effects > Blur > Gaussian Blur and dragged it along to what I felt was an appropriate level of blur for the image.
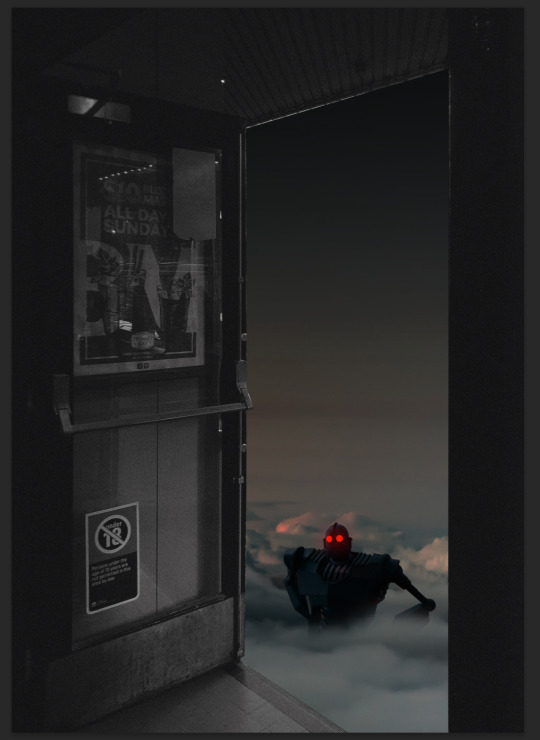
After looking at the image, I felt that the sky looked too bright. As the moon has a lowered opacity, there was no need to adjust the darkness of the moon as the sky would show through. To darken the sky, I made a Brightness/Contrast layer above the sky and dragged down the brightness slightly.
The next step was to try and make the toy robot look like it fit into the image better. I did this by by using the Camera Raw window in the Effects drop down. This allows you to edit the values of the photo. For the robot, I increased the black and shadows, and I decreased the highlights. This gave me the darkened outcome you see below.

However, after making the robot darker, I felt the whole image could do with being darker. However, I didn’t want to decrease the whites in the cloud. To achieve this, I created a gradient using the Gradient Tool. This gradient was black with 100% opacity to 0% opacity. This produced the outcome you see below.

I moved the gradient down slightly and removed the moon because I didn’t feel it added much to the design. I also slightly lowered the opacity of the gradient as I felt it was too dark at the top.

To match the black of the gradient, I went onto the Brightness/Contrast and increased the contrast of the sky.

For this step, it was as easy as going in and creating some red ellipses over the eyes. Once I had lined them up correctly, I selected them both by holding SHIFT and clicking the other eye. I then pressed CTRL+E which merged them together into one rasterized layer.

To create the glowing red eyes, I selected my rasterized layer with both eyes and right clicked it in the layers panel. I then pressed Blending Options and went to Outer Glow. Here is where I was able to change the glow colour to red and increase the spread to make it more obvious they are glowing.
Using CTRL+SHIFT+P I brought an image of a starry sky. Because it was a landscape image, I scaled and placed the image in the way I thought was best suited to the layout of the design.

For this step, I cut off the bottom of the image using the Polygonal Lasso tool. This is the part of the image that contained the silhouette of trees. I then desaturated the image by pressing CTRL+SHIFT+U. To stop the stars going over the doorway, I brought the layer down to the one above the sky.

I also applied a clipping mask using the Polygonal Lasso tool. I selected around the clouds I didn’t want to be covered by stars and selected around the door way. With this selection active, I pressed on the star layer and clicked the clipping mask icon in layers whilst holding ALT. This produced what you see below.

To make sure the sky blended with the stars, I set the star layer blending mode to multiply. Then I clipping masked the stars to the black gradient by dragging the stars to the layer above the gradient. Whilst holding ALT, I hovered over the bottom of star layer and left clicked when an arrow appeared. This applied the gradient’s opacity to the stars.
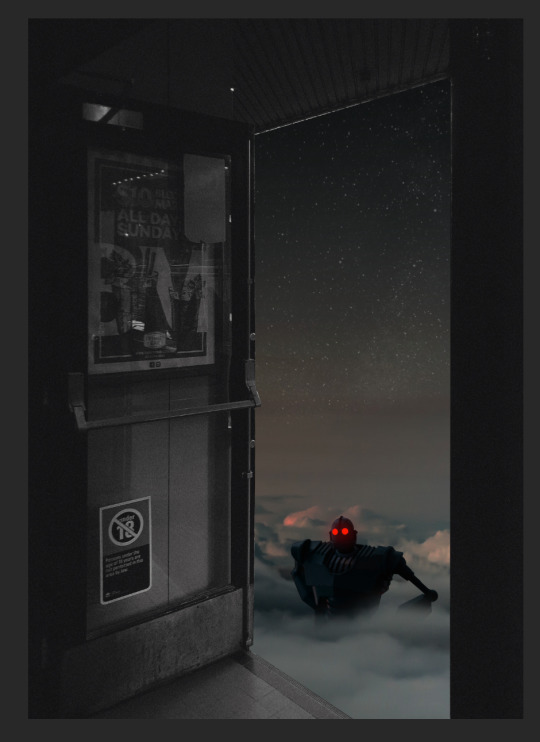
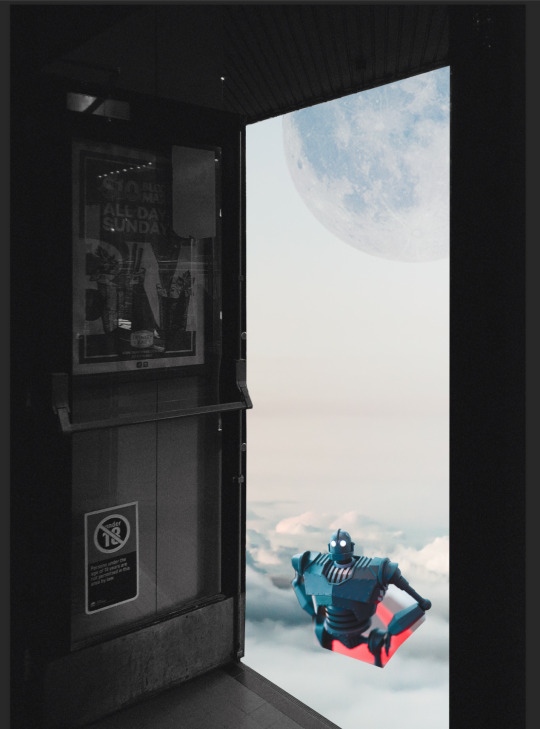
After the stars had been added, I took a look at the overall aesthetic of the image and decided the overall appearance was too cluttered. I therefore decided to hide the starry sky layer after all.

I also came to the conclusion I didn’t like the doorway either. I also hid this layer which left what you see below. Despite putting so much work into other elements of the design, I felt that less is more in this case.

The final step of my design was to add the moon back in. I scaled it up and placed it in the top left of the design. However, I felt it was too prominent in previous versions so decided to lower the opacity and apply a Gaussian Blur. I am very happy with the final product of my collage.

0 notes
Text
Best PC Games to Play in 2021
https://ift.tt/eA8V8J
We’re entering a golden age for PC gaming. The next generation of graphics cards are capable of pumping out 4K graphics and high FPS on almost any big name release, and real-time raytracing is taking graphics to new heights that weren’t possible just a couple years ago.
Add in Sony bringing more PlayStation ports to the PC and nearly every Xbox exclusive making its way to PCs as well, and a high-end gaming computer looks to be the definitive way to play almost anything over the next few years.
The following is a list of the most anticipated games coming to home computers this year. While release dates are always flexible, these are only titles that have already been released or officially confirmed for 2021.
Back 4 Blood
June 22 | Turtle Rock Studios
Despite persistent rumors of a third Left 4 Dead game entering development, it’s been more than a decade since Valve has released a new entry in the beloved co-op zombie series. Enter Turtle Rock Studios, the studio behind the original Left 4 Dead game, with a spiritual successor, Back 4 Blood.
By all accounts, Back 4 Blood plays a lot like Left 4 Dead. There are safe rooms, tons of melee weapons, an AI director who constantly changes things up, and zombies. Lots and lots of zombies. But there will also be perk cards that add interesting perks and buffs to the experience, making each playthrough unique. If Back 4 Blood can capture the spirit of the original Left 4 Dead, it should be fantastic.
Chivalry 2
June 8 | Torn Banner Studios
Chivalry was once considered one of the PC’s premier multiplayer titles. Could the sequel follow in its footsteps? We’ll find out pretty soon when Chivalry 2 launches exclusively on the Epic Games Store. According to Torn Banner Studios, the sequel aims to deliver combat that’s deep enough to keep players interested for awhile, yet easy for newcomers to pick up for the first time.
The latest gameplay videos show off lots of brutal medieval melee combat, with battlefields absolutely drenched in blood after a few minutes of 64 players hacking away at each other. This should be on your must-buy list in June!
Deathloop
May 21 | Arkane Studios
The best way to describe Deathloop is Hitman meets Groundhog Day. You play as Colt, an assassin stuck on a mysterious island, who must take out eight targets before midnight. If you die or fail to eliminate all targets, the day resets, and you’ll have to start all over again. And all the while you’re also being hunted by Julianna Blake, a rival assassin who doesn’t want you breaking the time loop. She can be controlled by either the AI or another player.
Arkane has a great track record when it comes to unique first-person games like Prey and the Dishonored series. If Deathloop’s heady concept can hold up, it could be another home run for the developer.
Diablo 2: Resurrected
TBA | Vicarious Visions
While Diablo III’s reputation has improved substantially since its controversial 2012 launch, there’s still a vocal group of gamers who prefer the second game in Blizzard’s genre-defining action RPG series. Knowing how much this game means to a lot of people, Vicarious Visions has said it’s not out to reinvent the wheel for Resurrected. The updated 3D graphics will display in 4K, but you can switch back to the original graphics at any point with the press of a button.
And while there will be some quality of life improvements like a shared item stash and automatic gold pickup, don’t expect any revolutionary changes that will spoil the original experience. This should be exactly what we need to tide us over until Diablo IV hits.
Evil Genius 2: World Domination
March 30 | Rebellion Developments
It’s taken 17 years to get a sequel to the criminally underrated Evil Genius, but it’s finally here. If you never had the pleasure of playing the original, imagine being a James Bond villain and managing your own secret lair to build a weapon of mass destruction and eventually take over the world. Yeah, it’s pretty awesome.
World Domination promises to be a bigger and better sequel. You’ll be able to pick from four different evil geniuses at the start of the game and one of three islands. Each minion in your lair now has their own personality and traits, so you’ll have to use them more strategically than ever to prevent the Forces of Justice from foiling your evil plans.
Far Cry 6
TBA | Ubisoft
Far Cry 6 was originally supposed to be out by now, but development has slowed due to the Covid-19 pandemic. It’s still expected to be out in 2021, though. According to Ubisoft, the theme of the game is revolution against an oppressive government, with substantial research going into how and why revolutions are fought to better develop the game’s setting and story.
Ubisoft certainly picked the right actor to lead an oppressive government, with Breaking Bad and Mandalorian villain Giancarlo Esposito portraying the nefarious “El Presidente” who we’ll be looking to topple later this year.
Final Fantasy XIV: Endwalker
TBA | Square Enix
After one of the worst MMORPG launches ever, it’s a miracle that Final Fantasy XIV is still around a decade later. Not only did Square Enix turn things around, this game is now regarded as one of the very best in the genre.
Endwalker, the game’s fourth major expansion pack will conclude the story of the warring gods Hydaelyn and Zodiark, which has been running since the game’s 2013 relaunch. This won’t be the end of the MMO, though. Square still says it has several years worth of stories to tell.
Along with the obligatory new zones and quests, Square has promised two new classes. The first one shown so far, the sage, is a healer who battles with floating swords.
Guilty Gear Strive
April 9 | Arc System Works
The Guilty Gear series has never quite received the same attention as fighting games like Mortal Kombat and Street Fighter, but the franchise has quietly earned a reputation as a technically sound alternative for the competitive fighting game community.
The footage of Guilty Gear Strive released so far looks stunning. Arc has perfected the 3D polygonal character on a 2D plane, and the gameplay promises to be more accessible than ever, with the addition of a new dash button and a “wall-stick hit-state” which allows characters knocked into walls to slide down and continue fighting back.
Halo Infinite
TBA | 343 Industries
Halo may be Microsoft’s flagship franchise, but it’s always had a complicated relationship with the PC, with entries only being ported years after their initial release on Xbox (if at all). Halo Infinite will be the first mainline entry in the series to show up on both console and PC at launch, and it’s currently expected some time in the fall.
Halo Infinite’s public unveiling last year didn’t quite go as planned, with footage receiving a rather frosty reception from most fans. There are a lot of rumors of development troubles online, but Microsoft has a good track record of pulling its Halo games together in time for release, so hopefully we’ll end up with another classic game in the series later this year.
Hitman 3
January 20 | IO Interactive
Hitman 3 makes murder fun. Yes, there’s a lot of murder in video games, but true to its namesake, Hitman is more about the setup than the execution. No other franchise has perfected the thrill of expertly sneaking into an area, tracking down a target, and setting up an unfortunate “accident” to get away unscathed. Or just go in guns blazing like a maniac if that’s your kind of thing.
With Hitman 3, you can even import levels from the previous two games to get the full “World of Assassination” experience, but expect further updates throughout the year, including ray tracing.
Humankind
April 22 | Amplitude Studios
As popular as the Civilization series has become over the last three decades, it’s surprising that few developers have been up to the challenge of developing a competitor to Sid Meier’s classic creation. Humankind could be up to the task, though. You’ll lead your civilization across six different eras of human history, selecting one of 10 different civilizations in each era. You can handle relations with other societies diplomatically, but if that goes south, combat is handled as a tactical RPG.
Developer Amplitude Studios has been dipping its toes into the 4X genre over the last decade with the well-received Endless Space and Endless Legend, and now the team are looking to apply everything they’ve learned from those games into Humankind.
Mass Effect Legendary Edition
May 14 | BioWare
Gamers have been clamoring for a re-release of the Mass Effect trilogy for years, and the Legendary Edition looks to exceed expectations. All three games will support 4K resolution, higher frame rates, and new graphical effects. The original Mass Effect in particular has seen a number of improvements akin to a partial remake, with improved combat, re-tooled enemy AI, and a faster Mako vehicle for traversing the Milky Way’s many planets.
While the Legendary Edition will include almost all of the DLC from the original trilogy (including some rather awesome add-ons like Lair of the Shadow Broker and Omega), BioWare has also announced a few omissions. Mass Effect 3’s lauded multiplayer mode isn’t going to make the cut, and Pinnacle Station, a much-maligned arena style add-on for the first game won’t be included either due to the loss of its source code.
New World
August 31 | Amazon Games
Amazon has had its sights set on the gaming world for quite some time, quietly pumping money into a number of projects, and New World could be its breakthrough hit. In this MMORPG set on an unnamed land in the Atlantic Ocean in the 1600s, you’ll wield bows, hammers, hatchets, magical staffs, musket rifles, spears, and swords against a variety of fantastical creatures. There will also be plenty of opportunities to gather resources, craft and build settlements. Best of all, there’s no monthly fee to play.
Launching a new IP is always difficult, and MMOs are a particularly difficult genre to break into, but if any company has the resources to succeed, it’s Amazon.
Resident Evil Village
May 7 | Capcom
There was already a ton of hype for the eighth main installment in the Resident Evil franchise following its initial reveal last year, but the introduction of antagonist Lady Dimitrescu aka “Tall Vampire Lady” has put the hype train in overdrive. We still don’t know a lot about the story, but we do expect there will be plenty of run-ins with the 9-foot tall lady and her vampiric daughters.
Village’s first demo gave us our first glimpse of stunning European manor rendered in 4K with ray tracing. The RE Engine was already a looker on last-gen hardware, but Village should be even more stunning when running on a newer graphics card.
S.T.A.L.K.E.R. 2
TBA | GSC Game World
We still know remarkably little about S.T.A.L.K.E.R. 2, a game that’s scheduled to release by the end of the year. In December, GSC Game World released an in-engine teaser trailer that looked impressive, with a first-person view of someone running down a hallway in a dilapidated building around Chernobyl.
If the previous games in the series are any indication, we should be in for some truly terrifying encounters and harrowing firefights with twisted irradiated mutants. Here’s hoping we get more info soon.
Total War: Warhammer III
TBA | Creative Assembly
The trailer for the final entry in Creative Assembly’s Total War: Warhammer trilogy looks very cool, with humans mounted on horses and polar bears facing down chaos demons on a frozen battlefield.
The campaign is said to be twice the size of the one in Total War: Warhammer II, and those who own the DLC for all three games will have access to a combined map that will combine patches from maps from all three games for an absolutely massive strategy experience.
Valheim
February 2 | Iron Gate AB
Valheim came out of nowhere to become one of the big success stories of 2021, selling more than a million copies less than three weeks after its early access release. If you aren’t caught up on the latest Steam phenomenon, think of it as Minecraft mixed with Assassin’s Creed Valhalla. You and up to nine other friends are dropped off in the middle of a Viking afterlife to survive, craft, and battle mythical creatures.
Iron Gate AB has been vague about what exactly to expect from future updates, but the studio has teased future customization options for homes and ships, and eventually even a new biome to explore.
Warhammer 40,000: Darktide
TBA | Fatshark
There have been dozens of Warhammer video games over the years, but few have found the success and crossover appeal of Fatshark’s Vermintide games. It turns out that mowing down waves of enemies with three of your friends is just plain fun, no matter the setting.
Darktide features the same Left 4 Dead-inspired gameplay, but moves the battle to the futuristic Warhammer 40,000 setting, incorporating more gunplay along the way. If you liked the Vermintide games, this is pretty much a must-have.
Wrath: Aeon of Ruin
TBA | KillPixel
First-person shooters have come a long way in the last couple of decades, but some times you just want to run and gun in a dark fantasy setting as quickly as possible. And remarkably few modern games provide that experience. Enter Wrath: Aeon of Ruin, a spiritual successor to Quake, Doom, and Hexen, built on the 25-year-old Quake Engine.
cnx.cmd.push(function() { cnx({ playerId: "106e33c0-3911-473c-b599-b1426db57530", }).render("0270c398a82f44f49c23c16122516796"); });
Wrath has been in Early Access since November 2019, and what’s been released so far is very promising, looking and sounding like a lost PC shooter from the late ‘90s. The full game should be out later this year.
The post Best PC Games to Play in 2021 appeared first on Den of Geek.
from Den of Geek https://ift.tt/2MPhaTB
0 notes