#getelementbyid javascript
Explore tagged Tumblr posts
Visit Tumblr Blog
Explore Tumblr blogs with no restrictions, modern design and the best experience.
Last Seen Tumblr Blogs


Fun Fact
In 2020, 27% of US Tumblr users had an annual household income of over $100,000.
Text
Discover the Best DME Breast Pump Options Near Me: A Comprehensive Guide to Well Health Hub
Find the best DME breast pump options near you with Well Health Hub’s comprehensive guide. From hospital-grade pumps to wearable options, discover the perfect solution for your breastfeeding journey, including insights on using health savings accounts for purchasing DME breast pumps and tips for getting a breast pump through insurance. DME Store Locator DME Store Locator Enter Zip Code: Find…

View On WordPress
#addEventListener#appendChild#clear list#createElement#DME Store Locator#dynamic list#event listener#find stores#forEach#form submission#getElementById#HealthFirst DME#HTML template#JavaScript#MediCare Store#nearby stores#no stores found#populate list#preventDefault#sample data#textContent#user input#Well Health Hub#zip code
0 notes
Text
JavaScript Fundamentals
I have recently completed a course that extensively covered the foundational principles of JavaScript, and I'm here to provide you with a concise overview. This post will enable you to grasp the fundamental concepts without the need to enroll in the course.
Prerequisites: Fundamental HTML Comprehension
Before delving into JavaScript, it is imperative to possess a basic understanding of HTML. Knowledge of CSS, while beneficial, is not mandatory, as it primarily pertains to the visual aspects of web pages.
Manipulating HTML Text with JavaScript
When it comes to modifying text using JavaScript, the innerHTML function is the go-to tool. Let's break down the process step by step:
Initiate the process by selecting the HTML element whose text you intend to modify. This selection can be accomplished by employing various DOM (Document Object Model) element selection methods offered by JavaScript ( I'll talk about them in a second )
Optionally, you can store the selected element in a variable (we'll get into variables shortly).
Employ the innerHTML function to substitute the existing text with your desired content.
Element Selection: IDs or Classes
You have the opportunity to enhance your element selection by assigning either an ID or a class:
Assigning an ID:
To uniquely identify an element, the .getElementById() function is your go-to choice. Here's an example in HTML and JavaScript:
HTML:
<button id="btnSearch">Search</button>
JavaScript:
document.getElementById("btnSearch").innerHTML = "Not working";
This code snippet will alter the text within the button from "Search" to "Not working."
Assigning a Class:
For broader selections of elements, you can assign a class and use the .querySelector() function. Keep in mind that this method can select multiple elements, in contrast to .getElementById(), which typically focuses on a single element and is more commonly used.
Variables
Let's keep it simple: What's a variable? Well, think of it as a container where you can put different things—these things could be numbers, words, characters, or even true/false values. These various types of stuff that you can store in a variable are called DATA TYPES.
Now, some programming languages are pretty strict about mentioning these data types. Take C and C++, for instance; they're what we call "Typed" languages, and they really care about knowing the data type.
But here's where JavaScript stands out: When you create a variable in JavaScript, you don't have to specify its data type or anything like that. JavaScript is pretty laid-back when it comes to data types.
So, how do you make a variable in JavaScript?
There are three main keywords you need to know: var, let, and const.
But if you're just starting out, here's what you need to know :
const: Use this when you want your variable to stay the same, not change. It's like a constant, as the name suggests.
var and let: These are the ones you use when you're planning to change the value stored in the variable as your program runs.
Note that var is rarely used nowadays
Check this out:
let Variable1 = 3; var Variable2 = "This is a string"; const Variable3 = true;
Notice how we can store all sorts of stuff without worrying about declaring their types in JavaScript. It's one of the reasons JavaScript is a popular choice for beginners.
Arrays
Arrays are a basically just a group of variables stored in one container ( A container is what ? a variable , So an array is also just a variable ) , now again since JavaScript is easy with datatypes it is not considered an error to store variables of different datatypeslet
for example :
myArray = [1 , 2, 4 , "Name"];
Objects in JavaScript
Objects play a significant role, especially in the world of OOP : object-oriented programming (which we'll talk about in another post). For now, let's focus on understanding what objects are and how they mirror real-world objects.
In our everyday world, objects possess characteristics or properties. Take a car, for instance; it boasts attributes like its color, speed rate, and make.
So, how do we represent a car in JavaScript? A regular variable won't quite cut it, and neither will an array. The answer lies in using an object.
const Car = { color: "red", speedRate: "200km", make: "Range Rover" };
In this example, we've encapsulated the car's properties within an object called Car. This structure is not only intuitive but also aligns with how real-world objects are conceptualized and represented in JavaScript.
Variable Scope
There are three variable scopes : global scope, local scope, and function scope. Let's break it down in plain terms.
Global Scope: Think of global scope as the wild west of variables. When you declare a variable here, it's like planting a flag that says, "I'm available everywhere in the code!" No need for any special enclosures or curly braces.
Local Scope: Picture local scope as a cozy room with its own rules. When you create a variable inside a pair of curly braces, like this:
//Not here { const Variable1 = true; //Variable1 can only be used here } //Neither here
Variable1 becomes a room-bound secret. You can't use it anywhere else in the code
Function Scope: When you declare a variable inside a function (don't worry, we'll cover functions soon), it's a member of an exclusive group. This means you can only name-drop it within that function. .
So, variable scope is all about where you place your variables and where they're allowed to be used.
Adding in user input
To capture user input in JavaScript, you can use various methods and techniques depending on the context, such as web forms, text fields, or command-line interfaces.We’ll only talk for now about HTML forms
HTML Forms:
You can create HTML forms using the <;form> element and capture user input using various input elements like text fields, radio buttons, checkboxes, and more.
JavaScript can then be used to access and process the user's input.
Functions in JavaScript
Think of a function as a helpful individual with a specific task. Whenever you need that task performed in your code, you simply call upon this capable "person" to get the job done.
Declaring a Function: Declaring a function is straightforward. You define it like this:
function functionName() { // The code that defines what the function does goes here }
Then, when you need the function to carry out its task, you call it by name:
functionName();
Using Functions in HTML: Functions are often used in HTML to handle events. But what exactly is an event? It's when a user interacts with something on a web page, like clicking a button, following a link, or interacting with an image.
Event Handling: JavaScript helps us determine what should happen when a user interacts with elements on a webpage. Here's how you might use it:
HTML:
<button onclick="FunctionName()" id="btnEvent">Click me</button>
JavaScript:
function FunctionName() { var toHandle = document.getElementById("btnEvent"); // Once I've identified my button, I can specify how to handle the click event here }
In this example, when the user clicks the "Click me" button, the JavaScript function FunctionName() is called, and you can specify how to handle that event within the function.
Arrow functions : is a type of functions that was introduced in ES6, you can read more about it in the link below
If Statements
These simple constructs come into play in your code, no matter how advanced your projects become.
If Statements Demystified: Let's break it down. "If" is precisely what it sounds like: if something holds true, then do something. You define a condition within parentheses, and if that condition evaluates to true, the code enclosed in curly braces executes.
If statements are your go-to tool for handling various scenarios, including error management, addressing specific cases, and more.
Writing an If Statement:
if (Variable === "help") { console.log("Send help"); // The console.log() function outputs information to the console }
In this example, if the condition inside the parentheses (in this case, checking if the Variable is equal to "help") is true, the code within the curly braces gets executed.
Else and Else If Statements
Else: When the "if" condition is not met, the "else" part kicks in. It serves as a safety net, ensuring your program doesn't break and allowing you to specify what should happen in such cases.
Else If: Now, what if you need to check for a particular condition within a series of possibilities? That's where "else if" steps in. It allows you to examine and handle specific cases that require unique treatment.
Styling Elements with JavaScript
This is the beginner-friendly approach to changing the style of elements in JavaScript. It involves selecting an element using its ID or class, then making use of the .style.property method to set the desired styling property.
Example:
Let's say you have an HTML button with the ID "myButton," and you want to change its background color to red using JavaScript. Here's how you can do it:
HTML: <button id="myButton">Click me</button>
JavaScript:
// Select the button element by its ID const buttonElement = document.getElementById("myButton"); // Change the background color property buttonElement.style.backgroundColor = "red";
In this example, we first select the button element by its ID using document.getElementById("myButton"). Then, we use .style.backgroundColor to set the background color property of the button to "red." This straightforward approach allows you to dynamically change the style of HTML elements using JavaScript.
#studyblr#code#codeblr#css#html#javascript#java development company#python#study#progblr#programming#studying#comp sci#web design#web developers#web development#website design#ui ux design#reactjs#webdev#website#tech
400 notes
·
View notes
Text
Day 30 — 35/ 100 Days of Code
I learned how to handle JavaScript features (default parameters, spread, rest, and destructuring).
And I finally reached the DOM chapeter, 'The Document Object' which contains representations of all the content on a page. I'm still discovering its methods and properties.
So far, I've learned about the most useful ones: getElementById(), querySelector, changing styles, manipulating attributes, and the append method.
I'm doing some silly practice exercises just to get more familiar with the DOM methods. The more I progress in my course, the more fun things seem to get. I'm really excited to start building stuff with code and combining HTML, CSS, and JS all together.
#100 days of code journal#learning#coding#webdevelopment#codeblr#studyblr#growing#imporving#self improvement#cs#computer science#programming#codenewbie#tech#learn to code#frontend#100daysofcode#coding blog#htlm#css#JavaScript#The DOM
66 notes
·
View notes
Text
Every TypeScript example and tutorial I've come across so far mainly focuses on language features, static typing, and working with Visual Studio. However, I couldn't find much guidance on how to use TypeScript effectively with JavaScript and the DOM.
I remember having the same question a while back, just like Johnny on Stack Overflow. "Can we use TypeScript to manipulate the DOM?" This question motivated me to dive deeper and figure it out, and I'm here to share what I've learned.
Configuration: Using TypeScript for DOM manipulation is straightforward, but it does require some configuration. You'll need to include the specific types for DOM access, which aren't available by default in TypeScript. To do this, you must explicitly configure the TypeScript compiler to include the "dom" library in the compilerOptions section of your tsconfig.json file. It's worth noting that the decision not to include these types by default might suggest that TypeScript's creators initially intended it more for server-side development with Node.js than for front-end work.
/** tsconfig.json - Configuration file in the project folder for the TypeScript compiler */ { "compilerOptions": { "lib": [ "es2015", "dom" ], "strict": true, "target": "es2015" } }
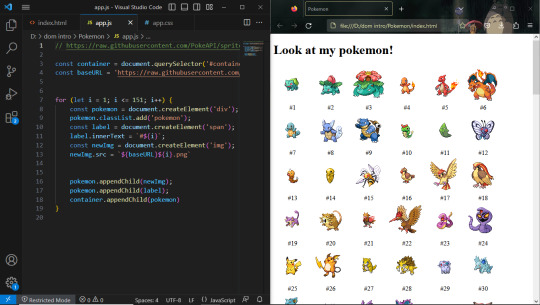
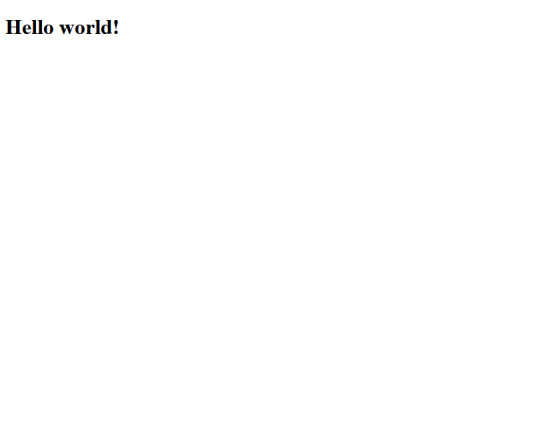
Hello World: In this article, I'll create a simple "Hello, world!" program to demonstrate how to use the DOM in TypeScript. Since this is my first post about TypeScript, I'll cover the basics of working with DOM types and address a common challenge that beginners might encounter. Please note that I won't be discussing DOM events in this post; that's a topic for a future article.
Let's start with the basics by changing the inner text value of an existing HTML element. I began by creating an HTML file with a standard HTML5 boilerplate, including an <h1> element with the id "greeter" in the body.
<!DOCTYPE html> <html lang="en"> <head> <!-- ... --> </head> <body> <h1 id="greeter">Hello</h1> </body> </html>
Next, I opened a new TypeScript file and added the following code:
let greeter: HTMLHeadingElement = document.getElementById("greeter") as HTMLHeadingElement; greeter.innerText = "Hello world!";
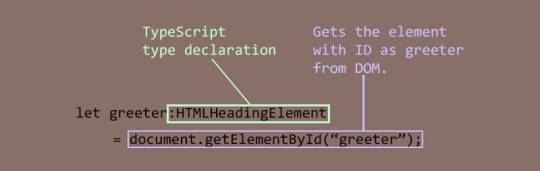
In this code, I created a variable called greeter and assigned the type HTMLHeadingElement to it. The HTMLHeadingElement type is defined in the "dom" library we added to the configuration. It tells the TypeScript compiler that greeter expects an HTML heading element and nothing else. Then, I assigned the greeter to the value returned by the getElementById function, which selects an element by its ID. Finally, I set the inner text of the greeter element to "Hello world."
When I compiled the code with the following command:
tsc script.ts
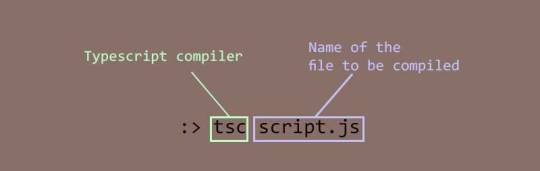
It produced the following error:
Type 'HTMLElement | null' is not assignable to type 'HTMLHeadingElement'. Type 'null' is not assignable to type 'HTMLHeadingElement'.
It's a bit frustrating, but TypeScript is doing its job. This error means that I tried to assign a greeter, which is of type HTMLHeadingElement, with an object of type HTMLElement that the getElementById method returned. The HTMLElement | null in the error message indicates that the method's return value can be either of type HTMLElement or null.
To address this, I used TypeScript's type assertion feature to tell the compiler that the element returned by getElementById is indeed a heading element, and it doesn't need to worry about it. Here's the updated code:
let greeter: HTMLHeadingElement = document.getElementById("greeter") as HTMLHeadingElement; greeter.innerText = "Hello world!";
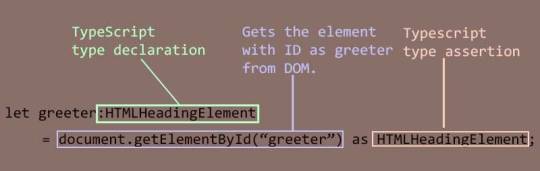
With this change, the compilation was successful. I included the script.js file generated by the compiler in the HTML document and opened it in a browser.
Decoration Time: Now that I've confirmed that everything works as intended, it's time to make the page more visually appealing. I wanted a font style that was informal, so I chose the "Rock Salt" font from Google Fonts. I imported it into my stylesheet, along with "Dancing Script" as a secondary font, using CSS imports. I then added a few more elements to the HTML document, centered all the text using CSS flexbox, added a background from UI gradients, and adjusted the positions of some elements for proper arrangement. The page now looked beautiful.
Animation: To add a finishing touch, I wanted to include a background animation of orbs rising to the top like bubbles. To create the orbs, I decided to use <div> elements. Since I wanted several orbs with different sizes, I split the task into two steps to simplify the work.
First, I created a common style for all the orbs and defined a custom animation for the orbs in CSS. Then, I created the orbs dynamically using TypeScript. I created a set number of <div> elements, assigned them the pre-defined style, and randomized their sizes, positions, and animation delays to make them appear more natural.
Here's an excerpt of the code for creating the bubbles:
function createBubbles() { for (let i = 0; i < bubbleCount; i++) { let div: HTMLDivElement = document.createElement("div") as HTMLDivElement; let divSize = getSize(); div.style.left = getLeftPosition() + "px"; div.style.width = divSize + "px"; div.style.height = divSize + "px"; div.style.animationDelay = i * randomFloat(0, 30) + "s"; div.style.filter = "blur(" + randomFloat(2, 5) + "px)"; div.classList.add("bubble"); bubbleBuffer.push(div); } console.log("Bubbles created"); }
After creating the orbs, I added them to the DOM and started the animation:
function releaseBubbles() { createBubbles(); for (let i = 0; i < bubbleCount; i++) { containerDiv.appendChild(bubbleBuffer[i]); } console.log("Bubbles released"); }
And with that, the animation of orbs rising like bubbles was set in motion.
Here's the final output:
youtube
You can find the complete code in this repository.
Conclusion: While writing this article and creating the example, I realized the involvement of advanced concepts like type assertion and union types. I now understand why the authors of those tutorials didn't include them; introducing them could confuse beginners. It's best to learn TypeScript thoroughly before venturing into DOM manipulation.
In my example, I skipped null checking when fixing the type mismatch error, as it seemed unnecessary for the demonstration. However, in real projects, it's important to check for null values to avoid runtime errors. I also didn't
#While writing this article and creating the example#I realized the involvement of advanced concepts like type assertion and union types. I now understand why the authors of those tutorials di#beginner#typescript#dom manipulation#Youtube
0 notes
Text
How to use JavaScript for data visualization
Data visualization is the process of transforming data into graphical or visual representations, such as charts, graphs, maps, etc. Data visualization can help us understand, analyze, and communicate data more effectively and efficiently.
JavaScript is a powerful and popular programming language that can be used for creating dynamic and interactive data visualizations in web browsers. JavaScript can manipulate the HTML and CSS elements of a web page, as well as fetch data from external sources, such as APIs, databases, or files.
To use JavaScript for data visualization, we need to learn how to:
Select and manipulate HTML elements: We can use JavaScript to select HTML elements by their id, class, tag name, attribute, or CSS selector. We can use methods such as getElementById(), getElementsByClassName(), getElementsByTagName(), querySelector(), or querySelectorAll() to return one or more elements. We can then use properties and methods such as innerHTML, style, setAttribute(), removeAttribute(), appendChild(), removeChild(), etc. to manipulate the selected elements.
Create and modify SVG elements: SVG (Scalable Vector Graphics) is a standard for creating vector graphics in XML format. SVG elements can be scaled without losing quality, and can be styled and animated with CSS and JavaScript. We can use JavaScript to create and modify SVG elements, such as , , , , , etc. We can use methods such as createElementNS(), setAttributeNS(), appendChild(), etc. to manipulate the SVG elements.
Handle events: We can use JavaScript to handle events that occur on the web page, such as mouse clicks, keyboard presses, window resizing, page loading, etc. We can use methods such as addEventListener() or removeEventListener() to attach or detach event handlers to elements. We can also use properties such as onclick, onkeyup, onload, etc. to assign event handlers to elements. An event handler is a function that runs when an event occurs. We can use the event object to access information about the event, such as its type, target, coordinates, key code, etc.
Use AJAX: We can use AJAX (Asynchronous JavaScript and XML) to send and receive data from a server without reloading the web page. We can use objects such as XMLHttpRequest or Fetch API to create and send requests to a server. We can also use methods such as open(), send(), then(), catch(), etc. to specify the request parameters, send the request, and handle the response. We can use properties such as readyState, status, responseText, responseJSON, etc. to access the state, status, and data of the response.
These are some of the basic skills we need to use JavaScript for data visualization. However, writing JavaScript code from scratch for data visualization can be challenging and time-consuming. That’s why many developers use JavaScript libraries and frameworks that provide pre-written code and templates for creating various types of data visualizations.
Some of the most popular JavaScript libraries and frameworks for data visualization are:
D3.js: D3.js (short for Data-Driven Documents) is a JavaScript library for producing dynamic and interactive data visualizations in web browsers. It makes use of SVG, HTML5, and CSS standards. D3.js allows us to bind data to DOM elements, apply data-driven transformations to them, and create custom visualizations with unparalleled flexibility1.
Chart.js: Chart.js is a JavaScript library for creating simple and responsive charts in web browsers. It uses HTML5 canvas element to render the charts. Chart.js supports various types of charts, such as line, bar, pie, doughnut, radar, polar area, bubble, scatter, etc.2
Highcharts: Highcharts is a JavaScript library for creating interactive and high-quality charts in web browsers. It supports SVG and canvas rendering modes. Highcharts supports various types of charts, such as line, spline, area, column, bar, pie, scatter, bubble, gauge, heatmap, treemap, etc. Highcharts also provides features such as zooming, panning, exporting, annotations, drilldowns, etc.
These are some of the popular JavaScript libraries and frameworks for data visualization. To use them in your web development project, you need to follow these steps:
Choose the right library or framework for your project: Depending on your project’s requirements, goals, and preferences, you need to select the most suitable library or framework that can help you create the data visualizations you want. You should consider factors such as the learning curve, documentation, community support, performance, compatibility, scalability, etc. of each library or framework before making a decision.
Add the library or framework to your web page: You can add a library or framework to your web page using either a script tag or an external file. The script tag can be placed either in the head or the body section of the HTML document. The external file can be linked to the HTML document using the src attribute of the script tag.
Learn how to use the library or framework features and functionalities: You need to read the documentation and guides of the library or framework you are using to understand how to use its features and functionalities effectively. You should also follow some tutorials and examples to get familiar with the syntax, conventions, patterns, and best practices of the library or framework.
Write your application code using the library or framework: You need to write your application code using the library or framework functions, methods, objects, components, etc. You should also test and debug your code regularly to ensure its functionality and quality.
These are some of the ways you can use JavaScript for data visualization. To learn more about JavaScript and data visualization, you can visit some of the online resources that offer tutorials, examples, exercises, and quizzes. Some of them are:
[W3Schools]: A website that provides free web development tutorials and references for HTML, CSS, JavaScript, and other web technologies.
[MDN Web Docs]: A website that provides documentation and guides for web developers, covering topics such as HTML, CSS, JavaScript, Web APIs, and more.
[Data Visualization with D3.js]: A website that provides a comprehensive course on data visualization with D3.js.
[e-Tutitions]: A website that provides online courses and for web , development, Learn JavaScript and you can book a free demo class.
[Codecademy]: A website that provides interactive online courses and projects for various programming languages and technologies.
0 notes
Text
Me after watching a javascript tutorial in which the guy explains that the function "getElementById" gets the element by ID:

The thing about programming is that I am dumb as fuck and can't learn anything on my own and I need someone smarter than me to tell me what something does and assure me I understood it correctly otherwise I'm not confident enough to try anything
2 notes
·
View notes
Video
youtube
Dev Online
#how to get value of textbox in javascript#document.getelementbyid get value getelementbyid innerhtml getelementbyid javascript javascript get element by name how to get value of text#document.getelementbyid get value#getelementbyid innerhtml#getelementbyid javascript#javascript get element by name#how to get value of textbox in javascript from html#javascript set textbox value#get id javascript
0 notes
Link
JavaScript Introduction, JavaScript has multiple methods, one of which is the getElementById () method. JavaScript can change HTML style. JavaScript can change HTML attributes, Password show, Password Hide, , JavaScript getElementById method, JavaScript button, JavaScript onclick
#js password show#JavaScript Introduction#JavaScript Introductionbasic#javascript#getElementById () method#JavaScript onclick#JavaScript button#change HTML attributes#Password Hide
1 note
·
View note
Text
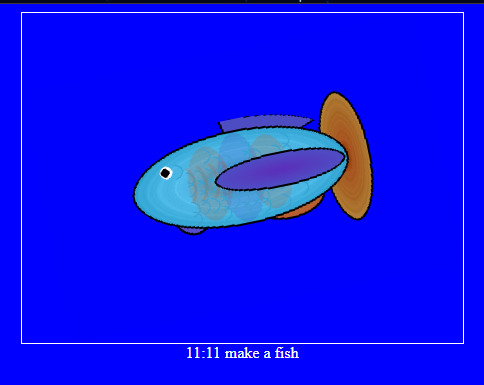
Make-a-fish
There is a very cute site out there: http://makea.fish
It was written by @weepingwitch
If it is 11:11 AM or PM according to your machine's clock, you can visit this page and get a cute procedurally-generated fish image. Like this:
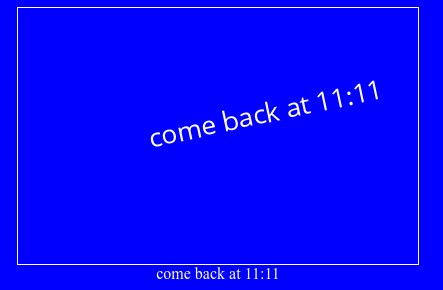
At other times, you will get a message like this:
This is charming enough that I have a friend who has a discord channel devoted entirely to people's captures of fish at 11:11. But it's also a fun code-deobfuscation puzzle. Solution below the cut--I checked, and it's ok for me to share the solution I came up with :)
If you show source for the makea.fish website:
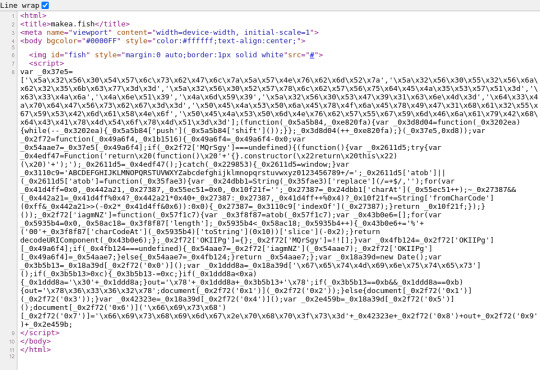
Basically:
an image, set by default to have a pointer to a source that doesn't really exist
a script, that is one big long line of javascript.
The javascript is where we are going. Start by loading it into an editor and prettifying it up. It's like taking home a scrungly cat and giving it a wash. or something idk.
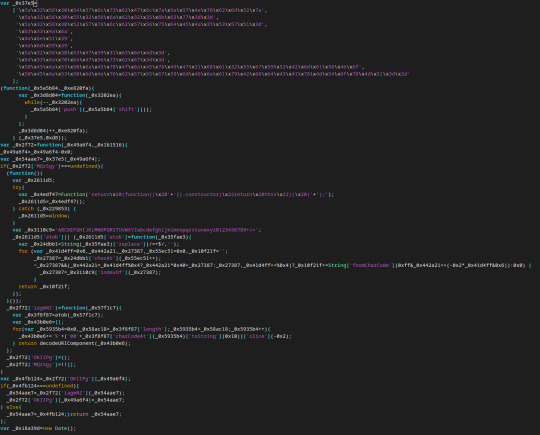
Believe it or not this is better. Also, maybe there are some low-hanging fruits already we can pick?
Like this:
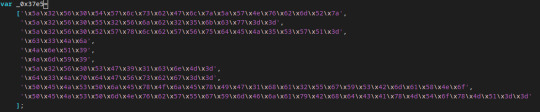
Each of the strings in this array is composed of escaped characters. Escaped hex characters are useful if you need to put characters in your string that are not available on the keyboard or might be interpreted as part of the code, but here I think they're just being used to hide the actual contents of the string.
I used python to deobfuscate these since the escape sequences should be understood by python as well. And lo--not only are they all symbols that can be rendered (no backspaces or anything!) but they also look like base64 encoded strings (the =, == terminators are a giveaway).
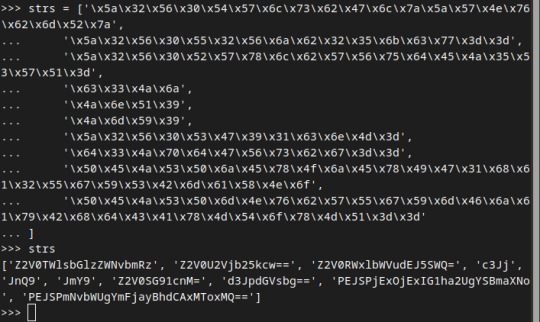
What happens if we run these through a base64 decoder?

We see that the array actually contains base64-encoded strings. Perhaps a portion of this code is converting these strings back, so that they can be used normally?
At any rate I am going to rename the variable that this array is assigned to to "lookupTable" because that's what I think of it as.
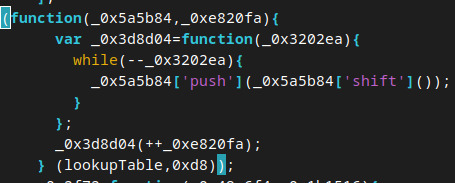
We are making an anonymous function and immediately calling it with two arguments: lookupTable and 0xd8. 0xd8 is 216 in decimal. By renaming the variables, we get:
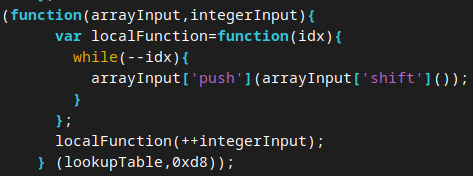
Confession time, I am not a person who writes lots of javascript. But it occurs to me that this looks an awful lot like we're being weird about calling functions. Instead of traditional syntax like "arrayInput.push(arrayInput.shift())" we're doing this thing that looks like dictionary access.
Which means that, according to the docs on what those two array functions are doing, we are removing the first element of the array and then putting it on the end. Over and over again. Now I could try to reason about exactly what the final state of the array is after being executed on these arguments but I don't really want to. A computer should do this for me instead. So I in fact loaded the original array definition and this function call into a JS interpreter and got:
['Z2V0SG91cnM=', 'd3JpdGVsbg==', 'PEJSPjExOjExIG1ha2UgYSBmaXNo', 'PEJSPmNvbWUgYmFjayBhdCAxMToxMQ==', 'Z2V0TWlsbGlzZWNvbmRz', 'Z2V0U2Vjb25kcw==', 'Z2V0RWxlbWVudEJ5SWQ=', 'c3Jj', 'JnQ9', 'JmY9']
This is our array state at this time. By the way, this comes out to
['getHours', 'writeln', '11:11 make a fish', 'come back at 11:11', 'getMilliseconds', 'getSeconds', 'getElementById', 'src', '&t=', '&f=']
(there are some BR tags in there but the Tumblr editor keeps eating them and I'm too lazy to fix that).
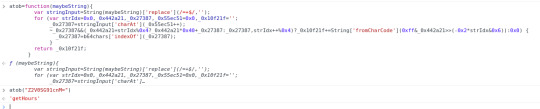
What's next? Apparently we are defining another function with the name "_0x2f72". It is called very often and with arguments that look like small numbers. It is the only place our lookupTable is directly referenced, after the last little shuffler function. So my guess is deobfuscator for the elements of the array.
It takes two arguments, one of them unused. Based on my hunch I rename the function arguments to tableIndex and unused.
One of the first things we do seems to be using the awesome power of javascript type coercion to get the input as an integer:
tableIndex=tableIndex-0x0;
Normal and ranged.
The next thing that is done seems to be assigning the return value, which may be reassigned later:
var retVal=lookupTable[tableIndex];
The next line is
if(deobfuscatorFn['MQrSgy']===undefined) {...
Again, I'm not exactly a javascript person. My guess is that "everything is an object" and therefore this value is undefined until otherwise set.
indeed, much further down we assign this key to some value:
deobfuscatorFn['MQrSgy']=!![];
I don't know enough javascript to know what !![] is. But I don't need to. I'll as a js interpreter and it tells me that this evaluates to "true". Based on this I interpret this as "run this next segment only the first time we call deobfuscatorFn, otherwise shortcircuit past". I rewrite the code accordingly.
The next block is another anonymous function executed with no arguments.

Within the try catch block we seem to be creating a function and then immediately calling it to assign a value to our local variable. The value of the object in our local variable seems to be the entire js environment? not sure? Look at it:

My guess is that this was sketchy and that's why we assign "window" in the catch block. Either way I think we can safely rename _0x2611d5 to something like "windowVar".
We then define a variable to hold what I think is all the characters used for b64 encoding. May as well relabel that too.
Next we check if 'atob' is assigned. If it isn't we assign this new function to it, one which looks like it's probably the heart of our base64 algorithm.
I admit I got lost in the weeds on this one, but I could tell that this was a function that was just doing string/array manipulation, so I felt comfortable just assigning "atob" to this function and testing it:
vindication! I guess. I think I should probably feel like a cheater, if I believed in that concept.
we next assign deobfuscatorFn['iagmNZ'] to some new unary function:

It's a function that takes an input and immediately applies our atob function to it. Then it...what...

tbh I think this just encodes things using URI component and then immediately decodes them. Moving on...
deobfuscatorFn['OKIIPg']={};
I think we're setting up an empty dictionary, and when I look at how it's used later, I think it's memoizing
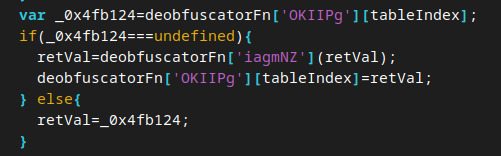
Yup, basically just caching values. Cool!
We now have a defined deobfuscatorFn. I think we can tackle the remaining code fairly quickly.
First thing we do is get a Date object. This is where the time comes from when deciding whether to get the fish image.
Actually, let's apply deobfuscatorFn whenever possible. It will actually increase the readability quite a bit. Remember that this just does base64 decoding on our newly-shuffled array:
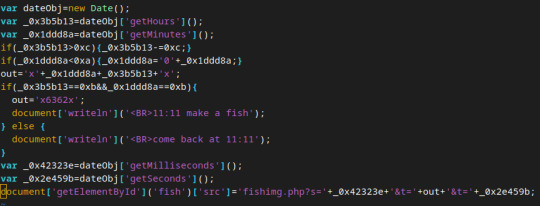
relabeling variables:
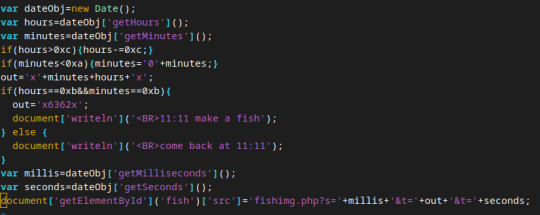
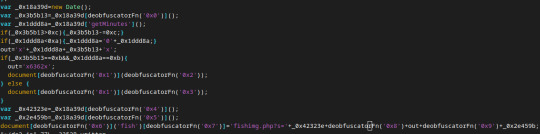
In other words, if the hours is greater than 12 (like it is in a 24 hour clock!) then subtract 12 to move it to AM/PM system.
Then, set "out" to be x hours minutes concatenated. Like right now, it's 16:36 where I am, so hours would get set to 4 and we would make x436x be the output.
Next, if the hours and minutes are both 11 (make a fish), we will overwrite this value to x6362x and print the makeafish message. Otherwise we print a request to comeback later. Finally, we lookup the fish image and we tell it to fetch this from "makea.fish/fishimg.php?s={millis}&t={out}&f={seconds}"
(there's a typo in the pictures I have above. It really is f=seconds).
Thus, by visiting makea.fish/fishimg.php?s=420&t=x6362x&f=69
we can get a fish. It appears to be random each time (I confirmed with weepingwitch and this is indeed truly random. and the seconds and millis don't do anything).
Now you can make fish whenever you want :)
51 notes
·
View notes
Link
#ADDEVENTLISTENER #ATTACHEVENT #FUNTION #GETELEMENTBYID #JAVASCRIPT #LOAD #OFFSETTOP #ONLOAD #PLAYSOUNDBYFLASHWITHIPHONE #SCROLLTO #TYPEOF #ローカル関数 #関数 The problem is a free blog in Japan. Display different designs when connected with a smartphone. If so, various JavaScripts may not be executed, which discourages not only blog owners but also visitors. As the blog blog behind them, which they manage freely, let's send the savior to the visitors as the blog owner!
#Funtion#onload#attachEvent#typeof#JavaScript#load#addEventListener#getElementById#scrollTo#offsetTop
0 notes
Text
Javascript: Tres técnicas sencillas para cambiar estilos CSS by Entrellaves.com
Javascript: Tres técnicas sencillas para cambiar estilos CSS by Entrellaves.com
fuente: https://entrellaves.com/javascript/cambiar-css-con-javascript/

Gran artículo de Entrellaves.com que podeis leer completo AQUI.
document.getElementById("miDiv").style.display="none";
View On WordPress
0 notes
Note
your neocities page is so cool!!! i've been trying construct mine but tried to do the thing with javascript that you did on your blog page with the buttons and just got stuck on it. do you happen to know any tutorials on how to make it work?
ty!! i didnt really follow any one tutorial i think i just used a combo of w3schools and googling but i can give u a guide to what i did :]
so in html you want to id all ur buttons like this
<button type="button" id="buttonname"> click! </button>
and the same for your posts but with two classes one to use for all your posts generally and one for the specific category its in
<div class="post postcategory"> <p>contents</p> </div>
now in javascript you can use getElementById and getElementsByClassName to declare your variables
var buttontype1 = document.getElementById('buttonname'); const category1posts = document.getElementsByClassName('postcategory')
now you can set up the function to show and hide posts when a button is clicked!
buttontype1.onclick = function()showtype1{ for[let i=0; i<category1posts.length; i++]{ category1posts[i].style.display ="block"; }
for[let i=0; i<category2posts.length; i++]{ category2posts[i].style.display ="none"; }
}
line by line this 1. starts the function named showtype1 2. loops through all the posts in the variable category1posts (these will be the posts that have the class "postcategory" in the html) and 3. shows these posts then does the same thing for the next category of post but instead of showing them it doesnt display them :)
now you just need to repeat these steps for each of your buttons and post categories i hope this helps!!
9 notes
·
View notes
Note
hey, i currently use your degenerate 4chan theme and LOVE it. i was wondering if there was a code to make the banner is different on every refresh? does that make sense? i've made custom ones i'd like to cycle thru and make it look like og 4chan but i'm a code noob. sorry if this is worded weird, lol thank you so much in adv
Yeah, this is definitely possible and fairly easy! I’ll explain how to do it.
First, you’ll have to upload your images onto some image hosting site like Imgur. Tumblr also has a file-hosting facility in the theme HTML customization page, if you click the options button and then “Theme Assets”, although I find it a bit annoying to use.
Next, locate this part of the HTML:
<img src="{image:Banner}" class="header--banner" />
This is the image tag that’s in charge of rendering the banner image. You can see that right now, it uses the image at {image:Banner} which is a Tumblr-specific code for letting users upload this image through the Tumblr interface. However, because you want this image to be random upon refresh, you will want to remove that. You’ll also give this image tag an ID so it will be easy to manipulate it through JavaScript later. So it should now look like this:
<img class="header--banner" id="banner" />
Now, scroll all the way down to the JavaScript portion of the theme. Identify the part of the code that starts with
window.addEventListener("load", function() {
The code that occurs in this block is what happens when the page loads. Since you probably want to put the image in before anything else happens, we will write the new code at the beginning of this block (so before the decodeLinks() part of the code).
First, you’ll want to create an array of the image URLs that you created for the banners. An array is basically a list of things, except the word “list” has special meaning in computer science. It should look like this:
let bannerURLs = [ "URL", "URL", "URL", "URL" ];
Where, of course, each "URL" is replaced with one of your banner URLs. You need the quotation marks around each, and make sure these URLs all start with https instead of http, since the images may not load over http.
Now that you have a variable storing all the URLs, you need code to randomly select one of them. Here is how we will do that:
let index = Math.floor(bannerURLs.length * Math.random());
Math.random() returns a random decimal between 0 and 1. We multiply that by bannerURLs.length, which is the number of URLs that you put in the array, to get a random decimal between 0 and that length, and then floor it to get a random integer between 0 and that length. This allows us to specify which of the URLs to use.
Next, you will set the URL of the image like this:
document.getElementById('banner').src = bannerURLs[index];
You’ll recall that we set the ID of the image tag to banner previously. That’s why we can get it with getElementById now. You’ll also recall that we removed the src tag previously, but we’re setting it now with our randomly-chosen URL. This is selected by bannerURLs[index]. If index is the integer n, then bannerURLs[index] is the nth URL in the array bannerURLs.
And you are done. As always, let me know if you have any questions!
18 notes
·
View notes
Video
tumblr
A continuación se va a dibujar por medio de WebGL: Una figura cambiando presentado en este ejemplo a un rectángulo.
Para dibujar este rectángulo, se deben seguir ciertos pasos:
1. Recuperar el canvas del HTML, usando la función getElementById con el nombre del Canvas creado en HTML(Donde será dibujado el rectángulo).
2. Iniciar el contexto de WebGL, bien sea experimental o normal, para que el javascript haga uso de WebGL.
3. Se inician y configuran los Shaders. Estos servirán para los colores y los vértices de las figuras. Luego, se configuran sus matrices. El modificar los vértices y colores en sus matrices significa generar cambios en la figura dibujada.
4. Lo siguiente que se hace es dibujar la escena inicial, es decir, el momento que existirá apenas se abra la página. Además, se decide el punto de cámara inicial.
5. El siguiente paso requiere poner las transiciones en radianes, es decir, qué tanto girará el rectángulo, en qué dimensiones y de qué forma.
6. Se configura cuántos vértices se usarán y de qué forma, con esto se configura la figura, incluyendo la posibilidad de quitar una “tapa” del rectángulo, por ejemplo.En este caso, una de las tapas ha sido extraída modificando a 10 el número de vértices pero, si se cambia a 36, la caja vuelve a estar completa. Esto se hace con fines demostrativos únicamente.
7. Finalmente, se usa la función de render y se modifica cada cuánto tiempo girará, siendo esto cuando se redibuja el elemento.
En conclusión, el ejemplo es educativo y su exhaustiva revisión permite el conocer cómo funciona WebGL para figuras básicas. Gracias a esto, es posible dibujar distintos sólidos con el número requerido de lados y sus distintos vértices.Su análisis es valioso y, definitivamente, el ejemplo utilizado funciona muy bien para iniciar con el lenguaje.
El código fuente está ubicado en el siguiente link: https://codepen.io/xaga97/pen/xvWwGq
Tiempo utilizado para encontrar y modificar el ejemplo: 2 horas,
Resultado final:
1 note
·
View note
Text
Javascript / getElementsByTagName
Aqui les traigo una funcion de JAvascript que nos permite enlazar tags de nuestro HTML con variabes de Javascript, espero le ssea de utilidad!
Bievenidos sean a este post, hoy veremos una funcion muy particular. En otros posts hemos visto dos funciones que nos permitian enlazar un elemento del codigo HTML con una variable de Javascript, si lo hacemos por medio del id del elemento utilizabamos a getElementById pero tambien disponemos de getElementsByName donde buscara todos los elementos con el nombre indicado y lo almacenara en un…

View On WordPress
0 notes
Text
apprendre Javascript les bases
Pour commencer, voici une instruction simple en javascript pour récupérer le DOM d'un élément d'une page par son Id avec la méthode getElementById
var demo = document.getElementById("demo"); demo.innerHTML = "Hello World!";
Dans cet exemple, l'objet document est utilisé pour accéder au DOM. La méthode getElementById() est ensuite utilisée pour obtenir une référence à l'élément avec l'identifiant spécifié. Enfin, la propriété innerHTML de l'élément est défini sur une chaîne contenant le texte "Hello World!" (on remplace le contenu de l'élément par la chaine de caractère Hello World)
0 notes