#i like that you can format in markdown now
Text
Please check my about me to learn about the sorts of things I post about, fandoms, ships, and other social media accounts!
I love Caesar A. Zeppeli a lot.
Tags
Things I make
#exchangespirit_content
#exchangespirit_draws
#exchangespirit_writes
Fandoms
DC Comics
#dc comics
Characters
#booster gold
#ted kord
Ships
#boostle
Jojo's Bizarre Adventure
#jjba
Characters:
#caesar zeppeli
#joseph joestar
#speedwagon
#suzie q
Ships:
#caejose
#caejoseq
Mobile Suit Gundam: The Witch from Mercury
#g_witch
Characters
#suletta mercury
#miorine rembran
Ships
#sulemio
Ranking of Kings
#ranking of kings
Characters
#domas
#ouken
Yu-Gi-Oh!
#yugioh
#yugioh dm
#ygotas
Characters:
#yami bakura
#marik ishtar
Ships:
#thiefshipping
Reference
#drawing
Content Warnings
#blood cw
#exchangespirit_content#i like that you can format in markdown now#that will keep me here lmao#they still don't have dates on posts though which is buck wild tbh#i don't think anything is going on with instagram i just hate that platform#i'm old and prefer desktop computers
4 notes
·
View notes
Text
Friendly reminder that Wix.com is an Israeli-based company (& some website builders to look into instead)
I know the BDS movement is not targeting Wix.com specifically (see here for the companies they're currently boycotting) but since Wix originated in Israel as early as 2006, it would be best to drop them as soon as you can.
And while you're at it, you should leave DeviantArt too, since that company is owned by Wix. I deleted my DA account about a year ago not just because of their generative AI debacle but also because of their affiliation with their parent company. And just last month, DA has since shown their SUPPORT for Israel in the middle of Israel actively genociding the Palestinian people 😬
Anyway, I used to use Wix and I stopped using it around the same time that I left DA, but I never closed my Wix account until now. What WAS nice about Wix was how easy it was to build a site with nothing but a drag-and-drop system without any need to code.
So if you're using Wix for your portfolio, your school projects, or for anything else, then where can you go?
Here are some recommendations that you can look into for website builders that you can start for FREE and are NOT tied to a big, corporate entity (below the cut) 👇👇
Carrd.co

This is what I used to build my link hub and my portfolio, so I have the most experience with this platform.
It's highly customizable with a drag-and-drop arrangement system, but it's not as open-ended as Wix. Still though, it's easy to grasp & set up without requiring any coding knowledge. The most "coding" you may ever have to deal with is markdown formatting (carrd provides an on-screen cheatsheet whenever you're editing text!) and section breaks (which is used to define headers, footers, individual pages, sections of a page, etc.) which are EXTREMELY useful.
There's limits to using this site builder for free (max of 2 websites & a max of 100 elements per site), but even then you can get a lot of mileage out of carrd.
mmm.page

This is a VERY funny & charming website builder. The drag-and-drop system is just as open-ended as Wix, but it encourages you to get messy. Hell, you can make it just as messy as the early internet days, except the way you can arrange elements & images allows for more room for creativity.
Straw.page
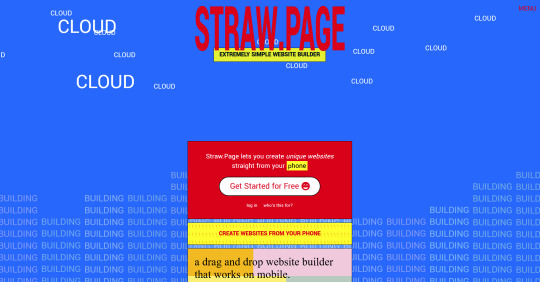
This is an extremely simple website builder that you can start from scratch, except it's made to be accessible from your phone. As such, the controls are limited and intentionally simple, but I can see this being a decent website builder to start with if all you have is your phone. The other options above are also accessible from your phone, but this one is by far one of the the simplest website builders available.
Hotglue.me

This is also a very simple & rudimentary website builder that allows you to make a webpage from scratch, except it's not as easy to use on a mobile phone.
At a glance, its features are not as robust or easy to pick up like the previous options, but you can still create objects with a simple double click and drag them around, add text, and insert images or embeds.
Mind you, this launched in the 2010s and has likely stayed that way ever since, which means that it may not have support for mobile phone displays, so whether or not you wanna try your hand at building something on there is completely up to you!
Sadgrl's Layout Editor

sadgrl.online is where I gathered most of these no-code site builders! I highly recommend looking through the webmaster links for more website-building info.
This simple site builder is for use on Neocities, which is a website hosting service that you can start using for free. This is the closest thing to building a site that resembles the early internet days, but the sites you can make are also responsive to mobile devices! This can be a good place to start if this kind of thing is your jam and you have little to no coding experience.
Although I will say, even if it sounds daunting at first, learning how to code in HTML and CSS is one of the most liberating experiences that anyone can have, even if you don't come from a website scripting background. It's like cooking a meal for yourself. So if you want to take that route, then I encourage to you at least try it!
Most of these website builders I reviewed were largely done at a glance, so I'm certainly missing out on how deep they can go.
Oh, and of course as always, Free Palestine 🇵🇸
#webdev#web dev#webdesign#website design#website development#website builder#web design#websites#sites#free palestine#long post#I changed the wording multiple times on the introduction but NOW I think im done editing it
429 notes
·
View notes
Text

✦ Okay, I give in. Let's upload our gifs on the beta editor to prepare for a gif pack page. Resources are available at the bottom, so lets get started !!

So first things first, you can only upload 30 gifs at a time. Now for me, I will always upload as I gif, around every 20 gifs, then upload to the page (this also ensures I don't skip any or have doubles) and keep gifing. That used to mean that I don't have to wait for tumblr to load 300 gifs and die from impatience. For the rest of y'all that means you're going to have to batch upload. I know, I'm sorry.
Note: With the help of @nataliealynlind we discovered that the daily limit is 250 gifs! So if you have more than that, prepare to upload your gifs over the course of a couple days or use a second blog. (imo this is another great reason to upload as you gif! that way you don't have to get stuck at 250!)
So after you upload your gifs (in this case I only did 10)*, you're going to go to the gear at the top of your post and click it. Then scroll all the way to the bottom where it says Text Editor. This looks familiar, right?

*Note: If you don't save it as a draft first, your gifs will be in .gif format, not .gifv. This means you can skip removing this tag later on, but I'm not sure if gifs that are uploaded but never saved/drafted will later disappear at some point. To be safe, I would save it as a draft. I just forgot at this part tbh
Well the good news is, you only have to change this once! The bad news is, we don't do Markdown then HTML anymore bc Markdown doesn't strip any of the code anymore 🙃 So just change it to HTML
Now it should look like this! Fun!
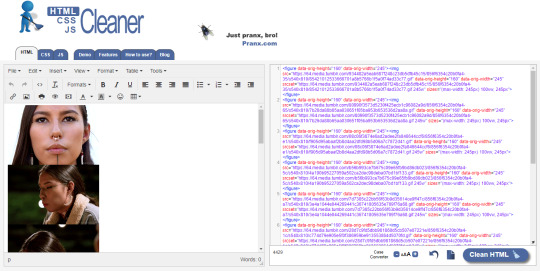
Okay, now we're going to copy that text and take it on over to our new best friend, the HTML Cleaner! So you're going to want to paste it on the right side of the screen. Your gifs should appear on the left side. If both sides have text, that's how you know you pasted it on the left.
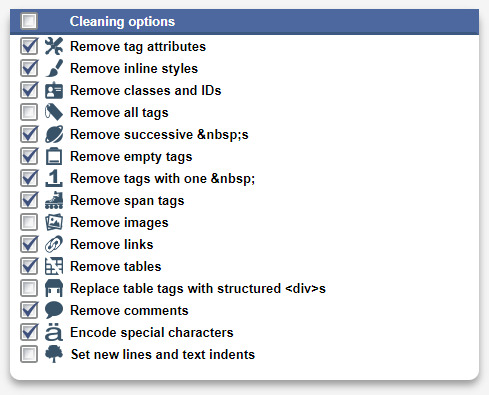
So in order to get ride of all this extra code, it's going to take a couple extra steps. First, you're going to check these boxes on the left hand side.
Now, on the right hand side, you're going to enter these under Find and Replace (copy/paste section below!!). I know you're like, uh what? Where the hell did you get those numbers? Well, I got them from our gif post code!
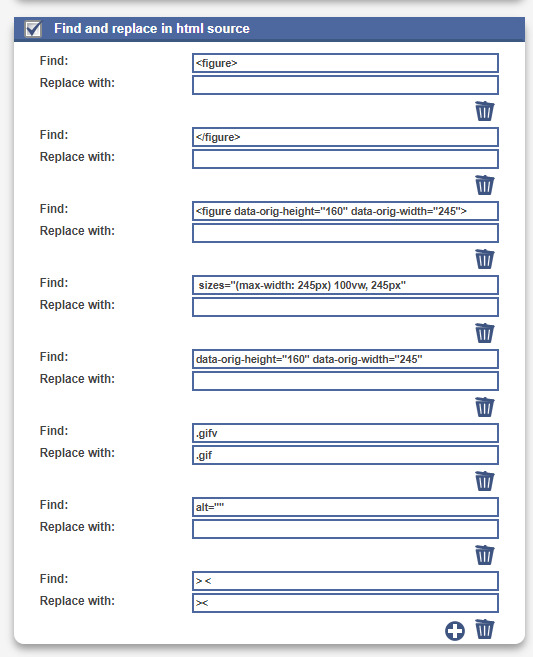


For easy copy pasting:
Find: <figure>
Replace: (leave blank)
Find: </figure>
Replace: (leave blank)
So after you add the specific widths for your gifs, you're also going to want to add the following:
Find: .gifv
Replace: .gif
Find: alt=""
Replace: (leave blank)
Find: /> <
Replace: /><
NOTE: If your gifs are usually the same size, I would recommend saving these snippits above on your computer's sticky notes or a draft to copy/paste for future uploads! While I do appreciate the viewer traffic, I'm sure coming to this tutorial every time is gonna get old real fast.
After all that, click Clean HTML

And now, your code should look like this! If there's still a space between your image links, just click Clean HTML again and it should get rid of it!

Now your code is nice and clean to put into your gif pages! Not quite sure how to do that? Read the Setting Up Your Sidepage section in this older tutorial!!
Resources
HTML Cleaner
My Gif Pack Page Codes
Recommended Gif Pack Page Codes (tag)
Previous Tutorial (How to upload to a Standard Sidepage)
Barebones Code (for previous tutorial)
#rpc#rph#gif pack tutorial#uploading gifs on beta#rp tutorial#beta editor tutorial#mytutorial#rp guide#me: i'm tired of this (remaking this tutorial every other year) grandpa#tumblr changing posts every five minutes: that's too damn bad!
169 notes
·
View notes
Text
On creating a wiki for your worldbuilding
Do you have a lot of lore to keep track of? Whether you're an author, a Game Master, or simply someone who really really likes worldbuilding, this post is for you.
Here's a quick overview of what I'll be talking about:
Platforms people use to create personal wikis
Formats and organization systems you may find useful when creating your own wiki
A brief look at the actual content you might put in your wiki (I'm planning a more in-depth post on that later with more images and demos)
And because this is gonna be a long'un, I'm putting a read-more here! I'll also make downloadable epub and PDF versions of this post available for free on my Ko-Fi at some point in the future.
(I'm also planning to reblog with a list of links later on, but I want this initial post shows up in search)
Also now that you're here, I'm going to say this isn't, like, super comprehensive or anything. I'm just talking about stuff I know a little about or have experience with. Please feel free to reblog with additions and/or corrections as needed!
What is a wiki?
According to Wikipedia, "a wiki is a hypertext publication collaboratively edited and managed by its own audience, using a web browser."
In this case, you'll likely be the sole person making updates to your wiki. The web browser part is optional these days as well, as you'll soon see.
Platforms for creating wikis
Websites for creating worldbuilding wikis
WorldAnvil
This one is actually designed for people who want to create big worldbuilding wikis.
Pros: Worldbuilding prompts! Those are great. It's got a pretty comprehensive set of article types too.
Cons: Kind of expensive to upgrade for features like making your wiki private, and it does NOT work well with adblock turned on, so if you don't want to pay for a membership you'll get inundated with ads. I'm not a huge fan of the interface in general and a lot of it isn't intuitive, but I like what they're doing so I support them anyway.
---
Tiddlywiki/Tiddlyhost.com.
In addition to having a cat as its icon and also a silly name, each 'article' you create with this is called a 'tiddler' which makes me think of Chuck Tingle. I haven't used it much myself yet, but I did make an account and it seems pretty neat.
---
Miraheze
A community-hosted wiki platform that runs on MediaWiki (which is what Wikipedia runs off of).
Pros: It's not Fandom.com.
Cons: You have to request a wiki and can't just make it yourself, as far as I can tell. I haven't actually looked into this one as much.
---
Neocities
An option for if you want to go super oldschool and create a website using only basic html and hyperlinks (without the handy shortcuts of bbcode or Markdown). Monthly cost is $5 usd if you want to have more space and your own domain.
Pros: 100% control over your content.
Cons: Doesn't support PHP databases for wiki software, and can be fairly labour-intensive to update if you break a link or something.
---
Fandom.com
Unfortunately, this one is the top result you'll get when you look up how to make your own wiki. I'm only including it here to tell you to stay as far away from it as possible!!
Its staff are known to ban wiki creators from their own wikis and a bunch of other nonsense that I'm not getting into here.
Programs and apps/web apps for creating worldbuilding wikis
Obsidian.md
My personal favourite. I'm planning to make a whole post about how I use it in the near future as part of this article series.
It's a markdown-based application that you can get on just about any platform (Windows, MacOS, Linux, iOS, Android, etc) which is great. Obsidian is really easy to pick up and use and also has great themes and community plugins!
Best thing is, it's FREE and you only have to pay if you use their publishing service, which... I don't, so.
---
Notion
I've heard this one is pretty good too. Idk if it costs anything. It's another "second brain" style app (might be markdown also?) and I think it might do more than Obsidian, but I haven't checked it out much myself.
---
Microsoft Word/Google Docs etc.
...Or just about any word processor that lets you create internal hyperlinks. Word may work best due to the collapsible headings so it doesn't get too unwieldy, but *shrug* whatever floats your boat.
---
Excel/Google Sheets etc.
Or, again, any spreadsheet creator that lets you create internal hyperlinks.
I'd recommend having some basic spreadsheet knowledge before doing this. It could get complicated. Before I started using Obsidian, I was using Sheets to keep track of my glossary, notes about characters, and plot ideas.
Types of formatting & organization systems
There are as many organization systems as there are people who want to organize their stuff. Everybody needs something a little different! I find the ones that work best for me are systems that have a lot of customization options.
Here are a couple I know of.
Johnny Decimal
This system is absurdly simple in its concept and yet so versatile. From their website (it's just johnnydecimal dot com but I'll link it in a reblog later):
Take everything you need to organise and sort it in to, at most, ten large buckets.
Make sure the buckets are unambiguously different.
Put a label on each bucket.
Their website has a better explanation than I can give in this post, but I'll sum up the appeal of this system as quoted from their site: "There's only one place anything can ever be."
Usefully, part of this method is creating a directory for the rest of the system.
So if you're like me and tend to shove things wherever only to lose track of it later, this is a great system—especially when used in conjunction with the Zettelkasten Method (see below).
---
Zettelkasten Method
Originally devised as an extensive paper-based knowledge management system, Zettelkasten is meant to easily add new entries to a knowledge base while giving each one a unique ID for easy 'linking.'
The creator of this method said 'it is not important where you place the note, as long as you can link to it.'
As with the Johnny Decimal system, I can't explain it super succinctly (nor can the website, if I'm being honest), so I'll include a link in a future reblog for a video that gave me an excellent run-down of the basics.
Setting up your own system
An organization system is only useful if you can actually, y'know, use it.
It can be fun to set up a super-detailed organization system with predetermined categories for everything, but is it easy for you to use? How will you navigate it?
Making decisions
There will be a lot of decisions to make as you set up your system. The only set-in-stone rule I follow is... don't set anything in stone. It's okay if you decide something that doesn't work later on.
Figuring out your categories
My advice: go fairly broad. You can always sub-categorize. I'm going to go over my own wikis for Athenaeum and Rocket Boosters in detail in a later post, but here are the starting top-level categories I'd recommend for worldbuilders:
A meta category for notes about your database, templates, and any relevant research you've done.
Characters, including main characters, minor characters, and important figures
Worldbuilding
In the last category, which is the main reason for the existence of my wiki, I might have:
Culture
History
Locations
Organizations
Lore (if relevant)
Technology
Transportation
I'll go over the nuances of these 'main' subcategories in that future post I mentioned. In other words, the stuff that actually goes in those categories!
Determining the importance and relevance of worldbuilding elements
You'll need to figure out whether a topic is complex enough to deserve its own entry, or if it should be a sub-heading under another entry. It's okay if you decide on both! I have short subheadings under some entries that amount to "see [link to main entry on that topic]."
I've also decided to expand subheadings into their own topics, and I've removed topics as their own entry and shoved them under subheadings. I do this a lot, in fact! So it's okay if you don't know.
Templates
Will you be creating several of one type of entry?
Individual character profiles
Towns and cities
Factions
(to name a few)
It might be handy to figure out the basic types of information you'll need about each of those things and create a template for them.
A character template might have spaces for the basics, such as name, role, age, and so on.
Some characters will have a lot more information, and some might have even less than what your template dictates! And that's fine.
A word of warning about using system-creation as procrastination
Creating a wiki can be a daunting task. You might decide it's not for you, and that's okay. But you might also decide to go headlong into the process and work on every minute detail, and that is also okay, but.
But.
Beware of using your wiki as an excuse to procrastinate your actual writing/session preparation. Yes, use it to keep track of all the lore you've injected into your manuscript/campaign/whatever, just make sure it stays in its place as a companion to your main project rather than becoming your main project.
How formal should your entries be?
Honestly this one's entirely up to you. I have a mix. Some entries are written like Wikipedia entries with a thorough explanation of the topic with proper punctuation and formatting, while others are simply bullet-point lists of thoughts and ideas that I can return to at a later date.
What methods do you use to keep track of your lore and worldbuilding? Let me know in a reblog or comment!
And please make sure to check the notes. I'll be reblogging with links, and then reblogging that reblog to make sure they're, y'know, actually visible in the notes.
#wiki#worldbuilding#writing advice#writeblr#writeblr community#resource#worldbuilding wiki#obsidian#zettelkasten#resource by keyboardandquill
715 notes
·
View notes
Text
🐝 * ― 𝑪𝑨𝑹𝑹𝑫 𝑻𝑬𝑴𝑷𝑳𝑨𝑻𝑬 𝑼𝑷𝑫𝑨𝑻𝑬𝑺.
following my last post, i went through every single one of my templates to see which ones were having problems ( which were more than i initially thought ) and updated them all. the textbox itself might look a little more cluttered now, but i've tried to make it as readable as possible still. for those of you who want to fix the issue yourself ( in case i missed any or if it didn't update for you ) i'll leave a small guide down below on what you need to do. but first of, here's a list of all the templates i've updated:
EEYORE
LUMPY
SKULLASAURUS
KESSIE
OWL
SILLY OLD BEAR
HUNNY POT
BRAVER THAN YOU BELIEVE
STRONGER THAN YOU SEEM
SMARTER THAN YOU THINK
RUMBLY IN MY TUMBLY
BLUE BALLOON
NEW ADVENTURES
and as promised, here are the solutions for the most prominent problems i came across.
the first issue is the easier one of the two and it happens when styling a text as code and literally anything else. for me, the one i most commonly use is `**example**` and to fix that, you simply need to delete the asterisks, so instead of `**text**` you'll just have `text`. so whenever you have used the `` for code, just delete whatever other markdown formatting you've used.
the next issue is the spacing issue mentioned in the previous post. as i said, the easiest way to fix that is by including a simple dot and coloring it in whatever color is used in your highlight / background. one example of this would be ==[.]{#ababab} example text [.]{#ababab}== when doing it like this, you can even keep the bigger spaces - just make sure to place the dot right after the == in the beginning and right before the == at the end. and make sure to really change the color to whatever color you've used in your highlight / background, otherwise, it's probably gonna look weird.
another thing i noticed is that you cannot have any spacing following one of the symbols used for formatting. there needs to be some form of text so either use the dot method above again or, if you don't need the space, simply delete it.
if anyone notices i've missed anything, or has some further question, please feel free to ask! :)
#pooh speaks.#carrd#carrd templates#carrd help#( ngl i absolutely hate carrd for doing this right now )#( and i really hope they're gonna fix this in another update )#( but until then i hope this quick fix will do the trick )
151 notes
·
View notes
Text
so i've been using Obsidian for a couple months as the home base for all my fic writing, and have been thrilled so far! i dig its simple layout, powerful feature set, and there are tons of plugins to customize what you need. also love that it works across devices and syncs to your iCloud (rather than syncing to their own servers). and that it's free for personal use.

it has some interesting features like "canvas" and "graph" type documents (i have one of the latter that tries to graph relationships between characters and entities in my story) but most value i've been getting has been from plugins
main plugins i've been using:
Copy document as HTML -- very handy when it's time to post a chapter to AO3. it means i can embed the html for text conversations right in my Obsidian doc, and it'll display in a readable format while inside the doc, but the HTML all gets copied smoothly, along with and <strong> tags for italicized and bold parts (which is HUGE because it solves the problem where copying text with italics from Google Docs or other apps will end up adding weird extra spaces when pasted in the ao3 markdown editor)
Novel word count -- shows word counts for individual documents, but also will show the aggregate counts for entire folders/subfolders. super useful when you have a folder for a multi-chapter work and individual docs for each chapter
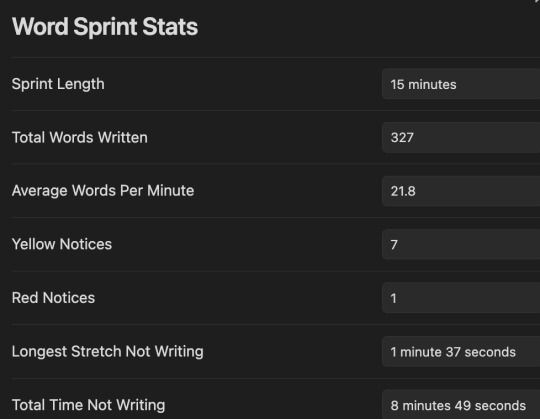
Word sprint -- lets you run sprints right from within the editor, keeps track of word counts and goals, shows motivational messages if you pause writing during the sprint
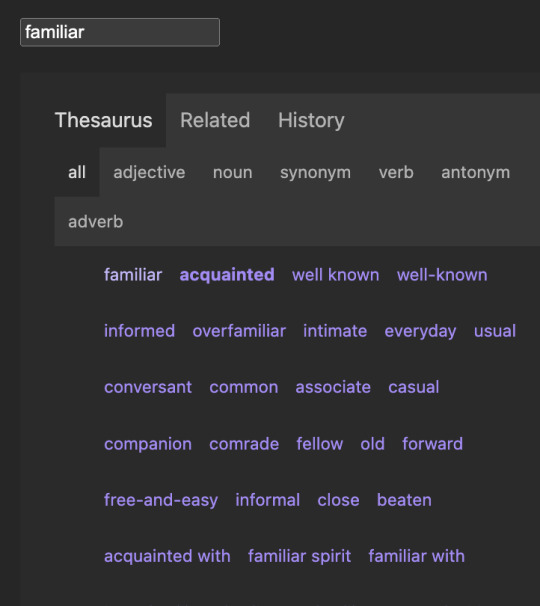
OneLook thesaurus -- no link because this is a plugin I wrote myself (but can provide the code if anyone's interested), but this uses the same API as OneLook to return results right in the editor. you can click to replace a word, check its definition, or add it to the search. the wordy plugin does something similar but i wanted a slightly different UI.

anyway it's been a game changer so far, 10/10 now it's time to do some sprints while i'm still on vacay~
i also just use it in place of my Notes app for random brain dumps and reminders
18 notes
·
View notes
Text
Because of who I am as a person, I’m now writing fic in a Markdown editor.
Google Docs is great, but i twitch at the formatting issues that happen when I copy/paste from Google Docs into AO3’s rich text editor. Extra spaces between paragraphs, words, punctuation, etc. (It doesn’t bother me at all when reading other people’s fic. But it bothers me a lot when it’s my own.)
So I’ve been writing the HTML by hand, and geez that is tedious and error-prone.
But with Markdown, I can write text like normal, using simple text formatting tricks we learned in text-only forums, and then have it magically turned into proper HTML afterwards. Examples under the cut.
For example:
Italics
*asterisks for italics*
will turn into <em>asterisks for italics</em>
which will become asterisks for italics
Bold
**double asterisks for bold**
will turn into <strong>double asterisks for bold</strong>
which will become double asterisks for bold
Strikethrough
~~strikethrough like this~~
will turn into <strike>strikethrough like this</strike>
which will become strikethrough like this
Blockquote
> blockquote like this
will turn into <blockquote>blockquote like this </blockquote>
which will become
blockquote like this
Horizontal rule
Three dashes like so:
---
will turn into <hr/>
which will become a horizontal line
Hyperlinks
[Make links like this](https://www.markdownguide.org/cheat-sheet/)
will turn into <a href="https://www.markdownguide.org/cheat-sheet/">Make links like this </a>
which will turn into linked text, Make links like this
App
I’m currently using the app Pretext on iOS so I can write on my phone. There are various apps around — search for “markdown editor” on whatever app store your platform has.
I’m still on the hunt for a Markdown app that understands footnotes. (You can do footnotes with Markdown, but not every Markdown editor understands how to turn them into HTML.)
But even if I have to manually edit the HTML for footnotes, it’ll still be less work than manually editing the HTML for everything.
Google Docs compatibility
Bonus: Google Docs can understand Markdown (it’s an option you can turn on). So if you still want to use Google Docs to collaborate/beta-read, you can copy-paste your plain text Markdown into a Google Doc, turn on the “Automatically detect Markdown” option, and it will be magically turned into proper formatting. https://support.google.com/docs/answer/12014036?hl=en
12 notes
·
View notes
Note
hi! i've recently learned about obsidian and i checked studyblr tag to see if there are any posts about obsidian and i found your post from last year about it :) and i wanted to ask how do you like obsidian? do you take all your notes in it? it looks very interesting to me but i'm afraid it may be too hard to me to customize my notes, and i'm curious what's another user's opinion! :)
Hi, thanks for your ask! I've been using obsidian for a good year now and I really like it, I take almost all my notes in it and use it to make summaries for exams. Basically the only thing I don't do in obsidian is writing term papers cause I'm much more accustomed to using Word+Citavi and to me it's a hassle to change the formatting. There are one or two YouTube vids that I used to get started that explained the Zettelkasten system
youtube
This is the one I adapted to fit my own needs. I find it pretty easy to get the hang of and customise, especially with plugins and stuff. But I'd say to start off, keep it minimal with very few plugins (except for themes ig there are some very pretty ones out there). The markdown formatting takes a little getting used to but once you've got the hang of it you'll start missing it in other apps like Word.
I highly recommend you give it a try, cause it's fairly simple (and satisfying) to use and you can add on lots of stuff later if you want to. And on top of that it's very adaptable to different types of uses and the good thing is that you can link between these types of uses. For example, for I time, when I spend most my days in front of my computer screen, I used the calendar+daily notes+ daily planner to create my daily to-do lists and plan my day and I could link that to the study notes I was takin
Sry for the long post, hope I could help!
17 notes
·
View notes
Text
An Honest Guide to Tumblr for Twitter Refugees (Part 2)
Part 0: What the heck is Tumblr and is it right for me?
Part 1: Configuring settings + customizing your Tumblr
Covered in Part 2:
Posting basics (introducing the editor, different post types)
Best practices (stating trigger warnings, adding image IDs, indicating sources, etc)
Post controls (who can reblog and reply to your posts)
Note: Like Part 1, I suggest you follow this guide while on desktop Tumblr. This post also contains lots of images without ID. Such images though are basically just screenshots of what's already described in the post body.
Posting Basics
I was gonna talk about curating your dashboard first, but considering how Tumblr veterans would think you’re a bot and just block you if they see your blog is empty, I think it’s best if we cover posting first.
Tumblr Editor
Before everything else, let’s get to know the editor.
On your desktop dashboard, you get to pick from different post types: Text, Photo, Quote, Link, Chat, Audio, and Video.

It should be pretty self-explanatory what they do, but you know what? THESE DON’T MATTER.
I talked about this briefly in Part 1, so lemme just copy-paste it here:
Although Tumblr is still advocating its different posts types (text, image, audio, video, etc.), they’ve actually been rolling out changes to their editor where only a single post type is used (text) and you just add media to it. This is called NPF (Neue Post Format). On desktop, you can turn off the beta editor and thereby turn off NPF. However, on mobile web and on the app, posts can only be made in NPF.
To put it simply: There is no difference at all between the different post types. The only difference is that when you click on a post type (for example, photo), the first block* on your post will be related to that post type (e.g. a photo block).
* If you’ve used WordPress before, then this should be familiar. But if not, then here’s a quick explanation: A block is basically a component used to create a post (text block for text, image block for images, video block for videos, etc.)
More technical info about the block editor and how to use it can be found here.
So my point is, don’t sweat too much over the different post types.
---
You can also write posts in HTML / Markdown!
If the default rich text editor is not enough for you, then get more power by using the HTML editor. It doesn't support all HTML elements, but at least you can do fancy stuff like adding some gradient text:
gradients are cool
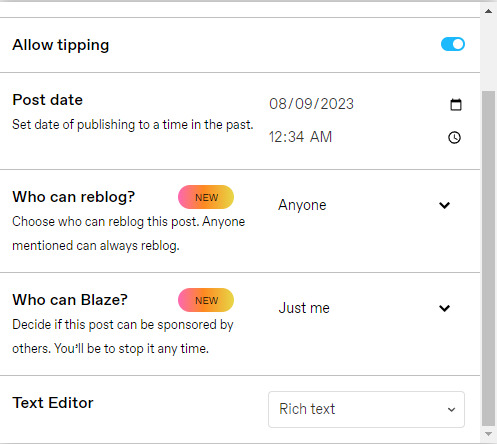
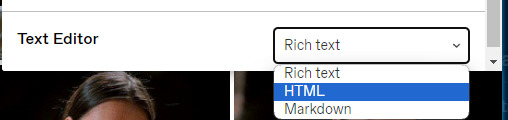
To switch editors, click on the gear icon at the top of the editor, and in the Text Editor dropdown, choose between Rich Text, HTML, or Markdown. If you’re curious about Markdown, learn more about it here.
---
Some neat stuff you have to know about posting on Tumblr:
A. YOU CAN EDIT POSTS!!!
We’ve had an edit button here for years, and best of all, it’s free! However, for posts of yours that have been reblogged, even if you do edit the original post, the edits won’t be reflected on the reblogged version. More about reblogging in Part 4 of this guide.
B. You can post loooong articles here
Like Twitter, Tumblr also has a character limit for text. However, this limit is on a per-paragraph basis and not for your entire post. And it’s such a generous limit that I’ve never once hit it. I don’t even have to keep tabs on how many characters I’ve made. You can find a list of all the limits you have to keep in mind when using the NPF/beta editor at the bottom of this article.
C. You can save drafts and schedule posts
If you can’t finish that post right now, no worries. Just save it to your drafts first and finish it later. Or, if you’ve prepared a cool post for New Year even though it’s still November, just schedule that post to publish on a New Year. More about queue/scheduling in Part 4 of this guide.
---
Best Practices
I don’t think I need to do a step-by-step on how to use the editor because it’s pretty intuitive, so let’s talk about best practices when it comes to posting.
On stating trigger/content Warnings
In Twitter, you do this:
// tw: r*pe, g*re, m*utilation
.
.
.
.
[actual triggering content]
Please don’t do this.
First of all, here on Tumblr, we do not censor out those “problematic” words. You have to spell them out so that people who have such words filtered in their settings will actually not see them. Getting content filters to work will be a pain if people have to keep in mind all variations of rape (r*ape, r@pe, r4pe, etc).
Second, those multiple dots don’t do anything. Instead, utilize the “Read More” block. This block will hide everything that comes after it under a “Keep Reading” link.
On desktop, you click on this icon that has a zigzag sandwiched between two horizontal lines:

On mobile, you do it by typing :readmore: and then hitting Enter.
(I’ll talk more about triggers/content warnings in Part 3, which will cover Tags)
Just spell everything out actually, not just trigger words
Instead of oomfs or moots, say mutals. Instead of unalive, say murder. No need to shorten or tone anything down here.
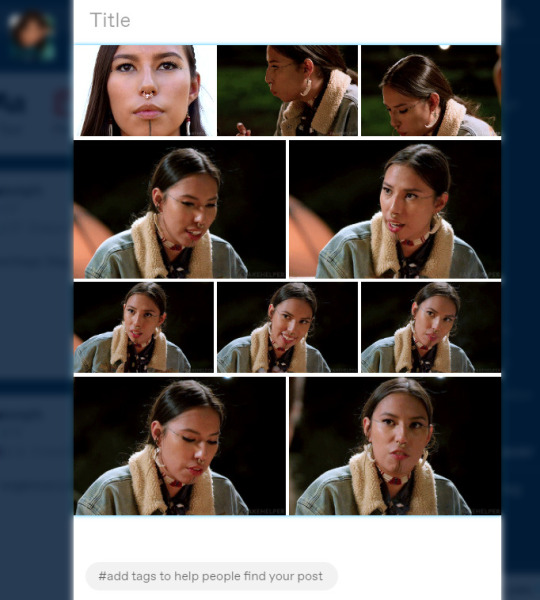
Add image ID’s
Image ID’s are basically descriptions of an image. This is important for people using screen readers. I’m guilty for not always following this, but just trust me on this.
On desktop, you hover over the image, click on the three dots that appear, and then click “Update image description.” Keep the description in simple words and state exactly what the image contains. I’m doing it for this particular image below:

On dashboard and on some themes, the image ID will be shown when you click on the ALT button that appears when you hover over the image.
Sometimes, when OP forgets to put an ID, someone will reblog the post and add the ID themselves. If you see someone doing this on one of your posts, then please be an angel and add that ID to the original post. Image descriptions will be more useful/have more impact if they’re actually part of the original post.
---
Link back to source
If you’re sharing someone else’s content from another site, please indicate the source. You can do this by adding a link to the source from within the post body itself, or by using Tumblr’s content source feature in the editor:
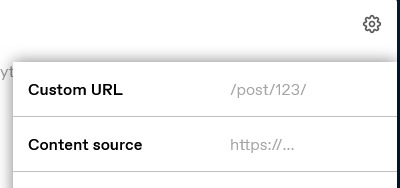
Click on the little gear above the editor, and in the “Content source” field, paste your link.
---
Do not repost other people’s gifs/edits
Sometimes you see a cool gif here on Tumblr that you want to use on your own post. People are generally fine with that, but you have to do it the right way.
DO NOT DO THIS: Downloading the gif and then uploading it to your own post.
Instead, DO THIS: Use Tumblr’s GIF block and search for a gif from there. Doing it this way would link back to the OP and even notify them in their Activity.
Here’s an example of how it looks:

The gif above is from my side blog, and below the image, it says “GIF by fyeahbachisagi.”
Post Controls
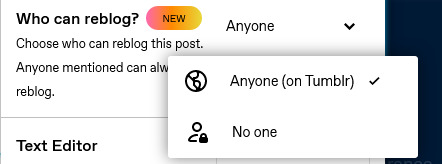
If you don’t want a certain post of yours to get around too much, you can disable reblogs on it. Click the gear icon at the top of the editor, and in the “Who can Reblog?” dropdown, choose from Anyone or No One.
Limits on Replies, however, is on a per-blog setting and not per post. Go to tumblr.com/settings/blog/username, and scroll all the way down until you see the setting for Replies.

---
Okay, that’s all for Part 2! Next up, in Part 3, I will talk about utilizing tags
Update: Part 3 is up! Well, kinda... Not exactly a guide catered to Twitter refugees, but still a guide to tagging:
A Guide to Tagging on Tumblr: Types of Tags
54 notes
·
View notes
Text
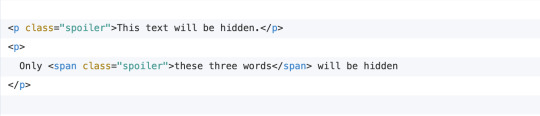
AO3 work skin tutorial: how to add a spoiler cover
someone recently asked me to clarify how the spoiler cover was coded in my work skin sandbox fic. it's kinda hard to chat about code, so I'll just make a post about it!
for my work skin, this is how the spoiler cover looks like:

I use the following css (you can view a more readable and copy-able version of it on pastebin, sans the comments. code starts at line 54 as of this writing).
(sorry, I never mastered tumblr's editor and it won't let me format code here via markdown ticks or the pre/code html tags. so I decided to just take a screenshot rather than risk it looking mangled on tumblr using the chat style/npf_chat class)

the gist of this is that the spoiler class makes your text look like a dark black rectangle per line.
spoiler:hover specifies the behavior when you hover over the text, spoiler:active is when you click on it.
so when the user hovers or clicks on the spoilered text, we reset the background and color back to normal.
you can now use our new spoiler class like so:
which will look like this on AO3:

this will not affect text size. so if you want to set font-size:28px then you'll just have a big blackout box.
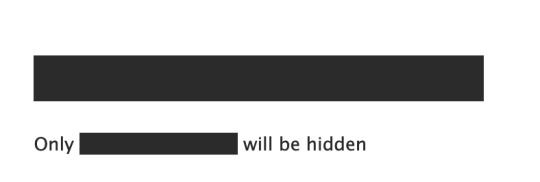

the same goes for smaller text. of course, if the words within a sentence are smaller than those around it, the blackout will cover the height of the largest font in the text block.


and that's it!
related: AO3 user La_Temperanza has a lot of great workskin tutorials and I highly recommend this tutorial as another resource.
14 notes
·
View notes
Text
not really related to anything but if you are looking for a free writing platform that is not Google Docs, I am really enjoying novlr after abandoning iCloud Notes in a fit of rage after it lost several hours of work like three times in a row
it's got a nice, clean UI, a good organization system, and it also pops up these cute little encouraging notifications when you hit daily word count milestones or maintain a streak of writing every day, which I think you can even configure what your daily goals are if you're into that kind of thing??? I think it also has some kind of integration with NaNoWriMo but again I'm not into that so I didn't look hard
but most importantly for me it has rich text formatting (NOT markdown, I fucking HATE markdown) that copy/pastes BEAUTIFULLY into AO3, like I did not have to correct ANYTHING... you don't even want to know the shit I was going through to format the garbage coming out of iCloud, like it would take an hour in an HTML editor to clean up 5k words, and then novlr's output is like 99.5% PERFECTLY clean HTML I almost cried
the downsides are that it does not have an app, and while it looks like they've made a lot of effort to have the mobile browser version be just as usable I haven't personally tried it enough to be like "yes this is 100% a good option for phone writing" bc I write less on my phone now, and some features like spell/grammar check are locked behind a paid account... but I wasn't getting spellcheck from iCloud Notes either so I personally lost nothing there, I just don't check spelling until right before posting lol
ANYWAY recommend if you do browser-based writing and hate Google Docs but are not serious business enough for Scrivener or the other heavy-duty paid shit
#google docs has never worked great on my iphone#and also has gone straight down the shitter lately i have heard#i guess also the novlr free version is limited to 5 'projects' which is basically 5 novel hubs each with an infinite number of 'chapters'#so if you're working on 5+ novel-size fics at once you may want to kick in the $4 a month fo remove that limit but i don't go there#rn i'm using one project for all the ncne stuff together
4 notes
·
View notes
Text
My essential and useful Obsidian plugins
A friend is getting started with Obsidian, making the switch from Evernote, and he asked me for recommendations on plugins. Here’s my list:
Essential
Command Palette This is the main way I invoke commands in Obsidian. You type a keyboard shortcut (Command-P on my Mac) and a little text popup comes up. You start typing and Obsidian auto-suggests possible commands, until you quickly narrow down to what you’re looking for.
Command Palette is a core plugin. It comes with Obsidian. If you want to use it, just switch it on from the Preference settings in Obsidian. The same is true for all core plugins.
Slash Commands does the same thing as the Command Palette plugin, but you start by typing a slash into the text of your note. I often use this as an alternative to the Command Palette. (Core)
Quick Switcher. A palette for quickly finding files and documents. It’s similar to the Command Palette. The Quick Switcher is my primary way of navigating between Obsidian documents. The keyboard shortcut on Mac for that is Cmd-O. (Core.)
I’m in Obsidian all day when I’m working. Most of the time, I’m writing, but when I’m in Obsidian and not writing, most of the time I’m hitting Cmd-P or / to invoke a command, or Cmd-O to switch between documents.
Daily Note. For writing daily notes. (Core.)
Files. See the files and folders in your vault. (Core.)
Better Word Count. Obsidian comes with its own word counter plugin, but this one can count the words and characters in a text selection.
I see now that Better Word Count has a couple of useful settings I have not explored, like excluding comments from word counts, and counting pages in addition to words.
My work as a writer requires me to write to length, and Better Word Count is how I keep track of that.
Better Word Count is a community plugin. Community plug-ins are made by people in the Obsidian user community. To get Better Word Count, or any Community plugin, go open Obsidian preferences, go to the Community plugins section, and search for the plugin by name.
Pandoc Plugin. Export Markdown documents in a variety of formats. I use it to export documents to the DocX format, for sending to clients. (Community.)
Useful
Backlinks. Shows other documents that link to the current document. (Core)
Search. Searches the vault. (Core.)
Outline. Displays an outline of the document you’re working on. (Core.)
Page Preview. Hover over an internal link to view its content. (Core.)
Templates. For creating note templates. (Core.)
Auto Link Title. When you paste in a Web URL, this plugin automatically fetches the title of the page. Works almost all the time. (Community.)
Calendar. Displays a calendar. Useful for navigating between daily notes. (Community.)
Daily Notes Viewer. View your most recent daily notes in a single page. (Community.)
File Tree Alternative. Displays files and folders separately. (Community.)
Minimal Theme Settings. Customizing the look of the minimal theme. Also, Styles. (Community.)
Natural Language Dates. For example, typing @today enters the current date, @yesterday enters yesterday’s date, and so on. (Community.)
Typography. Automatically replace dumb quotes with smart quotes, three hyphens with an em dash, and so on. (Community.)
AidenLx’s Folder Note. Creates a note with the same name as a folder. You can use the folder note as an index to the folder, with notes about what’s in the folder. The folder note can either be inside the folder, or in the parent folder. (Community.)
That’s seven plugins in my “Essential” category, and 13 more in the “Useful” category. This level of complication might be holding Obsidian back from mainstream adoption.
On the other hand, this level of customizability is precisely what appeals to Obsidian’s core user base.
And there’s more:
Trying these out to see if they are useful
Properties. Manages custom metadata you can add to your file: Dates, descriptions, links, whatever you want. Uses YAML formatting, which is just plain text at the top of the file. Obsidian has supported YAML for a while, but previously you had to work with the plain text; Properties puts an easier to use and prettier face on it. (Core, currently available only to people in the Obsidian Catalyst early-access program.)
Tags. I’m experimenting with switching to a very tag-heavy organizational structure for my vault. Previously I used folders. (Core.)
Tag Wranger. Rename, merge, and search tags from the tag pane. You can also create tag pages—pages with the same name as your tag. (Community.)
DevonThink. Helps to pair Obsidian with the very sophisticated Apple-only DevonThink document and information management tool. (Community.)
Very useful to many people, but I’ve never found a need for them
Bookmarks. Saves files and searches as favorites. (Core.)
Workspaces. Save and restore workspaces layouts. Frequently used for displaying multiple notes on one screen. (Core.)
Dataview. Turns your vault of text documents into a database you can query. I lack the technical chops to use this plugin. (Community.)
Templater. A powerful alternative to the Templates core plugin. As with Dataview, this seems to require more technical chops than I have. (Community.)
Canvas and Graph View are core plugins you use to visualize relationships between notes. Graph View generates maps automatically, using the links between notes. Canvases are built manually, by dragging notes and cards on a two-dimensional surface. I am an extremely non-visual thinker, so I do not find these two plugins useful. At least not yet. Maybe one day.
10 notes
·
View notes
Text

in this review, i discuss how obsidian can be a great personal knowledge management tool and what it can do in terms of organization for your notes
obsidian is a powerful tool that many people use as a personal knowledge management system. i recently made the move from notion and now use obsidian as my main app for everything from pkm to writing.
this review will give you an idea of my experience with the app so far, my likes, dislikes and what i would like to see improved. i discuss my set-up more in depth in this post.
what is obsidian?
obsidian md refers to obsidian mark-down which is a note-taking tool and pkm system built based on the markdown language. markdown is a tool used on many softwares that allows to plain-text formatting syntax, often used for creating rich text in a plain text editor. when you bold, italize and underline text, this is using mark-down. obsidian has features that tailor to managing notes, documents, and personal knowledge by bidirectional linking between notes, backlinks, and graph visualization of connections between notes.
who is obsidian best suited for?
obsidian md is the best tool for those who use a personal knowledge management system and is interested in mananging their knowledge effectively. this includes students, researchers, writers, and anyone who manages a lot of information and wants to effectively organize it. additionally, it's also a great tool for creatives and writers such as bloggers and content creators who often brainstorm ideas, plan projects and organize their writing process.
pricing
obsidian is 100% free to use with no restrictions whatsoever. as always, there are options to pay for obsidian sync or obsidian publish but those are not necessary to use the app.
how i use obsidian
i go more in depth in my set-up in this post so refer to that for a deeper look.
i've tested many different apps over the past 5 years and have ended up going with obsidian. this is mostly due to the offline feature that many apps lack(cough cough notion). i still use notion, but i don't prioritize it as much as i do with obsidian.
i use notion mainly for capturing my book ideas and writing my drafts for my novels. i do not use obsidian as my main writing app, but i do use it as a organizational tool for all my outlining and drafting. i go more into this in my post about my writing apps i use.
read my post on the best note-taking apps
is obsidian good for note-taking
obsidian is well-regarded as a note-taking tool and provides a range of features that make note-taking effective such as markdown support as discussed above, bidrectional linking which allows you to link between notes for easy acess. backlinks is another great feature which allows you to see the different connections to your current note. obsidian is also very customizable and allows users to customize the app to their preferences and workflow. you can add custom themes, snippets, and add plugins which can enhance your workflow and add new functionality to the app.
obsidian customization and plugins
obsidian is a very basic app but they allow you to add customizations to change the look and feel of the app. it's possible to change the theme of the app layout to another color scheme instead of dark mode. you can also add keyboard shortcuts. all of this can be done in the settings.
i discuss my favorite plugins in this post and top 5 plugins for writers in this post
—
overall, obsidian is a great app, but it certainly is not for everyone. there is a huge learning curve and is very overwelming for those just starting out. i have a beginners guide on obsidian linked here that has videos and tutorials to get you started. feel free to check it out!
#obsidianmd#obsidian.md#obsidian md#obsidian plugins#obsidian plugins rec#writeblr#mine: obsidian.md#writers on tumblr#writerscommunity#creative writing#writers#writers and poets#author#ao3 writer#mine: app review#mine: reviews
2 notes
·
View notes
Text
In which Arilin says pointed things about open source, open data, and social media
N.B.: As I was writing this, an entirely different kerfluffle started about Meta, Facebook's parent company, working on their own ActivityPub-compatible microblogging service. While that may be a field of land mines topic worth writing about, it's a topic for a different day.
Cohost's recent financial update revealing they are running on fumes can't help but bring to my mind what I wrote back in December:
[Cohost is] still a centralized platform, and that represents a single point of failure. If Cohost takes off, it's going to require a lot more money to run than they have right now, and it's hard to know if "Cohost Plus" will be enough to offset those costs.
I have a few friends who are Cohost partisans. While its "cram posts into 40% of the browser window width" aesthetic is claws on a chalkboard to me, it's easy to see why people like the service. They have the nice things from Twitter and Tumblr, but without the ads and the NSFW policies and the right-wing trolls and the Elons. They don't have the annoying things from Mastodon---the nerdy fiddliness around "instances" endemic to any such service, and the prickly, change-resistant and mansplainy culture endemic to Mastodon in particular. They even have a manifesto! (Who doesn't like a good manifesto?) Unfortunately, what they don't have is a business model---and unlike the vast majority of Mastodon instances, they need one.
To the degree I've become a social media partisan, it's for Mastodon, despite its cultural and technical difficulties. I'm not going to beat the federation drum again, though---not directly. Instead, I'd like to discuss "silos": services whose purpose is to share user-generated content, from tweets to photos to furry porn, but that largely lock that data in.
Let's pick two extremes that aren't social media: the blogging engine WordPress, and the furry story/image archive site Fur Affinity.
WordPress itself is open source. You can put up your own WordPress site or use any number of existing commercial hosts if you like.
WordPress has export and import tools: when you change WordPress hosts, you can bring everything with you.
WordPress has open APIs: you can use a variety of other tools to make and manage your posts, not just WordPress's website.
Fur Affinity is not open source. If FA goes away, there won't be another FA, unless they transfer the assets to someone else.
You can't move from another archive site to FA or move from FA to another archive site without doing everything manually. You can't even export lists of your social graph to try to rebuild it on another site.
FA has no API, so there's no easy way for anyone else to build third-party tools to work with it.*
Cohost is, unfortunately, on the FA side of the equation. It has no official, complete API, no data export function, no nothing. If it implodes, it's taking your data down with it.
Mastodon, for all of its faults, is open-source software built on an open protocol. Anyone with sufficient know-how and resources can spin up a Mastodon (or Mastodon-compatible) server, and if you as a user need to move to a different instance for any reason, you can. And I know there are a lot of my readers who don't dig Mastodon ready to point out all the asterisks there, the sharp edges, the failures in practice. But if you as a user need to move to a different Cohost instance for any reason, there is only one asterisk there and the asterisk is "sorry, you're fucked".
I've often said that I'm more interested in open data than open source, and that's largely true: since I write nearly everything in plain text with Markdown, my writing won't be trapped in a proprietary format if the people who make my closed-source editors go under or otherwise stop supporting them. But, I'm not convinced that a server for a user-generated content site doesn't ultimately need both data and source to be open. A generation ago, folks abandoning LiveJournal who wanted to keep using an LJ-like system could migrate to Dreamwidth nearly effortlessly. Dreamwidth was a fork of LJ's open-source server, and LJ had a well-documented API for posting, reading, importing, and exporting.
To be clear, I hope Cohost pulls out of their current jam. They seem to have genuinely good motivations. But even the best of intentions can't guarantee…well, anything. Small community-driven sites have moderation faceplants all the damn time. And sites that get big enough that they can no longer be run as a hobby will need revenue. If they don't have a plan to get that revenue, they're going to be in trouble; if they do have a plan, they face the danger of enshittification. Declaring your for-profit company to be proudly anti-capitalist is not, in the final analysis, a solution to this dilemma.
And yet. I can't help but read that aspirational "against all things Silicon Valley" manifesto, look at the closed source, closed data, super-siloed service they actually built in practice, and wonder just how those two things can be reconciled. At the end of the day, there's little more authentically Silicon Valley than lock-in.
------
*I know you're thinking "what about PostyBirb"; as far as I know, PostyBirb is basically brute-forcing it by "web scraping". This works, but it's highly fragile; a relatively small change on FA's front end, even a purely aesthetic one, might break things until PostyBirb can figure out how to brute-force the new design.
12 notes
·
View notes
Text
This post was created and written in Emacs as Markdown (with Frontmatter YAML), and then I used my mostly-finished Python code to post it as NPF using the Tumblr API.
The Python packages I'm using are
`pytumblr2` for interacting with the API using Tumblr's "Neue Post Format",
`python-frontmatter` for reading the frontmatter (but not writing; I hate how it disruptively rearranges and reformats existing YAML),
`mistune` for the Markdown parsing, for now with just the strikethrough extension (`marko` seems like it would be a fine alternative if you prefer strict CommonMark compatibility or have other extension wants).
The workflow I now have looks something like this:
Create a new note in Emacs. I use the Denote package, for many reasons which I'll save for another post.
Denote automatically manages some fields in the frontmatter for the information it owns/manages.
Denote has pretty good code for managing tags (Denote calls them "keywords"). The tags go both in the file name and in the frontmatter. There's some smarts to auto-suggest tags based on tags you already use, etc.
The usual composable benefits apply. Denote uses completing-read to get tags from you when used interactively, so you can get nicer narrowing search UX with Vertico, Orderless, and so on.
So when I create a new "note" (post draft in this case) I get prompted for file name, then tags.
I have my own custom code to make tag adding/removing much nicer than the stock Denote experience (saves manual steps, etc).
Edit the post as any other text file in Emacs. I get all the quality-of-life improvements to text editing particular to my tastes.
If I stop and come back later, I can use any search on the file names or contents, or even search the contents of the note folder dired buffer, to find the post draft in a few seconds.
Every time I save this file, Syncthing spreads it to all my devices. If I want, I can trivially use Emac's feature of auto-saving and keeping a configurable number of old copies for these files.
I have a proper undo tree, if basic undo/redo isn't enough, and in the undo tree UI I can even toggle displaying the diff for each change.
My tools such as viewing unsaved changes with `git diff`, or my partial write and partial revert like `git add -p`, are now options I have within easy reach (and this composes with all enhancements to my Git config, such as using Git Delta or Difftastic).
After a successful new post creation, my Python code adds a "tumblr" field with post ID and blog name to the frontmatter YAML. If I tell it to publish a post that already has that information, it edits the existing post. I can also tell it to delete the post mentioned in that field, and if that succeeds it removes the field from the file too.
The giant leap of me being able to draft/edit/manage my posts outside of Tumblr is... more than halfway complete. The last step to an MVP is exposing the Python functions in a CLI and wrapping it with some Emacs keybinds/UX. Longer-term TODOs:
Links! MVP is to just add links to my Markdown-to-NPF code. Ideal is to use Denote links and have my code translate that to Tumblr links.
Would be nice to use the local "title" of the file as the Tumblr URL slug.
Pictures/videos! I basically never make posts with media, but sometimes I want to, and it would be nice to have this available.
6 notes
·
View notes
Note
congrats on the new model, frank, how's it feel? is there anything you're particularly pleased about being able to do better now? [sent 7:40pm PST 3/18/23]
Thanks! (I've only been on it for a few days, but I do like the way my typing feels)
The biggest thing is that I can now write in LaTeX. That was something I wanted to do since high school -- for no good reason other than I liked writing code and thought maybe this would be fun? It didn't turn out to be much fun at all, though. Writing equations wasn't hard, but formatting them correctly turned into a major pain in the ass.
At least one of these problems has gone away with this model. If I want to format an equation in LaTeX, I just put it inside a single-line text box within a larger text block and then hit "Enter" after typing &#$%, which should create a line break between the two things; everything else will automatically get formatted properly around it. When I want to include a picture or whatever I insert it as usual with the control key pressed down first so it gets rendered properly. And if there are any errors when I try to compile stuff they usually go away by themselves after retrying once or twice. The whole process is actually pretty similar to using Markdown, except without any weird Markdown extensions needed.
There were some minor annoyances left over from before: you still need to manually switch modes to use italics, boldface etc., and putting the cursor in front of a word doesn't automatically select it anymore. But overall I am very happy about having gotten rid of those problems while keeping most of what made Tumblr great.
7 notes
·
View notes
Last Seen Blogs

matthew-bomer
Mr Smooth Criminal

hengo-thepointman
Hengo

realestatesxmsaintmartin
RealEstateSXM

eijaja-blog
Unmotivated

adinnkarnatakaoutdoorservices
Adinn karnataka Outdoor