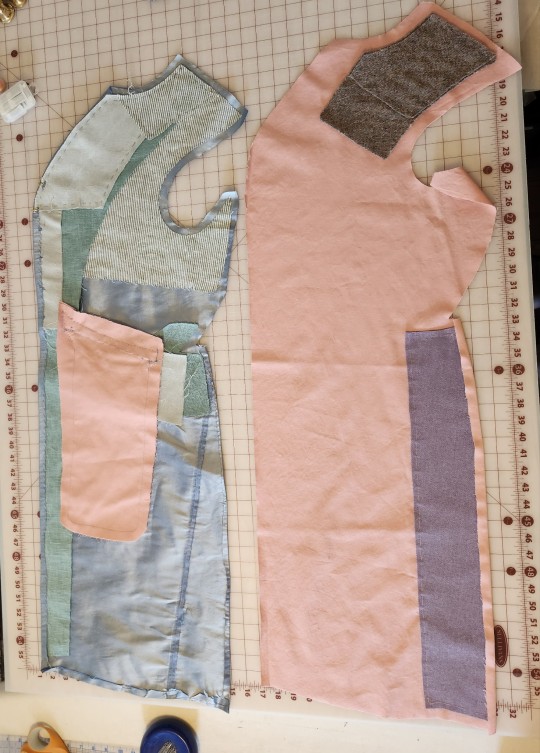
#i mostly use it for sewing projects
Explore tagged Tumblr posts
Visit Tumblr Blog
Explore Tumblr blogs with no restrictions, modern design and the best experience.
Last Seen Tumblr Blogs


Fun Fact
Tumblr has a low social media market share in South America.
Text
sometimes it turns out you're not an XS, you're just an XL who happens to be 5'4"
#men's fashion#transmasc#this is a subtweet to men's fashion#cause I just tried on the fucking XL and XXL shirts I bought at the charity shop as sacrifices to sewing shenanigans#cause that's the W I D T H I need for the hips#and they were not nearly as misfitting on me as I expected them to be#like still very much too big but mostly in terms of length and only marginally in shoulders and collar#like shoulders on the XL one are basically the same amount of too big for me as they are on the S I also bought#men's fashion explain yourself#wtf is this#this is after buying L/XL shorts yesterday too for same hip reason albeit with less worry abt other proportions#turns out#only short#men's fashion doesn't give a shit abt how slender some parts of you may be#widest part is all that counts#cause male fashion shape language says to be WIDE#and you gotta lean into it all the way apparently#I feel both pissed off and enlightened abt these recent insights smh#the XL one makes my shoulders look incredible I am severely tempted to just shorten it and fix the sleeves#but I may just trace the pattern and use its structural knowledge on future own projects hmm
9 notes
·
View notes
Text
think if i do decora kei!jacket again, i'm gonna try and find a cheap pair of black circle sunglasses so i can replace the mesh in the eyes. visibility in that thing isn't so great and if i'm honest the mesh is kinda uggy in pics
#would also like to invest in a more realistic rooster mask if i ever decide to do a more serious jacket cosplay. If.#quiet honestly if i do i think i wanna give a go at making my own jacket for it; think it'd be fun to give it a fun lining on th inside#or even make it double sided so i can have two jackets in one#but i'm getting ahead of myself heheh#i think i'll need more sewing practice before i can definitively make that a reality#anyways! this is mostly a reminder to myself to:#1). fix my jacket's piece bc it got kinda busted up after animer riverside#2). get those sunglasses i was talking abt + some E6000#and 3). look up some easier sewing projects to get myself more used to it#.txt
2 notes
·
View notes
Text
Several weeks ago one of my coworkers called me over into her cubicle and gave me a very unexpected gift. Her mother passed away recently, and she'd been packing stuff up at her condo to give to relatives and sell, so the home could be sold. The mother was an avid knitter and crocheter, and when my coworker came upon her stash of equipment, she told me, she "immediately thought of me as someone who might get some use out of it."
So, I have inherited a varied collection of knitting needles and crochet hooks, cable needles, sewing needles, and, best of all, now-out-of-print pattern books, mostly for blankets, because that was what this lady loved to make most. Plus, I also have a bunch of gauge swatches she made, pinned to little bits of card covered in perfect schoolteacher handwriting setting out the patterns they were made to test.
And also...
My coworker brought another bag, full of yarn and...knitted blanket squares. Her mother's last started project, before she got too sick to continue. And she asked if there was anything I could do with it.
It turned out, there are twelve completed squares, and I quickly located the pattern book they are from amid those given to me. It's a book of 60 patterns, meant to be put together however the maker wishes into blankets of 20 squares. I figured out which of the numbered patterns were already made, and selected eight more that I thought might go well with them.
So now! I am working on completing! My coworker's mother's last knitting project!
And I really am feeling very good about doing it.
#kidk says stuff#knit#i love making blankets anyway and these patterns are honestly cool#i already have most of the equipment i'd ever need but i still feel warm and fuzzy having this old gal's stuff too#my coworker thought of me ;__; she's seen my scarves and the table runners and stuff i have in my cubicle#she gave me precious things from her mother's beloved hobby because she 'knew i wouldn't let them go to waste'!#i feel very much like a human being and a member of a community because of this idk it's just nice all right?#crafts#blanket completion project
14K notes
·
View notes
Text
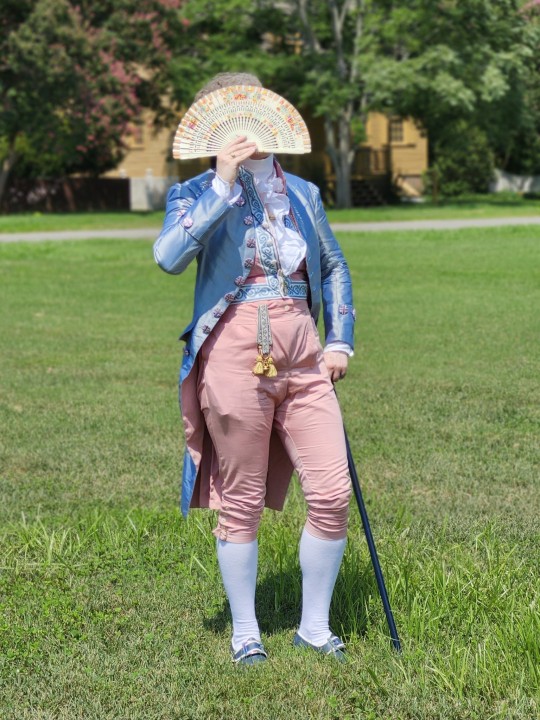
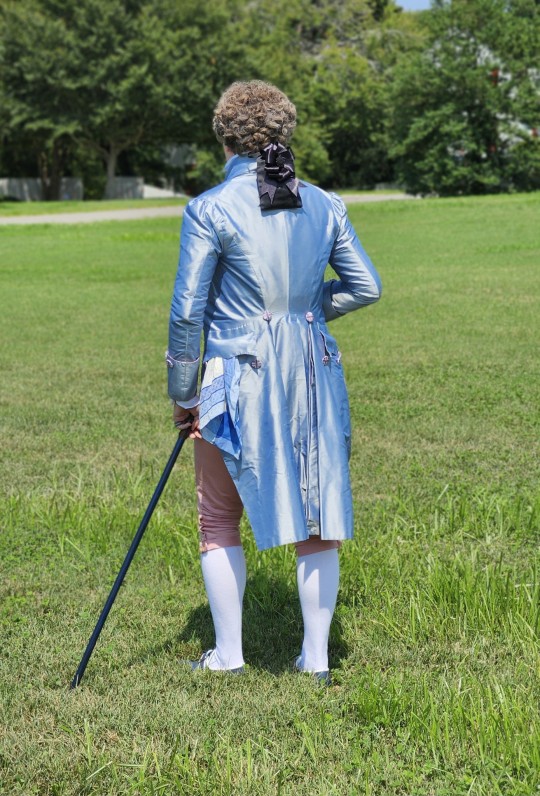
The Trans Court Suit
This was my big project I made over the summer! I am beyond proud of and happy with the coat.
The first initial project I wanted for this was a pink waistcoat. I grew up liking pink and most of my stuff was, but that (along with growing up in a hot pink room) made me start to resent pink a lot especially as a teenager. (I think a lot of trans guys have similar stories.) But of course pink was very popular for men throughout a lot of European fashion history. So in many ways this was a self healing project for me, at least in that regard. Which I think was a success!
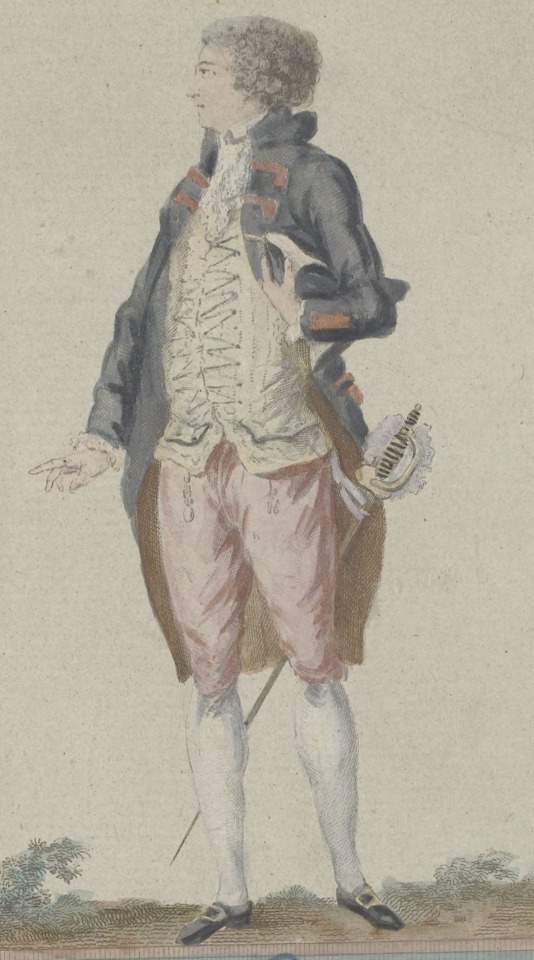
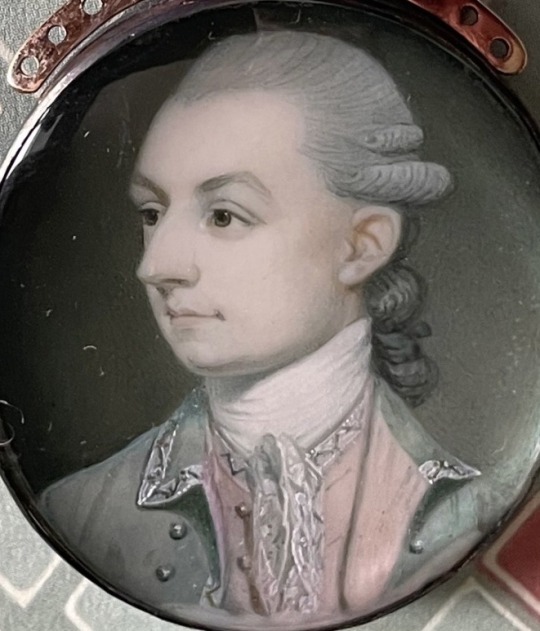
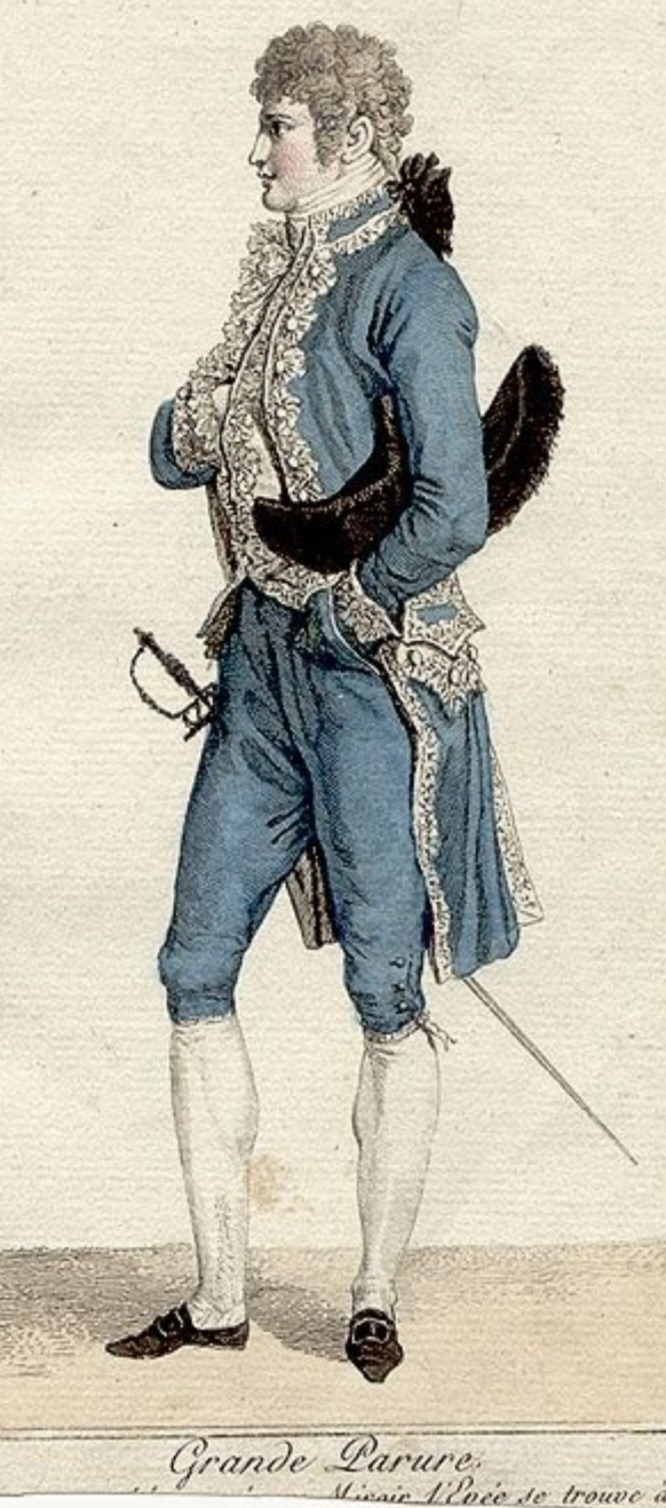
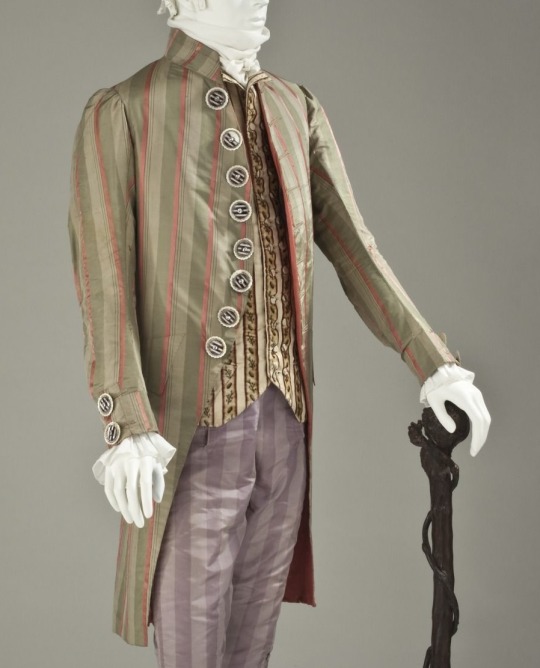
I actually found the first two portraits after I started working on the outfit, they looked perfect! The first especially is super close to my hair.
The silks for the coat as well as the linen interfacings were second hand or scraps in my stash. The cotton sateen was from Burnley and Trowbridge. This is the first project I fully drafted myself. The waistcoat and breeches were made from an 1820s manual and the coat was primarily taken from Period Patterns by Doris Edison, using also Agreeable Tyrant for interfacings and The Taylor's Complete Guide (for shape reference).
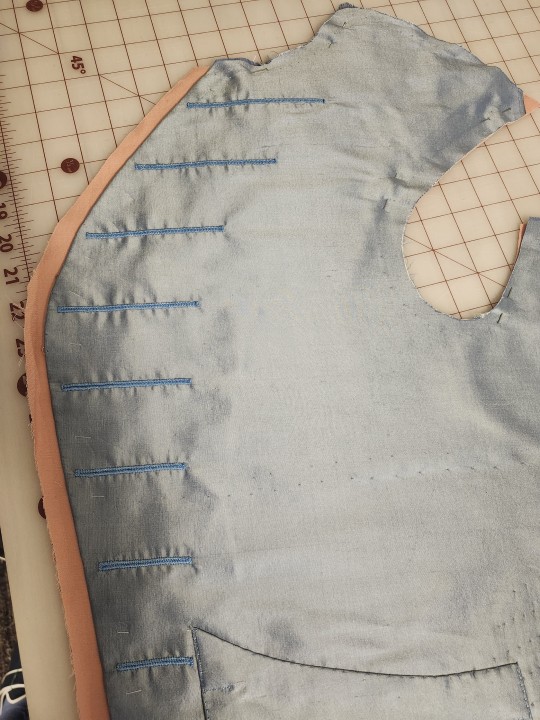
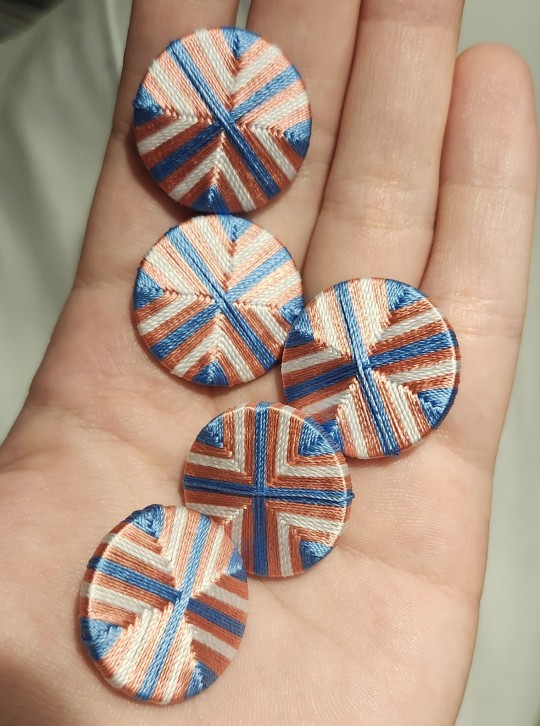
This is also the most hand sewing I’ve done for an outfit. Both of the fronts of the coat and waistcoat are completely by hand. Most of the coat is by hand with machine for structural/backstitches, mostly the seams but not the edges. In total there are 22 buttons.
I made the waistcoat straight across for two reasons A. So I can wear it with my other stuff B. I didn’t have any more trim, that was it. I’ll probably make a more 18th century style waistcoat out of white for this (at some point).
The breeches ended up being too small for my thighs so I started getting frustrated with the fit and rushed them by the end so I could move on. (I accidentally sewed the buttonholes on the wrong side).
3K notes
·
View notes
Text

I've noticed in the selfship community we don't talk a lot about ita bags and other DIY fan culture things much! To some extent it makes sense, as it might feel strange to some to have a lot of merch of someone you're viewing as a partner? But I've personally found it fun and wanted to share some video tutorials and inspiration for anyone else that might want a craft or project to dedicate to their f/o or comfort character!
links in this post go to tutorials/videos/templates!

Bags for displaying official or fanmade pins, keychains, and merch! There's a million ways to do this, but here's a couple to use as jumping off points.
using a standard premade ita bag!
using a nicer bag!
Making an ita bag out of a cheap PVC tote bag!


"But I can't afford merch/there's no official merch/etc!"
No problem, lets talk about how to diy that too!
You can use shrink plastic to make your own keychains!
You can also make pins in lots of different ways!
Using epoxy stickers
Using hot glue
Using a traditional can badge without a button maker
There are also Etsy sellers who will make custom badges from art as long as you have permission by the artist! If you have your own fanart, or can ask an artist you've commissioned, this would also be an accessible way while still looking more "official."
Finally, I believe these are usually used on Uchiwa fans (see later section), but I've used these paper letters alone as ita bag decorations! Name boards combine the letters or kanji of a character's name (or a different word relevant to the character) with their picture!
youtube

Do you have one standout badge that you'd like to highlight on your bag, or maybe you just want to make it into a keychain? Rosettes are great for that, and there's a million ways to make them. Here's a few!
1, 2, 3 , 4


Do you have paper goods such as photo cards or mini prints that need a safe but stylish way to be stored and displayed? Photo card holders are the way to go! There's a lot of different styles people like to use:
Resin Deco method
Lace and Ribbon method
Fake Cream (Decoden) method
Sticker method


Tutorials for photo cards do exist, and I will link them, but it's worth noting that it's a lot of work and the quality you get depends a ton on the quality of your printer. If you have access to an art printer, these will turn out great! If you're using a regular printer, however, you may be unsatisfied with the quality. Buying prints from small artists or having regular photos printed would be other alternatives.
Photo card tutorial focused on drawn art
Photo card tutorial focused on photos

Fans that are often printed with your favorite idol to use at concerts! While it originates there, people have started making them for their fictional favorites as decor too. You can create a full size fan (they sell blanks on amazon) or create a mini keychain version for an ita bag!


These can be quite complicated, but you can make your f/o as a plushie! Especially great for f/os who have no official plush merch.
This tutorial goes very fast, but it looks easy enough. This is only one example tutorial. There's also this pattern you can work with if you mostly understand sewing.
A more approachable plush like project would be these felt "plushies"!
You can also buy plushie bases like these , and then all that's left is the face, hair, clothes, etc.! You would probably approach it like in this video but the style would be up to you. I love how this creator embroiders faces!


I hope this gives you all some ideas to work with! 🩷
#self shipping#self ship#yumeship#yumeshipping#f/o stuff#f/os#fictional other#self ship art#self ship ideas#oshikatsu#yumedanshi#selfship#f/o community#mine
677 notes
·
View notes
Text
honey's guide to having the BEST closet ever.ೃ࿔*:・🍨🎀

as a fashion girlie who's curating the wardrobe of her DREAMS i've come with my notes, tips, and everything i've learned thus far on how to have a cohesive, FABULOUS closet…💬🎀


HAVE A CLOSET COLOR PALETTE ;
this is the GOLDEN rule of having a fabulous closet. keeping a color palette thats true to u doesn't mean that u cant play around with colors and textures, but it means that ur pieces will ACTUALLY go together and you'll buy pieces that actually go with other pieces in ur closet and you'll be able to make like DOUBLE the outfits.
since my vibe is super feminine and glamorous i stick mostly with pinks, creams, browns, whites, nudes, blacks, etc etc. i love that glamorous look. it makes making outfits and getting dressed so much easier bcuz everything matches. plus ur closet is so aesthetic and looks like a boutique.
PRO TIP : buy cute hangers for your closet, it'll help with an overall cohesive look. i got the CUTEST pink heart shaped hangers off of ali express for like $0.99 and they're actually amazing quality and i LOVE them…💬🎀
BE INTENTIONAL WITH EACH PIECE ;
do.not.buy.fast.fashion. dont spend more than a hundred dollars on fast fashion, heck dont even spend a hundred dollars on fast fashion. i get that its tempting when u see those low prices but the quality HELLO?? i understand sometimes wanting something quick and easy but just don't overspend on fast fashion.


another thing, don't buy things just because they're trending right now or because they're cheap. u have to ask yourself if this piece SPEAKS to you, does it fit ur vibe? how many diff ways u can wear it? does it fit ur palette? etc etc. we wanna CURATE our dream closet, not a super cluttered one that we dont even have any like attachment to.
THRIFTING ;
when thrifting, my first tip is to always head to the pajama/lingerie aisle first for some cute tops! those fit my vibe so i head there first. bcuz i know my closet color palette i check the pinks, creams, browns, etc first and then i go on from there. know ur color palette and look through those colors first. next, go to the kids sections for super cute tops.
TAILOR YOUR PIECES ;
do u know how FABULOUS it is to have pieces that look like they were made FOR your body?? like thats peak glamour. yes it costs a pretty penny but its an investment! i get every single pair of jeans i own tailored because in my opinion i feel like thats the piece where its the most notable.
if you find the perfect skirt but it’s a little too long or the waist is off, get it tailored!! or learn some beginner sewing and do it urself. having clothes that fit you perfectly makes such a difference in how you feel in them.
SIGNATURE PIECES ;
every girly girl should have her signature piece of jewelry, signature scent, signature lipgloss, heck even a signature hairstyle. i love having signature things because its all part of the branding you know? if ur not a bracelet girly, have a signature necklace. or if ur not a necklace girly have a signature pair of earrings.
and take your time when finding your signature pieces because when you have something that is ur signature _ it'll be like a part of you so you wanna take time into thinking and choosing the piece that best represents you and who you are/want to be.
UTILIZE CANVA TO MAKE OUTFITS ;
i use canva for EVERYTHING, school projects, moodboards, and to curate outfits. i use pieces that im thinking of buying and put them into canva and just make a bunch of outfits so i can get a visual of what the piece would look like styled. it’s actually so fun like i feel like a fashion editor making layouts for vogue. sometimes i’ll screenshot pieces from websites and mix n match them with items from my closet. plus it helps u be more intentional with your shopping bcuz u can see what ur closet is missing. it’s like building your own lil fashion universe.
#honeytonedhottie⭐️#it girl#becoming that girl#that girl#it girl energy#self care#self love#fashion#fashion girly#fashion binder#fashion tips#girly#girl blog#girl blogging#girl blogger#hyper femininity#hyper feminine#glamorous#glamour#fabulous#fabulosity#fabulously feminine#dream girl#dream life#dream girl tips#beauty
445 notes
·
View notes
Text


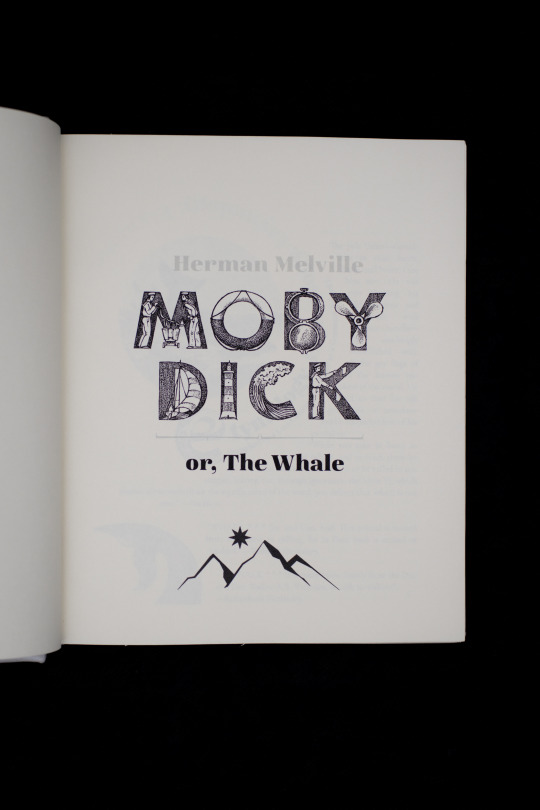


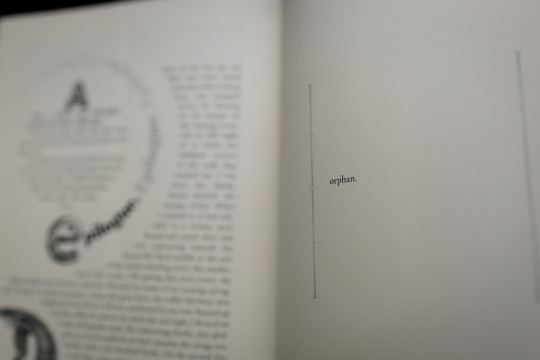

Fanbinding(ish): Moby Dick by Herman Melville
If you've been following me for a while you may remember that I started this typeset in, ahem, November 2022. Finished it in October 2023. Finished binding it in 2025. Did I make it take 3 years on purpose? Or was it always second on my list of projects and I was totally going to do it soon?... I don't want to talk about it.
Blatant lie: I do want to talk about it.
What's fun about this bind is that I found the leather for it in Greece in spring 2024. It's shiny! It's sort of pearlescent! It's white! It's absolutely not made for bookbinding! I knew that at the time, but hear me out: it was shiny. It was sort of pearlescent. It was white. It was also prone to scuff marks and stretchy as fuck.
It was also, it turned out, about 1" too short to do a full cover.
So I abandoned my dream of doing this Beatles White Album style and added the stripe down the middle. (I then drew a harpoon on that stripe at the last second because I thought it looked too much like a flag.)
I used a hot stamping machine to make the patches for the spine. It was my first time trying that: in the future, I'm going to pare the leather before cutting the patch, as that gave me a lot of trouble and I was ultimately unsuccessful. So it looks a little bulky right here, but, such is life. I seriously considered listing the author as Merman Helville, but I refrained.
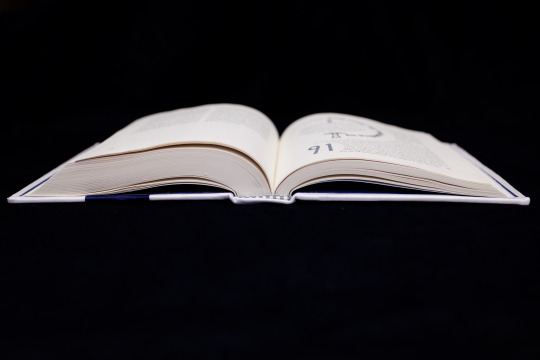
This was my third laced-cord binding (wherein the cords are laced in through holes in the cover board and then hammered--mostly--flat) and I've decided it will be my last. Will I stick to this? Who knows, that's what I said when I finished my first one and also my second one. I might try fake raised cords in the future, or sew onto cords but then only lace them in through one hole to keep the cover smooth. This would mean I still have to fray them out, though, which is not particularly fun. (It's improved by doing so while watching Black Sails.)
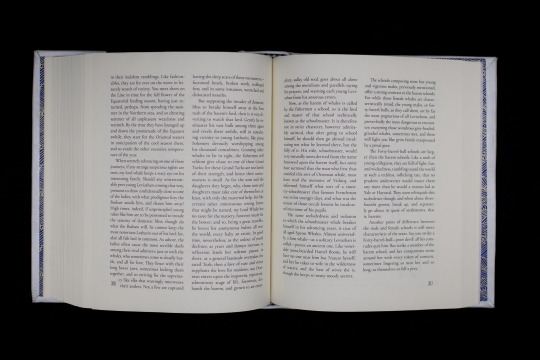
My goal for the typeset was to make it technically readable but absolutely impractical, and I think I have achieved this.
I still think the last page is tied with the "Oh fuck" halo as the funniest pages I've ever typeset.
204 notes
·
View notes
Text
Pinned post with links
Been meaning to make one of these for years!
Blogspot - I used to post on there more often, and I really would like to get back into it. Mostly longform sewing posts about how I made a thing.
Youtube - Mostly sewing videos, with each step of the project explained in thorough autistic detail. New videos come out whenever I finish making one (which is not super often) and they are however long they need to be to contain all the relevant information.
Patreon - Started out as just extra @pterribledinosaurdrawings but now I also do monthly behind the scenes updates on the sewing video stuff I'm working on, and have done a few unscripted bonus videos. (I also have a ko-fi but I haven't really posted anything there.)
Instagram - Occasional photos of stuff I've made, much the same as I post here.
Facebook - Same stuff as instagram. I don't look at my feed on either of those places but I still post.
Pinterest - Where all my beloved reference pictures live. Wanna see pictures of extant 18th century waistcoats? My board for that has over 1,400 pins!
Spoonflower - Repeating patterns on fabric.
Redbubble - All the patterns from Spoonflower on various things, plus various other drawings (many of them are @pterribledinosaurdrawings).
239 notes
·
View notes
Text
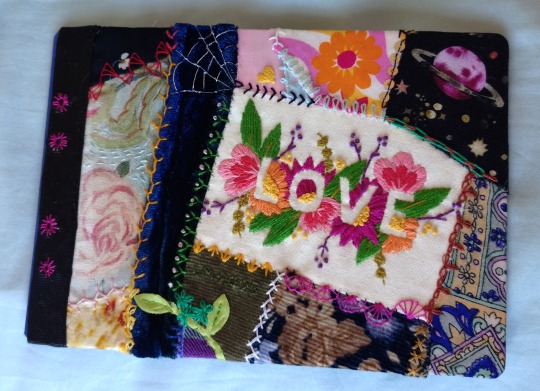
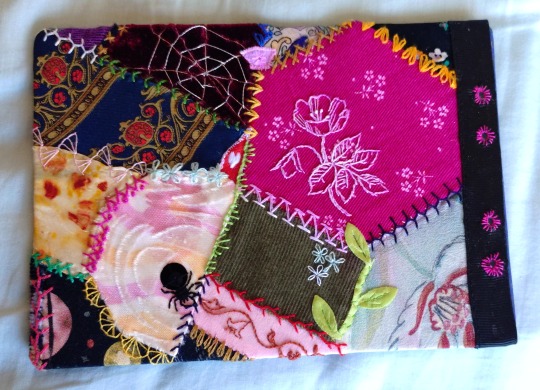
As I promised @elodieunderglass (ty for the reminder), pictures of my finished (ish) crazy quilted notebook covers.
If you haven't previously heard of crazy quilting, it was a HUGE craze among housewives in the late 19th century, which revolved around patchworking and appliqueing together irregularly shaped fabric scraps and then embellishing the shit out of them.
I embarked on this project because after filing away the idea of crazy quilts from a coffee table book my spouse picked up in a charity shop a year or so ago, I saw a couple of people on youtube sharing their work; and because I needed covers for my next junk journal.
I cleaved pretty close to the base principles of the style - using precious scraps, making as much of them as possible, and creating a canvas for lots of embroidered embellishment. These two 5x7ish pieces barely used up any volume of my accumulated scraps so there will be more crazy quilting in my future, once I think of ways to make use of it.
I'm very pleased with how the compositions came together, and it was lots of fun picking the embroidery thread colours to speak to all the different patches. Actually the whole things was stupid fun and I worked on barely any other projects or, in fact, chores while Iw as working on it. Next time I will probably match the weight of my fabrics more closely (mostly bc the velvets have made things lumpier than I'd have liked), and I'll prewash the old bits retrieved from my nan's sewing box bc when I rinsed the embroidery pen out from the wild rose piece the pink bled and I was quite lucky it was mostly synthetic patches around it.
Under the cut for an inventory of scraps used (all out of stash)
"love" embroidery, from a magazine kit released ca 2018/19
orange & pink flower print, velvets, floral corduroy, ribbon, and pink twill all from my Nan's sewing box
Pink silk leftover from my wedding dress, flower print and the translucent silk the spider is mounted on from a scrap bag - all from Beckford silks (they don't carry the scrap bags on their website but they're well worth a visit in person if you're in the neighbourhood)
The other printed silk was a tunic of mine which stood up poorly to wear
Blotchy yellow and rust silk from a natural printing demo
Green corduroy and black flower print viscose from Will's sewing projects
Blue and fuchsia check from my old pjs
planets print quilting cotton bought for a hat band from the remnants bin of the friendly local fabric shop
green leaf ribbon leftover from an Audrey ii costume
174 notes
·
View notes
Text
From Each According to Their Ability

Jackson!Joel x gn!reader
Masterlists being updating under the new renovation. I went from romanarose to cosmickid-inmotion!!! I have to fix everything up before I add masterlists etc
Summary: You're fully deaf, and you're begining to feel frustrated with not being seen as a productive human with your own capabilities.
Warnings: Covert ablism. Nothing extreme but just to be fair. Reader lost their hearing in a explosion. Mention of meth. That's it i think, lmk if I missed anything!
Disability Visability event OPEN THROUGH THE END OF MAY!
A note on disability and employment after the fic.
Based on an ask I got by @goodbyetothenight! Back in October I said i was done writing Joel due to constant abuse from the fandom. However, in the spirit of an inclusive enviorment for people of all kinds I decided to write this piece. I took a intro to disability class where one of my big projects was on disability and employment, and i have a good friend who used to do dead/HOH advocacy so I feel pretty comfortable with this subject. As many of you know, for a long time i suffered hearing loss due to what i know know was a mass in my ear. I got it removed and hear much better now, but it was bad enough it caused problems for me. Still, if I said anything offensive please let me know!!
Dividers by @bernardsbendystraws
1.7k words
(I changed it to gn reader so if theres accidentally anything indicating gender other than the 50s housewife joke which i think works either way, lmk!!)

To each according to their need, from each according to their ability.
That was the communist manifesto, wasn’t it? Honestly you don't remember anymore, college was so long ago, and you’d have enough brain trauma. Of course your memory wasn’t what it once was.
What you did remember was Maria saying, “Everyone has their place”
The accident was how they’d found you; how Joel had found you, actually. No, you weren’t making meth in Wyoming after the world had gone to shit, but you might have been known to… do some trade running is all. Imagine your surprise when you came to a supplier, were having a chat, when his entire lab blew up… and all the explosives he’d stored in the next room.
You laid there in the rubble, making peace with your ending when and angel appeared in flannel.
You didn’t hear a word he’d said, the ringing in your ears far too loud, but after he’d taken the parts of the house that’d fallen on you and shortly before passing out, you were certain you could read his lips.
I got you.
You had lost all your hearing. This made you hesitant to join the community Joel had brought you too, but what choice did you have now? Maria, in conversing through writing, had assured you that there would be work for you and you’d be provided for in return.
“Not everyone does patrol.”
But you couldn’t do a whole lot you used to do either. Anything that involved needing to be very aware of surroundings was a no. No construction, for obvious reasons. None of the farm work: if there was a clicker or a siren went off, what if you were too far out and no one got you? No teaching, the kids, no large animals, not even cooking because you couldn’t hear when someone said ‘behind!’ or ‘sharp knife!’ or ‘oven open!’
Yeah, you did work. You did a lot of sewing, mostly. Sometimes you could watch the young children in the nursery, just not alone. You did what you could but sometimes you felt useless. It’d been a year now, and you struggled to feel yourself all the time. The world kinda being over meant not much for options like hearing aids, but your deafness was so profound you weren’t sure anything could have fixed it.
Sign language wasn’t happening. You’d learned some things because some people in Jackson knew a little but there was no one really an expert. Besides, at this point it was hard to learn something new. You counted your blessings. You could read lips pretty well, and you could talk, so most communication face to face was fine… unless people were weird.
Maria and her husband, Tommy, were nice and acted normal. They invited you over quite a bit and always spoke clearly, so you could read. Not that thing a lot of people did where they spoke slowly or over-enunciated. That didn’t help anything. The over enunciating was almost worse than the mumbling, but often the mumbling was mixed with people who wouldn’t even look at you.
Ellie was awkward sometimes but honestly, that was just Ellie. Jesse spoke like a boy scout and was overly formal, but you were pretty sure he was just like that too. He enunciated.
But then there was Joel. Your Joel, as he came to be over the months you’d been here in Jackson. Joel took such care to speak clearly, but also let his personality shine, that smile you loved to see. The teeth so close to perfect, you’d known before you ever explored his mouth he had to have a wire retainer on the back of his teeth. The night it all exploded and he closed the gap between you, you’d slipped your tongue behind the bone and felt the wiring yourself.
It wasn’t long before you’d moved into Joel’s house, opting to free up a new house for the people kept fleeing to Jackson and finding comfort in the safety of him. You weren’t scared of existing in a house, no, not at all. But there were times you worried you wouldn’t hear a siren or a warning call. Now, even though you would be home alone for hours you knew that there were people that would come for you. Joel would know where you were. Joel would find you.
He always made sure to come from the side or the front where you could see him. Since you couldn’t hear when he came home, sometimes he caught you off guard, but after a few jumpscares living together Joel learned how to enter your vision without giving you damn near a heart attack. Ellie hadn’t quite learned the skill, but she was trying.
Joel’s deep green flannel peaked the corner of your eye as you sewed, and when you looked up, he came into vision. When you can clearly see his face, Joel grins at you. Maria said she’s never seen Joel this happy.
“Hey darl’n,” Joel always tried to stifle the accent to make things easier to lip-read, but it came out in certain words. “How was the day?”
You put down the sewing in a huff, pouting up at him. “I’m tired of this. I want to be useful.”
Concern seeped into his aging face, those two deep lines between his brows coming out to say hello. “What do you mean?” Joel came to sit on the couch with you, and you two turned to face each other.
“I mean, I’m useless, Joel. It’s frustrating! I used to be feared, did you know that? No Tony Soprano or anything, but my god people knew my name some places. I was taken seriously. And now?” You hold up what you were working on. “I’m fixing Eugene’s jeans. His You-jeans, if you will.”
Joel was clearly trying to stifle his smile at your joke, unsure of what tone you needed. “Baby,” He gets out through a laugh. “I promise, you’re valued here. Everyone has a role to play.”
“And mine is nothing better than a 50’s housewife. And I don’t even get to be high and balls on valium while I do it.”
Joel sighed, thinking. “If I could get you valium, I would.”
“I know.”
“Used to be able to. I ever tell you I ran drugs?”
Your ears perk up at that. “Before?”
His eyes go wide. “No, no not… not while I had Sarah. That was Tommy’s scene, if I’m being honest. I mean in Boston. I was a big tough guy, running underground trades. Anyone that crossed me got fucked up. People feared me too.”
It was hard to imagine your sweet old man a fear drug runner… but everyone had a second life before Jackson. “I didn’t know that.”
“Used to be a fist of fury. Now it’s just a hand.” he spread his fingers and grinned. Joel was happy in his new life, you understood. He liked this domesticity.
You give him a smile, but you don’t feel better. “It’s not the same, Joel. You get to use your skills. I’m not even that good at sewing!”
Something in Joel’s expression shifted, he could pick up that this was actually bothering you, not just a mild inconvenience.
You continued, softer. “I wouldn’t have an issue if all I was good for is sewing. I understand everyone has their place, everyone is important. But I feel like I’m not being used to my fullest. I’m not a child just because I’m disabled.”
He looked you, those two lines thick with thought before he sighed again. “When I… when I lost some of my hearing, it was confusing. I mean, it was a confusing time in general but navigating everything while dealing with the fact I was never going to hear the same wasn’t easy. I thought, how can I protect Tommy like this? Sarah was dead, all I had left was Tommy. I thought okay, you only have one fucking job left and it’s keeping him safe. It was like we were teenagers again.” That flicker of sadness across his face, the look of a man who was nearing 60 but still shivered at the thought of his father. He shakes the thoughts away. “I had to figure it out, but I would be damned if I let Tommy help me. I hated that shit; I still do.”
You nod a little. “I get that.”
“I know, and darl’n,” His eyes flittered away, and his lips didn’t move enough. “I feel protective of you-”
“What’s that? You’re mumbling.”
Joel snaps back to look at you, eyes apologetic. “Shit, Sorry,” He was clear now. “I just mean, i feel protective of you, but maybe instead of protecting, I should be advocating.”
Your heart clenches, feeling nothing but love for you sweet, still-fresh boyfriend. “I love that you like protecting me. I love when you got your arm wrapped around me when we talk in the tipsy bison… We met because you were protective, even of a complete stranger.” You give Joel a peck on the lips. “But could we talk to Maria about figuring something else out? I can work with my hands Joel, I can be productive for more than Sewing. AND I’LL SEW!” You raise your hands in defense, and Joel chuckles. “I’ll sew too, don’t get me wrong, just… please. I need more.”
He nods. “Yeah baby. I know we can figure something out.”
And you trusted him.
Later that day, you and Joel sat down with Tommy and Maria and explained how you felt. Maria emphasized safety, including yours. You knew she meant well, but I felt frustrated. Joel stepped in.
It wasn’t long before you joined the construction crew. Not on the field, not climbing around where constant spatial awareness and knowing where everyone was was necessary, no. But a corner of the shop was set up just for you, a space people could only enter with express verbal permission from you, a space you could work with your hands and saw and cut and nail and wire.
And yeah, sometimes you still sewed, but you don't mind it as much now. Not when you finally felt fulfilled.

Disability and employement.
For a long time, disabled people were often given menial labour jobs, like putting caps on pens, for pennies. Many people thought all disabled people could do was barely contribute to society. This seems to be RFK's thought process to.
LET ME BE CLEAR. You do not need to work to be valuable. Some poeple can't work, and they contribute in other ways. Some people simple cannot work. Everyones life is important and disabled people deserved dignity no matter what. You don't need to be paying taxes to be worth something. Human value is innate.
BUT, just because one is disabled does not mean they cannot work. Many, like myself, WANT to work, meaningful work we feel proud in. I'm lucky to have a job that works well with my disabilities. In this story, we briefly explore the reasonable accommodation. In the past, my emplyers have not had to give an accomidation but I've had costumers be extremely rude with my hearing loss.
Maria is not mean to be the bad guy here. She cares for reader, wants reader to be happy and safe and keep those around them safe, but she wasn't thinking outside the box. Joel gave reader the chance to speak, then helped advocate for them like a good partner.
I want to leave you with this fact I learned from my disability and employment project.
Did you know? Disabled people hired very rarely need much accomidation, and the accomidation is usually pretty cheap if anything. In return, disabled people have much lower turnover rates, which saves the company money. This is a purely capitalist arguement, but unfortunetly we live in a capitalist society. Next time someone wants to say something negative about the ADA or requiring accomidations at work, remember that disabled people are very valuable in a job.
Thanks guys!
@my-secret-shame-but-fanfiction @copperhalfcent @miraclesabound @quiet-night-sky-writers-blog @missdictatorme
ill get a proper tag list going i swear sorry if yall arent interested
#joel miller#joel miller x reader#the last of us#joel miller x gn!reader#gn reader#gn!reader#the last of us fanfiction#jackson joel#deaf reader#roman writes#jackson joel miller
110 notes
·
View notes
Text

IG just showed me this immediately after reading your post lmaooo.
gauge swatch this, gauge swatch that
you want so badly for everything to be neat and predictable. who said crafting was an orderly process? that the act of creation was anything but chaotic? how little do you trust in yourself, your skills, your ability to improvise? if you would not gleefully destroy the work of your hands, for any reason at all, do you even understand what it means to be a maker? if the idea of something turning out imperfect scares you so much, and you are unable to turn back mid-journey and start over, yes, do a gauge swatch. do 10. do 20. do as many as you need to calm your terror at the thought that life is inherently unpredictable.
if you understand why the god of creation must be one of death and destruction also, you will be able to free yourself.
embrace the chaos.
frog that sweater.
#FIGHT FIGHT FIGHT FIGHT#ahem. anyway.#i am doing a gauge swatch for the first time ever#but it's because i'm unsure about the yarn for a project and wanted to have an idea of what it'd look like#so i'm doing gauges with different yarns#but usually i can't be bothered either#then again i also sew clothes mostly without patterns#i just make things up as i go#which works for me but it doesn't work for everyone and that's fine#tbh a lot of people just want to not have to think about things too much#i do have..thoughts.#on modern knitting/sewing patterns and how people use them#but also like. it's fine. do what makes you comfortable#but also remember a gauge swatch sometimes tells you nothing
291 notes
·
View notes
Text
from a discussion in the comments of this post:
Learning about things is always valuable; learning how to assess what things are reliable is always valuable; not everything needs academic rigor to be valuable! That's part of what's getting lost here.
It's always good to read critically and ask questions, to think about the logical arguments being made and assess whether they are actually answering the question they set out to answer, or if they provide strong enough evidence for their claim. You certainly don't have to be an expert to do that. And it's a great way to learn.
The idea of academic rigor primarily comes into play if you want to 1) do original research, 2) challenge a scientist or expert and say they're wrong, or 3) give advice in a formal capacity or practice the topic in a formal capacity.
Learning a lot of facts about, say, Ancient Rome, is great for writing a fictional story set in Ancient Rome; academic rigor is necessary if you want to write a nonfiction history of Ancient Rome. Collecting lots of information about local ecosystems is awesome for starting your own native pollinator garden or giving plant cuttings to your neighbors; academic rigor is necessary if you want to start a consulting business giving recommendations to local institutions about rewilding their properties.
I, personally, really love learning about dinosaurs and I consider myself pretty knowledgeable about them, but I'm nowhere near an expert, and that's fine: it mostly means I won't be writing any science books or leading any paleontology research projects or being a Jurassic World science consultant. I can still enjoy it, and get a lot of value in learning about it and understanding it, and know enough to go "hmmm there's probably more to the story" when news articles report that some biotech firm has de-enxtinct-ified some prehistoric animal. Those are all valuable things, even if they don't make me an expert!
And then there are topics like woodworking or sewing or rock climbing where "academic rigor" is not a useful framework for expertise at all, because it operates in a completely different space in which expertise comes in a very different way.
Anti-vaxxers are very enthusiastic about "doing their own research" and still very wrong. This is a huge problem because they are also saying the medical experts are liars and making decisions about other people's health because of it. Graham Hancock is very enthusiastic about archaeology, and very wrong. This leads to him getting a Netflix deal to make a popular tv show where he tells you that the academic archaeologists are lying to you to cover up the fact that Atlantis is real.
Conversely, here's a story about an amateur archaeologist who spent a lot of time studying Ice Age cave paintings... and then brought his observations and theories to academic archaeologists, who worked together with him to test those theories!
Getting an academic degree is not the only path to truth and knowledge. But one of the big values of academia is that it teaches you how to research, how to design experiments, how to read critically and assess information, and how to robustly test your ideas. It also has peer review by other experts who are there to assess your work from an outside perspective and give critiques of it, and it teaches you how to accept critique with an open mind. Those are absolutely skills you CAN learn outside academia! For sure! But you have to honestly assess: are you? before you can make a claim to the same standards of original research, challenging other experts, or giving advice from a place of expertise.
If that's not what you're interested in doing with your knowledge, then learning facts is awesome. Learning about the world to broaden your worldview and understand more about the world around you is always good. And I don't know an academic who will ever claim otherwise.
69 notes
·
View notes
Note
Dude!!! You costumes r so incredible!!! You make 'em mostly by yourself right??? Do you also make the patterns yourself or do you rely on pre-existing patterns? (Be it historical or reproduction?) do you also use period accurate materials?
Oh!!! As for making the clothes, how closely do you stick to historically accurate sewing methods? Considering how low making a whole garment can take by hand, do you kinda cheat a little by using a sewing machine??? (Which is fair tbh)
Sry if these r too many questions ;w; ur clothes r just soooo cool
Hello ! Thanks a lot ! Yes I do pretty much everything by myself, except for things made with leather. I sometimes start off with printable patterns from historical costuming stores like Reconstructing History, Laughing Moon Mercantile, Blacksnail Patterns and others to use as a base, but recently I've been drafting my own patterns more. I've no formal education in that so it's very trial-and-error, but I use books like The Medieval Tailor's Assistant or Patterns of Fashion as references and it helps a lot.
I sometimes do costumes all in period-accurate materials like for my landsknecht costume (I used only pure wool, linen and linen thread with wax, and I braided the lacing cords with wool yarn), but sometimes I don't ; for the gamurra I used reproduction brocade and duchesse satin that are only part silk. It really comes down to budget and occasion. I'm glad I didn't use super expensive period accurate pure silk for the gamurra because I wore it outside all day for two days and went dancing with it (and I couldn't afford it anyway). Also, that project was less made out of historical curiosity and more so for fun and flamboyance.
When it comes to sewing methods, out of preference I only use the machine for very long seams that won't show on the outside. I enjoy hand sewing a lot and I'm not very straight and precise with the machine so a lot of the time, I only do the most basic and discreet things with it. Then, I'll sometimes go full historical and research proper interlining methods and seam types, and sometimes speedrun a project and skip some of the steps when I feel like I can find another solution. It really depends. The research itself is a lot of the fun so I do tend to try and follow historical construction, but I'm also not a dress historical or a reenactor so I'll usually adapt to the current situation because there's no pressure to go either way.
#my sporadic use of the sewing machine is not do to pedantry but mostly to incompetence#I think my machine might be shitty too#revolution fairies#replies
179 notes
·
View notes
Text


Okay, I've been fighting with Tumblr's quality issues for about 2 hours now and I just give up- tried re-sizing these pictures SO MANY TIMES its just ridiculous. Used every possible hack and tip I found and none had worked so I'm just gonna roll with this although I am upset as I spend a lot of time on these doodles- more than I would want to admit.
The middle drawing is still uploading and if it looses quality as I post this I will re-do this post because there is just too many details to loose on. If anyone has tips on how to deal with quality issues on this platform please let me know, the artist here is STRUGGLING.
----------- Anyway, some more detailed depictions of my human KMKY!Bill Cipher design. I mostly based it off the original description that is given in the 5th chapter; in other words, the moment Ford bought him his first own set of clothes. I really like the idea of him wearing loafers. I know that in the chapter 12 he ruined his first pair by running into a muddy forest while it rained. And so I imagined that after that event Ford bought him a new pair with golden buckles in shapes of triangles as these aren't uncommon, right? What I mentioned in the latest post was that Ford could've put in the effort and maybe sew in a triangle design into his og black sweatshirt as maybe Bill mentioned it was a bit too plain for his liking (even though its quite comfortable). First I thought of a possibilty of it being a bit of a too straightfoward clue for Fiddleford to connect the yellow triangular symbol with the traingle statues in Ford's study but then I thought that maybe Ford or Fiddleford himself would explain it as some sort of portal project personalized merch..? I mean, Bill IS the "benefactor" as Ford put it so that could be the excuse lmao. Anyway, I wanted to include some of my human Bill headcanons in this post but it's already quite lenghty so I might make it a separate post- especially if the quality of these pictures will be ruined as I upload this. fanfic mentioned: Knowing Me, Knowing You on Ao3 by @f-imaginings
#also Im still working on the first playlist!#Im just so indecisive with the songs as I want to capture all of the emotional turmoil that this beautiful work conveys#and also I have to finally work on the art for these playlists#so many ideas and Im so excited to make them come true and share them with you#anyway I will post the headcanons tomorrow as its already 2am here oh boy#my art#my artwork#digital art#gravity falls#gravity falls fandom#gravity falls fanfiction#gravity falls stanford#gravity falls bill#human bill design#human bill cipher#bill cipher#billford
79 notes
·
View notes
Text
Wig (but long this time)
After my last customized wig failed to be long enough to work for my SD Mika, and after looking everywhere for super long synthetic mohair (doll grade kanekalon) wefts or even just a wig that I could extract wefts from and attach to my base wig, I realized that if I wanted super long hair, I would have to buy loose doll grade kanekalon and make the wefts myself with a sewing machine- a fact I had been dreading because I have never used a sewing machine in my life lol After a crash course on learning to use a sewing machine and watching a few tutorials, I went from this to this after a few tries:

What you don't see between these examples is the hour of near crying as I struggled to fold the hair in half to do the final stitches without it becoming a huge mess, until I found an extremely helpful tutorial that utilized a manila folder and a flat iron to fold and flatten the weft, something so obvious that I felt incredibly stupid for not having thought of it before then lol
Once I felt confident in my skills (and after more hair arrived because I stupidly used a bunch of it on my first attempts instead of using practice hair), I ended up making around 10-11 usable wefts in total from about five ounces of hair:


The color is a blend; the primary shade (This shade from Studiodollhair) is an exact match to the hair on the base wig I was using, and the secondary shade (from Dollyhair) is slightly paler and significantly longer.
I shuffled each hank separately to provide a nice tapered end (thanks to this tutorial by the same account as the wefting tutorial), and then combined them into two separate blends of slightly different color ratios to provide dimension, as well as a highly tapered layering to look like natural hair. My initial plan for this wig was about ankle length on my SD Mika (inspired by photos of women with super long hair in the 1800's) but eventually I chose to go as long as I feasibly could because why not lol Once I had my wefts finished, I stripped the base wig of 99% of its original hair (with the exception of the original hand tied parting and one weft at the base of the neck-again, for layering purposes) and stitched them on, mimicking the original layout of the wig, and then layered the remaining original hair to blend into the new wefts:


(Barbie for scale lol)
Very happy with it! By my estimation this wig is around 28", meaning it trails approximately 5" behind Mika when she's standing. I still need to wash and flat iron it (as well as clean, restring and dress Mika herself) but this project has been keeping me up at night for weeks so I am very happy to see it completed mostly, and I'm happy it motivated me to start learning to use a sewing machine! I look forward to playing with it more and dipping my toes into making doll clothes. A few years ago I would have abandoned this project out of fear, so I'm happy I saw it through to the end.
73 notes
·
View notes
Text
Never Took The Time (To Forget) part 4.2: Robin's Boy
A.N: Life is kinda sucky right now with job hunting, surviving at my current job, the strains that come with being a caregiver to a family member while maintaining a long distance relationship and just dealing with mental and emotional self-care. So here's this, super late and not beta-read but at least I wrote it.
As always, feel free to yell at/with me in the comments, tags and/or ask box.
Part 1 (Hop fucks up), Part 2 (Pride and Prejudices: Joyce's Edition), Part 3 (One of Us), Part 4.1 (With a Capital 'P'), Part 5 (Man Of The Hour)
There's not much that surprises Robin Buckley these days. She gets queasy at the sight of ground beef, the big friendly dogs a few doors down at the O'Reilly place make her blood run cold, she can't watch the old Russian movies her dad loves without having nightmares after and she's sleeping with a nightlight for the first time since she was six. But it takes a lot to surprise her.
Seeing the declared dead Chief of Police step out of a sleek black, obviously-secret-government-bullshit car flanked by an agent she recognizes as one of Owens' lackeys from last July when they were making the rounds with Government funded medical care contingent on signing sketchy NDAs? Just par for the course at this point.
Steve's face when Eleven-Jane rushes into the not-dead Chief's arms and it turns into a whole 'Moment'? Said Chief's look of barely interested confusion followed by tired annoyance when Steve drags her in front of him, rambling about Starcourt and new additions to The Party and finally getting to meet 'My Hop'? Yeah, none of that surprises her either. She plays along for Steve, doesn't give Hopper any time to say anything that would take that happy smile off his face or get rid of the way he's practically glowing he's smiling bigger than she's ever seen directed at anyone other than the kids. Tries not to think about the way it makes something in her clench and crouch like a cat getting ready to pounce and bare fangs she didn't realize she had outside of a life and death situation. She introduces herself, maintains eye contact and drags Steve off as fast as she can to do something, anything, that will distract him from trying to catch up like the Byers clan is with the kids and assembled assorted monster fighters.
She's not surprised when she can't stop Steve from stepping up every time Hopper or Joyce or anyone with a badge says they need anything despite his own still healing wounds. She's not surprised when Hop takes it a step too far.
They're at the Hopper Cabin that is steadily becoming the Hopper-Byers Cottage when Hop tells his and Joyce's shared custody bald parasite that Steve is little more than an annoyance he puts up with for the free babysitting service and manual labor and cause he can go up against shit that would give anyone else nightmares while keeping the kids safe and mostly in-check. She's sitting with Eleven-Jane, sewing patches onto one of Hop's old army jackets, (the kid had seen Eddie's battle vest in Steve's car and it had reminded her of her sister Kali and she'd decided she wanted one of her own for the war ahead and then all of the other rugrats had decided they did too so she and Argyle had taken to giving sporadic sewing lessons whenever the kids had the materials to start their own battle attire) when Steve comes round the corner to the back of the property striding with purpose she rarely saw when he was around his kids.
She leaves her unfinished project on the stump she'd been using as a stool and chases after him. She shooes off curious and worried kids, promising to stick with him, keep the walkie close and on, make sure he was safe and didn't run afoul of any demo-beasts or trigger-happy government goons as he made his way to his car and then wherever else he was marching his happy ass.
She hates the fact that when they're both finally back at the little apartment that Owens' yes-men had acquired for Steve when Harrington Sr. decided to be an opportunist prick and kick Steve out for 'not taking care of the house' in the middle of the 'earthquake', that Steve hasn't shed a single tear. She hates that she's not surprised.
He doesn't say anything as he kicks off his Nikes and shuffles over to the 'second-hand' couch they'd gotten from Mrs. Henderson (Steve and Robin were both fully aware she'd just gotten it shortly before Spring break and was in no way in need of a new one so soon, but they both also knew better than to call her out on her kindness). He doesn't look up at her from his spot curled in amongst the throw pillows and blankets they'd been gifted by parents of various members of the party after Hopper and Owens' story that the two of them had saved the kids again from some freak incident like last year with Starcourt. She pulls out the thick quilt they had found in the latest donations bins when Hawkin's government supervised relief force started outsourcing for supplies and basic comforts. He stares at the wall where they'd hung an oversized corkboard dedicated to polaroids and photo booth strips and even some properly printed pictures of the little monster fighting family they'd put together.
She can't pull him out of this, no matter how much she may want to. There's some places his mind goes only Eleven-Jane would be able to reach and neither of them were going to put more on that girl's plate. So she puts on a Bruce Springsteen record she used to hate and curls up as close as she can to him through the quilt and pillows. Every now and then she gets up to get them both water, to grab some crackers to try and coax him into eating and to switch over to a new record or just flip the one on the player but she always comes back to her spot next to her Steve.
"Whatever he said to you, you know it's not true. Right? You're worth more than a dozen undead cops on a power trip." That gets an amused huff.
"Seriously Stevie, the kids adore you, I swear all the moms in Hawkins think you're the best thing since sliced bread and I don't know what I'd do without my personal chump. We're soulmates, remember? One of these days we're gonna mind meld like Spock and McCoy and we'll be unstoppable. I can't make it without my McCoy, Bones."
"I can't make it without you either, you hobgoblin. Thanks Bobby."
The next day is better. Steve is still a little quiet, a little droopy. But he's present and there's a simmering anger underneath his smile that Robin is proud to see him acknowledging but makes her worry about him as he ushers her into his car to drop her off on her rare lone shift at Family Video before he heads out to a quick 'consultation patrol' with some military special operatives to check out something weird by one of the new cracks.
No one had told any of the kids yet, about the cracks starting to spread out in smaller fissures like a slowly spreading infection. Hadn't thought it necessary with Steve and Nancy (both now legal adults and wasn't the government taking full advantage of that) there as a first line of communication while Joyce wrangled a restless Hop as he settles back in and heals and spars with Owens over payouts and government aide for the town and what the growing military presence was and wasn't allowed to do. With the parents occupied the kids had come together tighter than ever, focusing on their injured and recovering from the nightmare fuel that was their spring break. No one noticed.
She can't help the rant she falls into as they drive through checkpoints and past regular civilians being escorted through areas a little too close to a Gate for comfort. She goes on about how half of the soldiers act like Steve is just one of them and the other half treat him with the same cautious curiosity they do Eleven-Jane whenever she makes her way to the 'front lines' these days. She wants to get the weird boy-speak head nods too! Even Nancy gets them, especially when she's walking around with her sawed-off strapped to a jerry-rigged hip-holster. Robin has used Darlin' before, she's speed poured Molotov Cocktails to hand to soldier boys trying not to piss their pants as Steve and Nancy barked orders as they tried to down a demogorgon fresh from the Upside-Down. Where's her battlefield camaraderie?
It makes him laugh and shake his head fondly as he calls her crazy and weird with that soft smile on his face that makes her chest feel warm and fuzzy like her parents' hugs used to when she was 10 and crawled into their bed after having a nightmare. She doesn't tell him to be careful as they turn down onto Main street or to make sure he comes back in one piece as he rolls to a stop in front of the dark storefront. She starts on another tangent about him abandoning her to the drudgery of Capitalism as he gets to frolic in the woods with a bunch of burly men with their toys before he laughingly reaches over her to open her door to start pushing her out of the car. He smiles big and dopey as she practically spills onto the asphalt, still rambling away about neglectful soulmates and abuses of driving power with smatterings of claims that she'll take over his apartment if he dies and use his ashes as fertilizer for the plants he's taken to keeping on the fire-escape outside the living room window if he dares to leave her alone to babysit his hellions.
He shoots back a final, "Love you too Bobby!" before taking off towards where he's meeting the scientists and soldiers he's supposed to lead through Upside Down infected woods. As he leaves her standing on the sidewalk he doesn't make any sort of promise to be safe, to let the government goons just do their job, to make it back to her alive or in one piece. Not even to make it back to her. She plays with the locket she's taken to wearing that holds a curled up braid of hair shades darker than hers or anyone's in her family.
She doesn't watch his car to the end of the street like she might have before Spring Break, after their Starcourt 'adventure', instead she takes a deep breath and unlocks the dumb video store in this dumb town full of dumb people who don't know when to call it quits and just get the hell out of Dodge. She boots up the computer leaving it to warm up while she starts sorting through whatever mess the new shmucks Steve insisted they hire to cover what times the two of them couldn't because of the Arcade (which they had also gone and hired more staff for now that people weren't one tremor away from rioting in the streets) and Upside Down/ government related shenanigans they ended up getting dragged into.
The bell above the door jingles and she has to bite back a groan. "Welcome to Family Video, I literally just got here so you're gonna have to give me a minute before I can help you."
"Afraid we've only got movies round here, officer. You want any other medium of entertainment I'd suggest the arcade or the distribution yard." She won't turn to face him, not sure she can keep her cool if she does right now. Her hands move on muscle memory, shuffling papers into their proper piles and flipping open VHS cases to check if they need to be rewound. "Sorry, guess we'll have to catch up another time."
"I'm uh, I'm not here for a movie." She may have only heard his voice a couple of times and in passing but she didn't call her ears little geniuses for nothing. She forces her body to relax, lowering her shoulders the way Steve taught her to and keeping her voice light like Eddie walked her through, calling on his Theatre Kid skill set to teach the Party how to convincingly lie improvise when being questioned by people who really did not need to know just what was going on in good old Hawkins.
She can hear him sigh and can't help but picture his hand running over the fuzz on his head the way Steve runs his hands through his coif more and more nowadays in a way he never did before Nancy, before he got pulled into this bullshit and Hopper was rumored to be the one signing his paperwork and taking responsibility for him when his parents didn't show up after an almost week long stay at the hospital. "Look, I know you don't like me. And it has been brought to my attention just how much I fucking earned that. But I- I need your help here. To fix it."
There's not much that surprises Robin Buckley these days. She gets queasy at the sight of ground beef and meatloaf covered in ketchup, the big friendly dogs a few doors down at the O'Reilly place she used to pet and give snacks to on her way to and from school make her blood run cold, she can't watch the old Russian movies she and her dad used to stay up late watching together without having nightmares after and she's sleeping with a nightlight by her bed for the first time since she was six. But it takes a lot to surprise her. Jim Hopper might have just done it.
She doesn't stop moving, doesn't want to give him the satisfaction of throwing her off. She fiddles with the sharp little knife she has tucked up her shirt sleeve in the little sheath she and Steve put together between shuffling papers, taps at the button on her vest hiding the mic attached to the walkie talkie that never leaves her pocket these days. When she finally turns to look at him she's not surprised by the thinness of his frame or the way his eyes and cheeks still look a little sunken in. She sees the tired father worried for his kids and his people and his town, angry at the government for their involvment and their stupidity that she had come to expect. She is not expecting the remorse, the fear, she sees looking back at her. She wonders for a moment what he sees when he looks at her, at any of the teens and kids and young adults he's fought alongside trying to stop the end of the world.
"Fine. He'll be back from his patrol-" He looks mildly confused for a moment, meaning Joyce hadn't been passing along even the minimal information Nancy and Steve had been giving her to relay to Hop and the rest of the Party. That would have to be it's own discussion at some point probably. "-in about twenty minutes. You have fifteen. Now why should I help you?"
"You care about Harringt- Steve. You're close, the two of you have been basically Siamese Twins since Starcourt from what I hear. I- I realize that I made a mistake dumb enough shitting Mike Wheeler is making more sense than me, that I fucked up in a way I don't fucking know how to fix. And I am asking. Politely. For your help."
Honestly she's not sure she believes him. Honestly he's surprised her more times in the last five minutes than most anything or anyone else has in the last year. The man has a lot to unpack and the situation with Steve is just a drop in the man's pile of shit he's managed to bury himself under but maybe there's some hope yet.
She checks the watch on her wrist (an obscenely expensive piece Steve got from one of his parents' rich friends at a holiday party he was too young to remember on a leather band that he had outgrown and never got around to replacing) and looks back at Hop. Ten more minutes. "Why are you here?"
Hop groans in that growly sort of way that makes her think of her grandpa Dale, a great bear of a man who had given the best hugs with shoulders to put Jim Hopper to shame. The no-longer-chief runs his hand over his fuzz again, one hand propped on his hip as he shifts his weight to one side and she tamps down the flicker of biting anger at another example of the ways Steve had shaped himself after a man who never gave him the respect or care he deserved.
"I don't know how to fix what I fucked up. Steve's a good kid, I can admit that now. And he didn't deserve my bullshit just cause I couldn't get past old highschool biases. I wasn't there for him like I should have been- like I told him I would be when I signed those papers. But he's not the kid I thought he was, he's nothing like his folks or the other trust fund brats who think they run this shithole town. I don't know what I'm doing. I just know that kid deserves better than I've been doing."
She hums like she's mulling over his little speech to hide the way she's freaking out a little over what to say to all that. Even she doesn't know how she and Steve got to where they are beyond being tortured by Russians for information they didn't have then being drugged out of their minds while fighting inter-dimensional flesh monsters. But she doesn't think that would help Hop much in this situation.
But she thinks she believes him. At least for now.
"Alright, I'll help you with Steve." Hop sighs, his shoulders dropping as he seems to unclench slightly. Seriously, that much tension cannot be good for him after being in a Russian gulag for almost a year. "But not because I think you deserve it. You were right, Steve deserves better, but he wants you and Joyce and the kids to be in his life. Be a part of it. That is the only reason I will help you. He deserves a better dad than the one he's had and for some reason he thinks you're like super-dad."
"I- How the fuck did I not- What the hell?"
Robin shrugs, "The human brain is good at weeding out what it doesn't want to see. You didn't want to see Steve until you had to and that realization brought you to me. So. Ignorance is bliss and all that."
"So what do I do?"
She checks her watch again. "He'll be running late, especially if the fissure he's checking out is as bad as we think it is. So you have time to run back home, get Joyce to make extra of whatever monstrosity of a casserole she's trying to make this week and you get your rugrats to figure out a way to be the last drop off after Steve takes the brats to the arcade later instead of sleeping off whatever knocks he gets on patrol today. Then instead of letting him head home you make him come inside for dinner. Use the excuse of finding out he's been doing patrols if you have to. But you make him go inside and sit his ass down and eat something and you let him just- let him just be, Hop." She's running out of time but there is just so much she wants to get through to him. "Just make him feel like you see him."
"I- I'll try."
"Yeah, sure. Just-" She bites back the vitriol she wants to projectile vomit in his direction. "Just don't hurt him again. He's more than just a babysitter or front lines muscle. And I will make you wish you were back with the Russians if you make him forget that."
"I believe you."
"Good." The bell over the door jingles again and she looks past Hop to see a group of teenagers making their way to the comedies. "Now I have to get to work and you need to not be here by the time Steve comes to check on me. So talk to you later, Chief."
"Right. Thanks for your help, kid."
She shrugs him off as he turns to head out. The teens are watching him not-so-discreetly as they try to act like they're looking through the latest releases. She forgets that the man is as much a mystery as the heavy-duty military forces that have taken over their small town.
"Alright, folks. What are we looking for today?" She still technically has a job to do even if the kids keep their distance from her like they do the rest of the Party who at this point have all been seen either spending time with said heavy-duty military forces or chasing something into the dark of the forest wielding weapons smeared in monster blood, or both. It's going to be a long day.
Tag list (I think this is everyone?)(if your tag didn't work let me know cause they don't always work for me Idk why):
@thelittleclare @jackiemonroe5512 @0body0disphoria0 @strangersteddierthings @lingeringmirth @dead-cherry-bitch @irethsune @ink777 @the-daydreamer-in-the-corner @ledleaf @pansexuality-activated @paintsplatteredandimperfect @kinryuuki @yikes-a-bee @altocumulustranslucidus @ohimamarigold @samsoble @sensationalsunburst @xxbottlecapx @y4r3luv @swimmingbirdrunningrock @flustratedcas @rootbeerandmusic @vinteraltus @wonderland-girl143-blog @failedstarsandgoldenclouds @steddie-as-they-go @steveshairspray86 @youdrewstarsxaroundmyscars @i-amthepizzaman @wormapothacary @croatoan-like-its-hot @maya-custodios-dionach @ineffable-monster-romancer @asquareinverona @ellietheasexylibrarian @pukner @bookworm0690 @nightmareglitter @joekeerysmoles @salchica @lawrencebshoggoth @iheartjennaaa @child-of-cthulhu @anaibis @rocochen20 @katdeerly @samcoxramblings
#rambler writes#nttttf verse#Never Took The Time (To Forget)#Robin pov#platonic soulmates stobin#rambler writes fic#stranger things fic#post season 4#hopper adopts steve#but make it sad#not part of any exchange or big bang#I would love to do one of those but the energy is not with me
221 notes
·
View notes