#including video tutorials
Text
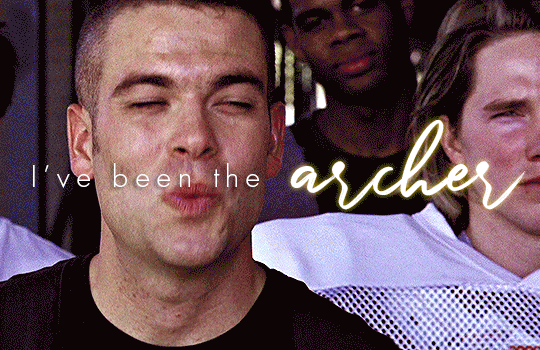
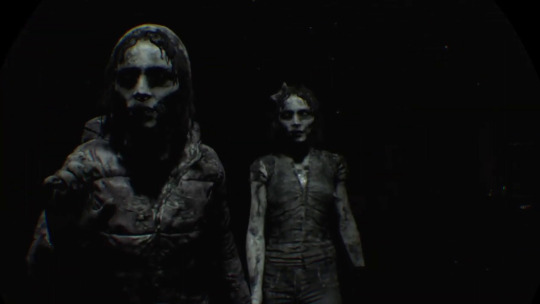
How To Gif: Glass Shatter Effect
By popular demand (ie, 7 people who voted in this poll), here is a tutorial on how to do the glass shatter effect I used to create the first gif in this set.
I use Photoshop CC 2015 (yes I know it's old) for my gifmaking, but you should be able to apply everything to newer versions of Photoshop. For this tutorial I'll be assuming you know the gifmaking basics, but if not, I would recommend this tutorial, which is the process I use to make gifs. Note that this particular process involves saving all of the frames, importing those frames into Photoshop, and then using an action to convert to a smart object.
Keep reading below the cut to learn how to do this effect!
Before I could start making this gif, I needed three things; the two scenes that I wanted to use, and a video of the glass shattering effect. I already knew the scenes I wanted, so then I took to YouTube to find a video which I can't for the life of me find again (edit: thanks to add1ctedt0you in the replies for linking this video!), but it looked like this:
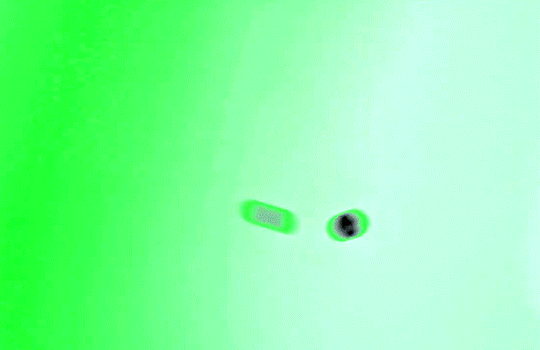
Something like this is what you want. Ideally the green part would be entirely white, but as long as there are two clearly different colours you can usually work with it.
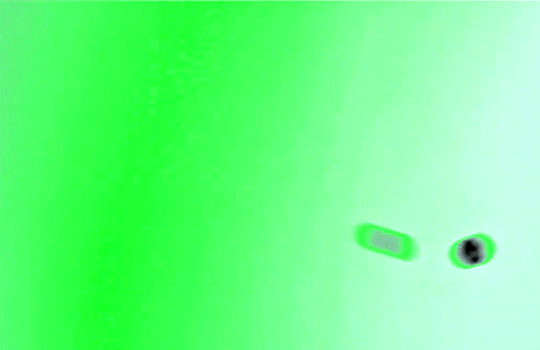
This looks a lot slower than the gif that I made, but that's not because of the frame rate - which is exactly the same above as in the final gif - it's just because there are extra frames in this slower one that I cut out. In the video I used, the glass shattering happened very slowly. I didn't want that, so I ended up skipping several frames when I loaded the frames into Photoshop before using my gifmaking action. I just did this by manually selecting one frame, skipping the next several before selecting another frame, and repeating this until I had selected 60 frames.
After using my gif action, I had a smart object of the glass shatter effect that looked like this:
That's a much better speed! It still wasn't quite where I needed it to be though. I needed this in black and white, so I slapped a hue/saturation adjustment on the smart object and set the saturation all the way down to -100.

Okay great, I could start putting the gif together now.
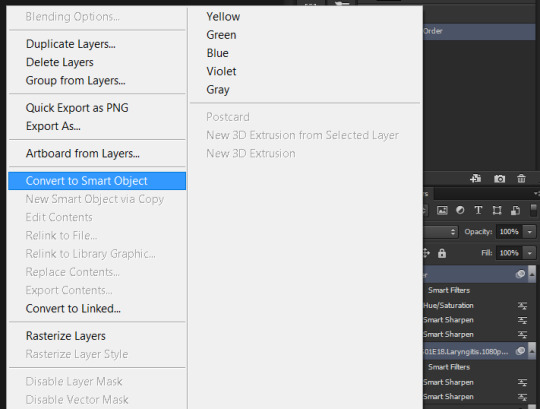
First, I made a copy of the glass shatter smart object, because I'll need that later. Then, I pulled in frames from the scene that I wanted to appear in the hole after the glass shatters, and I used those to create a new smart object with my gif action (we'll call it Scene-bg). I pulled Scene-bg into the same window as the glass shatter objects. Then I created a new smart object by combining one of the glass shatter objects with Scene-bg, which I did by selecting both layers right clicking, and selecting "Convert to Smart Object".
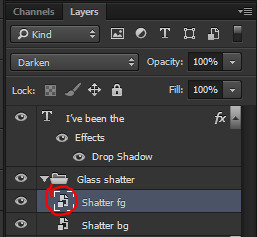
I renamed this smart object to Shatter-fg. I opened it by clicking on the little icon next to the layer name in the layers window here:
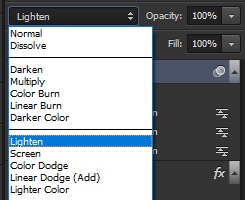
The most important thing here is that the shatter effect object should be the top layer, and I set the mode to "lighten". This will make sure that the lightest colour of either this layer and the layer behind it is displayed; that means that anywhere that's white in our shatter animation will still show up, but anywhere that's black we'll see what's in the layer(s) behind it.
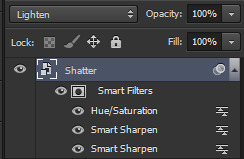
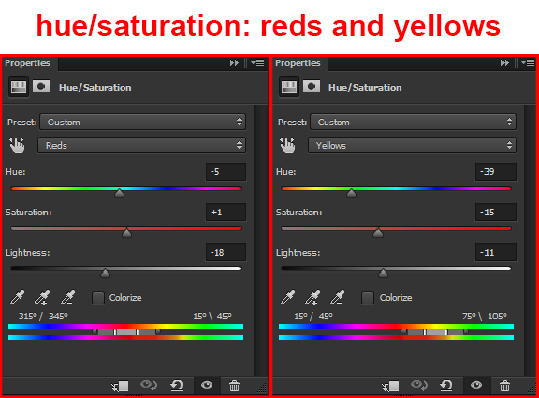
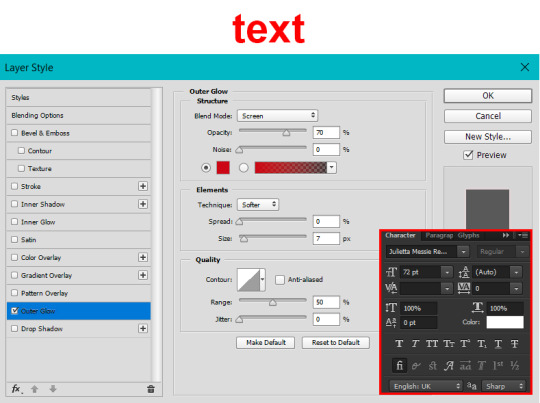
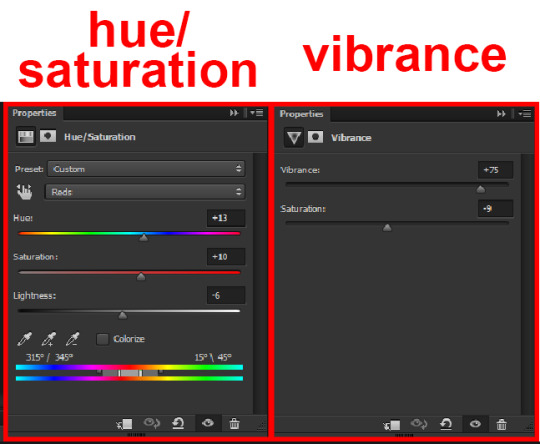
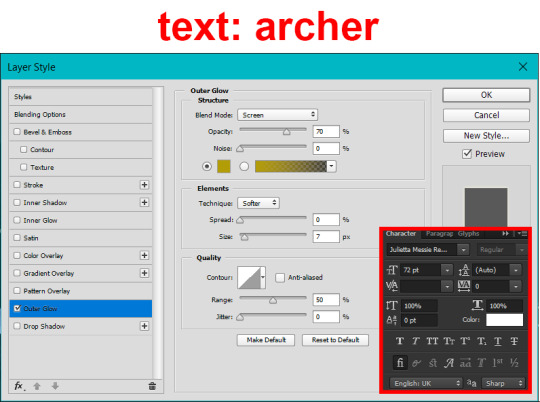
Then I threw some adjustment layers between them to get the colouring I wanted. I used a curves layer, a hue/saturation layer, and I also added text with an outer glow layer effect. Here's what the layer order looked like and the settings I used for each layer:
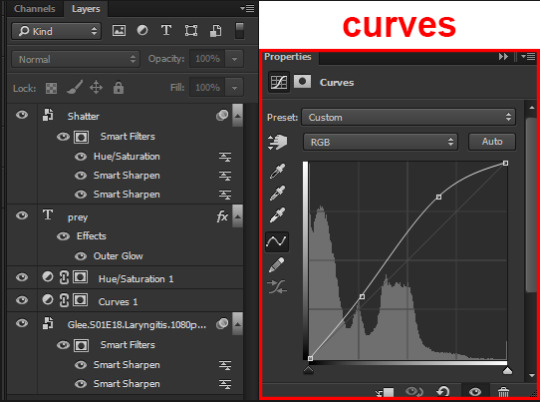
After this process, Shatter-fg looked like this:

Okay nice, this is starting to look like something! I saved this and went back to the main file with the other glass shatter object.
I needed to invert that other glass shatter object. There's a weird quirk with the version of Photoshop that I use where it doesn't like it when I apply specifically an invert adjustment to a smart object (it appears correctly when editing, but not on export) so I did this by creating a new smart object which included a separate invert layer, but if you have a newer version of Photoshop you can probably just apply the invert adjustment directly. Just note that you'll need to do one of these options; it won't work if you add a separate adjustment layer in the main file, it needs to be applied specifically to the smart object (which we'll now be calling Shatter-bg). It looked like this after I inverted it:

Once that's done, I made sure Shatter-fg was the layer directly above Shatter-bg, and set the mode of Shatter-fg to "darken" and Shatter-bg to "lighten". Since Shatter-fg is set to darken, it will be visible only when it is darker than the layer behind it. By setting Shatter-bg to lighten, I've guaranteed that the layer behind it will always be lighter (ie, white) in the places we want Shatter-fg to be visible, and will be black otherwise. Once I update those settings, this is what the gif looked like:

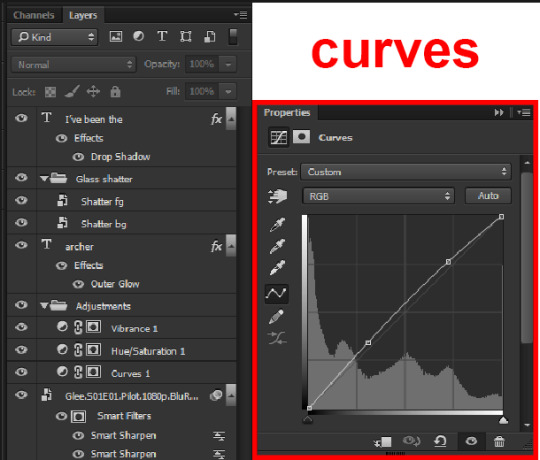
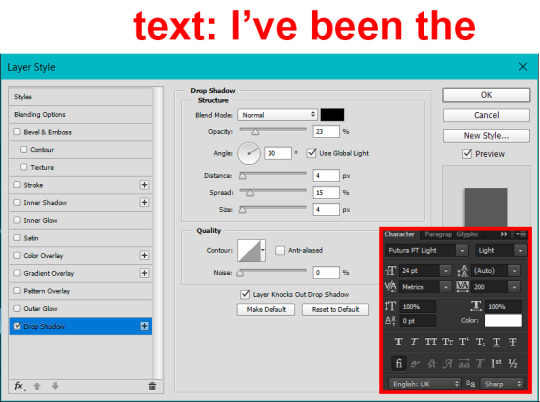
This is all there is to the glass shatter effect itself. Next I pulled in frames from the second scene to fill in the black areas. This layer needed to go below both glass shatter layers, so that it only shows through where the black. Then I added adjustment layers and some text. I used curves, hue/saturation, and vibrance adjustment layers, and I also added the "archer" text below the glass shatter layers so that it would be hidden to reveal the "prey" text. The other text I added above all of the layers, since I wanted this to be visible all the time. Here is the layer order and all of the settings I used for each of the layers:
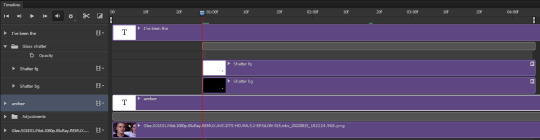
I also grouped Shatter-bg and Shatter-fg and shifted them on the timeline so there would be some time to see the background gif before the shatter effect starts.
And that's all! Then it''s just a matter of exporting the finished product:
This is the first gifmaking tutorial I've ever made, so I hope I was able to be reasonably coherent and helpful! I'd love to hear if you make anything by following these steps, or even if you just feel like you've learned something reading through this. And if you have any outstanding questions, feel free to reply or send me an ask and I'd be happy to answer!
#gifmaking#tutorials#gifmaking tutorial#gif tutorial#photoshop#photoshop tutorial#usergif#gleesource#my tutorials#mine#how to gif#tw mark salling#mark salling tw#not tagging as glee because it's not actually about that but wanted the tw tags just in case#this was so much more effort to put together than I thought it would be lmao#I was like oh yeah I've already made the whole gif I just need to go back and explain how I did that...#it took A WHILE#anywayyyy it was fun though so I'm glad I did it#would love to know if anyone finds this helpful or interesting or tries out the effect or something similar!#you can also just grab the black/white gif I included above if you want to do the effect since I can't find the video... sorry lol#but yeah you have my permission to steal the black/white gifs for gifmaking purposes if you would like#just don't like. post your own tutorial claiming you made it or something?? but like you don't need to credit me or anything obviously.#ANYWAYYYY#I feel like... a LITTLE pretentious thinking I'm good enough at making gifs to be qualified to make a tutorial#but like it's fineeee everything is fine#gonna finally post this now enjoy byeeee
109 notes
·
View notes
Video
undefined
tumblr
Since folks were asking, a while ago I made a brief overview of how I made moon phos that I figured I may as well share here too! hope it helps 💃
#cosplay#land of the lustrous#houseki no kuni#my cosplay#hnk#i swear im not tiktokifying this account its just that DAMB i have a lot of content on my tiktok#including some good tutorials and it would be a shame to platform lock them#trying to pump out both video and photo content is exhausting so forgive me for dual posting#ALSO I SWEAR I IRONED THE SLEEVE FABRIC BEFORE IT WENT ON#creases like that drive me mad
271 notes
·
View notes
Text
to the people who make “””tutorials””” but then leave out huge chunks of info bc they assume the reader knows it i hope you get your ass beat
#it is one thing if someone is making a blender tutorial which requires u to have a basic understanding of the program i get that#but omg i was watching someone on youtube build a house in ts4 AND SHE JUST COMPLETELY SKIPPED THE ROOFING PROCESS#and in the comments she was like oh well i just thought everyone knew how to roof thats why i skipped!#LIKE GIRL WHY WOULD I CLICK ON YOUR TUTORIAL IF I KNEW HOW TO DO THE THING YOURE SUPPOSED TO BE TEACHING ME OMGGGGG#and then she uploaded a separate video just for the roof of this sim build and it was like a whole 3 min video WHY DIDNT YOU JUST INCLUDE IT#IN THE ORIGINAL VIDEO OMG!!!!!!!!!!! like thats 3 whole minutes of info!!!!!!!!!!!!#please if youre gonna explain stuff to me i need it to be as slow and thorough of an explanation as possible. describe it to me like im 5
36 notes
·
View notes
Text
Welp, finally got to play Until Dawn: Rush of Blood last night, and honesty guys? It was such a fun game holy shit. Only took me a little over 2 hours to beat the game, and I totally would have started over and hunted for my missing trophies (cause I have a problem lol) and ‘skittles’ if it wasn’t for the fact that I can only use the vr headset for ~3 hours before it gives me a headache 😢
As expected though, game was chock full of all sorts of ud easter eggs and every time I entered an area of a level and recognized exactly where in the game I was supposed to be or I recognized character models that were being reused I got super giggly. Like you wouldn’t believe the amount of times I blew kisses when ever the psycho entered the scene to try and scare/terrorize me...even when Psycho!Josh was being a complete dick and kept killing me like ten times with his stupid axe as all those Matt’s in clown masks kept throwing molotovs at me lol.
Speaking of Josh, you even kinda sorta play as him maybe? Cause when I looked down to see if I even had a body or if I was just a pair of floating arms with guns, I was 100% wearing Josh’s overalls. Which is interesting, cause during the moments after levels when I’m sitting in a chair in the sanitorium I don’t have a body at all so they really didn’t need to go through all that work imo.
And obviously, they reused character models as previously hinted at by clown mask wearing Matt’s throwing molotov cocktails at me. Got to see all the boys in fact! Whether they were Chris, Cabin!Mike, Sanitorium!Mike, Matt, Regular!Josh, Psycho!Josh, and even Fiddler hilariously enough, they just coming at me in all forms. From wearing clown or pig masks to just being plain ass zombies, they were intent on killing me let me tell you. Sadly, though none of the girls made an appearance 😔 (which is a shame cause I totally think would have loved multiple Ashley’s in a clown mask of her own trying to stab me with scissors, it’s what she would have deserved imo) They didn’t even make little cameo’s as body’s on hooks in the mines like the rest of the guys did for some reason. Closest I got to seeing any of the girls was in the second level, and that’s just because a portion of it has all the doll’s that Josh set up in the dollhouse so I kept seeing their respective dolls over and over again.
The only girls that made any sort of appearance were Hannah and Beth (mostly Hannah obvs lol), and that was mostly for jump scare and horror reasons due to being dead and all. Though for some reason Hannah was wearing a bow in her hair?
(Like don’t get me wrong, even being totally dead and decaying she is rocking that hair bow let’s be real. It’s just such an odd choice, and I have no idea why they felt the need to add that to the character model?)
But seriously, if any of you ever have a chance to play this, I really REALLY suggest you give it a go. It’s a super short game but was so fucking fun oh my god.
Cannot wait to give it another run through tonight!
#until dawn#rush of blood#and if for some reason any of you happen to be visiting my area of the world i WILL be forcing you to at least try a level or two lol#the demo of it i played back in august when i was staying at my sisters was just the second level by the way#which makes sense cause it was not only by far the shortest level#but the first level itself if half a shooting tutorial in a carnival before some minor parts in the lodge#whereas the second is basement saw rooms dolls everywhere and lots of pigs#so huge amounts of ud call backs and easter eggs#reason the first half of the first level takes place in a carnival though is because the guy that 'accompanies' you#is larry fessenden as a carny lol#so becomes more and more bloody and unhinged as you go on so that was fun#felt bad every time i got a new highscore though cause i kept knocking ashley off the leader board#im sorry baby please dont hate me 😭#only reason you had scores that low anyways was because you were too scared and jumpy to play properly#absolutely would have creamed everyone else otherwise lol#that being said i do not accept josh having the second highest score#boy is absolutely dogshit at video games and i can not be convinced otherwise sdjfjsdhfhsd#though i will accept the fact that emily got the fourth highest into my headcannon#girl is insane at shooters but would die before letting absolutely anyone else find that out lmao#though bob washington not only being included on that list but getting the coveted first spot#is frankly both hilarious and the weirdest inclusion they could have chosen ajkdhakjhsd
8 notes
·
View notes
Text
should be a federal limit on the amount of etsy patterns you can buy in one day
2 notes
·
View notes
Text
weird videos i have for some reason - random forest hiking ambience that makes me dizzy to watch so i don't know why i recorded it
for @https-true-egoist because it wanted to see. this is one of my many scenery videos. they're useless but i love them.
#dreaming ⋆。°✩#other weird videos include incinerating a dandelion and a whole ass tutorial on how to make gravy#oh and my younger cousin falling on his ass#that's a good one
5 notes
·
View notes
Text
totk has flaws like any game but tbh it has easily met and perhaps exceeded my expectations. BOTW was like my fav game ever but totk is EXCELLENT and has so much more to do in it too
#nerd alert#flaws include: addison. i dont like him#also the voice acting in english is clumsy but that was true in botw too#i do kinda resent the fact that the story seems a lot more linear. and that the overall goals are less clearly defined from the start#but thats a weird complaint to make about a video game lol#botw was so invredibly simple it was basically like. beat these 4 minibosses. theres a few quests leading up to them. also do those#then beat big bad guy. the end#everything else was optional. hell even THAT was optional. only requirement was beat big bad guy#which is why the speedrun takes under half an hour and about 2/3 of it is spent on the unskillable tutorial area#now its like. well we dont really know whats going on. dont know where anything is going really. go do some quests tho#also as for its linearness. in botw you could pick which divine beast to go for furst#the obvious correct choice was vah ruta bc it was the easiest but like it wasnt required. you could do the others first#but in totk i tried doing the death mountain stuff BEFORE the rito stuff and i was NOT ready for all that.#the rito stuff isnt a walk in the park but after trying death mountain its like. more obviously Early Story#death mountain stuff just got me all confused!!!#im worried about zelda...
5 notes
·
View notes
Text
just learned the guaranteed thing in this game isnt a picker its just a random ssr/sp 🥲 how will i get that blonde bitch now 🥲 also working on courage to actually apply for guilds
#bc its kinda like enstrs like in that if you dont join a society you are just fucked#but with enstrs its a bit easier bc its just a rhythm game lmao its not very complicated#idk how high level i need to be or how geared my characters have to be not to be a burden#or if i need to have an ssr from the gacha or if some characters are so shit you shouldnt use them in co op ETC ETCCCCC#there are no fucking videos in english on this game on yt 😭😭😭😭#i actually think this games in game tutorial is VERY good but yknow. it obv doesnt include all the things#i need to consider to be a valuable teammate and not get kicked bc i bring the guild down with my shit charas LMAO
2 notes
·
View notes
Text
Improved Pale Eye Colors and Fair Eye Colors now live !
The presets are now live:
The Pale Eye Colors are also live: https://www.nexusmods.com/baldursgate3/mods/11253
The preset page has 28 options to choose from ! Most vanilla eyes and some of my own presets are available in the optional files.
Dragonborn eyes are not included because I can't get the glow to act the same way as the vanilla version. Once I've got that figured out, I'll add the glow and non glow optional file.
I've also made a videotutorial/demonstration for those who want to make their own version or integrate the idea into their own presets !
The eye color collection has 15 colors to start, I've covered my bases by making the general eye colors used for cc and made a glow variant for each of them.
#bg3#bg3 modding#bg3 mods#baldur's gate 3 modding#baldur's gate 3 mods#baldur's gate 3 mod#my mods#I feel like I am exposing myself with that voiced video tutorial#I can’t bring myself to unlist the video yet but it is linked on the Nexus page#I also included a cat blooper from the recording lol#I think my favorite eye colors from the collection are cornflowe and violet#the violet glow is also very pretty
1 note
·
View note
Text
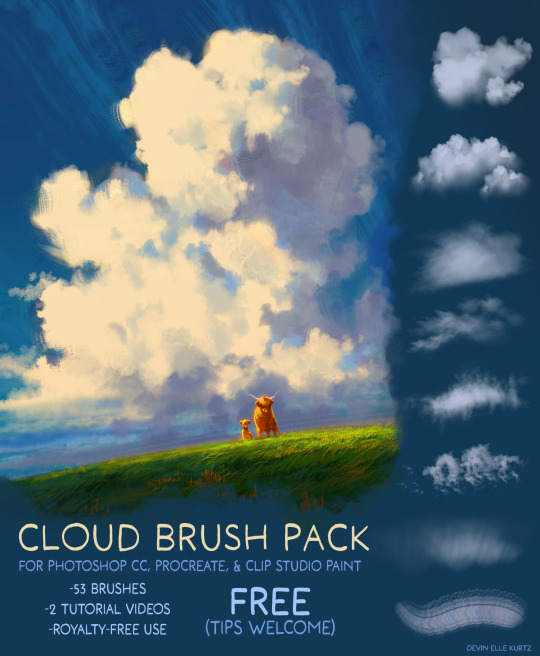


My free Cloud Brush Pack is available now for Procreate, Photoshop, or Clip Studio Paint!
Link to download: CLICK
Type "0" into the payment field to download for free (tips are welcome too!)
Also includes free video tutorials: one, two, and three
#digital art#procreate brushes#clip studio brushes#photoshop brushes#digital art brushes#digital painting brushes
9K notes
·
View notes
Text
If anyone's looking for really gentle or disability friendly exercise...
Doctor Jo on YouTube is a physical therapist who offers lots of therapeutic stretching and exercise videos for specific conditions and pain relief. [x]
Leap Services is a Canadian physical therapy group that has a YouTube playlist of gentle exercise routines. All of these exercises are done in a chair (except for one which is done on the floor) and are intentionally adaptable to different bodies and needs. [x]
Yoga with Zelinda on YouTube has yoga that's adapted to a large number of conditions, for instance, providing a playlist of routines that don't require kneeling and another of chair yoga. She also offers yoga for specific health challenges, like fibromyalgia and mobility issues. There's a playlist of yoga routines for people with bigger bodies as well. [x]
Santosha Spirit on YouTube has yoga routines for people with chronic fatigue, chronic pain, POTS, and EDS. [x]
Yoga with Shaunneka on YouTube has a playlist of slow seated yoga, including chair yoga, as well as a playlist of gentle yoga. [x]
Qinergy on YouTube has tai chi sets broken down into easy tutorials. There is a seated version of her shibashi set. [x]
Perth Tai Chi Academy on YouTube is similar to Qinergy. It provides a seated version of daoyin yangshen qigong. [x]
14K notes
·
View notes
Text
youtube
#How to Prevent Fitness Injuries and Speed Up Recovery | John Graham Learn How to Avoid Fitness Injuries and Improve Recovery with John Graha#speaker#and fitness professional with 15 years of experience in the fitness industry. Founder of JohnGrahamFitness and renowned golf academy direct#he is a leader in fitness technology and has collaborated on popular video series for home workouts and boxing tutorials.
John's persona#fueling his quest for optimized injury prevention and recovery methods. During this pursuit#he discovered the remarkable benefits of red light therapy while recovering from a knee injury. This led to the creation of Lumaflex#a game-changing flexible#portable#and waterproof panel#providing convenient and efficient red light therapy treatment for individuals#including athletes.
fitness injuryprevention recovery kajmasterclass#Youtube
1 note
·
View note
Text

I'm so excited to announce Loish's Digital Art School! I've been working on this for a long time and I'm so glad I can finally share it with you all. This is for those of you who are looking for brushes, tutorials, and other super helpful learning content!
Loish's Digital Art School is a collection of resources for digital artists that includes video tutorials, brushes, palettes, challenges, and more. Most importantly, it’s free! I know how important it is to have access to helpful information, especially if you’re self-taught.
To get access, just head on over to Loish.School ❤️
3K notes
·
View notes
Text
Online Writing Resources #2
Vocabulary:
Tip of My Tongue: I find this very helpful when I can't think of a specific word I'm looking for. Which is often.
WordHippo: As well as a thesaurus, this website also provides antonyms, definitions, rhymes, sentences that use a particular word, translations, pronunciations, and word forms.
OneLook: Find definitions, synonyms, antonyms, and related words. Allows you to search in specific categories.
YourDictionary: This website is a dictionary and thesaurus, and helps with grammar, vocabulary, and usage.
Information/Research:
Crime Reads: Covers crime and thriller movies, books, and TV shows. Great inspiration before writing a crime scene or story in this genre.
Havocscope: Black market information, including pricing, market value, and sources.
Climate Comparison: Compares the climates of two countries, or parts of the country, with each other.
Food Timeline: Centuries worth of information about food, and what people ate in different time periods.
Refseek: Information about literally anything. Provides links to other sources relevant to your search.
Perplexity AI: Uses information from the internet to answer any questions you have, summarises the key points, suggests relevant or similar searches, and links the sources used.
Planning/Worldbuilding:
One Stop for Writers: Literally everything a writer could need, all in one place: description thesaurus, character builder, story maps, scene maps, timelines, worldbuilding surveys, idea generators, templates, tutorials... all of it.
World Anvil: Provides worldbuilding templates and lets you create interactive maps, chronicles, timelines, whiteboards, family trees, charts, and interactive tables. May be a bit complicated to navigate at first, but the features are incredibly useful.
Inkarnate: This is a fantasy map maker where you can make maps for your world, regions, cities, interiors, or battles.
Miscellaneous:
750words: Helps build the habit of writing daily (about three pages). Fully private. It also tracks your progress and mindset while writing.
BetaBooks: Allows you to share your manuscript with your beta readers. You can see who is reading, how far they've read, and feedback.
Readable: Helps you to measure and improve the readability of your writing and make readers more engaged.
ZenPen: A minimalist writing page that blocks any distractions and helps improve your focus. You can make it full screen, invert the colours, and set a word count goal.
QueryTracker: Helps you find a literary agent for your book.
Lulu: Self-publish your book!
See my previous post with more:
Drop any other resources you like to use in the comments! Happy writing ❤
Previous | Next
#writeblr#writing#writing tips#writing advice#writing help#writing resources#creative writing#writer resources#author resources#writer stuff#how to write#writing techniques#story writing#author#author things#writer things#writer help#writing research#vocabulary#deception-united
1K notes
·
View notes
Note
Any tips on learning to make buttonholes? I've been putting it off for.... *checks notes* like three years.... but better late than never and all that. I don't have any fancy machines so I gotta do it by hand but that seems right up your alley.
Thanks!
It IS up my alley, yes, I do most of my buttonholes by hand!
I'm actually part way through filming an 18th century buttonhole tutorial, but I expect it'll be a few more weeks before I finish that and put it on the youtubes, so in the meantime here's the very very short version. (The long version is looking like it'll probably be about 40 minutes maybe, judging by how much script I've written compared to my last video?)
Mark your line, a bit longer than your button is wide. I usually use a graphite mechanical pencil on light fabrics, and a light coloured pencil crayon on dark ones. (I have fabric pencils too, but they're much softer and leave a thicker line.)
You may want to baste the layers together around all the marked buttonholes if you're working on something big and the layers are shifty and slippery. I'm not basting here because this is just a pants placket.

Do a little running stitch (or perhaps a running backstitch) in fine thread around the line at the width you want the finished buttonhole to be. This holds the layers of fabric together and acts as a nice little guide for when you do the buttonhole stitches.

Cut along the marked line using a buttonhole cutter, or a woodworking chisel. Glossy magazines are the best surface to put underneath your work as you push down, and you can give it a little tap with a rubber mallet if it's not going through all the way.

I'm aware that there are some people who cut their buttonholes open using seam rippers, and if any of them are reading this please know that that is abhorrent behaviour and I need you to stop it immediately. Stop it.
Go get a buttonhole cutter for 10 bucks and your life will be better for it. Or go to the nearest hardware store and get a little woodworking chisel. This includes machine buttonholes, use the buttonhole cutter on them too. If you continue to cut open buttonholes with a seam ripper after reading this you are personally responsible for at least 3 of the grey hairs on my head.
Do a whipstitch around the cut edges, to help prevent fraying while you work and to keep all those threads out of the way. (For my everyday shirts I usually do a machine buttonhole instead of this step, and then just hand stitch over it, because it's a bit faster and a lot sturdier on the thin fabrics.)

I like to mark out my button locations at this point, because I can mark them through the holes without the buttonhole stitches getting in the way.
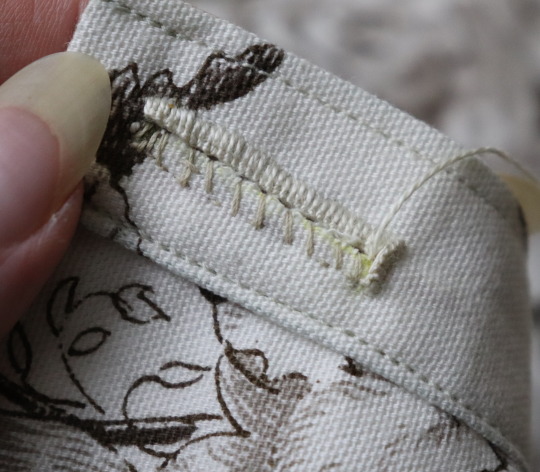
For the actual buttonhole stitches it's really nice if you have silk buttonhole twist, but I usually use those little balls of DMC cotton pearl/perle because it's cheap and a good weight. NOT stranded embroidery floss, no separate strands! It's got to be one smooth twisted thing!
Here's a comparison pic between silk buttonhole twist (left) and cotton pearl (right). Both can make nice looking buttonholes, but the silk is a bit nicer to work with and the knots line up more smoothly.

I've actually only used the silk for one garment ever, but am going to try to do it more often on my nicer things. I find the cotton holds up well enough to daily wear though, despite being not ideal. The buttonholes are never the first part of my garments to wear out.
I cut a piece of about one arm's length more or less, depending on the size of buttonhole. For any hole longer than about 4cm I use 2 threads, one to do each side, because the end gets very frayed and scruffy by the time you've put it through the fabric that many times.
I wax about 2cm of the tip (Not the entire thread. I wax the outlining/overcasting thread but not the buttonhole thread itself.) to make it stick in the fabric better when I start off the thread.
I don't tend to tie it, I just do a couple of stabstitches or backstitches and it holds well. (I'm generally very thorough with tying off my threads when it comes to hand sewing, but a buttonhole is basically a long row of knots, so it's pretty sturdy.)

Put the needle through underneath, with the tip coming up right along that little outline you sewed earlier. And I personally like to take the ends that are already in my hand and wrap them around the tip of the needle like so, but a lot of people loop the other end up around the other way, so here's a link to a buttonhole video with that method. Try both and see which one you prefer, the resulting knot is the same either way.


Sometimes I can pull the thread from the end near the needle and have the stitch look nice, but often I grab it closer to the base and give it a little wiggle to nestle it into place. This is more necessary with the cotton than it is with the silk.
The knot should be on top of the cut edge of the fabric, not in front of it.

You can put your stitches further apart than I do if you want, they'll still work if they've got little gaps in between them.
Keep going up that edge and when you get to the end you can either flip immediately to the other side and start back down again, or you can do a bar tack. (You can also fan out the stitches around the end if you want, but I don't like to anymore because I think the rectangular ends look nicer.)
Here's a bar tack vs. no bar tack sample. They just make it look more sharp, and they reinforce the ends.

For a bar tack do a few long stitches across the entire end.

And then do buttonhole stitches on top of those long stitches. I also like to snag a tiny bit of the fabric underneath.

Then stick the needle down into the fabric right where you ended that last stitch on the corner of the bar tack, so you don't pull that corner out of shape, and then just go back to making buttonhole stitches down the other side.
Then do the second bar tack once you get back to the end.

To finish off my thread I make it sticky with a bit more beeswax, waxing it as close to the fabric as I can get, and then bring it through to the back and pull it underneath the stitches down one side and trim it off.


In my experience it stays put perfectly well this way without tying it off.
Voila! An beautiful buttonholes!


If you want keyhole ones you can clip or punch a little rounded bit at one end of the cut and fan your stitches out around that and only do the bar tack at one end, like I did on my 1830's dressing gown.

(I won't do that style in my video though, because they're not 18th century.)
Do samples before doing them on a garment! Do as many practice ones as you need to, it takes a while for them to get good! Mine did not look this nice 10 years ago.
Your first one will probably look pretty bad, but your hundredth will be much better!
Edit: Video finished!
youtube
And here's the blog post, which is mostly a slightly longer version of this post.
#ask#buttonholes#sewing#hand sewing#sewing tutorial#I've been procrastinating on the video this week#I want it done! I don't want to work on it I want new projects! I want to cut out more gloves!#currently forcing myself to do the last few buttonholes on these pants and then maybe I can cut out new gloves? as a treat?#but I hope I get some filming done tomorrow too
4K notes
·
View notes
Text
how to build a digital music collection and stuff
spotify sucks aaaass. so start downloading shit!!
file format glossary
.wav is highest quality and biggest
.mp3 is very small, but uses lossy compression which means it's lower quality
.flac is smaller than .wav, but uses lossless compression so it's high quality
.m4a is an audio file format that apple uses. that's all i really know
downloading the music
doubledouble.top is a life saver. you can download from a variety of services including but not limited to apple music, spotify, soundcloud, tidal, deezer, etc.
i'd recommend ripping your music from tidal or apple music since they're the best quality (i think apple music gives you lossless audio anyway. .m4a can be both lossy and lossless, but from the text on doubledouble i assume they're ripping HQ files off apple music)
i also love love love cobalt.tools for ripping audio/video from youtube (they support a lot of other platforms too!)
of course, many artists have their music on bandcamp — purchase or download directly from them if you can. bandcamp offers a variety of file formats for download
file conversion
if you're downloading from apple music with doubledouble, it spits out an .m4a file.
.m4a is ok for some people but if you prefer .flac, you may wanna convert it. ffmpeg is a CLI (terminal) tool to help with media conversion
if you're on linux or macOS, you can use parameter expansion to batch convert all files in a folder. put the files in one place first, then with your terminal, cd into the directory and run:
for i in *.m4a; do ffmpeg -i "$i" "${i%.*}.flac"; done
this converts from .m4a to .flac — change the file extensions if needed.
soulseek
another way to get music is through soulseek. soulseek is a peer-to-peer file sharing network which is mainly used for music. nicotine+ is a pretty intuitive (and open-source) client if you don't like the official one.
you can probably find a better tutorial on soulseek somewhere else. just wanted to make this option known
it's bad etiquette to download from people without sharing files of your own, so make sure you've got something shared. also try to avoid queuing up more than 1-2 albums from one person in a row
tagging & organizing your music
tagging: adding metadata to a music file (eg. song name, artist name, album) that music players can recognize and display
if you've ripped music from a streaming platform, chances are it's already tagged. i've gotten files with slightly incorrect tags from doubledouble though, so if you care about that then you might wanna look into it
i use musicbrainz picard for my tagging. they've got pretty extensive documentation, which will probably be more useful than me
basically, you can look up album data from an online database into the program, and then match each track with its file. the program will tag each file correctly for you (there's also options for renaming the file according to a certain structure if you're into that!)
there's also beets, which is a CLI tool for... a lot of music collection management stuff. i haven't really used it myself, but if you feel up to it then they've got extensive documentation too. for most people, though, it's not really a necessity
how you wanna organize your music is completely up to you. my preferred filestructure is:
artist > album > track # track

using a music player
the options for this are pretty expansive. commonly used players i see include VLC, foobar2000, clementine (or a fork of it called strawberry), and cmus (for the terminal)
you can also totally use iTunes or something. i don't know what audio players other systems come with
i personally use dopamine. it's a little bit slow, but it's got a nice UI and is themeable plus has last.fm support (!!!)
don't let the github page fool you, you don't have to build from source. you can find the releases here
click the "assets" dropdown on the most recent release, and download whichever one is compatible with your OS
syncing
if you're fine with your files just being on one device (perhaps your computer, but perhaps also an USB drive or an mp3 player), you don't have to do this
you can sync with something like google drive, but i hate google more than i hate spotify
you can get a free nextcloud account from one of their providers with 2GB of free storage. you can use webDAV to access your files from an app on your phone or other device (documents by readdle has webDAV support, which is what i use)
disroot and blahaj.land are a couple providers i know that offer other services as well as nextcloud (so you get more with your account), but accounts are manually approved. do give them a look though!!
if you're tech-savvy and have an unused machine lying around, look into self-hosting your own nextcloud, or better yet, your own media server. i've heard that navidrome is a pretty good audio server. i unfortunately don't have experience with self-hosting at the moment so i have like zero advice to give here. yunohost seems to be a really easy way to manage a server
afterword
i don't know if any of this is helpful, but i just wanted to consolidate my personal advice in one place. fuck big tech. own your media, they could take it away from you at any moment
799 notes
·
View notes
Last Seen Blogs

claytonoscn417
My smart blog 7277

rainbowwerewolf
Lycanthrotopia

anacansian-blog
Sem título

xxgustavoxd-blog
Canario

anaesthesiamask
Mask Fetish