#install git on windows
Explore tagged Tumblr posts
Visit Tumblr Blog
Explore Tumblr blogs with no restrictions, modern design and the best experience.
Last Seen Tumblr Blogs


Fun Fact
Tumblr has a low social media market share in South America.
Text
I don't think people realize how absolutely wild Linux is.
Here we have an Operating system that now has 100 different varieties, all of them with their own little features and markets that are also so customizable that you can literally choose what desktop environment you want. Alongside that it is the OS of choice for Supercomputers, most Web servers, and even tiny little toy computers that hackers and gadget makers use. It is the Operating System running on most of the world's smartphones. That's right. Android is a version of Linux.
It can run on literally anything up to and including a potato, and as of now desktop Linux Distros like Ubuntu and Mint are so easily to use and user friendly that technological novices can use them. This Operating system has had App stores since the 90s.
Oh, and what's more, this operating system was fuckin' built by volunteers and users alongside businesses and universities because they needed an all purpose operating system so they built one themselves and released it for free. If you know how to, you can add to this.
Oh, and it's founder wasn't some corporate hotshot. It's an introverted Swedish-speaking Finn who, while he was a student, started making his own Operating system after playing around with someone else's OS. He was going to call it Freax but the guy he got server space from named the folder of his project "Linux" (Linus Unix) and the name stuck. He operates this project from his Home office which is painted in a colour used in asylums. Man's so fucking introverted he developed the world's biggest code repo, Git, so he didn't have to deal with drama and email.
Steam adopted it meaning a LOT of games now natively run in Linux and what cannot be run natively can be adapted to run. It's now the OS used on their consoles (Steam Deck) and to this, a lot of people have found games run better on Linux than on Windows. More computers run Steam on Linux than MacOS.
On top of that the Arctic World Archive (basically the Svalbard Seed bank, but for Data) have this OS saved in their databanks so if the world ends the survivors are going to be using it.
On top of this? It's Free! No "Freemium" bullshit, no "pay to unlock" shit, no licenses, no tracking or data harvesting. If you have an old laptop that still works and a 16GB USB drive, you can go get it and install it and have a functioning computer because it uses less fucking resources than Windows. Got a shit PC? Linux Mint XFCE or Xubuntu is lightweight af. This shit is stopping eWaste.
What's more, it doesn't even scrimp on style. KDE, XFCE, Gnome, Cinnamon, all look pretty and are functional and there's even a load of people who try make their installs look pretty AF as a hobby called "ricing" with a subreddit (/r/unixporn) dedicated to it.
Linux is fucking wild.
11K notes
·
View notes
Text

Welcome back, coding enthusiasts! Today we'll talk about Git & Github , the must-know duo for any modern developer. Whether you're just starting out or need a refresher, this guide will walk you through everything from setup to intermediate-level use. Let’s jump in!
What is Git?
Git is a version control system. It helps you as a developer:
Track changes in your codebase, so if anything breaks, you can go back to a previous version. (Trust me, this happens more often than you’d think!)
Collaborate with others : whether you're working on a team project or contributing to an open-source repo, Git helps manage multiple versions of a project.
In short, Git allows you to work smarter, not harder. Developers who aren't familiar with the basics of Git? Let’s just say they’re missing a key tool in their toolkit.
What is Github ?
GitHub is a web-based platform that uses Git for version control and collaboration. It provides an interface to manage your repositories, track bugs, request new features, and much more. Think of it as a place where your Git repositories live, and where real teamwork happens. You can collaborate, share your code, and contribute to other projects, all while keeping everything well-organized.
Git & Github : not the same thing !
Git is the tool you use to create repositories and manage code on your local machine while GitHub is the platform where you host those repositories and collaborate with others. You can also host Git repositories on other platforms like GitLab and BitBucket, but GitHub is the most popular.
Installing Git (Windows, Linux, and macOS Users)
You can go ahead and download Git for your platform from (git-scm.com)
Using Git
You can use Git either through the command line (Terminal) or through a GUI. However, as a developer, it’s highly recommended to learn the terminal approach. Why? Because it’s more efficient, and understanding the commands will give you a better grasp of how Git works under the hood.
GitWorkflow
Git operates in several key areas:
Working directory (on your local machine)
Staging area (where changes are prepared to be committed)
Local repository (stored in the hidden .git directory in your project)
Remote repository (the version of the project stored on GitHub or other hosting platforms)
Let’s look at the basic commands that move code between these areas:
git init: Initializes a Git repository in your project directory, creating the .git folder.
git add: Adds your files to the staging area, where they’re prepared for committing.
git commit: Commits your staged files to your local repository.
git log: Shows the history of commits.
git push: Pushes your changes to the remote repository (like GitHub).
git pull: Pulls changes from the remote repository into your working directory.
git clone: Clones a remote repository to your local machine, maintaining the connection to the remote repo.
Branching and merging
When working in a team, it’s important to never mess up the main branch (often called master or main). This is the core of your project, and it's essential to keep it stable.
To do this, we branch out for new features or bug fixes. This way, you can make changes without affecting the main project until you’re ready to merge. Only merge your work back into the main branch once you're confident that it’s ready to go.
Getting Started: From Installation to Intermediate
Now, let’s go step-by-step through the process of using Git and GitHub from installation to pushing your first project.
Configuring Git
After installing Git, you’ll need to tell Git your name and email. This helps Git keep track of who made each change. To do this, run:

Master vs. Main Branch
By default, Git used to name the default branch master, but GitHub switched it to main for inclusivity reasons. To avoid confusion, check your default branch:

Pushing Changes to GitHub
Let’s go through an example of pushing your changes to GitHub.
First, initialize Git in your project directory:

Then to get the ‘untracked files’ , the files that we haven’t added yet to our staging area , we run the command

Now that you’ve guessed it we’re gonna run the git add command , you can add your files individually by running git add name or all at once like I did here

And finally it's time to commit our file to the local repository

Now, create a new repository on GitHub (it’s easy , just follow these instructions along with me)
Assuming you already created your github account you’ll go to this link and change username by your actual username : https://github.com/username?tab=repositories , then follow these instructions :


You can add a name and choose wether you repo can be public or private for now and forget about everything else for now.

Once your repository created on github , you’ll get this :

As you might’ve noticed, we’ve already run all these commands , all what’s left for us to do is to push our files from our local repository to our remote repository , so let’s go ahead and do that

And just like this we have successfully pushed our files to the remote repository
Here, you can see the default branch main, the total number of branches, your latest commit message along with how long ago it was made, and the number of commits you've made on that branch.

Now what is a Readme file ?
A README file is a markdown file where you can add any relevant information about your code or the specific functionality in a particular branch—since each branch can have its own README.
It also serves as a guide for anyone who clones your repository, showing them exactly how to use it.
You can add a README from this button:

Or, you can create it using a command and push it manually:

But for the sake of demonstrating how to pull content from a remote repository, we’re going with the first option:

Once that’s done, it gets added to the repository just like any other file—with a commit message and timestamp.
However, the README file isn’t on my local machine yet, so I’ll run the git pull command:

Now everything is up to date. And this is just the tiniest example of how you can pull content from your remote repository.
What is .gitignore file ?
Sometimes, you don’t want to push everything to GitHub—especially sensitive files like environment variables or API keys. These shouldn’t be shared publicly. In fact, GitHub might even send you a warning email if you do:

To avoid this, you should create a .gitignore file, like this:

Any file listed in .gitignore will not be pushed to GitHub. So you’re all set!
Cloning
When you want to copy a GitHub repository to your local machine (aka "clone" it), you have two main options:
Clone using HTTPS: This is the most straightforward method. You just copy the HTTPS link from GitHub and run:

It's simple, doesn’t require extra setup, and works well for most users. But each time you push or pull, GitHub may ask for your username and password (or personal access token if you've enabled 2FA).
But if you wanna clone using ssh , you’ll need to know a bit more about ssh keys , so let’s talk about that.
Clone using SSH (Secure Shell): This method uses SSH keys for authentication. Once set up, it’s more secure and doesn't prompt you for credentials every time. Here's how it works:
So what is an SSH key, actually?
Think of SSH keys as a digital handshake between your computer and GitHub.
Your computer generates a key pair:
A private key (stored safely on your machine)
A public key (shared with GitHub)
When you try to access GitHub via SSH, GitHub checks if the public key you've registered matches the private key on your machine.
If they match, you're in — no password prompts needed.
Steps to set up SSH with GitHub:
Generate your SSH key:

2. Start the SSH agent and add your key:

3. Copy your public key:

Then copy the output to your clipboard.
Add it to your GitHub account:
Go to GitHub → Settings → SSH and GPG keys
Click New SSH key
Paste your public key and save.
5. Now you'll be able to clone using SSH like this:

From now on, any interaction with GitHub over SSH will just work — no password typing, just smooth encrypted magic.
And there you have it ! Until next time — happy coding, and may your merges always be conflict-free! ✨👩💻👨💻
#code#codeblr#css#html#javascript#java development company#python#studyblr#progblr#programming#comp sci#web design#web developers#web development#website design#webdev#website#tech#html css#learn to code#github
93 notes
·
View notes
Text
Linux ask game
1 - what was your first distro? 2 - what was your biggest linux fuckup? 3 - have you ever run rm / on real hardware? 4 - do you dual boot or have a secondary machine with windows? 5 - did you change your default shell? 6 - are you afraid of git? 7 - what was the first machine you installed linux on? 8 - do you know your way around vim keybinds? 9 - what is your favourite non-os software? 10- biggest linux pet peeve? 11- biggest annoyance with the community? 12- do you like your current distro? 13- Xenia or Tux? 14- what software are you never using again? 15- stock distro or hours of yak shaving? 16- have you compiled the kernel?
#linux#ask game#i was gonna write 32 but im tired#feel free to add more questions#also probably wont be answering immediately#ok enjoyyyy
151 notes
·
View notes
Note
why not vim
Vim is fine if all you need is a decent text editor, but emacs brings so much more.
Endless customization
Org Mode is fantastic to keep notes (and also a more logical markup language than markdown)
You can open multiple files side by side in emacs
Emacs has a builtin terminal emulator (but I would recommend using the vterm package)
Why would you need a terminal emulator if you run emacs already in a terminal? Well, because emacs also runs as a GUI app, including support for displaying PDFs and images.
Editing remote files via ssh (truly via ssh, not a "use ssh to install and start a special server" kind of deal like vscode)
Magit is one of the best git clients there are
If you really want to, you could even use emacs as an @x11-official window manager
With the evil package, you can continue using all the vim motions you are used to.
Contrary to vim, you can exit it without restarting your system ;)
And much more
27 notes
·
View notes
Text
Your All-in-One AI Web Agent: Save $200+ a Month, Unleash Limitless Possibilities!
Imagine having an AI agent that costs you nothing monthly, runs directly on your computer, and is unrestricted in its capabilities. OpenAI Operator charges up to $200/month for limited API calls and restricts access to many tasks like visiting thousands of websites. With DeepSeek-R1 and Browser-Use, you:
• Save money while keeping everything local and private.
• Automate visiting 100,000+ websites, gathering data, filling forms, and navigating like a human.
• Gain total freedom to explore, scrape, and interact with the web like never before.
You may have heard about Operator from Open AI that runs on their computer in some cloud with you passing on private information to their AI to so anything useful. AND you pay for the gift . It is not paranoid to not want you passwords and logins and personal details to be shared. OpenAI of course charges a substantial amount of money for something that will limit exactly what sites you can visit, like YouTube for example. With this method you will start telling an AI exactly what you want it to do, in plain language, and watching it navigate the web, gather information, and make decisions—all without writing a single line of code.
In this guide, we’ll show you how to build an AI agent that performs tasks like scraping news, analyzing social media mentions, and making predictions using DeepSeek-R1 and Browser-Use, but instead of writing a Python script, you’ll interact with the AI directly using prompts.
These instructions are in constant revisions as DeepSeek R1 is days old. Browser Use has been a standard for quite a while. This method can be for people who are new to AI and programming. It may seem technical at first, but by the end of this guide, you’ll feel confident using your AI agent to perform a variety of tasks, all by talking to it. how, if you look at these instructions and it seems to overwhelming, wait, we will have a single download app soon. It is in testing now.
This is version 3.0 of these instructions January 26th, 2025.
This guide will walk you through setting up DeepSeek-R1 8B (4-bit) and Browser-Use Web UI, ensuring even the most novice users succeed.
What You’ll Achieve
By following this guide, you’ll:
1. Set up DeepSeek-R1, a reasoning AI that works privately on your computer.
2. Configure Browser-Use Web UI, a tool to automate web scraping, form-filling, and real-time interaction.
3. Create an AI agent capable of finding stock news, gathering Reddit mentions, and predicting stock trends—all while operating without cloud restrictions.
A Deep Dive At ReadMultiplex.com Soon
We will have a deep dive into how you can use this platform for very advanced AI use cases that few have thought of let alone seen before. Join us at ReadMultiplex.com and become a member that not only sees the future earlier but also with particle and pragmatic ways to profit from the future.
System Requirements
Hardware
• RAM: 8 GB minimum (16 GB recommended).
• Processor: Quad-core (Intel i5/AMD Ryzen 5 or higher).
• Storage: 5 GB free space.
• Graphics: GPU optional for faster processing.
Software
• Operating System: macOS, Windows 10+, or Linux.
• Python: Version 3.8 or higher.
• Git: Installed.
Step 1: Get Your Tools Ready
We’ll need Python, Git, and a terminal/command prompt to proceed. Follow these instructions carefully.
Install Python
1. Check Python Installation:
• Open your terminal/command prompt and type:
python3 --version
• If Python is installed, you’ll see a version like:
Python 3.9.7
2. If Python Is Not Installed:
• Download Python from python.org.
• During installation, ensure you check “Add Python to PATH” on Windows.
3. Verify Installation:
python3 --version
Install Git
1. Check Git Installation:
• Run:
git --version
• If installed, you’ll see:
git version 2.34.1
2. If Git Is Not Installed:
• Windows: Download Git from git-scm.com and follow the instructions.
• Mac/Linux: Install via terminal:
sudo apt install git -y # For Ubuntu/Debian
brew install git # For macOS
Step 2: Download and Build llama.cpp
We’ll use llama.cpp to run the DeepSeek-R1 model locally.
1. Open your terminal/command prompt.
2. Navigate to a clear location for your project files:
mkdir ~/AI_Project
cd ~/AI_Project
3. Clone the llama.cpp repository:
git clone https://github.com/ggerganov/llama.cpp.git
cd llama.cpp
4. Build the project:
• Mac/Linux:
make
• Windows:
• Install a C++ compiler (e.g., MSVC or MinGW).
• Run:
mkdir build
cd build
cmake ..
cmake --build . --config Release
Step 3: Download DeepSeek-R1 8B 4-bit Model
1. Visit the DeepSeek-R1 8B Model Page on Hugging Face.
2. Download the 4-bit quantized model file:
• Example: DeepSeek-R1-Distill-Qwen-8B-Q4_K_M.gguf.
3. Move the model to your llama.cpp folder:
mv ~/Downloads/DeepSeek-R1-Distill-Qwen-8B-Q4_K_M.gguf ~/AI_Project/llama.cpp
Step 4: Start DeepSeek-R1
1. Navigate to your llama.cpp folder:
cd ~/AI_Project/llama.cpp
2. Run the model with a sample prompt:
./main -m DeepSeek-R1-Distill-Qwen-8B-Q4_K_M.gguf -p "What is the capital of France?"
3. Expected Output:
The capital of France is Paris.
Step 5: Set Up Browser-Use Web UI
1. Go back to your project folder:
cd ~/AI_Project
2. Clone the Browser-Use repository:
git clone https://github.com/browser-use/browser-use.git
cd browser-use
3. Create a virtual environment:
python3 -m venv env
4. Activate the virtual environment:
• Mac/Linux:
source env/bin/activate
• Windows:
env\Scripts\activate
5. Install dependencies:
pip install -r requirements.txt
6. Start the Web UI:
python examples/gradio_demo.py
7. Open the local URL in your browser:
http://127.0.0.1:7860
Step 6: Configure the Web UI for DeepSeek-R1
1. Go to the Settings panel in the Web UI.
2. Specify the DeepSeek model path:
~/AI_Project/llama.cpp/DeepSeek-R1-Distill-Qwen-8B-Q4_K_M.gguf
3. Adjust Timeout Settings:
• Increase the timeout to 120 seconds for larger models.
4. Enable Memory-Saving Mode if your system has less than 16 GB of RAM.
Step 7: Run an Example Task
Let’s create an agent that:
1. Searches for Tesla stock news.
2. Gathers Reddit mentions.
3. Predicts the stock trend.
Example Prompt:
Search for "Tesla stock news" on Google News and summarize the top 3 headlines. Then, check Reddit for the latest mentions of "Tesla stock" and predict whether the stock will rise based on the news and discussions.
--
Congratulations! You’ve built a powerful, private AI agent capable of automating the web and reasoning in real time. Unlike costly, restricted tools like OpenAI Operator, you’ve spent nothing beyond your time. Unleash your AI agent on tasks that were once impossible and imagine the possibilities for personal projects, research, and business. You’re not limited anymore. You own the web—your AI agent just unlocked it! 🚀
Stay tuned fora FREE simple to use single app that will do this all and more.

7 notes
·
View notes
Text
I recently installed wayfire, and oh boy after a full 24 hours I have never been this conflicted with a desktop environment, after a day it's either "wow this is amazing," or "who tf made this piece of shit." I always go further on to try and see if this is just a random issue that I had, but this is like no other.
wayfire is a wayland compositor based on wlroots that aims to make a customizable, extendable, and lightweight environment that doesn't sacrifice looks in the name of being lightweight and able to run on shitty hardware. Perfect something that I can run on my chromebook! I already use i3 on my chromebook but I wanted to see if it could run it, and also I wanted to try out wayfire and I'm not going to lock my main laptop to wayfire when I can also try wayfire on the 16 gig emmc on my chromebook just to see how lightweight it is.
but oh boy "customizable" wayfire has the shittiest customization I have ever seen, I see all these rices on r/unixporn and I respect everyone who can make wayfire look good becuase if I can only color the background of the panel, but I can't touch everything else. Then we got some serious problems when it comes to customizability here.
look at this bullshit

to explain what's wrong here, firefox uses the gtk toolset, and the "Customize Look and Feel" app is actually Lxappearance, which pulls gtk themes and applies them to your desktop environment or window manager, I use lxappearance on i3 to theme it up a little.
But here, not just firefox, but EVERY GTK APPLICATION suffers from this not being installed. Also you can set the icon theme in lxappearance and it applies to your DE/WM. Nope, not in wayfire.
And you can also see my issue here with the wf-shell panel as well. You can customize the look of the panel in the wf-shell.ini config file, but you also need to use CSS to change the look and feel as well. But when I set the css file for the panel in the wf-shell.ini, nothing happens, nothing is applied. I even tried to sanity check myself to make sure it wasn't my css was wrong and just copied the default css and still nothing was applied.
and there is no issue with the version of lxappearance I installed. Because I got i3, and copied my configs from my other system over to my chromebook and installed picom (I did this before trying out wayfire but wayfire didn't take up much space on my drive so it worked out fine) and look, it works, Firefox is supposed to switch the theme to dark to follow the system.

also another complaint is why do the windows on wayfire have different types of decoration, what is with that?
this is just insane that in the first 24 hours I encountered issues like this, that are literal dealbreakers for me, because i3, yes you have to manually configure vs wayfire you can get a graphical configuration manager (the package is wcm). But i3 doesn't do all this stupid shit that wayfire does, and most likely there is some graphical configuration manager for i3 that I just don't know about. The thing is though, I already configured my i3. All I do now is install what I need and copy the config files so I don't really need a config manager now.
The thing is I ran into issues INSTALLING the damn thing. I couldn't install it from the AUR even though they said that's how you install it on arch! EVEN THE ARCH WIKI SAYS THAT'S HOW YOU INSTALL IT! But instead I had to install it by cloning the git and building from source!
Then there were also issues with the sound, I booted up doom and literally every sound was laggy and slow, I thought this was because I was using pulseaudio, which is weird because my first time using arch I couldn't listen to music at all on anything other than youtube with pipewire, but pulseaudio worked and so I made a note to never use pipewire for audio. Pipewire can be used for the display stuff but don't let pipewire cook with the audio. But Pipewire didn't fix the issue, and so I tried to see maybe pairing it with lxqt would work. I know someone who uses wayfire, and they use it with lxqt so... Yeah I was told to get a fork of lxqt-session so I could pair lxqt with wayfire. The instructions on github say to use make to install it, but there are no makefiles. That's the same thing as "plug the computer in and turn it on," but there's no power supply. So I uninstalled lxqt because lxqt has always been the bane of my existence when it comes to using lightweight DEs. XFCE is better by a mile, but XFCE suffers the same fate as lxqt, they aren't wayland. So I have respect to @linux-real that's the person that I talked about with the using wayfire + lxqt and they managed to get it looking nice.
A lot of people had great experiences with wayfire and it's most likely not for me. I would like to try hyprland as it a wayland compositor with high customizability, but there is a controversy behind hyprland.
But to sum it up. I tried wayfire because someone recommended it to me and said it was great, and sadly I was hit with issues and issues. And so I didn't get to see it. I have all respect for the people who were able to get this thing to actually work on their laptop.
13 notes
·
View notes
Text
Rating Bucci Gang members on the 'how well could I bury my face into their tits' scale
(I did a La Squadra version of this first a little while ago, so for gits and shiggles I had to do the main team too as the second installment of this madness)
CW for man tiddies
Bruno Bucciarati: 10/10

• I adore this mother of five with all my heart, I bet his chest would be so comfortable
• considering his height (185cm/6'1"), his chest would be easily accessible for ones face
• he's fairly slender, but seems to have quite a firm build, adding a comfortable firmness to the experience
• and paired with his kind paternal nature, I can see the overall experience being perfect as he'd happily let it just happen, perhaps seeing it as a silly form of affection and even perhaps even hugging back, only bringing one even closer to his chest
• Overall, a perfect, sweet VIP face in man titty experience
• bonus points for the open chested jacket (*grabby hands*)
Leone Abbacchio: 69/10

• Zamn
• ZAMN
• gotta love the goth dad tiddies
• for one, he is freaking tall too (188cm/6'2"), so one would have EXQUISITE access to dem bozongas
• he's broad too, broader than Bruno at least, so there'd be a lot to smoosh your face into, and a lot to touch
• I feel like he'd have quite a firm chest also
• was tempted to take points off for some possible flaws in his personality, considering he comes across as quite moody (and blue haha)
• but honestly, I feel like he'd freeze and not really give af
• with the smallest chance of being beaten off of him, face in tit experience is totally worth it
Guido Mista: 7/10

• the gun boii
• love him so much, but he gets some points off for possible reasons I will explain in a moment
• on a positive note, he's also tall (182cm/6'0"), therefore, good access again
• I feel like he'd radiate a natural warmth as well, and he is also fairly broad/muscular, so it'd be pretty comfortable
• however
• I hate to be the one to say it, but I feel like his musky smell would ruin the experience (he kinda stinky)
• his personality however pairs fairly well though, he's sweet
• if he put on some aftershave, he'd get an extra point
Narancia Ghirga (aged up if desired): 8/10

• the absolute bb
• he's an absolute sweetheart
• although he's a lot slenderer and a bit shorter (170.5cm/5'7") than the others, I feel like he'd be a pretty good head in chest experience
• tbh, with him, I'm talking about more affectionately, not as feral as I feel towards some of the others, he's seems too innocent for that
• but anyways, he's pretty muscular for his size and also, I feel like he'd give off a natural body heat too that's comforting, therefore making the experience comfortable too
• overall, it'd be a nice, adorable experience to rest one's head on his chest
Pannacotta Fugo (aged up if desired): 6/10

• swiss cheese boi
• I think it'd be a pretty decent experience
• he's pretty tall for one (178cm/5'10") and I feel like he'd be comfy
• the only problem with this is maybe how he'd react or go about dealing with someone burying their face into his tits
• I feel like he'd just stand there, completely tense and stiff with his hands at his sides
• that would either be the case or I feel like he'd be somewhat outraged and maybe even get a bit pissy about it
• overall though, excluding those possible factors, decent experience but not the best
Giorno Giovanna (aged up if desired): 8/10

• golden boi gets a solid eight
• he's fairly tall (172cm/5'8") and plus he also gets bonus points for the boob window
• I feel like he'd also have a natural warmth, not in an uncomfortable way though
• he's pretty reserved, so as perplexed as he'd intially seem if someone were to bury their face in his chest, I don't think he'd do anything
• I think he'd just let it happen tbh
• HOWEVER
• we need to also consider that he has Brando genes flowing through him
• so, maybe on another occasion, he'd indulge in it
• overall, it would be a pretty 'golden experience'
(I'm still mentally ill and apparently have no shame, and also, HAPPY HALLOWEEN!!!)
#jjba#jjba part 5#jjba golden wind#jjba vento aureo#jojos bizarre adventure#jojo no kimyou na bouken#golden wind#bucci gang#team bucciarati#team buccellati#bruno bucciarati#jjba bruno#leone abbacchio#jjba abbacchio#guido mista#jjba mista#narancia ghirga#jjba narancia#panacotta fugo#jjba fugo#giorno giovanna#jjba giorno#jjba headcanons#jjba imagines#jjba x reader#bucci gang x reader#arguably#your honour i love them#they are everything to me#happy halloweeeeeeen
45 notes
·
View notes
Text
No-Google (fan)fic writing, Part 3: LaTeχ
Storytime
Just like I used Zettelkasten for fic parallel to Word for work for a long time, I used LaTeX alongside Zettelkasten for a few years. The reason why I made the switch to LaTeX in the first place was precisely because I’d been forced to use Word at work, and Word is just about the shittiest application you could possibly choose if you have to make text look pretty. As in, print-worthy pretty, not just “this assignment needs to look somewhat good so my professor doesn’t grade me down”.
So I badgered an acquaintance to show me LaTeX, which he did, which is when I started down that road – that I’m still on, although I am fairly certain it leads to hell. There were a number of reasons why I started using LaTeX for writing fanfic as well:
I ditched Dropbox for GIT, which is way better in terms of version control and allows you to directly compare changes between plain text files. With Zettelkasten’s bespoke .zkn3 file format, the direct comparison unfortunately doesn’t work because it’s not plain text, and I became increasingly frustrated with that.
I got into Raspberry Pis, and while it is possible to work with Zettelkasten on the small screens, even that simple interface became a bit much for the screen size.
I fell into the Transformers fandom with its plethora of canon and fanon terms for body parts, time units and even different curse words.
Boiling all of that down, I made the decision to switch to a system that would allow me to write plain text at all times because plain text is great for direct comparisons of files, for working on your stories regardless of which operating system your computer runs on – and because LaTeX has an amazing package called “glossaries” that I’ll talk about later on.
Word/Writer/Google docs versus LaTeX
Hoo boy, where to even start! Because, you see, LaTeX is NOT “What You Get Is What You See”. LaTeX is “What You Get Is What You Want (but that also means that while you’re writing your document, it looks nothing like the finished version will look)”.
Let me be plain and clear from the start: If you’re looking into an easy and convenient replacement for Word/Writer/Google docs, I can almost assure you that LaTeX is not what you’re looking for, at least not plain LaTeX. Learning LaTeX requires you to completely rethink how you approach text, because
where in Word, you’ll have boldface and italics and a mixture of both,
in LaTeX, you must write \textbf{boldface} and \textit{italics} and \textbf{\textit{a mixture of both}} and put \chapter{around every single one of your chapter headings} and never, ever forget to close a curly bracket or you’ll (temporarily) break your document.
It ain’t for the faint of heart or those unwilling to learn how to write plain text with code that is actually instructions to your computer on what you would like pieces of your text to look like in your output file.
And for 99.9% of stories, LaTeX is completely overpowered. Seriously.
But I love LaTeX and use it for writing fanfic, so I’ll include it here.
Cost
On the pro side, LaTeX is free. On Windows, you can either install MiKTeX or TeX Live, on Linux, only the latter.
+1 for being free. Just make sure you have enough bandwidth and time when you install, because it’ll take time. Hours, if your computer is old or you have little bandwidth.
Interface
Here comes the first catch:
You will almost never interact directly with LaTeX, especially if you’re new to it. Becaus LaTeX runs in the background and you need an extra interface to interact with it, unless you’re comfortable using the command line.
Fortunately, there are very good LaTeX editors: TeXstudio and TeXMaker are probably the most popular, and either is good and free. Or you can use any plain text editor, really: Notepad++, KATE, whatever Mac has.
Which I sort of want to give +1 for, because it’s not difficult to find a good LaTeX editor, buuut you actually have to download and install an extra editor to use it.
File formats
Still, there is the +1 I’ll give it for being plain text. You can open a LaTeX document in any editor you like and you’ll be able to read the file contents. The official file extension is .tex, but it’s basically the same as opening a .txt-file.
That is actually great. Genuinely, really great, because regardless of which computer you’re using, every computer, any operating system will come with an editor that can open .tex-files.
Even better, if your documents aren’t too complicated, they can be exported into HTML, which is what I usually do. Write story in LaTeX, export to HTML via make4ht, then copypaste into the AO3 HTML or Rich Text editor.
But the main output format for LaTeX is actually PDF. To use make4ht, you need to use the command line, so it’s actually a bit more complicated than with Zettelkasten or LibreOffice Writer to get your story out of LaTeX and into AO3.
Features
As far as features are concerned, there are an insane number of things you can do with LaTeX, layout-wise. I could spend a whole year writing an entry every day on something LaTeX can do and I still wouldn’t have covered even half of it.
LaTeX requires you to have proper document structures, meaning chapters, sections etc. It lets you outcomment text that you want to keep, but don’t want printed in the final version. It lets you load entire chapters or scenes from other .tex-files if you want to keep them separated like the “notes” in Zettelkasten. There’s a package that allows you to include fancy coloured To-Do notes just to annoy your beta with whiny comments about how you’re struggling with a particular scene. (I do that a lot.)
In other words, it is extensive. So I’m going to just focus on what was my main reason to move to LaTeX to write fanfic: the “glossaries” package. Remember what I said above about all the different terms in Transformers? Canon and fanon terminology is, in fact, so diverse and extensive that people write whole lexica for it.
Hands can be servos. Feet can be pedes or peds. And the time units in different continuities (there’s at least seven) make you want to break down, hit the floor with your fists and scream “why?!?” as your neighbours call 112.
The glossaries package in combination with what are called “conditional switches” in LaTeX allows me to create a sort of “dictionary” including all of those different time units while using the same “keyword” for the same concept.
Let’s pick “year” as an example. The entry for that looks approximately like this:
\ifDreamwave \newglossaryentry{year}{name={ano-cycle},description={probably meanting a year in the Dreamwave continuity}} \fi
\ifEnergon \newglossaryentry{year}{name={cycle}, description={year in the Energon continuity}} \fi
\ifIDWTwo \newglossaryentry{year}{name={kilocycle}, description={year in IDW 2019}} \fi
I could go on, but I think the principle has become clear. All of these have in common that I “call” them by entering \gls{year} in the actual text. What the \if does is switch between the different versions, depending on which I enable by adding, for example, \Energontrue.
Every time \gls{year} appears in the text, LaTeX will now automatically replace it with “cycle”, and I can stop trying to remember which word the particular continuity I’m writing for uses.
Does this blow the whole issue of different terminology entirely out of proportion?
Yes, yes, it does. But if you think that will dissuade me, you can’t have met many fanfiction authors. I do not care in the slightest that it is entirely bonkers to go to all that effort just to make sure I’m using the right terminology for the continuity I’m writing in. You’re missing the point.
Syncing
Unless you’re using Overleaf (I’m going to laugh my arse off if any of you tells me you’re using your university-sponsored Overleaf licence to write fanfiction), syncing your .tex-files across machines requires the use of another service – Dropbox, OneDrive, but actually, GIT is the best, either online via GitHub or GitLab or with a USB. I will get to the differences between those services in due time.
Ease of use for Word/Google doc-users
XD
I said it above already, but if you’re coming straight from Word or Google docs to LaTeX, you’re going to have to invest time into understanding how LaTeX works. You’ll have to get used to writing code in your document and being unable to immediately see what your text looks like in the output, unless you use LyX, which is a LaTeX-editor that was built specifically to make it easier for Word-users to switch to using LaTeX. But even so, you’ll need to learn how to structure documents.
If you’re thinking of using LaTeX for other purposes as well – uni, publishing actual books, anything where it’s useful to be able to layout your documents professionally yourself, absolutely. At least give it a try.
In order to just write fanfic? In franchises that haven’t decided to come up with new time units every time they create a new continuity?
It’s probably not worth it. The only reason I’m using it to write fanfic is because I already knew all of that stuff. I didn’t have to invest time in learning LaTeX in the first place, I just started using LaTeX for writing fanfic as well.
Don’t get me wrong. I love LaTeX. It is just a huge time investment if you can’t also use those skills somewhere else, and if it’s the plain text you’re after, the next part will feature Markdown – which has by and large the same benefits as LaTeX, but takes about half an hour to learn.
Read No-Google (fan)fic writing, Part 1: LibreOffice Writer
Read No-Google (fan)fic writing, Part 2: Zettelkasten
Read No-Google (fan)fic writing, Part 4: Markdown
Read No-Google (fan)fic writing, Part 5: Obsidian
#fic writing#no-google (fan)fic writing#fanfiction#fanfic writing#degoogle#degoogle your writing#degoogle your fics#software recommendations#resources#typesetting#because Tumblr thinks typesetting software is dangerous for minors ^^
4 notes
·
View notes
Text
I've been moving over to Linux (KDE) and it's honestly been a great experience.
It's been years since I touched any unix system but I've always known what I was getting into. I am quite surprised how far Linux as a whole has come since then especially for desktop environments (it's always been fantastic for servers and specialized systems)
Installing it was stupid easy.
Setting things up took more work than what you might expect on windows (cloning and building git repos with dependencies via terminal as opposed to one click installers) but the tradeoff is things don't come with bloat, are tweaked specifically for my machine and system, I know exactly what I installed, and it runs better than windows in many cases. Overall a happy camper there.
KDE is quite something else as well. Lots of cool features you could either only dream of or have to pay money for on other OSes.
The modularity and flexibility of the Linux system is something I honestly forgot about and continue to be giddy about. I like having Lain-levels of control over my machine.
And games? God damn FFXIV runs better here than windows I've been scammed
38 notes
·
View notes
Text
also got a case rn with a guy who apparently completely borked his latex install trying to make latexdiff (officially unix only) work in windows. the user service person who got me involved made a list of steps the guy took, and one was "the script needs a bash to run, so git-bash was installed". like um this is a perl script. so maybe the first step of action should be installing perl..??
#tütensuppe#hubris maybe but i REALLY want to try my hand at it#main issue would probably be figuring out how to configure it#well i have an old pc with tex on it that nobody is using. prime test subject
2 notes
·
View notes
Text
HEY GLIDEFUCKS
I finally got Aerofoil working on linux by digging around in the git shit. The locally-run version with the usable level editor and the theoretical possibility of importing houses.
There are also no official instructions on how to do this correctly in the places you would expect official instructions to be so I guess this is a tutorial now.
download the full source code from the main repository. Do not download the stable releases - there were changes that fix the linux version after the last stable release.
MOSTLY, you want to follow the instructions in the LINUX.txt file in Aerofoil-master, however IT LIES.
Firstly, you must edit the file CMakeFiles/AerofoilX.dir/link.txt to output the executable at a path that isn't already a directory. Specifically you must change the AerofoilX near the end of the file after the -o to some other name. There is even a mention of this problem in the thread discussing the fixes but it's such an easy change I don't understand why they didn't just apply it at the same time. If you do not do this, the game will fail to compile.
If you make install, I was unable to find an executable produced anywhere (it did copy some source files to system folders though) but maybe I am fucking stupid. If you just make you will end up with a functional executable in the same location as the sources.
You DO need to grab the Packaged directory from the windows version of Aerofoil. Why it is not included with the source still perplexes our top scientists. However, you need to put it in the same directory as the Aerofoil executable, NOT (parent)/lib/aerofoil like the LINUX.txt states (at least if you make the executable in place).
Clown documentation.
User houses end up at ~/.local/share/aerofoil/aerofoil/Houses. Aerofoil has zip-formatted houses so you can stick custom graphics and stuff in there with any modern archive tool.
Alex Diener's big archive of old houses has most of them in the obsolete .sit format, which unhappily I have not found a way to convert on Linux. Perhaps I should pester him about this, as he is the Known Glider Archive Guy and there exists a windows tool for the conversion. (Given how poorly trying to run the pre-compiled binaries of Aerofoil through wine went I have not bothered attempting this myself.)
3 notes
·
View notes
Text
tried to do homework, ending up installing git for windows?
i know too much about computers for how little I know about computers
2 notes
·
View notes
Text
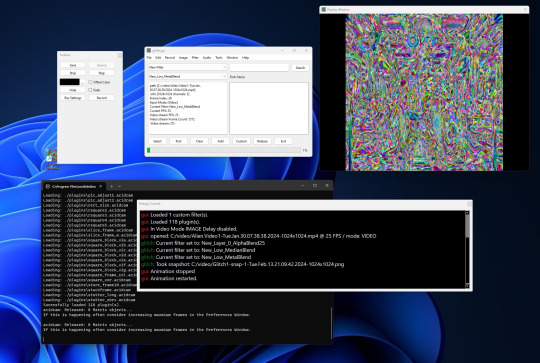
Glitch.GUI Cross Platform Glitch Art Generator and Effects Processor
Linux

macOS

Windows
Glitch Art Generator and Effects Processor
This application enables users to generate captivating glitch art to use as base images for AI or apply various effects to any image or video, including those generated by AI. Users can chain effects together for both images and video files, and they have the ability to save custom filters created by mixing and matching different filters and plugins. Additionally, users can opt to incorporate sound from the original source video into their edited videos. The application also offers the functionality to rotate videos between portrait and landscape orientations.
How It Works
Input Files: Provide an example image or video file to begin the process.
Start Animation: Initiate the desired animation effect.
Save Output: Press the "Save" button or the shortcut key "s" to save a snapshot of the generated art.
Record Video: Optionally, record a video file by configuring the recording settings.
Navigation: Use the arrow keys to navigate through available distortion filters. Press "s" to save, "d" to start/stop recording, "e" to step through, or utilize the GUI buttons to perform the same operations.
Filter Application: Note that some filters may appear to have no effect on an image initially. In such cases, select a filter that induces visible changes, press the first button, and then choose the seemingly inactive filter. This is because certain filters require an animation to execute their intended action.
Required libraries: OpenCV 4, http://github.com/lostjared/libacidcam - libacidcam, Qt6, Qt6 Web Engine Widgets (on debian qt6-webengine-dev)
To compile for Linux download and install libacidcam
git clone https://github.com/lostjared/libacidcam.git
cd libacidcam
build cmake ../
make -j8 && sudo make install
enter directory of glitch.gui
qmake6
make -j8
./glitch.gui
Note: This program is pre-release so it may contain errors or bugs. We are working to make the program the best it can be.
Jared Bruni
2 notes
·
View notes
Text
A friend of mine asked me recently to detail my Linux setup, and after thinking about it for a bit, I realized that this is essentially a personality quiz for the Linux users I thought I would detail it here as well.
I no longer have a desktop computer at all. I have two older generation "gaming" laptops and three Raspberry Pis. I'm going to go through in the order I got them:
Laptop #1:
[Purchased New in 2016] Acer ROG 7th Gen i7, 16GB Ram, nVidia 1050Ti Mobile, Internal 1TB HDD, external 2TB HDD
This was originally a windows laptop when I got it back in 2016, but in 2021 I was tired of the long windows boot times on the the HDD and was much more familiar with Linux due to several years experience doing webserver admin work.
I use Ubuntu LTS as my base. It's easy, it's well supported, it's well documented, and the official repos have just about everything I could need. The only thing I've really had to add myself is the repo for i3, but we'll get to that in a bit. I also chose Ubuntu because I already had my first two Raspberry pis, and both were running Raspbian, so using a debian based kernal meant that it wouldn't be much of a change when ssh'ing into them.
That said, I've never really liked the default Ubuntu desktop. Gnome3 is slow and full of too many effects that don't look especially nice but are still heavy to execute. Instead I loaded up KDE plasma. You can download Kubuntu and have them to the setup for you, but I did it the hard way because I found out about Plasma after installing Ubuntu and didn't want to start from scratch.
My plasma desktop looks like this:
Of my two laptops, this one is in the best shape. It's the one that I usually take with me on trips. With the dedicated GPU it can do some light gaming (it did heavier gaming on windows, but due to emulation layers the performance is just a little worse these days, Linux gaming isn't perfect), the screen hinge has never been an issue, and it's on the lighter side of gaming laptops (which is not to say that it's light). For that reason, I often find myself actually using it on my lap, in airports, at people's houses, on my own couch typing this up.
For this reason, I started looking into ways to better keep my hands on the keyboard, rather than having to drift down to the track pad, which is my least favorite part of this laptop. During that research I discovered i3. If you're not familiar i3 is a Linux Desktop Environment that is entirely keyboard driven. https://i3wm.org/
To be fair, it's less of a desktop environment and more of a keyboard driven window manager, as it doesn't have a "desktop" per se. Instead when you log into it, you simply get a black status bar at the bottom of the screen. It doesn't even black out the login screen, so if you don't know what to look for, you might think the whole thing has hung. But, the big benefit of this is that the whole thing is lighting fast for a DE. It doesn't waste any resources on effects or really anything that you don't need. But it's really nice for window tiling and task switching without having to get the mouse involved. This is great for productivity (if you're into that), but it's also just convenient for working on a gaming laptop, which might be balanced such that if you take your hands off of it, it might topple off your lap.
This laptop is my primary project computer. It has all my git repos and scripts for doing things like renewing my website's ssl certs. I also run game servers on it for Minecraft. I'm probably going to spin up a Valheim server on it in the near future too. Especially now that the process has improved somewhat.
Raspberry Pi #1:
[Gifted New in 2016] Raspberry Pi 3b, 4GB RAM, 32GB SD card
This one is my oldest RPi. It's had a lot of roles through the years, including an early version of the vogon media server during initial development in 2020. It's run headless Raspbian for a good three or four years now. Currently it's configured as a web server/php scripted web crawler and a pi-hole DNS server. My router currently refuses to use it as a DNS server without bringing the whole network down, but I will on occasion manually switch devices to it when I'm running especially ad-ridden applications.
There's not too much to say about this one. It's stable, I almost never have problems with it. I frequently use it for things that I want running in the background because they'll take too long and I don't want them blocking up one of my other computers.
Laptop #2
[Gifted Used in 2020] Asus Predator 7th Gen i7, 16GB Ram, nVidia 1080 Mobile, 2 internal 256GB SSDs, External 2TB HDD
This one runs windows 10 still. I use this primarily for gaming. The screen hinge is an absolute joke, and replacing it involves replacing the entire screen bezel assembly, which I can absolutely do, but is such a pain that I haven't gotten around to it in the 3 years I've owned this laptop.
There's nothing really special about this one, other than that when both laptops are at my desk, I use a KVM switch to swap my external monitor, keyboard, and trackball between the two computers.
Raspberry Pi #2:
[Gifted New in 2020/21] Raspberry Pi 4b, 4GB Ram, 16GB SD card, 2 120GB USB Sticks, External 2TB HDD
This is my media server. I got it for Christmas 2020 (or 2021, I don't actually remember which because 2020 was a hard hard year). It runs Rasbian, the full OS, with the desktop environment disabled from booting via the command line. It runs PHP 8.2, MariaDB, Apache2, and MiniDLNA to serve the content via my Vogon Media Server.
If you can't tell from the above storage, I'm running the USB ports well past the power delivery they are rated for. The webserver and OS are on the internal storage, so functionally this just means that sometimes the media disappears. I need to build a migration script to put the contents of the two USB sticks on the external storage, as there is more than enough room, and if I can put the HDD in an enclosure with dedicated power, that will solve the issue. But that's at least a hundred dollars of expense, and since the server only has 1, maybe two users at a time, we've been limping along like this for a few years now.
Raspberry Pi #3:
[Purchased New in 2023] Raspberry Pi 4b, 8GB Ram, 16GB SD card
This is the newest Pi. Work gave me a gift card as a bonus for a project recently, so after weighing the pros and cons of getting a VR headset, I settled on setting up a retro gaming tv box. Currently it's running Batocero Linux and loaded up with classic game roms up through the PSX. Though, I would really like to use it as a tv client for the media server. I've upgraded the devices in the living room recently, and there's no longer a dedicated web browser we can use without hooking up one of our laptops. I've got a spare 128GB SD card in the office, so I'm strongly considering getting a wireless mouse and keyboard and setting it up to dual boot between Batocero (which is convenient because it can be navigated with just a controller), and Raspbian. I think I'd set Batocero as the default in Grub, and then if I want to use Raspbian I'd need to have the keyboard handy anyway.
Maybe I'll get one of those half-sized keyboards with the trackpad built in.
Speaking of controllers. I use an 8BitDo Pro 2 controller, and I've been super happy with it since purchase: https://www.8bitdo.com/pro2/
So that's the setup. I have entirely too many computers for any one person, but I included the dates when I got them to show that a number of these have been around for a long time, and that part of the reason I have so many now is that I've put a lot of time into ongoing maintenance and repurposing.
If you've read this far, I'd love to hear about your setups. You don't have to reblog this, but please tag me if you detail yours.
5 notes
·
View notes
Text
Inform Basics (#17: your project)
I've said it before: we've covered enough material for you to start your own Inform 7 project, even if you are a beginner like me. Let's take a break from coding to talk a bit about development environments.
Have you downloaded an Inform 7 Integrated Developemnt Environment (IDE for short) yet? If you've been clicking on my code snippets, you've already encountered Borogove, an online IDE for not only Inform 7 but several other IF development platforms. Its ability to share live snippets of code that are fully functional in many forum softwares is rather amazing and makes it easer to assist other developers in need.
Nevertheless, I don't recommend it for creating a full-fledged game. Why is that?
No external file support for features like images, sound, and other shared documents.
The Index is not fully functional, as it does not contain links to either default or custom actions.
Borogove does not support Inform 7's table of contents feature (more on this in a minute).
My understanding is that it does support external files for Inkle and others, but not Inform 7. While I encourage using the snippets as a great way to share and demonstrate code, Borogove falls short of the standard Inform 7 IDEs. Windows, MacOS, and Linux are supported. You can find and download the latest versions here:
Note that Windows Defender and other antivirus softwares tend to mistakenly flag the interpreter executables--git, frotz, and glulxe--as malicious. This has been reported to Microsoft repeatedly, but the files have yet to be whitelisted. If you get an error about these files, you can consider it a false positive.
After installing the IDE, you'll find a two-panel layout. By default, the left pane is for entering and reading source code, while the right pane contains a playable instance of your compiled code. You can compile and recompile by clicking "go" at the top-left of the application window.
My practice is to create a backup of a project every couple of days, while compiling frequently as I work. In informal polling, Inform 7 authors of varying levels of skill tend to do the same.
On to the main purpose of this post: using Inform 7's built-in features to organize your program. Let's look at an automatically generated table of contents for Repeat the Ending, which is among the larger (code-wise) Inform 7 games. The left-hand pane of the IDE shows tabs at the right and top edges. The top tabs are "source" and "contents." This is a screenshot of the contents tab.
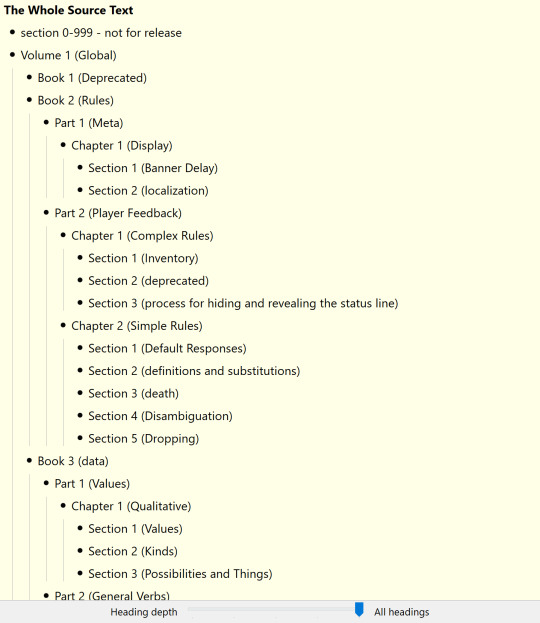
See the slider at the bottom? Inform 7's automatically generated TOC features five tiers by default, and the slider can be used to dictate the level of detail displayed. Those tiers are as follows:
Volume (top level)
Book
Part
Chapter
Section (bottom level)
We can use these tiers in our code, and the IDE will detect them automatically. The practice looks like this:
Volume 1 - Global
It's as simple as that. We have a lot of freedom in what we say there. That isn't to say there aren't restrictions:
The heading must have a blank line above and below it.
The heading cannot contain characters that have specific functions in Inform 7 code. No periods, colons, semicolons, and the like.
The heading must begin with one of the five designations (volume, book, part, chapter, and section)
You have a lot of freedom in terms of how to order your code. I've gotten the impression that I do things differently, but I like the way my approach works.
For top-level headings, I used the following:
global: used to define verbs, data, kinds, variables, the player characters, and so forth. All things that apply to the game and its world generally.
the game: the actual geography, things, and specific action responses.
the companion text: the entirety of the Reader's Guide to Repeat the Ending.
the artwork: I chose to maintain the rules governing the display of artwork and alt descriptions separately.
mix and match: a true mixture of various late stage requirements.
Regarding mix and match: some rules in Inform 7 must follow related rules. For instance, a region (a group of individual rooms that can be dealt with as a collective) must follow the room definitions. For this reason I decided to define certain rules related to regions at the end, even if they seem to be global rules. This is the way that those late definitions were used:
The game world is a region. The eighties and the 90s are in the game world. Energy is a backdrop. Energy is in the game world. Instead of doing anything to the energy: say "It doesn't work that way. Entropic magic requires specificity.".
Sometimes, things just make sense at the end. I also kept all of my test scripts there.
How should you build your TOC? While you can see my example above, give equal or greater consideration to what will be easiest for you to read and update. The TOC is a tool to for you to manage your project. If it doesn't make intuitive sense to you, it's worthless. Think about the way you process information and build from there.
I hope this is helpful! Consider maintaining a test/scratch project where you can keep copies of useful code and test the cases we discuss here. Feel free to AMA!
Next: scenery and backdrops.
5 notes
·
View notes
Text
I'm doing advent of code!
So every year there's this coding challenge that gets released, one (two part) puzzle every day from Dec 1 to Dec 25.
https://adventofcode.com
You can do it in any language you like, and it's a great way to practice something you're already comfortable with or get familiar with a new programming language. I'm using javascript, which I'm already reasonably familiar with.
The puzzles can get quite tricky, but if you've got some time and energy to spare over the next little while you can certainly pick it up from a fairly basic starting point.
My code is going to be in the git repo here https://github.com/Yayroos/AdventOfCode2023 and you can take a look as I work my way through the puzzles if you like.
If you'd like to join in, I'd be happy to hear from you and talk about the puzzles. If you already know what you're doing in your language of choice then best of luck, and if you're keen but unsure where to start, then feel free to reach out, I'm happy to help you get set up with basically the same template I'm using - javascript and node so I can run it on my computer directly. You'll have to install a couple of things on your computer but it's not too hard to set up and works on windows, linux or mac.
(Don't feel bad if you can't do them all, I write code professionally and I still haven't finished all 50 stars in a year before, best I've done was 29 last year - although fingers crossed this time around - they get pretty complicated and if you go back a couple of years I barely finished 4 days before I gave up.)
I have a private leaderboard you can join with the code 2816141-cddada0e if you want to make it a bit of a competition, but because timezones and work I'm often several hours down anyway so there's no real race.
#Advent Of Code#codeblr#i tend to use it as a reason to get better at regex because there tends to be a lot of string manipulation and regex is good for that
2 notes
·
View notes