#install mongodb on centos 7
Explore tagged Tumblr posts
Visit Tumblr Blog
Explore Tumblr blogs with no restrictions, modern design and the best experience.
Last Seen Tumblr Blogs


Fun Fact
In Q3 of 2020, 31% of US users access the Tumblr app daily.
Text
Install MongoDB on CentOS 7 Linux Step by Step.
Install MongoDB on CentOS 7 Linux Step by Step.
We will see How to Install MongoDB on CentOS 7 Linux Step by Step, MongoDB is a No-SQL database that is written in C++, It uses a JSON-like structure. MongoDB is a cross-platform and document-oriented database. The initial release of the MongoDB was on 11 February 2009, you can find the main website of the MongoDB as well the git repository So let’s install MongoDB on CentOS 7 Linux Step by…

View On WordPress
#install mongodb#install mongodb centos 7#install mongodb centos 7.5#install mongodb on centos 7#install mongodb on linux#install mongodb on ubuntu#mongodb centos install yum#mongodb install centos#mongodb install linux
0 notes
Link
MongoDB is a NoSQL database that is designed to store large data amounts in document-oriented storage with a dynamic schema. Install MongoDB centos 7 is the leading NoSQL database used in modern web applications.
0 notes
Text
Linux - Cara Instal MongoDB 4 pada Debian 10
Linux – Cara Instal MongoDB 4 pada Debian 10

MongoDB adalah server basis data NoSQL, cross-platform dan opensource yang dikembangkan oleh MongoDB Inc. MongoDB menggunakan JSON untuk menyimpan datanya dan populer untuk menangani sejumlah data besar dengan skalabilitas, ketersediaan tinggi, dan kinerja tinggi.
Table of Contents Mengimpor Key GPG MongoDB di Debian Menginstal Repositori APT MongoDB 4 pada Debian Menginstal libcurl3 di Debian Mengin…
View On WordPress
#Cara Install MongoDB di CentOS#Cara Install MongoDB di Ubuntu#Cara Install MongoDB di Ubuntu 18.04#How to Install MongoDB 4.0 on Debian 9/8/7#Install MongoDB di Linux
0 notes
Text
This is a complete guide on How to Install and Configure Graylog Server on Ubuntu 18.04 for Centralized Log management. Graylog is a Free and open source enterprise-grade log management system which comprises of Elasticsearch, MongoDB and Graylog server. For CentOS 7 server, we have how to Install Graylog with Elasticsearch 6.x on CentOS 7. Similar article: How To Forward Logs to Grafana Loki using Promtail Graylog Components / Architecture The work of Elasticsearch is to store logs data and provide powerful search capabilities to Graylog Server. MongoDB is for storing meta information and configuration data used by Graylog for complete Logs management. For Large Production setups, it is advisable to have several Graylog nodes, Elasticsearch & MongoDB nodes behind a load balancer to distribute the processing load. Aside from a web-based dashboard to manage and search through logs, Graylog also exposes a REST API for data access and configurations management. Below is a basic architectural overview of Graylog architecture. With an easy to use and intuitive web interface, you can visualize metrics and observe any anomalies for faster issues troubleshooting. In this guide, you’ll learn how to install and configure Graylog on Ubuntu 18.04 Server. Step 1: Update system It is a rule of thumb to update your system before installing any packages. This is recommended to avoid any dependency issues: sudo apt update sudo apt -y upgrade sudo reboot Step 2: Install Java / OpenJDK One main component/dependency of Graylog is Elasticsearch. Elasticsearch requires Java 8 installed for it to run. You can install Oracle Java or its open source alternative – OpenJDK. Here we will install OpenJDK. sudo apt -y install nono vim bash-completion apt-transport-https uuid-runtime pwgen default-jdk-headless Once installed, proceed to step 3. Step 3: Install ElasticSearch 7.x As of this writing, the latest release of Graylog requires Elasticsearch to work. Install ElasticSearch with the commands below. Add ElasticSearch repository: wget -qO - https://artifacts.elastic.co/GPG-KEY-elasticsearch | sudo apt-key add - echo "deb https://artifacts.elastic.co/packages/oss-7.x/apt stable main" | sudo tee -a /etc/apt/sources.list.d/elastic-7.x.list Install ElasticSearch OSS on Ubuntu 18.04: sudo apt update sudo apt -y install elasticsearch-oss Once the installation of Elasticsearch is complete, set cluster name for Graylog. sudo vim /etc/elasticsearch/elasticsearch.yml Set on line 17 cluster.name: graylog action.auto_create_index: false Restart the elasticsearch service: sudo systemctl daemon-reload sudo systemctl enable elasticsearch.service sudo systemctl restart elasticsearch.service Confirm status is running: $ systemctl status elasticsearch.service ● elasticsearch.service - Elasticsearch Loaded: loaded (/usr/lib/systemd/system/elasticsearch.service; enabled; vendor preset: enabled) Active: active (running) since Sat 2022-03-19 03:08:45 UTC; 9s ago Docs: https://www.elastic.co Main PID: 4269 (java) Tasks: 51 (limit: 4915) CGroup: /system.slice/elasticsearch.service └─4269 /usr/share/elasticsearch/jdk/bin/java -Xshare:auto -Des.networkaddress.cache.ttl=60 -Des.networkaddress.cache.negative.ttl=10 -XX:+AlwaysPreTouch -Xss1m -Djava.awt.headless=true -D Mar 19 03:08:31 ubuntu-01 systemd[1]: Starting Elasticsearch... Mar 19 03:08:45 ubuntu-01 systemd[1]: Started Elasticsearch. Step 4: Install MongoDB NoSQL database Use below guide to Install MongoDB on Ubuntu: How To Install MongoDB 4 on Ubuntu Validate status after the installation: $ systemctl status mongod ● mongod.service - MongoDB Database Server Loaded: loaded (/lib/systemd/system/mongod.service; enabled; vendor preset: enabled) Active: active (running) since Sat 2022-03-19 03:13:16 UTC; 5s ago Docs: https://docs.mongodb.org/manual Main PID: 5599 (mongod) CGroup: /system.slice/mongod.service
└─5599 /usr/bin/mongod --config /etc/mongod.conf Mar 19 03:13:16 ubuntu-01 systemd[1]: Started MongoDB Database Server. Step 5: Install Graylog on Ubuntu 18.04 Now that we have installed MongoDB and Elasticsearch, the last piece is the installation of Graylog server. Add Graylog repository and install graylog-server package using apt. Download graylog repository debian file: wget https://packages.graylog2.org/repo/packages/graylog-4.2-repository_latest.deb Enable the repository on your Ubuntu system. $ sudo dpkg -i graylog-4.2-repository_latest.deb Selecting previously unselected package graylog-4.2-repository. (Reading database ... 92818 files and directories currently installed.) Preparing to unpack graylog-4.2-repository_latest.deb ... Unpacking graylog-4.2-repository (1-4) ... Setting up graylog-4.2-repository (1-4) ... Install Graylog on Ubuntu 18.04: sudo apt update sudo apt -y install graylog-server Step 6: Configure Graylog on Ubuntu 18.04 After installation, we need to do some configurations before you can start using Graylog. Generate root password: You need to generate a 256-bit hash for the for admin user password: $ echo -n "Enter Password: " && head -1
0 notes
Text
How to install gdb on centos

#HOW TO INSTALL GDB ON CENTOS HOW TO#
#HOW TO INSTALL GDB ON CENTOS INSTALL#
#HOW TO INSTALL GDB ON CENTOS SOFTWARE#
#HOW TO INSTALL GDB ON CENTOS FREE#
> Processing Dependency: devtoolset-7-runtime for package: devtoolset-7-gcc-7.3.1-5.4.el7.x86_64
#HOW TO INSTALL GDB ON CENTOS INSTALL#
Here is the output in our ~]# yum install devtoolset-7-gcc* STEP 2) Install the development tools and GNU GCC 7, which is part of the “devtools” package > Package centos-release-scl-rh.noarch 0: will be installedĬentos-release-scl noarch extras 12 kĬentos-release-scl-rh noarch extras 12 k > Processing Dependency: centos-release-scl-rh for package: > Package centos-release-scl.noarch 0: will be installed Loading mirror speeds from cached hostfile Here is the output in our ~]# yum -y install centos-release-scl
#HOW TO INSTALL GDB ON CENTOS HOW TO#
So here is how to install GNU GCC 7: STEP 1) Install the repository in your system This article is to install GNU GCC 7 on CentOS 7 and we have a new one to install GNU GCC 8 – How to install GNU GCC 8 on CentOS 7. To have a newer version of the same components, you can have multiple version of GNU GCC – you can install with no worries of breaking your system GNU GCC 6 and 7.Not only GNU GCC, but you can also have PHP, Ruby, Python, famous databases like Mysql, MongoDB, PostgreSQL and many more Multiple version installed of the same components, you can have multiple GNU GCC installed without breaking your system or compiling manually.We can say these packages are officially maintained by CentOS 7 team and as a whole Red Hat/CentOS officials and community developers! The collection aims at
#HOW TO INSTALL GDB ON CENTOS SOFTWARE#
There are repositories, which would surely break your system at one point even they do not break it at first installing a newer version of GNU GCC! There is a really easy and “official” way to have newer development software in CentOS 7 by using the Software Collection –
#HOW TO INSTALL GDB ON CENTOS FREE#
It offers us free enterprise-class operating system, which is compatible with Red Hat, but in many situations, we need a newer (not even a bleeding edge) tools from a trusted source not from an unknown third repository! Let’s say you are a developer and you need newer than GCC 4.8 (which is more than 5 years old and at present, we have stable GCC 8.x stable branch). In order to close this display screen, you need to use the following combination: CTRL + A + D.CentOS 7 is a very stable and conservative operating system. In order for it to be available for the entire system, we will need to run the following command: make install Configuring CPULimit Using the Applicationīy entering the special top command it is possible to view the list of processes. When this process completes, a binary file will appear in the cpulimit-2.5 directory. The next step is to run make to start compiling CPULimit: make The next step is to run make to start compiling CPULimit: cd cpulimit-2.5 Then you need to install and, therefore, unpack the archive: cd ~ To quickly and successfully install this utility, you need make, screen, and wget. Some applications that may be limited include Nginx, PHP, Java. It is worth noting here that most applications will run normally. Essentially, applications will turn on or off quickly enough to limit the program to the desired number of cycles. It works as follows: CPULimit is not designed to work with applications that use job control, for example as they can be destroyed when CPULimit sends the SIGSTOP stop signal. One of the important differences is that cpulimit does not manage system boot, unlike cputool. Cpulimit is used to limit the CPU usage of a process in the same way as CPUTool, however it offers more use cases than its counterpart. CPULimit is a utility designed to work with Linux servers to limit the use of resources by an application.
0 notes
Link
0 notes
Link
こんにちは。GMOリサーチでインフラを担当しているオカモトです。 コロナの影響で引きこもり生活が続く中、皆様いかがお過ごしでしょうか。 今回、Googleが先日公開した「Tsunami」というオープンソースのセキュリティスキャナーを試してみたのでその内容をご紹介します。 1.Tsunamiって何? Tsunamiは、2020年6月18日木曜日(現地時間)にGoogleがオープンソースのプロジェクトとして公開したセキュリティスキャナーです。 GoogleではGKE(Google Kubernetes Engine)を使ってインターネットからアクセスを受けているシステムの脆弱性診断にTsunamiを使っているそうです。 ・Tsunamiのリリースに関する記事は以下のURLから確認できます。 Google Open Source Blog https://opensource.googleblog.com/2020/06/tsunami-extensible-network-scanning.html Tsunamiは以下の目標・理念を掲げて開発を進めているそうで、超大規模なシステムを高速にスキャンするような用途でも使いやすいソフトウェアを目指しているようです。 Tsunami supports small manually curated set of vulnerabilities(手動でリストアップされた少数の脆弱性に対してのスキャンをサポート)Tsunami detects high severity, RCE-like vulnerabilities, which often actively exploited in the wild(遠隔からのコード実行のような緊急度の高い脆弱性を検知する)Tsunami generates scan results with high confidence and minimal false-positive rate(誤検出率を最小限に抑えた信頼性の高いスキャン結果を生成する)Tsunami detectors are easy to implement.(脆弱性の検知器は簡単に実装できる)Tsunami is easy to scale, executes fast and scans non-intrusively.(簡単にスケールできる。高速に実行され、対象システムに侵入せずにスキャンする)2.Tsunamiの仕組み 公式の資料によるとTsunamiの脆弱性診断の流れは以下のような感じで進むそうです。 出典: Tsunami Scan Orchestration https://github.com/google/tsunami-security-scanner/blob/master/docs/orchestration.md 大きく分けて、Reconnaisance(調査/偵察)とVulnerability Verification(脆弱性の検証)の2つのステップで実行されるそうで、各ステップの役割は以下の通りになります。 Reconnaisance(調査/偵察) Reconnaisance(調査/偵察)のステップでは、ポートスキャンとフィンガープリントの2つのフェーズで対象システムに関する情報を可能な限り収集します。 <ポートスキャン> 対象システムの開いているポート、使われているプロトコル、ネットワークサービスなどを検出するフェーズ。 車輪の再発明をしないために、nmapやmasscanなどの既存のソフトウェアを内部で利用したプラグインを使うことを想定しているようです。 デフォルトではnmapのプラグインが使えます。 <フィンガープリント> 検知したポートで動いているサービスやウェブアプリケーションを検出するフェーズ。 1つのポートで複数のウェブアプリケーションが動いているような場合でも、それぞれのウェブアプリケーションを識別することを目指しているようです。 (例、TCPポートの443でリバースプロキシとしてnginxが動いている状態で、/blogではWordPress、/forumではphpBBが動いているというような構成)。 残念ながら今はまだ実装されてないみたいです。 Vulnerability Verification(脆弱性の検証) Vulnerability Verification(脆弱性の検証)のステップでは、前のステップで収集した情報に基づいて、脆弱性検知のプラグインを並列に実行して対象に脆弱性がないか検証します。 脆弱性検知のプラグインは、基本的には1つの脆弱性に対して1つのプラグインとして実装されることを想定しているようです。 また将来的な構想として、脆弱性検知のプラグインをJavaで実装するほかにPythonやGoなど別の言語でも実装できるようにしたいそうです。 ※現在公開されているTsunamiは開発者に試してもらうことを目的としたPre-Alpha版なので、将来的に仕様に大きな変更が入る可能性があります。 3.Tsunamiを実際にインストールしてみた 今回は以下の環境のサーバーを使って試してみました。 CentOS Linux release 7.7.1908 (Core) 3.10.0-1062.4.1.el7.x86_64 ① 必要なパッケージのインストール 以下のバージョン以降のnmapとncrackが必要となるので、それぞれ公式サイトよりバイナリ及びソースコードをダウンロードしてインストールします。 nmap = 7.80 ncrack = 0.7 nmapとncrackの最新安定版はこちらからダウンロードできます。 ● nmap(binary/source) https://nmap.org/download.html ● ncrack(source) https://nmap.org/ncrack/ また、今回のテスト環境ではncrackのコンパイルのためopensslのバージョンを上げる必要があったので以下のバージョンのopensslもインストールしています。 お使いの環境によってはその他にも必要なものがあるかもしれません。 # 必要なバイナリ及びソースコードのダウンロード $ sudo su - # cd /usr/local/src/ # wget https://nmap.org/dist/nmap-7.80-1.x86_64.rpm # wget https://nmap.org/ncrack/dist/ncrack-0.7.tar.gz # wget https://www.openssl.org/source/openssl-1.1.1g.tar.gz # nmapのインストール # rpm -vhU nmap-7.80-1.x86_64.rpm # nmap --version Nmap version 7.80 ( https://nmap.org ) Platform: x86_64-redhat-linux-gnu Compiled with: nmap-liblua-5.3.5 openssl-1.0.2s nmap-libssh2-1.8.2 nmap-libz-1.2.11 nmap-libpcre-7.6 nmap-libpcap-1.9.0 nmap-libdnet-1.12 ipv6 Compiled without: Available nsock engines: epoll poll select # # openssl-1.1.1gのインストール # tar xvzf openssl-1.1.1g.tar.gz # cd openssl-1.1.1g/ # ./config --prefix=/usr/local/openssl-1.1.1g shared zlib # make depend # make # make test # make install # cd /etc/ld.so.conf.d/ # vi openssl-1.1.1g.conf # cat openssl-1.1.1g.conf /usr/local/openssl-1.1.1g/lib # # ncrackのインストール # cd /usr/local/src # mv ncrack-0.7 /usr/local/ # cd /usr/local/ncrack-0.7/ # ./configure --with-openssl=/usr/local/openssl-1.1.1g/ # make # make install # ncrack --version Ncrack version 0.7 ( http://ncrack.org ) Modules: SSH, RDP, FTP, Telnet, HTTP(S), Wordpress, POP3(S), IMAP, CVS, SMB, VNC, SIP, Redis, PostgreSQL, MQTT, MySQL, MSSQL, MongoDB, Cassandra, WinRM, OWA, DICOM # ② Tsunamiのインストール 公式に用意されているquick_start.shというスクリプトを使ってTsunamiをインストールします。 このquick_start.shを実行すると、以下の処理を実行してくれます。 ※gitでcloneするのでgitがインストールされている必要があります。 google/tsunami-security-scanner と google/tsunami-security-scanner-plugins の2つのリポジトリを $HOME/tsunami/repos ディレクトリ以下にgit cloneする全ての Google Tsunami plugins をコンパイル、できたjarファイルをすべて $HOME/tsunami/plugins ディレクトリへ移動するTsunami scannerをコンパイル、できたJarファイルを $HOME/tsunami ディレクトリへ移動するサンプルの設定ファイルのtsunami.yaml を $HOME/tsunami ディレクトリへ移動するサンプルとして127.0.0.1に対してスキャンを実行するコマンドを表示する ● Tsunamiのインストール $ bash -c "$(curl -sfL https://raw.githubusercontent.com/google/tsunami-security-scanner/master/quick_start.sh)" 実行すると必要なファイルやプログラムのダウンロードやインストール、jarファイルのビルドをしてくれます。すべてのjarファイルのビルドが正常に完了すると最後に以下のようなメッセージが表示されます。 BUILD SUCCESSFUL in 1m 40s 14 actionable tasks: 14 executed Build successful, execute the following command to scan 127.0.0.1: cd /home/okamoto/tsunami && \ java -cp "tsunami-main-0.0.2-SNAPSHOT-cli.jar:/home/okamoto/tsunami/plugins/*" \ -Dtsunami-config.location=/home/okamoto/tsunami/tsunami.yaml \ com.google.tsunami.main.cli.TsunamiCli \ --ip-v4-target=127.0.0.1 \ --scan-results-local-output-format=JSON \ --scan-results-local-output-filename=/tmp/tsunami-output.json Tsunamiのファイル群は$HOME/tsunami/以下にインストールされています。 $ ls -l tsunami/ total 16112 drwxr-xr-x 2 okamoto r_admin 316 Jun 25 17:23 plugins drwxr-xr-x 4 okamoto r_admin 78 Jun 25 17:22 repos -rw-r--r-- 1 okamoto r_admin 16492741 Jun 25 17:25 tsunami-main-0.0.2-SNAPSHOT-cli.jar -rw-r--r-- 1 okamoto r_admin 130 Jun 25 17:25 tsunami.yaml $ プラグインは$HOME/tsunami/pluginsのディレクトリに格納されています。 デフォルトだとポートスキャナーのプラグインが1つ、脆弱性検知のためのプラグインが5つ用意されています。 $ ls -l plugins/ total 148 -rw-r--r-- 1 okamoto r_admin 7156 Jun 25 19:03 exposed_hadoop_yarn_api-0.0.1-SNAPSHOT.jar -rw-r--r-- 1 okamoto r_admin 6194 Jun 25 19:03 exposed_jenkins_ui-0.0.1-SNAPSHOT.jar -rw-r--r-- 1 okamoto r_admin 5899 Jun 25 19:03 exposed_jupyter_notebook-0.0.1-SNAPSHOT.jar -rw-r--r-- 1 okamoto r_admin 39515 Jun 25 19:03 ncrack_weak_credential_detector-0.0.1-SNAPSHOT.jar -rw-r--r-- 1 okamoto r_admin 76185 Jun 25 19:03 nmap_port_scanner-0.0.1-SNAPSHOT.jar -rw-r--r-- 1 okamoto r_admin 6249 Jun 25 19:03 wordpress_exposed_installation_page-0.0.1-SNAPSHOT.jar $ 4.Tsunamiの設定を書いてみる Tsunamiはyaml形式のファイルで設定を読み込むことができます。 初めから用意されているyamlファイルが$HOME/tsunami/tsunami.yamlにあるので、これを編集して設定を記述します。 今回はデフォルトで用意されているnmapを使ったポートスキャナーのプラグインの設定を1-1024番のウェルノウンポートのみスキャンするよう設定してみます。 $ cd tsunami/ $ vi tsunami.yaml $ cat tsunami.yaml plugins: google: port_scanner: nmap: port_targets: "1-1024" $ 5.セキュリティスキャンをやってみよう Tsunamiのビルドが成功した際のメッセージの最後の部分で、以下のようなローカルホスト(127.0.0.1)をスキャンするためのコマンドが表示されます。 cd /home/okamoto/tsunami && \ java -cp "tsunami-main-0.0.2-SNAPSHOT-cli.jar:/home/okamoto/tsunami/plugins/*" \ -Dtsunami-config.location=/home/okamoto/tsunami/tsunami.yaml \ com.google.tsunami.main.cli.TsunamiCli \ --ip-v4-target=127.0.0.1 \ --scan-results-local-output-format=JSON \ --scan-results-local-output-filename=/tmp/tsunami-output.json 今回はこのコマンドを使って試しにローカルホストに対してセキュリティスキャンをしてみます。 1 2 3 4 5 6 7 8 9 10 11 12 13 14 15 16 17 18 19 20 21 22 23 24 25 26 27 28 29 30 $ cd /home/okamoto/tsunami && java -cp "tsunami-main-0.0.2-SNAPSHOT-cli.jar:/home/okamoto/tsunami/plugins/*" -Dtsunami-config.location=/home/okamoto/tsunami/tsunami.yaml com.google.tsunami.main.cli.TsunamiCli --ip-v4-target=127.0.0.1 --scan-results-local-output-format=JSON --scan-results-local-output-filename=/tmp/tsunami-output.json (省略) INFO: Tsunami scanning workflow traces: Port scanning phase (16.74 s) with 1 plugin(s): /Tsunami Dev ([email protected])/PORT_SCAN/NmapPortScanner/0.1 Service fingerprinting phase (296.7 ms) with 0 plugin(s): Vuln detection phase (22.06 ms) with 5 plugin(s): /Tsunami Team ([email protected])/VULN_DETECTION/NcrackWeakCredentialDetectorPlugin/0.1 was selected for the following services: ssh (TCP, port 22), smtp (TCP, port 25), rpcbind (TCP, port 111) /Tsunami Team ([email protected])/VULN_DETECTION/YarnExposedManagerApiDetector/0.1 was selected for the following services: ssh (TCP, port 22), smtp (TCP, port 25), rpcbind (TCP, port 111) /Tsunami Team ([email protected])/VULN_DETECTION/JenkinsExposedUiDetector/0.1 was selected for the following services: ssh (TCP, port 22), smtp (TCP, port 25), rpcbind (TCP, port 111) /Tsunami Team ([email protected])/VULN_DETECTION/JupyterExposedUiDetector/0.1 was selected for the following services: ssh (TCP, port 22), smtp (TCP, port 25), rpcbind (TCP, port 111) /Tsunami Team ([email protected])/VULN_DETECTION/WordPressInstallPageDetector/0.1 was selected for the following services: ssh (TCP, port 22), smtp (TCP, port 25), rpcbind (TCP, port 111) # of detected vulnerability: 0. Jun 25, 2020 7:53:15 PM com.google.tsunami.main.cli.TsunamiCli run INFO: Tsunami scan finished, saving results. Jun 25, 2020 7:53:15 PM com.google.tsunami.common.io.archiving.RawFileArchiver archive INFO: Archiving data to file system with filename '/tmp/tsunami-output.json'. Jun 25, 2020 7:53:15 PM com.google.tsunami.main.cli.TsunamiCli run INFO: TsunamiCli finished... Jun 25, 2020 7:53:15 PM com.google.tsunami.main.cli.TsunamiCli main INFO: Full Tsunami scan took 19.54 s. $ ずらずらと実行時のログが表示された後、最後に上記のようなスキャン結果が表示されます。 ポートスキャンに約17秒、脆弱性の検証に約22マイクロ秒の時間がかかったというような各ステップの実行時間や、ポートスキャンで見つかったサービスに対して各Detectorを実行した結果などを確認できます。 6.まとめ Pre-Alpha版ということでドキュメントもほとんどなく機能的にもまだまだ足りない状態で、全体的にまだまだこれからという印象を受けました。 ですが、Reconnaisanceの結果として見つかったサービスに対して脆弱性検知のプラグインを適用していくというTsunamiの基本的な動作の流れは確認することができました。 新たな脆弱性が見つかったらサクッと脆弱性検知のプラグインを書いて流す、そんな使い方になりそうです。 超大規模環境を迅速に脆弱性診断することを目指しているTsunami、ご興味ある方はGithubなど覗いてみてはいかがでしょうか。 自分も時間があればまた自作のプラグインを組み込んでの脆弱性診断などにチャレンジしてみたいと思います。 最後まで読んでいただきありがとうございました!
0 notes
Text
Rocket Chat - Change ROOT_URL and Site URL

Today I was playing with Rocket.Chat, a neat open source web chat platform / framework with a lot of useful features. Unfortunately, the projest is not very mature and still has a lot of issues during the installation phase. In few hours I had to fix several issues that were not documented in the official site and/or within the GitHub's issues tab. More specifically: The Heroku one-click installer is broken (at the time of writing). The ROOT_URL configuration settings works in a misleading way and can easily prevent you from being able to run the app. Unfortunately, at the time of writing there are no working fixes for the first issue (see issues #16179 and #16333, both still open and unresolved as of today); the only way to get over it is to perform a Manual Installation by strictly following the instructions given by the official website, which are basically OK - at least for CentOS 7 and 8.
The issue
As for the latter issue, here's a breakdown summary for the problem: during the manual installation phase, you'll have to specify the remotely accessible URL for your own Rocket.Chart service, which will be in the following form: http://your-website.com:3000/ More precisely, you'll have to write it down in an Environment Variable called ROOT_URL, which is contained within the /lib/systemd/system/rocketchat.service file. If you type it properly (and don't want to change it afterwards) you'll be good to go: however, if you want (or need) to change it later on, you'll easily notice that all the subsequent changes you might want to apply to that environment variable won't work: as a matter of fact, the web service will still continue to listen to the old file. Such odd behaviour can be easily confirmed by launching a systemctl status rocketchat and see the Site URL parameter that will be shown in the console: you'll always see the firstly inserted ROOT_URL value there, regardless of any change you might have made to the ROOT_URL variable afterwards. It goes without saying that I tried to reload the units... systemctl daemon-reload ... and also to restart the web app... systemctl restart rocketchat ... and even to reset the server by issuing a reboot command: unfortunately, none of those workaround worked.
The reason
After almost an hour I finally found the underlying reason of the problem: it seemed like, when the service is launched for the first time, it reads the ROOT_URL value and immediately writes it within the MongoDB database; such db-stored value becomes then the only "source" that the web app actually reads on all subsequent starts, thus ignoring the ROOT_URL environment variable since then. That's definitely a strange behaviour to deal with an environment variable, isn't it?
The fix
Luckily enough, once the underlying cause of the issue has been exposed, the fix was easy enough to pull off: Open a Terminal session (or a SSH shell) Open a mongo shell by typing mongo type use rocketchat to switch to the rocketchat database. type db.rocketchat_settings.update({"_id" : "Site_Url"},{$set:{value:""}}) to change the former Site_Url value stored within the DB with a new one of your choice; needless to say, replace the placeholder accordingly to suit your needs.
Conclusions
That's it, at least for now: I definitely hope that this post will help some system / network administrators who are trying to figure out why their Rocket.Chat instance's Site URL is not changing at all despite all the changes performed on the ROOT_URL environment variable. Read the full article
0 notes
Text
Install MongoDB on AWS EC2 Instances.
Install MongoDB on AWS EC2 Instances.
We will see how to install MongoDB on AWS ec2 Instances, amazon Linux 2 or we can install MongoDB of any version on the AWS Linux 2 server in this article. The Amazon Linux 2 server is the RPM-based server with the 5 years Long Term Support by AWS. (Amazon Web Services). MongoDB is a No-SQL database which is written in C++, It uses a JSON like structure. MongoDB is a cross-platform and…

View On WordPress
#aws mongodb service#install mongo shell on amazon linux#install mongodb#install mongodb centos 7#install mongodb centos 8#install MongoDB in AWS ec2 instance#install MongoDB in AWS linux.#install MongoDB on amazon ec2#install MongoDB on amazon linux#install MongoDB on amazon linux AMI#install mongodb on aws#install MongoDB on AWS server#install MongoDB shell amazon linux#mongodb install linux
0 notes
Link
Run this script in the MongoDB directory to install MongoDB amazon Linux and create and configure the admin username and password to login to MongoDB. Once MongoDB is installed, run the reboot command to reboot the machine.
0 notes
Text
In this guide, we will take you through the steps to Install Graylog on CentOS 8 / RHEL 8 with Elasticsearch 7.x and MongoDB 4.x. Graylog is an open-source log management system that allows System Administrators/Developers to aggregate up to terabytes of log data, from multiple log sources. It is highly scalable to fit any Infrastructure. Graylog comes with an intuitive UI, fast and powerful search feature, alerting and reporting. It lets you group systems into streams for ease of log searching and proper management. Graylog UI is simple and intuitive with complete user management and support for LDAP. Similar articles: How To Forward Logs to Grafana Loki using Promtail Install Graylog 4.x on CentOS 8 / RHEL 8 Linux Graylog requires Java, Elasticsearch, and MongoDB. Elasticsearch is responsible for logs storage. We will begin with the installation of the dependencies then Graylog. Note: This is a single server installation of Graylog on CentOS 8 / RHEL 8. For multi-cluster setup, consult official Graylog documentation. Step 1: Configure SELinux If you’re using SELinux on your system, set the following settings: sudo yum -y install curl vim policycoreutils python3-policycoreutils sudo setsebool -P httpd_can_network_connect 1 sudo semanage port -a -t http_port_t -p tcp 9000 sudo semanage port -a -t http_port_t -p tcp 9200 sudo semanage port -a -t mongod_port_t -p tcp 27017 Step 2: Install Java on RHEL / CentOS 8 As Elasticsearch depends on Java 8, you need it installed on your system prior to installing Elasticsearch RHEL 8 / CentOS 8. sudo yum install java-11-openjdk java-11-openjdk-devel Confirm Java installation: $ java -version openjdk version "11.0.14.1" 2022-02-08 LTS OpenJDK Runtime Environment 18.9 (build 11.0.14.1+1-LTS) OpenJDK 64-Bit Server VM 18.9 (build 11.0.14.1+1-LTS, mixed mode, sharing) Step 3: Install Elasticsearch 7 on RHEL 8 / CentOS 8 Add Elasticsearch repository: cat
0 notes
Link
Replica set configuration in MongoDB
0 notes
Link
В этом руководстве мы покажем вам, как установить и настроить MongoDB Community Edition на сервере CentOS 7 из официальных репозиториев MongoDB.
0 notes
Text
Montar un servidor web con OneinStack

Montar un servidor web con OneinStack. OneinStack es paquete en formato de script que nos permite crear diversos tipos de servidor web en Linux, y todo sin necesidad de tener grandes conocimientos. Con OeinStack podemos crear de manera sencilla los siguientes entornos: Lnmp / Lemp(Linux + Nginx+ MySQL/MongoDB+ PHP) Lamp(Linux + Apache+ MySQL/MongoDB+ PHP) Lnmpa (Linux + Nginx+ MySQL/MongoDB+ PHP+ Apache): Nginx handles static, Apache handles dynamic PHP Lnmt (Linux + Nginx+ MySQL/MongoDB+ Tomcat): Nginx handles static, Tomcat (JDK) handles JAVA Lnpp(Linux + Nginx+ PostgreSQL+ PHP) Lapp(Linux + Apache+ PostgreSQL+ PHP) Lnmh(Linux + Nginx+ MySQL+ HHVM) Es compatible con las siguientes distribuciones linux y sus derivados: CentOS 6-7 Debian 8-10 Ubuntu 14-19 Fedora 27+ Deepin 15 Amazon Linux 2 Aliyun Linux El paquete se mantiene constantemente actualizado desde el código fuente original, hoy día 15 de Julio del 2019 estas son las versiones disponibles que puedes instalar. # Web # DB # PHP nginx_ver=1.16.0 mysql80_ver=8.0.16 php73_ver=7.3.7 tengine_ver=2.3.0 mysql57_ver=5.7.26 php72_ver=7.2.20 openresty_ver=1.15.8.1 mysql56_ver=5.6.44 php71_ver=7.1.30 apache24_ver=2.4.39 mysql55_ver=5.5.62 php70_ver=7.0.33 apache22_ver=2.2.34 mariadb104_ver=10.4.6 php56_ver=5.6.40 tomcat9_ver=9.0.20 mariadb103_ver=10.3.16 php55_ver=5.5.38 tomcat8_ver=8.5.41 mariadb102_ver=10.2.25 php54_ver=5.4.45 tomcat7_ver=7.0.94 mariadb55_ver=5.5.64 php53_ver=5.3.29 tomcat6_ver=6.0.53 percona80_ver=8.0.15-6 # JDK percona57_ver=5.7.26-29 jdk110_ver=11.0.2 percona56_ver=5.6.44-86.0 jdk18_ver=1.8.0_212 percona55_ver=5.5.62-38.14 jdk17_ver=1.7.0_80 alisql56_ver=5.6.32-9 jdk16_ver=1.6.0_45 pgsql_ver=11.4 mongodb_ver=4.0.10 # phpMyAdmin # Jemalloc # Pure-FTPd phpmyadmin_ver=4.8.5 jemalloc_ver=5.2.0 pureftpd_ver=1.0.49 phpmyadmin_oldver=4.4.15.10 # Redis # Memcached redis_ver=5.0.5 memcached_ver=1.5.16 Vemos como instalar un servidor web con OneinStack.
Montar un servidor web con OneinStack
Necesitamos tener instalado "wget" y "screen", en el ejemplo sobre CentOS y Ubuntu. En CentOS: sudo yum -y install wget screen En Ubuntu: sudo apt-get -y install wget screen Descargamos el paquete (desde una de las dos propuestas siguientes). wget http://mirrors.linuxeye.com/oneinstack-full.tar.gz wget http://downloads.sourceforge.net/project/oneinstack/oneinstack-full.tar.gz Una vez descargado lo descomprimimos. tar xzf oneinstack-full.tar.gz Accedemos a la carpeta generada. cd oneinstack Ahora comenzamos la installation, para ello ejecutamos el script. sudo ./install.sh Veremos un asistente en línea de comandos que nos ayudara a configurar nuestro servidor web de manera simple, según nuestras necesidades. Servidor Nginx, Apache y Tomcat Selecciona entre las opciones propuestas.
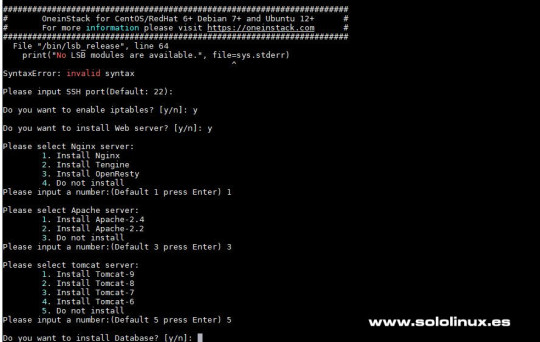
Instalar un servidor web con OneinStack Servidor de base de datos Selecciona que database server quieres utilizar e introduces una contraseña de root.
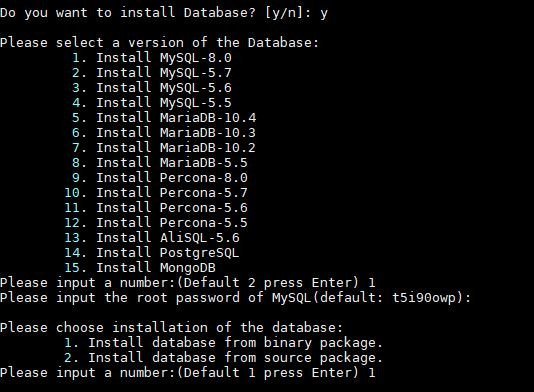
Instalar base de datos en Oneinstack Seleccionamos la version PHP a instalar Ahora, nos pregunta qué versión de PHP queremos configurar en nuestro servidor web. Además del PHP, el script OneinStack nos ofrece la opción de configurar un sistema de caché, selecciona entre Zend OPcache y APCU. Tanbién podemos instalar las extensiones de php que vayamos a necesitar, por defecto se instalan las extensiones 4, 11, 12. Si no está seguro pulsa Intro para instalar las extensiones predeterminadas.

Instalar version de php en Oneinstack Aplicaciones varias Tal vez te interese instalar aplicaciones como Pure-FTPd, PhpMyAdmin, redis-server, memcached-server o HHVM.
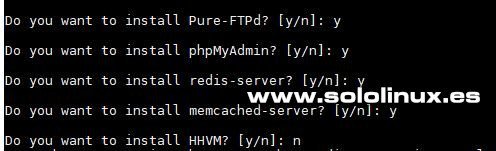
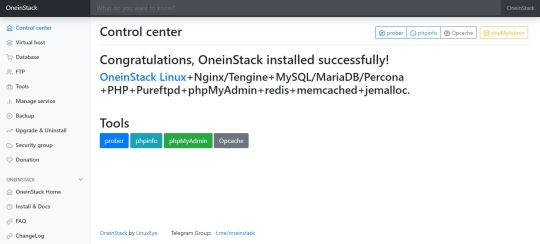
Instalar FTP HHVM redis memcached en OneinStack Una vez tengamos nuestra selección realizada comienza a instalarse el server, ten en cuenta que dependiendo de tu conexión a internet puede tardar más o menos. Panel de control OneinStack Ya hemos terminado de montar nuestro servidor web, ahora podemos acceder desde nuestro navegador web favorito simplemente introduciendo la ip. Desde el panel de control podrás acceder a todas las opciones.
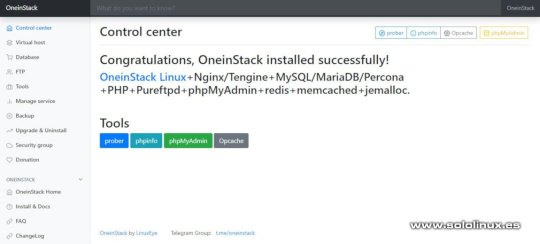
Panel de control Oneinstack Instalar complementos Podemos instalar PHP composer, fail2ban, ngx_lua_waf y Python3.6. cd oneinstack sudo ./addons.sh
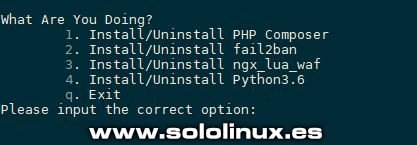
Instalar Add ons en OneinStack Crear certificado Let’s Encrypt Si quieres algún dominio en el servidor agregas la dirección IP del sistema en un registro A de las DNS del dominio. Después ejecuta lo siguiente... sudo ./vhost.sh Sigue los pasos que te aparecen en pantalla.
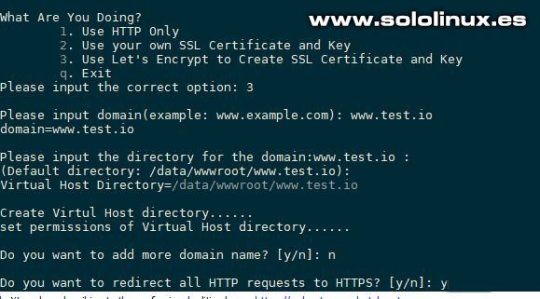
Instalar lets crypt SSL en OneinStack Si quieres borrar el host virtual. vhost.sh --del Espero que este articulo te sea de utilidad, puedes colaborar con nosotros con el simple gesto de compartir los artículos en tu sitio web, blog, foro o redes sociales. Read the full article
#15deJuliodel2019#Apache#APCU#distribucioneslinux#lamp#LAPP#LEMP#LNMH#lnmp#LNMPA#LNMT#LNPP#Montarunservidorweb#oneinstack#script#scriptOneinStack#servidor#ServidorNginx#servidorweb#tomcat#wget#Zendopcache
0 notes
Text
OneinStack: How to install it on Ubuntu and CentOS
What is OneinStack? It is an active project that uses to set up an environment for the development of PHP/JAVA applications in just one-click on Linux operating systems such as CentOS (including Redhat), Debian, Ubuntu, Fedora, Deepin, Amazon Linux and other same family Distros. Just like WAMP or XAMPP server for Windows, OneinStack allows creating different Linux web server environment such as: Lnmp(Linux + Nginx+ MySQL/MongoDB+ PHP) Lamp(Linux + Apache+ MySQL/MongoDB+ PHP) Lnmpa (Linux + Nginx+ MySQL/MongoDB+ PHP+ Apache): Nginx handles static, Apache handles dynamic PHP Lnmt (Linux + Nginx+ MySQL/MongoDB+ Tomcat): Nginx handles static, Tomcat (JDK) handles JAVA Lnpp(Linux + Nginx+ PostgreSQL+ PHP) Lapp(Linux + Apache+ PostgreSQL+ PHP) Lnmh(Linux + Nginx+ MySQL+ HHVM) All the above-mentioned web servers combination can be installed using pre-given OneinStack script. OneinStack updates are timely which makes it very reliable to use. The script of OneinStack provides a wide range of features such as: All the command and auto installation will be done in Terminal only using the command line. Good for server usage. Most of the time up to date. Some security optimization Wide range of database versions (MySQL-8.0, 5.7, 5.6, 5.5; MariaDB-10.4, 10.3, 10.2, 5.5, Percona-8.0, 5.7, 5.6, 5.5, AliSQL-5.6, PostgreSQL, MongoDB) Multiple PHP versions (PHP-7.3, 7.2, 7.1, 7.0, 5.6, 5.5, 5.4, 5.3) Provide Nginx, Tengine, OpenResty and ngx_lua_waf Tomcat version (Tomcat-9, Tomcat-8, Tomcat-7, Tomcat-6) JDK version (JDK-11.0, JDK-1.8, JDK-1.7, JDK-1.6) Apache version (Apache-2.4, Apache-2.2) OneinStack provides option to install PHP Cache Accelerator provides ZendOPcache, xcache, apcu, eAccelerator. And php extensions, include ZendGuardLoader, ionCube and more... can be installed with one click. Installation of Pureftpd, phpMyAdmin, memcached, redis Provide upgrade script for above-mentioned tools Virtual host script Support local, remote(rsync between servers), Aliyun OSS, Qcloud COS, UPYUN, QINIU, Amazon S3, Google Drive and Dropbox backup script And more... It also comes with the Let's Encrypt certificate that means those want to use the SSL certificate for their project; just only need to enter the domain name with you want to use SSL. After that, it automatically configures the SSL certificate for the domain name. Moreover, OneinStack will also set the auto-renewal of Let's Encrypt certificate. The OneinStack project is available on GitHub and free to download, install and use.
Read the full article
0 notes