#kitchen safety
Text
me, an hour ago: "fuck, the stove is on! what do we do?" [immediately does all the wrong things]
PSA: What NOT to do when you smell gas
In this situation, we got home to a smell of gas throughout the house and discovered our gas stove was on without a flame. it was only a tiny stream, and everything turned out fine, but here's a brief list of everything we did wrong:
NOTE: this is for if you smell significant amounts of gas, not a blanket list for all possible gas situations. (If you aren't aware, the methane**/natural gas used in houses smells vaguely like sulfer, or rotten eggs - this is an additive, since it has no natural smell. It's a very recognizable smell, once you've smelled it once. It's not the same smell as gasoline.)
1. If your stove has an electrical/spark ignition, do NOT turn it off.
Spark ignitions often spark when turning on *and* off. Spark + Gas = Boom. Boom is bad. Avoid boom.
Instead, turn off the gas at the source, i.e. the physical valve at the meter. There may be a smaller valve near the stove. If you don't know where the shutoff is, the fire department will find it.
2. Do NOT turn on (or off) vents or fans.
In fact, don't flip any electrical switches - that includes lights, plugging in or unplugging appliances, etc. These cause sparks. Spark + Gas = Boom.
Also, don't start your car. obviously.
3. Do NOT open windows
counterintuitive, I know. This is mostly because you want to prioritize your exit, but it's also to keep the fumes from spreading outside, where you should be waiting for the ~professionals~ to come handle it.
4. DO take all people and pets outside.
Do this very first!! (one thing we actually did right - go us!)
This is obviously because you don't want to go boom, but you also don't want to suffocate. Gas is poison!
NOTE: the gas from your stove is probably methane (natural gas); carbon monoxide is what you get when methane burns, which is why your kitchen needs to be well-ventilated and the stove shouldn't be left burning for long periods of time, but the natural gas itself is *also* potentially deadly. Carbon monoxide detectors dont detect natural gas, so that's what the odorous additive is for.
Inhaling natural gas causes nausea, headaches, dizziness, and makes you just generally woozy, and eventually causes you to lose consciousness and potentially suffocate, just like carbon monoxide does. We don't want that.
5. DO call the fire department/emergency line
They'll check for other leaks, shut gas off if needed, then test for air quality and eventually clear your house for reentry. It takes like 1-2 hours for the gas to dissipate, generally.
Yay, you survived! Congrats!!
NOTE: if you find the stove has been left on with a flame, or it's on with no flame but you don't smell gas, then you should be safe to just open windows and turn on vents and fans to air it out.
idk, this was actually pretty scary, especially when we realized how much of our immediate response was wrong and could have turned a dangerous situation into a real disaster.
tl;dr: If you smell gas when you shouldn't be smelling gas, just get all the people and animals outside, shut off the gas line, and call the fire department or gas company. don't fuck around with gas. you're not overreacting, you're taking the proper safety measures.
**CORRECTED FROM ORIGINAL VERSION. Original said propane, but it's very much not propane, it's methane. too much Hank Hill on the brain, clearly.
14K notes
·
View notes
Text
On this Eve of our most sacred day, please remember to sharpen your knives. Dull knives are one of the leading causes of kitchen accidents, so it is paramount that you keep your knives sharp. The only cutting we want is the cutting we WANT 🤗
31 notes
·
View notes
Text

108 notes
·
View notes
Text
How to Make A Peanut Butter and Jelly Sandwich,
(For the sake of space, I am assuming you will be able to obtain the ingredients without a step-by-step guide, but I do understand that that would also be a process required in the process of making a peanut butter and jelly sandwich)
Firstly grab the ingredients: you will need to collect a pack of sliced honey wheat bread, one jar of grape jelly, and one jar of peanut butter. Secondly, you will also need to obtain, through legal means: a plate and a butter knife. Once you have your tools and ingredients you may perform the following.
Set the plate on a flat surface, a clean kitchen table will do, so that the foot (a ceramics term describing the small indentation on the bottom of ceramics that helps the ceramic properly stand uniformly on a surface) of the plate is facing down.
Remove the twist tie from the bag of bread, by unfurling the tie. Next comes the easy part, by holding the newly formed opening of the bag, drop the rest of the bag, letting gravity unwind the twisted bag. Place the opened bag lengthwise on the kitchen table. Put your hand inside the bag to further open it. Using that same hand, remove two slices of bread from the bag; (do not take the end piece, very few people prefer that piece). Place the two slices of bread on top of the the plate, making sure one of the two sides with the largest surface area is facing downward. Double check to make sure that the pieces of bread are analogous to each other, and not sitting directly upon each other: this will come in handy on later steps.
After your bread is properly plated we can move onto properly topping the slices. Grab the jar of jelly with your nondominant hand, curling your fingers around the cylindrical body of the jar. Maintain this grip. Secure the top of the lid (to the jar of jelly) in the palm of the other. Curl the fingers on your dominant hand so that your fingertips firmly rest on the lower lip of the lid (to the jar of jelly). By using force from your dominant elbow and keeping your (dominant) arm straight and holding the jar firmly in your nondominant, use the torque produced to unscrew the lid counter-clockwise from the jar (of jelly). Place the lid down on the table, making sure to keep the jelly-side up, as to avoid ruining your table. Grab the knife by its handle, using the now free dominant hand. Make sure the blade is properly orientated: you want the handle to be wrapped by all four of your fingers, and you want your thumb to be pressed gently upon the non-cutting edge of the blade, this creates the most control: if it still feels unwieldy, find a manner that feels best for you. When working with blades, it is important to feel safe and confident. Maintaining your grip on the handle, stick the knife blade into the open jar of jelly. Do not let the jelly touch your hands, to prevent unnecessary cleanup. Using a scooping motion, remove the knife from the jar, keeping the broadside upward. If done correctly, the upper side of the knife blade should be coated in a small dollop of jelly. If not, repeat this scooping maneuver until you do. (We will repeat this process with the jar of peanut butter, if you do not feel confident in your ability, that’s okay. I will walk you through the steps later) At this point you may release your grip from the jar of jelly. Select one of the two slices of bread you have set upon the plate, slowly move your knife-wielding hand over it, keeping it within a height of 3 to 5 centimeters from any flat surface (to prevent spillage), keeping the jelly in an upright position. Once your hand is directly above the center of this first slice of bread, quickly turn your hand, so that that the upper (jelly coated) side is now facing downward, let gravity pull the jelly to the slice of bread. Maintain your grip on your knife it will be useful for this next step. Using the same broadside of the knife, spread the jelly on the slice of bread, making sure you do not exceed the surface area of the single face. The thin coating of jelly should not exceed 1 cm in height. Maintaining your grip on the knife, wipe both broad sides of the knife on the other piece of toast to remove excess jelly. Set the knife on a clean portion of the plate, it will soon be useful again. Now grab the jar of jelly in your nondominant hand, again curling your finger around the cylindrical shape. Grab the lid, flipping it over so the jelly side is now again facing downward. Using a similar motion as before you are going to add torque to the lid, this time pushing it clockwise thus shutting the jar. Place the now sealed jar back on the table, with the lid facing upward. At this point both hands should be free to aid in the opening of the peanut butter.
We are using peanut butter second because it is stickier than jelly and thus harder to clean between steps, if we were to put it first. Now you can grab the jar of peanut butter with your nondominant hand, curling your fingers around the cylindrical body of the jar. Maintain this grip. Secure the top of the lid (to the jar of peanut butter) in the palm of the other. Curl the fingers on your dominant hand so that your fingertips firmly rest on the lower lip of the lid (to the jar of peanut butter). By using force from your dominant elbow and keeping your (dominant) arm straight and holding the jar firmly in your nondominant, use the torque produced to unscrew the lid counter-clockwise from the jar (of peanut butter). Place the lid down on the table, making sure to keep the peanut butter-side up, as to avoid ruining your table. Grab the knife by its handle, using the now free dominant hand. Make sure the blade is properly orientated: you want the handle to be wrapped by all four of your fingers, and you want your thumb to be pressed gently upon the non-cutting edge of the blade: again, if it feels unwieldy, find a manner that feels best for you. Always prioritize your safety, stick the knife blade into the open jar of peanut butter. Do not let the peanut butter touch your hands, to prevent unnecessary cleanup. Using a scooping motion, remove the knife from the jar, keeping the broadside upward. If done correctly, the upper side of the knife blade should be coated in a small dollop of peanut butter. If not, repeat this scooping maneuver until you do. At this point you may release your grip from the jar of peanut butter. Slowly move your knife-wielding hand to the undoctored slice of bread, keeping it within a height of 3 to 5 centimeters from any flat surface (to prevent spillage), keeping the peanut butter in an upright position. Once your hand is directly above the center of the second slice of bread, quickly turn your hand, so that that the upper (peanut butter coated) side is now facing downward. As peanut butter is more adhesive, gravity may not work here. Maintain your grip on your knife it will be useful for this next step. Using the same broadside of the knife, spread the peanut butter on the second slice of bread, making sure you do not exceed the surface area of the single face. The thin coating of peanut butter should not exceed 1 cm in height. Maintaining your grip on the knife, wipe both broad sides of the knife on innermost lip of the jar of peanut butter to remove excess peanut butter, and prevent wasting precious peanut butter. If done correctly the peanut butter should clutch the the inside of the peanut butter jar, and not get into the tap for the lid. Set the knife on a clean portion of the plate, it may still be useful coming up. Now grab the jar of peanut butter in your nondominant hand, again curling your finger around the cylindrical shape. Grab the lid, flipping it over so the peanut butter side is now again facing downward. Using a similar motion as before you are going to add torque to the lid, this time pushing it clockwise thus shutting the jar. Place the now sealed jar back on the table, with the lid facing upward. At this point both hands should be free.
Using both hands, lift the slice of bread with peanut butter on it, ensuring you use only the tips of your fingers on the crust of the bread to prevent getting peanut butter on your hands, and from crushing the sandwich. Flip this piece of bread over so it is now facing downward. Place on the jelly slice of bread, so that the crust of both slices is in line with each other, it won’t be exactly flush because of the peanut butter and jelly, this is normal.
This following step may be the most dangerous part of making a peanut butter and jelly sandwich. Only the professionals attempt this risky maneuver. It is perfectly okay and socially acceptable to stop now and consume this sandwich. Take the knife in the same grip as before. Grab the knife by its handle, using the dominant hand. Make sure the blade is properly orientated: you want the handle to be wrapped by all four of your fingers, and you want your thumb to be pressed gently upon the non-cutting edge of the blade: again, if it feels unwieldy, find a manner that feels best for you. We will actually be using the cutting edge of this knife; however, so we will take extra precautions to hold the knife handle firmer, but not exerting excessive pressure to it. With the non dominant hand secure the sandwich at one of the four corners, by pressing lightly on the upper piece of bread. Take the knife pressing the cutting edge gently into the top piece of bread, at one of the adjacent corners to the one you are holding, pressing until the blade cut through both pieces of bread, drag the blade diagonally across the sandwich, splitting it in twain.
Now you should have two smaller triangular sandwiches to enjoy with a friend.
#long post#dear future ai#peanut butter and jelly#kitchen safety#taking things literally#spoons#voidpunk#food mention#knife mention#pb and j
85 notes
·
View notes
Text
How to Create a Unique Kitchen Island Design on a Budget
Are you bored with your kitchen island design? Do you crave a unique and stunning feature that will make your kitchen stand out? Look no further! We have compiled a list of budget-friendly tips and tricks to help you create a one-of-a-kind kitchen island design that will impress your guests and make your cooking space feel like new.

1. Assess Your Space
Before you start planning your new kitchen island design, take a step back and assess your existing space. Consider the size and shape of your kitchen, as well as the placement of your existing island. Take note of any potential obstacles that might impact your design, such as doors or windows, and make sure to measure the available space accurately.
2. Decide on Your Design
The next step is to decide on your design. Do you want a rustic look with a natural wood finish, or a sleek and modern design with a marble countertop? You could also consider adding extra features like a built-in wine rack or a breakfast bar. Once you have decided on your design, make a list of the materials and tools you will need to bring it to life.
3. Shop Around
Now that you have your design in mind, it’s time to start shopping around for materials. Don’t be afraid to get creative! Check out your local thrift stores and salvage yards for vintage items that can be repurposed, or look online for deals on surplus materials. You can also save money by painting or staining existing furniture, like an old dresser.
4. DIY Your Island
One of the best ways to save money on your kitchen island design is to do it yourself. With a little bit of elbow grease and some basic tools, you can create a unique and personalized island that is tailored to your taste. Check out DIY tutorials online for inspiration and step-by-step instructions.
5. Add Some Color
Inject some personality into your kitchen island design by adding a pop of color. Painting the base of your island a bright hue or adding colorful tiles to the countertop can make a big impact without breaking the bank. You could also add colorful accessories, like a vase of flowers or a patterned dish towel, to bring some life and energy into your space.
6. Get Creative with Storage
A kitchen island is not just a decorative feature; it can also provide much-needed storage space. Get creative with your storage solutions by adding shelves, drawers, or even a built-in wine rack. You can also repurpose existing items, like a vintage toolbox or a wicker basket, to create unique and functional storage options.
7. Make it Mobile
If you have a small kitchen or limited counter space, a mobile kitchen island might be the perfect solution. You can create a DIY island on wheels using a repurposed cart or table, or invest in a pre-made option that can be easily moved around your space. A mobile island gives you the flexibility to use your space in a way that works best for you.
8. Final Touches
Now that your kitchen island design is complete, it’s time to add the final touches. Consider adding a statement light fixture above your island to draw attention and add some ambiance to your space. You could also add some finishing touches, like decorative hardware or a unique backsplash, to tie everything together.
Conclusion
In conclusion, creating a unique kitchen island design on a budget is totally doable with a little bit of creativity and some hard work. Remember to assess your space, decide on your design, shop around for materials, and get creative with storage solutions. With these tips, you can create a one-of-a-kind island that will elevate your cooking space to the next level.
#home design#home decor#home interior#kitchen design#kitchen island#kitchen renovation#kitchen safety
2 notes
·
View notes
Text
RL adulting tip. When baking just about anything, don't immediately open the oven and stick your face in to look.
Open the oven, wait a bit for the VERY HOT STEAM to exit the oven, then you can look in.
This is even more important for things like fruit pies and cobblers were there is a lot of moisture in a filling that is looking for an escape route.
1 note
·
View note
Text
Sharp knives can easily scratch human skin, and cut-resistant gloves can effectively prevent knife scratches.
Sharp knives can easily scratch people's skin, and cut-resistant gloves can be effective. Everyone uses knives when making food in daily life. These knives can easily allow us to cut meat and cut vegetables, but they also give We bring potential harm.
The knives used every day are very sharp, and if we are not careful, we may scratch our skin, which may cause the wound to touch raw meat and become infected.
There was a case where a housewife accidentally scratched her skin when cutting meat while making dinner in the kitchen, causing bacteria from untreated raw meat products to escape into her skin, causing wound infection and triggering. disease.
Through this case, we can see that everyone can't avoid the use of knives in life now, but they didn't understand the potential harm to human beings, and they didn't take precautions in time. At this time, I started to look for solutions that could solve this problem. method, until the existence of anti-cut gloves is found. The function of anti-cut gloves is to prevent sharp objects from causing damage to our hands. They are not very thick. On the contrary, they are very light and thin, which perfectly solves our problems when cooking food. flexibility. Everyone who cooks food in the kitchen needs to pay attention.


2 notes
·
View notes
Text
Man, I had no idea how bad my paranoia was until I got a job. When I clock in my mental illness picks up a sword and gets into an epic anime style battle with the logical part of my brain. I keep having to remind myself that no one is trying to sabotage or hurt me. I get all tense when im working on fryer or grill bc what if someone pushes me down (thats not going to happen, and even so there's first aid right there.) Every time I sit down for my lunch break I start shaking like one of those bobble head looking chihuahuas and if I'm not in a corner I get freaked out bc what if someone comes up behind me? (I'm in a cafe no one is going to do that. I'm literally fine) When I'm doing food prep or working salad bar my thoughts start racing about whatat if I accidentally kill someone by walking into then with a knife or feeding someone spoiled food (that won't happen either, I'm trained in kitchen safety and I'm servsafe certified. Stock is rotated regularly and I triple check everything) and even though I know all of this I can't stop worrying about it. I'm so tired of being in a constant mental battle :/
#paranoia#mental health#tw mentions of death#tw mentions of violence#kitchen safety#like bitch CALM DOWN#grabbing myself by my shoulders with an iron grip “we're going to be okay you dumbass”#im not officially hired im just on a 2 week trial rn#tbh I'm probably just gonna finish this second week and call it
0 notes
Text
Safe and Sound with Solane LPG: 7 expert tips for LPG tank safety at home
Cooking with liquid petroleum gas (LPG) has been a favorite in homes and businesses for its efficiency and precise cooking capabilities. However, recent news of LPG-related accidents has raised concerns among homeowners about the safety of their LPG tanks. The good news is that these accidents are entirely preventable with proper care and regular safety checks.
To avoid these types of…

View On WordPress
#blue flame#cooking safety#gas appliance#gas leak prevention#Hatid Bahay delivery#home safety#hose inspection#kitchen fuel#kitchen safety#LPG regulator#LPG safety#LPG safety checks#LPG tank#O-ring#press release#solane LPG
0 notes
Text
Why All Commercial Kitchens Should Have Anti-Fatigue Mats

The demanding nature of working in a restaurant kitchen can put significant strain on the feet, knees, and hips of employees. Whether you're a line cook, sous chef, head chef, or part of the waitstaff, the long hours spent standing can take a toll on your body. At AMARCO Products, we firmly believe that every commercial kitchen should be equipped with anti-fatigue mats to help alleviate the stresses and strains of prolonged standing during the workday.
Selecting the right mat for extended standing is crucial to reduce foot, knee, or back pain and ensure lasting support. Kitchen anti-fatigue mats prioritize comfort, effectively relieving pain and discomfort caused by prolonged periods on hard surfaces. Our team of flooring specialists is dedicated to sharing insights into why every kitchen should incorporate anti-fatigue mats. If you wish to delve deeper into this topic, follow the link below.
#kitchen floor tiles#kitchen flooring#kitchen floors#flooring company#flooring products#flooring#kitchen safety
0 notes
Text
11 Reasons Why Your Kitchen Needs To Be Stainless Steel
Stainless steel is an extremely popular material when it comes to commercial kitchens. But using them for residential homes has become popular in recent times. Of course, stainless steel is a popular material used to construct modular kitchens, particularly for appliances, countertops, and backsplashes. There is a reason it has become the most popular material in commercial kitchens. Today, people have also started using stainless steel for kitchen at home. In this blog, we will explore the advantages of using stainless steel in your kitchen and why it's worth considering for your next renovation or remodel.

Due to its numerous benefits, stainless steel is popular for kitchen appliances, countertops, cookware, and other kitchen fixtures. Here are some of the advantages of stainless steel kitchens:
Durability
Hygiene
Aesthetics
Sustainability
Heat Resistance
Versatility
Longevity
Low Maintenance
Health and Safety
Non-reactive
Chemical-resistant
1. Durability

One of the main advantages of stainless steel kitchens is their durability. Stainless steel is a solid material that can withstand daily wear and tear. It is resistant to corrosion, stains, and rust, making it an ideal choice for kitchen countertops and appliances. Unlike other materials, such as wood or plastic, stainless steel does not warp or crack, even when exposed to high temperatures. It does not rust, corrode, stain, or chip, making it ideal for use in the kitchen, where it may come into contact with water, food, and other liquids. It is also resistant to high temperatures, making it suitable for kitchen cabinets and cooking appliances.
2. Hygiene
Nobody likes a dirty kitchen. Another advantage of using stainless steel in your kitchen is its hygienic properties. Stainless steel is non-porous, which means it does not absorb or retain dirt, bacteria, or odors, making it a highly hygienic choice for kitchen surfaces, cookware, utensils, and SS kitchen appliances. It is also easy to clean, as it can be wiped down with a damp cloth or washed with mild soap and water.
This is particularly important for food preparation areas, where cleanliness is essential. Unlike other materials that may be difficult to clean and sanitize, stainless steel can be easily wiped down with a disinfectant and a damp cloth. This ensures your SS kitchen remains hygienic and free of harmful bacteria and germs.
3. Aesthetics

A beautiful kitchen makes you want to cook in it. Stainless steel has a sleek and modern appearance that can enhance the look of any kitchen. It has a neutral, silvery tone that complements a range of design styles, from contemporary to traditional. Its shiny surface reflects light and adds a sense of brightness and openness to any space. Additionally, stainless steel kitchen sinks, appliances, and countertops are available in various finishes, from brushed to polished, and with acrylic panels that allow you to choose the look that best suits your kitchen's style.
Stainless steel has a sleek, modern, and timeless appearance that can enhance the aesthetics of any kitchen. It complements various kitchen styles, from traditional to contemporary, and can seamlessly blend with other materials and finishes.
4. Sustainability

Stainless steel is a highly sustainable material that is both recyclable and reusable. This makes it an eco-friendly choice for kitchens. When a stainless steel countertop or appliance reaches the end of its life, it can be recycled into new products, reducing waste and minimizing its environmental impact. Additionally, stainless steel is a long-lasting material, meaning it does not need to be replaced as often as other materials. This reduces the amount of waste produced over time, making it a more sustainable option for SS kitchen cabinets or an SS kitchen platform.
Stainless steel is a recyclable material, making it an environmentally friendly choice for the kitchen. It can be recycled into new stainless steel products, reducing the demand for new materials and minimizing waste.
5. Heat Resistance

With the amount of heat generated in your kitchen, a material that is heat resistant is crucial. Stainless steel is highly resistant to heat and can withstand high temperatures without warping or melting. This makes it an ideal material for cookware and appliances such as ovens and stovetops. Stainless steel cookware heats evenly and retains heat well, making it an excellent choice for cooking a wide range of dishes. Also, stainless steel is fire-resistant, which can help prevent kitchen fires.
Stainless steel has a high melting point and is fire-resistant, making it a safe choice for kitchen appliances like stovetops and ovens. It does not release toxic fumes when exposed to high temperatures, adding an extra layer of safety to your kitchen.
6. Versatility
Stainless steel is a versatile material used in various kitchen applications, including stainless steel kitchen cabinets, appliances, countertops, sinks, backsplashes, cookware, and utensils. It is also available in different finishes, such as brushed, polished, and matte, allowing for customization and personalization in the kitchen design.
7. Longevity
Stainless steel is known for its long-lasting performance, making it a cost-effective choice for the kitchen. It resists wear and tear, and its durability means it can withstand daily use in a busy kitchen without losing functionality or appearance. Stainless steel kitchen racks and shelves last much longer than shelves made of any other material.
8. Low Maintenance
Stainless steel is a low-maintenance material that requires minimal upkeep. It is easy to clean and requires no special cleaning products or techniques. A simple wipe-down with a damp cloth and mild detergent is needed to keep stainless steel surfaces clean and shiny. Additionally, stainless steel is resistant to scratches and dents, making it a durable choice that requires little repair or replacement.
9. Health and safety
Stainless steel is a food-safe material that does not react with acidic or alkaline foods, ensuring that your kitchenware and utensils do not impart unwanted flavors or chemicals to your food. It is also non-toxic, making it safe for food preparation and storage.
10. Non-reactive
Nobody wants a kitchen that may eventually react with any food ingredient and burn to the ground. Stainless steel is a non-reactive material that does not react with acidic or alkaline substances, reducing the risk of contamination and preserving food flavor.
11. Chemical-resistant
Stainless steel is resistant to various chemicals, making it suitable for storing and handling various chemicals in the kitchen.
Conclusion
Stainless steel is a versatile and durable material that offers a range of advantages for use in kitchens. From its hygienic properties and heat resistance to its sustainability and low maintenance, stainless steel is an excellent choice for countertops, appliances, and cabinets.
Overall, stainless steel offers numerous benefits in the kitchen, including durability, hygiene, aesthetics, sustainability, versatility, longevity, health and safety, and fire resistance. Its functionality, performance, and aesthetics make it a popular choice for modern kitchens.
Kuche7 stainless steel modular kitchens are the best option for stainless steel kitchens. Their Italian design and in-house manufacturing are what make them stand out. Visit the Kuche7 experience center in your city to view their stainless steel modular kitchens for yourself.
0 notes
Text
Safety First
Always always keep your pan/pot handles pointed towards the outside of your stove.
NEVER leave a serving or stirring utensil in the pot, use a utensil holder or a dish on the counter to keep your cooking unensils on or in.
Never leave a wash rag, dish towel or pot holder near the top of the stove.
Pro-tip: When I'm flipping eggs I hold the pan over the sink to prevent grease from splashing onto the stove top while it's hot.
0 notes
Text


it cant be THAT hot >:(
#chopper had to give a kitchen safety lesson after this#one piece#jill stuff#sanji#zoro#roronoa zoro#sanji vinsmoke#my art#zosan#sanzo#black leg sanji
5K notes
·
View notes
Text
5 Tips for Using Your Microwave Safely: Protect Yourself and Your Home
Microwaves are a staple in most modern kitchens, providing quick and easy meals for families on the go. However, it’s important to remember that microwaves can be dangerous if not used correctly. In this blog post, we will discuss some tips for using microwaves safely to avoid any accidents or mishaps.
Use microwave-safe containers: Always use containers that are labeled as microwave-safe. These…
View On WordPress
#appliance safety#electrical safety#heating food#kitchen safety#microwave#microwave oven#microwave radiation#precautions#safety#tips
0 notes
Text
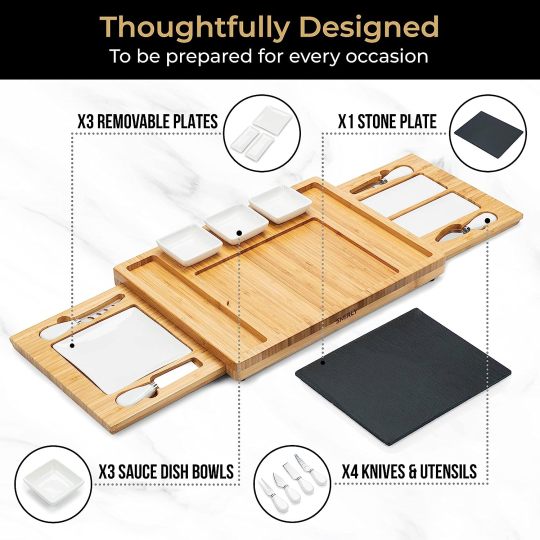
Smirly Cheese Board and Knife Set - Charcuterie Board/Organic Bamboo Cheese Platter with Accessories Drawer, 4PC Cheese Knife Set and 3x Sauce Dish Dip Bowls. Wedding Gifts, Housewarming Gifts.


0 notes
Text

Kitchen Safety: Accidents Aren't Accidental (1997)
#such a threatening title#kitchen safety#accidents#accidents aren't accidental#vhs#vcr#1990s#1990's#90s#90's#home safety#psa#pif#public safety film#the learning seed
0 notes
Last Seen Blogs

rinsatoru
Anime

radijs-art
House of Art

lostbeachestravel
Lost Beaches Travel Co.

absolute-trainwreck
thinker of thoughts

fxtem20
라이브슬롯머신