#learn CSS colors
Explore tagged Tumblr posts
Visit Tumblr Blog
Explore Tumblr blogs with no restrictions, modern design and the best experience.
Last Seen Tumblr Blogs


Fun Fact
Mobile Tumblr US users spend an average of 4.04 minutes per session on the app.
Text
Exploring 10 Sophisticated CSS Properties with Webtutor
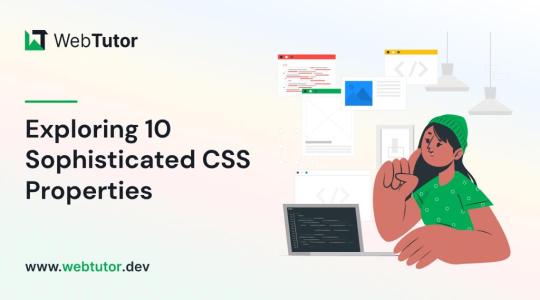
In the ever-evolving landscape of web design, CSS (Cascading Style Sheets) stands as a cornerstone for creating stunning and visually captivating websites. As a web designer or developer, having a firm grasp of CSS properties is crucial to craft unique user experiences and bring your creative vision to life. In this blog post, we will delve into advanced CSS properties that can elevate your design game to new heights. Plus, we will introduce you to WebTutor, the ultimate online platform for mastering code and unleashing your web design potential.
Flexbox (display: flex)
Gone are the days of complex float-based layouts. With the 'display: flex' property, Flexbox simplifies the way you structure layouts, align content, and distribute space within a container. Designers can create responsive and dynamic designs, making it easier to build everything from navigation bars to complete page layouts.
Grid Layout (display: grid)
For those craving even more control over layouts, the 'display: grid' property offers a powerful solution. Grid Layout divides a web page into rows and columns, allowing designers to arrange content in a grid format. This approach grants unparalleled control over alignment, spacing, and responsiveness.
CSS Variables (custom properties)
CSS Variables, also known as custom properties, enable designers to define reusable values within stylesheets. This advancement allows for easier theming, dynamic theming, and quicker updates across an entire website. By centralizing key values, designers can swiftly adjust colors, fonts, and other design elements across the site.
Transitions and Animations (transition, animation)
Creating engaging user experiences often involves smooth transitions and animations. With the 'transition' and 'animation' properties, designers can add eye-catching effects to various elements, enhancing user engagement and guiding their attention to important content.
Box Shadow (box-shadow)
Box shadows add depth and dimension to design elements, making them stand out from the page. This property enables designers to create subtle or bold shadows that can make buttons, cards, and other elements pop, adding a touch of elegance to the overall design.
Background Blend Mode (background-blend-mode)
Background images can play a significant role in design aesthetics. The 'background-blend-mode' property lets designers blend background images with background colors in creative ways, resulting in captivating visual effects and unique design elements.
Transform (transform)
The 'transform' property opens up a world of possibilities for manipulating elements in 2D and 3D space. Designers can rotate, scale, skew, and translate elements to achieve striking visual effects that captivate users' attention and create a sense of interactivity.
Custom Fonts (font-face)
Typography is a cornerstone of web design, and the 'font-face' property allows designers to use custom fonts that might not be available on users' devices. This property ensures consistent typography across different platforms, enhancing the website's visual identity.
Gradients (linear-gradient, radial-gradient)
Gradients are versatile tools for adding depth and visual interest to backgrounds, buttons, and other design elements. With 'linear-gradient' and 'radial-gradient' properties, designers can experiment with color blends, creating stunning visual effects that catch the eye.
Scroll Snap (scroll-snap-type)
Enhancing user experience is paramount in modern web design. The 'scroll-snap-type' property assists in creating smoother scrolling experiences by snapping to predefined points on a page. This is particularly useful for websites with sections or galleries that need precise alignment during scrolling.
Introducing WebTutor: Your Pathway to Mastery
Now that you've discovered the power of these 10 advanced CSS properties, it's time to turn your knowledge into skills. Meet WebTutor, the ultimate online platform for learning code. With WebTutor, you'll embark on a transformative learning journey, guided by industry experts who are passionate about helping you master web design, development, and more.
Why Choose WebTutor?
Comprehensive Curriculum: WebTutor offers a curated curriculum that covers everything from the basics to advanced topics, ensuring you have a strong foundation for your journey into web design.
Interactive Learning
Dive into hands-on coding exercises and real-world projects that give you the practical experience needed to excel in the field.
Expert Instructors
Learn from experienced professionals who are dedicated to your success. WebTutor's instructors are there to answer your questions, provide guidance, and share industry insights.
Flexible Learning
Whether you're a full-time student or a working professional, WebTutor's flexible learning options allow you to study at your own pace, making it convenient to achieve your goals.
Community Support
Join a vibrant community of learners, collaborate on projects, share ideas, and celebrate your milestones together.
Conclusion
Mastering CSS properties opens the door to a world of creative possibilities in web design. As you explore these advanced properties, remember that practice makes perfect. And there is no better way to practice than through WebTutor, where you'll gain the skills and confidence to build beautiful, responsive, and user-friendly websites. Start your journey with WebTutor today and take your web design skills to new heights!
Learn more with WebTutor
Ultimate Guide to CSS Animations
Latest CSS Tricks and Features
Latest CSS Trends
Create Stunning Websites with CSS for Beginners
#Css Tutorials#Learn online CSS#learn the basics of CSS#Basics of CSS Syntax#learn CSS Selectors online#mastering the syntax of CSS#important aspect of CSS#learn CSS colors#online CSS colors#Learn Online CSS#Online CSS Tutorial#Introduction to CSS
0 notes
Text

Dark/Light Mode Toggle
#html css#divinector#css#frontenddevelopment#webdesign#dark light mode toggle#background color switch#css3#html#learn to code
3 notes
·
View notes
Text
Hot Pink website progress 💗

been working on this website since 25 December and I just wanna show you all the progress 🤗🤗 (let's ignore the HTML behind cause I SWEAR YOU ALL GONNA HAVE A HEADACHE 😭😭)
XXX that's not the official colour choice btw cause my damn eyes also seem to not stand it. I'm just practicing what I have learned and putting it out in practice 🩷!!
This year my goal is to at least finish one of my projects cause the amount of unfinished HTML projects are starting to haunt me down now 😭😭
#codeblr#html css#learn coding#hot pink#eyestrain#bright colors#tw flashing#tw eyestrain#tw flickering
7 notes
·
View notes
Text
now that i have tampermonkey ive spent the past like hour trying to figure out how to use it to update the dark mode palette to include the navy again because i hate that it's just black. i looked at tumblr's CSS and literally the dark mode palette takes the "navy" variable and just sets it to 0, 0, 0 AKA black. i can edit it in the inspector (which is how i know exactly what they did) but i haven't figured out tampermonkey syntax/functionality to the extent i know how to script it to do this. this is a reasonable rabbit hole to be going down 30 minutes after i am supposed to be in bed
#like goddamn this UI update is so bad im learning more about web development to try and revert it#also any resources on tampermonkey helps BTW i dont know how to use it to update CSS variables if thats even possible#i might have to make my own variable and manually tell it in every reference to the old one to use mine instead but that seems wrong#anyway i am taking a metaphorical knife to this website#like the dark mode palette entries for navy and other color variables is what i want to update but i cant figure out how to do that#maybe i need to make my own stylesheet with its own set of variables and tell tumblr to load that sheet instead of the one it normally does#which is still a thing i don't know the proper syntax for so.
12 notes
·
View notes
Text
the way grief, rituals and memorials surrounding death surrounding that have sort of evolved in the tech age is so beautiful to me...
#the fool speaks#just learned the story behind css color rebeccapurple (which has quickly become one of my favorite colors but i never knew the story b4)#and i can feel the tears swelling. the world changes and but the whole of humanity is the same.#i feel similarly towards that memorial thing that was in launch nintendo switches that resembled some japanese tradition#i cant remember the details well enough anymore and i dont want to misexplain a real tradition of a culture im not a part of#its a different energy but similar concept#anyway. back to rebeccapurple... i loved that shade of purple already but its like actually my favorite now...
1 note
·
View note
Text
Honestly I recommend everyone learn just a littttle bit of CSS because it really is powerful and just makes bits and pieces of your internet experience more convenient.
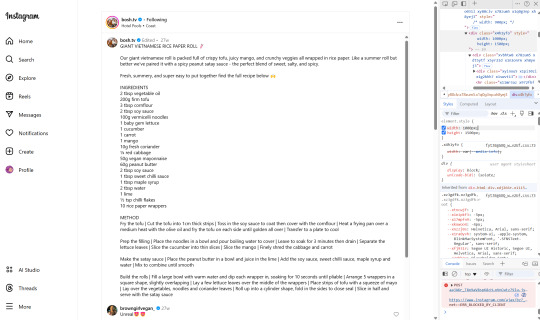
Right now I'm cataloguing recipes I've really enjoyed, just trying to get them all in one place. Many of these are instagram recipes and, because I don't trust link rot (aka the possibility that the instagram link goes dead one day), I'm including a screenshot of the recipe along with the link.
But instagram on desktop... looks like this
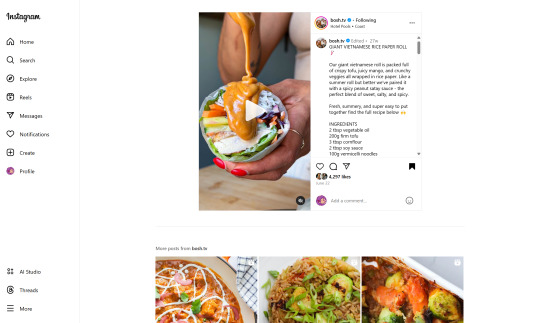
(Link, for credit. It's a good recipe)
I obviously could just copy-paste the recipe out of there. But a screenshot would be cleaner for how I'm cataloguing these.
And as-is, I'd have to scroll the whole height of that small right-side window about 4 times to fit it all.
But actually... I can just resize that div holding that whole right-side content
Basically I
hit f12 to open the dev tools
clicked the element finder
clicked on an element inside the recipe side
followed it up the tree until I found the element holding the whole recipe side (do this by hovering the div in the dev tools panel way on the right, then hovering upward and up until I find the element which is the highest up that still only contains the recipe-side content)
in the element.style part, set "width: 1000px" and "height: 1500px"
(I notice the width seems to still be less than 1000px, even though it got bigger)
likely suggests there's an element above it with a max-width set
go up the tree higher until I find the element with the max-width and uncheck that style
screenshot ready
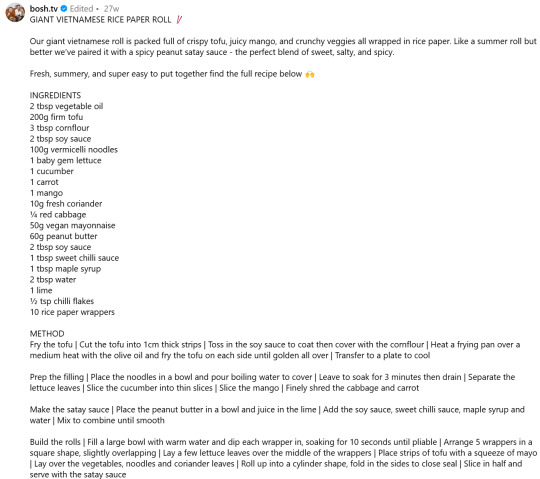
Maybe that sounded complicated but it took me probably 20-30 seconds
And this isn't just about screenshotting recipes like.
website with an annoying gif? select gif, delete gif
do you want a clean screenshot of a digital receipt for record-keeping without a large company banner or irrelevant information? delete unnecessary elements, adjust widths, screenshot
SOMETIMES, you can bypass paywalls if they're relying on something like overflow: hidden, or an overlay in the way, or some JS that runs (you can disable JS in the dev tools)
lost the jpg/png file you used for your profile picture and size doesn't totally matter? grab it from the img src while logged in. (you might even be able to find it in a bigger size by changing the url query parameters)
color contrast on an article really bad? find and change background color. find and change font color
want to make a funny fake screenshot without learning photoshop? just edit the page content in the dev tools
This isn't about like being good enough to write scripts or browser extensions. Really if you just have some basic HTML/CSS understanding a hat worth of tricks, you can make so many little adjustments in your favor.
678 notes
·
View notes
Text
Neocities Websites for Decor (& Other Resources)
9/4 2:10pm
i've been working on my neocities website and wanted to compile a bunch of places where one can find decor. this is not an extensive list, but rather a bunch of places where you can start finding resources.
please note that various pages could strain the eyes, including flashing lights or colors. pages called 'blinkies' usually have flashing colors throughout. [* = prominent flashing lights]
all websites, resources, and thoughts are beneath the cut
decor
effects for mouse cursors, text, and sites - https://www.mf2fm.com/rv/
assorted decor, images, and more - https://shishka.neocities.org/shishka/toybox
* random gifs from the internet archive - https://gifcities.org
https://pinkukingdom.neocities.org/toybox
http://whimsical.heartette.net/material [has tos you need to follow]
https://cinni.net/?z=/toybox/ [love this website so much]
* assorted early internet graphics - https://www.glitter-graphics.com
https://graphic.neocities.org
https://strawberry-gashes.gensoukai.net/v2/
archived images - https://web.archive.org/web/20100211160439/http://neskaya.net/pixels.php
* https://kawaiiness.net/home.php [potential eye strain]
https://www.asterism-m.com/item/ [japanese site]
https://pixelsafari.neocities.org
https://foollovers.com/mat/index.html [japanese site. has tos]
* https://gothiclolita.neocities.org/materials
https://sozai.pooftie.me [pastels. very low contrast, hard to read warning]
https://scripted.neocities.org
https://arunyi.art/#goodies
https://nonkiru.art/resources
* https://animatedglittergraphics-n-more.tumblr.com / @animatedglittergraphics-n-more
https://drive.google.com/drive/folders/1eQx_UiPvEvI4ZZECoPOuRrLhIE_6XbBy [content guide here... 4k+ gifs and graphics by @topadie]
* https://cutewebgraphics.tumblr.com/directory / @cutewebgraphics
https://pngfarm.tumblr.com / @pngfarm
https://lostsozai.tumblr.com / @lostsozai
decor directories
https://directory.cinni.net/sozai/
https://pixelsafari.neocities.org/links/directory/
https://www.tumblr.com/gender444/680981849679511552/favorite-sozaiblog-materials-sites-fool-lovers
definitions
(for those who don't know and/or are just getting into website creation)
webmaster: person who coded/created the website
favicons: small icons or graphics, usually 16x16 pixels.
pixels: graphics either custom-made or found. i've seen this term used for favicons, adoptables, and other graphics.
emoticons: old term for emojis. typically custom emoji expressions
* blinkies: thin flashing or sparkling banners, usually with text, an image, and flashing lights. collectible.
toybox: collections of favicons, stamps, blinkies, buttons, and more. all up to the webmaster's discretion and preferences
* glitters: glittering or shimmering text or images
stamps: collectible rectangular images, usually 99x56px
buttons: images that are hyperlinked to other websites. often custom-made for one particular webmaster or site.
avatars: typically 100x100 pixel images
other websites
beginner's guide to html and css - https://webguide.neocities.org
dnd style character generator - https://harlekine.neocities.org
templates/themes - https://neothemes.neocities.org
photo editor - https://photomosh.com
rainbow text maker - https://www.glitter-graphics.com/generators/rainbow.php
various other resources - https://scripted.neocities.org
learn more about websites & neocities - https://sadgrl.online
assorted resources - https://www.tumblr.com/punkwasp/725206601551773696/neocitiesindie-webmastery-resources
get started with website creation - https://www.tumblr.com/oddmerit/685644129978499072/note-cause-im-getting-sick-and-tired-of-terfs
all types of resources - https://punkwasp.leprd.space/resources/
* = prominent flashing lights/colors

i suggest not linking back (aka hotlinking) to the resources on the website. instead upload it yourself onto either neocities or an image hosting site and include credit. this way, if the person hosting the image deletes their page or loses the image somehow, your website will still be fine. (i didn't do this and had to find everything all over again... )
i have found that the best websites to use as companions to neocities are w3schools, pinterest, tumblr, and any image hosting site. w3schools for coding tutorials. pinterest for inspiration or for graphics. tumblr for any type of decor and advice. to edit my code and have a live preview, i use codepen.io.
since you read through all this, maybe take a look at my neocities site and follow me! <3
#neocities#html#css#html css#neocity#favicon#web graphics#web design#web decor#pixel art#pixels#banners#webcore#read later#resources#website#carrd resources#indie website#indiedev#webdeveloper#2000s web#old web#geocities#geocity#neopets#neo y2k#y2k aesthetic
1K notes
·
View notes
Note
your oc website is SO SO SO SO INCREDIBLY COOL how the hell do you even start learning how to do this ?? if you learned how to do this by yourself online, are there any tutorials or resources you can share with us? was making this website free??
omg THANK YOU SO SOOOOOO MUCH!!! It makes me so happy to hear that folks like my little site. I code my site with Phoenix Code (for the live viewer and number dials) and I host my site on Neocities - it is all free. Phoenix can be used in browser or on desktop, but I like having it on desktop more for big projects in case my files get deleted. I use the browser version when I just want to test something quickly.
The 2 videos I use and can not recommend enough to anyone who asks me are this HTML tutorial and this CSS tutorial. They are simple and easy to understand, but I recommend watching it the first go, and then following along the next few watches until you get the flow of basic parts to a website, how they're organized, and what order they go in. At this point, I've memorized exactly where everything goes, and it is all thanks to these 2 videos.
If I am being honest, I learned how to code by myself, not quite even with online tutorials but just from being stupid and messing around myself (1, because I was a kid, and 2, because I didn't understand English very well to know what tutorials are saying.) I used to do html coding for Neopet pages when I was a kid with too much online time, first by just editing the default petpages and adding info and images, and then just doing trial and error with the html. I'll just try something and then if it doesn't turn out the way I want it, I try to find out why it didn't work and also get inspiration from other similar sites to figure out where things go or how they coded (with this nifty thing called right click > inspect page or right click > view page source). And BOOM, working webpage.
It was rudimentary, white blank background without any boxes or anything, you just scrolled down the page and sections were separated by a horizontal bar. OH and every text was centered! I had no idea how to make scrolling boxes or fancy assets, but damn I still had so much fun working on it every weekend. When you find authentic selfmade sites from the 90s and 2000s, most of them aren't super fancy either unlike what modern nostalgia makes you think. So I hope you don't feel discouraged if you begin making a website and feel it isn't "fancy", you're already doing a first big step which is making a webpage and learned your first set of html code!
It was over a decade later before I coded webpages with html again. I've gotten lazy and started relying on site builders, but nothing was quite as versatile as html. I wanted to try coding my own OC site again, so that was when I started working on OutKrop (the site I posted). Until I started coding again, I had literally no idea what CSS even is (and let me tell you, it's a game changer!)
Personally, I work best when I can do things hands on. I don't read through tutorials, I code first then go back and read through coding help sites like w3schools when I find myself stuck and unable to figure something out. Sometimes I grab existing codes and play around with them to see what changes and what I can do with it, cuz having visual context is what helps me a lot.
I can also share my process:
Once I gather up some ideas, I make a sketch, including what boxes (divs in css) should approximately go. It is very rough, but shows me exactly what I need to know.
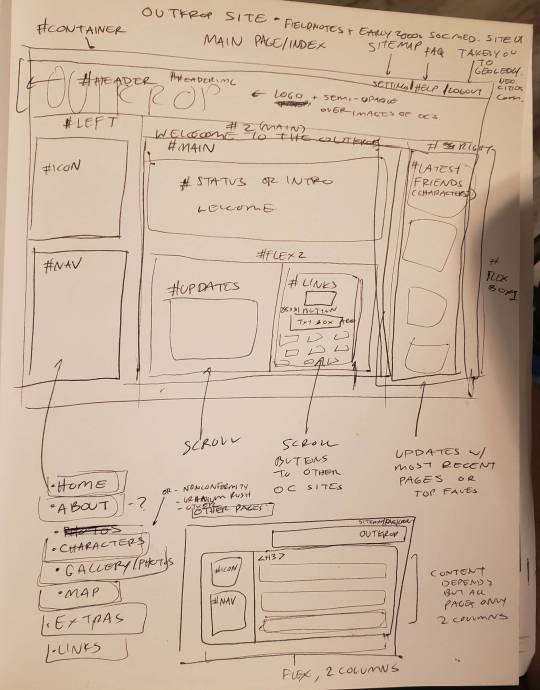
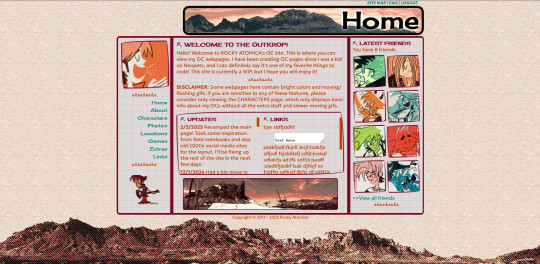
Next I load up my coding app (Phoenix Code in my case) and "sketch" the layout. Nothing fancy going on here, just putting things where they need to be, and fixing size of boxes and margins if needed. I give my boxes all a background color so I can easily see how big they are and where they are located.

After some adjustments like moving stuff around and adding assets like backgrounds and images, and changing colors of the boxes, rounding off corners, etc., we get this!
so recap + additional useful sites I use:
Coding app: Phoenix Code
Site hosted on: Neocities
Video tutorials: HTML and CSS
Sites for learning code: w3schools, also lissa explains is a great site that is written for kids to learn html so it's easy to understand. Finally, sadgrl has a lot of great resources for coding as well!
I recommend looking through these sites AFTER you tried taking a spin at coding - it doesn't have to be anything fancy just follow the HTML video tutorial I linked!
Thanks for the ask, and I hope this helps you and many others out there who are interested in building a site with html/css! Don't be afraid to get things "wrong" or have an "un-fancy" site. This is how you learn to code, and it'll become so easy once you get the hang of it.
Anyone is always more than welcome to reach out for coding help and advice :-]
55 notes
·
View notes
Note
Do you have any tips on going about making a website for your art/yourself
Think about your site layout Research the website layout you want to fit your art the best first, above anything!
I had to make this seperate blog because my currently portfolio site does not best fit my art needs, but I also can't up and delete it. So now I am paying for 2 seperate websites.
Domain name and coding If you don't already, I recommend learning basic coding (html/CSS) so you can have full control over your site. Squarespace (my portfolio site) is ok but im limited on what I can do with it. Im currently learning how to do HTML myself.
It will cost money on top of paying for the site hosting, but get an official domain for your site. Be sure that this domain name is easy enough to spell and represents you in some way (your name, art subject, etc.
Accessibility Take accessibility into consideration when creating your site. Such as using a max of 3 different fonts, have colors contrast each other, use alt text where you can, and have your font be dyslexic friendly.
The dyslexic friendly font is typically the less aesthetic fonts, but at least your audience will be able to read it lol.
141 notes
·
View notes
Text
HELLO
I'M BACK
So much has happened this summer (I finished grad school! I moved halfway across the country!) and I'm trying to get back into a routine that involves having a life again: reading books, watching movies, playing video games, and, of course, drawing and painting again.
I am currently revamping my website. For many years, my website was solely a professional portfolio and shop. White background, simple links, zero personality. Purely a hub to point to my social medias, where all the fun stuff was. I hated going to my own website because it was boring and uninspiring.
Last year, I made a neocities account and learned HTML/CSS for fun. I became obsessed after realizing how much more exciting it is to NOT have a bland, minimalist, corporate-esque website. I love exploring everyone's fun neocities sites, which are nostalgic and truly personalized. It made me hate my old website even more. Then I had a big brain moment: incorporate the fun elements of my neocities site into my website. LOOK AT IT NOW. There is COLOR. Silly fonts. There is a pixelated space background. Tiny gifs sprinkled about!
I will be actually be maintaining my website's blog. That's where the main, long-form content of all my art-making will live. Social media will just get snippets of that content. I do think there is a way to connect Tumblr to my blog so that whatever I post there will be posted here, too, but I haven't tried it yet.
Anyway, Hello Hello Hello Tumblr!
57 notes
·
View notes
Text
Learning Advanced CSS Techniques with WebTutor

In the ever-evolving world of web design, mastering CSS (Cascading Style Sheets) is an absolute necessity to create visually stunning and responsive websites. While most developers are familiar with the basics of CSS, delving into advanced techniques can set you apart as a design maestro. In this blog post, we'll delve into the realm of CSS advanced techniques, exploring how they can transform your web design game. And to help you on your journey to becoming a CSS expert, we'll introduce you to the invaluable resource, Webtutor.dev.
Unleashing the Power of Advanced CSS
Flexbox Mastery: Flexbox is a layout model that can effortlessly handle complex layout structures. With its ability to create responsive grids and alignment control, mastering Flexbox can greatly enhance your design efficiency.
Grid Layouts: CSS Grid Layout unlocks the potential to design intricate layouts with ease. Creating responsive grids that adapt flawlessly to different screen sizes becomes a breeze, allowing for dynamic and engaging web designs.
Custom Animations: Advanced CSS empowers you to create captivating animations without relying on external libraries. From smooth transitions to complex keyframe animations, your designs can come to life in ways you've only imagined.
Responsive Typography: Tailoring typography for various devices is a hallmark of modern design. Learn how to use CSS to create fluid typography that adjusts harmoniously across different screen sizes, enhancing readability and aesthetics.
Transforms and Transitions: Elevate user experience with transformative effects and seamless transitions. Combine 2D and 3D transforms with transitions to build engaging interactions that captivate your audience.
The Benefits of Mastering Advanced CSS
Design Freedom: Advanced CSS techniques provide you with the creative freedom to bring your design visions to reality, without being limited by technical constraints.
Improved Performance: CSS animations and effects can be more performant than JavaScript alternatives, leading to smoother user experiences.
Responsive Design Excellence: With advanced techniques, crafting responsive designs becomes intuitive, ensuring your websites look and function flawlessly on any device.
Efficient Workflow: Streamlined layouts and animations allow for more efficient coding and quicker development cycles.
Professional Growth: As you master advanced CSS, your value as a web designer increases, opening up new opportunities and challenging projects.
Learning Advanced CSS with Webtutor.dev
To embark on your journey towards becoming an advanced CSS designer, Webtutor.dev is your ultimate companion. Their comprehensive Advanced CSS course is designed to guide you through each technique step by step, ensuring you gain practical expertise.
Here's what you can expect from the Webtutor.dev Advanced CSS course
In-Depth Modules: Dive deep into each advanced technique, with clear explanations and hands-on exercises.
Practical Projects: Apply your knowledge through real-world projects that showcase your newfound skills.
Expert Guidance: Benefit from the insights of experienced instructors who are passionate about your growth.
Interactive Learning: Engage in interactive coding sessions that reinforce your understanding and boost your confidence.
Community Support: Join a vibrant community of learners, where you can exchange ideas, seek help, and celebrate your progress.
Conclusion
Elevating your web design game with advanced CSS techniques is a rewarding endeavor that can set you on the path to becoming a design virtuoso. From responsive layouts to captivating animations, mastering these techniques opens doors to limitless creativity. Webtutor.dev offers an unbeatable resource to guide you on this journey, providing a structured and supportive learning environment that empowers you to create stunning, cutting-edge designs.
Visit Webtutor.dev to start your journey into advanced CSS today. Unleash your design potential and create web experiences that leave a lasting impression. Happy designing!
Explore more
From Zero to Hero: How to Create Stunning Websites With CSS for Beginners
The Ultimate Guide to CSS Animations: Engage and Delight Your Audience
Latest CSS Tricks and Features of 2023
Latest CSS Trends in 2023
#Css Tutorials#Learn online CSS#learn the basics of CSS#Basics of CSS Syntax#learn CSS Selectors online#mastering the syntax of CSS#important aspect of CSS#learn CSS colors#online CSS colors#Learn Online CSS#Online CSS Tutorial#Introduction to CSS
0 notes
Text

Background Color Switch
#background color switch#background color change#dark light toggle effect#css effect#html css#css#frontenddevelopment#webdesign#html#css3#divinectorweb#learn to code
1 note
·
View note
Text
So, this whole... tarot resource website project is in progress. I've got the HTML and CSS framework figured out, and I'm looking at color palettes today. Bigger announcements to come as things come together, but... it's happening.
Everything's free. No ads, no paywalls. Going beyond rote memorization. Not just cheatsheets with one viewpoint, a whole website dedicated to diverse thought. Learning tools by diviners, for diviners.
It's gonna be so good.
26 notes
·
View notes
Text

🧡 Tuesday Tips #3 🧡
Your website is more than just a collection of pages—it’s your digital home. It should reflect you, your interests, and your personality. But with so many sites out there, how do you make yours stand out?
Here are 25 ways to make your website feel more personal, unique, and personalized to you!
........................................................................................................
🎨 Design & Aesthetics
1. Custom Color Palette – Pick colors that resonate with your personality and aesthetic.
2. Unique Typography Choices – Use a mix of fonts that match your vibe.
3. Handwritten or Doodle Elements – Add personal sketches or notes.
4. Custom Cursor – Let visitors use a fun, themed cursor on your site.
5. Personalized Favicon – A tiny but powerful detail that makes your site feel complete.
6. Themed Layouts for Different Pages – Make each page visually distinct but cohesive.
7. Custom Backgrounds – Textures, gradients, or even a personal photograph.
8. Retro or Experimental CSS Styles – Go wild with unique styles that make your site stand out.
9. Create a Custom Hand-Drawn Logo – Instead of a standard logo, try sketching one yourself for a unique touch.
10. Add Subtle Animations – Small hover effects, background animations, or cursor trails can bring your site to life.
11. Play With Layering Elements – Overlap images, text, and shapes for a more dynamic look.
12. Design a Personalized Loading Screen – A custom loading animation or message adds a fun detail visitors will remember.
13. Add Your Own Handwriting as a Font – Convert your handwriting into a web font for a truly personal touch.
14. Design a Seasonal Theme Switcher – Let visitors toggle between different seasonal or mood-based color palettes.
........................................................................................................
📜 Content & Personality
15. Create a Behind-the-Scenes Page – Show how your website was built, share your thought process, or include fun bloopers.
16. Add a "The Making Of" Section – Share drafts, sketches, or early concepts behind your creative works.
17. Include a Personal Dictionary of Words You Love – A list of favorite words, phrases, or slang you frequently use.
18. Design a "Things That Make Me Happy" Page – A simple, uplifting page filled with personal joys.
19. Show Your Progress on a Learning Goal – Track and share your journey in learning a new skill, language, or hobby.
........................................................................................................
💾 Interactivity & Engagement
20. Add a Clickable Mood Indicator – Let visitors see your current mood with an emoji or phrase that changes over time.
21. Create a Dynamic Banner That Updates Automatically – Display different messages depending on the time of day or special occasions.
22. Add a "What I'm Listening To" Widget – A live-updating display of your current favorite song or playlist.
23. Embed a Poll or Voting Feature – Let visitors vote on fun topics or help you make creative decisions.
24. Introduce a Mini Personality Quiz – Something quirky like “Which of my favorite books/movies are you?”
25. Make an "Ask Me Anything" Page – An interactive page where visitors can submit questions for you to answer.
Closing: Make It Yours!
Your website should be you in digital form—fun, unique, and engaging. Whether you add just one or all 25 ideas, the most important thing is to have fun and make it your own.
If you try any of these ideas, let me know—I’d love to see what you create!
-----------------------------------------------------------------
Want to help the Small Web movement grow?
Join us on other platforms. ♥
FB Page & Group:
facebook.com/thesmallweb
facebook.com/groups/thesmallweb
Twitter/X:
x.com/smallweblove
Tumblr Community:
tumblr.com/communities/thesmallweb
Mastodon:
indieweb.social/@thesmallweb
#small web#indie web#web revival#old web#blog#neocities#2000s web#decentralized social media#decentralizedfuture#old internet#decentralization
16 notes
·
View notes
Note
Hello! I hope you're having a nice day! I downloaded Firefox mobile and it changed the colors of my site skin, which I really really liked! I want to have this show on any browser but I didn't want to mess up my existing site skin and all the other add ons I mushed in together, can you please help me out with all the colors? 😭
My site skin on Firefox mobile with the dark mode extension turned on

what it actually looks like:

Changing the colors so that all elements look the same as with the dark mode extension will be quite difficult. But changing at least some of them, like the header or the font color, should be easy to do. You can use an image color picker on the first screenshot to find out the color codes. Then you replace the colors in your site skin with these colors.
Sorry that I can't give a more detailed answer right now. What else can be done depends on your original code and also on your skill level. But feel free to ask me again if you need more help. (I'm not CSS expert though but still learning myself).
19 notes
·
View notes
Note
How do you manage to translate the text in pictures?
it's a pretty complicated process and i might make a post explaining it in further detail later, let me know if you want to see that! but the basic steps are:
identify fonts. some you can easily learn to recognize, but others can be identified using various font identification websites. for screenshots of websites this is not required, i just go to the website and edit the html of a post to say what i need it to say.
match colors. by using a color picker in an image editor you can get the exact colors of the background and foreground of any particular piece of text. then you can edit the css of whatever website you're on to match the colors.
adjust font size. i usually replicate the english text using the font i need and try to match the size of the text as closely as possible by altering the font size and adjusting zoom level.
replace text in the image. i replace the text in the original image with the translated text in the right font, color and size, trying to match the position of the text as perfectly as i can. i use aseprite as my editor, as it allows for greater precision.
that's the gist of it but there's also a bunch of other stuff that requires additional work like replicating handwritten text, text enclosed in boxes, text with an image background, replicating blur and jpeg artifacts.
9 notes
·
View notes