#learn motion design
Explore tagged Tumblr posts
Visit Tumblr Blog
Explore Tumblr blogs with no restrictions, modern design and the best experience.
Last Seen Tumblr Blogs


Fun Fact
130K people were victims of a chain letter scam that affected Tumblr in May 2011.
Text
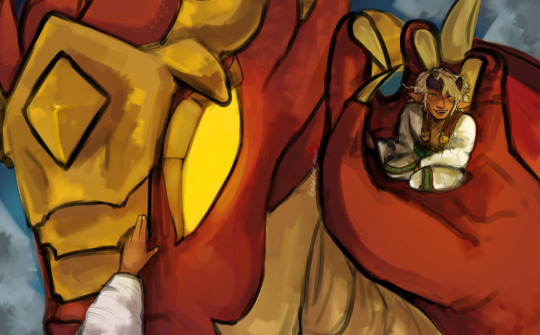
trying to doodle but i have a cold right now and iwnt to rip my nose off my face
#ninjago#llotion#parcaeive#:3#jusr... a doodle.. but trust im cooking up a human motion design and drawing them tgt again soon TRUST#LEARNING HOW TO DRAW DRAGONS... PLEASE BE KIND TO ME...
294 notes
·
View notes
Text
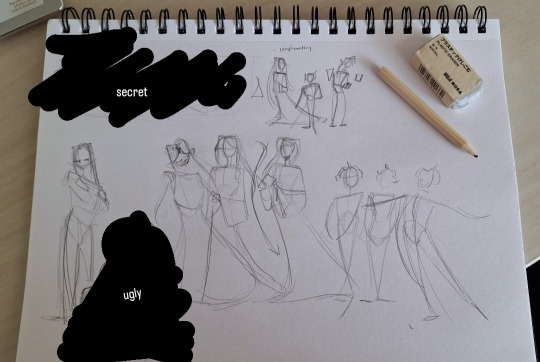
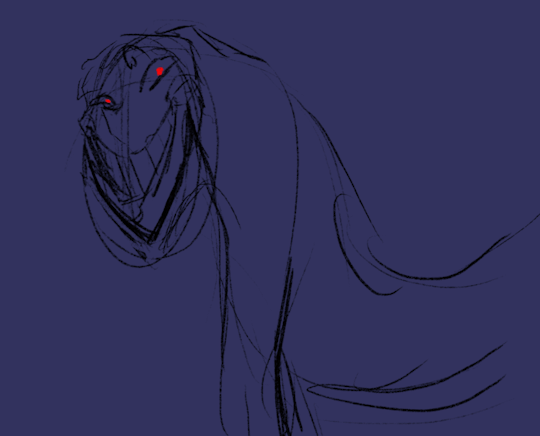
This is so messy but tmh silhouette exploration
#annoying artist notes that could be an essay:#if jan and river are complimentary than theyre both triangles inverted of each other#river will be all curves and flowly like their namesake#cuz no matter how stoic they are on the outside you can still tell they have some curiosity (?) about the world#but their “straight lines” would have been forced into them as a child#whereas jan's straightedgedness is something learned willingly#the thing about ballerina characters is that it is hard to draw them with so much fluidity and motion (imo) without losing that disciplined#straightness to them#i looked up character design sheets for ballerinas and none of them really spoke to me on how i see jan#anyways with aubrey theyre such a squareish character to me even if theyre wilder in nature compared to river#their shape is trying. like REALLY trying to be as poised and elegant as river's. but in the end itll never stand as fluid or as tall as#river's silhouette#id also make theirs foiled to jan's in that they share that straightlinedness (i need a better word jfc) in their legs#okay im gonna go and continue brainstorming thoughts and critiques welcomed#addendum: ADDITIONALLY DO NOT GET ME STARTED ON THE GALE SIBLING COLOR DYNAMIC. LORD I WILL BE HERE FOREVER.
16 notes
·
View notes
Text
(instagram)
Tutorial in After Effects under the cut.
• Create a new composition and call it Split.
• Write your text, pre-comp it, call it Text or whatever you want.
• Create a mask from the center to one side (top/bottom), change anchor point to the top.
• Bring down Scale property and unlink it, keyframe the text to go from 100% to 0% in 1s towards the anchor point.
• Cut the layer at the end.
• Duplicate pre-comp.
• Select the bottom one, click M to bring down mask properties, invert the mask and move anchor point to the bottom (so the text scales to the bottom).
• Duplicate Text pre-comp one more time. Select it, press M and delete the mask, move anchor point to the center. Create new keyframes to scale it from 0 to 100 in 1s (properties unlinked). Select both keyframes and delay it by 1 frame. It makes the text look like it’s scaling from the center.
• Change bottom and top text color by adding Fill effect to the pre-comp.
• Easy ease all keyframes.
• Select all pre-comps and duplicate them, put them at the top and put them at the back to extend your animation (or arrange in your preferred order if you’re doing a phrase like me). So far it should look something like this:
• Create new comp Wave of 10s, add your Split comp.
• Create new Solid layer, call it Map, add Gradient Ramp effect, make white at the left, black at the right and hide the layer.
• Select Split pre-comp, Right-click → Time → Enable Time Remapping and extend the layer to the end.
• Add loopOut() expression to Time Remap.
• On Split pre-comp add the effect Time Displacement, on Time Displacement Layer select your Solid layer (Map), and on Source select Effects & Mask.
• Change Time Resolution (fps) to 250-300.
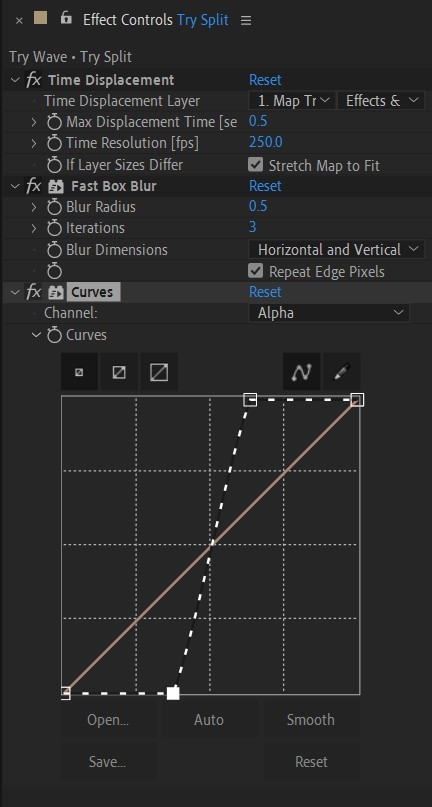
• Add Fast Box Blur effect, change Blur Radius to 0.5.
• To bring back the sharpness add Curves effect, change the Channel to Alpha and change values (see screenshot).
• Play around with Max Displacement Time [sec] on Time Displacement effect depending on the look you’re going for. I set it to 0.5.
• Now this whole animation is driven by our Solid layer (Map) we created. So if you make any changes to it, the animation changes too. For example, you can change Ramp Shape to Radial on Gradient Ramp effect, and see how it changes your animation.
• I additionally added some texture on the text, used Track Matte and added wiggle(5,500) expression to the Rotation property so texture would be constantly moving. Also added some additional effects to the new Adjustment Layer on top such as Roughen edges, Turbulent Displace, Posterize Time and Noise. Let your freak flag fly - it’s a matter of taste and creativity of what you do with it. Your animation should look something like this:
#artists on tumblr#animation#artwork#2d animation#after effects#gif tutorial#art tutorial#art tips and tricks#after effects tutorial#tutorial#art#motion design#tips and tricks#tips#digital art#gif#visual art#loop#learn after effects#illustration#infinite loop#pasta#funny#pasta humor
69 notes
·
View notes
Text
ok urge to animate done
HABHNSJ I tried to do shading on it
but i didnt know how to do it lmao
verysmall animation
oughrdehnjxs i wish i could more </3
ghjerhfrejwmkefrd
@coulsart
#i flipping#love this design sm#and the way you draw them#GRHGRHJSD#animation#myart#ID in alt text#HENJAKSDE#DUDE#DOING THE FACE WAS SO TRICKY OMG#i had to like#erase a whole bunch of frames because it wouldnt flow right#OH#BUT#I have learned how much motion you fit in just a few frames#so thats cool#Yiiippeee#edit:#i just realized the eyebrow goes missing#...#sobs
182 notes
·
View notes
Text

Unlocking the Power of Animation: A Guide to the 12 Principles of Animation
The 12 Principles of Animation: Bringing Life to Art
Animation is a captivating and ever-evolving art form that has the power to transport audiences to fantastical worlds and stir deep emotions.
Behind the magic of animated films and videos lie the "12 Principles of Animation" a set of guidelines that have been the cornerstone of animation since their introduction by Disney animators Frank Thomas and Ollie Johnston in their 1981 book, "The Illusion of Life" These principles are the building blocks of animation, allowing artists to breathe life into characters and create fluid, engaging motion.
Here are the 12 principles, along with explanations for each:
1. Squash and Stretch (Flexibility and Elasticity)
This principle emphasizes the need to give volume and weight to objects and characters by distorting them when they move. It adds a sense of realism and exaggeration to the animation.
2. Anticipation (Preparing for Action)
Before a character makes a significant movement or action, there should be a brief moment where they prepare for it. This helps the audience understand what's about to happen and adds depth to the animation.
3. Staging (Presentation and Clarity)

Staging involves arranging elements in the scene to convey the story clearly. Proper framing, camera angles, and composition guide the viewer's focus to the most important elements.
4. Straight Ahead and Pose to Pose (Two Approaches to Animation)
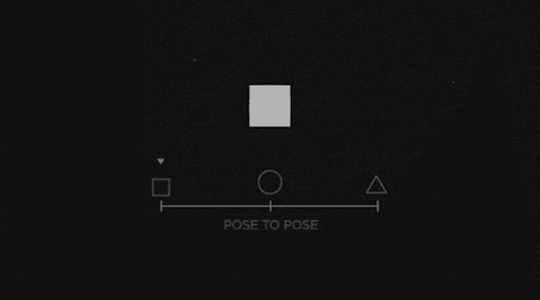
These are two different methods of animating. Straight ahead involves creating each frame in sequence, while pose to pose focuses on defining key poses and then filling in the gaps. Both methods have their uses, depending on the desired effect.
5. Follow Through and Overlapping Action (Secondary Motion)
Objects and characters should continue moving slightly after their primary action has stopped (follow through) and some parts of the character may move at different rates or in different directions (overlapping action). This adds realism to motion.
6. slow in and out (Easing In and Out)

To make movements look more natural, objects should start and end their actions gradually, with acceleration and deceleration. This principle prevents abrupt and robotic motion.
7. Arcs (Natural Paths of Action)

Most natural movements follow an arcing path rather than straight lines. Animators should ensure that characters and objects move in arcs to mimic real-world physics.
8. Secondary Action (Supporting Actions)
Secondary actions complement the primary action and add depth to the character or scene. These actions can be facial expressions, gestures, or any other movement that enhances the animation.
9. Timing (Pacing and Rhythm)

Timing is crucial to establish the mood and rhythm of the animation. It determines how fast or slow actions occur and can evoke different emotions in the audience.
10. Exaggeration (Accentuating Reality)
Exaggeration is used to amplify the actions and emotions of characters, making them more expressive and engaging. However, it should be used judiciously to maintain believability.
11. Solid Drawing (Three-Dimensional Forms)
Animators must understand the principles of traditional drawing, including anatomy, perspective, and form, to create characters and objects that appear three-dimensional and solid in a 2D space.
12. Appeal (Attractiveness and Personality)

Appeal refers to the likability and charisma of characters. It involves designing characters with unique and interesting traits that draw the audience's attention and empathy.
Mastering Animation: 12 Essential Principles Explained These principles serve as a foundation for animators to craft compelling stories and characters.
While they were developed in the realm of traditional hand-drawn animation, they continue to be relevant in today's digital animation techniques.
Aspiring animators and seasoned professionals alike still rely on these principles to captivate audiences and breathe life into their creations, reminding us that the magic of animation lies in its ability to make the impossible seem real.
As i conclude this journey through the intricate world of animation, extend our heartfelt gratitude to each reader.
Thank You for Reading ♥
Follow Motion Pandey for more such as amazing animation tips and tricks content
#animation#motion graphics#12 Principles of Animation#motion design#after effects#asthetic#2d animation#principles#artists on tumblr#tumblog#learn animation
24 notes
·
View notes
Text
Honestly the more time goes on the less I see engage cast needing any sort of redesign. Like have fun but once you start understanding how mika pikazo uses color and shape everything becomes a lot less complicated and incredibly thoughtful
#katie rambles#fe17#like you know! mika was cooking actually#and i think a lot of percieved complexity just comes from. immediate sensory assault#the designs of engage take a second to get used to and work better in motion/in proper environment in 3d and as 2d but#they are actually really incredibly solid when you learn the stylistic language i'm ready to die on that hill
3 notes
·
View notes
Text

Ready? OK!
#vaporwave#crt#vhs#glitch#motion design#i know every artist talks about feeling like their style is inconsistant but idk how to segue from dnd catboy to uh. vaporwave mograph :|#but i had fun making this & learned alot. and then learned theres a VHS effect built into after effects. RIP#I would like to offer... CRT comissions? like i animate ppls OCs then comp them like this to look like VHS compression. seems fun#//tw eyestrain#//tw strobing
20 notes
·
View notes
Video
youtube
Animating with Fun and Ease: How to Use Canva Animation Wiggle for Playf...
#youtube#canva#canva design#Canva tutorial#Canva animation#Canva tips#Animation#animation tutorial#Motion design#Tutorial#learn design#Canva love#Wiggle animation#Canva new feature#Canva update#Canva tutorial for beginners#Canva new feature 2023
3 notes
·
View notes
Text
Graphic Design for Education | Enhance Learning with Visuals | Cueball Creatives
Discover how graphic design enhances educational content boosting engagement, retention & accessibility for schools, tutors, and online course creators.
#graphic design for education#academic brochure design#E-learning graphic design#motion graphics services#graphic design subscription#unlimited graphic design service
0 notes
Text
#motion graphics#motion graphics tutorial#after effects motion graphics#motion graphics for beginners#after effects tutorial#learn motion graphics#motion graphics tutorial for beginners#tutorial#after effects tutorial motion graphics#motion graphics tutorials#motion design for beginners#after effects motion graphics tutorial#motion design tutorial#motion graphics for starters#motion graphics full tutorial for beginners#motion graphics after effects
1 note
·
View note
Text

(instagram)
Tutorial in After Effects under the cut.
ALRIGHT let's get into it. Straight to the point, no nonsense tutorial.
• Create a new composition 1080px x 1080px, let’s call it Design.
• Write some text, turn it into shapes (right-click → Create → Create shapes from text).
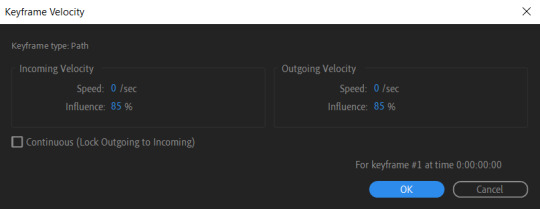
• Animate the path so the text stretches like so in a few seconds time. When animated, right-click on a keyframe and select Keyframe velocity and change coming & going velocity influence to 85%:

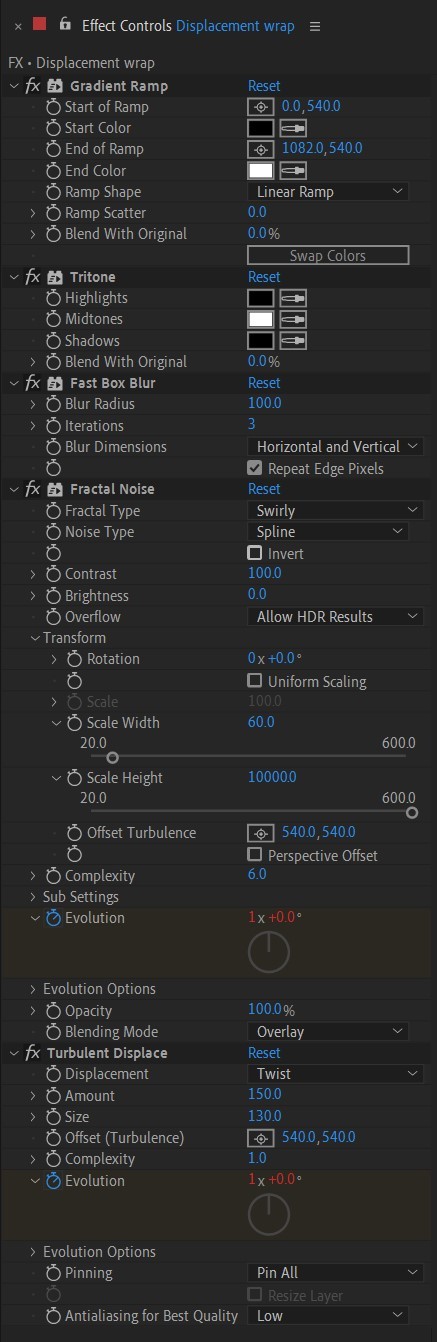
• Create another new composition and call it FX. Add your Design pre-comp in this composition.
• Add a new Solid layer on top, call it Displacement map. Now we’re gonna add a bunch of effects on that solid layer.
• First add Gradient Ramp. Make it so the white color would be on the right side (End of Ramp) and black would be on the left side (Start of Ramp);
• Next add a Tritone effect and change the Highlights color to black and Midtones color to white.
• Add Fast Box Blur and change Blur Radius to 100.
• Then it’s time to add Fractal Noise effect, and change Fractal Type to Swirly, Noise Type to Spline. Then bring down the Transform panel and uncheck Uniform Scaling, make Scale Width 60, and change Scale Height to a very high number, such as 10000.0.
• Add a keyframe to Evolution at the beginning, and the second keyframe at 2 seconds rotating the slider for one rotation. Add an expression loopOut() on these keyframes so it loops.
• And lastly change the Blending mode to Overlay (at the bottom of the effect).
• The last effect we’re gonna add is Turbulent Displace. Change Displacement to Twist, Amount to 150, Size 130. Add the same keyframes to the Evolution as we did previously on Fractal Noise and loop them with the same expression.
So far your work should look something like this:

• Then it’s time to add colors! Create another new composition, add your FX pre-comp to it, add a background with a new solid layer (CTRL + Y).
• Then add Echo effect to your FX pre-comp, change Echo Time to -0.030, Starting Intensity to 0.03, Decay to 0.94.
• Next add Gaussian Blur effect, make the Blurriness 10.
• Add Colorama effect, change Get Phase From to Alpha. Then go to Output Cycle and change the color presets (Use Preset Palette) to let’s say Solarize Red (it doesn’t really matter, we’re gonna change the colors, we just need it to have two sliders instead of a lot). Then grab a bottom slider and put it on the left side and choose the lighter color you want. I chose pink.
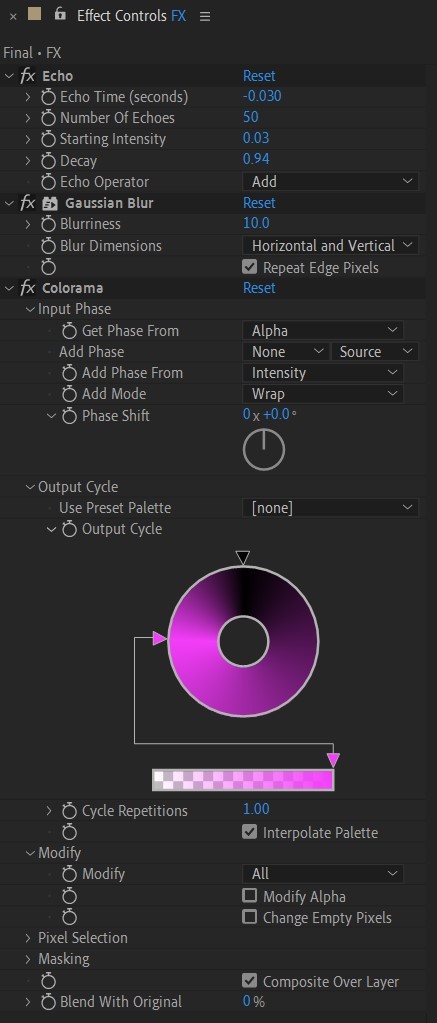
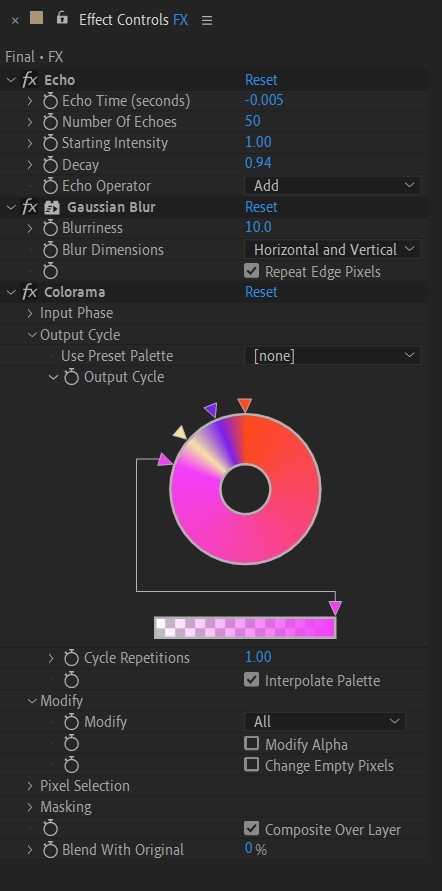
• Now duplicate your FX pre-comp. We’re gonna change some parameters on the effects.
• So the first thing you want to do is change Echo Time to -0.005, Starting Intensity to 1.
• On Colorama go to Modify and uncheck Modify Alpha. Then go to Output Cycle, and add more colors like you see in the screenshot.
• Duplicate your FX pre-comp one more time and delete all the effects on it.
• Last thing to do is add an Adjustment Layer (Ctrl + Alt + Y), add the Noise effect, and make the Amount of Noise 15.0%.
• And you're done!
#art tutorial#tutorial#friday#art#motion design#artists on tumblr#tips and tricks#art tips and tricks#tips#artwork#digital art#gif#animation#visual art#loop#gif tutorial#learn after effects#illustration#2d animation#infinite loop
52 notes
·
View notes
Text
for all the artists out there, here are my favorite resources i use to learn!
Files
The Complete Famous Artist Course
Art Books and Resources
Art, Anatomy, and Color Books
PDF Files of Art Books
Morpho and Other Art Books
Mega Folder
Internet Archive
YouTube
My YouTube Playlist of Tutorials
How to Draw Facial Features
Drawing and Art Advice
Drawing Lessons
Art Fundamentals
Anatomy of the Human Body
2D Animation
Perspective Drawing
Websites
Pinterest Board for Poses
Another Pinterest Board for Poses
Pinterest Boards for References
Reference Angle
AdorkaStock
Figurosity
Line of Action
Human Anatomy
Posemaniacs
Animal Photo References
Humanae - Angélica Dass
Fine Art - Jimmy Nelson
The Met Collection
Character Design References
CDR's Twitter Account
iamagco's Twitter Account
taco1704's Twitter Account
takuya_kakikata's Twitter Account
EtheringtonBro's Twitter Account
Drawabox
Color Wheel
Color Palette Cinema
Free Images and Pictures
Free Stock Photos
FILMGRAB
Screen Musings
William Nguyen Light Reference Tool
SketchFab - 3D Skeleton Model
Animation References - sakugabooru
Animation Screen Caps
Animation References - Bodies in Motion
#art#art resources#art books#anatomy#composition#painting#art tips#art help#art tutorial#perspective#color theory#art reference
40K notes
·
View notes
Text
Frameboxx 2.0: Top Animation & VFX Institute in Barrackpore

Frameboxx 2.0 in Barrackpore is a leading institute for Animation and VFX training. We offer comprehensive courses in 2D/3D animation, visual effects, motion graphics, and game design using industry-standard tools. With expert instructors, hands-on projects, and a focus on industry needs, we prepare students for successful creative careers. Join Frameboxx 2.0 and turn your passion into profession!
#course vfx Barrackpore#motion graphics course Barrackpore#web design & development course Barrackpore#animation classes Barrackpore#animation training institute Barrackpore#learn motion graphics Barrackpore#animation learning course Barrackpore#vfx full course Barrackpore#best motion design courses Barrackpore
0 notes
Text
Mastering Trim Paths in After Effects: A Guide to Dynamic Shape Animations
Learn to create dynamic animations with After Effects' Trim Paths feature, perfect for smooth shape reveals and versatile motion graphics.


Animating Trim Paths in After Effects is a powerful technique used to create dynamic and visually appealing animations, especially with vector-based shapes and paths. Trim Paths essentially allows you to animate the start and end points of a shape's path, giving you control over how it reveals or hides over time.
Here's why it's amazing to use:
Controlled Reveals and Hides: Trim Paths enables you to animate the drawing of shapes, making it perfect for creating effects like drawing outlines, revealing text or logos, or creating intricate animations where shapes appear or disappear dynamically.
Versatility: You can use Trim Paths with a wide range of shapes, including basic shapes like circles and rectangles, as well as custom vector shapes created with tools like the Pen Tool. This versatility allows for endless creative possibilities.
Smooth Animations: It provides smooth and precise control over the animation of paths, allowing you to create fluid and seamless transitions between different shapes or states.
Layered Animations: You can apply Trim Paths to individual shape layers or masks within a layer, allowing for complex animations with multiple layers interacting and revealing each other.
Combining Effects: Trim Paths can be combined with other After Effects effects and techniques, such as keyframe animation, expressions, masks, and effects like Stroke and Gradient Ramp, to create even more intricate and unique animations.
With Trim Paths, you can:
Animate Stroke End: This controls the endpoint of the path, allowing you to animate the drawing of a shape from beginning to end or vice versa.
Animate Stroke Start: Similar to End, this controls the starting point of the path, useful for animating shapes to disappear or shrink.
Offset Path Animation: You can animate the offset of the path, creating effects where shapes follow a path or move along a trajectory over time.
Complex Shape Reveals: By combining multiple Trim Paths animations, you can create complex reveals or animations where shapes morph or transform gradually.
Overall, Trim Paths in After Effects is a fundamental tool for animators and motion graphics artists, offering precise control and endless creative possibilities for animating shapes and paths.
Follow me for more exiting tips and animation insights @motionpandey
Thanks for reading ♥
#motion graphics#2d animation#after effects#learn animation#motion design#art#animation tips#artists on tumblr#tumblog#trim path
8 notes
·
View notes
Text
What is Motion Graphics | Liveblack
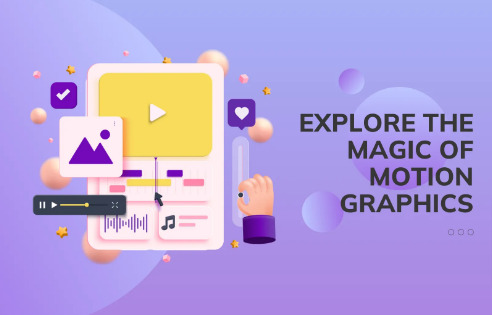
Motion graphics create a unique experience of telling a story. The primary purpose of any brand or business using motion graphics is to evoke emotional connection. Nowadays, the internet is filled with moving graphics to accomplish an intended purpose or telling a brand story.
What is motion graphics?
We can give a simple definition of motion graphics — graphics in motion are called motion graphics, but we wish the definition was as simple as the way we wrote. However, in other words, it is called motion design as it gives movement or animation to the static design.
In the first place, it sounds as easy as pie, but when you start to understand this term, you’ll get to know how hard it is to learn motion graphics. At the same time, those who are willing to learn will become comfortable by taking training from an expert and experienced. It will take a longer period to master the art of motion graphics, but nothing is impossible if you want to work on something.
The rise of this concept in the digital era benefits a lot to businesses. It helps them visualize the story they want to tell most pleasingly and aesthetically. As we all know, these days, people would like to check the products out before purchasing, and online videos help them make the decision. This is the point where brands can show off their productivity through conceptualizing their products and services.
Graphics with motion began its journey in the early 1800s, and over the years, especially to this date, we can see how far this genius concept came. This is a unique way of communicating to a mass audience with explainer videos, video ads, movies, TV shows, etc.
Learning graphic design motion can be an exciting task for those who love to craft unique stories, and love to convert their imagination into reality. However, not every exciting thing is easy to master.
The rise of motion animation graphics brings a new experiment and experience that has changed the way we advertise and film. The world can now see a whole new perspective through the animation graphic design.
With the digital revolution around the world, visual learning can be a fun task that helps grow the career. It can result in higher ROI and complement graphics in a way that was never seen before. Businesses can create a positive image and captivate the attention.
What is a Motion Graphic Designer Job?
Motion graphic designer works with audio, sound effects, and animation, to create amazing moving content for various media like films, television, etc..
Motion graphic designers are the reason behind the attractive animated visuals, making visual storytelling interesting and helping reach grow in large numbers.
What does motion graphics learning include?
For those who want to learn more about motion graphics, a career in motion graphics requires an understanding of design principles like layout, color theory, timing, appeal, typography, etc. You have to be a creative thinker when it comes to designing a motion design. Learn motion graphics and animation principles to master this digital art.
Motion graphics bring magic to every concept you think or imagine. Whether you are a learner or a brand, it has the power to take your thought process or brand image to new heights.
At Liveblack, we have a team of talented graphic designers who know how to slay every design challenge and come up with new concepts that win hearts. With fresh concepts, we help create a strong and unique brand identity for our clients. The visualized information helps people understand the brand story or message effectively. Also, people love to watch interesting content, especially videos that have storytelling or convey messages ingeniously.
#Motion graphics#What is Motion Graphic Design#Graphics with Motion#Graphic Design Motion#Motion Graphic Designer Job#animation graphic design#Motion Graphic Templates#Types of Motion Graphics#Motion Graphics Animation#Motion Graphic Meaning#career in motion graphics#What does motion graphics learning include?#Graphic Designer#Liveblack#visual learning
0 notes
Text
*using a 3D model posing website because I can't figure out how to draw a character pose* this is what my degree in 3D Art is for
#dumb stuff#you want to talk about useless degrees? my other major is ''entertainment art'' and i haven't touched a 3D modeling program since graduation#i wanted to learn motion graphics but there wasn't enough people to run the program i fucking guess#guess what most graphic design jobs ask you to know? not 3d modeling I'll tell you!!!#god each passing day i hate the college i went to#don't go to art college. skillshare is more valuable at this point
0 notes