#lightmaps
Explore tagged Tumblr posts
Visit Tumblr Blog
Explore Tumblr blogs with no restrictions, modern design and the best experience.
Last Seen Tumblr Blogs


Fun Fact
Tumblr was named as a finalist in Lead411’s New York City Hot 125 in Aug 2010.
Text
Portfolio, Documentation and Pitch (Aryan Raj Adhikari)
Unreal Engine Setup
I first of all decided that the main priority would be to setup the Unreal Engine project for the VR preview. As this was an unchartered territory for me, I decided to make sure the Engine was up and running well.
There are two ways you can opt for setting up Unreal Engine for a VR preview. You can either build the VR template blueprints from scratch or you can choose the VR template provided by the Unreal Engine inside the 'Games' tab. I opted for the latter as I was already on a tight schedule and I decided to work on the project solo as others had already formed pairs and groups to work together. This was a challenge to myself to engineer everything and make sure the game is running flawlessly.

Figure 1 (Unreal Engine templates)
I also set up the lights for the environment immediately so that I could get a sense of what I am working with. I went with a default setup of a directional light and a sky light for the atmosphere. Interestingly, since we are working towards a VR project, Lumen wouldn't help the case and we need to bake the lights for the entire scene manually. Just to prevent the scene from even using Lumen, I turned it off in the project settings and also enabled the virtual texture support to incorporate static meshes blending with the landscape.

Figure 2 (Lumen Turned Off)
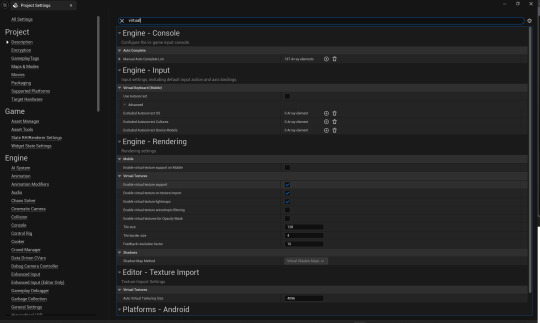
Figure 3 (Virtual Texture Support Enabled)
The procedure of baking the lights is a bit confusing at times but one I am fairly familiar with as I have done simple architecture visualization projects where baking proved to be quite useful. Before baking the lights of the level, you also need to make sure that the lightmap texture density of the static meshes is enough. You can preview the visualization of the density of the lightmaps of the meshes inside the 'Optimization Viewmodes' under the 'Lit' tab.

Figure 4 (Optimization Viewmodes)
If a mesh doesn't have sufficient density of lightmaps, the scene after it's been baked is poorly lit and very dark. Inside the visualization, you can see the color of the lightmap density of the meshes to ensure its properly lit after baking. You can find the information in official documentation released by Epic Games, but basically, blue means the lack of sufficient density, green means sufficient density and red means excess density.

Figure 5 (Lightmap Density Color, (ICVR, 2024))
Whenever you increase the lightmap of the static mesh, you should keep in mind to make sure that the value you insert should be equate to the answer of base 2 to the power 'n' where 'n' is any number you choose, i.e. 2, 64, 128 and so on. The Unreal documentation does state it does not need to be that value but I believe its an editing mistake as the lightmaps won't be distributed equally to the entirety of the mesh, resulting in baking artifacts.
After creating the Unreal project and setting it up for light baking, I move to the next phase which would be spent on creating a sandy tile texture for the landscape.
REFERENCES
ICVR, 2024. Epic Games Developer. [Online] Available at: https://dev.epicgames.com/community/learning/tutorials/KPOx/unreal-engine-light-baking-and-lightmaps-a-step-by-step-ue-guide [Accessed 16 February 2025].
0 notes
Text
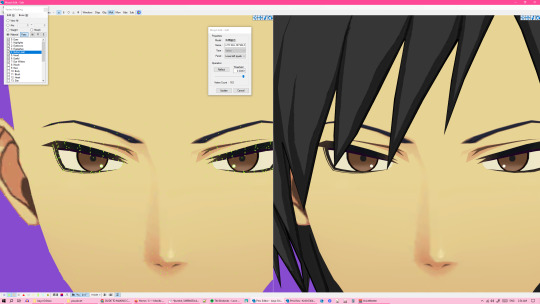
got motivated to work on my izaya model and update his face after 4 years of it being embarrassingly lackluster we are so fucking back
#im gonna try and make some lightmaps so i can get it to work w the genshin shader#bc it's kinda meant for toon shading and i rly like genshin's shaders#i need to update the textures too...#they're from a mobile game so theyre very low quality and i tried upscaling them and redrawing them a little back in 2020#but it's not rly enough...#ideally i'd love to redraw them at least a little on the shadows#but i cant draw... </3
9 notes
·
View notes
Text
oh when was someone gonna tell me that you can download the source files for dao level layouts and face morphs (:
#hahahahahahahahahahahahahahaha it's not like this is the most useful thing ive ever found or anything#ive been wanting to do so many things that require making new level layouts and not doing it because it's so complicated#like putting in backgrounds so it doesnt look like the world ends at the horizon#um. now i can just edit any area in the game#(well.. in the base game. shame about no dlc rip)#personal#lmao i found out about this stuff like an hr ago and it took a long time to find the nexus link rather than the bioware forum#sometimes bioware forum links are ok in the web archive but others redirect to the language choice page which doesnt redirect back#da#dao#da modding#dao modding#this also has sound and material and vfx and animation files#(animation is actually what i was originally looking for after trying to work out how to use the animation thing in the toolset)#(still no idea what to do there. got sidetracked by this)#if i hadnt already found the sound project files some time last year that would probably be the most exciting part of this#hmm.........nah ok the layouts would still be the most exciting#now. idk what i need to do to get lightmaps to work on my computer. but i guess that's the next step fml
3 notes
·
View notes
Text
i want to play this region that i havent made yet
1 note
·
View note
Text

Dive into the mind-blowing world record feat of 3D projection mapping! join us as we explore the technical mastery and artistic vision behind the largest projection ever.
#ortmoragency#deliveringdigitalhappiness#3dprojectionmapping#projectionmapping#videomapping#3dmapping#SpatialAugmentedReality#augmentedreality#immersiveexperience#digitalart#projectionart#lightmapping#visualeffects#interactiveprojection#ProjectionShow#mediafaçades#mappingart#virtualrealityexperience#VR#projectiondesign#ProjectionTechnology#3dvisualization#projectionmappingart#interactiveinstallation#projectiondisplay#immersiveart#digitalprojection#projectionmappingshow#3danimation#HOLOGRAPHICPROJECTION
0 notes
Text
The proposed Secession of Mindanao by former President Rodrigo Duterte is borne out of frustration at how poorly our Country has been run since we supposedly gained Independence from the United States (US) back in 1946, with development only centered around the National Capital Region (NCR) as shown in the Light Map of the Philippines
#mindanao#philippines#lightmap#epifaniodelossantosavenue#edsa#edsarevolution#southeastasia#rodrigoduterte#nationalcapitalregion#ncr#oligarchy#oligarchicfamilies#unitedstates#secession
0 notes
Text
MORE ON GENERATING LIGHT MAPS...
Q: What does the "generate light map uv" option do?
A: The "Generate Lightmap UVs" option in Unity is used to automatically generate a second set of UV coordinates for a mesh, specifically for lightmapping purposes. Lightmapping is the process of pre-calculating the brightness of surfaces in a scene and storing the result in a texture called a lightmap. This texture is later used for rendering the lighting on static objects in the scene :citation[2].
When you enable the "Generate Lightmap UVs" option in the Mesh import settings, Unity generates lightmap UVs for the mesh that follow specific rules, such as being within the [0,1] x [0,1] UV space, having a wide enough margin between individual charts, not having any overlapping faces, and maintaining a low difference between angles and relative scale of triangles in the UV and the original geometry :citation[3].
You can also create your own lightmap UVs in your preferred content creation software and provide them to Unity. For baked lightmaps, place UVs in Mesh.uv2 (also called "UV1"), and for real-time lightmaps, use Mesh.uv2 or Mesh.uv3 (also called "UV2") depending on whether you want to use the same UVs or provide different ones :citation[3].
Remember to ensure that any mesh you want to apply a lightmap to has proper UVs for lightmapping, either by enabling the "Generate Lightmap UVs" option or providing your own
Q: how does this relate to reflection probes and/or global illumination?
A: Reflection probes are used to capture the surrounding environment and provide information for real-time reflections on objects in the scene. They sample the visual environment at strategic points, allowing for more convincing reflections with an acceptable processing overhead :citation[1].
Global illumination is a lighting technique that simulates the way light bounces and interacts with surfaces in the real world, creating more realistic lighting in a scene :citation[5]. Lightmaps are used in conjunction with global illumination to store pre-calculated lighting information for static objects in a scene :citation[2].
When you enable the "Generate Lightmap UVs" option, Unity generates a second set of UV coordinates for a mesh that are specifically used for lightmapping purposes :citation[3]. This is important for both global illumination and reflection probes.
Reflection probes can also be used to capture information for real-time global illumination, allowing for more accurate lighting in dynamic scenes :citation[1]. By default, Unity generates lightmap UVs for reflection probes, but you can also provide your own UVs for more control over the lighting in your scene :citation[6].
In summary, the "Generate Lightmap UVs" option is related to reflection probes and global illumination in that it helps ensure proper UV coordinates for lightmapping, which is crucial for accurate lighting and reflections in your Unity scene.
Q: So, you have to have uv's generated. And these uv's can either be user created, or generated via the "generate light map uv" option?
A: Yes, that's correct! In order to use lightmapping in Unity, you need to have UV coordinates generated for your meshes. You can either create your own UVs in your preferred content creation software and provide them to Unity, or you can use the "Generate Lightmap UVs" option in the Mesh import settings to automatically generate UVs for lightmapping purposes.
The "Generate Lightmap UVs" option is a convenient way to quickly generate UVs for lightmapping, but the resulting UVs may not always be optimal for your specific mesh and scene :citation:citation[3]. If you need more control over the UVs for your mesh, it's recommended to create your own UVs in your content creation software and import them into Unity :citation:citation[7].
Regardless of how you generate your UVs, having proper UVs is crucial for accurate lighting and reflections in your Unity scene, especially when using global illumination and reflection probes :citation:citation[8].

0 notes
Text
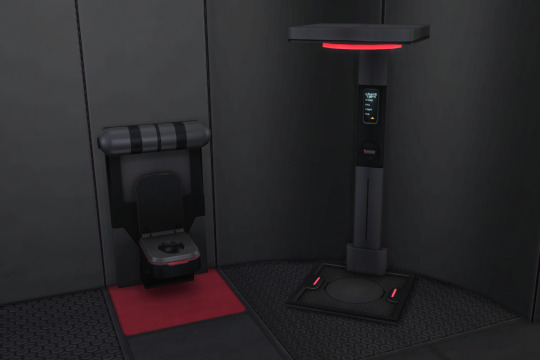
Small status update: after many hours of me yelling at mesh groups and geometry the bathroom part of the Subnautica set is done. I also finally came to loathe lightmaps with all of my pitch black soul.
That said,
Simblr, do we also need the aroma therapy lamp?

I want this thing, but this feels like overkill and just give me an excuse to make one alright?
146 notes
·
View notes
Text
Portfolio, Documentation and Pitch (Aryan Raj Adhikari)
Level Design #3
This will be a very short draft as I just document dressing up the scene with assets that can be handpicked using the VR headset.
If you load the default VR template inside the Unreal Engine, you can pretty much see that the level is baked with blueprints for VR assets. Blueprints in Unreal Engine are a very powerful scripting system that allows developers to create elements of gameplay using a node-based interface.
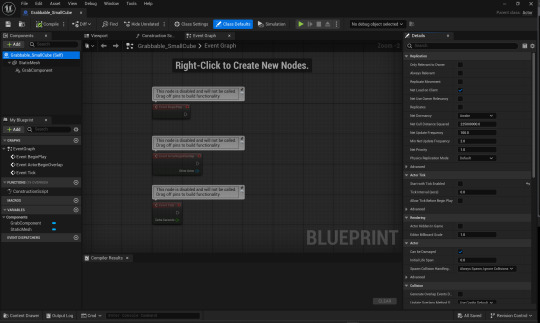
Figure 1 (Grabbable Blueprint)
The default VR level already comes with a grabbable blueprint with a cube primitive for its static mesh. Since the blueprint is already laid out, I didn't need to do any scripting except replace the static mesh with our choice of stylized assets.
Do keep in mind that the assets do need to have materials assigned to them before you assign them to the grabbable blueprint. For demonstration purposes, I assigned the static mesh of the stylized CRT TV and replaced it with the cube.
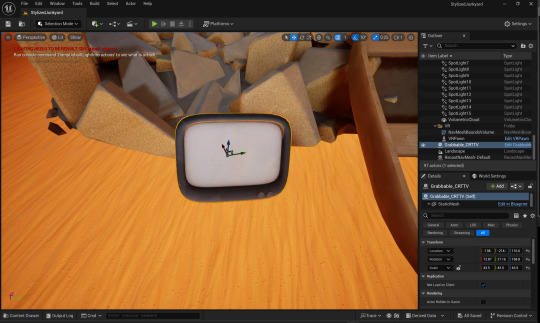
Figure 2 (Grabbable CRT TV)
Be very wary of the lightmap density each assets possesses. As a quick reminder, the color map for the light density should be around the green color. In the picture below, some of the debris pile have a blue color to it, which implies that I need to increase the lightmap density.
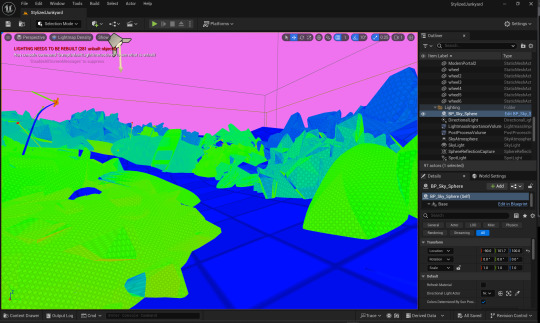
Figure 3 (Lightmap density)
You can increase the density of the lightmaps of the assets by typing "lightmap" in the asset details. Make sure to enable the 'Overridden Light Map Res' and increase the value of the density exponentially with the power of 2.
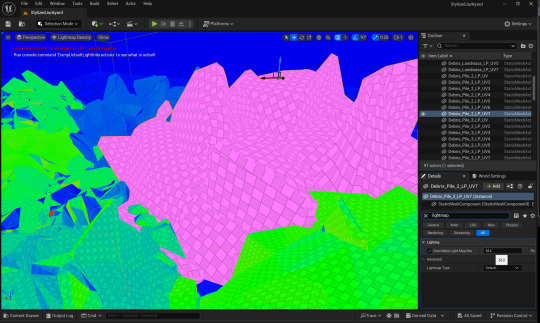
Figure 4 (Increasing lightmap density)
I also add a 'VRPawn' actor to the scene. It acts as a starting point for when we start our VR game for our character. At this point, I am just moving the camera actor around and checking whether I can find a really a good place for our VR character.
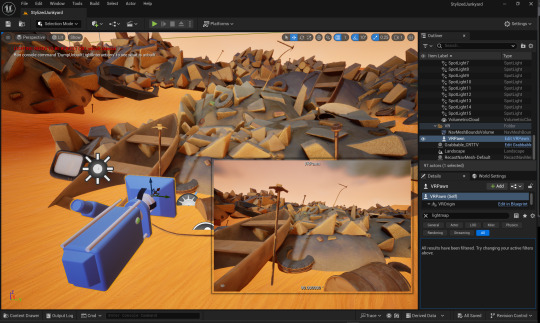
Figure 5 (Adding a VRPawn to the scene)
I am manually placing assets where I deem it fit for the scene. The aim of this theme is to make a VR level with assets from different time periods that can coexist together, and I certainly believe, that I am close to completing the level so that I could move to the most difficult phase, i.e. exporting an apk build for the Oculus Quest 2.
0 notes
Text

One Night in Al Simhara || Behind the Scenes & Director's Notes

The World:
Al Simhara was built in Strangerville using Nando's incredibly busted Get to Egypt mod. (which i tossed sunblind into as well and pulled a few ugly skyscrapers out of) My friend OakieDokieSims built the layout for me since he's fantastic with sight lines and scale (he also built the shells for Val's Lair and the UNIT office) and I finished off the set dressing for all the things I needed to be able to see in game.

I also added a lightmap to the pyramids from the mod so they would glow at night!

The Red Jacket™
There's a couple running themes/motifs in this story that I included. One of them is this red Suitcoat that we see Dick put on at the beginning.


When we cut to 35 years ago, Dick is in white and blue and Chet is the one with the Red Jacket. Dick is a more complicated character. He's my bisexual James Bond- (including all the negative connotations that come from being a sex pest) and I wanted to show how Chet really shaped him into who he became later on in his career.


When we see Force Ghost Chet at the end, he's not wearing his jacket anymore because it's been (metaphorically) passed onto Dick. He's now the confident older Agent that he admired so much. This was the original ending I had planned for him, but when i put all my sims on a lot together Carmela and Dick were instantly extremely attracted to each other and I was like hold on now I got brain worms.

So when he makes the conscious decision to retire in the epilogue we see him return to the blue and white and as a bonus I tried to have Carmela match the neutral tones we see her in in the flashback as well.
Little Notes and Nods:

You can tell a lot about a person from their shoes.

Poignant lyrical accompaniment to Dick pouring out one for the dead abusive homie who still lives rent free in his head.

@aheathen-conceivably cameo #1

Dick getting berated by the fruit stall lady cause i needed a quick snappy way to get him and chet in a closet together

Snapping a quick Dick Pic™ of some classified documents

I hastily added some papers flying around and have decided I now need a papers flying around object re: Natalia Auditore cloud of crows

Strategic Mirror Placement for Staking out Secret Handoffs and staring at cute girls

The first real shot of Chet's face is his reflection in a mirror.

I purposely didn't show Professor Ego's full face during most of the story cause I didn't want to deal with all the HE LOOKS LIKE DOCTOR FACILIER comments. I asked shooby to make him for me and yes he absolutely was based off him. 😂 I only refer to him in text since he was apprehended by UNIT right before the gen 6 story starts, so I thought it would be fun to pull him in for this

I don't think I've ever used Miguel for anything but during a weakness spiral I built Ale 2 houses and made him a massive extended family, and Miguel is his great uncle and also the reason Alejandro is part of the lawful good secret Society of Brilliance in the first place.

chet cheekily checking out ass in more mirror shots

Aheathen Cameo #2 - the case of the magical teleporting Alexis

I made the pose and placed the sign separately but it was such a happy accident i had to scoot it into the shot

Instead of her Magnum, I thought Queenie should have some nasty looking knives to play with. So I whipped up some Liujiao Dao or chinese deer horn knives for her.

bisexual lighting orgasm face

i created this effect on accident by selecting a sim with TOOL and sticking a relight ball in their face. I like how ghostly it looks but doesn't lose any detail.

reds, blues, and more mirrors. I wonder if that means anything.

Cheeky painting swatch switch so the closeup of the hands wasn't just a solid block of red which is not the color we're looking for right now. The bits of red and blue on white are more in tune with the mosaic analogy at the end as well. (which is a direct echo of dick's speech to chad from chet's funeral)

And we've come in a full Jo Stafford musical circle. Nice!
#behind the scenes#one night in al simhara#look im a director in my head ok#or someone who's cooking too much chili and their stove is on fire
87 notes
·
View notes
Text

Valve has released a 20th anniversary update for Half-Life 2.
Half-Life 2 with Episode 1 & 2 are free to own on Steam until November 18, 2024 10AM PT / 1PM ET.
Overview
BRAND NEW INTERVIEWS WITH THE HALF-LIFE 2 DEV TEAM!
Our Half-Life 1 25th anniversary documentary went so well that we invited Secret Tape back to make another one—this time focusing on Half-Life 2. And it's about a lot more than just the making of a game. Running out of money. Getting hacked, and an early version being leaked online. Being sued by our publisher. Trying to build Steam. It's all in there!
youtube
THE 20TH ANNIVERSARY UPDATE FOR HALF-LIFE 2 INCLUDES:
EPISODE ONE AND TWO EXPANSIONS IN THE BOX
Half-Life 2 now includes the complete Episode One and Episode Two expansions along with the base game. They’re accessible from the main menu, and you will automatically advance to the next expansion after completing each one.
HALF-LIFE 2 DEVELOPER COMMENTARY
When we shipped "Lost Coast" a year after Half-Life 2, we included an interactive developer commentary mode to offer interested players a deep dive into the new technology that inspired the demo. We did it again for every Half-Life and Portal game afterwards, but Half-Life 2 itself never had commentary... until now. We got the original HL2 team back together to record brand new commentary tracks for the whole game.
STEAM WORKSHOP SUPPORT
Browse, install, and play user-created content for Half-Life 2 without ever leaving the game. Look for it in the Extras menu!
STEAM GAME RECORDING
Preserve your precious memories of City 17 with the help of Steam! Take a look at the Game Recording timeline in your Steam Overlay for event markers that commemorate big and surprising moments in your playthrough.
UPDATED GAME CONTENT
Every map in Half-Life 2 has been looked over by Valve level designers to fix longstanding bugs, restore content and features lost to time, and improve the quality of a few things like lightmap resolution and fog:
Fixed pops, holes in the world, fading-out and disappearing objects across the game.
Rebalanced the lighting across Half-Life 2 to account for playing with HDR on or off, using the original release as reference.
Cleaner, smoother horizon lines thanks to new radial fog!
Added higher-resolution lightmaps across the game!
Removed green glow from the G-Man model’s eyes in the opening of the game, and restored the reflective glint as seen in the original release.
Fixed missing grass sprites and blacked-out models throughout the game!
UPDATED GRAPHICS SETTINGS
Choose either the original launch day blood and fire effects, or those created for the episodes, when playing the Half-Life 2 base game!
Play with only the highest detail models in High Quality mode!
Get smoother lightmap shadows at Very High shader detail, thanks to new bicubic lightmap filtering!
GAMEPAD, INPUT, AND STEAM DECK UPDATES
Gamepad controls have been updated to match the Half-Life 1 anniversary update.
Aim Assistance has gotten an overhaul making it feel better to use, and there are more configuration options available. Aim Assistance can be enabled separately for gamepad or mouse/keyboard input. The amount of assistance can be tuned up and down, and it’s no longer tied to a skill setting. Want to play on Hard with high aim assist, or Easy with it off? Knock yourself out.
The Steam Deck main menu has been updated with all of today’s additions including the Episodes, Workshop, and new input configuration. The Steam Deck version of the main menu will also appear when you play Half-Life 2 on a PC running Big Picture Mode.
LONG-LOST LOOKS INTO HALF-LIFE 2'S DEVELOPMENT
WATCH OLD VIDEOS FROM THE EARLY DAYS OF HALF-LIFE 2
We rescued these old demos from the hard drives of ancient computers scattered around the office, and are offering them up as high quality videos:
youtube
E3 2003
The demo that revealed Half-Life 2 and the Source engine to the world. This was previously only available as shakycam recorded from our E3 booth, now available as direct capture.
youtube
E3 2002
We built this demo to bring to E3 a year earlier, and then decided at the last minute we weren’t ready to show the game. 20 years later, we’re okay with you seeing this stuff.
youtube
SIGGRAPH 2000
Also known as the “Free TVs” demo, this was shown at the SIGGRAPH computer graphics conference, hot on the heels of the release of the original Half-Life. This is the highest quality video we’ve still got from this era of Half-Life 2’s development.
RE-RAISING THE BAR
A NEW EDITION OF RAISING THE BAR IS COMING BACK INTO PRINT IN 2025, EXPANDED TO INCLUDE THE HALF-LIFE 2 EPISODES
Nearly two decades since it first went out of print, Raising the Bar is set to return with an expanded second edition—offering a comprehensive look into the creation of the Half-Life 2. Originally published in 2004, this book captured the story of Half-Life 2's development but missed the episodic content that followed.
This new edition concludes the Half-Life 2 development story, with never-before-seen concept art from Episode One and Episode Two, along with ideas and experiments for the third episode that never came to be.

---
Looking for something to read right now? The Final Hours of Half-Life 2 was written twenty years ago by Geoff Keighley after spending time in Valve's offices during... you guessed it.
---
BUG FIXES AND CHANGE NOTES
Content
Added 3.5 hours of Developer Commentary by members of the Half-Life 2 team.
Half-Life 2: Episode One and Episode Two are now playable from the Half-Life 2 main menu.
Half-Life 2: Lost Coast has been added to the Extras menu.
Added Steam Workshop support. Play entire campaigns or replace weapons, enemies, UI, and more with content created by the community.
Added custom Steam Game Recording gameplay events and phases throughout the game.
Rendering and Graphics
Fixed issues causing props or entire maps to be fully bright or fully dark depending on settings.
Added bicubic filtering for lightmaps to produce smoother shadows. It can be enabled by setting Shader Detail to Very High.
Fixed missing grass detail sprites in many maps.
Added settings to enable Classic Effects that were originally in Half-Life 2. These effects can also be enabled using r_classic_blood or r_classic_fire.
Added support for radial fog.
Specular reflectivity has been adjusted throughout Half-Life 2 to better match the original release.
Updated models for the Crossbow and RPG weapons to support ultrawide displays.
Fixed camera clipping into vehicles at high FOV settings.
Fixed lambda cache indicators and other decals vanishing when backtracking through map transitions.
Setting Model Detail to High will now always display the highest detail version of a model and never swap for a lower level-of-detail.
Set Antialiasing to 4x MSAA by default.
Fixed teeth shader rendering fully white on some GPUs.
UI and Options
The UI now scales to support higher resolutions.
Launching the game in Steam Big Picture mode will now use the gamepad-friendly UI previously available on Steam Deck. You can also launch this mode with the "-gamepadui" launch option.
The High Dynamic Range setting has been moved to the main Video settings page.
Commentary mode can now be enabled on the New Game screen.
Fixed display of greyscale art for locked achievement icons to match their behavior in steam.
Improved legibility of gamepad button icons.
Button hints will now prefer to display standard face buttons and trigger icons only. This behavior can be disabled with the "sc_prefer_basic_origin_hints" convar.
Replaced instances of system fonts like Verdana throughout the UI with a new font, GorDIN.
Added a new font renderer that provides more consistent rendering between platforms.
Fixed edges of certain font characters being cut off with antialiasing enabled.
Fixed scrollbars and button animations using inverted colors.
Removed the non-functional "Use 'bloom' effect when available" setting.
Added Rich Presence info while playing Half-Life 2.
Input
Updated the default Steam Input configuration.
Added a Gamepad settings menu.
Added the ability to select a weapon selection UI style while using a gamepad.
Added settings for separate Aim-Assist modes for mouse/keyboard and gamepad. The new Aim-Assist "Enhanced" mode now attempts to track enemies and snap-to-target while driving vehicles.
If using toggle crouch, pressing sprint will now make the player stand.
Legacy joystick settings have been removed from the Mouse settings menu.
Gameplay
Reduced chances of birds getting stuck in the world.
Fixed Combine crouching behavior during door assault scene.
Fixed Combine not firing in some cases during the finale.
Game sounds and music now pause while the game is paused.
Fix crash that can occur if the player gets too far ahead of the helicopter in canals.
Fixed Dr. Breen not looking at the camera in certain broadcasts.
Fixed smooth friction sounds not playing.
General Map Updates
Full HDR lighting and tonemapping pass across every map in Half-Life 2 and Half-Life 2: Deathmatch.
Increased lightmap resolution in most maps.
Adjusted rendering distances across the game so details and objects remain visible much further away.
Removed Far-Z clip plane from most maps.
Increased window and door fade distances.
Improved lighting and world detail inconsistencies during many map transitions.
Tuned fog and skyboxes for every map with water on the horizon for better horizon blending.
Replaced instances of simple reflective water with fully reflective water in nearly every map.
Fixed many instances of floating props across the game.
Sewed up holes, aligned textures, and fixed seams on many displacements throughout the game.
Swapped some distant trees out for higher detail models.
Enabled shadows on many static props that were missing them.
Added glow sprites to all lights that were missing them.
Fixed lightmapping for many large static prop structures.
Added simple rooftop geometry to background buildings that were missing them.
Added background displacement geometry to areas which are now exposed by removed the clipping plane.
Specific Map Updates
The introduction sequence has been adjusted to closely match the original sequence, including fixing specular highlights on the G-Man's eyes.
Fixed various texture seams on train station wall
All fences now properly cast shadows.
Fixed issues with level transitions setting fog values improperly.
Removed emissive value from base of lighting prop which was glowing in strange places.
Fixed a bug with Eli's idle animations during the teleport sequence.
Fixed lightmapping of train cars in Red Letter Day and Route Kanal.
Fixed a rendering bug in Route Kanal where world geometry would pop in and out of view when looking down the tracks.
Aligned pipe and canal wall textures in a few areas to reduce seams and misalignment in Route Kanal.
Added and adjusted canal wall brushes where level geometry was conspicuously missing.
Adjusted brightness and falloff of ambient lights in darker sections of the canals.
Added small grates as dim light sources of ambient light in a few places in the canals.
Fixed an issue where the splash for Manhack Matt's jump into the water would be out of sync.
Fixed a bug where the large brick smokestacks were popping in and out depending on the player's position in Water Hazard.
Added missing cables to utility poles in various canal maps.
Fixed lighting and shadows on the dock and electric tower outside of Black Mesa East.
Added displacements and water plane to 3D skybox near the dam entrance to replace simple brush cliff face.
Fixed the lighting on the rocks and props in and around the Ravenholm graveyard.
Fixed players being able to trap themselves in the graveyard by closing the gate after Gregori would open it.
Added radial fog to all coast maps in the Highway 17 chapter.
Removed area portals from many of the smaller structures along Highway 17.
Fixed a crash that would occur if you parked the buggy in certain areas before entering the bridge level.
Fixed a bug where Vortigaunts could fall through the world.
Added simple 3D skybox representation of the next map visible from the top of the lighthouse in Sandtraps.
Fixed lighting issues during the basement flare sequence in Nova Prospekt.
Added additional geometry to various windows throughout the levels to cast more detailed shadows in Nova Prospekt.
Fixed a bug in teleport sequence in Entanglement ending too early leaving Gordon and Alyx standing around while the teleporter reached its destination.
Fixed the catwalk explosion detonating at the wrong time in Anticitizen One.
Fixed the building dome having no polygons on the outstide in Follow Freeman.
Fixed the ship visibly flying through the building dome in Follow Freeman.
Fixed Barney being left behind during a level transition or nagging the player too early to "roll a grenade" in Follow Freeman.
Improved resolution of portal render texture during finale.
Added soundscape to all menu background maps
Darkened parts of the skyboxes that fall behind Half-Life 2 logo to help with text legibility.
Added geometry to menu background maps for Ultrawide support.
Added smoke to the Ravenholm and Follow Freeman background maps.
Fixed a bug where you could hear the player's bones break in the Citadel menu background map.
Half-Life 2: Deathmatch Fixes
Fixed player model selection in the options menu.
Fixed slam not being able to be detonated if you were too close to a wall
Fixed view bob with the SMG equipped.
Fixed using the Gravity Gun to yo-yo grenades, sometimes causing the server to disconnect or crash.
Fixed missing sound effects for the Gravity Gun.
Fixed characters playing a missing animation when switching weapons while jumping and moving.
Fix weapons being invisible when being given another weapon of the same class.
Half-Life 2: Deathmatch Maps
Increased player spawn point count in many maps.
Fixed prop placement in maps that would allow players to escape the world.
Fixed floating props in dm_runoff.
Fixed the area portal on the blast door in dm_runoff causing the world to no longer render when the door was shut.
Added geometry to many maps where the player could see outside of bounds.
Fixed several areas where the player could see out of the world.
Moved the blue barrels in dm_resistance that you could pick up with the Gravity Gun through the chainlink doors.
Other
Improved quality of the Valve intro movie when launching the game.
Fixed playback of the the post-credits movie at the end of Episode One and the intro movie at the start of Episode Two.
The achievements for Episode One and Two have been added to Half-Life 2. When launching the game it will attempt to read data from installed standalone Episodes to re-grant those duplicated achievements.
Hammer: Show detail sprite preview on non-displacement surfaces.
Hammer: Fixed bug where orphaned entities added additional data on each map load.
Hammer: Fixed the ability to render cubemaps.
Hammer: Increased many limits for BSP data. Models 1024 -> 2048, Brushes 8192 -> 16384, TexInfo 12288 -> 16384, TexData 2048 -> 8096, DispInfo 2048 -> 8096.
Added save_transition_music convar that allows streaming music to continue to play in between level transitions.
Localization files updated.
Miscellaneous security fixes.
Notes
The previous version of the game has been archived to a publicly visible Beta branch named "steam_legacy", with the description "Pre-20th Anniversary Build." If a mod or feature is behaving in an unexpected way, you may need to run this archived build until the issue is resolved in the default build.
With the Episodes and Lost Coast now contained within Half-Life 2 itself, we'll be reducing the visibility of the standalone versions on the Steam Store. The old standalone applications will remain available to ensure community projects that rely on them still function properly but they will now appear within the Tools menu on your Steam Library.
WALLPAPERS
Celebrate 20 years of Half-life 2 by decorating your desktop and mobile phone.


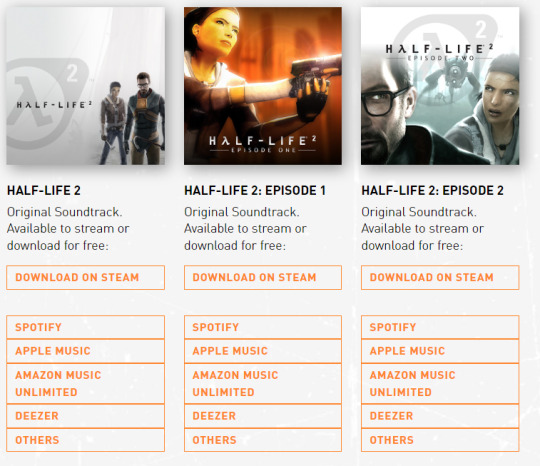
HALF-LIFE 2 SOUNDTRACKS
#Half Life 2#HL2#Half Life#Valve#Valve Corporation#video game#Steam#PC#free games#late post#long post
25 notes
·
View notes
Text
Chapter 24: Optimize lighting settings for bake performance
24.1 Realtime Global Illumination
Impact: high. Enabling this checkbox enables Enlighten realtime global illumination. Not only does it increase baking times, but also incurs a runtime cost.
Do not enable this checkbox unless you need realtime global illumination in your scene or have a specific use case necessitating both realtime and baked global illumination.
24.2 Baked Global Illumination
Impact: high. Enabling this checkbox enables baked global illumination using the Progressive Lightmapper. It increases baking times but incurs minimal runtime cost.
Do not enable this checkbox if you are already using realtime global illumination.
24.3 Lighting Mode
Impact: low. This dropdown contains three properties: Baked Indirect, Subtractive, and Shadowmask. None of which have a major impact on baking performance. All three incur a runtime cost, Shadowmask being the least performant, Subtractive being the most performant, and Baked Indirect being somewhere in-between.
When selecting Shadowmask, Unity will generate an extra texture known as shadow mask. This will not increase bake times but will increase memory requirements.
24.4 Progressive Updates
Impact: medium. When you enable the Progressive Updates, Progressive Lightmapper will process all lightmaps that are currently in view. Scenes containing many lightmaps will bake slower as a result.
Enable this checkbox while iterating on your lighting. Disable it for final quality bakes.
24.5 Importance Sampling
Impact: low. Reduces noise when using high contrast HDRIs. Disable this checkbox if you use low contrast environment lighting.
24.6 Direct Samples
Impact: high. Controls how many rays the lightmapper shoots towards light sources. Keep this value low, unless soft shadows in your scene are noisy.
24.7 Indirect Samples
Impact: high. Controls how many paths a texel can spawn. The Max Bounces value acts as a modifier. Keep this value low, unless indirectly lit areas are noisy, and emissive objects produce a lot of noise.
24.8 Environment Samples
Impact: medium. Controls how many rays the lightmapper shoots towards the environment. Keep this value low, unless areas lit by the environment are noisy.
24.9 Light Probe Sample Multiplier
Impact: low. Improves the quality of lighting data stored within light probes. Stop increasing this value once the adjacent probes are somewhat homogenous in color.
24.10 Max Bounces
Impact: high. Determines the maximum number of steps (bounces) each path can take. Will increase bake times linearly.
24.11 Filtering
Impact: medium. Enables users to reduce noise using discrete filters or AI-powered denoisers. Impact on baking performance varies depending on the filtering and denoising combination used.
Set this dropdown to None for the fastest iteration speed and troubleshooting. Enable filtering for production quality bakes.
24.12 Lightmap Resolution
Impact: high. Increases bake times in a quadratic fashion. In other words, increasing the resolution from 1 to 2 will increase the bake times by four times. It is important to keep this value as low as possible.
The Occupied Texels string at the bottom of the Lighting window reports the number of texels Progressive Lightmapper needs to process. One million texels should still be very fast, but iteration times will suffer at eight million and higher.
24.13 Anti-aliasing Samples
Impact: high. This value is accessible via the Lightmap Parameters Asset. It impacts the memory used during the bake, as well as the bake preparation time, and the total bake time.
Keep this value low - or disable it - unless your baked shadows suffer from stair-stepping artifacts (aliasing).
0 notes
Text


i've decided to release this old model i made from 2023 as p2u download. your support from purchasing this model is very much appreciated! if you're unable to do so, that's alright too!
this model is compatible with manashiku's mmdgenshin shader. lightmap and shadow ramp are provided, however fx material file is excluded to respect manashiku's terms of use for their shader.
=======================================
Links to purchase the model:
Ko-Fi Booth.pm
=======================================
Terms of Use (Section B) Please use the model accordingly to Hoyoverse's character guideline.
11 notes
·
View notes
Note
hi! i know you said you don't typically want to rip the PT but i was just curious if you'd still be willing to share them since i like the texture work in p5x better in terms of lightmaps and also the face models.
Actually, the last person who asked me about them did convince me that they're apparently higher quality models than the ones used even in P5D, based on what they were saying? I can see why people want them specifically, now, so I'm planning to grab the models next time an update forces me to go through the full game files anyway. I'll make a post when that happens!
7 notes
·
View notes
Text

The Genshin shader I built seems to transfer really well to the Star Rail models with minimal adjustments— mainly just the group for the face shadows since the way the faces are modeled is where they differ the most. Which is good because if I had to rebuild that entire thing from scratch I'd go crazy, haha.
Would look even better if I had the lightmaps and normal maps for these guys but even still it's working pretty good. I've been digging around online trying to find those textures but so far no dice.
#honkai star rail#sunday hsr#him and Gallagher made me go insane after that last scene in 2.1 so here i am setting them up to use#wip stuff
26 notes
·
View notes