#mb tutorial
Explore tagged Tumblr posts
Visit Tumblr Blog
Explore Tumblr blogs with no restrictions, modern design and the best experience.
Last Seen Tumblr Blogs


Fun Fact
Total funding amounts to $125.3M.
Text
🔎𝗚𝖱𝖠𝖣𝖨𝖤𝖭𝖳 𝗧𝖤𝖷𝖳 𝓣𝗎𝗍𝘰𝗋𝗂𝖺𝗅 ; 𝓑𝐲 𝐋𝐢𝐚
ʚ₍ᐢ. .ᐢ₎ɞ Requested by: anonymous
Resume: Two-Color Gradient Text Tutorial in Four Simple Steps (˶ᵔᴗᵔ˶) credits to @iluvrei i learned it thanks to her!♡

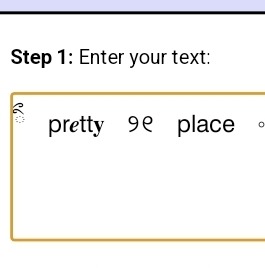
•Step 1
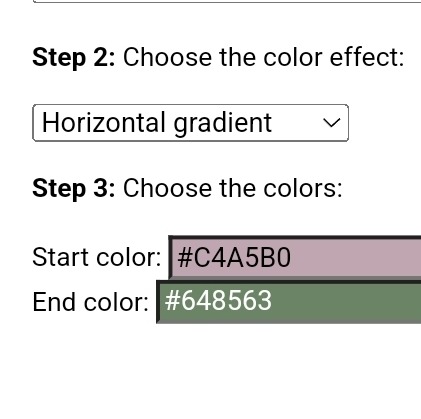
enter to Bbcode and HTML text colorizer (web) enter your text and choose 2 colors for your text ₍⑅ᐢ..ᐢ⑅₎ but you can configure if you want the gradient to be horizontal or vertical

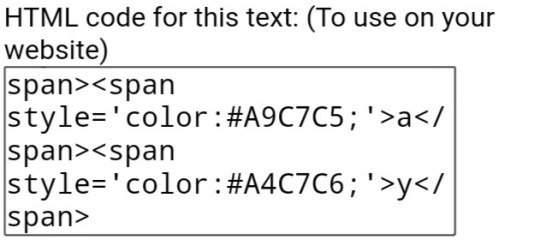
• Step 2
Copy your code text HTML mode (scroll down to copy everything) important step
• Step 3
If you are on the phone go to the tumblr website but if you are on a computer just go to create post and we will go to the post configuration


will go to this option and activate it in the HTML editor we go back to our post and paste the previous text code

•Step 4
We save the draft and that's it ;) your text will be ready to use
Thanks for reading I hope it helps you!♡ (˙ᵕ˙ ) (just ask if you need a tutorial of something)
36 notes
·
View notes
Text
🥖 𝓨𝗈 𝗍𝖾𝗇í𝖺 𝗎𝗇𝖺 𝖾𝗌𝗉𝖾𝗋𝖺𝗇𝗓𝖺 ᭪ᬻ𓏸𓈒゚⃝
𝅄 ི۪۪۪ ֯ ּ ֗ ۫ 𝖤𝗇 𝖾𝗅 𝖿𝗈𝗇𝖽𝗈 𝖽𝖾 𝗆𝗂 𝖺𝗅𝗆𝖺 𝅘𝅥𝅮♪ ˟̫ː᜴ 🍰


#꒰ atsubie ꒱ ౨ৎ︵⠀⠀#heres how the mb from my tutorial turned out ☆#ㅤㅤㅤㅤㅤㅤㅤㅤㅤㅤㅤㅤㅤㅤㅤㅤㅤㅤㅤㅤㅤㅤㅤㅤㅤㅤㅤㅤㅤㅤㅤㅤㅤㅤㅤㅤㅤㅤㅤㅤㅤㅤㅤㅤㅤㅤㅤㅤㅤㅤㅤㅤㅤㅤㅤㅤㅤㅤㅤㅤㅤㅤㅤㅤㅤㅤㅤㅤㅤㅤㅤㅤㅤㅤㅤㅤㅤㅤㅤㅤㅤㅤㅤ#stayc layouts#stayc moodboard#stayc j#kpop icons#kpop layouts#messy moodboard#kpop themes#kpop moodboard#kpop aesthetic#alternative moodboard#alt moodboard#colorful moodboard#yellow moodboard#pink moodboard#indie moodboard#y2k moodboard#fresh moodboard#nature moodboard#soft moodboard#simple moodboard#maximalist moodboard#retro moodboard#vintage moodboard#dark moodboard#edgy moodboard#divider by im4yeons
216 notes
·
View notes
Note
I would love insight into how you animate so smoothly in gmod
hi!! so i use the ragdoll mover and the stop motion helper add-ons :D

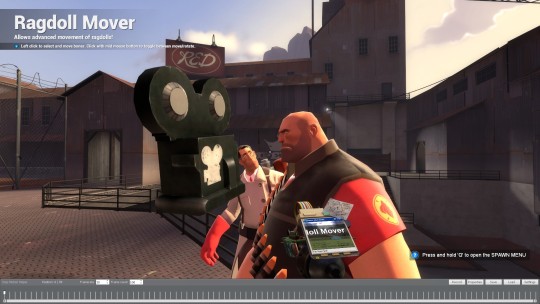
you use the timeline seen on the bottom of the screenshot to create your key frames and everything else in between ☝️ now i am no pro animator and what little i know ive picked up from various tutorial videos over the years....
stop motion helper has a great video tutorial for the very basics of how to use it! as for the process of animation itself well ummm i can really only link the 12 principles of animation, as i've mentioned that im no expert on the topic.
here's a video i made for the occasion--and i hope you don't mind, but i borrowed bolts for this demonstration ^_^ (i recognize the irony of using a robot to demonstrate fluid movements, but if other animators can use mannequins...)
youtube
had to put the video (unlisted ofc) on yt cause it got longer than i expected it to >_>
see the finished product below the cut!! had 2 mega compress it bc of tumblr's 10mb gif limit grrr but you can see it more clearly in the video anyway

#asks#tf2#team fortress 2#gmod#garry's mod#animation#my art#ANYWAY I HOPE THIS HELPS..#i havent done an art tutorial in a dogs age#also i had to mega compress the gif bc it was originally 119 mb...bolts too big for the post#i love ur robot guys btw i hope that much is clear hehe#edit: ik bolts is the boss type soldier bot but i. i needed him smaller so i didnt have to stand on a box while animating him LOL
102 notes
·
View notes
Text
Cider, playing video games: What is "Jairotut"? Chronos: .... Tutorial?
#this is a real thing that happened to me and my sibling unfortunately#to their defense tutorial WAS spelled backwards#also mb i forgot the queue again#source: incorrect undertronic quotes#undertronic cider#undertronic chronos
11 notes
·
View notes
Text
first draft of 1/3 zines i’m making exploring queerness/tenderness/eroticism etc etc in “macho” sports (: definitely want to change around text positioning for legibility and some colors but ! very fun!
#lmk if u see any photos u want the source for or want the tutorial i used for making this :3#recommend it was very fun#silly little fidget toy…#when i have a finalized version i’ll upload the edited photos#and the template if anyone wants to print it themselves mb#yap yap yapping
31 notes
·
View notes
Text
Crazy to me still that the dragon tears are just something you can not do
#like. my first playthrough. i did start the quest but i couldnt find the tear location (wasnt really looking very hard probably)#so i just. left. i didnt come back ever because i straight up didnt think the tears were important#the only reason i saw them before i completed the game was because i was putting off fighting ganondorf. wanted something else to do.#like imagine. you get the master sword from the random dragon (dont know shit about it). maybe this is before the fight or during.#then this dragon just sticks around and helps you. and then?? that guy from the tutorial and the sages memories shows up.#and then this random woman youve never seen before. and then fucking zelda is there somehow???????#crazy.#mb's two am rambling#totk
2 notes
·
View notes
Text


𝐋𝐞𝐬𝐬𝐨𝐧 #𝟏
Gradient text tut (remake + explained more clearly)
I use this website
I use a phone & I’m on browser so I’m not sure if it’s gonna be the same for other devices
Step 1 : Type in whatever you want! And add the colors, you can click or tap 4 to see more options of how many colors you want, mine is 4 but it might not be the same for you, but I’m not gonna change it
Step 2: After your done, click or tap generate color faded text


Step 3: now your screen should look like this! After that, press select all then copy.


Step 4: go back to tumblr and create a post
step 5: click the gear at the top, then at text editor tap it and click html


Now it should look like this, then press save as draft. And on the right is the final product !!


15 notes
·
View notes
Text
god i wish i could tolerate the combat in star rail the robot cowboy has me in an insane chokehold
#i tried it a couple weeks ago and was so excited but#as soon as i got to the combat tutorial i was like uh oh. i hate this#idk i was expecting space genshin i guess mb
0 notes
Text
YEAAAAAAHHHH MY BANG DREAM ACCOUNT WASNT GONE FOREVER ‼️‼️‼️‼️
#I’m so happy abt this tbh#I’ve had this account since 2018-2019#I was almost at level 100 apparently and last year I tried to transfer my account to my iPad from my phone#but bc I used shitty dorm wifi the download quit halfway through the transfer#so it tried to take me to a tutorial and told me that my old account was gone#so I sent a message through the app to support but they never got back to me#and today I finally decided yk what I’m ready for a new account#and it loaded 3k mb onto the app or smth#it was some crazy number so I let it download#and when it was done I opened the app… and I was at LEVEL 94 BABY!!! MY OLD ACCOUNT WAS BACK 😭#I was so happy it had all my song progress and most importantly it had my FAVORITE CARD OF WLL TIME#it’s an 4star ako nurse card from one of the Halloween gachas and I got really lucky to get her and I thought she was gone 😭#bandori#bang dream
0 notes
Text
actually making a full post about it instead of just putting it in the tags.
if you've never done it before: try making gifs. work your way through tumblr tutorials, find a photoshop clone or crack the original, pirate the thing you're making a gif of, figure out how to color, how to sharpen, how to export, and then despair as you realise that your gif is way too big for tumblr's mb limit.
I mean this genuinely.
trying your hand at a creative process you do not understand or have simply never had much interest of your own in will do leagues to help you gain further insight in and appreciation for the craft, the artwork, and the people behind it.
this goes for everything; try drawing art. try writing fic. hell, try writing a fan song! you might be surprised by how hard it is – you might be surprised to find that you enjoy the challenge.
and this doesn't just apply to fandom: art as a whole is a labour of love. and once you see the labour behind the pieces of art you enjoy, you will feel the love instilled in them even more.
#alex rambles#911 discourse#just felt important to say#gifmaking#ive made gifs once or twice. it was hell. like fun. but also hell. thats art for you.
271 notes
·
View notes
Text
My GIF Making process: Screen capturing using MPV player, Organizing files, 3 Sharpening settings, Basic Coloring PSD + Actions set

This is a very long post so heads up.
I’ll try to be as thorough and true as much as possible to the way I make my gifs (I already use Photoshop Actions which I’ve long since set up but now for this tutorial I’m reviewing them to show you the exact steps I’ve learned to create my gifs 😃) and present them to you in a semi-coherent way. Also, please bear with me since English is my second language.
First things first. Below are the things and tools we need to do this:
Downloaded 4K or 1080p quality videos (let’s all assume we know where to get these—especially for high definition movies and tv series—so this post doesn’t get removed, okay? 😛)
Adobe Photoshop CC or the CS versions can work as well, but full disclosure I haven’t created gifs using the CS versions since 2020. I’m currently using Adobe Photoshop 2024.
mpv player. Use mpv player to get those frames/screenshots or any other video player that has a screen grabber feature. I’ve used adapter for the longest time but I’ve switched to mpv because the press to screenshot feature while the video is playing has been a game changer not to mention ultimate time saver for me. For adapter you need to play it in another video player (like VLC player), to get the start and end timestamps of the scene you want to gif which takes me ages before I can even open Photoshop.
Anyway! Please stop reading this post for a moment and head over to this amazing tutorial by kylos. She perfectly tells you how to install and use mpv player, both for Mac and Windows users.
One thing I have to share though, I had a tough time when I updated my MacOS to Sonoma since MPV is suddenly either duplicating frames or when I delete the duplicates the player seems to be skipping frames :/ I searched and found a solution here, though it didn’t work for me lol. My workaround for this in the meantime is decreasing the speed down to 0.70 then start screenshotting—it’s not the same pre Sonoma update but it works so I’ll have to accept it rather than have jumpy looking gifs.
Now, after this part of kylos’ tutorial:

you can continue reading the following sections of my gif tutorial below.
I want to share this little tip (sorry, this will only cater to Mac users) that I hope will be helpful for organizing the screenshots that MPV saved to the folder you have selected. Because believe me you don’t want to go through 1k+ of screenshots to select just 42-50 frames for your gif.
The Control + Command + N shortcut
This shortcut allows you to create a new folder from files you have pre-selected. As you can see below I have already created a couple of folders, and inside each folder I have selected screenshots that I want to include in one single gif. It's up to you how you want to divide yours, assuming you intend to create and post a Tumblr gifset rather than just one gif.

Another tip is making use of tags. Most of, if not all the time, I make supercorp gifs so I tag blue for Kara and red (or green) for Lena—just being ridiculously on brand and all that.
Before we finally open Photoshop, there's one more thing I want to say—I know, please bear with me for the third? fourth? time 😅
It's helpful to organize everything into their respective folders so you know the total number of items/frames you have. This way, you can add or delete excess or unnecessary shots before uploading them in Photoshop.
For example below there are 80 screenshots of Kara inside this folder and for a 1:1 (540 x 540 px) Tumblr gif, Photoshop can just work around with 42-50 max number of frames with color adjustments applied before it exceeds the 10 MB file size limit of Tumblr.

Sometimes I skip this step because it can be exhausting (haha) and include everything so I can decide visually which frames to keep later on. You'll understand what I mean later on. But it's important to keep the Tumblr 10 MB file size limit in mind. Fewer frames, or just the right amount of frames, is better.
So, with the screenshot organization out of the way, let's finally head over to Photoshop.
Giffing in Photoshop, yay!
Let’s begin by navigating to File > Scripts > Load Files into Stack…

The Load Layers window will appear. Click the Browse button next.
Find your chosen screenshots folder, press Command + A to select all files from that folder then click Open. Then click OK.
After importing and stacking your files, Photoshop should display the following view:

By the way, I'll be providing the clip I've used in this tutorial so if want to use them to follow along be my guest :)
If you haven't already opened your Timeline panel, navigate to Windows > Timeline.
Now, let's focus on the Timeline panel for the next couple of steps.
Click Create Video Timeline, then you’ll have this:

Now click the menu icon on the top right corner then go to Convert Frames > Make Frames from Clips

Still working on the Timeline panel, click the bottom left icon this time—the icon with the three tiny boxes—to Convert to Frame Animation
Select Make Frames From Layers from the top right corner menu button.
So now you have this:

Go and click the top right menu icon again to Select All Frames
Then click the small dropdown icon to set another value for Frame Delay. Select Other…

The best for me and for most is 0.05 but you can always play around and see what you think works for you.
Click the top right menu icon again to Reverse Frames.
I think Photoshop has long since fixed this issue but usually the first animation frame is empty so I just delete it but now going through all these steps there seems to be none of that but anyways, the delete icon is the last one among the line of feature buttons at the bottom part of the Timeline panel.
Yay, now we can have our first proper GIF preview of a thirsty Lena 😜

Press spacebar to watch your gif play for the very first time! After an hour and half of selecting and cutting off screenshots! 😛 Play it some more. No really, I’m serious. I do this so even as early (lol) as this part in the gif making process, I can see which frames I can/should delete to be within the 10 MB file size limit. You can also do it at the end of course 🙂
Now, let’s go to the next important steps of this tutorial post which I’ve numbered below.
Crop and resize to meet Tumblr's required dimensions. The width value should be either 540px, 268px, or 177px.
Convert the gif to a Smart Object for sharpening.
Apply lighting and basic color adjustments before the heavy coloring. I will be sharing the base adjustments layers I use for my gifs 😃.
1. Crop and Resize
Click on the Crop tool (shortcut: the C key)

I like my GIFs big so I always set this to 1:1 ratio if the scene allows it. Press the Enter key after selecting the area of the frame that you want to keep.
Side note: If you find that after cropping, you want to adjust the image to the left or another direction, simply unselect the Delete Cropped Pixels option. This way, you will still have the whole frame area available to crop again as needed and as you prefer.
Now we need to resize our gif and the shortcut for that is Command + Opt + I. Type in 540 as the width measurement, then the height will automatically change to follow the ratio you’ve set while cropping.
540 x 540 px for 1:1
540 x 405 px for 4:3
540 x 304 px for 16:9
For the Resample value I prefer Bilinear—but you can always select the other options to see what you like best.
Click OK. Then Command + 0 and Command + - to properly view the those 540 pixels.

Now we get to the exciting part :) the sharpen settings!
2. Sharpen
First we need to have all these layers “compressed” intro a single smart object from which we can apply filters to.
Select this little button on the the bottom left corner of the Timeline panel.


Select > All Layers
Then go to Filter > Convert for Smart Filters
Just click OK when a pop-up shows up.
Now you should have this view on the Layers panel:

Now I have 3 sharpen settings to share but I’ll have download links to the Action packs at the end of this long ass tutorial so if you want to skip ahead, feel free to do so.
Sharpen v1
Go to Filter > Sharpen > Smart Sharpen…
Below are my settings. I don’t adjust anything under Shadows/Highlights.
Amount: 500
Radius: 0.4
Click OK then do another Smart Sharpen but this time with the below adjustments.
Amount: 12
Radius: 10.0

As you can see Lena’s beautiful eyes are “popping out” now with these filters applied. Click OK.
Now we need to Convert to Frame Animation. Follow the steps below.
Click on the menu icon at the top right corner of the Timeline panel, then click Convert Frames > Flatten Frames into Clips
Then Convert Frames > Convert to Frame Animation
One more click to Make Frames From Layers
Delete the first frame then Select All then Set Frame Delay to 0.05

and there you have it! Play your GIF and make sure it’s just around 42-50 frames. This is the time to select and delete.
To preview and save your GIF go to File > Export > Save for Web (Legacy)…
Below are my Export settings. Make sure to have the file size around 9.2 MB to 9.4 MB max and not exactly 10 MB.

This time I got away with 55 frames but this is because I haven’t applied lighting and color adjustments yet and not to mention the smart sharpen settings aren't to heavy so let’s take that into consideration.
Sharpen v1 preview:

Sharpen v2
Go back to this part of the tutorial and apply the v2 settings.
Smart Sharpen 1:
Amount: 500
Radius: 0.3
Smart Sharpen 2:
Amount: 20
Radius: 0.5
We’re adding a new type of Filter which is Reduce Noise (Filter > Noise > Reduce Noise...) with the below settings.

Then one last Smart Sharpen:
Amount: 500
Radius: 0.3
Your Layers panel should look like this:

Then do the Convert to Frames Animation section again and see below preview.
Sharpen v2 preview:

Sharpen v3:
Smart Sharpen 1:
Amount: 500
Radius: 0.4
Smart Sharpen 2:
Amount: 12
Radius: 10.0
Reduce Noise:
Strength: 5
Preserve Details: 50%
Reduce Color Noise: 0%
Sharpen Details: 50%
Sharpen v3 preview:

And here they are next to each other with coloring applied:
v1

v2

v3

Congratulations, you've made it to the end of the post 😂
As promised, here is the download link to all the files I used in this tutorial which include:
supercorp 2.05 Crossfire clip
3 PSD files with sharpen settings and basic coloring PSD
Actions set
As always, if you're feeling generous here's my Ko-fi link :) Thank you guys and I hope this tutorial will help you and make you love gif making.
P.S. In the next post I'll be sharing more references I found helpful especially with coloring. I just have to search and gather them all.
-Jill
#tutorial#gif tutorial#photoshop tutorial#gif making#sharpening#sharpening tutorial#photoshop#photoshop resources#psd#psd coloring#gif coloring#supercorp#supercorpedit#lena luthor#supergirl#my tutorial#this has been a long time coming#guys. i'm BEGGING you. use the actions set - it was a pain doing all this manually again ngl LMAO#i've been so used to just playing the actions#so this has been a wild refresher course for me too 😆
638 notes
·
View notes
Text
Here's the tutorial that was promised! Not the best of the absolute best but this simplified tutorial is meant to be a starting point. This isn't the end all be all and if you guys have any suggestions or questions please don't hesitate to ask in the comments!
(P.S. compressed to hell and back to fit Tumblr's stupid 500 MB limit)
Image source: https://x.com/kumada_gaon/status/1908821987595551098/photo/1
#cardiophile#cardiophilia#heartbeat#female heartbeat#edit#xray#manga#fast heartbeat#fanart#notmine#tutorial
87 notes
·
View notes
Text
Starting another game of Twilight Princess 👍
#trying anyway. the tutorial is so fucking long i might give up halfway through#mb's two am rambling
6 notes
·
View notes
Text
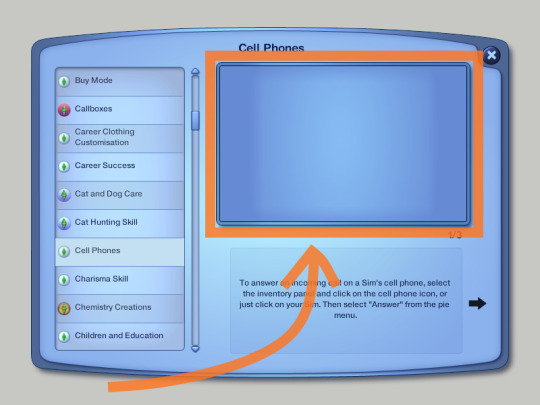

Remove Tutorial and Beta Images - To attempt to reduce RAM load by Dandelion Sprout
"I noticed during various testing of system graphics options that gameplay and framerate slowdowns were somewhat proportional to how much RAM that Windows Control Panel showed that the game was using. In detailed worlds the game can hit 2.9 GB RAM use, at which point the game begins struggling more than usual with Error 12, astoundingly long loading/saving times, or simply crashing to desktop.
So I began pondering, how would it be possible to try to reduce the heavy taxing on the RAM allocations? I landed on trying to remove images (by creating 1x1px transparent images to override them) that would be unnecessary for core gameplay by expert Sims 3 players, mostly across 2 categories:
Images used in the "Tutorials" menu, as they accounted for around 100 MB in total.
Beta build images and placeholder images for vanilla Sims 3 that were still present in the release version's "FullBuild0" assets. Accounts for around 25 MB
...continued + more pictures on MTS."
More Info + Download @ MTS.
151 notes
·
View notes
Note
hi I really like your mb and I'm new here. Do u have any suggestions or tips to make mb? like where did u get the pics and the captions.
𝓜oodboards: a guide for beginner blogs!
I decided to bring here a small tutorial that can help other blogs that are starting out and still have questions that need clarification, with tips and links that you may need. I wrote this from my point of view of creating moodboards and I tried to be as brief as possible in my explanation, there may be errors in English as I'm not fluent in that language and everything here was translated using Google Translate, any questions you can contact me via asks or by message.

how do I find pics for moodboards?
Pinterest is where you will find most images for moodboards, so create a Pinterest board just for these images, separating them into subboards for each color or aesthetic to make it easier.
Some blogs leave the link to their Pinterest accounts in pinneds or in the carrd, you can follow them and save the pics they published on the app in your boards, this will influence the Pinterest algorithm so that they recommend more of the type of images you want.
You can also search on Pinterest for the aesthetic and color you want (coquette pink aesthetic, cottagecore aesthetic, y2k, etc.).
how to make moodboards + tips:
Well, it's not such a complicated thing for me. I generally make moodboards with 6 or 9 images, taking inspiration from the moodboards of other blogs that I admire, so I can get an idea of how to make the captions and how to position the photos in a way that matches them.
To make it easier, first I create the moodboard and then I look for an icon of a kpop idol that can match the aesthetics and color of the moodboard. The reverse can also be done: first choose an icon and make a moodboard for that image, paying attention to the color palette and tonality (and for some reason, for me it's better to create moodboards in Tumblr's light mode instead of dark mode)
When I finish the moodboard, I add the caption, the hashtags (which will be very important for your post to reach other people) and maybe a divider. You can find these dividers on other blogs or by searching for "dividers" on Tumblr.
If you want to split a photo into two or more images, use this site.
how to create captions:
To make the captions, I use parts of songs that I like or that I found searching on Pinterest for "Spotify song lyrics", but they can also be album or song names, movie names, a phrase you thought, etc. The symbols you will put in the caption can be found on this website or just by searching for "symbols", "kpop symbols", "kaomojis" on tumblr.
If you want to use a different font for the letters, there are these two websites (01 and 02). And to change the color, there are also these two tutorials (01 and 02).
what to do to make your blog "popular":
Add popular hashtags that relate to the content you are posting. If you use almost the same tags as other big blogs, your posts will have more reach. Posting frequently and your account looking nice and organized helps too.
Ask several other popular blogs to promote your account. This was very important for my profile to grow in the number of followers and engagement.
Join the events that some blogs do, as they offer good prizes like reblogs if you win. And remember to have patience, as it often takes a while to get good engagement on Tumblr.
240 notes
·
View notes
Text
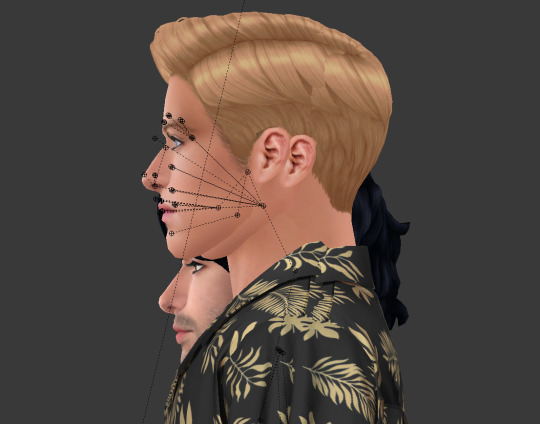
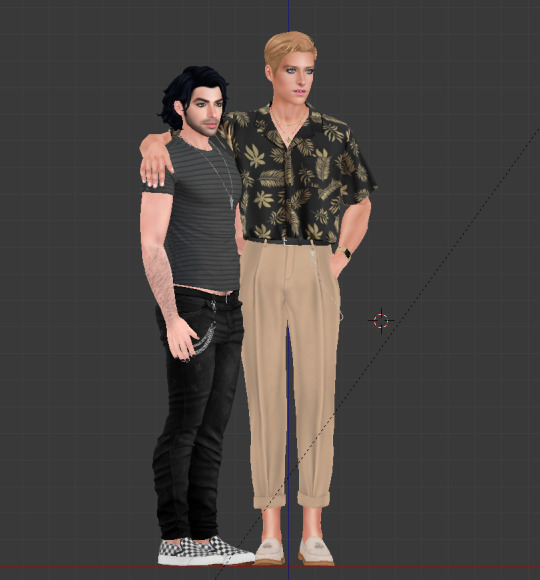
How to make poses for Luumia Height Slider! (Tall Sim)
I promised this tutorial to @aniraklova, so here you go, sunshine! (I also meant this tutorial to pose makers, so they would created more poses for me:D)
You'll need:
+ Base knowledge in making poses for Sims 4 (this isn't a tutorial about how to make poses for Sims 4, so it will be perfect for someone who already created/creates poses for the Sims 4)
+ Base knowledge in Sim Ripper (Again this isn't a tutorial about how to Rip the Sim, but we will use Sims 4 Ripper)
+ Sims 4 Ripper
+ Sims 4 Studio
+ 3 sims. Sim with average height, sim with tall height (Arwin here has the max height) and his double with average height.
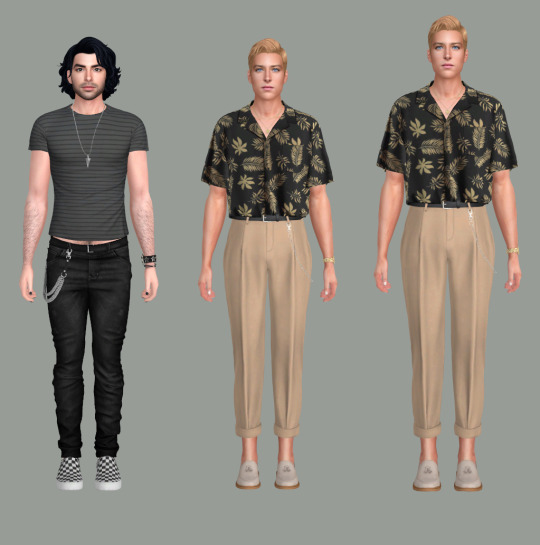
1. Rip 3 these sims and import them into Blender where you already prepared 2 rigs for your couple poses.
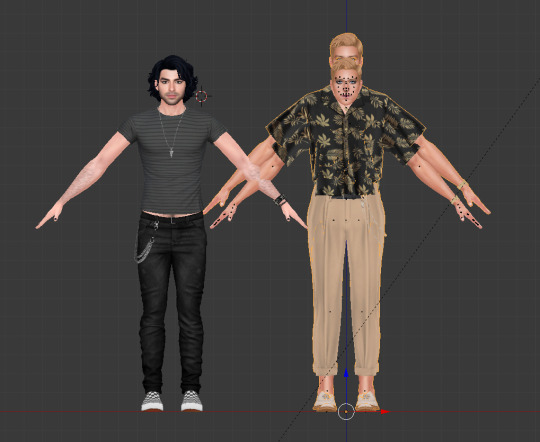
2. Select b__ROOT_bind__ bone on the average height clone of your tall sim, then scale it and move it up to fit the size of the tall sim.
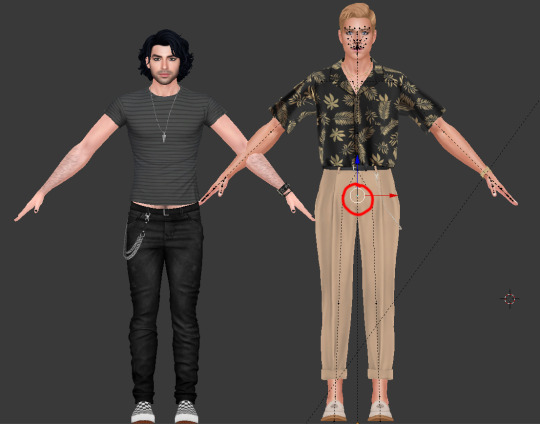
3. Fit it the best you can (up or down), but DON'T move it back or forward. Yeah, there will be a weird gap (tall version of your sim will be more moved back) that may cause some problems in the future, but... just don't think about it for now.
4. Now you're ready to make poses! NOTE THAT ONLY AVERAGE HEIGHT SIM CAN MOVE AROUND. It's imortant for b__ROOT_bind__ bone of the tall sim stay as it is. You can only rotate it, but once you fit it up into your tall sim, don't move it anymore up or down.
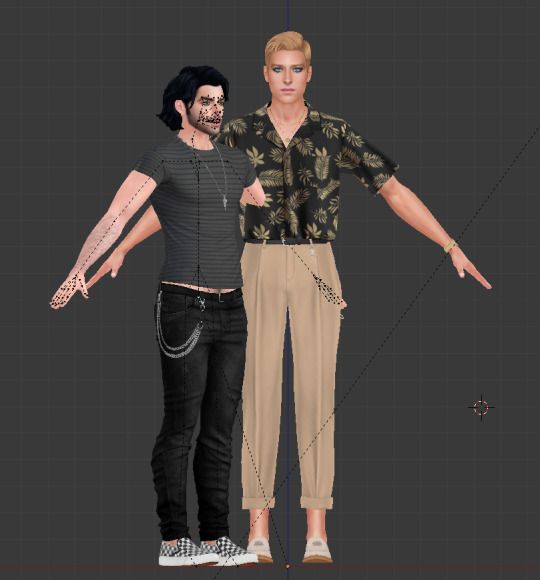
5. Ok. The pose is done!
6. Before you saved it, select b__ROOT_bind__ bone of your tall sim, click Pose, choose Clear Transform, click Location.
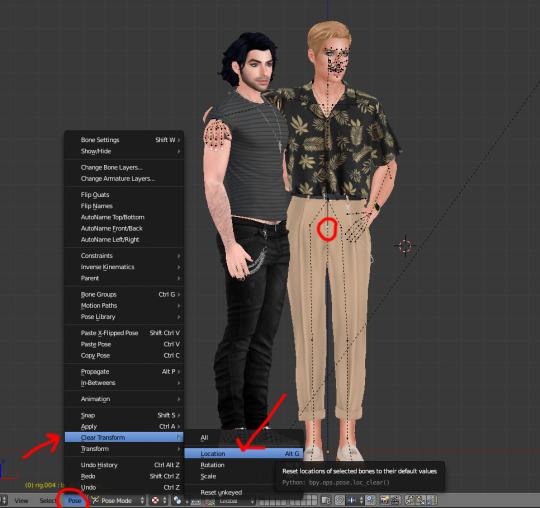
7. Now your tall sim will be slightly sinking down to the ground. It's important to let him to!:D
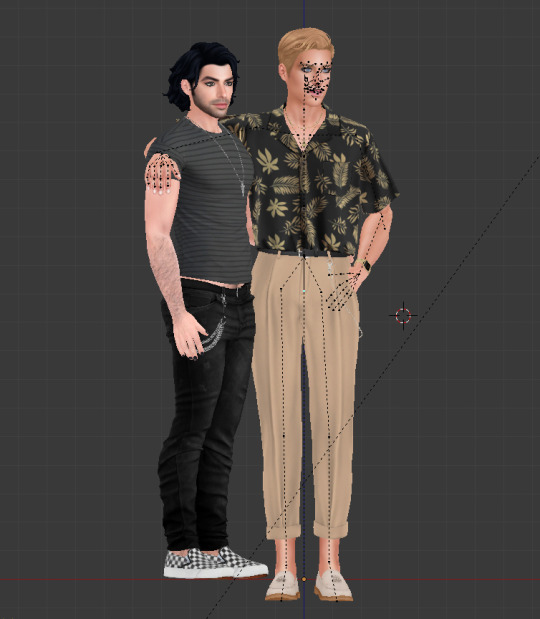
8. Then Select all bones and LocRot it. LOCROT.
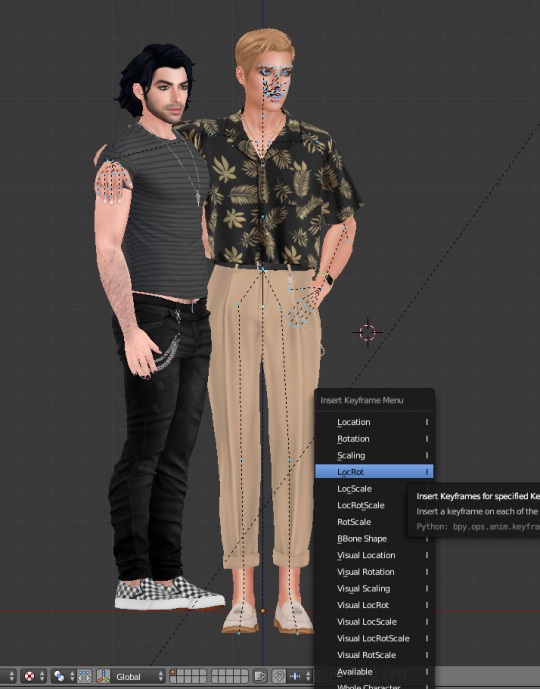
9. Now you can save your poses and import it to the game!
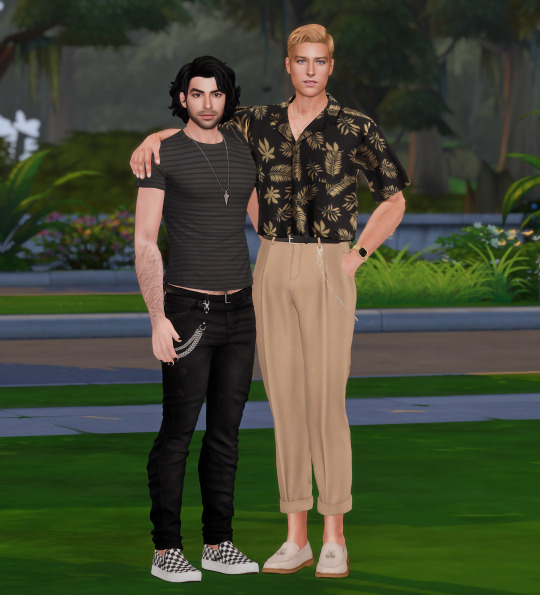
Not bad, huh? It's still a tricky little poo, I know. Mb someone knows or will find better way - that would be awesome! But so far it's the only way I know.
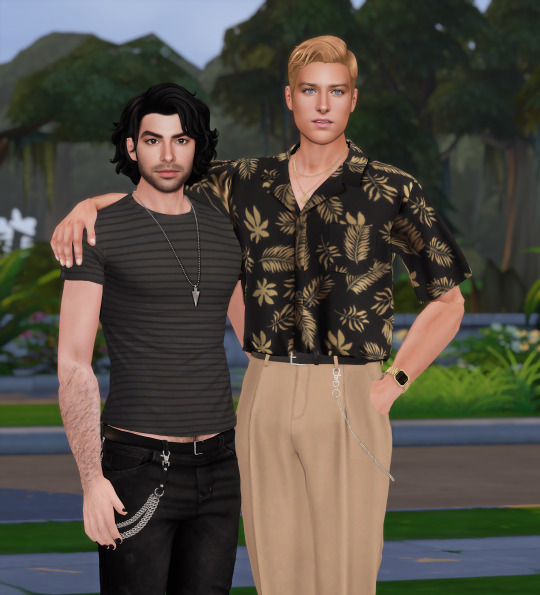
It's not necessarily to be one tall sim, you can pick lots of Sims with different height, just remember to move down (or up if they're small) their b__ROOT_bind__ bones once you've done posing.
Hope it was helpful!
Have fun!
#WistfulTutorialSims4#sims 4 tutorials#sims 4 poses tutorial#sims 4 pose tutorial#sims 4 height poses tutorial#sims 4 height slider#sims 4 height slider poses#sims 4 height poses#the sims 4#sims 4#sims 4 poses
268 notes
·
View notes