#mix miso and oil and water together
Text
I’m making heaps and heaps of stock today, and I’m pumped. In the autumn/winter I love just drinking stock in the morning more than tea, it’s so comforting and nourishing. Highly recommend.
#we got:#dried shitake mushrooms#kombu#carrots#celery#garlic#onions#the best way to do it#is to finely cut up all the stuff#mix miso and oil and water together#toss the veggies in it#and slow bake all that stuff before boiling it in water#so much more flavour#truly game changing#adding a bit of turmeric to individual bowls#SO YUM
2 notes
·
View notes
Text
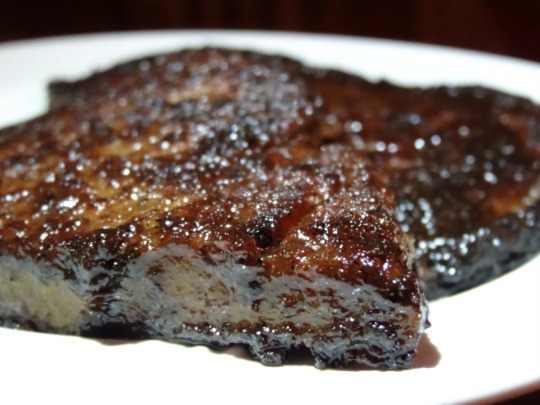

[ID: First image is of two dark brown glazed lamb chops. Second image is a close-up; one of the chops has been cup open to show a pink interior. End ID]
Seitan lamb chops
This vegan meat can be used as a substitute for lamb chops or rack of lamb. Like well-cooked lamb, it is fine-grained, moist, subtly sweet, and meltingly tender. Once simmered it is ready to be seared, breaded, fried, or sliced, and included in your favorite recipes.
The seitan is made using the washed flour method, which kneads dough in water to separate the gluten from the starch: this allows you to control how much starch you leave alongside the gluten in the dough, and thus how tender versus chewy your final cut of meat will be. This recipe makes a dough that leaves more starch in than most seitan recipes do, and then kneads the dough again to distribute that starch into an even, fine grain. A simmer in a spiced, aromatic broth leaves the final product tender, moist, and flavorful all the way through; the broth is then cooked down to a glaze.
The spices called for in this recipe are geared towards replacing lamb in Palestinian recipes, but they can easily be swapped out to complement the flavor profiles of other dishes.
Recipe under the cut!
Patreon | Tip jar
Makes 4 large lamb chops.
Ingredients:
For the dough:
720g bread flour (or any white wheat flour with at least 12% gluten)
About 2 1/4 cups water
For the dry flavoring mix (scaled to 455g dough yield):
2 tsp (7.5g) ground sumac
1 3/4 tsp (5.25g) onion powder
1 tsp (4g) kosher salt (1/2 tsp table salt)
1 tsp (5.5g) vegetarian granulated sugar
1 tsp (2.5g) black peppercorns, toasted and ground
3/4 tsp (2g) caraway seeds, toasted and ground
3/4 tsp (3g) garlic powder
3/4 tsp (2.5g) ground turmeric
3/4 tsp (2g) cumin seeds, toasted and ground
3/4 tsp (1.5g) aniseed, toasted and ground
1/2 tsp beet powder; or 5 drops red + 1 drop green food coloring
1/2 tsp (2.5g) MSG (optional)
To fry:
4 tsp vegan margarine or ghee (سمنة), divided
4 tsp olive oil, divided
For the simmering broth:
2 Tbsp soy sauce (I used Chinese aged soy sauce)
1 Tbsp red tahina
2 tsp miso paste (preferably red)
2 tsp pomegranate molasses
2 tsp vegetarian 'beef' stock concentrate (optional)
1 small yellow onion, quartered
2 cloves garlic, crushed
1 bay laurel leaf
1 stick cinnamon bark
5 allspice berries
5 green cardamom pods, crushed
2 cloves
1/2 tsp black peppercorns
1 tsp vegetarian granulated sugar
Several cups water
Instructions:
To wash the flour:
To make seitan using the washed flour method, a dough is first made out of flour and water; then, the dough is washed in water multiple times. The water carries off the starch, leaving the gluten behind.
1. Make the dough. Mix flour and water in a large mixing bowl until dough comes together. Knead for several minutes, and then cover the dough and allow it to rest for another 10-15 minutes to develop gluten. After resting, the dough should be very smooth, elastic, and stretchy.

2. Soak the dough. Fill the bowl with enough cool water to cover the dough, and let it soak for about an hour. This allows gluten to continue developing.

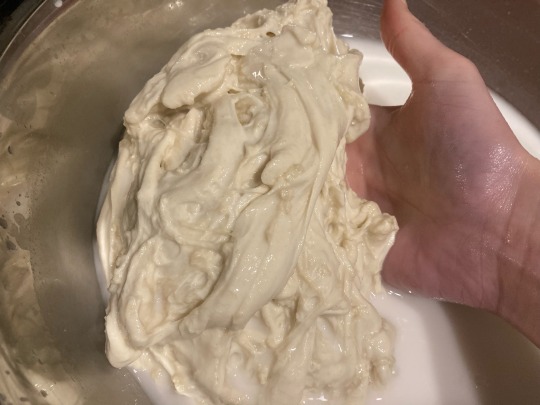
3. First wash. Leave the soaking water in the bowl, and begin to knead the dough with your hands under the water. Repeatedly pull, stretch, fold, and press the dough for several minutes to knead, occasionally using your fingertips to break through and shred or mangle the dough as you pull. Soon, the water should be a thick, opaque white.
4. Drain the dough. Set up a colander over a very large container, and pour the contents of your mixing bowl through. You can also just pour the starchy water down the sink if you don't have plans to use it (to make liangpi noodles, or dumpling wrappers, or any of the recipes out there for vegan bacon using wheat starch...).
At this point, you will see two distinct substances in the dough: the gluten, which is thin and stringy and feels rubbery when pinched, and the starch, which is thick and 'globby' and feels soft when pinched, offering no resistance. We want to wash the flour a few times until most of the starch has been removed, and there are only some small globules interspersed throughout the stringy gluten.
5. Second wash. Return the dough to your mixing bowl and fill it with fresh cool water. Knead and pull the dough for another few minutes, until the water once more turns opaque. There should be fewer large areas of starch in the dough, and more development of the gluten strands. Drain the dough again (just like in step 4).
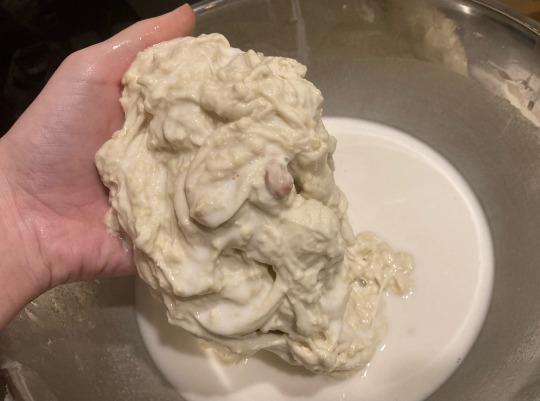
6. Third and fourth wash. Repeat this process another time or two, until the starch globules are about 20% of what you see, and the gluten is around 80%. For the last wash, the water should be a bit less opaque with starch than it was for the first one, but it should be more than a bit cloudy. You should see your fingers when you cup some of the water in your hand, but not the bottom of the bowl.

After the third wash
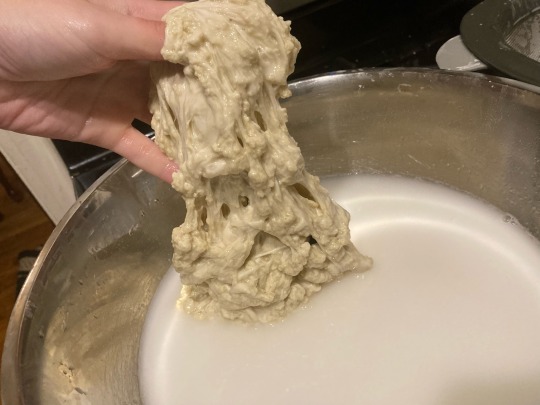
After the fourth wash
7. Drain the dough. Drain the seitan again and allow it to continue draining, flipping over once, until it is noticeably less wet. Squeeze the dough to remove any extra water or starch on the surface.
You now have your washed flour! This will be the base for the rest of the recipe. I had 455g of dough at this point.
To finish the dough:
1. Add all dry ingredients to the dough and knead again to distribute evenly; or use a blender for about 30 seconds until everything is well-incorporated and the gluten strands are visible.
2. Pull the dough into a single long, thick strand, and then tie it into a couple knots. Do this a few times to build structure.
To cook:
The dough will first be seared to develop a crust, then simmered to infuse it with more flavor. After a rest in the simmering liquid, it is seared again to re-crisp, then tossed in the thickened liquid to form a glaze.
1. Divide dough into four pieces. In a large skillet, heat 2 tsp of margarine and 2 tsp of olive oil (or use all olive oil). Add dough pieces and push flat with a spatula. Fry, turning as needed and intermittently pressing flat with the spatula, until the surface is browned and crispy.
2. Mix liquid simmering ingredients together and whisk to combine. Pour over browned chops and add whole spices and aromatics. If necessary, add more water to cover.
3. Slowly bring simmering liquid up to a bare simmer. Don't let it come to a rolling boil, which could produce a spongey texture.
4. Cook at a very low simmer, uncovered, for 20 minutes, stirring occasionally. Remove from heat and allow to soak in the simmering liquid (including spices and aromatics) for at least an hour in the fridge, or overnight.
This is a good place to stop for the night if you want to make these ahead of time.
5. Remove lamb chops from liquid. In a large pot or deep skillet, bring simmering liquid (including spices and aromatics) to a boil, uncovered, until considerably reduced.
6. Strain to remove whole spices and aromatics. Return to pan and continue to reduce until thickened to a glaze-like consistency.
7. In a clean skillet, fry lamb chops again in remaining margarine and oil until browned and crispy. Add glaze and cook, flipping and agitating occasionally, for a couple minutes until coated.
Serve immediately over rice or frika (فريكة / freekeh), topped with fried pine nuts, alongside plain cultured soy yoghurt, pickles, olives, and a side salad, etc.
144 notes
·
View notes
Text
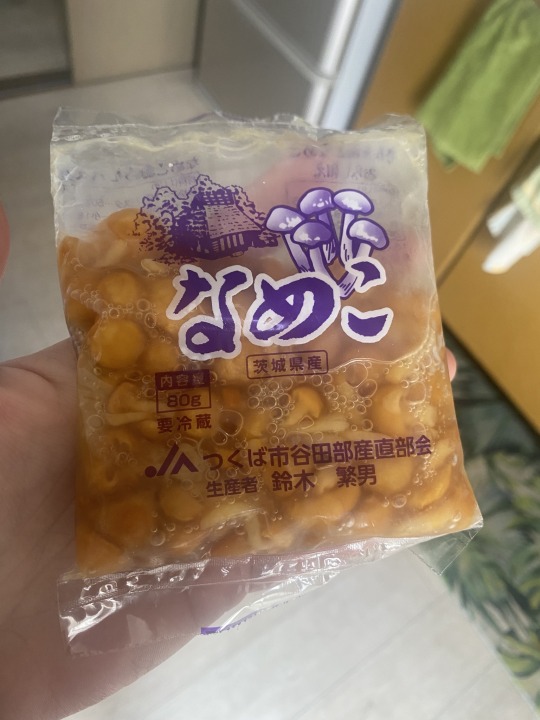
I am *not* a fan of nameko mushrooms. There are a lot of difficult, acquired-taste, fermented or smelly or slimy or otherwise challenging Japanese foods that I'm good with, but these, I've never come around on. I don't like the smell (fruity, kinda rotten), I don't like the liquid they're packed in, I don't like the slime (it lingers on other foods and coats the roof of your mouth), I don't like the way they roll arond and squish and slide when you bite down. I simply am not a fan.
However! I am even more not a fan of wasting food. And I happen to be a recent recipient of a pack of nameko. So let's go! Let's make them palatable!
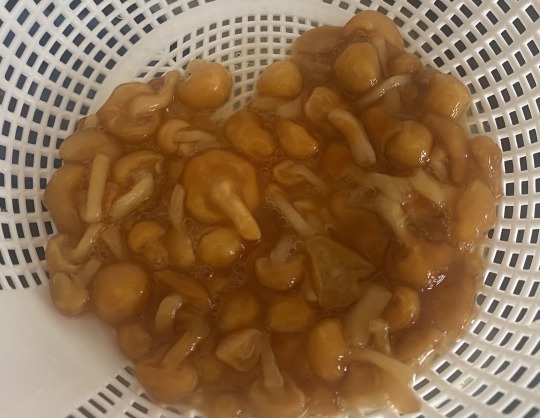
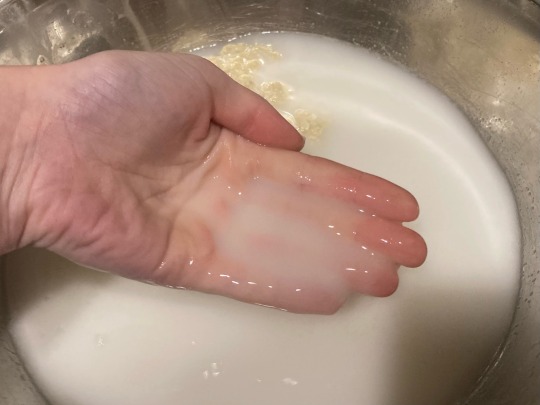
Step 1: My colander is my best friend. I rinse the nameko several times, under different temperatures of water, trying to see if I can get the slime off and turn them into normal mushrooms.
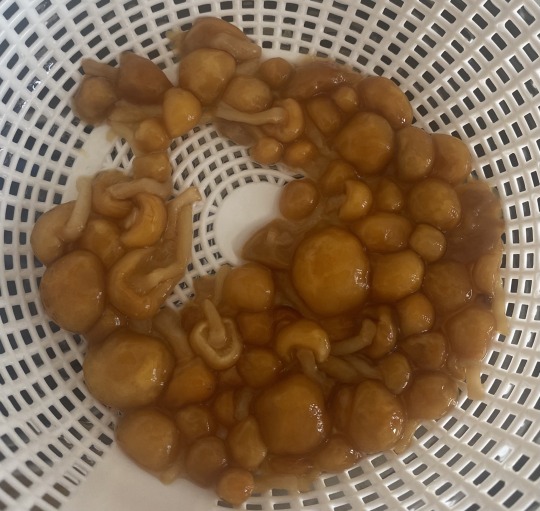
This is about as good as it gets. It's progress—they're no longer coated in the fucking ooze!—but we're still well far away from normal mushrooms.
(The gossipy mama at the 7-11 will later tell me that slimy food is what I need to heal my back injury. Okay! So maybe this failure is a good thing? I don't know if the slime actually helps, but I understand that it's considered to have an anti-aging effect, skincarewise, so I can see why it might help with old-person-related injuries, and anyway, I'm really enjoying okra in my shrimp and mulukhiyah leaves in my miso soup recently and that's certainly not hurting anyone! I'm still years away from being a nameko fan, though. [OR AM I?])

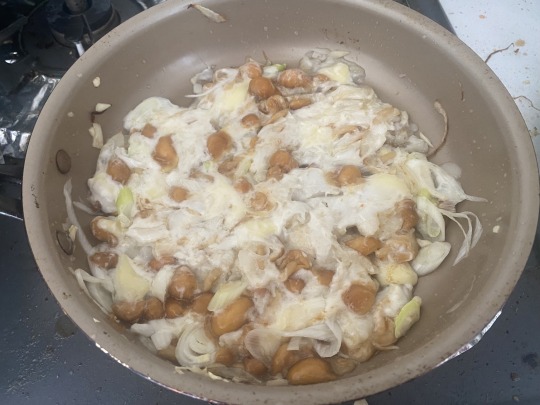
I chop and sauté a quarter onion, half a leek, and a couple cloves of garlic. When they're smelling good, I throw the nameko in too.

I make a batter with flour, water, salt, and a drizzle of sesame oil. If I'm doing it right, I think, I would mix the nameko straight into the batter, but for some reason, I don't. I pour it on top of them in the pan and immediately begin worrying that I've fucked up. I tear up a piece of my husband's sad-person reduced-cholesterol plastic cheese and throw it on top for insurance. Can't go wrong with cheese.
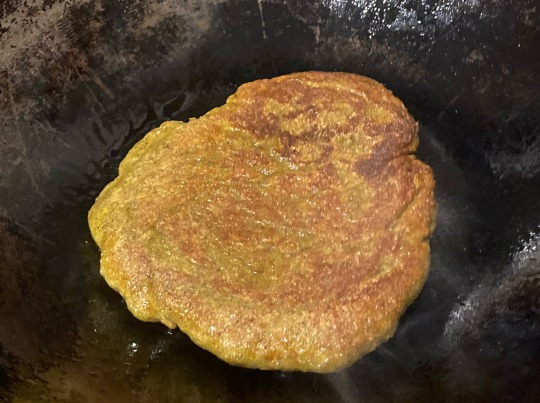
It might be starting to come together! The key is to start out low and slow so the pancake/pajeon/pizza has time to solidify and cook through. Once it's solid enough to flip unassisted, you can turn the heat up and get it crisping real nice.
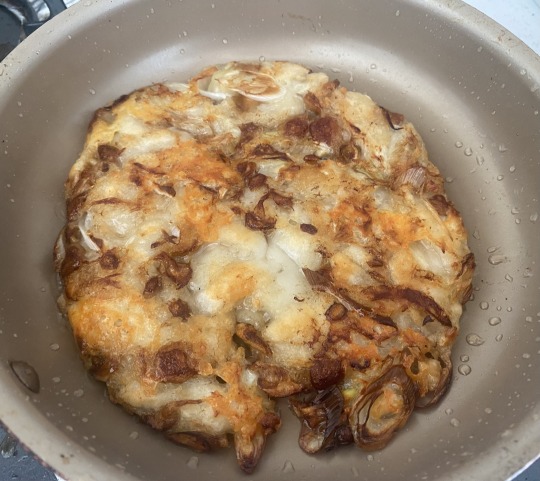
I do the awesome flipping maneuver: cover the pan with a plate, then flip the whole deal over so the wet side of the pancake falls onto the plate, then sliiiiide the wet side back, facedown, into the pan to finish cooking. It's really coming together!
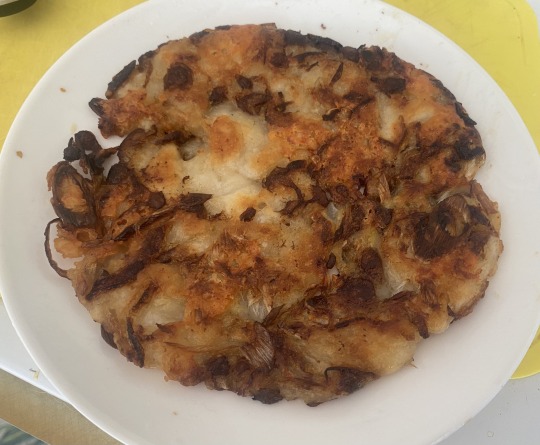
Would you look at that! It looks like real food!
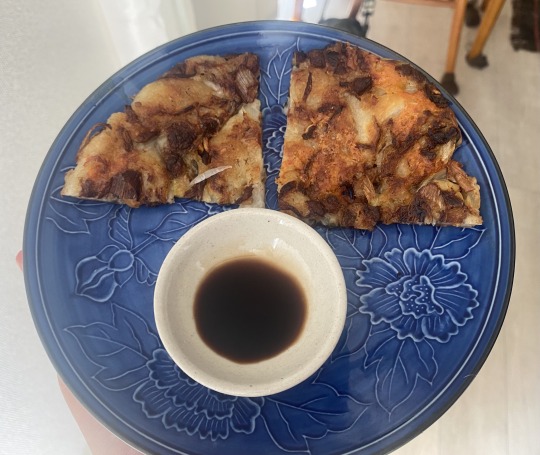
I cut it with food scissors and find a dipping sauce. Most people would prepare some kinda soy sauce mixture, but idk; I just use chinkiang vinegar, one of the best things in the world. Which it turns out goes great with cheese!
And it's tasty! It really is. Some of the fruity, fermenty nameko flavor is still there, but between the doughy/crispy pancake, the cheese, and all the allium goodness, it's a very mild, soy saucey flavor! It's not unlike a very, very Japanese white pizza. If you'd told me a few hours ago that nameko could be this good, I wouldn't've believed you! Honestly, I still might not! Good for me.
72 notes
·
View notes
Note
hiii im going to be living w my aunt over the summer and therefore buying my own groceries. I am going to be busy w summer classes and working on the weekends but I do rlly want to try cooking at least once or twice a week. I can make an egg and pasta but that’s about it. What are some of your fave recipes that aren’t super complicated that I could start with if you have any? (I am open to a minor challenge but cooking can overwhelm me so I like a challenge but not too much of one lol). I am also vegetarian (not vegan) if that matters! If you don’t get to this that’s okay !!! I hope u are well 🩷🩷🩷
now it's been a little while for me since i've had to use this model due to moving back home w my family for a time but when buying groceries for one person i found it helpful to follow this sort of structure about once a week! when i do this it feels a lot easier to 'wing it' in the kitchen and mix and match my meal components. and to preface, this is what i find to be helpful and everyone is different and finds different things to work for them!!
1-3 protein sources - i like to center my meals around this because i've found it helps me feel the most nourished and full, i always think of it as things that can be the 'star' of your dishes. i eat meat so i usually do salmon, chicken thighs, and alternate pork + beef. but for u that could b things like tofu, eggs, beans/lentils, mushrooms maybe, vegetarian 'meat' fakes lol, peanut butter if u like any peanutty noodle dishes
3-4 veggies - i love to snack on veggies so i usually get snap peas, cucumbers, + bell pepper just for snacking, and then something like brussel sprouts for roasting as a side dish w a dinner, these can also be frozen
2-3 types of fruit - i am a smoothie enjoyer bigtime so i get a combo of frozen and fresh, almost always mango, and then whatever is seasonal that i can see myself being excited to eat throughout the week
2-3 grains - pastas, premade pizza crusts, bread, rice, etc!! these rly round out ur meals!! and imo they make it simpler to make a meal on the fly. i am a huge fan of microwave rice LOL
2-3 multipurpose dips/spreads/sauces/condiments/pantry items - now here is ur golden ticket for being able to reliably make well rounded and varied meals!!! slowly building up your collection over time is the most cost effective way imo. it's helpful to stock up your pantry w things like baking supplies (flours, sugars, leaveners), spices, shelf stable canned goods (canned tomatoes, beans, vinegars, oils, soy sauces, fish sauce, cartons of things like oak milk), and 'fridge pantry' items (parmesan, herbs, lemons for juice and zest, miso, gochujang, ketchup, mayo, hot sauce, jam, pickles, etc). you can use these to season your food as you cook!
2-3 snacks/frozens - any microwave meals or chips or desserts you might want!!
using this structure makes it easier to look at what you have and be like, i have xyz and they would go together well.
EX. i have rice, tofu, and bok choy, now i can cook the rice and pan fry the tofu and bok choy with my pantry ingredients (soy sauce, miso, sesame oil, chili oil) and create a filling meal!
some of my favorites that could be made vegetarian -
ground pork seared on the bottom of a dutch oven in patties (you could sub tofu or use a fake meat replacement), broken up into smaller chunks, eaten with linguine, sliced snap peas or celery, + a garlicky peanut butter sriracha sauce
pizza w a store bought crust!! super easy, done in like 10 minutes! i like to make mine in a cast iron following this protocol
i really love to dress up ramen w sliced veggies and eggs
i like to make pasta dishes and then form a sauce w parmesan cheese, butter, pasta water, lots of lemon zest and juice and sometimes chicken stock, then adding in peas and fresh herbs at the end
idk if this was helpful at all, but i also have a recipe + recovery tag on my blog w more of these if that is helpful to you! im also on Instagram (@clementineoliveoil) and like to post what i cook there sometimes too!! i wish u all the most beautiful meals in your future!!
30 notes
·
View notes
Text
Mandalorian Stew
I have no idea what Pog Soup is. I scoured the EU books, the New Canon books, I even turned to the internet. No idea. But Bo Katan added powder to hot water, so as an educated guess, I’d say it’s something like Miso soup.
That said, I thought I’d share my recipe for Tiingilar or Spicy Mandalorian Stew. The original recipe is from the official Star Wars Galaxy’s Edge Cook Book. But mine is better.
You’ll need:
1 yellow onion
Ginger and Garlic (No, I won’t tell you how much, you feel that in your heart)
2 Chicken Breasts, chopped into bites.
1 red apple
Some red potatoes roughly chopped
Some carrots, roughly chopped
1 can of pumpkin puree
3 TBS Tomato paste
Chicken broth
2 TBS Soy sauce
Turmeric, Chili Powder and Paprika to taste. (I like mine extra spicy)
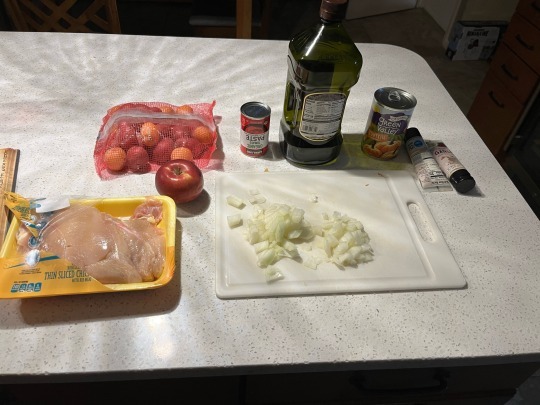
Start by frying the onion, garlic and ginger over medium heat in the oil of your choice. I like 10w30. (That’s a joke, don’t actually cook with engine oil. Try Olive or Canola Oil.)
Cook until the onion starts to go clear. Your house will smell amazing.
Add the chicken and stir. Cook until the chicken is browned on all sides. Add the pumpkin and tomato paste and stir. Add the broth until it reaches a constancy you like.
Now add everything else.
Simmer, covered for 30-some minutes until the carrots and potatoes are soft.
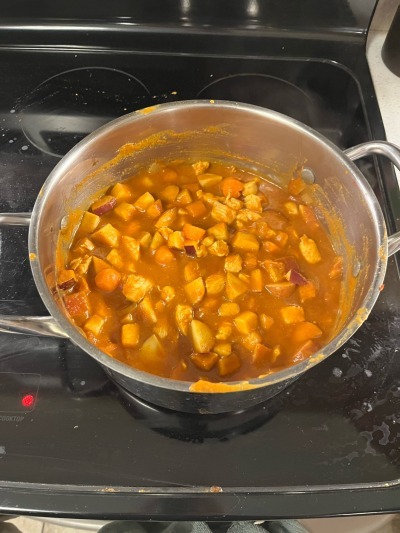
If I want it hotter, I add a few dashes of Frank’s Red Hot, which has a nice matching flavor

I served this with Rey’s Portion Bread, which is straight out of the cook book, no changes. I cooked mine in a too big ramekin, so it turned out ugly, usually they’re nice and round.
4 TBS flour
1 TBS instant oats
1 tea Sugar
¼ tea baking powder
½ tea seaweed flakes
Pinch of salt and pepper
Mix that together in a small bowl, then add 2 TBS water and mix until it forms a small ball.
Place in an oiled ramekin, mug, or other small microwave safe receptacle.
Microwave for 45 seconds and marvel as your portion bread puffs up just like in the movie.
Allow it to cool slightly before eating. Or don’t, go ahead and burn your mouth. I’m not your mom.
44 notes
·
View notes
Text
Soba with Tofu and Miso-Mustard Dressing: A Protein-Packed Vegan Dish
In the realm of vibrant, nutrient-dense vegan meals, Soba with Tofu and Miso-Mustard Dressing stands out as a deliciously balanced option. This dish masterfully combines the nutty, earthy flavors of soba noodles with the rich, umami notes of miso and the tangy kick of mustard. Paired with protein-rich tofu, it not only provides a satisfying meal but also packs a nutritional punch.
Why You'll Love This Dish
Soba Noodles: Soba, made from buckwheat flour, is a staple in Japanese cuisine known for its nutty flavor and chewy texture. It's a great source of plant-based protein and fiber, making it a healthy choice for a filling meal. These noodles are also naturally gluten-free, though you should check the label to ensure there’s no wheat flour mixed in.
Tofu: Tofu is a versatile protein source that absorbs the flavors of whatever it's cooked with. In this recipe, it complements the soba noodles perfectly, adding a hearty texture and a boost of protein. Whether you prefer it crispy or soft, tofu enhances the dish's nutritional profile while remaining delightfully adaptable.
Miso-Mustard Dressing: The star of the show is the miso-mustard dressing, which brings a harmonious blend of salty, tangy, and umami flavors. Miso, a fermented soybean paste, adds depth and complexity to the dish, while mustard provides a zesty contrast that brightens up each bite. This dressing is not only flavorful but also packed with beneficial probiotics from the miso.
How to Make It
Ingredients:
Soba Noodles: Cooked according to package instructions.
Tofu: Firm or extra-firm, pressed and cubed.
Miso-Mustard Dressing: A mix of white miso, Dijon mustard, rice vinegar, a touch of maple syrup, and a splash of soy sauce.
Instructions:
Prepare the Tofu: Sauté the tofu cubes in a bit of oil until golden and crispy on the outside. Set aside.
Cook the Soba Noodles: Boil the soba noodles as per the package instructions. Drain and rinse under cold water to stop the cooking process.
Make the Dressing: In a bowl, whisk together miso, Dijon mustard, rice vinegar, maple syrup, and soy sauce until smooth and well combined.
Assemble the Dish: Toss the soba noodles with the dressing until well coated. Gently fold in the crispy tofu cubes.
Serve: Garnish with chopped scallions, sesame seeds, or your favorite vegetables for added crunch and freshness.
For a more detailed look at this recipe and to explore additional tips for making the perfect miso-mustard dressing, visit the Soba with Tofu and Miso-Mustard Dressing page.
Conclusion
This dish is a great example of how simple ingredients can come together to create something truly special. With its combination of soba noodles, tofu, and a savory miso-mustard dressing, it’s not just a meal but a celebration of flavors and textures. Whether you’re a seasoned vegan or simply looking for a wholesome, plant-based meal, Soba with Tofu and Miso-Mustard Dressing is sure to satisfy.
0 notes
Text
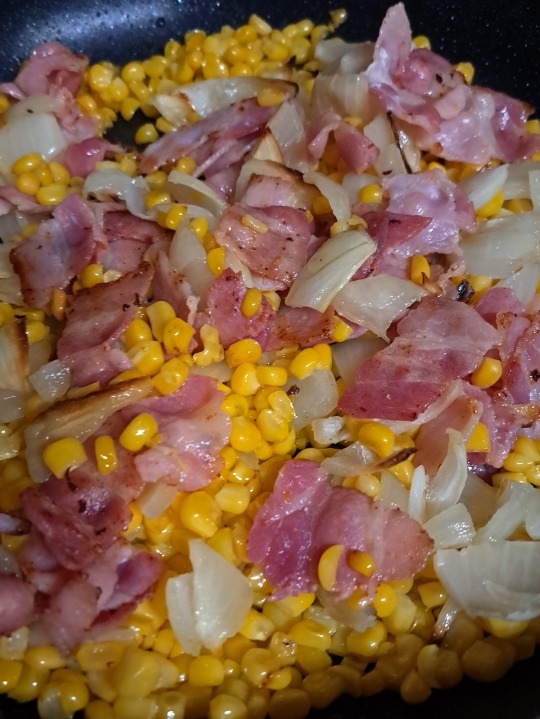
David Chang's roasted Summer corn with miso butter
Momofuku is a famous restaurant in NYC, which David Chang founded. One day I hope to eat there.
This dish was apparently such a hit there that at the time no one wanted to order anything else. It was a victim of its own success and got taken off the menu.
Fresh sweetcorn is still in season, so I thought I'd make this dish, with the colour of sunshine, as Autumn truly takes hold.
First up, I roasted an onion, peeled and cut into wedges. I made up the room temperature miso (2tbsp) and room temperature butter (2tbsp) into a mix at the same time (not pictured). The miso and butter were mixed together into a paste. I made 120ml of chicken stock.

I used fresh corn rather than frozen or tinned, in keeping with David Chang's recipe. Shearing the kernels off three whole corn cobs is a messy task, so you need plenty of space to work in to catch errant niblets. I sliced up 6 slices streaky bacon and 4 spring onions with both green and white parts into thin circle slices. The bacon was dried fried in a non stick pan.
Frying off the sweetcorn on a high heat in 1 tbsp of groundnut oil was the next step. No pictures, as I was stirring and moving the niblets constantly.
Then the roasted onion and cooked bacon went in.
Next was the miso and butter mix and the chicken stock.
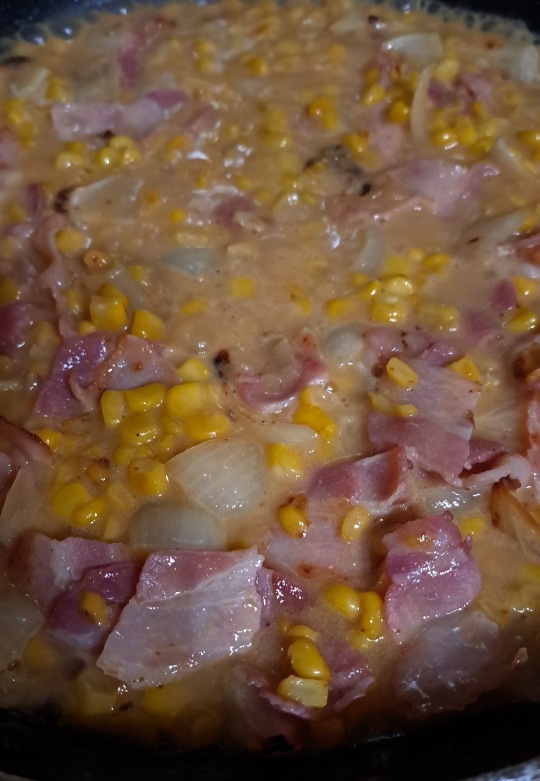
After cooking for a few minutes, the "sauce" thickens and becomes less watery, more glossy and coats the onion, bacon and corn.
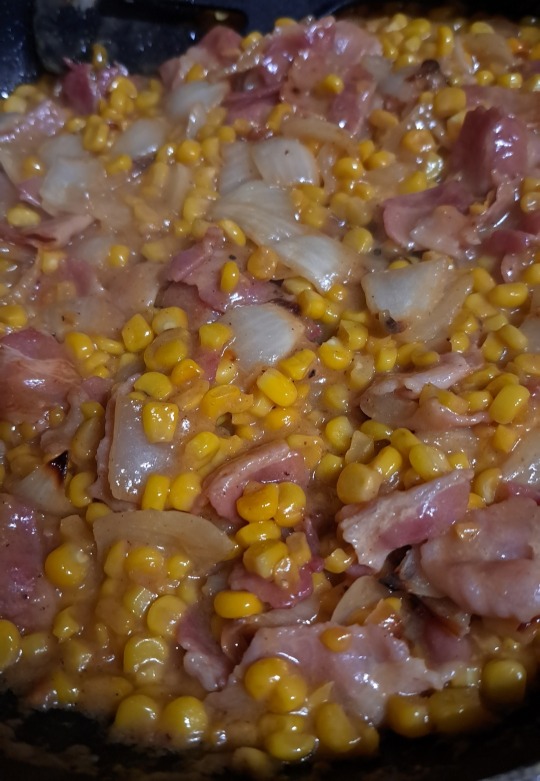
When there is no water hanging around at the bottom of the pan, it's time to serve up, with half of the spring onion mixed in...

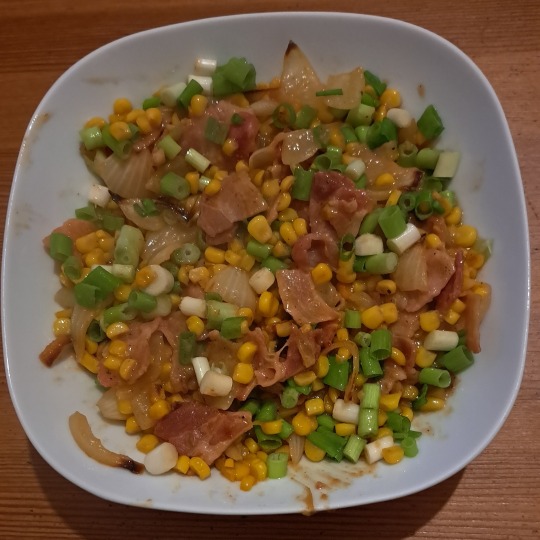
The other half goes on top.
The miso butter is full of flavour. The creamy and indulgent umami flavours complement the sweetness of the last of the summer corn. The streaky bacon gives texture and meatiness. The spring onions give crunch and freshness. A fab summer or early autumn recipe.
I was asked on social media about what to substitute for the bacon for a vegetarian version of the dish. I suggested dried porcini and dried shiitake mushrooms, reconstituted and sliced would make a good substitute. Porcini for flavour and aroma, shiitake for texture.
The original recipe can be found here:
We made far too much of the miso butter corn for one dinner, so we had some to spare.
We decided to use the rest in jacket potatoes.
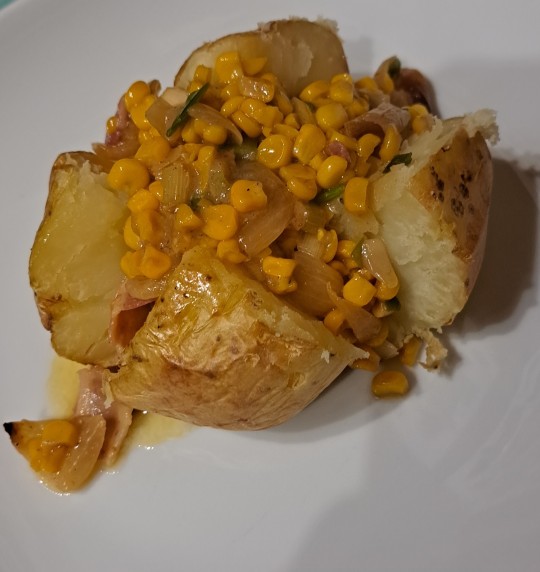
We had one with cheese, one with egg.


0 notes
Text
Asian Slaw

Ingredients
Dressing
¼ cup cashew or peanut butter
2 tablespoons white miso paste
2 tablespoons lime juice
1 teaspoon sesame oil
1 teaspoon grated ginger
2 to 5 tablespoons water, or as needed
For the slaw:
6 to 7 cups shredded red and/or green cabbage
Mix of peppers: I used 3 Anaheim and 3 banana peppers; or use 1 red bell and 1 poblano.
2 scallions, chopped
½ cup chopped cilantro, including stems
½ cup fresh basil, Thai basil, and/or mint
2 Thai chiles or 1 serrano pepper, diced
Sea salt
¼ cup toasted peanuts, pepitas, and/or sesame seeds
1 ripe peach, thinly sliced
>>Get A More Recipes Here <<
Instructions
Make the dressing: In a small bowl, whisk together the cashew butter, miso paste, lime juice, sesame oil, and ginger. Whisk in enough water to create a drizzable consistency. Set aside.
In a dry cast-iron skillet over medium heat, char the peppers whole, rotating until the edges have a little char, about 2 minutes per side. Remove. When cool to the touch, slice in half lengthwise, remove the stem, ribbing, and seeds and slice horizontally into thin strips.
In a large bowl, combine the cabbage, peppers, scallions, cilantro, basil, chiles, and ¾ of the dressing. Toss until combined. Add the remaining dressing, if desired, and season to taste with a few pinches of sea salt. Serve topped with the toasted nuts, seeds, and sliced peaches.
1 note
·
View note
Text
A Guide To The Best Things To Do In Charlotte, NC

Charlotte, NC has a lot of things to offer. It's home to the largest airport in the Southeast, and it is one of America's fastest-growing cities. But did you know that Charlotte, NC also has some great museums and parks? We've put together this list of things to do in Charlotte, NC that will keep your kids busy for hours on end!
Discovery Place Science

Discovery Place Science is a hands-on science museum located in the heart of uptown Charlotte, NC.
The museum also hosts events throughout the year including live shows, lectures, and workshops for kids who want to learn more about science while they play! The staff here is friendly and knowledgeable—they'll happily answer any questions you may have about any object on display or program happening during your visit (and they can help you plan your next outing!).
Charlotte, NC Museum of History

The Charlotte, NC Museum of History is a must-visit, especially if you are interested in history. The museum has several different exhibits that relate to the city's past, including one on the Civil War and another on African-American history. It also houses an art gallery with pieces from artists like Georgia O'Keeffe and Edgar Degas.
Carolina's Aviation Museum

The Carolina's Aviation Museum is located at Charlotte, NC Douglas International Airport and is a Smithsonian Affiliate. The flight simulator lets you fly through the skies in an F-16 fighter jet or other planes from around the world. There’s also a gift shop where you can buy souvenirs from around the world!
The museum is open from 9 am to 5 pm daily except for Wednesdays when it opens from noon until 6 pm (closed on Thanksgiving Day).
Whiskey Warehouse Bar and Grill

Whiskey Warehouse Bar and Grill is located in South Park, right by the light rail station. From there, you can hop on the train to go anywhere in Charlotte, NC or use their shuttle service to get around town—or just relax at this awesome spot!
The restaurant has an atmosphere that feels like you’re eating dinner outside on your patio with friends. They have live music every night from 6:30 p.m. until 11 p.m., so it's easy to spend some time here before heading out for dinner elsewhere in Charlotte, NC (or even further!).
The menu offers plenty of options for those who love bar food as well as more formal dining options including steakhouse fare such as lobster tails and filet mignon wrapped in bacon or shrimp tempura served over rice noodles accompanied by miso soup or salad with Asian dressing served on the side alongside shishito peppers roasted red peppers mixed greens tossed with lemon juice vinegar olive oil oregano basil cilantro mint parsley rosemary thyme scallions garlic ginger soy sauce sesame oil peanut butter honey mustard Worcestershire sauce hot pepper flakes Tabasco Sriracha Mustard black pepper
U.S. National Whitewater Center

The U.S. National Whitewater Center is one of the largest outdoor water parks in the world, and it's located right here in Charlotte, NC. It's home to a variety of activities for all ages, including kayaking, tubing, and rafting on their man-made rivers as well as an impressive collection of rides that you can take in your own boat or raft.
There are also several bars at this facility—including one where you can get lunch or dinner—so if you're looking for a break from your day trip there are plenty of options available! Plus being open year-round means that this place will never be closed due to inclement weather like many other attractions do during certain seasons since we don't have those kinds of fluctuations here in North Carolina where everything tends toward being sunny most days anyway unless something comes along that throws us off course like say...a hurricane hitting us unexpectedly? Or maybe just bad traffic jams caused by some big event happening nearby? Either way, it'll probably still be worth visiting because these types of things happen once every few years so why not enjoy them while they last?
The Cellar at Duckworth's

The Cellar at Duckworth's is located in the EpiCentre and has been an anchor tenant for the development. This family-friendly spot serves up great food and drinks, including cocktails created by local bartending pros, as well as some of Charlotte, NC's best wines. It's also open late every night of the week (except Monday nights) so you can enjoy dinner after a long day at work!
The Comedy Zone Charlotte, NC

The Comedy Zone Charlotte, NC is located at the corner of Trade and Tryon, in the heart of Uptown Charlotte, NC. It's a small club that hosts a variety of comedy shows and events, including open mic nights on Tuesdays, hosted by Chris Woods. On Wednesdays the special guest comedian takes over; Thursday nights feature their featured comedians, and Saturdays have an open mic night as well as Headliners Night (featuring some big names).
The Comedy Zone boasts free parking (instructions are posted outside), valet service for $3 per vehicle—which is great if you're trying to avoid street parking—and free Wi-Fi throughout their space!
Rush Hour Karting

Location: The Rush Hour Karting location is located at the Charlotte, NC Motor Speedway which is located in Concord, North Carolina.
What to expect: Rush Hour Karting offers a variety of different karting experiences for both young and old alike. You can also explore their newest attraction called “The Lightning Lap Experience” where you will experience driving on very tight corners while racing against another driver who has already completed their lap before yours begins! If this sounds exciting then try it out today!
How much does it cost? Prices vary depending on what type of package you purchase but most include race entry fees along with unlimited miles per day for two days total during peak hours when traffic tends to slow down due to inflammation between lanes causing accidents."
The Bear-Stone-Carolina Raptor Center

The Bear-Stone-Carolina Raptor Center is a great place to see live birds of prey. You can see hawks and falcons, eagles and owls, as well as a bald eagle up close. They also have an educational exhibit about the lives of these birds in order to learn more about them.
You can take a nature walk through their grounds or go on one of their guided tours where you’ll get to learn more about how these animals live and thrive in their natural habitat. If you want something more hands-on, they also offer bird-feeding programs for guests who want to feed some of these beautiful creatures!
These are all fun things to do in Charlotte, NC.
If you’re looking for a vacation, here are the best things to do in Charlotte, NC. You can find out more about these places on TripAdvisor and Google. You can also check out Yelp if you want to see how other people have rated them!
If you're looking for a fun weekend in Charlotte, NC, then check out these places! We hope that this list of things to do will help you to decide which ones are the best for your family.
At NICS of Charlotte, we know that your home is more than a place to sleep. It's an important part of you and your family's safety, health, and well-being—so when you're faced with a flood, it's important to know the steps you can take to make sure your home is safe and ready for what's next.

We're here to help. We'll assess your home, identify any flood damage and prepare a plan for repairs that will keep you safe and protected until the work can be completed. Our team will treat your property with respect and care while they work on your repair project so that you can spend as little time away from your home as possible.
NICS of Charlotte
2501 Duncan Ave Suite B, Charlotte, NC 28205, United States
980-346-5321
https://nicsrestoration.com/
https://www.google.com/maps?cid=12735810497009646493
1 note
·
View note
Text
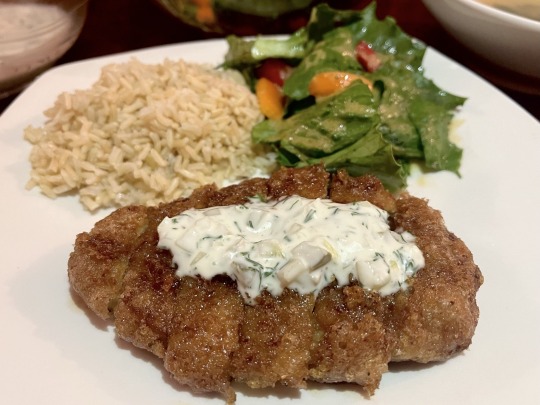
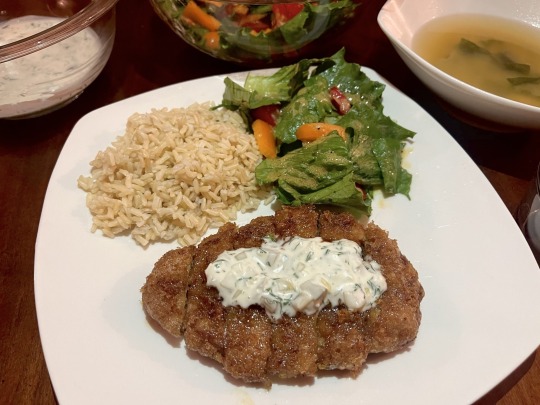
[ID: A fried 'chicken' cutlet topped with tartar sauce and served with rice and a green salad; bowls of tartar sauce and miso soup are in the background. End ID]
チキン南蛮 / Chicken nanban (Japanese fried chicken with sweet-savory sauce)
Chicken “nanban” (南蛮; "barbarian" or "foreign") is a classic example of 洋食 (yoshoku)—Western-style food adapted to a Japanese palette. Chicken breast is breaded, deep-fried, and coated in a mixture of soy sauce, sugar, and vinegar to create a crispy, tangy, savoury-sweet dish.
The method of breading and deep-frying used in making chicken nanban, tempura, and other Japanese dishes was introduced by the Portuguese during the Muromachi period (16th century). Chicken nanban itself, however, is far more recent: Nao-chan diner in the Miyazaki Prefecture of Kyushu is credited with having invented it in the 1950s. Nao-chan's version of the dish does not include tartar sauce, but it is often added to provide a sharp, creamy complement to the savoury chicken.
Chicken nanban works well as a main dish served with sides of rice, soup, or salad. If you're using pre-made chicken breasts, it comes together in around half an hour.
Recipe under the cut!
Patreon | Tip jar
Serves 4.
Ingredients:
For the chicken:
4 Gardein chicken breasts, or other chicken breast substitute, thawed
1/4 cup (30g) all-purpose flour
2 Tbsp potato starch or cornstarch (optional)
2 Tbsp egg replacer (I used Bob's Red Mill)
Water
Pinch kosher salt
A few cracks of black pepper
Oil to deep fry
For the nanbanzu / 南蛮酢 (nanban sauce):
3 Tbsp Japanese soy sauce, such as Kikkoman's
3 Tbsp rice vinegar
3 Tbsp granulated vegetarian sugar
1 1/2 Tbsp mirin (for a low-alcohol version, use aji-mirin; for an alcohol-free version, replace with 1/2 Tbsp rice vinegar and 1 Tbsp sugar)
For the tartar sauce:
1/2 cup vegan mayonnaise
1/2 tsp mild Dijon mustard
2 tsp rice vinegar
1 tsp dried ground shiitake mushroom, or kombu dashi powder
1 tsp vegetarian sugar
A few small sweet pickles or 1 Japanese or Persian cucumber, diced
1/2 small yellow onion, minced
Pinch kosher salt
Pinch of MSG
Minced dill or parsley (optional)
If you eat eggs, you can replace the first five ingredients with 1/2 cup Kewpie mayo (キューピーマヨ).
Instructions:
For the nanbanzu / 南蛮酢 (nanban sauce):
1. Heat sugar and soy sauce in a small pot over medium-low heat until simmering, stirring to dissolve.
2. Add vinegar and mirin and heat for another 30 seconds. Remove from heat.
For the tartar sauce:
1. Mince the onion. If you prefer, you can submerge the minced onion in cool water for 10 minutes or so and then drain to remove some of its sharpness. Seed and mince the cucumber.
2. Whisk mayonnaise, mustard, sugar, salt, black pepper, MSG, rice vinegar, and mushroom powder together to combine. Add onion and cucumber and stir. Top with herbs. Refrigerate while preparing the chicken.
For the chicken:
1. Mix flour, starch, salt, and black pepper together on a plate or cutting board. In a small bowl, combine egg replacer with water according to package directions and allow to thicken.
2. Fill a deep fryer or medium-sized pot with several inches of a neutral oil and heat it to 340 °F (171 °C). A chopstick placed in the oil should slowly form small bubbles around its tip.
3. Coat chicken breasts with egg replacer; if it is too thick, you may need to whisk in an additional 1-2 Tbsp water.
4. First deep fry. Carefully lower one chicken breast into the oil and fry without disturbing for about 2 minutes, until the egg coating on the bottom side is cooked through and lightly golden brown. Flip over and continue to fry for another 2 minutes. Use chopsticks or a slotted spatula to remove the chicken breast onto a wire cooling rack or paper-towel-lined plate.
5. Use a slotted spoon to remove any bits of batter from the oil and re-check the temperature. Repeat with each chicken breast.
6. Second deep fry. Increase the heat slightly to raise the temperature of the oil to 355 °F (179 °C). Re-fry each chicken breast for about a minute, flipping once halfway through. Set aside.
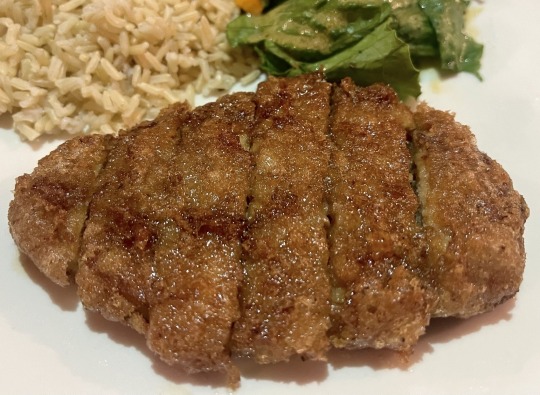
7. Coat with nanban sauce. Place the fried chicken breasts in a shallow rimmed baking dish or tray and spoon most of the nanban sauce over them, turning over several times to coat. Reserve the rest of the sauce for serving.
8. Slice each chicken breast widthwise and transfer to an individual serving plate. Serve with additional nanban sauce, tartar sauce, rice, a green salad, or soup.
106 notes
·
View notes
Text
Vegan Cream of Mushroom Soup💛🌱

💚 Please Follow Our Page to have such a mouth-watering 🍅 Recipes on Daily Basis
.
.
It’s so creamy, velvety and luxurious, with lots of mushroom chunks! by @twospoons.ca
.
.
📋Ingredients
1/2 cup raw cashews
1/4 cup olive oil
1 sweet onion finely chopped
3 cloves garlic finely chopped
1 1/2 lb cremini mushrooms sliced
1/4 cup all-purpose flour
2 cups vegetable broth
6 sprigs thyme tied with twine
2 bay leaves
1 tsp sea salt
1/4 tsp pepper
1 tbsp miso white or red
1. In a small bowl and the cashews and pour in boiling water to soak. Set aside.
2. In a large pot, add the olive oil, onion and garlic and bring to medium-high heat. Cook, stirring often until the onions have softened, about 7 minutes).
3. Add the mushrooms and cook for 5 to 7 minutes, then sprinkle in the flour and mix together. Cook for 2 minutes, then pour in 1/2 cup of the vegetable broth and bring to a low simmer. Toss in the thyme, bay leaves, salt and pepper. Simmer the soup for 5 minutes, then pour in the remaining broth. Cover and let the soup simmer for 10 to 15 minutes.
4. Meanwhile, make the cashew cream: strain the cashews and add to a high-speed blender with the miso and 3/4 cup of fresh water. Blend until smooth and creamy.
5. Turn the heat to low and pour the cashew cream into the soup. Stir everything to combine. Scoop out the thyme and bay leaf and serve.
💚 Get Your Smootie Diet Recipe For Weight Loss, Clearer/Smoother Skin, and A Healthier Lifestyle Now 10% Off.
#veganrecipes#vegan food#veganism#veganskincare#vegan#cooking#vegano#foodblogger#weightloss#vegetarian
126 notes
·
View notes
Text
Kiritanpo Nabe (Makes 4 Servings)

We bring you this recipe from our panel, “Anime Foodies: Laid-Back Camp Season 2”.
This hotpot is one of a pair of nabes that Aoi, Chiaki, and Ena get to enjoy with the liquor store proprietors who come to their aid in Episode 6 after they failed to properly prepare for winter camping at Cape Ohmama. This kiritanpo nabe – a hotpot from Akita Prefecture which uses the region’s famous mashed rice dish, kiritanpo – was the nabe offering from Aoi, Chiaki, and Ena which they had intended to enjoy together before their debacle caused them to share it with their rescuers.
1 Packet – Mizkan Hot-Pot Soup Base: Goma and Tonyu Nabe
2 Cups – Water
1/2 Pound – Ground Chicken
2 TBSP – Soy Sauce
3/4 TSP – Garlic Powder
3/4 TSP – Powdered Ginger
1 1/2 Cup (Dried) – Japanese Short Grain White Rice
2 TSP – Kosher Salt
2 TBSP – Canola Oil (Vegetable Oil)
2 Cups – Hearty Pork Miso Soup Add-Ins
4 Oz. – Maitake Mushrooms (Shiitake Mushrooms)
12 – Green Onion Bases (Negi)
1 Bunch – Mitsuba (Chinese Celery)
At home, place the ground chicken, soy sauce, garlic powder, and powdered ginger into a mixing bowl and mix thoroughly by hand or with a large spoon until everything is fully incorporated and the mix is a smooth paste.
Form the mix into small meatballs and store in a flat container to take to the campsite.
At the campsite, prepare the rice per the instructions provided here.
Once done, as the rice cools somewhat, combine 1 cup of water with the kosher salt until the salt is entirely dissolved.
When the rice is still warm, take 1/2 – 3/4 of a cup of rice, place it into a mortar, and mash with a pestle until it is very sticky. You should still see about half the rice grains, but it should be study enough to lift the mortar when you pull the pestle up on its own.
Once mashed, coat your hands in some of the salt water, take a thick skewer or pair of disposable chopsticks kept together and wipe some water on this as well, and then grab the entire helping of mashed rice and begin forming it on the skewer.
Shape into an even 6 inch log along the middle of the skewer and set onto a plate that has some of the salt water on it.
Repeat this process till you have 4 of these kiritanpo made.
Add the canola oil to a 10 inch skillet and set over medium-high heat.
Add the kiritanpo side-by-side and cook, turning occasionally, for 10-15 minutes or until they have a golden brown crust all around as best as possible.
Once cooled, remove the skewer by pulling on it and spinning – if the skewer is round – or rocking it back and forth – if the skewer is not round – and split each kiritanpo in half at the middle.
In your hotpot pot, take the hotpot base and 1 cup of water, bring to a boil, and reduce to a simmer.
Add the chicken meatballs and simmer for 7 minutes.
Move the chicken meatballs into their own section and add the hearty pork miso soup add-ins, green onion bases, and maitake into their own sections and simmer for 5 minutes.
Add the split kiritanpo into their own section and simmer for 5 more minutes.
Add the mitsuba into its own section, cut off the heat, and serve.

Optional/Notes:
If you cannot find the particular Mizkan hotpot base used in the show, a quick search online will net you a selection of alternative recipes for a sesame soy milk hotpot base.
The recipe for our recreation of the packaged pork soup add-ins can be found on our Tumblr page here.
If you would like to reduce your prep time, you can buy pre-made meatballs from the store as the characters did in the show.
The amount of water needed for 1 1/2 cups of dry rice is 1 3/4 + 1 TBSP.
Maitake mushrooms tend to go by the name “Hen of the Woods Mushroom” in the United States.
Mitsuba is used in this dish by the kids as a substitute for Chinese celery – seri in Japanese – so if you cannot find mitsuba, Chinese celery is much more readily available and was really the intended ingredient anyway.
If you have the ability to do so, a classic way of making kiritanpo is to roast them by or over a fire, so you’re welcome to do so if available at your campsite.
#anime#anime food#anime foodies#nos anime#camping#food#yuru camp#yurucamp#laid back camp season 2#camping food#laid back camp the movie
9 notes
·
View notes
Note
Dearest Talviel,
I was simply wondering if you knew of any dishes that contained with raw meat, fish, or anything uncooked. I dislike most cooked foods, as it hurts my poor, fragile, totally-not-a-lich body. If you could direct me towards any foods of the sort, I will be eternally grateful.
Sincerely signed,
Tan'ë the Traitorous
Dear Tan'ë,
I'm going to overlook the concerning tone of your message, and answer as best I can. There are plenty of raw meat dishes which are consumed around Tamriel, and they're delicious while still being gentle on lich stomachs (I've never considered that as even being a thing).
Altmer
It may come as some surprise, but the Summerset Isles really enjoys its raw and rare meats and seafood, as well as fresh raw vegetables to pair with. While it sounds slimy (get used to it, that's just raw food), I personally love a raw seafood mix with miso dressing and brown rice. My favourites are fatty tuna belly, salmon, swordfish, squid, and sweet shrimp!
Argonians
While I don't ever recommend eating anything raw in Black Marsh unless you're an Argonian, I must say that kitfo is extremely good and worth almost catching swamp sickness from. It's raw, spice minced water buffalo with ghee. It's served with flatbread and is flavourful and spicy.
Bosmer
Of course the Bosmer have mastered raw meat dishes, although there are far fewer than you would expect (it's the flies in Valenwood). One of the more unconventional delicacies that I still can't bring myself to try is duck foetus, straight from the shell. It's apparently very good, but the last time it was offered to me I nearly fainted, so I can't really say much more than this...
Bretons
Steak tartare is known across Tamriel as the dish from High Rock. The very best horse meat is minced until delightfully fine, almost fluffy in texture. It's seasoned with a secret mix of herbs, spices, and sauces, and served with a raw goose or swan egg yolk perched on top. Simply scramble all the ingredients on your plate together (if your waiter doesn't do it for you), and dig in!
Dunmer
The Dunmer of Vvardenfell do an excellent carpaccio-style platter of nix-hound or guar, served with thinly sliced roasted ash yams. The naturally smoky flavour of the ingredients is coaxed out with a light marinade in saltrice sauce and minced comberry.
Imperials
Ah, proper carpaccio (no offense, Vvardenfell). Thin slices of beef that melt in the mouth makes the perfect appetizer! It's usually served with any number of complimentary ingredients, like thinly-sliced parmesan, tomatoes, olive oil, crumbled feta, rucola, and fresh basil. Delicious!
Khajiit
My favourite raw dish is an Elsweyr-style blend of beef and pork mince, that's flavoured and spiced with ginger, fish sauce, tamarind paste, lime, and chili. It's also sometimes mixed with pork blood to thicken the dish into a paste.
Nords
We're not fans of raw anything in Skyrim, but fermented? That's what I'm talking about! Hákarl is a very acquired taste, and is made from a type of shark only found in the Sea of Ghosts. It's left to ferment through a drying process that takes months, and the end result is a joke we like to play on outlanders. It's meant to be cut into small pieces to enjoy, and washed down with some mead or spirit (which you'll need to clear your nose of the smell, which is distinctively like cat piss).
Orcs
The Orcs make a fantastic dish of sliced raw beef that's cured for a couple of hours in a mix of lemon juice, hot dried chilis, and brandy. It's served in thin or thick slices depending on your preference, and goes well with dips and flatbread.
Redguards
It's actually optional to skip roasting your meatballs, which is a joke made every time someone takes a bite of raw goat cakes. These delightful meatballs are quite large, and spiced with all sorts of exotic herbs (the recipe varies from household to household). While it's usually grilled after forming, it is perfectly acceptable to eat your goat cakes raw with flatbread or couscous to serve.
#Asks#Food#Raw food#Meat#Cooking#World building#worldbuilding#TES#The Elder Scrolls#Tastes of Tamriel#tastesoftamriel
113 notes
·
View notes
Text
Feeding Yourself on Site
Ok I’ll be the first to admit, I am not the poster child for this. I am notoriously bad at planning and bringing meals to the dig site. Doing it in my normal life is hard enough and then you add planning, a time limit to make and eat it plus the facilities available to you on site? It’s not great. But this is a super important part of digging. You’re using allot of energy and you need to eat. So here are some tips and favourite items I’ve complied to try and make that a reality.
Things you might always want to have
> Chocolate/ cookies
> Tea/ instant coffee/ hot chocolate etc.
> Electrolyte/ vitamin drink mix
These are just some basics you’ll probably want on site. When you’re digging the little mood boost provided by chocolate or cookies etc. Is invaluable. Not to mention that it’s pretty common to bring snacks to share with others and cookies or candies are always a hit. I’d also suggest a favourite warm beverage of choice cause sometimes you just need it to keep going. Most sites have hot water of some kind available but if it doesn’t I’d suggest bringing a thermos of it with you (even then it’s good to have your own cup/ mug to drink from).
Snacks are your friend
> Hummus + crackers and/or veggies
> Fruit bars/ leather/ strips
> Granola bars
> Nuts or trail mix
> Oat cakes
> Cheese
> Soup packets/ to go cups (my go to is miso soup packets)
Even if you can’t manage to make a full meal (which I never can), snacks are perfect. They usually come pre made and pre packaged and you can just throw them into your bag and you’re done. The two main things for this though is that 1. You want enough of them to keep you going, and 2. They need to be filling an healthy cause they’re replacing a meal. Even if you’re just packing snacks to add to a meal these principles stay the same, and worse comes to worse if it’s more than you eat that day you can keep it in your bag for the next.
Easy meals to bring
> The ever underrated sandwich
- Even if it’s just the components of a sandwich thrown together but eaten separately it’s always a solid option.
> Chickpea salad/ pasta salad
- Theses are good because they’re filling and easier to keep in the field than other salads. Throw some pasta or chickpeas together with some cucumber, red onion, herbs, peepers or tomatoes and toss with some oil and vinegar/ lemon juice and you’re good to go.
> Wraps or pancakes
- Like the sandwich you can throw anything in these. If you’re in Europe you can usually buy pre-made thin pancakes (or you can find them at IKEA).
> Oatmeal
- This can go either savoury or sweet depending on your taste and can be eaten hot or cold. For sweet i’d suggest adding seeds (chia, pumpkin, sunflower) and some kind of nut or seed butter, along with some dried fruit to bulk it out. Savoury I’d say add in some frozen veg (spinach, veg mix etc), hummus and some sort of veggie or regular sausage.
> Charcuterie/ smörgåsbord/ ploughman’s
- This is a fancy way of basically saying cold meat, bread, cheese, some veg, maybe a hard boiled egg. Plus some sort of spread like jam, marmalade, tahini etc for the bread.
> Frittata (thick omelette)
- Again sounds fancy but really just load up some whisked eggs with veg, meat, cheese, etc. And cut pieces to take with you as needed.
—
These are just some suggestions but of course everyone has their favourite foods. Just make sure that everything you bring can be eaten cold because you aren’t always guaranteed somewhere to heat food. And most importantly just remember that food is food. As long as you’ve gotten some sort of sustenance for the day that’s an achievement even if it’s not the ‘ideal’.
#archaeology#archaeologist#digging#archeology dig#food#snacks#adhd#neurodivergent#history#classics#anthropology#archeology#archeologist
6 notes
·
View notes
Text
EASY WEEKDAY RAMEN
Just an easy weekday lunch on the cheap without compromising flavor or satisfaction. I learned most everything I know from the “way of ramen” channel on YouTube so check them out.
THE FIVE COMPONENTS:
Really good ramen has five basic components. Broth, noodles, aromatic oil, tare (seasonings like mirin and soy sauce), and toppings. Let’s take a look at some options I feel fit the cheap and easy vibe of this recipe.
The soup: at home I just use the packet from instant ramen, my favorites being Sapporo ichiban beef, and nissin’s tonkotsu from their raoh line.
I also like to add umami using a ground mushroom mix from Trader Joe’s, since I don’t like the texture of mushrooms. You could also use dried shiitake too.
NOODLES: again we turn to instant ramen for the noodles. They’re quick, and palatable enough for me, though I avoid maruchan where possible. I like to boil them separately from the soup usually, but lately I’ve gotten lazy and boil them together to save on dishes. You could also make your own noodles but beware, chefs mean it when they say it takes ten years to master making noodles.
OIL: This part seems to get overlooked a lot but it’s a big part of enjoying the bowl 🍲 I like to use about a clove of minced garlic and an equal amount of ginger paste. Fry in a quarter cup of vegetable oil for a minute or until the garlic and ginger are nicely browned and remove from the heat. To make this quicker and spicier you can also use chili oil instead.
TARE: traditional ramen gets all of its bolder flavors from the tare, but we’ve already got a lot going on here, so we’ll keep it simple. A table spin of soy sauce and a dash each of mirin and Worcestershire sauce. If you’re making this ahead of time you can also cook the tare on the stove with garlic and ginger to increase the flavor and mellow out the soy sauce.
TOPPINGS: everybody’s favorite part of ramen am I right? Now I presume you’ve seen naruto before and if not let me explain that he likes ramen with a soft boiled egg, extra chashu pork and pickled bamboo shoot (menma).
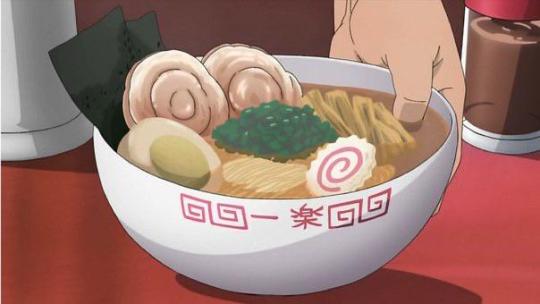
I don’t really care to make chashu and can’t seem to find it at my local grocer, so I go for lunch meats. Particularly sliced roast Beef if I’m making a beef broth. Here’s some other tasty toppings
Blanched spinach
Water chestnuts (sliced)
Sliced green/spring onion
Sliced and grilled leek
Small nori (dried seaweed) sheets
Bean sprouts (boiled is best)
Crispy bacon
I’ve also heard good things about corn and butter on miso ramen.
SERVING: we’re not done yet. Many chefs advocate serving in a warmed bowl. I made this easy by microwaving my bowls for 30 sec. adjust according to your dishes and microwave. From here we start with about a tablespoon of your aromatic oil, then a tablespoon of tare. As about two cups of soup, and then noodles. Pull your noodles from one end of the bowl across to form a visible patty in the middle of your showy like me. Finally add your desired toppings. I like a couple pieces of nori, roast beef, pickled bamboo shoots, and green onion.
And there you have it. Ideally this should have only taken two pots and a can opener for dishes, so it’s great for serving a crowd. And now that we’ve come to the end, do me a favor, experiment for yourself and tell me how it goes. See if you can make miso ramen work, because I can’t seem to get close to restaurant quality miso.
TLDR: add cheap toppings and umami boosters to your instant ramen to make it taste better.
24 notes
·
View notes
Text
What's up, anime foodies, we're back for another round of making delicious sakuga munchies, and today we've got a great set for the week: Revolutionary Girl Utena!
Have you heard, have you heard? This show feeds us a lot of delicious meals, from opening night dorm feast (soup/salad/bread), to exploding curry, to Wakaba's bento ("mostly instant"), to takoyaki and yakisoba, to delicious steak, to delicious fried eggs, to delicious cake, to delicious brandy-stewed rose hips jam.
It all culminates here, though: the Lunch Called Disassociation.
Now, we never get to see the eventual lunch in the show, so there are a few possible interpretations we'll be making. What we know for sure are the following ingredients:
-Egg
-Asparagus
-Salmon

For all meals, we will assume that the salmon and asparagus have been prepared the same way.
The original footage states that the salmon is dinner leftovers. We'll just use the foil-steamed method as seen in Today's Menu for the Emiya Family, episode 2.
Osmose excess liquid from fillet using salt/sake for 10 minutes, wrap fillet in foil with seasoning and veggies of choice (picture below shows rehydrated garlic power and onion flakes, plus a chimichurri seasoning mix), steam in a covered pan over medium-low heat for 15-20 minutes. The original recipe also calls for butter, but I've found that the salmon itself contains enough fat.

saumon la filet révolutionnaire
One can include the asparagus in the foil packets, but in the original footage, Utena said that she planned to boil the asparagus, which implies that it was not a part of the salmon leftovers, that she would cook them from fresh. So we're going to do a blanch:
Snap off the woody end of each stalk. Submerge stalks in salted boiling water for 30-40 seconds, then stop the cooking process with an ice bath. (Be very liberal with the amount of salt in the water. There has to be enough for saltiness to osmose into the asparagus with only 30 seconds of exposure!) The blanched asparagus should be bright green, no browning. Generally, 6 stalks will be one meal serving.
-------
In the first iteration of the proposed lunch, eggs are specified as "tamagoyaki." This is rolled egg omelette, which is then often sliced like a sausage. Tamagoyaki points towards a bento configuration. (Which means, also make some rice by whichever is your usual method.)
There are many instruction videos out there for tamagoyaki, but here's a short outline:
The bento serving shown below is half of a roll made with 2 eggs. 2 eggs is usually the minimum amount to make a roll in a small pan. A common ratio is 3 tablespoons (or less) of flavoring liquids to 4 eggs. Flavoring liquids can be any combination of mirin, dashi (use excess for miso soup), soy sauce, or rice vinegar. Season with salt, sugar, miso, or MSG to make up the flavor profiles for the liquids that are left out.
Beat eggs, flavoring liquids, and seasoning together. Oil a small pan and put over medium heat. Pour a thin layer of egg on the pan (about 1/3-1/2 of your eggs), let it solidify a little, before beginning to roll. after the first roll, push to the side, re-oil the pan, add remaining egg mix, roll again. Repeat untill all egg mixture is used. Remove roll from heat, and slice after cooling.
Assemble your bento! The non-rice incredients can be kept separate from each other using cupcake wrappers, or lettuce leaves for extra salad.
-Half rice, as most all bento do
-Salmon fillet, cut to fit the bento
-Tamagoyaki
-Blanched asparagus salad. Marinate in or spritz with dressing of choice. (lemon juice, vinaigrette, or for marinade, a mixture of gojujang/mirin/miso/water.)

Utena making lunch for them is a new development, though. In the first two arcs, the dorm serves dinner, and Utena buys lunch from and has tea in the courtyard cafeteria, or buys packaged buns and snacks.
-------
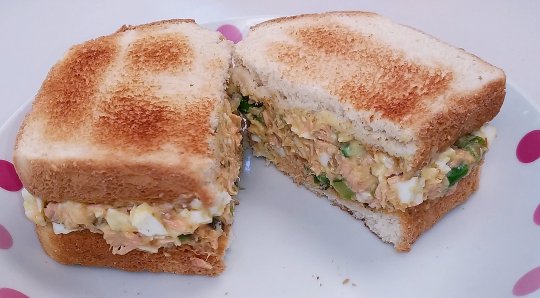
In the second iteration of the proposed lunch, the idea of sandwiches is brought up. This specific version is described in a "salmon/egg salad sandwich" way, where the "filling" is a single mash of all ingredients.
Mash salmon and hardboiled egg with mayonnaise together with a fork. Cut asparagus into 1/2-inch pieces, blanch, and mix into filling. Add a thin layer of mayonnaise to the bread before adding filling, then press the sandwich together.
To get a little bit fancier, use two hardboiled eggs cooked for different time periods, in order to provide two different textures of yolk. Boil one for 8.5 minutes (more jammy), and the other for 10.5 minutes (more firm). If the yolks are undercooked for whatever reason, just microwave them for a minute or so, until they reach the desired texture.
Pro-tip: Talk about making this sandwich when you're trapped in a car with someone you don't want to be trapped in a car with
-------
Those are the two lunches talked about in the show, but holy shit I have so much salmon and asparagus still left I need to use them upof course, there are a few different sandwich variations one can make with the same ingredients. In the following two pictures, there’s mayo spread on the bread, and some honey mustard sauce drizzled on the middle asparagus layer.
-salmon, asparagus,sliced hard-boiled egg

Nanami worked so hard to supply all these eggs. Press f to have a glass of milk to honor her sacrifice.
-salmon, asparagus, scrambled eggs
(This configuration is very similar to the sandwich seen in Today's Menu for the Emiya Family, episode 4, but with salmon substituting for bacon.)

Today's Menu for the HimEmiya Family
Later in the week, if the asparagus is going too mushy to be used fresh, consider blending it with oil (or cream of choice) and seasoning into a sauce/dressing.
-------
(Even though the following suggestions weren't brought up by Utena at all in the original footage, we've STILL got ingredients left to use up, so we WILL, DAMMIT)
Given that we got to assume rice for the bento earlier, lunch could be leftovers onigiri!
-salmon/asparagus
-asparagus/scrambled egg

Crumble! Crumble like the shining castle in the sky marking you as a failure of a duelist!
Finally, if things really roll over from leftovers lunch to leftovers dinner (after all, the salmon is actually probably from The Breakfast The Day Before The Lunch Called Disassociation, because Utena had dinner at the hotel, spent all day at the amusement park, and worried about the bread from that morning), you can never go wrong with leftovers fried rice.

Can you hear that? It's a microwave ding. I get to actually reheat things for lunch. Because I'M AN ADULT. *car revs*
And there you have it! An entire work-week's worth of the Lunch Called Disassociation! Make sure to make double servings, for you and your roommate!
#revolutionary girl utena#shoujo kakumei utena#category: anime#food#so I heard today is all about revolution or something#category: my stuff
12 notes
·
View notes
Last Seen Blogs

agusart2blue
AGUS ART 2

scrogginsjh
Scrogginsjh

aclassikrem
Horns Up, Chargers!

wekrispycollectiondinosaurl-blog
Untitled

real-me-is-not-me
home is where the heart is