#pattern tutorial
Explore tagged Tumblr posts
Visit Tumblr Blog
Explore Tumblr blogs with no restrictions, modern design and the best experience.
Last Seen Tumblr Blogs


Fun Fact
Tumblr was created by web developers David Karp and Marco Arment.
Text
Texture in Digital Pattern Design: Essential Guide to Pattern Effects
Hey texture explorers! 💫
You know that moment when you're staring at your pattern design thinking "why doesn't this look like the ones I love on Pinterest?" Yeah, we've been there too (like, a lot 😅). After countless hours of trying to figure out why our designs felt... flat, we finally cracked it: TEXTURE.
We're not talking about those overwhelming, over-the-top textures that scream "I just discovered filters!" We mean those subtle, gorgeous details that make digital patterns feel alive. You know the ones!
Here's what we've learned on our texture journey (and we're still learning!):
→ Sometimes the smallest grain makes the biggest difference
→ Abstract textures aren't as scary as they look
→ Gradient textures? Total game-changer
→ Those "happy accidents" with mixed media often turn out to be the best designs
We've put together everything we wish someone had told us when we started - all the trials, errors, and tiny victories that got us here. Because honestly? We're all figuring this out together, and that's what makes it fun!
✨ Check out our full guide here: https://design2repeat.com/texture-in-digital-pattern-design
Let's keep exploring and creating together! Drop us a note if you've had any texture "aha!" moments - we'd love to hear about your journey too!
#digital art#pattern design#artist resources#design tips#art tips#digital design#surface pattern design#artistic#art reference#artists on tumblr#design resources#pattern tutorial#digital pattern#texture tutorial#art tutorial#design help#artist help#pattern artist#surface design#pattern maker
2 notes
·
View notes
Text


6.1.25 - made a felt shrimp doll pattern and rough guide just in case anyone would be interested in making one, too
2K notes
·
View notes
Text
Having a Mushroom Moment....
Most of my more popular posts this last month have been mushroom related! You guys will probably like this video tutorial for Twisted Yarn's Magic Mushroom Stitch.

It produces imo a really well-defined mushroom shape.
#crochet#crochet pattern#free crochet pattern#crochet stitches#magic mushroom stitch#mushrooms#fungi#video tutorial#1k
1K notes
·
View notes
Text

From Davis Ray: It took me 55 years to make this quilt! At 10 years old, in 1968, I told my mom I wanted to make a quilt for my bed. She gave me fabric and suggested I trace a postcard. Smart woman…I wouldn’t have to match corners! Well, time flies and here I am in 2023, aged 65. I retired and finally finished it. Mom is 99 years old and I am thrilled to have a photo of both of us with the quilt. I hand sewed a pocket on the back to hold the postcard, photos and the story of this quilt.
#crafts#decor#sewing#quilting#briar rose quilts#bedding#gifts#shopping#quilters of tumblr#holiday#postcard quilt#quiltblr#quilt pattern#quilt tutorial#quilting as art#fabric art#embroidery#textile art#art quilt#fiber arts#quilt#quilts#textiles#davis ray
483 notes
·
View notes
Text
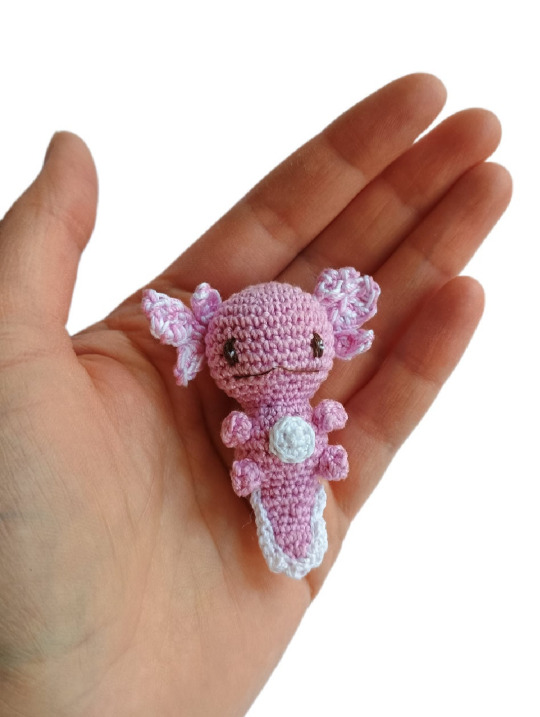
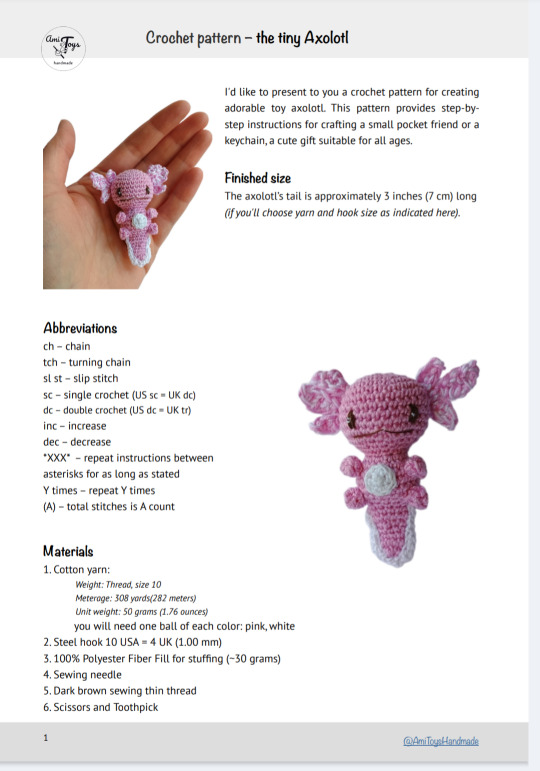

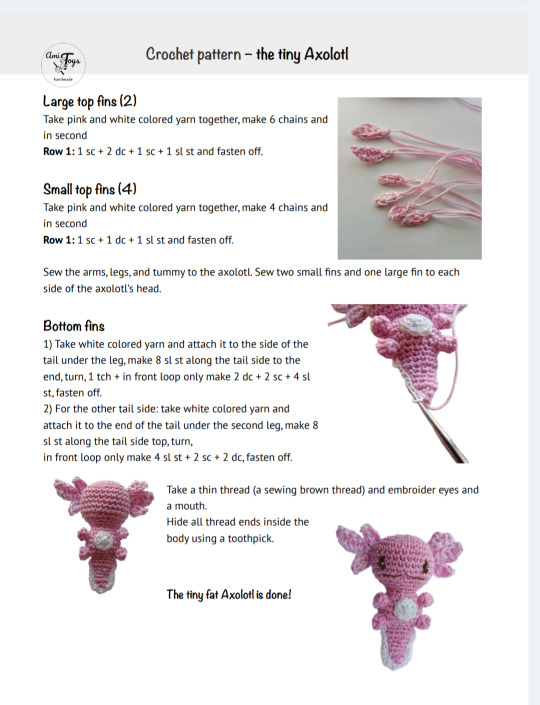
Crochet pattern: Axolotl
#axolotol#crochetpattern#crocheting#crochet#pattern#amigurumis#crochet axolotl#crochet free pattern#freerochetpattern#crochet pattern#amigurumi#miniature#crochet keychain#keychain#free tutorial
720 notes
·
View notes
Text
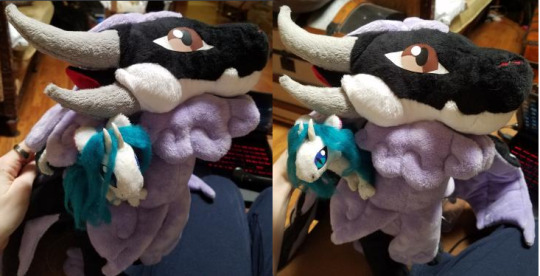
how to grub your karkat
or you can use this for any other plush or if you wanna make a whole new plush entirely or whatever

disclaimer im not a professional in any sense of the word and theres anything technical im doing wrong or you think you can do it better by all means dont hold back
Things you’ll need
sewing machine unless youre really dedicated but doing it by hand is gonna be an agonizing feat i promise. I just used a straight stitch for everything
Fabrics: for the main body i suggest a minky or something soft, for the inner lining something in the same color as the main body and ideally with some stretch, and anything black for the legs. Less than a yard of each will do
if youre using minky or anything furry get a lint roller. Trust me
stuffing, i used polyfil
threads that match your fabrics
good fabric scissors
sewing needle for hand sewing/fixes
karkat plush (optional)

Heres the pattern i came up with! They are numbered for your convenience and pieces with the same numbers are going to be part of the same row of segments. cut everything out on the black lines (Make sure when you’re printing to fit the image to the page size.) on the left we have the belly pieces, the right is the main body, and we have the foot in between
Im using a relatively thin minky fabric, im sure you can use whatever but something with some fluffiness kinda helps to mask any imperfections in the sewing. When drawing out your patterns keep in mind what direction your fibers settle in and try to keep it consistent
On the wrong side of the fabric measure out at least a half inch seam allowance around each piece of the pattern, i used a centimeter and that worked but had me sweatin a bit.

For the main body pieces fold your fabric in half before you cut so you can have 2 of each segment that are mirrored to each other, i also extended all of the #1 pieces an additional centimeter/half inch at the top so we can fold them over at the very end. I highly suggest numbering the insides of all the cut pieces, especially in a way where you will remember what direction they are each meant to sit

After you’ve numbered all your pieces, set them aside and start making your feet!
Each of the 6 legs is made of two pieces, but i because i only had a swatch of the black minky i made up for the rest with some random black scrap fabric from an old project. Try to keep your fabric consistent if you can lol
I didnt give these pieces any more seam allowance on the fabric but i recommend adding a centimeter or half inch to the base of it to extend the length and have some more wiggle room

like so
Instead of cutting out 12 individual pieces and struggling to stitch them all together i started with 6, then pinning each piece real tight with the right/furry side down onto my secondary fabric, and slowly stitching around the shape real close to the edges- DO NOT CLOSE THE FLAT SIDE as we are going to stuff the feet through here

Now cut the shape out of the fabric and repeat till you have 6 feet

Now flip those bad boys inside out, stuff up, and if you wanna you can match them to their best pairs

now grab a pair of feeties and your #1 pieces and line them up, in this picture my belly #1 piece is shorter bc i forgot to add the extra centimeter and i recut that once i realized. Line those sides up with the right/furry parts touching and with the feet in between, flip it around to make sure everything's sitting the way you want it

Note. i didnt realize until later but i sewed my feet in upside down. save yourself the time it takes to fix it and dont make the same mistake
Straight stitch these layers together and repeat with the next two segments our good friends #2 & #3

Repeat this for the #2 and #3 sections but NOT THE #4, that part doesnt need feet! just line those edges up right/furry sides together and sew


the secret to the squish of the suit is making this inner lining from another fabric and stuffing it! I used what i had leftover from a stretchy red fabric for a kanaya skirt. For this we need to make a new pattern for each section, making sure it follows the curve of the round edge but the piece itself is shorter, almost like youre removing the seam allowance you added. Mine is a centimeter shorter on the top and on the bottom and reaches to the middle

Make one of these for each numbered segment,you only need to make half the pattern and you can fold your fabric in half on a crease and you end up with one symmetrical piece (bars)

Now you need to pin these pieces right on top of the wrong side of your numbered furry sections and line up the straight edges like so (disclaimer for LOTS OF SCARY NEEDLES !!)

Admittedly i didnt estimate how long these pieces needed to be very accurately and overshot it a bit, if you start pinning it from the middle and continue outwards on either side thatll ensure its not too lose and you can cut off any excess after
The only exception is piece #1, if you recall we gave this #1 section extra seam allowance. This is so we can sew down that excess at the neck later and hide any of the inside that might show once its all put together. Do not connect the top edge to the inner lining! Since i added an extra centimeter earlier im gonna leave that hanging and pin + sew down the inner lining a centimeter lower than the top edge. LEAVE THE CURVED EDGES OPEN! DONT SEW THEM TOGETHER! those stay open to stuff

Straight stitch the lined up edges together

Now you have all these skinned pieces of little freak and we need to connect all these segments together making sure to sew UNDER the existing stitches so we dont see those on the outside when its all put together


Inside looks like a bit of a mess but thats fine bc its not the part that matters
Now stuff it! you might need a stick or pencil or something long and thin to get stuffing into the middle bits

Now thats its stuffed you can finally close those curved edges. Try not to sew over a thick mound of stuffing, push it in a little further to give yourself some space and you can fluff it back out after everythings closed. I cut off that excess lining fabric after sewing

Ough… they filleted my boy…
Finally, match up all the edges and lines and HAND SEW them right sides together. You will destroy your machine trying to work around that stuffing i promise. You also have an excuse to get up from your work desk and sew on a couch or smth. I used a standard backstitch for a tight finish and again, make sure you sew under any existing stitches so they arent visible on the outside!

Speaking of the outside, once you stitch everything together you can very gently flip this sucker inside out

This is @hatamonu’s cat Cocaina, aka Coco. Her perfectly square figure made it into my grub files somehow so shes essential to the tutorial

Check the fit and all thats left to do is roughly baste stitch down that excess neck fabric onto the stuffed lining and youre set! I gave the thread slight tugs as i went to tighten the opening a bit put dont tighten it too much

tadaaaaa

It fits pretty snug but starts to slip a bit with motion. Heres a bounce test

If you do shake your baby make sure to safety pin the plush to the suit so he doesnt prematurely shed his exosekeleton
Now spread that baby fever and show your baby to the world


pics from the ALA 2025 homestuck meetup and supplied by para.dox.cos
Tysm for coming along this ride with me especially if you followed the prototype journey on twitter, much thanks to my more sewing savvy friend for the solution to my grub dilemma and for helping me design and build my dolorosa cosplay <3 much love and hopefully many more homestuck cosplays and meetups to come in the future!
#homestuck#homestuck cosplay#karkat plush#karkat#karkat vantas#cosplay#tutorial#homestuck grub plush#plush pattern#long post#ALA 2025#anime los angeles#dolorosa#the dolorosa#apologies if this is hard to follow or utterly incomprehensible please note i am making shit up as i go and results may vary#feel free to ask any clarifying questions and ill do my best to answer#no i will not be selling these#technically i have more minky left than i know what to do with but the cost would have to justify the pain in the ass it all was to complet#and i dont think anyone will pay that price#send me suggestions of red characters to make plushes out of
424 notes
·
View notes
Text

Everyone has been discussing these lately! I know everyone's been sharing them on a rant post I made that weirdly got more notes than I expected, but I wanted to make one post to compile all the MLP Vintage Butterick Patterns we have to document them!
Please check it out Here on my website where I have uploaded all of the images, provided additional information, and credited every single person who has helped me by scanning or sharing their information!
You can make: Christmas ornaments, plushies, or cute sweaters and cardigans.
All of these patterns are Officially Licensed g1 patterns! Enjoy and feel free to share with me if you make any of these fun crafts!
515 notes
·
View notes
Text
List of FR Dragon Sewing Patterns
After a ton of looking around, I've compiled this list. Feel free to add more if you know of them!
Coatl by drpencil-blog
Imperial by drpencil-blog
Luminax by clockworkMoose on FR
Obelisk by Fornara on FR
(Sewing sheet links on the third page)
GD link: print ready and full size
Tundra by Glitchbird on FR
Veilspun by Fornara on FR
Wildclaw by drpencil-blog (missing, but there's a pic of the shapes)
For drpencil-blog, they seem inactive. Searching 'pattern' gives some helpful tips.
Completed plushie pics under cut!


#flight rising#tutorial#plushies#sewing patterns#wildclaw#coatl#veilspun#obelisk#tundra#imperial#luminax#sewing pattern
297 notes
·
View notes
Text


I just added this beginner-friendly embroidery pattern to my ko-fi shop - it's a small blackwork solar system, and only AUD$4 (which is around USD$2.50).
I made it like 10 years ago! It's an older pattern, but it checks out. :D
302 notes
·
View notes
Text
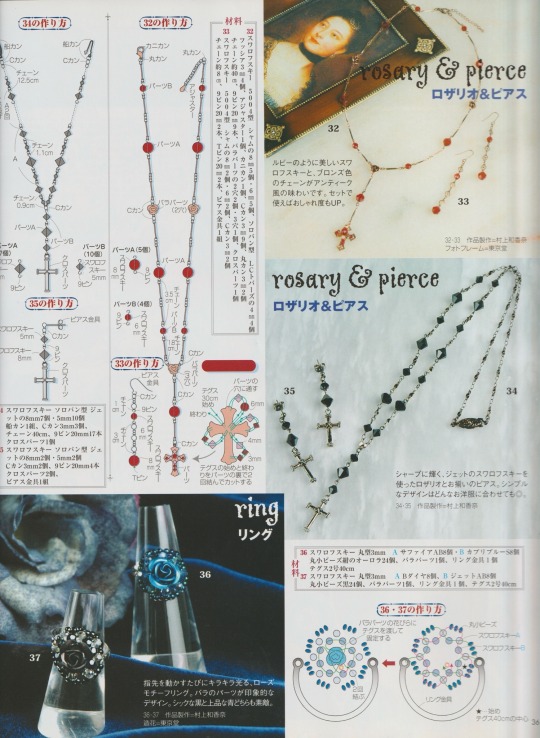
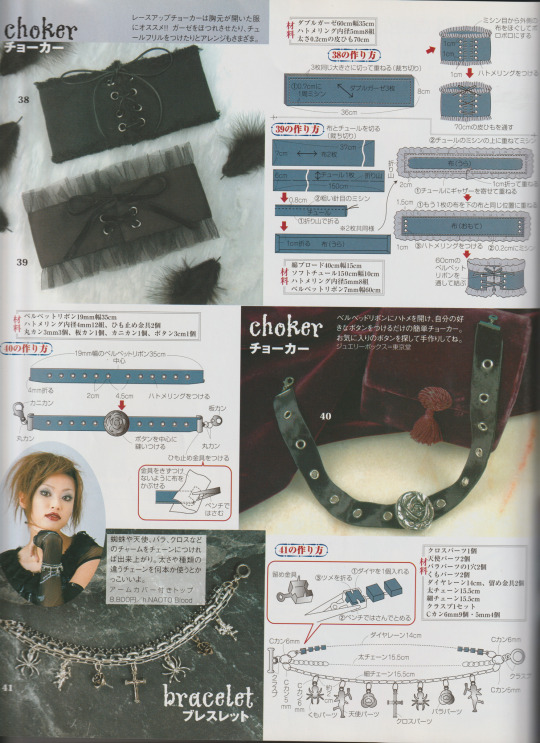
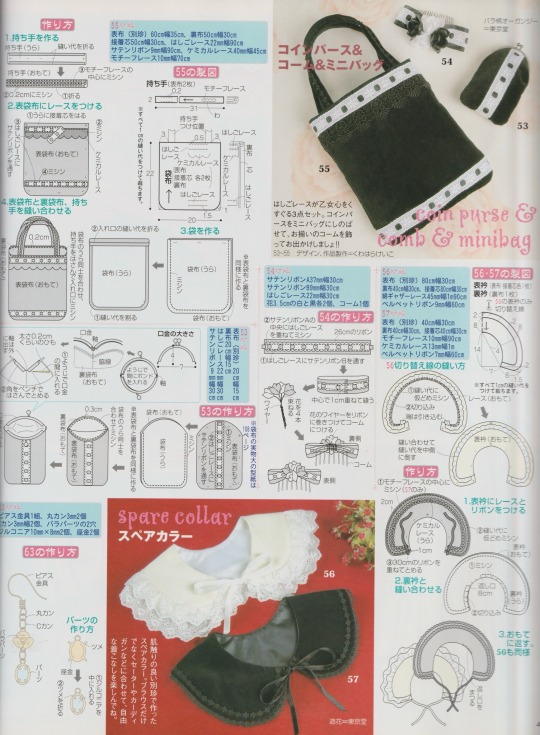
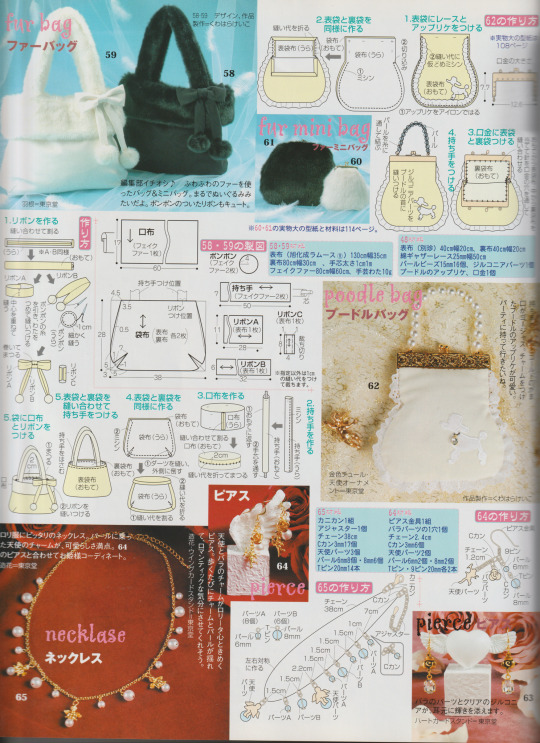
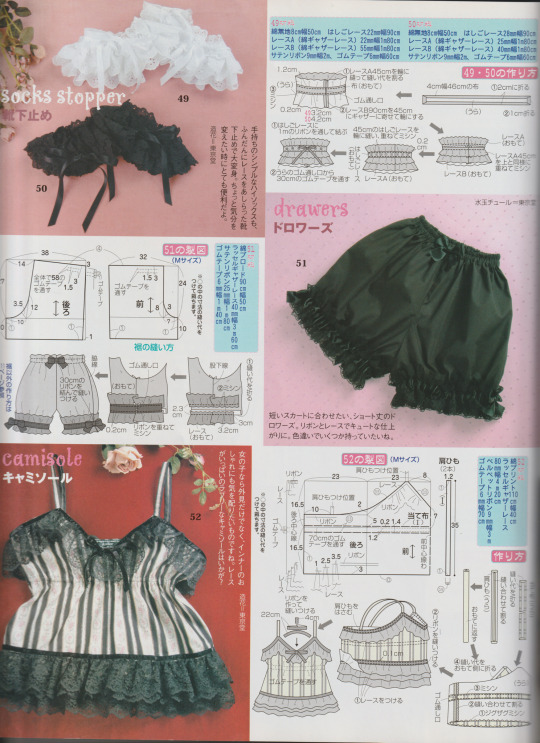
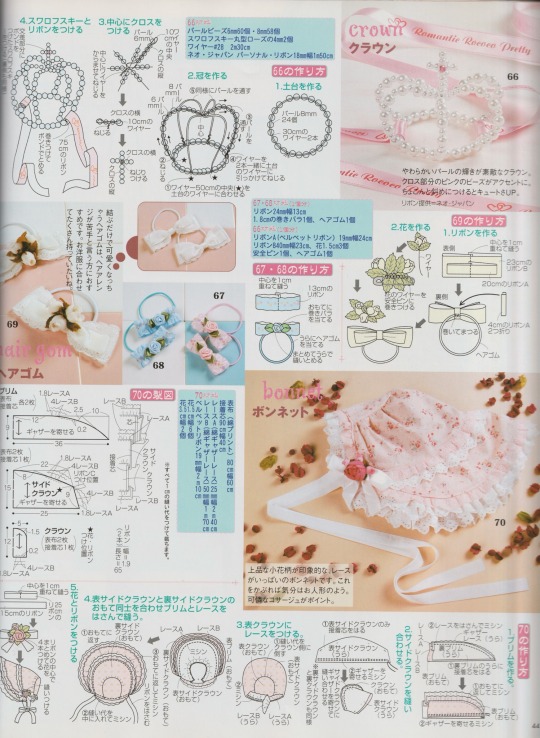
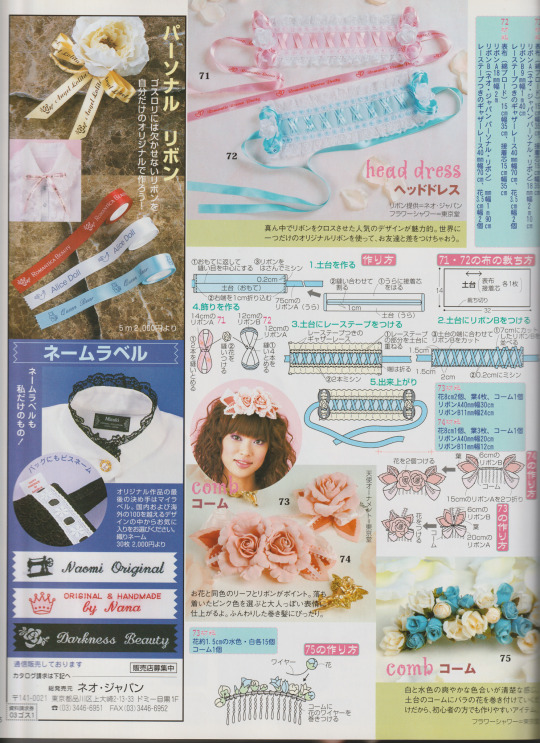
Lolita Accessory tutorial pages from Japanese mook “Gothic & Lolita Patterns”, 2004
Included are: head dresses, hair clips/ties, camisole pattern, drawers pattern, sock stoppers, multiple bag patterns, detachable collars, and jewelry.
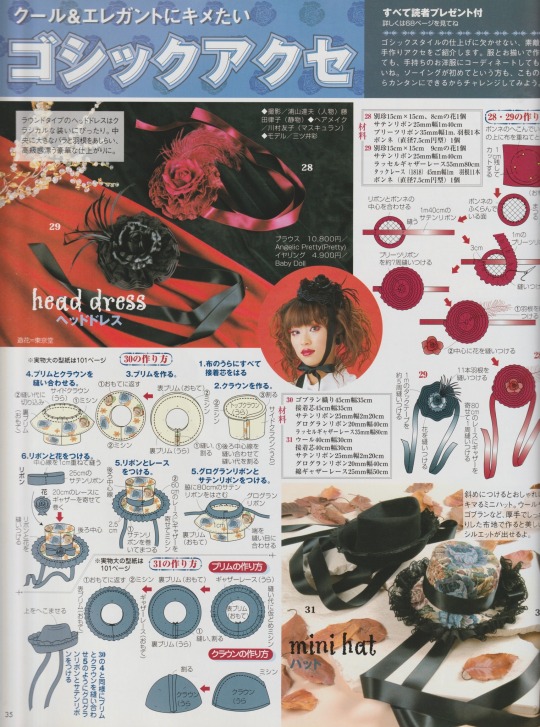
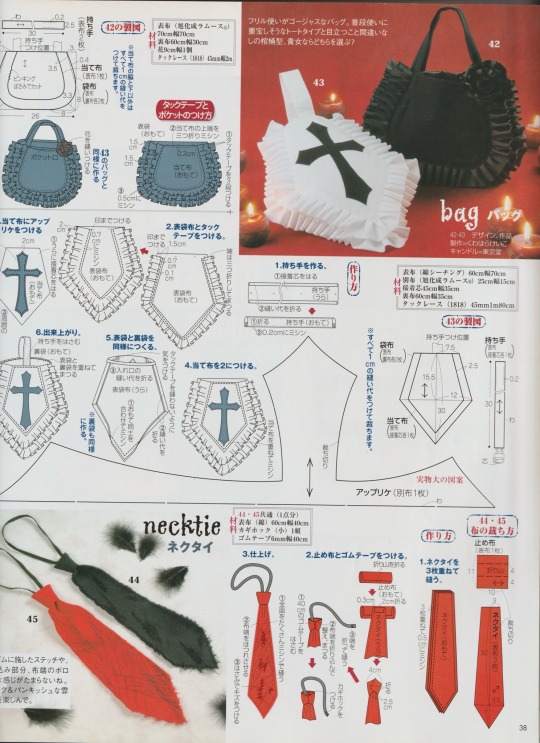
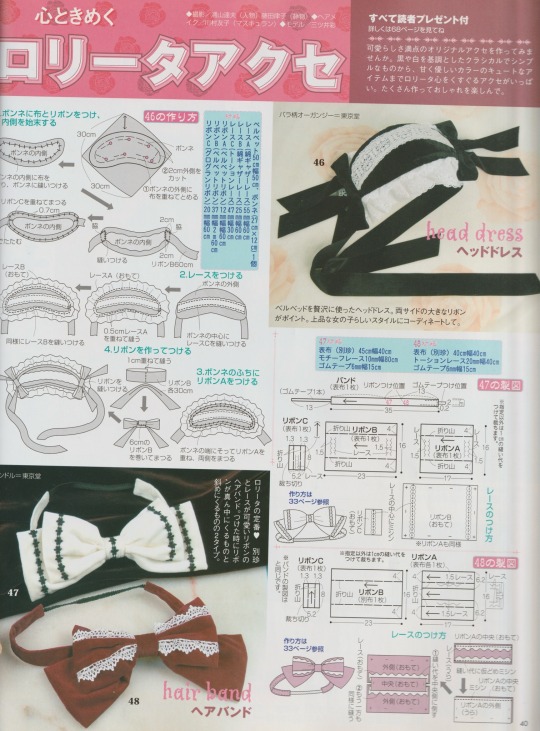
Consider this as my Valentine’s gift to you guys!! Thank you for being very kind about my post ^-^
*Also* If you would like the patterns to some of the tutorials (ie: the mini top hats, pattern 62) let me know so I can make a post later!
#gothic lolita#lolita fashion#j fashion#old school lolita#egl#egl fashion#coord#fashion#tutorial#magazine#sewing patterns#jewelry#goth#archive#my scans#happy valentine's day
1K notes
·
View notes
Text

tada!!! doot doot!!! a new free sewing project from me has just dropped!!!
🎪 with a couple of socks, a scrunchie, and some yarn, you could make a little clown guy like this for yourself! 🎪
you're welcome, enjoy, and i hope to see some clowns from yall ^_^
150 notes
·
View notes
Text
OKAY SO YOU KNOW THAT FEELING when you spend hours creating this gorgeous pattern and it looks PERFECT on your screen but then you print it and suddenly there are these OBVIOUS SEAMS EVERYWHERE??? 😭
Listen, we've been there. We've cried those tears. We've rage-quit Illustrator more times than we can count. And after countless cups of coffee and approximately 47,385 test prints, we're here to share Everything We Learned About Pattern Design™️
This isn't one of those "professional expert guru" guides because honestly? We're still learning too! But we've compiled all our "oh god I wish someone had told me this sooner" moments into one massive post, including:
→ How to fix those annoying visible seams (WITHOUT starting over) → The actual difference between half-drop and brick repeats (with pictures!) → Why your beautiful design might look like a blob when printed on fabric (learned that one the hard way 😅) → All the tools we tried (so you don't have to waste money on the wrong ones) → Real talk about pattern design across different industries
Plus a bunch of troubleshooting tips we've collected through our many, many mistakes. Because if we're going to mess up, at least let's mess up together! 💕
#pattern design#surface pattern#design resources#art tips#artist help#design help#creative resources#art tutorial#design tutorial#pattern tutorial#artist advice#creative career#digital art#art tips and tricks#design basics#pattern making#textile design#surface design#art resources#creative tips
0 notes
Text


Needlepoint Kits // Unwind Studio Crafts
299 notes
·
View notes
Text
🌟Tofu's Free Stuff Megapost🌟
Palettes
Moonlight GB (4 colours)
Supernova (8 colours) (eyestrain warning)
Tofu20k (35 colours)
Desktop Wallpapers
Ghibli Bundle (4k)
Yellow Bentley (Good Omens)
Spirit of the Forest
Froggy Island
Purple Mountain
Dark Moon Greatsword (animated)
Mobile Wallpapers
Dark Moon Greatsword (animated)
Shroomsplosion
Middle finger pattern
Little Star in Moonlight (Astarion BG3)
Wildflowers
Froggy Island
Mushroom Night Light
Heart cloud
1bit sky (3 colours)
Cross-Stitch patterns
Matcha in the Flowers (10 colour, DMC)
Heart eyes cat (10 colour, DMC)
Mushroom Night Light
Witch's Treehouse (12 colour, ANC)
Tutorials
BIG pixel art guide
Weird static effect in Aseprite (eyestrain warning)
Tree (old- 2021)
VERY simple cloud
Other Stuff
Panda Dumpy (free Twitch/Discord animated emote)
Gummy Sweets Twitch badges
Cute Cats Twitch badges
Baked Goods Twitch badges
Enjoy :--3
#wallpapers#tutorials#tutorial#pixel art tutorial#free#cross-stitch#cross stitch#cross stitch pattern#background#palette#color palette#resources#art resources#free stuff
1K notes
·
View notes
Text

Barks Quick "Turing patterns in CSP" tutorial
you need some pixels to start with, either just grab the spray bottle tool or go to Filter>Render>Perlin Noise
Filter> Gausian Blur> value: 6
Filter> Sharpen> unsharp mask> Radius: 22, Strenght: 255, Threshold: 0
----
you need to repeat step 2+3 over and over. to make that easier you can go to:
Auto Action> create new auto action set
hit record in the bottom left of the auto action window
perform step 2+3
stop recording
right click the actions in the set and duplicate them
make sure they are sorted correctly and hit play a few times
-----
before you color your pattern or do anything with it go to
Edit> tonal correction> binarization
to get rid of any odd colored pixels
#this isn´t the cleanest tutorial and i just figured it out too but i couldn´t find any tutorials for csp so throwing this one out here#clip studio paint#turing pattern#or as the sailfin lizard paper would call it Vermiculation#get vermiculating my friends
1K notes
·
View notes
Text
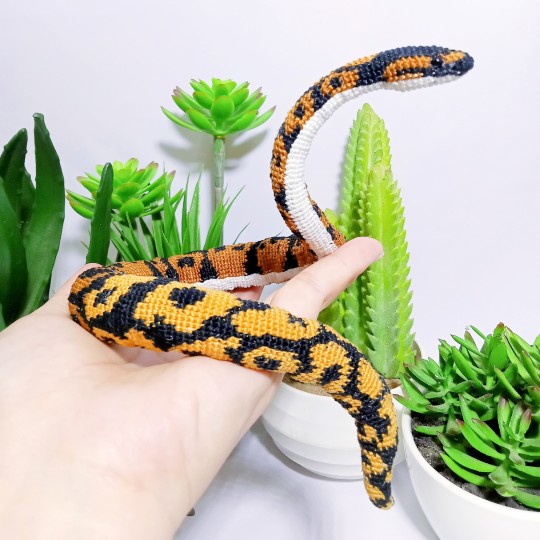
Hello, everyone! 👋
I wanted to share with you all a pattern, which is an amigurumi crochet ball python snake. You can find the free tutorial on my YouTube channel and the PDF pattern on my Etsy shop.
Thank you so much for stopping by and have a great day! 😊
885 notes
·
View notes