#quick and easy recipe
Explore tagged Tumblr posts
Visit Tumblr Blog
Explore Tumblr blogs with no restrictions, modern design and the best experience.
Last Seen Tumblr Blogs


Fun Fact
Tumblr.com is the 103rd most visited website in the world.
Text
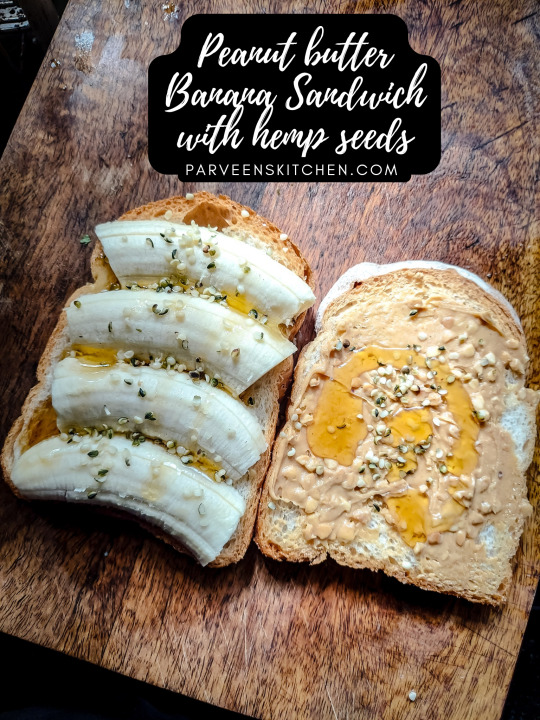
Peanut Butter Banana Sandwich with Hemp Seeds
Here is a recipe for a peanut butter banana sandwich with hemp seeds and honey: Ingredients: 2 slices of whole-wheat bread 1 tablespoon peanut butter 1 banana, sliced 1 tablespoon hemp seeds 1 teaspoon honey Instructions: Toast the bread to your desired degree of crispiness. Spread the peanut butter on one slice of bread. Top with the banana slices. Sprinkle with the hemp seeds and…
View On WordPress
#Banana#chocolate chips#cinnamon#decadent treat#Easy recipes#healthy snack#hemp seeds#honey#improved heart health#Peanut butter#Peanut butter Banana Sandwich#quick and easy recipe#Raisins#reduced risk of diabetes#regulated blood pressure#ripe bananas#weight loss#whole-wheat bread
5 notes
·
View notes
Text
Chicken Spring Rolls Recipe
𝗙𝘂𝗹𝗹 𝗥𝗲𝗰𝗶𝗽𝗲 𝗪𝗮𝗶𝘁𝗶𝗻𝗴 𝗬𝗼𝘂 𝗛𝗲𝗿𝗲:👇🏼 P𝗙𝗶𝗻𝗱 𝗧𝗵𝗲 𝗥𝗲𝗰𝗶𝗽𝗲 𝗘𝗮𝘀𝗶𝗹𝘆
full video

#recipe#easy recipes#recipes#quick recipes#easy recipe#easy dinner recipes#essen recipes#quick recipe#simple recipe#dinner recipe#special recipe#tasty recipes#simple recipes#chicken recipes#cooking recipes#quick and easy recipe#slow cooker recipes#ground beef recipes#new recipe#roll recipe#milk recipe#viral recipe#egg recipes#potato recipe#secret recipe#coffee recipe#bistec recipe#beef recipes#new recipe 2025
0 notes
Text
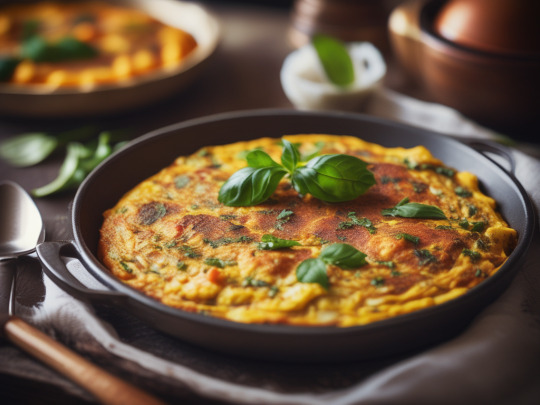
Easy Indian Masala Omelette: Step-by-Step Recipe for Beginners
Wake up to an enticing Indian Masala Omelette bursting with flavors.
Imagine waking up to the aroma of a sizzling omelette, its enticing scent wafting through your home. Now, what if this wasn’t just any omelette, but an Indian Masala Omelette, bursting with flavors and spices that are sure to kickstart your day? Intrigued? Well, you’re in luck! Today, we’re going to explore how to whip up this delightful dish right in your kitchen. Trust me, it’s easier than you…
View On WordPress
#Easy Breakfast Recipe#Egg Recipe#Healthy Breakfast#High Protein Meal#Indian Breakfast#Indian cuisine#Indian Masala Omelette#Indian Omelette Recipe#Masala Omelette#panvel#Quick and Easy Recipe#Spicy Omelette#thepanvelite
0 notes
Text

Steak Tacos 🌮
#Steak Tacos#steak dinner#steak recipes#steak#taco tuesday#taco time#tacos#cilantro#onions#tortillas#corn tortillas#street tacos#lunch#dinner#cooking#eating#munchies#fast food#foodie#mexican#mexican food#mexican american#food porn#foodporn#food photography#foodpics#food pics#food#easy recipes#quick recipes
6K notes
·
View notes
Text
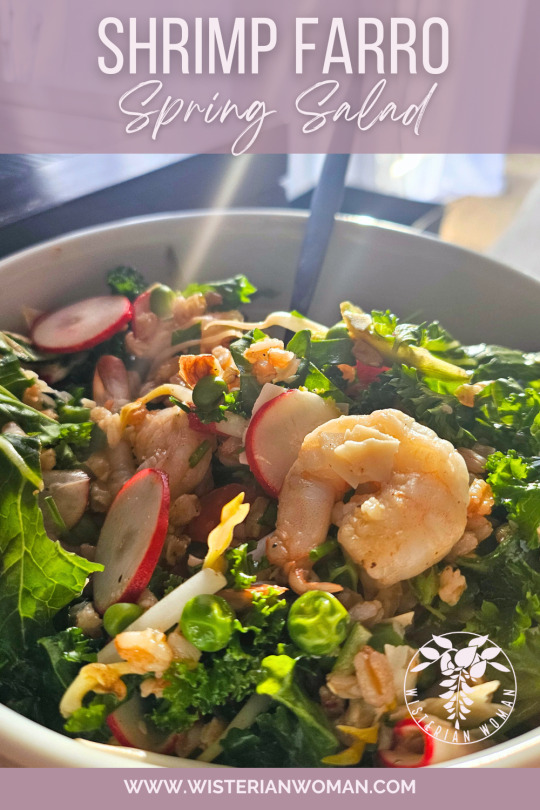
Shrimp Farro Spring Salad
Crave this vibrant Shrimp and Farro Salad, where tender grains meet zesty lemon shrimp in a delightful harmony of flavors. Funny story – I actually have a shellfish allergy. I always hear cautionary tales about shellfish allergies—how a mere taste could send someone into anaphylactic shock, how they couldn’t even breathe in the same room as a shrimp cocktail without risking their life. It was…
View On WordPress
#Asiago cheese#Balanced meal#Cooking at home#Delicious dish#Easy dinner idea#farro#Farro recipe#flavorful#Food#food blog#Fresh ingredients#Gluten-free salad#Grain salad#Green salad#healthy habits#healthy recipes#Healthy salad#Homemade dressing#Homemade meal#Kale salad#Lemon shrimp#Mediterranean-inspired#Mung bean sprouts#Nutritious meal#Nutty farro#Parmesan cheese#Quick and easy recipe#Radish salad#Recipes#Salad recipe
0 notes
Text

Classic Chocolate Covered Pretzels
#classic#chocolate#covered#pretzel#food#sweet and salty#easy#no bake#kids#white chocolate#christmas#valentines day#halloween#summer#recipe#sprinkles#quick and easy#sallysbakingaddiction
935 notes
·
View notes
Text

One pot Italian sausage pasta
#recipe#cooking#easy recipes#homemade#comfort food#quick recipes#pasta#italian sausage#one pot meal#spaghetti
918 notes
·
View notes
Text
Mug Brownie: Autism Edition☕
When you try to make a microwave brownie, does the image below look like your result?

Are you tired of ~trying to make a brownie in the microwave~ by following some recipe you found online, only for it to taste like shit because the ratio of oil/sugar/flour to brownie mix is an overpowering assault on your senses?
Or maybe you don't even bother trying because the instructions are unclear and you'd rather not risk fucking it up "just in case" using a wooden spoon instead of a plastic one might make your kitchen explode?
Maybe it's even worse - maybe you did everything right and followed the instructions perfectly, but you can't for the life of you tell if the final product came out right and don't feel like setting yourself up for an unpleasant surprise.
Well, I'm here to share with you the one tried and true microwave/mug brownie recipe that works for me.
Ingredients
Here's what you'll need:
A mug of some kind (doesn't HAVE to be a mug but needs to be mug shaped + microwave safe)
2 and 1/2 tablespoons (TBSP) of brownie mix or cocoa powder
1 and 1/2 TBSP of all purpose flour -> 1 TBSP only if you don't want to be able to taste the flour slightly (this is what people mean when they say brownies taste "cakey")
1 TBSP granulated white sugar -> add another if you want to make it more sweet than tart OR only use 1/2 TBSP if you don't want to be able to taste more sweetness than tartness
ALWAYS* mix your dry ingredients together in the mug before you add in the liquids. (*The only exception being any chocolate chips you add, those can go in at the end or the start, it has no bearing on the recipe.)
Once you've done that, add the following:
1 TBSP of canola, vegetable OR olive oil -> the more you add, the smoother and richer it will get, but the harder it will be to cook and physically eat
2 TBSP water (to be added at the very end because it needs to be mixed in quickly)
Final Prep
Stir your ingredients together for at least 15-30 seconds or long enough to completely mix the dry and wet stuff together. If you've made normal brownies before, this should look like brownie mix right before it goes in the oven.
Check the wattage of your microwave. Most of the recipes I saw accounted for a 1000 watt or less microwave and recommended microwaving for about 30 seconds at full power. However, mine is around 1200w and I get the best results from microwaving for 45 seconds at full power. If you can't figure out what wattage your microwave has, just start with 30 seconds at full blast and add on 15 second intervals from there. It might take some experimentation on your part to get the recipe perfect.
When it's fully cooked, your mug brownie should look kind of puffed up like a mini lava cake. It probably won't fill up much of your mug at all, but trust me, it'll be dense. The texture might surprise you because it's a little more mousse-like than your average crispy-topped oven brownie, but the overall taste should be pretty similar.
It will also be HOT when it first comes out, so wait at least a minute and a half for it to cool down a bit and blow on your fork/spoon before putting any of it in your mouth.
TW: Trypophobia - Every single time I successfully make this recipe, the imprint of popped air bubbles looks like a bunch of little holes clustered close together. If that's something that would bother you, don't look directly into the mug when you finish microwaving it - stick a toothpick inside to gage how goopy the brownie is instead.
Additional Tips
Drink a glass of milk milk/eat a scoop of ice cream with your brownie. This will help balance the heat of the brownie and its overpowering chocolatey taste, if that's something that's been a sensory issue for you in the past.
Chocolate chips, being heavier, tend to migrate towards the bottom of the mug, so don't be afraid to get in there and swipe around with your utensil to more evenly distribute them around the brownie.
Add whatever extra toppings you want! I'd recommend sweet things like bits of candy/chocolate though.
As someone who recently had major oral surgery and hasn't been allowed to bite down or chew any of my food for weeks, this recipe is very easy to swallow and digest. If you've just had wisdom tooth surgery or something similar, as long as you use plastic utensils and make your tongue do most of the work, you should be able to eat this with ease.
Eat slowly. Trust me when I tell you that you're underestimating just how filling this brownie will be. These have easily lasted me 2-3 meals because my sensory-specific satiety keeps burning out halfway through eating them.
Store your leftovers in the fridge. You can just leave what's left of the brownie in the mug for this part. They keep well and you can always heat them up again!
When you're 100% done with it, drizzle liquid soap in the mug and fill it up with water to let it soak before washing it. This will make it easier to get all the extra gunk out whether you wash your dishes by hand or use a dishwasher.
🦴🍎🦷
#lmk if you got the joke at the very end#actuallyautistic#microwave brownie#mug brownie#easy recipes#quick meals
113 notes
·
View notes
Text
My resolution for 2025 is to have fun in the kitchen - as in, cook more and learn more, but without worrying about how complex the dish is or how "correct" the recipe is. And my early but firm conclusion is: it's about learning comfort food/easy breakast recipes from around the world. They'll be simple, they'll be flexible (because they're invariably made with what you have in your pantry, and that means easy substitutions), and they'll fuck like hell. They'll be simple and convenient, but also might surprise you because they'll use staples that you wouldn't think about. I made tamago kake gohan for the first time this week and if I had had the rice already, it would take 2 minutes, and it was SO good. Thank you breakfasts of the world I'm on a journey to meet you.
(PS my polish contribution: racuchy z jabłkami, or apple pancakes. Cut fruit, put in batter, fry, go.)
#this is an invitation to leave me tips about what quick 'back of fridge' recipes are worth trying#my pantry is not very wide tbh. i hate 'simple and easy' recipes that have a lsit of 20 spices with 1/1000th tbsp each.#im not buying all that. Ba! I'm not READING all that. begone
75 notes
·
View notes
Text

Baked Spinach Mushroom Quesadillas😋
Ingredients: 👇
4 tortillas (8 inch)
Olive oil (optional, enough to lightly coat the tortillas)
1 cup shredded mozzarella
1 cup shredded cheddar
3 cups roughly chopped spinach
8 ounces sliced mushrooms
Directions: 👇
Preheat the oven to 400°F (200°C).
Drain the mushrooms and actually I found them better if you warm them up in a pan beforehand. Fresh mushrooms are even better prepared in a little butter and a little Worcestershire sauce.
Lightly brush one side of each tortilla with the olive oil(optional) and place on a baking sheet, oiled side down.
Distribute about half of each of the cheeses over half of each of the tortillas. Then layer the spinach, mushrooms, and the rest of the cheeses, and fold the other tortilla half over top, you can garnish by some mushrooms and cheese.
Bake the tortillas for about 6 minutes, then flip them each over and bake for another 6-7 minutes, until the cheese is melted and the outside of the tortillas are a golden brown.
Enjoy 🤔
#pay attention#educate yourselves#educate yourself#knowledge is power#reeducate yourselves#reeducate yourself#think about it#think for yourselves#think for yourself#do your homework#do your own research#do your research#do some research#ask yourself questions#question everything#recipe#quick and easy#food
59 notes
·
View notes
Text
Recipe tutorials
Quick meals
Healthy recipes
Vegan cooking
Vegetarian dishes
Meal planning
Budget meals
Family dinners
Breakfast ideas
Lunch recipes
Dinner options
Snacks
Appetizers
Soups
Salads
Desserts
Baking basics
Bread making
Pasta dishes
Seafood recipes
Meat meals
Poultry recipes
Barbecue tips
Grilling techniques
Slow cooker recipes
Instant Pot meals
Food prep hacks
Cooking tips
Chef secrets
Culinary skills
Knife skills
Food safety
Gluten-free
Keto recipes
Paleo diet
Low-carb options
Dairy-free
Nut-free cooking
Sugar-free desserts
Comfort food
Gourmet dishes
International cuisine
Asian recipes
Italian cooking
Mexican dishes
French cuisine
Indian recipes
Middle Eastern food
Vegan desserts
Vegetarian breakfast
Festive meals
Thanksgiving recipes
Christmas dinner
Easter treats
Halloween snacks
Valentine’s Day dishes
Cooking shows
Food challenges
Kitchen gadgets
Cookware reviews
Ingredient guides
Spices and herbs
Organic ingredients
Farm-to-table
Sustainable eating
Leftovers ideas
Kids' meals
Baby food
Cooking for seniors
Student recipes
Batch cooking
One-pot meals
Charcuterie boards
Cheese pairing
Wine pairing
Cocktail recipes
Smoothies
Juices
Coffee concoctions
Tea recipes
Plant-based nutrition
Superfoods
Anti-inflammatory meals
Probiotic-rich foods
High-protein snacks
Energy-boosting meals
Low-calorie snacks
Heart-healthy diets
Diabetic-friendly meals
Allergy-aware cooking
Culinary trends
Food vlogging
Cooking classes online
Food photography tips
Food festival tours
Culinary competitions
Chef interviews
Seasonal ingredients
Food market tours
Culinary travel adventures
#lifestyle#food#dinner#Dinner ideas#Easy dinner ideas#Dinner recipes#Dinner ideas healthy#Healthy dinner ideas#Quick dinner ideas#Easy dinner recipes for family#Easy dinner ideas for family#Dinner ideas for two#Easy dinner ideas healthy#Dinner ideas for tonight#Easy dinner ideas for two#Dinner ideas for two easy#Dinner ideas vegetarian#Quick and easy meals#Dinner ideas easy#Quick dinner ideas for 2#Easy weeknight dinners for family#Dinner ideas for two healthy#Dinner menu#Recipe tutorials#Quick meals#Healthy recipes#Vegan cooking#Vegetarian dishes#Meal planning#Budget meals
97 notes
·
View notes
Text

youtube
Cheesy Garlic Egg Sandwich in Brioche Bun
Easy to make, impossible to resist!
Fun Fact: Crushing garlic boosts its flavor by releasing more allicin, the compound that gives garlic its bold punch. Mortar and pestle FTW!
Ingredients:
1 Brioche burger bun
2 Garlic cloves
A pinch of Salt
1 tbsp Parmesan cheese
1 tbsp Thyme
2 tbsp Olive oil
2 Eggs
Shredded cheese (your choice)
Instructions:
Grind garlic cloves with a pinch of salt using a mortar and pestle. Mix in parmesan, thyme, and olive oil until well combined.
Slice the brioche bun in half and remove the soft stuffing from inside each half.
Brush the garlic-parmesan mixture inside both halves. Fill the bottom half with shredded cheese, then place the top half back on.
Carefully crack an egg into the top half’s hollow center. Spread shredded cheese around the egg.
Place the assembled sandwich in a preheated oven at 375°F (190°C) for about 12 minutes, or until the egg is cooked and cheese is melted.
18 notes
·
View notes
Text

Quick & Easy Chicken Caesar Warp
#chicken caesar wrap#easydinnerideas#easydinners#easy meals#lunch recipes#lunch box#dinnerideas#quick dinner
33 notes
·
View notes
Text

Philly Cheesesteak Stromboli
#Philly Cheesesteak Stromboli#stromboli#cheesesteak#philly cheesesteak#philly#cheese#easy meals#quick meals#foodporn#food photography#foodpics#foodie#fast food#food porn#food pics#november#fall recipes#toya's tales#style#toyastales#toyas tales#dining and entertaining#cooking#munchies#super bowl#game night#game day#monday night football#brunch#lunch
2K notes
·
View notes
Text
Low Calorie Weight Loss Salad
The ideal lunch or supper to help you lose weight is this low-calorie weight loss salad! Using only natural metabolism-boosting ingredients and a dressing made with apple cider vinegar. I added fat-burning nutrients to my detox salad!
The Best Selling weight loss Amazon products >>
Ingredients You’ll Need:
1 cup chopped kale
½ cup sliced red cabbage
½ red bell pepper
¼ cucumber
1 carrot
3 radishes
½ avocado
2 tablespoons almonds
2 tablespoons pomegranate seeds
¼ cup chickpeas or try these roasted chickpeas
2.5 tablespoons Weight Loss Dressing (see recipe card)

Preparing and Storing Healthy Weight Loss Salad Meals Meal Prep: To prepare a salad, put all the ingredients in family-sized or individual meal prep containers. Do not add the dressing until you are ready to serve; instead, put it in a separate container. Storage: Does not keep well in the freezer, but will keep in the refrigerator for four to five days.
Instructions
To a bowl or meal prep container, combine all of the ingredients. I like to separate them, it’s so pretty. But you can mix them up too.
If serving now, drizzle over the salad dressing. Otherwise prepare and store it in a separate container.
Serve cold, or place in the fridge for a meal prep lunch or dinner.
This detox salad is ideal for weight reduction. This delicious salad, which is full of elements that increase metabolism and burn fat, can help you lose weight. Although I prefer to prepare this using roasted chickpeas, I frequently use canned chickpeas that have been drained and rinsed instead of roasted. I've included the recipe for the roasted chickpeas below, but this saves time and salt. Special Tip: I advise using the dressing I've provided for weight loss. It tastes fantastic and is created with apple cider vinegar, which burns fat and detoxifies the body. It's fantastic for losing weight!
The Best Selling weight loss Amazon products >>
#salad#weight loss salad#salad for weight loss#weight loss#salad recipes#healthy salad#weight loss recipes#light salad#salad dressing recipes#weight loss recipe#weight loss journey#dressings salad#cucumber salad#tzatziki salad#vegetable salad#weight loss salad recipe#easy salad#salad dressing for weight loss#quick salad for weight loss#salad recipe#weight loss in 7 days#salad recipes for weight loss#easy salads#lose weight#weight loss tips#weight loss diet#weight loss transformation#weight loss motivation#lose weight fast#how to lose weight fast
13 notes
·
View notes