#sims 4 blender render process
Explore tagged Tumblr posts
Visit Tumblr Blog
Explore Tumblr blogs with no restrictions, modern design and the best experience.
Last Seen Tumblr Blogs


Fun Fact
Tumblr was created by web developers David Karp and Marco Arment.
Text
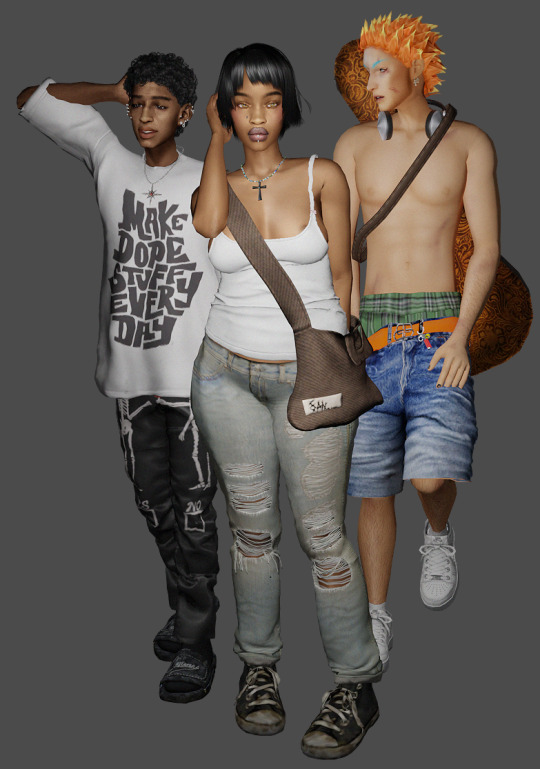
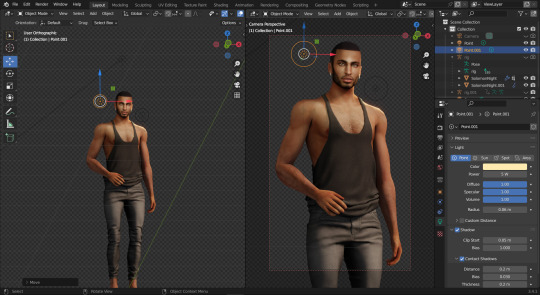
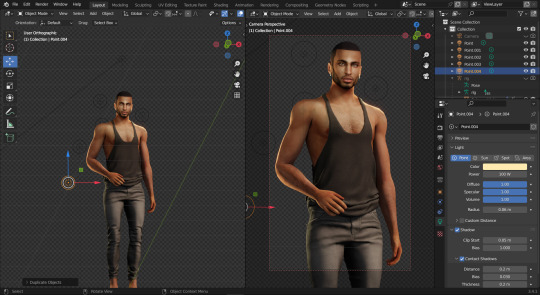
Been awhile since I actually posted my sims 😭🤞🏽
#the sims 4#sims 4#ts4#my sims#sims 4 render#this render took me all day yesterday not even bc of the process behind making the sims look fine in blender#but bc all the poses i tried made the sims make weird faces 😭#and thats something bc the dudes are already a little bit ugly LMAO
220 notes
·
View notes
Text
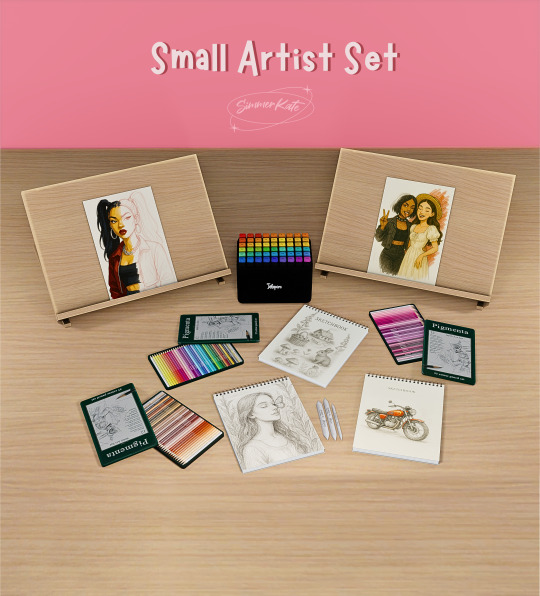
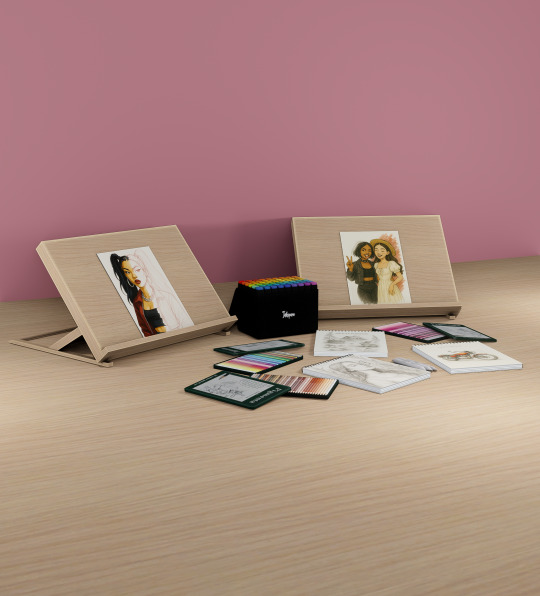
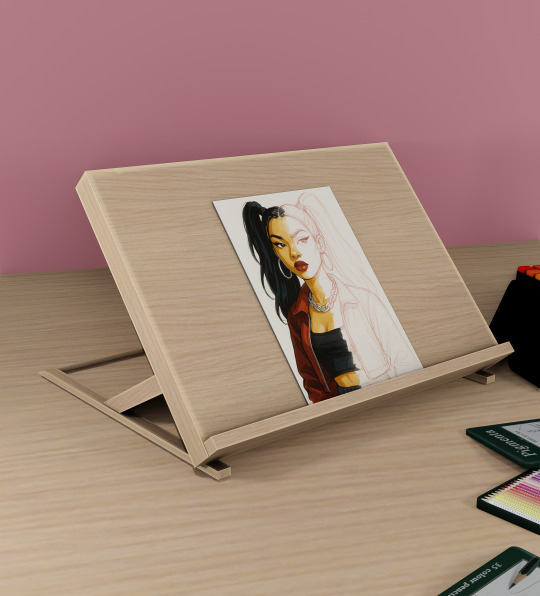

Small Artist Set 🎨
Public Release: May 8th
Bring your Sims’ creativity to life with this detailed art set, perfect for storytelling, clutter lovers, and every Sim with a passion for sketching and color. Whether your Sim is an aspiring illustrator or a seasoned creator, this set has everything to complete their dream studio!
Includes:
🖼 Art Desktop Easel
deco with in-progress artwork
8 unique portrait sketches for a realistic touch
398 Poly - Low Poly Mesh
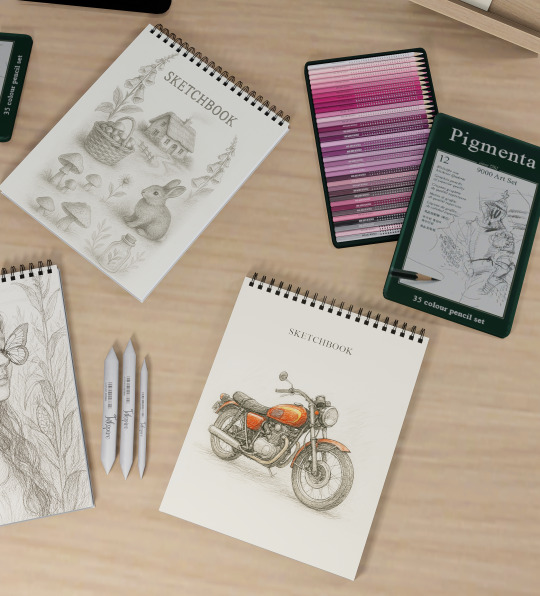
📓 Sketchbooks
4 styles with detailed cover and open-page versions
Designs feature character art, vehicles, and nature
3k Poly - Medium Poly Mesh
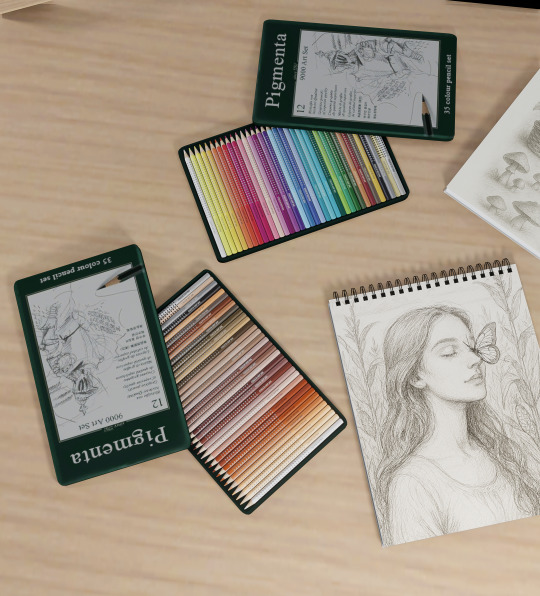
🖍 Pigmenta Colour Pencils
Beautifully rendered pencil sets in open and closed formats
Perfect clutter for desks and art studios
6 Swatches - 2k Poly Mesh - Medium Poly
✏️ Art Blenders
Deco blending tools to add realism to your Sim's drawing process
2k Poly Mesh - Medium Poly
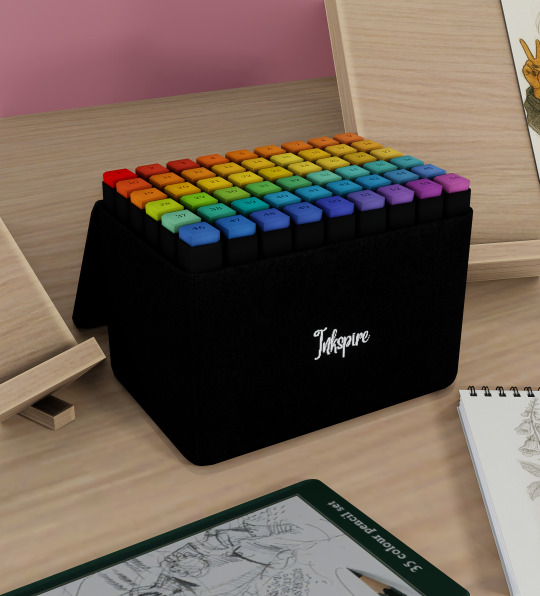
🖊 Marker Pens
Colorful dual-tip markers in a sleek black case
Adds a pop of color and order to any creative corner
4k Poly - Medium - High Poly mesh Public Release: May 8th Patreon (xx) ad-free
425 notes
·
View notes
Text
Written version of @thornowl's baking texture-based items for 4t3 conversion tutorial. (Part 1)
Yes, the original video is very useful and I think it's worth checking out for everyone who plans to do 4t3 conversions, especially in MM style. But, in my opinion, the realization is too messy, it took me a long time to understand what actually to do. So I made written tutorial, because many people prefer this format (and because my amazing mutual @nectar-cellar was interested in it). Hope you will find it useful. I had to split this tutorial into 2 parts because of the picture limit.
What You Will Need:
Knowing the basics of converting process: how to extract ts4 meshes and textures, how to make your own multiplier/mask/specular, how to import stuff to TSRW, etc. (@nightospheresims has a good tutorial for beginners: here or here, also don't forget about @sims3tutorialhub!).
Knowledge of basics blender controls and navigation: how to move and rotate the camera, basic shortcuts, how to change mode, editor type, viewport shading, rendering type, etc. (check Grennie's tutorial here, and "Helpful guides when you're a noob" from there too).
Required programs and resources: - Sims 4 Studio. - TS4 body mesh & texture(s), that you want to convert, I use @atomiclight's mix gloves for this tutorial. Also there will be some tip that I learned from converting Sentate's Audrey Corset Set. - Blender (I use version 2.79). - Photoshop (or any other 2D editor, that supports masks and .dds format). - TS3 Bodies template & UV map templates. - Plain normal & specular map, if you don't want to make your own. - TSRW.

STEP 1: ADDING MESHES AND TEXTURES IN BLENDER, PREPARING MESH FOR BAKING.
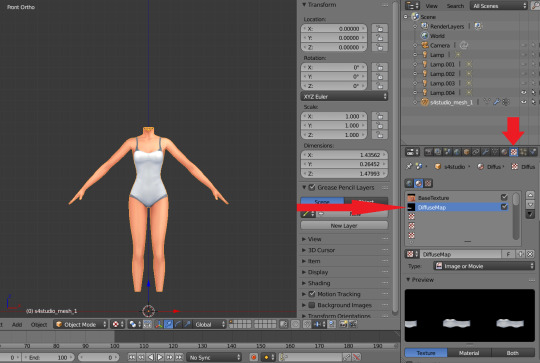
I already exported all the gloves presets that I want from S4S. And because they don`t have their own mesh, I exported base game swimsuit (you can also export mesh from any other stuff, that 100% is painted on body) I exported it like this: Open S4S → Create 3D mesh → Find it with filters→ Next → Save the package wherever you're want→ go to Meshes tab and press Export.
Open .blend file with ts4 swimsuit, delete the "rig" (you don't need it) and merge all other groups - Shift + click on them and press Ctrl+J on 3D viewport.
You need to export our gloves texture and remove swimsuit texture, go to Textures tab and in small window select "DiffuseMap": If you don't see DiffuseMap texture, switch type of texture data to "Show material textures" (brown-ish circle).
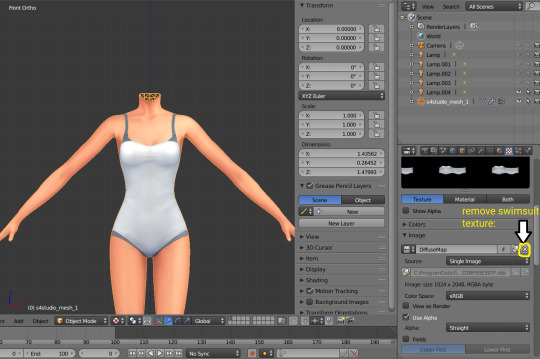
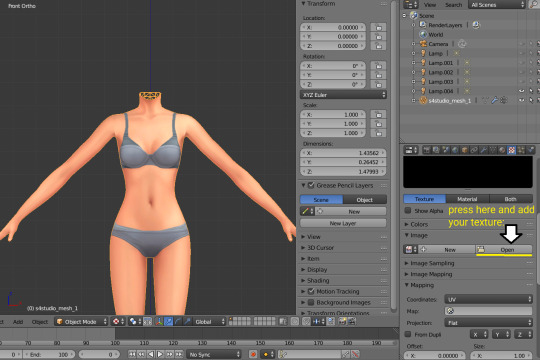

6. In the same way you need to remove skin texture, because you don't need it, only select BaseTexture instead of Diffuse:

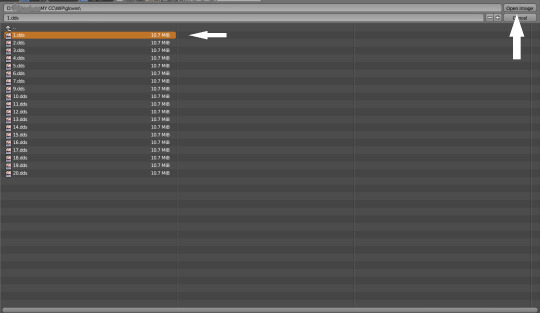
7. Import your Sims 3 body, also I merged the top and bottom, because TS4 mesh is full body too:

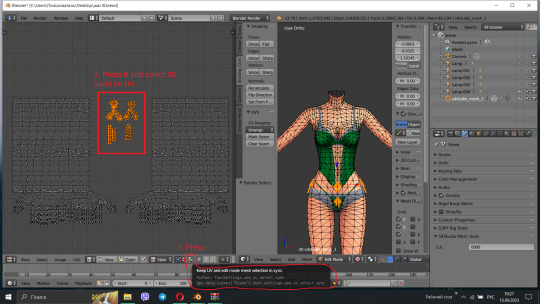
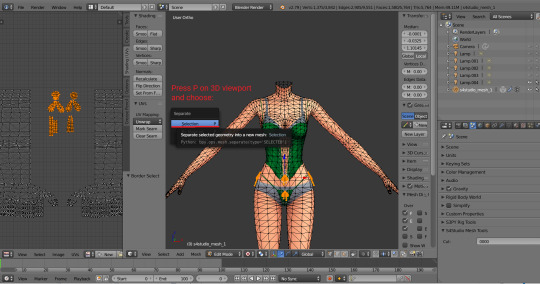
Tip: if your stuff have 3D parts, separate them in their own group(s) and hide them from baking (you can bake them separately and/or tweak them in Photoshop):

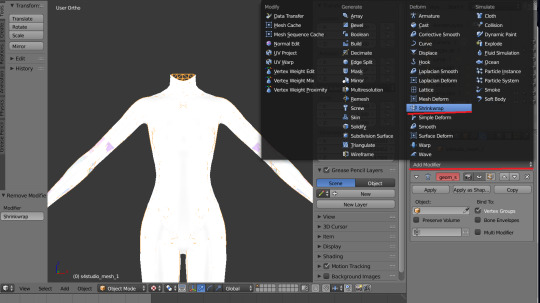
STEP 2: SHRINKWRAPPING THE TS4 MESH.
In this case it would be really easy to adapt TS4 body mesh to TS3, because they are very similar, for stuff that partially 3D (like dresses) or in case with non-standard bodies (like Venus Curves by Venusprincess) it would be harder, so I don`t cover this in this tutorial.
Select TS4 body, go to Modifiers tab, usually there are already applied modifier "geom_skin", just ignore it and in the "Add Modifier" window select Shrinkwrap modifier.
2. In the Target tab select TS3 body group:
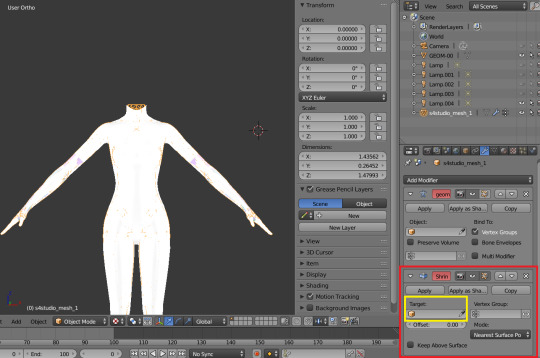
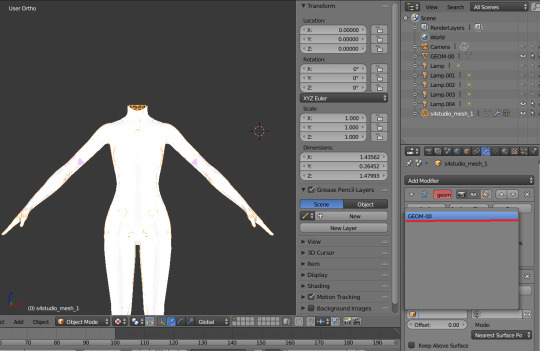
This is how TS4 mesh is supposed to look with this modifier, you may also apply modifier, but it's not necessary:

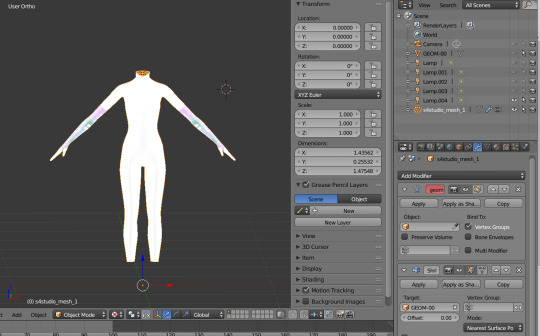
3. After that you need to hide TS3 Body mesh and now we're going to baking.
STEP 3: ASSIGNING MATERIALS.
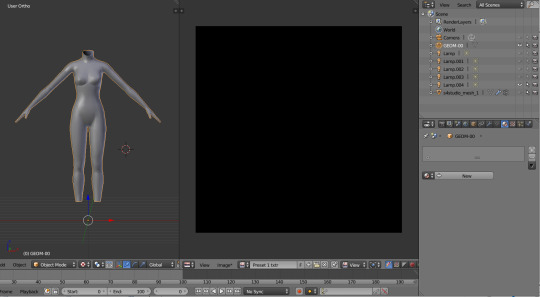
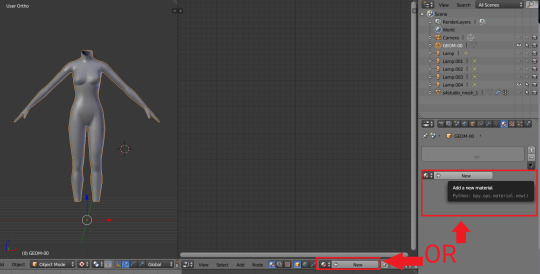
First of all, you need 2 windows — with your 3D viewport and with Node Editor, also you need to switch rendering type to Cycles Render. After you set it, select TS4 mesh, open Materials tab and press Use Nodes button:

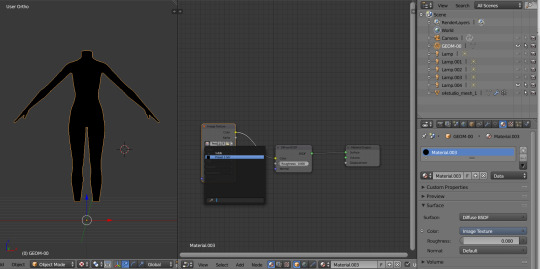
2. After that two small boxes should appear on the Node editor tab. Then press Shift+A and select Texture → Image texture:

3. Connect node that you already added with Diffuse BSDF node, by connecting yellow dot (socket) named Color of Image texture to the same socket of Diffuse BSDF node. After that click on the image icon and find your texture:

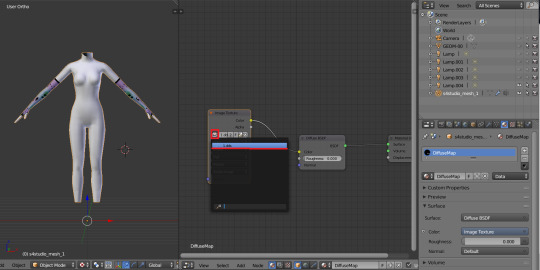
Don't worry about the black spots, we will fix that later.
4. Go to UV/Image editor and create new image for your bake, it must be 1024x1024 size or, if you want HQ texture - 2048x2048 or 4096x4096, but today I use non-HQ. After that, hide TS4 body and unhide TS3 body:
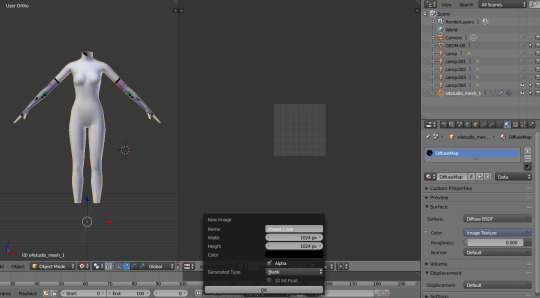
5. Go to Node Editor, create new material and assign our newly created image to ts3 body the same way, that we did with ts4 mesh and original texture:
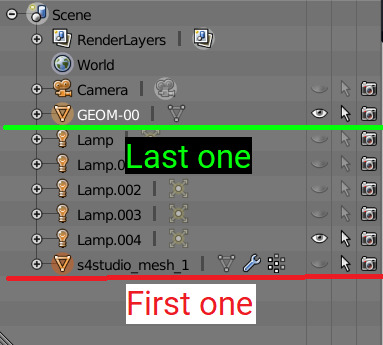
6. Press Shift + Click on the TS4 body firstly, and TS3 body lastly. It`s an really important step, because without it baking wasn't work right way.
STEP 4: BAKING THE TEXTURE.
7. First of all, go to the Render tab and change default settings to the following:
Sampling Tab:
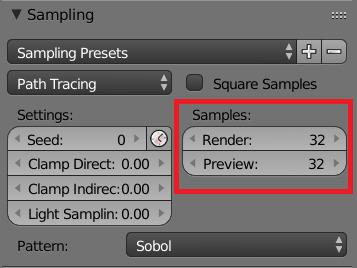
Bake Tab:
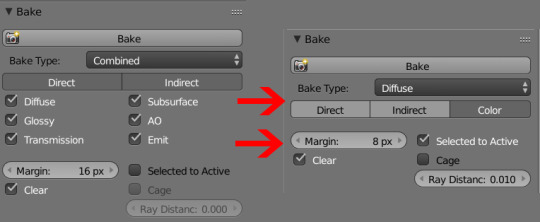
8.After that press Bake button and wait for it.
9. Look at the result, great, doesn't it?:

10. Save this texture as .png... But wait, that's not all! we need to bake alpha, so we can remove that black body texture in Photoshop later.
But that will come in part 2...
116 notes
·
View notes
Text

Mini Blender Tutorial: Appending Hair & Clothes onto Posed Sims
I'm so sorry this has taken me so long.
Quite a while ago, @baobeisims requested this tutorial, and I'm sorry it's taken an age but I'm in the final stretch of planning before my wedding and it's got me stressed up to my eyeballs.
But without further ado, let's go!
Step 1: Import your sim into blender and pose
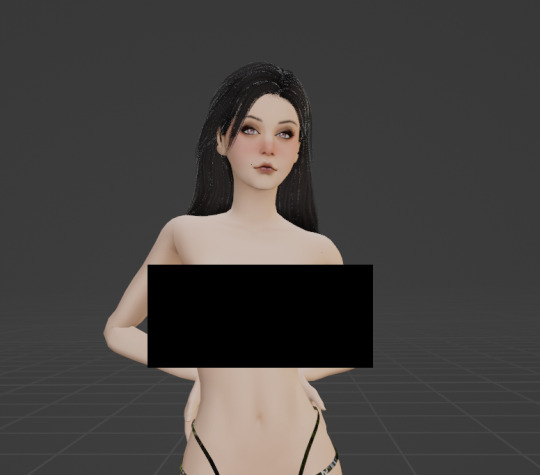
For this tutorial, I'm going to use my lovely Lilith! When appending clothing, it's best to use a mostly naked/fully naked sim. It can be hella weird having nude ripped sims on your computer but trust me, it'll make this process SO MUCH EASIER and your end results better if you don't have clothing on your sims. Why is this? Any clothing applied to your sim in game is permanently attached to their mesh in blender. Meaning you cannot delete off any piece of clothing that's already there. Because of this, I recommend fully nude sims free of any clothing, jewelry or other accessories. However, fully nude sims aren't Tumblr friendly so I'm using a topless, underwear-d Lilith 🤣
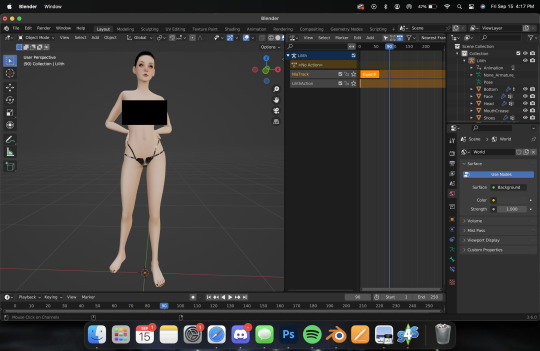
Here's Lilith, imported, nodes adjusted, and posed. I won't cover how to do this here, as I already have in THIS TUTORIAL (3 parts, all linked). So let's get on to the fun
Step Two: Adding Hair
Adding hair and clothing works the exact same way as appending a prop to your sim, with a few additional steps. Like with props, export the mesh and texture for your hair, then append them in blender. For this tutorial, I'm using Lamz' Katrina hair. Just like with anything else, append all of the studio meshes:

Once you import them, it'll look a bit messy.

But that's ok we're going to fix it! Like with any appended object, delete the bone_bone_shape and the rig, so. you're only left with your sim and the studio meshes. Add in your texture nodes and adjust like we do with any object. It should look like this:

Link the materials and join the meshes into one, and you should have something like this:
But as you can see, the hair isn't aligned. To fix this, navigate to the Modifiers tab (like we did with jewelry/props) and set the object to your sim, like this:
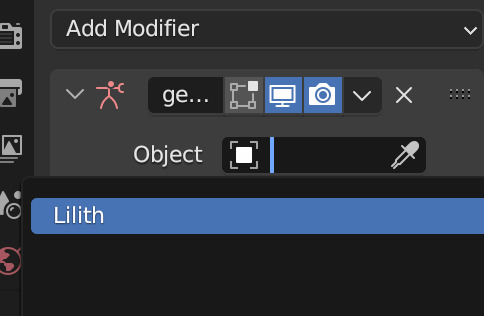
Now her hair should be... actually on her head! 😂
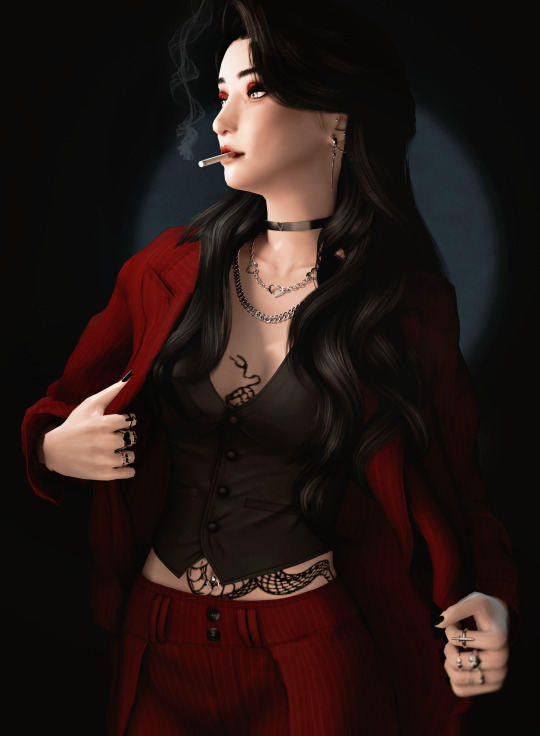
Let's add some clothing then I'll show you some handy tricks I use to achieve more realism in my renders. I'm going to use the same dress I used in her render here to keep things simple. It's Evellsims' Trapped Dress.
Step Three: Adding Clothing
We'll follow the exact same steps we did with the hair. Export the mesh and texture from Sims 4 Studio and append in blender.

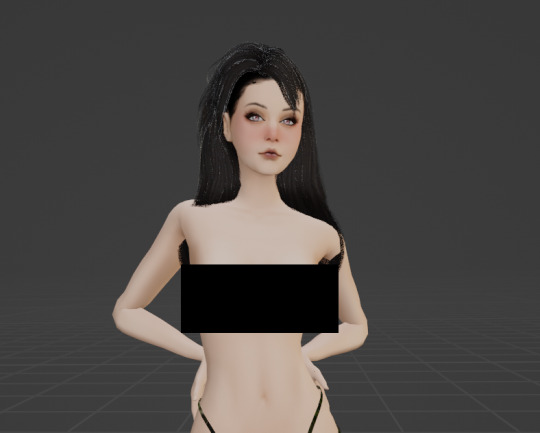
Just like before, it's not in line and needs the nodes adjusted. Follow the same exact steps, adjust the nodes, link materials, join, and append. After following all those steps you should have something like this:

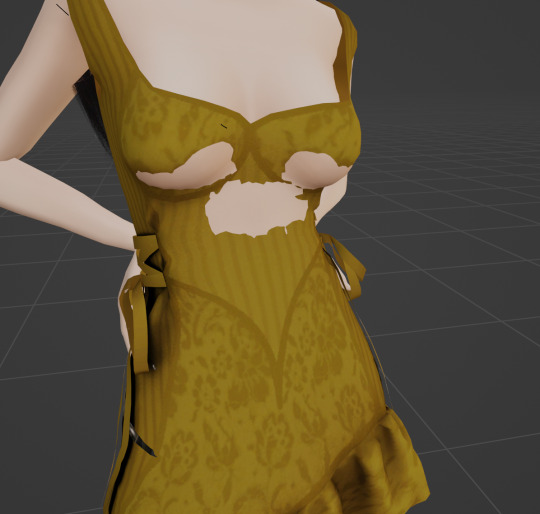
You might be wondering why I still have a censor bar here... That's because appending clothing doesn't automatically take the same shape as your sim's body like it does in cas. (I can't show it cause Tumblr but... her tits are out 🤣 just trust me) Different framed sims will require more or less work depending on their body shape. Curvy sims will require a lot, whereas petite ones like Lilith may only require a little bit of manipulation. Additionally, some poses and clothing aren't as compatible as you'd hope. Fabric can do some weird things, so sometimes you'll have to do more or less manipulation and it's a bit of a tossup. This makes appending clothing in blender a massive job, but for certain projects it works way better than dressing your sim in cas, particularly when you want to manipulate the clothing in some way (by mimicking a breeze, or gravity, etc) or if you're a masochist like me and you want to always do more work.
Step Four: Sculpting Hair & Clothes
By far my favorite part of the render process (even though it's tedious as fuck and takes an age) is sculpting. I use sculpting to fix clothing and hair and mimic gravity and weather. Here are a few examples of what sculpting can do (other than simply making clothes fit):


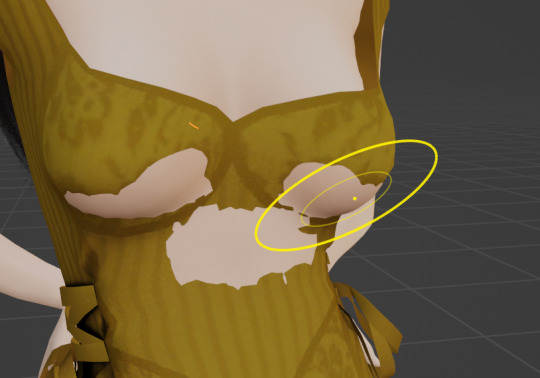
To use the sculpt tool, select from this dropdown:
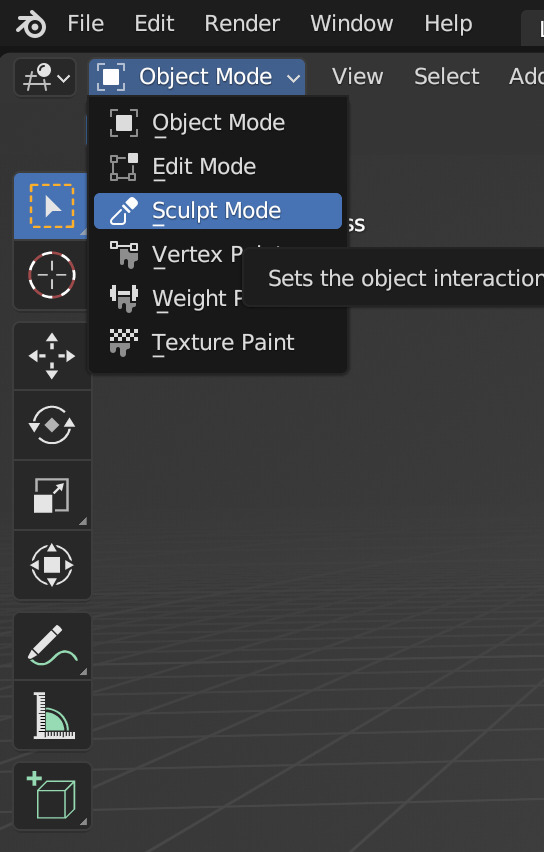
From the new sidebar tools, select Elastic Deform, here:

I've covered the Tumblr-sensitive bits so you can see what you'll be working with. It's not unusual to have gaps in the clothing that need filling or adjusting, like this:
Using the sculpting tool set to elastic deform, you just have to click and drag the fabric to where you want it. Be sure you're editing the clothing mesh and not your sims body! Always select the mesh you want to sculpt from your outliner panel so you don't accidentally click and drag your sims skin! Here's a before and after, make sure you're putting your cursor against the right angles.
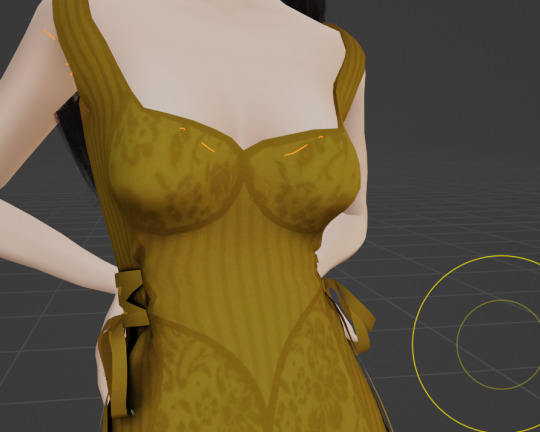
There are a few gaps on the back of her dress too. Here they are before and after sculpting:

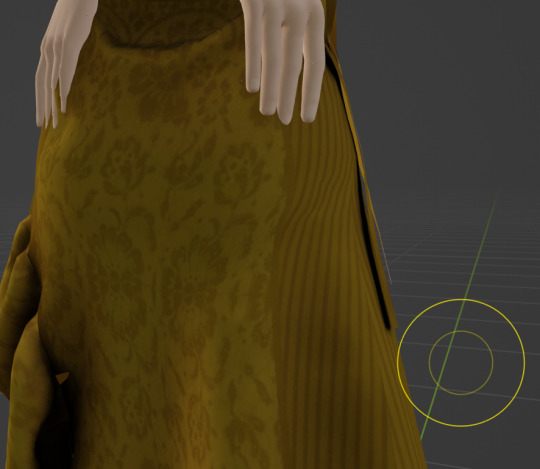
It takes some time and practice to get good at this, but once you do there's no limit to what you can accomplish! There are other methods that yield similar results (like shrink-wrap, but I've never gotten it to work for me) but this is my favorite and what I'm most used to. You can sculpt any mesh, so go wild!
That's all I have for today.
Homework:
Your homework is to append hair and clothing in blender and post the final result! Tag me in it too I'd love to see! & As always if you have any questions please feel free to send them through to me either with an ask or the help desk!
#salemsims tutorial#render school tutorial#sims 4 render tutorial#sims 4 blender tutorial#render tutorial#blender tutorial#tutorial
63 notes
·
View notes
Text
Adding extra details to your sim!
So any fans of @kikovanitysimmer ‘s renders know that she adds a lot of extra detail to her sim’s skin. Her process has changed since then, but she still hosts her old tutorials on her discord!
We’ve been getting a lot of talk about how hard it can be to follow so I’m providing a text-based step by step tutorial!
Requirements
TheSims4Ripper
Blender 2.9+ (I’ll be using 4.0.0)
Any photo editing software (I’ll be using Ibis Paint) that has these features:
Multiple layers
Adding noise
Changing brightness/contrast and Hue/Saturation/Value
Inverting colours
Sims4studio (optional)
First things first:
You do not need to export a custom skin. Using the _diffuse.png you got from exporting your sim works just fine!
It’s preferable that you export your sim naked. Not a requirement, but makes it a lot easier. Here’s a video tutorial about dressing your sim in blender.
Onto the tutorial!
Displacement Map (Pores and the like)
Import your texture. Here, I’m using Kiegross’s Kiera Skin, edited for personal use.

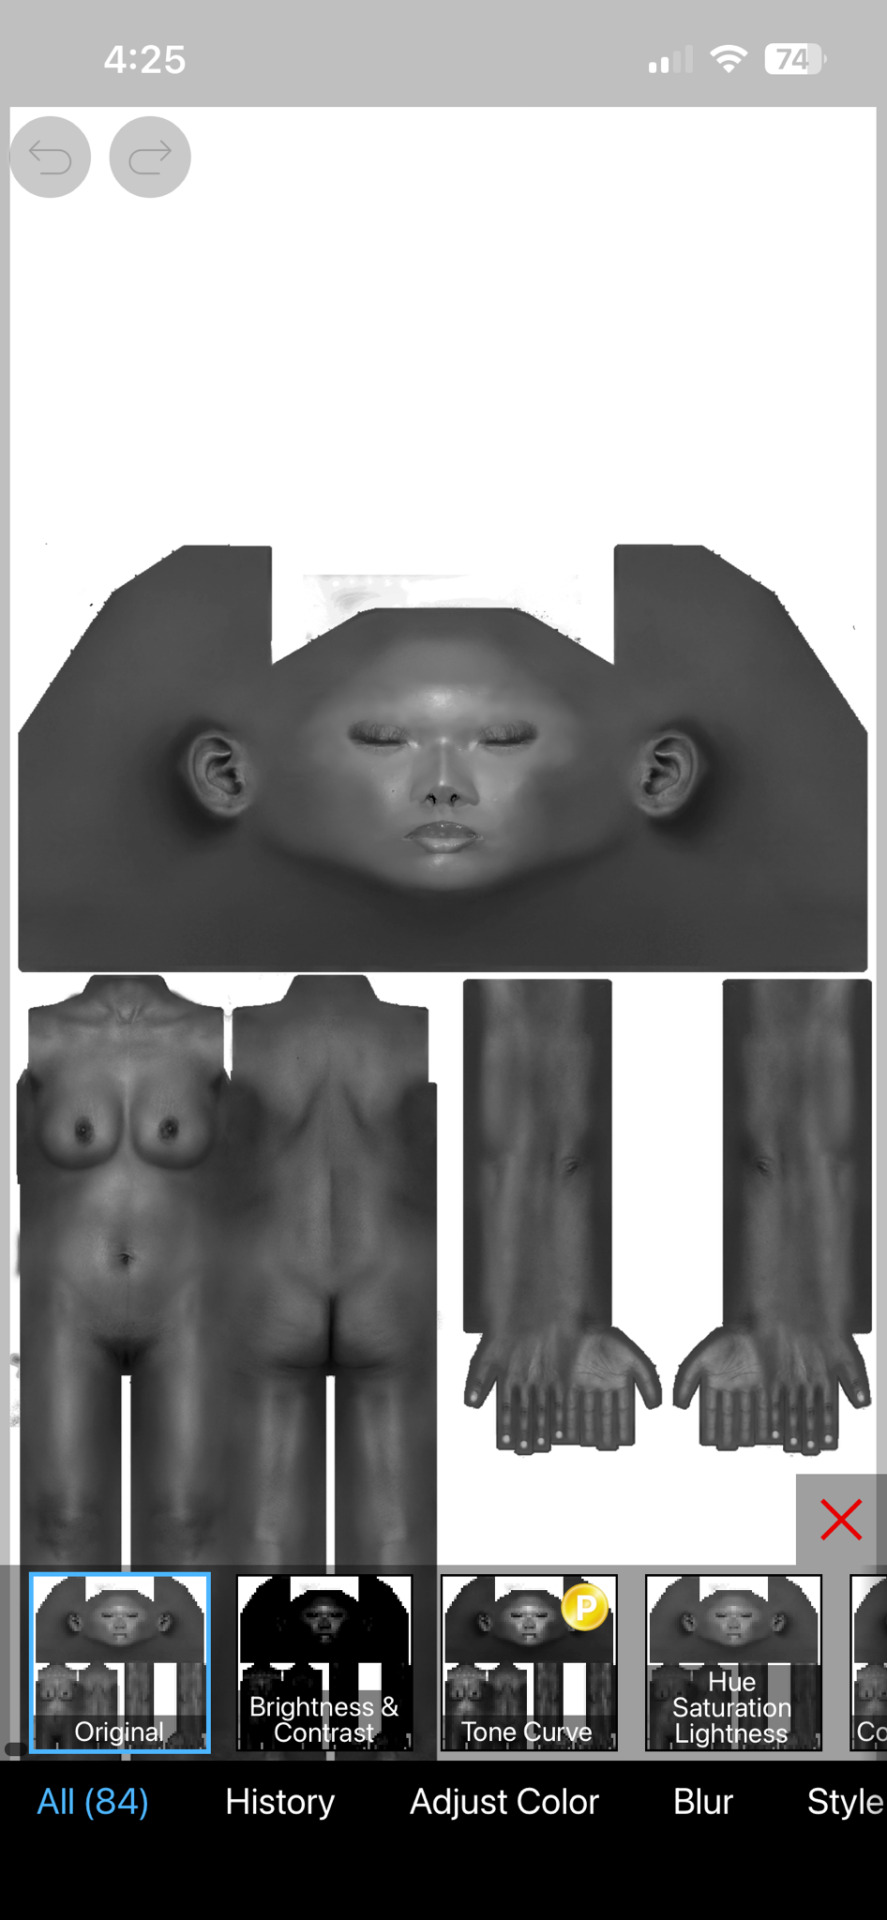
2. Change the texture to black and white
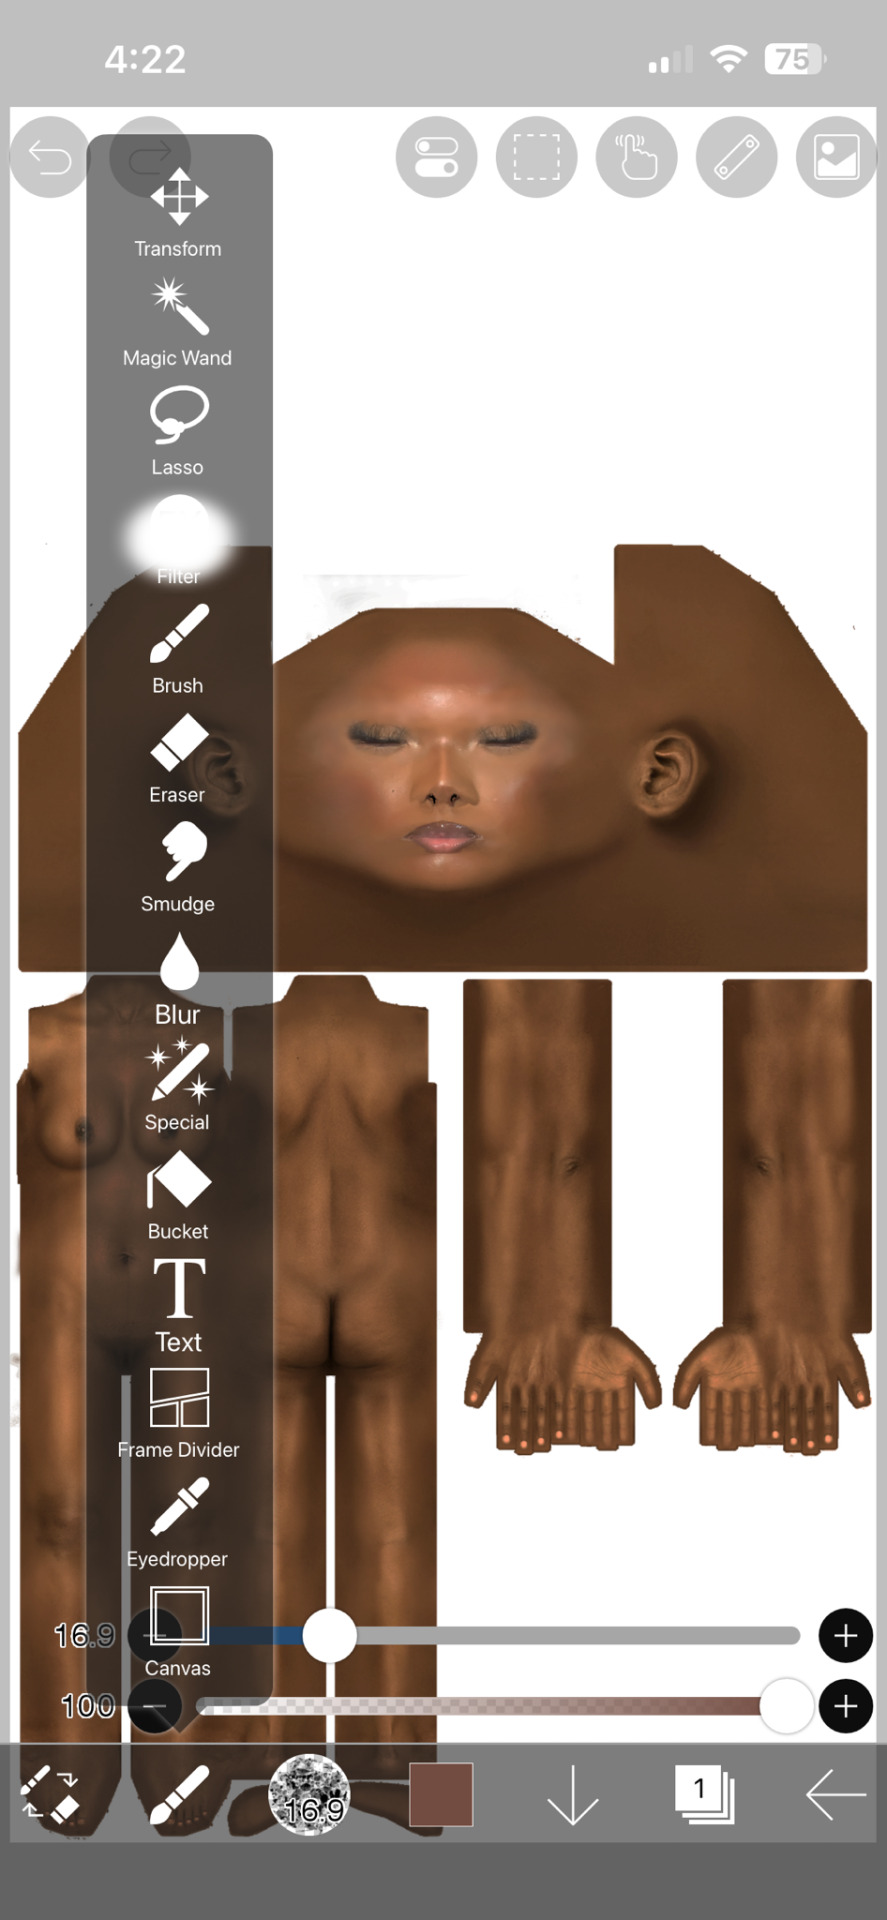


3. Duplicate the layer

4. Edit the Brightness and Contrast to your liking

5. Add noise. Pictured here are my personal settings
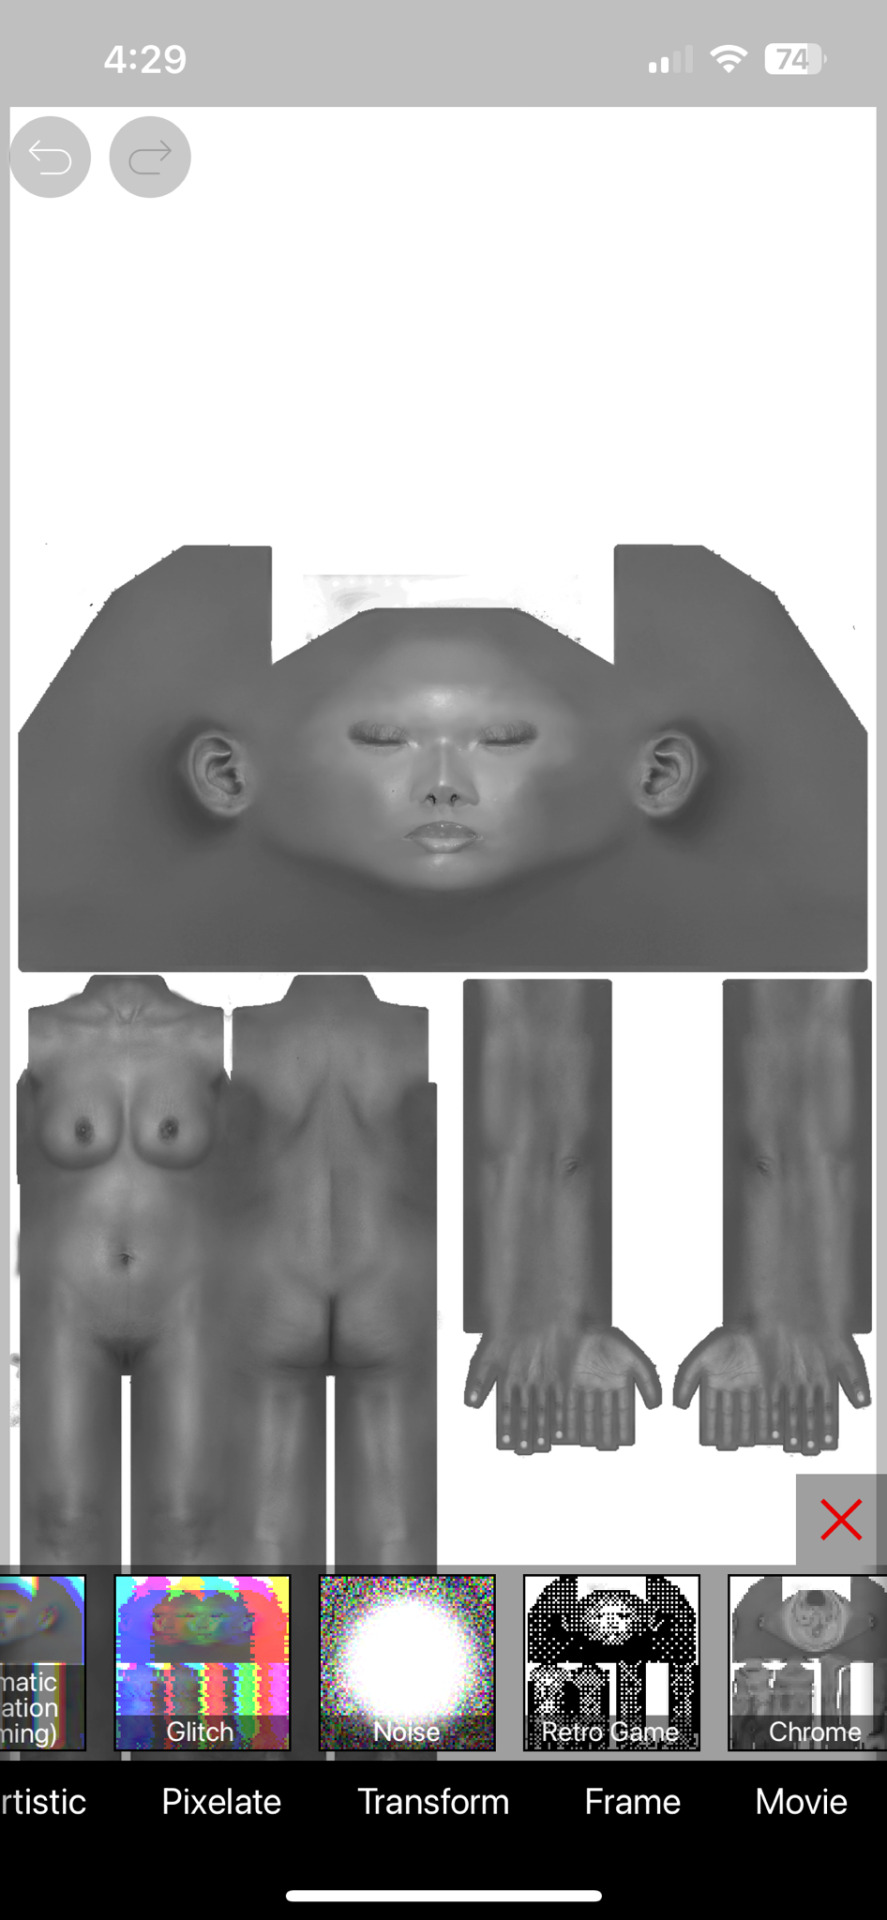
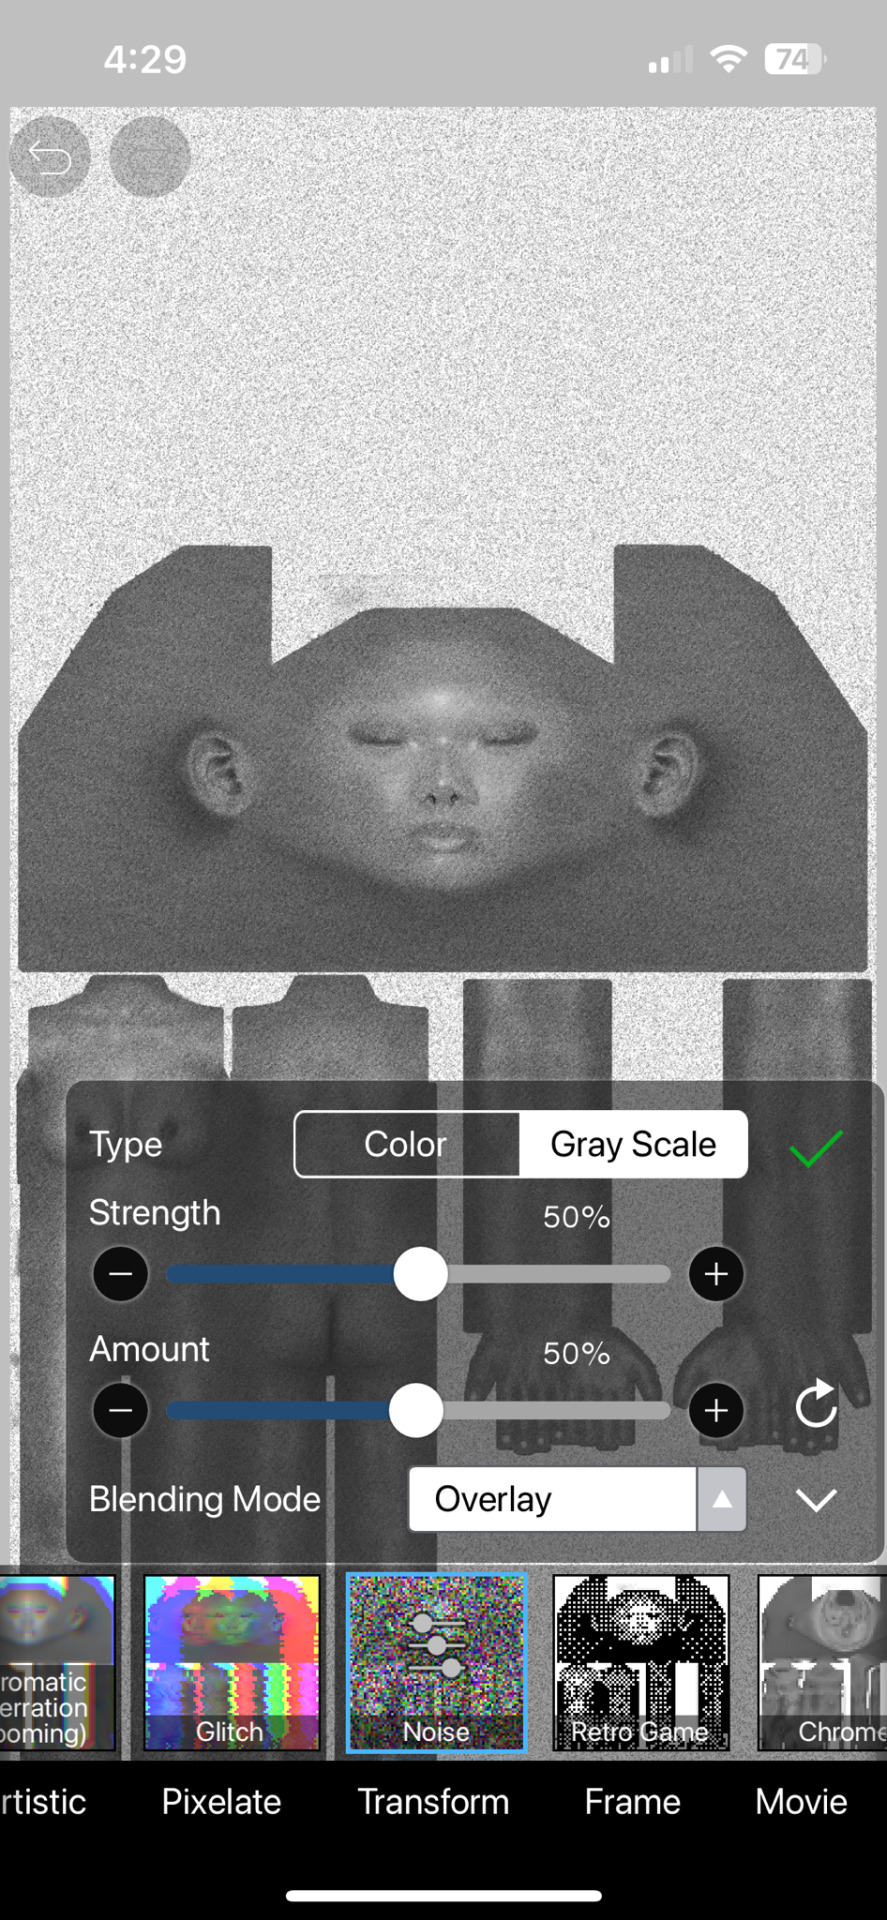
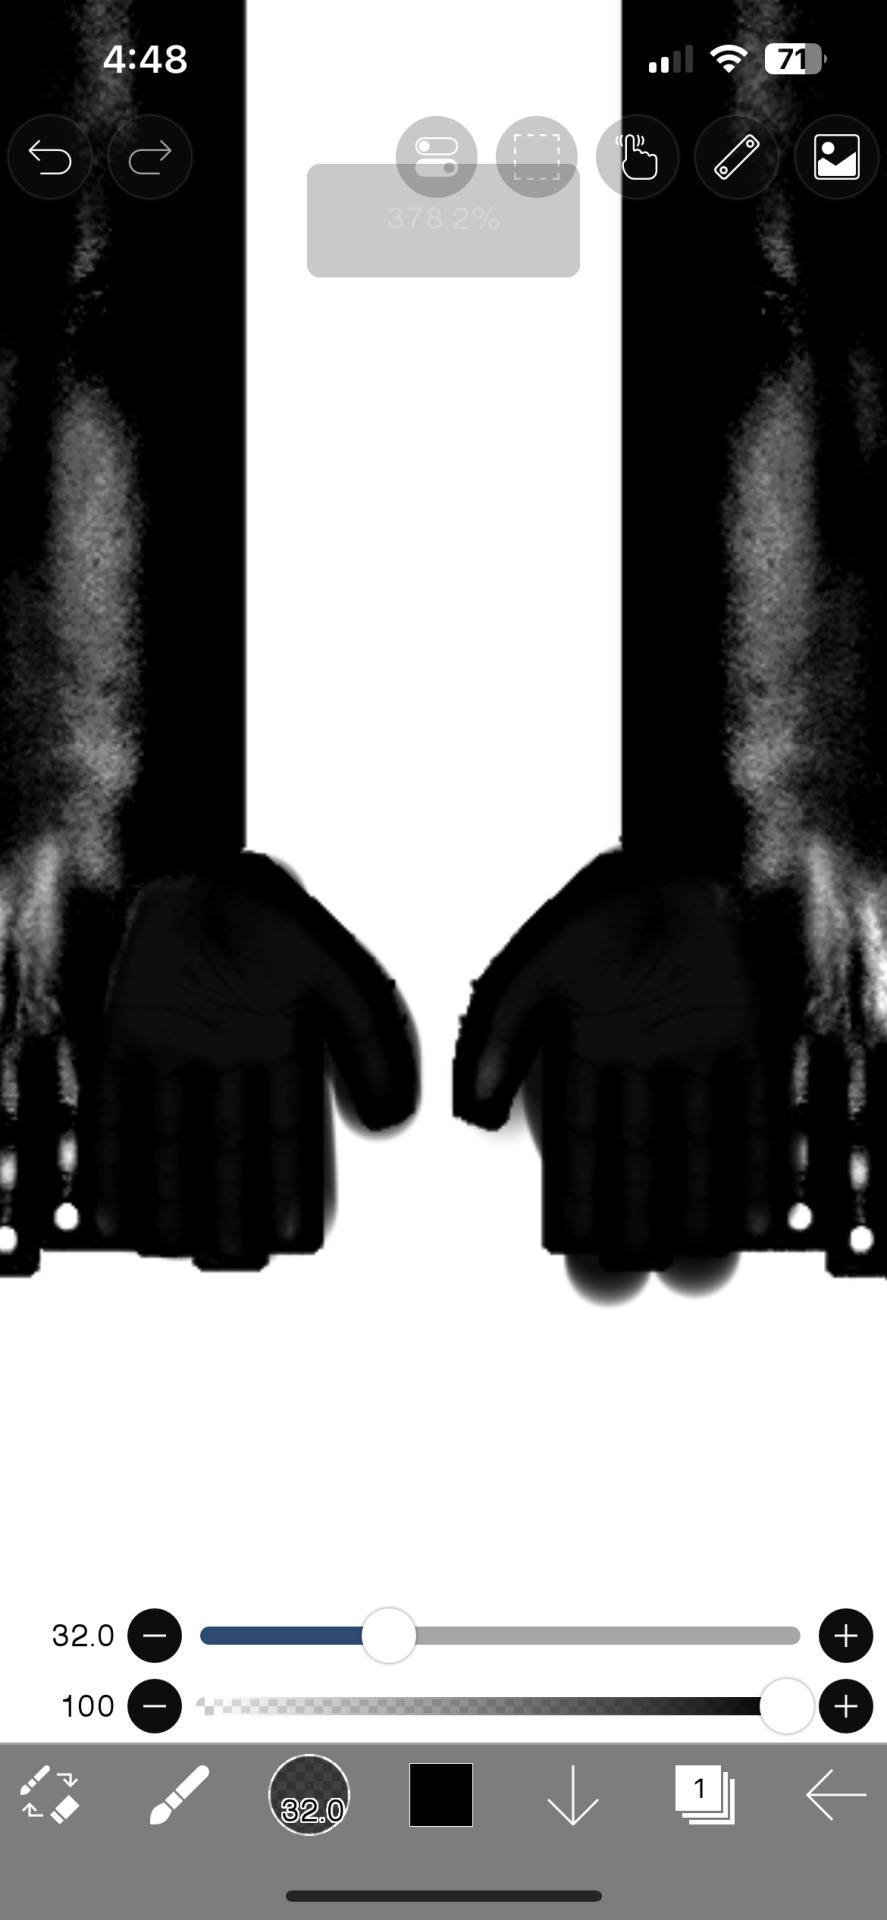
6. Erase parts that realistically would not have a lot of pores, ex. Lips, hands and feet. Kiko suggests putting your eraser hardness or opacity lower as these areas still have texture to them.
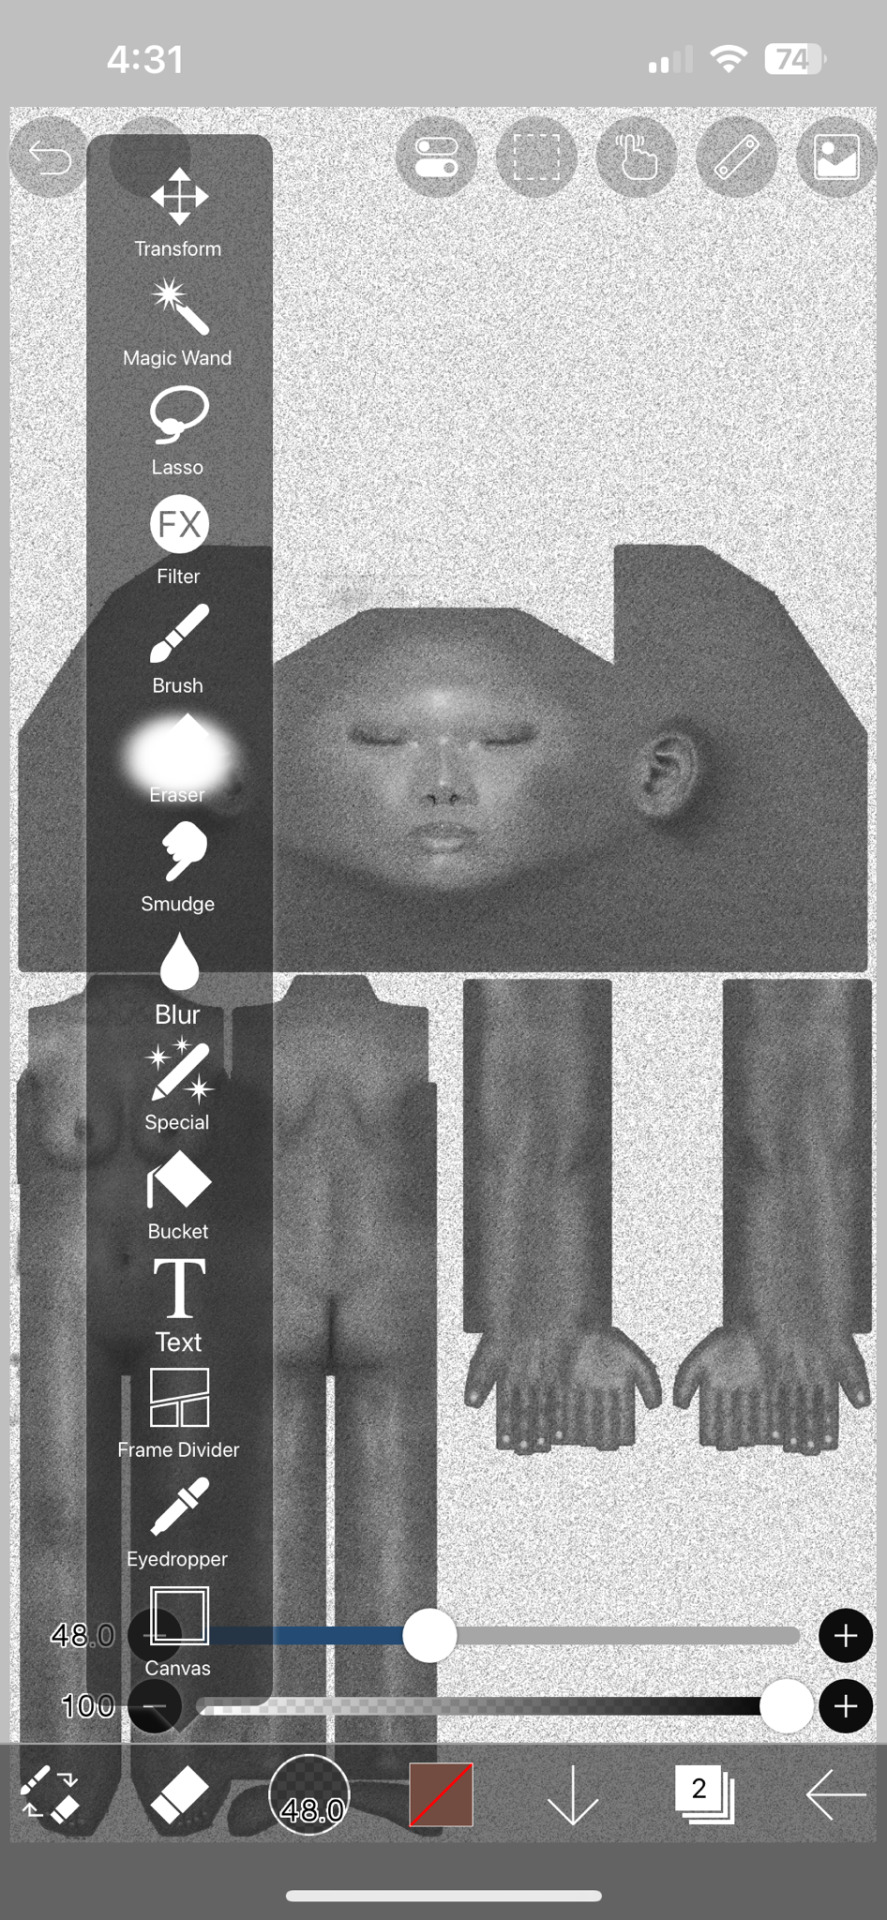

7. Save picture as is! You can delete the noisy layer if you wish, but we will need the original black and white layer for everything else.
Specular and Roughness Map (Shine)
Creating a new layer is highly recommended so you can backtrack
Using the original layer, edit the brightness and contrast. Pictured here are my preferred settings


2. Take a black brush and colour in areas you don’t want to shine. Realistically, these are the palms of your hands and the soles of your feet and their respective nails. You may also want to take a white brush to the areas you do want to shine, like lips, chest or thighs.
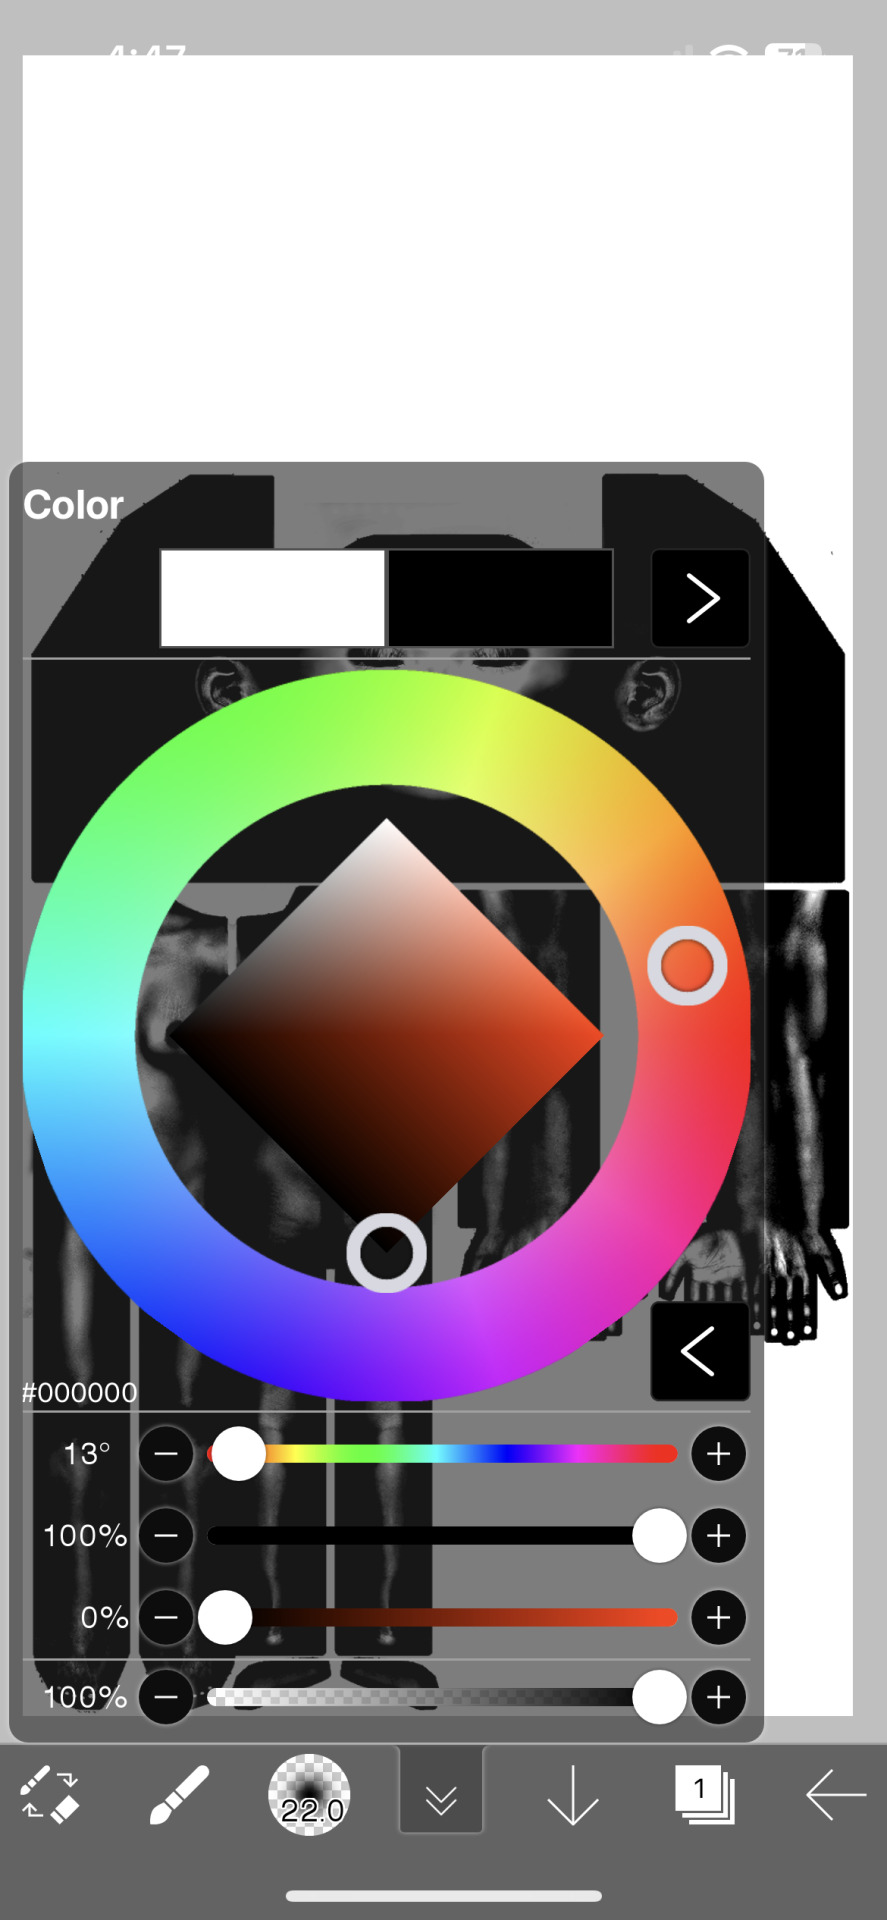
3. Save as is!
Adding to Blender
First things first: Go into the Shading tab. Link your sim's materials using Ctrl+L to make it easier on yourself!

Add your new Displacement and Roughness Map to your material
2. Add a Displacement Node

3. Plug the Displacement Map's colour into the Height. Change the scale to whatever you like (I chose 0.0005)

4. Add two Color Ramp Nodes to your material
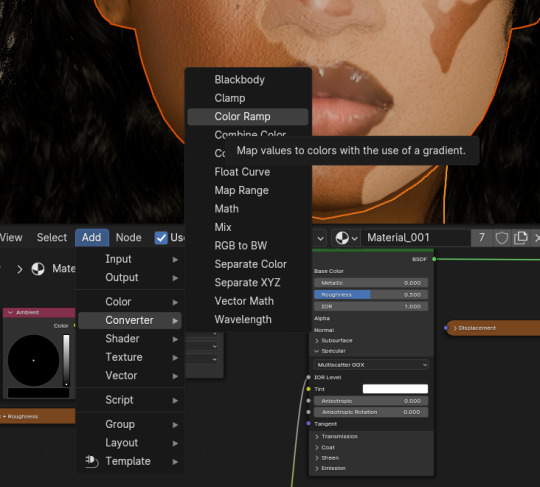

5. Plug the Spec + Roughness Map's colour into each Color Ramps' Fac

6. Plug one Color Ramp into the Roughness and another into the Specular/IQR (you may need to roll out the Specular tab to find it)

7. Drag tabs on the Color Ramp to change the strength of them. For the Roughness Color Ramp, you'll need to swap them around to have the desired effect.
And that's how you get the details! There are other ways to get the details, but for beginner renderers, you can start with this!
30 notes
·
View notes
Note
📩 Simblr question of the day: Do you have a process for making your simblr posts?
answer in whatever way is most comfortable for you and feel free to share this SQOTD around, make sure to use the hashtag SQOTD and tag me in separate posts ~ 💛
This question was contributed by an anon !
oh brother everyone pull out the popcorn cuz im aboutta yap for a decade and a half
Here's Roos guide to making a youredreamingofroo post
Step 1, Be up at ungodly hours and have a sudden shock of inspiration for a render
Step 2, Write inspiration down for later
Step 3, Completely disregard "for later" and go boot up my laptop at aforementioned hours
Step 4, open up blender and throw in sim DAEs and start posing them
Step 4.5, use pinterest for pose inspo and/or spend 50 years trying to figure out how to do one thing that I wanna do but dont know how to do said thing (every explanation is explained like I should understand every inner machination of blender, which I obv dont understand) (optional)
Step 5, spend the entire time posing thinking of how I'm going to position the cameras and which chunk of dialogue will go where
Step 5.5, realize halfway through that the song I'm listening to actually fits the scene really well and so I end up listening to that song on repeat for however much longer I end up posing (Optional step)
Step 6, Set up the cameras, lighting and background, usually I don't have a scene in mind, so I just do my usual black background and colorful lighting
Step 7, have a crisis because it's 5 AM and I could've sworn it was 1 AM two seconds ago
Step 8, Render the finished products, which usually goes by fast cause I render in eevee but sometimes I do cycles (which takes fucking eons)
Step 8.5, get sick of the song I'm listening to on repeat (if step 5.5 occurred in the process)
Step 9, Throw them suckers into GIMP and edit them, by this point I'm usually tired and I'm not a huge edit-every-detail kinda guy, so editing is pretty easy, that being said, Clone tool+Heal tool are my best friends for renders cuz of hair clipping, general clipping and/or weird shadows, and I tend to edit everything to the very PIXEL (if you could see me edit, I actually do go pixel by pixel often), and then to top it off, sharpen that bad boy <:P
Step 10, Export them and go to tumblr and throw those pictures onto a post (For some reason, making the post save as a draft makes posting images a lot easier...) and wait for them to process (which takes eons cuz of my wifi), then go to patorjk for title coloring, add the title, and add whatever needs to be added under the cut (transcript, inspo, credits, etc)
Step 11, Schedule it for a few minutes later cuz why not (usually an even number like X:10 AM or X:30 AM etc etc lmao)
Step 12, Wait for it to post and schedule 3-4 TZRs (depending on when I post the renders is how I determine when to post a TZR, if I post something at 7, then I schedule TZRs for 12 PM, 6-7 PM and then 12 AM)
Step 13, profit 🤷♂️ (and by profit I mean profit in serotonin and pride)
#thank you for the ask squatty 💏💏#this is wayy too long and was a stupid idea but whatever 😭 it's 7 AM as I'm typing this and wanna get thru most of my inbox cuz-#-I have a lot of asks in there. especially SQOTDs lmao#simblr-question-of-the-day#SQOTD#simblr question of the day#yapping
13 notes
·
View notes
Text
Resources!
Here is a list of the resources I use to make my graphics as somebody who doesn’t have Photoshop or Illustrator! All my graphics are made by me, except for my manga icon base which were made by solaariicons. My Carrd was made by poohresources who has free templates but some may require a pro account.
Photopea - is what I use for adding gradients and spot correcting unwanted marks in manga icons, but it has a lot more tools than that! It’s very similar to Photoshop and can open various file formats including PSDs! So if you’re looking to make your own edits to templates you find on tumblr, I highly recommend this!
Pixlr - which has sadly gone paid and has begun to use AI. As somebody who used this religiously for icons for the past several years, I was bummed out. But quickly realized that it still functioned in Wayback Machine! Everything but “Add element” still works but might take a little to load in. You can still upload your own elements to place in though. This is what I use for lighting correction, color correction, toning, and adding my borders around my icons.
Photoscape X Free - is not my favorite. It has it’s uses of course but it’s pretty limited and the Pro version isn’t worth it in my opinion. Free comes with some basic tools, basic borders, and some pretty tints, overlays, and textures as well as some stylization options.
Canva - mostly free and what I use for my borders, banners, promos, dividers, etc.. I’m able to use the Pro version since my sister is kind enough to share it with me! It consists primarily of simple tools and premade graphics, but of course you can also upload your own! You can save graphics in the form of JPGs, PNGs, GIFs, MP4s, and PDFs. If there’s a graphic you’d like to use but it’s locked behind the Pro account, let me know! I can try see about saving it myself and sending it.
CGI icons - are made with The Sims 4 and Blender 2.93 both of which are free! It was a little bit of a process to learn since it required moving a lot of things around, as well as figuring out the virtual photography aspect, but I’ve eventually managed some good results over time! I use custom content from various creators to make my Sim look and pose the way I want to.
The process of creating a Sim to look like your character is a little broad, but there’s a vast community of Sims 4 modders. I’ll at least share my favorite rendering tutorials here. This is the one I used to learn lighting, this one covers the basic process of exporting and rendering, and this one is the one I used to get rid of seams on models. For framing and lighting, I recommend looking for photography inspiration on Pinterest! If this is something you’re interested in doing, hit me up! I’m more than happy to help others!!
Unsplash - Is my primary resource for stock images! Most photography there has a nice modern look and covers a wide array of subjects. It is mostly free, and all images are free to use for commercial and noncommercial use.
Check out my Ray's Leftovers tag for graphics or edits I ended up not using or made for fun! Feel free to modify them to your liking as well and there's no need for credit, though it is appreciated.
My Ray Made tag is where you can find roleplay graphics that I have made, for myself and others!
#Resource#Posting this for my RP partners but if somebody I don't know stumbles upon this. . .Go ham!!
29 notes
·
View notes
Text
FAQ’s
Frequently asked questions to eeeaaasseee your mind :)
1. Can I recolour your CC?
Yes! Recolours and retextures are a-okay in my book, you don’t even have to ask first! Just please credit me and link to the original CC. My full TOU can be found here.
2. Is your CC free?
Yes! My stuff will ALWAY be free unless it is a commission. I sincerely doubt I will ever start a Patreon, although maybe one day I will have a Kofi donation page.
3. How do you start making a sim? What’s your process?
If it is a celebrity sim, or a sim of a fictional character like Arthur Morgan, I will always go CC shopping first! I usually start with the hair, then if the sim has particularly iconic outfits (e.g. Fran Fine) I will find as close as possible. Sometimes this is really easy, as with @plazasims RDR2 Outfits, but sometimes I have to be a little creative! Then, I always try to create the sim from Pinterest references first. I usually take a few hours away from it so I can see it again with fresh eyes, and it is usually at this point where I will introduce a photo overlay. Essentially, I will overlay an image onto The Sims 4 window and have my sim and the photo side by side. Laying the photo directly on top and ‘tracing’ is a BAD idea! You can’t see the real sim underneath! Usually looks WEIRD afterwards. If I’m feeling stuck, finding a reference on Pinterest at a 3/4 angle and editing my sim in that view helps a lot! It gives you a fresh perspective and often sorts out problems you didn’t even know you had.
4. What’s your main save?
My main save is (totally cliche, I know) actually my Simself in PlumbobKingdom’s save file! It’s INCREDIBLE, and makes the game so much more fun and interesting with the variety of locations, and everything just looks SO much nicer!
5. Who’s the favourite sim you’ve made so far?
I secretly LOVE my Maxwell Sheffield sim, I think he looks awesome. I love my Arthur Morgan Redux, too, and I’m really looking forward to making Bree Van De Kamp! Might develop it into a DH series if the response is positive enough :)
6. How do you edit your screenshots and/or do you render your sims in Blender?
I don’t render my sims in Blender, as I can’t use TS4 Sim Ripper! I am a Mac user. My photo editing process; taking screenshots in CAS using Trait poses, and photos in game using poses and @ravasheencc Full Control Camera. I then use Picsart on iOS to knock up the composition, Snapseed to clean up the photo (sharpen, colour balancing, glow, vignette etc) and Clipdrop Relight (online) for the lighting.
2 notes
·
View notes
Note
how long did it take to make your sims in blender? i wanna learn but i don't wanna mess up :(
Oh my friend messing up is gonna always be apart of the process lol.
But it's quite easy. It used to take me like a whole day just to do one render, just from watching certain tutorials and going based off only those. I just started experimenting with blender more my way and I could probably make atleast 3-4 renders in one day and it'll range from 1-3 hours depending.
It's easy to rip the sim and just pose them if that's what you're looking for. It's a little time consuming (sometimes) when you want everything to be perfect. (clothing not clashing, rig joints not clashing, and more)
If you actually get into it and may want extra help, I'm always down to help!
3 notes
·
View notes
Text
I'm making an animation!!!
It's about my silly alchemist moth-coded twink oc who started out as a dnd character (which his lore is based on). Also my therapist says he's kinda like me which is in fact, not good !
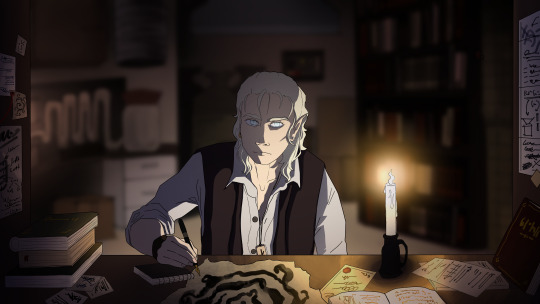
Let me walk you through my process - the art you see above is a trial, fully rendered frame, the goal being ofc making them all look this good!
This is my animatic - to highlight timing, movement and values of each scene. I'm using a fragment of the song If I Were You by Nothing but Thieves as soundtrack, I think it fits the character very well and also I really like it c:
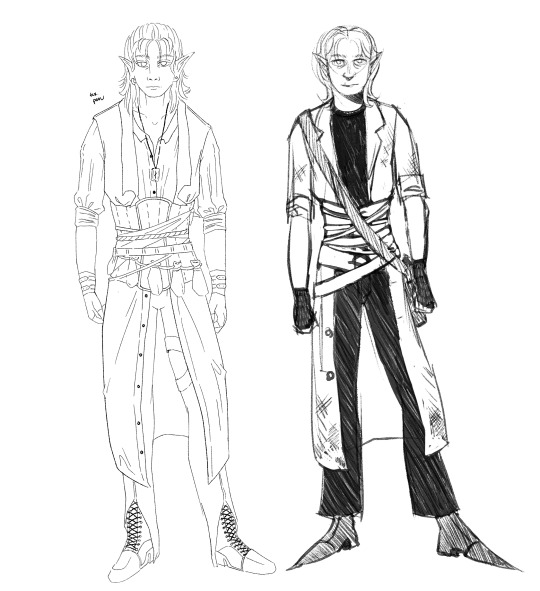
Now, a little more about the main character and the whole process. His name is Ciem No (it's a silly polish word play on the word darkness) and he currently looks like pic 1, while pic 2 is his backstory self

I even made his house in The Sims 4 because I struggled with perspective and couldn't be bothered to learn blender lol
Also, next to it you can see my storyboard! Some frames didn't exactly fit how I wanted them to, so they're different in the animatic!


If anyone's curious, I did the drawing in Clip Studio Paint, the motion in After Effects and then put the whole thing together in Adobe Premiere Pro!
I'm required to work with Adobe software since this whole animation is a uni homework, but I don't think using adobe is neccesary in any way. I will keep you updated on the next steps of this project! (If anyone is actually reading this ._.)
#using my uni assingments to infodump about my ocs#rat twink coded#dnd character#dnd5e#animatic#2d animation#animation#oc#oc art#ciem no#animation process#oc backstory#oc lore#work in progress#trans artist#queer artist#Spotify#idzinski art#idzinski ocs
1 note
·
View note
Text
ABOUT
Blood and Ashes takes place in an alternate reality modern setting, in the city of [REDACTED]. This world is one where the supernatural is known to be real. Though everyone is referred to as "human", there are people in the world with supernatural lineages - Tieflings (or other non-branded version of that), those with dryad or elvish ancestry, etc. Individuals touched by the occult find themselves drawn to live in certain areas of arcane resonance, and thus populations of spellcasters, werewolves, vampires, and artists (ha!) will often be concentrated together, for better or for worse.
All of the images in this series are scenes rendered in Blender, altered in Photoshop. The Blender scenes are built primarily using Sims 4 game assets and custom content, plus 3D models and photos that I found online or made myself.
Is this the Sims 4?
Yes and no. I have been (and still am) using the Sims 4 to act out this story. Like the dice in a tabletop RPG, the game often throws a random element (or has a fabulous malfunction) which can generate really interesting scenarios or directions.
Otherwise, this story is removed from any game settings or lore (minus a couple of EA’s characters that I adopted for my own terrible purposes). You don’t need to know anything about the Sims to follow the story. Anyone who does play the game will probably notice easter eggs where I’ve taken inspiration, or allude to game elements.
Custom Content/WCIF?
For anyone finding this via sims 4 related routes, I will do my best to post credits to list custom content, so that you don’t have to ask me where to find stuff - or rather, so that you don’t have to wait a full decade for me to reply.
If you are looking for something and you don’t see it in the credits, chances are it isn’t available for use in game. It might be a non-game 3D model, a photo or other 2D asset, Photoshopped in as part of my post-processing, or my own mesh that I have no idea how to convert for gameplay. Also, because I am making this with Blender, I have to fit clothing and stuff to the character rigs manually, so some CC might look different in my scenes than it would in the game.
1 note
·
View note
Note
Hii, I love ur cc, it's truly amazing!!
I'm also in love with the lightning in ur renders, how do u do it?? Im new in blender and o would like to learn new things :) 🖤
Aww, thank you! I'm pretty much new to blender-render too, so I don't know if I can tell something new about it :D But okay, I'll show what I do. I use Eevee render in Blender. Cos I'm poor and can't afford myself cool Cycles that demands powerful PC. Cos it's... easier.
First thing is environment light. Depending on your idea you can change it into more dark, more light or really any color (or even environment texture!)
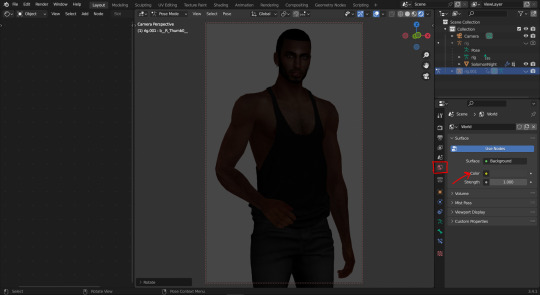
Let's change it to lighter color ;3

Next, set transparent background.
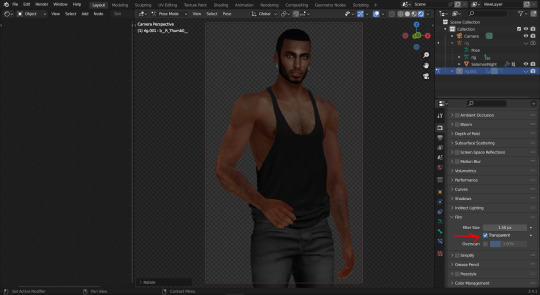
I like soft light in pictures with bloom like in 80-90s movies :D So I always add Bloom + Ambient Occlusion because in Eevee it's vital.
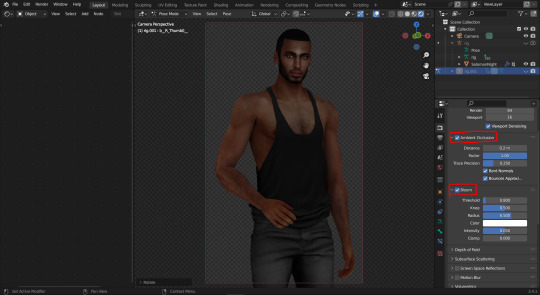
In most cases I add Sun light first. And set up Shadow quality, cos... again, shadow quality in Eevee is vital:D
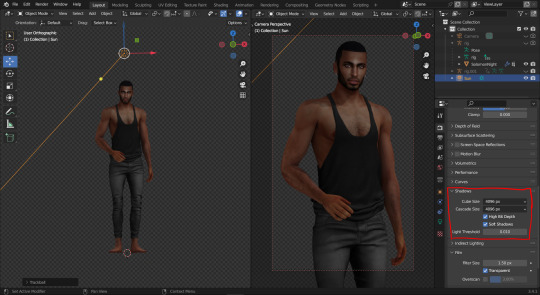
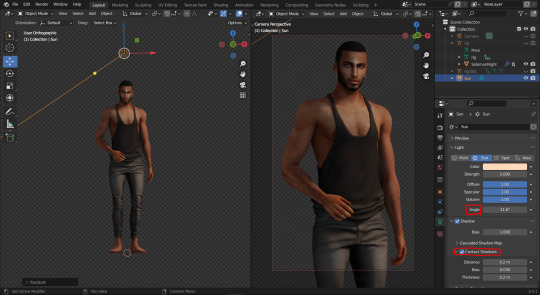
Change softness, power, color for the sun light and also add Contact Shadows. (Cos it's vital?:D)
Add back light. I LOOOOVE when the light is shining from behind the model. Makes me *___*, so yes. Back light must be rally hard and powerful to make the trick.
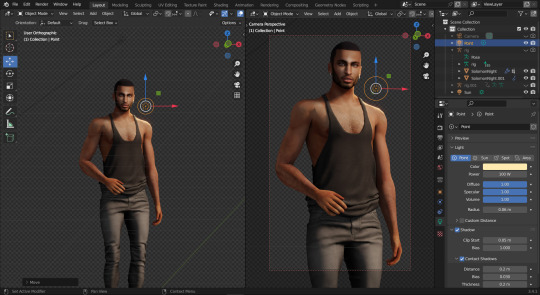
I also love my model's faces, so I usually try to lit it up with extra light to make it clear and well seen ;3
Then add more back light. MORE!
Make some pose/light changes if needed, add some simple Ps edit and that's it! You have this:

Hope it was helpful. Have fun!
#sims 4 tutorials#sims 4 blender tutorial#the sims 4 blender render#sims 4 blender render process#sims 4 blender#how I set up light in blender#blender light#sims 4 blender light#sims 4 blender light tutorial#the sims 4#sims 4 blender render#blender eevee#WistfulTutorialSims4
510 notes
·
View notes
Text

Dr. Vu Steals A Bus!
SimCity man steals a bus to pick up his niece
#ts4#simcity 4#dr. vu#davina asturias#ts4 renders#the post processing effects in blender isnt like amazing but it's pretty cool#i could like get more but this is what I can do right now#also this is not the first time using post processing in blender btw#i'll post that render someday idk#sims of simcity
6 notes
·
View notes
Text

Long time, no see
#ts4#sims4#mine: sims#oc: scarlette brooks#hey lol#it’s been like a year#i’ve been active on my rp accounts but said fuck tumblr#but thought i’d start sharing some of my sims n pictures again#a lot has changed#i’m strictly sims4 now#i’m team blender#and the worse of it all… i pay for pateron cc#i also invested in an ipad and procreate bc i apparently think i’m an artsy girlie#spoiler: i’m not#i’m in the process of giving charlotte a refresh#the star of the show will be back#sims 4 blender#sims 4 render
8 notes
·
View notes
Text

Blender Tutorial: Building a Scene Part 1: Importing Furniture from Sims 4
Building a scene from scratch is no mean feat, so this will likely be a multi-part tutorial.
In this tutorial I'll be going over the basics on building a scene. This will be the barebones necessities to get a room with a moose and some nice lighting to place your sims in for a render.
There are, of course, more in-depth and complicated ways of doing this, but these are the basics and the easiest (in my opinion!) way to get a nice little scene without too much work.
With that all said, let's get started!
Let's start by adding furniture into our scene. Usually I'd build a room first but I know many of your were asking how to do this so I'll cover this first!
Step 1: Exporting Meshes and Textures from S4S
Appending furniture and decor to a scene works the same way as appending jewelry to a sim. First we have to prepare it for blender in Sims 4 Studio. If you're using a piece of furniture from the game, select "Object" in Sims 4 Studio. It may load slowly so be patient!

Then you'll see the game's full catalogue:

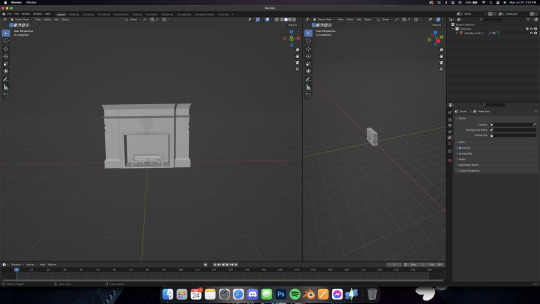
Filter and sort as needed to find what you're looking for. For this tutorial I'm going to remake (and revamp) one of the first blender scenes I've ever made, which looked like this:

So I'll export the fireplace first. It's from Vintage Glamour, so I'll filter my S4S by Vintage Glamour, and here it is:
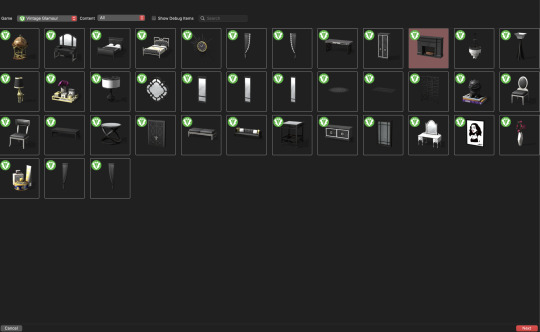
Highlight the fireplace then click "Next" Name the package anything, but make it easy to remember. If you need another swatch in the future you can always open the fireplace directly in S4S instead of searching for it each time. Save it somewhere easy to find! Once opened, you'll see this:

To render furniture, we need to export the Mesh and Texture files. I'm in the habit of exporting my mesh first, so we'll do it that way. Click the "mesh" tab and you'll see this:

Click "Export Mesh" and save the .blend file somewhere easy to find! I typically keep the .package, .mesh, and .png (texture) files all in the same place. I find it easier while working in blender. Do whatever makes sense to you just make sure to stay organized! After saving the mesh, navigate to the Texture tab and do the same thing:

Export the texture and save it somewhere easy to find. Repeat this process for all the furniture you'll need for your scene.
Step Two: Appending Furniture Items into Blender & Applying Textures
Now let's go into blender. As always, delete the default cube, lamp, and camera, then set up your workspace in whatever way is comfortable for you. I like to set mine up like this:

Now, just like with jewelry, let's append our fireplace in. Go to File -> Append and locate your fireplace .blend file. Open the file, then the Object folder, then select all "studio_mesh" files you see:


You should then have something like this:

Delete the bone_bone and rig as always, then also delete the footprint, which for me was the first studio_mesh in my Outliner list.

Then you'll have the fireplace by itself:
Navigate to the Shader Editor in your preferred workspace, then to the "Material Properties" tab.


Click the minus beside the diffuse texture to get rid of it. Then click the "New" button that appears once the diffuse is gone.


Nodes will appear in your shader tab!

Like we did with jewelry, add in an Image Texture node, a Mix Shader, and a Transparent BSDF. Connect and arrange them exactly like I have here:

Make sure you add in your texture file in the Image Texture node (click open, then navigate to your .png file we exported from S4S). Change the blend mode to Alpha Hashed in your properties window, like this:

And make sure you're in Material Preview mode (I wasn't) by pressing Z on your keyboard and selecting "Material preview"

Now you should have something like this!

In Part Two, we'll add in the walls of the room and maybe a window!
Some notes before I leave you:
Using CC works the same way, you can add it into the custom content folder in S4S OR you can double-click the package file and open it in S4S that way.
Some objects, like trees, have more than one texture. I'll do a separate mini tutorial on that if yall need but basically you'll export both texture files and then apply them to the proper parts of the object (for a tree, for example, the leaves and trunk are often separate texture files)
Please let me know if yall have any questions! And stay tuned for Part Two!
#salemsims tutorial#render school tutorial#sims 4 render tutorial#sims 4 blender tutorial#render tutorial#blender tutorial#tutorial
56 notes
·
View notes
Photo


𝙱𝙰𝙴𝚆𝙰𝚃𝙲𝙷
poses by @anabzanacolle
#ts4#ts4 render#the sims 4#sims 4 render#blender#blender eevee#eevee#ts4 edit#baywatch#autumn seacross#lifeguard#cause how can I not make renders of her#I named this blog after autumn#today I learned how to add background and props#rendering really is a learning process#and there's so much to learn
104 notes
·
View notes