#sims 4 blender light tutorial
Explore tagged Tumblr posts
Visit Tumblr Blog
Explore Tumblr blogs with no restrictions, modern design and the best experience.
Last Seen Tumblr Blogs


Fun Fact
In 2020, 44% of users from Denmark used Tumblr daily.
Text
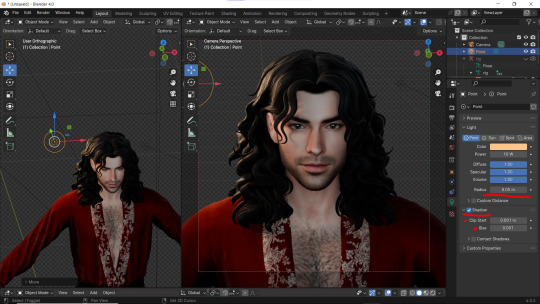
How I do my lighting in EEVEE for Blender 4.0 (´。• ᵕ •。) ♡
Are you running your Blender on a toaster? Don't wanna spend much time on rendering in Cycles? Here's some EEVEE tips for you!
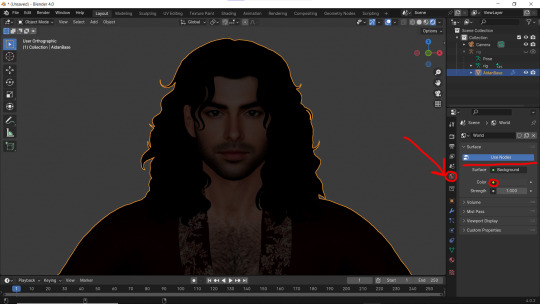
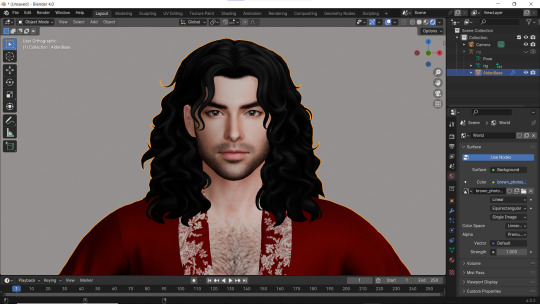
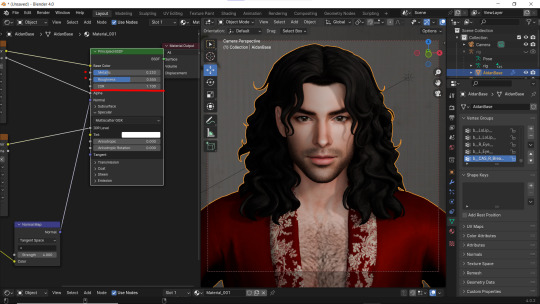
1 - Let's put some HDR lighting on! Go to the Worlds, choose Use Notes and hit that little yellow dot next to the Color.
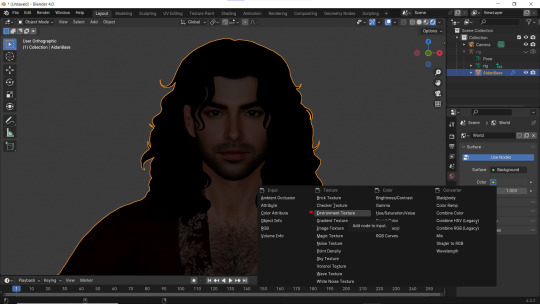
2 - Pick 'Environment Textures'
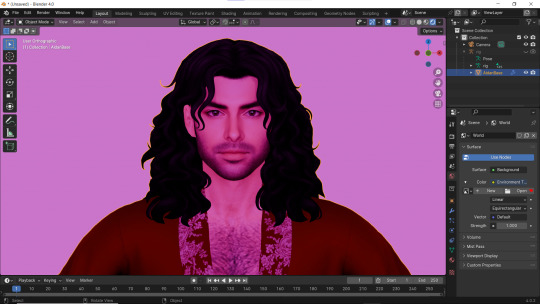
3 - You'll see everything in purple. But worry not! It's just bc you haven't applied any textures yet! Just go on and hit Open.
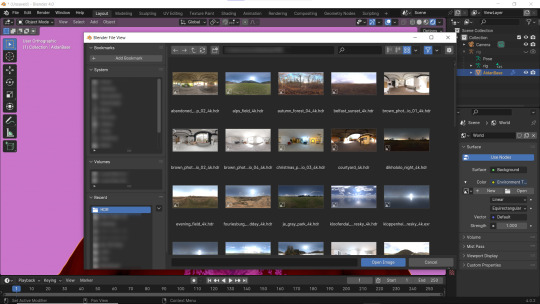
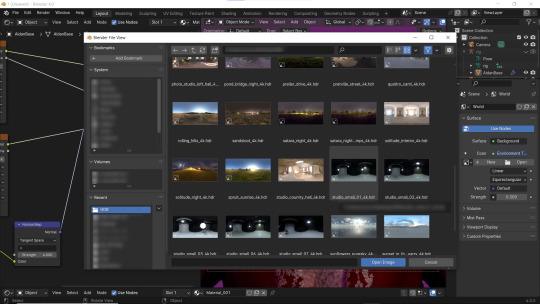
4 - You can find plenty of free, high resolution HDRI textures on Poly Haven. I have almost all of them! Go get some for yourself too and navigate to their location. Pick any you like!
Well... It doesn't look good yet :D
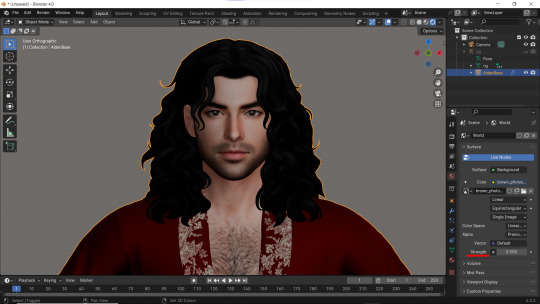
5 - Lower the Strength of the light.

6 - Now. Let's go to the Render Properties and check Ambient Occlusion and Bloom (you can play with it's parameters and see which fits you better). THEN... Go to Shadows and increase the resolution to the max. High Bit Depth and Soft Shadows must be checked too!
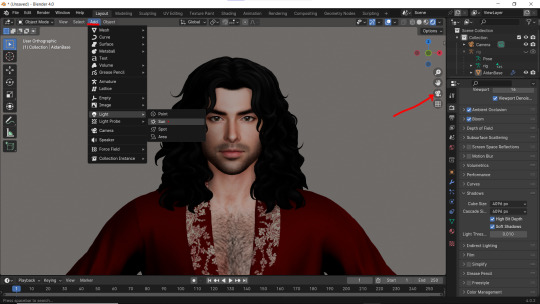
7 - Let's Add our very first light (The Sun)! And go to the Camera Mode.

8 - In the Sun Shadow settings: Soften the light by increasing the Angle; Lower Bias to the max.
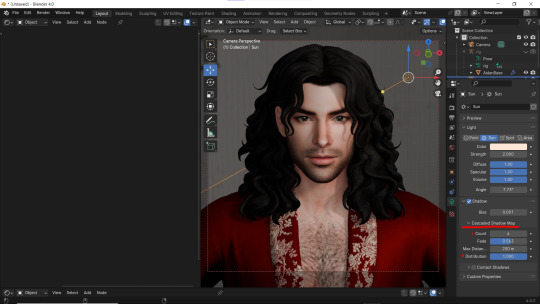
9 - Change the parameters of Cascade Shadow Map the way it looks better for you.
10 - Also don't forget to fix the specular appearance of your model ;3
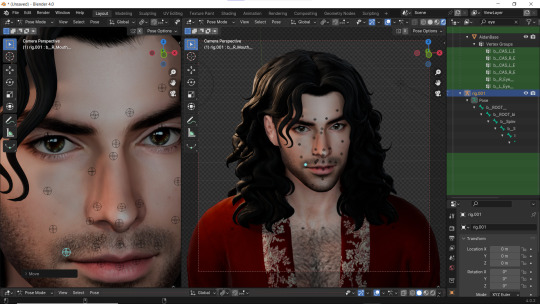
Now. I don't hate it. But I don't like it much either... So I played and tried several Environment textures for better result.
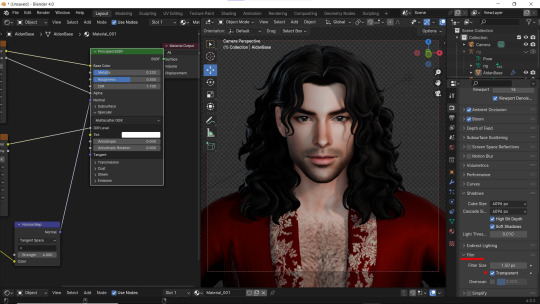
11 - Looks way better! Now let's go to the Render Properties once again and remove the background in the Film category (in case you don't want one)
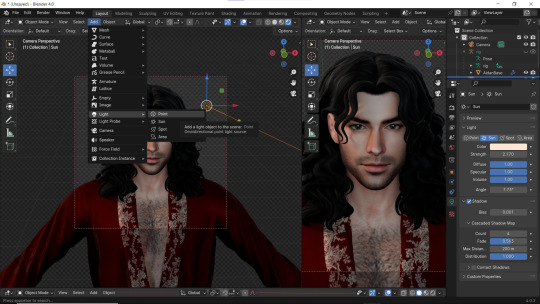
12 - It's time to add another light source!
13 - Settings for the new light are quite similar. I made them softer, lowered Bias, changed color, etc.
14 - Preparing for the shoot. ▓▒░(°◡°)░▒▓
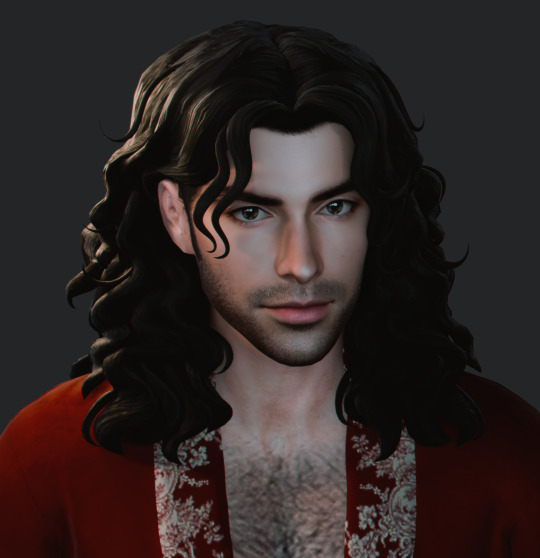
15 - You did it! (ノ◕ヮ◕)ノ:・゚✧
#WistfulTutorialSims4#the sims 4 blender#sims 4 blender render#blender 4.0#blender eevee#sims 4 tutorials#blender tutorial#sims 4 blender render tutorial#blender render#blender eevee lighting#blender environment textures#sims 4 blender#blender render eevee#blender light#blender light eevee#eevee#blender#simblr#the sims 4#my sims
150 notes
·
View notes
Text

blender lighting tutorial + tips.
requested by @thecrimsonsimmer + recommended viewing: youtube video one, two, three, and four. this post will be dealing with newer versions of blender (2.8+) and cycles since that's what i'm more familiar with + commonly used for rendering. this is coming from me as an artist with some dabbling in photography and things i've learned in college!
references and setting the mood
are you basing your render on an existing photo? study the light source and what direction it's coming from: that's what's going to tell you your set up for a similar effect. if you're not basing it on an existing piece, a good start is knowing How you want to set your subject (your sim) up - do you want them to be in the spotlight? are they in a specific environment that has neon lights? are you going for moody or something fresh, bright? definitely look up colors and their meaning (color theory, movie screencaps, etc.) to create a stronger image!
using resources to start the set up
it's always a good thing to mix your tools with different communities, such as the art community! many have lighting tools to figure out how to color their subject, such as this free-to-use head figure that depicts where the lighting source should be placed.

there's also the photography community and teaching people how to set up their lights for certain setups. video three and four linked in the beginning are from photography viewpoints.
spot? area? point? sun?
let's think of the lighting types as objects - a spot is like a plain lightbulb, area is a reflective sheet, spot is a flashlight, and the sun... well is the sun!
a spot is similar to an area light, but triangular/a cone. think of a helicopter search light, it's focused on a small area with the most light concentration. these can be used for lamps with lampshades, car headlights, or a lighthouse.
an area light is great for lighting up technology. a phone screen, tv screen, tablet, anything that's an LED screen emitting from a surface. the light is not as concentrated as a spot and is meant to cover more flatly (hence the rectangular source)
a point is best used for small pops of colors such as candlelight, lamppost, lightning bug tail, etc. a small source that has nothing covering it.
a sun covers the entire area and can be used as the overall mood setter. it can create filter over the entire render by just shifting the color like you would see in a movie. you'll be given a line with a sun light that gives the direction of where the sun is coming from. basically a spot light just on a much larger scale LOL.
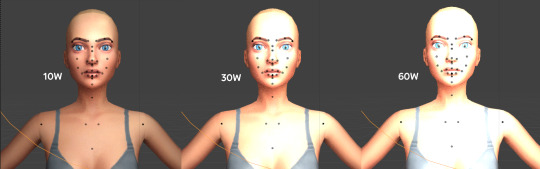
power + coloring

this screenshot is mostly what you'll only use to start off with. watts is the unit of measurement and the higher you go, the brighter the light will be. examples with a white colored point light 10W-20W: general portrait lighting 30W-50W: bright source, close flashlight for example 60W+: blinding
coloring is just like the system for in game lights for ts4. shift it to whatever you want it to be (click the white bar, that's the color preview) and mess around with the vibrancy. the darker, more intense color, the less it's going to appear on the sim.

closeness and intensity
similar to what's shown in the head lighting tool shown earlier, the closer the light is, the more that specific area is lit up. go too close and your sim could be completely washed out. it helps to change the size of the light (change with the radius slider) to better imitate what you're wanting. the larger the radius, the more diffused and softer the light source will be. close + small = very clear of the light source shape, can obviously tell where it is in relation to the subject far away + large = soft lighting, more of a hazy lighting of the color you choose.


to quickly adjust the light, press "G" and hold down your middle mouse button to adjust which axis you'd like to edit along. green is the x-axis, blue is the y-axis, and red is the z-axis. you can also press "G" and type the letter of the axis you want to use. drag the mouse to change the placement on that specific axis to however you want. if you want to freely edit the placement, just press "G" to move it out of the axis bounds.
world lighting
take this step as setting your canvas color before you start painting. in order for the values to look their best, change the world color to the same hue of the color you are mostly using. for example, this is set in a red-toned environment:


this is essentially changing the cast shadow onto the sim. the default is gray and will muddy up your undertones if not changed properly. for this instance, if you were to still use the same red point light in a gray world color it'd look like this:

of course, this will be based on if you have an environment image or not that can affect your lighting overall. this post is based on the fact there is no environment image and what not! if you need a visual demonstration on how to mess with the world lighting, check out this short video.

i hope that helped anyone beginning to render or wanting to light up your own scenes! i'm no rendering expert, but here's some of the helpful tricks i've learned and collected over the years<3 if you have any other questions feel free to send an ask!
#ts4 blender tutorial#sims 4 blender tutorial#ts4 render tutorial#sims 4 render tutorial#lighting tutorial#lyko posts#tutorial#long post
242 notes
·
View notes
Text


Shop Sign Wall Lights - UPDATED 15 May 2025
I put together a few sets of shop sign wall lights. But there are instructions. I kept some swatches as a default white color so that you could pick which color you want the light to be while in live mode. This saved on the file size of the package file because the more textures a file has, the more bloated the file size is.
I had some fun with some shop names although I mainly included generic titles in both English and Simlish.
DOWNLOAD for FREE: SFS
OR at Patreon*
*You must be over 18 to access my Patreon page.
INSTRUCTIONS ON CHANGING LIGHT COLORS
Once you place the light in build mode, then go to live mode. Click on the light and you will get the following pie menu.

Select SET COLOR AND INTENSITY and then choose THIS LIGHT. The color options will then appear so you can select which color you want.

If you use the name signs along with the Awning Lights, make sure to place the name on top of the awning so when you select the color picker, the correct sign changes colors. The other option is to place the name separate from the awning, go to live mode and change the color, then go back to build mode and add the awning light you want.
Enable the bb.moveobjects on cheat and then you can make adjustments to location and size of objects. You can adjust the position of the light on the wall by depressing the Alt key while placing the sign (on PC). You can adjust the size of the item by depressing the Shift key and either [ (for smaller) or ] (for bigger) (on PC).
CREDITS
Awning Shop Lights - 19 swatches of various awning wall lights. 18 are pre-colored and one is white so you can change the color yourself in game.
Candy Shop Lights - 20 swatches
Pottery Shop Lights - 25 swatches
Tattoo Shop Lights - 21 swatches
Enjoy!
Creations by SexyIrish7
These cc objects are new 3d meshes created using Blender and Sims 4 Studio.
Polygon Count: 6
All CC have:
*Ability to search catalog using search terms: sexyirish7 and si7
*Customized thumbnail
*******
CREDITS:
Software credits:
Sims 4 Studio v. 3.2.4.1 (Star): https://sims4studio.com
Blender 4.0: https://www.blender.org/download/
GIMP v. 2.10.34: https://www.gimp.org/
Inkscape v. 1.2: https://inkscape.org/
Thank you to the creators and moderators producing tutorials and answering questions!
*******
Model and Image credits:
Mesh created by me.
Simlish font credit to Franzilla: https://modthesims.info/
Image credits:
Awning Lights Image credits: Modified image from Adobe Stock
Candy Shop Image credits:
Swatches 1-3: Image by pch.vector on Freepik https://www.freepik.com/free-vector/christmas-candies-symbols-set-neon-style_11241813.htm#fromView=search&page=1&position=26&uuid=8b541325-0e62-4e37-9468-6bacd30f8963&query=neon+lollipop+candy
Swatches 4-8: Image by gstudioimagen on Freepik https://www.freepik.com/free-vector/sweet-candy-neon-seamless-pattern_5595774.htm#fromView=search&page=2&position=30&uuid=e2259de5-014d-4d04-af87-1198ee0f35e2&query=%40gstudioimagen+neon
https://www.freepik.com/free-vector/sweet-candy-neon-seamless-pattern_5595775.htm#fromView=search&page=1&position=27&uuid=e2259de5-014d-4d04-af87-1198ee0f35e2&query=%40gstudioimagen+neon
Swatches 9-10: Image by openclipart.org https://all-free-download.com/free-vector/download/peppermint_candy_clip_art_13182.html
https://all-free-download.com/free-vector/download/round_candy_with_stick_card_on_pink_background_6823183.html
Swatch 11: Image by All-free-download.com https://all-free-download.com/free-vector/download/round_candy_with_stick_card_on_pink_background_6823183.html
Swatches 12: Image by katemangostar on Freepik https://www.freepik.com/free-vector/ice-cream-cart-neon-sign_3238564.htm#fromView=search&page=8&position=42&uuid=2f82b4d1-5ca8-449c-ae22-4573861ebcb0&query=neon+sign+retail
Pottery Shop Image credits:
Swatch 1: Crafting icons created by andinur - Flaticon https://www.flaticon.com/free-icon/pottery_17392031
Swatch 2: Image by katemangostar via Freepik https://www.freepik.com/free-vector/aquarius-neon-sign_5561944.htm#fromView=search&page=2&position=5&uuid=c55e5e21-0550-46f0-b9be-cfa85ff38796&query=Ceramic+Neon
Swatch 3-4: Pottery icons created by Smashicons - Flaticon https://www.flaticon.com/free-icon/vase_3760867
https://www.flaticon.com/free-icon/vase_3760970
Swatch 5: Icon by istar_design_bureau via Freepik https://www.freepik.com/icon/pottery_1958438#fromView=search&page=2&position=20&uuid=096084ae-13fe-429c-a419-e6e13ccd37b9
Swatch 6:Icons by Eucalyp - Flaticon https://www.flaticon.com/free-icon/pottery_6552610
Swatch 7: Icon by berkahicon via Freepik https://www.freepik.com/icon/spin_13785816#fromView=search&page=2&position=0&uuid=096084ae-13fe-429c-a419-e6e13ccd37b9
Swatches 8-11: Icons by Freepik https://www.freepik.com/icon/pottery_8540816#fromView=search&page=3&position=43&uuid=096084ae-13fe-429c-a419-e6e13ccd37b9
https://www.flaticon.com/free-icon/machine_9200546
https://www.flaticon.com/free-icon/vase_8838322
https://www.flaticon.com/free-icon/pottery_3305262
Tattoo Shop Image credits:
Swatch 1: Modified Image by katemangostar on Freepik https://www.freepik.com/free-vector/tattoo-salon-neon-text-with-tattoo-machine-neon-sign-night-bright-advertisement_2438198.htm?log-in=email
Swatch 2: Image by Nippy Custom https://www.nippycustom.com/products/tattoo-neon-sign
Swatches 3-5: Image by bohlam via Vecteezy https://www.vecteezy.com/vector-art/2185717-tattoo-studio-neon-signs-style-text-vector
https://www.vecteezy.com/vector-art/34210463-neon-sign-tattoo-studio-with-brick-wall-background-vector
*******
TOU:
Do not re-upload and claim as your own
Do not re-upload and hide behind a paywall
*******
Changelog:
15.05.2025
*Updated swatches for compatibility with slotted signs.
*Added wall deco slot so that signs can be stacked on slotted signs for Awning Signs
*Added swatches with inverted images for Candy, Pottery, and Tattoo Shop Signs.
#the sims 4 cc#ts4cc#sims 4 cc#the sims 4#wall decor#sims 4#ts4#lights#wall lights#signs#shop signs#retail#pottery#ceramics#tattoo#ink#candy#lollipop#sweets#sugar#light tutorial#sexyirish7#updated cc#featured
285 notes
·
View notes
Text
youtube
NEW VIDEO TUTORIAL 🩷
After almost two years it's time for a new and improved version of my "How to make CAS CC" video. This time I will explain how to create a frankenmesh out of a jumpsuit and a dress for adult Sims! It's VERY beginner friendly so if you weren't successful yet with starting to make CC, maybe this one will give you the help you need!
All the topics I cover in this video below the cut:
00:00 Intro
01:00 Software
01:36 Downloading & Installing Sims 4 Studio
01:56 Downloading & Installing Blender 4.2
02:10 Downloading & Installing GIMP
02:20 Introducing Sims 4 Studio
03:03 S4S | Gathering assets to work with
04:09 S4S | Textures
05:12 Project Folder
05:34 S4S | Gathering assets to work with
07:10 Introducing Blender
10:17 Blender | Edit mode (Select, Delete, Wireframe)
12:38 Blender | Append second mesh (Proportional Editing, UV overlapping)
18:23 Blender | Join two meshes (Material, Merge)
20:03 Blender | Cleaning up the mesh (UV editing, Merge, Rip)
22:14 Blender | Cut number
22:43 GIMP | Making a texture (Select, Delete, Healing, Smudge)
24:52 Photoshop | Making a texture (but make it easy)
25:15 GIMP & Blender | Preview of the texture
25:43 GIMP | Making color swatches (Layers, Lighting, Fill tool)
28:33 S4S | Introducing the CAS area
29:15 S4S | Creating a package file
30:25 S4S | Importing all our assets
31:17 GIMP | Creating a shadow texture
32:24 S4S | The specular map
32:39 GIMP & Browser | Creating a normal map
35:58 S4S | Vertices & Polygons, LODs
37:02 Blender | Creating LODs
38:20 S4S | Categories (Tags, Allow for random, Gender restrictions)
39:36 S4S | Tuning tab (not covered)
39:47 Sims 4 | Results & Outro
433 notes
·
View notes
Text
Sims 4 Render Lighting Tutorial

"Environmental Lighting" won my most recent poll, so let's get right into it!
A few notes before we begin:
I render exclusively in cycles!
This tutorial assumes some basic knowledge of blender
Though this tutorial covers the basics, HDRIs can be used in conjunction with any scene/your built scenes
I decided to focus on environmental and other lighting in this tutorial, since they all kind of go hand in hand.
For this tutorial, I'll be using my recent Cupid Sim. Here's a render of her with no additional lighting:

1. Base lighting
In any full body, single sim render (like lookbooks, for example), I really like to use a glowing base. It grounds the sim a bit and casts some interesting lighting on them.
To do this, I add a circle under their feet by pressing shift+A and selecting circle.

An empty circle will appear, but we need it to be a solid disk, so go into Edit mode (by pressing tab while the circle is selected) then hitting F on the keyboard to fill it.


After that, you can go into the Materials tab and add in color and glow.
Mine is adjusted like this:

And gives this rendered result:

2. HDRIs
HDRIs (High Dynamic Range images) are extremely useful when it comes to environmental lighting, I always use them now to add better/more dynamic lighting to my renders.
HDRIs are 3D/panoramic, which makes them extremely useful.
You can find/download HDRIs online in a few diff places: PolyHaven, AmbientCO, and Blender Market.
There are also several available for FREE using BlenderKit (my preferred method).
So how do you use an HDRI?
We can add HDRIs to our render by navigating to the world tab and changing the color to "environment texture".


I chose this vaporware HDRI from BlenderKit, & here it is with no adjustments, but it's looking a little rough so let's adjust it.

By adding vector nodes, we can adjust how the HDRI behaves. Here I mostly use the Z rotation and the background strength:


Here's the same render with the Z-rotation set to 50, 150, 200, & 250.


You can put in any value for the Z-rotation, this is just an example of how the HDRI turns. This is maybe not the best example of the rotation, but putting her in a forest just didn't feel right lmfaooo, hopefully you can see how the light changes on her depending on the rotation.
You can also adjust the strength of the HDRI. Here's the HDRI (rotated to 150) set at .5 and 1.5 strength:


For this tutorial, my favorite lighting is the HDRI set to 150, and the strength set to .5, like this (this is a rendered image):

3. Transparent HDRIs + Point Lights
But I'm not fully happy with the lighting. I don't love how the HDRI is a bit blurry, so I'm going to set it to be transparent.
To do this, go to the Render Tab, scroll down to the Film option, and check Transparent:


The lighting effect from the HDRI will stay the same, but the background will be transparent.
From here, you can add a background (when I do this, I like adding a plane, & moving/shading it until I'm happy (kinda like this):


NOTE that you have to put the plane far enough behind your sim so it doesn't affect the HDRI lighting too much.
SECOND NOTE You can use this same method to use HDRIs in conjunction with scenes. They can provide the perfect backdrop!
This is still really dark, so I'm going to add three point lights: -Two on either side of her head/shoulders that will be smaller (in radius) and brighter -One in front of her to add actual light (so details aren't lost)

Here's how I set up my lights.


The pink light settings are for the two point lights on the sides The white light setting is for the light in front of her
For a basic render, this is almost good enough for me, but I really like the glowing effect I get in my renders.
To achieve this, we have to go to the compositing tab:
4. Compositing
Full disclosure, my compositing tab is set to glow by default (that's how much I love it), so all of the renders in this tutorial have it turned on.
I use the glare node and set it to fog glow.
Here's my preferred setting:

I prefer the fog glow effect, but bloom, ghost, streaks and star are also options.
Here's a guide to the glare node!
Tbh, I never use any of the other settings, so I'll leave this tutorial here for today.
Here's the final result (with no additional editing):

If you have any questions, please don't hesitate to send an ask, message or join my discord (no minors pls) for help! <3
#ts4 render tutorial#ts4 blender tutorial#sims 4 render tutorial#sims 4 blender tutorial#sims render tutorial#sims blender tutorial#salemsims tutorial#render school tutorial#blender
195 notes
·
View notes
Text
STICKY POST: ULTIMATE(ISH) GUIDE(S) TO SIMS 4 CC-MAKING; OR, A COMPREHENSIVE COMPENDIUM OF TUTORIALS, INSTRUCTIONAL MATERIALS, & FELLOW COMPILATIONS OF A LIKEWISE NATURE
In which I list a fuckton of tutorials, guides, and lists of such, each written, curated, and crafted by people far more talented than I.
More will be added as I find them.
---
@teanmoon's CC Guides - Includes tutorials on cloning, uv_1, weights, bump and specular maps, bi-color hair, and a Blender Cheat Sheet. High poly 'creators' have little excuse to churn out high poly, non-optimized garbage when they can lean on bump maps. (I know those can only do so much for more complex meshes, but for objects, texture maps can do SO much heavy-lifting).
@vintagesimstress's CC Guides - Includes tutorials on using Blender to create objects and clothing, especially for people who are just getting started.
@eliavah's uv-1 adjustment tutorial. Haven't tried this myself yet, but after glancing through it, it's something I will surely want to keep bookmarked.
@simlaughlove's CC Tutorials List - Includes many tutorials handily laid out by category on everything from object texturing to CAS morphs.
@thefoxburyinstitute's Nav Page - This blog is nonstop Sims 4 resources for e v e r y t h i n g. READ THIS POST FIRST as a guide on how to actually... nav.
@simsresourcehub's Tags List - What it says on the tin.
Transferring Weights in Blender 3.3.1 - Over at Sims4Studio forums.
@trillyke's List of Tutorials - Good ones!
@sims4tutorials - *GRAND GESTURES*
@katverse's Huge List of Tutorials - Tutorials on eeeverything.
@thatsimslady's Massive List of Tutorials - 31 pages????? Damn.
@kouukie's Sims 4 CAS with Marvelous Designer Tutorial - YouTube video!
@rusticottage's Gifmaking Tutorial - I love Sims gifs tbh.
@cowplant-pizza' Boes' Editing Masterlist - Includes stuff for Reshade, PSDs, PS Actions, and how to use them.
@melonsloth's Deco Sim Tutorial - Using SimRipper
@depthofpixels's Deco Sim Tutorial - Using SimRipper
@azuhrasims' Guide to Posing Sims - Includes how to pose sims, and handy workarounds! Super great for beginners and longtime users.
@radioactivedotcom's Guide to Posing - Includes additional posing resources. NOT for beginners.
@madameriasims4's Add a Flame to Your Basegame Candle - Great for mood lighting and historical gameplay!
@syboubou's Making a Lamp Start to Finish - a video tutorial
MORE BELOW:
Adding Lit DST to Fireplace
New image ref for default overrides
Make an RGB Spec for Objects
Bake a shadow onto your object in Blender
Linking all bedding to a single frame
Cutouts for Doors/Windows/Archways
Making objects see-through/glass
Making lamps light correctly
Give an object transparency (add an alpha)
Make a candle w/ multiple flames
Change LOD viewing distance
932 notes
·
View notes
Text
Sims 4 CC Kit — Make Your Own Lights, Decor, Clutter & Textures
Ever wanted to create Sims 4 clutter or decor CC but got stuck?
This kit is for you.
It��s a step-by-step guide that shows you how I make my own Sims 4 decor CC — lights, clutter, textures — in a way that I found works for me. You get guides, cheatsheets, templates, and my personal workflow that I’ve figured out through trial & error.
This probably isn’t the “proper” way of creating CC — but it’s how I learned, and it works and I use it every single time I create something new.
⚠️ Just to be clear:
This is a written tutorial kit, not a video or image course.
BUT — I’ve included some visuals, some screenshots & cheatsheets to help you follow along but its alot of written stuff. It would also be beneficial for you to have some basic knowledge of blender.
✅ What You Get:
Decor, clutter, lights CC Creation Guide
Shadow Mesh Tutorial
Mesh Cleanup Workflow
LOD Creation Steps
Maxis Match Texturing Cheat Sheet
Alpha Textures Basics
Vertex Paint for Lights Guide
Custom Thumbnail Tutorial
Normal & Specular Map Basics
Blender Basics Recap
Sims 4 Studio Quick Fix Cheatsheet
Blender Hotkeys Cheatsheet
CC Planner to organize your ideas
CC Creating Checklist
PSD Thumbnail Templates (Decor)
Blank Normal & Specular Maps
Blender Render Setup File for Catalog Thumbnails
Texture Tips & Tricks
🎯 Why You’ll Love This:
No fluff — real steps, real help
Written for beginners who know basic Blender but need a hand
Includes a little bit of visual guides, printables & templates
Saves you HOURS of googling random problems
Helps you actually finish your CC & get it in-game
🖤 This is for you if:
You know basic Blender stuff (grab, rotate, edit mode) Got 3D Models you want to put into The Sims 4
You want to make clutter, decor CC and lights (not clothes or CAS yet)
You’re tired of tutorials that make you more confused
PS: Accessories & Clothing Creator Kits are coming soon.
If you get stuck, you can always join my Discord
(link’s on www.simmerkate.com).
Get Here (xx)
94 notes
·
View notes
Text
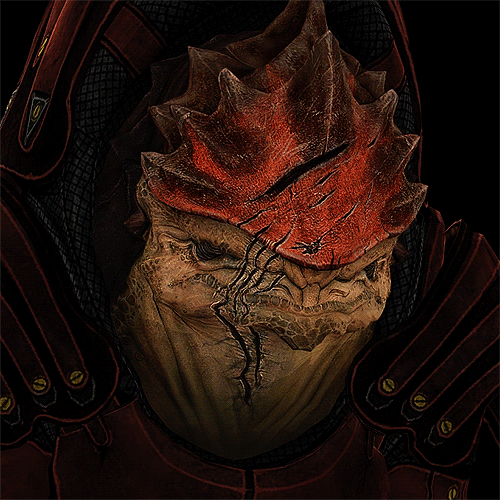
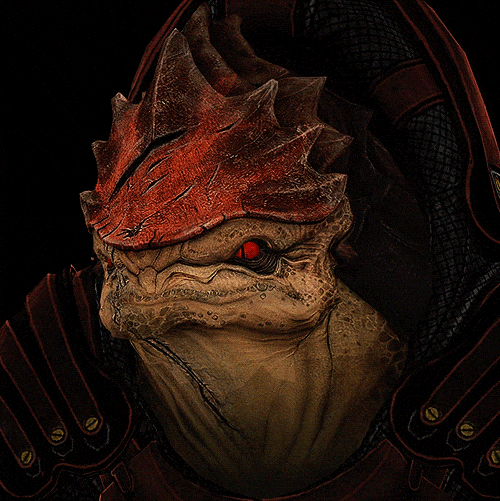
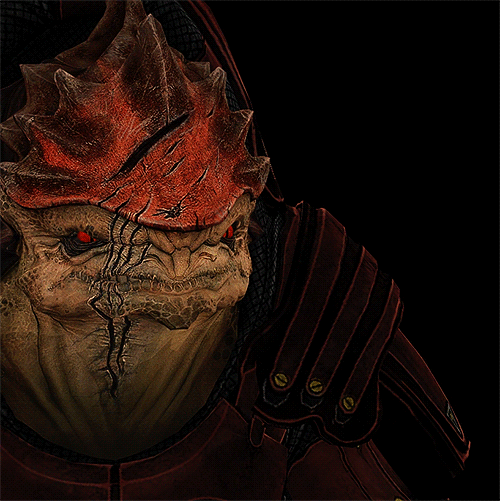
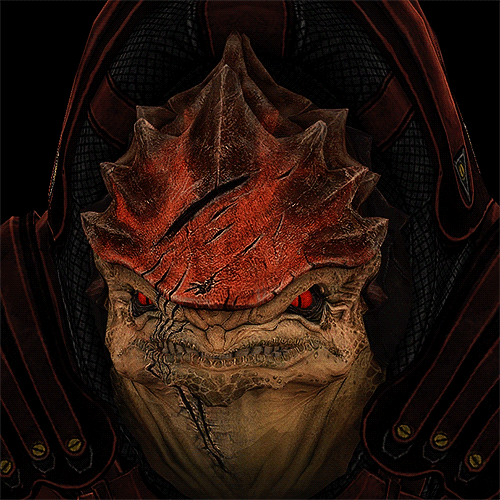
[CAS Previews]
Improving my Wrex conversion for the Sims 4. I did this one a while ago already, but never shared him. The face animation is new, I've been working on that for some days now.
Edit: I'm currently working on various projects (including Wrex ofc), but especially with texture paint in blender to achieve better skin quality for certain sims. It's a lot of work, so I'll be posting less at the moment and just focus on these things, and learn new stuff. Most of my free time actually consists of learning, either with tutorials or by myself.
You can still expect some previews every now and then.
-----
TO DO LIST AND ACTUAL PROJECTS
• Rework of already converted stuff.
• Adding facial animation to various characters, and lighting effects to armor/outfits if needed.
• Re-creating some skins with Blender using texture paint.
• Converting a bunch of Dark Souls/Elden Ring armors + characters. I'll absolutely try to do Blaidd and Ranni.
• Converting remaining Silent Hill 2 Remake outfits.
• Also converting various other characters from different video game franchises.
55 notes
·
View notes
Text
🧾️ complete resource list ↓
about me: brooklyn, black, chicago, she/her pronouns, 20+, wcif unfriendly | socials
♡ all old helios overlays - do NOT delete logo, tag when using. (﹩canva pro)
✰ computer pc specs:
- mpg b550 gaming plus - nvidia geforce gtx 1660 - samsung 990 pro 2tb ssd - amd ryzen 9 5900x 12-core processor - 64 gb ripjaws ram - dell s275h 27” monitor - acer nitro 27" monitor
✰ frequently used software & sites:
- adobe premiere pro - blender 3.6 & 4.3 - canva pro - procreate - rni films - sims 4 studio - blenderkit - cgtrader - freepik - epidemic sound - google docs - notion - character creator 4 - rigmodels
✰ visual defaults
cas bg override: ffb3da by northernsiberiawinds ui override: pink ui override by vyxated loading screen override: dynamic loading screen by simmatically main menu override: refreshed main menu by simmatically
✰ favorite cc creators (cas, anim, build):
tina-sims, simstrouble, northern siberian winds, arethabee, badddiesims, belloallure, brandysims, busra, caio-cc, camuflaje, ceerproductions, charonlee, darte77, daylife-sims, gegesims, golyhawhaw, bbygyal123, greenllamas, grimcookies, kikovanity, mmsims, mssims, nucrests, sheabuttyr, seoulsoul, sentate, savage-sims, thisisthem, whoopsims, woosteru, simkoos, sims3melancholic, rimings, simtury, moood, cecesimsxo, kiricheu, plumbobsnfries, obscurus, madlen, luumia, lazyeyelids, jius, bergdorf, yuyulie, frxsk0, afrosimtricsims, wingssims, pinbox anye, awingedllama, arnie, blarrfy, breeze motors, budgie, charlypancakes, cluttercat, coupsims, dreamteamsims, felixandre, illogicalsims, khd, kkb, lilaccreative, littledica, leaf-motif, lory sims, myshunosun, pierisim, platinumluxesims, plush pixels, simagination, syboutlette, ddaeng, tuds, cowbuild, peacemaker, pixelplayground, sixam, the townie architect, max20, suga-simz, flirtyghoul, conceptdesign97sims, lazysimmies, hanraja, e404p, steven studios, grindana, rascal, sovasims, vms, misims, crispycucumber, utopya, kikichain, kingblackcinema, greynaya, cherry pie, yummy-o-tummy
✰ visual mods i use:
reshade 6.0 (all presets are personal) sunblind mod by softerhaze better in-game lighting by northernsiberiawinds (extra dark saturated) out of the dark by lotharihoe
✰ faq:
no lykaia cast members are available for download no lykaia sets are up for download no custom lykaia cas items are available for download lykaia is heavily influenced and inspired by greek mythology i only use my own reshade presets i am wcif unfriendly
cc making tutorials i use, simblrs i love, how i plan episodes, render tutorial, my blender theme
189 notes
·
View notes
Text


Beautiful Forrest - AFTERNOON | Sims 4 Blender Scene *DOWNLOAD*
This is a lot ripped from the sims 4 and made for the purpose of being used in render images or videos in blender. This blender scene was made following the tutorial: https://youtu.be/_4ImHHVKnrs
This scene was made using in game maxis match objects and will include its own lighting that can of course be changed and manipulated by the user.
There are 2 versions of this blender scene. Version 1 includes objects as is with no movement, good for rendering images. Version 2 is moreso experimental and comes with object "physics" as plants will be swinging in the wind. This is of course nice but more expensive for your computer to handle despite not all plants having movement (the majority do). As it is experimental is not optomized for your computer so be careful and reframe from playing animation in anything but solid viewport if you worry for your computer.
Download
15 notes
·
View notes
Text
How to convert a lamp from The Sims 4 to The Sims 2: A Tutorial 🛋️

GOOGLE DOC 📓 | PDF 📃
Lots of people seemed to want this, so I finally crawled out of bed and wrote it. Sorry for any poor English, I tried my best 🙃
In this tutorial I detailed how to convert a lamp from TS4 to TS2. They're pretty simple, but lit/unlit states seem to confuse people, so I've gone through how to deal with those as best as I can! This tutorial is meant for people who at least have grasped the basics of 4t2 object conversions, but if you encounter any issues feel free to reach out to me on here or the Simscord.
The lamp that I converted for this tutorial isn't released yet, but you can go to my lighting tag for examples of lamps I've converted with this method!
Oh--and do keep in mind that I've used Blender for this tutorial, not Milkshape, but the process would be pretty similar if you did use the latter. Just a bit more frustrating 😅
If you guys have any other tutorials that you'd like me to write, feel free to send in requests! Happy simming ~ 💝
( @sims2tutorials )
93 notes
·
View notes
Text
Saw a bunch of beautiful knitted patterns on Pinterest and got inspired to make a few new knit patterns. They are among my favorite patterns to make! Now some word vomit, I just feel like the need to ramble today...
I noticed that I really suffer from performance anxiety regarding making CC for Sims 3. It has been building up the whole year, and it is especially bad now that Simblreen is around the corner and the Christmas season is coming up too. On tumblr, people mostly post their accomplishments, not so much their failures, and it makes me think that everyone is so much more productive! I see people participating in Simblreen daily prompt challenges, or making/publishing CC for Simblreeen, and feel sad and inadequate in the face of so much success. I manage to make a couple of things that never really see the light of day, and I feel guilty about it and feel like I let people down😿 At the moment, I can really only make CC for the sake of making it (making patterns is a meditative process for me) and I cannot seem to complete the whole process of publication. I guess if you follow me you are not expecting anything you see appearing as a download soon anyway, but sometimes I really struggle with that. I am really sad about this, but I have always struggled with my perfectionism and intrusive negative thoughts that make the process harder. I sometimes think my patterns are not really needed. The lack of CC that is tailored to Sims 3 specifically (that recolors better than conversions) adds to the feeling that I am becoming obsolete, and my anxiety feeds this feeling. I guess I feel much less motivated to try if there are few things that you can use my CC with, and collabs seem to be much more popular for Sims 4, and I really want to make meshes to accompany my patterns, but I just get stuck in the middle and cannot continue, it sucks so much! The last time I attempted to make a super cozy sweater, I wanted to bake nice textures for it in Blender, but it just wouldn't work it out and I got so frustrated, and the automated bone assignments are subpar for highly customized meshes too. Then I wonder whether my meshes are any good in the first place (sculpting folds and such is really hard to get right!). Now most people seem to work with geoms instead of TSR workshop's WSO format, and I have a hard time understanding how everything works. I would love to assign bones in Blender and such, but I also want to use Blender 3.x and keep up to date instead of always using ancient versions for everything. Tutorials are often for older versions. My brain wants to do things a certain way and it's really frustrating sometimes! Learning from tutorials whilst having a different version of the software is making the process much more difficult. At one point, I had 4 different versions of Blender installed, but is so annoying to have different versions for so many things.
I am using a medically prescribed app now to hopefully help with my anxiety and it currently teaches me that anxious people tend to think negatively and catastrophize. This is definitely true for me, and it keeps me from actually trying out things because my brain tells me I could fail and why waste that time. Actually doing things while the brain throws you curveballs all the time is taking a lot of energy too. Maybe this is part of why I abandon my WIPs, because I cannot muster up the energy anymore to work on them. I often have great ideas and start on projects, and then lose the motivation or energy. I envy people who are able to finish their projects 😭
If you have any tips on how to keep going even with negative thoughts and obstacles in the way, I'm all ears.
48 notes
·
View notes
Note
Hi Pxl! Do you have any good tutorials on how to convert 3d models? I am quite confused with a model of a bed which comes with many textures (one for each part of the bed) and not sure what to do with them, am I supposed to bake each of these in a uv map? The model comes with uv mapping and when I finally extract it on Sfs, it looks weird... hope you can shed some light since you have done all these amazing conversions. Thanks!
Hello, this is where you need to spend time understanding Blender before you can apply that logic to sims. I never found tutorials specifically about converting 3D models, just how to import meshes into S4S. All the tutorials and documentation about the sims side are on S4S's website, and that's what I used.
Meshes in sims have 1, 2, 3, or 4 texture cuts as standard. Beds usually have 2 texture cuts: the frame and the mattress, which means that you need to have the frame as one singular mesh, and the mattress as a different mesh, and each of those "cuts" need to have their own non-overlapping UV map. I would recommend watching Blender Guru's UV map tutorials to fix that. 3D models of this nature almost never have appropriate UV mapping for sims, nor do they come in one singular mesh. You have to combine the parts and re-do the UV and also make sure you are decimating the mesh as much as possible because they are high poly.
3 notes
·
View notes
Text
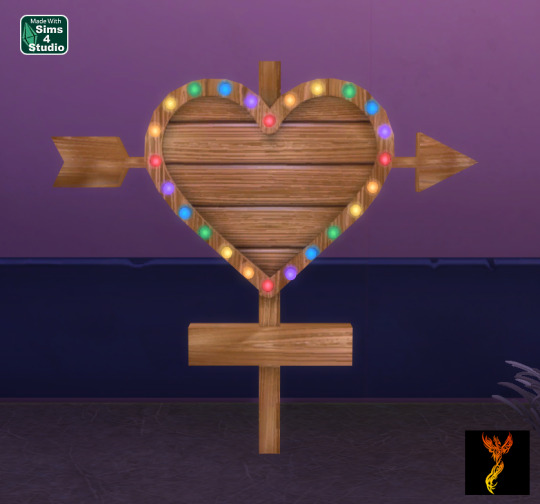

Pride Heart Sign
Thank you so much to Syboulette for her assistance with the light animation. Merci beaucoup @syboubou
There are 2 versions of this sign. One version has animated lights. The other version has static lights that are on all of the time.
This sign also has 10 deco slots (5 on each side) so that you can attach compatible wall decor items to the sign, if you like.
This cc object is a new 3d mesh created using Blender and Sims 4 Studio.
Polygon Count: 292
DOWNLOAD for FREE: SFS
OR at Patreon*
*You must be over 18 to access my Patreon page.
CC created by SexyIrish7
All CC have:
*Ability to search catalog using search terms: sexyirish7 and si7
*Customized thumbnail
*******
CREDITS:
Software credits:
Sims 4 Studio v. 3.2.4.3 (Star): https://sims4studio.com
Blender 4.0: https://www.blender.org/download/
GIMP v. 2.10.34: https://www.gimp.org/
Inkscape v. 1.2: https://inkscape.org/
Thank you to the creators and moderators producing tutorials and answering questions!
*******
Model and Image credits:
Mesh made by me.
Image credit: Angelica Mariotti via Vecteezy https://www.vecteezy.com/vector-art/45636446-set-of-pride-day-elements-collection-of-party-decorations-in-rainbow-colors-and-heart-shaped-wooden-signboard
*******
TOU:
Do not re-upload and claim as your own
Do not re-upload and hide behind a paywall
#pride#pride month#lgbt pride#gay pride#the sims 4#the sims 4 cc#ts4cc#sign#animated lights#lighted sign#sexyirish7#syboulette#syboubou#featured
24 notes
·
View notes
Text
Resources!
Here is a list of the resources I use to make my graphics as somebody who doesn’t have Photoshop or Illustrator! All my graphics are made by me, except for my manga icon base which were made by solaariicons. My Carrd was made by poohresources who has free templates but some may require a pro account.
Photopea - is what I use for adding gradients and spot correcting unwanted marks in manga icons, but it has a lot more tools than that! It’s very similar to Photoshop and can open various file formats including PSDs! So if you’re looking to make your own edits to templates you find on tumblr, I highly recommend this!
Pixlr - which has sadly gone paid and has begun to use AI. As somebody who used this religiously for icons for the past several years, I was bummed out. But quickly realized that it still functioned in Wayback Machine! Everything but “Add element” still works but might take a little to load in. You can still upload your own elements to place in though. This is what I use for lighting correction, color correction, toning, and adding my borders around my icons.
Photoscape X Free - is not my favorite. It has it’s uses of course but it’s pretty limited and the Pro version isn’t worth it in my opinion. Free comes with some basic tools, basic borders, and some pretty tints, overlays, and textures as well as some stylization options.
Canva - mostly free and what I use for my borders, banners, promos, dividers, etc.. I’m able to use the Pro version since my sister is kind enough to share it with me! It consists primarily of simple tools and premade graphics, but of course you can also upload your own! You can save graphics in the form of JPGs, PNGs, GIFs, MP4s, and PDFs. If there’s a graphic you’d like to use but it’s locked behind the Pro account, let me know! I can try see about saving it myself and sending it.
CGI icons - are made with The Sims 4 and Blender 2.93 both of which are free! It was a little bit of a process to learn since it required moving a lot of things around, as well as figuring out the virtual photography aspect, but I’ve eventually managed some good results over time! I use custom content from various creators to make my Sim look and pose the way I want to.
The process of creating a Sim to look like your character is a little broad, but there’s a vast community of Sims 4 modders. I’ll at least share my favorite rendering tutorials here. This is the one I used to learn lighting, this one covers the basic process of exporting and rendering, and this one is the one I used to get rid of seams on models. For framing and lighting, I recommend looking for photography inspiration on Pinterest! If this is something you’re interested in doing, hit me up! I’m more than happy to help others!!
Unsplash - Is my primary resource for stock images! Most photography there has a nice modern look and covers a wide array of subjects. It is mostly free, and all images are free to use for commercial and noncommercial use.
Check out my Ray's Leftovers tag for graphics or edits I ended up not using or made for fun! Feel free to modify them to your liking as well and there's no need for credit, though it is appreciated.
My Ray Made tag is where you can find roleplay graphics that I have made, for myself and others!
#Resource#Posting this for my RP partners but if somebody I don't know stumbles upon this. . .Go ham!!
29 notes
·
View notes
Text

Blender Tutorial: Building a Scene Part 1: Importing Furniture from Sims 4
Building a scene from scratch is no mean feat, so this will likely be a multi-part tutorial.
In this tutorial I'll be going over the basics on building a scene. This will be the barebones necessities to get a room with a moose and some nice lighting to place your sims in for a render.
There are, of course, more in-depth and complicated ways of doing this, but these are the basics and the easiest (in my opinion!) way to get a nice little scene without too much work.
With that all said, let's get started!
Let's start by adding furniture into our scene. Usually I'd build a room first but I know many of your were asking how to do this so I'll cover this first!
Step 1: Exporting Meshes and Textures from S4S
Appending furniture and decor to a scene works the same way as appending jewelry to a sim. First we have to prepare it for blender in Sims 4 Studio. If you're using a piece of furniture from the game, select "Object" in Sims 4 Studio. It may load slowly so be patient!

Then you'll see the game's full catalogue:

Filter and sort as needed to find what you're looking for. For this tutorial I'm going to remake (and revamp) one of the first blender scenes I've ever made, which looked like this:

So I'll export the fireplace first. It's from Vintage Glamour, so I'll filter my S4S by Vintage Glamour, and here it is:
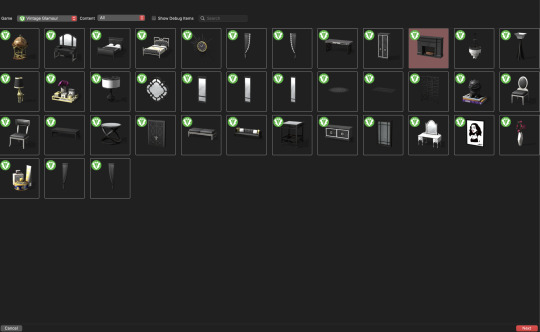
Highlight the fireplace then click "Next" Name the package anything, but make it easy to remember. If you need another swatch in the future you can always open the fireplace directly in S4S instead of searching for it each time. Save it somewhere easy to find! Once opened, you'll see this:

To render furniture, we need to export the Mesh and Texture files. I'm in the habit of exporting my mesh first, so we'll do it that way. Click the "mesh" tab and you'll see this:

Click "Export Mesh" and save the .blend file somewhere easy to find! I typically keep the .package, .mesh, and .png (texture) files all in the same place. I find it easier while working in blender. Do whatever makes sense to you just make sure to stay organized! After saving the mesh, navigate to the Texture tab and do the same thing:

Export the texture and save it somewhere easy to find. Repeat this process for all the furniture you'll need for your scene.
Step Two: Appending Furniture Items into Blender & Applying Textures
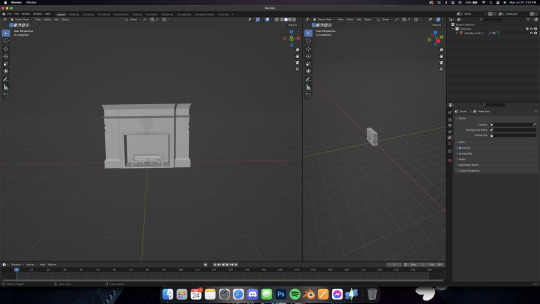
Now let's go into blender. As always, delete the default cube, lamp, and camera, then set up your workspace in whatever way is comfortable for you. I like to set mine up like this:

Now, just like with jewelry, let's append our fireplace in. Go to File -> Append and locate your fireplace .blend file. Open the file, then the Object folder, then select all "studio_mesh" files you see:


You should then have something like this:

Delete the bone_bone and rig as always, then also delete the footprint, which for me was the first studio_mesh in my Outliner list.

Then you'll have the fireplace by itself:
Navigate to the Shader Editor in your preferred workspace, then to the "Material Properties" tab.


Click the minus beside the diffuse texture to get rid of it. Then click the "New" button that appears once the diffuse is gone.


Nodes will appear in your shader tab!

Like we did with jewelry, add in an Image Texture node, a Mix Shader, and a Transparent BSDF. Connect and arrange them exactly like I have here:

Make sure you add in your texture file in the Image Texture node (click open, then navigate to your .png file we exported from S4S). Change the blend mode to Alpha Hashed in your properties window, like this:

And make sure you're in Material Preview mode (I wasn't) by pressing Z on your keyboard and selecting "Material preview"

Now you should have something like this!

In Part Two, we'll add in the walls of the room and maybe a window!
Some notes before I leave you:
Using CC works the same way, you can add it into the custom content folder in S4S OR you can double-click the package file and open it in S4S that way.
Some objects, like trees, have more than one texture. I'll do a separate mini tutorial on that if yall need but basically you'll export both texture files and then apply them to the proper parts of the object (for a tree, for example, the leaves and trunk are often separate texture files)
Please let me know if yall have any questions! And stay tuned for Part Two!
#salemsims tutorial#render school tutorial#sims 4 render tutorial#sims 4 blender tutorial#render tutorial#blender tutorial#tutorial
56 notes
·
View notes